
-
Contents
-
Table of Contents
-
Bookmarks
Quick Links
RANGEVISION
Setup and calibration
SPECTRUM
Related Manuals for Rangevision SPECTRUM
Summary of Contents for Rangevision SPECTRUM
-
Page 1
RANGEVISION Setup and calibration SPECTRUM… -
Page 2: Table Of Contents
Contents Contents Introduction Technical specifications 3D resolution System requirements Preparing for work Package contents Installing software and drivers Setting up your computer for work with the scanner Connecting projector Configuring computer parameters Scanner Assembly Scanner setup ScanCenter NG launch Select scanning zone Calibration field parameters Placing the calibration plate Initial setup of cameras and lenses Checking camera arrangement Finding a working distance Adjustment of the projector focus Bringing the cameras together Final calibration of the cameras Calibrating the scanner Calibration plate Full calibration Fast calibration (orientation) Focus assessment during calibration…
-
Page 3: Introduction
Introduction Thank you for choosing RаngeVisiоn Spectrum! Please read this manual before using RangeVision 3D scanner. Here are described the procedures for preparing the scanner, installing the required drivers, calibration procedure, scanning procedure, and tips for acquiring high-quality three-dimensional object model. Information may be amended from time to time. These changes will be inserted into the new versions of the manual, or in the additional documents and publications.
-
Page 4: Technical Specifications
Technical specifications Scanning zone Scanning Area (WxHxD) (mm) 520*400*400 320*250*220 120*90*100 3D point accuracy 0.12 mm 0.06 mm 0.04 mm Model Spectrum Resolution of cameras 3 Mpix Diagonal of the matrix 1/2” Texture scanning 3D resolution Scanning zone 3D resolution 0.25 mm 0.15 mm 0.06 mm Operation distance 1.05 m 0.6 m 0.3 m System requirements operating system — Windows 7/8/10 64bit, ● ● processor — Intel Core i3/i5 1.8 GHz and better, ● graphics card with HDMI output, ● RAM — Not less than 8 GB, 3 USB-ports.
-
Page 5: Preparing For Work
Preparing for work Package contents RаngeVisiоn 3D scanner is supplied in a protected road hard case. Camera tripod is placed in a separate bag. The scanner is equipped with three scanning areas. Scanning area is a calibration plate and stand for the calibration plate.
-
Page 6
№ Name qty. Scanning module: Installation construction with projector Cable kit for connection to a PC (2 USB + HDMI) Machine vision camera Tripod Calibration plate Kit of optics Stand for the calibration plate USB disk with the software License dongle Power Cord 5 m USB hub Hex key… -
Page 7: Installing Software And Drivers
Get the RаngeVisiоn software (equipped with the scanner) and run the installer — RаngeVisiоn SсаnCenter setup. Following the prompts, select the desired language, type and path for installation. After the files have been copied install drivers and graphics libraries, necessary for the correct operation of RangeVision 3D scanner. If you have access to the Internet RangeVision ScanCenter NG will automatically notify you when updates are available. You can check for updates manually by clicking About → Check for Updates.
-
Page 8: Setting Up Your Computer For Work With The Scanner
Setting up your computer for work with the scanner For the correct operation of Rаngevisiоn 3D scanner you will need to setup your computer. This procedure is performed once before the first use of the scanner . Connecting projector Turn on the projector and connect it to the HDMI-port of your video card. After connecting the projector, it should be displayed in the system. If the computer has several video outputs, define the one to be used. Right click on the desktop, select Screen resolution, 2. Make sure that the projector has been successfully recognized by the system and that both connected screens are displayed.
-
Page 9: Configuring Computer Parameters
Configuring computer parameters To avoid a recurrence of the problems during the scanner operation, you must turn off the screensaver and sleep mode. By clicking right mouse button on the desktop, select Personalize → Screensaver and turn off the screensaver, disable turning off the display and putting the computer in sleep mode.
-
Page 10: Scanner Assembly
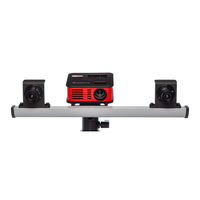
Scanner Assembly 1. Mount the cameras on the scanning module. 2. Install the scanning module on tripod. 3. Connect the projector with HDMI cable. 4. Connect cameras with USB cables. 5. Connect power supply and turn on the projector. *old color variant with identical specifications is pictured…
-
Page 11: Scanner Setup
Scanner setup ScanCenter NG launch RangeVision ScanCenter If the scanner is not connected or drivers aren’t installed, an indication will appear on the Start Screen, as shown below: Check the connection of cables, power supply, and then click Update. If you are sure that…
-
Page 12: Select Scanning Zone
Selecting scanning zone After preparatory actions on setting up the computer, you should carry the scanner setting procedure. Select Configure scanner for a new area Calibration window on the Start screen and follow the instructions for each step. Before beginning the configuration, select the desired scan area (zone), depending on the object scanned.
-
Page 13: Calibration Field Parameters
Calibration field parameters Take the necessary calibration to configure the scanner to the selected scan area. Make sure that the scan area is included in the package of your scanner. The exact size and measurement temperature are written on the label on the reverse side of the calibration plate. Enter these values into the Configuration Wizard or select from the drop-down list of previously entered values. Placing the calibration plate To find a working distance place the calibration plate in front one of the cameras.
-
Page 14: Initial Setup Of Cameras And Lenses
Initial setup of cameras and lenses When you first set up the scanner, image from the cameras may not be in focus or can be too bright or too dark due to different external lighting conditions. Adjust camera lenses, so that the brightness is acceptable: without the red overexposed areas and not too dark. Lens adjustment is carried out by rotating the ring on the objective. Loosen (do not unscrew!) the retention screw and rotate the ring. Lens adjustment is carried out by the following elements: 1. The iris tuning ring 2. The iris ring retention screw 3. The focus tuning ring 4. The focus ring retention screw Do not completely remove the retaining screws of the lens rings, it is enough just to loosen them. After you finished tuning the lens, lock the adjustment rings with the screws provided.
-
Page 15: Checking Camera Arrangement
Checking camera arrangement Images from right and left cameras can be mismatched or flipped. Use the buttons present on this step to arrange them correctly. If this setup wizard step is not needed after completion, it can be turned off by checking Don’t show this step anymore box. It can be brought back by checking the Show the camera arrangement step in setup wizard box located in Settings → Software → Cameras menu. Finding a working distance The scanner has own working distance (distance to the object) for each scanning area. When you configure your scanner, this distance is determined by calibration plate.
-
Page 16: Adjustment Of The Projector Focus
Adjustment of the projector focus During the scanner operation the projector project structured light to the object — coded lines and stripes. To ensure that the lines are sharp, the projector must be focused on the working distance of the scanner. By switching the mode «Lines and Stripes», adjust the focus of the projector, so that the lines on the calibration plate were as sharp as possible. Check and if it’s necessary to adjust the projector focus.
-
Page 17: Bringing The Cameras Together
Bringing the cameras together For the work of the scanner it is necessary to point both cameras to the same position on the specified working distance. Install the calibration plate in front of the scanner on the found working distance (if you changed its position after the projector focusing procedure). Turn on the Cross light mode and aim the scanner to the calibration plate. It is not necessary to combine cross with marks on the plate at this stage, the focused projector should be projecting a cross on any surface, located at the working distance from the scanner.
-
Page 18: Final Calibration Of The Cameras
Final calibration of the cameras After the cameras are positioned align the projected cross with the central mark on the calibration plate and proceed. Before setting the exposure adjust the sharpness of the lenses: 1. Turn on «Black light» projector mode. 2. Set the minimal exposure value (1) using the slider. 3. Open the lens iris as much as possible without getting overexposure. 4. Adjust the lens sharpness. It is convenient to use camera view zoom by left-clicking the camera views to assess sharpness.
-
Page 19
Set the projector to the lines and stripes mode. Set the exposure for the cameras between 30 and 60 (less if the scanning object is dark and more if it is bright). By default the value is 49~50. Areas illuminated with red mean overexposed areas where the image is too bright. Configure lenses iris so that the lines on the calibration plate are as bright as possible, but without a significant amount of excessive light. Image brightness of both cameras must be the same! -
Page 20
If you are setting up for the ”S” FOV, it may be necessary to decrease the brightness of lines and stripes due to the close distance to object. Decrease the brightness value, as shown in the figure. Brightness value of lines is approximately 2 times greater than the brightness of the stripes. -
Page 21: Calibrating The Scanner
Calibrating the scanner You need to perform calibration in order to ensure the work of the scanner after the adjustment of lenses. Scanning software analyses the image of the plate, obtained from the cameras and compares it with the mathematical model, marked by the algorithm. There are 3 types of calibration: Full calibration, fast calibration (orientation) and Calibration of turntable (finding the table axis). Full calibration is used if: ● the lenses of the cameras need to be reconfigured (for example, if you change the scanning area), ● if you suspect that scanning accuracy got worse, ● after transporting the scanning complex. Orientation is used: if you suspect that the camera moved due to unreliable mounting, ● ● if you want to check the accuracy of performed calibration, ● before the work with the scanner (recommended). Calibration of rotary table is performed: in case of any change in the position of the rotary table to the scanner (when ● scanning on the rotary table). Calibration of rotary table is described in the Scanning on rotary table section.
-
Page 22
Calibration plate Calibration plate is a special plate with markers, the distance between which is measured with high accuracy. It is used for setting up a scanner and its calibration. For each scanning zone a separate calibration plate is used. There are three standard plates for Spectrum : L is the largest and S is the smallest. The approximate size of plates is specified in the Scanner setup section. For calibration of rotary table on the S scan area you should use the «axis evaluation» plate. In the picture below you can see different calibration plate examples. -
Page 23: Full Calibration
Full calibration Full calibration dialog box opens automatically after the Configuration wizard or manually from the menu Configuration → Full calibration. Calibration procedure: 1. In the dropdown list the previously selected (in Сonfiguration wizard) calibration plate size is chosen. Compare it to the actual calibration field, choose it from the list, if needed. Focal distance of the lenses is detected automatically, and is only allowed to change by technical support specialist when calibration problems occur. 2. In accordance with the text prompt and symbol image install the calibration plate in the desired position. The brightness of the images of calibration plate can be adjusted with exposure controller. You should not allow very dark images or images with excessive brightness areas. Press the Capture button. Original plate position — the position at the working distance from the scanner (marking on the view from cameras matches the markers on the plate), the cross is projected on the central marker.
-
Page 24
In case if not all marks are found on the image, you will also see the error message. It may mean the following: ● not all markers are visible on one of the snapshots, not all markers are lit by the projector, ●… -
Page 25
Some advice on calibration: do not change the distance from the center of the plate to the scanner when ● turning the plate. The exception are only snapshots in positions 10 and 11, ● do not rotate the plate at a very high angle. Ensure that all marks on the plate are visible from both cameras, when you turn the table, ● be careful with calibration plates! It is not permitted to contaminate or perform any mechanical damage to the surface with the marks. After the use store the plates in designated case, before the calibration procedure ensure that cameras and cables are secure in ● the designated position. -
Page 26: Fast Calibration (Orientation)
Fast calibration (orientation) The orientation can be started from the Calibration window on the Start screen. ● place the calibration plate at the working distance to the scanner (the first calibration position), press the Capture button, ● ● next, following the steps, make two more shots, ● after this the accuracy of orientation will be shown. It should be approximately equal to the accuracy value of the last calibration.
-
Page 27: Focus Assessment During Calibration
Focus assessment during calibration While performing the calibration steps it is important to not deviate too much from the working distance in order to keep the calibration field in focus. The focus assessment option can help with this task. It is located in the Hardware settings →…
-
Page 28
Waste Electrical and Electronic Equipment Directive 2002/96/EC (WEEE). The mark indicates the requirement NOT to dispose the equipment as unsorted municipal waste, but use the return and collection systems according to local law. RangeVision, 2021…
RangeVision Spectrum – это новое слово в трехмерном сканировании. Модель представляет собой универсальный 3D-сканер с HD-проектором, позволяющий сканировать как крошечные объекты размером от 1 см, так и крупногабаритные предметы, максимальный размер которых составляет 3 метра. В статье разберемся, чем обусловлена популярность RangeVision Spectrum, каковы уникальные особенности сканера и кому он лучше всего подойдет, а также рассмотрим пошаговую инструкцию по эксплуатации универсального 3D-сканера.
Обзор 3D-сканера RangeVision Spectrum


Описание
RangeVision Spectrum представляет собой максимально точный 3D-сканер. Устройство позволяет получать трехмерные модели объектов с высокой степенью детализации (0,072 мм) и не менее высокой точностью (до 0,04 мм).
Сканер выполнен из качественных материалов, прост в эксплуатации, и отлично подходит для сканирования предметов практически всех форм и размеров от 1 см до 3 м.
В комплектацию Spectrum входят поворотный стол и кейс, позволяющие с легкостью сканировать небольшие объекты.
Сам процесс сканирования на RangeVision Spectrum не представляет особых сложностей. Производитель уверяет, что научиться пользоваться этим универсальным сканером очень просто, а сам агрегат подойдет как начинающим пользователям, так и искушенным профи аддитивного производства. При этом полученные результаты сканирования – на самом высоком профессиональном уровне.
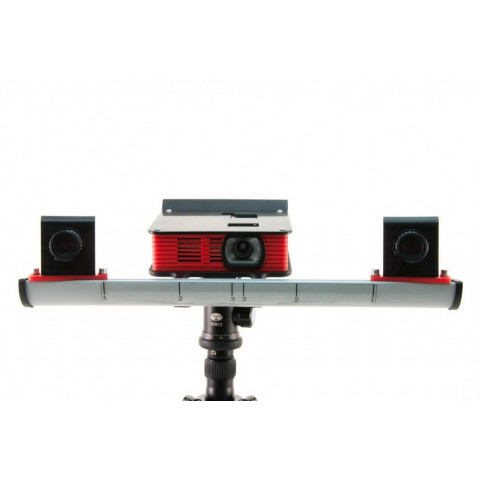
RangeVision Spectrum работает по технологии структурированного подсвета, а также обладает тремя областями сканирования. Устройство оснащено цветными камерами высокого разрешения (3,1 Мп).
Основные особенности
RangeVision Spectrum обладает следующими техническими параметрами:
- Метод работы: структурированный подсвет, оптическая триангуляция.
- Зоны сканирования: 3 рабочие зоны.
- Наличие камер: цветные камеры с разрешением 3,1 Мп.
Обратите внимание! В модель Spectrum интегрированы две цветные камеры для максимально точного определения 3D-точки.
- Минимальный рабочий диапазон сканирования: 133 × 100 × 100 мм.
- Максимальный размер рабочего диапазона: 520 × 390 × 390 мм.
- Точность сканирования: 0,072–0,26 мм.
- Минимальный размер модели для сканирования: 1 см.
- Максимальный размер модели: 3 м.
- Формат файлов: STL.
RangeVision Spectrum обладает тремя режимами сканирования. Вкратце рассмотрим особенности каждого из них:
- Маркерный режим. Как понятно из названия, сканирование происходит с помощью маркеров, а сами сканы автоматически совмещаются. Маркерный режим больше всего подходит для простых и крупных объектов без мелких деталей и сложной геометрии.
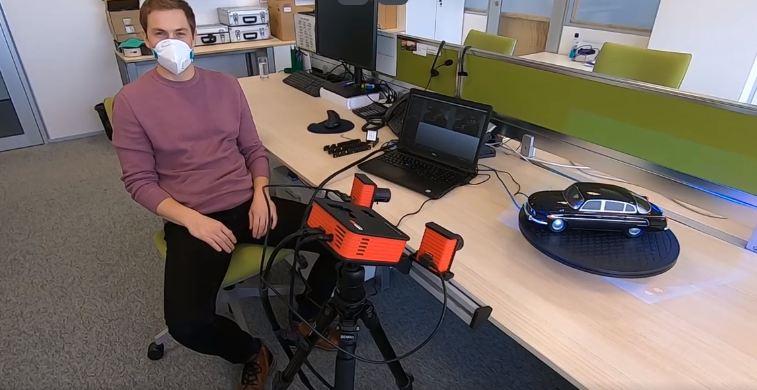
- Режим сканирования на поворотном столе. В этом режиме происходит быстрое сканирование небольших моделей в автоматическом режиме. Процесс занимает около двух минут.
- Ручной режим. Здесь придется выставлять настройки самостоятельно. Режим подойдет только опытным пользователям.
Трехмерный сканер RangeVision Spectrum обладает следующими функциональными особенностями:
- Сканирование с захватом текстуры.
- При сканировании с текстурой настройка баланса белого происходит автоматически.
- Автоматическая проверка наличия светофильтров.
- В маркерном режиме – точное определение маркеров на объекте.
- Функция автоматического перерасчета положения скана при неправильном отождествлении маркеров.
- Включение/выключение видимости скана.
- Оптимизированная визуализация объектов на устаревших компьютерах с низкой производительностью.
- Улучшенное определение частоты кадров цветных камер.
- Звуковой сигнал, оповещающий об окончании прогрева камер на устройстве.
- Границы отсечения проставляются автоматически в зависимости от области сканирования.
- Исправление направления вращения поворотного стола в автоматическом режиме.
- Автоматическая установка режима функционирования проектора в параметрах ОС.
- Инструкцию по эксплуатации теперь можно загрузить прямо с сервера.
- Уменьшенный размер ПО для удобства скачивания и оптимизации работы.
- Группы регистрируются автоматически. Локальная регистрация, подразумевающая объединение разрозненных сканов после сканирования без меток и поворотного стола, также происходит автоматически.
- При удалении следов маркеров остается визуальное отображение диаметра сферы.
- При регистрации для выравнивания указываются общие точки на сканах.
- Улучшенное выравнивание и отсечение объектов по плоскости. Функция задания секущей плоскости линией.
- Улучшенный и функциональный «Мастер настройки».
- Модели экспортируются в формат OBJ type 2.
Таким образом, RangeVision Spectrum обладает несколькими преимуществами:
- Для профессиональной оцифровки объектов любых размеров, сканер оснащен тремя настраиваемыми областями сканирования.
- Для получения цветных трехмерных моделей с высокой детализацией в сканер интегрированы две камеры.
- Пользователь может выбрать удобный режим работы, а также самостоятельно настроить параметры сканирования.
- Текстуры сканируются в высоком разрешении.
Итак, мы рассмотрели технические характеристики и функциональные особенности 3D-сканера RangeVision Spectrum. В следующем разделе поговорим о том, как производитель укомплектовал устройство.
3D сканер RangeVision Spectrum
-
Размеры, мм
255 x 455 x 100 -
Программное обеспечение
RangeVision ScanСenter -
Страна производитель
Россия -
Вес, кг
1.65
-
3D разрешение
1: 0.26 мм, 2: 0.17 мм, 3: 0.072 мм -
Время экспонирования
12 сек -
Зона сканирования
520 x 390 x 390 -
Интерфейсы
USB 2.0, HDMI -
Источник света
white-light DLP -
Разрешение камеры
3.1 Мп -
Расстояние до объекта
300-1000 мм -
Точность, мкм
40
-
Цена
390 000 ₽
Комплектация
Учитывая, что сканер стоит около 300 тысяч рублей и является далеко не самой дорогой моделью, RangeVision укомплектовал свое детище довольно щедро: Spectrum уже включает в себя все необходимое для сканирования.

Отдельно отметим автоматический поворотный стол: модель TS станет отличным помощником при сканировании моделей весом до 20 кг. На столе удобно работать с мелкими и средними объектами.

Отдельно отметим автоматический поворотный стол: модель TS станет отличным помощником при сканировании моделей весом до 20 кг. На столе удобно работать с мелкими и средними объектами.
Сам Spectrum упакован в жесткий и качественный кейс. Производитель уточняет, что кейс был специально разработан для удобства транспортировки на объекты и в офисы клиентов.
Итак, комплект поставки включает в себя:
- Сканирующий модуль. В него входят две камеры, HD-проектор, объективы, конструкция для установки.
- Набор кабелей, которые пригодятся при подключении к компьютеру или ноутбуку
- Плиты калибровочные, подставка под плиты.
- Стол поворотный.
- Штатив.
- Лицензионное программное обеспечение RangeVision ScanCenter. Производитель комплектует сканер ПО с возможностью постоянного бесплатного обновления и с бессрочной лицензией.
- Качественный транспортировочный кейс для самого устройства и аксессуаров к нему.
Забота производителя чувствуется в каждой детали: автоматический поворотный стол и переносной кейс делают процесс эксплуатации устройства максимально надежным и комфортным.
Кому подойдет RangeVision Spectrum?

Универсальный сканер может быть использован в следующих сферах:
- Промышленный дизайн и тюнинг.

Универсальный сканер может быть использован в следующих сферах:
- Промышленный дизайн и тюнинг.
- Контроль геометрии.

- Реверс-инжиниринг и прототипирование.
- Реверс-инжиниринг и прототипирование.
- Сувенирная продукция.

- Оцифровка музейных ценностей.

- Оцифровка музейных ценностей.
- Создание виртуальных библиотек.

- Образование.
Примеры сканирования
С помощью RangeVision Spectrum ученые Института археологии и этнографии СО РАН совместно со специалистами лаборатории «Цифра» успешно создают трехмерные изображения древних экспонатов. 3D-сканирование пригодилось ученым для последующих исследований. Готовые модели отличаются максимальной точностью.
В коллекции прогрессивных ученых уже есть множество изображений: с помощью Spectrum удалось оцифровать несколько сотен уникальных археологических находок. Полученный скан с цифровым изображением древнего артефакта можно распечатать на 3D-принтере. Впрочем, гораздо чаще ученые отправляют снимки коллегам для совместного исследования.
В процессе сканирования HD-проектор «наносит» на объект движущуюся сетку светотеней, после чего RangeVision Spectrum, получив изображение искажений сетки на исследуемой модели, автоматически рассчитывает цифровой трехмерный прототип объекта. Научные сотрудники отмечают, что направленность цветных камер под разными углами к артефакту дает возможность увеличить детализацию съемки до максимума, достигая 0,04 мм.
Но использование сканера не ограничивается только лабораторными условиями. Воспользоваться трехмерными технологиями могут и частные лица. Например, у владельца RangeVision Spectrum возникла необходимость создать трехмерную модель штампованного стального кронштейна. Приобрести подобный предмет негде: виной всему сложная геометрия и нестандартные размеры. Сканер Spectrum справился за 10 часов. На первичное сканирование и верификацию ушло около 6 часов, а дальнейшая обработка полученного снимка и построение трехмерной модели заняли оставшиеся 4 часа.

Владелец нестандартного кронштейна проанализировал коробление детали, исключив все возможные деформации, после чего решил напечатать объект на 3D-принтере.

Владелец нестандартного кронштейна проанализировал коробление детали, исключив все возможные деформации, после чего решил напечатать объект на 3D-принтере.
Используемое программное обеспечение
Лицензионное программное обеспечение RangeVision поставляется в комплекте с 3D-сканером. ПО входит в стоимость устройства и не требует дополнительного платного подключения.
ПО RangeVision обладает следующими полезными функциями:
- Разработанные производителем уникальные алгоритмы сканирования, позволяющие обрабатывать большое количество данных; заполнять пустоты; сшивать фрагменты как вручную, так и автоматически; сканировать с текстурой и пр.
- Разнообразные инструменты редактирования данных.
- Лицензия от RangeVision предоставляется бессрочно.
- Для сканера доступны бесплатные обновления в режиме онлайн.
- ПО не привязано к одному устройству: можно подключать сканер к разным ноутбукам или компьютерам.
- Возможность экспортировать скан во все современные форматы: STL, OBJ, PLY и пр.
Программное обеспечение RangeVision дает возможность создать трехмерную модель высокой точности для последующей работы практически в любых современных средах 3D-моделирования и программах CAD/CAM. ПО поддерживает 3Ds Max, Maya, Rhinoceros и аналогичные программы и среды.
Инструкция по первоначальной настройке и подготовке к работе
Первоначальная подготовка к работе начинается со сборки:
- Присоедините камеры к сканирующему модулю.
- Соедините штатив и сканирующий модуль.
- Вставьте кабель HDMI в разъем проектора.
- Вставьте кабели USB в разъемы на задней части цветных камер.
- Подключите блок питания к HD-проектору.
- Включите проектор.

Приступаем к установке программного обеспечения:
- Установите драйверы и ПО: вставляем USB-флешку в ноутбук.
- Запустите файл RangeVision ScanCenter Setup.
- Программа предложит следовать указаниям для дальнейшей установки.
- Вставьте электронный USB-ключ в ноутбук для корректной установки ПО.
Теперь установим цветные камеры:
- Программа ToupView установится вместе с драйверами.
- Не прикасайтесь к линзам объективов.
- Не выкручивайте регулировочные винты полностью.
Настраиваем проектор:
- Отключите на ноутбуке заставку, режим энергосбережения либо спящий режим.
- Включите проектор.
- Соедините HDMI-кабель с ноутбуком.
- В меню «Разрешение экрана» проверьте настройки разрешения проектора. Они должны соответствовать 1280 × 800.
Более подробную инструкцию по установке устройства, его калибровке и сканированию можно найти в электронном руководстве пользователя, доступном в ScanCenter из меню «Справка».
RangeVision Spectrum – это универсальный 3D-сканер с HD-проектором и двумя цветными камерами. Сканер обладает следующими функциональными особенностями:
- Для профессиональной оцифровки объектов любых размеров сканер оснащен тремя настраиваемыми областями сканирования.
- Для получения цветных трехмерных моделей с высокой детализацией в сканер интегрированы две камеры.
- Пользователь может выбрать удобный режим работы, а также самостоятельно настроить параметры сканирования.
- Текстуры сканируются в высоком разрешении.
RangeVision Spectrum позволяет быстро сканировать как небольшие объекты размером с гайку, так и крупногабаритные трехметровые модели.
Spectrum обладает двумя цветными камерами с разрешением 3,1 Мп и точностью до 0,04 на минимальной зоне сканирования.
В устройстве есть три режима сканирования: сканирование с маркерами, на поворотном столе либо в свободном режиме. Время оцифровки составляет не более двух минут.
RangeVision Spectrum отлично справляется с оцифровкой поверхностей моделей с многочисленными мелкими деталями. Кроме того, сканер поставляется вместе с бесплатным программным обеспечением. Пользователи отмечают, что ПО обладает интуитивно понятным интерфейсом, несложным даже для новичка.
Для дальнейшей обработки файлы можно отправить в популярные программы: Solidworks, Autocad, NX Graphics и прочие.
RangeVision Spectrum щедро укомплектован: производитель позаботился о том, чтобы пользователи могли приступить к работе практически сразу после распаковки сканера.
На наш взгляд, устройство является оптимальным по соотношению цены и качества, позволяя использовать 3D-сканер в различных сферах – от науки, образования и воссоздания древних артефактов до сувенирной промышленности и прототипирования.
Manual, Setup And Calibration Instructions for Rangevision SPECTRUM Scanner (28 pages)
Specifications:2361/2361313-spectrum.pdf file (25 Nov 2022) |
Accompanying Data:
Rangevision SPECTRUM Scanner PDF Setup And Calibration Instructions (Updated: Friday 25th of November 2022 12:21:58 PM)
Rating: 4.5 (rated by 25 users)
Compatible devices: Smart, 1000 ICS, PhoXi 3D Scanner S, D70n, bizhub PRESS 1250, NEO, EC9100i series, OpticFilm 135 Series.
Recommended Documentation:
Text Version of Manual, Setup And Calibration Instructions
(Ocr-Read Summary of Contents of some pages of the Rangevision SPECTRUM Document (Main Content), UPD: 25 November 2022)
-
8, Settingupyourcomputerforworkwiththe scanner ForthecorrectoperationofRаngevisiоn3Dscanneryouwillneedtosetupyour computer. Thisprocedureisperformedoncebeforethefirstuseofthescanner. Connectingprojector Turnonthe…
-
13, Calibrationfieldparameters Takethenecessarycalibrationtoconfigurethescannertotheselectedscanarea. Make sure thatthescanareaisincludedinthepackageofyourscanner. The exact size and measurement temperature are written on the label on t…
-
9, Rangevision SPECTRUM Configuringcomputerparameters Toavoidarecurrenceoftheproblemsduringthescanneroperation,youmustturn off the screensaverandsleepmode. Byclickingrightmousebuttononthedesktop,selectPersonalize→Screensaver and turn off th…
-
2, Contents Contents 2 Introduction 3 Technicalspecifications 4 3Dresolution 4 Systemrequirements 4 Preparingforwork 5 Packagecontents 5 Installingsoftwareanddrivers 7 Settingupyourcomputerforworkwiththe scanner 8 Connectingprojector 8 Configuringcom…
-
7, Rangevision SPECTRUM Installingsoftwareanddrivers Get the RаngeVisiоn software (equipped with the scanner) and run the installer — RаngeVisiоn SсаnCenter setup. Followingtheprompts,selectthedesiredlanguage,typeandpathforinstallation. Afterthefileshavebeencopied…
-
12, Rangevision SPECTRUM Selectingscanningzone After preparatory actions on setting up the computer, you should carry the scanner setting procedure. Select Configure scanner for a new area in Calibration window on the Start screen and follow the instructions for each step. Before beginning the configuration, select the desired scan are…
-
Rangevision SPECTRUM User Manual
-
Rangevision SPECTRUM User Guide
-
Rangevision SPECTRUM PDF Manual
-
Rangevision SPECTRUM Owner’s Manuals
Recommended: VE02AL, AL800ULADA, RONDO 92


-
Emerson Rosemount 5708 3D Solids Scanner DeltaV Series
1Manual Supplement 00809-0300-4570, Rev BARosemount 5708 Series 3D Solids Scanner Integration with DeltaV2016Rosemount 5708 Series 3D Solids Scanner Integration with DeltaVRosemount™ 5708 Series 3D Solids Scanner Integration with DeltaV™Introduction . . . . . . . . . . . . . . . . . . . . . . . . . . . . . . . …
Rosemount 5708 3D Solids Scanner DeltaV Series 32
-
Renkforce SC-12
BedienungsanleitungSC-12 LED-Scanner 12 WBest.-Nr. 1452033 Seite 2 — 21Operating InstructionsSC-12 LED-scanner 12 WItem No. 1452033 Page 22 — 41Notice d’emploiScanner à LED SC-12, 12 WN° de commande 1452033 Page 42 — 61GebruiksaanwijzingSC-12 LED-Scanner 12 WBestelnr. 1452033 Pagina 62 — 81 …
SC-12 84
-
Baracoda IDBlue
Traceabilitywww.baracoda.com Unique pen-shaped ergonomic design RFID 13.56 MHz encoder and reader Bluetooth Class 2 (up to 10m) Can be also used as a stylus on tactile screensID-BlueAn efficient way to add RFID reader/encoder to Bluetooth PDA & mobile phonesAccess ControlField Force AutomationSecuri …
IDBlue 2
-
Cypress HHR-3160
HHR-3160_210625HHR-3160 SYSTEM Handheld Wireless Reader Kit with Single Wiegand Output Product ManualCypress Integration Solutions 35+ Years of Access Control Ingenuity CypressIntegration.com © 2020 Cypress Computer Systems 1778 Imlay City Road, Lapeer, MI 48446 800-807-2977 …
HHR-3160 16
Additional Information:
Product Types by Rangevision:
- Scanner
Popular Right Now:
Operating Impressions, Questions and Answers:
- Manuals
- Brands
- Rangevision Manuals
- Scanner
- SPECTRUM
Manuals and User Guides for Rangevision SPECTRUM. We have 2 Rangevision SPECTRUM manuals available for free PDF download: Setup And Calibration Instructions, Setup
Rangevision SPECTRUM Setup And Calibration Instructions (28 pages)
Brand: Rangevision
|
Category: Scanner
|
Size: 5.82 MB
Table of Contents
-
Table of Contents
2
-
Contents
2
-
Introduction
3
-
Technical Specifications
4
-
3D Resolution
4
-
System Requirements
4
-
Preparing for Work
5
-
Package Contents
5
-
Installing Software and Drivers
7
-
Setting up Your Computer for Work with the Scanner
8
-
Connecting Projector
8
-
Configuring Computer Parameters
9
-
Scanner Assembly
10
-
Scanner Setup
11
-
Scancenter NG Launch
11
-
Select Scanning Zone
12
-
Calibration Field Parameters
13
-
Placing the Calibration Plate
13
-
Initial Setup of Cameras and Lenses
14
-
Checking Camera Arrangement
15
-
Finding a Working Distance
15
-
Adjustment of the Projector Focus
16
-
Bringing the Cameras Together
17
-
Final Calibration of the Cameras
18
-
Calibrating the Scanner
21
-
Calibration Plate
21
-
Full Calibration
23
-
Fast Calibration (Orientation)
26
-
Focus Assessment During Calibration
27
Advertisement
Rangevision SPECTRUM Setup (28 pages)
Brand: Rangevision
|
Category: Test Equipment
|
Size: 1.03 MB
Table of Contents
-
Table of Contents
2
-
Introduction
3
-
Technical S Pecifications
4
-
System R Equirements
4
-
Preparing F or W Ork
5
-
Package C Ontents
5
-
Installing S Oftware a Nd D Rivers
7
-
Setting up Your Computer for Work with the Scanner
8
-
Connecting P Rojector
8
-
Configuring C Omputer P Arameters
9
-
Scanner a Ssembly
10
-
Scanner S Etup
11
-
Scancenter
11
-
N G L Aunch
11
-
Select S Canning Z One
12
-
Calibration F Ield P Arameters
13
-
C Alibration P Late
13
-
O F C Ameras a Nd L Enses
14
-
Checking C Amera a Rrangement
15
-
W Orking D Istance
15
-
O F T He P Rojector F Ocus
16
-
T He C Ameras T Ogether
16
-
Final C Alibration
17
-
O F T He C Ameras
17
-
Calibrating T He S Canner
21
-
Calibration P Late
21
-
Full C Alibration
23
-
Fast C Alibration ( Orientation)
25
-
Focus Assessment During Calibration
27
Advertisement
Related Products
-
Rangevision Standard Plus
-
Rangevision Smart
-
Rangevision Advanced
-
Rangevision NEO
-
Rangevision Premium
-
Rangevision SMART ScanCenter 2016.2
Rangevision Categories
![]()
Scanner
Test Equipment
More Rangevision Manuals
Haven’t found what you were looking for? Read our answers to FAQ.
Why is the RangeVision 3D scanner better than other 3D scanners in the same price range?
As opposed to other 3D scanners, RangeVision Smart 3D scanner has 2 Full HD cameras which enable scanning with markers so it automatically puts together individual scans. This makes the scanning process much faster. It is also equipped with autofocus and a battery, thanks to which you will be able to scan for up to an hour without charging. Furthermore, it is delivered in a practical case, so you can take it wherever you want.
Do I have to assemble the device by myself?
In contrast to our competition, you will receive your 3D scanner already assembled. You only have to take it out of the box and connect it to your PC.
Will I be able to get the RangeVision 3D scanner working by myself?
Yes, RangeVision is very easy to operate and it is delivered already assembled. The process of running the 3D scanner and the scanning itself will be very easy thanks to our manual. If you have any additional questions, feel free to contact us.
What size objects is the RangeVision 3D scanner able to scan?
RangeVision Smart can scan objects ranging from the size of 4 cm up to more than 1 m. You can also scan larger objects thanks to the possibility of scanning with markers.
How long does the scanning take?
Scanning on the RangeVision Smart 3D scanner is extremely fast and depends on the size of the scanned object. Small objects are scanned within seconds. You’ll need a few extra minutes for calibration.
What kind of objects can the RangeVision 3D scanner scan?
RangeVision Smart can handle basically any objects which have a suitable size. 3D scanning based on the structured light principle can have some problems with objects which are too shiny or parts of objects which are very dark and reflect or absorb light. The surface of such objects needs to be sprayed over with a special mattifying spray prior to scanning and which can then be wiped away easily.
In which fields can 3D scanning be used?
3D scanning is useful in any field that works with 3D models. Among the most common fields, in which the RangeVision 3D scanner is used, are:
- Medicine – for example when scanning dental plaster casts to create dental implants
- Archeology – scanning of findings
- Design, graphics – scanning of models to create visuals and animations
- Industry – scanning of components or parts which are hard to measure (eg. plane wings), reverse engineering etc.