Руководство по эксплуатации Bluetooth-геймпада 8BitDo M30 представляет собой исчерпывающее руководство по подключению и сопряжению геймпада с различными устройствами. В руководстве приведены пошаговые инструкции по подключению геймпада к устройствам Switch, Android, Windows и macOS. Пользователи могут легко включать и выключать контроллер, нажимая кнопку запуска в течение трех секунд, или принудительно выключать, удерживая кнопку запуска в течение восьми секунд. Руководство также включает информацию о турбо-функции, состоянии батареи и режиме энергосбережения. Встроенная литий-ионная батарея емкостью 480 мАч обеспечивает до 18 часов воспроизведения и может заряжаться через кабель USB-C со временем зарядки 1-2 часа. Кроме того, руководство предлагает поддержку для пользователей, которым нужна дополнительная информация или помощь. В целом, руководство по эксплуатации Bluetooth-геймпада 8BitDo M30 является ценным ресурсом для всех, кто хочет использовать геймпад с различными устройствами.
![]() Геймпад M30 Bluetooth — инструкция по эксплуатации
Геймпад M30 Bluetooth — инструкция по эксплуатации

- Нажмите Начало включить контроллер
- нажмите и удерживайте Начало на 3 секунды, чтобы выключить контроллер
- нажмите и удерживайте Начало на 8 секунд, чтобы принудительно выключить контроллер
 Коммутатор
- нажмите и удерживайте Y & начать для включения контроллера светодиоды начинают вращаться слева направо
- нажмите и удерживайте пара в течение 2 секунд, чтобы войти в режим сопряжения, светодиоды останавливаются на две секунды, а затем снова начинают вращаться
- перейдите на домашнюю страницу коммутатора, нажмите «Контроллеры», затем нажмите «Изменить захват / порядок». Светодиоды загораются при успешном подключении
- контроллер автоматически переподключится к вашему коммутатору нажатием Начало как только он был спарен
• при подключении к коммутатору звезда button = Переключить кнопку ScreenShot
• дом button = Переключить кнопку HOME
 Android (D — ввод)
- нажмите и удерживайте B & начать для включения контроллера светодиод 1 мигает
- нажмите и удерживайте пара на 2 секунды, чтобы войти в режим сопряжения, LED 1 пауза на секунду, затем снова начинает вращаться
- перейдите к настройкам Bluetooth вашего Android-устройства, выполните сопряжение с [8BitDo M30 gamepad]. Светодиод загорается при успешном подключении
- контроллер автоматически переподключится к вашему устройству Android нажатием Начало как только он был спарен
• USB-соединение: подключите контроллер к устройству Android через USB-кабель после шага 1.
 Windows (X — ввод)
- нажмите и удерживайте X & начать для включения контроллера мигают светодиоды 1 и 2
- нажмите и удерживайте пара в течение 2 секунд, чтобы войти в режим сопряжения, светодиоды останавливаются на две секунды, а затем снова начинают вращаться
- перейдите к настройкам Bluetooth вашего устройства Windows, выполните сопряжение с [8BitDo M30 gamepad]. Светодиоды загораются при успешном подключении
- контроллер автоматически переподключится к вашей Windows нажатием Начало как только он был спарен
• USB-соединение: подключите контроллер к устройству Windows через USB-кабель после шага 1.
 MacOS
MacOS
- нажмите и удерживайте Начало для включения контроллера мигают светодиоды 1, 2 и 3
- нажмите и удерживайте пара в течение 2 секунд, чтобы войти в режим сопряжения, светодиоды останавливаются на две секунды, а затем снова начинают вращаться
- перейдите к настройке Bluetooth вашего устройства MacOS, выполните сопряжение с [Wireless Controller]. Светодиоды загораются при успешном подключении
- контроллер автоматически переподключится к вашему устройству macOS нажатием Начало как только он был спарен
• USB-соединение: подключите контроллер к устройству MacOS через USB-кабель после шага 1.
 Функция Turbo
1- удерживайте кнопку, на которую вы хотите включить турбо-режим, а затем нажмите Начало кнопка для активации / деактивации его функции турбо
- d-pad и аналоговые джойстики в комплект не входят
- это не относится к Switch
 Батарея
|
статус — |
Светодиодный индикатор- |
| режим низкого заряда батареи | красный светодиод мигает |
| зарядка батареи | красный светодиод горит постоянно |
| аккумулятор полностью заряжен | Светодиод гаснет |
- встроенный Li-on 480 мАч с 18 часами воспроизведения
- заряжается через кабель USB-C, время зарядки составляет 1-2 часа
 Энергосбережение
- Спящий режим -1 минута без подключения Bluetooth
- Спящий режим -15 минут с подключением по Bluetooth, но бесполезно
- Нажмите Начало разбудить ваш контроллер
- контроллер остается включенным и подключен к проводному USB-соединению
 поддержка
- пожалуйста, посетите 8bitdo.com для получения дополнительной информации и дополнительной поддержки
ТЕХНИЧЕСКИЕ ХАРАКТЕРИСТИКИ
| Технические характеристики изделия | Описание |
|---|---|
| Совместимость контроллера | Переключатель, Android, Windows, macOS |
| Контроллер вкл./выкл. | Нажмите кнопку запуска в течение 3 секунд, чтобы включить/выключить; удерживайте кнопку запуска в течение 8 секунд, чтобы принудительно выключить |
| спаривание | Нажмите и удерживайте кнопку сопряжения в течение 2 секунд, чтобы войти в режим сопряжения. |
| Срок службы батареи | Встроенный литий-ионный аккумулятор емкостью 480 мАч обеспечивает до 18 часов воспроизведения. |
| Зарядка батареи | Перезаряжается через кабель USB-C, время зарядки 1–2 часа. |
| Турбофункция | Удерживайте кнопку и нажмите кнопку запуска, чтобы активировать / деактивировать турбо-функцию. |
| Режим экономии энергии | Спящий режим через 1 минуту без подключения Bluetooth или 15 минут с подключением Bluetooth, но без использования; нажмите кнопку запуска, чтобы разбудить контроллер |
| Поддержка | Посетите 8bitdo.com для получения дополнительной информации и дополнительной поддержки. |
FAQS
Как включить Bluetooth-геймпад 8BitDo M30?
Нажмите кнопку запуска, чтобы включить контроллер.
Как отключить Bluetooth-геймпад 8BitDo M30?
Нажмите и удерживайте кнопку запуска в течение трех секунд, чтобы выключить контроллер. Удерживайте кнопку запуска в течение восьми секунд, чтобы принудительно выключить контроллер.
Как подключить Bluetooth-геймпад 8BitDo M30 к коммутатору?
Нажмите и удерживайте Y и начните включать контроллер. Нажмите и удерживайте кнопку сопряжения в течение двух секунд, чтобы войти в режим сопряжения. Перейдите на домашнюю страницу коммутатора, чтобы нажать «Контроллеры», затем нажмите «Изменить захват/порядок». При успешном подключении светодиоды загораются.
Как подключить Bluetooth-геймпад 8BitDo M30 к моему устройству Android?
Нажмите и удерживайте B и начните включать контроллер. Нажмите и удерживайте кнопку сопряжения в течение двух секунд, чтобы войти в режим сопряжения. Перейдите к настройкам Bluetooth вашего Android-устройства, выполните сопряжение с геймпадом [8BitDo M30]. Светодиод загорается при успешном подключении.
Как подключить Bluetooth-геймпад 8BitDo M30 к моему устройству с Windows?
Как подключить Bluetooth-геймпад 8BitDo M30 к моему устройству с macOS?
Как подключить Bluetooth-геймпад 8BitDo M30 к моему устройству с macOS?
Нажмите и удерживайте A и начните включать контроллер. Нажмите и удерживайте кнопку сопряжения в течение двух секунд, чтобы войти в режим сопряжения. Перейдите к настройкам Bluetooth вашего устройства macOS, выполните сопряжение с [Беспроводной контроллер]. При успешном подключении светодиоды загораются.
Как активировать/деактивировать турбо-функцию на Bluetooth-геймпаде 8BitDo M30?
Удерживайте кнопку, для которой вы хотите установить турбо-функцию, а затем нажмите кнопку запуска, чтобы активировать / деактивировать ее турбо-функцию.
Как долго работает батарея Bluetooth-геймпада 8BitDo M30?
Встроенный литий-ионный аккумулятор емкостью 480 мАч обеспечивает до 18 часов воспроизведения.
Как зарядить аккумулятор Bluetooth-геймпада 8BitDo M30?
Аккумулятор можно заряжать через кабель USB-C со временем зарядки 1-2 часа.
Как работает режим энергосбережения на Bluetooth-геймпаде 8BitDo M30?
Контроллер переходит в спящий режим через 1 минуту без соединения Bluetooth или через 15 минут с соединением Bluetooth, но бесполезно. Нажмите «Старт», чтобы разбудить контроллер. Контроллер остается включенным и подключен к проводному USB-соединению.
Где я могу найти дополнительную поддержку для Bluetooth-геймпада 8BitDo M30?
Посетите 8bitdo.com для получения дополнительной информации и дополнительной поддержки.
![]() 8bitdo.com
8bitdo.com
Документы / Ресурсы
I ntroduction
Thank you for choosing this innovative RF Gamepad. This gamepad not only can be
compatible with both PC and PS, but also be equipped with a high 2.4G RF
technology. To satisfy users this gamepad is expanded the Macro and Turbo function,
users, can perfectly enjoy the convenience and exciting playing with this gamepad.
Package Contents
Gamepad
*1
Receiver
*1
USB Cable
*1
CD Driver
*1
User Manual
*1
System R equirement
PC
1. IBM PC 586/PentiumII compatibles or higher
2. Available USB port or extension USB hub
3. CD-ROM drive
4.
Microsoft Windows XP/ME/2000/98 recommended
PlayS tation
1. PlayStation 2 / PSOne / PlayStation
Hardwar e Over view
Recei ver
Connection LED
Low-Battery LED
USB Connector
Connection Button
1. 1 Connection Button
2. 2 LED Indicator (One is connection indicator and another is low-battery indicator.)
3. 1 USB Connector for PC
Gamepad
Macro/Turbo
Button10/Start
Vibration/Connection
Button9/Select
Button5, 7 / L1, L2
D-Pad
PC
Eight ways D-Pad
Button 1, 2, 3, 4
Button 5, 6, 7, 8, 11, 12
Button 9, 10
Analog Ministick
Analog/Digital switching button
Program (Macro/Turbo) button
Vibration/Connection button
Red/Green/Orange LED indicator
RF-2.4G Gamepad User’s Manual
R F-2.4G PC Combo PS2 Gamepad
Button6, 8 / R1, R2
Button4 /△
Button2 /○
Button3 /□
Button1 /Χ
Right stick & button12/R3
Mode-LED
A/D
Left stick & button11/L3
PlayStation
Eight ways D-Pad
Χ,○,□,△
L1, L2, L3, R1, R2, R3
Select, Start
Oper ation Reference
1. G amepad Calibration
Before using this gamepad, please rotate the sticks once to calibrate perfectly.
2. Connect Gamepad with Recei ver
Please follow below steps to connect the gamepad with the receiver.
1) Press and hold the Connection/Vibration button of the gamepad until the Mode-
LED twinkles with orange color.
2) Press the button of the receiver to connect with each other.
> L E D indicator:
C ondition
Online
Connection -LED ON
OFF
3. Analog/ Digital S witching
This gamepad is equipped with Digital and Analog modes. And there are some
different features with PC and PlayStation modes in A/D modes as followings:
> PC
Gamepad
D-pad
POV HAT
Left Mini-stick
X&Y Axis motion
Right Mini-stick
Throttle& Rudder
Button 11, 12
Normal function
Other Buttons
Normal function
Mode-LED Indicator Red
> PlayStation
You can switch between digital and analog modes. The Mode-LED turns ON with
red color in Analog mode and with green color in Digital mode. When the
gamepad is in Analog mode, the following buttons and sticks may operate in
Analog fashion depending on the features supported by the software title. Refer to
the software manual for details.
PlayStation2 format software
D-Pad / Χ,○,□,△ / 2 ministicks / L1, L2, R1, R2
PlayStation f or mat softwar e
2 ministicks
4. V ibration F unction
You can switch the vibration function ON or OFF by pressing the Vibration
Connection button.
>L E D indicator:
V ibr ation ON
Twinkle
ON
M ode-LED
5. Macro function
There are four buttons (L2, L3, R2, R3) allowed being set as the macro buttons.
Please follow below steps to set up the macro function.
1) Press the Program button to set up the macro function.
2) Press one of four buttons (L2, L3, R2, R3) which you want to set as a macro
button.
3) Press the buttons (D-Pad, △,Χ,□,○, L1, R1, L2, R2, L3, R3, Start) in turn to
set into the Macro function.
4) Press the Program button again to finish the Macro function setup.
> L E D indicator
Step 1)
Steps of the
Mac ro set
Orange
M ode-LED
OFF.
OFF
Connection-
LED
6. T urbo function
Please follow below steps to set up the Turbo function.
1) Press the Program button.
2) Press the buttons (△,Χ,□,○, L1, R1, Start) which you want to set with the
Turbo function.
Note: If you want to remove the Turbo function, please repeat the above steps.
> L E D indicator
Steps of the Turbo set
Orange
Mode-LED
OFF
Connection-LED
Off line
C onnecting
Twinkle & Orange
Analog
Digital
X&Y Axis motion
POV HAT
Throttle& Rudder
No function
Normal function
Green
V ibr ation OFF
Step 2)
Step 3)
Twinkle & Orange
Step 1)
OFF
ON
Step 4)
OFF.
ON
Step 2)

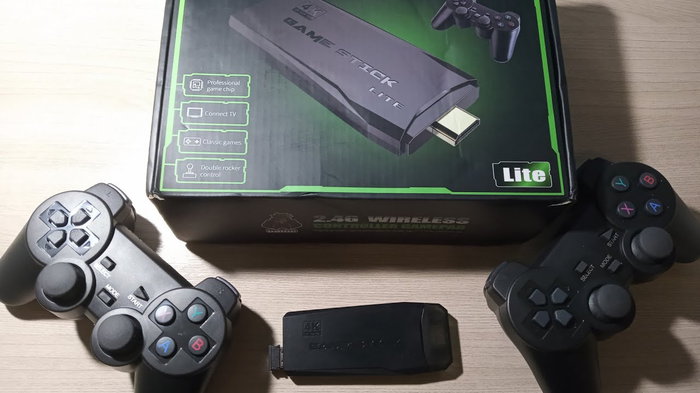
Относительно недавно на рынке появилась новая «серьезная» игрушка, которая точно заинтересует фанатов ретро-игр, детей 80-х и 90-х годов, а также техногиков. Речь идет об универсальной консоли для эмуляции старых игр под названием Game Stick Lite. В этом обзоре мы расскажем, что это за консоль и как подключить Game Stick Lite к монитору или телевизору.
Описание консоли
Среди нашей аудитории есть люди разных возрастов. Это и дети, которые пока учатся в школе, и взрослые люди, и даже активные пенсионеры, изучающие современные технологии. Однако почти все наши читатели, вне зависимости от возраста, хотя бы раз слышали про популярно ретро-игры, которые выпускались примерно во второй половине XX века. И, наверное, каждый второй взрослый человек порой мечтает вернуться в те времена и вновь поиграть «DOOM», «Pacman», «Super Mario Bros» и другие игры, ушедшие вместе с игровыми приставками 90-х и 00-х годов. Благодаря консоли Game Stick Lite эта мечта становится явью.
Приставка Game Stick– это универсальное устройство, которое поддерживает запуск большинства популярных игр, выпущенных для следующих платформ:
- SEGA;
- PlayStation 1, PlayStation 2;
- Atari;
- Dandy;
- Игровые автоматы.
Список не совсем полон. Дело в том, что эта консоль также может работать даже с теми играми, которые выпускались только в определенных странах или разрабатывались для не особо популярных специфичных программ. В общем, многофункциональная и незаменимая вещь для занятых людей, которые предпочитают ретро-классику, нежели современные реалистичные игрушки.
Инструкция по подключению
Несмотря на наличие руководства пользователя и отсутствие лишних портов и интерфейсов, процесс подключения устройства к телевизору нередко вызывает у пользователей массу проблем. Люди боятся случайно сжечь монитор или саму консоль, а потому не рискуют лишний раз втыкать неизвестные кабели в неизвестные порты. Страх вполне оправдан, учитывая стоимость самой приставки и телевизора, к которому она будет подключена. Поэтому перед подключением рекомендуем ознакомиться с подробной инструкцией, которая представлена ниже:
- Включите телевизор.
- Вставьте MicroUSB-кабель, который идет в комплекте, в соответствующий вход на консоли.
- Вторую сторону USB вставьте в обычный USB-порт телевизора. Это нужно для подачи питания на приставку с напряжением в 5 вольт. Не рекомендуем подключать устройство к блокам питания с более высокой мощностью.

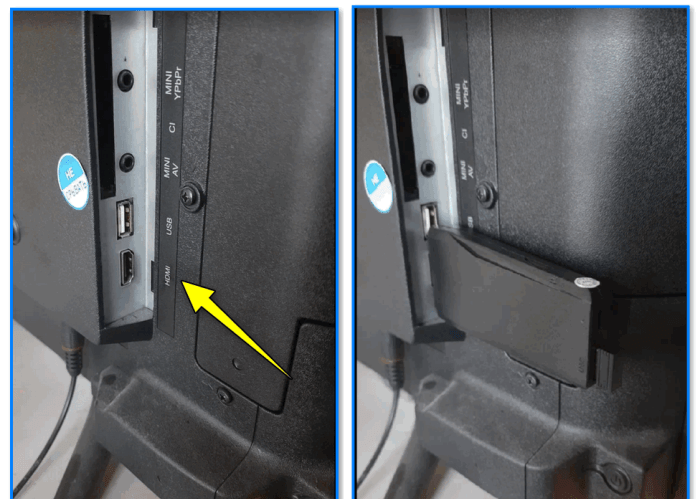
- Снимите крышку с портативной приставки. Под ней будет находиться HDMI-штекер.
- Вставьте этот штекер в соответствующий порт телевизора.
- Возьмите в наборе USB-адаптер (маленькая деталь, похожа на кусок флешки) и вставьте его в оставшийся порт на Game Stick. Это Bluetooth-адаптер для подключения контроллеров
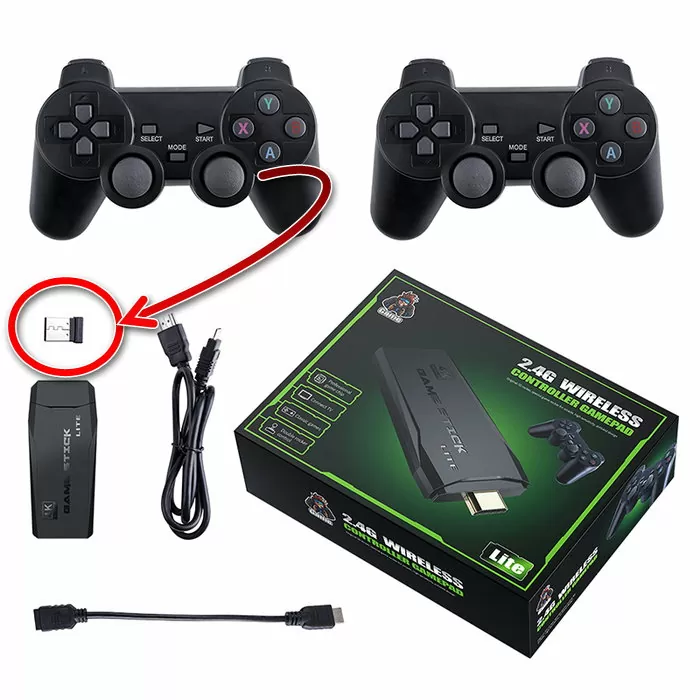
- Возьмите оба контроллера и включите их. ПО индикаторам в верхней части вы сможете определить, какой контроллер определился как основной (первый игрок), а какой как второстепенный.
Поздравляем, на этом процесс подключения подходит к концу. Последнее действие, которое останется сделать пользователю – это выбрать HDMI-интерфейс на телевизоре.
Обычно на пульте для этого есть специальная кнопка со значком двери.
Можно ли обойтись без HDMI
Все современные телевизоры, выпущенные после 2003-го года, оснащаются встроенными HDMI-портами (хотя бы одним), а поэтому поддерживают подключение цифровых видеоустройств, в том числе и Game Stick Lite. Однако если пользователь захочет подключить портативную консоль к старому телевизору, то, скорее всего, столкнется с проблемой отсутствия нужного порта. Проблема, к счастью, решается с помощью переходников, трансиверов и ТВ-приставок.
Они позволяют перевести цифровой сигнал, поступающий через HDMI, в аналоговый, а после отправить его через порты-«тюльпаны». Напомним, это такие три штырька, каждый из которых подключается в определенный порт на телевизоре. Учтите, что появление устройства-посредника значительно скажется на картинке. Также, в теории можно попробовать использовать переходник HDMI-VGA. Это касается только тех пользователей, у которых на телевизорах есть VGA-порты, но нет HDMI-входов. К слову, лично автор таких телевизоров еще не видел.

Подключается ли консоль к ПК
В теории консоль Game Stick можно подключить к HDMI-порту на ноутбуке и компьютере, ведь этот вход есть на всех современных компьютерах. Однако на практике это сделать крайне проблематично, а может и вовсе невозможно. По крайней мере, попытки автора подключить консоль к компьютеру завершились провалом.
ПК определял устройство, но не знал, как его инициализировать. Пришлось пойти на компромисс и подключить приставку напрямую к монитору, а после с помощью меню монитора переключаться между ПК и приставкой. Возможно, автор просто упустил какой-то важный момент. Пишите в комментариях, удалось ли вам запустить Game Stick на ПК.

Возможные проблемы
Увы, но не существует идеальных устройств, которые стабильно бы работали на всех телевизорах. Даже портативная консоль Game Stick иногда выходит из строя или начинает вести себя странным образом. Если пользователь в ходе настройки столкнулся с проблемами, рекомендуем выполнить действия ниже для их исправления:
- Отключите консоль от питания и подключите снова.
- Нажмите на кнопки на контроллере, чтобы «разбудить» устройство с помощью команд.
- Подключите приставку к другому устройству, а после верните его на телевизор.
- Перезапустите телевизор.
Содержание
- — Как подключить геймпад Wireless Controller?
- — Как подключить джойстик Wireless Controller к телефону?
- — Как подключить Wireless Controller к ПК?
- — Как подключить геймпад по блютуз?
- — Как настроить Bluetooth геймпад для андроид?
- — Как подключить геймпад от Xbox One к телефону?
- — Как подключить игровой джойстик к смарт ТВ?
- — Как подключить геймпад к телефону без root?
- — Как подключить геймпад от Xbox One S к ПК?
- — Как подключить геймпад от Xbox One к компьютеру?
- — Что делать если геймпад Xbox One не подключается к ПК?
Геймпад совместим со всеми видами симуляторов и игр.
…
Включение и выключение Bluetooth:
- Нажмите одновременно клавишу А, а затем кнопку Home.
- Индикатор будет мигать, что означает, что контроллер готов к подключению.
- Найдите имя контроллера на смартфоне или планшете.
- Затем нажмите подключить.
Если у вас Bluetooth джойстик (без отдельного USB-адаптера) — то сразу после его включения зайдите в настройки телефона в раздел «Подключение устройства», включите протокол Bluetooth и среди найденных устройств выберите геймпад… Как правило, сопряжение происходит в 1-2 клика по экрану.
Как подключить Wireless Controller к ПК?
Нажмите и удерживайте кнопку привязки геймпада в течение трех секунд, потом отпустите ее.
- На ПК нажмите кнопку «Пуск», затем Настройки > Устройства > Bluetooth и другие устройства.
- Включите Bluetooth, чтобы ПК мог обнаружить устройства Bluetooth.
Как подключить геймпад по блютуз?
На компьютере нажмите кнопку Пуск , затем выберите Параметры > Устройства > Bluetooth и другие устройства. Включите Bluetooth. Выберите Добавление Bluetooth или другого устройства > Bluetooth. Компьютер начнет поиск геймпада.
Как настроить Bluetooth геймпад для андроид?
Делается это так:
- Сначала убедитесь, что на целевом устройстве включён Bluetooth. …
- Теперь переходим к геймпаду. …
- Включите геймпад и переведите в совместимый с Андроидом режим. …
- Под именем геймпада будет надпись «Подключено» – теперь можно переходить к настройке.
8 сент. 2020 г.
Как подключить геймпад от Xbox One к телефону?
Сначала потребуется включить геймпад, затем нажмите кнопку привязки к новому устройству, после чего логотип «Xbox One» очень быстро замигает. Включите Bluetooth, в поиске новых устройств появится «Xbox Wireless Controller» — выбирайте его, после чего он подключится.
Как подключить игровой джойстик к смарт ТВ?
Самым простым способом будет подключение геймпада через ресивер или консоль Smart TV. Для этого достаточно подключить USB кабель джойстика в соответствующий порт и удерживать кнопку HOME (или аналогичную) в течение нескольких секунд. Подключение осуществлено и геймпад готов к использованию.
Как подключить геймпад к телефону без root?
Если вы задумываетесь, как подключить джойстик к телефону android без root-прав, следует присоединить его через USB-кабель. Для этого: Перед непосредственной установкой загружаем софт из Гугл Плей. Оно должно проверить, совместима ли ОС с устройством.
Как подключить геймпад от Xbox One S к ПК?
Как подключить:
- Включите Bluetooth на компьютере;
- Нажмите центральную кнопку Xbox на джойстике;
- В течение 3-х секунд удерживайте кнопку привязки контроллера, которая находится около курков на верхней панели;
- На ПК зайдите в меню «Пуск» и откройте «Настройки» — «Устройства» — «Bluetooth и другие устройства».
18 апр. 2018 г.
Как подключить геймпад от Xbox One к компьютеру?
Если джойстик Xbox One проводной, то подключение происходит очень просто. Просто вставьте кабель MicroUSB в контроллер одним концом, а другим подключите к порту на ПК. Windows сама установит необходимые драйвера. Когда загорится кнопка Xbox Guide, значит, что вы в деле.
Что делать если геймпад Xbox One не подключается к ПК?
Если он не работает при подключении к консоли с помощью USB-кабеля, необходимо заменить геймпад. Если геймпад подключается с использованием кабеля USB, но теряет подключение после отсоединения кабеля, подключите его снова и проверьте наличие обновления для геймпада. Нажмите кнопку Xbox , чтобы открыть гид.
Интересные материалы:
Как быстро возвращают налоговый вычет за квартиру?
Как через госуслуги подать документы на налоговый вычет?
Как через Госуслуги посмотреть налоги?
Как через сайт налоговой оформить налоговый вычет?
Как через сайт подать налоговый вычет?
Как долго рассматривается заявление на налоговый вычет?
Как долго ждать налоговый вычет на квартиру?
Как формируется налог на имущество физических лиц?
Как исчисляется имущественный налог?
Как исчисляется налог на автомобиль по мощности?
 14:29
14:29
Худший новогодний подарок для геймера или честный обзор геймпада Defender
 46:54
46:54
как настроить геймпад Defender на PC
 03:47
03:47
Геймпад за 850 рублей — Defender Game Racer Turbo RS3 — Железный цех — Игромания
 02:57
02:57
Обзор моего старого геймпада Defender Game racer wireless g2
 04:16
04:16
Defender Game Racer Wireless PRO (64262)
 01:47
01:47
Обзор геймпада Defender Game Racer Wireless G2
 06:10
06:10
Пробуем играть геймпадом Defender Game Master g2
 04:26
04:26
Как Настроить Геймпад на ПК для Всех Игр | Windows 10 (2019)
Беспроводной геймпад РУКОВОДСТВО ПОЛЬЗОВАТЕЛЯ Особенности…
Беспроводной геймпад руководство пользователя, Defender game racer wireless g2, Особенности
- Изображение
- Текст
1
Беспроводной
геймпад
РУКОВОДСТВО
ПОЛЬЗОВАТЕЛЯ
Особенности
◎
◎
◎
◎
Функция
вибрации
;
◎
◎
◎
◎
Два
режима
работы
:
цифровой
и
аналоговый
;
◎
◎
◎
◎
Рабочая
частота
: 2.4
ГГц
;
◎
◎
◎
◎
Функция
беспроводного
соединения
(
кнопка
FC);
◎
◎
◎
◎
Функция
Turbo
с
LED-
индикатором
;
◎
◎
◎
◎
Предупреждение
о
низком
заряде
батареи
;
◎
◎
◎
◎
Режим
энергосбережения
(
спящий
режим
);
◎
◎
◎
◎
Рабочий
ток
:
не
более
130
мА
.
Системные
требования
◎
◎
◎
◎
Свободный
USB-
порт
;
◎
◎
◎
◎
Windows XP/Vista/7/8;
◎
◎
◎
◎
DirectX7.0
или
более
новая
версия
.
Установка
◎
◎
◎
◎
Вставьте
CD
с
драйвером
(
входит
в
комплектацию
).
◎
◎
◎
◎
Дважды
кликните
по
иконке
SETUP.
◎
◎
◎
◎
Следуйте
инструкциям
,
появляющимся
на
экране
в
процессе
установки
.
◎
◎
◎
◎
После
завершения
процесса
установки
подключите
ресивер
к
USB-
порту
.
◎
◎
◎
◎
Вставьте
батарейки
и
переведите
переключатель
на
тыльной
стороне
геймпада
в
положение
“ON”.
◎
◎
◎
◎
Во
время
определения
геймпада
индикатор
на
приемнике
будет
быстро
мигать
.
После
успешного
определения
загорится
индикатор
в
положении
LED ON.
Defender Game Racer Wireless G2

2
Описание
кнопок
Выключение
/
Включение
/
Отключение
вибрации
LED for connection
D-pad
MODE
TURBO
Правый джойстик
Левый джойстик
Кнопка
FC (
для
связи
)
Defender Game Racer Wireless G2

3
Описание
функций
Смена
режима
1
)
Цифровой
режим
(LED
выкл
.)
Аналоговый
режим
(LED
вкл
.)
2
)
Цифровой
режим
установлен
по
умолчанию
.
Режим
энергосбережения
(
спящий
режим
)
Спящий
режим
для
экономии
батареек
включается
в
двух
случаях
:
1.
Если
связь
между
геймпадом
и
приемником
не
происходит
более
15
секунд
.
2.
Геймпад
не
используется
в
более
3
минут
.
Чтобы
выйти
из
спящего
режима
нажмите
кнопки
10, 11
или
12,
после
чего
загорится
LED-
индикатор
.
Предупреждение
о
низком
заряде
батареи
При
низком
заряде
батареи
индикатор
начнет
мигать
и
функция
вибрации
автоматически
отключится
.
ПРЕДУПРЕЖДЕНИЕ
:
Пожалуйста
,
убедитесь
в
том
,
что
батарейки
вставлены
правильно
.
Неправильная
установка
батареек
может
привести
к
поломке
.
Кнопка
беспроводного
соединения
Если
в
помещении
работает
одновременно
более
1
геймпада
кнопка
беспроводного
соединения
поможет
установить
надежную
связь
между
геймпадом
и
его
приемником
.
1.
Присоедините
приемник
к
USB-
порту
компьютера
;
2.
Нажмите
кнопку
FC button
на
приемнике
,
а
затем
на
геймпаде
;
3.
Когда
LED-
индикатор
перестанет
мигать
,
это
будет
означать
,
что
успешное
беспроводное
соединение
установлено
.
Функция
Turbo
1
)
Функция
Turbo
может
быть
назначена
на
кнопки
1-8, 11
и
12.
2
)
Одновременно
нажмите
кнопку
Turbo
и
любую
из
указанных
выше
кнопок
,
после
этого
LED-
индикатор
отобразит
включение
функции
Turbo.
3
)
Для
отключения
функции
Turbo
одновременно
нажмите
кнопку
Turbo
и
любую
из
указанных
выше
кнопок
.
Defender Game Racer Wireless G2

4
Устранение
неполадок
:
a)
Геймпад
не
работает
или
плохо
работает
после
установки
программного
обеспечения
.
i.
Проверьте правильность подключения приемника к USB-порту.
ii.
Убедитесь, что в настройках в Панели Управления геймпад выбран в качестве
контроллера.
iii.
По возможности, устраните помехи, которые могут создавать другие беспроводные
устройства.
iv.
Перезагрузите компьютер.
b)
Программное
обеспечение
не
устанавливается
или
не
работает
после
установки
.
Обновите версию до 7.0 или более поздней.
c)
Не
работает
функция
вибрации
в
гонках
.
Выйдите из игры и зайдите заново. Если не поможет, перезагрузите компьютер.
d)
Если
действия
происходят
без
нажатия
кнопок
.
Руль не был откалиброван. Откройте Option — Controllers — Dead Zone, отрегулируйте
область мертвой зоны.
Effect Zone Dead Zone Effect Zone
Axis
Axis
e)
Правый
мотор
постоянно
вибрирует
в
игре
.
Откройте “Force Feedback”, поменяйте положение ползунка.
Ползунок
f)
Недостаточная
мощность
вибрации
.
Откройте Force Feedback , настройте “STICK VOLUME
、
“ROAD EFFECTS” и т.д.
g)
Не
получается
произвести
калибровку
в
тестовом
режиме
.
Сначала нажмите “Default”, затем“Set”.
h)
Отсутствует
вибрация
в
тестовом
режиме
.
Обновите версию до 7.0 или более поздней.
Defender Game Racer Wireless G2

Wireless gamepad user manual, Defender game racer wireless g2, Design and spec
Страница 5
- Изображение
- Текст
5
WIRELESS GAMEPAD
User Manual
Design and spec
◎
◎
◎
◎
Built-in motors support dual shock function to make your game more realistic and
interesting;
◎
◎
◎
◎
With 2 modes: Digital/Analog;
◎
◎
◎
◎
Transmission Frequency: 2.4GHz;
◎
◎
◎
◎
Force Connection function ( short for FC button);
◎
◎
◎
◎
Turbo function with blue LED indicator;
◎
◎
◎
◎
Low Voltage Alert feature;
◎
◎
◎
◎
Power Save mode ( sleep mode);
◎
◎
◎
◎
Operating Current: less than130mA;
Connection and Installation
1. Connect the receiver with your PC;
2. Insert batteries correctly into your joypad and then turn the power switch to ON
position;
3. The joypad will be paired with the receiver automatically and you will notice the
LED on the receiver will flash when they’re pairing and then turn stable after well
connected;
4. It’s time to play.
System requirements
2
、
Support USB port
3
、
Windows 98/ME/2000/XP/Vista/7/8
4
、
DirectX7.0and higher
Installing under Windows98/me/Windows2000/WinXP/Vista/7/8
2. Log on Windows operating system, insert CD and double click SETUP to install
driver as per system prompt
3. Start Control Panel Game Controller
4. Insert USB plug into PC Install driver as per PC prompt computer
automatically searches ”PC Twin Shock…” driver property
Defender Game Racer Wireless G2

6
Buttons Layout
Power Switch
LED for connection
D-pad
MODE
TURBO
Right Thumb Stick
Left Thumb Stick
FC button
Defender Game Racer Wireless G2

Defender game racer wireless g2, Functions description
Страница 7
- Изображение
- Текст
7
Functions description
Mode Changing
1
)
Digital mode (LED off) Analog mode (LED on)
2
)
Digital mode set as “Default”.
Low Power Consumption (sleep mode)
In order to save batteries power and prolong batteries life, the wireless joypad features a
sleep mode if it has not been used for a period of time. There are 2 ways getting into
sleeping mode:
1. If the wireless joypad is not paired with the receiver for over 15 seconds, the
wireless joypad will get into Sleep mode automatically,
2. If the wireless joypad is connected to the receiver and not used for over 3
minutes it will enter a Sleep Mode
To Exit the Sleep Mode, Press 10,11 or 12 button on the joypad, the receiver LED light will
then turn on.
Low Voltage Alert
When the power of the wireless joypad is weak, the LEDs on the joypad will begin to
flash indicating the current batteries need to be replaced. And the vibration function
would be left to idle automatically.
WARNING: Please ensure that the batteries are inserted correctly. If they are inserted
incorrectly, it may cause personal injury as well as damage to your wireless joypad.
Force Connection
If there are more than one wireless joypad working in the one operating environment,
use the Force Connect button to manually connect a joypad to its respective receiver.
4. Connect the receiver to your PC;
5. Press FC button on the receiver and then FC button on the joypad;
6. You will notice the LED on the receiver will turn stable to indicate the Force
Connection has succeeded.
Turbo function
4
)
Fire Buttons (Key 1-8, 11 and 12) can be set with Turbo function
5
)
Press Turbo and any fire button synchronously, you will notice the LED for Turbo will turn
on to indicate the fire button can perform Turbo and shooting consecutively;
6
)
Press Turbo and the fire button which has been set with Turbo function, the LED for
Turbo will be off, and the Turbo function for this fire button has been cleaned up
Defender Game Racer Wireless G2

8
Trouble shootings:
g) The controller doesn’t work normally after installing the software and hardware?
i.
Check whether the controller’s link cable is strongly connected to PC/whether the controller
connected well with computer.
ii.
Please check and confirm that the “Game Port Controller” of the “Game Controller” in the
“Control Panel” is “Confirmation”, and “Controller ID” of “Game Port Steering Wheel
Controller” shows “1”.;
iii.
Make sure the controller’s I/O setting has no conflict with other peripheral settings.
iv.
Restart the computer if it still doesn’t work normally.
h) The driving program “
PC TWIN SHOCK
” can’t be installed
,
or the test of controller has no
response after installing it
DirectX’s version is too low. It requires a version of 7.0 and up
i) There is no vibration from motor while playing racing games
Exit the game and reenter. If it still cannot work normally, restart your PC.
j) Some analog axis can go into effect automatically after you enter the games (e.g. Need for
Speed game).
The steering wheel hasn’t been calibrated or hasn’t been confirmed after calibrations.
Enter Option — Controllers — Dead Zone to adjust the range of the dead zone, and make sure
the axis in the range of the dead zone.
Effect Zone Dead Zone Effect Zone
Axis
Axis
k) Right motor vibrating constantly after entering game
Enter “Force Feedback”, turn off or turn down the engine.
Engine
l) Motor vibrate weakly after entering game
Enter Force Feedback , adjust the intensity of“STICK VOLUME
、
“ROAD EFFECTS” etc.
,
to be stronger.
g) It is difficult to calibrate in the testing platform.
Click “Default” first, and then click “Set”
h) The motor has no vibration on the testing platform.
DirectX’s version is too low. It requires a version of 7.0 and up.
Defender Game Racer Wireless G2

Комментарии
инструкция8BitDo M30 RR

For PS4 controller
1. Insert Retro Receiver into console and then press the pairing button (the LED will rapidly blink)
2. Press and hold the Share and PS buttons until the lightbar begins to strobe quickly in double.
3. Wait until your Retro Receiver’s LED is solid blue and the controller’s lightbar stay on.
4. For next connection only need to press PS button and wait until receiver’s LED is solid blue.
MODE START
DPAD
Z
A
Y
C
B
X
For PS3 controller
1. Download and Run 8BitDo Retro Receiver Tools on your PC available for Mac and PC.
2. On your Retro Receiver, hold down the pairing button and connect it to your MAC/PC via USB.
3. Connect your PS3 controller to MAC/PC via USB.
4. Once your Retro Receiver and PS3 controller are both connected via USB, click the «Pair» button
in the soware.
5. Once pairing is complete, you can insert your Retro Receiver into your console.
6. Now press the PS button on your PS3 controller.
7. Wait until your Retro Receiver’s LED is solid blue and the controller’s #1 LED stay on.
8. To re-sync aer powering your console down, begin from step 6.
Retro Receiver
for original Genesis & Mega Drive
• 6 button mode <=> 3 button mode switching can be achieved by pressing mode button on the
controller for 3 seconds. LED on the receiver will blink twice to indicate the change
Посмотреть инструкция для 8BitDo M30 RR бесплатно. Руководство относится к категории без категории, 1 человек(а) дали ему среднюю оценку 9.1. Руководство доступно на следующих языках: английский. У вас есть вопрос о 8BitDo M30 RR или вам нужна помощь? Задайте свой вопрос здесь
- 页 1
- 页 2
- 页 3
- 页 4
- 页 5
- 页 6
- 页 7
- 页 8

Главная
Не можете найти ответ на свой вопрос в руководстве? Вы можете найти ответ на свой вопрос ниже, в разделе часто задаваемых вопросов о 8BitDo M30 RR.
Не нашли свой вопрос? Задайте свой вопрос здесь

Тема: 8bitdo Sega M30 2.4G для оригинальной SMD подключить к ПК (Прочитано 1844 раз)

0 Пользователей и 1 Гость просматривают эту тему.
Имеется беспроводной геймпад 8bitdo, играю им на оригинальной Sega Mega Drive. Также на ПК и андроид приставке играю в эмуляторы через кабель, что не совсем удобно. Хотел бы подключать его беспроводным способом. Может есть бюджетные переходники как у дуалшока, или может отдельно продающийся свисток USB 2.4G, который этот увидит и распознает?
Ещё видел на Али вот такой геймпад 1 904,19 руб. | Беспроводной геймпад 8BitDo M30 2,4G для Sega Genesis Mini и Mega Drive Mini — Sega Genesis
https://a.aliexpress.com/_9wAH31
Одновременно и USB и 2.4G, говорят, к ПК и андроиду подходит. Можно ли его свисток законнектить с тем геймпадом что уже у меня есть, который для оригинальной SMD?

Так для этих джоев есть отдельный УСБ свисток, который принимает сигналы от 2.4G джоев
На сайте 8битду посмотри
З.Ы. Я купил и такой и такой джой, один для андроид эмулей по блютуз, второй ос свистком для железной сежки 
Можно ли его свисток законнектить с тем геймпадом что уже у меня есть, который для оригинальной SMD?
Можно. Только у тебя будет два пэда и всего один приёмник — смысл их местами менять тогда?
Вот у меня тоже возникал такой вопрос, но мне отвечали что и донгл отдельно не продадут!
Эта зараза и так оверпрайс, так ещё и делемма такая с донглами, зла не хватает!
Обещали ведь с аналоговыми стиками, так нет. А мне такой джой нужен был чтобы он был один для всего… Но я походу такой геймер последние 20 лет, что моих 20 для ничего, мне вполне хватит…
И сразу оффтоп, но по-делу!
Я реально мечтал заполучить такой один для всего и навсегда, да так что уже примерялся его самостоятельно собирать!.. А сколько гляжу уже в сети, лет 5 — никому кастомные джойстики как-то и не нужны, когда и оригинальных тысячи и китайских миллионы(((
Эта зараза и так оверпрайс, так ещё и делемма такая с донглами, зла не хватает!
Чейто? Здесь есть люди китайский проводной джой по 1500р покупают, потому что там слоном пахнет  А ту современное устройство беспроводное в те же деньги. Крикза вон джой сотка баксов
  Считаю 1500 вполне себе достойная цена, темболее качество четкое.
Добавлено позже:
По поводу донгда так он есть отдельно на их сайте, щи лот на алике, уверен должен быть
По поводу донгда так он есть отдельно на их сайте
Где это на сайте ретроресивер 2.4 для ПК отдельно?
Так для этих джоев есть отдельный УСБ свисток, который принимает сигналы от 2.4G джоев
На сайте 8битду посмотри
По поводу донгда так он есть отдельно на их сайте, щи лот на алике, уверен должен быть
Где это на сайте ретроресивер 2.4 для ПК отдельно?
Чел что-то попутал, нет там такого и не было. Видимо увидел там свисток под блютус пады, он тоже под кирпич оформлен.
Можно. Только у тебя будет два пэда и всего один приёмник — смысл их местами менять тогда?
С чего ты взял что можно? У меня два обычных 2.4 m30 для smd и они конектятся только каждый к своему свистку. Так что думаю брать отдельно 2.4 свисток бессмысленно.
Добавлено позже:
Может есть бюджетные переходники как у дуалшока, или может отдельно продающийся свисток USB 2.4G, который этот увидит и распознает?
https://a.aliexpress.com/_ABv1OL
Вот такой адаптер себе взял. Он позволяет подключать smd пад к PC/android/raspberry. В него вставляю m30 2.4. Правда вариант не совсем бюджетный, и работают соответственно только те кнопки, которые есть на smd падах, т. е. доп. кнопки не фурычат, что логично.
« Последнее редактирование: 06 Январь 2021, 06:14:54 от Werton »
У меня два обычных 2.4 m30 для smd и они конектятся только каждый к своему свистку.
Собственно, поэтому приёмники отдельно от джоев и не продают, т.к. они привязываются к друг другу при сборке прошивкой, а программная перепривязка пользователем не предусмотрена.
С чего ты взял что можно?
Читал где-то.
Собственно, поэтому приёмники отдельно от джоев и не продают
На сайте же они есть.
На сайте же они есть.
на 2.4G или bluetooth?
supremacy,
так, а мы сейчас чью хотелку обсуждаем?
Вот на сайте производителя УСБ свисток. Можно в него свистеть жоями современных консолей + вся линейка M30/N30 и т.д КРОМЕ версий 2.4G
https://i.imgur.com/GCq6xvB.png
И вот такой свисток в сежку, который видит этот же самый М30 джой и кучу других.
https://i.imgur.com/FCaBwe7.png
+ к этим двум свисткам джой на вбор, например М30 от сежки.
Вопрос думаю закрыт. можно гамать одним джоем на 101м девайсе включая сежку.
Где купить — alibaba ищите официальный стор производителя там и договаривайтесь
Добавлено позже:
P.S. Кстати вариант подключение джоев от Сега на ПК через УСБ есть как самоджелки от Кластера так и вполне готовые решения за 700р  Это на случай если уже имеется 2,4Г джой и жаба душит тратится.
Я когда гуглил конвертер джоев с Сега на Дендии — кучу китов видел как раз для УСБ
Добавлено позже:
Вот на ардуйне например
https://cxem.net/comp/comp212.php
Или вот готовое
https://www.youtube.com/watch?v=mV7VCAtAVE8&feature=emb_logo
« Последнее редактирование: 07 Январь 2021, 02:10:18 от Triplex »
Вот на сайте производителя УСБ свисток. Можно в него свистеть жоями современных консолей + вся линейка M30/N30 и т.д КРОМЕ версий 2.4G
https://i.imgur.com/GCq6xvB.pngИ вот такой свисток в сежку, который видит этот же самый М30 джой и кучу других.
https://i.imgur.com/FCaBwe7.png+ к этим двум свисткам джой на вбор, например М30 от сежки.
Вопрос думаю закрыт. можно гамать одним джоем на 101м девайсе включая сежку.
Где купить — alibaba ищите официальный стор производителя там и договаривайтесь
Эти все свистки только для Bluetooth падов, м30 2.4G с ними не работает, а ты лечил, что на сайте 8bitdo есть отдельный лот-свисток под м30 2.4G, а сейчас переобулся и уже Bluetooth m30 и какие то левые переходники использовать предлагаешь.
Добавлено позже:
На сайте же они есть.
Нету на сайте приемников под 2.4G. Все свистки, которые там есть — только под блютус пады. Ты в описание любого зайди, там написано *not compatible with 2.4G controllers.
« Последнее редактирование: 07 Январь 2021, 04:06:56 от Werton »
Эти все свистки только для Bluetooth падов, м30 2.4 Гц с ними не работает, а ты лечил, что на сайте 8bitdo есть отдельный лот-свисток под м30 2.4 Гц, а сейчас переобулся и уже Bluetooth m30 и какие то левые переходники использовать предлагаешь.
Дома маме хами, ок?
Дома маме хами, ок?
какие мы нежные, я ещё даже хамить не начинал
вариант подключение джоев от Сега на ПК через УСБ
Кстати, а почему их на том же али нет? Для несовских/снесовских есть, для ПС1-2 есть, даже для Сатурна видел, хоть и дорогие, а для весьма популярной МД нет… Эти ретробит из видео тоже давно уже не продаются 
Кстати, а почему их на том же али нет? Для несовских/снесовских есть, для ПС1-2 есть, даже для Сатурна видел, хоть и дорогие, а для весьма популярной МД нет… Эти ретробит из видео тоже давно уже не продаются
Чего нет? Есть! Выше скидывапи ссылку
https://aliexpress.ru/item/1005001280485489.html
Нету на сайте приемников под 2.4G. Все свистки, которые там есть — только под блютус пады. Ты в описание любого зайди, там написано *not compatible with 2.4G controllers.
Это был не тебе ответ, и не на это. Просто в тему понабежало хотельщиков, вот уже и путаюсь кому чего.
Ещё видел на Али вот такой геймпад 1 904,19 руб.
Купи его, короче. Будет у тебя два пэда, зато одинаковых — разницы в использовании не заметишь.
Спасибо друзья, значит сторонний донгл не подойдёт, есть переходник, но стоит дорого и дополнительные кнопки не будут работать (шрифты использую для сохранения и загрузки, очень удобно) остаётся купить ещё один контроллер 2.4G.
Просто в тему понабежало хотельщиков
Даа, я один из них. Как раз говорил что 2.4Гц радиосвисток отдельнодополнительно не раздобыть… а лучше бы я матчасть читал. Сам же видел по жизни что такие радио-хрени один к одному и всё тут. Чё за шаманство?… Блютуцы купить и бед не знать. PS4 на Блютузе жи работает, и никто не обижается, наверное
-
Staff have decided to place a soft ban on topics concerning AI content generation and their algorithms like Stable Diffusion and ChatGPT. You can read more about the update here.
You should upgrade or use an alternative browser.

-
#101


-
#102
I had one dropout but other than that it was good. Loving it. D-pad is perfect.

butman
Attempted to circumvent ban with alt account
-
#103
-
#104
How many shoulder buttons? Please be 4.
Nope, physically just two. The other two shoulder buttons get picked up as C and Z in Steam, though.
![]()
-
#105
The d-pad does look like the Saturn one, but I don’t know how comparable the Genesis 6-button d-pad was to the Saturn Model 2. Is anyone able to weigh in on that? Can’t seem to find the info elsewhere.
I don’t know if it’s the relative age of them or not but I feel like the d-pad on Saturn controllers feels a little sturdier and provides a little more resistance than the 6-button Genesis controllers. It’s somewhere in-between the Genesis 3-button and 6-button controllers in how it handles.
![]()
-
#106

-
#107
Any word on the button mapping for the Switch? I prefer to have ABXY mapped to CBYZ and L2 and R2 mapped to A and X when I use a Saturn pad to play Nintendo games.Lots of games have customisable controls now at least, so it shouldn’t really matter for most games.
EDIT
Found out ABXY are mapped to BAYX as I expected.
Just found this out from an Amazon review. I don’t know why this wasn’t in the manual, but you can hold the — (Minus) button and a direction on the d-pad for five seconds to do any of the following:
— (Minus) & Up = Makes the d-pad mimic a d-pad. (By default, it mimics a left analog stick.)
— (Minus) & Left = Makes the d-pad mimic a left analog stick.
— (Minus) & Right = Makes the d-pad mimic a right analog stick.
— (Minus) & Down = Really only useful on Switch. Toggles between the default A/B/X/Y functions and those that match the Switch button labels.

-
#108

-
#109
Since I use Launchbox though, I realized it was easier to not rely on autoconfigs and just do a per-core config setup and adjust accordingly.

-
#110

-
#111

-
#112
Oh they have one! Nice.
-
#113
Just found this out from an Amazon review. I don’t know why this wasn’t in the manual, but you can hold the — (Minus) button and a direction on the d-pad for five seconds to do any of the following:— (Minus) & Up = Makes the d-pad mimic a d-pad. (By default, it mimics a left analog stick.)
— (Minus) & Left = Makes the d-pad mimic a left analog stick.
— (Minus) & Right = Makes the d-pad mimic a right analog stick.
— (Minus) & Down = Really only useful on Switch. Toggles between the default A/B/X/Y functions and those that match the Switch button labels.
Interesting. I tried this and there’s no indication from the controller the setting actually changed. I guess the only way to know is to test it out in a software configuration app, like what Steam provides. Will try that later.
-
#114
Interesting. I tried this and there’s no indication from the controller the setting actually changed. I guess the only way to know is to test it out in a software configuration app, like what Steam provides. Will try that later.
I used the built-in controller testing menu on Switch. The reason why I knew about the d-pad acting as the left analog stick in the first place was because d-pad presses didn’t register during the aforementioned test. Once I switched the d-pad to d-pad mode, though, its presses registered properly within the controller testing menu on Switch.
-
#115
Interesting. I tried this and there’s no indication from the controller the setting actually changed. I guess the only way to know is to test it out in a software configuration app, like what Steam provides. Will try that later.
You can also use Windows’ own game controller settings screen to see the difference

-
#116
I have just one minor complaint and that is appears the star button is not detected in windows in xinput mode, you have to instead pair it in switch mode to gain that extra button. In SFV I ended up sticking with Switch mode and using Steam input to assign star to the right stick click function as the game uses that for some things. Outside of Steam I may have to make do with one less button depending on the game, but hey that’s still 2 more then I had before.
-
#117
Press and hold the above key combinations for 5 seconds,red LED will blink to indcate when successful.
I believe mine shipped with fw 1.0, and I definitely wasn’t getting the red LED blink on successful change. Hopefully mimicking the control pad will help control for games like Shock Troopers on the PC, as that has control problems when using the M30.
http://support.8bitdo.com

-
#118
i adore my 6 button genny controllers but this is cool! no idea why somebody’d want one in white tho
White is a good color you heathen.

-
#119

-
#120
That’s it’s so lightweight is a big bonus when travelling too.

-
#121
I can’t comment on the SNES30 Pro admittedly as I do not have one, but I do have the standard SN30 (both the older SNES30 model and the 2017 revision for the SuperNT) and both have contact design on the PCB that’s inaccurate to the original. They just use four circular contacts in the cardinal directions, unlike the original, which had tabs (vertical for the contacts on the X axis, horizontal on the Y) that led to more accurate inputs and cut down on erroneous diagonals. The SN30’s essentially got the same design quirk as the Switch Pro controller with inputs, in that the way the d-pad rocks and activates contacts will cause unintentional presses if slightly off-center. This is easily demonstrated by pressing the very end of a d-pad direction and rocking it back and forth a bit, while not intentionally putting pressure on any other direction. Whether or not people notice it or experience it is one thing, but it’s commonly cited as a flaw by myself and others.
I tried switching from my regular Xbone controller to my SF30 for Street Fighter V usage. I dropped straight down from gold to ultra bronze rank in a week of pretty much straight losses. Partially from trying to readjust to the tiny form factor of the controller but mostly due to the d-pad being disappointingly shit.
-
#122
White is a good color you heathen.
for dreamcast maybe

-
#123
![]()
-
#124

-
#125
Hey everyone, if it’s not too much to ask can someone confirm if the 2.4ghz version works with usb on pc and switch? I have seen some people talking about it but I can’t find a definitive answer to that.
I can tell you the Bluetooth version doesn’t work via USB on Switch. I got mine yesterday and happened to try.
![]()
-
#126
I can tell you the Bluetooth version doesn’t work via USB on Switch. I got mine yesterday and happened to try.
Just found a unbox video that shows the manual for the 2.4ghz version (since for the life of me I can’t find a pdf of it) and there’s a section that talks about wired connection with Windows/Switch, so it seems that it works?
Edit: I’m dumb, there is a pdf on the support part of the site and yes it does show that the 2.4 can connect wired to a pc and switch: http://download.8bitdo.com/Manual/Controller/M30-2.4g/M30_2.4g.pdf

-
#127
My M30 arrived today. It’s main use would be for Retroarch and man, it sure was a struggle trying to map controls properly for stuff like the Saturn and Genesis cores. I was able to create an autoconfig profile but it only worked for one core.Since I use Launchbox though, I realized it was easier to not rely on autoconfigs and just do a per-core config setup and adjust accordingly.
Came in here regarding this. I love this controller, and it works awesome with Openemu on my Mac, but I’ll be goddamned if I can figure out how to configure this properly with Retropie/EmuStation on my Pi3.
-
#128
Came in here regarding this. I love this controller, and it works awesome with Openemu on my Mac, but I’ll be goddamned if I can figure out how to configure this properly with Retropie/EmuStation on my Pi3.
This is something I’m hoping to get some guidance on too. I assume I need to get Retropie to ID my controller as a 6 button in the first place, then set it up so ABC is YBA and I don’t know what to do for the top row…

-
#129
My M30 arrived today. It’s main use would be for Retroarch and man, it sure was a struggle trying to map controls properly for stuff like the Saturn and Genesis cores. I was able to create an autoconfig profile but it only worked for one core.Since I use Launchbox though, I realized it was easier to not rely on autoconfigs and just do a per-core config setup and adjust accordingly.
Damn really? I was expecting it to be correctly mapped by default in RetroArch. Mind listing which button goes where? Just ordered this controller mainly for RetroArch as well.
-
#130
Damn really? I was expecting it to be correctly mapped by default in RetroArch. Mind listing which button goes where? Just ordered this controller mainly for RetroArch as well.
I think I threw away the autoconfig I created. I was trying to map things with the controller in xinput mode, but the autoconfig doesn’t really translate well across cores (mainly Genesis and Saturn). Also, I don’t think xinput mode gives me access to all buttons. What I’m doing now is just keeping it in Switch mode since that allows me to map all the buttons (retroarch seems to detect it as a Switch Pro controller in this case), and using core remaps instead.
-
#131
I think I threw away the autoconfig I created. I was trying to map things with the controller in xinput mode, but the autoconfig doesn’t really translate well across cores (mainly Genesis and Saturn). Also, I don’t think xinput mode gives me access to all buttons. What I’m doing now is just keeping it in Switch mode since that allows me to map all the buttons (retroarch seems to detect it as a Switch Pro controller in this case), and using core remaps instead.
So, I just got my gamepad and huh… I’ve had the opposite experience more or less lol. Running it in Switch Pro mode (via USB) detects the gamepad in both Windows and Steam correctly but none of the buttons work whatsoever anywhere in the OS. Haven’t tried via Bluetooth yet. XInput unfortunately recognized it as my Arcade Stick with a custom label in Steam and that would probably also mean that rebinding it in RetroArch would rebind all of my XInput controllers which is a no-go.
What I’ve landed on currently is running it in DInput mode, which required me to bind everything in Steam from scratch but at least it has a unique identifier now. I mapped it fine in RetroArch as well. The problem is that the Star and Guide buttons aren’t registered by Windows at all (presumably because the Android/DInput mode doesn’t even send any signals from those buttons) so I’m stuck with no Guide button. I wanted to bind that to a long press of Start or Select/Minus but for some reason Steam only allows me to bind keys to keyboard/mouse functions? Lol.
This stuff aside, I am incredibly impressed with how the gamepad feels. The d-pad specifically might just be the very best Saturn-style I’ve ever had the pleasure of using. Zero creaking on this particular d-pad and it feels so responsive compared to all of my other d-pads that I’m actually pressing stuff too early sometimes, heh. The raised directions on the sides make it incredibly snappy. The buttons are fine but nothing special compared to my (five…) other Saturn pads. Shoulder buttons however are obviously much better than any of those, thank god.
By the way, weren’t there some hidden button combinations on these gamepads as well? To toggle between Analog Stick emulation vs a true d-pad and stuff like that?
Edit: Got ’em! Required a firmware update but holding Select + a d-pad direction for a couple of seconds switches modes.
-
#132
So, I just got my gamepad and huh… I’ve had the opposite experience more or less lol. Running it in Switch Pro mode (via USB) detects the gamepad in both Windows and Steam correctly but none of the buttons work whatsoever anywhere in the OS. Haven’t tried via Bluetooth yet. XInput unfortunately recognized it as my Arcade Stick with a custom label in Steam and that would probably also mean that rebinding it in RetroArch would rebind all of my XInput controllers which is a no-go.What I’ve landed on currently is running it in DInput mode, which required me to bind everything in Steam from scratch but at least it has a unique identifier now. I mapped it fine in RetroArch as well. The problem is that the Star and Guide buttons aren’t registered by Windows at all (presumably because the Android/DInput mode doesn’t even send any signals from those buttons) so I’m stuck with no Guide button. I wanted to bind that to a long press of Start or Select/Minus but for some reason Steam only allows me to bind keys to keyboard/mouse functions? Lol.
This stuff aside, I am incredibly impressed with how the gamepad feels. The d-pad specifically might just be the very best Saturn-style I’ve ever had the pleasure of using. Zero creaking on this particular d-pad and it feels so responsive compared to all of my other d-pads that I’m actually pressing stuff too early sometimes, heh. The raised directions on the sides make it incredibly snappy. The buttons are fine but nothing special compared to my (five…) other Saturn pads. Shoulder buttons however are obviously much better than any of those, thank god.
By the way, weren’t there some hidden button combinations on these gamepads as well? To toggle between Analog Stick emulation vs a true d-pad and stuff like that?
Edit: Got ’em! Required a firmware update but holding Select + a d-pad direction for a couple of seconds switches modes.
Switch mode is what allows me to use all the buttons in retroarch. Weird that you couldn’t get it to work though, but I only use bluetooth mode so maybe there’s a difference there? My dpad unfortunately has the creaking problem, but only if you press on it hard so it isn’t really a big deal for me.
-
#133
Switch mode is what allows me to use all the buttons in retroarch. Weird that you couldn’t get it to work though, but I only use bluetooth mode so maybe there’s a difference there? My dpad unfortunately has the creaking problem, but only if you press on it hard so it isn’t really a big deal for me.
The built-in Bluetooth on my mobo just keeps losing connection, bleh. Gonna try it via my Steam Link instead, that has worked flawlessly via Bluetooth for other controllers.
-
#134
Do I really need to update the receiver? I don’t have a screwdriver but with the connection problems I’ve had pairing and losing connection then I guess I may try update that too.

-
#135
Note that this for a Bluetooth connection in dinput mode (Hold Start+B). The file also assumes the d-pad is in Left-Analog mode. So if your M30 is in D-pad mode, that’ll be the only thing you have to remap.
https://drive.google.com/file/d/1jLnY2GqENjFnKaA412RHXS6Sq_iH9Ozj/view
Props to the original file creator:
https://forums.libretro.com/t/8bitdo-m30-w-retroarch/21175/15

-
#136
I’ve had a few connection issues on my Mega SG, I have the 2.4 version and not Bluetooth. I’ve downloaded the firmware and when I open the controller folder via my work laptop it’s showing empty? I’ve dragged the update file in anyways but not sure it’s even sent or done anything. How do I check that it’s been updated and what version I’m on?Do I really need to update the receiver? I don’t have a screwdriver but with the connection problems I’ve had pairing and losing connection then I guess I may try update that too.
I believe updating the receiver is necessary. I updated both before even testing, it they worked great.

-
#137
Makes me wish that there was a way to play Sonic the Hedgehog 3 on the Nintendo Switch though. The only one that’s missing. 😞

-
#138
There needs to be more six-button controllers.

-
#139
If any Bluetooth users need an autoconfig file for RetroArch, I found and edited (and by edit, I literally just changed udev to dinput) a file that syncs up very well. Was able to play Genesis/CD, and Saturn games on Genesis+ and BeetleSaturn cores without changing anything. You’ll probably have to remap Picodrive for 32X, but it’s waaaay less confusing.Note that this for a Bluetooth connection in dinput mode (Hold Start+B). The file also assumes the d-pad is in Left-Analog mode. So if your M30 is in D-pad mode, that’ll be the only thing you have to remap.
https://drive.google.com/file/d/1jLnY2GqENjFnKaA412RHXS6Sq_iH9Ozj/view
Props to the original file creator:
https://forums.libretro.com/t/8bitdo-m30-w-retroarch/21175/15
I’m trying this file but for some reason Retroarch keeps recognizing it as something called «RB8-64». I can’t get an actual game to recognize the Dpad, and I’m not seeing anything in the instructions (or anywhere online) about switching between Dpad and analog mode.
How would one set up this config file for Xinput?
Edit: Now it’s simply defined as «Bluetooth Wireless Controller» after saving an autoconfig, but I can’t figure out which autoconfig file in the dinput folder it’s using. Still trying to figure out what should correspond to the C and Z buttons too.

-
#140

-
#141
this thing is absolutely perfect on the mega sg, and one of the most comfortable controllers i’ve ever used. I might like it more than the sn30
I loved mine so much I ended up buying 3 lol (black bluetooth, black and white 2.4 GHz). Surprising to me because I absolutely hated my SN30 and N30 controllers from 8bitdo, but the M30s actually have usable dpads.


-
#143
The USB cord is super short though. I need at least another 6 feet to get comfortable.
Does anyone know what type of cord I should buy for a replacement?
-
#144
My m30 2.4 just arrived. I only had time for some Celeste and a play-through of Thunder Force IV, but I already really like it.
The USB cord is super short though. I need at least another 6 feet to get comfortable.Does anyone know what type of cord I should buy for a replacement?
I never unwrapped the cable that came with my M30. How long is it?
This micro-usb cable here is only 9 feet long, but it’s nice, thick and doesn’t feel flimsy. I’ve bought a few different cheaper micro-usb cables over the years and most of the time they fall apart soon after I get them. I bought this one just over 3 years ago and it still feels solid; it’s not expensive either at under 10 dollars. https://www.amazon.com/gp/product/B00IWLF9MS/?th=1 It’s a NYKO «XBOX ONE CHARGE LINK», but works just fine with my 8bitdo controllers on pc.
Also, some other micro-usb cable that came from God knows where I was using before I dug this one out would like… disconnect if the cable wobbled too much one way, like it wouldn’t stay snug in the port. I don’t have that issue with this cable. I can even tap the sides of the cable and it’ll stay snugly connected.
I’m not too… experienced with a lot of cables now. I just can recommend this one after getting a few suck-ass micro-usb cables before.
edit: note, the leds on the cable don’t light up when I hook it up to an 8bitdo controller. I’ve only seen it light up when I have an Xbox One controller connected (typically a Duke).
-
#145
I never unwrapped the cable that came with my M30. How long is it?
About 3 feet.

-
#146
It bothers me a little bit that the shape is off. It’s neither shaped like a 6 button Mega Drive controller, nor like a Saturn controller. Maybe I’m being unreasonable, because it’s not uncomfortable and it certainly evokes Sega controllers of the Era, it just feels wrong to hold it.
What are the odds the 2.4ghz version gets a PC receiver?
-
#147

-
#148
I can tell you the Bluetooth version doesn’t work via USB on Switch. I got mine yesterday and happened to try.
Just found a unbox video that shows the manual for the 2.4ghz version (since for the life of me I can’t find a pdf of it) and there’s a section that talks about wired connection with Windows/Switch, so it seems that it works?Edit: I’m dumb, there is a pdf on the support part of the site and yes it does show that the 2.4 can connect wired to a pc and switch: http://download.8bitdo.com/Manual/Controller/M30-2.4g/M30_2.4g.pdf
Thanks. I’m hoping the upcoming saturn- 8bitdo with the two analogue sticks will support usb connection then.

-
#149
![]()
-
#150
I wanted to get the SNES one for the Super NT, but it’s not yet released with the OG SNES connector, only the SNES Classic variant…and the reviews aren’t glowing, apparently the D-Pad quickly becomes trash and is oversensitive on diagonal inputs, hopefully the Genesis one last long because right now it’s winning my heart.