Беспроводная точка доступа tp-link AC1350

Настройка с видео
Посетите: https://www.tp-link.com/support/setup-video/ или отсканируйте QR-код, чтобы найти видео настройки вашей модели продукта.
Примечание: Изображение может отличаться от реального продукта.
Оборудование закончилосьview
Передняя панель

Светодиодный индикатор
- Горит зеленым: устройство инициализируется или работает правильно.
- Медленно мигает зеленым: устройство находится в изолированном состоянии.
- Мигающий желтый: устройство работает ненормально.
- Мигающий желтый, зеленый: устройство обновляется. Не отсоединяйте и не выключайте устройство.
- Быстро мигает желтым, зеленым: устройство сбрасывается до заводских настроек по умолчанию.
Задняя панель

СБРОС
Когда устройство включено, нажмите и удерживайте кнопку около 5 секунд, пока светодиодный индикатор не начнет быстро мигать желтым, а затем зеленым, затем отпустите кнопку. Устройство восстановит заводские настройки по умолчанию.
ETH1 (PoE) (для EAP225/EAP223/EAP245/EAP265 HD)
Порт используется для подключения к порту PoE предоставленного адаптера PoE или PSE (оборудование для подачи электроэнергии), например коммутатора PoE, как для передачи данных, так и для передачи питания через Ethernet (PoE) через кабель Ethernet.
ETH2 (для EAP245 / EAP265 HD)
Порт представляет собой порт Gigabit Ethernet, используемый для моста.
Примечание: Для EAP245 V4 ETH2 поддерживает Passive PoE Out, а энергопотребление его оконечных устройств не должно превышать 5 Вт.
ETHERNET (для EAP110 / EAP115)
Порт используется для подключения к маршрутизатору или коммутатору для передачи данных или к PSE (оборудование источника питания), например коммутатору PoE, как для передачи данных, так и для передачи питания через Ethernet (PoE) через кабель Ethernet.
ПИТАНИЕ (для EAP115)
Подключите один конец прилагаемого адаптера питания к этому порту, а другой конец — к стандартной электрической розетке для питания EAP.
Установка оборудования
EAP может быть установлен на потолке или стене. Выберите способ крепления в соответствии с вашими потребностями. Следуйте инструкциям ниже для соответствующей установки.

Вариант 1: потолочный монтаж
Примечание: Убедитесь, что потолочная плитка больше EAP.
- Снимаем потолочную плитку.

- Установите монтажный кронштейн в центр потолочной плитки. Отметьте три позиции для отверстий для винтов и положение для отверстия для кабеля Ethernet.

Просверлите три отверстия диаметром 4 мм для винтов и отверстие диаметром 25 мм для кабеля Ethernet в отмеченных местах. - Прикрепите монтажный кронштейн к потолочной плитке с помощью трех винтов M3x30 с полукруглой головкой, шайб и барашковых гаек, как показано слева.

- Пропустите кабель Ethernet через отверстие и установите потолочную плитку на место.

- Подключите кабель Ethernet к порту ETHERNET. Прикрепите EAP к монтажному кронштейну, совместив стрелку.
на EAP со стрелкой на монтажном кронштейне, затем поверните EAP до фиксации, как показано слева.


Вариант 2: настенный монтаж
Примечание: Из соображений безопасности не рекомендуется устанавливать EAP жалюзи вниз.
- Если кабель Ethernet проходит через стену, вы можете расположить монтажный кронштейн, чтобы пропустить кабель через крепежное отверстие. Отметьте три позиции для отверстий под винты, а затем просверлите три отверстия диаметром 6 мм в отмеченных местах.

- Вставьте пластиковые анкеры в отверстия диаметром 6 мм.

- отверстия. Закрепите монтажный кронштейн на стене, вкрутив саморезы в анкеры. Убедитесь, что выступы монтажного кронштейна находятся снаружи.

- Подключите кабель Ethernet к порту Ethernet на EAP.

- Прикрепите EAP к монтажному кронштейну, совместив стрелку на EAP со стрелкой на монтажном кронштейне, затем поверните EAP до фиксации, как показано слева.


Наконечник: Чтобы снять EAP с монтажного кронштейна, вставьте канцелярскую скрепку в паз безопасности, чтобы освободить фиксирующий язычок, и поверните EAP, пока он не отсоединится от монтажного кронштейна, как показано ниже.
Напряжение питания
EAP может питаться от адаптера питания или устройства PSE (например, коммутатора PoE), которое соответствует классу источника питания 2 (PS2) или ограниченному источнику питания (LPS) стандарта IEC 62368-1.
Вариант 1: Через коммутатор PoE (для EAP115/EAP225/EAP223/EAP245/EAP265 HD)

Подключите кабель Ethernet от коммутатора PoE к порту Ethernet (ETH1 для EAP245/EAP265 HD).
Вариант 2: Через адаптер PoE (для EAP110/EAP225/EAP223/EAP245/EAP265 HD)
- Подключите кабель Ethernet от порта Ethernet (ETH1 для EAP245 / EAP265 HD) устройства EAP к порту PoE предоставленного адаптера PoE.
- Подключите кабель Ethernet от вашей локальной сети к LAN-порту адаптера PoE.
- Подключите шнур питания к сетевой розетке адаптера. Подсоедините другой конец шнура питания к стандартной
Вариант 3: Через адаптер питания (для EAP115)
Подключите один конец прилагаемого адаптера питания к порту POWER EAP, а другой конец — к стандартной розетке электросети.
Конфигурация программного обеспечения
Выберите один из следующих методов для настройки ваших EAP:
Метод 1: Автономный режим
Отдельная настройка EAP и управление ими (удобно для небольшой сети с несколькими устройствами)
Метод 2: Режим контроллера
Для настройки и управления EAP в пакетном режиме на центральной платформе, а именно Omada Controller.
Метод 1: автономный режим
Внимание
- Перед тем, как начать, обязательно включите питание и подключите устройства в соответствии со схемой топологии.
- DHCP-сервер (обычно маршрутизатор с включенной функцией DHCP) необходим для назначения IP-адресов EAP и клиентам в вашей локальной сети.
Через приложение Omada
- Загрузите приложение TP-Link Omada на свое мобильное устройство. Его можно скачать в App Store или Google Play:
- Подключите мобильное устройство к EAP, используя SSID по умолчанию (формат:
TP-Link_2.4GHz / 5GHz_XXXXXX), напечатанный на этикетке внизу продукта. - Откройте приложение Omada и дождитесь появления EAP на странице «Автономные точки доступа». Нажмите на EAP, который хотите настроить.
С помощью Web Браузер
- Подключайтесь по беспроводной сети, используя SSID по умолчанию (формат: TP-Link_2.4 ГГц / 5 ГГц_XXXXXX), указанный на этикетке в нижней части устройства.
- Запустить web браузера и введите http://tplinkeap.net в адресной строке. Используйте admin как для имени пользователя, так и для пароля для входа в систему.
- Установите новое имя пользователя и пароль для безопасного управления. Измените параметры беспроводной связи и повторно подключите беспроводные устройства к новой беспроводной сети.
Метод 2: Режим контроллера
Выберите один из следующих двух типов контроллера Omada:
Тип 1: Программный контроллер Omada
На ПК с ОС Windows или ОС Linux загрузите программный контроллер Omada из https://www.tp-link.com/support/download/omada-software-controller/. Затем запустите file и следуйте инструкциям мастера, чтобы установить и запустить программный контроллер Omada. Для управления вашими устройствами Omada Software Controller должен продолжать работать на вашем компьютере.
Тип 2: Аппаратный контроллер Omada (OC200/OC300)
Аппаратный контроллер Omada (OC200 / OC300) — хорошая альтернатива, если у вас нет запасного ПК для работы программного контроллера Omada в сети. Его нужно приобрести дополнительно.
Для получения дополнительной информации см. Руководство по установке OC200 / OC300.
Примечание:
- Перед тем, как начать, обязательно включите питание и подключите устройства в соответствии со схемой топологии.
- DHCP-сервер (обычно маршрутизатор с включенной функцией DHCP) необходим для назначения IP-адресов EAP и клиентам в вашей локальной сети.
- Контроллер Omada должен иметь сетевой доступ к вашим устройствам Omada (маршрутизатору, коммутатору и EAP), чтобы находить, внедрять и управлять ими.
Через приложение Omada
- Загрузите приложение TP-Link Omada на свое мобильное устройство. Его можно скачать в App Store или Google Play:

- Запустите приложение Omada и настройте контроллер на локальном или удаленном сайте.
- Местное управление
- a. Подключите мобильное устройство к EAP, используя SSID по умолчанию (формат:
TP-Link_2.4GHz / 5GHz_XXXXXX), напечатанный на этикетке внизу продукта. - b. Запустите приложение Omada и перейдите в раздел «Локальный доступ», нажмите кнопку «+» в правом верхнем углу, чтобы добавить контроллер. Затем можно дополнительно настроить контроллер.
- Удаленное управление
Примечание: Прежде чем начать, убедитесь, что и ваш контроллер, и мобильное устройство имеют доступ к Интернету. - Для программного контроллера Omada
- Убедитесь, что на вашем контроллере включен облачный доступ и ваш контроллер привязан к вашему TP-Link ID.
- Запустите приложение Omada и войдите в систему со своим TP-Link ID. Затем перейдите в Cloud Access. Появится список контроллеров, привязанных к вашему TP-Link ID. Затем вы можете продолжить настройку контроллера.
- Для аппаратного контроллера Omada
- a. Убедитесь, что на вашем контроллере включен облачный доступ. По умолчанию облачный доступ включен. Убедитесь, что индикатор «Облако» медленно мигает.
- b. Запустите приложение Omada и войдите в систему, используя свой идентификатор TP-Link. Затем перейдите в «Облачный доступ». Нажмите кнопку + в правом верхнем углу, чтобы добавить контроллер. Затем можно дополнительно настроить контроллер.

С помощью Web Браузер
- Откройте контроллер Omada web стр.
Для программного контроллера Omada
Запустите программный контроллер Omada на вашем ПК. После процесса запуска контроллер автоматически открывает свой web страница. Если нет, нажмите «Запустить браузер» для управления сетью.
Для аппаратного контроллера Omada
Поскольку аппаратный контроллер Omada получает свой IP-адрес от DHCP-сервера маршрутизатора, мы не знаем его IP-адрес явно. Однако мы можем найти его в списке клиентов DHCP маршрутизатора.
a. Сначала вам нужно найти IP-адрес маршрутизатора. Откройте командную строку на вашем ПК и введите
ipconfig. В списке результатов найдите шлюз по умолчанию, который также является IP-адресом маршрутизатора.
b. Запустить web браузер и введите IP-адрес роутера. Войдите в роутер web страницы, а имя пользователя и пароль по умолчанию — admin. Затем перейдите в Сеть> LAN> Список клиентов DHCP, чтобы найти IP-адрес вашего контроллера в соответствии с его MAC-адресом.
c. Введите IP-адрес вашего контроллера в адресной строке, чтобы открыть его web стр. - На контроллере Omada web страницу, следуйте указаниям мастера, чтобы завершить быструю настройку.
- После быстрой настройки появится страница входа в систему. Введите имя пользователя и пароль, которые вы создали, и нажмите «Войти». Затем вы можете продолжить настройку контроллера.
- (Для удаленного управления) Вы можете получить удаленный доступ к контроллеру и управлять им через облачную службу Omada.
Примечание: Перед тем как начать, убедитесь, что и ваш контроллер, и ваш компьютер имеют доступ к Интернету.
Для программного контроллера Omada- a. Убедитесь, что на вашем контроллере включен облачный доступ и ваш контроллер привязан к вашему TP-Link ID. На контроллере Omada web перейдите в Настройки> Доступ к облаку, чтобы включить доступ к облаку и привязать свой TP-Link ID. Если вы настроили его при быстрой настройке, пропустите этот шаг.
- b. Запустить web браузер и введите https://omada.tplinkcloud.com в адресной строке. Введите б. Запустить web браузер и введите https://omada.tplinkcloud.com в адресной строке. Войти
- Для аппаратного контроллера Omada
- a. Убедитесь, что на вашем контроллере включен облачный доступ. По умолчанию облачный доступ включен. Убедитесь, что индикатор «Облако» медленно мигает.
- b. Запустить web браузера и введите https://omada.tplinkcloud.com в адресную строку. Введите свой TP-Link ID и пароль для входа в систему. Нажмите + Добавить контроллер и выберите «Аппаратный контроллер», чтобы добавить свой контроллер. Затем вы можете продолжить настройку контроллера.
Подробные сведения о конфигурации см. В Руководстве пользователя контроллера и EAP. Руководства можно найти в центре загрузки нашего официального webсайт:
https://www.tplink.com/support/download/.
Чтобы задать вопросы, найти ответы и пообщаться с пользователями или инженерами TP-Link, посетите https://community.tp-link.com и присоединитесь к сообществу TP-Link.
- Для получения технической поддержки, руководства пользователя и другой информации,
- пожалуйста, посетите https://www.tp-link.com/supportили просто отсканируйте QR-код.
Информация по технике безопасности
- Держите устройство подальше от воды, огня, влажности или жарких сред.
- Не пытайтесь разбирать, ремонтировать или модифицировать устройство. Если вам нужна услуга, свяжитесь с нами.
- Не используйте устройство там, где использование беспроводных устройств запрещено.
- Не используйте поврежденное зарядное устройство или USB-кабель для зарядки устройства.
- Не используйте другие зарядные устройства, кроме рекомендованных. Адаптер должен быть установлен рядом с оборудованием и должен быть легко доступен.
Продукты TP-Link частично содержат программный код, разработанный третьими сторонами, включая программный код, подпадающий под Стандартную общественную лицензию GNU («GPL»). Если применимо, условия GPL и любая информация о получении доступа к соответствующему коду GPL, используемому в продуктах TP-Link, доступны вам в
GPL-Code-Center под (https://www.tp-link.com/en/support/gpl/). Соответствующие программы распространяются БЕЗ КАКИХ-ЛИБО ГАРАНТИЙ и защищены авторскими правами одного или нескольких авторов. Подробнее см. Код GPL и другие условия GPL.
Документы / Ресурсы
Рекомендации
-
Contents
-
Table of Contents
-
Bookmarks
Quick Links
User Guide
AC1350 Wireless Dual Band Router
Archer C60
REV3.0.0 1910012532
Related Manuals for TP-Link Archer C60
Summary of Contents for TP-Link Archer C60
-
Page 1
User Guide AC1350 Wireless Dual Band Router Archer C60 REV3.0.0 1910012532… -
Page 2: Table Of Contents
Chapter 5. TP-Link Cloud Service ……..23…
-
Page 3
Chapter 8. QoS……….. . . 35 Chapter 9. -
Page 4
13. 6. Set the Router to Reboot Regularly……… . 75 13. -
Page 5: About This Guide
The Quick Installation Guide can be found where you find this guide or inside the package of the router. Specifications can be found on the product page at https://www.tp-link.com. A TP-Link Community is provided for you to discuss our products at https://community.tp-link.com. Our Technical Support contact information can be found at the…
-
Page 6
Speed/Coverage Disclaimer *Maximum wireless signal rates are the physical rates derived from IEEE Standard 802.11 specifications. Actual wireless data throughput and wireless coverage are not guaranteed and will vary as a result of 1) environmental factors, including building materials, physical objects, and obstacles, 2) network conditions, including local interference, volume and density of traffic, product location, network complexity, and network overhead, and 3) client limitations, including rated performance, location, connection, quality, and client condition. -
Page 7: Chapter 1. Get To Know About Your Router
Chapter Get to Know About Your Router This chapter introduces what the router can do and shows its appearance. It contains the following sections: • “Product Overview” • “Panel Layout”…
-
Page 8: Product Overview
Ethernet ports supply high-speed connection to your wired devices. Moreover, it is simple and convenient to set up and use the TP-Link router due to its intuitive web interface and the powerful Tether app.
-
Page 9: The Back Panel
Chapter 1 LED Explanation Name Status Indication The system has started up successfully. Flashing The system is starting up or the firmware is being upgraded. Do Slowly not disconnect or power off your router. (Power) Flashing WPS connection is in progress. Quickly Power is off.
-
Page 10
Chapter 1 Item Description Power Port For connecting the router to a power socket via the provided power adapter. Power On/Off Button Press this button to power on or off the router. Press this button, and immediately press the WPS button on your device. The WPS LED of the router should change from flashing to solid on, indicating WPS/Wi-Fi On/Off successful WPS connection. -
Page 11: Chapter 2. Connect The Hardware
Chapter Connect the Hardware This chapter contains the following sections: • “Position Your Router” • “Connect Your Router”…
-
Page 12: Position Your Router
Chapter 2 2. 1. Position Your Router • The product should not be located in a place where it will be exposed to moisture or excessive heat. • Place the router in a location where it can be connected to multiple devices as well as to a power source.
-
Page 13
Chapter 2 Smart Device 4. Connect the power adapter to the router and turn on the router. 5. Verify that the following LEDs are on and solid to confirm the harware is connected correctly. Power Internet 2.4G Note: If the 2.4G LED and 5G LED are off, press and hold the WPS/Wi-Fi On/Off button on the back panel for about 5 seconds. -
Page 14
Chapter 2 close to • Method 3: Use the WPS button Wireless devices that support WPS, including Android phones, tablets, and most USB network adapters, can be connected to your router through this method. Note: • WPS is not supported by iOS devices. •… -
Page 15: Chapter 3. Log In To Your Router
Chapter Log In to Your Router…
-
Page 16
• If the login window does not appear, please refer to the “FAQ” Section. • If you have registered a TP-Link ID and bound your cloud router to it, the login password you created here will be ineffective. Please log in to the cloud router using your TP-Link ID. -
Page 17: Chapter 4. Set Up Internet Connection
Chapter Set Up Internet Connection This chapter introduces how to connect your router to the internet. The router is equipped with a web-based Quick Setup wizard. It has necessary ISP information built in, automates many of the steps and verifies that those steps have been successfully completed.
-
Page 18: Use Quick Setup Wizard
ISP. Follow the steps below to check or modify your internet connection settings. 1. Visit http://tplinkwifi.net, and log in with your TP-Link ID or the password you set for the router.
-
Page 19
Chapter 4 Note: If you are unsure of what your connection type is, click Auto Detect. Since different connection types require different cables and connection information, you can also refer to the demonstrations in Step 4 to determine your connection type. -
Page 20
Chapter 4 3 ) If you choose PPPoE, enter the username password provided by your ISP. PPPoE users usually have DSL cable modems. 4 ) If you choose L2TP, enter the username password and choose the Secondary Connection provided by your ISP. Different parameters are needed according to the Secondary Connection you have chosen. -
Page 21
Chapter 4 5 ) If you choose PPTP, enter the username and password, and choose the Secondary Connection provided by your ISP. Different parameters are needed according to the Secondary Connection you have chosen. 5. Click Save. 6. To check your internet connection, click Network Map on the left of the page. -
Page 22: Set Up An Ipv6 Internet Connection
Your ISP provides information about one of the following IPv6 internet connection types: PPPoE, Dynamic IP(SLAAC/DHCPv6), Static IP, 6to4 tunnel, Pass-Through (Bridge). 1. Visit http://tplinkwifi.net, and log in with your TP-Link ID or the password you set for the router.
-
Page 23
Chapter 4 Dynamic IP(SLAAC/DHCPv6): Click Advanced to input further information if your ISP requires. Click Save and then click Renew. PPPoE: By default, the router uses the IPv4 account to connect to the IPv6 server. Click Advanced to input further information if your ISP requires. Click Save and then click Connect. -
Page 24
Chapter 4 6to4 Tunnel: An IPv4 internet connection type is a prerequisite for this connection type (“Manually Set Up Your Internet Connection”). Click Advanced to input further information if your ISP requires. Click Save and then click Connect. Pass-Through (Bridge): Click Save and skip to Step 6. -
Page 25: Configure The Router In Access Point Mode
Chapter 4 5. Configure LAN ports. Windows users are recommended to choose from the first two types. Fill in Address Prefix provided by your ISP, and click Save. Tips: Find Help on the web management page to know more about items. 6.
-
Page 26
Router Clients 1. Connect the router’s Internet port to the existing router’s Ethernet port via an Ethernet cable. 2. Visit http://tplinkwifi.net, and log in with your TP-Link ID or the password you set for the router. 3. Go to Advanced >… -
Page 27: Chapter 5. Tp-Link Cloud Service
TP-Link Cloud service provides a better way to manage your cloud devices. Log in to your router with a TP-Link ID, and you can easily monitor and manage your home network when you are out and about via the Tether app. To ensure that your router stays new and gets better over time, the TP-Link Cloud will notify you when an important firmware upgrade is avaliable.
-
Page 28: Register A Tp-Link Id
“Manage the User TP-Link IDs”. • Once the router is bound to your TP-Link ID, you need to log in to the router with the TP-Link ID. • You can register another TP-Link ID via the Tether APP. Please refer to “Manage the Router via the TP-Link Tether App”…
-
Page 29: Manage The User Tp-Link Ids
The first-time login TP-Link ID will be bound automatically to your router as an Admin account. An admin account can add or remove other TP-Link IDs to the same router as Users. The admin account and User accounts both can monitor and manage the router locally or remotely, but user accounts cannot: •…
-
Page 30: Add Tp-Link Id To Manage The Router
“Manage the Router via the TP-Link Tether App” to install the app and register a new one. 4. The new TP-Link ID will be displayed in the Bound Accounts table as a User. 5. 3. 2. Remove TP-Link ID(s) from Managing the Router 1.
-
Page 31: Manage The Router Via The Tp-Link Tether App
QR code to download and install the app. 2. Connect your device to the router’s wireless network. 3. Launch the Tether app, select the model of your router and log in with your TP-Link ID or the password you set for the router.
-
Page 32: Chapter 6. Guest Network
Chapter Guest Network This function allows you to provide Wi-Fi access for guests without disclosing your main network. When you have guests in your house, apartment, or workplace, you can create a guest network for them. In addition, you can customize guest network options to ensure network security and privacy.
-
Page 33: Create A Network For Guests
Chapter 6 6. 1. Create a Network for Guests 1. Visit http://tplinkwifi.net, and log in with your TP-Link ID or the password you set for the router. 2. Go to Advanced > Guest Network. Locate the Wireless section. 3. Create a guest network as needed.
-
Page 34: Customize Guest Network Options
Chapter 6 6. 2. Customize Guest Network Options 1. Visit http://tplinkwifi.net, and log in with your TP-Link ID or the password you set for the router. 2. Go to Advanced > Guest Network. Locate the Settings section. 3. Customize guest network options according to your needs.
-
Page 35: Chapter 7. Parental Controls
Chapter Parental Controls This function allows you to block inappropriate, explicit and malicious websites, and control access to specified websites at specified time. It contains the following sections: • “Setting Up Access Restrictions” • “Monitoring Internet Usage”…
-
Page 36: Setting Up Access Restrictions
2 hours every day and block internet access during bed time (10 PM to 7 AM) on School Nights (From Sunday to Thursday). How can I do that? 1. Visit http://tplinkwifi.net, and log in with your TP-Link ID or the password you set for the router. 2. Go to Basic >…
-
Page 37
Chapter 7 1 ) Enter a keyword (for example, “Facebook”) or a URL (for example, “www. facebook.com”), then click Add.All websites containing the keywords will be blocked. 2 ) Click Next. 6. Set time restrictions on internet access. 1 ) Enable Time Limits on Monday to Friday and Saturday &… -
Page 38: Monitoring Internet Usage
Check which websites my child has visited and how much time they have spent online recently. How can I do that? 1. Visit http://tplinkwifi.net, and log in with your TP-Link ID or the password you set for the router. 2. Go to Basic >…
-
Page 39: Chapter 8. Qos
Chapter This chapter introduces how to create a QoS (Quality of Service) rule to specify prioritization of traffic and minimize the impact caused when the connection is under heavy load.
-
Page 40
2 hours. How can I do that? 1. Enable QoS and set bandwidth allocation. 1 ) Visit http://tplinkwifi.net, and log in with your TP-Link ID or the password you set for the router. 2 ) Go to Advanced >… -
Page 41: Chapter 9. Network Security
Chapter Network Security This chapter guides you on how to protect your home network from cyber attacks and unauthorized users by implementing these three network security functions. You can protect your home network against DoS (Denial of Service) attacks from flooding your network with server requests using DoS Protection, block or allow specific client devices to access your network using Access Control, or you can prevent ARP spoofing and ARP attacks using IP &…
-
Page 42: Protect The Network From Cyber Attacks
DoS Protection can protect your home network against DoS attacks from flooding your network with server requests. Follow the steps below to configure DoS Protection. 1. Visit http://tplinkwifi.net, and log in with your TP-Link ID or the password you set for the router.
-
Page 43: Access Control
Block or allow specific client devices to access my network (via wired or wireless). How can I do that? 1. Visit http://tplinkwifi.net, and log in with your TP-Link ID or the password you set for the router. 2. Go to Advanced >…
-
Page 44: Ip & Mac Binding
Chapter 9 To allow specific device(s): 1 ) Select Whitelist and click Save. 2 ) Click in the Devices in Whitelist section. Enter the Device Name Address (You can copy and paste the information from the Online Devices list if the device is connected to your network).
-
Page 45
Chapter 9 How can I do that? 1. Visit http://tplinkwifi.net, and log in with your TP-Link ID or the password you set for the router. 2. Go to Advanced > Security > IP & MAC Binding. 3. Enable Binding. 4. Bind your device(s) according to your need. -
Page 46: Chapter 10. Nat Forwarding
The TP-Link router supports four forwarding rules. If two or more rules are set, the priority of implementation from high to low is Virtual Servers, Port Triggering, UPNP and DMZ.
-
Page 47: Share Local Resources On The Internet By Virtual Servers
WAN: 218.18.232.154 How can I do that? 1. Assign a static IP address to your PC, for example 192.168.0.100. 2. Visit http://tplinkwifi.net, and log in with your TP-Link ID or the password you set for the router. 3. Go to Advanced >…
-
Page 48: Open Ports Dynamically By Port Triggering
VoIPs, video players and common applications including MSN Gaming Zone, Dialpad and Quick Time 4 players, etc. Follow the steps below to configure the Port Triggering rules: 1. Visit http://tplinkwifi.net, and log in with your TP-Link ID or the password you set for the router. 2. Go to Advanced >…
-
Page 49: Make Applications Free From Port Restriction By Dmz
Chapter 10 3. Click View Existing Applications, and select the desired application. The Triggering Port, External Port Protocol will be automatically filled in. The following picture takes application MSN Gaming Zone as an example. 4. Click OK. Tips: • You can add multiple port triggering rules according to your network need. •…
-
Page 50: Make Xbox Online Games Run Smoothly By Upnp
DMZ host with all ports open. How can I do that? 1. Assign a static IP address to your PC, for example 192.168.0.100. 2. Visit http://tplinkwifi.net, and log in with your TP-Link ID or the password you set for the router. 3. Go to Advanced >…
-
Page 51
Therefore, you can play Xbox online games without a hitch. Internet XBOX Router If necessary, you can follow the steps to change the status of UPnP. 1. Visit http://tplinkwifi.net, and log in with your TP-Link ID or the password you set for the router. 2. Go to Advanced >… -
Page 52: Chapter 11. Vpn Server
Chapter VPN Server The VPN (Virtual Private Networking) Server allows you to access your home network in a secured way through internet when you are out of home. The router offers two ways to setup VPN connection: OpenVPN and PPTP (Point to Point Tunneling Protocol) VPN. OpenVPN is somewhat complex but with greater security and more stable.
-
Page 53: Use Openvpn To Access Your Home Network
VPN client software on the remote device. Please follow the steps below to set up an OpenVPN connection. ¾ Step1. Set up OpenVPN Server on Your Router 1. Visit http://tplinkwifi.net, and log in with your TP-Link ID or the password you set for the router. 2. Go to Advanced >…
-
Page 54: Use Pptp Vpn To Access Your Home Network
Please follow the steps below to set up a PPTP VPN connection. ¾ Step 1. Set up PPTP VPN Server on Your Router 1. Visit http://tplinkwifi.net, and log in with your TP-Link ID or the password you set for the router. 2. Go to Advanced >…
-
Page 55
Chapter 11 Note: Before you enable Server, we recommend you configure Dynamic DNS Service (recommended) or assign a static IP address for router’s WAN port and synchronize your System Time with internet. 3. In the Client IP Address filed, enter the range of IP addresses (up to 10) that can be leased to the devices by the PPTP VPN server. -
Page 56
Chapter 11 3. Select Connect to a workplace and click Next. 4. Select Use my Internet connection (VPN). -
Page 57
Chapter 11 5. Enter the internet IP address of the router (for example: 218.18.1.73) in the Internet address field. Click Next. 6. Enter the User name Password you have set for the PPTP VPN server on your router, and click Connect. -
Page 58
Chapter 11 7. The PPTP VPN connection is created and ready to use. -
Page 59: Chapter 12. Customize Your Network Settings
Chapter Customize Your Network Settings This chapter guides you on how to configure advanced network features. It contains the following sections: • “Change the LAN Settings” • “Configure to Support IPTV Service” • “Specify DHCP Server Settings” • “Set Up a Dynamic DNS Service Account” •…
-
Page 60: Change The Lan Settings
If the IP address conflicts with another device on your local network or your network requires a specific IP subnet, you can change it. 1. Visit http://tplinkwifi.net, and log in with your TP-Link ID or the password you set for the router. 2. Go to Advanced >…
-
Page 61: Specify Dhcp Server Settings
Chapter 12 2 ) Click Save. 3 ) After configuring IGMP proxy, IPTV can work behind your router now. You can connect your set-top box to any of the router’s Ethernet port. If IGMP is not the technology your ISP applies to provide IPTV service: 1 ) Enable IPTV/VLAN.
-
Page 62
IP Address Pool. You can change the settings of the DHCP Server if necessary, and you can reserve LAN IP addresses for specified client devices. 1. Visit http://tplinkwifi.net, and log in with your TP-Link ID or the password you set for the router. -
Page 63: Set Up A Dynamic Dns Service Account
Note: DDNS does not work if the ISP assigns a private WAN IP address (such as 192.168.1.x) to the router. 1. Visit http://tplinkwifi.net, and log in with your TP-Link ID or the password you set for the router. 2. Go to Advanced >…
-
Page 64
Chapter 12 Note: To enjoy TP-Link’s DDNS service, you have to log in with a TP-Link ID. If you have not logged in with one, click 4. Click Register in the Domain Name List if you have chosen TP-Link, and enter the Domain Name as needed. -
Page 65: Create Static Routes
Chapter 12 5. Click Login and Save. Tips: If you want to use a new DDNS account, please click Logout first, and then log in with a new account. 12. 5. Create Static Routes Static routing is a form of routing that is configured manually by a network administrator or a user by adding entries into a routing table.
-
Page 66
1. Change the routers’ LAN IP addresses to two different IP addresses on the same subnet. Disable Router B’s DHCP function. 2. Visit http://tplinkwifi.net, and log in with your TP-Link ID or the password you set for Router A. 3. Go to Network >… -
Page 67: Specify Wireless Settings
The preset SSID and password can be found on the label of the router. You can customize the wireless settings according to your needs. Visit http://tplinkwifi.net, and log in with your TP-Link ID or the password you set for the router.
-
Page 68: Use Wps For Wireless Connection
Chapter 12 1. Go to Basic > Wireless. 2. Click Sharing Network, then the wireless SSID and password with QR code will be displayed on the page. You can save the picture and share to someone. ¾ To enbale TxBF, MU-MIMO TxBF,MU-MIMO (Transmit Beamforming, Multi-User Multi-Input Multi-Output) enables the router to boost network capacity and strengthen Wi-Fi signals.
-
Page 69: Method 2: Set The Router’s Pin
This feature allows you to turn off the wireless netowrks at a specific time automatically when you do not need the wireless connection. 1. Visit http://tplinkwifi.net, and log in with your TP-Link ID or the password you set for the router.
-
Page 70
Chapter 12 4. Click and drag the mouse over the schedule table to select the period during which you need your wireless off automatically. 5. Click Save. Note: • The Effective Time Schedule is based on the time of the Router. You can go to Advanced >… -
Page 71: Chapter 13. Manage The Router
Chapter Manage the Router This chapter will show you the configuration for managing and maintaining your router. It contains the following sections: • “Set Up System Time” • “Control LEDs” • “Test the Network Connectivity” • “Upgrade the Firmware” • “Backup and Restore Configuration Settings”…
-
Page 72: Set Up System Time
Parental Controls. You can choose the way to obtain the system time as needed. 1. Visit http://tplinkwifi.net, and log in with your TP-Link ID or the password you set for the router.
-
Page 73: Control Leds
The router‘s LEDs indicate router’s activities and status. You can turn on or turn off the LEDs either from the web management page or by pressing the LED button. 1. Visit http://tplinkwifi.net, and log in with your TP-Link ID or the password you set for the router.
-
Page 74: Test The Network Connectivity
13. 3. Test the Network Connectivity Diagnostics is used to test the connectivity between the router and the host or other network devices. 1. Visit http://tplinkwifi.net, and log in with your TP-Link ID or the password you set for the router. 2. Go to Advanced >…
-
Page 75: Upgrade The Firmware
Backup your router configuration before firmware upgrade. • Do NOT turn off the router during the firmware upgrade. 13. 4. 1. Online Upgrade 1. Visit http://tplinkwifi.net, and log in with your TP-Link ID or the password you set for the router.
-
Page 76: Manual Upgrade
Firmware Upgrade page. 13. 4. 2. Manual Upgrade 1. Download the latest firmware file for the router from www.tp-link.com. 2. Visit http://tplinkwifi.net, and log in with your TP-Link ID or the password you set for the router. 3. Go to Advanced >…
-
Page 77: Restore Interrupted Upgrade After Power Failure
Moreover, if necessary you can erase the current settings and reset the router to the default factory settings. 1. Visit http://tplinkwifi.net, and log in with your TP-Link ID or the password you set for the router.
-
Page 78
• During the resetting process, do not turn off the router. • After reset, you can still use the current login password or the TP-Link ID to log in to the web management page. ¾ To reset the router to factory default settings: 1. -
Page 79: Set The Router To Reboot Regularly
The account management feature allows you to change your login password of the web management page. Note: If you are using a TP-Link ID to log in to the web management page, the account management feature will be disabled. To manage the TP-Link ID, go to Basic >…
-
Page 80: Password Recovery
This feature allows you to recover the login password you set for you router in case you forget it. Note: If you are using a TP-Link ID to log in to the web management page, the Password Recovery feature will be disabled. To manage the TP-Link ID, go to Basic >…
-
Page 81: Local Management
This feature allows you to limit the number of client devices on your LAN from accessing the router by using the MAC address-based authentication. 1. Visit http://tplinkwifi.net, and log in with your TP-Link ID or the password you set for the router.
-
Page 82: Remote Management
6. Click OK. 13. 10. Remote Management This feature allows you to control remote devices’ authority to manage the router. 1. Visit http://tplinkwifi.net, and log in with your TP-Link ID or the password you set for the router. 2. Go to Advanced >…
-
Page 83: System Log
When the router does not work normally, you can save the system log and send it to the technical support for troubleshooting. ¾ To save the system log locally: 1. Visit http://tplinkwifi.net, and log in your TP-Link ID or the password you set for the router. 2. Go to Advanced >…
-
Page 84
It would be great if the system logs could be sent to my mailbox at 8 a.m. every day. 1. Visit http://tplinkwifi.net, and log in with your TP-Link ID or the password you set for the router. -
Page 85: Monitor The Internet Traffic Statistics
The Traffic Statistics page displays the network traffic of the LAN, WAN and WLAN sent and received packets, allowing you to monitor the volume of internet traffic statistics. 1. Visit http://tplinkwifi.net, and log in with your TP-Link ID or the password you set for the router.
-
Page 86: System Parameters
You can configure the parameters of traffic transmission rules in wireless networks. It’s recommended to keep the default settings if you are not sure of the proper ones in the case. 1. Visit http://tplinkwifi.net, and log in with your TP-Link ID or the password you set for the router. 2. Go to Advanced >…
-
Page 87: 4Ghz/5Ghz Wds
Chapter 13 • Bacon Interval — Enter a value between 40 and 1000 to determine the duration between beacon packets that are broadcasted by the router to synchronize the wireless network. The default is 100 milliseconds. • RTS Threshold – Enter a value between 1 and 2346 to determine the packet size of data transmission through the router.
-
Page 88
WDS bridging function can be enabled either in 2.4GHz frequency or 5GHz frequency for a dual-band router. We use the WDS bridging function in 2.4GHz frequency as example. 1. Visit http://tplinkwifi.net, and log in with your TP-Link ID or the password you set for the router. -
Page 89: Duplex Setting
WDS status. When the WDS status is Run, it means WDS bridging is successfully built. 13. 13. 3. Duplex Setting 1. Visit http://tplinkwifi.net, and log in with your TP-Link ID or the password you set for the router. 2. Go to Advanced >…
-
Page 90: Faq
Q2. What should I do if I forget my web management password? • If you are using a TP-Link ID to log in, or you have enabled the Password Recovery feature of the router, click…
-
Page 91
4 ) Click LAN settings and deselect the following three options and click OK. 5 ) Go to Advanced > Restore advanced settings, click to save the settings. -
Page 92
Note: You’ll need to reconfigure the router to surf the internet once the router is reset. Q4. What should I do if I cannot access the internet even though the configuration is finished? 1. Visit http://tplinkwifi.net, and log in with your TP-Link ID or the password you set for the router. 2. Go to Advanced >… -
Page 93
• Your computer might not recognize any DNS server addresses. Please manually configure the DNS server. 1 ) Go to Advanced > Network > DHCP Server. 2 ) Enter 8.8.8.8 as Primary DNS, click Save. Tips: 8.8.8.8 is a safe and public DNS server operated by Google. •… -
Page 94
• Make sure the physical connection between the router and the modem is proper. • Clone the MAC address of your computer. 1 ) Visit http://tplinkwifi.net, and log in with your TP-Link ID or the password you set for the router. -
Page 95
• Modify the LAN IP address of the router. Note: Most TP-Link routers use 192.168.0.1/192.168.1.1 as their default LAN IP address, which may conflict with the IP range of your existing ADSL modem/router. If so, the router is not able to communicate with your modem and you can’t access the internet. -
Page 96
1 ) If you see the message Windows cannot configure this wireless connection, this is usually because windows configuration utility is disabled or you are running another wireless configuration tool to connect the wireless. 2 ) Exit the wireless configuration tool (the TP-Link Utility, for example). -
Page 97
3 ) Select and right click on My Computer on desktop, select Manage to open Computer Management window. 4 ) Expand Services and Applications > Services, find and locate Wireless Zero Configuration in the Services list on the right side. 5 ) Right click Wireless Zero Configuration, and then select Properties. -
Page 98
2 ) If you cannot find the PIN or PIN failed, you may choose Connecting using a security key instead, and then type in the Wireless Password/Network Security Key. 3 ) If it continues to show note of Network Security Key Mismatch, it is suggested to confirm the wireless password of your wireless router. -
Page 99
COPYRIGHT & TRADEMARKS Specifications are subject to change without notice. TP-Link is a registered trademark of TP-Link Technologies Co., Ltd. Other brands and product names are trademarks or registered trademarks of their respective holders. No part of the specifications may be reproduced in any form or by any means or used to make any derivative such as translation, transformation, or adaptation without permission from TP-Link Technologies Co., Ltd. -
Page 100
Component Name Model I.T.E POWER SUPPLY AMS159A-1201000FU Responsible party: TP-Link USA Corporation, d/b/a TP-Link North America, Inc. Address: 145 South State College Blvd. Suite 400, Brea, CA 92821 Website: http://www.tp-link.com/us/ Tel: +1 626 333 0234 Fax: +1 909 527 6803 E-mail: sales.usa@tp-link.com… -
Page 101
20 cm from all persons and must not be co- located or operating in conjunction with any other antenna or transmitter.” We, TP-Link USA Corporation, has determined that the equipment shown as above has been shown to comply with the applicable technical standards, FCC part 15. There is no unauthorized change is made in the equipment and the equipment is properly maintained and operated. -
Page 102
Any changes or modifications not expressly approved by the party responsible for compliance could void the user’s authority to operate the equipment. We, TP-Link USA Corporation, has determined that the equipment shown as above has been shown to comply with the applicable technical standards, FCC part 15. There is no unauthorized change is made in the equipment and the equipment is properly maintained and operated. -
Page 103
2412MHz—2472MHz (20dBm) 5180MHz—5240MHz (23dBm) EU declaration of conformity TP-Link hereby declares that the device is in compliance with the essential requirements and other relevant provisions of directives 2014/53/EU, 2009/125/EC and 2011/65/EU. The original EU declaration of conformity may be found at https://www.tp-link.com/en/ce… -
Page 104
aux appareils radio exempts de licence. L’exploitation est autorisée aux deux conditions suivantes : 1) L’appareil ne doit pas produire de brouillage; 2) L’appareil doit accepter tout brouillage radioélectrique subi, même si le brouillage est susceptible d’en compromettre le fonctionnement. Caution: 1) The device for operation in the band 5150–5250 MHz is only for indoor use to reduce the potential for harmful interference to co-channel mobile satellite systems;… -
Page 105
之無線電信。低功率射頻電機需忍受合法通信或工業、科學以及醫療用電波輻射性電機 設備之干擾。 4.7.9.1 應避免影響附近雷達系統之操作。 4.7.9.2 高增益指向性天線只得應用於固定式點對點系統。 安全諮詢及注意事項 • 請使用原裝電源供應器或只能按照本產品注明的電源類型使用本產品。 • 清潔本產品之前請先拔掉電源線。請勿使用液體、噴霧清潔劑或濕布進行清潔。 • 注意防潮,請勿將水或其他液體潑灑到本產品上。 • 插槽與開口供通風使用,以確保本產品的操作可靠並防止過熱,請勿堵塞或覆蓋開 口。 • 請勿將本產品置放於靠近熱源的地方。除非有正常的通風,否則不可放在密閉位置 中。 • 請不要私自打開機殼,不要嘗試自行維修本產品,請由授權的專業人士進行此項工 作。 限用物質含有情況標示聲明書 限用物質及其化學符號 鉛 鎘 汞 六價鉻 多溴聯苯 多溴二苯醚 產品元件名稱 CrVI PBDE ○ ○ ○ ○ ○ ○ 外殼 ○… -
Page 106
• Adapter shall be installed near the equipment and shall be easily accessible. • Use only power supplies which are provided by manufacturer and in the original packing of this product. If you have any questions, please don’t hesitate to contact us. Explanations of the symbols on the product label Symbol Explanation…
На чтение 11 мин Просмотров 3.4к.

Максим aka WisH
Высшее образование по специальности «Информационные системы». Опыт работы системным администратором — 5 лет.
Задать вопрос
Сейчас провайдеры предоставляют высокоскоростной интернет, который способны поддерживать смартфоны, но не выдерживают старые маршрутизаторы. Поэтому требуется покупка новых, с лучшими функциями. Сегодня расскажем про такой роутер и про его настройку — TP-Link Archer C60.
Содержание
- Технические характеристики
- Подключение
- Вход в настройки роутера
- Автоматическая настройка
- Ручная настройка
- Wi-Fi
- Настройка IP TV
- Смена пароля
- Режим повторителя
- Обновление прошивки
- Сброс настроек
- Отзывы
Технические характеристики
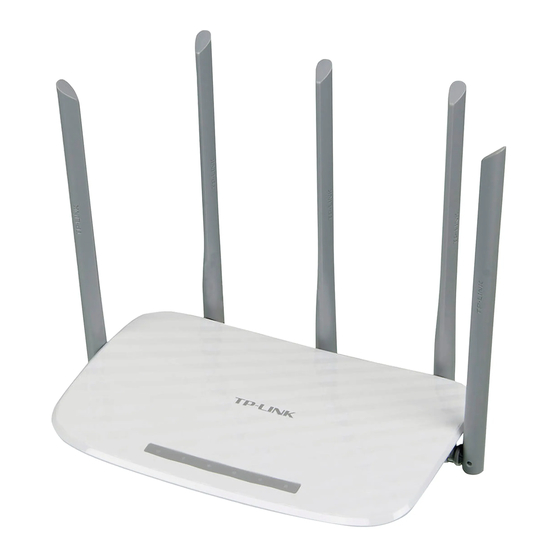
Archer C60 AC1350 — двухдиапазонный Wi-Fi роутер с рядом полезных опций:
- Wi-Fi стандарта AC повышает производительность беспроводных устройств;
- три 2,4 ГГц антенны и две 5 ГГц антенны;
- MU-MIMO позволяет взаимодействовать сразу с двумя устройствами, что увеличивает эффективность в два раза;
- технология Beamforming обеспечивает высокопроизводительное подключение к Wi-Fi (начиная с аппаратной версии 2.0);
- расширенные возможности ПО, включая родительский контроль и гостевую сеть;
- мобильное приложение Tether для управления роутером со смартфона.
Вообще его технические характеристики выглядят следующим образом:
- интерфейс: 4 порта LAN 10/100 Мбит/с и 1 порт WAN 10/100 Мбит/с;
- два процессора: Qualcomm QCA9561 и Qualcomm QCA9882;
- стандарты беспроводных сетей: IEEE 802.11ac/n/a 5 ГГц и IEEE 802.11b/g/n 2,4 ГГц;
- скорость беспроводной передачи данных 450 Мбит/с (2,4 ГГц) и 867 Мбит/с (5 ГГц);
- оперативная память: 64 МБ;
- встроенная память: 8 МБ.
Дальнейший обзор характеристик TP-Link Archer C60 не имеет смысла. Роутер современный, так что поддерживает все протоколы передачи информации, также обладает стандартным набором возможностей и программного обеспечения. Это не просто маршрутизатор, а целый интернет-центром. ТП-Линк Арчер С60 способен принять на себя функции небольшого сервера, который будет стоять между домашней сетью и интернетом. Выпускается только белого цвета с 5 антеннами, поэтому впишется не в любой интерьер.
Подключение
Первым делом нужно подключить Archer C60 к сети. Выберите место, где он не будет мешать. Там необходима розетка, а также нормальная температура, не должно быть слишком влажно. Роутер работает в широком диапазоне температур, но критические значения снизят срок работы.

Подключаем кабель от провайдера в разъем WAN с надписью «Ethernet». Он выделен синим и стоит отдельно от остальных, так что перепутать его с другими невозможно. После этого переходите к подключению шнура от блока питания в разъем Power, здесь проблем не будет, потому что других похожих на девайсе нет. Дальше переходим к настройке.
Вход в настройки роутера
Настроить Wi-Fi роутер TP-Link Archer C60 можно через вайфай или через провод. Для настройки через беспроводную сеть придется узнать ее название и пароль. Написаны они на наклейке на нижней части роутера, так же, как и данные для подключения по проводу.
Дальше действия будут немного отличаться :
- Wi-FI. Найдите со своего мобильного телефона или ноутбука указанное имя вайфай сети и подключитесь к ней, введя пароль.
- Проводное подключение. Воткните шнур, идущий в комплекте с роутером, в одно из желтых гнезд LAN на его задней части и соедините его с компьютером.
А вот дальнейшие действия одинаковы для обоих вариантов. Открывайте браузер на любом устройстве, подключенном к роутеру ТП Линк Арчер С60. Вводите там в адресной строке данные для входа: tplinkwifi.net или 192.168.0.1, дальше в появившемся окне введите логин и пароль (в стандартном сочетании admin и admin, проверьте на наклейке).

С вайфаем все сработает без проблем. Заминки возникают при подключении по кабелю. Чтобы это исправить перейдите в «Центр управления сетями и общим доступом».
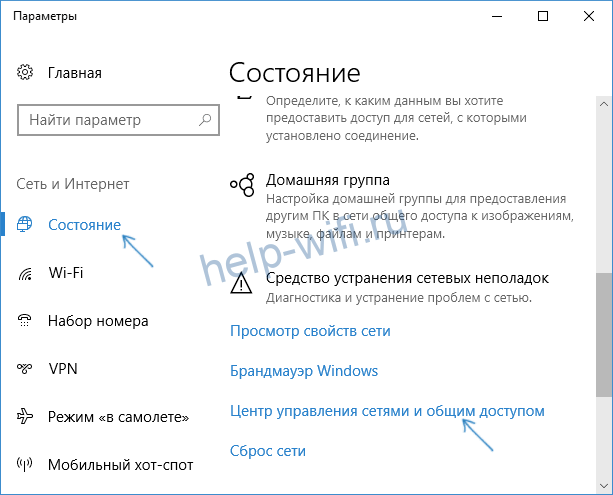
Чтобы туда попасть, достаточно в любой операционной системе открыть «Панель управления» и выбрать раздел «Сеть и Интернет». Теперь перейдите в изменение параметров адаптера, эта настройка расположена в левой части открывшегося окна. Там найдите свое подключение, обычно оно активно и выделено цветом, неактивные все серые. Кликните по нему правой кнопкой мыши, нажмите на свойства, перейдите в раздел “Ipv4” и поставьте автоматическое получение адреса. Это нужно, чтобы роутер смог выдать правильный адрес компу.

Автоматическая настройка
После первого входа посмотрите на верхнюю часть страницы. Там должен быть доступен раздел «Быстрая настройка» или «Quick Setup». Он позволит провести настройки в одном окне и довольно быстро. Сам он ничего делать не будет, только задавать вопросы. Нужно знать на них ответы, а для этого прочитайте инструкцию по установке от своего провайдера или свяжитесь с техподдержкой. Без знания логина и пароля, а также протокола подключения ничего не получится. Возможно, у вас стоит активация по МАС-адресу, такой вопрос тоже будет. Быстро ответьте на них и роутер настроится сам. Всю информацию стоит записать, она понадобится при сбоях или точечной ручной настройке.
- В первом пункте вводится часовой пояс. Во втором запрашивают способ подключения к провайдеру, нажмите на кнопку автоопределения. В зависимости от выбранного типа, возможно, придется заполнить дополнительные поля.

- В следующем окне как раз и будет вопрос про МАС – адрес. Если авторизация выполняется по нему, то клонируйте адрес компьютера, если нет, то не трогайте.

- В следующем разделе выполняется настройка беспроводной сети. Придумайте имя и пароль и введите данные здесь. Предпоследнее окно показывает все выбранные настройки, чтобы можно было вернуться и исправить, если что-то неправильно. Иногда здесь же предлагают пройти регистрацию в облачных сервисах разработчика, это не обязательно.
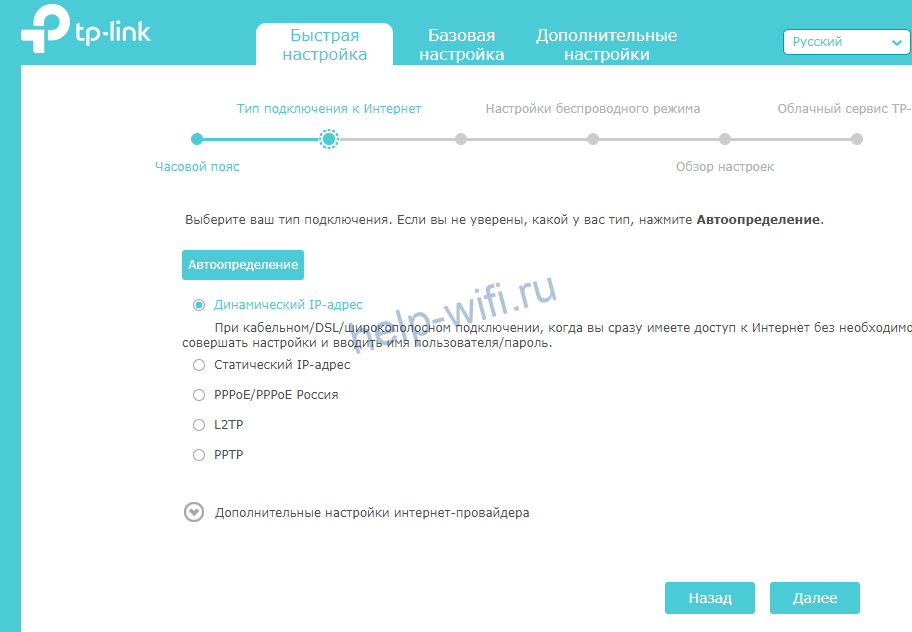

Ручная настройка
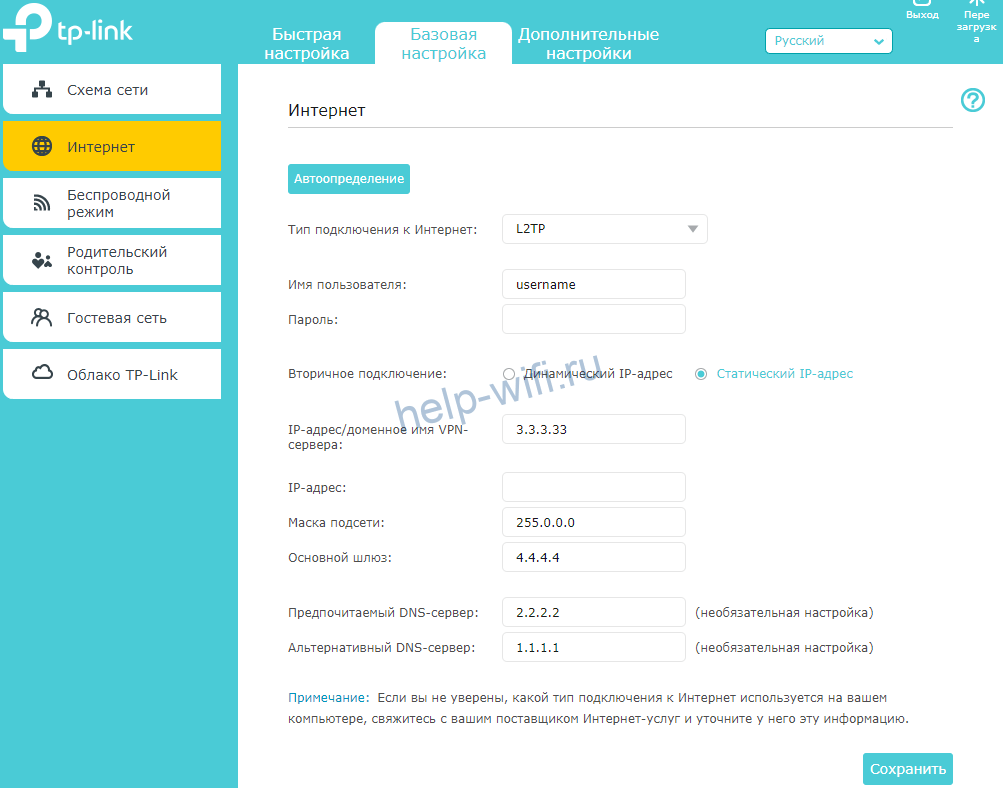
Если после быстрой настройки инет не заработал, то придется проверять и забивать все параметры вручную. Быстрая настройка предполагает только основные вопросы, которые справляются с настройкой под большинство провайдеров. У некоторых слишком хитрые настройки или есть какая-то важная мелочь, которая не учитывается в автоматическом варианте. Тогда придется поэтапно пройти по настройкам и проверить каждый раздел.
Зайдите в веб-интерфейс роутера. Перейдите на страницу «Базовая настройка», оттуда в раздел «Интернет». На английском выглядит как «Basic» – «Internet».

На этом этапе и потребуется все данные по параметрам от провайдера. В верхней части выберите способ подключения. Там есть выпадающий список, в котором перечислены все доступные для устройства варианты. Список параметров для ввода будет меняться в зависимости от того, какой протокол выбран. Выберите свой и правильно впишите параметры. После этого все начнет работать сразу же.
В случае динамического адреса, роутер должен заработать сразу, потому что никаких данных вводить не нужно. Если у вас выбран статический адрес, то следует ввести свой адрес, адрес шлюза, маску подсети и DNS-сервер. Все это прописано в договоре. В случае «PPPoE/PPPoE Россия» основной настройкой является логин и пароль.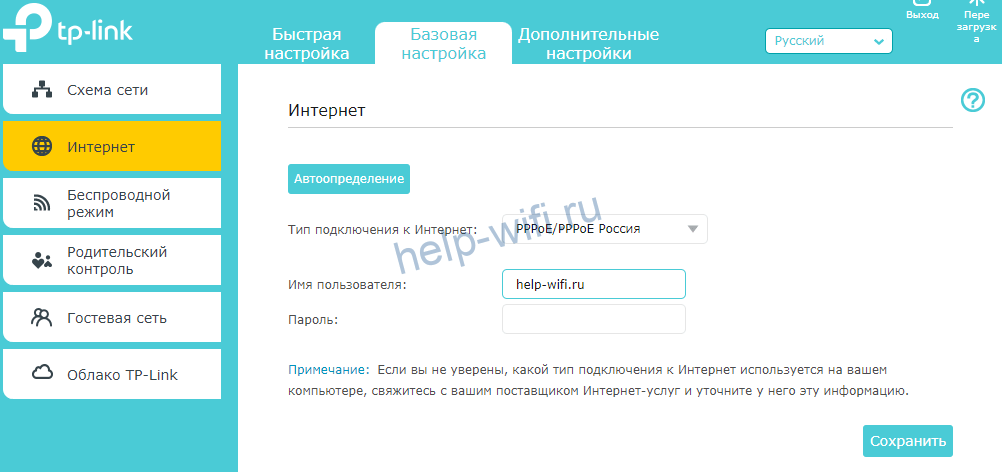
Если провайдер требует что-то еще, то все пункты находятся под галочкой «Дополнительные настройки».
Наибольшее количество настроек требуется при протоколах L2TP и PPTP. На самом деле сложного здесь ничего нет, нужно ввести данные, предоставленные провайдером в договоре. Необязательные пункты не меняйте. Те, что не указаны в инструкции от провайдера, оставляйте в первоначальном виде.
Wi-Fi
У вас уже есть работающая сеть. Её параметры написаны на нижней части роутера, так что потерять или забыть их не получится. Только пароль может оказаться слишком слабым или слишком сложным для запоминания. В этом случае нужно перенастроить беспроводную сеть. В английском варианте это «Basic» – «Wireless», а в русском «Базовая настройка» — «Беспроводной режим». Здесь все упрощено и сокращено до минимума. Если хочется покопаться во всех параметрах, то переходите в режим дополнительных настроек.

Здесь и менять-то особо ничего не надо. Маршрутизатор по стандарту выбирает лучшие параметры. Установите имя и пароль, остальное можете оставить в стандартных параметрах. Если есть какие-то свои пожелания, например, по каналам и его ширине, либо по рабочим протоколам, то изменяется здесь все просто.
Настройка IP TV
Обычно приставки начинают работать даже если их воткнуть в разъем. Но в некоторых случаях роутеру нужно указать на то, что именно сюда подключена приставка. Это связано с настройками самого провайдера. Нет ничего сложно в организации такого подключения. Перейдите в дополнительные настройки (advanced), оттуда в сеть (network), а дальше к IPTV.
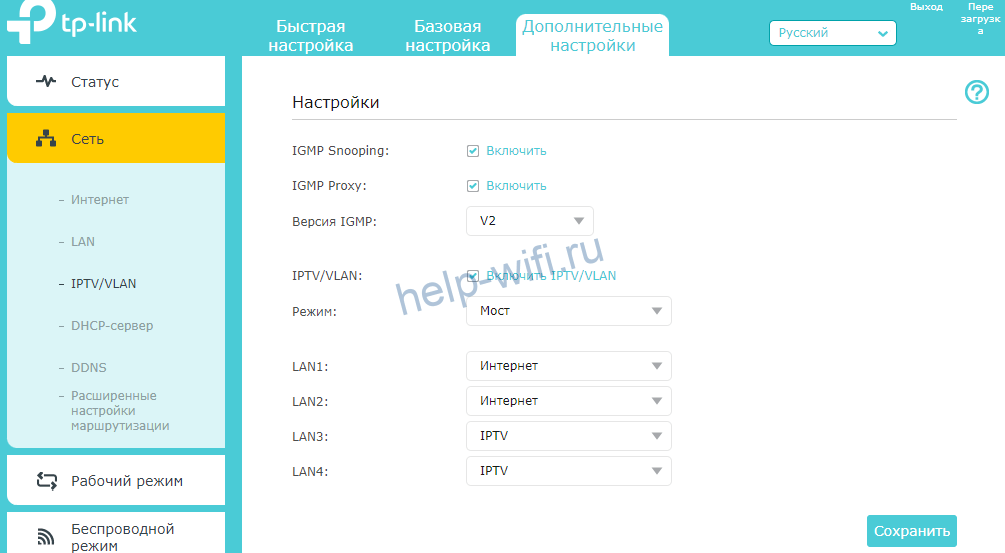
В открывшемся окне включите нужный режим, нажав на галочку. Выберите режим моста (bridge), и укажите тот порт, к которому подключена приставка. Они все подписаны на задней панели роутера, так что с номером не ошибетесь. На этом все, сохраняйте настройки и выходите.
Смена пароля
Если настраиваем роутер не в первый раз, то пароль уже может быть изменен. Данные для входа стандартными оставлять не стоит, особенно на вайфае или роутере. Иначе любой любопытный, который заучил стандартные комбинации логина и пароля, попадет к вам в домашнюю сеть и сделает в ней что угодно.
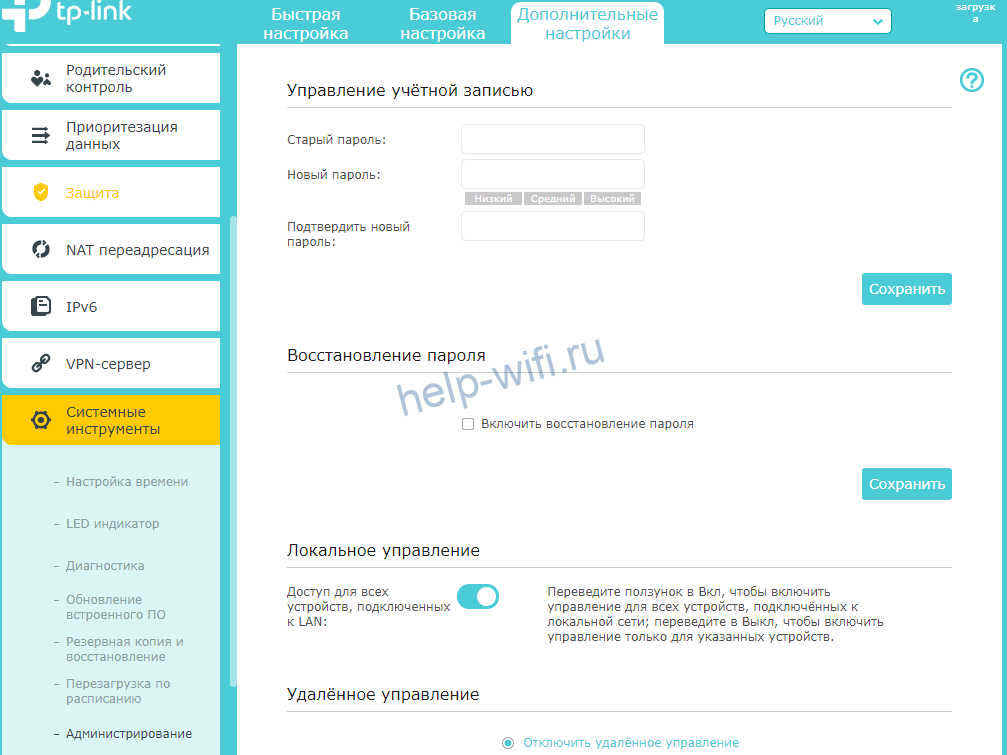
Перейдите в дополнительные настройки, оттуда к системным инструментам, а дальше к администрированию. Здесь введите старый пароль, а потом два раза новый. Подтвердите изменения и завершайте работу.
Режим повторителя
Роутер работает в качестве репитера, который также называется усилителем или повторителем. Режим позволяет расширить поле покрытия беспроводной сети. Он подхватывает сигнал от предыдущего маршрутизатора, к которому подключен кабель от провайдера, и передает его дальше. Таким образом расширяется сигнал от одного входа на большое расстояние.
Режима повторителя у этой модели, к сожалению, нет. В качестве альтернативы доступен режим моста.
Для начала зайдите в дополнительные настройки. Оттуда перейдите к системным инструментам, а дальше к параметрам системы. Теперь мотайте до того диапазона, на котором работает первый роутер. Дойдите до нежного раздела с частотой и поставьте там галку на включение WDS.
Появится новые данные в той же частоте. Кликните по кнопке поиска, чтобы перейти к списку доступных сетей. Здесь выберите нужную, нажмите на кнопку выбора и введите пароль от неё.
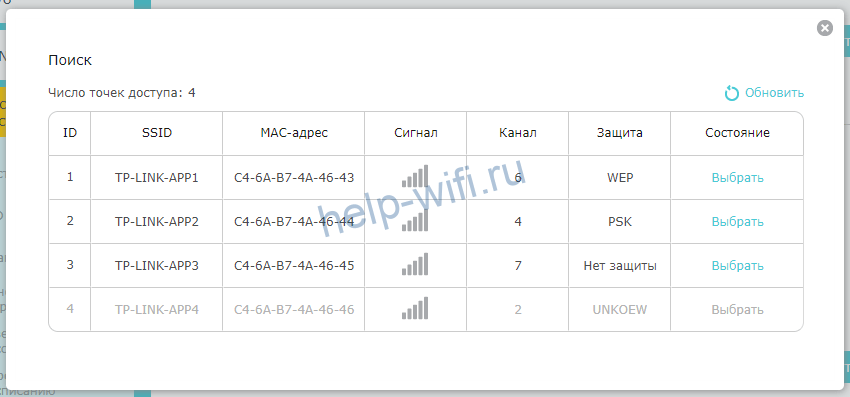
В том же меню выберите тип защиты для новой общей сети и поставьте пароль. Лучше оставить все так же, как на первой сетке. Тогда не потребуется ничего вводить при переключении между ними.

Теперь перейдите к разделу Сеть и там выберите DHCP. Здесь снимите галочку с активации сервера, ведь раздавать адреса будет первый маршрутизатор. Обычно на этом настройка заканчивается, но есть еще один пункт, который стоит проверить. Зайдите в раздел Сеть и перейдите в LAN. Здесь стоит адрес роутера. Он не должен совпадать с адресом первого маршрутизатора и должен быть в той же сети. Например, адрес второго 192.168.0.2, если адрес главного 192.168.0.1. Или там стоит автоматическое получение и тогда все нормально. После смены адреса придется перезайти в личный кабинет, ведь его адрес сменится.
Обновление прошивки
Чем новее прошивка устройства, тем лучше оно работает и меньше бывает сбоев. Если сбой произойдет во время процедуры, то выскочит куча ошибок и перешивать придется вручную. Так что лучше сделать резервную копию, чтобы откатиться на неё, если что-то пойдет не так. Перейдите в раздел дополнительных настроек, оттуда в системные инструменты, а дальше в резервное копирование и восстановление.
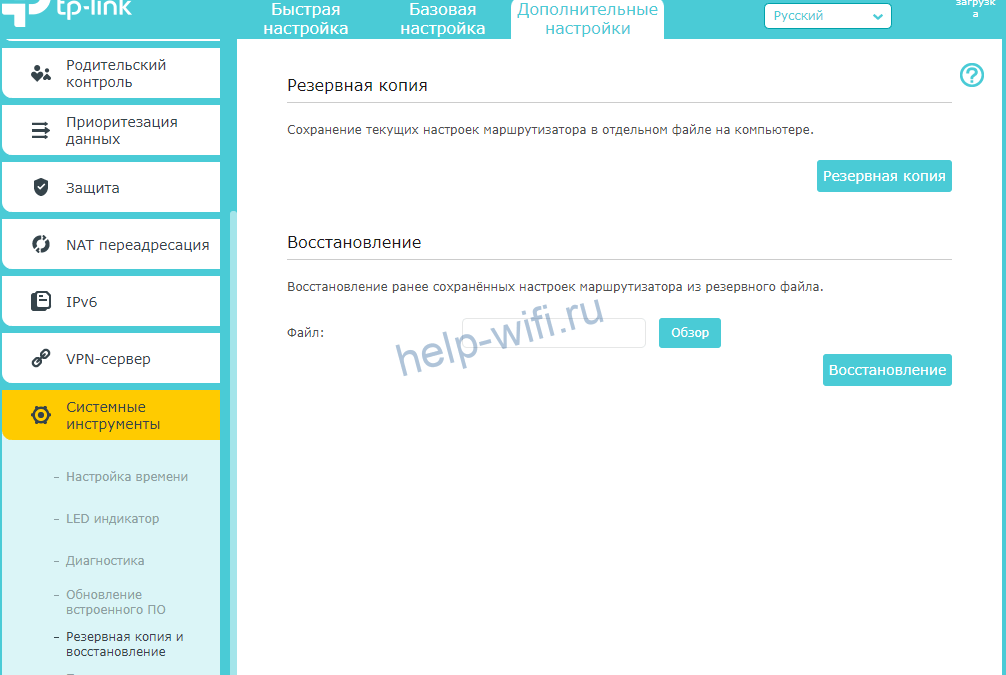
Здесь создайте резервную копию, восстановление происходит в этом же разделе. Обновление ПО находится на один пункт выше. Здесь нажмите на поиск и обновление. Скачивание и установка произойдут автоматически. Есть возможность ручной установки, но это дольше и требуется больше действий. Лучше выберите момент, когда не планируется отключение электричества и сеть не слишком загружена.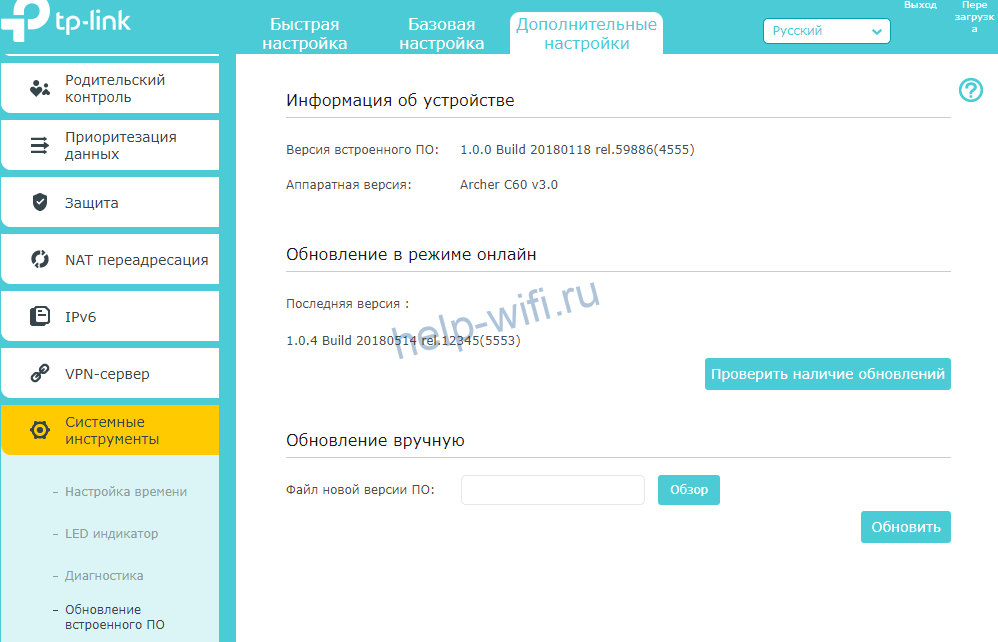
Сброс настроек
Если что-то пошло не так: забыли пароль, запутались в настройках и теперь ничего не работает, после обновления роутер превратился в кирпич — то выход остается один. Сброс до заводских настроек. Все установки и все данные уничтожатся, обновлений не будет, останется голая первая версия. Зато все заработает.
Сброс проводится просто. Возьмите роутер и найдите на задней панели (куда идут провода), кнопку reset. Обычно она маленькая и находится в отверстии. Нажмите на неё чем-то тонким, но не острым и подержите 15 секунд. Роутер перезагрузится и будет совершенно пуст.
Отзывы
Если рассматривать отзывы на TP-Link Archer C60, то получается, что сигнал идет хорошо, хватает на квартиру и дом. Люди хвалят простую настройку и мощный сигнал. Некоторые ругают слабый процессор и плохую техподдержку. Насчет первого пункта есть сомнения, для такого устройства вполне нормальная мощность, если не пытаться развернуть на нем полноценный сервер. Что касается техподдержки, то дозвониться бывает сложновато, зато у TP-Link появились официальный русскоязычный Telegram-чат и поддержка по WhatsApp.
Highlights
Household Wi-Fi at Streaming Speeds
Press play and forget about buffering with the Archer C60. Five external
antennas provide maximum omni-directional wireless coverage and reliability
for all of your HD streaming, gaming, and networking needs. The strong 2.4GHz
(450Mbps) Wi-Fi band is perfect for sending emails, browsing the web, and
listening to music. The router’s 5GHz band reaches 867Mbps so you can game
online and stream in HD simultaneously.
2.4GHz 450Mbps
5GHz 867Mbps
Fast Ethernet
Enjoy fast, reliable wired connections for gaming and streaming in the best
quality.
Power
Power
WPS/
Reset
On/Off
Wi-Fi
On/Off
TP-Link AC1350 Wireless Dual Band Router
Internet
Ethernet Ports
Access
C60