Table of Contents
Aircrack-ng Newbie Guide for Linux
Idea and initial work: ASPj
Additions by: a number of good souls
Last updated: Nov 21, 2018
This tutorial will give you the basics to get started using the aircrack-ng suite. It is impossible to provide every piece of information you need and cover every scenario. So be prepared to do some homework and research on your own. The Forum and the Wiki have lots of supplementary tutorials and information.
Although it does not cover all the steps from start to finish like this tutorial, the Simple WEP Crack tutorial covers the actual aircrack-ng steps in much more detail.
Setting up Hardware, Installing Aircrack-ng
The first step in getting aircrack-ng working properly on your Linux system is patching and installing the proper driver for your wireless card. Many cards work with multiple drivers, some of which provide the necessary features for using aircrack-ng, and some of which do not.
Needless to say, you need a wireless card which is compatible with the aircrack-ng suite. This is hardware which is fully compatible and can inject packets. A compatible wireless card can be used to crack a wireless access point in under an hour.
To determine to which category your card belongs to, see hardware compatibility page. Read Tutorial: Is My Wireless Card Compatible? if you don’t know where to look in this table. It still does not hurt to read this tutorial to build your knowledge and confirm your card attributes.
First, you need to know which chipset is used in your wireless card and which driver you need for it. You will have determined this using the information in the previous paragraph. The drivers section will tell you which drivers you need.
Aircrack-ng installation
Get the latest copy of aircrack-ng from the homepage, use our packages or use a penetration testing distribution such as Kali Linux or Pentoo where Aircrack-ng is already installed and up to date.
To install aircrack-ng, refer to the documentation on the installation page.
IEEE 802.11 basics
Ok, now everything is ready, time to make a pit stop before the action finally starts and learn something about how wireless networks work.
The following chapter is very important, if something doesn’t work as expected. Knowing what all is about helps you find the problem or helps you at least to describe it so someone else who can help you. This is a little bit scientific and maybe you feel like skipping it. However, a little knowledge is necessary to crack wireless networks and because it is a little more than just typing one command and letting aircrack do the rest.
How a wireless network is found
This is a short introduction into managed networks, these ones working with Access Points (AP). Every AP sends out about 10 so called beacon frames a second. These packets contain the following information:
-
Name of the network (ESSID)
-
If encryption is used (and what encryption is used; pay attention, that may not be always true just because the AP advertises it)
-
What MBit data rates are supported
-
Which channel the network is on
This information is then shown in your tool that connects to this network. It is shown when you let your card scan for networks with iwlist <interface> scan and when you run airodump-ng.
Every AP has a unique MAC address (48 bit, 6 pair of hexadecimal numbers). It looks like 00:01:23:4A:BC:DE. Every network hardware device has such an address and network devices communicate with each other by using this MAC address. So its basically like a unique name. MAC addresses are unique, no two network devices in the world have the same MAC address.
Connecting with a network
If you want to connect to a wireless network, there are some possibilities. In most cases, Open System Authentication is used. (Optional: If you want to learn more about authentication, check this out.)
Open System Authentication:
-
Ask the AP for authentication.
-
The AP answers: OK, you are authenticated.
-
Ask the AP for association
-
The AP answers: OK, you are now connected.
This is the simplest case, BUT there could be some problems if you are not legitimate to connect:
-
WPA/WPA2 is in use, you need EAPOL authentication. The AP will deny you at step 2.
-
Access Point has a list of allowed clients (MAC addresses), and it lets no one else connect. This is called MAC filtering.
Simple sniffing and cracking
Discovering Networks
The first thing to do is looking out for a potential target. The aircrack-ng suite contains airodump-ng for this — but other programs like Kismet can be used too.
Prior to looking for networks, you must put your wireless card into what is called “monitor mode”. Monitor mode is a special mode that allows your computer to listen to every wireless packet. This monitor mode also allows you to optionally inject packets into a network. Injection will be covered later in this tutorial.
To put your wireless card into monitor mode using airmon-ng:
airmon-ng start wlan0
It will create create another interface, and append “mon” to it. So, wlan0 will become wlan0mon. To confirm it is in monitor mode, run “iwconfig” and confirm the mode.
Then, start airodump-ng to look out for networks:
airodump-ng wlan0mon
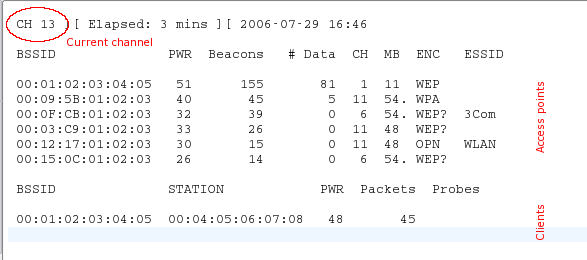
If airodump-ng could connect to the WLAN device, you’ll see a screen like this:

airodump-ng hops from channel to channel and shows all access points it can receive beacons from. Channels 1 to 14 are used for 802.11b and g (in US, they only are allowed to use 1 to 11; 1 to 13 in Europe with some special cases; 1-14 in Japan). 802.11a is in the 5GHz and availability in different countries is more fragmented than on 2.4GHz. In general, known channels starts at 36 (32 in some countries) to 64 (68 in some countries) and 96 to 165. Wikipedia has more details on channel availability. The Linux Central Regulatory Domain Agent takes care of allowing/forbidding transmissions on the different channels for your country; however, it needs to be set appropriately.
The current channel is shown in the top left corner.
After a short time some APs and (hopefully) some associated clients will show up.
The upper data block shows the access points found:
| BSSID | The MAC address of the AP |
|---|---|
| RXQ | Quality of the signal, when locked on a channel |
| PWR | Signal strength. Some drivers don’t report it |
| Beacons | Number of beacon frames received. If you don’t have a signal strength you can estimate it by the number of beacons: the more beacons, the better the signal quality |
| Data | Number of data frames received |
| CH | Channel the AP is operating on |
| MB | Speed or AP Mode. 11 is pure 802.11b, 54 pure 802.11g. Values between are a mixture |
| ENC | Encryption: OPN: no encryption, WEP: WEP encryption, WPA: WPA or WPA2 encryption, WEP?: WEP or WPA (don’t know yet) |
| ESSID | The network name. Sometimes hidden |
The lower data block shows the clients found:
| BSSID | The MAC of the AP this client is associated to |
|---|---|
| STATION | The MAC of the client itself |
| PWR | Signal strength. Some drivers don’t report it |
| Packets | Number of data frames received |
| Probes | Network names (ESSIDs) this client has probed |
Now you should look out for a target network. It should have a client connected because cracking networks without a client is an advanced topic (See How to crack WEP with no clients). It should use WEP encryption and have a high signal strength. Maybe you can re-position your antenna to get a better signal. Often a few centimeters make a big difference in signal strength.
In the example above the net 00:01:02:03:04:05 would be the only possible target because it’s the only one with an associated client. But it also has a high signal strength so it’s really a good target to practice.
Sniffing IVs
Because of the channel hopping you won’t capture all packets from your target net. So we want to listen just on one channel and additionally write all data to disk to be able to use it for cracking:
airodump-ng -c 11 --bssid 00:01:02:03:04:05 -w dump wlan0mon
With the -c parameter you tune to a channel and the parameter after -w is the prefix to the network dumps written to disk. The “--bssid” combined with the AP MAC address limits the capture to the one AP. The “--bssid” option is only available on new versions of airodump-ng.
Before being able to crack WEP you’ll usually need between 40 000 and 85 000 different Initialization Vectors (IVs). Every data packet contains an IV. IVs can be re-used, so the number of different IVs is usually a bit lower than the number of data packets captured.
So you’ll have to wait and capture 40K to 85K of data packets (IVs). If the network is not busy it will take a very long time. Often you can speed it up a lot by using an active attack (=packet replay). See the next chapter.
Cracking
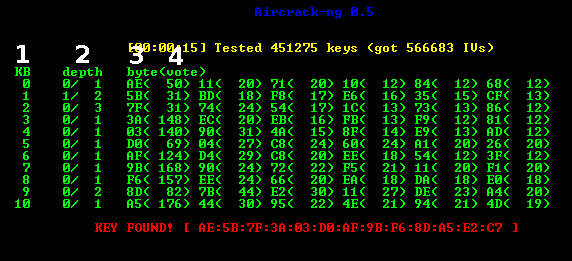
If you’ve got enough IVs captured in one or more file, you can try to crack the WEP key:
aircrack-ng -b 00:01:02:03:04:05 dump-01.cap
The MAC after the -b option is the BSSID of the target and dump-01.cap the file containing the captured packets. You can use multiple files, just add all their names or you can use a wildcard such as dump*.cap.
For more information about aircrack-ng parameters, description of the output and usage see the manual.
The number of IVs you need to crack a key is not fixed. This is because some IVs are weaker and leak more information about the key than others. Usually these weak IVs are randomly mixed in between the stronger ones. So if you are lucky, you can crack a key with only 20 000 IVs. But often this it not enough and aircrack-ng will run a long time (up to a week or even longer with a high fudge factor) and then tell you the key could not be cracked. If you have more IVs cracking can be done a lot faster and is usually done in a few minutes, or even seconds. Experience shows that 40 000 to 85 000 IVs is usually enough for cracking.
There are some more advanced APs out there that use an algorithm to filter out weak IVs. The result is either that you can’t get more than “n” different IVs from the AP or that you’ll need millions (like 5 to 7 million) to crack the key. Search in the Forum, there are some threads about cases like this and what to do.
Active attacks
Injection support
Most devices don’t support injection — at least not without patched drivers. Some only support certain attacks. Take a look at the compatibility page, column aireplay. Sometimes this table is not up-to-date, so if you see a “NO” for your driver there don’t give up yet, but look at the driver homepage, the driver mailing list or our Forum. If you were able to successfully replay using a driver which is not listed as supported, don’t hesitate to update the compatibility page table and add a link to a short howto. (To do this, request a wiki account on IRC.)
The first step is to make sure packet injection really works with your card and driver. The easiest way to test it is the injection test attack. Make sure to perform this test prior to proceeding. Your card must be able to successfully inject in order to perform the following steps.
You’ll need the BSSID (AP MAC) and ESSID (network name) of an AP that does not do MAC filtering (e.g. your own) and must be in range of the AP.
Try to connect to your AP using aireplay-ng:
aireplay-ng --fakeauth 0 -e "your network ESSID" -a 00:01:02:03:04:05 wlan0mon
The value after -a is the BSSID of your AP.
If injection works you should see something like this:
12:14:06  Sending Authentication Request
12:14:06  Authentication successful
12:14:06  Sending Association Request
12:14:07  Association successful :-)
If not
-
double-check ESSID and BSSID
-
make sure your AP has MAC filtering disabled
-
test it against another AP
-
make sure your driver is properly patched and supported
-
Instead of “0”, try “6000 -o 1 -q 10”
ARP replay
Now that we know that packet injection works, we can do something to massively speed up capturing IVs: ARP-request reinjection
The idea
ARP works (simplified) by broadcasting a query for an IP and the device that has this IP
sends back an answer. Because WEP does not protect against replay, you can sniff a packet, send it out again and again and it is still valid.
So you just have to capture and replay an ARP-request targeted at the AP to create lots of traffic (and sniff IVs).
The lazy way
First open a window with an airodump-ng sniffing for traffic (see above). aireplay-ng and airodump-ng can run together.
Wait for a client to show up on the target network. Then start the attack:
aireplay-ng --arpreplay -b 00:01:02:03:04:05 -h 00:04:05:06:07:08 wlan0mon
-b specifies the target BSSID, -h the MAC of the connected client.
Now you have to wait for an ARP packet to arrive. Usually you’ll have to wait for a few minutes (or look at the next chapter).
If you were successful, you’ll see something like this:
Saving ARP requests in replay_arp-0627-121526.cap
You must also start airodump to capture replies.
Read 2493 packets (got 1 ARP requests), sent 1305 packets...
If you have to stop replaying, you don’t have to wait for the next ARP packet to show up, but you can re-use the previously captured packet(s) with
the -r <filename> option.
When using the ARP injection technique, you can use the PTW method to crack the WEP key. This dramatically reduces the number of data packets you need and also the time needed. You must capture the full packet in airodump-ng, meaning do not use the “--ivs” option when starting it. For aircrack-ng, use “aircrack -z <file name>”. (PTW is the default attack)
If the number of data packets received by airodump-ng sometimes stops increasing you maybe have to reduce the replay-rate. You do this with the -x <packets per second> option. I usually start out with 50 and reduce until packets are received continuously again. Better positioning of your antenna usually also helps.
The aggressive way
Most operating systems clear the ARP cache on disconnection. If they want to send the next packet after reconnection (or just use DHCP), they have to send out ARP requests. So the idea is to disconnect a client and force it to reconnect to capture an ARP-request. A side-effect is that you can sniff the ESSID and possibly a keystream during reconnection too. This comes in handy if the ESSID of your target is hidden, or if it uses shared-key authentication.
Keep your airodump-ng and aireplay-ng running. Open another window and run a deauthentication attack:
aireplay-ng --deauth 5 -a 00:01:02:03:04:05 -c 00:04:05:06:07:08 wlan0mon
-a is the BSSID of the AP, -c the MAC of the targeted client.
Wait a few seconds and your ARP replay should start running.
Most clients try to reconnect automatically. But the risk that someone recognizes this attack or at least attention is drawn to the stuff happening on the WLAN is higher than with other attacks.
More tutorials can be found on this page.
Aircrack-ng is a tool that comes pre-installed in Kali Linux and is used for wifi network security and hacking. Aircrack is an all in one packet sniffer, WEP and WPA/WPA2 cracker, analyzing tool and a hash capturing tool. It is a tool used for wifi hacking. It helps in capturing the package and reading the hashes out of them and even cracking those hashes by various attacks like dictionary attacks. It supports almost all the latest wireless interfaces.
It mainly focuses on 4 areas:
- Monitoring: Captures cap, packet, or hash files.
- Attacking: Performs deauthentication or creates fake access points
- Testing: Checking the wifi cards or driver capabilities
- Cracking: Various security standards like WEP or WPA PSK.
Working with aircrack-ng
1. To list all network interfaces.
airmon-ng
This command will return all the network interfaces available or connected to the system.

2. Stopping the desired network interface.
airmon-ng stop wlan0mon
To stop a network interface enter the above command and replace “wlan0” with the desired network interface.

3. Starting a network interface at a specific channel.
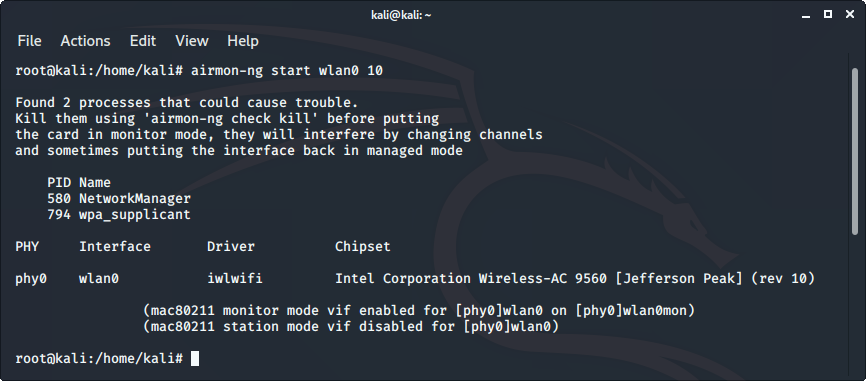
airmon-ng start wlan0 10
To start a network interface at a specific channel enter the above command and replace “wlan0” with the desired network interface and 10 with the desired channel name.
4. Collecting authentication handshake
airodump-ng -c 10 --bssid 00:15:5D:9C:44:00 -w psk wlan0
To collect the authentication handshake enter the above command in terminal and replace “wlan0” with the desired network interface and 10 with the desired channel name and bssid with the bssid of the wifi.

5. Cracking the captured handshake file by means of a wordlist
aircrack-ng -w wordlist psk*.cap

To run a brute force attack and to crack the password enter the above command in the terminal and replace “wordlist” with the desired wordlist to be used and “wpa.cap” with the desired handshake filename.
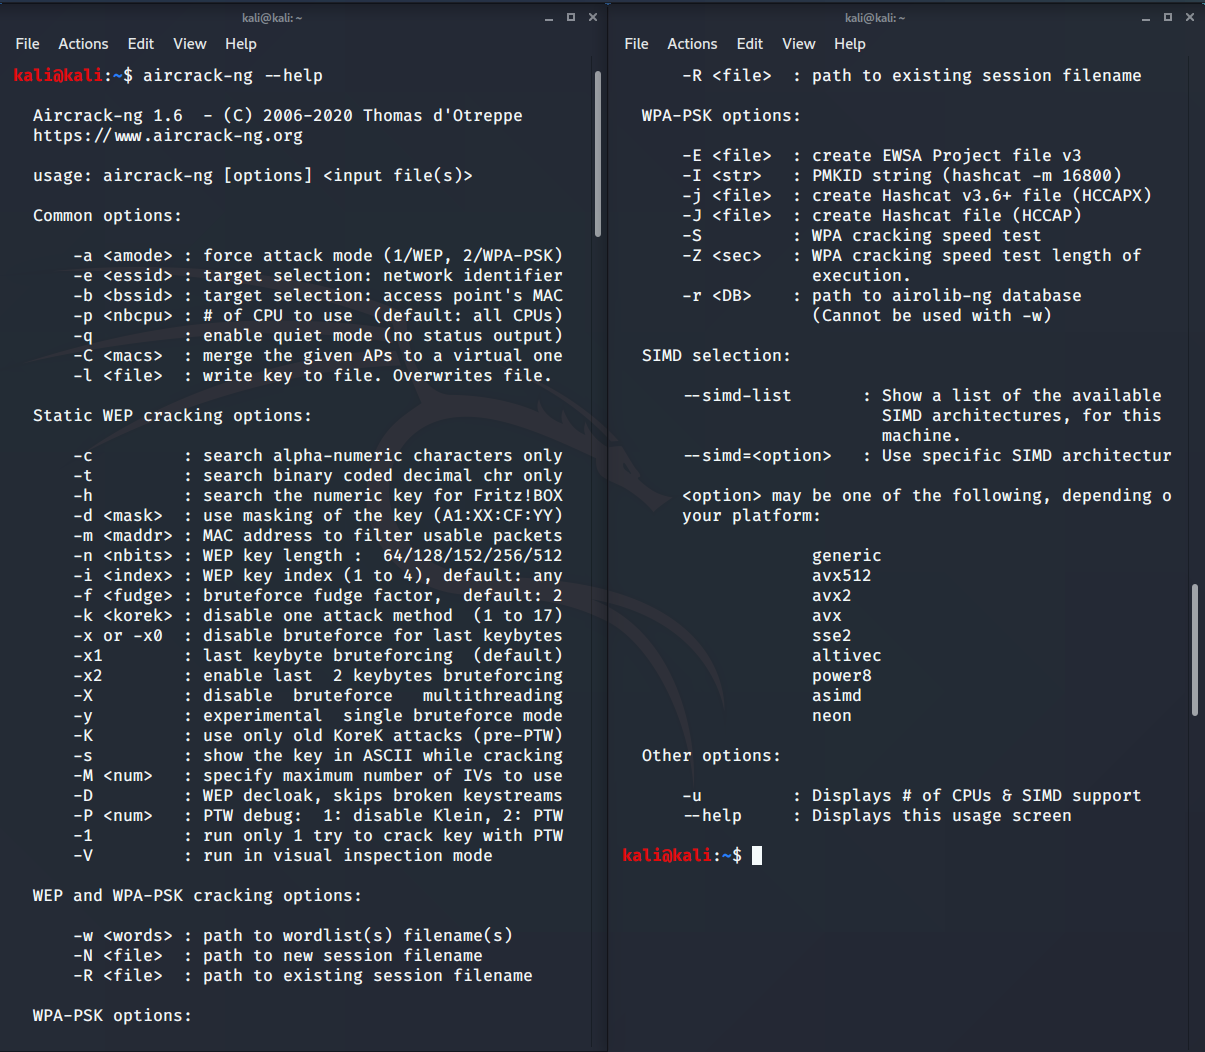
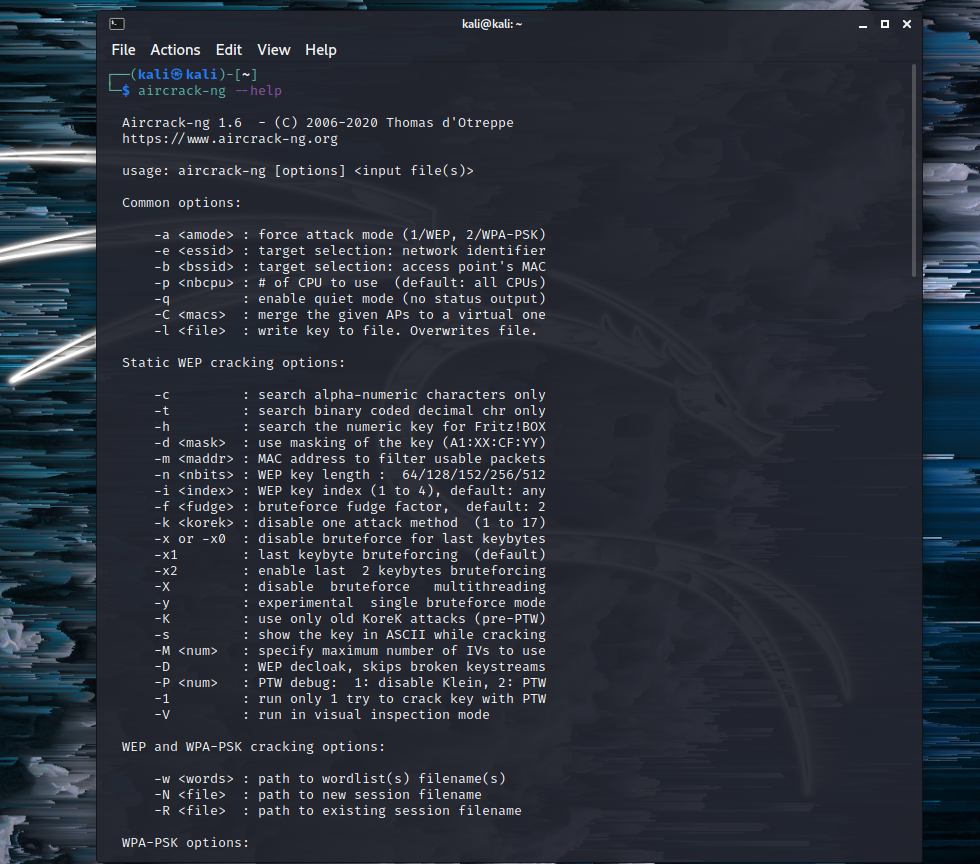
6. To get the help section of the tool
aircrack-ng --help
The above command will display the help section of the aircrack-ng command.
7. To display the # of CPUs and SIMD support
aircrack-ng -u
The above command will display the details of the hash of CPUs and SIMD support.

Last Updated :
28 Jul, 2020
Like Article
Save Article
It’s always fascinating to tweak wireless networks for learning or even to monitor a network. This article will use the aircrack-ng suite in Kali Linux to penetrate a wireless network in 5 simple steps.

2. Stopping the desired network interface.
airmon-ng stop wlan0mon
To stop a network interface enter the above command and replace “wlan0” with the desired network interface.
3. Starting a network interface at a specific channel.
airmon-ng start wlan0 10
To start a network interface at a specific channel enter the above command and replace “wlan0” with the desired network interface and 10 with the desired channel name.
4. Collecting authentication handshake
airodump-ng -c 10 --bssid 00:15:5D:9C:44:00 -w psk wlan0
To collect the authentication handshake enter the above command in terminal and replace “wlan0” with the desired network interface and 10 with the desired channel name and bssid with the bssid of the wifi.
5. Cracking the captured handshake file by means of a wordlist
aircrack-ng -w wordlist psk*.cap
To run a brute force attack and to crack the password enter the above command in the terminal and replace “wordlist” with the desired wordlist to be used and “wpa.cap” with the desired handshake filename.
6. To get the help section of the tool
aircrack-ng --help
The above command will display the help section of the aircrack-ng command.
7. To display the # of CPUs and SIMD support
aircrack-ng -u
The above command will display the details of the hash of CPUs and SIMD support.
Last Updated :
28 Jul, 2020
Like Article
Save Article
It’s always fascinating to tweak wireless networks for learning or even to monitor a network. This article will use the aircrack-ng suite in Kali Linux to penetrate a wireless network in 5 simple steps.
Aircrack-ng has many packets and binaries, and all of them are used for achieving exciting results. Of course, we will need the metapackages, which will also be covered in the tutorial. So, brace your keyboard, fellow hackers, and get with wireless (WPA/WPA-2) networking cracking in Kali Linux.
First and foremost, we should mention hacking eligibility. Practice network hacking on your network where there will be no issue for someone else to lose privacy. Also, don’t capture packets of other people, even if they are friends or family. Nosing on people’s privacy is something we are up against. Also, we’ll be needing some tools, which are mentioned below.
Tools we’ll be needing to learn how to use aircrack in kali linux:
• Kali Linux machine (or Virtual environment with Kali Linux)
• Wifi Network card that supports monitor mode. Depending on our need, a wireless network card can have 2.4 GHz or 5 GHz or even a combination of both channels. Get which one suits you better. Make sure to set up proper drivers. Most of the drivers are set up for wireless adapters to use in a plug-and-play manner. Others will be needing separate installation of drivers. Check your wireless network card manual to install the drivers from the respective website.
• Aircrack-ng suite
Good to know:
Aircrack-ng is a network software suite that helps penetration testers to monitor, attack, test, and crack wireless network security. It has tools that can work as packet detector/sniffer and enable the user to analyze 802.11 wireless LANS. It can also perform many attacks such as deauthentication, replay attack, and packet injection attack. It’s a multi-platform tool suite that is supported by Linux, Windows, MacOS, Android, and FreeBSD.
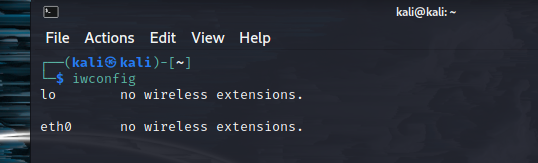
Aircrack-ng can capture passwords through encrypted packets of 802.11 or 802.11a WEP/WPA/WPA-2 packets. The default method for aircrack-ng to dump passwords is PTW; Pyskin, Tews, and Weimann methods are also used. To get details about the wireless interface, type iwconfig. We still haven’t connected any wireless device, hence its responding eth0 is showing no wireless extensions.
Step 1:
Kali Linux comes default with aircrack-ng suite, which makes our task a whole lot easier. Firstly, to check if our networking interface is working correctly. Open your terminal and enter “ipconfig,” which will show relevant network information and network card interface.
Network adapter is listed as “waln0”, multiple network adapters will have different options.
To install aircrack-ng (2.36 MB), type in
sudo apt install aircrack-ng
On the terminal, if we type in
aircrack-ng -–help
We are greeted with commands and WEP cracking options. There are many interesting options, as seen below.
Step 2:
With root privilege, typing in sudo airmon-ng start wlan0
Here, airmon-ng enables the monitor mode on the wireless interface; if we type in ‘stop’ simultaneously, the monitoring is disabled.
As we started the process of the monitoring network, a PID was interfering with the adapter; we need to disable it. To make that airmon-ng check kill followed by the process number, e.g., 500/ 8080.
Step 3:
This is where we start seeing some action—commanding the console with airodump-ng wlan0 to show available network BSSID, CH, Authentication level, and similar details. Once we find our targeted network, copy (ctrl + c) the BSSID or MAC address and remember its CH (channel) value. Find more about airodump-ng here.
At this moment, our command is
sudo airodump-ng -c 1 -w Kali -bssid xx:xx:xx:xx:xx:xx wlan0. The bssid is our previously copied MAC address.
Step 4:
We already started capturing packets with the airodump-ng command in the previous step. For capturing a 4-way handshake, we need to open a new console or command window and de-authenticate the bssid. The command is airplay-ng -0 0 -a bssid wlan0.
Once the bssid tries to reconnect with the host or wireless device, necessary information can be captured. Our function will load the WPA/WPA-2 handshake with the bssid.
Step 5:
As we have dump files and handshake packets, it’s time to expand our attack with a dictionary attack with hash. We can find many passwords wordlist online, save one inside the directory or paste the location, including file format. It should be like this as below:
aircrack-ng -w wordlist.txt kali-01.cap
The hash compares with passwords inside the text file. Every line will convert into a hash, and when the dump file hash matches with the WPA/WPA-2 PSK, we will have a successful match with which we can connect to the wireless network.
System response:
Interface Chipset Driver
Wi-Fi Tenda 1.5 (monitor mode enabled)
Recap:
iwconfigsudo airmon-ng start wlan0airodump-ng wlan0airodump-ng -c 1 -w wifi -bssid wlan0aireplay-ng -0 0 -a bssid wlan0monaircrack-ng -w wordlist.txt kali-01.cap
About the wordlist:
Though Kali comes default with some wordlist, it is easy to find more if that interests our fellow hackers. Wordlists can go hundreds of gigabytes as those data are collected from nooks and corners of the internet. On default kali, /usr/share/wordlists is the location where default lists are located.
We can create our wordlist using Crunch in Kali Linux. For that in console, type in
# crunch 2 3 0123456789
Doing so will create a wordlist with every possible combination of the numbers from 0 to 9. We can feed it more data by adding alphabets both in upper case and lowercase. Here 2 and 3 are set to create from two to three-character wordlist.
Troubleshooting:
• Some wireless adapters might not work appropriately with Kali Linux virtual machine, but some work fine out of the box. It is advised to ignore adapter branding and go for specs that suit the need. For example, TP-Link wireless adapter TL-WN227N version 1 has a chipset that supports monitoring, where version 2 and version 3 lacks the feature. If there is no monitoring mode on the device itself, there is no use for it. If it is not labeled as version 1, then chances are it doesn’t have a monitoring mode.
• Also, the procedure causes less hassle if the machine has kali as the default OS, not as a virtual OS.
• Wordlist or text list, or password list has to be strong to capture the password. If the admin created a password with 15 characters, scrambled, with numbers, alphabets, upper and lower case, if our wordlist doesn’t contain this kind of complex password, hashes will just go through till it runs to the end.
• Kali Linux username and password are always kali.
Shortcuts:
- BSSID – MAC address of the IP.
- CH – Channel the AP is operating on.
- PWR – Signal strength
- Packets – Number of data frames received
- Probes – Network names (ESSIDs)
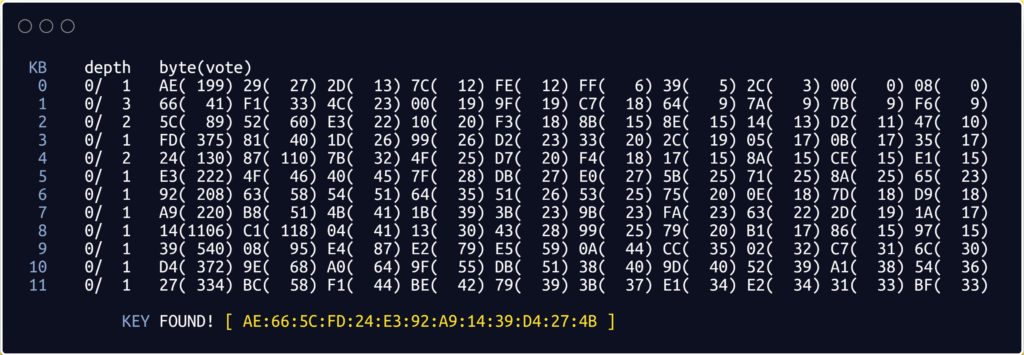
- Collected from aircrack-ng.org, here 1 is Key byte, 2 is the depth of the current key search, 3 is the Byte the IVs leaked, and 4 is the number of votes indicating this is correct.
- For more shortcuts, visit the aircrack-ng manual.
Additional Examples:
In these examples, we’ll sniff the network traffic using airodump-ng, deauthenticate some devices connected to the WiFi Network (using aireplay-ng), to capture the encrypted handshake. Then later, using Aircrack-ng we’ll crack the hashes captured in the handshake. All the above mentioned utilities are a part of Aircrack-ng suite.
Airmon-ng:
Airmon-ng is used to switch between monitor mode and managed mode on a wireless interface. To begin with, check whether the wireless card has injection and monitor mode support or not. The tool allows you to list the interfaces that support monitor mode, by using the following command:
root@kali:~$ sudo airmon-ng
PHY    Interface                  Driver         Chipset
Phy0   wlan                       st57xuu        Broadcom Corporation
The above command shows a network interface, which indicates that the wireless card has injection and supports monitor mode. Use the following command to change the active wireless interface (wlan) to monitor mode:
root@kali:~$ sudo airmon-ng start wlan
(mac60322 monitor mode vif enabled on [phy0]wlanmon
(mac60344 station mode vif disabled for [phy0]wlxcc87cg67ff)
It’s an important step as the network interface in monitor mode or promiscuous mode, enables us to capture all kinds of wifi and data packets.
Airodump-ng:
Airodump-ng is used to sniff the data packets around the network in promiscuous mode. It lists the WiFi networks around us and gives us detailed information about them i.e MAC address, number of clients connected to a given network, BSSID, channel name, etc. This helps in targeting the desired network. We will use the following command to sniff packets on a particular wifi interface (wlanmon in our case):
root@kali:~$ sudo airodump-ng wlanmon

 CH  5 ][ Elapsed: 26 s ][ 2021-11-07 00:17

 BSSID              PWR  Beacons    #Data, #/s  CH  MB   ENC  CIPHER AUTH ESSID

 D6:8D:42:02:DB:42  -32       55       27    0   1  46d  WPA2 CCMP   PSK  Secure66
 C4:8F:66:04:4B:22  -56       66        0    0   6  46d. WPA2 CCMP   PSK  Router88
 B4:83:DD:43:02:33  -59       77        0    0   8  46d  WPA2 CCMP   PSK  Batman
 64:32:55:BD:95:90  -44       43        2    0  11  46d  WPA2 CCMP   PSK  Neighbours

 BSSID              STATION            PWR   Rate    Lost    Frames  Probe

 D6:8D:42:02:DB:42  5B:7A:84:DB:0C:6D   -3    0 - 1e     8        5
 D6:8D:42:02:DB:42  D4:67:D3:C2:CD:D7  -33    1e- 6e     0        3
 D6:8D:42:02:DB:42  5B:7A:84:DB:0C:6D  -35    0 - 1      0        6
 D6:8D:42:02:DB:42  B6:DB:0C:DB:64:42  -39    0e- 1    983       13
The target network in this case is Secure66.
Aireplay-ng:
Aireplay-ng is used to perform different kinds of attacks i.e chop-chop attack, Interactive packet replay attack, Cafe-latte attack, Deauthentication attack, etc. The main goal of these attacks is to introduce packets to a wireless network to create or accelerate traffic.
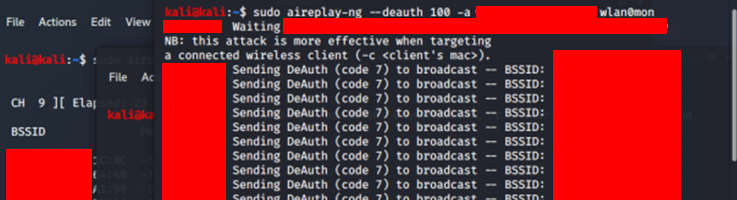
A device can take a long time to connect to our network so instead of waiting for a device to connect and capture its 4-way handshake, a better approach is to perform the “Deauthentication Attack”. This attack de-authenticates all the devices connected to our network and when they try to reconnect, a handshake occurs which will help us in cracking the wifi password. We will use the following command to perform the “Deauthentication Attack” via aireplay-ng tool. Use root privileges to run the aireplay-ng tool with –0 flag for the type of attack and -a flag for BSSID.
root@kali:~$ sudo aireplay-ng -0 -a D6:8D:42:02:DB:42
Airodump-ng:
The successful execution of the deauthentication attack will disconnect all the connected network devices. Now use the airodump-ng utility to capture the 4-way handshake with the -c flag to specify the channel name and the -w flag that specifies the filename to store the handshake.
root@kali:~$ sudo airodump-ng -c 1 --bssid  D6:8D:42:02:DB:42 -w hs.cap wlan

CH  1 ][ Elapsed: 30 s ][ 2020-12-02 00:02 ][ WPA handshake: D6:8D:42:02:DB:42

 BSSID              PWR RXQ  Beacons    #Data, #/s  CH  MB   ENC  CIPHER AUTH E

D6:8D:42:02:DB:42  -47   1      228      807   36   1  54e  WPA2 CCMP   PSK  P

 BSSID              STATION            PWR   Rate    Lost    Frames  Probe

 D6:8D:42:02:DB:42  5B:7A:84:DB:0C:6D   -3    0 - 1e     8        5
 D6:8D:42:02:DB:42  D4:67:D3:C2:CD:D7  -33    1e- 6e     0        3
 D6:8D:42:02:DB:42  5B:7A:84:DB:0C:6D  -35    0 - 1      0        6
 D6:8D:42:02:DB:42  B6:DB:0C:DB:64:42  -39    0e- 1    983       13      Secure66
The “WPA handshake” appears at the top right corner, it means the handshake has been captured successfully and it is saved in the file specified.
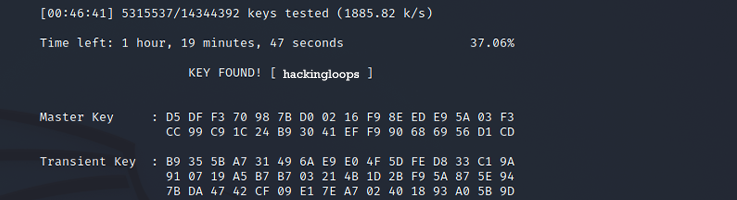
After capturing the hashes, we use aircrack-ng as a cracking program. Aircrack-ng uses statistical mathematical analysis to break WEP keys while it can also break WPA PSK and WPA2 keys by brute force attack via a dictionary mode. Aircrack-ng takes in some arguments to crack the captured WPA key i.e -b flag for bssid of the network, -a for the mode of attack and -w for specifying the wordlist, as follows:
root@kali:~$ sudo aircrack-ng -a2 -w /usr/share/wordlists/rockyou.txt -b  D6:8D:42:02:DB:42 hs.cap

Aircrack-ng 1.6
[00:04:02] 9567 keys tested (966 k/s)

KEY FOUND! [ Cinderella 43! ]

Master Key :   1B 73 5D 82 DA5 B6 7F DB 2X BD 4D AC 8A
2F 1A 26 34 D 82 DA5 B6 7F DF 6B AC 88 88 73
Transient Key : 73 5D 82 DA5 B6 7F DB 2X BD
1B 73 5D 82 DA5 B6 7F DB 2X BD 2B 6D BD A0
5D 4H 7S 8B 24 5V 2X 9A 8B 8B DC 1B 73 5D 82
2X 9A 8B 8B DC 1B 73 5D 82 DA5 B6 7F DB 2X BD
EAPOL HMAC : 9F C6 51 57 D3 FA 99 11 9D 17 12 BA B6 DB 06 B4
Endnote:
Aircrack-ng is a powerful tool that can crack and test WiFi networks’ security and gives illegitimate access to them. It provides functionality for wifi network monitoring, sniffing the data packets, and performing different attacks like WEP dictionary and cafe late attacks, among many others. The article is a short guide on how a combination of Wifi security assessment tools can help us crack the wifi network password.
Though hacking is fun and using aircrack in Kali gives you tons of learning options, it should be supervised by yourself, fellow hacker buddies. Please do not use this knowledge to gain leverage on others; use it to spread knowledge and keep yourself safe. Of course, there is plenty more you can do by following the official metapackages and commands we previously showed.
Please review your concern and interaction while hacking.
In this comprehensive Aircrack-ng tutorial, we’ll guide you through the ins and outs of using the powerful Aircrack-ng suite to assess and enhance the security of WiFi networks. Whether you’re a seasoned ethical hacker or a newcomer to the cyber security field, this tutorial will provide valuable insights and actionable steps to help you understand and effectively use the various tools within the Aircrack-ng suite.
Throughout this tutorial, we’ll cover the essential tools, including airmon-ng, airodump-ng, airgraph-ng, aireplay-ng, aircrack-ng, and airbase-ng. Along the way, we’ll include some helpful commands for each one. Additionally, we’ll discuss the requirements, such as compatible wireless adapters and operating systems, to ensure you’re well-equipped to tackle any wireless network security challenge.
Get ready to dive into wireless network security and auditing with the Aircrack-ng suite, and discover how you can fortify your WiFi network against potential threats.
Requirements
Before diving into how to use Aircrack-ng, it’s essential to ensure you have the proper hardware and software requirements to make the most of the tools in the suite.
Requirements to run Aircrack-ng:
- Wireless adapter capable of monitor mode and packet injection.
- Sufficient storage space and processing power.
- Aircrack-ng installed or available for installation.
- A solid understanding of wireless networking concepts.
The specific WiFi adapter we’re using throughout this article is the Alfa AWUS036ACH, but you can find several others that meet this requirement in our review Best WiFi Adapters for Kali Linux to Buy in 2023. The processing power of your device really comes into play with aircrack-ng. If you’re using Kali Linux as a VM, it may be worth bumping up the processors and RAM allocated more than usual. We ran it with 4 cores and 4096MB of RAM.
As mentioned above, Aircrack-ng and all its tools that we’ll cover in this article come pre-installed on Kali Linux. However, you can download the suite on any Linux, macOS, or Windows device if you’d prefer. Additionally, you’ll need an understanding of wireless networking and the elements involved to truly appreciate the steps you’ll execute with some of the tools in Aircrack-ng and how to wargame a strategy for pentesting or ethical hacking.
What Is Aircrack-ng?
Aircrack-ng is a comprehensive suite of tools designed for auditing and securing WiFi networks. Its primary purpose is to help ethical hackers and security professionals test the security of wireless networks by cracking WEP and WPA keys, creating fake access points, capturing and analyzing network traffic, and performing various other network-based attacks.
You can use the Aircrack-ng suite to assess the security posture of your wireless network, identify vulnerabilities, and test the strength of your network’s encryption. Additionally, Aircrack-ng can be used to identify rogue access points, simulate various attack scenarios, and perform penetration testing tasks.
Using the Aircrack-ng suite involves employing different tools within the suite, depending on the task. Each tool has a specific purpose and can be used independently or in conjunction with other tools in the suite to perform a wide range of wireless network security tasks.
Aircrack-ng comes preinstalled on Kali Linux, making it readily accessible for security professionals and ethical hackers alike. In this article, we’ll cover the following tools in the Aircrack-ng suite:
- Airmon-ng: Used to enable monitor mode on a wireless adapter, allowing you to capture network traffic.
- Airodump-ng: Captures network traffic, focusing on identifying wireless networks and capturing data packets.
- Airgraph-ng: Generates graphical representations of network traffic based on captured data, providing a visual representation of network activity.
- Aireplay-ng: Creates network traffic and performs various attacks, such as deauthentication and packet injection, to manipulate network behavior.
- Aircrack-ng: The flagship tool that cracks WEP and WPA/WPA2 encryption keys, allowing you to assess the strength of your network’s security.
- Airbase-ng: Creates fake access points for testing network security, performing man-in-the-middle attacks, or social engineering purposes.
There are other several other tools that fall under the suite, such as airdecap-ng, airdecloak-ng, and airtun-ng. However, for this tutorial, we will cover only the ones listed above because of the prevalence they have in security auditing and network hardening. These selected tools also have a natural flow, as you’ll soon see.
For the sake of clarity: During this article, we will distinguish between Aircrack-ng (meaning the suite) and aircrack-ng (meaning the tool).
Disclaimer
We want to be absolutely clear on this point. Even though it might seem innocent enough to perform a scan on your neighbor’s wireless network, a server hosting a website, or other networks, don’t do it. You need permission from the network owner if you are to do any kind of hacking or penetration testing on their systems.
It might not seem like a big deal, but hacking, or even scanning, a system without permission can hold extremely steep legal penalties, including jail time, depending on your location. Such laws include:
- The Computer Fraud and Abuse Act (United States)
- Sections 184, 342.1, 380, and 430 of the Criminal Code of Canada (Canada)
- Computer Misuse Act 1990 (England)
- Sec. 202a and 202b of the German Criminal Code (Germany)
- Information Technology Act Sec. 43 and 66 (India)
- The Act on the Prohibition of Unauthorised Computer Access (Japan)
Read our article Is port scanning legal? to learn more about this topic and to make sure you’re operating in the clear.
Airmon-ng
Airmon-ng is an essential tool in the Aircrack-ng suite, primarily used to enable monitor mode on your wireless adapter. Monitor mode allows your wireless adapter to listen to all the WiFi traffic in the air, even outside of the network your device belongs to. This is crucial for capturing packets, analyzing network traffic, and injecting packets into the target network when needed.
You use airmon-ng at the beginning of any wireless network auditing or penetration testing process. It sets the stage for using other tools in the Aircrack-ng suite, such as airodump-ng, aireplay-ng, and aircrack-ng itself.
Using airmon-ng is straightforward. First, identify the interface name of your wireless adapter (e.g., wlan0) using the ifconfig command and iwconfig. Once you have the interface name, you can enable monitor mode with the airmon-ng start command followed by the interface name.
Managed Mode: This means that your WiFi adapter is set to only receive packets directed to our specific MAC address. Think of this as only receiving letters delivered to your home.
Monitor Mode: When your device is in monitor mode it will be able to receive all packets that are in range of the WiFi adapter, even if they aren’t addressed to your machine’s MAC address. Think of this as standing in the postal receiving and sorting room and watching all of the envelopes come in.
Typically, you’ll run this in the following order:
- Run
ifconfigto first check for the interface name. - Run
iwconfigto check the mode. If it’s in managed mode, continue with the next steps. If it’s already in monitor, then you likely left it in that state from a previous session and can skip the rest of this. - Next run
sudo airmong-ng checkto look for any conflicting process that might interfere with setting up monitor mode. - If you find any interesting processes, run
sudo airmon-ng check killto stop them. - Finally, run the
sudo airmon-ng start <Name of Adapter>, in our examplewlan0. This command is used to bring your adapter back up in monitor mode. This will appendmonto the end, such aswlan0mon.
Common airmon-ng commands:
| Command | Action |
|---|---|
airmon-ng check kill |
Terminates interfering processes identified by the «airmon-ng check» command. Example: sudo airmon-ng check kill |
airmon-ng start |
Enables monitor mode on the specified interface. Example: sudo airmon-ng start wlan0 |
airmon-ng stop |
Disables monitor mode on the specified interface. Example: sudo airmon-ng stop wlan0mon |
airmon-ng --channel <num> |
Sets the default channel for the wireless adapter when entering monitor mode. Example: sudo airmon-ng start wlan0 --channel 6 |
The most common frequency to test is 2.4GHz, and the most common, non-overlapping channels operated are 1, 6, and 11.
If you’re auditing and testing on 5GHz, there are many more non-overlapping channels. Generally, every fourth channel between 36-144 and 149-165.
Using airmon-ng you can enable monitor mode to capture the necessary data and perform various wireless security tests. This crucial first step lays the foundation for the rest of the Aircrack-ng suite to work effectively.
Airodump-ng
Airodump-ng is another critical tool in the Aircrack-ng suite, primarily used for capturing packets from wireless networks. By capturing packets, you can analyze network traffic, identify connected devices, and obtain essential information such as encryption keys and handshakes required for cracking the network’s security.
You need to use airodump-ng after enabling monitor mode with airmon-ng. It allows you to gather valuable information about the target network and its clients, which will help you better understand the network’s structure and identify potential vulnerabilities.
Using airodump-ng involves executing the tool with the monitoring interface (e.g., wlan0mon) and specifying various parameters such as the channel to monitor, the BSSID to filter, and the output file prefix for the captured data. Once started, airodump-ng will display live information about the networks and clients it detects.
See all networks in range:
sudo airodump-ng wlan0mon
Common airodump-ng commands:
| Command | Action |
|---|---|
--channel |
Specifies the channel to listen on. Example: --channel 6 |
--bssid |
Filters the captured data to a specific BSSID. Example: --bssid AA:BB:CC:DD:EE:FF |
-w |
Sets the output file prefix for the captured data. Example: -w output |
--encrypt |
Filters the captured data to networks with a specific encryption type. Example: --encrypt WPA |
--showack |
Displays acknowledgment statistics for each client, useful for identifying packet injection vulnerabilities. Example: --showack |
Example of a packet capture:
sudo airodump-ng wlan0mon --channel 6 --bssid AA:BB:CC:DD:EE:FF -w output
Utilizing airodump-ng effectively, you can gather essential data (such as AP and client MAC addresses) for further analysis and set yourself up for more advanced attacks or security assessments using other tools in the Aircrack-ng suite.
Airgraph-ng
Airgraph-ng can be a valuable tool in the Aircrack-ng suite, used to create graphical representations of wireless networks and their associated clients. These visualizations can help you better understand the relationships between networks and devices, making it easier to identify potential targets and vulnerabilities.
You would use airgraph-ng after capturing packets with airodump-ng. By converting the captured data into a graphical format, you can gain a clearer understanding of the network’s structure, which can help you plan and execute more targeted and effective attacks or security assessments.
Using airgraph-ng involves providing an input file (CSV) generated by airodump-ng and specifying an output file for the generated graph. The tool supports multiple graph types, allowing you to choose the one that best suits your needs.
Common airgraph-ng commands:
| Command | Action |
|---|---|
-i |
Specifies the input CSV file generated by Airodump-ng. Example: -i output-01.csv |
-o |
Sets the output file for the generated graph. Example: -o output.png |
-g |
Specifies the graph type to generate. Example: -g CAPR or -g CPG |
-c |
Sets the channel filter for the generated graph. Example: -c 6 |
--essid |
Filters the graph data to networks with a specific ESSID. Example: --essid MyNetwork |
Example of generating a graph from the captured data:
sudo airgraph-ng -i output-01.csv -o output.png -g CAPR
Using Airgraph-ng, you can visually analyze the relationships between networks and clients, helping you identify potential targets and better understand the overall structure of the wireless environment. This insight can be crucial for planning and executing advanced wireless security assessments or ethical hacking operations.
If you’re going through this tutorial to improve your skills as an ethical hacker, you might be wondering which certificate is best to market yourself. Take a look at our article, CEH vs OSCP 2023: Which One Should You Pursue?, for some helpful insight.
Aireplay-ng
Aireplay-ng is a great tool in the Aircrack-ng suite, designed to generate, inject, and manipulate wireless network traffic. It supports various attack types, including deauthentication, fake authentication, and ARP request injection, which can help facilitate different stages of wireless security assessments or ethical hacking operations.
You would use aireplay-ng after capturing packets with airodump-ng and analyzing the network traffic. Based on the information gathered, aireplay-ng can be employed to speed up the cracking process, force client disconnections, or test network security by injecting custom packets.
When you execute a deauthentication (deauth) attack with aireplay-ng, the tool sends a series of deauthentication frames to the target device and access point. These frames are designed to mimic legitimate management packets from the access point or the client device, instructing them to disconnect from each other. As a result, the target device is disconnected from the WiFi network, forcing it to re-establish the connection, which can be used to capture the handshake.
Using aireplay-ng involves specifying the attack type, target network, and relevant parameters depending on the attack. You may need to provide the monitoring interface (e.g., wlan0mon) and the MAC addresses of the target access point and client devices.
Common aireplay-ng commands:
| Command | Action |
|---|---|
--deauth |
Executes a deauthentication attack, disconnecting clients from the target network. Example: --deauth 100 |
--fakeauth |
Performs a fake authentication attack, simulating a client connecting to the target network. Example: --fakeauth 60 |
--arpreplay |
Conducts an ARP request replay attack to generate more IVs for WEP cracking. Example: --arpreplay |
-a |
Specifies the target access point’s BSSID. Example: -a AA:BB:CC:DD:EE:FF |
-c |
Sets the target client’s MAC address. Example: -c 11:22:33:44:55:66 |
Example of a deauthentication command:
sudo aireplay-ng --deauth 100 -a AA:BB:CC:DD:EE:FF -c 11:22:33:44:55:66 wlan0mon
When using aireplay-ng effectively, you can manipulate wireless network traffic, test network security, and gather additional information to aid in cracking WiFi encryption or identifying vulnerabilities. Its various attack types make it a valuable addition to the Aircrack-ng suite, offering flexibility and adaptability for different wireless security scenarios.
Aircrack-ng is the flagship tool of the Aircrack-ng suite, primarily used for cracking wireless networks encryption keys, such as WEP and WPA/WPA2. It employs various algorithms and techniques to recover encryption keys, enabling you to gain unauthorized access to a wireless network or verify the strength of your own network’s security.
You would use aircrack-ng after capturing packets with airodump-ng and potentially manipulating traffic with aireplay-ng. Once you have collected enough data, such as a WPA handshake or a sufficient number of WEP IVs (Initialization Vector), aircrack-ng can be employed to attempt a key recovery using a dictionary or brute-force attack.
Using aircrack-ng involves providing the captured data (in .cap format) and specifying the attack parameters, such as the dictionary file or the key length for brute-force attacks. The tool will then analyze the captured data and attempt to recover the encryption key.
Common aircrack-ng commands:
| Command | Action |
|---|---|
-w |
Specifies the wordlist or dictionary file for a dictionary attack. Example: -w dictionary.txt |
-b |
Sets the target access point’s BSSID. Example: -b AA:BB:CC:DD:EE:FF |
-e |
Specifies the target network’s ESSID. Example: -e MyNetwork |
-a |
Forces the attack mode to use between WEP and WPA/WPA2-PSK. Example (WPA/WPA2-PSK): -a 2 |
Hidden Networks
Cracking WPA/WPA2-PSK networks where the ESSID is not broadcasted (hidden) requires that the ESSID be specifically tagged as an optional command with -e <NetworkName>.
Example of cracking a WPA key:
sudo aircrack-ng -w dictionary.txt -b AA:BB:CC:DD:EE:FF output-01.cap
Executing aircrack-ng effectively, you can attempt to crack wireless network encryption keys and assess the security of WiFi networks. Its various attack options and algorithms make it a powerful tool for ethical hackers and security professionals alike, providing insights into potential vulnerabilities and the effectiveness of network security measures.
The Aircrack-ng suite is very powerful, but there are a host of other tools that come pre-installed on Kali Linux to help you with your ethical hacking efforts. Check out some of our top picks in 25 Top Penetration Testing Tools for Kali Linux in 2023.
Airbase-ng
Airbase-ng is a powerful and fun tool within the Aircrack-ng suite, designed to create fake access points (APs) for various purposes, such as testing client devices’ behavior, performing man-in-the-middle attacks, or social engineering attacks. By emulating legitimate access points, airbase-ng can trick nearby devices into connecting to the fake AP, allowing you to monitor or manipulate their network traffic.
You would use airbase-ng after gathering information about the target network and clients using tools like airodump-ng and aireplay-ng. Once you’ve identified a suitable target, airbase-ng can be employed to create a fake access point, luring unsuspecting users into connecting and potentially revealing sensitive information.
Airbase-ng involves specifying the parameters for the fake access point, such as the ESSID, channel, and encryption type. You will need to provide the monitoring interface (e.g., wlan0mon) and may need to configure additional settings to match the target network’s characteristics.
Common airbase-ng commands:
| Command | Action |
|---|---|
-a |
Sets the fake access point’s BSSID (MAC address). Example: -a AA:BB:CC:DD:EE:FF |
--essid |
Specifies the fake access point’s ESSID (network name). Example: --essid MyFakeAP |
--channel |
Sets the channel for the fake access point. Example: --channel 6 |
-W 1 |
Enables WEP encryption for the fake access point. Example: -W 1 |
-z |
Sets the fake access point to use WPA/WPA2 encryption. Example: -z 2 (for WPA2) |
Example usage:
sudo airbase-ng -a <AA:BB:CC:DD:EE:FF> --essid <FakeAPName> --channel <#> wlan0mon
By using airbase-ng correctly, you can create fake access points for various purposes, such as testing network security, performing man-in-the-middle attacks, or social engineering. Its flexibility and adaptability make it a valuable tool in the Aircrack-ng suite, offering unique opportunities for ethical hackers and security professionals to assess the behavior of client devices and the effectiveness of network security measures.
Conclusion
Throughout this Aircrack-ng tutorial, we’ve explored the powerful features of the Aircrack-ng suite and demonstrated how it could be used to assess and enhance the security of WiFi networks. If you’d like to see all of these steps chained together in a demonstration of hacking a WiFi network, you can find that in How to Hack WiFi With Kali Linux Like a Pro.
Remember that ethical hacking and network security testing should only be performed on networks you have permission to access, and always adhere to legal and ethical guidelines. As you continue to develop your skills in the cyber security field, using tools like Aircrack-ng will empower you to take a proactive approach to wireless network security, ensuring that your WiFi connections remain safe and secure in an ever-evolving digital landscape.
Elevate your cyber security expertise to new heights by enrolling in our engaging courses, designed to empower you with valuable knowledge and practical skills:
Frequently Asked Questions
Can WPA2 be cracked?
Yes, WPA2 can be cracked, but it is generally more secure than WEP and WPA. The most common method for cracking WPA2 involves capturing the four-way handshake that occurs when a client connects to the network and then performing a brute-force or dictionary attack to guess the pre-shared key. However, this can be a time-consuming process, and the chances of success depend on the strength of the password and the attacker’s resources.
Is WPA2 easy to hack?
WPA2 is not easy to hack compared to its predecessors, WEP and WPA. WPA2 has improved encryption and security measures that make it more challenging for attackers. However, it is still vulnerable to specific attacks, such as capturing the four-way handshake and performing a brute-force or dictionary attack. To protect your WPA2 network, use a strong, unique password and keep your router firmware up-to-date.
Can Aircrack-ng use GPU for password cracking?
Aircrack-ng itself does not support GPU acceleration for password cracking. However, there are other tools, like hashcat, that can leverage the power of GPUs to perform password cracking more efficiently. You can use Aircrack-ng to capture the handshake and then use hashcat (included with Kali Linux) with GPU support to perform the password-cracking process.
What is the most secure WiFi password?
A secure WiFi password should be long, unique, and contain a mix of uppercase and lowercase letters, numbers, and special characters. In line with NIST 800-63b guidelines, consider using a passphrase (a sequence of words or other text) instead of a traditional password. If using a passphrase, consider inserting random characters, numbers, or special characters in between the words.
Aim for a password or passphrase that is at least 12-16 characters long. Avoid using common words, phrases, or easily guessable information like names, birthdays, or addresses. A strong password or passphrase reduces the likelihood of a successful brute-force attack.
Level Up in Cyber Security: Join VIP Membership Today!
-
Andrew is a Content Writer at StationX. He comes from a multi-discipline professional background with over 20 years of combined experience in healthcare compliance, financial cyber security regulations, wireless and mobile security, and threat modeling. He is dedicated to translating complex technical concepts into an easily understandable language to help you successfully navigate the ever-evolving landscape of cyber threats.
View all posts
Всем привет. В преддверии старта курса «Практикум по Kali Linux» подготовили для вас перевод интересной статьи.

Сегодняшнее руководство познакомит вас с основами для начала работы с пакетом aircrack-ng. Конечно, невозможно предоставить всю необходимую информацию и охватить каждый сценарий. Так что будьте готовы делать домашние задания и проводить исследования самостоятельно. На
форуме
и в
Wiki
есть множество дополнительных туториалов и другой полезной информации.
Несмотря на то, что оно не покрывает все шаги от начала до конца, руководство Simple WEP Crack подробнее раскрывает работу с aircrack-ng.
Настройка оборудования, установка Aircrack-ng
Первым шагом в обеспечении правильной работы aircrack-ng в вашей системе Linux является патчинг и установка соответствующего драйвера для вашей сетевой карты. Многие карты работают с несколькими драйверами, некоторые из них предоставляют необходимый функционал для использования aircrack-ng, другие нет.
Думаю, излишне говорить о том, что вам нужна сетевая карта, совместимая с пакетом aircrack-ng. То есть то аппаратное обеспечение, которое полностью совместимо и может внедрять инъекции пакетов. С помощью совместимой сетевой карты можно взломать беспроводную точку доступа менее, чем за час.
Чтобы определить к какой категории относится ваша карта, ознакомьтесь со страницей совместимости оборудования. Прочитайте Tutorial: Is My Wireless Card Compatible?, если не знаете, как обращаться с таблицей. Тем не менее, это не помешает вам при чтении руководства, которое поможет вам узнать что-то новое и убедиться в тех или иных свойствах вашей карты.
Для начала, вам нужно знать, какой чипсет используется в вашей сетевой карте и какой драйвер вам для него понадобится. Вам нужно определить это с помощью информации из абзаца выше. В разделе drivers вы узнаете, какие драйверы вам нужны.
Установка aircrack-ng
Последнюю версию aircrack-ng можно получить, скачав с главной страницы, или же вы можете воспользоваться дистрибутивом для проведения тестирования на проникновение, таким как Kali Linux или Pentoo, где стоит последняя версия aircrack-ng.
Чтобы установить aircrack-ng обратитесь к документации на странице установки.
Основы IEEE 802.11
Хорошо, теперь, когда все готово, пора сделать остановку прежде, чем мы начнем действовать, и узнать кое-что о том, как работают беспроводные сети.
Следующую часть важно понять, чтобы смочь разобраться в случае, если что-то будет работать не так, как ожидается. Понимание того, как все это работает, поможет вам найти проблему или, по крайней мере, правильно ее описать, чтобы кто-то другой смог вам помочь. Здесь все немного заумно, и, возможно вам захочется пропустить эту часть. Однако для взлома беспроводных сетей нужно немного знаний, и потому взлом – это чуть больше, чем просто набрать одну команду и позволить aircrack сделать все за вас.
Как найти беспроводную сеть
Эта часть – краткое введение в управляемые сети, которые работают с точками доступа (Access Point, AP). Каждая точка доступа посылает около 10 так называемых Бикон-фреймов (beacon frame) в секунду. Эти пакеты содержат следующую информацию:
- Имя сети (ESSID);
- Используется ли шифрование (и какое шифрование используется, но обратите внимание на то, что эта информация может не являться правдивой, только потому что точка доступа сообщает ее);
- Какие скорости передачи данных поддерживаются (в MBit);
- На каком канале находится сеть.
Именно эта информация отображается в инструменте, который подключается конкретно к этой сети. Она отображается, когда вы разрешаете карте сканировать сети с помощью iwlist <interface> scan
Каждая точка доступа обладает уникальным MAC-адресом (48 бит, 6 пар шестнадцатеричных чисел). Выглядит он примерно так: 00:01:23:4A:BC:DE. У каждого сетевого устройства есть такой адрес, и сетевые устройства взаимодействуют друг с другом с их помощью. Так что это что-то вроде уникального имени. MAC-адреса уникальны и нет двух устройств с одинаковыми MAC-адресами.
Подключение к сети
Есть несколько вариантов подключения к беспроводной сети. В большинстве случаев используется Open System Authentication. (По желанию: если вы хотите узнать больше об аутентификации, прочтите это.)
Open System Authentication:
- Запрашивает аутентификацию точки доступа;
- Точка доступа отвечает: OK, вы аутентифицированы.
- Запрашивает ассоциацию точки доступа;
- Точка доступа отвечает: ОК, вы подключены.
Это самый простой случай, но проблемы возникают, когда вы не имеете прав доступа, поскольку:
- Используется WPA/WPA2, и вам нужна аутентификация APOL. Точка доступа ответит отказом на втором шаге.
- У точки доступа есть список разрешенных клиентов (MAC-адресов) и она не позволит подключиться никому другому. Это называется фильтрация по MAC.
- Точка доступа использует Shared Key Authentication, то есть вам нужно предоставить правильный WEP-ключ, чтобы подключиться. (См. раздел «Как сделать поддельную аутентификацию с общим ключом?» чтобы узнать больше об этом)
Простой сниффинг и взлом
Обнаружение сетей
Первое, что нужно сделать – это найти потенциальную цель. В пакете aircrack-ng для этого есть airodump-ng, но можно использовать и другие программы как, например, Kismet.
Прежде чем искать сети, вы должны перевести свою карту так называемый «режим мониторинга». Режим мониторинга – это специальный режим, который позволяет вашему компьютеру прослушивать сетевые пакеты. Этот режим также позволяет внедрять инъекции. Об инъекциях мы поговорим в следующий раз.
Чтобы перевести сетевую карту в режим мониторинга, используйте airmon-ng:
airmon-ng start wlan0Так вы создадите еще один интерфейс и добавите к нему «mon». Итак, wlan0 станет wlan0mon. Чтобы проверить, действительно ли сетевая карта находится в режиме мониторинга, выполните iwconfig и убедитесь в этом сами.
Затем, запустите airodump-ng для поиска сетей:
airodump-ng wlan0monЕсли airodump-ng не сможет подключиться к WLAN-устройству, вы увидите что-то подобное:
airodump-ng
перескакивает с канала на канал и показывает все точки доступа, от которых он получает биконы. Каналы с 1 по 14 используются для стандартов 802.11 b и g (в США разрешено использовать только с 1 по 11; в Европе с 1 по 13 за некоторым исключением; в Японии с 1 по 14). 802.11a работает в диапазоне 5 ГГц, и его доступность варьируется в разных странах больше, чем в диапазоне 2,4 ГГц. В целом, известные каналы начинаются с 36 (32 в некоторых странах) по 64 (68 в некоторых странах) и с 96 по 165. В Википедии вы можете найти более подробную информацию о доступности каналов. В Linux о разрешении/запрете передачи по определенным каналам для вашей страны заботится
Central Regulatory Domain Agent
; однако он должен быть настроен соответствующим образом.
Текущий канал показан в левом верхнем углу.
Через некоторое время появятся точки доступа и (надеюсь) некоторые связанные с ними клиенты.
Верхний блок показывает обнаруженные точки доступа:
bssid
mac-адрес точки доступа
pwr
качество сигнала, когда выбран канал
pwr
сила сигнала. некоторые драйверы ее не сообщают.
beacons
количество полученных биконов. если у вас отсутствует показатель силы сигнала, вы можете измерить ее в биконах: чем больше биконов, тем лучше сигнал.
data
количество полученных фреймов данных
ch
канал, на котором работает точка доступа
mb
скорость или режим точки доступа. 11 – это чистый 802.11b, 54 – это чистый 802.11g. значения между этими двумя – это смесь.
enc
шифрование: opn: нет шифрования, wep: wep шифрование, wpa: wpa или wpa2, wep?: wep или wpa (пока неясно)
essid
имя сети, порой скрыто
Нижний блок показывает обнаруженные клиенты:
bssid
mac-адрес, с которым клиент ассоциируется у данной точки доступа
station
mac-адрес самого клиента
pwr
сила сигнала. некоторые драйверы ее не сообщают.
packets
количество полученных фреймов данных
probes
имена сети (essid), которые этот клиент уже апробировал
Теперь вам нужно следить за целевой сетью. К ней должен быть подключен хотя бы один клиент, поскольку взлом сетей без клиентов – это более сложная тема (см. раздел Как взломать WEP без клиентов). Она должна использовать WEP-шифрование и иметь хороший сигнал. Возможно, вы можете поменять положение антенны, чтобы улучшить прием сигнала. Иногда для силы сигнала несколько сантиметров могут оказаться решающими.
В примере выше есть сеть 00:01:02:03:04:05. Она оказалась единственной возможной целью, поскольку только к ней подключен клиент. А еще у нее хороший сигнал, поэтому она является подходящей целью для практики.
Сниффинг Векторов Инициализации
Из-за перескоков между каналами вы не будете перехватывать все пакеты из целевой сети. Поэтому мы хотим слушать только на одном канале и дополнительно записывать все данные на диск, чтобы в последствии иметь возможность использовать их для взлома:
airodump-ng -c 11 --bssid 00:01:02:03:04:05 -w dump wlan0mon С помощью параметра -с вы выбираете канал, а параметр после -w является префиксом сетевых дампов, записанных на диск. Флаг –bssid вместе с MAC-адресом точки доступа ограничивает получение пакетов до одной точки доступа. Флаг –bssid доступен только в новых версиях airodump-ng.
Перед взломом WEP, вам понадобится от 40 000 до 85 000 различных векторов инициализации (Initialization Vector, IV). Каждый пакет данных содержит вектор инициализации. Их можно переиспользовать, поэтому количество векторов обычно немного меньше, чем количество перехваченных пакетов.
Таким образом, вам придется подождать, чтобы перехватить от 40к до 85к пакетов данных (с IV). Если сеть не занята, это займет очень много времени. Вы можете ускорить этот процесс используя активную атаку (или атаку повторного воспроизведения). О них мы поговорим в следующей части.
Взлом
Есть у вас уже есть достаточно перехваченных векторов инициализации, которые хранятся в одном или нескольких файлах, вы можете попробовать взломать WEP-ключ:
aircrack-ng -b 00:01:02:03:04:05 dump-01.cap MAC-адрес после флага -b – это BSSID цели, а dump-01.cap – это файл, содержащий перехваченные пакеты. Вы можете использовать несколько файлов, для этого просто добавьте в команду все имена или воспользуйтесь символом подстановки, например dump*.cap.
Больше информации о параметрах aircrack-ng, выводе и использовании вы можете получить из руководства.
Количество векторов инициализации, необходимых для взлома ключа, не ограничено. Так происходит потому, что некоторые вектора слабее и теряют больше информации о ключе, чем другие. Обычно эти вектора инициализации смешиваются с более сильными. Так что, если вам повезет, вы сможете взломать ключ всего с 20 000 векторами инициализации. Однако часто и этого бывает недостаточно, aircrack-ng может работать долго (неделю или больше в случае высокой погрешности), а затем сказать вам, что ключ не может быть взломан. Чем больше у вас векторов инициализации, тем быстрее может произойти взлом и обычно это делает за несколько минут или даже секунд. Опыт показывает, что для взлома достаточно 40 000 – 85 000 векторов.
Существуют более продвинутые точки доступа, которые используют специальные алгоритмы, чтобы отфильтровывать слабые вектора инициализации. В результате вы не сможете получить больше, чем N векторов от точки доступа, либо вам понадобятся миллионы векторов (например, 5-7 миллионов), чтобы взломать ключ. Вы можете почитать на форуме, что делать в таких случаях.
Активные атаки
Большинство устройств не поддерживают инъекции, по крайней мере без пропатченных драйверов. Некоторые поддерживают только определенные атаки. Обратитесь к странице совместимости и посмотрите в столбец aireplay. Иногда эта таблица не дает актуальной информации, поэтому если вы увидите слово “NO” напротив вашего драйвера, не расстраивайтесь, а лучше посмотрите на домашнюю страницу драйвера, в список рассылок драйверов на нашем форуме. Если вам удалось успешно провести повторное воспроизведение с помощью драйвера, который не был включен в список поддерживаемых, не стесняйтесь предлагать изменения на странице таблицы совместимости и добавлять ссылку на краткое руководство. (Для этого нужно запросить учетную запись wiki на IRC.)
Для начала нужно убедиться, что инъекция пакетов действительно работает с вашей сетевой картой и драйвером. Самый простой способ проверить — это провести тестовую инъекционную атаку. Перед тем, как продолжать работу, убедитесь, что вы прошли этот тест. Ваша карта должна иметь возможность внедрять инъекции, чтобы вы могли выполнить следующие шаги.
Вам понадобится BSSID (MAC-адрес точки доступа) и ESSID (сетевое имя) точки доступа, которая не выполняет фильтрацию по MAC-адресам (например, ваша собственная), и находится в доступном диапазоне.
Попробуйте подключиться к точке доступа с помощью aireplay-ng:
aireplay-ng --fakeauth 0 -e "your network ESSID" -a 00:01:02:03:04:05 wlan0mon Значением после -а будет BSSID вашей точки доступа.
Инъекция сработала, если вы увидите что-то вроде этого:
12:14:06  Sending Authentication Request
12:14:06  Authentication successful
12:14:06  Sending Association Request
12:14:07  Association successful :-)
Если нет:
- Перепроверьте корректность ESSID и BSSID;
- Удостоверьтесь, что на вашей точке доступа отключена фильтрация по MAC-адресам;
- Попробуйте это же на другой точке доступа;
- Удостоверьтесь, что ваш драйвер правильно настроен и поддерживается;
- Вместо «0» попробуйте «6000 -o 1 -q 10».
ARP replay
Теперь, когда мы знаем, что инъекция пакетов работает, мы можем сделать что-нибудь, что сильно ускорит перехват векторов инициализации: атака инъекций ARP-запросов.
Основная идея
Если говорить простым языком, то ARP работает, передавая широковещательный запрос на IP-адрес, а устройство с этим IP-адресом отправляет обратно ответ. Поскольку WEP не защищает от повторного воспроизведения, вы можете сниффить пакет и отправлять его снова и снова, пока он валидный. Таким образом, вам нужно просто перехватить и воспроизвести ARP-запрос, отправленный точке доступа, чтобы создать траффик (и получить вектора инициализации).
Ленивый способ
Сначала откройте окно с airodump-ng, который сниффит трафик (см. выше). Aireplay-ng и airodump-ng могут работать одновременно. Дождитесь появления клиента в целевой сети и начинайте атаку:
aireplay-ng --arpreplay -b 00:01:02:03:04:05 -h 00:04:05:06:07:08 wlan0mon-b указывает на целевой BSSID, -h на MAC-адрес подключенного клиента.
Теперь вам нужно дождаться получения ARP-пакета. Обычно нужно ждать несколько минут (или прочитать статью дальше).
Если вам повезло, вы увидите что-то подобное:
Saving ARP requests in replay_arp-0627-121526.cap
You must also start airodump to capture replies.
Read 2493 packets (got 1 ARP requests), sent 1305 packets...
Если вам нужно прекратить воспроизведение, то не нужно ждать появления следующего ARP-пакета, вы можете просто использовать ранее перехваченные пакеты с помощью параметра -r <filename>
При использовании ARP-инъекций, вы можете использовать метод PTW для взлома WEP-ключа. Он значительно сокращает количество необходимых пакетов, а с ними и время на взлом. Вам нужно перехватить полный пакет с помощью airodump-ng, то есть не использовать опцию “--ivs” при выполнении команды. Для aircrack-ng используйте “aircrack -z <file name>”
Если количество пакетов данных получаемых airodump-ng перестает увеличиваться, вам, возможно, придется уменьшить скорость воспроизведения. Сделайте это с помощью параметра -x <packets per second>
Агрессивный способ
Большинство операционных систем очищают кэш ARP при отключении. Если нужно отправить следующий пакет после повторного подключения (или просто использовать DHCP), они отправляют ARP-запрос. В качестве побочного эффекта вы можете сниффить ESSID и, возможно, keystream во время переподключения. Это удобно, если ESSID вашей цели скрыт или она использует shared-key authentication.
Пускай airodump-ng и aireplay-ng работают. Откройте еще одно окно и запустите атаку деаутентификации:
Здесь -a – это BSSID точки доступа, -с МАС-адрес выбранного клиента.
Подождите несколько секунд и ARP replay заработает.
Большинство клиентов пытаются восстановить соединение автоматически. Но риск того, что кто-то распознает эту атаку, или, по крайней мере, проявит внимание к тому, что происходит на WLAN, выше, чем при других атаках.
Больше инструментов и информации о них, вы найдете здесь.