-
Contents
-
Table of Contents
-
Bookmarks
Quick Links
User Guide
English ( 3 – 9 )
Guía del usuario
Español ( 10 – 16 )
Guide d’utilisation
Français ( 17 – 23 )
Guida per l’uso
Italiano ( 24 – 30 )
Benutzerhandbuch
Deutsch ( 31 – 37 )
Appendix
English ( 38 )
Related Manuals for Alesis Nitro
Summary of Contents for Alesis Nitro
-
Page 1
User Guide English ( 3 – 9 ) Guía del usuario Español ( 10 – 16 ) Guide d’utilisation Français ( 17 – 23 ) Guida per l’uso Italiano ( 24 – 30 ) Benutzerhandbuch Deutsch ( 31 – 37 ) Appendix English ( 38 ) -
Page 3: Quick Start / Connection Diagram
Introduction Support For the latest information about this product (system requirements, compatibility information, etc.) and product registration, visit alesis.com. For additional product support, visit alesis.com/support. Quick Start / Connection Diagram Setup and Playing Crash 2 Cymbal Pad* Tom 4 Drum Pad*…
-
Page 4: Front Panel
Features Front Panel 1. Display: Shows the module’s current settings and functions. 2. Song/Pattern: In Normal Mode, press this button to enter the Song Menu, where you can select a song or adjust song-related settings. In Learning Mode, press this button to enter the Pattern Menu, where you can select a pattern (full kit plus accompaniment) to play along to or adjust pattern-related settings.
-
Page 5: Rear Panel
Rear Panel 1. Outputs: Use standard 1/4″ TRS cables to connect these outputs to a speaker or amplifier system. The level of these outputs is controlled by the Volume knob. 2. Aux In: Use a standard 1/8″ stereo cable to connect this input to an optional audio player (e.g,.
-
Page 6: Editing And Saving Drum Kits
Basic Functions Editing and Saving Drum Kits Important: • To edit and save your kits, you must be in Normal Mode. If the LED above the Song/Pattern button is not lit, press and hold Page/Select until it is. • Remember to save your kits after you have entered the settings you want! First, press Kit until NUM appears in the display.
-
Page 7: Playing Along With Songs
Playing Along With Songs Important: To play songs, you must be in Normal Mode. If the LED above the Song/Pattern button is not lit, press and hold Page/Select until it is. To select and play a song: 1. Press Song until NUM appears in the display. 2.
-
Page 8: Adjusting Utility Settings/Metronome
Advanced Functions Adjusting Utility Settings The Utility settings let you further customize your pad settings and adjust the module’s MIDI settings. To adjust the Utility settings: Hit the pad whose settings you want to adjust, or press its corresponding Pad Select button. Press Utility, then press Page/Select until the desired setting appears in the display: •…
-
Page 9: Midi Settings
Stop recording on your sequencer. Your performance has been recorded. Notes: • Pressing Start/Stop to start/stop Song playback generates the MIDI message FA (start) or FC (stop). • When syncing the module with another MIDI device, the Nitro module can only be the master, not the slave.
-
Page 10: Inicio Rápido Y Diagrama De Conexión
Introducción Soporte Para obtener la información más completa acerca de este product (los requisitos del sistema, compatibilidad, etc) y registro del producto, visite alesis.com. Para soporte adicional del producto, visite alesis.com/support. Inicio rápido y diagrama de conexión Cómo instalarlo y tocar…
-
Page 11: Panel Frontal
Características Panel frontal Pantalla: Muestra los parámetros y funciones actuales del módulo. Tema/Patrón: En modo normal, pulse este botón para abrir el menú Song (Tema), en el que puede seleccionar un tema o ajustar parámetros relacionados con el tema. En modo de aprendizaje, pulse este botón para abrir el menú…
-
Page 12: Panel Superior
Panel superior 1. Salidas: Use cables estándar TRS de 1/4 pulg. para conectar estas salidas a un altavoz o sistema de amplificador. El nivel de estas salidas se controla con la perilla Volume. 2. Entrada auxiliar: Use un cable estéreo estándar de 1/8 pulg.
-
Page 13
Funciones básicas Cómo editar y guardar los kits de batería Importante: • Para editar y guardar sus kits, debe estar en modo normal. Si el LED que está arriba del botón Song/Pattern no está encendido, mantenga pulsado Page/Select hasta que se encienda. •… -
Page 14
Cómo tocar con temas de acompañamiento Importante: Para reproducir temas, debe estar en modo normal. Si el LED que está arriba del botón Song/Pattern no está encendido, mantenga pulsado Page/Select hasta que se encienda. Para seleccionar y reproducir un tema: Pulse Song (Tema) hasta que aparezca NUM en la pantalla. -
Page 15: Funciones Avanzadas
Funciones avanzadas Cómo ajustar los parámetros de la utilidad Los parámetros Utility (Utilidad) le permiten personalizar más aún los parámetros de sus pads y ajustar los parámetros MIDI. Para ajustar los parámetros de la utilidad: Toque el pad cuyos parámetros desea ajustar o pulse su botón Pad Select (Selección de pad) correspondiente. Pulse Utility y luego Page/Select hasta que aparezca el parámetro deseado en la pantalla: •…
-
Page 16
Al pulsar Start/Stop para iniciar/parar la reproducción del tema, se genera el mensaje MIDI FA (inicio) o FC (parada). • Cuando sincroniza el módulo con otro dispositivo MIDI, el módulo Nitro sólo puede ser el maestro y no el esclavo. -
Page 17: Français
Introduction Assistance Pour les dernières informations concernant ce produit (la configuration système minimale requise, la compatibilité, etc) et l’enregistrement du produit, veuillez visitez le site alesis.com. Pour de plus amples informations, visitez alesis.com/support. Utilisation rapide / schéma de connexion Mise en route installation…
-
Page 18: Caractéristiques
Caractéristiques Panneau avant Écran : Cet écran affiche tous les paramètres et les fonctions en cours du module. Touche Song/Pattern : En mode Normal, appuyez sur cette touche afin d’accéder au menu Song, d’où vous pouvez sélectionner une chanson, ou encore, modifier les paramètres de la chanson.
-
Page 19: Panneau Supérieur
Panneau supérieur 1. Sorties : Utilisez des câbles TRS 1/4 po (6,35 mm) standards afin de brancher ces sorties à un haut-parleur ou à un système de sonorisation. Le niveau de ces sorties est commandé par le bouton Volume. 2. Entrée Aux : Utilisez un câble 1/8 po (3,5 mm) standard afin de brancher cette entrée à…
-
Page 20: Fonctions De Base
Fonctions de base Modification et enregistrement des ensembles de sons de batterie Important : • Pour modifier et enregistrer vos ensembles, le module doit être en mode Normal. Si la DEL au-dessus de la touche Song/Pattern n’est pas allumée, enfoncez la touche Page/Select jusqu’à…
-
Page 21
Utilisation de chansons d’accompagnement Important : Pour faire jouer des chansons, le module doit être en mode Normal. Si la DEL au-dessus de la touche Song/Pattern n’est pas allumée, enfoncez la touche Page/Select jusqu’à ce qu’elle s’allume. Remarque : Pendant la lecture, les touches de sélection s’allumeront à indiquer lesquelles batteries sonnent. -
Page 22: Fonctions Évoluées
Fonctions évoluées Réglage des paramètres utility Les paramètres Utility vous permettent de personnaliser encore plus les paramètres des pads et MIDI. Pour modifier les paramètres Utility : Frappez maintenant le pad pour lequel vous désirez modifier les paramètres ou appuyez sur la touche de sélection correspondante.
-
Page 23
Appuyez sur la touche Start/Stop afin de lancer/arrêter la lecture d’une chanson génère des messages MIDI FA (lancer) ou FC (arrêter). • Lors de la synchronisation du module à un autre appareil MIDI, le module Nitro est toujours le maître, il ne peut être l’esclave. -
Page 24: Inizio Rapido/Schema Dei Collegamenti
Assistenza Per conoscere le ultime informazioni in merito a questo prodotto (i requisiti di sistema complete, compatibilità, ecc) e per la registrazione del prodotto, recarsi alla pagina alesis.com. Per ulteriore assistenza, recarsi alla pagina alesis.com/support. Inizio rapido / schema dei collegamenti…
-
Page 25: Pannello Superiore
Caratteristiche Pannello superiore Display: Mostra le attuali impostazioni e formazioni del modulo. Song/Pattern: In modalità normale, premere questo tasto per entrare nel menu canzoni (Song), dove sarà possibile scegliere una canzone o regolare configurazioni relative alle canzoni. In modalità di apprendimento, premere questo tasto per entrare nel menù…
-
Page 26: Pannello Anteriore
Pannello anteriore 1. Uscite: Servirsi di cavi TRS standard da 1/4″ per collegare queste uscite ad un altoparlante impianto amplificatori. Il livello di queste uscite è controllato dalla manopola Volume. 2. Ingresso Aux: Servirsi di un cavo stereo standard da 1/8″ per collegare questo ingresso ad un lettore audio opzionale (ad es.
-
Page 27
Funzioni base Modifica e salvataggio dei set batteria Importante: • Per modificare e salvare i set, bisogna essere in modalità normale. Se il LED al di sopra del tasto Song/Pattern non è acceso, tenere premuto Page/Select finché non si accende. •… -
Page 28
Suonare a tempo con le canzoni Importante: per suonare le canzoni, occorre essere in modalità normale. Se il LED al di sopra del tasto Song/Pattern non è acceso, tenere premuto Page/Select finché non si accende. Per selezionare e riprodurre una canzone: Premere Song fino a quando a display non compare NUM. -
Page 29: Registrazione
Funzioni avanzate Regolazione delle impostazioni utilità Le impostazioni delle Utilità consentono di personalizzare ulteriormente le configurazioni dei pad e di regolare le impostazioni MIDI del modulo. Per regolare le configurazioni delle Utilità: Battere il pad le cui configurazioni si desidera regolare, oppure premere il tasto Pad Select corrispondente. Premere Utility, quindi premere Page/Select fino a quando la configurazione desiderata non compare a display: •…
-
Page 30: Impostazioni Midi
La pressione di Start/Stop per avviare/interrompere la riproduzione della canzone genera il messaggio MIDI FA (avvio) o FC (stop). • Al momento di sincronizzare il modulo con un altro dispositivo MIDI, il modulo Nitro può solo essere il master, non lo slave.
-
Page 31: Schnellstart / Anschlussdiagramm
Benutzerhandbuch (Deutsch) Einführung Kundendienst Die neuesten Informationen zu diesem Produkt (Systemanforderungen, Kompatibilitätsinformationen usw.) und die Registrierung Ihres Produkts finden Sie auf alesis.com. Für zusätzlichen Produkt-Support besuchen Sie alesis.com/support. Schnellstart / Anschlussdiagramm Einrichten und Spielen Crash 2 Becken-Pad Tom 4 Drum Pad separat erhältlich…
-
Page 32
Funktionen Vorderseite Display: Zeigt die aktuellen Einstellungen und Funktionen des Moduls an. Song/Vorlage: Drücken Sie diese Taste im Normal- Modus, um das Song-Menü aufzurufen, in dem Sie einen Song auswählen oder Song-Einstellungen anpassen können. Drücken Sie diese Taste im Lernmodus, um ins Vorlage-Menü… -
Page 33
Oberseite 1. Ausgänge: Verwenden Sie handelsübliche 1/4″ TRS-Kabel, um diese Ausgänge an einen Lautsprecher oder Verstärkersystem anzuschließen. Lautstärke dieser Ausgänge steuern Sie über den Lautstärke- Regler. 2. Aux In: Verwenden Sie ein handelsübliches Miniklinke 1/8″-Stereokabel, um diesen Eingang mit einem optionalen Audio-Player zu verbinden (z.B. MP3-Player, CD-Player etc.). -
Page 34
Grundfunktionen Drum Kits Bearbeiten und Speichern Wichtig: • Um Ihre Kits zu bearbeiten und zu speichern müssen Sie sich im Normal-Modus befinden. Wenn oberhalb Song/Vorlage-Taste nicht leuchtet, halten Seite/Auswählen bis sie leuchtet. • Denken Sie daran Ihre Kits zu speichern, nachdem Sie die gewünschten Einstellungen eingegeben haben! Drücken Sie zuerst Kit bis NUM am Display erscheint. -
Page 35
Songs Begleiten Wichtig: Um Songs abzuspielen, müssen Sie sich im Normal-Modus befinden. Wenn die LED oberhalb der Song/Vorlage-Taste nicht leuchtet, halten Sie Seite/Auswählen gedrückt bis sie leuchtet. Hinweis: Während der Wiedergabe leuchten die Pad-Auswahltasten auf, um anzuzeigen, welche Drums spielen. Um diese Funktion zu deaktivieren bzw. -
Page 36: Erweiterte Funktionen
Erweiterte Funktionen Anpassen der Optionen Mit den Optionen können Sie Ihre Pad-Einstellungen und die MIDI-Einstellungen des Moduls weiter anpassen. So passen Sie die Optionen an: Betätigen Sie das Pad, dessen Einstellungen Sie anpassen möchten oder drücken Sie die entsprechende Pad- Auswahltaste.
-
Page 37
Wenn Sie Start/Stopp drücken, um die Song-Wiedergabe zu starten/stoppen, wird eine MIDI-Nachricht FA (Start) oder FC (Stopp) erzeugt. • Bei der Synchronisierung des Moduls mit einem anderen MIDI-Gerät kann das Nitro Modul nur als Master und nicht als Slave verwendet werden. -
Page 38: Velocity Curves
Appendix (English) Velocity Curves Curve 1 Curve 2 Curve 3 Volume Volume Volume Velocity (striking Velocity (striking Velocity (striking Curve 4 Curve 5 Curve 6 Volume Volume Volume Velocity (striking Velocity (striking Velocity (striking Pad MIDI Note Numbers Trigger MIDI Note Number Trigger MIDI Note Number Kick…
-
Page 39: Technical Specifications
Specifications are subject to change without notice. Trademarks and Licenses Alesis is a trademark of inMusic Brands, Inc., registered in the U.S. and other countries. All other product or company names are trademarks or registered trademarks of their respective owners.
-
Page 40
Manual Version 1.0…
This manual is also suitable for:
Dm7x
Introduction
Support
For the latest information about this product (system requirements, compatibility information, etc.) and product registration, visit alesis.com.
For additional product support, visit alesis.com/support.
Quick Start / Connection Diagram
Setup and Playing

- Connect your electronic drum kit’s pads to the cable snake, then connect the cable snake to the Cable Snake Input on the module’s rear panel.
- Optional: If you have any additional pads (e.g., an extra tom, an extra crash cymbal), connect them to the module’s Tom 4 Input or Crash 2 Input.
- Connect speakers (sold separately) to the Outputs and/or connect 1/8″ stereo headphones (sold separately) to the Phones output. Turn the Volume knob all the way down (counterclockwise).
- Connect the module to a power source, using the included power adapter (9 VDC, 500 mA, center positive).
- Press the Power Switch to turn the module on.
- Adjust the Volume knob to an appropriate level and play some drums!
Selecting a Drum Kit: After powering on the module, or after pressing the Kit button, you will see the Kit indicator and NUM in the display. Use the < and > buttons to select a drum kit, and start playing! You can also preview the sounds (at a fixed velocity) by pressing the Pad Select buttons. Kits 01-24 are Preset Kits. Kits 25-40 are User Kits (see Editing and Saving Drum Kits for more information).
Note: If the LED above the Song/Pattern button is not lit, press and hold Page/Select until it is.
Using the Metronome: You can turn the metronome («click track») on or off by pressing the Click button. Adjust its tempo by pressing Tempo and using the < and > buttons to set the new BPM (beats per minute). See Adjusting the Metronome for more information about metronome features.
Features
Front Panel

- Display: Shows the module’s current settings and functions.
- Song/Pattern: In Normal Mode, press this button to enter the Song Menu, where you can select a song or adjust song-related settings. In Learning Mode, press this button to enter the Pattern Menu, where you can select a pattern (full kit plus accompaniment) to play along to or adjust pattern-related settings.
Note: The LEDs above and below this button indicate whether the module is in Normal Mode or Learning Mode, respectively. - Kit/Rhythm: In Normal Mode, press this button to enter the Kit Menu, where you can select a kit or adjust kit-related settings. In Learning Mode, press this button to select a rhythm (full kit) to play along to or adjust pattern-related settings.
- Voice/Beat: In Normal Mode, press this button to enter the Voice Menu, where you can select a voice (drum sound) or adjust voice-related settings. In Learning Mode, press this button to select a beat (snare drum only) to play along to or adjust pattern-related settings.
- Page/Select: Press this button to cycle through the available settings for the current mode/menu. Press and hold this button for one second to switch the three buttons above it between Normal Mode and Learning Mode.
- Volume: Adjusts the output volume of the Main Out and Phones.
- Start/Stop: Press this to start/stop playback or recording.
- Save: Press this to save your current kit settings.
- < / >: Use these arrow buttons to change the value of the setting shown in the display. (Usually, this adjusts numerical values, such as kit numbers or effects levels.)
- Click: Press this to turn the metronome («click track») on/off. See the Adjusting the Metronome section for more information.
- Drum Off: When this button is on, its LED will be lit and the pre-recorded drum part will be muted so you can hear only your performance and any accompaniment (backing music). Press it again to hear the pre-recorded drum part. (This button will automatically be on while recording.)
- Record: Press this button once to record-arm the module. Its LED will flash. To start recording, press Start/Stop or hit a pad. When recording, its LED will light solid. (To stop recording, press Start/Stop again.) See the Recording section for more information.
- Tempo: Press this to show the current tempo in BPM (beats per minute) in the display. Use the < or > buttons to change the tempo.
- Utility: Press this button to access advanced settings for the pads as well as the module’s MIDI settings. See the Adjusting Utility Settings section for more information.
- Play/Practice: In Normal Mode, press this button to hear a recorded performance. In Learning Mode, press this button to start playing the beat, rhythm, or pattern; you can then play along to it without being scored. Press and hold this button for 2 seconds to hear the playback of your practice (every practice is automatically recorded). Press it again to stop playback.
- Pad Select Buttons: Press these buttons to preview the voices (drum sounds) used for each part of the kit, represented by the buttons. (After pressing the Snare button or any of the Tom buttons, you can press the Rim button to hear the voice used as the rim sound of that drum.)
Rear Panel

- Outputs: Use standard 1/4″ TRS cables to connect these outputs to a speaker or amplifier system. The level of these outputs is controlled by the Volume knob.
- Aux In: Use a standard 1/8″ stereo cable to connect this input to an optional audio player (e.g,. MP3 player, CD player, etc.). This audio will be heard in the Outputs and Phonesoutput. During recording, the audio from this input will not be recorded.
- Tom 4 Input: Use a standard 1/4″ TRS cable to connect this input to an optional drum pad, which will trigger the Tom 4 sound.
- Crash 2 Input: Use a standard 1/4″ TS cable to connect this input to an optional cymbal pad, which will trigger the Crash 2 sound.
- MIDI Out: Use a standard five-pin MIDI cable to connect this output to the MIDI In of an external MIDI device.
- MIDI In: Use a standard five-pin MIDI cable to connect this input to the MIDI Out of an external MIDI device.
- USB: This connection will allow you to send MIDI information to a computer. Use a USB cable (sold separately) to connect the module to an available USB port on your computer.
Note: Only MIDI information is sent over the USB connection, not audio.
Side Panels

- Power Connection:Connect the included power adapter (9V DC, 500mA, center pinpositive) here, then connect the adapter to wall power.
- Power Button: Press this button to turn the module on. Press and hold it for a second then release it to power the module off.
- Phones: Connect a set of 1/8″ stereo headphones to this output.
Note: To save energy, the drum module will shut down automatically after 30 minutes of no activity. If you do not need this feature or want to adjust the shutdown time, do the following:
- Power on the drum module.
- Press Utility.
- Use the < / > buttons to select the Power Page (POW).
- Use the < / > buttons to adjust the shutdown time (30 – 60 minutes, or OFF).
Basic Functions
Editing and Saving Drum Kits
- To edit and save your kits, you must be in Normal Mode. If the LED above the Song/Pattern button is not lit, press and hold Page/Select until it is.
- Remember to save your kits after you have entered the settings you want!
First, press Kit until NUM appears in the display. Use the < and > buttons to select your desired kit. Once you’ve selected your kit, you can edit its settings:
To adjust the kit settings:
- Press Kit, then press Page/Select until the desired setting appears in the display:
- VOL: Kit volume
- REV*: Kit reverb
- EQH*: Equalization, high frequencies
- EQM*: Equalization, mid frequencies
- EQL*: Equalization, low frequencies
- Use the < and > buttons to adjust the value.
* The reverb and equalization affect the sound of the kit, song, and the output of a connected MIDI device when that kit is selected.
To adjust the pad settings:
- Hit the pad whose settings you want to adjust, or press its corresponding Pad Select button.
- Press Voice, then press Page/Select until the desired setting appears in the display:
- NUM / H-C**: Pad voice (drum sound)
- VOL: Pad volume
- PAN: Pad panning
- PIT: Pad pitch
- REV: Pad reverb
- MID: MIDI note. See the Appendix for a list of the default MIDI note numbers for each pad.
- P-S: Pad song switch (selects whether or not a song will play when that pad is struck)
- P-N***: Pad song number (selects which song will play when that pad is struck, if PS is set to ON)
- Use the < and > buttons to adjust the value.
** If the selected pad is the Hi-Hat, you can choose one of the combinations of open and closed hi-hat sounds (H-C, 001-007).
*** Songs 61-80 are pitched, nondrum samples (e.g., bass, piano, vibraphone, etc.) rather than actual songs, so they’re ideal for assigning to a pad, when selecting the «pad song number.» They will change pitch with each hit. Songs 1-60 are actual songs
To save your settings:
- Press Save.
- Use the < and > buttons to select the User Kit slot you want to save it to (25-40).
- Press Save again.
Playing Along With Songs
To play songs, you must be in Normal Mode. If the LED above the Song/Pattern button is not lit, press and hold Page/Select until it is.
To select and play a song:
- Press Song until NUM appears in the display.
- Use the < and > buttons to select the song.
- Press Start/Stop to start playback.
Note:During playback, the Pad Select buttons will light up to indicate which drums are playing. To disable/re-enable this feature, press the «Kick» Pad Select button.
Adjust the tempo by pressing Tempo and using the < and > buttons to set the new BPM. Press both < and > buttons simultaneously to reset the tempo to its default value.
Adjust the volume of the music (not the drum part) by pressing Song, then pressing Page/Select until ACC appears in the display. Use the < and > buttons to adjust the volume. (It will return to its default setting if you power the module off.)
Adjust the volume of the drum part by pressing Song, then pressing Page/Select until DRM appears appears in the display. Use the < and > buttons to adjust the volume. To mute/unmute the drum part entirely, press Drum Off. (It will return to its default setting if you power the module off.)
Playing Along With Beats, Rhythms, and Patterns
To play along with patterns, you must be in Learning Mode. If the LED under the Song/Pattern button is not lit, press and hold Page/Select until it is.
- Press one of the Learning Mode buttons to select how you want to play:
- Beat (BEA): Snare drum only
- Rhythm (RHM): Full kit
- Pattern (PTN): Full kit plus musical accompaniment
- Use the < and > buttons to select the beat, rhythm, or pattern you want to practice.
- To practice without being scored, press Play/Practice (PRA will appear on the display). After a count-in, the beat, rhythm, or pattern will repeat so you can practice it.
To play and be scored, press Start/Stop. After a count-in (EXM will appear on the display), the beat, rhythm, or pattern will play once without the drum part. Play the drum part as accurately as possible. At the end, you will receive a score (SCO) based your accuracy. To improve your score, practice the beat, rhythm, or pattern without being scored (see above) and try again!
Every practice is automatically recorded. Press and hold Play/Practice for 2 seconds to hear the playback of your practice (PLY). Press Play/Practice again to stop playback.
Notes:
- If EPY appears on the display, it means the memory is empty because no recording was made. Play while scoring your performance (as described above) to record.
- If FUL appears on the display, it means the module’s memory became full while recording. You can clear/overwrite the memory by simply making a new recording.
To adjust the Learning Mode settings:
Each Learning Mode has different adjustable settings. Press the desired Learning Mode button (Beat, Rhythm, or Pattern), then keep pressing Page/Select to cycle through the settings, and use the < and > buttons to adjust their values:
- Beat (BEA): (DRM) Drum volume
- Rhythm (RHM): (LEV) Difficulty level; (DRM) Drum volume
- Pattern (PTN): (LEV) Difficulty level; (ACC) Accompaniment; (DRM) Drum volume
Advanced Functions
Adjusting Utility Settings
The Utility settings let you further customize your pad settings and adjust the module’s MIDI settings.
To adjust the Utility settings:
- Hit the pad whose settings you want to adjust, or press its corresponding Pad Select button.
- Press Utility, then press Page/Select until the desired setting appears in the display:
- SEN (Pad sensitivity): Controls how responsive a pad is when you hit it. The higher the value, the less forcefully you need to play to generate a loud hit.
- THR (Pad threshold): Controls how forcefully you have to hit the pad to generate a sound. The higher the value, the harder you have to hit it.
- CRO (Pad crosstalk): Crosstalk is the unintentional triggering of a pad when an adjacent pad is hit. The higher the value, the less likely the pad will be triggered by crosstalk.
- CUR (Pad velocity curve): Controls the pad’s dynamic response relative to the force (velocity) of your hit. The curves are shown in the Appendix.
- R-S (Pad rim sensitivity): Controls how responsive a pad’s rim is when you hit it.
- S-S (Hi-Hat «splash» sensitivity): Controls how responsive the hi-hat «splash» effect is when you hit the pedal. (To create this sound, tap your foot on the pedal but lift it up immediately instead of leaving your foot down.)
- LOC (Local Mode): See MIDI Settings for more information.
- GM (General MIDI Mode): See MIDI Settings for more information.
- Use the < and > buttons to adjust the value.
To save the settings, press Save. Otherwise, they will return to their default settings when you power the module off.
Adjusting the Metronome
The module’s built-in metronome can be used when practicing, performing, recording, or playback.
Using the metronome:
You can turn the metronome («click track») on or off by pressing the Click button. Adjust its tempo by pressing Tempo and using the < and > buttons to set the new BPM (beats per minute).
To adjust the metronome settings:
- Turn on the metronome (by pressing Click), then press Page/Select until the desired setting appears in the display:
- SIG (Time signature): The time signature the metronome is counting. (When a «0» is selected as the first number, the first beat will not be indicated by a different metronome sound; every beat will have the same sound.)
- INT (Interval): The subdivisions that the metronome will play.
- VOL (Volume): The metronome volume.
- VOC (Voice): The metronome sound.
- Use the < and > buttons to adjust the value. The settings will be automatically saved.
Recording
To record:
- If the LED above the Song/Pattern button is not lit, press and hold Page/Select until it is.
- Press Record. The button’s LED will flash and the metronome will turn on automatically. This means the module is record-armed.
- To start recording, press Start/Stop, or hit any pad. The Record LED will light solid. (To cancel recording instead, press Record again.)
- To stop recording, press Start/Stop, or press Record. The Record LED will turn off.
- To play the recording, press Play/Practice. Press it again to stop playback.
Notes:
- In Learning Mode, your performances are automatically recorded.
- If FUL appears on the display, it means the module’s memory became full while recording. You can clear/overwrite the memory by simply making a new recording.
To record your performance with a Song:
- Adjust the Song number (SNG) (as described in the To adjust the recording settings section below).
- Start recording (as described in the To record section above).
- To play the recording, press Play/Practice. Press it again to stop playback.
To adjust the recording settings:
- If the LED above the Song/Pattern button is not lit, press and hold Page/Select until it is.
- Press Record. The button’s LED will flash and the metronome will turn on automatically. This means
- the module is record-armed.
- Press Page/Select until the desired setting appears in the display:
- SNG (Song number): The song that will play in the background.
- KIT (Kit): The drum kit that will be recorded.
- BPM (Tempo): The recording tempo.
- SIG (Time signature): The recording time signature.
- INT (Interval): The subdivisions that the metronome will play.
- DRM (Drum off): When not set to a song (—) or when set to Song 61-80, this setting is disabled because an actual song is not selected (Songs 61-80 are actually just samples that can be assigned to the pads). When set to Song 1-60, you can set this to ON or OFF to turn the original drum part on or off. Alternatively, you can press the Drum Off button.
- PRC (Pre-count): When set to ON, there will be a one-measure count-in before the recording starts. When set to OFF, the recording will start immediately after you press Start/Stop or hit a pad.
- Use the < and > buttons to adjust the value. The settings will be automatically saved.
MIDI Settings
You can connect the drum module to an external MIDI module or device, allowing you to:
- use a connected electronic drum kit to trigger sounds in the external module
- use another MIDI device to trigger sounds in the drum module
To change the MIDI note number sent by each pad, see the To adjust the pad settings section under Editing and Saving Drum Kits.
To adjust the MIDI settings:
- Hit the pad whose settings you want to adjust, or press its corresponding Pad Select button.
- Press Utility, then press Page/Select until the desired setting appears in the display:
- LOC (Local Mode):
- When set to ON, playing your electronic drum kit will trigger the sounds in the drum module.
- When set to OFF, playing your electronic drum kit will trigger sounds in a sound module connected to the module’s MIDI Out, bypassing the drum module’s sound library.
- GM (General MIDI Mode): See Accessing the module’s programs below for more information. o When set to ON, Channel 10 in the drum module will use General MIDI percussion sounds.
- When set to OFF, Channel 10 in the drum module will use the module’s internal drum sounds.
- Use the < and > buttons to adjust the value.
Accessing the module’s programs: You can use an external MIDI device (e.g., a MIDI keyboard or sequencer) to access the drum module’s other sound libraries («programs»), such as piano, bass, strings, etc. Select a different program by sending a Program Change message from your external device. Each program uses a dedicated MIDI channel (1-16). Channel 10 is reserved for the drum sounds.
To record to an external sequencer:
- Use a standard MIDI cable (sold separately) to connect the drum module’s MIDI Out to your sequencer’s MIDI In. Use another MIDI cable to connect the sequencer’s MIDI Out to your module’s MIDI In.
- Set the active track of your sequencer to Channel 10, and start recording.
- Play your electronic drum kit!
- Stop recording on your sequencer. Your performance has been recorded.
Notes:
- Pressing Start/Stop to start/stop Song playback generates the MIDI message FA (start) or FC (stop).
- When syncing the module with another MIDI device, the Nitro module can only be the master, not the slave.
Here you can download full pdf version of manual, it may contain additional safety instructions, warranty information, FCC rules, etc.
Посмотреть инструкция для Alesis Nitro Mesh Kit бесплатно. Руководство относится к категории без категории, 9 человек(а) дали ему среднюю оценку 8.5. Руководство доступно на следующих языках: английский. У вас есть вопрос о Alesis Nitro Mesh Kit или вам нужна помощь? Задайте свой вопрос здесь
Главная
| Alesis | |
| Nitro Mesh Kit | NITRO MESH KIT | |
| без категории | |
| английский | |
| Руководство пользователя (PDF), Инструкция/сборка (PDF) |
Не можете найти ответ на свой вопрос в руководстве? Вы можете найти ответ на свой вопрос ниже, в разделе часто задаваемых вопросов о Alesis Nitro Mesh Kit.
Инструкция Alesis Nitro Mesh Kit доступно в русский?
Не нашли свой вопрос? Задайте свой вопрос здесь

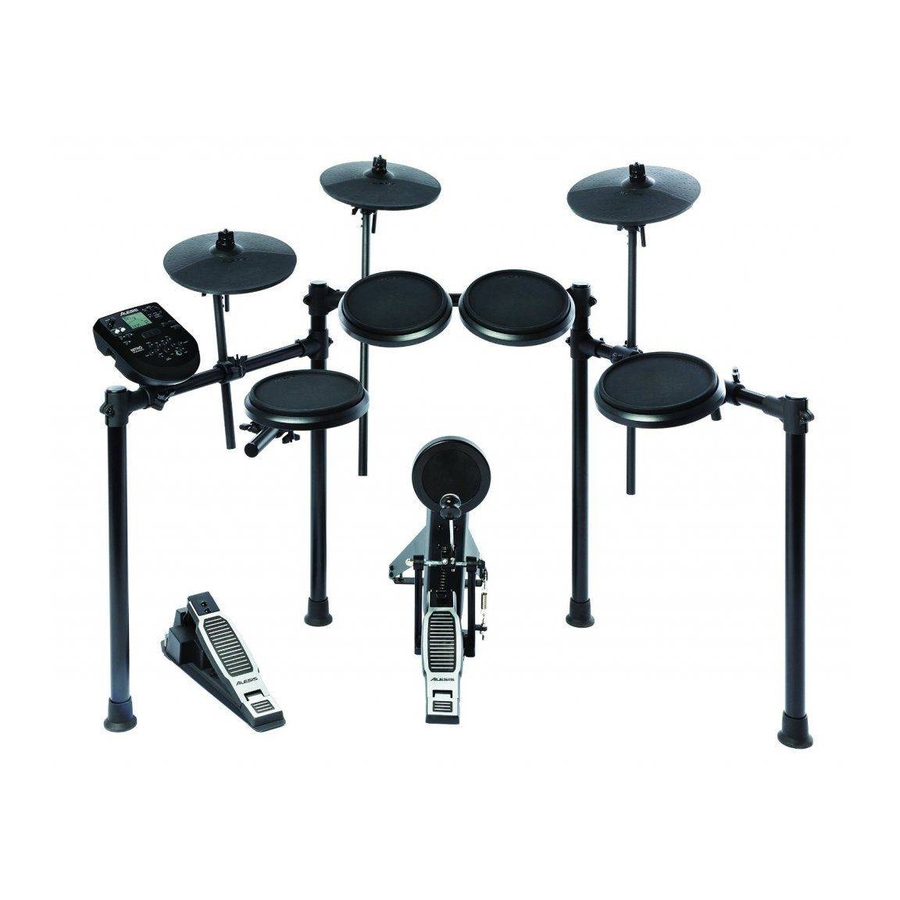
ALESIS NITRO MESH KIT — это полноценная электронная барабанная установка, имеющая восемь ударных поверхностей, созданная с применением технологии нового поколения — ALESIS MESH HEAD (сетчатый пластик). Сердцем этой установки является мощный модуль NITRO с сотнями звуков, различными вариантами барабанных установок и готовыми музыкальными композициями. В этом обзоре мы разберем основные функции и возможности этого модуля.
.jpg")
1. Дисплей: показывает текущие настройки модуля и основные функции.
2. Song/Pattern: в обычном режиме нажмите на эту кнопку для входа в меню песни, где вы можете выбрать песню или изменить настройки, связанные с песней. В режиме обучения, нажмите на эту кнопку, чтобы войти в меню паттернов, где можно выбрать паттерн (барабанный рисунок и аккомпанемент), подыгрывать или корректировать настройки, связанные с паттерном.
Примечание. Светодиоды над и под этой кнопкой указывают в каком режиме находится модуль: в обычном режиме или режиме обучения соответственно.
3. Kit/Rhythm: в обычном режиме нажмите на эту кнопку, чтобы войти в меню барабанных пресетов, где вы можете выбрать пресет или отрегулировать настройки, связанные с барабанными пресетами. В режиме обучения, нажмите эту кнопку, чтобы выбрать ритм (полноценный пресет), под который можно играть, или отрегулировать настройки, связанные с ритмом.
4. Voice/Beat: в обычном режиме нажмите на эту кнопку, чтобы войти в голосовое меню, где вы можете выбрать голос (звук ударных) или отрегулировать настройки, связанные с подбором звука инструмента. В режиме обучения нажмите на эту кнопку, чтобы выбрать долю (только для малого барабана) для игры или отрегулировать настройки, связанные с паттерном.
5. Page/Select: Нажмите на эту кнопку для просмотра доступных настроек для текущего режима или меню. Нажмите и удерживайте эту кнопку в течение одной секунды, чтобы переключить три кнопки выше между обычным режимом и режимом обучения.
6. Volume: регулирует громкость основного выхода и наушников.
7. Start/Stop: Нажмите, чтобы начать/остановить воспроизведение или запись.
8. Save: Нажмите, чтобы сохранить текущие настройки набора.
9. < / >: используйте эти кнопки со стрелками для изменения значения параметра, отображаемого на дисплее. (Обычно эти кнопки отображаются на дисплее числовыми значениями и содержат такую информацию, как номера пресетов или уровни эффектов.)
10. Click: Нажмите, чтобы включить или выключить метроном.
11. Drum Off: Когда эта кнопка включена, ее светодиод будет гореть, а предварительно записанная партия ударных не будет воспроизводиться, чтобы вы могли услышать только свое исполнение и любой аккомпанемент (музыкальное сопровождение). Нажмите ее еще раз, чтобы прослушать предварительно записанную партию ударных. (Эта кнопка будет автоматически включаться во время записи.)
12. Record: Нажмите эту кнопку один раз, чтобы активировать запись в модуль. Его светодиод будет мигать. Чтобы начать запись, нажмите Start/Stop или ударьте по пэду. Во время записи светодиод кнопки будет гореть постоянно. (Чтобы остановить
запись, снова нажмите Start/Stop.)
13. Tempo: нажмите эту кнопку, чтобы отобразить текущий темп в BPM (ударов в минуту) на дисплее. Используйте кнопки < или > для изменения параметров.
14. Utility: нажмите эту кнопку, чтобы получить доступ к расширенным настройкам пэдов, а также к настройкам модуля.
15. Play/Practice: в обычном режиме нажмите на эту кнопку, чтобы прослушать записанное исполнение. В режиме обучения, нажмите на эту кнопку, чтобы начать воспроизведение бита, ритма или паттерна; затем вы можете подыграть. Нажмите и удерживайте эту кнопку в течение двух секунд, чтобы прослушать воспроизведение вашего занятия (каждое занятие автоматически записывается). Нажмите еще раз, чтобы остановить воспроизведение.
16. Кнопки выбора пэдов: нажмите эти кнопки для предварительного просмотра тембров (звуков ударных), используемых для каждого элемента ударных. (После нажатия кнопки Snare или любой из кнопки Tom, вы можете нажать кнопку Rim, чтобы услышать звук, используемый в качестве звука обода этого барабана)
Modified on: Wed, 8 Jun, 2022 at 3:39 PM

The Alesis Nitro Mesh Kit is a complete 8-piece electronic drum kit centered around next-generation Alesis Mesh head drum technology. The Nitro Mesh Kit is the perfect choice for any electronic percussionist in any style, whether you’re just starting out, or looking to upgrade to a higher-quality kit with a professional module. This video shows you exactly how to assemble the Nitro Mesh Kit.
Did you find it helpful?
Yes
No
Send feedback
Sorry we couldn’t be helpful. Help us improve this article with your feedback.
Related Articles
Still need help?
Chat with one of our technical support experts! Click on the chat bubble in the bottom-right corner of this page during our business hours to get started.
Chat Hours
Monday through Friday:
- 5:00am EST — 2:00pm EST
- 2:30pm EST — 6:00pm EST
inMusic World Headquarters
200 Scenic View Drive
Suite 201
Cumberland, RI 02864
United States
inMusic Brands Europe LTD
Unit 3, Nexus Park, Lysons Avenue
Ash Vale
Hampshire GU12 5QE
United Kingdom
inMusic GmbH
Hans Günther Sohl Str. 4a
47807 Krefeld
Germany
inMusic Taipei
7th Floor, NO. 165, Naking East Road
Section 4
Taipei 105
Taiwan
inMusic Japan Corporation
6F, 3-19-23, Minami-Azabu
Minato-ku, Tokyo
106-0047, Japan