Инструкции и Руководства для Waeco AirCon Service Center ASC 1000, ASC 2000, ASC 2000RPA, ASC 3000.
Мы нашли 18
инструкции доступные для бесплатного скачивания:
Инструкция по эксплуатации

Waeco AirCon Service Center ASC 1000, ASC 2000, ASC 2000RPA, ASC 3000 Air conditioning service unit Benutzerhandbuch
Бренд:
Waeco
Размер:
6 MB
Страниц:
268
Язык(и):
Немецкий, Английский, Испанский, Французский, Русский
Открыть в новой вкладке

Dometic AirCon Service Center ASC 1000, ASC 2000, ASC 2000RPA, ASC 3000 Air conditioning service unit Návod na používanie
Бренд:
Waeco
Размер:
4 MB
Страниц:
56
Язык(и):
Словацкий
Открыть в новой вкладке

Dometic AirCon Service Center ASC 1000, ASC 2000, ASC 2000RPA, ASC 3000 Air conditioning service unit Betjeningsvejledning
Бренд:
Waeco
Размер:
3 MB
Страниц:
52
Язык(и):
Датский
Открыть в новой вкладке

Dometic AirCon Service Center ASC 1000, ASC 2000, ASC 2000RPA, ASC 3000 Air conditioning service unit Kasutusjuhend
Бренд:
Waeco
Размер:
1 MB
Страниц:
52
Язык(и):
Эстонский
Открыть в новой вкладке

Dometic AirCon Service Center ASC 1000, ASC 2000, ASC 2000RPA, ASC 3000 Air conditioning service unit Istruzioni per l’uso
Бренд:
Waeco
Размер:
4 MB
Страниц:
60
Язык(и):
Итальянский
Открыть в новой вкладке

Dometic AirCon Service Center ASC 1000, ASC 2000, ASC 2000RPA, ASC 3000 Air conditioning service unit Handleiding
Бренд:
Waeco
Размер:
4 MB
Страниц:
56
Язык(и):
Голландский
Оглавление
-
5
Over deze gebruiksaanwijzing
-
5
Hotline
-
6
Verklaring van de symbolen in deze gebruiksaanwijzing
-
7
Veiligheid
-
7
Algemene veiligheidsaanwijzingen
-
8
Veiligheid bij het gebruik van het toestel
-
9
Veiligheid bij de omgang met het koudemiddel
-
10
Bedrijfsmaatregelen bij het gebruik van het toestel
-
10
Waarschuwingen op het AirConServiceCenter
-
11
Veiligheidsinrichtingen
-
11
Omvang van de levering
-
12
Gebruik volgens de voorschriften
-
13
Overzicht van het AirConServiceCenter
-
13
Voorkant
-
14
Achterkantzicht
-
15
Eerste ingebruik-name
-
15
Opstellen en inschakelen
-
16
Taalkeuze
-
16
Firmagegevens invoeren
-
17
Datum en tijd invoeren
-
18
Standaardwaarden wijzigen
-
19
Reservoir voor oliën en UV-additief plaatsen
-
20
ASC3000)
-
21
Vullen van het interne koudemiddelreservoir
-
22
Infomenu oproepen
-
23
6.10 Stikstoffles aansluiten (alleen ASC2000RPA)
-
24
Gebruik
-
24
Snelstart
-
26
Gebruikerscodes
-
29
Persoonlijke databank aanmaken
-
30
Koudemiddelverbruik weergeven
-
32
Aircotest zonder koudemiddelservice
-
34
Handmatig Menu
-
35
Airconditioning spoelen
-
38
Onderhoudswerkzaamheden
-
38
(alleen ASC2000, ASC2000RPA, ASC3000)
-
40
Drogerfilter vervangen
-
41
Koudemiddelanalysefilter vervangen (alleen ASC2000 RPA)
-
42
Druksensor kalibreren
-
43
Vacuümpompolie verversen
-
44
Vervuild koudemiddel afzuigen
-
45
Correctie vulhoeveelheden bij langere serviceslangen
-
46
Printpapier vervangen
-
46
WAECO Flash Memory Card vervangen
-
47
8.10 Reiniging en onderhoud
-
48
Afvoeren
-
48
Afvoeren van de teruggewonnen materialen
-
48
Afvoeren van het verpakkingsmateriaal
-
48
Afvoeren van het oude toestel
-
49
Wat te doen, als?
-
53
Technische gegevens
-
55
Accessoires
Открыть в новой вкладке

Dometic AirCon Service Center ASC 1000, ASC 2000, ASC 2000RPA, ASC 3000 Air conditioning service unit Betjeningsvejledning
Бренд:
Waeco
Размер:
4 MB
Страниц:
56
Язык(и):
Датский
Оглавление
-
5
Om denne bruksanvisningen
-
5
Hotline
-
6
Forklaring av symboler som brukes i denne bruksanvisningen
-
7
Sikkerhet
-
7
Generelle sikkerhetsinstruksjoner
-
8
Sikkerhet ved bruk av apparatet
-
9
Sikkerhet ved håndtering av kuldemidlet
-
10
Driftsmessige tiltak ved bruk av apparatet
-
10
Varselinstruks på AirConservicesenter
-
11
Sikkerhetsinnretninger
-
11
Leveringsomfang
-
12
Tiltenkt bruk
-
13
Oversikt over AirConServiceCenter
-
13
Framside
-
14
Bakside
-
15
Første igangkjøring
-
15
Oppstilling og innkobling
-
16
Språkutvalg
-
16
Legg inn firmadata
-
17
Legge inn dato og klokkeslett
-
18
Endre standardverdier
-
19
Beholdere for olje og UV-tilsetning som brukes
-
20
Angi beholderstørrelser (kun ASC2000, ASC2000RPA, ASC3000)
-
21
Oppfylling av den interne kuldemiddelbeholderen
-
22
Hente fram infomenyen
-
23
6.10 Koble til nitrogen (kvelstoff)-flaske (kun ASC2000RPA)
-
24
Hurtigstart
-
26
Brukerkoder
-
28
Opprette personlig database
-
30
Vis kuldemiddelforbruk
-
32
Klimaanleggtest uten kuldemiddelservice
-
34
Manuell
-
35
Spyle klimaanlegg
-
38
Servicearbeider
-
38
(kun ASC2000, ASC2000RPA, ASC3000)
-
40
Skift tørkerfilter
-
41
Bytte kjølemiddelanalysefilter (kun ASC2000RPA)
-
42
Kalibrere trykksensor
-
43
Skifte vakuumpumpeolje
-
44
Suge opp forurenset kjølemiddel
-
45
Påfyllingsmengdekorreksjon ved lengre serviceslanger
-
46
Skift skriverpapir
-
46
Skifte WAECO flash-minnekort
-
47
8.10 Rengjøring og stell
-
48
Avhending
-
48
Avhending av resirkulerte væsker
-
48
Avhending av emballasje
-
48
Avhending av gammelt apparat
-
49
Hva man skal gjøre, når?
-
53
Tekniske data
-
55
Tilbehør
Открыть в новой вкладке

Dometic AirCon Service Center ASC 1000, ASC 2000, ASC 2000RPA, ASC 3000 Air conditioning service unit Instrukcja obsługi
Бренд:
Waeco
Размер:
4 MB
Страниц:
60
Язык(и):
Польский
Открыть в новой вкладке

Dometic AirCon Service Center ASC 1000, ASC 2000, ASC 2000RPA, ASC 3000 Air conditioning service unit Instruções de operação
Бренд:
Waeco
Размер:
4 MB
Страниц:
60
Язык(и):
Португальский
Оглавление
-
5
Relativamente a este manual de instruções
-
5
Linha de assistência
-
6
Explicação dos símbolos utilizados neste manual de instruções
-
7
Segurança
-
7
Indicações gerais de segurança
-
8
Segurança durante a utilização do aparelho
-
9
Segurança no manuseamento de líquido refrigerante
-
10
aparelho
-
11
Advertências de perigo no AirConServiceCenter
-
11
Dispositivos de segurança
-
12
Material fornecido
-
13
Utilização adequada
-
14
O AirConServiceCenter em resumo
-
14
Parte dianteira
-
15
Parte posterior
-
16
Primeira colocação em funcionamento
-
16
Montagem e ligação
-
17
Selecção do idioma
-
17
Introduzir os dados da empresa
-
18
Introduzir a data e a hora
-
19
Alterar os valores predefinidos
-
20
Utilizar recipientes para óleos e aditivo UV
-
21
ASC3000)
-
22
Enchimento do depósito do líquido refrigerante interno
-
23
Aceder ao menu de informação
-
24
6.10 Ligar o recipiente de nitrogénio (azoto) (apenas ASC2000RPA)
-
25
Operação
-
25
Selecção automática
-
27
Códigos do utilizador
-
30
Definir uma base de dados pessoal
-
32
Exibir o consumo de líquido refrigerante
-
34
Verificação do ar condicionado sem serviço de líquido refrigerante
-
36
Selecção manual
-
37
Lavar o ar condicionado
-
41
Trabalhos de assistência
-
41
(apenas ASC2000, ASC2000RPA, ASC3000)
-
43
Substituir o filtro exsicante
-
44
ASC2000RPA)
-
45
Calibrar o sensor de pressão
-
46
Substituir o óleo da bomba de vácuo
-
48
Aspirar o líquido refrigerante sujo
-
49
mangueiras mais compridas
-
50
Renovar o papel de impressão
-
50
Substituir o cartão de memória Flash da WAECO
-
51
8.10 Limpeza e manutenção
-
52
Eliminação
-
52
Eliminação dos resíduos recuperados
-
52
Eliminar o material de embalagem
-
52
Eliminação de equipamento velho
-
53
Como agir em determinadas situações?
-
57
Dados técnicos
-
59
Acessórios
Открыть в новой вкладке

Dometic AirCon Service Center ASC 1000, ASC 2000, ASC 2000RPA, ASC 3000 Air conditioning service unit Návod na používanie
Бренд:
Waeco
Размер:
4 MB
Страниц:
60
Язык(и):
Словацкий
Открыть в новой вкладке

Dometic AirCon Service Center ASC 1000, ASC 2000, ASC 2000RPA, ASC 3000 Air conditioning service unit Bruksanvisningar
Бренд:
Waeco
Размер:
4 MB
Страниц:
56
Язык(и):
Шведский
Открыть в новой вкладке

Dometic AirCon Service Center ASC 1000, ASC 2000, ASC 2000RPA, ASC 3000 Air conditioning service unit Kasutusjuhend
Бренд:
Waeco
Категория:
Print & Scan
Размер:
4 MB
Страниц:
56
Язык(и):
Эстонский
Оглавление
-
4
Sisukord
-
5
WAECO Infoliin
-
5
Kasutusjuhendis esinevate sümbolite tähendused
-
6
Ohutus
-
6
Üldised ohutussuunised
-
6
Seadme ohutu käitamine
-
7
Külmutusagensi ohutu käitamine
-
8
Ettevõtte meetmed seadme kasutamsel
-
8
AirConServiceCenter’il olevad hoiatused
-
9
Ohutusseadised
-
9
Tarnimine
-
10
Otstarbekohane kasutamine
-
11
AirConServiceCenter’i ülevaade
-
11
Esileht
-
12
Tagakülgvaade
-
13
Esmakordne kasutuselevõtt
-
13
Välja- ja sisselülitamine
-
14
Keelevalik
-
15
Ettevõtte andmete sisestamine
-
16
Kuupäeva ja kellaaja sisestamine
-
17
Vaikeväärtuste muutmine
-
18
Õlide ja UV-lisandi mahuti kasutamine
-
19
ASC3000)
-
20
Sisemise külmutusagensi mahuti täitmine
-
21
Infomenüü avamine
-
22
6.10 Lämmastikuballooni ühendamine (ainult seadmel ASC2000RPA)
-
23
Käitamine
-
23
Kiirvalik
-
25
Kasutajakoodid
-
28
Isikliku andmebaasi määramine
-
30
Külmutusagensi tarbimise kuvamine
-
32
Kliimaseadme kontroll ilma külmutusagensi hoolduseta
-
34
Vaba valik
-
35
Kliimaseadme pesemine
-
39
Hooldustööd
-
39
seade ASC2000, ASC2000RPA, ASC3000)
-
41
Kuivati filtri vahetamine
-
43
Rõhuanduri kalibreerimine
-
44
Vaakumpumbaõli vahetamine
-
45
Saastunud külmutusagensi väljaimemine
-
46
Täite kogus.te korrigeerimine pikemate hooldusvoolikute puhul
-
47
Trükipaberi uuendamine
-
47
WAECO Välkmälukaardi vahetamine
-
48
8.10 Puhastamine ja hooldamine
-
49
Kõrvaldamine
-
49
Eemaldatud vedeliku kõrvaldamine
-
49
Pakendimaterjali utiliseerimine
-
49
Vana seadme utiliseerimine
-
50
Tõrkeotsing
-
53
Tehnilised andmed
-
55
Lisatarvikud
Открыть в новой вкладке

Dometic AirCon Service Center ASC 1000, ASC 2000, ASC 2000RPA, ASC 3000 Air conditioning service unit Operativne instrukcije
Бренд:
Waeco
Размер:
4 MB
Страниц:
56
Язык(и):
Боснийский, Хорватский
Открыть в новой вкладке

Dometic AirCon Service Center ASC 1000, ASC 2000, ASC 2000RPA, ASC 3000 Air conditioning service unit Instrucțiuni de utilizare
Бренд:
Waeco
Размер:
4 MB
Страниц:
56
Язык(и):
Румынский
Открыть в новой вкладке

Dometic AirCon Service Center ASC 1000, ASC 2000, ASC 2000RPA, ASC 3000 Air conditioning service unit Navodila za uporabo
Бренд:
Waeco
Размер:
4 MB
Страниц:
56
Язык(и):
Словенский
Оглавление
-
4
K navodilu za uporabo
-
5
a linija
-
5
Pojasnitev simbolov v navodilu za uporabo
-
6
Varnost
-
6
Splošna varnostna opozorila
-
7
Varnost pri obratovanju naprave
-
8
Varnost pri rokovanju s hladilnim sredstvom
-
9
Ukrepi pri uporabi naprave, ki se jih izvede v obratu
-
10
Opozorila na napravi AirConServiceCenter
-
10
Varnostne naprave
-
11
Vsebina dostavljenega paketa
-
13
Pregled naprave AirConServiceCenter
-
13
Sprednja stran
-
14
Zadnja stran
-
15
Prvi zagon
-
15
Postavitev in vklop
-
16
Izbira jezika
-
16
Vpis podatkov podjetja
-
17
Vpis datuma in ure
-
18
Spreminjanje vpisanih vrednosti
-
19
Vstavljanje posod za olje in UV-barvilo
-
20
ASC3000)
-
21
Polnjenje interne posode za hladilno sredstvo
-
22
Priklic info-menija
-
23
itev nitrogensko (dušikove) jeklenke (samo ASC2000RPA)
-
24
Delovanje
-
24
Hitri program
-
26
Kode uporabnikov
-
29
Namestitev osebne banke podatkov
-
30
Prikaz porabe hladilnega sredstva
-
32
Test klimatske naprave brez menjave hladilnega sredstva
-
33
Prosta izbira
-
35
enje klimatske naprave
-
38
Servisna dela
-
38
ASC3000)
-
40
Menjava filtra sušilnika
-
41
Menjava filtra za analizo hladilnega sredstva (samo ASC2000RPA)
-
42
nega senzorja
-
43
rpalke
-
44
Odsesavanje onesnaženega hladilnega sredstva
-
45
Korekcije polnjenja pri daljših servisnih ceveh
-
46
Zamenjava papirja v tiskalniku
-
46
Menjava spominske kartice WAECO Flash-Memory
-
48
enje in nega
-
48
Odstranjevanje
-
48
Odstranitev embalažnega materiala
-
48
Odstranitev stare naprave
-
53
ni podatki
-
55
Oprema
Открыть в новой вкладке

Dometic AirCon Service Center ASC 1000, ASC 2000, ASC 2000RPA, ASC 3000 Air conditioning service unit Operativne instrukcije
Бренд:
Waeco
Размер:
4 MB
Страниц:
56
Язык(и):
Боснийский, Хорватский
Открыть в новой вкладке

Dometic AirCon Service Center ASC 1000, ASC 2000, ASC 2000RPA, ASC 3000 Air conditioning service unit Kullanma talimatları
Бренд:
Waeco
Размер:
4 MB
Страниц:
52
Язык(и):
Турецкий
Открыть в новой вкладке

Waeco AirCon Service Center ASC 1000, ASC 2000, ASC 2000RPA, ASC 3000 Air conditioning service unit Operating manual
Бренд:
Waeco
Размер:
33 MB
Страниц:
52
Язык(и):
Открыть в новой вкладке
-
Contents
-
Table of Contents
-
Bookmarks
Quick Links
AirConServiceCenter
VAS 6380B / VAS 6381B
Air conditioning service unit
Operating manual
Related Manuals for Waeco AirCon Service Center
Summary of Contents for Waeco AirCon Service Center
-
Page 1
AirConServiceCenter VAS 6380B / VAS 6381B Air conditioning service unit Operating manual… -
Page 2
© 2020 Dometic Group. The visual appearance of the contents of this manual is protected by copyright and design law. The underlying technical design and the products contained herein may be protected by design, patent or be patent pending. The trademarks mentioned in this manual belong to Dometic Sweden AB. All rights are reserved. -
Page 3: Table Of Contents
Operational measures when using the unit ….. . . 8 Warnings on the AirCon Service Center ……9 Safety devices .
-
Page 4: About This Operating Manual
Please also note the information in the current material safety data sheets. They can be found at: dometic.com/sds Keep this operating manual in the compartment of the AirCon Service Center, so that any information you need is always at hand.
-
Page 5: Hotline
VAS 6380B / VAS 6381B About this operating manual Hotline If you need more information on the AirCon Service Center that is not contained in this manual, please contact the hotline: Phone: +49 (0) 25 72 / 8 79-1 91…
-
Page 6: Safety
Observe national work safety regulations. Observe the safety instructions in this operating manual. The AirCon Service Center may only be used by personnel who are able to demonstrate the appropriate specialist training and are familiar with the operation and basic principles of the AirCon Service Center, of air conditioning systems and of refrigerants.
-
Page 7
Do not start up the AirCon Service Center if it is damaged. Each time you start up the unit or top up the AirCon Service Center, first check whether the unit and all the service hoses are undamaged and that all valves are closed. -
Page 8: Handling Refrigerant Safely
Operational measures when using the unit The operator must provide operating instructions according to TRG 402 for each filling system (AirCon Service Center). These operating instruc- tions must be used to train personnel in handling the unit. The operator must ensure that personnel are instructed in the following points at least once a year: …
-
Page 9: Warnings On The Aircon Service Center
The system operator must ensure that all service hoses are laid in such a way that they cannot be damaged when the unit is used. Warnings on the AirCon Service Center Please note! Observe the operating manual! Only connect the device to a socket with 230 V / 50 Hz AC.
-
Page 10: Scope Of Delivery
Scope of delivery VAS 6380B / VAS 6381B Scope of delivery The AirCon Service Center and its accessories are carefully checked before shipping. The AirCon Service Center was tested for leaks before shipping. After delivery, check that all the parts listed below are present and undamaged.
-
Page 11: Accessories
The AirCon Service Center may only be operated by personnel who have the expertise required for servicing air conditioning systems. This AirCon Service Center may only be used to service vehicle air condi- tioning systems in which R-134a refrigerant is used.
-
Page 12: Overview Of The Aircon Service Center
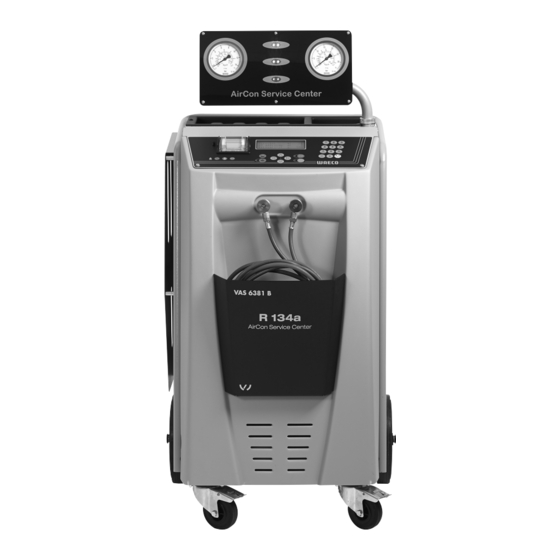
Overview of the AirCon Service Center VAS 6380B / VAS 6381B Overview of the AirCon Service Center Front Low pressure gage Red “Fill” lamp Blue “Evacuate” lamp Green “Suction” lamp High pressure gage Display Keypad Front cover Front wheels with wheel stops…
-
Page 13: Rear
VAS 6380B / VAS 6381B Overview of the AirCon Service Center 11 Service hose for high pressure connection (red) 12 Service coupling for high pressure connection (red) 13 Service coupling for low pressure connection (blue) 14 Printer 15 USB port…
-
Page 14: Initial Startup
VAS 6380B / VAS 6381B Initial startup Setting up and switching on 1. Wheel the AirCon Service Center to the workplace and lock the front wheels (9). NOTE During operation, the device must be on a level, flat surface so that measurements can be made correctly.
-
Page 15: Standby Menu
VAS 6380B / VAS 6381B Initial startup Standby menu The standby menu shows you the current supply quantities and the time settings of the AirCon Service Center. The following information is shown: Refrigerant quantity Fresh oil quantity (only VAS 6318B) …
-
Page 16: Entering Company Data
Initial startup VAS 6380B / VAS 6381B Entering company data The company data is printed out with every service log. 1. In the basic menu, use the cursor keys or to select “Other selections”: S h o r t s e l e c t i o n F r e e s e l e c t i o n O t h e r s e l e c t i o n s E N T E R — O K S T O P — E X I T…
-
Page 17: Entering The Date And Time
VAS 6380B / VAS 6381B Initial startup Entering the date and time The date and the time are printed along with the company data on every service log. 1. In the basic menu, use the cursor keys or to select “Other selections”: S h o r t s e l e c t i o n F r e e s e l e c t i o n…
-
Page 18: Editing Default Values
Initial startup VAS 6380B / VAS 6381B Editing default values The AirCon Service Center has preset values for the most important service tasks. The default values appear automatically when you select the respective menu. You can alter the following default values if necessary:…
-
Page 19: Putting In The Containers For Oil And Uv Additive
VAS 6380B / VAS 6381B Initial startup Putting in the containers for oil and UV additive The current supply quantities are displayed in the standby menu. 1. Open the cover flap (20) on the left side and push the containers into the snap locks: –…
-
Page 20: Entering The Container Size (Only For Vas 6381B)
Fresh oil and UV contrast agent can be kept in containers of 150 ml (A), 250 ml (B) or 500 ml (C) (accessories). You must enter the size of the container in the AirCon Service Center. 1. In the basic menu, use the cursor keys or to select “Other selections”:…
-
Page 21: Filling Up The Internal Refrigerant Container
VAS 6380B / VAS 6381B Initial startup Filling up the internal refrigerant container When the AirCon Service Center is started for the first time, the internal refrigerant vessel must be filled from an external refrigerant vessel with at least 5000 g of refrigerant.
-
Page 22
Initial startup VAS 6380B / VAS 6381B 5. Then follow the instructions on the display and here. C o n n e c t t h e H P h o s e t o t h e e x t e r n a l t a n k t h e n o p e n t h e v a l v e E N T E R — O K S T O P — E X I T Press ENTER to confirm. -
Page 23: Operation
Subsequent actions are only initiated once the preceding action has been completed successfully. 1. First fit the service hoses for the AirCon Service Center to the vehicle air conditioning system, and open the service couplings. 2. Press cursor key or to return to the basic menu.
-
Page 24
Either use the value shown on the filling quantities sticker in the vehicle and enter it using the keypad (7) and the cursor keys, or use the AirCon Service Center’s database. NOTICE! If in doubt, use the value shown on the label in the vehicle. -
Page 25: User Codes
✓ Fully automatic air conditioning service is started. ✓ After the air conditioning service has finished, you will be prompted to disconnect the hoses (10) and (11) of the AirCon Service Center from the vehicle air conditioning system. 10. Disconnect the service hoses (10) and (11) and press ENTER to confirm.
-
Page 26
Operation VAS 6380B / VAS 6381B 4. Enter password “9786” confirm and with ENTER to access the administrator menu “ADM”: S e r v i c e . — — — — 5. Enter administrator code “0000” (factory setting) and confirm with ENTER: I n s e r t A D M c o d e NOTE… -
Page 27
VAS 6380B / VAS 6381B Operation 10. Confirm new user code: A D M a r e a U s e r n u m b e r C o n f i r m n e w c o d e NOTE Use the yellow info button to switch between upper and lower case. -
Page 28: Creating A Personal Database
Operation VAS 6380B / VAS 6381B 8.3.2 Entering a user code When you switch on the air conditioning service station, the unit data appears in the display. If user codes have been created, a code must now be entered to enable the station. 1.
-
Page 29
VAS 6380B / VAS 6381B Operation 4. Use the cursor keys or to select “DATABASE” and press ENTER to confirm. F i l l i n g Q t . D A T A B A S E E N T E R — O K S T O P — E X I T 5. -
Page 30: Transferring The Consumption Of Refrigerant Onto A Usb Stick
Operation VAS 6380B / VAS 6381B Transferring the consumption of refrigerant onto a USB stick Each time a suction or filling process (single process or fully automatic) is completed, the station stores all the data in the internal memory. A report can be generated using this data and transferred to a USB stick.
-
Page 31: Showing The Refrigerant Consumption On The Display
VAS 6380B / VAS 6381B Operation 4. Use the cursor key to select “Service.” and press ENTER to con- firm: 5. Enter the password and press ENTER to confirm. – “4910”: Monthly report – “4918”: Annual report If a USB stick has not been inserted or is not recognized, the “Error 52”…
-
Page 32
Operation VAS 6380B / VAS 6381B Example R 1 3 4 a f r o m s y s t e m T o t a l ↩ P R I N T S T O P — E X I T “R134a from system”… -
Page 33: Air Conditioning System Test Without Refrigerant Service
(the service hoses are drained by the unit). 1. Start by fitting the connections of the AirCon Service Center to the vehicle air conditioning system, and opening them.
-
Page 34: Free Selection
Operation VAS 6380B / VAS 6381B 8. To end the air conditioning system test, press STOP. D i s c o n n e c t t h e H P s e r v i c e h o s e f r o m t h e A / C s y s t e m E N T E R — O K 9.
-
Page 35
Operation After each process has been performed, a service report is printed. 1. Start by fitting the connections of the AirCon Service Center to the vehicle air conditioning system, and opening them. 2. In the basic menu, use the cursor keys or to select “Free selection”:… -
Page 36
Operation VAS 6380B / VAS 6381B 4. Confirm both settings with ENTER. V a c u u m t i m e m i n . L e a k T e s t m i n . E N T E R — O K S T O P — E X I T NOTE The air conditioning system is deeply drained by the vacuum pump. -
Page 37
After the completion of the air conditioning service ✓ After the air conditioning service has finished, you are prompted to disconnect the hoses of the AirCon Service Center from the vehicle air conditioning system. 1. Disconnect the service hoses (10) and (11) and press ENTER to confirm. -
Page 38: Flushing The Air Conditioning System
AirCon Service Center using special adapters to form a flushing circuit. 1. Start by fitting the connections of the AirCon Service Center to the vehicle air conditioning system, and opening them.
-
Page 39
AirCon Service Center appears. 20. If necessary, remove the adapter from the flushing circuit and reconnect all the components to the refrigerant circuit. Fit the connections of the AirCon Service Center to the vehicle air conditioning system and open them. -
Page 40
30. Select “Process start ?” with ENTER. ✓ After filling is complete, you will be prompted to disconnect the hoses of the AirCon Service Center from the vehicle air conditioning system. 31. Disconnect the service hoses (10) and (11) and press ENTER to confirm. -
Page 41: Service Tasks
VAS 6380B / VAS 6381B Service tasks Service tasks Leak test Check the AirCon Service Center once a year for leaks in accordance with the applicable legal requirements. Use an electronic leak detector for this purpose. Calibrating the oil scales…
-
Page 42
Service tasks VAS 6380B / VAS 6381B 4. To check the zero point of the scales for oil and UV additive, open the cover (20) on the left side and take the containers off the catches: – Container for fresh oil (17) –… -
Page 43: Changing The Dryer Filter
8. Select “Process start ?”. Press ENTER to confirm. The service hoses will now be drained and the AirCon Service Center basic menu will be activated. The compressor has produced a slight internal vacuum so that the filter can be replaced with minimal refrigerant loss.
-
Page 44: Filter Maintenance
Service tasks VAS 6380B / VAS 6381B 11. Replace the O-rings (E). 12. Insert the new dryer and tighten the screw to max. 15°Nm. Filter maintenance NOTE After finishing the service tasks, you must delete the respective service messages (counter reset). To do this, switch to “Other selections” – “Service.”…
-
Page 45: Calibrating The Pressure Transducer
Calibration is required: Every four weeks If the AirCon Service Center has been subjected to heavy shaking every time the vacuum pump oil is changed, if the display shows implausible pressure readings. 1. In the basic menu, use the cursor keys or to select “Other selections”:…
-
Page 46: Changing The Vacuum Pump Oil
WARNING! Danger of fatal electric shock Touching uninsulated parts may result in serious injury. Switch off the AirCon Service Center and unplug it from the power supply before opening the housing. The AirCon Service Center may only be repaired by personnel authorized by Dometic.
-
Page 47
(E) on the bottom of the front panel and take it off. 3. Place a receptacle with a capacity of at least ½ liter under the AirCon Service Center. The oil from the vacuum pump flows through the opening (I) in the base of the device. -
Page 48
Service tasks VAS 6380B / VAS 6381B NOTE After finishing the service tasks, you must delete the respective service messages (counter reset). To do this, switch to “Other selections” – “Service.” and enter the code “7782”. Use the cursor keys or to select the required entry and press ENTER to confirm. -
Page 49: Meter Readings
VAS 6380B / VAS 6381B Service tasks S e r v i c e c o m p l e t e d : 0 7 . 0 3 . 2 0 2 0 T o t a l S T O P — E X I T “Service completed:”…
-
Page 50: Filling Level Correction For Longer Service Hoses
Service tasks VAS 6380B / VAS 6381B V a c u u m t i m e T o t a l m i n . S T O P — E X I T “Vacuum time” indicates how long the vacuum pump was operating in total.
-
Page 51: Replacing The Printer Paper
The USB stick must be formatted with the FAT32 file system. When updating the software, the following data is stored in the internal memory of the station: the current software of the AirCon Service Center the current database with all the common vehicle types and corresponding filling quantities You can update the software and the database separately.
-
Page 52
Service tasks VAS 6380B / VAS 6381B 2. Insert the USB stick into the USB connection (15) and switch on the device. ✓ The station will scan the USB stick for a later version. If the software on the USB stick is more up-to-date, the following menu is displayed: N e w f i r m w a r e r e l e a s e f o u n d E N T E R — U P G R S T O P — E X I T… -
Page 53: Manual Discharge Of Non-Condensing Gases
VAS 6380B / VAS 6381B Service tasks 9.11 Manual discharge of non-condensing gases NOTICE! The manual discharge of non-condensing gases may only be carried out during the initial power-on on a given day. When the device is put into operation, the internal pressures and temperatures change. This makes the procedure described in this chapter too inaccurate.
-
Page 54
Service tasks VAS 6380B / VAS 6381B If the tank pressure deviates by more than 1 bar from the normal pressure, the non-condensing gases must be discharged manually, as otherwise proper operation of the device is no longer guaranteed. CAUTION! Risk of injury Wear protective gloves and goggles. -
Page 55: Cleaning And Maintenance
Do not use solvents or scouring agents. Regularly check the service hoses (10) and (11) and the service couplings (12) and (13) for damage. Do not start up the AirCon Service Center if it is damaged.
-
Page 56: Disposal
11.3 Disposal of the old unit If you wish to scrap the AirCon Service Center, first completely drain it of all liquids and dispose of them according to national regulations. Have the old unit disposed of by qualified personnel in accordance…
-
Page 57: What To Do, When
” carry on? ing system after 8 minutes is AirCon Service Center for still more than 50 mbar. leaks. The display shows Message at the end of the Check the air conditioning vacuum process.
-
Page 58
This message appears when Change the internal filter as you switch on the soon as possible (chapter “Change the equipment AirCon Service Center. “Changing the dryer filter” on drier filter. page 43). To skip this, press ” Go on ? ENTER for 3 seconds. -
Page 59
VAS 6380B / VAS 6381B What to do, when? Fault Cause Solution The display shows It is not possible to lower the Check air conditioner and pressure when flushing takes connections for leaks, con- “Error 04” place. strictions and ice build-up. Check pressure transducer calibration. -
Page 60
What to do, when? VAS 6380B / VAS 6381B Fault Cause Solution The display shows During the hybrid service Are the service hoses con- (flushing the service hoses nected to the hybrid flush “Error 60” with hybrid oil), a vacuum container? could not be achieved. -
Page 61: Technical Data
VAS 6380B / VAS 6381B Technical data Technical data AirCon Service Center VAS 6380B Dimensions (width x height x depth): 560 mm x 1,300 mm x 650 mm Weight: 95 kg Power supply: 230 V/240 V – 50 Hz/60 Hz…
-
Page 62
Technical data VAS 6380B / VAS 6381B AirCon Service Center VAS 6381B Dimensions (width x height x depth): 560 mm x 1,300 mm x 650 mm Weight: 100 kg Power supply: 230 V/240 V – 50 Hz/60 Hz Refrigerant extraction rate:… -
Page 63
VAS 6380B / VAS 6381B Technical data 13.1 Flow chart 3&… -
Page 64
Technical data VAS 6380B / VAS 6381B Item Description UV container Fresh oil container Oil separator / heat exchanger Used oil container Refrigerant tank Compressor oil separator Compressor Coarse filter Dryer filter LP service coupling Service coupling, high-pressure Service hose, low-pressure Compressor hose, yellow Refrigerant supply line Service hose, high-pressure… -
Page 65
VAS 6380B / VAS 6381B Technical data Item Description Manual shut-off valve, yellow hose High-pressure safety valve NCG discharge valve Condenser VC solenoid valve CY solenoid valve LP solenoid valve DO solenoid valve UV solenoid valve Oil solenoid valve Z2 solenoid valve Z2 solenoid valve HD solenoid valve HD solenoid valve… -
Page 66
Technical data VAS 6380B / VAS 6381B 13.2 Electrical circuit diagram… -
Page 67
VAS 6380B / VAS 6381B Technical data… -
Page 68
Mail: info@dometic.be +39 0543 754983 +351 219 243 206 +41 44 8187191 Mail: vendite@dometic.it Mail: info@dometic.pt Mail: info@dometic.ch CHINA Dometic Waeco Trading – JAPAN RUSSIA UNITED ARAB EMIRATES Dometic Middle East FZCO Shanghai Branch Dometic KK Dometic RUS LLC Maekawa-Shibaura, Bldg. 2 P.
ASC_ru.book Seite 4 Dienstag, 30. Juni 2009 5:31 17 Об этой инструкции по эксплуатации 1 Об этой инструкции по эксплуатации Данная инструкция по эксплуатации описывает станции по обслуживанию кондиционеров (<strong>AirCon</strong> <strong>Service</strong> <strong>Center</strong>) ASC1000, ASC2000, ASC2000RPA, а также ASC3000. Данная инструкция по эксплуатации предназначена для лиц, проводящих техническое обслуживание автомобильных кондиционеров и имеющих соответствующие профессиональные знания. Данная инструкция по эксплуатации содержит все необходимые указания для безопасной и эффективной работы станции по обслуживанию кондиционеров. Прежде, чем в первый раз ввести прибор в эксплуатацию, внимательно прочтите данную инструкцию. Кроме того, соблюдайте: • Руководство <strong>WAECO</strong> по обучению «Кондиционирование воздуха в автомобилях – Технические основы» • Информационная брошюра <strong>WAECO</strong> «Кондиционирование воздуха в автомобилях – Юридические основы» • Указания изготовителя хладагента • Возможно имеющиеся на Вашем предприятии особые указания по техническому обслуживанию автомобильных кондиционеров Храните данную инструкцию в ящике <strong>AirCon</strong><strong>Service</strong><strong>Center</strong>, чтобы, вслучае необходимости, быстро получить требуемую информацию. 1.1 «Горячая» линия <strong>WAECO</strong> Если Вам требуется дальнейшая информация о <strong>AirCon</strong><strong>Service</strong><strong>Center</strong>, которую Вы не можете найти в данной инструкции, свяжитесь с «горячей» линией <strong>WAECO</strong> (тел. +49 (0) 25 72 / 8 79-1 91). 4 <strong>AirCon</strong> <strong>Service</strong> <strong>Center</strong>
ASC_ru.book Seite 5 Dienstag, 30. Juni 2009 5:31 17 Об этой инструкции по эксплуатации 1.2 Пояснение символов, используемых в данной инструкции Формат Значение Пример Жирный Надписи, имеющиеся Нажать ENTER. шрифт на приборе «Жирный шрифт» • Текст • Текст 1. Текст 2. Текст 3. Текст Текст (1) Текст (А) Сообщения на дисплее Перечни в любой последовательности Операции, которые должны быть выполнены в указанной последовательности Номера деталей, относящиеся к обзору (стр. 11 и стр. 12) Обозначения деталей, относящиеся к иллюстрациям, приведенным в данном разделе «Short selection» • Защитное реле давления • Предохранительные клапаны 1. Присоединить прибор. 2. Включить прибор. 3. Нажать кнопку выбора. С клавиатуры управления (7) ввести требуемые данные. Демонтировать фильтровальный патрон (E) на левой стороне. Опасность травм людей или опасность для окружающей среды Опасность повреждения прибора или другого материального ущерба Особпая информация по эффективному обращению с прибором <strong>AirCon</strong> <strong>Service</strong> <strong>Center</strong> 5
- Page 1 and 2: ASC_ru.book Seite 1 Dienstag, 30. J
- Page 3: ASC_ru.book Seite 3 Dienstag, 30. J
- Page 7 and 8: ASC_ru.book Seite 7 Dienstag, 30. J
- Page 9 and 10: ASC_ru.book Seite 9 Dienstag, 30. J
- Page 11 and 12: ASC_ru.book Seite 11 Dienstag, 30.
- Page 13 and 14: ASC_ru.book Seite 13 Dienstag, 30.
- Page 15 and 16: ASC_ru.book Seite 15 Dienstag, 30.
- Page 17 and 18: ASC_ru.book Seite 17 Dienstag, 30.
- Page 19 and 20: ASC_ru.book Seite 19 Dienstag, 30.
- Page 21 and 22: ASC_ru.book Seite 21 Dienstag, 30.
- Page 23 and 24: ASC_ru.book Seite 23 Dienstag, 30.
- Page 25 and 26: ASC_ru.book Seite 25 Dienstag, 30.
- Page 27 and 28: ASC_ru.book Seite 27 Dienstag, 30.
- Page 29 and 30: ASC_ru.book Seite 29 Dienstag, 30.
- Page 31 and 32: ASC_ru.book Seite 31 Dienstag, 30.
- Page 33 and 34: ASC_ru.book Seite 33 Dienstag, 30.
- Page 35 and 36: ASC_ru.book Seite 35 Dienstag, 30.
- Page 37 and 38: ASC_ru.book Seite 37 Dienstag, 30.
- Page 39 and 40: ASC_ru.book Seite 39 Dienstag, 30.
- Page 41 and 42: ASC_ru.book Seite 41 Dienstag, 30.
- Page 43 and 44: ASC_ru.book Seite 43 Dienstag, 30.
- Page 45 and 46: ASC_ru.book Seite 45 Dienstag, 30.
- Page 47 and 48: ASC_ru.book Seite 47 Dienstag, 30.
- Page 49 and 50: ASC_ru.book Seite 49 Dienstag, 30.
Инструкции по эксплуатации
Укажите здесь торговую марку и тип
В настоящее время вы находитесь на странице с руководствами Waeco. Выберите одну из категорий продуктов, чтобы быстро найти нужное руководство Waeco. Не удалось найти нужный продукт Waeco? Тогда попробуйте вбить в строку поиска Waeco и модель, чтобы найти нужное руководство Waeco. На ManualsPDF.ru в настоящее время имеется 268 руководств Waeco, разделенных на 20. Самые популярные категории продуктов Waeco:
- сумки-холодильники
- холодильники
- кондиционеры
Самые популярные продукты из Waeco на сегодня:
- Waeco CoolAir CA850S
- Waeco CoolFreeze CF 35
- Waeco CoolFreeze CDF-35
Обслуживание кондиционера Waeco ASC 2000 G
Waeco ASC 2000 G — современная автоматическая станция для профессионального обслуживания кондиционеров легковых и грузовых автомобилей при минимальных затратах труда за короткое время. Полностью автоматическая работа — выкачивание и регенерация хладагента, измерение остаточного давления, выпуск отработанного масла, вакуумирование, контроль герметичности, заправка свежим маслом и УФ-присадкой, заправка хладагентом с компенсацией объема хладагента в сервисных шлангах.
Индивидуальный PIN-код — для защиты от несанкционированного использования станции Waeco ASC 2000 G возможно создать до 10 имен пользователя в дополнении с индивидуальным PIN-кодом.
Индивидуальная база данных заправляемого количества — серия станций ASC позволяет создавать собственную базу данных заправляемого количества для 100 разных автомобилей.
Встроенный принтер — показатели можно напечатать сколько угодно раз, после окончания всех процедур. Количество заправленного хладагента можно не указывать, если необходимо.
USB порт — с помощью USB порта можно легко обновить ПО или экспортировать данные на USB накопитель.
Особенности
- Точное регулирование масла с помощью 3-х отдельных точных весов
- Емкость заправочного циллиндра: 21 кг, производительность вакуумного насоса: 5 машин/час
- Сервис азиатских авто, при установке комплекта для промывки внутреннего контура (опция)
- Подходит для гибридных авто немецких автопроизводителей
- Индивидуальная база данных заправляемого количества хладагента
- Управление через большой дисплей и подсвечиваемый манометр
- Запатентованная система подачи свежего масла и УФ-присадки
- Чехол от пыли включен в комплект
- Распечатка важных сервисных данных
- Автоматическая замена хладагента, масла и присадки
- Авто проверка на герметичность
- Автоматическая заправка средством поиска утечек
- IИнтегрированное регулирование количества хладагента
- IИнтегрированная база данных
- Требования SAE J 2099 и 2788
- Поворотно-откидной дисплей манометра (патент)
- Подогреваемый заправочный цилиндр
- Специальная, 8-подшипниковая платформа весов
- Особая функция промывки кондиционера
- Большая поверхность для инструментов
- Бак отработанного масла на 500 мл
- Мягкий графический дисплей
- USB порт