- Manuals
- Brands
- Avaya Manuals
- IP Phone
- J159
- Using manual
-
Contents
-
Table of Contents
-
Troubleshooting
-
Bookmarks
Quick Links
Using Avaya J159 IP Phone H.323
Release 6.8.5
Issue 1
November 2020
Related Manuals for Avaya J159
Summary of Contents for Avaya J159
-
Page 1
Using Avaya J159 IP Phone H.323 Release 6.8.5 Issue 1 November 2020… -
Page 2
RESERVES THE RIGHT TO TAKE LEGAL ACTION AGAINST YOU the express behalf of Avaya. End User agrees to indemnify and hold AND ANYONE ELSE USING OR SELLING THE SOFTWARE harmless Avaya, Avaya’s agents, servants and employees against all WITHOUT A LICENSE. -
Page 3
MAY BE OBTAINED FROM MPEG LA, L.L.C. SEE HTTP:// written consent of Avaya can be a criminal, as well as a civil offense WWW.MPEGLA.COM. under the applicable law. Compliance with Laws… -
Page 4
• Please only use the connecting cables, power cord, and U.S. Federal Communications Commission (FCC) Statements AC adapters shipped with the equipment or specified by Compliance Statement Avaya to be used with the equipment. If you use any other equipment, it may cause failures, malfunctioning, or fire. -
Page 5
Device Usage Consent interference by one or more of the following measures: By using the Avaya device you agree that Avaya, from time to time, • Reorient or relocate the receiving antenna. may collect network and device data from your device and may use such data in order to validate your eligibility to use the device. -
Page 6: Table Of Contents
Deleting a contact …………………. 28 Editing a contact ……………….. 28 Viewing the contact details ……………….. 28 Searching for a contact ……………………… 29 Call History ……………….. 29 Viewing the call history November 2020 Using Avaya J159 IP Phone H.323 Comments on this document? infodev@avaya.com…
-
Page 7
…………………. 51 Administrative messages Chapter 8: Troubleshooting……………….. 52 ……………….. 52 Limited access during failover Chapter 9: Resources…………………. 54 …………………… 54 Documentation ……………….. 54 Viewing Avaya Mentor videos …………………….. 55 Support November 2020 Using Avaya J159 IP Phone H.323 Comments on this document? infodev@avaya.com… -
Page 8: Chapter 1: Purpose
Chapter 1: Purpose This document describes the features of the Avaya J159 IP Phone and provides instructions on how to use this phone. It is intended for the end user. November 2020 Using Avaya J159 IP Phone H.323 Comments on this document? infodev@avaya.com…
-
Page 9: Chapter 2: Phone Overview
Chapter 2: Phone overview Avaya J159 IP Phone is intended to be used in business communications. The phone supports up to four call appearances with two lines of call display. Avaya J159 IP Phone has two color display. Physical specifications •…
-
Page 10
— Headset — Message — Recents Related links Physical layout on page 11 Connection jacks on page 13 Secondary display on page 15 Optional components on page 15 November 2020 Using Avaya J159 IP Phone H.323 Comments on this document? infodev@avaya.com… -
Page 11: Physical Layout
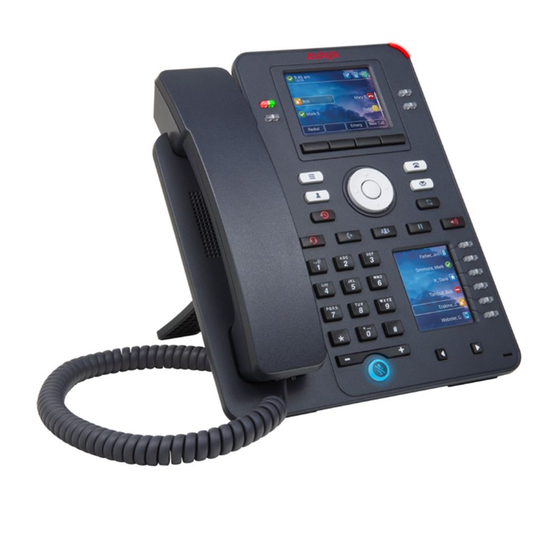
Physical layout Physical layout Figure 1: J159 IP Phone Following table lists the physical layout of Avaya J159 IP Phone. 5, 15, 16, and 17 are application keys which provides direct access to the corresponding applications. Name Description Beacon LED Provides visual alerts for the following: •…
-
Page 12
Left, Right keys Used to navigate on the Secondary Display screen towards Right and Left. Mute Button Used to mute and unmute the outgoing audio. Table continues… November 2020 Using Avaya J159 IP Phone H.323 Comments on this document? infodev@avaya.com… -
Page 13: Connection Jacks
Phone overview on page 9 Connection jacks The following image illustrates the connection jacks on the back panel of Avaya J159 IP Phone. It describes which device to connect to which jack. Back panel of J159 IP Phone: November 2020 Using Avaya J159 IP Phone H.323…
-
Page 14
Headset Jack Connect to your headset. Handset Jack Connect to your handset. Wi-Fi card Reserved for Wi-Fi card. H.323 release 6.8.5 firmware does not support Wi-Fi. Table continues… November 2020 Using Avaya J159 IP Phone H.323 Comments on this document? infodev@avaya.com… -
Page 15: Secondary Display
9 Secondary display Avaya J159 IP Phone has a secondary display that is located at the lower right corner. It provides additional call appearances and feature or application display. Secondary display has four pages with six lines per page, displaying 24 additional lines of information for incoming calls, outgoing calls, auto-dialing, and calling features.
-
Page 16: Chapter 3: Getting Started
Identifying the device type during phone boot-up About this task Avaya J100 Series IP Phones displays the device type on the primary screen while the phone boots up. You can configure your phone according to the device type while the phone boots up.
-
Page 17: Unlocking Your Phone
To unlock the phone, press Unlock and enter the PIN or password. November 2020 Using Avaya J159 IP Phone H.323 Comments on this document? infodev@avaya.com…
-
Page 18: Chapter 4: Navigation
Menu options The following image shows the menu options that are available to view the current settings and configure the required parameters on the Avaya J159 IP Phone: November 2020 Using Avaya J159 IP Phone H.323…
-
Page 19: Main Menu
Note: The options displayed on your deskphone are determined by the options configured for your extension by your administrator. Main menu The following table lists the Main menu icons used in Avaya J159 IP Phone: Name Description Options & Settings…
-
Page 20: Accessing The Features Screen
On the Phone screen, use the right navigation button to gain access to the Features screen. To return to the main Phone screen, press Phone or scroll to the left. November 2020 Using Avaya J159 IP Phone H.323 Comments on this document? infodev@avaya.com…
-
Page 21: Chapter 5: Call Operations
This will move the call appearance list to the top of your screen. Note: Set the Phone Screen on Ringing option to Yes to automatically display the phone screen when you receive a call. November 2020 Using Avaya J159 IP Phone H.323 Comments on this document? infodev@avaya.com…
-
Page 22: Making Calls
Use the dialpad keys to enter the first few letters of the name, and the screen displays the first match in your list. Procedure 1. Press Contacts. November 2020 Using Avaya J159 IP Phone H.323 Comments on this document? infodev@avaya.com…
-
Page 23: Calling A Person From The Call History
1. On the Phone screen, enter the number you want to call. 2. To edit the number, press Bksp to erase one character at a time. 3. To remove the entire number, press Clear 4. Press Call. November 2020 Using Avaya J159 IP Phone H.323 Comments on this document? infodev@avaya.com…
-
Page 24: Calling A Person From The Directory
Press Clear to erase all dialed digits and enter a new number. Note: You can clear a number by using the backspace button only if you have enabled the Edit Dialing feature on your deskphone. November 2020 Using Avaya J159 IP Phone H.323 Comments on this document? infodev@avaya.com…
-
Page 25: Transferring A Call
1. Press Phone to view the main Phone screen. 2. Select the active line you want to put on hold. 3. Press Hold soft key or Hold button. November 2020 Using Avaya J159 IP Phone H.323 Comments on this document? infodev@avaya.com…
-
Page 26: Contacts
• If the characters are on the same key, pause before entering the next character. • To enter a space, press 0. • Enter remaining letters or numbers. • To delete the last character, press the Bksp softkey. November 2020 Using Avaya J159 IP Phone H.323 Comments on this document? infodev@avaya.com…
-
Page 27: Deleting A Contact
1. Press Contacts. 2. Select the contact you want to delete. 3. Press one of the following: • Delete: To delete the contact. • Cancel: To cancel the action. November 2020 Using Avaya J159 IP Phone H.323 Comments on this document? infodev@avaya.com…
-
Page 28: Editing A Contact
D, E, F or 3 depending on how you set up your contacts and how many times you press 3 in succession. Procedure 1. Press Contacts. 2. Using the dial pad, start typing the name which you want to search. November 2020 Using Avaya J159 IP Phone H.323 Comments on this document? infodev@avaya.com…
-
Page 29: Call History
CALL FOR: (calls made to the bridged line) or CALLED FROM: (calls made from the bridged line) preceding the applicable number. 4. To return to the list view, press Back . November 2020 Using Avaya J159 IP Phone H.323 Comments on this document? infodev@avaya.com…
-
Page 30: Adding An Entry From The Call History To Your Contacts List
Use this task to turn History on or off. If you have bridged call appearances on your phone, you can choose whether or not to include calls to your bridged lines in your call history log. Procedure 1. Press Home. November 2020 Using Avaya J159 IP Phone H.323 Comments on this document? infodev@avaya.com…
-
Page 31: Conferences
• Redial the last dialed number by using the Redial softkey or Redial button. 3. When the third participant answers the call, press the Join softkey. 4. To add another person, press Add and repeat Step 2 and 3. November 2020 Using Avaya J159 IP Phone H.323 Comments on this document? infodev@avaya.com…
-
Page 32: Adding A Person On Hold To A Conference Call
You will see the More soft key. 2. Press End Call when the conference is active. Result The participant who was added last gets disconnected from the conference. November 2020 Using Avaya J159 IP Phone H.323 Comments on this document? infodev@avaya.com…
-
Page 33: Putting A Conference Call On Hold And Resuming A Call
The Message button and the Message Wait indicator at the upper right corner glows red to indicate that you have a message. Procedure Press the Message button to access your voice messages. November 2020 Using Avaya J159 IP Phone H.323 Comments on this document? infodev@avaya.com…
-
Page 34
Use this procedure to listen to your voicemail messages.. Few voicemail configuration has the web interface to access it, please contact your administrator for more information. For more details on using your voicemail services see, Avaya OneCloud-ReadyNow Messaging Service User Guide. -
Page 35: Chapter 6: Advance Features
When Send All Calls (SAC) feature is on, your incoming calls go directly to a predefined coverage number, typically your voice mail. Incoming calls ring once at your extension and then go directly November 2020 Using Avaya J159 IP Phone H.323 Comments on this document? infodev@avaya.com…
-
Page 36: Activating Ec500 For Simultaneous Ringing On Multiple Phones
The system administrator has to add your cell phone number and program the desk phone. Procedure 1. From the Phone screen, go to the Features screen. 2. Scroll to EC500, and press Select. November 2020 Using Avaya J159 IP Phone H.323 Comments on this document? infodev@avaya.com…
-
Page 37: Bridged Call Appearances
Recents list or select the Redial softkey or Redial button. Joining a call on a bridged line About this task Use this task to join an existing call on a bridged line. November 2020 Using Avaya J159 IP Phone H.323 Comments on this document? infodev@avaya.com…
-
Page 38
• Abbreviated: The phone plays a single beep to indicate a call on the bridged appearance. Note: For multiple call appearance alerting, the phone highlights the call appearance with the most recent incoming call. November 2020 Using Avaya J159 IP Phone H.323 Comments on this document? infodev@avaya.com… -
Page 39: Chapter 7: Customization
You can configure the Go to Phone Screen on Calling option to Yes to automatically display the Phone screen when you make a call. Procedure 1. Press Main menu > Options & Settings. 2. Press Select or OK. 3. Select Call Settings. November 2020 Using Avaya J159 IP Phone H.323 Comments on this document? infodev@avaya.com…
-
Page 40
4. Press Select or OK. 5. Select Go to Phone Screen on Answer. 6. Press Change or OK to set the option to Yes or No, depending on the current setting. November 2020 Using Avaya J159 IP Phone H.323 Comments on this document? infodev@avaya.com… -
Page 41
Use this task to cause the LED in the top right corner of the phone to flash when the phone gets incoming calls. Procedure 1. Press Main Menu. November 2020 Using Avaya J159 IP Phone H.323 Comments on this document? infodev@avaya.com… -
Page 42
7. Select Pair Contacts to Calls. 8. Press Change or OK to change the setting to On or Off. 9. Press Save. Related links Options & Settings on page 39 November 2020 Using Avaya J159 IP Phone H.323 Comments on this document? infodev@avaya.com… -
Page 43
• Switchhook only: The phone does not send the ringing tone to the headset. The headset switch-hook button is non functional. 5. Press Save. Related links Options & Settings on page 39 November 2020 Using Avaya J159 IP Phone H.323 Comments on this document? infodev@avaya.com… -
Page 44: Application Settings
The phones sets the option to No by default. Press Change to change the setting to Yes. 6. Press Save to save the change. Related links Options & Settings on page 39 November 2020 Using Avaya J159 IP Phone H.323 Comments on this document? infodev@avaya.com…
-
Page 45: Screen And Sound Options
Related links Options & Settings on page 39 Screen and Sound Options Adjusting the brightness of the display Procedure 1. Press Main menu. 2. Select Options & Settings. November 2020 Using Avaya J159 IP Phone H.323 Comments on this document? infodev@avaya.com…
-
Page 46
2. Press Select to select Options & Settings > Screen & Sound Options > Error Tones. 3. Press Change to turn error tones on or off. 4. Press Save. Related links Options & Settings on page 39 November 2020 Using Avaya J159 IP Phone H.323 Comments on this document? infodev@avaya.com… -
Page 47
The phone plays the ring tones once through the speaker as you scroll through the list. 6. Press Save to save your selection. The phone takes you to the Call Settings menu. November 2020 Using Avaya J159 IP Phone H.323 Comments on this document? infodev@avaya.com… -
Page 48: Advanced Options
When the restore is in progress, the phone displays Retrieval in progress. When the restore is complete, the phone displays either Retrieval successful or Retrieval failed. Related links Options & Settings on page 39 November 2020 Using Avaya J159 IP Phone H.323 Comments on this document? infodev@avaya.com…
-
Page 49
• HAC Opt.— Setting delivers “Hearing Aid Compatibility” performance. • Amplified— Setting allows users to reset the volume level to nominal between calls. 7. Press Save. Related links Options & Settings on page 39 November 2020 Using Avaya J159 IP Phone H.323 Comments on this document? infodev@avaya.com… -
Page 50
Customization Acoustic Protection Avaya J100 Series IP Phones have the acoustic exposure protection, to protect the user’s ears from the acoustic shocks. This feature reduces the loud volume of the conversations on the phone call to permissible acoustic limit. The user can set the permissible acoustic limit to dynamic or predefined static values. -
Page 51: Administrative Messages
While receiving an audible alert, you can change between the speaker, handset, and headset, can stop the transmission of pushed audio content by going on-hook, and can adjust the volume, as you normally do during a call. November 2020 Using Avaya J159 IP Phone H.323 Comments on this document? infodev@avaya.com…
-
Page 52: Chapter 8: Troubleshooting
Incoming calls might not reach you and can go to voice mail. • Emergency calls might or might not work, depending on the stage of failover and the functionality available on the alternate server. November 2020 Using Avaya J159 IP Phone H.323 Comments on this document? infodev@avaya.com…
-
Page 53
• The Message Waiting Indicator is cleared, but voice mail might still be available if the voice mail server to which calls are being sent is not in failover. Transitions back to the normal server will restore all original functionality. November 2020 Using Avaya J159 IP Phone H.323 Comments on this document? infodev@avaya.com… -
Page 54: Chapter 9: Resources
Avaya Mentor videos provide technical content on how to install, configure, and troubleshoot Avaya products. About this task Videos are available on the Avaya Support website, listed under the video document type, and on the Avaya-run channel on YouTube. • To find videos on the Avaya Support website, go to https://support.avaya.com/…
-
Page 55: Support
For example, Contact Centers. Note: Videos are not available for all products. Support Go to the Avaya Support website at https://support.avaya.com for the most up-to-date documentation, product notices, and knowledge articles. You can also search for release notes, downloads, and resolutions to issues. Use the online service request system to create a service request.
-
Page 56
Conference Calls Go to Phone Screen Options on ringing adding a person on hold ……….setting …………….dropping a person …………32 configuring …………..18, connection jacks …………..contacts November 2020 Using Avaya J159 IP Phone H.323 Comments on this document? infodev@avaya.com… -
Page 57
Ring Pattern changing …………… navigation arrows right and left …………..18 screen width ……………..47 up and down …………..SENDALL …………….navigation tips …………..18 settings screen width …………..Speaker …………….November 2020 Using Avaya J159 IP Phone H.323 Comments on this document? infodev@avaya.com… -
Page 58
Index support ……………..55 Transfer …………….25 unlockPIN password …………..videos ……………… Visual Alerts configuring …………..November 2020 Using Avaya J159 IP Phone H.323 Comments on this document? infodev@avaya.com…
инструкцияAvaya J159

Issue 16c — (Tuesday, December 10, 2019)
9600 Series Telephone User Guide
IP Office Platform R11.0
Посмотреть инструкция для Avaya J159 бесплатно. Руководство относится к категории телефоны, 1 человек(а) дали ему среднюю оценку 7.4. Руководство доступно на следующих языках: английский. У вас есть вопрос о Avaya J159 или вам нужна помощь? Задайте свой вопрос здесь
- Cover
- Table of Contents
- Introduction
- Making Calls
- Answering Calls
- Redialling
- Redirecting Calls
- Holding and Parking Calls
- Transferring Calls
- Account Codes
- Conference Calls
- Headset Operation
- Handsfree Speaker Operation
- Contacts/Directory
- Call Log/History
- Voicemail
- Logging In/Out
- Groups
- Feature Buttons
- Home Screen
- Phone Settings
- Status Menu
- Short Codes
- System Administration
- Menus
- Glossary
- Document History
- Legal
- Index
Главная
| Avaya | |
| J159 | 700512394 | |
| телефон | |
| английский | |
| Руководство пользователя (PDF) |
Дизайн
| Цвет товара | Черный |
| Тип телефонной трубки | Проводная телефонная трубка |
| Настенный | Да |
| Крепление | Стол / Стена |
| Тип продукта | IP телефон |
Порты и интерфейсы
| Поддержка модуля расширения | Нет |
| Количество портов Ethernet LAN ( RJ-45) | — |
| Число портов RJ-9 | 1 |
| Количество портов USB 2.0 | 1 |
Содержимое упаковки
| Ethernet кабель | Да |
| Количество ручек в комплекте | — шт |
Экран
| Цвет подсветки | Красный / Зеленый |
| Дисплей | LED |
| Разрешение экрана | 320 x 240 пикселей |
| Диагональ экрана | 3.5 « |
| Сенсорный экран | — |
| Дисплей с задней подсветкой | Да |
Характеристики управления
| Количество клавиш доп. клавиатуры | 48 |
| Количество програмируемых клавиш | 4 |
Характеристики телефона
| Сервер регистрации SIP | Да |
| Количество линий | — линий |
| Функция отложенного звонка (вызова) | Да |
| Быстрый набор | Да |
| Удержание вызова | Да |
| Переадресация вызова | Да |
| Возможность совещаний по телефону | Да |
| Повторный набор | Да |
| Идентификация абонента (Caller ID) | — |
| Полнодуплексный режим | Да |
| Переадресация | Да |
| Индикатор непросмотренных сообщений | Да |
| История звонков | Да |
| Вместимость телефонной книги | — записей |
| Количество VoIP аккаунтов | — |
Аудио
| Громкоговоритель | Да |
| Отключение микрофона | Да |
| Кодеки голоса | G.711, G.722, G.726, G.729, G.729A, G.729B, OPUS |
Сеть
| Подключение Ethernet | Да |
| Тип LAN Ethernet интерфейса | Гигабитный Ethernet |
| Wi-Fi | Да |
| Скорость передачи данных Ethernet LAN | 10,100,1000 Мбит/с |
| Bluetooth | — |
Энергопитание
| Питание по Ethernet (PoE) | Да |
| Входное напряжение адаптера переменного тока | 5 V |
Камера
Логистические данные
| Код гармонизированной системы описания (HS) | 85171800 |
показать больше
Не можете найти ответ на свой вопрос в руководстве? Вы можете найти ответ на свой вопрос ниже, в разделе часто задаваемых вопросов о Avaya J159.
Какой размер экрана Avaya J159?
Какое разрешение экрана дисплея Avaya J159?
Инструкция Avaya J159 доступно в русский?
Не нашли свой вопрос? Задайте свой вопрос здесь
![]()
SIP телефон Avaya J159 IP PHONE (700512394)
Код: 700512394
Старая цена:28 725 руб.21 470 руб.
Avaya J159 – новинка серии J компании Avaya. Это многофункциональный высокопроизводительный SIP телефон с двумя цветными дисплеями высокого разрешения, персонализированным пользовательским интерфейсом и широким набором функций, отвечающим ежедневной потребности пользователей качественной голосовой связи.
Характеристики:
- 2 цветных дисплея: основной дисплей 2,8” (320 x 240 pixels); дополнительный дисплей 2,3” (160 x 240 pixels)
- 48 программируемых кнопок (всего для 2-х дисплеев). Возможные конфигурации для основного дисплея: 6 страниц по 4 (режим с двумя столбцами)/12 страниц по 2 (в режиме с одним столбцом). Конфигурация для дополнительного дисплея: 4 страницы по 6
- 4 софт-клавиши
- 16 кнопок с фиксированными командами: вызов, сообщения, контакты, история, дом, навигационный кластер, гарнитура, динамик, громкость, отключение звука, перевод вызова, конференц-связь, удержание, повторный набор.
- Двухдиодная индикация кнопок (10 зеленых/красных светодиодных индикаторов)
- Громкоговоритель Full Duplex
- Поддержка широкополосного звука высокой четкости
- Поддержка Wi-Fi (подключение при помощи дополнительного беспроводного модуля J100)
- Поддержка проводной гарнитуры (EHS)
- Поддержка протоколов SIP и H.323
- Поддержка платформ (минимальные требования): Avaya Aura Platform 6.2 FP4; Avaya IP Office 11.0.4.2; сторонние платформы, утвержденные Avaya
- PoE 802.3az (класс 1) с поддержкой спящего режима
- Gigabit Ethernet (10/100/1000) х2
- USB Тип A
- Персонализированный пользовательский интерфейс
- Встроенные и загружаемые мелодии
- Поддержка русского языка
- Подставка: 2 позиции; возможность крепления к стене
- Источник питания AC-DC 5 вольт (опционально)
- Цвет: черный кобальт
Краткое содержание страницы № 1
Avaya B159 Conference Phone
User Guide
ENGLISH
16-603914 Issue 1
March 2011
Краткое содержание страницы № 2
Avaya B159 Conference Phone User Guide © 2011 Avaya Inc. All Rights Reserved. Notice While reasonable efforts have been made to ensure that the information in this document is complete and accurate at the time of printing, Avaya assumes no liability for any errors. Avaya reserves the right to make changes and corrections to the information in this document without the obligation to notify any person or organization of such changes. Documentation disclaimer Avaya shall not be responsible for
Краткое содержание страницы № 3
Avaya B159 Conference Phone User Guide the Software at any given time. A “Unit” means the unit on which Avaya, at its sole discretion, bases the pricing of its licenses and can be, without limitation, an agent, port or user, an e-mail or voice mail account in the name of a person or corporate function (e.g., webmaster or helpdesk), or a directory entry in the administrative database utilized by the Software that permits one user to interface with the Software. Units may be linked to a speci
Краткое содержание страницы № 4
Avaya B159 Conference Phone User Guide ® The patented audio technology OmniSound 2.0 provides impressive audio quality for your distance meetings. Full-duplex audio via the hypersensitive microphone and powerful speakers enables speech in both directions. This natural loudspeaker sound quality is critical for effective, collaborative meetings that keep everyone engaged and contributing. ® OmniSound 2.0 is also enhanced with innovative features: noise suppression minimizes distracting backg
Краткое содержание страницы № 5
Avaya B159 Conference Phone User Guide TABLE of Co NTENTS Description 2 Ending a recording ……………………………19 Listening to a recording ……………………. 20 General ………………………………………….. 2 Managing recordings …………………………21 Maintenance …………………………………… 2 Adjusting the recording indicator ………….21 keypad…………………………………………… 4 Displaying recording feature status .
Краткое содержание страницы № 6
Avaya B159 Conference Phone User Guide DESCRIPTIo N GENERAL The Avaya B159 conference phone offers a host of innovative features: ® • OmniSound audio technology. • USB connectivity allows the phone to be used to make VoIP calls. • The line mode enables you to combine and switch easily between connectivity technologies – analog, USB, mobile (GSM/DECT). • Conference guide for easy set-up of multiparty calls. • Record your meetings with an SD memory card so that you can listen to them later
Краткое содержание страницы № 7
Avaya B159 Conference Phone User Guide DESCRIPTIo N Speaker Microphone Display screen Keypad LEDs SD memory card port LEDs Flashing blue Incoming call Steady blue light Call in progress Flashing red Hold, microphone and speaker turned off Steady red light Mute, microphone turned off Expansion microphone port Mobile/DECT phone connection Analog line connection AUX port Mini USB port for PC connection Security lock port Expansion microphone port Power supply port 3
Краткое содержание страницы № 8
Avaya B159 Conference Phone User Guide DESCRIPTIo N KEYPAD UP ARRo W MENU, DoWN ARR oW Navigation in menus Settings menu Navigation in menus Display of call list Display of call list C oK No/end/back Yes/confirm choice Start/ stop recording Answer/connect calls and flash Increase volume During a call: Press to call a new person Decrease volume Hang up/end call Co Nf ERENCE Mute Automatic dialling of conference groups o ne press of this button will always connect all parties to a confe
Краткое содержание страницы № 9
Avaya B159 Conference Phone User Guide DESCRIPTIo N NAVIGATIoN AND SELECTIoN IN MENUS Press MENU. Select the option you want from the menu using the arrow buttons. Confirm by pressing oK to select the marked option. Cancel the setting or go back one level in the menu by pressing C. Quit the menu by pressing MENU again. Note that after you have made changes to a setting, you must press oK to activate the setting. Writing style in instructions In the instructions, MENU > SET
Краткое содержание страницы № 10
Avaya B159 Conference Phone User Guide Co NNECTIo NS UNPACKING Check that all parts are included in the package. If any parts are missing, please contact your retailer. • The Avaya B159 conference phone • Power adapter with universal socket compatibility • 7.5 metre cable for electric power and line connection • 1.5 metre USB cable • Intermediate plugs for analog connection • Quick reference guides in different languages CoNNECTING AND INSTALLING Connect to an analog line, wire
Краткое содержание страницы № 11
Avaya B159 Conference Phone User Guide Co NNECTIo NS Select the language you want. Click oK to confirm your selection. Select MENU > SETTINGS if you want to set the date and time or make other adjustments. Co NNECTIVITY o PTIo NS An analog phone line is the pre-programmed option, but it is possible to switch between and combine two connectivity options. Press the LINE Mo DE key. Use the arrow buttons to select a connectivity option and press oK to confirm your choice. o ptions
Краткое содержание страницы № 12
Avaya B159 Conference Phone User Guide ANSWERING AND MAKING CALLS ANSWERING CALLS A ring tone is heard and the blue LEDs start flashing. Press to answer. The LEDs show a steady blue light. The duration of the call is shown on the display screen. ENDING CALLS End the call by pressing . MAKING CALLS Dial the number. Press . The number is called and the LEDs show a steady blue light. The duration of the call is shown on the display screen. Or: Press . Dial the number. The nu
Краткое содержание страницы № 13
Avaya B159 Conference Phone User Guide ANSWERING AND MAKING CALLS MAKING THREE-WAY CALLS o N AN ANALoG LINE The simplest way to set up a multi-party call is to use the conference guide (see page 13). You can connect another party to an on-going call as follows. During a call, the button acts as R-pulse (flash), which means it transmits commands to the PBX. If you experience problems making multi-party calls: Please contact your telephone administrator. Turn to page 23 for more details.
Краткое содержание страницы № 14
Avaya B159 Conference Phone User Guide ANSWERING AND MAKING CALLS Answering a VoIP call Press . The Avaya B159 has now been put into call mode and the LEDs show a steady blue light. Indicate whether you want to start the call by answering in the computer’s VoIP software. The Avaya B159 functions as a speaker and microphone for the computer. Ending a VoIP call End the call in the computer’s VoIP software and put the Avaya B159 on stand-by by pressing . The Avaya B159 now only funct
Краткое содержание страницы № 15
Avaya B159 Conference Phone User Guide DURING A CALL ADJUSTING THE SPEAKER Vo LUME Adjust the speaker volume using the buttons and . Adjusting the speaker volume when two lines are connected If you have selected double lines, you can adjust the volume level for each line. This is useful if the lines have different volume levels. Press the button or the button to display the current volume setting. The current main volume appears on the display screen. Above it are two smaller volu
Краткое содержание страницы № 16
Avaya B159 Conference Phone User Guide DURING A CALL SWITCHING LINES DURING CALLS Connecting a new line during a call You can add another line or switch between connected lines during a call. Press the LINE Mo DE button during the call. An indicator appears on the display screen in front of the selected line(s). Use the arrow buttons to mark the line you want to connect and confirm your choice by pressing . If you selected USB or MOBILE, this line will open. You then connect the call
Краткое содержание страницы № 17
Avaya B159 Conference Phone User Guide Co Nf ERENCE GUIDE The conference guide allows you to create 20 conference groups with up to six people in each. You can now call the participants in a meeting by simply pressing a few buttons. You may need to adjust some settings in your Avaya B159 to make it compatible with your PBX. Please turn to page 16 in this User Guide for more details. Entering text with the keypad Please turn to page 4 for instructions on using the keypad to enter text. CREAT
Краткое содержание страницы № 18
Avaya B159 Conference Phone User Guide Co Nf ERENCE GUIDE MAKING MULTI-PARTY CALLS Press the (Conference) button. Select QUICK GUIDE with the arrow buttons. Press oK to confirm. The Quick Guide asks you to dial the first number. Dial the first person’s telephone number. Press oK to confirm. Press oK when the first person has answered. Press oK to call another person and repeat the above steps. Press C when you have called all the persons you want for your meeting. If one of t
Краткое содержание страницы № 19
Avaya B159 Conference Phone User Guide Co Nf ERENCE GUIDE DELETING CoNf ERENCE GRoUPS Select MENU > Co Nf GUIDE > ERASE GRo UP. Mark the group you want to delete and press oK . Confirm that you really want to delete the group by pressing oK or cancel the dele- tion of a group by pressing C. DELETE ALL CoNf ERENCE GRoUPS Select MENU > Co Nf GUIDE > ERASE ALL. Confirm that you really want to delete all groups by pressing oK or cancel the dele- tion of all groups by pressing C. C
Краткое содержание страницы № 20
Avaya B159 Conference Phone User Guide Co Nf ERENCE GUIDE DISPLAYING CoNf ERENCE GUIDE STATUS Select MENU > Co Nf GUIDE > STATUS. The display screen indicates the number of conference groups already stored plus how many more groups can be added. 16
©
2019-2020, Avaya Inc.
All Rights Reserved.
Note
Using a cell, mobile, or GSM phone, or a two-way radio in close
proximity to an Avaya IP telephone might cause interference.
Documentation disclaimer
«Documentation» means information published in varying mediums
which may include product information, operating instructions and
performance specifications that are generally made available to users
of products. Documentation does not include marketing materials.
Avaya shall not be responsible for any modifications, additions, or
deletions to the original published version of Documentation unless
such modifications, additions, or deletions were performed by or on
the express behalf of Avaya. End User agrees to indemnify and hold
harmless Avaya, Avaya’s agents, servants and employees against all
claims, lawsuits, demands and judgments arising out of, or in
connection with, subsequent modifications, additions or deletions to
this documentation, to the extent made by End User.
Link disclaimer
Avaya is not responsible for the contents or reliability of any linked
websites referenced within this site or Documentation provided by
Avaya. Avaya is not responsible for the accuracy of any information,
statement or content provided on these sites and does not
necessarily endorse the products, services, or information described
or offered within them. Avaya does not guarantee that these links will
work all the time and has no control over the availability of the linked
pages.
Warranty
Avaya provides a limited warranty on Avaya hardware and software.
Refer to your sales agreement to establish the terms of the limited
warranty. In addition, Avaya’s standard warranty language, as well as
information regarding support for this product while under warranty is
available to Avaya customers and other parties through the Avaya
Support website:
https://support.avaya.com/helpcenter/
getGenericDetails?detailId=C20091120112456651010
«Warranty & Product Lifecycle» or such successor site as designated
by Avaya. Please note that if You acquired the product(s) from an
authorized Avaya Channel Partner outside of the United States and
Canada, the warranty is provided to You by said Avaya Channel
Partner and not by Avaya.
«Hosted Service» means an Avaya hosted service subscription that
You acquire from either Avaya or an authorized Avaya Channel
Partner (as applicable) and which is described further in Hosted SAS
or other service description documentation regarding the applicable
hosted service. If You purchase a Hosted Service subscription, the
foregoing limited warranty may not apply but You may be entitled to
support services in connection with the Hosted Service as described
further in your service description documents for the applicable
Hosted Service. Contact Avaya or Avaya Channel Partner (as
applicable) for more information.
Hosted Service
THE FOLLOWING APPLIES ONLY IF YOU PURCHASE AN AVAYA
HOSTED SERVICE SUBSCRIPTION FROM AVAYA OR AN AVAYA
CHANNEL PARTNER (AS APPLICABLE), THE TERMS OF USE
FOR HOSTED SERVICES ARE AVAILABLE ON THE AVAYA
WEBSITE,
HTTPS://SUPPORT.AVAYA.COM/LICENSEINFO
THE LINK «Avaya Terms of Use for Hosted Services» OR SUCH
SUCCESSOR SITE AS DESIGNATED BY AVAYA, AND ARE
APPLICABLE TO ANYONE WHO ACCESSES OR USES THE
HOSTED SERVICE. BY ACCESSING OR USING THE HOSTED
SERVICE, OR AUTHORIZING OTHERS TO DO SO, YOU, ON
BEHALF OF YOURSELF AND THE ENTITY FOR WHOM YOU ARE
DOING SO (HEREINAFTER REFERRED TO INTERCHANGEABLY
AS «YOU» AND «END USER»), AGREE TO THE TERMS OF USE. IF
YOU ARE ACCEPTING THE TERMS OF USE ON BEHALF A
COMPANY OR OTHER LEGAL ENTITY, YOU REPRESENT THAT
YOU HAVE THE AUTHORITY TO BIND SUCH ENTITY TO THESE
TERMS OF USE. IF YOU DO NOT HAVE SUCH AUTHORITY, OR IF
YOU DO NOT WISH TO ACCEPT THESE TERMS OF USE, YOU
MUST NOT ACCESS OR USE THE HOSTED SERVICE OR
AUTHORIZE ANYONE TO ACCESS OR USE THE HOSTED
SERVICE.
Licenses
THE SOFTWARE LICENSE TERMS AVAILABLE ON THE AVAYA
WEBSITE, HTTPS://SUPPORT.AVAYA.COM/LICENSEINFO,
UNDER THE LINK «AVAYA SOFTWARE LICENSE TERMS (Avaya
Products)» OR SUCH SUCCESSOR SITE AS DESIGNATED BY
AVAYA, ARE APPLICABLE TO ANYONE WHO DOWNLOADS,
USES AND/OR INSTALLS AVAYA SOFTWARE, PURCHASED
FROM AVAYA INC., ANY AVAYA AFFILIATE, OR AN AVAYA
CHANNEL PARTNER (AS APPLICABLE) UNDER A COMMERCIAL
AGREEMENT WITH AVAYA OR AN AVAYA CHANNEL PARTNER.
UNLESS OTHERWISE AGREED TO BY AVAYA IN WRITING,
AVAYA DOES NOT EXTEND THIS LICENSE IF THE SOFTWARE
WAS OBTAINED FROM ANYONE OTHER THAN AVAYA, AN AVAYA
AFFILIATE OR AN AVAYA CHANNEL PARTNER; AVAYA
RESERVES THE RIGHT TO TAKE LEGAL ACTION AGAINST YOU
AND ANYONE ELSE USING OR SELLING THE SOFTWARE
WITHOUT A LICENSE. BY INSTALLING, DOWNLOADING OR
USING THE SOFTWARE, OR AUTHORIZING OTHERS TO DO SO,
YOU, ON BEHALF OF YOURSELF AND THE ENTITY FOR WHOM
YOU ARE INSTALLING, DOWNLOADING OR USING THE
SOFTWARE (HEREINAFTER REFERRED TO
INTERCHANGEABLY AS «YOU» AND «END USER»), AGREE TO
THESE TERMS AND CONDITIONS AND CREATE A BINDING
CONTRACT BETWEEN YOU AND AVAYA INC. OR THE
APPLICABLE AVAYA AFFILIATE («AVAYA»).
Avaya grants You a license within the scope of the license types
described below, with the exception of Heritage Nortel Software, for
which the scope of the license is detailed below. Where the order
documentation does not expressly identify a license type, the
applicable license will be a Designated System License as set forth
below in the Designated System(s) License (DS) section as
applicable. The applicable number of licenses and units of capacity
for which the license is granted will be one (1), unless a different
number of licenses or units of capacity is specified in the
documentation or other materials available to You. «Software» means
computer programs in object code, provided by Avaya or an Avaya
Channel Partner, whether as stand-alone products, pre-installed on
hardware products, and any upgrades, updates, patches, bug fixes,
under the link
or modified versions thereto. «Designated Processor» means a single
stand-alone computing device. «Server» means a set of Designated
Processors that hosts (physically or virtually) a software application
to be accessed by multiple users. «Instance» means a single copy of
the Software executing at a particular time: (i) on one physical
machine; or (ii) on one deployed software virtual machine («VM») or
similar deployment.
License types
Designated System(s) License (DS). End User may install and use
each copy or an Instance of the Software only: 1) on a number of
Designated Processors up to the number indicated in the order; or 2)
up to the number of Instances of the Software as indicated in the
order, Documentation, or as authorized by Avaya in writing. Avaya
may require the Designated Processor(s) to be identified in the order
by type, serial number, feature key, Instance, location or other
specific designation, or to be provided by End User to Avaya through
electronic means established by Avaya specifically for this purpose.
Shrinkwrap License (SR). You may install and use the Software in
accordance with the terms and conditions of the applicable license
agreements, such as «shrinkwrap» or «clickthrough» license
accompanying or applicable to the Software («Shrinkwrap License»).
UNDER
Heritage Nortel Software
«Heritage Nortel Software» means the software that was acquired by
Avaya as part of its purchase of the Nortel Enterprise Solutions
Business in December 2009. The Heritage Nortel Software is the
software contained within the list of Heritage Nortel Products located
at
https://support.avaya.com/LicenseInfo
Nortel Products» or such successor site as designated by Avaya. For
Heritage Nortel Software, Avaya grants Customer a license to use
Heritage Nortel Software provided hereunder solely to the extent of
the authorized activation or authorized usage level, solely for the
purpose specified in the Documentation, and solely as embedded in,
for execution on, or for communication with Avaya equipment.
Charges for Heritage Nortel Software may be based on extent of
activation or use authorized as specified in an order or invoice.
under the link «Heritage