-
Contents
-
Table of Contents
-
Bookmarks
Quick Links
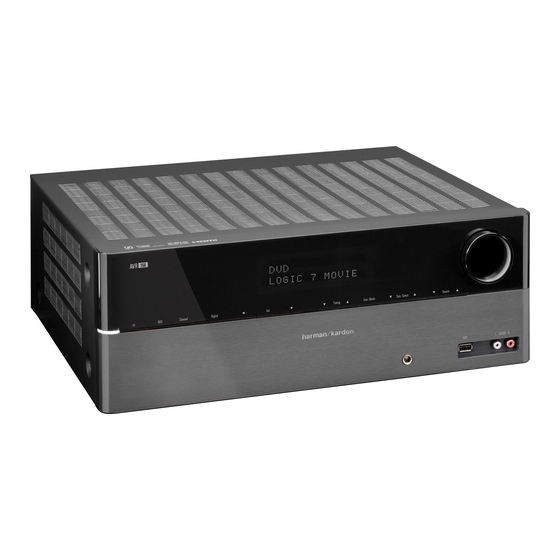
AVR 156
Audio/video receiver
Quick-Start Guide
Related Manuals for Harman Kardon AVR 156
Summary of Contents for Harman Kardon AVR 156
-
Page 1
AVR 156 Audio/video receiver Quick-Start Guide… -
Page 2: Place Your Speakers
Do not place the AVR in moist or humid locations, in extremely hot or cold locations, in areas For more detailed speaker placement information, including the use of front near heaters or heat registers, or in direct sunlight. height speakers, download the complete AVR 156 Owner’s Manual from www.harmankardon.com. Connections CAUTION: Before making any connections to the audio/video receiver, ensure that the AVR’s AC cord is unplugged from the AVR and the AC outlet.
-
Page 3: Connect Your Speakers
AVR 156 Connections Connect Your Speakers Connect Your Subwoofer Use a single RCA audio cable to connect the AVR’s Subwoofer Pre-Out connector to your How to use the AVR’s speaker terminals: subwoofer. Consult your subwoofer’s user manual for specific information about making connections to it.
-
Page 4: Connect Your Audio And Video Source Devices
AVR 156 Connections Connect Your Audio and Video Source Devices Source devices are components where a playback signal originates, e.g., a Blu-ray As you connect your various source components, fill out the “Source Device Connected” Disc™ or DVD player; a cable, satellite or HDTV tuner; etc. Your AVR has several different column in the following table –…
-
Page 5
AVR 156 Connections Composite Video Devices Analog Audio Devices You will need to make composite video connections from your source devices that do not Make analog audio connections from your source devices that do not have HDMI or digital have HDMI or component video connections. You will also need to connect the source audio connections. -
Page 6: Connect The Radio Antennas
NOTE: For instructions on connecting the Trigger output to compatible equipment, please Press the remote control’s OSD button. The AVR’s on-screen display (OSD) Master download the AVR 156 Owner’s Manual from www.harmankardon.com. Menu will appear on the TV. MASTER MENU Connect to AC Power Connect the AC power cord to the AVR’s AC Input connector and then to a working,…
-
Page 7: Assign The Digital Audio Connectors
“Back To Master Menu.” MASTER MENU For now you can skip the “Sub Mode” and “Crossover” settings. For complete details about making these settings, please download the AVR 156 Owner’s Manual from www. harmankardon.com. INPUT SETUP Measure the distance from each speaker in your system to the listening position. Write SURROUND SELECT down the distances.
-
Page 8
© 2011 HARMAN International Industries, Incorporated. All rights reserved. harman kardon is a trademark of HARMAN International Industries, Incorporated, registered in the United States and/or other coun- tries. EzSet/EQ is a trademark of HARMAN International Industries, Incorporated. HDMI, the HDMI logo and High-Definition Multimedia Interface are trademarks or registered trademarks of HDMI Licensing LLC in the United States and other countries.
This manual is also suitable for:
Avr 158
![]()
AVR 156
Аудио/видеоресивер
Руководство Пользователя
РУССКИЙ

AVR 156
|
Введение |
3 |
|
Поставляемое дополнительное оборудование |
3 |
|
ВАЖНАЯ ИНФОРМАЦИЯ ПО БЕЗОПАСНОСТИ ЭКСПЛУАТАЦИИ |
3 |
|
Размещение ресивера |
3 |
|
Элементы управления на передней панели |
4 |
|
Гнезда на задней панели |
6 |
|
Функции системы дистанционного управления |
8 |
|
Введение в использование домашнего кинотеатра |
10 |
|
Типичная система домашнего кинотеатра |
10 |
|
Многоканальное аудио |
10 |
|
Режимы объемного звучания |
10 |
|
Размещение Ваших колонок |
10 |
|
Размещение левой, центральной и правой колонок |
10 |
|
Размещение колонок объемного звучания |
10 |
|
РаЗмещение сабвуфера |
10 |
|
Типы разъемов, которые используются |
|
|
в системах домашних кинотеатров |
11 |
|
Разъемы динамиков |
11 |
|
Разъемы для подключения сабвуфера |
11 |
|
Разъемы для подключения |
|
|
устройств-источников сигнала |
11 |
|
Видеоразъемы |
12 |
|
Разъемы для подключения радио |
12 |
|
USB-разъем |
12 |
|
Подключение разъемов |
13 |
|
Подключение Ваших колонок |
13 |
|
Подключение сабвуфера |
13 |
|
Подключение телевизора или видеомонитора |
13 |
|
Подключение устройств-источников сигнала |
13 |
|
Подключение радиоантенн |
15 |
|
Подключение выходного разъема «12V Trigger Output» 15 |
|
|
Подключение к сети |
15 |
Содержание
|
Настройка пульта дистанционного управления |
15 |
|
Установка батареек в пульт |
|
|
дистанционного управления |
15 |
|
Запрограммируйте пульт дистанционного |
|
|
управления на управление вашими |
|
|
устройствами-источниками сигнала и ТВ |
16 |
|
Настройка AVR |
16 |
|
Включение ресивера |
16 |
|
Использование системы экранного меню |
16 |
|
Конфигурирование AVR для Ваших колонок |
17 |
|
Назначение цифровых аудиоразъемов |
18 |
|
Позиции меню для дополнительных |
|
|
установок входных сигналов |
19 |
|
Эксплуатация Вашего AVR |
19 |
|
Управление громкостью |
19 |
|
Отключение звука |
19 |
|
Прослушивание через наушники |
19 |
|
Выбор источника |
19 |
|
Советы по поиску и устранению |
|
|
неисправностей при приеме видеосигнала |
19 |
|
Прослушивание FM и AM радио |
20 |
|
Выбор режима объемного звучания |
20 |
|
Дополнительные функции |
20 |
|
Обработка аудио сигнала и объемный звук |
20 |
|
System Setup (Системные установки) |
22 |
|
Дополнительные возможности |
|
|
программирования дистанционного управления |
22 |
|
Запись |
22 |
|
Sleep Timer (Таймер отключения) |
23 |
|
Перезагрузка с использованием |
|
|
пульта дистанционного управления |
23 |
|
Перезагрузка процессора |
23 |
|
Память |
23 |
|
Устранение неисправностей |
24 |
|
Технические характеристики |
25 |
|
Приложение |
26 |
2

AVR 156
Введение, Поставляемое дополнительное оборудование, Важная Информация По Безопасности Эксплуатации и Размещение ресивера
Введение
Благодарим вас за то, что выбрали этот товар торговой марки Harman Kardon!
НапротяженииболеепятидесятилетмиссиейкомпанииHarmanKardonбылоудовлетворениепотребностей, связанных с музыкой и развлечениями. Для этого компания использовала самые современные технологии, чтобы достичь максимально высоких технических характеристик своих устройств. Сидней Харман и Бернард Кардон изобрели ресивер, который является одним устройством, целью разработки которого является упрощение устройств для домашних развлечений без ухудшения их техническиххарактеристик.СгодамитоварыторговоймаркиHarmanKardonсталипрощевэксплуатации, одновременно предлагая пользователю большее количество функций и лучшее качество звука, чем когда-либо.
AVR 156 5.1-канальный аудио/видеоресивер (AVR) до сих пор продолжает традицию наиболее продвинутых аудио и видеотехнологий, обеспечивая богатством возможностей для прослушивания и просмотра.
Для получения максимальных впечатлений от вашего нового аудио-/видеоресивера, пожалуйста, прочтите эту инструкцию по эксплуатации и просматривайте ее повторно, чтобы лучше узнать о функциях и работе этого устройства.
Если у вас возникли какие-либо вопросы, связанные с этим устройством, с его установкой или эксплуатацией,пожалуйста,обратитеськвашемурозничномупродавцутоваровкомпанииHarmanKardon или к специалисту по установке, или посетите Интернет-сайт www.harmankardon.com.
Поставляемое дополнительное оборудование
Вкомплектпоставкивашегоаудио-/видеоресиверавходитследующеедополнительноеоборудование: Если какие-либо из этих деталей отсутствуют, пожалуйста, обратитесь к вашему дилеру компании Harman Kardon или в отдел обслуживания потребителей компании Harman Kardon через Интернетсайт www.harmankardon.com.
•• Пульт дистанционного управления
•• Рамочная антенна AM-диапазона
•• Проводная антенна FM-диапазона
ВАЖНАЯ ИНФОРМАЦИЯ ПО БЕЗОПАСНОСТИ ЭКСПЛУАТАЦИИ
Перед эксплуатацией устройства проверьте напряжение электрической сети
AVR156питаетсяотсети~220–240В.Подключениекэлектрическойсети,напряжениекоторойотлича- ется от того, на которое рассчитан ваш аудио-/видеоресивер, может быть небезопасным, может стать причиной возникновения пожара и может привести к повреждению устройства. Если у вас возникли какие-либо вопросы, связанные с напряжением, на которое рассчитано именно ваше устройство или вопросы, связанные с напряжением электрической сети в вашем регионе, обратитесь к вашему розничному продавцу, прежде чем подключать устройство к электрической сети.
Не используйте удлинительные шнуры
Во-избежание проблем, связанных с безопасностью эксплуатации устройства, используйте только кабельэлектропитания,которыйвходитвкомплектпоставкивашегоустройства.Мынерекомендуем использование удлинительных шнуров с этим устройством. Как и для всех электрических устройств, не проводите кабели электропитания под ковриками или ковровым покрытием, а также не ставьте на них тяжелые предметы. Поврежденные кабели электропитания необходимо немедленно заменитьвавторизованномсервисномцентренакабель,соответствующийтехническимхарактеристикам завода-изготовителя.
Бережно обращайтесь с кабелем электропитания
Когда вы отключаете кабель электропитания от электрической сети переменного тока, всегда вытягивайте штепсель, держась за вилку. Никогда не вытягивайте штепсель, держась за кабель. Если вы не собираетесь использовать ваш аудио-/видеоресивер в течение какого-либо продолжительного периода времени, отключите штепсель от электрической сети переменного тока.
Не открывайте корпус устройства
Внутриэтогоустройстванетдеталей,обслуживаниекоторыхпроизводитсяпользователем.Открытие корпусаможетпредставлятьопасностьпораженияэлектрическимтоком.Такжелюбаямодификация устройстваприведетканнулированиюдоговораогарантийномобслуживанииустройства.Есливода или какой-либо металлический предмет, например, скрепка для бумаг, провод или скоба степлера случайно упали внутрь устройства, немедленно отключите устройство от источника электропитания переменного тока и обратитесь за консультацией в авторизованный сервисный центр.
•• Три батареи AAA
•• Кабель электропитания переменного тока
Размещение ресивера
•• Поставьте ресивер на твердую и ровную поверхность. Убедитесь, что поверхность и установочная фурнитура может выдержать вес ресивера.
•• Обеспечьтепространстводлявентиляциивышеинижересивера.Есливыустанавливаетересивер вшкафуилидругихзакрытыхместах,обеспечьтевшкафуохлаждениевоздуха.Внекоторыхслучаях может потребоваться установка вентилятора.
•• Не закрывайте вентиляционные отверстия в верхней части ресивера и не ставьте предметы непосредственно над ним.
•• Не ставьте ресивер непосредственно на покрытую коврами поверхность.
•• Не ставьте ресивер во влажных или сырых местах, в очень жарких или холодных местах, рядом с обогревателями или радиаторами отопления, или под прямыми солнечными лучами.
РУССКИЙ
3

|
AVR 156 |
Элементы управления на передней панели |
|
Элементы управления на передней панели |
|
Индикатор вклю- |
Кнопка Set |
Дисплей для ото- |
Кнопки выбора режима |
Кнопка регули- |
|
|
чения питания |
ИК датчик |
(Установить) |
бражения сообщений |
объемного звучания |
ровки громкости |
|
Кнопка включения |
Кнопка управления |
||||||||
|
уровнем канала |
|||||||||
|
Кнопки пере- |
|
мещения курсора |
|
влево/вправо |
|
Кнопка перемещения |
Гнездо для наушников |
USB-порт |
Гнездо для подклю- |
||||||||||||
|
курсора вверх/вниз/ |
чения дополни- |
||||||||||||||
|
Кнопки настройки |
тельного входного |
||||||||||||||
|
аудио сигнала |
|||||||||||||||
|
Кнопка режима |
Кнопка цифро- |
Кнопка категории |
Кнопки выбора источника |
|
настройки |
вого входа |
режима объем- |
|
|
ного звучания |
4

AVR 156
Элементы управления на передней панели, продолжение)
Элементы управления на передней панели (продолжение)
Индикатор включения: этот светодиод имеет три режима работы:
•• Светодиод не горит: Это означает, что сетевой шнур AVR извлечен из розетки или основной выключатель (Main Power) включен.
•• Светодиод горит янтарным цветом: Это означает, что AVR находится в режиме ожидания (Standby).
•• Светодиод горит белым цветом: Это означает, что AVR включен.
ВАЖНОЕЗАМЕЧАНИЕ:ПрилюбомпоявлениисообщенияPROTECT(ЗАЩИТА)надисплеепередней панелиприбораAVRнужноНЕМЕДЛЕННОвыключитьAVRиизвлечьегосетевойшнуризрозетки. После этого надо проверить все провода колонок на возможное наличие короткого замыкания (оно возникает в том случае, когда оголенные проводники“+”и“–”касаются друг друга или когда ониодновременнокасаютсяоднойитойжеметаллическойдетали).Есликороткоезамыканиене обнаружено, то нужно доставить устройство в авторизованный сервис-центр компании Harman Kardon для проверки и ремонта перед продолжением эксплуатации устройства.
ИКдатчик: Этот датчик получает команды, которые передаются инфракрасным лучом от пульта дистанционного управления. Очень важно следить за тем, чтобы этот датчик не был заблокирован.
Кнопка установки: Следует нажимать эту кнопку для выбора позиции меню, которая выделена подсветкой.
Дисплей сообщений: На этом дисплее, имеющим две строки, появляются различные сообщения в ответ на полученные команды и изменения в принимаемом сигнале. В обычном режиме работы наименование используемого датчика будет отображаться в верхней строке, а режим объемного звучания в нижней. Когда отображается на экране система экранного меню (OSD), на дисплее будут отображаться текущие установки этого меню.
Кнопкивыборарежимаобъемногозвучания:Послевыборанужнойкатегориирежимаобъемного звучанияследуетнажиматьэтикнопкидлявыбораспециальногорежимавнутрикатегории,например, для изменения режима Dolby® Pro Logic® II Movie на режим 7® Movie. Доступность режима объемного звучания зависит от природы входного сигнала источника, т.е. цифрового или аналогового, а также числа каналов, которые закодированы в сигнале.
Кнопка громкости: Нужно вращать эту кнопку для увеличения или уменьшения громкости.
Кнопка включения: Следует нажать эту кнопку, чтобы включить AVR или перевести его в режим ожидания (Standby).
Кнопкарежиманастройки:Этакнопкавыполняетпереключениемеждурежимаминастройки:вручную (с каждым шагом выполняется переключение на следующую частоту) и автоматически (выполняется поисквсехсигналов,которыеимеютдостаточнобольшуюмощностьвданномдиапазонечастот).Она также будет переключать между режимами стерео и моно при прослушивании FM-радиостанции.
Кнопка управления уровнем канала: Следует нажимать эту кнопку, чтобы активировать функцию настройки уровня канала. После нажатия этой кнопки следует использовать кнопки перемещения курсора вверх/вниз, чтобы выбрать канал, который надо настроить, и использовать кнопки перемещения курсора влево/вправо, чтобы настроить уровень этого канала.
Кнопка цифрового входа: Следует нажимать эту кнопку, чтобы изменить аудио вход для текущего источника. Надо использовать кнопки перемещения курсора влево/вправо, чтобы циклически переходитьотодногодоступноговходакдругому.ХотяВыможетеприписатьлюбойцифровойаудиовход клюбомуисточнику,аналоговыеаудиовходывсеявляютсяпостоянноназначеннымидляисточников, которыми они помечены.
Кнопкиперемещениякурсоравлево/вправо:Следуетиспользоватьэтикнопкидляперемещения по меню AVR.
Кнопкаперемещениякурсоравверх/вниз/Кнопкинастройки:Следует использовать эти кнопки для перемещения по меню AVR. Когда активным источником является радио, следует использовать эти кнопки для настройки на радиостанции в соответствии с установкой кнопкиTuning Mode (Режим настройки) (см. выше).
Кнопкакатегориирежимаобъемногозвучания:Следуетнажатьэтукнопку,чтобывыбратькатегорию объемного звучания. Каждое нажатие будет изменять категорию режима объемного звучания: Auto Select,Virtual,Stereo,Movie,MusicиVideoGame.Чтобыизменитьспециальныйрежимобъемногозвучания в пределах категории режима объемного звучания, следует использовать кнопки Surround Select Up/ Down(Выборобъемногозвучаниявверх/вниз).См.РазделОбработкааудиосигналаиобъемныйзвук, на стр. 20 для получения более подробной информации о режимах объемного звучания.
Гнездо для наушников: подключите наушники с разъемом 1/4″ (6,35 мм).
Кнопки выбора источника: Следует нажимать эти кнопки для выбора активного источника.
USB-порт: Вы можете использовать этот порт для выполнения обновления программного обеспечения, которое может быть предложено в будущем. Не следует подключать устройство для сохранения данных, периферийного оборудование или персональный компьютер в данном случае до тех пор, пока не будут получены соответствующие инструкции.
Гнездодляподключениядополнительноговходногоаудиосигнала:Следуетподключатькомпоненты в качестве дополнительного источника, которые будут использоваться временно, например, видеокамеру, портативные музыкальный плейер или игровую консоль.
РУССКИЙ
5

|
AVR 156 |
Гнезда на задней панели |
Гнезда на задней панели
|
Композитный вход монитора |
Гнездо выходного |
|
|
видеосигнала Video 2 Out |
||
|
Выходное гнездо мони- |
Входное гнездо компонент- |
Входные гнезда компо- |
|
тора сигнала высокой |
ного видеосигнала ДВД |
зитного видеосигнала |
|
четкости (HDMI®) |
|
Входные гнезда |
Входные гнезда циф- |
|||
|
Гнезда для подключе- |
сигнала высокой |
|||
|
четкости (HDMI) |
рового аудио сигнала |
Разъемы аналогового видео |
||
|
ния радиоантенны |
||||
|
Входное / выходное гнездо |
Клеммы для под- |
Основной сетевой |
Входное гнездо для подклю- |
|||||||||||||||||||||||||||||||||||||||||||||||||||||||
|
аналогового аудиосигнала |
ключения колонок |
|||||||||||||||||||||||||||||||||||||||||||||||||||||||||
|
выключатель |
чения сетевого напряжения |
|||||||||||||||||||||||||||||||||||||||||||||||||||||||||
|
Гнездо для подклю- |
Гнездо для триггера 12 В |
|||||||||||||||||||||||||||||||||||||||||||||||||||||||||
|
чения сабвуфера |
||||||||||||||||||||||||||||||||||||||||||||||||||||||||||
6

|
AVR 156 |
Гнезда на задней панели, продолжение |
Гнезда на задней панели (продолжение)
Гнезда для подключения антенны для радио: Подключить антенны для приема AM и FM, которые есть в комплекте поставки, в соответствующие гнезда для приема радиосигнала.
Выходноегнездомониторасигналавысокойчеткости(HDMI): Если Ваш телевизор имеет гнезда дляприемасигналавысокойчеткости(HDMI)иуВасестьустройства,являющиесяисточникамисигнала высокойчеткости(HDMI),тоследуетиспользоватькабельHDMI(егонетвкомплектепоставки),чтобы подключить его к выходному гнезду сигнала высокой четкости (HDMI Monitor Out) устройства AVR.
Замечания по использованию гнезда выходного сигнала высокой четкости для монитора (HDMI):
•• При подключении дисплея, поддерживающего интерфейс DVI, к гнезду HDMI Monitor Out (Выходного сигнала высокой четкости для монитора) следует использовать адаптер HDMI-to- DVI и выполнять отдельное подключение для передачи аудио сигнала.
•• Следуетубедиться,чтодисплейподдерживающийсигналывысокойчеткости(HDMI),является HDCP-совместимымустройством.Еслиэтонетак,тоследуетегоподключатьчерезподключение HDMI; в качестве альтернативы следуетиспользовать аналоговое подключение видеосигнала и выполнить отдельное аудио подключение.
Входные гнезда сигнала высокой четкости (HDMI): Функция HDMI (Мультимединый интерфейс высокойчеткости®)представляетсобойподключениедляпередачицифровыхаудиоивидеосигналов междуустройствами.Еслиустройство,являющеесяисточникомвидеосигнала,имеетгнездоHDMI,то это дает возможность воспользоваться в полной мере всеми функциями воспроизведения видео и аудиоинформации.ПосколькукабелиHDMIодновременнопередаютцифровыеаудиоивидеосигналы, то Вы не должны делать какие-либо дополнительные подключения для передачи аудио сигналов от Ваших устройств-источников, которые подключены с использованием подключения HDMI. См. Подключение Ваших источников на стр. 13 для получения более подробной информации.
Гнездо выходного сигнала композитного видео для монитора: Если Ваш телевизор или видео дисплейнеимеетгнезд HDMIилиеслиВаштелевизоримеетгнездо HDMI,ноВы подключаете некото- рыеустройства-источники,имеющиетолькоразъемыдлякомпозитноговидеосигнала,тоВыдолжны использоватькабельдлякомпозитноговидеосигнала(егонетвкомплектепоставки)дляподключения выходного гнезда для композитного видеосигнала монитора устройства AVR к гнезду для входного композитного видеосигнала Вашего телевизора.
Входное гнездо компонентного видеосигнала ДВД: Если Ваши плейеры Blu-ray Disc™ или ДВД не имеют гнезда HDMI, но имеют гнездо для компонентного видеосигнала, то использование гнезда для компонентного видеосигнала будет обеспечивать передачу видео изображения высокого качества. Вам также надо будет выполнить подключение аудио сигнала от плейера к устройству AVR.
Входные гнезда цифрового аудио сигнала: Если Ваши источники сигнала без гнезд HDMI имеют коаксиальныецифровыегнезда,тоихнадоподключатькгнездамдлякоаксиальныхцифровыхсигналов устройства AVR. ПРИМЕЧАНИЕ: Следует выполнять только одно цифровое подключение (HDMI, оптическое или коаксиальное) к каждому устройству. См. Подключение Ваших источников на стр. 13 для получения более подробной информации.
Гнездо выходного видеосигнала Video 2 Out: Подключите аналоговое входное видео гнездо видеомагнитофона к выходному гнезду композитного видеосигнала устройств AVR — Video Out 2. Вы можете записать любой входной композитный видеосигнал. ПРИМЕЧАНИЕ: Чтобы записать аудио и видеосигналы от устройства-источника, нужно подключить выходные гнезда аналогового видео и аудио сигнала AVR (Video Out 2/Analog Output) к входным гнездам аналогового аудио сигнала видеомагнитофона.
Входныегнездакомпозитноговидеосигнала:Используйтегнездадлякомпозитноговидеосигнала для подключения источников композитного видеосигнала, который не имеет гнезд HDMI или гнезд компонентноговидеосигнала.ВамтакжепотребуетсясделатьаудиоподключениеисточникакAVR.См. Подключение Ваших источников сигнала на стр. 13 для получения более подробной информации.
Гнездо для подключения сабвуфера: Следует подключать к этому гнезду активный сабвуфер с линейным входом. См. Подключение Вашего сабвуфера на стр. 13 для получения более подробной информации.
Входное/выходное гнезда аналогового аудиосигнала: Следует использовать входное/выходное гнезда аналогового аудиосигнала устройства AVR для источников, которые не имеют гнезд HDMI или гнезд для цифрового аудио сигнала. Следует использовать гнезда Video 2 Out (Выход видеосигнала 2) и Tape Out (Выход на магнитофон) для подключения к аудио входам видеомагнитофона и кассетного магнитофона. См. Подключение Ваших источников на стр. 13 для получения более подробной информации.
Гнезда колонок: Следует использовать двухжильный провод для подключения каждого набора клемм к правильной колонке. См. Подключение Ваших колонок на стр. 13 для получения более подробной информации.
Основнойвыключательнапряженияпитания:Этомеханическийвыключателькоторыйвключает илиотключаетнапряжениепитанияустройстваAVR.Обычнооннаходитсявовключенномположении и не может быть включен или выключен с использованием пульта дистанционного управления.
Гнездодлятриггера12В:Этогнездообеспечиваетподачу12Впост.напряжения,когдаустройствоAVR находитсявовключенномсостоянии.Ономожетбытьиспользованодлявключенияиливыключения других устройств, например, сабвуфера, который имеет отдельный блок питания.
Гнездо входного переменного напряжения: После того, как выполнили все остальные подключения нужно вставить вилку сетевого шнура в гнездо на устройстве и в стенную розетку, которая не отключается от сети.
РУССКИЙ
7

AVR 156
Функции системы дистанционного управления
Линзы ИК передатчика Светодиодный индикатор Program (Программы)
Кнопка включения напряжения питания Кнопка выключения напряжения питания
Кнопка AVR
Кнопка включения тестового тонового сигнала
Кнопки Автоматического отключения/ Перемещения курсора вверх/вниз
Кнопка OSD (Включения/выключения экранного меню)
Кнопка управления уровнем канала
Кнопка цифрового входа
Кнопка режима настройки
Кнопка прямого включения нужной станции
Кнопки настройки вверх/вниз
Кнопки управления тоном
Кнопка ночного режима
Кнопки пропуска дорожек вперед/назад
Функции системы дистанционного управления
Кнопка Mute (Тишина)
Кнопки выбора источника
Кнопки увеличения/уменьшения громкости
Кнопки установок колонки

 Кнопка OK (Подтверждения) Кнопка задержки
Кнопки перемещения курсора влево/вправо/вверх/вниз
Цифровые кнопки
Кнопка памяти Кнопка очистки (удаления)
Кнопки перехода к станциям, сохраненным в памяти, — вверх/вниз
Кнопка RDS
Кнопки запуска макропрограмм
Кнопка затемнения дисплея
Кнопки управления воспроизведением
8

AVR 156
Функции системы дистанционного управления, продолжение
Функции системы дистанционного управления (продолжение)
ВдополнениекуправлениюAVR,пультдистанционногоуправленияспособенуправлятьвосемьюдругими устройствами. В процессе установки Вы можете запрограммировать в пульт дистанционного управления коды каждого из Ваших устройств, которые служат источниками контента. (См. Программирование пульта дистанционногоуправлениядляуправленияВашимиисточникамиителевизоромнастр.16дляполучения болееподробнойинформациипопрограммированию).Чтобыуправлятькаким-либокомпонентом,следует нажать кнопку Source Selector (Выбора источника) для изменения режима управления.
Функция кнопки зависит от компонента, которым в данный момент управляет пульт дистанционного управления. См. Таблицу А10 в Приложении, где перечислены все функции для каждого типа управляемого устройства. Большинство кнопок на пульте дистанционного управления являются назначенными функциями, хотя точная передача кодов может варьироваться в зависимости от специфики управляемого устройства. Из-за широкого диапазона функций, которыми могут обладать различные устройства, являющиеся источниками контента, мы включили только большинство часто используемых функций, которые можно выполнять, используя пульт дистанционного управления: буквенно-цифровые кнопки, управление воспроизведением, управление телевизионными каналами, доступ к меню и включение и отключение.ЧтобывернутьпультдистанционногоуправлениякрежимууправленияAVRвлюбоймомент времени, надо нажать кнопку AVR.
ЛинзыИКпередатчика:Посленажатиякакой-либокнопкинапультедистанционногоуправления,коды инфракрасного излучения начнут генерироваться через эти линзы.
Светодиодный индикатор Program (Программы): Этот светодиодный индикатор загорается для обозначения различных процедур, когда пульт дистанционного управления находится в программируемом режиме.
Кнопки включения/выключения: Следует нажимать эти кнопки для того, чтобы включать и включать AVR или устройство, которым в данный момент времени управляет пульт. Основной выключатель на задней панели устройства AVR должен всегда находиться в положении «включено», чтобы эта кнопка могла включать и выключать AVR.
Кнопка Mute (Тишина): Следует нажать эту кнопку, когда надо отключить сигнал, которые подается на выходные гнезда AVR для подключения колонок и наушников. Чтобы восстановить звук, нужно нажать на эту кнопку еще раз или начать регулировать громкость звука.
Кнопка AVR: Следует нажать эту кнопку для переключения пульта дистанционного управления в режим управления непосредственно устройством AVR.
Кнопки выбора источника: Следует нажать одну из этих кнопок, чтобы выбирать устройство, которое является источником контента, например, ДВД, радио AM/FM и т.п. Это действие также будет приводить к включение AVR и переключению пульта дистанционного управления в режим управления выбранного источника.ПРИМЕЧАНИЕ:первоенажатиекнопкиRadioSourceSelector(Выбористочникарадиосигнала) будетприводитькпереключениюAVRнапоследнийдиапазон,накоторыйбылнастроенAVR(AMилиFM). Каждого последующее нажатие этой кнопки будет приводить к переключению в другой диапазон.
Кнопка включения тестового тонового сигнала: Следует нажать кнопку эту кнопку, чтобы сделать активным тоновый сигнал тестирования для калибровки уровня громкости колонок на слух.
Кнопкаавтоматическогоотключения/Кнопкипереключенияканаловвверх/вниз:Следуетнажать кнопку Sleep (Автоматического отключения), чтобы активировать таймер автоматического отключения, который выключить AVR через заданный период времени с максимальной длительностью до 90 минут. КнопкиChannelUp/Down(Переключенияканаловвверх/вниз)неоказываютникакогодействиянаAVR,но онииспользуютсядляпереключениятелевизоранадругиеканалы,атакжедляпереключениянекоторых других источников видеосигнала.
Кнопкиувеличения/уменьшениягромкости:Нужнонажиматьэтикнопкидляувеличенияилиуменьшения громкости.
Кнопка OSD: Следует нажимать эту кнопку, чтобы получить на экране изображение экранного меню системы.
Кнопкауправленияуровнемканала:Следуетнажиматьэтукнопку,чтобывыполнитьнастройкууровня каждого канала. Она дает возможность легко изменить баланс воспроизведения звука в соответствии со свойствами различных программ или при изменении положения слушателя. См. Конфигурирование AVR для Ваших колонок на стр. 17.
Кнопка Speaker Setup (Установок колонок): Следует нажимать эту кнопку, когда надо выполнить конфигурирование колонок, которые подключены к Вашей системе. См. Конфигурирование AVR для Ваших колонок на стр. 17.
Кнопка OK: Это кнопка используется для выбора позиций в меню.
Кнопка цифрового входа: Следует нажимать эту кнопку, чтобы выбрать специальный цифровой аудио выход (или аналоговый аудио выход), к которому подключен действующий источник.
Кнопка Delay (Задержки): Нажатие этой кнопки даст Вам возможность отрегулировать два различных типа установок задержки (используйте кнопки перемещения курсора вверх/вниз, чтобы пролистывать возможные значения установок в цикле):
•• A/V Sync: Эта установка дает возможность восстановить синхронизацию аудио и видеосигналов от источника, чтобы устранить проблему синхронизации звука и изображения. Проблемы Lip-sync могут возникать, когда порция видеосигнала требует дополнительной обработки либо источником, либо
воспроизводящим устройством. Следует использовать кнопки перемещения курсора влево/вправо чтобы изменить задержку аудиосигнала вплоть до 180 миллисекунд.
•• FrontL/Center/FrontR/SurrR/SurrL/Subwoofer(Передняялевая/Центральная/Передняяправая/Правая объемногозвучания/Леваяобъемногозвучания/Сабвуфер):ЭтиустановкидаютВамвозможностьнастроить задержку для каждой колонки, чтобы компенсировать разность в расстоянии их расположения относительно позиции слушателя. Следует использовать кнопки перемещения курсора вверх/вниз, чтобы в цикле переходить от одной установки к другой, и использовать кнопки перемещения курсора влево/вправо, чтобы установить нужное расстояние для каждой колонки от позиции слушателя. См.
Конфигурирование AVR для Ваших колонок на стр. 17.
Кнопкиперемещениякурсоравлево/вправо/вверх/вниз:Этикнопкииспользуютсядляперемещения по строкам меню.
Цифровые кнопки: Следует использовать эти кнопки для ввода частот радиостанций или для выбора радиостанций, которые сохранены в памяти.
Кнопкарежиманастройки:Следует нажимать эту кнопку, когда надо переключаться между режимами настройки:вручную(скаждымшагомвыполняетсяпереключениенаследующуючастоту)иавтоматически (выполняется поиск всех сигналов, которые имеют достаточно большую мощность в данном диапазоне частот). Она также будет переключать устройство между режимами стерео и моно при прослушивании FM-радиостанции.
КнопкаMemory(Память):Чтобы сохранить в памяти станцию, на которую в данный момент выполнена настройка, надо нажать эту кнопку, а затем цифровую кнопку.
Кнопка прямого включения нужной станции: Следует нажимать эту кнопку перед использованием цифровых кнопок для настройки на частоту нужной радиостанции.
Кнопка Clear (Очистки): Следует нажимать эту кнопку для удаления частоты радиостанции, которую Вы начали вводить.
Кнопки увеличения/уменьшения настройки: Следует нажимать эти кнопки, чтобы настроиться на частотурадиостанции.Взависимостиотрежиманастройкиэтоможетосуществлятьсявручнуюилиавтоматически — каждое нажатие будет приводить к переходу на один шаг на следующую частоту или поиску следующей передающей радиостанции в верхней или нижней частях диапазона, чей сигнал обладает достаточной мощностью.
Кнопки переход к станциям, сохраненным в памяти, — вверх/вниз: Эти кнопки используются для последовательного перехода от одной станции, сохраненной в памяти, к другой.
Кнопка управления тестовым тоновым сигналом: Следует нажимать эту кнопку для получения доступа к элементам управления низкими и высокими частотами. Следует использовать кнопку OK для выбора настройки и использовать кнопки перемещения курсора вверх/вниз для изменения значения этой настройки.
КнопкаRDS(Системапередачиданныхсрадиосигналом):При прослушивании радиостанции в диапазоне FM, которая транслирует информацию RDS, эта кнопка используется для активации различных функций управления RDS.
КнопкаNightMode(Ночногорежима):Следуетнажатьэтукнопкудлятого,чтобыактивироватьночной режим,длякоторогоспециальнокодируютсядискисзаписьювформатеDolby®Digitalиливкоторомидет трансляция программ. Ночной режим обрабатывает аудиосигнал таким образом, что отрывки с повышенной громкостью имеют пониженную громкость, чтобы избежать беспокойства спящих, в то время, как диалоги остаются в неизменном виде. Каждое нажатие этой кнопки будет приводить к переходу к одной из следующих установок:
•• Off(Выкл):Никакойобработкиневыполняется.Громкиеотрывкивпрограммеостаютсявнеизменном виде.
•• Mid (Среднее): Громкие отрывки в программе уменьшается на небольшую величину.
•• Max (Макс): Громкие отрывки в программе уменьшается на большую величину.
Кнопкимакропрограмм:Этикнопкимогутбытьзапрограммированытакимобразом,чтобысразувыполнятьдо19командодновременнопосленажатияэтойкнопки.Ониоченьполезныдляпрограммирования команд, которые позволяют включать или отключать все Ваши компоненты или получать доступ к специальным функциям различных устройств, используемых в настоящий момент. См. Программирование макрокоманд на стр. 22 для получения дополнительной информации о макропрограммах.
Кнопки пропуска дорожек вперед/назад: Эти кнопки не оказывают никакого действия на AVR, но используютсявмногихустройствах,которыйявляютсяисточникамисигнала,дляпереходамеждудорожками или разделами.
Кнопказатемнениядисплея:Следует нажимать эту кнопку, чтобы полностью или частично уменьшить свечение дисплея на передней панели AVR.
Кнопки управления воспроизведением: Эти кнопки не оказывают влияния на AVR, но используются дляуправлениямногоустройствами,которыеявляютсяисточникамисигналов.Поумолчанию,когдапульт дистанционного управления работает в режиме управления AVR, эти кнопки будут управлять плейером Harman Kardon Blu-ray Disc player или ДВД плейером.
РУССКИЙ
9

AVR 156
Введение в использование домашнего кинотеатра и Размещение Ваших колонок
Введение в использование домашнего кинотеатра
Этот Раздел является введением, которое должно помочь Вам лучше познакомиться с некоторыми базовыми концепциями, являющимися уникальными для многоканального устройства AVR, поддерживающего технологию объемного звучания. Информация, изложенная в этом Разделе, поможет Вам легче выполнить настройки и упростить использование Вашего устройства AVR.
Типичная система домашнего кинотеатра
Домашнийкинотеатробычносодержитаудио/видеоресивер(AVR),которыйуправляетсистемойиобеспечиваетподачуусиленногосигналанаколонки;дисковыйплейер;устройства,являющиесяисточниками телевизионнойтрансляции(кабельноетелевидение,спутниковаятарелкаAVR,тюнерHDTVилиантенна подключенная к телевизору); телевизор или видео дисплей; и многочисленные колонки.
Многоканальное аудио
Размещение Ваших колонок
Определите места куда можно установить колонки в соответствии с рекомендациями их изготовителя и с учетом акустический особенностей помещения. См. рисунок, который приведен ниже, в качестве руководства по 5.1-ти канальной системе.
Чтобы сделать возможным создание наиболее реалистичной среды,наполненной объемным звуком, нужноразместитьВашиколонкипокругу,вцентрекоторогодолжнанаходитьсяпозицияслушателя.Вы должнынаправитькаждуюколонкутакимобразом,чтобыонабыланаправленанапозициюслушателя. В качестве руководства используйте схему, которая приведена ниже.
Основноепреимуществосистемедомашнегокинотеатразаключаетсявееспособностивоспроизводить «объемноезвучание».Объемныйзвукиспользуетнесколькоколонокиканаловусилениядляпогружения Вас в аудио/видео представление, в котором с драматической яркостью воспроизводится состояние, близкое к реальности.
Ваш AVR может иметь до 5 основных колонок, подключенных к нему напрямую, плюс сабвуфер. Каждая основная колонка имеет свой собственный канал усилителя внутри AVR. Система, которая имеет более двухколонок,называетсямультиканальной.Кразличнымосновнымтипамколоноквсистемедомашнего кинотеатра относятся:
•• Передние левая и правая: Передняя левая и правя колонки используется также и в 2-х канальной системе.Вбольшинствережимовобъемногозвучанияэтиколонкиявляютсявторичными,втовремя, как основное действие, особенно диалоги, воспроизводятся через центральную колонку.
•• Центральная: Когда Вы смотрите фильмы и телевизионные программы, центральная колонка воспроизводит большую часть диалогов и другой информации звуковой дорожки, что соответствует тому, что происходит на экране, привязывая этот звук к изображению. Когда Вы прослушиваете музыкальную программу, центральная колонка помогает создать «бесшовную» сцену перед Вами, обеспечивая более реалистичный эффект присутствия (“you-are-there”).
•• Праваяилеваяколонкиобъемногозвучания:Праваяилеваяколонкиобъемногозвучания,производят звуки окружающей среды, что помогает создать ситуацию более близкую к реальности, и погрузитьВасвобъемнуюзвуковуюсреду.Онитакжепомогаютвосстановитьэффектынаправленного звука, как например, пролет самолета.
Многиелюдиожидают,чтоколонкиобъемногозвучаниябудутзвучатьтакжегромко,какипередние колонки. Хотя у Вас и есть возможность выполнить калибровку всех колонок в системе, чтобы они звучали одинаково громко в позиции слушателя, большинство артистов используют колонки объемного звучания только для создания эффектов окружающей среды и создают свои программы, в которых на эти колонки направляется очень небольшая часть звука.
•• Сабвуфер: Сабвуфер сконструирован для воспроизведения только самых низких частот (глубоких басов).Онзамещаетнебольшуюограниченнуючастьдиапазонаосновныхколонок,которыйобычно используется другими каналами. Большое число программ в цифровом формате, как например, фильмы, записанные в формате Dolby Digital, содержат низкочастотные эффекты (LFE), которые воспроизводятся через сабвуфер. Канал передачи LFE заполняется грохотом движущегося поезда или летящего самолета или мощью взрыва, добавляя реалистичность и проникновенность в звучании Вашего домашнего кинотеатра. Некоторые люди используют два сабвуфера для дальнейшего увеличения мощности и для более равномерного распределения звука.
Размещение левой, центральной и правой колонок
Установитецентральнуюколонкунаверхнююповерхностьтелевизораилидисплеядлявоспроизведения видео или ниже. Можно также закрепить колонки на стене выше или ниже телевизора или видео дисплея. Установите передние левую и правую колонки по кругу примерно под углом 30 градусов от центральной колонки и направьте их на слушателя.
Установите переднюю левую переднюю правую и центральную колонки на ту же самую высоту; лучше всего,когдаэтавысотапримерносовпадаетсрасположениемушейпользователя.Центральнаяколонка должна быть на высоте не более 2 футов (0,6 м) выше или ниже правой/левой колонок. Если Вы используете только две колонки вместе с AVR, то их нужно расположить впереди слева и справа.
Размещение колонок объемного звучания
Выдолжныустановитьпередниелевуюиправуюколонкиобъемногозвучанияприблизительноподуглом 110градусовотцентральнойколонкиинаправитьихнаслушателя.ВкачествеальтернативыВыможете ихрасположитьпозадипозициислушателятакимобразом,чтобыкаждаяколонкаобъемногозвучания была направлена в противоположную сторону относительно направления центральной колонки. Вы должны установить колонки объемного звучания на 2 — 6 футов (0,6 — 1,8 м) выше, чем уши слушателя.
ПРИМЕЧАНИЕ: Ваш AVR будет создавать наилучший звук, когда во всех позициях будут установлены колонки одной и той же модели или принадлежащие одному и тому же бренду.
Режимы объемного звучания
Существуют различные теории, указывающие каким образом воспроизвести объемный звук и распределитьинформациюотдельныхканаловпоколонкамвсистемеобъемногозвучания.Значительное количество алгоритмов было разработано с целью добиться восстановления состояния, в которое мы попадаем, когда слышим звуки в реальном мире, что привело к возникновению богатого выбора различных возможностей. Несколько компаний разработали разные технологии объемного звучания; все они могут быть воспроизведены Вашим AVR:
•• Dolby Laboratories: Dolby Truehd, Dolby Digital Plus, Dolby Digital, Dolby Digital EX, Dolby Pro Logic II.
•• DTS: DTS-HD™ High Resolution Audio, DTS-HD Master Audio™, DTS, DTS 96/24™.
•• HARMAN International: logic 7, виртуальная колонка HARMAN, наушники HARMAN.
•• Стерео режимы: 2-х канальный стерео и 5-ти канальный стерео.
ВТаблицеА9вПриложениинастр.30содержатсяподробныеобъясненияпоразличнымопциямобъемного звучания, которые можно получить с помощью Вашего AVR. Цифровые режимы объемного звучания, какнапример,DolbyDigitalиDTS,доступнытолькоприналичииспециальнозакодированныхпрограмм, например, тех, которые передаются в форматах HDTV, DVD и Blu-ray Disc, и по цифровому кабелю или спутниковомутелевидению.Другиережимыобъемногозвучаниямогутиспользоватьсявместесцифровымиианалоговымисигналами,создаваяразличноепредставлениеобъемногозвучанияилииспользуя разное число колонок. Выбор режима объемного звучания зависит от числа колонок в Вашей системе, программ, которые Вы смотрите или слушаете, а также от Ваших персональных предпочтений.
Размещение сабвуфера
Поскольку форма комнаты и ее объем могут оказать сильное влияние на воспроизведение сабвуфера, то лучше всего поэкспериментировать с его расположением с тем, чтобы найти то место, которое дает наилучшие результаты именно в Вашей комнате. С учетом этого, приведенные ниже правила, помогут Вам начать установку:
•• Установка сабвуфера рядом со стеной обычно приводит к возрастанию низкочастотной составляющей в комнате.
•• Установка сабвуфера в углу увеличит объем низких частот в Вашей комнате в значительной степени.
•• В большинстве комнат размещение сабвуфера вдоль той же плоскости, у которой расположены леваяиправаяколонкиможетприводитькнаилучшейинтеграциимеждузвукомсабвуфераиэтими колонками — левой и правой.
•• В некоторых комнатах наилучшее воспроизведение может даже привести размещение сабвуфера позади позиции слушателя.
Хорошийспособопределитьлучшееположениедлясабвуферэтовременноеразмещениееговпозиции слушателяивоспроизведениимузыкисмощнойнизкочастотнойсоставляющей.Далееследуетпоходить покомнатевовремявоспроизведениямузыки(прослушиваязвучаниетам,гдеможетбытьрасположен сабвуфер) и прослушивая музыку до тех пор, пока Вы не найдете место, где низкие частоты слышны лучше всего. Далее нужно просто установить сабвуфер в этом месте.
10
![]()
|
AVR 156 |
Типы разъемов, которые используются в системах |
|
домашних кинотеатров |
Типы разъемов, которые используются в системах домашних кинотеатров
Существуютразличныетипыаудиоразъмовивидеоразъемов,которыеиспользуютсядляподключения аудио-/видеоресивераквашимдинамикам,ТВилидисплею,атакжеквашимустройствам-источникам сигнала. Ассоциация бытовой электроники установила стандарт цветовой кодировки CEA®.
Таблица цветовой кодировки разъемов
|
Аналоговый аудиоразъем |
Цвет |
|
Передний левый/правый |
Белый/красный |
|
Центральный |
Зеленый |
|
Левый/правый динамик объемного звука |
Синий/серый |
|
Сабвуфер |
Пурпурный |
|
Разъем цифрового звука |
Цвет |
|
Коаксиальный (входной или выходной) |
Оранжевый |
|
Оптический входной |
Черный |
|
Аналоговый видеоразъем |
Цвет |
|
Компонентный видеосигнал |
Красный/зеленый/синий |
|
Композитный видеосигнал |
Желтый |
Разъемы динамиков
Кабелидинамиковпередаютусиленныйсигналотклеммдинамиковаудио-/видеоресивераккаждому динамику. В каждом кабеле имеется два провода или проводника, которые отличаются друг от друга, например, по цвету или наличием полос.
Различиепомогаетвамсохранятьправильнуюполярность,безсоблюдениякотороймогутухудшиться низкочастотныетехническиехарактеристикивашейсистемы.Каждыйдинамикподключенквыходным клеммамдинамиковаудио-/видеоресивераспомощьюдвухпроводов:одногоположительного(+),а другогоотрицательного(–).Всегдаподключайтеположительнуюклеммунадинамике,котораяобычно обозначенакраснымцветом,кположительнойклемменааудио-/видеоресивере,котораяимеетцвет, указанныйвприведеннойвышетаблицецветовойкодировки.Отрицательныеклеммынадинамиках и аудио-/видеоресиверах отмечены черным цветом.
В вашем аудио-/видеоресивере используются винтовые клеммы динамиков, к которым можно подключить оголенные кабели или штеккеры типа «банан». Оголенные провода устанавливаются, как показано на рисунке ниже:
Разъемы для подключения сабвуфера
Сабвуфер это динамик, который предназначен для воспроизведения только низких частот, для чего требуется большая мощность. Для получения наилучших результатов большинство производителей динамиковпредлагаютмощныесабвуферысовстроеннымиусилителями.ИспользуйтеодинарныйRCA аудиокабель(невходитвкомплектпоставки)длясозданиялинейногоподключения(безусиления)от разъема сабвуфера аудио-/видеоресивера до соответствующего входного гнезда сабвуфера.
Хотя выходной разъем аудио-/видеоресивера пурпурного цвета похож на полнофункциональный аналоговый аудиоразъем, подаваемый на него сигнал проходит через фильтр, поэтому через него проходит только низкочастотный сигнал. Не подключайте этот разъем к какому-либо устройству, кроме сабвуфера.
Разъемы для подключения устройств-источников сигнала
Аудиоивидеосигналывоспроизводятсявдругихустройствах-источниках(компонентах,гдепроисходит воспроизведениесигнала),такихкакBlu-ray,DVD-плеер,CD-плеер,DVR(цифровойвидеорекордер)или другойрекордер,кассетнаядека,игроваяконсоль,кабельныйилиспутниковыйтелевизионныйтюнер, MP3-плеер.FM/AMтюнераудио-/видеорекордератакжесчитаетсяустройством-источникомсигнала, даже не смотря на то, что внешние разъемы для него не нужны, кроме FM и AM антенн аудио-/видео- ресивера. Необходимы отдельные разъемы для аудиосигнала и видеосигнала устройства-источника сигнала,заисключениемцифровыхразъемовHDMI.Типыиспользуемыхвамиразъемовбудутзависеть от технических характеристик устройства-источника сигнала, а также от вашего ТВ или дисплея.
Цифровые аудиоразъемы – HDMI
Существует два типа аудиоразъемов – цифровые и аналоговые. Цифровые аудиосигналы требуются для прослушивания сигнала от устройств-источников сигнала, закодированных с использованием форматов цифрового объемного звука, например, Dolby Digital и DTS, или для цифрового несжатого аудиосигналавформатеPCM.Ввашемаудио-/видеоресивереимеетсятритипацифровыхаудиоразъе- мов:HDMI,коаксиальныйиоптический.Неиспользуйтеболееодноготипацифровыхаудиоразъемов для каждого источника сигнала. Но вы можете использовать как аналоговые, так и цифровые аудиоразъемы для одного источника сигнала.
Ввашемаудио-/видеоресивереимеетсячетыревходныхразъемаHDMI,которыерасположеныназадней панели, а также один выходной разъем HDMI для монитора. Технология HDMI позволяет передавать цифровую аудиоинформацию и видеоинформацию с использованием одного кабеля, обеспечивая наивысшее качество изображения и звука. Если в вашем ТВ или мониторе имеется входной разъем HDMI, подключите один разъем HDMI от каждого устройства-источника сигнала к аудио-/видеореси- веру. Обычно отдельного подключения цифрового аудиосигнала не требуется.
Разъем HDMI имеет форму, которая обеспечивает простоту подключения (смотрите рисунок ниже), а также длина HDMI-кабеля ограничена длиной около 10 футов (3 метра). Если в вашем мониторе имеется входной разъем DVI, а также разъем, совместимый с HDCP, используйте адаптер HDMI-DVI (не входит в комплект поставки) и создайте отдельное подключения для аудиосигнала.
|
1. Отвинтите колпачок |
2. Вставьте очищенный от |
3. Затяните колпачок |
|
изоляции конец провода. |
Штекерытипа»банан»устанавливаютсявотверстие,котороерасположеновсерединекрышкиклеммы, как показано ниже:
|
A. Затяните крышку |
B. Вставьте разъем типа «банан» |
|
в отверстие в крышке |
Всегда следует подключать цветной провод к клемме (+) на AVR и к клемме (+) на колонках (обычно положительныйпроводкрасногоцвета)ицветнойпроводкклемме(–)наAVRкклемме(–)наколонках (обычно черного цвета).
ОЧЕНЬ ВАЖНО: Необходимо следить за тем, чтобы оголенные концы проводов ( + ) и ( – ) не касались друг друга или других клемм. Соприкосновение проводов может стать причиной короткого замыкания, что может повредить ваш аудио-/видеоресивер или усилитель.
Цифровые аудиоразъемы – коаксиальный разъем
Коаксиальные цифровые аудиогнезда обычно оранжевого цвета. Хотя они выглядят как обычные аналоговые гнезда разъема RCA, вы не должны подключать коаксиальные цифровые выходные аудиоразъемы к аналоговым входным разъемам или наоборот.
РУССКИЙ
11

AVR 156
Типы разъемов, которые используются в системах домашних кинотеатров, продолжение
Цифровые аудиоразъемы – оптический разъем
Оптические цифровые аудиоразъемы обычно закрываются заслонкой, чтобы защитить их от пыли. Заслонкаоткрываетсяпривставкекабеля.Входныеоптическиеразъемыимеютцветовуюкодировку. Их заслонка окрашена в черный цвет.
Аналоговые аудиоразъемы
Для подключения двухканальных аналоговых аудиоразъемов требуется стерео аудиокабель с одним разъемом для левого канала (белый) и одним разъемом для правого канала (красный). Два этих разъема связаны друг с другом.
Для устройств-источников сигнала, в которых имеются как цифровые, так и аналоговые выходные аудиоразъемы, вы можете подключить оба разъема.
Аналоговые разъемы также подают сигнал на выходные аналоговые разъемы записи. Вы можете записать материалы с записей на Blu-ray дисках, DVD-дисках или на других источниках сигнала, в которых имеется защита от копирования, используя только аналоговые разъемы. Помните о том, что необходимо соблюдать все законы, связанные с защитой авторских прав, если вы решили сделать копию для личного использования.
Видеоразъемы
Большоеколичествоустройств-источниковсигналавыдаюткакаудиосигнал,такивидеосигнал(напри- мер, Blu-ray плеер, DVD-плеер, декодер кабельного телевидения, HDTV-тюнер, тюнер спутникового телевидения,видеомагнитофон,цифровойвидеомагнитофон).Вдополнениекподключениюописанного выше аудиоразъема, подключите видеоразъем для каждого из этих устройств-источников сигнала. Подключайте только один тип видеоразъема для каждого устройства.
Цифровые видеоразъемы
Есливыужеподключилиустройство-источниксигналакодномуизвходныхHDMI-разъемов,выавто- матическиподключиливидеосигналотэтогоустройства,таккакHDMI-разъемпередаеткакцифровой аудиосигнал, так и цифровой видеосигнал.
Аналоговые видеоразъемы — композитный видеосигнал
В вашем аудио-/видеоресивере используется два типа аналоговых видеоразъемов: композитный видеоразъем и компонентный видеоразъем.
Композитный видеоразъем -это основной разъем, который наиболее широко распространен. Как хроматический (цветность), так и фотометрический (яркость) компоненты видеосигнала передаются с использованием одного кабеля. Гнездо обычно имеет цветовую кодировку, окрашено в желтый цвет и выглядит как аналоговый аудиоразъем. Не подключайте к композитному разъему аналоговый аудиосигнал или коаксиальный цифровой аудиосигнал или наоборот.
Аналоговые видеоразъемы — композитный видеоразъем
Компонентныйвидеоразъемразделяетвидеосигналнатрикомпонента-одинфотометрический(“Y”) идвадискретизированныхподсигнала(“Pb”и“Pr”),которыепередаютсигналысиспользованиемтрех отдельныхкабелейзеленого(Y),синего(Pb)икрасного(Pr)цветов.Кабелидляпередачикомпонентного видеосигнала, в которые входят зеленый, синий и красный разъемы, продаются отдельно.
ЕсливвашемТВилимонитореимеетсяHDMI-разъем,мырекомендуемподключитьегодляобеспечения лучшего качества соединения. Ваш аудио-/видеоресивер конвертирует компонентные аналоговые входные видеосигналы в формат HDMI, увеличивая разрешение их изображения до 1080p.
Разъемы для подключения радио
Ввашемаудио-/видеоресивереиспользуютсяотдельныеклеммыдляантеннFMиAMдиапазонов,кото- рые входят в комплект поставки. В антенне FM диапазона используется F-образный разъем 75 Ом.
ВразъемеантенныAM-диапазонаиспользуютсяклеммыспружиннымизащелками.Послеустановки антенны,какпоказанониже,нажмитенарычаги,чтобыоткрытьразъемы,вставьтеоголенныепровода в отверстия и отпустите рычаги, чтобы закрепить провода. Провода антенны не имеют полярности, поэтому вы можете вставлять любой провод в любой разъем.
USB-разъем
USB-разъем вашего аудио-/видеоресивера используется для обновления прошивки. Если в будущем будет выпущено обновление операционной системы аудио-/видеоресивера, Вы сможете загрузить его на аудио-/видеоресивер с использованием этого разъема. В это время будут предоставлены полные инструкции.
ВАЖНО:НеподключайтеПКилидругойUSB-хост/контроллеркUSB-разъемуаудио-/видеореси- вера или вы можете повредить как аудио-/видеоресивер, так и подключаемое устройство.
12

|
AVR 156 |
Подключение разъемов |
Подключение разъемов
ВНИМАНИЕ: Перед подключением к аудио-/видеоресиверу каких-либо разъемов, убедитесь, что кабель электропитания переменного тока аудио-видеоресивера отключен от аудио-/видеоресивера и от электрической сети. Подключение разъемов в момент, когда аудио-/видеоресивер подключен к электрической сети и включен, может повредить динамики.
Подключение Ваших колонок
После того, как вы установили ваши динамики в помещении, как указано в разделе размещение динамиков на странице 10, подключите каждый динамик к клемме на аудио-/видеоресивере с соответствующей цветовой кодировкой, как указано в разделе подключение динамиков на странице 11. Подключите колонки так, как это показано на рисунке.
Подключение сабвуфера
ДляподключенияразъемапредусилителясабвуфераAVRквашемусабвуферуиспользуйтеаудиокабель RCA.Прочитайтеруководствопользователясабвуферадляполученияболееподробнойинформации о выполнении подключений.
|
Разъем AVR предуси- |
Сабвуфер со встроен- |
|
лителя сабвуфера |
ным блоком питания |
|
Одиночный кабель типа |
|
|
RCA для аудио сигнала (нет |
|
|
в комплекте поставки) |
Подключение телевизора или видеомонитора
Разъем HDMI выхода монитора
ЕслиувашеготелевизораимеетсяразъемHDMIиувасестьHDMIилиустройстваисточникакомпонентноговидеосигнала,используйтекабельHDMI(невключенвкомплект)дляподключениявашеготелевизора/монитора к разъему HDMI выхода ресивера. Это обеспечит наилучшее качество изображения.
|
Разъем HDMI выхода |
TV (Телевизор) |
|
монитора ресивера |
|
|
Кабель HDMI (нет в ком- |
|
|
плекте поставки) |
Выходной разъем монитора композитного видео
Если у вашего телевизора нет разъема HDMI или если у вашего телевизора есть разъем HDMI, но вы подключаетекакие-либоустройстватолькосразъемамикомпозитноговидео,подключитетелевизор/ монитор к выходу Monitor Out ресивера AVR при помощи кабеля для композитного видеосигнала (не входит в комплект).
Выходной разъем
Monitor Out TV (Телевизор) ресивера AVR
Кабель для аналогового видео сигнала (нет в комплекте поставки)
Подключение устройств-источников сигнала
Устройства-источники сигнала являются устройствами, в которых создается сигнал для воспроизведения, например, Blu-ray диск или DVD-плеер, кабельное или спутниковое ТВ или HDTV-тюнер. В вашемаудио-/видеоресивереимеетсянесколькоразличныхтиповвходныхразъемовдляподключе- нияаудиоустройствивидеоустройств,которыеявляютсяисточникамисигнала:HDMI,компонентный видеоразъем,композитныйвидеоразъем,оптическийцифровойаудиоразъем,коаксиальныйцифровой аудиоразъемианалоговыйаудиоразъем.Имеетсямаркировкаразъемовпотипамисточниковсигнала, которые вы, скорее всего, подключите.
Каждаяизкнопокнавашемаудио-/видеоресивере,предназначенныхдляисточниковсигнала,назна- чена для разъема HDMI или для входного аналогового разъема (который указан в столбце таблицы “кнопки источников сигнала аудио-/видеоресивера/аналоговый аудиоразъем”, которая приведена ниже).Дляобеспечениягибкостивподключениииконфигурированиивашейсистемы,мыразработали аудио-/видеоресивер,вкоторомвыможетеназначитьвходныецифровыеаудиоразъемыдлялюбого источника видеосигнала аудио-/видеоресивера.
После подключения источников сигнала заполните колонку «Подключенное устройство» в нижеука- заннойтаблице–позжевпроцессеустановкивамбудетлегченазначатьвходныеразъемыцифрового аудио и разъем компонентного видео.
|
Кнопка выбора источника |
Рекомендуемый тип устройства |
Подключенное |
Назначенный |
||
|
сигнала/Разъем аналого- |
разъем цифрового |
||||
|
устройство |
|||||
|
вого аудио |
аудиовхода |
||||
|
Video 1 |
Кабельный или спутниковый тюнер |
||||
|
Video 2 |
Устройство записи на DVD или |
РУССКИЙ |
|||
|
Диск Blu-ray (формат диска высокого |
|||||
|
видеомагнитофон |
|||||
|
DVD |
разрешения, работающего на основе |
||||
|
сине-фиолетового лазера) или |
|||||
|
DVD-плеер |
|||||
|
CD |
CD-плейер |
||||
|
Tape |
Кассетный магнитофон или устрой- |
||||
|
ство звукозаписи |
|||||
|
Aux |
Портативный медиа-плеер |
||||
|
Кнопка кнопка |
Подключенное |
Назначенный |
|||
|
выбора источника |
_ _ _ _ |
разъем цифрового |
|||
|
устройство |
|||||
|
сигнала/Разъем HDMI |
аудиовхода |
||||
|
HDMI 1 |
_ _ _ _ |
||||
|
HDMI 2 |
_ _ _ _ |
||||
|
HDMI 3 |
_ _ _ _ |
||||
Входные подключения и кнопки выбора источника сигнала
13
 Loading…
Посмотреть инструкция для Harman Kardon AVR-156 бесплатно. Руководство относится к категории приемники, 8 человек(а) дали ему среднюю оценку 7.7. Руководство доступно на следующих языках: английский. У вас есть вопрос о Harman Kardon AVR-156 или вам нужна помощь? Задайте свой вопрос здесь
Не можете найти ответ на свой вопрос в руководстве? Вы можете найти ответ на свой вопрос ниже, в разделе часто задаваемых вопросов о Harman Kardon AVR-156.
Когда звук считается слишком громким?
Могут ли устройства разных марок подключаться друг к другу при помощи Bluetooth?
Как лучше всего выполнять чистку приемник?
Инструкция Harman Kardon AVR-156 доступно в русский?
Не нашли свой вопрос? Задайте свой вопрос здесь
Смотреть руководство для Harman Kardon AVR-156 ниже. Все руководства на ManualsCat.com могут просматриваться абсолютно бесплатно. Нажав кнопку «Выбор языка» вы можете изменить язык руководства, которое хотите просмотреть.

MANUALSCAT | RU
Вопросы и ответы
У вас есть вопрос о Harman Kardon AVR-156, но вы не можете найти ответ в пользовательском руководстве? Возможно, пользователи ManualsCat.com смогут помочь вам и ответят на ваш вопрос. Заполните форму ниже — и ваш вопрос будет отображаться под руководством для Harman Kardon AVR-156. Пожалуйста, убедитесь, что вы опишите свои трудности с Harman Kardon AVR-156 как можно более детально. Чем более детальным является ваш вопрос, тем более высоки шансы, что другой пользователь быстро ответит на него. Вам будет автоматически отправлено электронное письмо, чтобы проинформировать вас, когда кто-то из пользователей ответит на ваш вопрос.
Задать вопрос о Harman Kardon AVR-156
- Бренд:
- Harman Kardon
- Продукт:
- приемники
- Модель/название:
- AVR-156
- Тип файла:
- Доступные языки:
- английский
Сопутствующие товары Harman Kardon AVR-156
 Loading…
Посмотреть инструкция для Harman Kardon AVR-156 бесплатно. Руководство относится к категории приемники, 8 человек(а) дали ему среднюю оценку 7.7. Руководство доступно на следующих языках: английский. У вас есть вопрос о Harman Kardon AVR-156 или вам нужна помощь? Задайте свой вопрос здесь
Не можете найти ответ на свой вопрос в руководстве? Вы можете найти ответ на свой вопрос ниже, в разделе часто задаваемых вопросов о Harman Kardon AVR-156.
Когда звук считается слишком громким?
Могут ли устройства разных марок подключаться друг к другу при помощи Bluetooth?
Как лучше всего выполнять чистку приемник?
Инструкция Harman Kardon AVR-156 доступно в русский?
Не нашли свой вопрос? Задайте свой вопрос здесь
Смотреть руководство для Harman Kardon AVR-156 ниже. Все руководства на ManualsCat.com могут просматриваться абсолютно бесплатно. Нажав кнопку «Выбор языка» вы можете изменить язык руководства, которое хотите просмотреть.
MANUALSCAT | RU
Вопросы и ответы
У вас есть вопрос о Harman Kardon AVR-156, но вы не можете найти ответ в пользовательском руководстве? Возможно, пользователи ManualsCat.com смогут помочь вам и ответят на ваш вопрос. Заполните форму ниже — и ваш вопрос будет отображаться под руководством для Harman Kardon AVR-156. Пожалуйста, убедитесь, что вы опишите свои трудности с Harman Kardon AVR-156 как можно более детально. Чем более детальным является ваш вопрос, тем более высоки шансы, что другой пользователь быстро ответит на него. Вам будет автоматически отправлено электронное письмо, чтобы проинформировать вас, когда кто-то из пользователей ответит на ваш вопрос.
Задать вопрос о Harman Kardon AVR-156
- Бренд:
- Harman Kardon
- Продукт:
- приемники
- Модель/название:
- AVR-156
- Тип файла:
- Доступные языки:
- английский
Сопутствующие товары Harman Kardon AVR-156
ENGLISH
AVR 156
Audio/video receiver
Owner’s Manual
0292CSK - HK (x65Series) AVR156-230 OM [HKP1991], WORK05.indd 1
30/06/11 12:41:52
AVR 156
Table of Contents
Set Up the Remote Control
15
Introduction
3
Supplied Accessories
3
Install the Batteries in the Remote Control
15
IMPORTANT SAFETY INFORMATION
3
Place the AVR
3
Program the Remote to Control Your Source
Devices and TV
16
Front-Panel Controls
4
Rear-Panel Connectors
6
Turn On the AVR
16
System Remote Control Functions
8
Using the On-Screen Menu System
16
10
Configure the AVR for Your Speakers
17
Typical Home Theatre System
10
Assign the Digital Audio Connectors
18
Multichannel Audio
10
Additional Input Setup Menu Items
19
Surround Modes
10
Place Your Speakers 10
Controlling the Volume
19
Placing the Left, Centre and Right Speakers
10
Muting the Sound
19
Placing the Surround Speakers
10
Listening Through Headphones
19
Placing the Subwoofer
10
Selecting a Source
19
11
Video Troubleshooting Tips
19
Speaker Connections
11
Listening to FM and AM Radio
20
Subwoofer Connections
11
Selecting a Surround Mode
20
Source Device Connections
11
Video Connections
12
Audio Processing and Surround Sound
20
Radio Connections
12
System Setup
22
USB Port
12
Advanced Remote Control Programming
22
13
Recording
22
Connect Your Speakers
13
Sleep Timer
23
Connect Your Subwoofer
13
Resetting the Remote
23
Connect Your TV or Video Display
13
Processor Reset
23
Connect Your Source Devices
13
Memory
23
Connect the Radio Aerials
15
Troubleshooting
24
Connect the 12V Trigger Output
15
Specifications
25
Connect to AC Power
15
Appendix
26
Introduction to Home Theatre
Types of Home Theatre System Connections
Making Connections
Set Up the AVR
Operating Your AVR
Advanced Functions
16
19
20
2
0292CSK - HK (x65Series) AVR156-230 OM [HKP1991], WORK05.indd 2
30/06/11 12:41:52
Introduction
IMPORTANT SAFETY INFORMATION
Thank you for choosing this Harman Kardon product!
Verify Line Voltage Before Use
For more than fifty years, the Harman Kardon mission has been to share a passion for music
and entertainment, using leading-edge technology to achieve premium performance.
Sidney Harman and Bernard Kardon invented the receiver, a single component designed
to simplify home entertainment without compromising performance. Over the years,
Harman Kardon products have become easier to use while offering more features and
sounding better than ever.
The AVR 156 has been designed for use with 220 – 240-volt alternating current (AC).
Connection to a line voltage other than that for which your AVR is intended can create
a safety and fire hazard, and may damage the unit. If you have any questions about
the voltage requirements for your specific model or about the line voltage in your area,
contact your selling dealer before plugging the unit into a wall outlet.
The AVR 156 5.1-channel digital audio/video receiver (AVR) continues this tradition with
some of the most advanced audio and video processing capabilities yet and a wealth of
listening and viewing options.
To obtain the maximum enjoyment from your new AVR, please read this manual and
refer back to it as you become more familiar with its features and their operation.
If you have any questions about this product, its installation or its operation, please
contact your Harman Kardon retailer or custom installer, or visit our Web site at www.
harmankardon.com.
Supplied Accessories
The following accessory items are supplied with your AVR. If any of these items are
missing, please contact your Harman Kardon dealer, or Harman Kardon customer service
at www.harmankardon.com.
•• System remote control
•• AM loop aerial
ENGLISH
AVR 156
Introduction, Supplied Accessories,
Important Safety Information and Place the AVR
Do Not Use Extension Cords
To avoid safety hazards, use only the power cord supplied with your unit. We do not
recommend that extension cords be used with this product. As with all electrical devices,
do not run power cords under rugs or carpets, or place heavy objects on them. Damaged
power cords should be replaced immediately by an authorised service centre with a cord
meeting factory specifications.
Handle the AC Power Cord Gently
When disconnecting the power cord from an AC outlet, always pull the plug; never
pull the cord. If you do not intend to use your AVR for any considerable length of time,
disconnect the plug from the AC outlet.
Do Not Open the Cabinet
There are no user-serviceable components inside this product. Opening the cabinet may
present a shock hazard, and any modification to the product will void your warranty. If
water or any metal object such as a paper clip, wire or staple accidentally falls inside
the unit, disconnect it from the AC power source immediately, and consult an authorised
service centre.
•• FM wire aerial
•• Three AAA batteries
•• AC power cord
Place the AVR
•• Place the AVR on a firm and level surface. Be certain that the surface and any mounting
hardware can support the AVR’s weight.
•• Provide proper space above and below the AVR for ventilation. If you install the AVR in
a cabinet or other enclosed area, provide cooling air within the cabinet. Under some
circumstances, a fan may be required.
•• Do not obstruct the ventilation slots on the top of the AVR or place objects directly
over them.
•• Do not place the AVR directly on a carpeted surface.
•• Do not place the AVR in moist or humid locations, in extremely hot or cold locations, in
areas near heaters or heat registers, or in direct sunlight.
3
0292CSK - HK (x65Series) AVR156-230 OM [HKP1991], WORK05.indd 3
30/06/11 12:41:52
AVR 156
Front-Panel Controls
Front-Panel Controls
Power
Indicator
IR
Sensor
Power
Button
Channel
Level Control
Button
Tuning Mode
Button
Digital Input
Button
Set
Button
Left/Right
Buttons
Message
Display
Surround Mode
Select Buttons
Up/Down Buttons/
Tuning Buttons
Surround-Mode
Category Button
Volume
Knob
Headphone Jack
USB
Port
Aux Analogue
Audio Input
Connector
Source Select
Buttons
4
0292CSK - HK (x65Series) AVR156-230 OM [HKP1991], WORK05.indd 4
30/06/11 12:41:53
Front-Panel Controls, continued
Front-Panel Controls, continued
Power button: Press this button to turn the AVR on or to place it in the Standby mode.
Power indicator: This LED has three possible modes:
Tuning Mode button: This button toggles between manual (one frequency step at a
time) and automatic (seeks frequencies with acceptable signal strength) tuning mode. It
also toggles between stereo and mono modes when an FM station is tuned in.
•• LED is off: Indicates that the AVR is unplugged or the rear-panel Main Power switch
is off.
•• LED glows amber: Indicates that the AVR is in the Standby mode.
•• LED glows white: Indicates that the AVR is turned on.
IMPORTANT NOTE: If the PROTECT message ever appears on the AVR’s front-panel
Message display, turn off the AVR and unplug it from the AC outlet. Check all speaker
wires for a possible short circuit (the “+” and “–” conductors touching each other
or both touching the same piece of metal). If a short circuit is not found, bring the
unit to an authorised Harman Kardon service centre for inspection and repair before
using it again.
IR sensor: This sensor receives infrared (IR) commands from the remote control. It is
important to ensure that the sensor is not blocked.
Set button: Press this button to select the currently highlighted menu item.
Message display: Various messages appear in this two-line display in response to
commands and changes in the incoming signal. In normal operation, the current source
name appears on the upper line, while the surround mode is displayed on the lower line.
When the on-screen display menu system (OSD) is in use, the current menu settings
appear.
Surround-Mode Select buttons: After you have selected the desired surround-mode
category, press these buttons to select a specific mode within the category, such as to
change from Dolby® Pro Logic® II Movie mode to Logic 7® Movie mode. Surround-mode
availability depends on the nature of the source input signal, i.e., digital versus analogue,
and the number of channels encoded within the signal.
Volume knob: Turn this knob to raise or lower the volume.
ENGLISH
AVR 156
Channel Level Control button: Press this button to activate the channel-level adjustment
feature. After pressing this button, use the Up/Down buttons to select the channel for
adjustment and use the Left/Right buttons to adjust the channel’s level.
Digital Input button: Press this button to change the audio input for the current source.
Use the Left/Right buttons to cycle through the available inputs. Although you can assign
any digital audio input to any source, the analogue audio inputs are all permanently
dedicated to the source with which they are labeled.
Left/Right buttons: Use these buttons to navigate the AVR’s menus.
Up/Down buttons/Tuning buttons: Use these buttons to navigate the AVR’s menus.
When the radio is the active source, use these buttons to tune stations according to the
setting of the Tuning Mode button (see above).
Surround-Mode Category button: Press this button to select a surround-sound
category. Each press changes the surround-mode category: Auto Select, Virtual, Stereo,
Movie, Music and Video Game. To change the specific surround-sound mode within the
category, use the Surround Mode Select buttons. See Audio Processing and Surround
Sound, on page 20, for more information on surround modes.
Headphone jack: Connect a 1/4" stereo headphone plug to this jack for private
listening.
Source Select buttons: Press these buttons to select the active source.
USB port: You can use this port to perform software upgrades that may be offered in
the future. Do not connect a storage device, a peripheral product or a PC here, unless
instructed to do so as part of an upgrade procedure.
Aux Analogue Audio Input connector: Connect an auxiliary source component that
will be used only temporarily, such as a camcorder, portable music player or game
console, here.
5
0292CSK - HK (x65Series) AVR156-230 OM [HKP1991], WORK05.indd 5
30/06/11 12:41:53
AVR 156
Rear-Panel Connectors
Rear-Panel Connectors
HDMI®
Monitor Out
Connector
Radio Aerial
Connectors
HDMI Input
Connectors
Analogue Audio
Input/Output
Connectors
Subwoofer
Connector
Composite
Monitor Input
Connector
Video 2 Out
Connector
DVD Component
Video Input
Connector
Composite
Video Input
Connectors
Digital Audio
Input Connectors
Speaker
Connectors
Analogue Video
Connectors
Main Power
Switch
AC Input
Connector
12V Trigger
Connector
6
0292CSK - HK (x65Series) AVR156-230 OM [HKP1991], WORK05.indd 6
30/06/11 12:41:54
Rear-Panel Connectors, continued
Radio Aerial connectors: Connect the included AM and FM aerials to their respective
terminals for radio reception.
HDMI Monitor Out connector: If your TV has an HDMI connector and you have HDMI or
component video source devices, use an HDMI cable (not included) to connect it to the
AVR’s HDMI Monitor Out connector.
Notes on using the HDMI Monitor Out connector:
•• When connecting a DVI-equipped display to the HDMI Monitor Out connector, use
an HDMI-to-DVI adapter and make a separate audio connection.
Rear-Panel Connectors, continued
Digital Audio Input connectors: If your non-HDMI source devices have digital outputs,
connect them to the AVR’s digital audio connectors. NOTE: Make only one type of
digital connection (HDMI, optical or coaxial) from each device. See Connect Your Source
Devices, on page 13, for more information.
Video 2 Out connector: Connect an analogue video recorder’s video input connector to
the AVR’s Video 2 Out connector. You can record any composite video input signal. NOTE:
To record the audio and video from the source device, connect the AVR’s Video 2 Out
Analogue Output connectors to the analogue video recorder’s audio inputs.
Composite Video Input connectors: Use composite video connectors for video source
devices that don’t have HDMI or component video connectors. You will also need to
make an audio connection from the source device to the AVR. See Connect Your Source
Devices, on page 13, for more information.
•• Make sure the HDMI-equipped display is HDCP-compliant. If it isn’t, do not connect
it via HDMI; use an analogue video connection instead and make a separate audio
connection.
Subwoofer connector: Connect this jack to a powered subwoofer with a line-level
input. See Connect Your Subwoofer, on page 13, for more information.
HDMI Input connectors: The HDMI (High-Definition Multimedia Interface®) feature is
a connection for transmitting digital audio and video signals between devices. If your
source devices have HDMI connectors, using them will provide the best possible video
and audio performance quality. Since the HDMI cable carries both digital video and
digital audio signals, you do not have to make any additional audio connections for
devices you connect via HDMI connections. See Connect Your Source Devices, on page
13, for more information.
Speaker connectors: Use two-conductor speaker wire to connect each set of terminals
to the correct speaker. See Connect Your Speakers, on page 13, for more information.
Composite Video Monitor Out connector: If your TV or video display does not have
an HDMI connector, or if your TV does have an HDMI connector but you are connecting
some source devices with only composite video connectors, use a composite video
cable (not included) to connect the AVR’s Composite Video Monitor Out connector to your
TV’s composite video input connector.
ENGLISH
AVR 156
Analogue Audio Input/Output connectors: Use the AVR’s Analogue Audio Input/Output
connectors for source devices that don’t have HDMI or digital audio connectors. Use the
Video 2 Out and Tape Out connectors to connect to the audio inputs of a VCR and tape
deck. See Connect Your Source Devices, on page 13, for more information.
Main Power switch: This mechanical switch turns the AVR’s power supply on or off. It is
usually left on and cannot be turned on or off using the remote control.
12V Trigger connector: This connector provides 12V DC whenever the AVR is on. It can
be used to turn on and off other devices such as a powered subwoofer.
AC Input connector: After you have made all other connections, plug the supplied AC
power cord into this receptacle and into an unswitched wall outlet.
DVD Component Video Input connector: If your Blu-ray Disc™ or DVD player does
not have an HDMI connector but does have a component video connector, using the
component video connector will provide superior video performance. You will also need
to make an audio connection from the player to the AVR.
7
0292CSK - HK (x65Series) AVR156-230 OM [HKP1991], WORK05.indd 7
30/06/11 12:41:54
AVR 156
System Remote Control Functions
System Remote Control Functions
IR Transmitter Lens
Program Indicator LED
Power On Button
Mute Button
Power Off Button
AVR Button
Source Selector Buttons
Test Tone Button
Sleep/CH Up/Down Buttons
Volume Up/Down Buttons
OSD Button
Channel Level Control Button
Speaker Setup Buttons
OK Button
Digital Input Button
Delay Button
Left/Right/Up/Down Buttons
Tuning Mode Button
Number Buttons
Memory Button
Direct Station Entry Button
Tuning Up/Down Buttons
Tone Control Button
Night Mode Button
Track Skip Up/Down Buttons
Clear Button
Preset Station Up/Down Buttons
RDS Button
Macro Buttons
Display Dimmer Button
Transport Control Buttons
8
0292CSK - HK (x65Series) AVR156-230 OM [HKP1991], WORK05.indd 8
30/06/11 12:41:54
System Remote Control Functions, continued
In addition to controlling the AVR, the AVR remote is capable of controlling eight other
devices. During the installation process, you may program the codes for each of your
source components into the remote. (See Program the Remote to Control Your Source
Devices and TV, on page 16, for programming information.) To operate a component,
press its Source Selector button to change the remote’s control mode.
A button’s function depends on which component is being controlled. See Table A10 in
the Appendix for listings of the functions for each type of component. Most of the buttons
on the remote have dedicated functions, although the precise codes transmitted vary
depending on the specific device being controlled. Due to the wide variety of functions
for various source devices, we have included only a few of the most often-used functions
on the remote: alphanumeric keys, transport controls, television-channel control, menu
access and power on and off. To return the remote to the AVR control mode at any time,
press the AVR button.
IR Transmitter lens: As buttons are pressed on the remote, infrared codes are emitted
through this lens.
Program Indicator LED: This LED lights up to indicate various procedures when the
remote is in the Programming mode.
Power On/Off buttons: Press these buttons to turn the AVR or the device being controlled
on and off. The Main Power switch on the AVR’s rear panel must be on for this button to
turn the AVR on and off.
Mute button: Press this button to mute the AVR’s speaker-output connectors and
Headphone jack. To restore the sound, press this button or adjust the volume.
System Remote Control Functions, continued
Left/Right/Up/Down buttons: These buttons are used to navigate the menu system.
Number buttons: Use these buttons to enter numbers for radio-station frequencies or
to select station presets.
Tuning Mode button: Press this button to toggle the radio between manual (one
frequency step at a time) and automatic (seeks frequencies with acceptable signal
strength) tuning mode. It also toggles between stereo and mono modes when an FM
station is tuned in.
Memory button: To save the currently tuned radio station as a preset, press this button,
then a Number button.
Direct Station Entry button: Press this button before using the Number buttons to enter
a radio station frequency.
Clear button: Press this button to clear a radio station frequency you have started to
enter.
Tuning Up/Down buttons: Press these buttons to tune a radio station. Depending on
whether the tuning mode has been set to manual or automatic, each press will either
change one tuning frequency increment at a time or seek the next higher or lower
station with acceptable signal strength.
Preset Station Up/Down buttons: Press these buttons to cycle through your preset
radio stations.
Tone Control button: Press this button to access the bass and treble controls. Use
the OK button to select an adjustment and use the Up/Down buttons to change the
settings.
AVR button: Press this button to switch the remote’s control mode to operate the AVR.
RDS button: When listening to an FM radio station that broadcasts RDS information, this
button activates the various RDS functions.
Source Selector buttons: Press one of these buttons to select a source device, e.g.,
DVD, AM/FM radio, etc. This action will also turn on the AVR and switch the remote’s
control mode to operate the selected source device. NOTE: The first press of the Radio
Source Selector button switches the AVR to the last-used tuner band (AM or FM). Each
successive press changes the band.
Night Mode button: Press this button to activate Night mode with specially encoded
Dolby® Digital discs or broadcasts. Night mode compresses the audio so that louder
passages are reduced in volume to avoid disturbing others, while dialogue remains
intelligible. Each press of the button advances through the following settings:
Test Tone button: Press this button to activate the test tone for calibrating channel
volume levels by ear.
Sleep button/Channel Up/Down buttons: Press the Sleep button to activate the sleep
timer, which turns off the AVR after a programmed period of time of up to 90 minutes. The
Channel Up/Down buttons have no effect on the AVR but are used to change channels on
TVs and some video sources.
Volume Up/Down buttons: Press these buttons to raise or lower the volume.
OSD button: Press this button to activate the on-screen display menu system.
Channel Level Control button: Press this button to activate the individual channel-level
adjustment. It lets you easily change the channel balance to suit different programs or
seating arrangements. See Configure the AVR for Your Speakers, on page 17, for more
information.
Speaker Setup button: Press this button to configure which speakers are included
in your system. See Configure the AVR for Your Speakers, on page 17, for more
information.
OK button: This button is used to select items from the menu system.
ENGLISH
AVR 156
•• Off: No compression is applied. Loud passages in the program remain as they were
recorded.
•• Mid: Loud passages in the program are reduced moderately in volume.
•• Max: Loud passages in the program are reduced more in volume.
Macro buttons: These buttons may be programmed to execute a series of up to 19
commands with a single button press. They are useful for programming the command
to turn on or off all of your components or for accessing specialised functions for a
different component from the one that you are currently operating. See Programming
Macro Commands, on page 22, for information about programming macros.
Track Skip Up/Down buttons: These buttons have no effect on the AVR but are used
with many source components to change tracks or chapters.
Display Dimmer button: Press this button to dim the AVR’s front-panel display partially
or fully.
Transport Control buttons: These buttons have no effect on the AVR but are used to
control many source components. By default, when the remote is operating the AVR,
these buttons will control a Harman Kardon Blu-ray Disc player or DVD player.
Digital Input button: Press this button to select the specific digital audio input (or
analogue audio input) to which the current source is connected.
Delay button: Pressing this button lets you adjust two different types of delay settings
(use the Up/Down buttons to cycle through the settings):
•• A/V Sync: This setting lets you resynchronise the audio and video signals from a source
to eliminate a “lip sync” problem. Lip-sync issues can occur when the video portion
of a signal undergoes additional processing in either the source device or the video
display. Use the Left/Right buttons to delay the audio by up to 180ms.
•• Front L/Centre/Front R/Surr R/Surr L/Subwoofer: These settings let you set the delay
for each speaker to compensate for the different distances they may be from the
listening position. Use the Up/Down buttons to cycle through each of the system’s
speakers, and use the Left/Right buttons to set the distance each speaker is from
the listening position. See Configure the AVR for Your Speakers, on page 17, for more
information.
9
0292CSK - HK (x65Series) AVR156-230 OM [HKP1991], WORK05.indd 9
30/06/11 12:41:54
Introduction to Home Theatre
and Place Your Speakers
AVR 156
Introduction to Home Theatre
Place Your Speakers
This introductory section will help you to familiarise yourself with some basic concepts
unique to multichannel surround-sound AVRs, which will make it easier for you to set
up and operate your AVR.
Determine the locations for your system’s speakers according to their manufacturer’s
directions and the layout of your listening room. Use the illustration below as a guide for
5.1-channel systems.
Typical Home Theatre System
To create the most realistic surround-sound environment possible, you should place
your speakers in a circle with the listening position at its centre. You should angle each
speaker so it directly faces the listening position. Use the diagram below as a guide.
A home theatre typically includes an audio/video receiver (AVR), which controls
the system and supplies amplification for the loudspeakers; a disc player; a source
component for television broadcasts (cable box, satellite dish AVR, HDTV tuner or aerial
connected to the TV); a TV or video display; and multiple loudspeakers.
TV
C
FL
Multichannel Audio
SUB
FR
The main benefit of a home theatre system is its ability to produce “surround sound.”
Surround sound uses multiple speakers and amplifier channels to immerse you in the
audio/video presentation for a dramatically increased sense of realism.
Your AVR can have up to five main speakers connected directly to it, plus a subwoofer.
Each main speaker is powered by its own amplifier channel inside the AVR. A system
with more than two speakers is called a multichannel system. The different main speaker
types in a home theatre system are:
SL
SR
•• Front Left and Right: The front left and right speakers are used as in a 2-channel
system. In many surround-sound modes, these speakers are secondary, while the
main action, especially dialogue, is reproduced by the centre speaker.
•• Centre: When you are watching movies and television programs, the centre speaker
reproduces most of the dialogue and other soundtrack information that occurs on the
screen, anchoring it with the picture. When you are listening to a musical program, the
centre speaker helps to create a seamless front soundstage, creating a more realistic
“you-are-there” listening experience.
•• Surround Left and Right: The surround left and right speakers produce ambient
sounds that help create a realistic and immersive surround-sound environment. They
also help recreate directional sound effects such as aircraft flyovers.
Many people expect the surround speakers to play as loudly as the front speakers.
Although you will calibrate all of the speakers in your system to sound equally loud at
the listening position, most artists use the surround speakers for ambient effects only,
and they create their programs to steer relatively little sound to these speakers.
•• Subwoofer: A subwoofer is designed to play only the lowest frequencies (the deep
bass). It augments smaller, limited-range main speakers that are usually used for
the other channels. Many digital-format programs, such as movies recorded in Dolby
Digital, contain a low-frequency effects (LFE) channel that is directed to the subwoofer.
The LFE channel packs the punch of a rumbling train or airplane, or the power of an
explosion, adding realism and excitement to your home theatre. Some people use two
subwoofers for additional power and for even distribution of the sound.
Surround Modes
There are different theories as to the best way to present surround sound and to distribute
the individual channel information to the surround-sound system’s speakers. A variety
of algorithms have been developed in an effort to recreate the way we hear sounds in
the real world, resulting in a rich variety of options. Several companies have developed
different surround-sound technologies, all of which can be accurately reproduced by
your AVR:
Placing the Left, Centre and Right Speakers
Place the centre speaker either on top of, below or mounted on the wall above or below
the TV or video-display screen. Place the front left and right speakers along the circle,
about 30 degrees from the centre speaker and angled toward the listener.
Place the front left, front right and centre speakers at the same height, preferably at
about the same height as the listener’s ears. The centre speaker should be no more than
2 feet (0.6m) above or below the left/right speakers. If you’re using only two speakers
with your AVR, place them in the front left and front right positions.
Placing the Surround Speakers
You should place the left and right surround speakers approximately 110 degrees from
the centre speaker, slightly behind and angled toward the listener. Alternatively, you can
place them behind the listener, with each surround speaker facing the opposite-side
front speaker. You should place the surround speakers 2 feet – 6 feet (0.6m – 1.8m)
higher than the listener’s ears.
NOTE: Your AVR will sound its best when the same model or brand of
loudspeaker is used for all positions.
Placing the Subwoofer
Because a room’s shape and volume can have a dramatic effect on a subwoofer’s
performance, it is best to experiment with placement so that you will find the location
that produces the best results in your particular listening room. With that in mind, these
rules will help you get started:
•• Dolby Laboratories: Dolby TrueHD, Dolby Digital Plus, Dolby Digital, Dolby Digital EX,
Dolby Pro Logic II.
•• Placing the subwoofer next to a wall generally will increase the amount of bass in
the room.
•• DTS: DTS-HD™ High Resolution Audio, DTS-HD Master Audio™, DTS, DTS 96/24™.
•• Placing the subwoofer in a corner generally will maximise the amount of bass in the
room.
•• HARMAN International: Logic 7, HARMAN virtual speaker, HARMAN headphone.
•• Stereo Modes: 2-channel stereo and 5-channel stereo.
Appendix Table A9, on page 30, contains detailed explanations of the different surroundsound options available on your AVR. Digital surround-sound modes, such as Dolby
Digital and DTS systems, are available only with specially encoded programs, such
as those available via HDTV, DVD and Blu-ray Disc media and digital cable or satellite
television. Other surround modes may be used with digital and analogue signals to create
a different surround presentation or to use a different number of speakers. Surroundmode selection depends upon the number of speakers in your system, the programs you
are watching or listening to, and your personal tastes.
•• In many rooms, placing the subwoofer along the same plane as the left and right
speakers can produce the best integration between the sound of the subwoofer and
that of the left and right speakers.
•• In some rooms, the best performance could even result from placing the subwoofer
behind the listening position.
A good way to determine the best location for the subwoofer is by temporarily placing
it in the listening position and playing music with strong bass content. Move around
to various locations in the room while the system is playing (putting your ears where
the subwoofer would be placed), and listen until you find the location where the bass
performance is best. Place the subwoofer in that location.
10
0292CSK - HK (x65Series) AVR156-230 OM [HKP1991], WORK05.indd 10
30/06/11 12:41:55
AVR 156
Types of Home Theatre System Connections
Subwoofer Connections
There are different types of audio and video connections used to connect the AVR to your
speakers, your TV or video display, and your source devices. The Consumer Electronics
Association has established the CEA® colour-coding standard.
The subwoofer is a speaker dedicated to reproducing only the low (bass) frequencies,
which require more power. To obtain the best results, most speaker manufacturers offer
powered subwoofers that contain their own amplifiers. Use a single RCA audio cable
(not included) to make a line-level (non-amplified) connection from the AVR’s Subwoofer
connector to a corresponding input jack on the subwoofer.
Connection Colour Guide Table
Analogue Audio Connection
Colour
Front Left/Right
White/Red
Centre
Green
Surround Left/Right
Blue/Gray
Subwoofer
Purple
Digital Audio Connection
Colour
Coaxial (input or output)
Orange
Optical Input
Black
Analogue Video Connection
Colour
Component Video
Red/Green/Blue
Composite Video
Yellow
Speaker Connections
Speaker cables carry an amplified signal from the AVR’s speaker terminals to each
loudspeaker. Each cable contains two wire conductors, or leads, that are differentiated
in some way, such as with colours or stripes.
The differentiation helps you maintain proper polarity, without which your system’s lowfrequency performance can suffer. Each speaker is connected to the AVR’s speakeroutput terminals using two wires, one positive (+) and one negative (–). Always connect
the positive terminal on the speaker, which is usually coloured red, to the positive
terminal on the AVR, which is coloured as indicated in the Connection Colour Guide
Table, above. The negative terminals on the speakers and the AVR are black.
Your AVR uses binding-post speaker terminals that can accept bare-wire cables or
banana plugs. Bare-wire cables are installed as shown below:
ENGLISH
Types of Home Theatre System Connections
Although the AVR’s purple subwoofer output looks similar to a full-range analogue audio
jack, it is filtered so that only the low frequencies pass through it. Don’t connect this
output to any device other than a subwoofer.
Source Device Connections
Audio and video signals originate in source devices (components where a playback
signal originates) such as your Blu-ray Disc or DVD player, CD player, DVR (digital video
recorder) or other recorder, tape deck, game console, cable or satellite television tuner
or MP3 player. The AVR’s FM/AM tuner also counts as a source, even though no external
connectors are needed other than the AVR’s FM and AM aerials. Separate connectors are
required for the audio and video portions of the source device’s signal, except for digital
HDMI connectors. The types of connectors you use will depend upon the capabilities of
the source device and of your TV or video display.
Digital Audio Connections – HDMI
There are two types of audio connections – digital and analogue. Digital audio signals
are required for listening to sources encoded with digital surround modes, such as Dolby
Digital and DTS, or for uncompressed PCM digital audio. Your AVR has three types of
digital audio connectors: HDMI, coaxial and optical. Do not use more than one type of
digital audio connector for each source device. However, it’s okay to make both analogue
and digital audio connections to the same source.
Your AVR is equipped with four rear-panel HDMI input connectors and one HDMI monitor
output connector. HDMI technology enables digital audio and video information to be
carried using a single cable, delivering the highest quality picture and sound. If your TV
or video-display device has an HDMI input connector, make a single HDMI connection
from each source device to the AVR. Usually, a separate digital audio connection is not
required.
The HDMI connector is shaped for easy plug-in (see illustration, below), and HDMI cable
runs are limited to about 10 feet (3m). If your video display has a DVI input and is
HDCP-compliant, use an HDMI-to-DVI adapter (not included), and make a separate audio
connection.
1. Unscrew Cap
2. Insert Bare Wire
3. Tighten Cap
Banana plugs are inserted into the hole in the middle of the terminal cap, as shown
below:
A. Tighten Cap
B. Insert Banana Connector
into Hole in Cap
Digital Audio Connections – Coaxial
Coaxial digital audio jacks are usually colour-coded orange. Although they look like
standard RCA-type analogue jacks, you should not connect coaxial digital audio outputs
to analogue inputs or vice versa.
Always connect the coloured (+) terminal on the AVR to the (+) terminal on the speaker
(usually red), and the black (–) terminal on the AVR to the (–) terminal on the speaker
(usually black).
IMPORTANT: Make sure the ( + ) and ( – ) bare wires do not touch each other or
the other terminal. Touching wires can cause a short circuit that can damage your
AVR or amplifier.
11
0292CSK - HK (x65Series) AVR156-230 OM [HKP1991], WORK05.indd 11
30/06/11 12:41:56
Types of Home Theatre System
Connections, continued
AVR 156
Digital Audio Connections – Optical
Analogue Video Connections – Component Video
Optical digital audio connectors are normally covered by a shutter to protect them from
dust. The shutter opens as the cable is inserted.
Component video separates the video signal into three components – one luminance
(“Y”) and two sub-sampled colour signals (“Pb” and “Pr”) – that are transmitted using
three separate cables that are colour-coded green (Y), blue (Pb) and red (Pr). Component
video cables that join three separate green, blue and red connectors into a single cable
are sold separately.
Analogue Audio Connections
Two-channel analogue connections require a stereo audio cable, with one connector for
the left channel (white) and one for the right channel (red). These two connectors are
attached to each other.
If your TV or video display has an HDMI connector, we recommend it for the best quality
connection. Your AVR converts component analogue video input signals to the HDMI
format, upscaling them to high-definition 1080p resolution.
Radio Connections
For source devices that have both digital and analogue audio outputs, you may make
both connections.
Your AVR uses separate terminals for the included FM and AM aerials. The FM aerial uses
a 75-ohm F-connector.
The analogue connections also feed the Analogue Record Output connectors. You may
record materials from Blu-ray Disc recordings, DVDs or other copy-protected sources
using only analogue connections. Remember to comply with all copyright laws if you
choose to make a copy for your own personal use.
Video Connections
Many source devices output both audio and video signals (e.g., Blu-ray Disc, DVD
player, cable television box, HDTV tuner, satellite box, VCR, DVR). In addition to an audio
connection as described above, make a video connection for each of these source
devices. Make only one type of video connection for each device.
The AM aerial connector uses spring-clip terminals. After assembling the aerial as shown
below, press the levers to open the connectors, insert the bare wires into the openings,
and release the levers to secure the wires. The aerial wires are not polarised, so you can
insert either wire into either connector.
Digital Video Connections
If you have already connected a source device to one of the AVR’s HDMI input connectors,
you have automatically made a video connection for that device, since the HDMI cable
carries both digital audio and digital video signals.
Analogue Video Connections – Composite Video
USB Port
Your AVR uses two types of analogue video connections: composite video and component
video.
The USB port on your AVR is used for firmware upgrades. If an upgrade for the AVR’s
operating system is released in the future, you will be able to download it to the AVR
using this port. Complete instructions will be provided at that time.
Composite video is the basic connection most commonly available. Both the chrominance
(colour) and the luminance (intensity) components of the video signal are transmitted
using a single cable. The jack is usually colour-coded yellow and looks like an analogue
audio jack. Do not connect a composite video jack to an analogue audio or coaxial digital
audio jack, or vice versa.
IMPORTANT: Do not connect a PC or other USB host/controller to the AVR’s USB
port, or you may damage both the AVR and the other device.
12
0292CSK - HK (x65Series) AVR156-230 OM [HKP1991], WORK05.indd 12
30/06/11 12:42:01
AVR 156
Making Connections
Making Connections
HDMI Monitor Out connector
CAUTION: Before making any connections to the AVR, ensure that the AVR’s AC
cord is unplugged from the AVR and the AC outlet. Making connections with
the AVR plugged in and turned on could damage the speakers.
Connect Your Speakers
After you have placed your loudspeakers in the room as explained in Place Your Speakers,
on page 10, connect each speaker to its colour-coded terminal on the AVR as explained
in Speaker Connections, on page 11. Connect the speakers as shown in the illustration.
If your TV has an HDMI connector and you have HDMI or component video source
devices, use an HDMI cable (not included) to connect your TV to the AVR’s HDMI Monitor
Out connector. It will provide the best possible picture quality.
AVR HDMI
Monitor Out
Connector
ENGLISH
Connect Your TV or Video Display
TV
HDMI Cable
(not supplied)
Composite Video Monitor Out connector
If your TV does not have an HDMI connector, or if your TV does have an HDMI connector
but you are connecting some source devices with only composite video connectors,
use a composite video cable (not included) to connect the AVR’s Composite Monitor Out
connector to your TV’s composite video connector.
AVR Composite
Monitor Out
Connector
Composite Video Cable
(not supplied)
C
FL
TV
Connect Your Source Devices
FR
Source devices are components where a playback signal originates, such as a
Blu-ray Disc or DVD player, or a cable, satellite or HDTV tuner. Your AVR has several
different types of input connectors for your audio and video source devices: HDMI,
component video, composite video, optical digital audio, coaxial digital audio and
analogue audio. The connectors are labeled for the types of source devices you are most
likely to connect.
SL
SR
Connect Your Subwoofer
Use a single RCA audio cable to connect the AVR’s Subwoofer Pre-Out connector to your
subwoofer. Consult your subwoofer’s user manual for specific information about making
connections to it.
AVR
Subwoofer
Pre-Out Connector
Single
RCA Audio Cable
(not supplied)
Powered
Subwoofer
Each of your AVR’s source buttons is assigned to an HDMI connector or an analogue
audio input connector (listed in the “AVR Source Button/Analogue Audio Connector”
column of the table below). To provide you flexibility for connecting and configuring your
system, we have designed the AVR so that you can assign the digital audio inputs to any
of the video AVR sources.
As you connect your various source components, fill out the “Source Device Connected”
column in the following table – it will make it easier for you to assign the digital audio
input connectors and component video connector later in the setup process.
AVR Source
Button/
Analogue Audio
Connector
Recommended Source
Device Type
Video 1
Cable or Satellite Tuner
Video 2
DVD Recorder or VCR
DVD
Blu-ray Disc or DVD Player
CD
CD Player
Tape
Cassette Deck or Audio
Recorder
Aux
Portable Media Palyer
AVR Source
Button/ HDMI
Connector
____
HDMI 1
____
HDMI 2
____
HDMI 3
____
Source Device
Connected
Digital Audio Input
Connector Assigned
Source Device
Connected
Digital Audio Input
Connector Assigned
Input Connections and Source Buttons
13
0292CSK - HK (x65Series) AVR156-230 OM [HKP1991], WORK05.indd 13
30/06/11 12:42:03
AVR 156
Making Connections, continued
HDMI devices
Optical digital audio devices
If any of your source devices have HDMI connectors, using those connectors will provide
the best possible video and audio performance quality. Since the HDMI cable carries
both digital video and digital audio signals, you do not have to make any additional audio
connections for devices you connect via HDMI cables, although you can assign one of
the digital audio connectors to one of the HDMI inputs.
If your source devices have optical digital outputs, connect them to the AVR’s Optical
Digital Audio connectors. NOTE: Make only one type of digital connection (HDMI, optical
or coaxial) from each device.
AVR Digital Audio
Connectors
AVR
HDMI Connectors
Optical Digital Audio
Cable (not supplied)
HDMI Cable
(not supplied)
To HDMI
Output
To Optical Digital
Audio Output
Optical Digital-Equipped
Source Device
Coaxial digital audio devices
HDMI-Equipped
Source Device
If your source devices have coaxial digital outputs, connect them to the AVR’s Coaxial
Digital Audio connectors. NOTE: Make only one type of digital connection (HDMI, optical
or coaxial) from each device.
Component video devices
If your Blu-ray Disc or DVD player does not have an HDMI connector but does have a
component video connector, using the component video connector will provide superior
video performance. You will also need to make an audio connection from the player to
the AVR.
AVR Digital Audio
Connectors
AVR DVD Component
Video Connectors
Coaxial Digital Audio
Cable (not supplied)
Component Video
Cable (not supplied)
To Component
Video Outputs
Component Video-Equipped
Blu-ray Disc or DVD Player
Composite video devices
You will need to make composite video connections from your source devices that
do not have HDMI or component video connectors. You will also need to connect the
source device’s analogue audio outputs to the AVR’s corresponding analogue audio
connectors.
To Coaxial
Digital Output
Coaxial Digital-Equipped
Source Device
Analogue audio devices
Make analogue audio connections from your source devices that do not have HDMI or
digital audio connectors. If you’re connecting video sources to the DVD, Video 1 or Video
2 audio inputs, you must also connect the source device’s composite video output to the
corresponding composite video connector.
AVR Analogue Audio
Connectors
IMPORTANT: If you connected your Blu-ray Disc or DVD player to the AVR’s DVD
Component Video Input connectors, do not connect a source device to the AVR’s DVD
Composite Video Input connector.
AVR Composite
Video Connectors
Stereo Audio Cable
(not supplied)
Composite Video
Cable (not supplied)
To Composite
Video Output
Composite Video-Equipped
Source Device
To Stereo Analogue
Audio Output
Analogue Source
Device
14
0292CSK - HK (x65Series) AVR156-230 OM [HKP1991], WORK05.indd 14
30/06/11 12:42:05
AVR 156
Audio recorders
Connect the 12V Trigger Output
Connect an analogue audio recorder’s inputs to the AVR’s analogue audio Tape Out
connectors. You can record any analogue audio input signal.
If your system has equipment that can be controlled by a DC trigger signal, connect it to
the AVR’s 12V Trigger connector with a mono 1/8-inch (3.5mm) mini-plug interconnect
cable. The AVR will supply a 12V DC (100mA) trigger signal at this connection whenever
it is powered on.
AVR Analogue Audio
Recorder Connectors
ENGLISH
Making Connections, continued,
and Set Up the Remote Control
AVR
Stereo Audio Cable
(not supplied)
To Stereo Analogue
Record Inputs
Mono 1/8-inch
(3.5mm)
Mini-Plug
Interconnect
(not supplied)
Device with Trigger
in Connector
Analogue Recording Device
Video recorders
Connect an analogue video recorder’s video input connector to the AVR’s Video 2 Out
Composite Video connector, and its audio input connectors to the AVR’s Video 2 Out
Analogue Audio connectors. You can record any composite video signal.
AVR Analogue
Audio Connectors
AVR Analogue
Video Connectors
Connect to AC Power
Connect the AC power cord to the AVR’s AC Input connector and then to a working AC
power outlet.
AVR AC
Input Connector
Analogue Audio/Video
Cable (not supplied)
To Analogue Audio/
Video Record Inputs
Analogue Video
Recording Device
Connect the Radio Aerials
•• Connect the supplied FM aerial to the AVR’s FM 75Ω Radio Aerial connector. For the
best reception, extend the FM aerial as far as possible.
•• Bend and fold the base of the supplied AM aerial as shown and connect the aerial
wires to the AVR’s AM and Gnd connectors. (You can connect either wire to either
connector.) Rotate the aerial as necessary to minimise background noise.
AC Power
Outlet
Power Cord
(supplied)
Set Up the Remote Control
Install the Batteries in the Remote Control
Remove the remote control’s battery cover, insert the three supplied AAA batteries as
shown in the illustration, and replace the battery cover.
AVR Radio Aerial
Connectors
FM Aerial (supplied)
AM Aerial
(supplied)
Bend and fold base
NOTE: Remove the protective plastic from the AVR’s front panel to keep it from reducing
the remote control’s effectiveness.
15
0292CSK - HK (x65Series) AVR156-230 OM [HKP1991], WORK05.indd 15
30/06/11 12:42:07
AVR 156
Program the Remote to Control Your Source Devices and TV
In addition to using the remote to control the AVR itself and the AM/FM radio, you can
program the remote to control up to eight additional audio/video source devices plus
your TV.
Once you have programmed the remote, you can switch the remote’s control mode to
access the functions for a particular source device by pressing the remote’s Source
Selector button for that device. To control the AVR, press the remote’s AVR button.
Set Up the Remote Control, continued,
and Set Up the AVR
Set Up the AVR
Turn On the AVR
1.Set the rear-panel Main Power switch to “On.” (The front-panel Power indicator will
glow amber.)
2.Press the front-panel Power button.
Main Power
Switch
Before you begin programming the remote, review the connections you filled in on the
Input Connections and Source Buttons table on page 13. The Source Selector buttons
are assigned to the components that you listed in the table’s “Source Device Connected”
column.
Power
Button
1.Turn on the source device you want to program the remote to control.
2.Look up the code numbers for the device in Tables A11 – A17 in the Appendix. Write
all the applicable code numbers in a convenient place.
3.Press and hold the Source Selector button for that source device until the Program
Indicator LED on the remote starts to flash, then release it. (This procedure places the
remote in the Programming mode.)
NOTE: If you’re programming one of the four HDMI source buttons, after pressing the
HDMI button you must also press the Source Selector button for the type of device that
will be controlled:
•• Press DVD to control a DVD player.
•• Press VID1 to control a VCR, DVR or Harman Kardon digital media centre.
•• Press VID2 to control a cable or satellite set-top box.
4.Aim the remote at the source device and use the remote’s Number buttons to enter a
code number from Step 2, above.
a)If the device turns off, press the Source Selector button again to save its code. The
Source Selector button will flash, and the remote will exit the Programming mode.
b)If the device does not turn off, enter another code number.
c) If you run out of code numbers for a device, you can search through all of the codes
in the remote’s library for devices of its type by pressing the Up or Down button
repeatedly until the device turns off. When it does, press the Source Selector button
to save the code.
5.Check that other functions control the device correctly. Sometimes manufacturers
use the same Power code for several models, while other function codes vary. Repeat
this process until you’ve programmed a satisfactory code set that operates most of
the device’s functions.
6.If you searched through the remote’s code library to find the code, you can find out
which code number you have programmed by pressing and holding the Source Selector
button to re-enter the Programming Mode. Then press the remote’s OK button, and the
Program Indicator LED will flash in the code sequence. One flash represents “1,” two
flashes represent “2,” and so forth. A series of quick flashes represents “0.” Record
the code number programmed for each device in Table A7 in the Appendix.
Repeat Steps 3 – 6 for each source device you want to control with the AVR remote.
In general, the label for each button on the remote describes the button’s function when
used to control the AVR. However, the button may perform a very different function when
used to control another device. Refer to the Remote Control Function List, Table A10 in
the Appendix, for each button’s functions with the various product types.
You can also program the remote to perform Macros (preprogrammed code sequences
that execute many code commands with a single button press) and “punch-through”
programming (allowing the remote to operate a device’s channel or transport controls
when the remote is in another device’s mode). See Advanced Remote Control
Programming, on page 22, for instructions on these functions.
Unless you will not be using the AVR for an extended period of time, leave the Main
Power switch set to “On.” When the Main Power switch is turned off, any settings you
have programmed will be preserved for up to four weeks.
IMPORTANT NOTE: If the PROTECT message ever appears in the Message
display, turn off the AVR and unplug it. Check all speaker wires for a short
circuit (“+” and “–” wires touching). If none is found, bring the unit to an
authorised Harman Kardon service centre for inspection and repair before
using it again.
Using the On-Screen Menu System
Although it’s possible to configure the AVR using only the remote and the front-panel
Message display, it is easier to use the on-screen menu system.
To access the menu system, press the OSD button on the remote. The Master menu will
appear.
**
MASTER MENU
**
INPUT SETUP
SURROUND SELECT
SPEAKER SETUP
SYSTEM SETUP
The Master menu consists of four submenus: Input Setup, Surround Mode, Speaker
Setup and System Setup.
Use the Up/Down/Left/Right buttons on the remote to navigate the menu system, and
press the OK button to select a menu or setting line, or to enter a new setting.
The current menu, setting line or setting will appear in the front-panel Message display,
as well as on screen.
To return to the previous menu, navigate to the “Back to Master Menu” line and press the
OK button. To exit the menu system, press the OSD button.
Most users should follow the instructions in this Set Up the AVR section to configure
a basic home theatre system. You may return to these menus at any time to make
additional adjustments, such as those described in the Advanced Functions section, on
pages 20 through 23.
Before you begin initial setup, all loudspeakers, a video display and all source devices
should be connected to the AVR. You should be able to turn on the AVR and view the
Master menu when you press the OSD button. If necessary, reread the Making
Connections section and the beginning of this section before continuing.
16
0292CSK - HK (x65Series) AVR156-230 OM [HKP1991], WORK05.indd 16
30/06/11 12:42:09
AVR 156
Your AVR is flexible and may be configured to work with most speakers and to
compensate for the acoustic characteristics of your room.
Select ON when the speakers are present in the system; select OFF for positions where
no speakers are installed. The Front Left & Right setting is always ON and may not be
disabled.
* NUMBER OF SPEAKERS *
Before beginning, place your loudspeakers as explained in the Place Your Speakers
section, on page 10, and connect them to the AVR. Consult the owner’s guide for the
speakers or the manufacturer’s Web site for their frequency-range specification. Although
you may set the AVR’s individual channel levels “by ear,” an SPL (sound-pressure level)
metre purchased at a local electronics store will provide greater accuracy.
Record your configuration settings in Tables A4 and A6 in the Appendix for easy re-entry
after a system reset or after the AVR’s Master Power switch has been turned off or the
unit has been unplugged for more than four weeks.
Step One – Determine Your Speakers’ Crossover Frequencies
Consult the technical specifications for all of your speakers and locate the frequency
response, usually given as a range, e.g., 100Hz – 20kHz (±3dB). Write down the lowest
frequency that each of your speakers is capable of playing (100Hz in the above example)
as the crossover in Table A6 in the Appendix. NOTE: This frequency is not the same as
the crossover frequency listed in the speaker’s specifications.
LEFT/RIGHT
CENTER
SURROUND
SUBWOOFER
:
:
:
:
ON
ON
ON
ON
BACK TO SPEAKER SETUP
When you have finished, select Back to Speaker Setup.
Crossover (Size)
After you return to the Speaker Setup menu, navigate to the Crossover line and press the
OK button to display the Crossover menu.
* CROSSOVER *
LEFT/RIGHT
CENTER
SURROUND
SUBWOOFER
:
:
:
:
100Hz
100Hz
100Hz
10inch
For the subwoofer, write down the transducer size. The AVR’s bass management
determines which speakers will be used to play back the low-frequency (bass) portion
of the source program. Sending the lowest notes to small satellite speakers will result
in bad sound and may even damage the speakers. The highest notes may not be heard
at all through the subwoofer.
Refer to Table A6 for each speaker’s crossover frequency.
With proper bass management, the AVR divides the source signal at a crossover point.
All information above that crossover point is played through your system’s speakers,
and all information below the crossover point is played through the subwoofer. This way,
each loudspeaker in your system will perform at its best, delivering a more powerful and
enjoyable sound experience.
For each speaker group, select one of these eight crossover frequencies: LARGE, 40Hz,
60Hz, 80Hz, 100Hz, 120Hz, 150Hz or 200Hz. If the speaker’s crossover frequency is
below 40Hz, select the first option, LARGE. This setting doesn’t refer to the speaker’s
physical size but to its frequency response, which is also called “full range.”
Step Two – Measure the Speaker Distances
Ideally, all of your speakers would be placed in a circle, with the listening position at the
centre. However, you may have had to place some speakers a little farther away from the
listening position than others. Sounds that are supposed to arrive simultaneously from
different speakers may blur, due to different arrival times.
Your AVR provides a Distance adjustment that compensates for these real-world
speaker-placement differences.
Measure the distance from each speaker to the listening position, and write it down
in Table A4 in the Appendix. Even if all of your speakers are the same distance from
the listening position, enter your speaker distances as described in Set the Speaker
Distances, on this page.
BACK TO SPEAKER SETUP
NOTE: The AVR will let you adjust settings only for those speaker groups you set to On
in the Number of Speakers menu.
Specify the size of the subwoofer’s transducer as 8, 10, 12 or 15 inches. The AVR always
sets the subwoofer crossover to 100Hz but uses the transducer size for equalisation.
Write down the settings in Table A6 in the Appendix.
When you have finished entering the settings, select Back To Speaker Setup.
Sub Mode
After you return to the Speaker Setup menu, navigate to the Sub Mode line and press
the OK button to display the Sub Mode menu. This setting depends upon the Crossover
setting you selected for the front left and right speakers.
Step Three – Speaker Setup Menu
•• If you set the front speakers to a numeric crossover frequency, the subwoofer setting
will always be SUB. All low-frequency information will always be sent to the subwoofer.
If you don’t have a subwoofer, either upgrade to full-range front left and right speakers
or add a subwoofer at the earliest opportunity.
Now you are ready to program the AVR. Sit in your usual listening position, and make the
room as quiet as possible.
•• If you set the front speakers to LARGE, select one of the three following settings for
the subwoofer:
With the AVR and video display turned on, press the OSD button to display the menu
system and select Speaker Setup. The Speaker Setup menu will appear:
L/R+LFE: This setting sends all low-frequency information to the subwoofer, including
a) information that would normally be played through the front left and right speakers
and b) the special low-frequency effects (LFE) channel information.
* SPEAKER SETUP *
NUMBER OF SPEAKERS
SUB MODE : SUB
CROSSOVER
DISTANCE
LEVEL ADJUST
BACK TO MASTER MENU
OFF: Select this setting when no subwoofer is in use. All low-frequency information
will be sent to the front left and right speakers.
LFE: This setting plays low-frequency information contained in the left and right
program channels through the front left and right speakers, and directs only the LFEchannel information to the subwoofer.
NOTE: All of the speaker setup submenus include a “Back to…” option. To save the
current settings, select the Back to… option.
When you have finished entering the settings, select Back To Speaker Setup.
For best results, adjust the submenus in this order: Number of Speakers, Crossover, Sub
Mode, Distance and Level Adjust.
As described above in Step Two, when you measured the distances from each of your
speakers to the listening position, your AVR provides an adjustment that compensates
for the different distances so that the sound from each speaker will reach the listening
position at the proper time. This process will improve the clarity and detail of the
sound.
Number of Speakers
This selection lets you program the correct setting for each speaker group. The settings
in this menu affect the remainder of the speaker-setup process and the availability of
various surround modes at any time.
ENGLISH
Configure the AVR for Your Speakers
Set Up the AVR, continued
Set the Speaker Distances
17
0292CSK - HK (x65Series) AVR156-230 OM [HKP1991], WORK05.indd 17
30/06/11 12:42:10
AVR 156
Set Up the AVR, continued
After you return to the Speaker Setup menu, navigate to the Distance line and press the
OK button to display the Distance menu.
* DISTANCE *
FL
CEN
FR
SR
:
:
:
:
10FT
10FT
10FT
10FT
SL : 10FT
SUB : 10FT
DELAY RESET : OFF
UNIT : FEET
A/V SYNC DELAY : 0mS
BACK TO SPEAKER SETUP
Channel Reset: To reset all channel levels to their factory defaults of 0dB, select this line
and press the Left/Right buttons.
When you have finished adjusting the speaker levels, record the settings in Table A6 in
the Appendix. Then select the Back to Speaker Setup option in the OSD.
Notes on Setting Speaker Volumes in Home Theatre Systems:
While setting your system’s individual speaker volume levels is ultimately up to your
personal taste, here are some ideas you may find helpful:
•• For films and video-music programs, your overall goal should be to create an
enveloping, realistic sound field that draws you into the film or music program without
drawing your attention away from the action on the screen.
Enter the distance from each speaker to the listening position that you measured in Step
Two and recorded in Table A4 in the Appendix (see page 27). Select a speaker, then use
the Left/Right buttons to change the measurement. You can enter distances between 0
and 30 feet (9.1m). The default distance for all speakers is 10 feet (3m).
•• For multichannel music recordings, some music producers will create a sound field
that places the musicians all around you; others will create a sound field that places
the musicians in front of you, with more subtle ambience in the surround speakers (as
you would experience in a concert hall).
The default unit of measurement is feet. To change the unit to metres, scroll down to the
Unit line and press the Left/Right buttons.
•• In most 5.1-channel film soundtracks, the surround speakers are not intended to be
as loud or as active as the front speakers. Adjusting the surround speakers so they are
always as loud as the front speakers could make dialogue difficult to understand and
will make some sound effects sound unrealistically loud.
When you have finished entering the settings, select Back To Speaker Setup.
Step Four – Setting Channel Output Levels Manually
For a conventional stereo AVR, a simple balance control adjusts the stereo imaging by
varying the relative loudness of the left and right channels. In a home theatre system
with up to seven main channels plus a subwoofer, achieving proper imaging becomes
both more critical and more complex. The goal is to ensure that each channel is heard
at the listening position with equal loudness (when signals of equal loudness are played
through them).
After you return to the Speaker Setup menu, navigate to the Level Adjust line and press
the OK button to display the Level Adjust menu.
Notes on Setting Subwoofer Volume:
•• Sometimes the ideal subwoofer volume setting for music is too loud for films, while
the ideal setting for films is too quiet for music. When setting the subwoofer volume,
listen to both music and films with strong bass content and find a “middle ground”
volume level that works for both.
•• If your subwoofer always seems too loud or too quiet, you may want to place it in a
different location. Placing the subwoofer in a corner will always tend to increase its
bass output, while placing it away from any walls or corners will always tend to lessen
its bass output.
* LEVEL ADJUST*
FL :
CEN:
FR :
SR :
0dB
0dB
0dB
0dB
SL : 0dB
SUB: 0dB
CHANNEL RESET: OFF
TEST TONE SEQ: MANUAL
TEST TONE
: OFF
BACK TO SPEAKER SETUP
All of the system’s speakers will appear with their current level settings. You can adjust
each speaker’s level between –10dB and +10dB in 1dB increments.
While making adjustments, you can measure the channel levels in one of these ways:
•• Preferably, use a handheld SPL metre set to the C-weighting, slow scale. Adjust each
speaker so that the metre reads 75dB when the AVR’s built-in test noise is playing.
•• By ear. Adjust the levels so that the test tone sounds equally loud to you when it plays
through each speaker.
To set your levels using the AVR’s internal test tone, select the menu’s Test Tone Seq
line and use the Left/Right buttons to select between Auto and Manual. After selecting
Auto or Manual, move the cursor to the Test Tone line and use the Left/Right buttons to
change the setting to On.
Auto: The test tone will automatically circulate to all speakers, as indicated by the
highlight bar. Use the Left/Right buttons to adjust the level for any speaker when the
test tone is paused there. Use the Up/Down buttons to move the cursor to another line,
and the test tone will follow the cursor. To stop the test tone, use the Up/Down buttons
to move the cursor out of the screen’s speaker-listings area.
Manual: The test tone will stay on the current speaker until you use the Up/Down
buttons to move it to another speaker. Use the Left/Right buttons to adjust the level for
the speaker through which the test tone is playing.
If you are using an external source to set your output levels, set Test Tone to Off, use the
Up/Down buttons to navigate to each speaker, and use the Left/Right buttons to adjust
the speaker’s level while the source plays. NOTE: If you are using a handheld SPL metre
with external source material, such as a test disc or an audio selection, play it and
adjust the AVR’s master volume control until the metre measures 75dB. Then adjust the
individual speaker levels.
Assign the Digital Audio Connectors
1.Review the input connections you listed on the Input Connections and Source Buttons
table, on page 13. Note which source devices you connected to the digital audio
connectors. (If you did not connect any source devices to the digital audio connectors,
you can skip this section.)
2.Turn on your TV and select the TV input where you connected the AVR in Connect Your
TV or Video Display, on page 13.
3.Press the remote control’s OSD button. The AVR’s on-screen display (OSD) Master
Menu will appear on the TV.
**
MASTER MENU
**
INPUT SETUP
SURROUND SELECT
SPEAKER SETUP
SYSTEM SETUP
4.Use the remote’s arrow and OK buttons to select “Input Setup.” The Input Setup menu
will appear.
* INPUT SETUP *
SOURCE
:
TITLE:
AUDIO IN :
AUTO POLL :
BXR
:
TONE
:
BASS
:
TREBLE
:
DVD
ANALOG
OFF
OFF
IN
0
0
BACK TO MASTER MENU
18
0292CSK - HK (x65Series) AVR156-230 OM [HKP1991], WORK05.indd 18
30/06/11 12:42:11
Set Up the AVR, continued,
and Operating Your AVR
AVR 156
Operating Your AVR
a) Use the remote’s Up and Down arrow buttons to select “Source.” Use the Left
and Right arrow buttons to change the listed source to one of the sources you
connected to a digital audio input connector.
Now that you have installed your components and completed a basic configuration, you
are ready to begin enjoying your home theatre system.
b) Use the remote’s down arrow button to select “Audio In.”
Controlling the Volume
* INPUT SETUP *
SOURCE
:
TITLE:
AUDIO IN :
AUTO POLL :
BXR
:
TONE
:
BASS
:
TREBLE
:
DVD
OPT 1
ON
OFF
IN
0
0
BACK TO MASTER MENU
c) Use the remote’s Left and Right arrow buttons to select the digital audio input
where you connected the source device.
Adjust the volume either by turning the front-panel Volume knob (clockwise to increase
volume or counterclockwise to decrease volume) or by pressing the Volume Up/Down
buttons on the remote. The volume is displayed as a negative number of decibels (dB)
below the 0dB reference point.
0dB is the maximum recommended volume for your AVR. Although it’s possible to turn
the volume to a higher level, doing so may damage your hearing and your speakers. For
certain more dynamic audio materials, even 0dB may be too high, allowing for damage
to equipment. Use caution with regard to volume levels.
Muting the Sound
To mute all speakers and the headphones, press the Mute button on the remote. Any
recording in progress will not be affected. The MUTE message will appear in the frontpanel display as a reminder. To restore the sound, press the Mute button again, or adjust
the volume.
Additional Input Setup Menu Items
Listening Through Headphones
You can also adjust the following settings independently for each source:
Plug the 1/4-inch stereo plug on a pair of headphones into the front-panel Phones
jack for private listening. The default Headphone Bypass mode delivers a conventional
2-channel signal to the headphones. Press the Surround Modes button on the front
panel or use the remote and OSD to switch to HARMAN headphone virtual surround
processing, which emulates a 5.1-channel speaker system. No other surround modes
are available for the headphones.
Title: You may change the display name for any source (except the radio). This feature
may help you to select the correct source device even when you have forgotten which
physical connections you used.
1.Move the cursor to the Title line and press the OK button. A block cursor will blink.
2.Use the Up/Down buttons to scroll through the alphabet in upper and lower case,
the numbers and many punctuation marks. When you have selected the desired
character, press the Right button to move to the next space. Press the Right button
twice to leave a blank space.
3.Press the OK button when you have finished.
Auto Poll: The Auto Poll feature is used when both an analogue audio and a digital audio
connection have been made for one source device. If no digital signal is available, the AVR
will automatically switch to the analogue input for the source. This situation can occur
with some cable or satellite television broadcasts, where some channels are broadcast
with digital audio and others with analogue audio, or when a DVD player is paused or
stopped.
Selecting a Source
There are two different ways to select a source:
•• Press the front-panel Source Select buttons.
•• Directly select any source by pressing its Source Selector button on the remote.
The AVR selects the audio and video inputs assigned to the source and any other settings
you made during setup.
The source name, the audio and video inputs assigned to the source, and the surround
mode will appear on the front panel.
For some sources such as DVD players, the Auto Poll feature is unnecessary and may be
undesirable. To turn Auto Poll off, move the cursor to the Auto Poll line and press the Left/
Right buttons until Off appears. With Auto Poll turned off, the AVR will check for a signal
only at the audio input assigned to the source.
Video Troubleshooting Tips
The remaining Input Setup menu items adjust the AVR’s audio performance for that
source and may be skipped at this time. For most listening, we recommend leaving
these settings at their factory defaults, allowing you to enjoy the sound mix created by
your favourite movie and music artists.
•• Check all connections for a loose or incorrect connection.
BXR: Enhances bass performance when playing MP3 tracks. Select On, or leave it at the
default Off setting for non-MP3 audio sources.
•• Turn off all devices (including the TV, the AVR and any source components).
Tone: This setting determines whether the treble and bass controls are active. When this
line is set to Off, the tone controls are out of the circuit, with no changes to the sound.
When this line is set to On, the bass and treble frequencies are boosted or cut, depending
upon the Bass and Treble settings (see below).
Bass and Treble: Boost or cut the low or high frequencies by up to 10dB by using the
Left/Right buttons to change the setting by 2dB at a time.
When you’re finished, press the remote’s OSD button to turn off the on-screen menu.
ENGLISH
5.For each source device you connected to a digital audio input:
If there is no picture:
•• Check the source selection.
•• Check the video-input selection on the TV/display device.
Additional Tips for Troubleshooting HDMI Connections
•• Unplug the HDMI cables, starting with the cable between the AVR and the TV, and
continuing with the cables between the AVR and each source device.
•• Carefully reconnect the cables from the source devices to the AVR. Connect the
cable from the AVR to the TV last.
•• Turn on the devices in this order: TV, AVR, source devices.
NOTE: Depending upon the particular components involved, the complexity of
the required communication between HDMI components may cause delays of
up to a minute in the completion of some actions, such as input switching or
switching between SD and HD channels.
19
0292CSK - HK (x65Series) AVR156-230 OM [HKP1991], WORK05.indd 19
30/06/11 12:42:11
Operating Your AVR, continued,
and Advanced Functions
AVR 156
Listening to FM and AM Radio
Select the AM/FM source. Use the Tuning Up/Down buttons to tune a station, which will
be shown on the front-panel display and the TV screen.
The AVR defaults to automatic tuning, meaning each press of the Tuning Up/Down
buttons scans until a station with acceptable signal strength is found. To switch to
manual tuning, in which each press of a Tuning button steps through a single frequency
increment, press the Tuning Mode button. Each press of the Tuning Mode button toggles
between the automatic and manual tuning modes.
Once you have tuned an FM station, toggling the Tuning Mode setting also switches the
radio between stereo and monaural reception. (Mono reception may improve reception
of weaker stations.)
Movie: Select from the following when you want a surround mode for movie playback:
Logic 7 Movie or Dolby Pro Logic II Movie.
Music: Select from the following when you want a surround mode for music playback:
Logic 7 Music or Dolby Pro Logic II Music. The Dolby Pro Logic II Music mode provides
some additional settings. See Audio Processing and Surround Sound, on this page, for
more information.
Video Game: Select from the following when you want a surround mode for game
playback: Logic 7 Game or Dolby Pro Logic II Game.
After you select the surround-mode category, the Mode menu will appear:
* MODE : MUSIC *
Preset Stations
DOLBY PLII MUSIC
A total of 30 stations (AM and FM combined) may be stored as presets. When the desired
station has been tuned in, press the Memory button on the remote, and two dashes will
flash on the front-panel Message display. Use the Number buttons to enter the desired
preset number.
CENTER WIDTH : 3
DIMENSION
:0
PANORAMA
: Off
To tune a preset station, press the Preset Up/Down buttons or enter the preset number
using the Number buttons.
Use the Left/Right buttons to change the surround mode.
Selecting a Surround Mode
1.Press the Surr Mode button. The Message display will show the surround-mode
category and surround mode.
Selecting a surround mode can be as simple or sophisticated as your individual system
and tastes. Feel free to experiment, and you may find a few favourites for certain sources
or program types. You can find more detailed information on surround modes in Audio
Processing and Surround Sound, on this page.
To select a surround mode, press the OSD Button on the remote to display the Master
menu:
**
MASTER MENU
**
INPUT SETUP
SURROUND MODE
MANUAL SETUP
SYSTEM SETUP
Use the Up/Down and OK buttons to select Surround Mode. The Surround Mode menu
will appear:
* MODE : MUSIC *
BACK TO MASTER MENU
You can also select surround modes using the AVR’s front-panel buttons:
2.To change the surround mode within the surround-mode category, press the Surround
Select Up/Down buttons. Each press will change to the next surround mode.
3.To change the surround-mode category, press the Surr Mode button. Each press will
change to the next surround-mode category.
Advanced Functions
Much of the adjusting and configuration your AVR requires is handled automatically, with
little intervention required on your part. You can also customise your AVR to suit your
system and your tastes. In this section, we will describe some of the more advanced
adjustments available to you.
Audio Processing and Surround Sound
DOLBY PLII MUSIC
Audio signals can be encoded in a variety of formats that can affect not only the quality
of the sound but also the number of speaker channels and the surround mode. You may
also manually select a different surround mode, when available.
CENTER WIDTH : 3
DIMENSION
:0
PANORAMA
: Off
Analogue Audio Signals
BACK TO MASTER MENU
Use the Up/Down and OK buttons to select the desired surround-mode category.
Auto Select: For a digital program, such as a movie recorded with a Dolby Digital or DTS
soundtrack, the AVR will automatically use the soundtrack’s native surround format. For
2-channel analogue and PCM programs, the AVR uses the Logic 7 Movie, Logic 7 Music
or Logic 7 Game mode, depending on the source.
Virtual Surround: When only two main speakers are present in the system, you can
use HARMAN virtual surround to create an enhanced sound field that virtualises the
missing speakers.
Stereo: When you want 2-channel playback, select the number of speakers you want
to use for playback:
•• “2 CH Stereo” uses two speakers.
•• “5 CH Stereo” plays the left-channel signal through the front left and surround left
speakers, the right-channel signal through the front right and surround right speakers,
and a summed mono signal through the centre speaker.
Analogue audio signals usually consist of two channels – left and right. Your AVR offers
two options for analogue playback:
DSP Surround Off Mode: The DSP Surround Off mode digitises the incoming signal and
applies the bass-management settings, including speaker configuration, delay times
and output levels. Select this mode when your front speakers are small, limited-range
satellites and you are using a subwoofer. To select this mode, use a digital audio input or
turn the Tone Control setting off, then select 2 CH Stereo mode.
Analogue Surround Modes: Your AVR is able to process 2-channel audio signals to
produce multichannel surround sound, even when no surround sound has been encoded
in the recording. Among the available modes are the Dolby Pro Logic II, HARMAN virtual
speaker, Logic 7 and 5 CH Stereo modes. To select one of these modes, see Selecting a
Surround Mode, on this page.
Digital Audio Signals
Digital audio signals offer greater flexibility and capacity than analogue signals and
allow the encoding of discrete channel information directly into the signal. The result is
improved sound quality and startling directionality, since each channel’s information is
transmitted discretely. High-resolution recordings sound extraordinarily distortion-free,
especially in the high frequencies.
20
0292CSK - HK (x65Series) AVR156-230 OM [HKP1991], WORK05.indd 20
30/06/11 12:42:12
AVR 156
Advanced Functions, continued
Each surround-mode category is set to a default surround mode:
Surround-mode selection depends upon the format of the incoming audio signal as well
as your personal taste. Although there is never a time when all of the AVR’s surround
modes are available, there is usually a wide variety of modes available for a given
input. Table A9 in the Appendix, on page 30, offers a brief description of each mode and
indicates the types of incoming signals or digital bitstreams the mode may be used with.
Additional information about the Dolby and DTS modes is available on the companies’
Web sites: www.dolby.com and www.dtsonline.com.
•• Virtual Surround: HARMAN virtual speaker.
When in doubt, check the jacket of your disc for more information on which surround
modes are available. Usually, nonessential sections of the disc, such as trailers, extra
materials or the disc menu, are available only in Dolby Digital 2.0 (2-channel) or PCM
2-channel mode. If the main title is playing and the display shows one of these surround
modes, look for an audio or language setup section in the disc’s menu. Also, make sure
your disc player’s audio output is set to the original bitstream rather than 2-channel
PCM. Stop play and check the player’s output setting.
You may select a different mode for each category. Below is a complete list of available
surround modes. (The actual surround modes available will depend on the number of
speakers in your system.)
The channels included in a typical 5.1-channel recording are front left, front right, centre,
surround left, surround right and LFE (low-frequency effects). The LFE channel is denoted
as “.1” to represent the fact that it is limited to the low frequencies.
Digital formats include Dolby Digital 2.0 (two channels only), Dolby Digital 5.1, Dolby
Digital EX (6.1), Dolby Digital Plus (7.1), Dolby TrueHD (7.1), DTS-HD High-Resolution
Audio (7.1), DTS-HD Master Audio (7.1), DTS 5.1, DTS 96/24 (5.1), 2-channel PCM
modes in 32kHz, 44.1kHz, 48kHz or 96kHz, and 5.1 or 7.1 multichannel PCM. (Your
AVR will downmix the discrete surround back-channel information in 6.1-channel and
7.1-channel recordings into your system’s surround left and surround right channels.)
When the AVR receives a digital bitstream, it detects the encoding method and the
number of channels, which is displayed briefly as three numbers, separated by slashes
(e.g., “3/2/.1”).
The first number indicates the number of front channels in the signal: “1” represents
a monophonic recording (usually an older program that has been digitally remastered
or, more rarely, a modern program for which the director has chosen mono as a special
effect). “2” indicates the presence of the left and right channels but no centre channel.
“3” indicates that all three front channels (left, right and centre) are present.
The second number indicates whether any surround channels are present: “0” indicates
that no surround information is present. “1” indicates that a matrixed surround signal
is present. “2” indicates discrete surround left and right channels. (Bitstreams with
discrete surround back left and right channel signals will be indicated by a “4,” although
the AVR downmixes the surround back-channel information into the surround left and
right channels.)
The third number is used for the LFE channel: “0” indicates no LFE channel. “.1”
indicates that an LFE channel is present.
Dolby Digital 2.0 signals may include a Dolby Surround flag indicating DS-ON or DS-OFF,
depending on whether the 2-channel bitstream contains only stereo information or a
downmix of a multichannel program that can be decoded by the AVR’s Dolby Pro Logic
decoder. By default, these signals are played in Dolby Pro Logic II Movie mode.
When a PCM signal is received, the PCM message and the sampling rate (32kHz,
44.1kHz, 48kHz or 96kHz) will appear.
ENGLISH
Surround Modes
•• Stereo: 5-CH Stereo.
•• Movie: Logic 7 Movie.
•• Music: Logic 7 Music.
•• Video Game: Logic 7 Game.
•• Virtual Surround: HARMAN virtual speaker.
•• Stereo: 2-CH Stereo or 5-CH Stereo.
•• Movie: Logic 7 Movie, Dolby Pro Logic II Movie.
•• Music: Logic 7 Music, Dolby Pro Logic II Music.
•• Video Game: Logic 7 Game, Dolby Pro Logic II Game.
Once you have programmed the surround mode for each type of audio, select the line
from the Surround Modes menu to override the AVR’s automatic surround-mode selection.
The AVR will use the same surround mode the next time the source is selected.
Please refer to Table A9 in the Appendix for more information on which surround modes
are available with different bitstreams.
Dolby Pro Logic® II Music Mode Adjustments
When you select Dolby Pro Logic II as the music surround mode, additional adjustments
become available:
* MODE : MUSIC *
DOLBY PLII MUSIC
CENTER WIDTH : 3
DIMENSION
:0
PANORAMA
: Off
BACK TO MASTER MENU
Center Width: This setting affects how vocals sound through the three front speakers.
A lower number focuses the vocal information tightly on the centre channel. Higher
numbers (up to 7) broaden the vocal soundstage. Use the Left/Right buttons to adjust
this setting.
Dimension: This setting affects the depth of the surround presentation, allowing you to
“move” the sound toward the front or rear of the room. The setting of “0” is a neutral
default. Setting “F-3” moves the sound toward the front of the room, while setting “R-3”
moves the sound toward the rear. Use the Left/Right buttons to adjust it.
Panorama: With the Panorama mode turned on, some of the sound from the front
speakers is moved to the surround speakers, creating an enveloping “wraparound”
effect. Each press of the OK button toggles the setting On or Off.
When only two channels – left and right – are present, the analogue surround modes
may be used to decode the signal into multiple channels. If you would prefer a different
surround format than the native signal’s digital encoding, press the Surround Modes
button to display the Surround Modes menu (see Selecting a Surround Mode, on page
20).
The Auto Select option sets the surround mode to the native signal’s digital encoding,
e.g., Dolby Digital, DTS, Dolby TrueHD or DTS-HD Master Audio. For analogue 2-channel
materials, the AVR defaults to the Logic 7 Movie mode. For Dolby Digital 2.0 programs,
the AVR defaults to the Dolby Pro Logic II Movie mode, which creates a 5.1-channel
surround-sound presentation from the 2-channel program. If you prefer a different
surround mode, select the surround-mode category: Virtual Surround, Stereo, Movie,
Music or Video Game. Press the OK button to change the mode.
21
0292CSK - HK (x65Series) AVR156-230 OM [HKP1991], WORK05.indd 21
30/06/11 12:42:12
AVR 156
System Setup
The AVR’s System Setup menu lets you customise in what way many of the AVR’s
features operate. Press the OSD button and navigate to the System Setup line. Press the
OK button to display the System Setup menu.
VFD Fade Time Out: Some people find the brightness of the AVR’s front-panel display
distracting during movies or listening sessions. It’s possible to dim the front-panel
display completely using the remote’s Display Dimmer button (see System Remote
Control Functions, on pages 8 and 9). The VFD Fade Time Out sets the display to remain
dark most of the time, lighting up only when a button is pressed or a remote command
is received, and going dark again five seconds after the last command. The feature also
causes the display to light up only when a button is pressed but the display immediately
begins to fade to dark. This setting allows you to program the length of the fade time.
Select a time-out period of between three and ten seconds, or select Off if you prefer to
leave the displays on at all times or to use the Display Dimmer button.
Advanced Functions, continued
You may reassign the transport-control punch-through programming for the AVR, VID2
and VID3 devices to another device, such as a CD player. If you wish to remove transportcontrol punch-through altogether for the AVR, VID2 or VID3 device, follow the same
procedure as for programming punch-through, but in Step 3 press either of the other
two of these three special selector buttons. For example, to remove transport-control
punch-through from the VID3 device so that pressing any of the transport controls will
have no effect, press and hold the VID3 Button until the Program Indicator LED flashes,
then press the Play Button, followed by either the AVR or VID2 Button.
Programming Macro Commands
Each of the AVR remote’s four Macro buttons and the Power On button (see System
Remote Control Functions, on pages 8 and 9) can be programmed to send out up to
19 commands at one time from a single button push. Any AVR remote control button’s
function from any mode (except the Mute button, the Dim button and the Channel Up/
Down buttons) can be programmed into a macro.
Volume Default and Default Volume Set: These two settings are used together to
program the volume level when you turn on the AVR. Set Volume Default to On, and then
set the Default Volume Set to the desired turn-on volume. When Volume Default is set
to Off, the AVR will turn on at the last-used volume setting from the previous listening
session.
NOTE: Use caution when programming complicated macros. It isn’t possible to program
a pause or delay before sending additional commands after a “Power On” command,
and the component may not be ready to respond to commands immediately after
powering on.
HDMI Audio To TV: This setting determines whether HDMI audio signals are passed
through the HDMI Monitor Out connector to the video display. In normal operation, leave
this setting at Off, as audio will be played through the AVR. To use the TV by itself, without
the home theatre system, turn this setting to On. In this case, you will need to mute the
TV’s speakers (or switch the setting to Off) when using the AVR for audio.
1.Simultaneously press one of the four Macro buttons, or the Power On button, and the
Mute button to enter the Programming mode.
Semi OSD Time Out: Program the amount of time (2 to 5 seconds) the two-line semiOSD status messages remain on screen, or deactivate the semi-OSD display altogether
if you find it distracting. These messages will continue to appear on the front panel of
the AVR.
Full OSD Time Out: Program the amount of time (20, 30, 40 or 50 seconds) the full OSD
menus remain visible on screen. The full OSD system may not be deactivated. NOTE: It
isn’t possible to view video sources while the full OSD menus are displayed.
HDMI Link: This setting allows the communication of control information among the
HDMI devices in your system. Turn this setting to On to allow control communication
among the HDMI devices; turn the setting to Off to forbid control communication.
Advanced Remote Control Programming
Remote Channel-Control Punch-Through
The punch-through feature allows you to operate one component while setting certain
groups of controls to operate another component. For example, while using the AVR
controls for surround modes and other audio functions, you may also use the remote
to operate the transport controls of your Blu-ray Disc player. Or while using the remote
to control video functions on your TV, you may also use the remote to change channels
on your cable box.
To program punch-through control while operating any device:
1.For three seconds, press and hold the Source Selector button (or the AVR button) for
the main device the remote will be operating. The Program Indicator LED will flash,
indicating that the remote is in Program mode and that you may release the button.
2.Select the type of punch-through programming.
To program a macro:
2.Press in up to 19 commands that you want stored in that Macro button. Press the
Source Selector button for each device (or AVR button for the AVR itself) before you
enter individual commands. This step counts as one of the 19 commands allowed for
each Macro.
3.For the Power On command, DO NOT press the Power On button. Press the Mute
button instead.
4.Press the Power Off button to program the Power Off command.
5.Press the Sleep button to end the programming process.
It isn’t possible to “edit” a command within a macro. However, you may erase the macro
as follows:
1.Simultaneously press and hold the Mute button and the Macro button containing the
macro until the Program Indicator LED flashes.
2.Press the Channel Down button to erase the macro.
To execute a macro, press the Macro button (or the Power On button) into which you
programmed the macro.
Recording
Two-channel analogue audio signals, as well as composite video signals, are normally
available at the appropriate recording output connectors. To make a recording, connect
your audio or video recorder to the appropriate AVR output connectors as described in
the Making Connections section, insert blank media in the recorder and make sure the
recorder is turned on and recording while the source is playing. Refer to the recording
device’s instructions for complete information about making recordings.
NOTES:
1.The AVR does not convert digital signals to analogue signals.
a)To program volume-control punch-through, press the Volume Up button.
2.HDMI and component video sources are not available for recording.
b)To program channel-control punch-through, press the Volume Down button.
3.Please make certain that you are aware of any copyright restrictions on any material
you record. Unauthorised duplication of copyrighted materials is prohibited by law.
c) To program transport-control punch-through, press the Play transport-control
button.
3.Press the Source Selector button for the device whose volume, channel or transportcontrols you will use while operating the device selected in the first step. The Program
Indicator LED will flash to confirm.
To undo punch-through programming, follow the same steps as above, but press the
same Source Selector button in Steps 1 and 3.
22
0292CSK - HK (x65Series) AVR156-230 OM [HKP1991], WORK05.indd 22
30/06/11 12:42:12
AVR 156
Advanced Functions, continued
Sleep Timer
ENGLISH
The sleep timer sets the AVR to play for up to 90 minutes and then turn off
automatically.
Press the Sleep button on the remote, and the time until turn-off will be displayed on the
front-panel Message display and on a connected TV. Each additional press of the Sleep
button decreases the play time by 10 minutes, with a maximum of 90 minutes. The
SLEEP OFF setting disables the sleep timer.
When the sleep timer has been set, the front-panel display will automatically dim to
half brightness.
If you press the Sleep button after the timer has been set, the remaining play time will
be displayed. Press the Sleep button again to change the play time.
Resetting the Remote
To reset the remote to its factory-default condition, simultaneously press and hold any
Source Selector button and the “0” Number button. When the Program Indicator LED
flashes amber, enter the code “333.” When the green LED goes out, the remote control
will be reset.
Processor Reset
If the AVR behaves erratically after a power surge, first turn off the rear-panel Main
Power switch and unplug the AC power cord for at least 3 minutes. Plug the cord back
in and turn the AVR on. If this procedure doesn’t help, reset the AVR’s processor as
described below.
NOTE: A processor reset erases all user configurations, including video resolution,
speaker and level settings, and tuner presets. After a reset, reenter all of these settings
from your notes in the Appendix worksheets.
To reset the AVR’s processor:
1.Press the front-panel Standby/On switch to place the unit in the Standby mode (the
Power Indicator LED will turn amber).
2.Press and hold the front-panel Surround Mode button for at least 5 seconds until the
RESET message appears on the front-panel Message display.
If the AVR does not function correctly after a processor reset, contact an authorised
Harman Kardon service centre for assistance. Authorised service centres may be located
by visiting our Web site at www.harmankardon.com.
Memory
If the AVR is unplugged or experiences a power outage, it will retain your user settings
for up to four weeks.
23
0292CSK - HK (x65Series) AVR156-230 OM [HKP1991], WORK05.indd 23
30/06/11 12:42:12
AVR 156
Troubleshooting
Troubleshooting
Symptom
Cause
Solution
Unit does not function when Main Power switch is
turned on
••No AC power
••Ensure that the power cord is plugged into a live AC
power outlet
Front-panel Message display lights, but there's no
sound or picture
••Intermittent input connection
••Secure all input and speaker connections
••Mute is on
••Press Mute button
••Volume control is turned down
••Turn up Volume control
••Amplifier is in protection mode due to possible short
circuit
••Check all speaker wires at speaker and AVR
connections for crossed wires
••Amplifier is in protection mode due to internal problems
••Contact your local Harman Kardon service centre
••Incorrect surround mode
••Select a surround mode other than stereo
••Program material is monophonic
••Mono programs contain no surround information
••Incorrect speaker configuration
••Check the speaker configuration in the setup menu
••Program material is stereo
••The surround decoder may not create centre- or
surround-channel information from nonencoded stereo
programs
••Weak batteries in remote
••Change batteries in remote
••AVR not selected
••Press the Setup/AVR button
••Remote sensor is obscured
••Ensure that the AVR’s front-panel remote sensor is in
the line of sight of the remote
Intermittent buzzing in tuner
••Local interference
••Move the AVR or aerial away from computers,
fluorescent lights, motors or other electrical appliances
Unable to activate remote control Programming mode
••Source Selector button is not held for at least 3 seconds
••Be sure to hold the Source Selector button for at least
3 seconds
••Check if the AC outlet is switch-controlled
No sound from any speaker; PROTECT message
appears on Message display
No sound from centre or surround speakers
Unit does not respond to remote control commands
Additional information on troubleshooting possible problems with your AVR and installation-related issues may be found in the list of “Frequently Asked Questions,” which is located in the Product
Support section of our Web site: www.harmankardon.com
24
0292CSK - HK (x65Series) AVR156-230 OM [HKP1991], WORK05.indd 24
30/06/11 12:42:13
AVR 156
Specifications
Audio Section
Stereo power:
Multichannel power:
ENGLISH
Specifications
Video Section
70W per channel,
two channels driven @ 8 ohms,
1kHz, <0.9% THD
Television format:
PAL
Input level/impedance:
1Vp-p/75 ohms
70W per channel,
two channels driven @ 8 ohms,
1kHz, <0.9% THD
Output level/impedance:
1Vp-p/75 ohms
Video frequency response (composite video):
10Hz – 8MHz (–3dB)
HDMI:
Version 1.4a with 12-bit
Deep Colour
Input sensitivity/impedance:
200mV/47k ohms
Signal-to-noise ratio (IHF-A):
100dB
Surround system adjacent-channel separation:
Dolby Pro Logic/PLII: 40dB
Dolby Digital: 55dB
DTS: 55dB
General Specifications
Frequency response (@1W):
10Hz – 130kHz (+0dB/–3dB)
Power requirement:
220V – 240V AC/50Hz – 60Hz
High instantaneous-current capability (HCC):
±25 amps
Power consumption:
Transient intermodulation distortion (TIM):
Unmeasurable
<0.5W (standby);
280W maximum
Slew rate:
40V/μsec
Dimensions (W x H x D)
440mm x 165mm x 435mm
(17-5/16" x 6-1/2" x 17-1/8")
Weight
9.1kg (20 lb)
FM Tuner Section
Frequency range:
87.5 – 108.0MHz
Usable sensitivity IHF:
1.3μV/13.2dBf
Signal-to-noise ratio (mono/stereo):
70dB/68dB
Distortion (mono/stereo):
0.2%/0.3%
Stereo separation:
40dB @ 1kHz
Selectivity (±400kHz):
70dB
Image rejection:
80dB
IF rejection:
90dB
AM Tuner Section
Frequency range:
520 – 1720kHz
Signal-to-noise ratio:
45dB
Usable sensitivity (loop):
500μV
Distortion (1kHz, 50% mod):
0.8%
Selectivity (±10kHz):
30dB
25
0292CSK - HK (x65Series) AVR156-230 OM [HKP1991], WORK05.indd 25
30/06/11 12:42:13
AVR 156
Appendix
Appendix – Default settings, worksheets, remote product codes
Table A1 – Recommended Source Component Connections
Device Type
AVR Source
Audio Connections
Video Connections
Cable TV, Satellite, HDTV or other device that
delivers television programs
Video 1
••Video 1 Analogue inputs
Composite Video 1 Input
VCR, DVR, PVR, or other audio/video recorder
Video 2
••Optical 1 Input (if not in use with HDMI 3
••Video 2 Analogue (inputs and outputs)
••Composite Video 2 Input
••Any one available coaxial or optical digital audio
input with corresponding coax digital output
••For recording, use Composite Video 2 Output
DVD or HDMI (for
Blu-ray Disc)
••DVD Analogue Inputs
••DVD Component Video Input
HDMI-capable disc player, game console or
other audio/video device
HDMI 1
••HDMI 1 Input
••HDMI 1 Input
HDMI-capable disc player, game console or
other audio/video device
HDMI 2
••HDMI 2 Input
••HDMI 2 Input
HDMI-capable disc player, game console or
other audio/video device
HDMI 3
••HDMI 3 Input
••HDMI 3 Input
Portable audio device
AUX 1 or AUX 2
••AUX inputs on front and rear panels
••Not required
CD player
CD
••CD Analogue Inputs
••Not required
DVD player, Blu-ray Disc player
••Coax 1 Input
••Any one available coaxial or optical digital audio
input
CD-R, MiniDisc, cassette
Tape
••Not required
••Tape Analogue (inputs and outputs)
••Any one available coaxial or optical digital audio
input
••Use corresponding optical digital output
Note: The AVR is equipped with a total of three digital audio inputs. Certain digital audio connections are recommended simply because those digital audio inputs are assigned to those sources by
default at the factory. But any digital audio input may be reassigned to any source. Since you may not be using all of the AVR's sources, you may reassign a digital audio input that is recommended
for a source you aren’t using to another device. Table A1 is a guideline; you may need to make adjustments to fit your system.
Table A2 – Source Setting Defaults
Source
DVD
HDMI 1
HDMI 2
HDMI 3
Video 1
Video 2
Aux 1
Aux 2
CD
Tape
Title
Tuner
TV
TUNER
Audio Input
COAX 1
HDMI
HDMI
HDMI
Analogue OPTICAL 1
Analogue Analogue Analogue Analogue INT. TUNER Optical 1
Auto Poll
ON
OFF
OFF
OFF
OFF
ON
OFF
OFF
OFF
ON
––
OFF
Surround Mode
LOGIC 7
MOVIE
LOGIC 7
MOVIE
LOGIC 7
MOVIE
LOGIC 7
MOVIE
LOGIC 7
MOVIE
LOGIC 7
MOVIE
LOGIC 7
MOVIE
LOGIC 7
MOVIE
LOGIC 7
MOVIE
LOGIC 7
MOVIE
LOGIC 7
MOVIE
LOGIC 7
MOVIE
26
0292CSK - HK (x65Series) AVR156-230 OM [HKP1991], WORK05.indd 26
30/06/11 12:42:13
AVR 156
Appendix
Source
All Sources
Left/Right Speaker
ON
Centre Speaker
ON
Surround Speaker
ON
Surround Back Speaker
ON
Subwoofer
ON
Left/Right Speaker Crossover
100Hz
Centre Speaker Crossover
100Hz
Surround Speaker Crossover
100Hz
Surround Back Speaker Crossover
100Hz
LFE
PRESENT
Sub Mode
SUB
ENGLISH
Table A3 – Speaker/Channel Setting Defaults
Table A4 – Distance Settings
Speaker Positions
Your Distances From Speaker to Listening Position
Front Left
Centre
Front Right
Surround Right
Surround Left
Subwoofer
A/V Sync Delay
0mS
27
0292CSK - HK (x65Series) AVR156-230 OM [HKP1991], WORK05.indd 27
30/06/11 12:42:13
AVR 156
Appendix
Table A5 – Source Settings
Source
DVD
HDMI 1
HDMI 2
HDMI 3
Video 1
Video 2
Aux 1
Aux 2
CD
Tape
Title
Tuner
INT. TUNER
Video Input
Component
Video Input
N/A
N/A
N/A
N/A
N/A
Digital Audio Input
Analogue Audio Input DVD
Video 1
Video 2
Auto Poll
N/A
N/A
N/A
N/A
AUX
(frontpanel)
AUX
(REARpanel)
N/A
N/A
N/A
N/A
N/A
N/A
CD
TAPE
TUNER
N/A
Table A6 – Speaker/Channel Settings
Front Left
Number of Speakers
Front Right
Centre
Surround Left
Surround Right
Subwoofer
ON
Crossover
Distance
Channel Level Adjust
28
0292CSK - HK (x65Series) AVR156-230 OM [HKP1991], WORK05.indd 28
30/06/11 12:42:13
AVR 156
Appendix
Source Input
Product Type (circle one)
Video 1
VCR, PVR, DMC
Video 2
Cable, Satellite
HDMI 1
DVD, Blu-ray Disc player, VCR/PVR/DMC, Cable/Satellite
HDMI 2
DVD, Blu-ray Disc player, VCR/PVR/DMC, Cable/Satellite
HDMI 3
DVD, Blu-ray Disc player, VCR/PVR/DMC, Cable/Satellite
DVD
DVD, Blu-ray Disc player, VCR/PVR/DMC, Cable/Satellite
CD
CD, CD-R
Tape
Cassette, CD-R
ENGLISH
Table A7 – Remote Control Codes
Remote Control Code
Table A8 – System Settings
Feature
Default Setting
VFD Fade Time-Out
OFF
Volume Default
OFF
Default Vol Set
–25dB
HDMI Audio to TV
OFF
Semi-OSD Time-Out
5 Seconds
Full-OSD Time-Out
20 Seconds
HDMI Link
OFF
Your Setting
29
0292CSK - HK (x65Series) AVR156-230 OM [HKP1991], WORK05.indd 29
30/06/11 12:42:13
AVR 156
Appendix
Table A9 – Surround Modes
Surround Mode
Description
Incoming Bitstream or Signal
Dolby Digital
Provides up to five separate main audio channels and a dedicated low-frequency
effects (LFE) channel.
••Dolby Digital 1/0/.0 or .1, 2/0/.0 or .1, 3/0/.0 or .1,
2/1/.0 or .1, 2/2/.0 or .1, 3/2/.0 or .1
••Dolby Digital EX (played as 5.1)
••Dolby Digital Plus decoded and delivered via coaxial or optical
connection
Dolby Digital Plus
An enhanced version of Dolby Digital encoded more efficiently, Dolby Digital Plus
has the capacity for additional discrete channels and for streaming audio from the
Internet, all with enhanced audio quality. Source material may be delivered via an
HDMI connection or decoded to Dolby Digital or PCM and transmitted via coaxial or
optical digital audio.
••Dolby Digital Plus via HDMI connection (source device decodes to
Dolby Digital when a coaxial or optical connection is used)
Dolby TrueHD
Dolby TrueHD is an expansion of MLP Lossless™ audio, the same format used on
DVD-Audio discs. Dolby TrueHD adds the features found in Dolby Digital, such as
night mode settings, while delivering fully lossless audio that is a true reproduction
of studio master recordings.
••Blu-ray Disc or HD-DVD encoded with Dolby TrueHD, delivered
via HDMI
Dolby Digital Stereo
Delivers a 2-channel downmix of Dolby Digital materials.
••Dolby Digital 1/0/.0 or .1, 2/0/.0 or .1, 3/0/.0 or .1,
2/1/.0 or .1, 2/2/.0 or .1, 3/2/.0 or .1
••Dolby Digital EX
Dolby Pro Logic II
Mode Group
Analogue decoder that derives five full-range, discrete main audio channels
from matrix surround-encoded or 2-channel analogue sources. Four variants are
available.
See below
Dolby Pro Logic II
Movie
Variant of Dolby Pro Logic II that is optimised for movie and television programs.
••Dolby Digital 2.0 or 2.1
••Analogue (two-channel)
••Tuner
••PCM (32kHz, 44.1kHz, 48kHz, 96kHz)
Dolby Pro Logic II
Music
Dolby Pro Logic II
Game
Variant of Dolby Pro Logic II that is optimised for music selections. Allows
adjustment of sound-field presentation in three dimensions:
• Centre Width (adjusts width of vocal soundstage)
• Dimension (adjusts depth of soundstage)
• Panorama (adjusts wraparound surround effect)
Variant of Dolby Pro Logic II that emphasises use of the surround channels and
subwoofer for total immersion in the video gaming experience.
••Dolby Digital 2.0 or 2.1
••Analogue (two-channel)
••Tuner
••PCM (32kHz, 44.1kHz, 48kHz, 96kHz)
••Dolby Digital 2.0 or 2.1
••Analogue (two-channel)
••Tuner
••PCM (32kHz, 44.1kHz, 48kHz, 96kHz)
Dolby Pro Logic
Original version of Dolby Pro Logic that steered a mono signal containing
information below 7kHz to the surround channels.
••Dolby Digital 2.0 or 2.1
••Analogue (two-channel)
••Tuner
••PCM (32kHz, 44.1kHz, 48kHz, 96kHz)
Harman Virtual Speaker
Simulates 5.1 channels when only two speakers are present or a more enveloping
sound field is desired.
••Dolby Digital
••Analogue (two-channel)
••Tuner
••PCM (32kHz, 44.1kHz or 48kHz)
30
0292CSK - HK (x65Series) AVR156-230 OM [HKP1991], WORK05.indd 30
30/06/11 12:42:13
AVR 156
Appendix
ENGLISH
Table A9 – Surround Modes (cont.)
Surround Mode
Description
Incoming Bitstream or Signal
DTS Digital
Using a different encoding/decoding method from Dolby Digital, DTS Digital
also provides up to five discrete main channels, plus an LFE channel.
••DTS 1/0/.0 or .1, 2/0/.0 or .1, 3/0/.0 or .1, 3/1/.0 or .1, 2/2/.0 or
.1, 3/2/.0 or .1
••DTS-ES Matrix (played as 5.1)
••DTS-ES Discrete (played as 5.1)
DTS-HD
DTS-HD is a high-definition audio format that complements the high-definition video
found on Blu-ray Disc and HD-DVD discs. It is transmitted using a DTS core with
high-resolution extensions. Even when only DTS 5.1 surround sound is desired (or
available, if the multizone system is in use), the higher capacity of high-resolution
discs serves up DTS at twice the bit rate used on DVD-Video discs.
••Blu-ray Disc or HD-DVD discs encoded with DTS-HD modes,
delivered via HDMI connection
DTS-HD Master Audio
DTS-HD Master Audio technology delivers bit-for-bit reproductions of studio master
recordings for an incredibly accurate performance.
••Blu-ray Disc or HD-DVD discs encoded with DTS-HD Master
Audio technology, delivered via HDMI connection
DTS Stereo
Delivers a 2-channel downmix of DTS Digital materials or presents a matrixencoded surround presentation.
••DTS 1/0/.0 or .1, 2/0/.0 or .1, 3/0/.0 or .1, 3/1/.0 or .1, 2/2/.0 or
.1, 3/2/.0 or .1
••DTS 96/24
••DTS-ES Matrix
Logic 7
Mode Group
A HARMAN proprietary technology, Logic 7 technology enhances two-channel
and matrix-encoded recordings by deriving separate information for the surround
back channels. It provides more accurate placement of sound, improves panning
and expands the sound field, even when used with 5.1-channel systems. Logic 7
technology uses 96kHz processing and is available in 5.1 mode. Three variants are
available.
See below
Logic 7
Movie
Especially suited to two-channel sources containing Dolby Surround or matrix
encoding, Logic 7 Movie mode increases centre-channel intelligibility.
••Analogue (two-channel)
••Tuner
••PCM (32kHz, 44.1kHz, 48kHz, 96kHz)
Logic 7
Music
Logic 7
Game
The AVR is programmed at the factory to default to this mode for twochannel signals. Logic 7 Music mode is well suited to conventional twochannel music recordings.
••Analogue (two-channel)
Use Logic 7 Game mode to enhance enjoyment of video-game consoles.
••Analogue (two-channel)
••Tuner
••PCM (32kHz, 44.1kHz, 48kHz, 96kHz)
••Tuner
••PCM (32kHz, 44.1kHz, 48kHz, 96kHz)
5-Channel Stereo
2-Channel Stereo
Useful for parties, the left- and right-channel information is played through both
the front and surround speakers on each side, while the centre speaker plays a
summed mono mix.
••Analogue (two-channel)
Turns off all surround processing and plays a pure 2-channel signal or a downmix
of a multichannel signal. The signal is digitised and bass management settings are
applied, making it appropriate when a subwoofer is used.
••Analogue (two-channel; DSP downmix available for multichannel)
••Tuner
••PCM (32kHz, 44.1kHz, 48kHz, 96kHz)
••Tuner
••PCM (32kHz, 44.1kHz, 48kHz, 96kHz)
31
0292CSK - HK (x65Series) AVR156-230 OM [HKP1991], WORK05.indd 31
30/06/11 12:42:14
AVR 156
Appendix
Refer to the numbered buttons when using the Remote Control Function List
32
0292CSK - HK (x65Series) AVR156-230 OM [HKP1991], WORK05.indd 32
30/06/11 12:42:14
AVR 156
Appendix
No. Button Name
AVR Function
DVD
CD/CD-R
Tape
VCR (VID1)
TiVo® (VID1)
DMC (VID 1/
HDMI 1/2/3)
CBL (VID2)
SAT (VID2)
HDMI
1/2/3
01
Power On
Power On
Power On
Power On
Power On
Power On/Off
Power On
Power On
Power On
Power On
02
Power Off
Power Off
Power Off
Power Off
Power Off
TV Power
Power Off
Power Off
Power Off
Power Off
03
Mute
Mute
Mute
Mute
Mute
Mute
Mute
Mute
Mute
Mute
Mute
04
AVR
AVR Select
AVR Select
AVR Select
AVR Select
AVR Select
AVR Select
AVR Select
AVR Select
AVR Select
AVR Select
05
DVD
DVD Select
DVD Select
DVD Select
DVD Select
DVD Select
DVD Select
DVD Select
DVD Select
DVD Select
DVD Select
06
VID 1 (VCR)
Video 1 Select
VCR Select
VCR Select
VCR Select
VCR Select
VCR Select
VCR Select
VCR Select
VCR Select
VCR Select
07
HDMI 1
HDMI 1 Select
HDMI 1 Select
HDMI 1 Select
HDMI 1 Select
HDMI 1 Select
HDMI 1 Select
HDMI 1 Select
HDMI 1 Select
HDMI 1 Select
HDMI 1 Select
08
Tape
Tape Select
Tape Select
Tape Select
Tape Select
Tape Select
Tape Select
Tape Select
Tape Select
Tape Select
Tape Select
09
CD
CD Select
CD Select
CD Select
CD Select
CD Select
CD Select
CD Select
CD Select
CD Select
CD Select
10
VID 2 (CBL/SAT)
Video 2 Select
CBL/SAT Select
CBL/SAT Select
CBL/SAT Select
CBL/SAT Select
CBL/SAT Select
CBL/SAT Select
CBL Select
SAT Select
CBL/SAT Select
11
HDMI 2
HDMI 2 Select
HDMI 2 Select
HDMI 2 Select
HDMI 2 Select
HDMI 2 Select
HDMI 2 Select
HDMI 2 Select
HDMI 2 Select
HDMI 2 Select
HDMI 2 Select
12
AUX 1
Aux 1 Select
Aux 1 Select
Aux 1 Select
Aux 1 Select
Aux 1 Select
Aux 1 Select
Aux 1 Select
Aux 1 Select
Aux 1 Select
Aux 1 Select
13*
AUX 2
Aux 2 Select
Aux 2 Select
Aux 2 Select
Aux 2 Select
Aux 2 Select
Aux 2 Select
Aux 2 Select
Aux 2 Select
Aux 2 Select
Aux 2 Select
15*
HDMI 3
HDMI 3 Select
HDMI 3 Select
HDMI 3 Select
HDMI 3 Select
HDMI 3 Select
HDMI 3 Select
HDMI 3 Select
HDMI 3 Select
HDMI 3 Select
HDMI 3 Select
16
Sleep/CH+
Sleep
Audio
Channel +
Channel +
Audio
Channel +
Channel +
Channel +
17
Test Tone
Test Tone
18
AM/FM
Tuner Select
19
Vol Up
Volume Up
20
CH-
21
OSD
ENGLISH
Table A10 – Remote Control Function List
Find
Tuner Select
Tuner Select
Volume Up
Disc Menu or
Title
OSD
Tuner Select
Tuner Select
Tuner Select
Tuner Select
Tuner Select
Tuner Select
Tuner Select
Volume Up
Volume Up
Volume Up
Title
Volume Up
Volume Up
Volume Up
CD-R Select
Channel -
Channel -
Info
Channel -
Channel -
Channel -
Program
OSD
Live TV
OSD
OSD
OSD
TV/DVD or V.
OFF
Input Select
TV/VCR
TV Input
TV/CBL
TV/SAT
TV/Video
Volume Down
Volume Down
Volume Down
Volume Down
Volume Down
Volume Down
Volume Down
22
T/V
23
Vol Down
Volume Down
24
CH./Guide
Channel Trim
25
Speaker Menu
Speaker Adjust
Menu or Setup
26
Up
Move/Adjust Up
27
Left
28
Title or Disc Menu Continuous Play
Guide
Disc Menu
Info/Guide
Info/Guide
Guide
Menu
Menu
Setup
Menu
Menu
Menu
Up
Up
Up
Up
Up
Up
Up
Move/Adjust Left
Left
Left
Left
Left
Left
Left
Left
OK
OK
Enter
Enter
Select
Enter
Enter
Enter
Set/Enter
29
Right
Move/Adjust
Right
Right
Right
Right
Right
Right
Right
Right
30
Down
Move/Adjust Down
Down
Down
Down
Down
Down
Down
Down
31
Digital/Exit
Digital Input Select
Open/Close
Return/Exit
Open/Close
32
Delay/Prev. Ch.
Delay Adjust
Return or Status
Open/Close
Status
Prev Channel
Prev Channel
Prev Channel
33
1
1
1
1
1
1
1
1
1
1
34
2
2
2
2
2
2
2
2
2
2
35
3
3
3
3
3
3
3
3
3
3
36
4
4
4
4
4
4
4
4
4
4
Intro Scan
* NOTE: There is no button #14
33
0292CSK - HK (x65Series) AVR156-230 OM [HKP1991], WORK05.indd 33
30/06/11 12:42:14
AVR 156
Appendix
Table A10 – Remote Control Function List (cont.)
No. Button Name
AVR Function
DVD
CD/CD-R
Tape
VCR (VID1)
TiVo® (VID1)
DMC (VID 1/
HDMI 1/2/3)
CBL (VID2)
SAT (VID2)
HDMI
1/2/3
37
5
5
5
5
5
5
5
5
5
5
38
6
6
6
6
6
6
6
6
6
6
39
7
7
7
7
7
7
7
7
7
7
40
8
8
8
8
8
8
8
8
8
8
41
Tun-M
Tuner Mode
Chapter+ or Zoom
Repeat
42
9
9
9
9
9
9
9
9
9
9
43
0
0
0
0
0
0
0
0
0
0
PPV
Cancel
Angle
FAV
FAV
Clear
Bypass
Next
Music
Alt
Zoom
Source
(DMC250 only)
44
Memory
Memory
Audio or Playlist
Time
45
Tuning Up
Tuning Up
Next Chapter
Track Direct
46
Direct
Direct Tuner
Entry
Angle
Random Play
47
Clear
Clear
Clear
Clear
48
Preset Up
Preset Tune Up
Slow Forward
+10
49
Tuning Down
Tuning Down
Prev Chapter
Track Increment
50
Tone
Tone mode
51
RDS
RDS
Disc Skip
52
Preset Down
Preset Tune
Down
Slow Rev
53
M1
Macro 1
Macro 1
Macro 1
Macro 1
54
M2
Macro 2
Macro 2
Macro 2
55
M3
Macro 3
Macro 3
56
M4
Macro 4
57
Night
58
Cancel
Clear
Clear
Angle/FAV
V-off
Disc Skip
Skip
Play Mode
Macro 1
Macro 1
Macro 1
Macro 1
Macro 1
Macro 1
Macro 2
Macro 2
Macro 2
Macro 2
Macro 2
Macro 2
Macro 2
Macro 3
Macro 3
Macro 3
Macro 3
Macro 3
Macro 3
Macro 3
Macro 3
Macro 4
Macro 4
Macro 4
Macro 4
Macro 4
Macro 4
Macro 4
Macro 4
Macro 4
Night Mode Select
Subtitle On/Off
CDP Select
Skip Down
Skip – (DVD)
Step –
Skip –
Scan –
Thumbs Down
Skip –
Skip – (DVD)
Skip – (DVD)
59
Skip Up
Skip + (DVD)
Step +
Skip +
Scan +
Thumbs Up
Skip +
Skip + (DVD)
Skip + (DVD)
60
Dim
Dimmer
Dimmer
61
Rewind G
R. Search
(DVD)
R. Search
R. Search
Rewind
Rewind
R. Search
R. Search
R. Search
(DVD)
R. Search
(DVD)
R. Search
62
Play B
Play (DVD)
Play
Play
R. Play/F. Play
Play
Play
Play
Play (DVD)
Play (DVD)
Play
63
FF H
F. Search
(DVD)
F. Search
F. Search
Fast Fwd
Fast Fwd
F. Search
F. Search
F. Search
(DVD)
F. Search
(DVD)
F. Search
64
Record
Record
Record/Pause
Record
Record
Record
65
Stop
Stop (DVD)
Stop
Stop
Stop
Stop
Stop
Stop
Stop (DVD)
Stop (DVD)
Stop
66
Pause
Pause (DVD)
Pause
Pause
Pause
Pause
Pause
Pause (DVD)
Pause (DVD)
Pause
Subtitle
Dimmer
* NOTE: There is no button #14
Note: When any of the transport controls are pressed while the remote is in AVR or Video 2 mode, the remote will automatically switch to DVD mode, and the command will be applied
to the DVD player. If you then press a button native to the original mode, e.g., Volume Down for the AVR, the remote will revert to the original mode. See Remote-Channel Control
Punch-Through, on page 22, for more information.
34
0292CSK - HK (x65Series) AVR156-230 OM [HKP1991], WORK05.indd 34
30/06/11 12:42:15
AVR 156
Appendix
TV Manufacturer/Brand
Setup Code Number
TV Manufacturer/Brand
Setup Code Number
ADMIRAL
192
KTV
045 123 132 162
ANAM
045 106 109 112 122
LG/GOLDSTAR
002 013 101 110 122 128 132
AOC
037 122 123 128
LLOYTRON
172 173
AUDIOVOX
012
LODGENET
069
BLAUPUNKT
084
LXI
077 145 148
BROKSONIC
205 206
MAGNAVOX
030 040 123 128 132 145 148
CITIZEN
045 123 128 132
MARANTZ
115 123 148
CONTEC
045
MEMOREX
069 128
CRAIG
045 157 158 159
METZ
084
CROWN
045 132
MGA
115 123 128
CURTIS MATHES
123 128 132
MITSUBISHI
077 115 123 128 160 167 168
DAEWOO
045 087 102 105 106 108 111 114 116 119 127 128 132
MTC
175 176
DAYTRON
128 132
NATIONAL
148 177 179 180 181 182
DYNATECH
063
NEC
010 115 121 123 125
DYNEX
014
OLEVIA
007
ELECTROHOME
115 132
OPTONICA
007
EMERSON
045 123 128 132 139 157 158 159 162 205
ORION
207 208 209 210 211
FUNAI
045
PANASONIC
087 148 169
FUJITSU
041 042
PHILCO
045 115 123 128 132 148
FUTURETECH
045
PHILIPS
033 034 035 036 123 128 132 145 148
GE
029 087 121 123 128 133 145 159 163
PIONEER
024 123 128
GRUNDIG
193
POLAROID
003 004 005 006 043
HALLMARK
128
PORTLAND
128 132
HARMAN KARDON
201
PROSCAN
133
HITACHI
123 128 132 144 147
PROTON
008 059 122 128 132 165
HYTEK
016
QUASAR
032 087
INKEL
120
RADIO SHACK
045 128 132 180 196 197
JC PENNEY
115 123 128 132 145
RCA
021 115 123 128 133 145 161 163
JENSEN
019
REALISTIC
045 167 196
JVC
079 087 134
RUNCO
044 046 152 153
KEC
045
SAMPO
059 123 128
KLH
006
SAMSUNG
020 022 124 128 132 145
ENGLISH
Table A11 – Remote Control Product Codes: TV
35
0292CSK - HK (x65Series) AVR156-230 OM [HKP1991], WORK05.indd 35
30/06/11 12:42:15
AVR 156
Appendix
Table A11 – Remote Control Product Codes: TV (cont.)
Table A12 – Remote Control Product Codes: VCR
TV Manufacturer/Brand
Setup Code Number
VCR Manufacturer/Brand
Setup Code Number
SANYO
026 054
AIWA
040
SCOTT
045 128 132
AKAI
048 108 109 126
SEARS
128 132 145
APPLE TV
016
SHARP
077 128 132
AUDIO DYNAMICS
018 048
SIEMENS
084
BROKSONIC
110 147
SIGNATURE
069
CANON
135 140
SONY
028 031 117 130 136 194 212
CAPEHART
094
SOUNDESIGN
045 128
CITIZEN
134
SYLVANIA
025 123 128 145 148
CRAIG
045 116
SYMPHONIC
184
DAEWOO
017 094 104
TANDY
077
DAYTRON
094
TATUNG
063
DBX
018 048
TECHNICS
181
DYNATECH
040
TECHWOOD
128
EMERSON
013 040 042 110 112
TEKNIKA
045 069 115 123 128 132
FISHER
017
TELERENT
069
FUNAI
040
TERA
156
GE
076 095 124
THOMSON
190 191
HARMAN KARDON
002 003 018 049
TIVO
051 052 and See Table A12
HITACHI
040 048
TMK
128
JC PENNEY
018 045
TOSHIBA
063 129 202
JENSEN
048
TOTEVISION
132
JVC
018 048 111 132
VIDEO CONCEPTS
160
KENWOOD
020 048
VIDTECH
128
LG/GOLDSTAR
018 107
VIEWSONIC
011 038 039 047
LLOYD
040
VIZIO
001 002
LXI
020 040
WARDS
069 128 132 148
MAGNAVOX
040
WESTINGHOUSE
017 018 023
MARANTZ
018
YAMAHA
123 128
MEMOREX
017 020 040 052 053 054 076 142
YORK
128
MGA
049
ZENITH
069 090
MITSUBISHI
049 131
MULTITECH
040
36
0292CSK - HK (x65Series) AVR156-230 OM [HKP1991], WORK05.indd 36
30/06/11 12:42:15
AVR 156
Appendix
Table A13 – Remote Control Product Codes: CD (cont.)
VCR Manufacturer/Brand
Setup Code Number
CD Manufacturer/Brand
Setup Code Number
SYLVANIA
040
CLARINETTE
166
SYMPHONIC
040
DENON
187 188 213
TANDY
017 040
EMERSON
052 093 108
TEAC
040 048
FISHER
055 095
TEKNIKA
040
FUNAI
126
THOMAS
040
GE
164
TiVo
004 005 006 007 008 009 011 012
HAITAI
099 214
TMK
013
HARMAN KARDON
001 002 025 054 190
TOSHIBA
112 155
HITACHI
093
TOTEVISION
045
INKEL
216
UNITECH
045
JC PENNEY
098 147
VECTOR RESEARCH
018
JENSEN
153
VIDEO CONCEPTS
018 040
JVC
176 195 196
VIDEOSONIC
045
KENWOOD
030 062 078 079 148 151 176 178 181
WARDS
040 045 112
LG/GOLDSTAR
016 087
YAMAHA
018 040 048
LOTTE
108
ZENITH
040 050 076 083
LUXMAN
077 102
LXI
164
MAGNAVOX
039 113
MARANTZ
058 084 191 192 193
Table A13 – Remote Control Product Codes: CD
CD Manufacturer/Brand
Setup Code Number
MCINTOSH
194
ADCOM
063 069
MCS
080 098
AIWA
072 111 118 156 170
MITSUMI
152
AKAI
050 177 184
MODULAIRE
166
AUDIO TECHNICA
053
NAD
013 074 197 198
AUDIOACCESS
125
NAKAMICHI
199 200 201
AUDIOFILE
211
NEC
069
BSR
044
NIKKO
053 055
CALIFORNIA AUDIO
109
ONKYO
037 038 045 046 171 175 202 203
CAPETRONIC
070
OPTIMUS
065 089 091 092 099 104 212
CARRERA
087
PANASONIC
075 109 119 158 183 204
CARVER
136 140 141 143 144 145 185 186
PHILIPS
039 138 149 209
CASIO
117 166
PIONEER
071 094 100 112 123 131 161 162 215
ENGLISH
Table A12 – Remote Control Product Codes: VCR (cont.)
37
0292CSK - HK (x65Series) AVR156-230 OM [HKP1991], WORK05.indd 37
30/06/11 12:42:15
AVR 156
Appendix
Table A13 – Remote Control Product Codes: CD (cont.)
Table A14 – Remote Control Product Codes: DVD (cont.)
CD Manufacturer/Brand
Setup Code Number
DVD Manufacturer/Brand
Setup Code Number
PROTON
210
MITSUBISHI
023
RADIO SHACK
126 166 213
NAD
062
RCA
024 081 093 150
ONKYO
009 048
REALISTIC
058 093 095 104 105 108 164 166
PANASONIC
008 024 030 044
SANSUI
047 081 134 157 172
PHILIPS
016 056
SANYO
033 082 095
PIONEER
018 027 041 065
SCOTT
108
PROCEED
060
SHARP
058 105 114 151 159 167 180 181
PROSCAN
004 103
SHERWOOD
003 041 058 105 133
RCA
004 103
SONY
103 115 116 118 132 139 163 205 206 207 208
212 217
SAMSUNG
017 053 054
SOUNDSTREAM
124
SHARP
028
SYMPHONIC
059 110
SONY
011 012 015 043 045
TAEKWANG
177
THOMSON
004 103
TEAC
011 058 085 086 106 107 110 121 137 146 154
TOSHIBA
009 058 067
THETA DIGITAL
039
YAMAHA
030 063
TOSHIBA
013 074 097 151 155 173
ZENITH
005 055 064
VECTOR RESEARCH
087
VICTOR
120 130
WARDS
095
SAT Manufacturer/Brand
Setup Code Number
YAMAHA
019 031 053 061 135 169
BIRDVIEW
425
YORK
166
CHANNEL MASTER
320 321 325 361
CHAPARRAL
315 316 451
CITOH
360
DIRECTV
309 310 314
Table A14 – Remote Control Product Codes: DVD
Table A15 – Remote Control Product Codes: SAT
DVD Manufacturer/Brand
Setup Code Number
DISH NETWORK
364
APEX DIGITAL
061
DRAKE
313 317 318 413 481
DENON
019 020 051
DX ANTENNA
331 352 379 483
GE
004 103
ECHOSTAR
364 395 397 452 453 463 477 478 484 485
HARMAN KARDON
001 002 003
ELECTRO HOME
392
JVC
006
FUJITSU
324 329 334
LG/GOLDSTAR
005 010 055 064 066
GENERAL INSTRUMENT
303 311 323 365 403 454 468 474
MAGNAVOX
056
HITACHI
304 455
MARANTZ
059
HOUSTON TRACKER
463
38
0292CSK - HK (x65Series) AVR156-230 OM [HKP1991], WORK05.indd 38
30/06/11 12:42:15
AVR 156
Appendix
SAT Manufacturer/Brand
Setup Code Number
HUGHES
305 306 437 489
JANIEL
366
JERROLD
454 468 484
LEGEND
453
MACOM
317 365 369 370 371
MAGNAVOX
461 473
MEMOREX
453
MITSUBISHI
307
MOTOROLA
312 319
NEXTWAVE
423
NORSAT
373
OPTIMUS
466
PACE
328 487
PANASONIC
353 366 457 469
PANSAT
420
PERSONAL CABLE
418
PHILIPS
375
PICO
407
PRESIDENT
381 404
RCA
301 358 439 458 465 490
REALISTIC
349 480
SAMSUNG
322 326 442
SATELLITE SERVICE CO
335 388
SCIENTIFIC ATLANTA
339 356
SONY
362 405
STAR CHOICE DBS
459
STARCAST
347
SUPER GUIDE
327 423
TELECOM
330 333 390 391 393 409
TOSHIBA
302 426 460 461 462 470
UNIDEN
323 332 348 349 350 351 354 355 381 383 389
403 466 479 480
ZENITH
359 384 385 387 394 419 488
Table A16 – Remote Control Product Codes: Tape
Cassette Deck
Manufacturer/Brand
Setup Code Number
HARMAN KARDON
001
ENGLISH
Table A15 – Remote Control Product Codes: SAT (cont.)
Table A17 – Remote Control Product Codes: Cable
Cable Manufacturer/Brand Setup Code Number
ABC
001 011
ALLEGRO
111
AMERICAST
212
ARCHER
112
BELCOR
113
CABLE STAR
033 113
CITIZEN
111
COMCAST
007
DIGI-LINK
114
EAGLE
186
EASTERN
066 070
EMERSON
112
GENERAL INSTRUMENT
001 011 017 096 097 210
GC ELECTRONICS
113
GEMINI
032 060
HAMLIN
056 099 100 101 117 175 208
HITACHI
001 188
JASCO
111
JERROLD
001 002 011 017 073 096 097 162 188 210
LINSAY
118
MACOM
191
MAGNAVOX
017 019 068
MOVIETIME
035 039
NSC
035 190
OAK
197 220
PACE
179
PANASONIC
053 176 177 189 214
PANTHER
114
39
0292CSK - HK (x65Series) AVR156-230 OM [HKP1991], WORK05.indd 39
30/06/11 12:42:16
AVR 156
Appendix
Table A17 – Remote Control Product Codes: Cable (cont.)
Cable Manufacturer/Brand Setup Code Number
PHILIPS
013 019 020 085 090
PIONEER
001 041 119 171 209 215 216
RADIO SHACK
111 112 213
RCA
053 214
RECOTON
116
REGAL
056 099 100 101 208
REMBRANDT
032
SAMSUNG
003 072 186
SCIENTIFIC ATLANTA
183 203 221 222
SEAM
121
SIGNATURE
001 188
SPRUCER
053 081 177 189
STARCOM
002 011 163
STARGATE
120
TANDY
024
TELECAPATION
028
TEXSCAN
036
TFC
122
TIVO
029 030 and See Table A12
TOCOM
170 205
UNITED CABLE
011
UNIVERSAL
033 034 039 042 113
VIDEOWAY
124 211
VIEWSTAR
019 025 053 086 089 190
ZENITH
065 125 211 219
40
0292CSK - HK (x65Series) AVR156-230 OM [HKP1991], WORK05.indd 40
30/06/11 12:42:16
HARMAN Consumer, Inc.
8500 Balboa Boulevard, Northridge, CA 91329 USA
© 2011 HARMAN International Industries, Incorporated. All rights reserved.
Harman Kardon and Logic 7 are trademarks of HARMAN International Industries, Incorporated, registered in the United States and/or
other countries. EzSet/EQ is a trademark of HARMAN International Industries, Incorporated.
Apple, iPhone, iPod, iPod touch, iPod nano and iPod classic are trademarks of Apple Inc., registered in the U.S. and other countries.
Blu-ray Disc is a trademark of the Blu-ray Disc Association.
CEA is a registered trademark of the Consumer Electronics Association.
Manufactured under license from Dolby Laboratories. Dolby, the double-D symbol and Pro Logic are registered trademarks of
Dolby Laboratories. MLP Lossless is a trademark of Dolby Laboratories.
Manufactured under license under U.S. Patent #’s 5,451,942; 5,956,674; 5,974,380; 5,978,762; 6,226,616; 6,487,535; 7,003,467
and other U.S. and worldwide patents issued and pending. DTS is a registered trademark, and DTS 96/24, DTS-HD and DTS-HD
Master Audio are trademarks, of DTS, Inc. © 1996-2007 DTS, Inc. All Rights Reserved.
HDMI, the HDMI logo and High-Definition Multimedia Interface are registered trademarks of HDMI Licensing LLC in the United States
and other countries.
TiVo is a registered trademark of TiVo Inc.
Features, specifications and appearance are subject to change without notice.
0292CSK - HK (x65Series) AVR156-230 OM [HKP1991], WORK05.indd 41
www.harmankardon.com
30/06/11 12:42:16
0292CSK - HK (x65Series) AVR156-230 OM [HKP1991], WORK05.indd 42
30/06/11 12:42:16