
-
Contents
-
Table of Contents
-
Troubleshooting
-
Bookmarks
Quick Links
AXIS 221 Network Camera
User’s Manual
Related Manuals for Axis Network Camera AXIS 221
Summary of Contents for Axis Network Camera AXIS 221
-
Page 1
AXIS 221 Network Camera User’s Manual… -
Page 2
Axis Communications AB makes no warranty of any kind with regard to the material contained within this document, including, but not limited to, the implied warranties of merchantability and fitness for a particular purpose. -
Page 3: Table Of Contents
Contents Product Features …………..5 Overview .
-
Page 4
AXIS 221 Network — Advanced TCP/IP Settings ……..38 Network — SOCKS . -
Page 5: Product Features
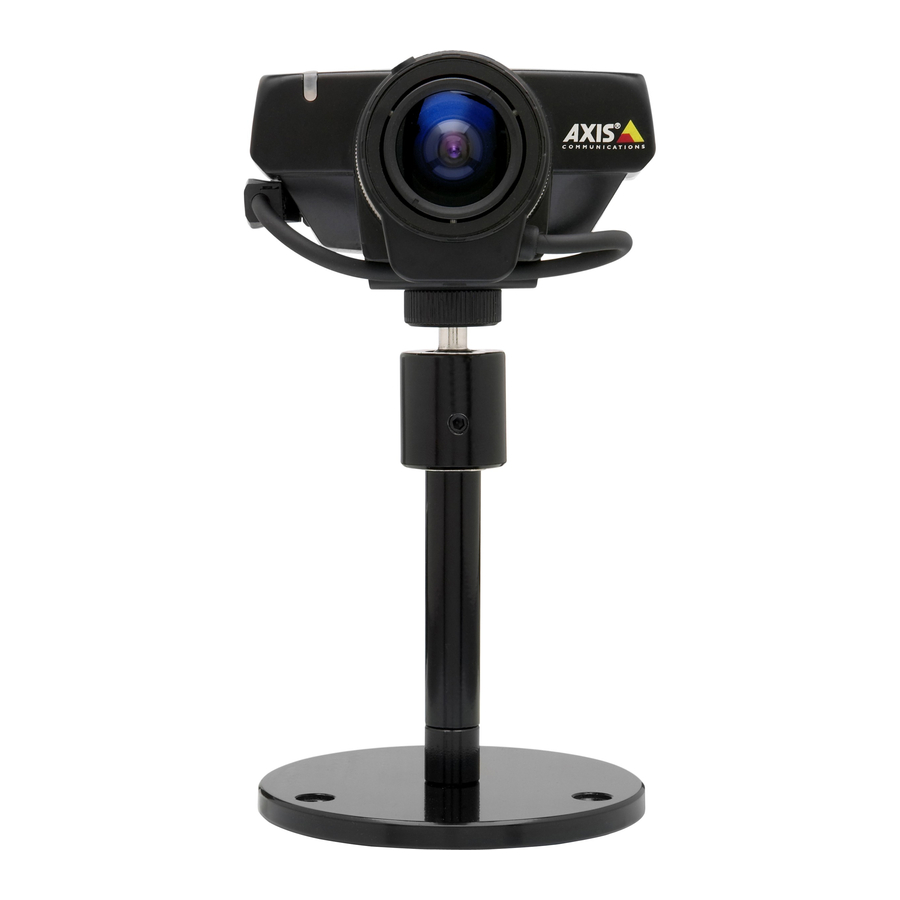
AXIS 221 — Product Features Product Features The AXIS 221 is part of the latest generation of fully featured Axis Network Cameras, based on the AXIS ARTPEC-2 compression chip. It features a DC-Iris and supports Power over Ethernet. It also features a metal casing and an infrared (IR) filter for day and night operation.
-
Page 6: Overview
AXIS 221 — Product Features The AXIS 221 features a varifocal lens with DC-Iris, which automatically regulates the amount of light entering the camera. Tele/wide and focus are adjusted manually with the aid of the pullers mounted on the lens. The AXIS 221 is also available without a lens. The AXIS 221 can be powered from the network cabling and supports Power over Ethernet (PoE) network transformers conforming to IEEE 802.3af.
-
Page 7
Power adapter connector — for connection of the PS-K power adapter (included). Power connector block — for connection of a power supply. See Power connections, on page 48 . I/O terminal connector — The I/O terminal connector provides the physical interface to one solid state relay output, two digital photo-coupled inputs, RS-485 and an auxiliary connection point for DC power. -
Page 8: Accessing The Camera
AXIS 221 — Accessing the Camera Accessing the Camera Follow the instructions in the AXIS 221 Installation Guide to install the camera. The camera can be accessed with most standard operating systems and browsers. The recommended browser is Internet Explorer for Windows, and Mozilla with other operating systems.
-
Page 9: Setting The Root Password
Setting the root password 1. When accessing the camera for the first time, the ‘Configure Root Password’ dialog will be displayed on the screen. 2. Enter a password and then re-enter it, to confirm the spelling. Click OK. 3. The Enter Network Password dialog will appear. Enter the User name: root Note: The default administrator user name root is permanent and cannot be deleted or altered.
-
Page 10: The Live View Page
AXIS 221 — Accessing the Camera The Live View page Depending on whether or not the Live View page has been customized, the buttons described below may or may not be visible. The Video Format drop-down list allows the video format on the Live View page to be temporarily changed.
-
Page 11
AXIS 221 — Accessing the Camera Click the View Full Screen button to make the video image fill the entire screen area. No other windows will be visible. Press Esc (Escape) on the computer keyboard to exit full screen. -
Page 12: Video Streams
AXIS 221 — Video Streams Video Streams The AXIS 221 provides several different image and video formats. The type to use depends on your requirements and on the properties of your network. The Live View page in the AXIS 221 provides access to Motion JPEG and MPEG-4 video streams, as well as to single JPEG images.
-
Page 13: Mpeg-4 Protocols And Communication Methods
MPEG-4 protocols and communication methods To deliver live streaming video over IP networks, various combinations of transport protocols and broadcast methods are employed. • RTP (Realtime Transport Protocol) is a protocol that allows programs to manage the real-time transmission of multimedia data, via unicast or multicast. •…
-
Page 14: The Axis Media Control
AXIS 221 — Video Streams Unicasting should be used for video-on-demand broadcasting, so that there is no video traffic on the network until a client connects and requests the stream. However, as more and more unicast clients connect, the traffic on the network will increase and may cause congestion.
-
Page 15
AXIS 221 — Video Streams Other MPEG-4 clients Although it may be possible to use other clients to view the MPEG-4 stream, this is not guaranteed by Axis. For some other clients, e.g. QuickTime™ the Video Object Type must be set to Simple. It may also be necessary to adjust the advanced MPEG-4 settings. -
Page 16: Setup Tools
AXIS 221 — Setup Tools Setup Tools The AXIS 221 is configured from the setup tools, which are available from the link in the web interface. The setup tools can be used by: • Administrators, who have unrestricted access to all the Setup tools •…
-
Page 17: Video And Image Settings
AXIS 221 — Video and Image Settings Video and Image Settings The following descriptions show examples of some of the features available in the AXIS 221. For details of each setting, please refer to the online help available from the setup tools.
-
Page 18: Overlay/Mask Settings
AXIS 221 — Video and Image Settings Please see the online help Video Stream Define the maximum video stream time per session in seconds, minutes or hours. When the set time has expired, a new stream can be started by refreshing the page in the Web browser.
-
Page 19
Upload and use an overlay To upload an overlay image to the camera: 1. Select the type of overlay to use in Overlay/Mask Type. 2. In the field Upload own image, click the Browse button and locate the image file on your computer or server. -
Page 20: Advanced Settings
AXIS 221 — Video and Image Settings Advanced settings These web pages include different settings for fine-tuning the video image. Camera settings To compensate for the Lighting Conditions, the Color level, the Brightness, the Sharpness, the Contrast, and the Exposure control, the Exposure area and the IR cut filter can all be adjusted.
-
Page 21
AXIS 221 — Video and Image Settings MPEG-4 Settings These are the tools for adjusting the MPEG-4 settings and controlling the video bit rate. The MPEG-4 standard provides many different coding tools for various applications in different situations. As most MPEG-4 clients do not support all of these tools, it is usual to instead define and use subsets for different clients or groups of clients. -
Page 22
AXIS 221 — Video and Image Settings MJPEG Settings The MJPEG Settings window is used to control the frame size of the video stream in order to improve either image quality or save bandwidth. Frame Size Control — Use Frame Size Control to set the maximum frame size to unlimited for best image quality, or to a limited number of Kbytes. -
Page 23: Live View Config
Live View Config These are the tools for deciding the layout of the camera’s Live View page. The layout can be set in 3 ways: • Use Axis look — the layout is unchanged. • Use custom settings — modify the default Live View page with your own colors, images etc.
-
Page 24
AXIS 221 — Live View Config Upload Own Web Files Your own background pictures, banners and logos can either be located externally on e.g. a network server, or they can be uploaded to the AXIS 221 itself. Once uploaded, files are shown in the drop-down lists for Own (file). -
Page 25: Action Buttons
User-defined CGI links can be used to issue advanced commands via the Axis HTTP API. For more information, see the Developer pages at www.axis.com/developer Action Buttons The manual trigger buttons can be used to manually trigger and stop an event from the Live View page.
-
Page 26: Html Examples
AXIS 221 — Live View Config Viewer settings Checking the Show viewer toolbar displays the viewer toolbar under the video stream in your browser. By checking the Enable MPEG-4 decoder installation box, it is also possible for the Administrator to enable or disable the installation of the MPEG-4 decoder. This is used to prevent the installation of unlicensed copies.
-
Page 27: Event Configuration
Event Configuration An event in the camera is when an Event Type is activated and causes certain actions to be performed. The event type is the set of parameters (or conditions) that specifies how and when which actions will be performed. A common event type is when the camera uploads images when an alarm occurs.
-
Page 28: Configuring Event Types
AXIS 221 — Event Configuration Configuring Event Types An Event Type describes how and when the camera will perform certain actions. Example: If somebody passes in front of the camera, and an event that uses motion detection has been con- figured to act on this, the camera can e.g.
-
Page 29
Please use the online help can be formatted according to specific requirements, such as time/date or type of triggered event. See File Naming & Date/Time Formats under Event Configuration. Note: Up to 10 event types can be configured in the camera, and up to 3 of these can be configured to upload images. Pre-trigger and Post-trigger buffers This function is very useful when checking to see what happened immediately before and/or after a trigger, e.g. -
Page 30: Camera Tampering
AXIS 221 — Event Configuration Please see the online help for descriptions of each available option. Camera Tampering The camera tampering application generates an alarm whenever the camera is repositioned, or when the lens is covered, sprayed, or severely defocused. You must also create an event, see How to set up a triggered event, on page 28, for the camera to send an alarm.
-
Page 31: Motion Detection
Motion Detection Motion detection is used to generate an alarm whenever movement either occurs or stops in the video image. A total of 10 Include and/or Exclude windows can be configured. • Included windows target specific areas within the whole video image •…
-
Page 32: Port Status
AXIS 221 — Event Configuration Please see the online help for descriptions of each available option. Object Size High level Only very large objects trigger motion detection Low level Even very small objects trigger motion detection Default value Examples: Avoid triggering on small objects in the image by selecting a high object size level. •…
-
Page 33: System Options
System Options Security — Users User access control is enabled by default. An administrator can set up other users, by giving these user names and passwords. It is also possible to allow anonymous viewer login, which means that anybody may access the Live View page, as described below: Users — the user list displays the authorized users and access levels: •…
-
Page 34
AXIS 221 — System Options Notes: •If the referrals feature is enabled and you wish to also allow normal access to the Live View page, the product’s own IP address or host name must be added to the list of allowed referrers. •Restricting referrers has no effect on an MPEG-4 video stream. -
Page 35: Security — 802.1X
AXIS 221 — System Options Security — 802.1x IEEE 802.1x is an IEEE standard for port-based Network Admission Control. It provides authentication to devices attached to a network port (wired or wireless), establishing a point-to-point connection. If authentication fails, access is prevented on the port. 802.1x is based on EAP (Extensible Authentication Protocol).
-
Page 36
AXIS 221 — System Options The authentication process Q: Certificate OK? A: OK 1. A CA server provides the required signed certificates. 2. The Axis video device requests access to the protected network at the network switch. The switch forwards the video device’s CA certificate to the RADIUS server, which then replies to the switch. -
Page 37: Date & Time
Date & Time Current Server Time — displays the current date and time (24h clock). The time can be displayed in 12h clock format in the Overlay Images (see below). New Server Time — Select your time zone from the drop-down list. If you want the AXIS 221 clock to automatically adjust for daylight savings time, select the Automatically adjust for daylight saving time changes.
-
Page 38: Network — Advanced Tcp/Ip Settings
AXIS 221 — System Options Services Enable ARP/Ping setting of IP address — The IP address can be set using the ARP/Ping method, which associates the unit’s MAC address with an IP address. Uncheck this box to disable the service in order to prevent unintentional resetting of the IP address. For more information see Other methods of setting the IP address in the AXIS 221 Installation Guide.
-
Page 39
AXIS 221 — System Options Use the following NTP server address — to make manual settings, check this radio button and enter the host name or IP address of the NTP server. Host Name Configuration The AXIS 221 can be accessed using a host name, instead of an IP address. The host name is usually the same as the assigned DNS Name. -
Page 40: Network — Socks
AXIS 221 — System Options If a router is not manually specified, the AXIS 221 will automatically search for NAT routers on your network. If more than one router is found, the default router, specified in System Options > Network > TCP/IP > Basic > IPv4 Address Configuration > Default router, will be selected.
-
Page 41: Network — Qos (Quality Of Service)
Network — QoS (Quality of Service) Quality of Service (QoS) provides the means to guarantee a certain level of a specified resource to selected traffic on a network. Quality can be defined as e.g. a maintained level of bandwidth, low latency, no packet losses, etc. The main benefits of a QoS-aware network can be summarized as: •…
-
Page 42: Network — Snmp
AXIS 221 — System Options Network — SNMP The Simple Network Management Protocol (SNMP) allows the remote management of network devices. Select the version of SNMP to use, depending on the level of security required. HTTPS should be enabled when setting the password for SNMPv3. Network — UPnP™…
-
Page 43: Led Settings
LED Settings The Status and Network Indicator LEDs can be set to flash at a configurable interval (or to not light up at all) whenever the unit is accessed. For a listing of all LED behavior, see page 7, or the online help. Note: The LED does not flash when the stream is retrieved using MPEG-4 multicast.
-
Page 44: Advanced
AXIS 221 — System Options Logs & Reports When contacting Axis support, please be sure to provide a valid Server Report with your query. The Access Log is automatically included in the server report. Information This page gives you access to the following log files and reports that may prove useful when troubleshooting a problem or when contacting the Axis support web.
-
Page 45: About
Axis strongly recommends that you do not use this function unless you fully understand its consequences. Axis support provides no assistance for customized scripts. For more information, please visit the Developer pages at www.axis.com/developer Plain Config — this function is for the advanced user with previous experience of configuring Axis cameras.
-
Page 46: Unit Connectors
AXIS 221 — Unit Connectors Unit Connectors This section describes the following: • The I/O Terminal connector • Power connections • The RS-232 D-Sub connector I/O Terminal connector The 10-pin I/O terminal connector provides the interface to a solid state relay output, two digital photo-coupled inputs, RS-485, GND and auxiliary power.
-
Page 47
I/O terminal connector pinout table Function Output A Output B Digital Input 1 Photocoupler Anode (+) Digital Input 1 Photocoupler Cathode (-) Digital Input 2 Photocoupler Anode (+) Digital Input 2 Photocoupler Cathode (-) RS-485-A (non-inverting) RS-485-B (inverting) DC + Power Output I/O Terminal connector schematic diagram Example schematic diagram of the AXIS 221 terminal connector — showing possible applications. -
Page 48: Power Connections
AXIS 221 — Unit Connectors Power connections Power can be supplied to the camera by the following methods: • the supplied power adapter, PS-K, 9W. The center pin is positive (+). • PoE (Power over Ethernet) with power classification Class 2, via the network cable.
-
Page 49: The Rs-232 Connector
The RS-232 connector The AXIS 221 provides one 9-pin D-sub connector, providing the physical interface for an RS-232 port, used for connecting accessory equipment. A diagram of the RS-232 connector, complete with pin assignment table, is shown below. Function — RXD — TXD AXIS 221 — Unit Connectors…
-
Page 50: Troubleshooting
Preconfigured and customized settings should be saved when the firmware is upgraded (providing the fea- tures are available in the new firmware) although this is not guaranteed by Axis Communications. 1. Save the firmware file to your computer. The latest version of the firmware is available free of charge from the Axis Web site at www.axis.com/techsup…
-
Page 51: Emergency Recovery Procedure
Emergency Recovery Procedure If power to the AXIS 221 is lost during the upgrade, the process will fail and the unit will become unresponsive. A flashing red Status LED indicates a failed upgrade. To recover the unit, follow the steps below. The serial number is found on the label attached to the bottom of the camera.
-
Page 52
AXIS 221 — Troubleshooting Symptoms, Possible Causes and Remedial Actions Problems setting the IP address When using ARP/Ping. The camera is located on a different subnet. The IP address is being used by another device. Possible IP address conflict with another device on the same subnet. -
Page 53
Video/Image problems — general No images in browser (Internet Explorer for Windows only) Installation of additional ActiveX com- ponent restricted or prohibited. Image too dark or too light. Missing images in uploads. Slow image update. Poor performance. Image gradually gets darker or lighter. When using the AXIS 221 in locations lit by fluorescent lighting, check in the advanced Image loses focus often. -
Page 54
AXIS 221 — Troubleshooting Poor rendering of MPEG-4 images. Color saturation is different in MPEG-4 and Motion JPEG. The test image does not display as expected Image settings. The Power indicator is not constantly lit Faulty power supply. The Status and Network indicator LEDs are flashing red rapidly Hardware failure. -
Page 55: Replacing The Lens
Replacing the lens If the lens on the AXIS 221 needs to be replaced or if the camera was supplied without a lens, a new lens can be fitted quickly and easily. As the AXIS 221 is designed with a CS-mount, the lens supplied with your product can be replaced with any standard C or CS lens.
-
Page 56: Technical Specifications
AXIS 221 — Technical Specifications Technical Specifications Item Image sensor Lens Angle of view Minimum illumination Video compression Resolutions Frame rate Video streaming Image settings Shutter time Security Users Alarm and event management • Events triggered by: video motion detection, tampering detection, temperature Specification 1/3”…
-
Page 57
Item Specification Connectors • RJ-45 for Ethernet 10BaseT/100BaseTX (PoE) • Terminal block for 2 alarm inputs, 1 output, • RS-485/422 half duplex port and alternative DC power connection • D-sub for RS-232 port Casing • Aluminum casing Processors and memory •… -
Page 58
AXIS 221 — Technical Specifications Item Included accessories Applications (not included) Accessories (not included) Approvals — EMC Dimensions (HxWxD) and weight Specification • Installation Guide, CD with User’s Manual • installation and management tools • demo software • mounting and connector kits •… -
Page 59: General Performance Considerations
General performance considerations When setting up your system, it is important to consider how various settings and situations will affect performance. Some factors affect the amount of bandwidth (the bit rate) required, others can affect the frame rate, and some will affect both. If the load on the CPU reaches its maximum, this will also affect the frame rate.
-
Page 60: Frame Rates — Motion Jpeg And Mpeg-4
AXIS 221 — Technical Specifications Frame rates — Motion JPEG and MPEG-4 The following table shows typical frame rates in frames/second (fps) for Motion JPEG and MPEG-4 video streams from the AXIS 221. Note that these values are guidelines only — actual values may vary. Motion JPEG settings: •…
-
Page 61: Glossary Of Terms
Half-duplex also provides bi-directional communication, but only in one direction at a time, as in a walkie-talkie system. See also Simplex. AXIS COMMUNICATIONS <Product Name> Quick User’s Guide HTML — Hypertext Mark-up Language. Used widely for authoring documents viewed in web browsers.
-
Page 62
Transmission Control Protocol (TCP) and, together with IP, is also known as UDP/IP. Unicast — Communication that takes place over a network between a single sender and a single receiver. AXIS COMMUNICATIONS <Product Name> Quick User’s Guide UPnP — Allows the automatic peer-to-peer detection of devices on the network. -
Page 63: Index
Index Access from a Browser 8 Access Log 44 Accessing the Video Stream 14 Action 27 Action Buttons 25 Active/Inactive 25 Administrators 16 Advanced Camera Settings 20 Advanced Simple Profile 12 Alarm 31, 46 AMC Viewer Toolbar 10 ARP/Ping 38 Auxiliary Power 46 AXIS Media Control (AMC) 14 Backup 43…
-
Page 64
AXIS 221 — Index Multicast 42 Multicasting 13 Network Connector 7 Network Settings — Advanced 38 Network Settings — Basic 37 NTP Server 37 Other MPEG-4 Clients 15 Output 46 Output Buttons 25 Overlay/Mask 18 Own Home Page 24 Own Web Files 24 Password 9 Port Status 32 Ports &…
Посмотреть инструкция для Axis 221 бесплатно. Руководство относится к категории камеры видеонаблюдения, 1 человек(а) дали ему среднюю оценку 7.5. Руководство доступно на следующих языках: английский. У вас есть вопрос о Axis 221 или вам нужна помощь? Задайте свой вопрос здесь
Не можете найти ответ на свой вопрос в руководстве? Вы можете найти ответ на свой вопрос ниже, в разделе часто задаваемых вопросов о Axis 221.
Что означает аббревиатура MП?
Какие сертификаты Axis 221 имеет?
Инструкция Axis 221 доступно в русский?
Не нашли свой вопрос? Задайте свой вопрос здесь
- Инструкции и руководства
- Бренды
- Axis
- 221
- Справочник Пользователя
![]()
AXIS 221 Network Camera
User’s Manual
Краткое содержание страницы № 1
AXIS 221 Network Camera
User’s Manual
Краткое содержание страницы № 2
Japan — This is a class B product based on the standard of the About this Document Voluntary Control Council for Interference from Information This manual is intended for administrators and users of the Technology Equipment (VCCI). If this is used near a radio or AXIS 221 Network Camera, and is applicable for software television receiver in a domestic environment, it may cause radio release 4.45. It includes instructions for using and managing interference. Install and use the equipment a
Краткое содержание страницы № 3
AXIS 221 3 Contents Product Features. . . . . . . . . . . . . . . . . . . . . . . . . . . . . . . . . . . . . . . . . . . . . . . . . . . . . . . . . . . . . . . . . 5 Overview . . . . . . . . . . . . . . . . . . . . . . . . . . . . . . . . . . . . . . . . . . . . . . . . . . . . . . . . . . . . 6 Accessing the Camera . . . . . . . . . . . . . . . . . . . . . . . . . . . . . . . . . . . . . . . . . . . . . . . . . . . . . . . . . . . . 8 Access from a browser . . . . . . . . . . . . . . . . .
Краткое содержание страницы № 4
AXIS 221 4 Network — Advanced TCP/IP Settings . . . . . . . . . . . . . . . . . . . . . . . . . . . . . . . . . . . . 38 Network — SOCKS . . . . . . . . . . . . . . . . . . . . . . . . . . . . . . . . . . . . . . . . . . . . . . . . . . . . 40 Network — QoS (Quality of Service). . . . . . . . . . . . . . . . . . . . . . . . . . . . . . . . . . . . . . 41 Network — SMTP (email). . . . . . . . . . . . . . . . . . . . . . . . . . . . . . . . . . . . . . . . . . . . . . . 41 Network — SNMP. . . .
Краткое содержание страницы № 5
AXIS 221 — Product Features 5 Product Features The AXIS 221 is part of the latest generation of fully featured Axis Network Cameras, based on the AXIS ARTPEC-2 compression chip. It features a DC-Iris and supports Power over Ethernet. It also features a metal casing and an infrared (IR) filter for day and night operation. Video from the camera is made available on the network as a real-time, full frame rate Motion JPEG stream and/or MPEG-4 video stream. The camera includes Video Motion Det
Краткое содержание страницы № 6
AXIS 221 — Product Features 6 The AXIS 221 features a varifocal lens with DC-Iris, which automatically regulates the amount of light entering the camera. Tele/wide and focus are adjusted manually with the aid of the pullers mounted on the lens. The AXIS 221 is also available without a lens. The AXIS 221 can be powered from the network cabling and supports Power over Ethernet (PoE) network transformers conforming to IEEE 802.3af. Overview Status Zoom puller indicator (Tele/wide) Focus pulle
Краткое содержание страницы № 7
AXIS 221 — Product Features 7 Power adapter connector — for connection of the PS-K power adapter (included). Power connector block — for connection of a power supply. See Power connections, on page 48 . I/O terminal connector — The I/O terminal connector provides the physical interface to one solid state relay output, two digital photo-coupled inputs, RS-485 and an auxiliary connection point for DC power. For more information, see Unit Connectors, on page 46. Network connector — The AXIS 22
Краткое содержание страницы № 8
AXIS 221 — Accessing the Camera 8 Accessing the Camera Follow the instructions in the AXIS 221 Installation Guide to install the camera. The camera can be accessed with most standard operating systems and browsers. The recommended browser is Internet Explorer for Windows, and Mozilla with other operating systems. See also the Technical Specifications, on page 56. Note: To view streaming video in Microsoft Internet Explorer, you must set your browser to allow the AXIS Media Control (AMC) to
Краткое содержание страницы № 9
AXIS 221 — Accessing the Camera 9 Setting the root password 1. When accessing the camera for the first time, the ‘Configure Root Password’ dialog will be displayed on the screen. 2. Enter a password and then re-enter it, to confirm the spelling. Click OK. 3. The Enter Network Password dialog will appear. Enter the User name: root Note: The default administrator user name root is permanent and cannot be deleted or altered. 4. Enter the password as set in step 2 above, and click OK. If the
Краткое содержание страницы № 10
AXIS 221 — Accessing the Camera 10 The Live View page Depending on whether or not the Live View page has been customized, the buttons described below may or may not be visible. The Video Format drop-down list allows the video format on the Live View page to be temporarily changed. The Output buttons, Pulse and Active/Inactive below, control the output directly from the Live View page. These buttons are configured under Setup > Live View Config > Layout. Pulse — click this button to activa
Краткое содержание страницы № 11
AXIS 221 — Accessing the Camera 11 Click the View Full Screen button to make the video image fill the entire screen area. No other windows will be visible. Press Esc (Escape) on the computer keyboard to exit full screen.
Краткое содержание страницы № 12
AXIS 221 — Video Streams 12 Video Streams The AXIS 221 provides several different image and video formats. The type to use depends on your requirements and on the properties of your network. The Live View page in the AXIS 221 provides access to Motion JPEG and MPEG-4 video streams, as well as to single JPEG images. Other applications and clients can also access these video streams/images directly, without going via the Live View page. Video stream types Motion JPEG This format uses standa
Краткое содержание страницы № 13
AXIS 221 — Video Streams 13 MPEG-4 protocols and communication methods To deliver live streaming video over IP networks, various combinations of transport protocols and broadcast methods are employed. • RTP (Realtime Transport Protocol) is a protocol that allows programs to manage the real-time transmission of multimedia data, via unicast or multicast. • RTSP (Real Time Streaming Protocol) serves as a control protocol, to negotiate which transport protocol to use for the stream. RTSP is th
Краткое содержание страницы № 14
AXIS 221 — Video Streams 14 Unicasting should be used for video-on-demand broadcasting, so that there is no video traffic on the network until a client connects and requests the stream. However, as more and more unicast clients connect, the traffic on the network will increase and may cause congestion. Although there is a maximum of 20 unicast viewers, note that all multicast users combined count as 1 unicast viewer. RTP/RTSP This unicast method is RTP tunneled over RTSP. This can be used
Краткое содержание страницы № 15
AXIS 221 — Video Streams 15 Other MPEG-4 clients Although it may be possible to use other clients to view the MPEG-4 stream, this is not guaranteed by Axis. For some other clients, e.g. QuickTime™ the Video Object Type must be set to Simple. It may also be necessary to adjust the advanced MPEG-4 settings. To assess the video stream from e.g. QuickTime™ the following path can be used: rtsp:///mpeg4/media.amp This path is for all supported methods, and the client will negotiate w
Краткое содержание страницы № 16
AXIS 221 — Setup Tools 16 Setup Tools The AXIS 221 is configured from the setup tools, which are available from the link in the web interface. The setup tools can be used by: • Administrators, who have unrestricted access to all the Setup tools • Operators, who have access to the Video & Image, Live View Config and Event Config- uration settings. Accessing the setup tools from a browser Follow the instructions below to access the Setup Tools from a browser. 1. Start your browser and enter th
Краткое содержание страницы № 17
AXIS 221 — Video and Image Settings 17 Video and Image Settings The following descriptions show examples of some of the features available in the AXIS 221. For details of each setting, please refer to the online help available from the setup tools. Click to access the online help. Image Settings Image Appearance Adjust these settings to optimize the video images according to your requirements. All configuration of images and overlays will affect the camera’s overall performance, depending
Краткое содержание страницы № 18
AXIS 221 — Video and Image Settings 18 Please see the online help for further information on these settings. Video Stream Define the maximum video stream time per session in seconds, minutes or hours. When the set time has expired, a new stream can be started by refreshing the page in the Web browser. For unlimited video stream time, set this value to 0. This setting is only applicable to Motion JPEG. The frame rate allowed to each viewer can also be limited, to avoid bandwidth problems
Краткое содержание страницы № 19
AXIS 221 — Video and Image Settings 19 Upload and use an overlay To upload an overlay image to the camera: 1. Select the type of overlay to use in Overlay/Mask Type. 2. In the field Upload own image, click the Browse button and locate the image file on your computer or server. 3. Click the Upload button and follow the on-screen instructions. To use an already uploaded image: 1. Select an uploaded image from the Use image drop-down list. 2. Place the image at the required location by entering
Краткое содержание страницы № 20
AXIS 221 — Video and Image Settings 20 Advanced settings These web pages include different settings for fine-tuning the video image. Camera settings To compensate for the Lighting Conditions, the Color level, the Brightness, the Sharpness, the Contrast, and the Exposure control, the Exposure area and the IR cut filter can all be adjusted. DC-Iris should always be enabled, except when focusing, or when using a non-DC-Iris lens. The settings for Low Light Behavior determine how the camera wi
-
Contents
-
Table of Contents
-
Bookmarks
Quick Links
AXIS 221/223M
Network Camera
Installation Guide
Related Manuals for Axis 221
Summary of Contents for Axis 221
-
Page 1
AXIS 221/223M Network Camera Installation Guide… -
Page 3: Installation Steps
Printed Materials • AXIS 221/223M Installation Guide (this document) • Axis Warranty Document Important! To use the AXIS 221/223M outdoors it must be installed in a protective housing. For more information on protective housings and other accessories, please visit www.axis.com…
-
Page 4: Front View
Connections 1. Connect the AXIS 221/223M to your network using a standard network cable. 2. Connect power, using one of the 3 supported methods listed below: • The supplied power adapter. • Power over Ethernet (PoE) via the network cable. This will automatically be detected if available via the network.
-
Page 5: Led Indicators
AXIS 221/223M Installation Guide Page 5 10 pin I/O terminal connector block Function Description Output A On the external device output terminals (A and B), there is no distinction between positive and negative (+ and -). The terminals use a photocoupler and are electri- Output B cally isolated from the other internal circuitry.
-
Page 6: Setting The Ip Address
Page 6 AXIS 221/223M Installation Guide Setting the IP address The AXIS 221/223M is designed for use on an Ethernet network and must be assigned an IP address to make it accessible. Windows AXIS IP Utility and AXIS Camera Management are the recommended methods for setting an IP address in Windows.
-
Page 7: Axis Ip Utility
AXIS IP Utility automatically discovers and displays Axis devices on your network. The application can also be used to manually set a static IP address. AXIS IP Utility is available on the CD supplied with this product, or it can be downloaded from www.axis.com/techsup Note that you must install the AXIS 221/223M on the same network segment (physical subnet) as the computer running AXIS IP Utility.
-
Page 8
Management is available on the CD supplied with this product, or can be downloaded from www.axis.com/techsup Set the IP address 1. Check that the AXIS 221/223M is connected to the network and that power has been applied. 2. Start AXIS Camera Management. When the AXIS 221/223M appears in the window, double-click it to open the camera’s home page. -
Page 9
(See note below) Notes: • UPnP™, DHCP and Bonjour are enabled by default in the AXIS 221/223M. • The AXIS 221/223M has the default IP address 192.168.0.90 • To view the admin pages for the DHCP server, please see the server’s own documentation. You may need to contact your network administrator. -
Page 10: Axis Internet Dynamic Dns Service
(Windows ME or XP), the camera will automatically be detected and a new icon will be added to “My Network Places.” Click this icon to access the AXIS 221/223M. See also page 12 for instructions on how to set the password.
-
Page 11
1. Acquire an IP address on the same network segment your computer is connected to. 2. Locate the serial number (S/N) on the AXIS 221/223M product label. 3. Open a Command Prompt on your computer and enter the following commands… -
Page 12: Setting The Password
Note: The default administrator user name root is permanent and cannot be deleted. 4. Enter the password as set in step 2 above, and click OK. If the password is lost, the AXIS 221/223M must be reset to the factory default settings. See page 13.
-
Page 13: Resetting To The Factory Default Settings
Page 13 Accessing the AXIS 221/223M from the Internet Once installed, your AXIS 221/223M is accessible on your local network (LAN). To access the camera from the Internet, network routers must be configured to allow incoming traffic, which is usually done on a specific port. Please refer to the documentation for your router for further instructions.
-
Page 14
Page 14 AXIS 221/223M Installation Guide… -
Page 15: Étapes De L’installation
• Document de garantie d’Axis Important ! Pour pouvoir être utilisée à l’extérieur, la AXIS 221/223M doit être placée dans une housse de protection. Pour plus d’informations sur les housses de protection et sur d’autres accessoires, visitez le site www.axis.com.
-
Page 16
DC Connecteur Branchements 1. Connectez la AXIS 221/223M à votre réseau à l’aide d’un câble de réseau standard. 2. Branchez l’alimentation à l’aide d’une des 3 méthodes autorisées reprises ci-dessous. • Le transformateur fourni. • PoE (Power over Ethernet) via le câble réseau. Cette connexion sera automatiquement détectée si elle est disponible via le réseau. -
Page 17: Témoins Del
AXIS 221/223M Guide d’installation Page 17 Connecteur pour terminaux E/S à 10 broches Broche Fonction Description Sortie A Sur les terminaux de sortie externes (A et B), il n’y a aucune distinction entre le positif et le négatif (+ et -). Les terminaux utilisent un photocoupleur et Sortie B sont isolés électriquement de l’autre circuit interne.
-
Page 18: Définition De L’adresse Ip
Page 18 AXIS 221/223M Guide d’installation Définition de l’adresse IP La AXIS 221/223M a été conçue pour être utilisée sur un réseau Ethernet et doit se voir attribuer une adresse IP pour être accessible. Windows Nous recommandons l’utilisation des applications AXIS IP Utility et AXIS Camera Management pour la définition d’une adresse IP sous Windows.
-
Page 19
2. Cliquez sur le bouton Set IP address using serial number (Paramétrer l’adresse IP en utilisant le numéro de série), puis saisissez le numéro de série et l’adresse IP de la AXIS 221/223M. Le numéro de série se trouve sur l’étiquette du produit. -
Page 20
AXIS Camera Management détecte et définit automatiquement les adresses IP, affiche les états de connexion et gère les mises à niveau de microprogrammes de nombreux produits vidéo Axis. Cette application est disponible sur le CD fourni avec ce produit ou peut être téléchargée sur www.axis.com/techsup. -
Page 21
(Voir remarque ci-dessous) Remarques : • UPnP™, DHCP et Bonjour sont activés par défaut dans la AXIS 221/223M. • L’adresse IP par défaut de la AXIS 221/223M est 192.168.0.90. • Pour consulter les pages administratives du serveur DHCP, veuillez vous référer à la documentation du serveur. Il est possible que vous deviez contacter l’administrateur de votre réseau. -
Page 22
à Mes emplacements réseau. Cliquez sur cette icône pour accéder à votre AXIS 221/223M. Consultez également la page 24 pour savoir comment définir le mot de passe. Notez que vous devez installer la AXIS 221/223M sur le même segment de réseau (sous-réseau physique) que l’ordinateur exécutant l’installation. ™… -
Page 23
1. Trouvez une adresse IP sur le même segment de réseau que celui de votre ordinateur. 2. Repérez le numéro de série (S/N) sur l’étiquette de la AXIS 221/223M. 3. Ouvrez une invite de commande et entrez les commandes suivantes (selon votre système… -
Page 24: Définition Du Mot De Passe
Pour ce faire, vous devrez être connecté à votre ordinateur avec les droits d’administrateur. 6. La page Live View (Vidéo) de la caméra AXIS 221/223M s’affiche. Elle propose des liens vers les outils de configuration afin que vous puissiez adapter la caméra à vos besoins.
-
Page 25: Rétablissement Des Paramètres D’usine Par Défaut
4. Quand le voyant d’état émet une lumière verte (ce qui peut prendre jusqu’à 1 minute), la caméra est revenue aux paramètres par défaut définis en usine. 5. Réinstallez la caméra AXIS 221/223M à l’aide de l’une des méthodes décrites dans ce document.
-
Page 26
Page 26 AXIS 221/223M Guide d’installation… -
Page 27
Einschließlich Installationstool und weiterer Software sowie Produktdokumentation Gedruckte Dokumente • AXIS 221/223M Installationshandbuch (dieses Dokument) • Axis-Garantieerklärung Wichtig! Für die Benutzung im Freien muss die AXIS 221/223M in ein Schutzgehäuse eingebaut werden. Weitere Informationen zum Schutzgehäuse und sonstigem Zubehör finden Sie unter www.axis.com. -
Page 28
-Steuerkabel Anschluss Anschlüsse 1. Schließen Sie die AXIS 221/223M über ein Standard-Netzwerkkabel an das Netzwerk an. 2. Schließen Sie die Kamera an die Stromversorgung an. Sie haben dazu drei Möglichkeiten: • Über den mitgelieferten Netzadapter • Power over Ethernet (PoE) über das Netzwerkkabel. Die Kamera erkennt automatisch, ob diese Option von Ihrem Netzwerk unterstützt wird. -
Page 29
AXIS 221/223M – Installationshandbuch Seite 29 10-polige E/A-Anschlussleiste Kontakt Funktion Beschreibung Ausgang A An den Ausgängen für externe Geräte (A und B) wird keine Unterscheidung zwischen Plus und Minus (+ und -) gemacht. Für die Anschlüsse wird ein Ausgang B Optokoppler verwendet. -
Page 30: Ip-Adresse Festlegen
Die AXIS 221/223M ist für die Verwendung in einem Ethernet-Netzwerk vorgesehen. Für den Zugriff auf die Kamera muss dieser eine IP-Adresse zugewiesen werden. Windows Es wird empfohlen, die IP-Adresse unter Windows mit Hilfe der Dienstprogramme AXIS IP Utility und AXIS Camera Management festzulegen. DHCP-…
-
Page 31: Axis Ip Utility
IP-Adresse in eine statische IP-Adresse umgewandelt werden. Automatische Erkennung 1. Stellen Sie sicher, dass die AXIS 221/223M an das Netzwerk und an die Stromversorgung angeschlossen ist. 2. Starten Sie AXIS IP Utility. Doppelklicken Sie im Fenster AXIS IP Utility auf das Symbol der AXIS 221/223M, um die Startseite der Kamera zu öffnen.
-
Page 32
CD oder kann im Internet unter www.axis.com/techsup heruntergeladen werden. IP-Adresse festlegen 1. Stellen Sie sicher, dass die AXIS 221/223M an das Netzwerk und an die Stromversorgung angeschlossen ist. 2. Starten Sie AXIS Camera Management. Doppelklicken Sie auf das Symbol der AXIS 221/ 223M, um die Startseite der Kamera zu öffnen. -
Page 33
Wenden Sie sich ggf. an Ihren Netzwerkadministrator. • Falls ein Festlegen der IP-Adresse nicht möglich ist, müssen ggf. die Einstellungen der Firewall überprüft werden. • Voraussetzung für die Verwendung von AXIS Dynamic DNS Service ist eine Internetverbindung, bei der für den HTTP-Zugriff kein Proxyserver verwendet wird. -
Page 34
Implementers Corporation. Bonjour Bonjour (Mac OSX) erkennt die AXIS 221/223M automatisch, sobald diese mit dem Netzwerk verbunden ist. Navigieren Sie einfach zu dem Bonjour-Lesezeichen in Ihrem Browser (z. B. Safari), und klicken Sie auf den Link der Kamera, der Sie zu den Webseiten leitet. Anweisungen zum Festlegen des Kennworts finden Sie auf Seite 36. -
Page 35
1. Wählen Sie eine IP-Adresse aus dem Netzwerksegment, in dem sich auch Ihr Computer befindet. 2. Suchen Sie die Seriennummer (S/N) auf dem Produktaufkleber der AXIS 221/223M. 3. Öffnen Sie auf Ihrem Computer ein Programm mit Eingabeaufforderung, und geben Sie je… -
Page 36: Kennwort Festlegen
Sie das Kennwort vergessen haben, muss die AXIS 221/223M auf die Werkseinstellungen zurückgesetzt werden. (Siehe Seite 37.) 5. Klicken Sie auf Yes (Ja), um AMC (AXIS Media Control) zu installieren. Nach Abschluss der Installation können Sie im Browser Videodaten anzeigen. Hierzu müssen Sie über Administratorrechte für den Computer verfügen.
-
Page 37: Werkseitige Standardeinstellungen Wiederherstellen
Seite 37 Über das Internet auf die AXIS 221/223M zugreifen Sobald die AXIS 221/223M installiert ist, können Sie über Ihr lokales Netzwerk (LAN) auf die Kamera zugreifen. Um auch über das Internet auf die Kamera zugreifen zu können, müssen Sie die Netzwerk-Router so konfigurieren, dass diese den entsprechenden eingehenden Datenverkehr zulassen, was üblicherweise durch Zuweisung eines bestimmten Ports geschieht.
-
Page 38
Seite 38 AXIS 221/223M – Installationshandbuch… -
Page 39: Pasos De Instalación
Guía de instalación de AXIS 221/223M (este documento) • Documento de garantía de Axis Importante: Para utilizar la AXIS 221/223M en espacios exteriores, es necesario instalar una caja de protección. Si desea obtener más datos sobre las cajas de protección y otros accesorios, visite www.axis.com.
-
Page 40: Vista Frontal
DC-Iris de RS-232 Conexiones 1. Conecte la AXIS 221/223M a su red con un cable de red estándar. 2. Conecte la alimentación utilizando uno de los tres métodos especificados en la lista que aparece a continuación: • El adaptador de corriente suministrado.
-
Page 41: Bloque De Conectores Del Terminal De E/S De 10 Pines
AXIS 221/223M Guía de instalación de la Página 41 Bloque de conectores del terminal de E/S de 10 pines Clavija Función Descripción Salida A En los terminales de salida del dispositivo externo (A y B) no se distingue el positivo del negativo (+ y-). Los terminales utilizan un fotoacoplador y están Salida B aislados eléctricamente del resto de los circuitos internos.
-
Page 42: Configuración De La Dirección Ip
La AXIS 221/223M está diseñada para funcionar en una red Ethernet y debe configurarse una dirección IP para facilitar el acceso. Windows AXIS IP Utility y AXIS Camera Management son los métodos recomendados para configurar una dirección IP en Windows. Servidor Sistema operativo Método…
-
Page 43
1. Compruebe que la AXIS 221/223M está conectada a la red y que recibe alimentación. 2. Inicie AXIS IP Utiliy. Cuando aparezca la AXIS 221/223M en la ventana de AXIS IP Utility, haga doble clic para abrir la página de inicio. Para identificar la cámara, busque el número de serie en la lista. -
Page 44
Configuración de la dirección IP 1. Compruebe que la AXIS 221/223M está conectada a la red y que recibe alimentación. 2. Inicie AXIS Camera Management. Cuando aparezca la AXIS 221/223M en la ventana, haga doble clic para abrir la página de inicio. -
Page 45
(Véase la nota siguiente) Notas: • UPnP™, DHCP y Bonjour están habilitados de forma predeterminada en la AXIS 221/223M. • La dirección IP predeterminada de la AXIS 221/223M es 192.168.0.90. • Para visualizar las páginas admin del servidor DHCP, consulte la documentación del servidor. Es posible que deba ponerse en contacto con su administrador de redes. -
Page 46
AXIS 221/223M. Consulte también la página 48 para obtener instrucciones sobre cómo configurar la contraseña. Recuerde que debe instalar la AXIS 221/223M en el mismo segmento de red (subred física) que el equipo que controla la instalación. -
Page 47
1. Adquiera una dirección IP en el mismo segmento de red en el que está conectado su equipo. 2. Ubique el número de serie (S/N) en la etiqueta de producto de la AXIS 221/223M. 3. Abra una línea de comando en el equipo y escriba los comandos siguientes (los adecuados… -
Page 48: Configuración De La Contraseña
Para ello, debe tener derechos de administrador en su ordenador. 6. La página de Live View de la AXIS 221/223M aparece con enlaces a las herramientas de configuración que le permiten adaptar la cámara a sus necesidades específicas.
-
Page 49: Reconfiguración A Los Valores Iniciales
Asimismo, a través de la interfaz Web pueden restablecerse todos los parámetros, excepto los de la IP, a los valores de fábrica. Si desea más información, consulte la ayuda en línea y el manual del usuario. El manual de usuario de la AXIS 221/223M está disponible en el sitio Web de Axis en…
-
Page 50
Página 50 Guía de instalación de la AXIS 221/223M… -
Page 51: Procedura Di Installazione
AXIS 221/223M Guida all’installazione (questo documento) • Documento di garanzia Axis. Importante Per utilizzarla in esterni, l’AXIS 221/223M deve essere installata in un alloggiamento di protezione. Per ulteriori informazioni sugli alloggiamenti di protezione e altri accessori, visitare il sito Web all’indirizzo www.axis.com.
-
Page 52: Vista Anteriore
RS-232 di alimentazione Collegamenti 1. Collegare la videocamera AXIS 221/223M alla rete mediante un cavo di rete standard. 2. Collegare l’alimentazione mediante uno dei tre metodi supportati elencati di seguito: • Tramite l’adattatore di alimentazione fornito. • Tramite alimentazione su rete Ethernet (PoE, Power over Ethernet) utilizzando il cavo di rete, che verrà…
-
Page 53: Morsettiera Di Alimentazione I/O A 10 Pin
Guida all’installazione di AXIS 221/223M Pagina 53 Morsettiera di alimentazione I/O a 10 pin Funzione Descrizione Uscita A Nei connettori di uscita della periferica esterna (A e B) non è presente alcuna distinzione tra positivo e negativo (+ e -). Con i connettori, isolati dagli altri circuiti Uscita B elettrici interni, si utilizza un componente optoisolato.
-
Page 54: Impostazione Dell’indirizzo Ip
L’AXIS 221/223M è progettata per l’installazione su una rete Ethernet e per essere accessibile necessita dell’assegnazione di un indirizzo IP. Windows AXIS IP Utility e AXIS Camera Management sono i metodi consigliati per impostare un indirizzo IP in Windows. Server DHCP Sistema operativo…
-
Page 55
AXIS IP Utility consente di individuare e visualizzare automaticamente la presenza di periferiche Axis sulla rete. Tale applicazione consente inoltre di impostare manualmente un indirizzo IP statico. AXIS IP Utility è disponibile sul CD fornito con il prodotto oppure può essere scaricata dal sito Web all’indirizzo www.axis.com/techsup Si tenga presente che l’AXIS 221/223M deve essere installata sullo stesso segmento di rete (subnet fisica) del computer sul quale è… -
Page 56
AXIS Camera Management è in grado di individuare e impostare automaticamente gli indirizzi IP, mostrare lo stato di connessione e gestire gli aggiornamenti del firmware di più prodotti video di Axis. AXIS Camera Management è disponibile sul CD fornito con il prodotto oppure può essere scaricato dal sito Web all’indirizzo www.axis.com/techsup Imposta indirizzo IP 1. -
Page 57
(vedere la nota di seguito) Note • UPnP™, DHCP e Bonjour sono attivi per impostazione predefinita nell’AXIS 221/223M. • L’indirizzo IP predefinito per l’AXIS 221/223M è 192.168.0.90 • Per visualizzare le pagine admin del server DHCP, vedere la documentazione specifica del server. Rivolgersi all’amministratore di rete. -
Page 58: Servizio Axis Internet Dynamic Dns
UPnP è abilitata anche sul computer in uso (con sistema operativo Windows ME o XP), la videocamera verrà automaticamente rilevata e verrà aggiunta una nuova icona in «Risorse di rete». Fare clic su questa icona per accedere all’AXIS 221/223M. Vedere anche pagina 60 per istruzioni su come impostare la password.
-
Page 59
1. Acquisire un indirizzo IP sullo stesso segmento di rete cui è connesso il computer utilizzato. 2. Individuare il numero di serie indicato sull’etichetta del prodotto dell’AXIS 221/223M. 3. Aprire un prompt dei comandi sul computer e digitare i seguenti comandi (in base al… -
Page 60: Impostazione Della Password
221/223M. Vedere pagina 61. 5. Se richiesto, fare clic su Yes (Sì) per installare l’AXIS Media Control (AMC) e consentire la visualizzazione di streaming video nel browser. A questo scopo è necessario disporre dei privilegi di amministratore.
-
Page 61: Ripristino Delle Impostazioni Di Fabbrica
È anche possibile ripristinare le impostazioni di fabbrica per tutti i parametri, ad eccezione dei parametri dell’indirizzo IP, mediante l’interfaccia Web. Per ulteriori informazioni, fare riferimento alla Guida in linea e al Manuale per l’utente. Il manuale dell’utente dell’AXIS 221/ 223M è disponibile sul sito Web Axis all’indirizzo…
-
Page 62
Pagina 62 Guida all’installazione di AXIS 221/223M… -
Page 64
AXIS 221/223M Installation Guide v1.0 June 2006 Copyright © Axis Communications AB, 2006 Part No. 26670…
This manual is also suitable for:
223m