Bounty Hunter Metal Detector Manual
To get the most enjoyment from your Metal Detector, we suggest you do the following:
- Use 9-volt ALKALINE batteries only.
- Do not use Heavy Duty batteries.
- Do not use ordinary Zinc-Carbon Batteries.
- Make sure the right knob is clicked on (i.e. not in battery-test position).
- Use your detector OUTDOORS only
- Large metal objects inside the home may interfere with thedetector’s operation. Floors and walls of most homes contain metal.
- Electrical appliances inside the home, like microwave ovens, televisions, and some light fixtures, emit electromagnetic energy which can interfere with the detector’s operation.
- Do not place coins on the floor of your home and try to detect. Try this test outside only.
- If conducting an indoor demonstration, hold search coil offground and wave coins over search coil.
Installing Batteries
Use 9-volt ALKALINE batteries only!
- Remove the battery door from the underside of the detector.
- Pull out the two battery connectors.
- Snap on two 9-volt ALKALINE batteries. Do not use Heavy Duty or ordinary Zinc Carbon batteries.
- Place batteries into compartment one on top of the other.
- Replace the battery door. Slide over until it shuts securely in place.
All battery brands differ slightly in size. If you want to secure the batteries more tightly in the compartment, feed the battery wires underneath and between the batteries.
If batteries fit too tightly, causing battery door to bulge, move battery wires toward front of compartment, not between the batteries.
Quick-Start Demo
Try this quick way to demonstrate the basic features of your metal detector:
- Supplies Needed
- A nail
- A zinc penny (pennies dated after 1982 are made of zinc)
- A quarter
- Position Your Detector
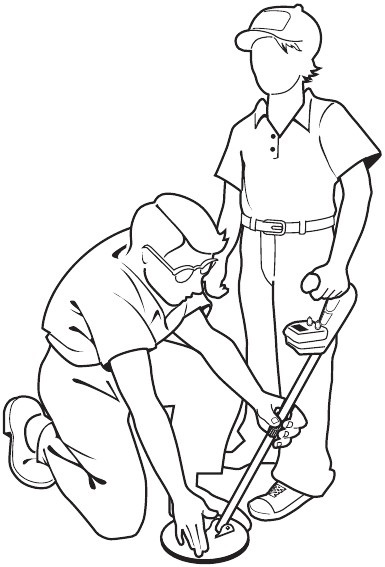
Keep the detector away from floors, walls, and metal objects. One person holds the detector still, so that another can sweep coins under the coil.
Sweep coins under the bottom of the search coil. - Beginning Settings
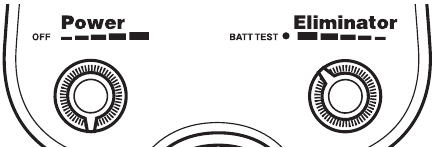
- Left Knob: At 6:00 position
- Right Knob: Click on, but keep counterclockwise
- Detecting All Types of Metals
- Wave each object over the search coil. Notice the tone isloudest as the object passes over the center.
- Pass each object at varying distances from the search coil. Notice that the sound gets louder as the object moves closer to the search coil. Also notice that beyond a certain distance, the object is no longer detected.
- Eliminating Some Metals
- Wave the nail and slowly turn the right knob to the right.
- Notice where the nail is eliminated from detection
- Wave the penny and keep turning the right knob until thepenny is eliminated from detection
- Wave the quarter
- Notice that the quarter is never eliminated from detection.
- Wave the nail and slowly turn the right knob to the right.
Adjusting Length
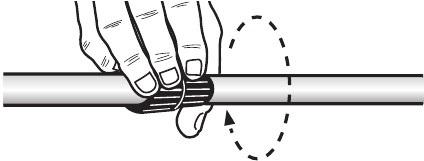
Loosen the tube clamping nut 1/4 turn
Extend tube assembly
- Grasp the top tube with one hand.
- Grasp the search coil with the other hand.
- Pull two sections apart to slide the bottom tube out of the top tube.
Establish Tube Length
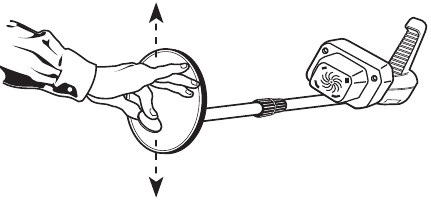
- Pivot the search coil perpendicular to the tube.
- Place detector in user’s hand, with arm extended.
- Adjust tube length so that search coil rests on the ground, close to the user’s feet.
- Align the coil to the detector body.
- Tighten the tube clamping nut, while holding the search coil in place on the ground to prevent twisting of the tube assembly while tightening.
Battery Test
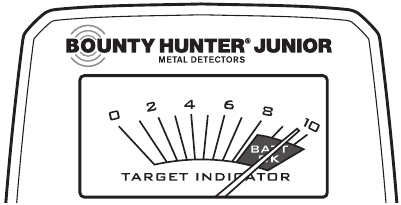
Click the right knob fully counterclockwise (all the way to the left), in order to test the batteries. If the batteries are good, the needle will move to the right and enter the green zone on the indicator label.
If the needle does not enter the green zone, replace the batteries.
Practicing Outside
- Turn the detector on
- Rotate left knob clockwise to a high sensitivity setting.
- Click right knob on to exit the «battery test» mode.
- Maintain right knob in counterclockwise position, but do not click into the «battery test» mode.
- Find a clear area in the grass
Sweep the search coil around the grass to find an area where the detector does not beep. In order to test your detector, you must first find an area free of metal objects. - Toss these metal objects on the ground
- A nail or other iron object like a small screwdriver
- A zinc penny (dated after 1982)
- A quarter
- Keep the objects spaced apart on the ground
- Sweep the search coil over each of the objects
- You must keep the search coil moving.
- Notice that the sound is loudest when the metal object isunder the center of the search coil.
- While sweeping back and forth, slowly raise the search coilseveral inches off the ground. Notice that the sound is louder when the search coil is closer to the objects.
- Turn the right knob progressively to the right while passing the search coil over each of the objects
The nail (or small iron object) is eliminated from detection with the right knob in approximately the 3:00 position. The zinc penny (pre-1982) is eliminated from detection with the right knob in approximately the 6:00 position.
Sensitivity and Target Elimination
Adjusting Sensitivity
The left knob clicks on to power the detector on.
After turning on, the left knob is used to control the detector’s sensitivity level. In the 100% clockwise position, the detector is at maximum sensitivity. At this level, the detector will detect a coin-sized object, like a quarter, up to 5″ away from the coil. Very large metal objects will be detected up to one and one-half feet from the search coil at maximum sensitivity.
Reduce the sensitivity if the detector chatters or emits false signals; your detector is probably reacting to electromagnetic interference.
Target Elimination
The right knob is used to eliminate unwanted metals from detection.
For instance, you may be searching for coins, and want to eliminate objects like nails, bolts, or pull-tabs from detection.
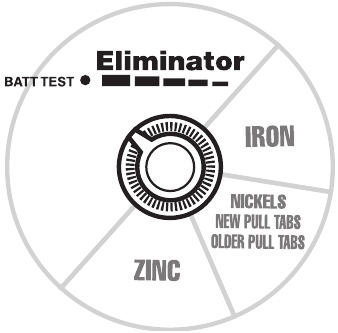
As you turn the right knob clockwise, you progressively eliminate different types of metals from detection. As you rotate the right knob, you first eliminate iron objects from detection. Iron objects include nails, bolts, old cans, and tools. Next, you eliminate nickels, pull-tabs, and finally zinc pennies.
Gold is also eliminated from detection with the right knob. First smaller gold objects are eliminated; as you rotate the knob further, larger gold objects are eliminated. Silver objects, like high-value coins, are not eliminated from detection.
Refer to this scale for the relative positions at which different types of metals are eliminated from detection:
Operation in the Field
Sweep the search coil from side to side, in slow, overlapping motions. Keep the search coil parallel to the ground. Keep search coil 1/2″ off the ground and try not to make contact with the ground.
Try not to lift the search coil at the end of your sweeps. This may be difficult for younger children, but the closer the search coil is to the ground throughout the sweep, the more likely you are to find buried metal objects.
Keep the left knob in the maximum sensitivity setting possible. Click the right knob on and start searching with it in the fully counterclockwise position.
You may want to move the right knob during your search, depending on what you find. For instance, if you start searching with the right knob to the left(but not in battery test mode), you will detect all types of metal objects. If you find that you are in a trashy area, and wish to eliminate unwanted objects from detection, sweep the search coil over an undesirable object while turning the knob. Find the knob setting at which certain types of metals are eliminated, and adjust your settings accordingly.
Gold rings can be eliminated from detection along with pull-tabs. Be aware that some desirable objects, like nickels and gold, are eliminated from detection in the middle of the range. Gold rings have a metallic signature similar to pull-tabs; nickels have a metallic signature similar to some newer pull tabs. It requires practice and patience to understand what types of objects are eliminated at each setting.
Pinpointing
Accurate pinpointing takes practice and is best accomplished by «X-ing» the suspected target area.
- Once a buried target is identified by a good tone response, continue sweeping the coil over the target in a narrowing side to side pattern.
- Take visual note of the place on the ground where the «beep» occurs as you move the coil slowly from side to side.
- Stop the coil directly over this spot on the ground.
- Now move the coil straight forward and straight back towards you a couple of times.
- Again make visual note of the spot on the ground at which the «beep» occurs.
- If needed, «X» the target at different angles to «zero in» on the exact spot on the ground at which the «beep» occurs.
REMEMBER: The detector will beep just as the search coil passes over the buried object. If you have difficulty pinpointing very strong signals, try lifting the coil higher off the ground until a weaker, but more concise, signal is heard. For very weak signals, try moving the coil in short quick sweeps, closer to the ground.
TREASURE HUNTER’S CODE OF ETHICS
- Respect the rights and property of others.
- Observe all laws, whether national, state or local.
- Never destroy historical or archaeological treasures.
- Leave the land and vegetation as it was. Fill in the holes.
- All treasure hunters may be judged by the example you set. Always obtain permission before searching any site. Be extremely careful while probing, picking up, or discarding trash items. And ALWAYS COVER YOUR HOLES!
FIRST TEXAS PRODUCTS, LP 1-YEAR LIMITED WARRANTY
Bounty Hunter Metal Detectors are warranted against defects in workmanship or materials under normal use for five years from date of purchase to the original user. Liability in all events is limited to the purchase price paid. Liability under this Warranty is limited to replacing or repairing, at our option, any Bounty Hunter Detector returned, shipping cost prepaid, to First Texas Products, LP. Damage due to neglect, accidental damage or misuse of this product is not covered by this warranty.
Copyright© 2004 by First Texas Products, L.P.
All rights reserved, including the right to reproduce this book, or parts thereof, in any form.
Bounty Hunter® and Bounty Hunter Junior are registered trademarks of First Texas Products, L.P.
www.detecting.com
First Texas Products, LP
1100 Pendale
El Paso, TX 79907
(915) 633-8354
Videos
Bounty Hunter Junior — How to Use Video
Documents / Resources
References
BOUNTY HUNTER METAL DETECTORS
Download manual
Here you can download full pdf version of manual, it may contain additional safety instructions, warranty information, FCC rules, etc.
Download Bounty Hunter Metal Detector Manual
Просмотр
Доступно к просмотру 8 страниц. Рекомендуем вам скачать файл инструкции, поскольку онлайн просмотр документа может сильно отличаться от оригинала.
-
User’s Manual
To get the most enjoyment from your Metal Detector, we suggest you do the
following:
1. Use 9-volt ALKALINE batteries only.
• Do not use Heavy Duty batteries.
• Do not use ordinary Zinc-Carbon Batteries.
2. Make sure the right knob is clicked on (i.e. not in battery-test
position).
3. Use your detector OUTDOORS only
• Large metal objects inside the home may interfere with the
detector’s operation.  Floors and walls of most homes contain
metal.
• Electrical appliances inside the home, like microwave ovens,
televisions, and some light fixtures, emit electromagnetic energy
which can interfere with the detector’s operation.
• Do not place coins on the floor of your home and try to detect.
Try this test outside only.
• If conducting an indoor demonstration, hold search coil off
ground and wave coins over search coil.
-
Installing Batteries
Use 9-volt ALKALINE batteries only!
1. Remove the battery door from the underside of the detector.
push door
from side
2. Pull out the two battery connectors.
3. Snap on two 9-volt ALKALINE batteries.
Do not use Heavy Duty or ordinary Zinc Carbon batteries.
4. Place batteries into compartment one on top of the other.
5. Replace the battery door.
Slide over until it shuts securely in place.
All battery brands differ slightly in size.
If you want to secure the batteries more tightly in the
compartment, feed the battery wires underneath and between the
batteries.
If batteries fit too tightly, causing battery door to bulge, move
battery wires toward front of compartment, not between the
batteries.
2
-
Quick-Start Demo
Try this quick way to demonstrate the basic features of your metal detector:
I. Supplies Needed
a. A nail
b. A zinc penny (pennies dated after 1982 are made of zinc)
c. A quarter
II. Position Your Detector
Keep the detector away from floors, walls, and metal objects.
One person holds the detector still, so that another can sweep
coins under the coil.
Sweep coins under the bottom of the search coil.
III. Beginning Settings
a. Left Knob:  At 6:00 position
b. Right Knob: Click on, but keep counterclockwise
IV. Detecting All Types of Metals
a. Wave each object over the search coil.  Notice the tone is
loudest as the object passes over the center.
b. Pass each object at varying distances from the search coil.
Notice that the sound gets louder as the object moves closer to
the search coil. Also notice that beyond a certain distance, the
object is no longer detected.
V. Eliminating Some Metals
a. Wave the nail and slowly turn the right knob to the right.
• Notice where the nail is eliminated from detection
b. Wave the penny and keep turning the right knob until the
penny is eliminated from detection
c. Wave the quarter
• Notice that the quarter is never eliminated from detection.
3
- 1
- 2
- 3
- 4
- 8
User’s Manual
To get the most enjoyment from your Metal Detector, we suggest you do the
following:
1.
Use 9-volt
ALKALINE
batteries only.
• Do not use Heavy Duty batteries.
• Do not use ordinary Zinc-Carbon Batteries.
2.
Make sure the right knob is clicked on (i.e. not in battery-test
position).
3.
Use your detector
OUTDOORS
only
• Large metal objects inside the home may interfere with the
detector’s operation. Floors and walls of most homes contain
metal.
• Electrical appliances inside the home, like microwave ovens,
televisions, and some light fixtures, emit electromagnetic energy
which can interfere with the detector’s operation.
• Do not place coins on the floor of your home and try to detect.
Try this test outside only.
• If conducting an indoor demonstration, hold search coil off
ground and wave coins over search coil.
User’s Manual
To get the most enjoyment from your Metal Detector, we suggest you do the
following:
1. Use 9-volt ALKALINE batteries only.
• Do not use Heavy Duty batteries.
• Do not use ordinary Zinc-Carbon Batteries.
2. Make sure the right knob is clicked on (i.e. not in battery-test
position).
3. Use your detector OUTDOORS only
• Large metal objects inside the home may interfere with the
detector’s operation. Floors and walls of most homes contain
metal.
• Electrical appliances inside the home, like microwave ovens,
televisions, and some light fixtures, emit electromagnetic energy
which can interfere with the detector’s operation.
• Do not place coins on the floor of your home and try to detect.
Try this test outside only.
• If conducting an indoor demonstration, hold search coil off
ground and wave coins over search coil.
Содержание
- 1 Технические характеристики
- 1.1 Катушка
- 1.2 Дисплей
- 1.3 Комплектация
- 1.4 Параметры и настройки
- 2 Программы поиска
- 3 Тесты копателя
- 4 Особенности ремонта
- 5 Примеры находок
- 6 Сравнение с другими моделями
- 7 Отзывы владельцев
Младший. Так переводится с английского слово Junior. Действительно, эта модель начального уровня в линейке Bounty Hunter предназначена для детей и подростков. Принцип — включил и пошёл. Разберёмся, что же можно найти с таким металлоискателем.
Технические характеристики
Конструктив металлоискателя весьма странный. Блок управления, вытянутый вдоль штанги, заканчивается рукоятью наверху. Подлокотника нет, штанги для него тоже нет.
Есть две модификации, которые выглядят по-разному, но имеют одинаковый функционал и примерно похожий конструктив — Junior и Junior T.I.D. (Target ID). У T.I.D. цифровое управление и экран на рукояти сверху. У обычного управление с помощью потенциометров и экран перед ручкой на штанге.
Поставляется в собранном виде — реально, включил и пошёл.
Кабель катушки проложен внутри штанги.
Катушка
Концентрическая катушка 152 мм или 6 дюймов. О водонепроницаемости ничего не заявлено, пользователи пишут, что катушку мочить нельзя.
Дисплей
У T.I.D. дисплей жидкокристаллический, показывает смайлики. Вернее, подсвечивает один из трёх смайликов — грустный, озадаченный и весёлый. Соответственно, чермет, ювелирка, монеты.
У обычного Junior — шкала со стрелкой. Как её должен понимать ребёнок? Вопрос риторический. Папа объяснит, видимо.
Комплектация
В комплекте металлоискателя — сам металлоискатель в сборе. Питание нужно купить отдельно — 2 батарейки по 9В типа Крона.
Для T.I.D. используются обычные AA батарейки. Нужно 2 штуки, тоже приобретаются самостоятельно.
Положена в коробку и мурзилка, в доступной форме описывающая азы приборного поиска. У T.I.D. мурзилка веселее, так как картинок в ней больше. Даже отстройка от грунта прорисована.
Параметры и настройки
У прибора не так уж много настроек. У обычного Джуниора две крутилки. Левая регулирует чувствительность, правая отвечает за дискриминацию.
У T.I.D. управление с плёночной клавиатуры. Две кнопки, левая — включение, правая — управление дискриминацией, можно исключить два левых сегмента из трёх.
Программы поиска
Загружать подрастающее поколение кучей программ поиска инженеры не стали. Оба прибора Bounty Hunter Junior работают в одном режиме — поиск с дискриминацией. Исключение регулируется с помощью потенциометра или кнопки Disc у T.I.D.
Тесты копателя
Ведущий канала Fix Play — подросток, если не сказать ребёнок, достаточно грамотно проводит воздушный тест и пытается дать обзор на обычный Джуниор. Смотрим.
Смотрим видео индийских подростков. Пацаны сделали тест на обнаружение перстня в грунте, как смогли. Несмотря на незнакомый язык, видео вполне информативно.
Особенности ремонта
Ремонтировать в приборе особо нечего. Если что-то случится в гарантийный период — несём продавцу или в АСЦ. Если гарантия вышла — стоит поискать плату прибора вместо вышедшей из строя, новую или контрактную.
Штанга сделана так, что сломать её сложно. Но на входе в пластмассовую рукоять отломить, в принципе, можно. Стоит ли такой прибор ремонтировать — большой вопрос. При примерной стоимости фирменного американского в 5000 рублей шкурка вряд ли стоит выделки. Китайские поделки, выполненные по мотивам Bounty Hunter Junior — и того дешевле.
В отзывах пользователей проскакивала информация от одного из отцов: человек сам впаял гнездо для наушников. О том, как именно, пользователь умолчал.
Примеры находок
В сети можно встретить упоминание о том, как семилетний мальчик с металлоискателем Bounty Hunter нашёл клад на десятки тысяч долларов. Разочаруем: клад был, мальчик был, но Bounty Hunter другой. Какой-то старый аналоговый прибор из дедушкиной кладовки. Если при переходе по ссылкам вас не будет преследовать распространённая ошибка «403 Forbidden» от подсистемы nginx, эту информацию вы и сами без труда найдёте.
На деле же основная добыча — отдельно лежащие монеты. По большей части — современные.
Дети на копе. Три забавных карапуза, которые пытаются подражать папе. Смотрим.
https://youtu.be/AitZBECkIdg
Монета и нательный крест — улов копателя с обычным джуниором. Смотрим короткое видео канала ShopDetectRu.
Сравнение с другими моделями
Когда задумываешься о сравнении, на ум приходят разве что китайские приборы, которые стоят втрое дешевле и ищут от случая к случаю.
Среди нормальных конкурентов приходит на ум Minelab Go Find 11 — он очень похож на своего старшего брата Minelab Go Find 60. Стоит в полтора раза дороже, находит примерно то же самое. Но сложнее в управлении. Конструктив одинаково хлипкий у обоих приборов.
Отзывы владельцев
Покупатели DNS отмечают низкую цену и сетуют на отсутствие подлокотника. Все говорят о том, что детям прибор нравится.
Покупатели на Озоне отмечают хлипкую конструкцию. Буквально каждый второй рассказывает о то, что приколхозил хомут, стяжку или что-то типа, чтобы подсобрать прибор после незначительных падений. Но! Дети довольны.
Один из пользователей по имени Алексей в своём отзыве делится опытом пляжного поиска. В Таиланде ребёнок горстями приносил монеты с пляжа. Поднимал с глубины примерно 15 см. Металлоискатель прекрасно вписался в габариты чемодана и радовал на отдыхе — а что ещё нужно?
Удачи на копе, камрады! И радуйте детей.
↓↓↓ Обсуждайте данную статью в комментариях. Листайте вниз ↓↓↓


