инструкцияBosch VeroCup 100 TIS30129RW

[en] Instruction manual Fully automatic espresso machine 5
[fr] Mode d’emploi Machine à expresso automatique 27
[nl] Gebruiksaanwijzing Volautomatische espressomachine 50
[pl] Instrukcja obsługi Ekspres do kawy 72
[cs] Návod k použití Plně automatický kávovar 94
[ru] Правила пользования Автоматическая кофемашина 116
[de] Gebrauchsanleitung Kaffeevollautomat 139
Fully automatic espresso machine
TIS3.1..
Посмотреть инструкция для Bosch VeroCup 100 TIS30129RW бесплатно. Руководство относится к категории кофеварки, 51 человек(а) дали ему среднюю оценку 8.2. Руководство доступно на следующих языках: английский. У вас есть вопрос о Bosch VeroCup 100 TIS30129RW или вам нужна помощь? Задайте свой вопрос здесь
Главная
| Bosch | |
| VeroCup 100 TIS30129RW | |
| кофеварка | |
| английский | |
| Руководство пользователя (PDF), Техническая спецификация (PDF) |
Не можете найти ответ на свой вопрос в руководстве? Вы можете найти ответ на свой вопрос ниже, в разделе часто задаваемых вопросов о Bosch VeroCup 100 TIS30129RW.
Как часто следует очищать кофеварку от накипи?
Какой лучший способ очистки кофеварки от накипи?
Как долго можно хранить кофе в зернах?
Как лучше всего хранить кофе?
Как помол сказывается на вкусе кофе?
Инструкция Bosch VeroCup 100 TIS30129RW доступно в русский?
Не нашли свой вопрос? Задайте свой вопрос здесь

Данная инструкция на русском языке предназначена для кофемашины
Bosch VeroCup 100 TIS30129RW, описывает принцип работы и основные моменты эксплуатации устройства.
Производитель настойчиво рекомендует перед включением кофемашины
внимательно изучить настоящую инструкцию.
Инструкция для кофемашины
представлена в формате PDF. Все современные браузеры уже поддерживают данный формат и сложностей с открытием файла возникнуть не должно.
Но если открыть инструкцию все же не удается, то необходимо установить на компьютер программу для чтения PDF файлов, например, Acrobat Reader. Если у вас возникли сложности с открытием инструкции на смартфоне под управлением Android, нужно установить, например, Adobe Acrobat Reader.
Комментарии (0)
Комментарии про другие Кофемашины
Другие Кофемашины Bosch
en Instruction manual ………………………………………………..5
fr Mode d’emploi ………………………………………………….27
nl Gebruiksaanwijzing ……………………………………………..50
pl Instrukcja obsługi ……………………………………………….72
cs Návod k použití ………………………………………………….95
ru Правила пользования ………………………………………… 117
de Gebrauchsanleitung ……………………………………………139
Fully automatic espresso machine
Machine à expresso automatique
Volautomatische espressomachine
Ekspres do kawy
Plně automatický kávovar
Автоматическая кофемашина
Kaffeevollautomat
TIS 3.1.
#
$
,
,,
,,,
FOLFN
, ,, ,,,
,9 9 9,
%
&
‘
, ,, ,,,
,,
,9 9 9,
,,,,
, ,, ,,,

en
5
Table of contents
enInstruction manual
8 Intended use. . . . . . . . . . . . . . . . . 6
( Important safety information . . . 6
7 Environmental protection . . . . . . 8
Saving energy. . . . . . . . . . . . . . . . . . . 8
Environmentally-friendly disposal . . . . 8
* Getting to know your appliance . 8
Included in delivery. . . . . . . . . . . . . . . 8
Assembly and components . . . . . . . . 9
Controls . . . . . . . . . . . . . . . . . . . . . . . 9
_ Accessories . . . . . . . . . . . . . . . . 10
K Before using for the first time. . 11
Installing and connecting the
appliance . . . . . . . . . . . . . . . . . . . . . 11
Commissioning the appliance . . . . . 11
1 Operating the appliance . . . . . . 12
Preparing coffee using freshly ground
beans . . . . . . . . . . . . . . . . . . . . . . . . 12
Preparing drinks with milk . . . . . . . . 13
Adjusting beverage settings . . . . . . . 14
Water filter . . . . . . . . . . . . . . . . . . . . 15
Frost protection. . . . . . . . . . . . . . . . . 15
1 Settings. . . . . . . . . . . . . . . . . . . . 16
Automatic switch-off . . . . . . . . . . . . . 16
Switching the audible signal on/off. . 16
Setting the water hardness . . . . . . . . 17
Factory reset. . . . . . . . . . . . . . . . . . . 17
D Daily care and cleaning. . . . . . . 18
Cleaning agent . . . . . . . . . . . . . . . . . 18
Cleaning the appliance. . . . . . . . . . . 19
Cleaning the drip tray and coffee
grounds container. . . . . . . . . . . . . . . 19
Cleaning the milk system . . . . . . . . . 19
Cleaning the brewing unit . . . . . . . . . 20
. Service programmes. . . . . . . . . 21
Starting Calc’nClean . . . . . . . . . . . . . 22
3 Trouble shooting . . . . . . . . . . . . 23
4 Customer service . . . . . . . . . . . 26
Technical data. . . . . . . . . . . . . . . . . . 26
E number and FD number. . . . . . . . . 26
Guarantee . . . . . . . . . . . . . . . . . . . . . 26
en Accessories
10
———
_ Accessories
Accessories
The following accessories are available
from retailers or from customer service:
———
The contact data for customer service in
all countries can be found at the back of
these instructions.
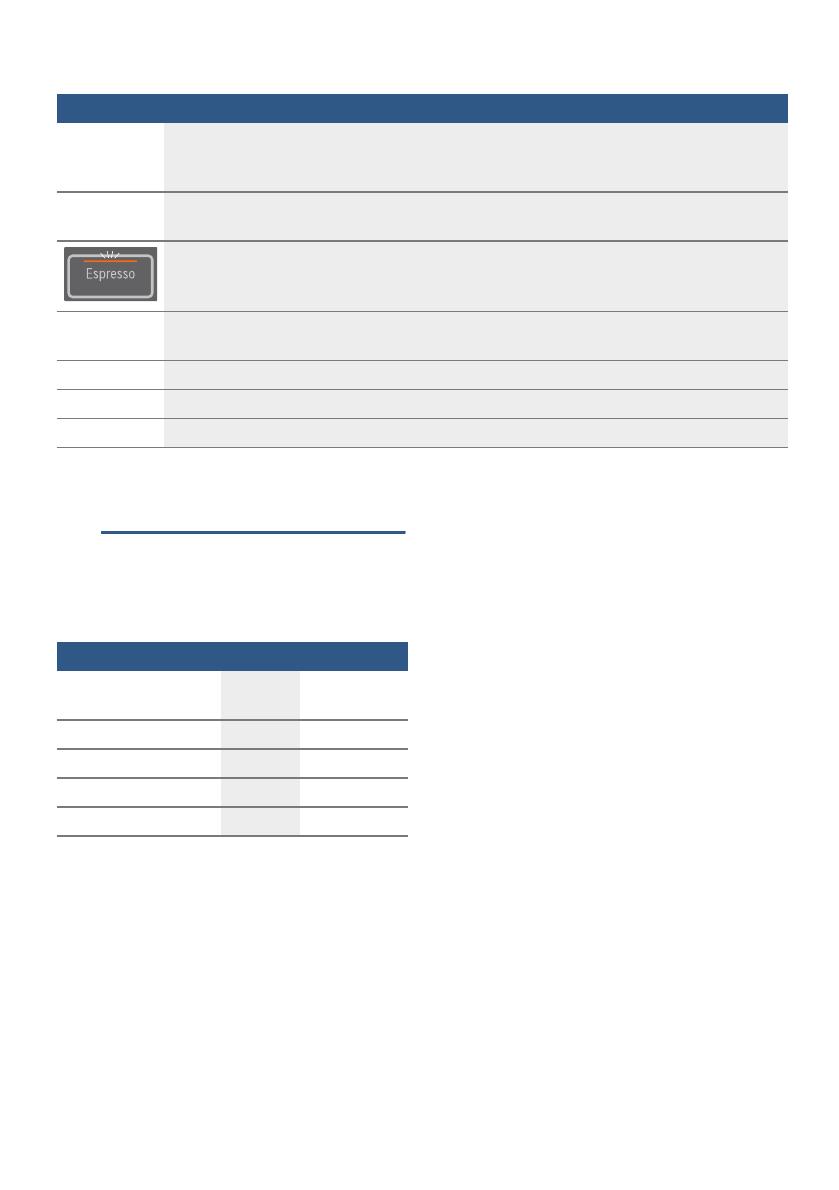
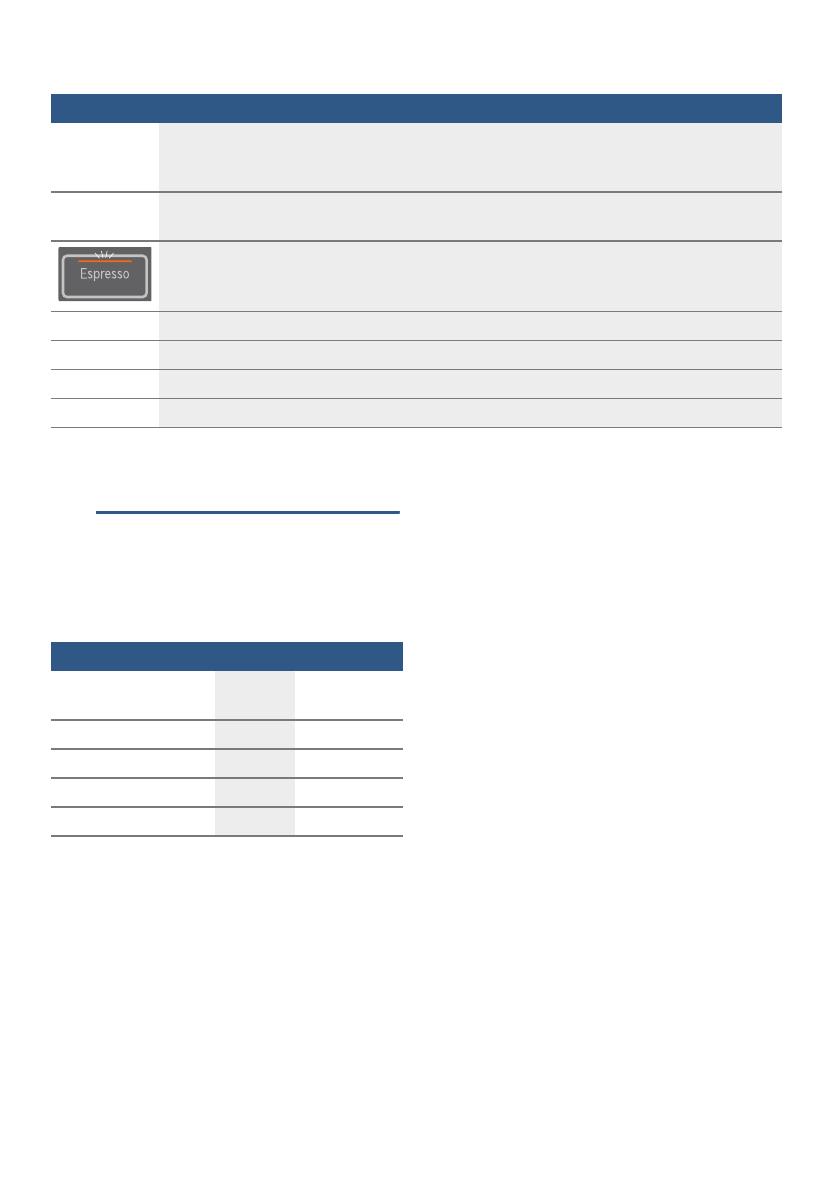
Symbol
‘
Lights up when the water tank needs to be topped up with water or the water tank is not
inserted.
Flashes when the water filter needs to be replaced.
(
Lights up when trays need to be emptied.
Flashes when door of brewing chamber is open.
is continu-
ously lit
Ready to use, selection possible
is pulsing
Dispensing underway
is flashing
Waiting for operation, e.g. with Calc’nClean
off
Not available
Accessory Order number
Retail Customer ser-
vice
Cleaning tablets
TCZ8001 00311807
Descaling tablets
TCZ8002 00576693
Water filter
TCZ7003 00575491
Care set
TCZ8004 00576331

Before using for the first time en
11
K Before using for the
first time
Before using for the first time
In this section, you will learn how to
commission your appliance.
Note: Only use the appliance in
frost-free areas. If the appliance was
transported or stored at temperatures
below 0 °C, you must wait for at least 3
hours before using it.
Installing and connecting the
appliance
1. Remove any protective plastic film.
2. Place the appliance on a level,
water-resistant surface which can
bear the weight.
3. Using the mains plug, connect the
appliance to an earthed socket that
has been correctly installed.
Note: After plugging in, always wait
(approx. 5 seconds).
Commissioning the appliance
Attaching milk frother
~ Fig. #
1. Remove milk frother parts from the
bag.
2. Assemble milk frother.
3. Attach the milk frother on the front of
the appliance.
Filling the bean container
This appliance can be used to make
coffee drinks from coffee beans.
1. Open the lid )» of the bean
container )*.
2. Pour in coffee beans.
3. Close the lid again.
Notes
■ Coffee beans that have been glazed
or caramelised or that contain other
sugary additives block the brewing
unit. Only use pure bean mixes that
are suitable for use in fully automatic
espresso or coffee machines.
■ The coffee beans are freshly ground
for each brewing process.
■ Keep the coffee beans sealed and
stored in a cool place to maintain
optimum quality.
■ Coffee beans can be stored in the
bean container for a number of days
without losing their aroma.
Filling the water tank
Important: Fill the water tank with fresh,
cold, still water on a daily basis. Prior to
operation, check whether the water tank
has been sufficiently filled.
1. Carefully remove the cover of the
water tank.
2. Use the handle to remove the water
tank.
3. Fill the water tank with water up to
the «max» marking.
4. Put the water tank back in the holder
again, keeping it straight, and fit the
cover of the water tank.
en Daily care and cleaning
18
D Daily care and
cleaning
Daily care and cleaning
With good care and cleaning, your
appliance will remain fully functioning
for a long time to come. In this section,
you will learn how to correctly clean and
care for your appliance.
:Warning
Risk of electric shock!
Before cleaning the appliance, pull out
the mains plug. Never immerse the
appliance in water. Do not use a steam
cleaner.
Cleaning agent
Please observe the following
information to ensure that the different
surfaces are not damaged by using the
wrong type of cleaning agent.
Do not use:
■ Harsh or abrasive cleaning agents.
■ Any cleaning agents containing
alcohol or spirits.
■ Hard scouring pads or sponges.
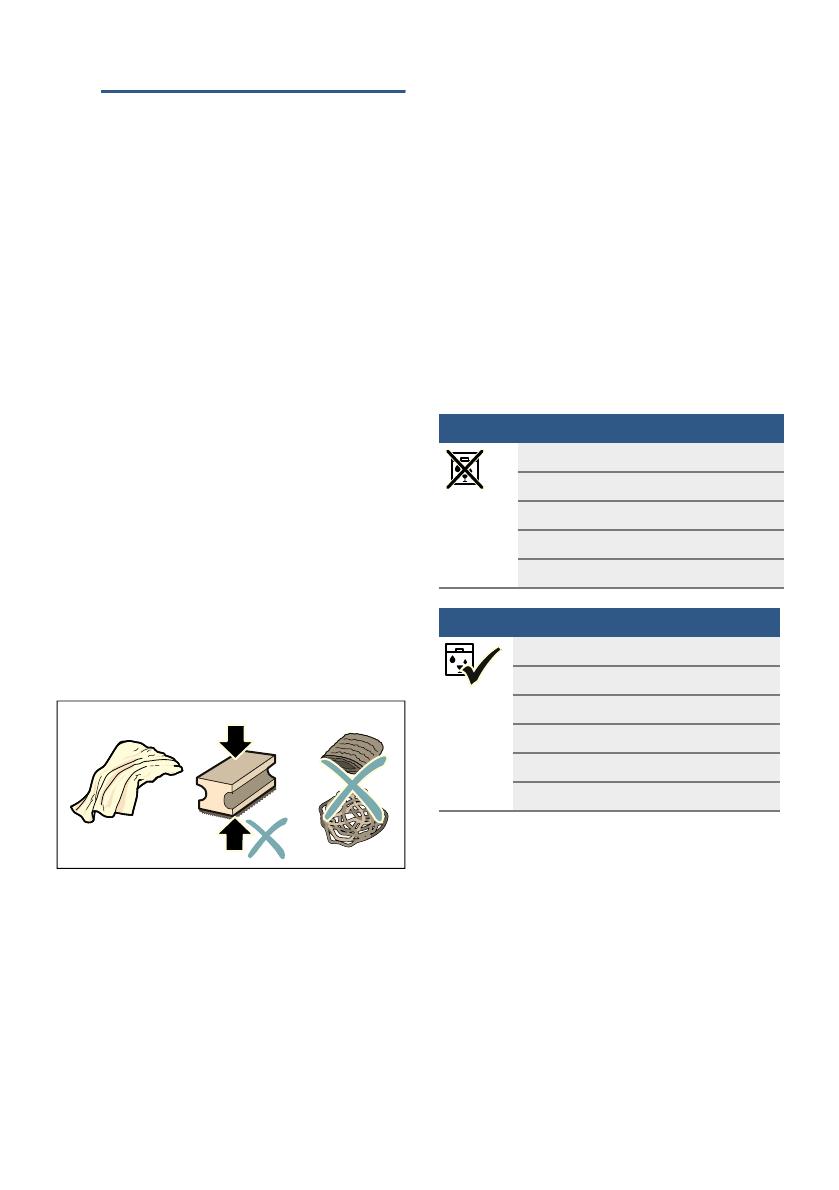
Notes
■ New sponge cloths may contain
salts. Salts can cause rust film on
stainless steel. Wash new sponge
cloths thoroughly before use.
■ Always remove any limescale,
residues of coffee or milk, cleaning
or descaling solution
immediately.This residue may cause
corrosion.
Caution!
Not all of the appliance’s components
can be cleaned in the dishwasher.
~ Fig. % — ‘
9
9
Not dishwasher-safe:
Water tank
Cover for water tank
Aroma lid
Brewing unit
Drip tray
Dishwasher-safe:
max.
60°C
Drip plate
Drip grate
Coffee grounds container
Float
Milk frother
Cover for milk frother

fr
27
Table des matières
frMode d’emploi
8 Utilisation conforme . . . . . . . . . 28
( Précautions de sécurité
importantes . . . . . . . . . . . . . . . . 28
7 Protection de l’environnement . 30
Économie d’énergie . . . . . . . . . . . . . 30
Elimination écologique . . . . . . . . . . . 30
* Présentation de l’appareil . . . . . 30
Contenu de l’emballage . . . . . . . . . . 30
Configuration et éléments. . . . . . . . . 31
Eléments de commande. . . . . . . . . . 31
_ Accessoires . . . . . . . . . . . . . . . . 32
K Avant la première utilisation. . . 33
Installation et raccordement de
l’appareil. . . . . . . . . . . . . . . . . . . . . . 33
Mise en service de l’appareil . . . . . . 33
1 Utilisation de l’appareil . . . . . . . 34
Préparer une boisson à base de café en
grains fraîchement moulus . . . . . . . . 34
Préparation de boissons lactées . . . 35
Ajustage des réglages des boissons 36
Filtre à eau . . . . . . . . . . . . . . . . . . . . 37
Protection contre le gel. . . . . . . . . . . 38
1 Réglages. . . . . . . . . . . . . . . . . . . 38
Coupure automatique . . . . . . . . . . . 38
Activer/désactiver le signal sonore. . 39
Réglage de la dureté de l’eau . . . . . 39
Factory reset. . . . . . . . . . . . . . . . . . . 39
D Entretien et nettoyage
quotidiens . . . . . . . . . . . . . . . . . 40
Nettoyants . . . . . . . . . . . . . . . . . . . . . 40
Nettoyage de l’appareil . . . . . . . . . . . 41
Nettoyer le bac d’égouttement et le bac
à marc de café. . . . . . . . . . . . . . . . . . 41
Nettoyage du système à lait . . . . . . . 41
Nettoyer l’unité de percolation. . . . . . 42
. Programme de service . . . . . . . 43
Démarrer Calc’nClean. . . . . . . . . . . . 44
3 Anomalies, que faire ? . . . . . . . 45
4 Service après-vente . . . . . . . . . 49
Données techniques . . . . . . . . . . . . . 49
Numéro E et numéro FD . . . . . . . . . . 49
Garantie. . . . . . . . . . . . . . . . . . . . . . . 49

Avant la première utilisation fr
33
K Avant la première
utilisation
Avant la première utilisation
Ce chapitre vous explique comment
mettre en service votre appareil.
Remarque : Utiliser l’appareil
uniquement dans des locaux hors gel.
Si l’appareil a été transporté ou
entreposé à des températures
inférieures à 0°C, vous devez attendre
au moins 3 heures avant de le mettre
en service.
Installation et raccordement
de l’appareil
1. Retirer les films protecteurs.
2. Poser l’appareil sur une surface
plane, résistante à l’eau et pouvant
supporter son poids.
3. Raccorder la fiche secteur de
l’appareil à une prise femelle à
contacts de terre installée de
manière règlementaire.
Remarque : Attendre un peu (env.
5 secondes) après chaque
branchement.
Mise en service de l’appareil
Mettre en place le mousseur de lait
~ Figure #
1. Retirer les composants du mousseur
de lait de l’emballage.
2. Assembler le mousseur de lait.
3. Monter le mousseur de lait à l’avant
de l’appareil.
Remplir le réservoir pour café en
grains
Cet appareil vous permet de préparer
des boissons à base de café en grains.
1. Ouvrir le couvercle )» du réservoir
pour café en grains )*.
2. Remplir de café en grains.
3. Refermer le couvercle.
Remarques
■ Des grains de café avec glaçage,
des grains caramélisés ou enrobés
d’une substance sucrée quelconque
obstruent l’unité de percolation.
Utiliser exclusivement un mélange
de café en grains pour expresso ou
percolateur.
■ Les grains de café sont fraîchement
moulus avant chaque percolation.
■ Conserver le café en grains dans un
endroit frais et à l’abri de l’air pour
conserver tout son arôme.
■ Vous pouvez laisser les grains de
café dans le réservoir pour café en
grains plusieurs jours sans que le
café ne perde son arôme.
Remplir le réservoir d’eau
Important : verser chaque jour de l’eau
fraîche non gazeuse dans le réservoir
d’eau. Avant de faire fonctionner
l’appareil, vérifier qu’il y a suffisamment
d’eau dans le réservoir.
1. Retirez le couvercle du réservoir
d’eau.
2. Retirer le réservoir d’eau par la
poignée.
3. Remplir le réservoir d’eau jusqu’au
repère « max ».
4. Replacer le réservoir d’eau droit
dans son support et remettre en
place le couvercle du réservoir
d’eau.

Gebruik volgens de voorschriften nl
51
8 Gebruik volgens de
voorschriften
Gebruik volgens de voorschriften
Controleer het apparaat na het
uitpakken. Niet aansluiten in
geval van transportschade.
Dit apparaat is alleen bestemd
voor huishoudelijk gebruik en
de huiselijke omgeving.
Gebruik het apparaat alleen
binnenshuis bij
kamertemperatuur en tot
2000 m boven de zeespiegel.
( Belangrijke veilig-
heidsvoorschriften
Belangrijke veiligheidsvoorschriften
Lees de gebruiksaanwijzing
zorgvuldig door, houd u eraan
en bewaar hem goed. Geeft u
het apparaat door aan derden,
voeg deze gebruiksaanwijzing
er dan bij.
Dit apparaat kan worden
bediend door kinderen vanaf
8 jaar en door personen met
fysieke, sensorische of
geestelijke beperkingen of met
gebrekkige ervaring en/of
kennis, indien zij onder toezicht
staan of zijn geïnstrueerd in het
veilige gebruik van het
apparaat en de daaruit
resulterende gevaren hebben
begrepen. Kinderen jonger dan
8 jaar dienen uit de buurt van
het apparaat en het
aansluitsnoer te worden
gehouden en mogen het
apparaat niet bedienen.
Kinderen mogen niet met het
apparaat spelen. Reiniging en
gebruikersonderhoud mogen
niet door kinderen worden
uitgevoerd, tenzij de kinderen
8 jaar of ouder zijn en zij deze
werkzaamheden onder toezicht
uitvoeren.
Toebehoren nl
55
———
_ Toebehoren
Toebehoren
Onderstaand toebehoren is in de
handel en via de servicedienst
verkrijgbaar:
———
De contactgegevens voor de
servicedienst van alle landen vindt u op
de laatste pagina van deze handleiding.
Indicatie
‘
Licht op wanneer de watertank met water moet worden bijgevuld of de watertank ont-
breekt.
Knippert wanneer het waterfilter moet worden vervangen.
(
Licht op als de bakjes geleegd moeten worden.
Knippert als de deur voor de zetkamer open is.
licht op Klaar voor gebruik, er kan een keuze worden gemaakt
pulseert
Afgifte loopt
knippert
Wacht op bediening, bijv. bij Calc’nClean
uit
Niet beschikbaar
Toebehoren Bestelnummer
Handel Klantenser-
vice
Reinigingstabs
TCZ8001 00311807
Ontkalkingstabs
TCZ8002 00576693
Waterfilter
TCZ7003 00575491
Onderhoudsset
TCZ8004 00576331

nl Voor het eerste gebruik
56
K Voor het eerste
gebruik
Voor het eerste gebruik
In dit hoofdstuk leest u hoe u het
apparaat in gebruik neemt.
Aanwijzing: Machine alleen gebruiken
in vorstvrije ruimtes. Is de machine bij
temperaturen onder de 0 °C
getransporteerd of opgeslagen, dan
dient u minstens 3 uur te wachten
alvorens hem weer in gebruik te nemen.
Apparaat installeren en
aansluiten
1. Verwijder de beschermende folie.
2. Zet het apparaat neer op een vlak en
voor het gewicht geschikt, watervast
oppervlak.
3. Het apparaat met de stekker in een
volgens de voorschriften
geïnstalleerd geaard stopcontact
steken.
Aanwijzing: Na elke aansluiting een
moment (ca. 5 seconden) wachten.
Apparaat in gebruik nemen
Melkschuimer aansluiten
~ Afb. #
1. Onderdelen van de melkschuimer uit
de zak nemen.
2. Melkschuimer in elkaar zetten.
3. Melkschuimer voor op het apparaat
aansluiten.
Bonenreservoir vullen
Met dit apparaat kunt u koffiedranken
uit koffiebonen bereiden.
1. Deksel )» van het
bonenreservoir )* openen.
2. Koffiebonen vullen.
3. Deksel weer sluiten.
Aanwijzingen
■ Geglaceerde, gekaramelliseerde
koffiebonen of bonen met andere
suikerhoudende toevoegingen
verstoppen de zetgroep. Alleen
zuivere espressobonen of
bonenmengsels voor volautomaten
gebruiken.
■ De koffiebonen worden voor elk
zetproces vers gemalen.
■ De koffiebonen koel en gesloten
bewaren, zo blijft de kwaliteit
optimaal behouden.
■ U kunt koffiebonen meerdere dagen
in het bonenreservoir bewaren
zonder dat het aroma verloren gaat.
Watertank vullen.
Belangrijk: vul de watertank dagelijks
met vers, koud water zonder koolzuur.
Controleer voor de werking, of de
watertank voldoende is gevuld.
1. Het deksel van de watertank nemen.
2. De watertank er aan de greep uit
tillen.
3. De watertank tot de markering «max»
met water vullen.
4. De watertank weer rechtop in de
houder plaatsen en het deksel op de
watertank plaatsen.

Apparaat bedienen nl
57
Algemene aanwijzingen
De volautomatische espressomachine
is af fabriek geprogrammeerd met de
standaardinstellingen voor een optimale
werking.
■ Het apparaat schakelt zichzelf na
een geselecteerde tijd automatisch
uit.
■ Bij aanraking van een toets klinkt er
een geluid, dat kan worden
uitgeschakeld.~ «Instellingen»
op pagina 61
■ Als u het apparaat voor de eerste
keer gebruikt, nadat er een
serviceprogramma is uitgevoerd of
nadat het apparaat langere tijd niet
is gebruikt, dient u de eerste drank
niet te drinken aangezien deze nog
niet het volle aroma bezit.
■ Na de ingebruikname van het
apparaat krijgt u pas een voldoende
dikke en stabiele laag ‘crema’ nadat
u de eerste paar kopjes hebt gezet.
■ Bij langdurig gebruik kunnen zich
waterdruppels bij de
ventilatiesleuven voordoen.
■ Uittredende stoom is geen defect,
maar een normaal verschijnsel.
Voordat u uw nieuwe apparaat gebruikt,
dient u de waterhardheid te controleren
en in te stellen.~ «Instellingen»
op pagina 61
1 Apparaat bedienen
Apparaat bedienen
In dit hoofdstuk leest u hoe u koffie- en
melkdranken bereidt. U krijgt informatie
over de instellingen, het waterfilter, de
aanpassing van de maalfijnheid en de
vorstbescherming.
Aanwijzing: Vers bereide dranken
kunnen zeer heet zijn.
Koffiedrank van versgemalen
bonen zetten
U kunt kiezen uit Espresso en Caffe
Crema. ~ «Dranken met melk
bereiden» op pagina 58
Het apparaat is ingeschakeld. De
watertank en het bonenreservoir zijn
gevuld.
1. Plaats een kopje onder het
uitloopsysteem.
2. Door herhaalde aanraking van
% de gewenste koffiesterkte
instellen.
3. Toets Espresso of Caffe Crema
aanraken.
Nu wordt de koffie gezet en aansluitend
wordt het kopje gevuld.
Aanwijzing: Om de drankbereiding
voortijdig te stoppen, Espresso of Caffe
Crema opnieuw aanraken.

nl Apparaat bedienen
60
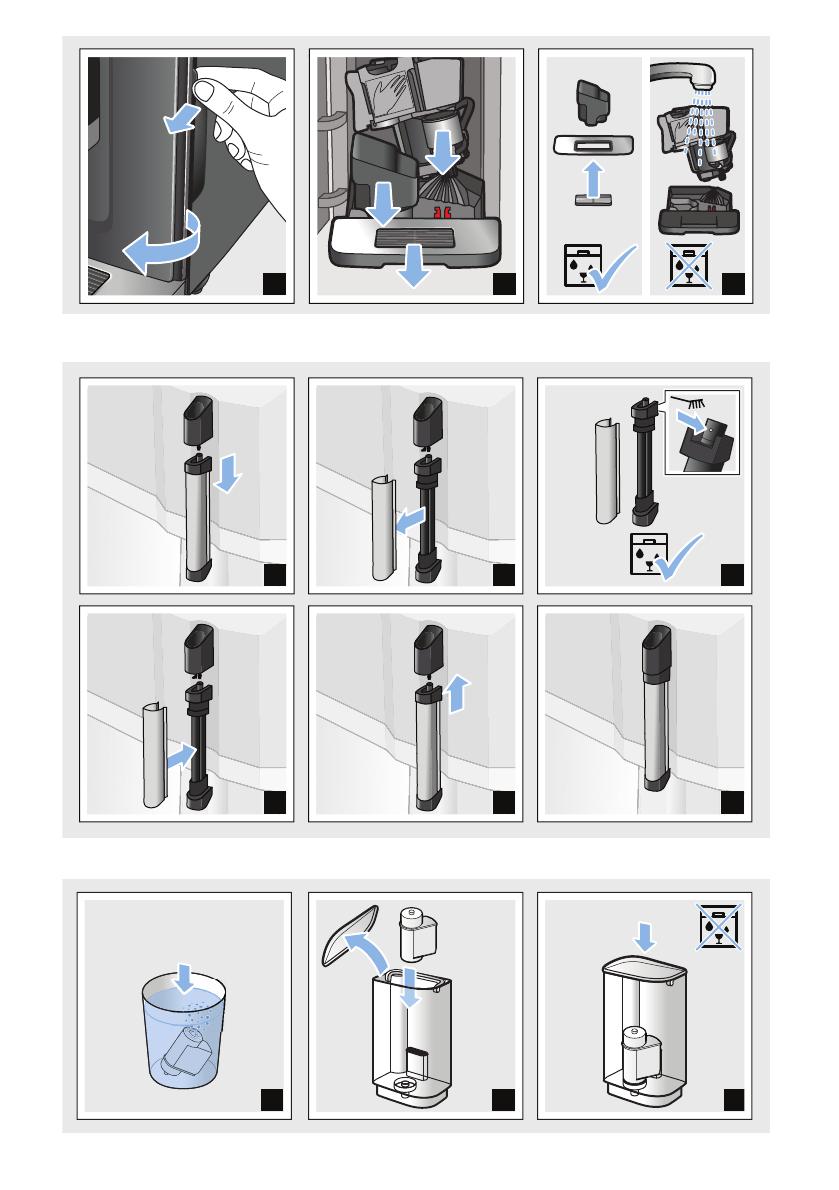
Waterfilter
Waterfilter
~ Afb. ‘
Een waterfilter vermindert
kalkafzettingen, reduceert
verontreinigingen in het water en
verbetert de koffiesmaak. Waterfilters
zijn verkrijgbaar in de handel of via de
klantenservice.
Waterfilter aanbrengen of vervangen
Voordat u een nieuw waterfilter kunt
gebruiken, dient u het filter te spoelen.
Het apparaat is ingeschakeld. De
watertank is gevuld.
1. % en Calc’nClean ten minste
3 seconden ingedrukt houden.
2. Toets Espresso aanraken, het menu
“Waterhardheid” wordt geactiveerd.
3. Toets % aanraken en als volgt
instellen:
4. Het waterfilter (opening naar boven)
onderdompelen in een met water
gevulde kom tot er geen luchtbellen
meer ontsnappen.
~ Afb. ‘
5. Vervolgens het waterfilter stevig in
de lege watertank drukken.
6. De watertank tot de markering
«max.» met water vullen.
7. Een kom met een capaciteit van min.
1,0 l onder de uitloop plaatsen.
8. Toets Espresso aanraken om de
instelling op te slaan en het spoelen
te activeren.
9. Watertank aanbrengen.
10. Toets Espresso aanraken om het
spoelen te starten. Er stroomt water
door het filter.
11. Toets Calc’nClean aanraken om het
menu te verlaten.
12. Vervolgens de kom leegmaken. Het
apparaat is weer klaar voor gebruik.
Waterfilter verwijderen
Als het waterfilter wordt verwijderd en er
geen nieuw waterfilter wordt
aangebracht, dient u de desbetreffende
instelling van de waterhardheid uit te
voeren. ~ «Waterhardheid instellen»
op pagina 62
Vorstbescherming
Om beschadiging door vorst te
voorkomen bij transport en opslag,
moet het apparaat eerst geheel leeg
worden gemaakt.
Info: Het apparaat moet klaar zijn voor
gebruik en de watertank moet gevuld
zijn.
1. Een grote kom onder de uitloop van
de melkschuimer plaatsen en de
melkschuimer omlaag schuiven.
2. Toets Milk ten minste 5 seconden
ingedrukt houden.
De led van de toets knippert, het
apparaat warmt nu op.
3. De watertank verwijderen zodra er
stoom uit de melkschuimer komt.
4. Het apparaat laten stomen. Wachten
tot het symbool ‘ en alle leds
knipperen.
5. Met de toets k het apparaat
uitschakelen.
6. De watertank en de lekschaal
leegmaken en het apparaat grondig
reinigen.
Het apparaat kan nu worden
getransporteerd of opgeslagen.
Aanwijzing: De zetgroep is nu
beveiligd en kan niet worden verwijderd.
met waterfilter

Dagelijks onderhoud en reiniging nl
65
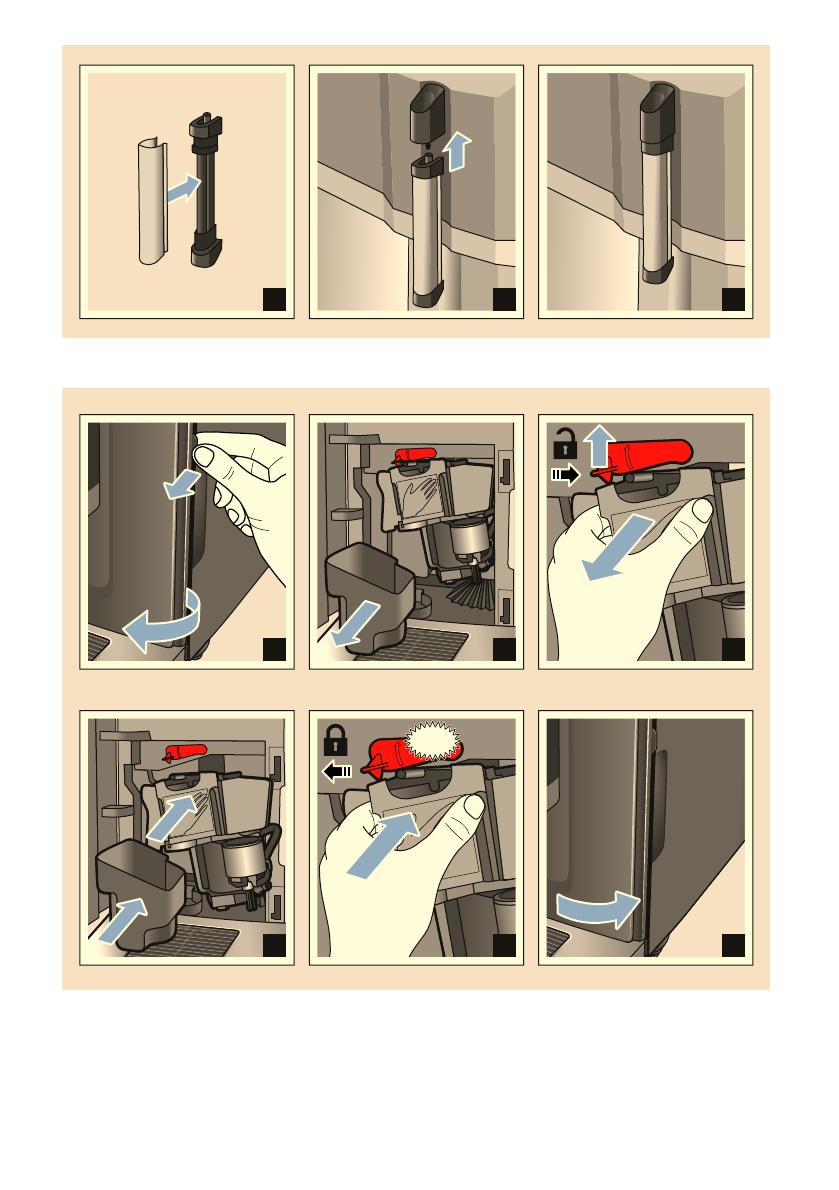
Zetgroep reinigen
~ Afb. $, ~ Afb. %
Aanvullend bij het automatische
spoelen dient de zetgroep regelmatig te
worden verwijderd en gereinigd.
Attentie!
De zetgroep zonder afwasmiddel of
middelen met azijn of zuur reinigen en
niet in de vaatwasser doen.
Zetgroep eruit nemen:
1. Apparaat uitschakelen.
2. De deur van de zetkamer openen.
3. Het koffiedikreservoir verwijderen.
4. De rode hendel omhoog duwen, de
zetgroep aan de greep vastpakken
en voorzichtig naar voren toe eruit
trekken.
5. De zetgroep grondig met stromend
warm water reinigen.
6. Reinig de binnenkant van de
machine grondig met een vochtige
doek, verwijder eventueel aanwezige
koffieresten.
7. Laat de zetgroep en de binnenkant
van het apparaat drogen.
Zetgroep plaatsen:
1. De zetgroep aan de greeep
vastpakken.
2. De rode hendel omhoog duwen, de
zetgoep onder de hendel plaatsen
en tot aan de aanslag naar achteren
schuiven. De hendel moet
vastklikken.
3. Het koffiedikreservoir weer
aanbrengen en de deur sluiten.
Belangrijk: Bij ontbrekende of verkeerd
aangebrachte zetgroep of lekschaal kan
de deur niet worden gesloten.
Servicedienst nl
71
4 Servicedienst
Servicedienst
Technische gegevens
E-nummer en FD-nummer
Geef tijdens het telefoongesprek altijd
het volledige productnummer (E-nr.) en
het fabricagenummer (FD-nr.) van uw
apparaat op, zodat wij u goed van
dienst kunnen zijn. U vindt de nummers
op het typeplaatje `. (~ Afb. «)
Om niet te lang te hoeven zoeken
wanneer u de servicedienst nodig heeft,
kunt u hier direct de gegevens van uw
apparaat en het telefoonnummer van de
servicedienst invullen.
De contactgegevens voor de
servicedienst van alle landen vindt u op
de laatste pagina van deze handleiding.
Garantievoorwaarden
Voor dit apparaat gelden de
garantievoorwaarden die worden
uitgegeven door de vertegenwoordiging
van ons bedrijf in het land van aankoop.
De leverancier, bij wie u het apparaat
heeft gekocht, geeft u hierover graag
meer informatie. Om aanspraak te
maken op de garantie heeft u altijd uw
aankoopbewijs nodig.
Wijzigingen voorbehouden.
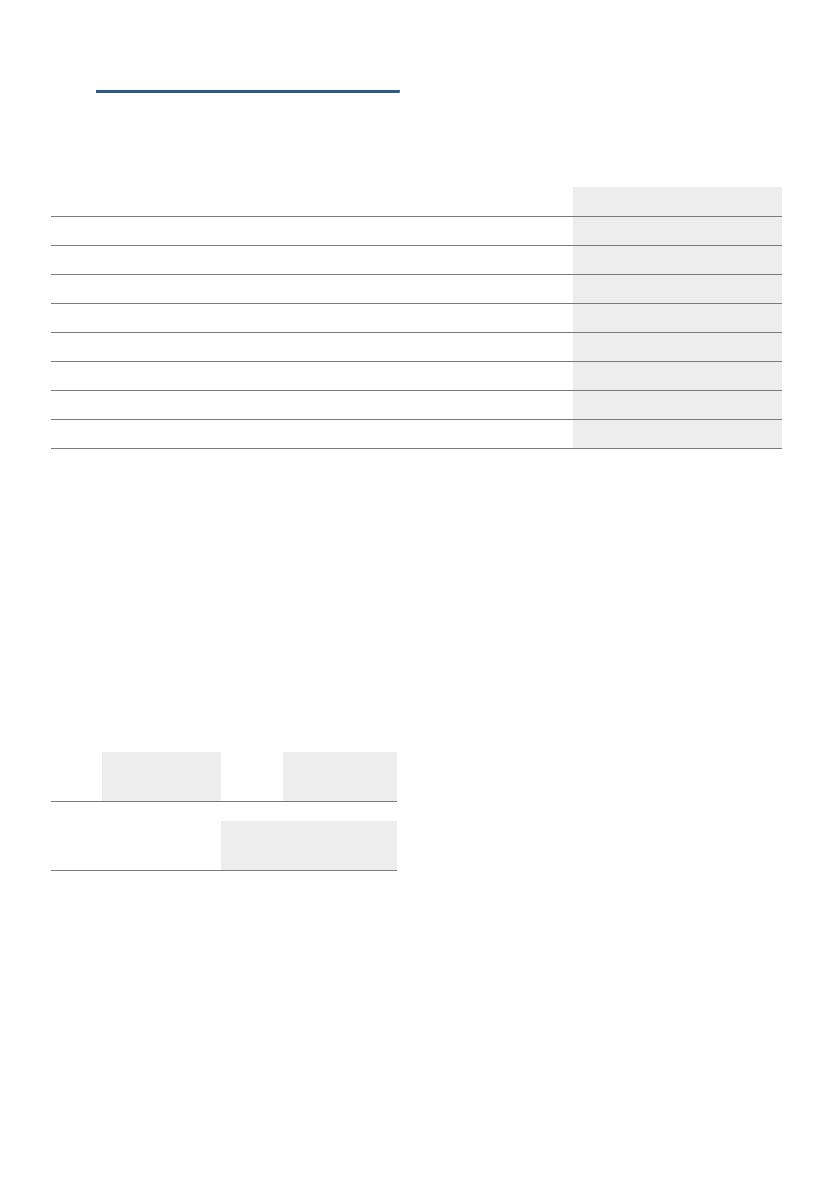
Elektrische aansluiting (spanning – frequentie) 220–240 V ∼, 50 / 60 Hz
Aansluitwaarde 1300 W
Maximale pompdruk, statisch 15 bar
Maximale capaciteit waterreservoir (zonder filter) 1,3 l
Maximale capaciteit bonenreservoir ≈ 250 g
Lengte netsnoer 100 cm
Afmetingen (H x B x D) 37,3 x 24,9 x 42,8 cm
Gewicht, leeg ca. 8–9 kg
Type maalwerk Keramisch / staal
E-nr.
FD-nr.
Servicedienst O

pl
72
Spis treści
plInstrukcja obsługi
8 Używanie zgodne
z przeznaczeniem . . . . . . . . . . . 73
( Ważne wskazówki dotyczące
bezpieczeństwa. . . . . . . . . . . . . 73
7 Ochrona środowiska . . . . . . . . 75
Oszczędność energii . . . . . . . . . . . . .75
Utylizacja zgodna z przepisami o
ochronnie środowiska naturalnego . .75
* Informacje na temat urządzenia76
Zakres dostawy . . . . . . . . . . . . . . . . .76
Budowa i części. . . . . . . . . . . . . . . . .76
Elementy obsługi . . . . . . . . . . . . . . . .77
_ Wyposażenie. . . . . . . . . . . . . . . 78
K Przed pierwszym użyciem . . . . 78
Ustawienie i podłączenie urządzenia .78
Uruchamianie urządzenia . . . . . . . . .79
1 Obsługa urządzenia . . . . . . . . . 80
Przyrządzanie napoju ze świeżo
zmielonej kawy . . . . . . . . . . . . . . . . .80
Przygotowywanie napoju z mlekiem .80
Dostosowywanie ustawień napojów. .81
Filtr wody . . . . . . . . . . . . . . . . . . . . . .82
Ochrona przed zamarzaniem. . . . . . .83
1 Ustawienia. . . . . . . . . . . . . . . . . 83
Automatyczne wyłączanie . . . . . . . . .83
Wyłączanie i wyłączanie sygnału
dźwiękowego. . . . . . . . . . . . . . . . . . .84
Ustawianie twardości wody . . . . . . . .84
Reset ustaw. (przywracanie ustawień
fabrycznych) . . . . . . . . . . . . . . . . . . .84
D Codzienna pielęgnacja i
czyszczenie. . . . . . . . . . . . . . . . .85
Środki czyszczące . . . . . . . . . . . . . . 85
Czyszczenie urządzenia . . . . . . . . . . 86
Czyszczenie pojemnika na skropliny i
pojemnika na fusy . . . . . . . . . . . . . . 86
Czyszczenie systemu spieniania
mleka . . . . . . . . . . . . . . . . . . . . . . . . 86
Czyszczenie zaparzacza. . . . . . . . . . 87
. Programy serwisowe . . . . . . . . .88
Uruchamianie programu Calc’nClean 89
3 Co robić w razie usterki?. . . . . .90
4 Serwis . . . . . . . . . . . . . . . . . . . . .94
Dane techniczne. . . . . . . . . . . . . . . . 94
Numer produktu (E-Nr.) i data produkcji
(FD) . . . . . . . . . . . . . . . . . . . . . . . . . 94
Gwarancja . . . . . . . . . . . . . . . . . . . . 94

Před prvním použitím cs
101
K Před prvním použitím
Před prvním použitím
V této kapitole je popsané uvedení
spotřebiče do provozu.
Upozornění: Přístroj používejte pouze
v prostorech bez nebezpečí koroze.
Pokud přístroj transportujete nebo
skladujete při teplotě pod 0 °C, musíte
před uvedením do provozu počkat
minimálně 3 hodiny.
Instalace a připojení
spotřebiče
1. Odstraňte ochranné fólie.
2. Spotřebič umístěte na rovnou a pro
jeho hmotnost dostatečnou,
vodotěsnou plochu.
3. Spotřebič připojte síťovou zástrčkou
k předpisově instalované uzemněné
zásuvce.
Upozornění: Po každém připojení chvíli
vyčkejte (cca 5 sekund).
Uvedení spotřebiče do
provozu
Nasazení napěňovače mléka
~ Obrázek #
1. Součásti napěňovače mléka vyjměte
ze sáčku.
2. Sestavte napěňovač mléka.
3. Napěňovač mléka nasaďte vpředu
na spotřebič.
Naplnění zásobníku na kávová zrna
Pomocí tohoto spotřebiče můžete
připravovat kávové nápoje z kávových
zrn.
1. Otevřete víko )» zásobníku na
kávová zrna )*.
2. Naplňte kávová zrna.
3. Víko opět uzavřete.
Upozornění
■ Glazovaná, karamelizovaná nebo
jinak pomocí přísad s obsahem
cukru upravená kávová zrna
ucpávají spařovací jednotku.
Používejte pouze směsi na espresso
nebo jiné směsi vhodné pro
automatické přístroje na přípravu
espressa.
■ Kávová zrna jsou pro každé spaření
kávy čerstvě namleta.
■ Kávová zrna uchovávejte v chladu a
uzavřená, tak zůstane optimálně
zachována jejich kvalita.
■ Kávová zrna můžete několik dní
uchovávat v zásobníku na kávová
zrna, aniž by ztratila své aroma.
Naplnění zásobníku na vodu
Důležité: Nádržku na vodu denně plňte
čerstvou, studenou neperlivou vodou.
Před použitím zkontrolujte, zda je
nádržka na vodu dostatečně naplněna.
1. Sejměte víčko nádržky na vodu.
2. Za madlo nádržku na vodu
vytáhněte.
3. Nádržku na vodu naplňte vodou až
po značku “max”.
4. Nádržku na vodu opět rovně vložte
do uchycení.

117
ru
x
Оглавление
ruПравила пользования
8 Применение по назначению . . 118
( Важные правила техники
безопасности . . . . . . . . . . . . . . . 118
7 Охрана окружающей среды. . 120
Экономия электроэнергии . . . . . . . . 120
Правильная утилизация упаковки . . 120
* Знакомство с прибором. . . . . . 120
Комплектация . . . . . . . . . . . . . . . . . . 120
Конструкция и компоненты . . . . . . . 121
Элементы управления . . . . . . . . . . . 121
_ Принадлежности. . . . . . . . . . . . 122
K Перед первым
использованием . . . . . . . . . . . . 123
Уcтaнoвкa и пoдключeниe пpибopa. 123
Начало работы с прибором . . . . . . . 123
1 Управление бытовым
прибором . . . . . . . . . . . . . . . . . . 124
Приготовление кофейного напитка из
свежемолотых кофейных зёрен. . . . 124
Приготовление напитков с молоком 125
Изменение установок для напитков 126
Фильтр для воды. . . . . . . . . . . . . . . . 127
Защита от замерзания . . . . . . . . . . . 127
1 Установки . . . . . . . . . . . . . . . . . . 128
Автоматическое отключение . . . . . 128
Включение и выключение звукового
сигнала . . . . . . . . . . . . . . . . . . . . . . . 128
Установка жесткости воды . . . . . . . . 129
Возврат к заводским настройкам . . 129
D Ежедневный уход и очистка . 130
Чистящее средство . . . . . . . . . . . . . .130
Очистка прибора. . . . . . . . . . . . . . . .131
Очистка поддона и емкости для
кофейной гущи. . . . . . . . . . . . . . . . . .131
Очистка системы подачи молока . . .131
Очистка заварочного блока . . . . . . .132
. Сервисные программы . . . . . . 133
Запуск программы Calc’nClean . . . .134
3 Что делать в случае
неисправности? . . . . . . . . . . . . 135
4 Cлyжбa cepвиca . . . . . . . . . . . . 138
Технические характеристики . . . . . . 138
Номер E и номер FD . . . . . . . . . . . . . 138
Условия гарантийного
обслуживания . . . . . . . . . . . . . . . . . .138

ru Применение по назначению
118
8 Применение по
назначению
Применение по назначению
Распакуйте и осмотрите
прибор. Не подключайте
прибор, если он был
поврежден во время
транспортировки.
Этот прибор предназначен
только для домашнего
использования и в бытовых
условиях.
Используйте прибор только
внутри помещений при
комнатной температуре на
высоте не выше 2000 м над
уровнем моря.
( Важные правила
техники безопасности
Важные правила техники безопасности
Внимательно ознакомьтесь с
инструкцией по эксплуатации,
при работе руководствуйтесь
указаниями данной
инструкции и сохраняйте ее
для дальнейшего
использования. Передавая
прибор другим лицам,
прилагайте данную
инструкцию.
Данный прибор может
использоваться детьми в
возрасте от 8 лет и старше, а
также лицами с
ограниченными физическими,
сенсорными или умственными
способностями или с
недостатком опыта и
/или
знаний, если они находятся
под присмотром или после
получения указаний по
безопасному использованию
прибора и после того, как они
осознали опасности,
связанные с прибором. Детей
младше 8 лет нельзя
подпускать к прибору и шнуру
питания; им нельзя
пользоваться прибором.
Детям запрещено играть с
прибором. Производить
очистку и техобслуживание
детям запрещается; это
разрешено детям старше
8 лет и под наблюдением
взрослых.

Instruction manual ........................................................ 5
Mode d’emploi .......................................................... 27
Gebruiksaanwijzing ..................................................... 50
Instrukcja obsługi ....................................................... 72
Návod k použití .......................................................... 95
Правила пользования ................................................ 117
Gebrauchsanleitung ................................................... 139
!
"
,
,,,
,,
#
,
,,
,,,
9
9,
FOLFN
,9
$
,
,,
,,,
,
,,
,,,
,9
9
9,
,
,,
,,,
%
&
'
en
l aunam
*
.
1
.
.
.
.
16
16
17
17
D
en Intended use
e s u dedne t n I
6
no i t amro f n i y t e f as t na t ropmI
7
Saving energy
no i t ce t orp l a t nemnor i vnE
■
■
■
■
8
ecna i l p a ruoy wonk o t gn i t eG
Controls
Button
k
Espresso
Dispensing Espresso
Cappuccino
Dispensing cappuccino
Latte Macchiato Dispensing latte macchiato
Milk
%
Calc’nClean
--------
9
en Accessories
Symbol
'
(
is pulsing
off
--------
se i r os ec A
TCZ8001 00311807
TCZ8002 00576693
Water filter
TCZ7003 00575491
Care set
TCZ8004 00576331
--------
10
emi t t s r i f eh t ro f gn i su ero f eB
water tank.
bag.
tank.
the "max" marking.
11
■
■
■
■
ecna i l p a eh t gn i t arepO
12
Latte Macchiato
13
sgn i t es egareveb gn i t su j dA
regular
strong
mild
14
■
■
D
E
Water filter
re t l i f re t aW
15
en Settings
1 Settings
sgn i t eS
2. Touch Cappuccino button, and
f o-hc t iws c i t amo t ua gn i t ce l eS
menu.
16
4. Touch Cappuccino button to save
menu.
Settings en
Degree of water hardness
German (°dH)
French (°fH)
1
1-7
1-13
2
8-14
14-25
3
15-21
26-38
4
22-30
39-54
2. Touch Latte Macchiato button.
H2O-Softener (if available)
setting.
menu.
17
gn i nae l c dna erac y l i aD
Water tank
■
■
■
9
9
18
required after dispensing each
beverage.
me t sys k l im eh t gn i nae lC
milk system.
19
20
■
semargorp ec i v reS
■
21
en Service programmes
gn i t o h s e l buo r T
Set a finer grinding level.
Set a finer grinding level.
Use a darker roast.
Set a coarser grinding level.
23
Milk/blended milk drinks too
cold.
No milk/milk froth dispensed.
24
Water filter is old.
Restart appliance.
25
en Customer service
4 Customer service
Technical data
ec i v res remo t suC
220–240 V ∼, 50/60 Hz
1300 W
Maximum static pump pressure
15 bar
1.3 l
≈ 250 g
100 cm
Dimensions (H x W x D)
37.3 x 24.9 x 42.8 cm
approx. 8–9 kg
Type of grinder
Ceramic/steel
Guarantee
E no.
FD
Number
26
fr
i o l pme ’ d
7
D Entretien et nettoyage
1
27
fr Utilisation conforme
emro f noc no i t as i l i tU
28
29
t nem n or i vne ' l ed no i t ce t orP
■
■
■
■
30
l i e r ap a ' l ed no i t a t ne s é r P
k
Espresso
Cappuccino
Latte Macchiato Préparation Latte Macchiato
Milk
%
Calc’nClean
--------
31
'
(
allumé
pulse
clignote
Non disponible
--------
se r i os ec A
TCZ7003 00575491
TCZ8004 00576331
--------
32
no i t as i l i t u erè imerp a l t navA
d'eau.
33
■
■
■
■
34
l i e r ap a ’ l ed no i t a s i l i t U
Latte Macchiato
35
s no s i ob s ed s ega l gé r s e l r e t s u j A
36
■
■
D
E
37
sega l géR
euq i t amo t ua erupuoc a l re l géR
38
1
1-7
1-13
2
8-14
14-25
3
15-21
26-38
4
22-30
39-54
39
sne i d i t ouq egayo t en t e ne i t er t nE
■
■
9
9
40
41
percolation.
42
■
ec i v res ed emargorP
■
■
43
fr Programme de service
nae lCn´ c l aC ne i t er t ne ' d emargorP
1. Maintenez la touche Calc’nClean
? er i a f euq , se i l amonA
45
La LED ( clignote.
46
47
48
e t nev - sèrpa ec i v reS
1 300 W
15 bar
1,3 l
≈ 250 g
100 cm
37,3 x 24,9 x 42,8 cm
env. 8–9 kg
Numéro E et numéro FD
Garantie
E-Nr.
FD-Nr.
49
nl
Inhoudsopgave
gn i z j iwna sk i urbnelG
8 Gebruik volgens de
voorschriften. . . . . . . . . . . . . . . 51
veiligheidsvoorschriften . . . . . 51
*
_ Toebehoren . . . . . . . . . . . . . . . . 55
K Voor het eerste gebruik . . . . . . 56
Apparaat installeren en aansluiten. . . 56
Apparaat in gebruik nemen . . . . . . . .56
1
50
ne t f i rhcs ro v ed sneg l ov k i urbeG
heidsvoorschriften
ne t f i rhcs ro vsd i ehg i l i ev ek j i rgna l eB
51
: Waarschuwing
: Waarschuwing
Kans op stikken!
Laat kinderen niet met
verpakkingsmateriaal spelen.
Bewaar kleine onderdelen op
een veilige plaats, deze kunnen
ingeslikt worden.
: Waarschuwing
: Waarschuwing
Energiebesparing
g n i mr e h c s e b u e i l i M
■
■
■
■
nen ek nere l t a rap a t eH
53
Montage en onderdelen
~ Afb. "
( Toets aan / uit (stand-by-modus)
0 Bedieningspaneel
8 Greep melkschuimer
@ Uitloopsysteem voor koffie, in
hoogte verstelbaar
H Melkschuimer (houder, schuimer,
afdekking), in hoogte verstelbaar
k
Espresso
Afgifte Espresso
Cappuccino
Afgifte cappuccino
Latte Macchiato Afgifte latte macchiato
Milk
%
Koffiesterkte
Aanpassing van de koffiesterkte ~ "Drankinstelling aanpassen" op pagina 59
Calc’nClean
--------
54
'
Licht op wanneer de watertank met water moet worden bijgevuld of de watertank ontbreekt.
Knippert wanneer het waterfilter moet worden vervangen.
(
pulseert
Afgifte loopt
knippert
uit
--------
n e r o h e b e oT
TCZ8001 00311807
Ontkalkingstabs
TCZ8002 00576693
TCZ7003 00575491
Onderhoudsset
TCZ8004 00576331
--------
55
Bonenreservoir vullen
Met dit apparaat kunt u koffiedranken
uit koffiebonen bereiden.
In dit hoofdstuk leest u hoe u het
apparaat in gebruik neemt.
gebruik
k i u r beg e t s r e t eh r o V
2. Koffiebonen vullen.
3. Deksel weer sluiten.
Apparaat in gebruik nemen
Melkschuimer aansluiten
~ Afb. #
1. Het deksel van de watertank nemen.
2. De watertank er aan de greep uit
56
tillen.
met water vullen.
■
■
■
■
■
nene i deb t a r ap A
57
nl Apparaat bedienen
Latte macchiato
58
Apparaat bedienen nl
Drankinstellingen aanpassen
Koffiesterkte
Voordat u een drank afneemt, kunt u de
koffiesterkte aanpassen:
Stel hiervoor door aanraking van %
de gewenste sterkte in.
ne s apna gn i l e t s n i k na r D
mild
normaal
: Waarschuwing
■
■
D
E
59
nl Apparaat bedienen
re t l i f re t aW
60
negn i l e t s n I
Automatisch uitschakelen
ne l e t sn i ne l ekahcs t i u hcs i t amo t uA
instelling op te slaan.
instelling op te slaan.
61
nl Instellingen
1
1-7
1-13
2
8-14
14-25
3
15-21
26-38
4
22-30
39-54
Fabrieksreset
instelling op te slaan.
62
gn i g i n i er ne duohredno sk j i l egaD
: Waarschuwing
9
9
Vlotter
Melkschuimer
Afdekking melkschuimer
63
Apparaat reinigen
~ Afb. &
Het melksysteem moet na elk gebruik
worden gereinigd om alle resten te
verwijderen.
: Waarschuwing
2. Reinig het bedieningspaneel met
3. De koffie-uitloop na elke
naar voren toe eruit trekken.
64
Melksysteem reinigen
neg i n i er me t sysk l eM
vastpakken.
65
nl Serviceprogramma's
■
s ' amargorpec i v reS
66
■
Calc’nClean starten
Duur: ca. 40 minuten
nae lCn´ c l aC amargorpec i v reS
11. Deur sluiten en kom onder het
?negn i ro t s j i b neod e t t aW
Storingstabel
Probleem
Netstekker lostrekken, 5 seconden
wachten, netstekker aansluiten.
Sterk wisselende koffie- of
melkschuimkwaliteit.
68
Een donkerder gebrande soort gebruiken.
Een andere koffiesoort gebruiken.
Een andere koffiesoort gebruiken.
Te weinig melk in het glas of
kopje.
Meer melk gebruiken of de schuimduur aanpassen.
Led ( knippert.
Koolzuurhoudend water in de
watertank.
Watertank met schoon leidingwater
vullen.
Waterfilter volgens de gebruiksaanwijzing spoelen en in gebruik nemen.
Er zit lucht in het waterfilter.
Waterfilter oud.
Watertank juist aanbrengen.
Watertank met schoon leidingwater
vullen.
Geen water met koolzuur gebruiken.
Alle leds knipperen.
Onjuiste spanning in de huisinstallatie.
Apparaat alleen met 220-240 V
gebruiken.
Led ' knippert en alle
drank-leds knipperen.
70
t sne i dec i v reS
Elektrische aansluiting (spanning – frequentie)
220–240 V ∼, 50 / 60 Hz
Aansluitwaarde
1300 W
Maximale pompdruk, statisch
15 bar
Maximale capaciteit waterreservoir (zonder filter)
1,3 l
Maximale capaciteit bonenreservoir
≈ 250 g
Lengte netsnoer
100 cm
Afmetingen (H x B x D)
37,3 x 24,9 x 42,8 cm
ca. 8–9 kg
Type maalwerk
Keramisch / staal
E-nummer en FD-nummer
Garantievoorwaarden
E-nr.
FD-nr.
71
pl
i gu ł s bo
1
72
73
74
■
■
■
■
75
a i nezdąz ru t ame t an e j camro f n I
76
k
Espresso
Cappuccino
Latte Macchiato Przygotowywanie latte macchiato
Milk
%
Calc’nClean
--------
'
(
pulsuje
miga
--------
77
Akcesoria
Numer katalogowy
Handel
TCZ8001 00311807
TCZ8002 00576693
TCZ7003 00575491
--------
78
mleka.
■
na kawę ziarnistą )*.
■
■
■
■
Latte macchiato
81
■
■
D
E
82
a i ne iwa t sU
83
Francuski (°fH)
1
1-7
1-13
2
8-14
14-25
3
15-21
26-38
4
22-30
39-54
zamknąć menu.
9
9
85
skropliny i pojemnik na fusy.
pojemnika na skropliny).
86
ake lm a i na i ne i ps ume t sys e i nezczsyzC
87
■
ewos iwres ymargorP
■
Uruchamianie programu
Calc’nClean
Czas trwania: ok. 40 minut
nae lCn´ c l aC ywos iwres margorP
? i k re t su e i zar w ć i bor oC
Tabela usterek
Problem
90
91
pl Co robić w razie usterki?
Miga dioda LED (.
Stary filtr wody.
92
93
pl Serwis
4 Serwis
Dane techniczne
220–240 V ∼, 50 / 60 Hz
1300 W
15 bar
1,3 l
≈ 250 g
100 cm
37,3 x 24,9 x 42,8 cm
ok. 8-9 kg
Ceramika i stal
FD-Nr.
94
cs
Obsah
dovcsáN
k
.
1
96
97
Úspora energie
■
■
■
■
98
meč i beř t ops es í nemánzeS
k
Espresso
Odběr Espresso
Cappuccino
Odběr Cappuccino
Latte Macchiato Odběr Latte macchiato
Milk
%
Calc’nClean
--------
99
'
(
svítí
pulzuje
bliká
--------
TCZ8001 00311807
TCZ8002 00576693
TCZ7003 00575491
Sada údržby
TCZ8004 00576331
--------
100
kávová zrna )*.
3. Nádržku na vodu naplňte vodou až
po značku “max”.
101
■
■
■
■
102
Latte Macchiato
103
silná
slabá
104
Nebezpečí úrazu!
Nesahejte do mlýnku.
■
■
D
E
r t l i f í ndoV
105
cs Nastavení
1. % a Calc’nClean držte stisknuto
í neva t saN
1. % a Calc’nClean držte stisknuto
2. Dotkněte se tlačítka Caffe Crema a
106
1-7
1-13
2
8-14
14-25
3
15-21
26-38
4
22-30
39-54
1. Držte stisknuto % a Calc’nClean
107
9
9
108
1. Naplňte sklenici do poloviny vodou a
dolů.
4. Napěňovač mléka posuňte nahoru a
109
madlo.
110
■
ymargorp í ns i v reS
■
111
nae lCn´ c l aC margorp í ns i v reS
1. Tlačítko Calc’nClean podržte
112
Odpojte síťovou zástrčku, vyčkejte
5 sekund, zapojte síťovou zástrčku.
Nevhodný druh kávy.
113
114
115
220–240 V ∼, 50 / 60 Hz
1300 W
15 bar
1,3 l
≈ 250 g
Délka kabelu
100 cm
37,3 x 24,9 x 42,8 cm
cca 8–9 kg
Keramika / ocel
Č. výrobku
(E-Nr.)
Výr. č.
(FD-Nr.)
116
ru
Оглавление
аливаruрП
я и н а в о з ь ло п
8 Применение по назначению . . 118
( Важные правила техники
безопасности . . . . . . . . . . . . . . . 118
7 Охрана окружающей среды . . 120
Экономия электроэнергии . . . . . . . . 120
Правильная утилизация упаковки . . 120
* Знакомство с прибором. . . . . . 120
D Ежедневный уход и очистка . 130
Чистящее средство . . . . . . . . . . . .
Очистка прибора . . . . . . . . . . . . . .
Очистка поддона и емкости для
кофейной гущи. . . . . . . . . . . . . . . .
Очистка системы подачи молока .
Очистка заварочного блока . . . . .
. . 130
. . 131
. . 131
. . 131
. . 132
. Сервисные программы . . . . . . 133
Запуск программы Calc’nClean . . . . 134
Комплектация . . . . . . . . . . . . . . . . . . 120
Конструкция и компоненты . . . . . . . 121
Элементы управления . . . . . . . . . . . 121
3 Что делать в случае
_ Принадлежности. . . . . . . . . . . . 122
K Перед первым
4 Cлyжбa cepвиca . . . . . . . . . . . . 138
использованием . . . . . . . . . . . . 123
Уcтaнoвкa и пoдключeниe пpибopa. 123
Начало работы с прибором . . . . . . . 123
неисправности? . . . . . . . . . . . . 135
Технические характеристики . . . . . . 138
Номер E и номер FD . . . . . . . . . . . . . 138
Условия гарантийного
обслуживания . . . . . . . . . . . . . . . . . . 138
1 Управление бытовым
прибором . . . . . . . . . . . . . . . . . . 124
Приготовление кофейного напитка из
свежемолотых кофейных зёрен . . . . 124
Приготовление напитков с молоком 125
Изменение установок для напитков 126
Фильтр для воды . . . . . . . . . . . . . . . . 127
Защита от замерзания . . . . . . . . . . . 127
1 Установки . . . . . . . . . . . . . . . . . . 128
Автоматическое отключение . . . . . 128
Включение и выключение звукового
сигнала . . . . . . . . . . . . . . . . . . . . . . . 128
Установка жесткости воды . . . . . . . . 129
Возврат к заводским настройкам . . 129
x
117
ru Применение по назначению
8 Применение по
назначению
Распакуйте и осмотрите
прибор. Не подключайте
прибор, если он был
поврежден во время
транспортировки.
Этот прибор предназначен
только для домашнего
использования и в бытовых
условиях.
Используйте прибор только
внутри помещений при
комнатной температуре на
высоте не выше 2000 м над
уровнем моря.
юинечанзан оп еиненемирП
118
( Важные правила
техники безопасности
Внимательно ознакомьтесь с
инструкцией по эксплуатации,
при работе руководствуйтесь
указаниями данной
инструкции и сохраняйте ее
для дальнейшего
использования. Передавая
прибор другим лицам,
прилагайте данную
инструкцию.
Данный прибор может
использоваться детьми в
возрасте от 8 лет и старше, а
также лицами с
ограниченными физическими,
сенсорными или умственными
способностями или с
недостатком опыта и/или
знаний, если они находятся
под присмотром или после
получения указаний по
безопасному использованию
прибора и после того, как они
осознали опасности,
связанные с прибором. Детей
младше 8 лет нельзя
подпускать к прибору и шнуру
питания; им нельзя
пользоваться прибором.
Детям запрещено играть с
прибором. Производить
очистку и техобслуживание
детям запрещается; это
разрешено детям старше
8 лет и под наблюдением
взрослых.
итсонсапозеб икинхет аливарп еынжаВ
Важные правила техники безопасности ru
: Предупреждение
Опасность поражения
электрическим током!
■
Прибор можно подключать
только к электросети
переменного тока через
установленную согласно
предписаниям розетку с
заземлением. Убедитесь в
том, что система
заземления в домашней
электропроводке
установлена согласно
предписаниям.
ОпасностьПри
поражения электрическим
током!
■
подключении
прибора
и его эксплуатации
соблюдайте данные,
приведенные на типовой
табличке. Если кабель для
подключения прибора к
сети будет поврежден, он
должен быть заменен
сервисной службой.
Опасность
поражения электрическим током!
■
Пользоваться
прибором
допускается только при
отсутствии повреждений
кабеля и прибора. В случае
неисправности сразу же
выньте штекер из розетки
или выключите сетевое
напряжение.
Опасность
поражениясоображений
электрическим током!
■
Из
безопасности прибор
подлежит ремонту
исключительно только
нашей сервисной службой.
Опасность
поражения электрическим током!
■
Запрещается
погружать в
воду прибор или сетевой
кабель.
: Предупреждение
Опасность, связанная с
магнитным полем!
Прибор содержит постоянный
магнит, который может
воздействовать на
электронные имплантанты,
например,
кардиостимуляторы и
инсулиновые помпы. При
наличии в организме
электронного имплантанта
нельзя приближаться к
прибору и вынутому
резервуару для воды ближе,
чем на 10 см.
: Предупреждение
Опасность удушья!!
Не разрешайте детям играть с
упаковкой. Храните мелкие
детали в надежном месте, так
как ребенок может их
проглотить.
: Предупреждение
Опасность ожога!!
Система подачи молока
становится очень горячей.
После использования сначала
дождитесь охлаждения
системы, прежде чем браться
за неё.
: Предупреждение
Опасность травмирования!
■
Неправильное применение
прибора может привести к
травмам.
Опасность
травмирования!
■
Не
прикасайтесь к
внутренним частям
кофемолки.
119
ru Охрана окружающей среды
7 Охрана окружающей
среды
Экономия электроэнергии
ыдерс йещюажурко анархО
■
■
■
■
Если прибором не пользуются, его
нужно выключить.
Установить интервал для
автоматического отключения на
минимальное значение.
По возможности не прерывайте
процесс приготовления кофе или
молочной пены. Преждевременное
прерывание процесса
приготовления кофе или молочной
пены приводит к увеличению
расхода энергии и ускоренному
скоплению остатков воды в поддоне.
Регулярно выполняйте меры по
удалению накипи, чтобы
предотвратить ее образование.
Накипь приводит к увеличению
расхода электроэнергии.
Правильная утилизация
упаковки
Утилизируйте упаковку с соблюдением
правил экологической безопасности.
Данный прибор имеет отметку
о соответствии европейским
нормам 2012/19/EU
утилизации электрических и
электронных приборов (waste
electrical and electronic
equipment - WEEE).
Данные нормы определяют
действующие на территории
Евросоюза правила возврата и
утилизации старых приборов.
Информацию о существующих методах
утилизации можно получить в
специализированной торговой
организации.
120
* Знакомство с
прибором
В данной главе описаны комплект
поставки, сборка и составные части
прибора. Кроме того, представлены
различные элементы управления.
моробирп с овтсмоканЗ
Указание: В зависимости от типа
прибора возможны расхождения в
цвете и некоторые незначительные
отклонения от данного описания.
О пользовании данной инструкции по
эксплуатации:
В начале инструкции по эксплуатации
имеются разворачиваемые страницы.
Иллюстрации обозначены номерами, на
которое содержатся ссылки в тексте
инструкции по эксплуатации.
Пример: ~ рис. !
Комплектация
~ Рис. !
# Автоматическая кофемашина
+ Индикаторная полоска для
определения жесткости воды
3 Инструкция по эксплуатации
; Капучинатор
Знакомство с прибором ru
Конструкция и компоненты
~ Рис. "
( Кнопка включения / выключения
(режим ожидания)
0 Панель управления
8 Ручка капучинатора
@ Регулируемый по высоте
диспенсер для кофе
H Регулируемый по высоте
капучинатор (держатель,
вспениватель, крышка)
P Поддон (емкость для кофейной
гущи, решетка, лоток для сбора
капель, поплавок)
X Дверца кипятильника
` Типовая табличка
h Заварочный блок
)" Крышка, сохраняющая аромат
)* Емкость для кофейных зерен
)2 Поворотный переключатель для
настройки степени помола
): Крышка резервуара для воды
)B Резервуар для воды
Элементы управления
Кнопка
k
Значение
Включение и выключение прибора
При включении и выключении прибора производится его автоматическая промывка.
Прибор не производит промывку, если:
■
в момент включения прибор еще горячий;
■
перед выключением кофе не готовился.
Прибор готов к работе, если на панели управления горят светодиоды кнопок для
выбора напитков. Прибор оснащен функцией автоматического отключения.
~ "Настройка автоматического отключения" на страница 128
Espresso
Приготовление Espresso
Приготовление Caffe Crema
Cappuccino
Приготовление капучино
Latte Macchiato
Приготовление латте макиато
Milk
Вспенивание молока
%
Крепость кофе
Изменение крепости кофе ~ "Изменение установок для напитка" на страница 126
Calc’nClean
Запуск сервисной программы
Мигает, если нужно выполнить сервисную программу.~ "Сервисная программа
Calc´nClean" на страница 134
--------
121
ru Принадлежности
Индикация
'
Загорается, если нужно залить воду в резервуар для воды или отсутствует резервуар для
воды.
Мигает, если нужно заменить фильтр для воды.
(
Горит, если требуется опорожнить поддоны.
Мигает, если дверца кипятильника открыта.
горит
готов к работе, можно выбрать режим
пульсирует
идет процесс приготовления
мигает
ожидание команды управления, например, при Calc’nClean
выкл.
отсутствует
--------
_ Принадлежности
Следующие принадлежности можно
приобрести в торговой сети и через
нашу сервисную службу:
итсонжелданирП
Принадлежности
Номер для заказа
Торговая Сервисная
сеть
служба
Таблетки для очистки TCZ8001 00311807
Таблетки для удаления накипи
TCZ8002 00576693
Фильтр для воды
TCZ7003 00575491
Набор для ухода за
прибором
TCZ8004 00576331
--------
Контактные данные сервисной службы
для всех стран приведены на последних
страницах этой инструкции.
122
Перед первым использованием ru
K Перед первым
использованием
В данной главе описан ввод в действие
прибора.
меинавозьлопси мывреп дереП
Указание: Используйте прибор только
в помещениях с положительными
температурами. Если транспортировка
или хранение прибора производились
при температурах ниже 0 °C, включать
прибор можно не менее чем через
3 часа.
Уcтaнoвкa и пoдключeниe
пpибopa
1. Снимите имеющиеся защитные
пленки.
2. Поставьте прибор на ровную и
достаточно прочную для его массы
водостойкую поверхность.
3. Подсоедините прибор посредством
сетевого штекера к установленной в
соответствии с предписаниями
розетке с защитным контактом.
Указание: После каждого подключения
выждите некоторое время (прибл. 5
секунд).
Начало работы с прибором
Установка капучинатора
~ Рис. #
1. Выньте части капучинатора из
пакета.
2. Выполните сборку капучинатора.
3. Установите капучинатор спереди на
приборе.
Наполнение емкости для кофейных
зерен
В приборе можно приготавливать
кофейные напитки из кофейных зерен.
1. Откройте крышку )" емкости для
кофейных зерен )*.
2. Загрузите кофейные зерна.
3. Снова закройте крышку.
Указания
■
Глазированные, карамелизованные
или обработанные другими
содержащими сахар добавками
кофейные зерна приводят к забивке
заварочного блока. Используйте
только смеси кофейных зерен,
предназначенные для полностью
автоматической кофемашины.
■
При использовании кофейных зерен
выполняется их свежий помол для
каждой варки.
■
Храните кофейные зерна в
прохладном месте и в закрытых
емкостях для оптимального
сохранения их качества.
■
В емкости для кофейных зерен
кофейные зерна можно хранить в
течение нескольких дней без потери
аромата.
Наполнение резервуара для воды
Важно: Ежедневно заливайте в
резервуар для воды свежую холодную
воду без углекислоты. Перед
эксплуатацией прибора проверьте,
достаточно ли наполнен резервуар для
воды.
1. Снимите крышку резервуара для
воды.
2. Поднимите за ручку резервуар для
воды.
3. Залейте воду в резервуар для воды
до отметки «max».
4. Вставьте резервуар для воды прямо
в держатель и установите крышку
резервуара для воды.
123
ru Управление бытовым прибором
Общие указания
На заводе-изготовителе
запрограммированы стандартные
настройки, обеспечивающие
оптимальный режим работы
автоматической кофеварки.
■
■
■
■
■
■
По истечении заданного времени
прибор автоматически выключается.
При касании любой кнопки
раздается звуковой сигнал, который
можно выключить.~ "Установки"
на страница 128
При первом использовании прибора,
после выполнения сервисной
программы или после длительного
перерыва в работе аромат напитка в
первой чашке не раскрывается в
полной мере, и этот напиток пить не
рекомендуется.
После начала работы прибора
мелкопористая, кремообразная
консистенция пены достигается
только после приготовления
нескольких чашек.
При длительном использовании
является нормальным, что на
вентиляционных отверстиях
образуются капельки воды.
Выход пара обусловлен
конструкцией прибора и не является
неисправностью.
1 Управление бытовым
прибором
В данной главе описано приготовление
кофейных и молочных напитков.
Описаны также установки прибора,
использование фильтра для воды,
изменение степени помола, а также
защита от замерзания.
моробирп мывотыб еинелварпУ
Указание: Свежеприготовленные
напитки могут быть очень горячими.
Приготовление кофейного
напитка из свежемолотых
кофейных зёрен
Вы можете выбрать Espresso или Caffe
Crema. ~ "Приготовление напитков с
молоком" на страница 125
Прибор включен. Резервуар для воды и
емкость для кофейных зерен
наполнены.
1. Поставьте чашку под диспенсер.
2. Коснувшись несколько раз %,
установите нужную крепость кофе.
3. Коснитесь кнопки Espresso или
Caffe Crema.
Кофеварка сварит кофе и затем нальет
его в чашку.
Указание: Чтобы преждевременно
закончить приготовление напитка,
снова коснитесь Espresso или Caffe
Crema.
Перед тем, как начать пользоваться
новым прибором, проверьте и
установите жесткость
воды.~ "Установки" на страница 128
124
Управление бытовым прибором ru
Приготовление напитков с
молоком
В данном приборе имеется
капучинатор. Вы можете приготовить
кофейные напитки с молоком или
вспенить молоко.
4. Коснувшись несколько раз %,
установите нужную крепость кофе.
5. Коснитесь кнопки Cappuccino или
Latte Macchiato.
Сначала вспенивается молоко в чашке
или стакане. Затем заваривается кофе
и разливается в чашку или стакан.
Указание: Засохшие остатки молока
удалять сложно, поэтому обязательно
очистить.~ "Ежедневный уход и
очистка" на страница 130
Указание: Чтобы преждевременно
закончить данный этап приготовления
напитка, снова коснитесь Cappuccino
или Latte Macchiato.
: Предупреждение
Вспенивание молока
Опасность ожога!
Капучинатор сильно нагревается.
Беритесь только за ручку. После
использования, прежде чем
прикасаться, дождитесь охлаждения.
Кофейные напитки с молоком
Вы можете выбрать капучино или латте
макиато. При этом примите во
внимание положение диспенсера и
капучинатора.
Капучино
Прибор включен. Резервуар наполнен.
Капучинатор установлен.
1. Налейте в большую чашку или
большой стакан прибл. 100 мл
молока.
2. Поставьте чашку или стакан под
диспенсер.
3. Опустите диспенсер для кофе и
капучинатор до упора вниз.
4. Коснитесь кнопки Milk.
Прибор вспенивает молоко.
Указание: Чтобы преждевременно
закончить процесс, снова коснитесь
Milk.
Латте Макиато
Прибор включен. Резервуар для воды и
емкость для кофейных зерен
наполнены.
Капучинатор установлен.
1. Налейте в большую чашку или
большой стакан прибл. 100 мл
молока для капучино и прибл. 150
мл молока для латте макиато.
2. Поставьте чашку или стакан под
диспенсер.
3. Опустите диспенсер для кофе и
капучинатор до упора вниз.
125
ru Управление бытовым прибором
Изменение установок для
напитков
Крепость кофе
Перед тем, как разлить напиток, можно
установить крепость кофе.
Для этого, коснувшись %, выберите
нужную крепость.
актипан ялд ковонатсу еиненемзИ
слабый
нормальн.
крепкий
Указание: Установленная крепость
кофе действительна для всех кофейных
напитков.
Количество напитка
Вы можете изменить количество
приготавливаемого напитка.
Удерживайте нажатой Espresso или
Caffe Crema в течение 3 секунд.
Идет приготовление напитка, выбранная
кнопка мигает.
После того, как будет достигнуто
нужное количество напитка в чашке ,
коснитесь кнопки, чтобы прекратить
процесс. Установленное заново
количество напитка реализуется, только
начиная со следующего приготовления
напитка.
Указание: Можно установить
количество напитка для Espresso (25 60 мл) или Caffe Crema (80 - 200
мл).Всегда приготавливается
минимальное количество, Espresso
прибл. 25 мл и Caffe Crema
прибл. 80 мл.
Длительность вспенивания
Вы можете изменить длительность
вспенивания напитка.
Удерживайте нажатой Cappuccino, Latte
Macchiato или Milk в течение 3 секунд.
126
Молоко вспенивается, выбранная
кнопка мигает.
После того, как нужная длительность
вспенивания будет достигнута,
коснитесь кнопки, чтобы прекратить
процесс.
Указание: Установка длительности
вспенивания не влияет на количество
кофе.
Установка степени помола
Данный прибор оборудован
регулируемой кофемолкой. Это
позволяет индивидуально изменять
степень помола кофе.
: Предупреждение
Опасность травмирования!
Не прикасайтесь к внутренним частям
кофемолки.
Внимание!
Возможны повреждения прибора!
Степень помола можно регулировать
только при работающей кофемолке!
При работающей кофемолке установите
поворотным переключателем )2
степень помола.
Тонкий помол: вращение против
часовой стрелки. (Рис. a)
Более грубый помол: вращение по
часовой стрелке. (Рис. b)
■
■
D
E
Указания
■
Изменение настройки будет заметно
лишь начиная со второй чашки кофе.
■
Для темных жареных кофейных
зерен выберите более мелкий
помол, для более светлых зерен –
более крупный помол.
Управление бытовым прибором ru
Фильтр для воды
~ Рис. '
Фильтр для воды замедляет
образование накипи, уменьшает
загрязнение воды и улучшает вкус
кофе. Фильтры для воды можно
приобрести в магазинах или через
сервисную службу.
ыдов ялд ртьлиФ
Установка или замена фильтра для
воды
Перед использованием нового фильтра
для воды его нужно промыть.
Прибор включен. Резервуар наполнен.
1. Удерживайте нажатыми % и
Calc’nClean минимум 3 секунды.
2. Коснитесь кнопки Espresso,
откроется меню «Жесткость воды».
3. Коснитесь кнопки % и
выполните следующую установку:
с фильтром для воды
4. Погрузите фильтр для воды
(отверстием вверх) в наполненный
водой контейнер и оставьте в нем,
пока не прекратится выход
пузырьков воздуха.
~ Рис. '
5. После этого прочно вставьте фильтр
для воды в пустой резервуар для
воды.
6. Залейте воду в резервуар для воды
до отметки «max».
7. Подставьте емкость объемом
минимум 1,0 л под диспенсер.
8. Коснитесь кнопки Espresso, чтобы
сохранить установку и задействовать
процесс промывки.
9. Установите контейнер для воды.
10. Коснитесь кнопки Espresso, чтобы
сохранить установку и запустить
процесс промывки. Вода течет через
фильтр.
11. Коснитесь кнопки Calc’nClean,
чтобы выйти из меню.
12. По окончании опорожните емкость.
Прибор снова готов к работе.
Извлечение фильтра для воды
Если фильтр для воды вынут и новый
фильтр для воды не вставлен,
установите жесткость воды.
~ "Установка жесткости воды"
на страница 129
Защита от замерзания
Чтобы избежать повреждений в
результате воздействия холода во
время транспортировки или хранения,
прибор необходимо предварительно
полностью опорожнить.
Информация. Прибор должен быть
готов к работе, резервуар для воды
наполнен.
1. Поставьте под диспенсер
капучинатора емкость большого
размера и опустите вниз
капучинатор.
2. Удерживайте нажатой кнопку Milk
минимум 5 секунд.
Светодиод кнопки мигает,
выполняется разогрев прибора.
3. Как только из капучинатора начнет
выходить пар, снимите резервуар
для воды.
4. Выполняется процесс пропаривания
прибора. Подождите, пока символ '
и все светодиоды начнут мигать.
5. Кнопкой k выключите прибор.
6. Опорожнив резервуар для воды и
поддон, тщательно очистите прибор.
Теперь можно транспортировать
прибор или установить его на хранение.
Указание: Заварочный блок
заблокирован и не вынимается.
127
ru Установки
1 Установки
Включение и выключение
звукового сигнала
В приборе выполнены различные
заводские настройки. Настройки
прибора можно регулировать
индивидуально.
При нажатии любой кнопки раздается
звуковой сигнал.
Его можно включить или выключить.
Указание: Если в течение 90 секунд ни
одна из кнопок не будет нажата, прибор
переходит в режим выбора напитка без
сохранения настроек. Сохраненные до
этого настройки не меняются.
1. Удерживайте нажатыми % и
Calc’nClean минимум 3 секунды.
2. Коснитесь кнопки Cappuccino,
откроется меню «Звуковой сигнал».
3. Коснитесь кнопки % и включите
или выключите звуковой сигнал.
и к в о н а т сУ
Можно выполнить следующие
настройки.
Автоматическое отключение
По истечении определенного времени
после последнего касания кнопки
прибор автоматически выключается.
Это время можно установить, причем
возможна установка от 15 минут до
4 часов.
яинечюлкто огоксечитамотва акйортсаН
1. Удерживайте нажатыми % и
Calc’nClean минимум 3 секунды.
2. Коснитесь кнопки Caffe Crema,
откроется меню «Автоматическое
выключение».
3. Коснитесь кнопки % и
установите нужное время.
Возможны следующие настройки:
15 минут
30 минут (заводская установка)
1 час
2 часа
4 часа
4. Коснитесь кнопки Caffe Crema,
чтобы сохранить установку.
5. Коснитесь кнопки Calc’nClean,
чтобы выйти из меню.
128
Вкл (заводская установка)
Выкл
4. Коснитесь кнопки Cappuccino,
чтобы сохранить установку.
5. Коснитесь кнопки Calc’nClean,
чтобы выйти из меню.
Установки ru
Установка жесткости воды
Правильная установка жесткости воды
важна для своевременного
напоминания о необходимости
удаления накипи. Предварительно
установлен режим жесткости воды 4.
Жесткость воды можно узнать в
местной водоснабжающей организации
или определить при помощи
прилагаемой индикаторной полоски.
1. На короткое время погрузите
прилагаемую индикаторную полоску
в свежую водопроводную воду и
спустя минуту проверьте результат.
2. Удерживайте нажатыми % и
Calc’nClean минимум 3 секунды.
3. Коснитесь кнопки Espresso,
откроется меню «Жестк. воды».
4. Коснитесь кнопки % и
установите жесткость воды.
Возможны следующие настройки:
Жестк. воды 1
Жестк. воды 2
Жестк. воды 3
Жестк. воды 4 (заводская установка)
Фильтр воды (если вставлен)
Установка для умягчения воды (при
наличии)
5. Коснитесь кнопки Espresso, чтобы
сохранить установку.
6. Коснитесь кнопки Calc’nClean,
чтобы выйти из меню.
В таблице представлено соответствие
режимов различным степеням
жесткости воды:
Режим
Степень жесткости воды
Немецкая шкала
(°dH)
Французская
шкала (°fH)
1
1-7
1-13
2
8-14
14-25
3
15-21
26-38
4
22-30
39-54
Последующее изменение жесткости
воды возможно в любой момент.
Указание: При использовании фильтра
для воды (см. главу «Принадлежности»)
выполните следующее. ~ "Фильтр для
воды" на страница 127
Возврат к заводским
настройкам
Восстанавливаются заводские
настройки, собственные установки
теряются.
1. Удерживайте нажатыми % и
Calc’nClean минимум 3 секунды.
2. Коснитесь кнопки Latte Macchiato.
Заводские установки снова
активированы.
3. Коснитесь кнопки Calc’nClean,
чтобы выйти из меню.
129
ru Ежедневный уход и очистка
D Ежедневный уход и
очистка
При тщательном уходе и очистке ваш
прибор надолго сохранит свою
функциональность. В данной главе
описаны правильный уход за прибором
и его очистка.
актсичо и доху йынвендежЕ
: Предупреждение
Опасность поражения электрическим
током!
Перед очисткой отсоединить сетевой
кабель от сети. Запрещается погружать
прибор в воду. Не используйте паровые
очистители.
Чистящее средство
Чтобы не допустить повреждения
различных поверхностей в результате
использования неподходящих чистящих
средств, соблюдайте следующие
указания.
Не используйте
■
■
■
едкие или абразивные чистящие
средства,
чистящие средства, содержащие
спирт,
жесткие мочалки и губки.
9
9
130
Указания
■
В новых губчатых салфетках могут
содержаться соли. Соли могут
привести к образованию налета
ржавчины на стальных деталях.
Новые губки для мытья посуды
тщательно вымойте перед
использованием.
■
Остатки накипи, кофе, молока,
моющих средств и раствора для
удаления накипи удаляйте
немедленно. Под такими остатками
могут образовываться очаги
коррозии.
Внимание!
Не все части прибора разрешается
мыть в посудомоечной машине.
~ Рис. % - '
Не пригодны для мытья в посудомоечной машине:
Резервуар для воды
Крышка резервуара для воды
Крышка, сохраняющая аромат
Заварочный блок
Поддон
Пригодны для мытья в посудомоечной машине:
Лоток для сбора капель
Решетка
Емкость для кофейной гущи
макс. 60 Поплавок
°C
Капучинатор
Крышка капучинатора
Ежедневный уход и очистка ru
Очистка прибора
1. Вытрите корпус мягкой влажной
тканью.
2. Очистите панель управления
микрофибровой салфеткой.
3. Если потребуется, протирайте
диспенсер для кофе после каждого
приготовления напитка.
Указания
■
Если прибор включается в холодном
состоянии или выключается после
приготовления кофе, промывка
прибора производится
автоматически. Таким образом,
система очищается самостоятельно.
■
Перед длительным перерывом в
использовании (например, перед
отпуском) следует тщательно
очистить весь прибор, включая
капучинатор и заварочный блок.
Очистка поддона и емкости
для кофейной гущи
~ Рис. %
Указание: Поддон и емкость для
кофейной гущи нужно опорожнять и
очищать каждый день во избежание
слоев отложений.При частом
использовании нужно периодически
опорожнять, когда станет отчетливо
виден поплавок или загорится
соответствующий символ.
1. Откройте дверцу.
2. Выньте поддон с емкостью для
кофейной гущи, потянув их вперед.
3. Выньте лоток для сбора капель с
решеткой.
4. Опорожните и очистите поддон и
емкость для кофейной гущи.
5. Протрите внутреннее пространство
прибора (в зоне поддона).
Очистка системы подачи
молока
~ Рис. &
Систему подачи молока следует
очищать после каждого использования
для удаления остатков.
аколом ичадоп ыметсис актсичО
: Предупреждение
Опасность ожога!
Капучинатор сильно нагревается.
Беритесь только за ручку. После
использования, прежде чем
прикасаться, дождитесь охлаждения.
1. Налейте стакан до половины водой и
поставьте под диспенсер.
2. Опустите капучинатор до упора
вниз.
3. Коснитесь кнопки Milk, выполняется
очистка системы подачи молока.
4. Поднимите капучинатор вверх и
дайте ему остыть.
5. Разберите капучинатор на
отдельные детали и тщательно
очистите.
6. Высушите отдельные детали,
соберите их и вставьте обратно в
прибор.
Указания
■
Чтобы преждевременно закончить
процесс, снова коснитесь Milk.
■
Все части системы подачи молока
следует мыть в посудомоечной
машине. После промывки тщательно
удалите остатки мыльного раствора
из системы подачи молока.
131
ru Ежедневный уход и очистка
Очистка заварочного блока
~ Рис. $, ~ рис. %
Дополнительно к автоматической мойке
необходимо регулярно вынимать для
очистки заварочный блок.
Внимание!
Для очистки заварочного блока
запрещается использовать моющие
средства, а также средства,
содержащие уксус или кислоту; его
также нельзя мыть в посудомоечной
машине.
Извлечение заварочного блока
1. Выключите прибор.
2. Откройте дверцу кипятильника.
3. Извлеките емкость для кофейной
гущи.
4. Нажмите вверх на красный рычаг,
возьмите заварочный блок на ручку
и осторожно выньте его, потянув
вперед.
5. Тщательно вымойте заварочный
блок в теплой проточной воде.
6. Тщательно очистите внутреннее
пространство прибора влажной
тканью и удалите остатки кофе при
их наличии.
7. Подождите, пока заварочный блок и
внутреннее пространство прибора
высохнут.
Установка заварочного блока
1. Возьмите заварочный блок за ручку.
2. Нажмите вверх на красный рычаг,
установите заварочный блок под
рычаг и задвиньте его назад до
упора. Рычаг должен
зафиксироваться.
3. Вставьте обратно емкость для
кофейной гущи и закройте дверцу.
Важно. При отсутствующем или
неправильно вставленном заварочном
блоке или поддоне дверца не
закрывается.
132
Сервисные программы ru
. Сервисные
■
программы
В зависимости от жесткости воды и
степени износа прибора через
определенные промежутки времени
загорается кнопка Calc’nClean.
Прибор необходимо немедленно
очистить при помощи соответствующей
программы и удалить накипь.
ым аргорп еынсивреС
Указания
■
Важно. Если своевременно не
очистить прибор и не удалить
накипь, возможно повреждение
прибора.
■
Внимание! Для каждой сервисной
программы Calc’nClean используйте
средства для удаления накипи и
очистки в соответствии с
инструкцией, соблюдая при этом
(соответствующие) указания по
технике безопасности.
■
Не пейте применяемые жидкости.
■
Категорически запрещается
использовать уксус, средства на
основе уксуса, лимонную кислоту
или средства на основе лимонной
кислоты.
■
Для удаления накипи и очистки
прибора используйте только
подходящие для этого таблетки.Они
специально разработаны для
данного прибора, их можно
дополнительно приобрести через
сервисную службу.
~ "Принадлежности"
на страница 122
■
Категорически запрещается
загружать таблетки для удаления
накипи и прочие средства в
заварочный блок.
■
Ни в коем случае не прерывайте
сервисную программу.
■
Перед запуском сервисной
программы выньте, очистите и
вставьте обратно заварочный блок.
Очистите капучинатор.
■
■
По окончании сервисной программы
протрите прибор мягкой влажной
тканевой салфеткой, чтобы сразу же
устранить остатки раствора для
удаления накипи. Под такими
остатками могут образовываться
очаги коррозии.
В новых губчатых салфетках могут
содержаться соли. Соли могут
привести к образованию налета
ржавчины на стальных деталях,
поэтому перед использованием
губчатых салфеток их следует
тщательно промыть.
Если, например, вследствие
перебоев в энергоснабжении
сервисная программа была
прервана, загорается ' и
Calc’nClean.
Выполните следующие действия.
1. Промойте контейнер для воды.
2. Залейте свежую негазированную
воду до отметки «max».
3. Коснитесь кнопки Calc’nClean.
Программа запустится и промоет
прибор. Продолжительность прибл.
2 минуты.
4. Опорожните поддон, очистите и
вставьте его обратно, закройте
дверцу.
Программа завершена. Прибор снова
готов к работе.
133
ru Сервисные программы
Запуск программы
Calc’nClean
Длительность: прибл. 40 минут
nae lCn´ c l aC ам аргорп яансивреС
1. Держите нажатой кнопку
Calc’nClean примерно 5 секунд.
Загорается символ (.
2. Откройте дверцу, выньте и
опорожните поддон и емкость для
кофейной гущи.
3. Извлеките и очистите заварочный
блок.
4. Загрузите в заварочный блок
таблетку для очистки Bosch и
вставьте обратно заварочный блок.
5. Установив обратно поддон и емкость
для кофейной гущи, закройте
дверцу.
Загорается символ '.
6. Извлеките фильтр для воды (при
наличии).
7. Налейте в пустой резервуар для
воды теплую воду до отметки 0,5 л и
растворите в ней таблетку для
удаления накипи Bosch.
8. Вставьте обратно резервуар для
воды и подставьте под диспенсер
емкость большого объема
(прибл. 1 л).
9. Calc’nClean мигает, коснитесь
Calc’nClean.
Программа запускается, выполняя
очистку прибора и удаление накипи.
Calc’nClean пульсирует.Длительность
прибл. 20 минут.
Загорается символ (.
134
10. Опорожните емкость, откройте
дверцу, опорожните поддон и
вставьте его обратно.
11. Закройте дверцу и поставьте
емкость под диспенсер.
Загорается символ '.
12. Очистите контейнер для воды и
установите обратно фильтр для воды
(если он был вынут).
~ Рис. '
13. Залейте свежую негазированную
воду до отметки «max» и снова
поставьте емкость под диспенсер.
14. Calc’nClean мигает, коснитесь
Calc’nClean.
Программа запускается, выполняя
очистку прибора и его промывку.
Calc’nClean пульсирует. Длительность
прибл. 20 минут.
Загорается символ (.
15. Опорожните, очистите поддон и
установите обратно поддон и
емкость для кофейной гущи.
Программа завершена. Прибор снова
готов к работе.
Что делать в случае неисправности? ru
3 Что делать в случае
неисправности?
Часто случается, что причиной
неисправности стала какая-то мелочь.
Перед обращением в сервисную службу
?и т с о н в а р п с и е н е а ч у л с в ь т алед о тЧ
попробуйте устранить возникшую
неисправность самостоятельно, следуя
указаниям из таблицы.
Прочтите указания по технике
безопасности в приложении к данной
инструкции.
Таблица неисправностей
Проблема
Причина
Уcтpaнeниe
Прибор больше не реагирует.
Нeисправность прибора.
Выньте штепсельную вилку из розетки,
выждите 5 секунд и вставьте штепсельную вилку обратно в розетку.
Очень неравномерное качество кофе или молочной пены.
Отложения накипи в приборе.
Очистите прибор от накипи согласно
инструкции.
Индивидуально заданное коли- Слишком мелкий помол.
чество напитка не достигается, Сильные отложения накипи в
кофе льется тонкой струйкой
приборе.
или не льется вообще
В фильтре для воды находится
воздух.
Вытекает только вода, а не
кофе.
Пустая емкость для кофейных
зерен не идентифицируется
прибором.
Установите более грубый помол.
Удалите накипь согласно инструкции.
Погрузите фильтр для воды в воду до
тех пор, пока не перестанут выходить
пузырьки воздуха, и заново вставьте
его.
Загрузите кофейные зерна
Указание: Прибор при следующих
приготовлениях будет настроен на
кофейные зерна.
Отсек для кофе на заварочном Очистите заварочный блок.
блоке засорен.
~ "Очистка заварочного блока"
на страница 132
Кофе без пенки.
Кофе слишком «кислый».
Зерна не поступают в кофемолку (слишком маслянистые
зерна).
Слегка постучите по емкости для
кофейных зерен. Попробуйте использовать другой сорт кофе. Протрите
пустую емкость для кофейных зерен
сухой тканью.
Неподходящий сорт кофе.
Используйте сорт кофе с большим
содержанием зерен Robusta.
Используются не свежеобжаренные зерна.
Используйте свежие кофейные зерна.
Степень помола не соответствует сорту кофейных зерен.
Установите более тонкий помол.
Слишком грубый помол.
Установите более мелкий помол.
Неподходящий сорт кофе.
Используйте более сильную степень
обжарки.
135
ru Что делать в случае неисправности?
Кофе слишком «горький».
Слишком мелкий помол.
Установите более грубую степень
помола.
Неподходящий сорт кофе.
Используйте другой сорт кофе.
Слишком мелкий помол.
Установите более грубую степень
помола.
Неподходящий сорт кофе.
Используйте другой сорт кофе.
Молоко/молочные коктейли
слишком горячие.
Молочная пена слишком крупнопористая, сильный шум всасывания.
Слишком мало молока в стакане или чашке.
Используйте больше молока или измените длительность вспенивания.
Молоко/молочные коктейли
слишком холодные.
Слишком много молока в стакане или чашке.
Используйте меньше молока или измените длительность вспенивания.
Нет выхода молока или молочной пены.
Капучинатор загрязнен.
Капучинатор не погружается в
молоко.
Вымойте капучинатор в посудомоечной машине. ~ "Очистка системы
подачи молока" на страница 131
Используйте больше молока; проверьте, погружается ли капучинатор в
молоко. Опустите диспенсер до упора
вниз.
Кофе имеет «подгорелый»
привкус.
Фильтр для воды не держится в Фильтр для воды закреплен
контейнере для воды.
неправильно.
Погрузите фильтр для воды в воду до
тех пор, пока не перестанут выходить
пузырьки воздуха, и заново вставьте
его.
Вставьте фильтр для воды прочно и без
перекоса в гнездо резервуара.
Мигает несколько кнопок, раздается громкий шум.
Резервуар для воды отсутствует Правильно установите резервуар для
или неправильно установлен.
воды.
Вода на внутреннем дне прибора при извлеченном поддоне.
Поддон извлечен слишком
рано.
Заварочный блок не вынимается.
Заварочный блок не находится Снова включить прибор.
в позиции извлечения (например, задействована защита от
замерзания).
Управление прибором невозможно, светодиоды горят или
мигают.
Прибор в демонстрационном
режиме.
Кофемолка не запускается.
Перегрев прибора.
Выждите 1 час и дайте прибору остыть.
Светодиод ( мигает.
Дверца плохо закрыта.
Плотно прижмите дверцу.
Перегрев прибора.
Выждите 1 час и дайте прибору остыть.
При выключенном приборе
опорожнение не обнаружено.
При включенном приборе выньте и
вставьте обратно поддон.
Светодиод ( горит, хотя поддон пустой – что делать?
136
Извлекайте поддон только через
несколько секунд после приготовления последнего напитка.
Чтобы выключить демонстрационный
режим, держите кнопку k нажатой
минимум 5 секунд.
Что делать в случае неисправности? ru
Светодиод ' горит, хотя
резервуар для воды полон.
Неправильно установлен
резервуар для воды.
Правильно установите резервуар для
воды.
Вода, содержащая углекислый Наполните резервуар для воды свежей
газ, в резервуаре для воды.
проточной водой.
В резервуаре для воды застрял Извлеките резервуар для воды и тщапоплавок.
тельно его очистите.
Новый фильтр для воды не про- Промойте и введите в действие фильтр
мыт в соответствии с инструкдля воды в соответствии с инструкцией.
цией.
Светодиод ' мигает и мигают
все светодиоды напитков.
В фильтре для воды находится
воздух.
Погрузите фильтр для воды в воду
(отверстием вверх) до тех пор, пока не
перестанут выходить пузырьки воздуха,
и заново вставьте его. ~ "Установка
или замена фильтра для воды"
на страница 127
Старый фильтр для воды.
Вставьте новый фильтр для воды.
Резервуар для воды отсутствует Правильно установите резервуар для
или неправильно установлен.
воды.
В системе подачи воды прибора нет воды.
Правильно установите резервуар для
воды.
Наполните резервуар для воды свежей
проточной водой.
Не заливайте газированную воду.
В фильтре для воды находится
воздух.
Погрузите фильтр для воды в воду
(отверстием вверх) до тех пор, пока не
перестанут выходить пузырьки воздуха,
и заново вставьте его. ~ "Установка
или замена фильтра для воды"
на страница 127
Все светодиоды мигают.
Ошибочное напряжение в
домашней электросети.
Эксплуатируйте прибор только при
напряжении 220 – 240 В.
Светодиоды ', ( и
Calc’nClean мигают.
Температура окружающей
среды слишком низкая.
Эксплуатируйте прибор при температуре > 5 °C.
Светодиоды ( и %
мигают.
Заварочный блок очень сильно По возможности очистите заварочный
загрязнен или его невозможно блок, выключите и снова включите
вынуть.
прибор.
Светодиоды % мигают.
Нeисправность прибора.
Заново запустите прибор в работу.
Если проблемы устранить не удается, обязательно свяжитесь с «горячей линией»!
Номера телефонов приведены на последних страницах инструкции
--------
137
ru Cлyжбa cepвиca
4 Cлyжбa cepвиca
Технические характеристики
acивpec aбжyлC
Электропитание (напряжение / частота)
220–240 В ∼, 50 / 60 Гц
Потребляемая мощность
1300 Вт
Максимальное давление насоса, статическое
15 бар
Максимальная вместимость контейнера для воды (без фильтра)
1,3 л
Максимальная вместимость емкости для зерен
≈ 250 г
Длина сетевого кабеля
100 см
Размеры (В х Ш х Г)
37,3 x 24,9 x 42,8 см
Вес, порожний
прибл. 8–9 кг
Тип кофемолки
керамика / сталь
Номер E и номер FD
При звонке обязательно сообщите
полный номер изделия (номер E) и
заводской номер (номер FD), что
позволит вам получить
квалифицированную помощь. Номера
указаны на типовой табличке `. (~
Рис. ")
Чтобы не тратить время на поиски,
можно записать данные прибора и
телефонный номер сервисной службы
здесь.
Номер
изделия
Номер
FD
Сервисная
служба O
Контактные данные сервисной службы
для всех стран приведены на последних
страницах этой инструкции.
138
Условия гарантийного
обслуживания
Получить исчерпывающую информацию
об условиях гарантийного
обслуживания Вы можете в Вашем
ближайшем авторизованном сервисном
центре, или в сервисном центре от
производителя ООО «БСХ Бытовая
техника», или в сопроводительной
документации.
Мы оставляем за собой право на
внесение изменений.
de
.
1
.
.
.
.
.
.
.
.
.
.
.
.
.
.
.
.
.
.
.
.
.
.
.
.
150
150
151
151
hcuarbeG reßämegsgnum i t seB
140
es i ewn i hs t i ehrehc iS eg i t hc iW
: Warnung
: Warnung
: Warnung
: Warnung
: Warnung
141
z t uhcs t l ewmU
■
■
■
■
142
nenre l nen ek t äreG
k
Espresso
Cappuccino
Bezug Cappuccino
Latte Macchiato Bezug Latte macchiato
Milk
%
Calc’nClean
--------
143
'
(
leuchtet
pulst
blinkt
aus
--------
r ö h e b uZ
Bestellnummer
Handel
TCZ8001 00311807
Entkalkungstabletten
TCZ8002 00576693
TCZ7003 00575491
TCZ8004 00576331
--------
144
145
■
■
■
■
nene i deb t äreG
146
: Warnung
Latte Macchiato
147
nes apna gnu l e t sn i e knär t eG
148
: Warnung
■
■
D
E
re t l i f res aW
149
negnu l e t s n i E
ne l e t sn i e ne t l ahcsbA sehcs i t amo t uA
1. % und Calc’nClean mindestens
150
1
1-7
1-13
2
8-14
14-25
3
15-21
26-38
4
22-30
39-54
1. % und Calc’nClean mindestens
2. Taste Latte Macchiato berühren.
151
gnug i n i eR dnu ege l fP ehc i l gäT
9
9
152
neg i n i er me t syshc l iM
: Warnung
153
154
■
emargorP-ec i v reS
■
■
155
de Service-Programme
Calc’nClean starten
Dauer: ca. 40 Minuten
nae lCn´ c l aC margorP ec i v reS
1. Die Taste Calc’nClean
156
?nu t saw , negnurö tS
157
LED ( blinkt.
158
LED ' blinkt und alle
Getränke LEDs blinken.
Alle LEDs blinken.
LEDs ', ( und Calc’nClean
blinken.
LEDs ( und % blinken.
LEDs % blinken.
159
t sne i dnednuK
220–240 V ∼, 50 / 60 Hz
1300 W
15 bar
1,3 l
≈ 250 g
100 cm
37,3 x 24,9 x 42,8 cm
ca. 8–9 kg
Keramik / Stahl
Garantiebedingungen
E-Nr.
FD-Nr.
160
161
*8001036200*
8001036200
970406
View a manual of the Bosch VeroCup 100 below. All manuals on ManualsCat.com can be viewed completely free of charge. By using the ‘Select a language’ button, you can choose the language of the manual you want to view.

MANUALSCAT | EN
Question & answers
Have a question about the Bosch VeroCup 100 but cannot find the answer in the user manual? Perhaps the users of ManualsCat.com can help you answer your question. By filling in the form below, your question will appear below the manual of the Bosch VeroCup 100. Please make sure that you describe your difficulty with the Bosch VeroCup 100 as precisely as you can. The more precies your question is, the higher the chances of quickly receiving an answer from another user. You will automatically be sent an e-mail to inform you when someone has reacted to your question.
Dripping tray is filling with water fast while the machine is in operation.
Mary G. 2022-08-21
Ask a question about the Bosch VeroCup 100
Page: 1
en
28
Table of contents
enInstruction manual
8 Intended use . . . . . . . . . . . . . . . 29
( Important safety information. . 29
7 Environmental protection . . . . 31
Saving energy . . . . . . . . . . . . . . . . . .31
Environmentally-friendly disposal. . . .31
* Getting to know your appliance 31
Included in delivery . . . . . . . . . . . . . .31
Assembly and components . . . . . . . .32
Controls . . . . . . . . . . . . . . . . . . . . . . .32
_ Accessories. . . . . . . . . . . . . . . . 33
K Before using for the first time . 34
Installing and connecting the
appliance. . . . . . . . . . . . . . . . . . . . . .34
Commissioning the appliance . . . . . .34
1 Operating the appliance. . . . . . 35
Preparing coffee using freshly ground
beans. . . . . . . . . . . . . . . . . . . . . . . . .35
Preparing drinks with milk . . . . . . . . .36
Adjusting beverage settings . . . . . . .36
Water filter . . . . . . . . . . . . . . . . . . . . .38
Frost protection . . . . . . . . . . . . . . . . .38
1 Settings . . . . . . . . . . . . . . . . . . . 39
Automatic switch-off . . . . . . . . . . . . .39
Switching the audible signal on/off . .39
Setting the water hardness . . . . . . . .40
Factory reset . . . . . . . . . . . . . . . . . . .40
D Daily care and cleaning . . . . . . 41
Cleaning agent . . . . . . . . . . . . . . . . .41
Cleaning the appliance . . . . . . . . . . .42
Cleaning the drip tray and coffee
grounds container . . . . . . . . . . . . . . .42
Cleaning the milk system. . . . . . . . . .42
Cleaning the brewing unit . . . . . . . . .43
. Service programmes . . . . . . . . .44
Starting Calc’nClean. . . . . . . . . . . . . 45
3 Trouble shooting . . . . . . . . . . . .46
4 Customer service . . . . . . . . . . . .49
Technical data . . . . . . . . . . . . . . . . . 49
E number and FD number . . . . . . . . 49
Guarantee . . . . . . . . . . . . . . . . . . . . 49
Page: 2
Intended use en
29
8 Intended use
Intendeduse Check the appliance for
damage after unpacking it. Do
not connect the appliance if it
has been damaged in
transport.
This appliance is intended for
domestic use only.
Only use the appliance indoors
at room temperature and up to
2000 m above sea level.
( Important safety
information
Importantsafetyinformation Please read carefully, follow
and retain the operating
instructions. When passing on
the appliance, enclose these
instructions.
This appliance can be used by
children aged from 8 years and
above and by persons with
reduced physical, sensory or
mental capabilities or lack of
experience and knowledge if
they have been given
supervision or instruction
concerning use of the
appliance in a safe way and if
they understand the hazards
involved. Keep children under
8 years of age away from the
appliance and connecting
cable and do not allow them to
use the appliance. Children
shall not play with the
appliance. Cleaning and user
maintenance shall not be made
by children unless they are
older than 8 years and
supervised.
Page: 3
en Important safety information
30
:Warning
Danger of electric shock!
■ The appliance may only be
connected to a power supply
with alternating current via a
correctly installed socket
with earthing. Ensure that the
protective conductor system
of the domestic electricity
supply has been correctly
installed.
Riskofelectricshock!
■ Connect and operate the
appliance only in
accordance with the
specifications on the rating
plate. If the power cord of
this appliance is damaged, it
must be replaced by
customer service.
Riskofelectricshock!
■ Do not use if the power
cable or appliance is
damaged. If a fault occurs,
pull the mains plug or switch
off the mains voltage
immediately.
Riskofelectricshock!
■ To prevent hazards, the
appliance may be repaired
by our customer service
only.
Riskofelectricshock!
■ Never immerse the
appliance or mains cord in
water.
:Warning
Hazard due to magnetism!
The appliance contains
permanent magnets which may
affect electronic implants, e.g.
heart pacemakers or insulin
pumps. Persons with electronic
implants should keep a
minimum distance of 10 cm
from the appliance and the
water tank when removed.
:Warning
Risk of suffocation!
Do not let children play with
packaging material. Store small
parts safely as they can be
easily swallowed.
:Warning
Risk of burns!
The milk system becomes very
hot. After use, allow it to cool
down first before touching it.
:Warning
Risk of injury!
■ Improper use of this
appliance may result in
injury.
Riskofinjury!
■ Do not reach into the
grinding unit.
Page: 4
Environmental protection en
31
7 Environmental
protection
Environmentalprotection Saving energy
■ If the appliance is not being used,
switch it off.
■ Set the interval for automatic
switch-off to the smallest value.
■ If possible, do not interrupt coffee or
milk froth dispensing. Stopping a
process prematurely results in
higher energy consumption and the
drip tray fills up more quickly.
■ Descale the appliance regularly to
avoid a build-up of limescale.
Limescale residue results in higher
energy consumption.
Environmentally-friendly
disposal
Dispose of packaging in an
environmentally-friendly manner.
Please ask your dealer about current
disposal routes.
* Getting to know your
appliance
Gettingtoknowyourappliance This section provides an overview of the
scope of delivery, the assembly and the
components of your appliance. It also
introduces you to the different controls.
Note: Depending on the appliance
model, individual details and colours
may differ.
How to use these instructions:
The cover pages of the operating
instructions can be folded out towards
the front. The illustrations are identified
using numbers that are referred to in the
operating instructions.
Example: ~ Fig. !
Included in delivery
~ Fig. !
This appliance is labelled in
accordance with European
Directive 2012/19/EU
concerning used electrical and
electronic appliances (waste
electrical and electronic
equipment — WEEE). The
guideline determines the
framework for the return and
recycling of used appliances
as applicable throughout the
EU.
# Fully automatic coffee machine
+ Water hardness testing strip
3 Instruction manual
; Milk frother
Page: 5
en Getting to know your appliance
32
Assembly and components
~ Fig. »
Controls
———
( On / off button (stand-by mode)
0 Control panel
8 Handle of milk frother
@ Outlet system for coffee, height
adjustable
H Milk frother (holder, frother, cover),
height adjustable
P Drip tray (coffee grounds
container, drip grate, drip plate,
float)
X Door of brewing chamber
` Rating plate
h Brewing unit
)» Aroma lid
)* Bean container
)2 Rotary selector for setting grinding
level
): Cover for water tank
)B Water tank
Button Meaning
k
Switch the appliance on and off
The appliance rinses automatically when it is switched on and off.
The appliance is not rinsed if:
■ it is still warm when switched on, or
■ coffee was not dispensed before the appliance was switched off.
The appliance is ready for use when the LEDs of the buttons for selecting drinks light
up in the control panel. The appliance has automatic switch-off. ~ «Selecting
automatic switch-off» on page 39
Espresso Dispensing Espresso
Caffe Crema Dispensing Caffe Crema
Cappuccino Dispensing cappuccino
Latte Macchiato Dispensing latte macchiato
Milk Frothing up milk
% Coffee strength
Adjusting the coffee strength ~ «Adjusting beverage settings» on page 36
Calc’nClean Start the service programme
Flashes when the service programme needs to be performed.~ «Calc’nClean
service programme» on page 45
Page: 6
Accessories en
33
———
_ Accessories
Accessories The following accessories are available
from retailers or from customer service:
———
The contact data for customer service in
all countries can be found at the back of
these instructions.
Symbol
‘
Lights up when the water tank needs to be topped up with water or the water tank is not
inserted.
Flashes when the water filter needs to be replaced.
( Lights up when trays need to be emptied.
Flashes when door of brewing chamber is open.
is continu-
ously lit
Ready to use, selection possible
is pulsing Dispensing underway
is flashing Waiting for operation, e.g. with Calc’nClean
off Not available
Accessory Order number
Retail Customer ser-
vice
Cleaning tablets TCZ8001 00311807
Descaling tablets TCZ8002 00576693
Water filter TCZ7003 00575491
Care set TCZ8004 00576331
Page: 7
en Before using for the first time
34
K Before using for the
first time
Beforeusingforthefirsttime In this section, you will learn how to
commission your appliance.
Note: Only use the appliance in
frost-free areas. If the appliance was
transported or stored at temperatures
below 0 °C, you must wait for at least 3
hours before using it.
Installing and connecting the
appliance
1. Remove any protective plastic film.
2. Place the appliance on a level,
water-resistant surface which can
bear the weight.
3. Using the mains plug, connect the
appliance to an earthed socket that
has been correctly installed.
Note: After plugging in, always wait
(approx. 5 seconds).
Commissioning the appliance
Attaching milk frother
~ Fig. #
1. Remove milk frother parts from the
bag.
2. Assemble milk frother.
3. Attach the milk frother on the front of
the appliance.
Filling the bean container
This appliance can be used to make
coffee drinks from coffee beans.
1. Open the lid )» of the bean
container )*.
2. Pour in coffee beans.
3. Close the lid again.
Notes
■ Coffee beans that have been glazed
or caramelised or that contain other
sugary additives block the brewing
unit. Only use pure bean mixes that
are suitable for use in fully automatic
espresso or coffee machines.
■ The coffee beans are freshly ground
for each brewing process.
■ Keep the coffee beans sealed and
stored in a cool place to maintain
optimum quality.
■ Coffee beans can be stored in the
bean container for a number of days
without losing their aroma.
Filling the water tank
Important: Fill the water tank with fresh,
cold, still water on a daily basis. Prior to
operation, check whether the water tank
has been sufficiently filled.
1. Carefully remove the cover of the
water tank.
2. Use the handle to remove the water
tank.
3. Fill the water tank with water up to
the «max» marking.
4. Put the water tank back in the holder
again, keeping it straight, and fit the
cover of the water tank.
Page: 8
Operating the appliance en
35
General information
The factory settings of the fully
automatic coffee machine are
programmed for optimal performance.
■ The appliance switches off
automatically after a specific time.
■ Whenever a button is pressed, a
signal sounds. It can be switched
off.~ «Settings» on page 39
■ When the appliance is used for the
first time, after running a service
programme or has not been
operated for a long period, the first
beverage will not have the full aroma
and should not be consumed.
■ After commissioning the appliance,
you will only achieve a suitably thick
and stable «crema» after the first few
cups have been dispensed.
■ If the appliance is in use for a long
period of time, water droplets will
form on the ventilation slots. This is
normal.
■ Escaping steam is not a fault but
due to the design of the machine.
Before using your new appliance, you
should check and select the water
hardness.~ «Settings» on page 39
1 Operating the
appliance
Operatingtheappliance In this section, you will learn how to
make beverages with coffee and milk. It
contains information about settings,
water filters and adjustment of the
grinding level, in addition to frost
protection.
Note: Freshly prepared beverages may
be very hot.
Preparing coffee using freshly
ground beans
You can choose between Espresso and
Caffe Crema. ~ «Preparing drinks with
milk» on page 36
The appliance is switched on. The water
tank and bean container have been
filled.
1. Place a cup under the outlet system.
2. Touch % repeatedly to select
the required coffee strength.
3. Touch the Espresso or Caffe Crema
button.
The coffee is brewed and then
dispensed into the cup.
Note: To stop dispensing the drink
before the end, touch Espresso or
Caffe Crema again.
Page: 9
en Operating the appliance
36
Preparing drinks with milk
This appliance has a milk frother. You
can make drinks of coffee with milk or
froth up milk.
Note: Dried milk residues are difficult to
remove so always perform
cleaning.~ «Daily care and cleaning»
on page 41
:Warning
Risk of burns!
The milk frother gets very hot. Hold only
by the handle. After use, let it cool down
first before touching it.
Coffee drinks with milk
You can choose between cappuccino
and latte macchiato. When doing so,
please check the position of the coffee
dispenser and milk frother.
The appliance is switched on. The water
tank and bean container have been
filled.
The milk frother is installed.
1. Fill a large cup or a large glass with
approx. 100 ml milk for cappuccino
and approx. 150 ml milk for latte
macchiato.
2. Place a cup or a glass under the
outlet system.
3. Push the coffee dispenser and milk
frother right down.
4. Touch % repeatedly to select
the required coffee strength.
5. Touch the Cappuccino or Latte
Macchiato button.
The milk is first frothed up in the cup or
glass. The coffee is then brewed and
dispensed into the cup or glass.
Note: To stop current dispensing of the
drink before the end, touch Cappuccino
or Latte Macchiato again.
Frothing up milk
The appliance is switched on. The water
tank has been filled.
The milk frother is installed.
1. Fill a large cup or a large glass with
approx. 100 ml milk.
2. Place a cup or a glass under the
outlet system.
3. Push the coffee dispenser and milk
frother right down.
4. Touch the Milk button.
The milk is frothed up.
Note: To stop the process before the
end, touch Milkagain.
Adjusting beverage settings
Adjustingbeveragesettings Coffee strength
Before making a drink, you can adjust
the coffee strength:
To do so, touch % to select the
strength you require.
Note: The coffee strength selected is
then active for all drinks made with
coffee.
Cappuccino
Latte Macchiato
mild
regular
strong
Page: 10
Operating the appliance en
37
Filling level
You can adjust the filling level of your
drinks.
Press and hold Espresso or Caffe
Crema for 3 seconds.
Dispensing takes place, with the button
selected flashing.
Once the required filling level is reached
in the cup, touch the button selected to
stop. The new filling level is only
apparent after the next drink is
dispensed.
Note: The filling level can be selected
either for Espresso (25 — 60 ml) or Caffe
Crema (80 — 200 ml).A minimum
quantity is always brewed: Espresso
approx. 25 ml and Caffe Crema
approx. 80 ml.
Frothing time
You can adjust the frothing time of your
drinks.
Press and hold Cappuccino, Latte
Macchiato or Milk for 3 seconds.
The milk is frothed up, and the button
selected flashes.
Once the required frothing time is
reached, touch the button selected to
stop.
Note: Setting the frothing time has no
impact on the amount of coffee.
Setting the grinding level
This appliance features an adjustable
grinder. This enables the grinding level
of the coffee to be individually changed.
:Warning
Risk of injury!
Do not reach into the grinding unit.
Caution!
The appliance may be damaged! Only
adjust the grinding level when the
grinder is running!
When the grinder is in operation, use
the rotary selector )2 to set the
grinding level.
■ Finer grinding level: turn
anticlockwise. (Fig. a)
■ Coarser grinding level: turn
clockwise. (Fig. b)
Notes
■ The new setting will not become
apparent until after the second cup
of coffee.
■ Set a finer grinding level with
dark-roasted coffee beans and a
coarser grinding level with lighter
coffee beans.
D E
Page: 11
en Operating the appliance
38
Water filter
Waterfilter ~ Fig. ‘
A water filter lessens limescale
deposits, reduces impurities in water
and improves the taste of the coffee.
Water filters are available from retailers
or from customer service.
Inserting or replacing a water filter
A new water filter must be rinsed before
it can be used.
The appliance is switched on. The water
tank has been filled.
1. Press and hold % and
Calc’nClean for at least 3 seconds.
2. Touch Espresso button, and «W.
hardness» will be activated.
3. Touch % button and make the
following selection:
4. Immerse the water filter (opening
facing up) in a container filled with
water until no more air bubbles rise
to the surface.
~ Fig. ‘
5. Then press the water filter firmly into
the empty water tank.
6. Fill the water tank with water up to
the «max» marking.
7. Place a container with a capacity of
1.0 litre under the outlet.
8. Touch Espresso button to save the
setting and activate rinsing.
9. Insert water tank.
10. Touch Espresso button to save the
setting and start rinsing. Water will
now flow through the filter.
11. Touch Calc’nClean button to exit the
menu.
12. Then empty the container. The
appliance is ready for use again.
Removing the water filter
If the water filter has been removed and
no new one inserted, please select the
appropriate water hardness. ~ «Setting
the water hardness» on page 40
Frost protection
To prevent frost damage during
transportation and storage, the
appliance must be completely emptied
beforehand.
Info: The appliance must be ready for
use and the water tank filled.
1. Place a large container under the
outlet of the milk frother and push
the frother down.
2. Press and hold Milk button for at
least 5 seconds.
The LED in the button flashes, and
the appliance now heats up.
3. As soon as steam escapes from the
milk frother, remove the water tank.
4. Allow the appliance to cool down.
Wait until ‘ symbol and all LEDs are
flashing.
5. Use k button to switch the
appliance off.
6. Empty the water tank and the drip
tray and thoroughly clean the
appliance.
The appliance can now be transported
or stored.
Note: The brewing unit is now secured
and cannot be removed.
with water filter
Page: 12
Settings en
39
1 Settings
Settings This appliance has different factory
settings. You can customise the settings
on the appliance.
Note: If no button is pressed within
90 seconds, the appliance switches to
«Choose beverage» without saving. The
previous setting remains unchanged.
You can select the following settings:
Automatic switch-off
Selectingautomaticswitch-off The appliance switches off automatically
at a specific time after the last button
was pressed. This time can be selected,
with settings from 15 minutes to
4 hours possible here.
1. Press and hold % and
Calc’nClean for at least 3 seconds.
2. Touch Caffe Crema button and
«Automatic switch-off» will be
activated.
3. Touch % button and select the
required time.
The following settings are possible:
4. Touch Caffe Crema button to save
the setting.
5. Touch Calc’nClean button to exit the
menu.
Switching the audible signal
on/off
Whenever a button is pressed, an
audible signal sounds.
This can be switched on or off.
1. Press and hold % and
Calc’nClean for at least 3 seconds.
2. Touch Cappuccino button, and
«Signal tone» menu will be activated.
3. Touch % button and switch
signal tone on or off.
4. Touch Cappuccino button to save
the setting.
5. Touch Calc’nClean button to exit the
menu.
15 minutes
30 minutes (factory setting)
1 hour
2 hours
4 hours
On (factory setting)
Off
Page: 13
en Settings
40
Setting the water hardness
It is important to set the water hardness
correctly so that the appliance indicates
in good time when the descaling
programme should be run. The preset
water hardness is level 4.
You can check the water hardness
using the enclosed test strip or by
asking your local water supplier.
1. Briefly immerse the enclosed test
strip in fresh tap water, leave it to
drip and read off the result after one
minute.
2. Press and hold % and
Calc’nClean for at least 3 seconds.
3. Touch Espresso button, and
«W. hardness» will be activated.
4. Touch % button and select the
water hardness.
The following settings are possible:
5. Touch Espresso button to save the
setting.
6. Touch Calc’nClean button to exit the
menu.
The table shows the allocation of the
levels to the different degrees of water
hardness:
Subsequent changes to the water
hardness can be made at any time.
Note: When using the water filter (see
section «Accessories»), proceed as
follows. ~ «Water filter» on page 38
Factory reset
If you set the appliance back to the
factory settings, you will lose your own
settings.
1. Press and hold % and
Calc’nClean for at least 3 seconds.
2. Touch Latte Macchiato button.
The factory settings are reactivated.
3. Touch Calc’nClean button to exit the
menu.
W. hardness 1
W. hardness 2
W. hardness 3
W. hardness 4 (factory setting)
Water filter (when used)
H2O-Softener (if available)
Level Degree of water hardness
German (°dH) French (°fH)
1 1-7 1-13
2 8-14 14-25
3 15-21 26-38
4 22-30 39-54
Page: 14
Daily care and cleaning en
41
D Daily care and
cleaning
Dailycareandcleaning With good care and cleaning, your
appliance will remain fully functioning
for a long time to come. In this section,
you will learn how to correctly clean and
care for your appliance.
:Warning
Risk of electric shock!
Before cleaning the appliance, pull out
the mains plug. Never immerse the
appliance in water. Do not use a steam
cleaner.
Cleaning agent
Please observe the following
information to ensure that the different
surfaces are not damaged by using the
wrong type of cleaning agent.
Do not use:
■ Harsh or abrasive cleaning agents.
■ Any cleaning agents containing
alcohol or spirits.
■ Hard scouring pads or sponges.
Notes
■ New sponge cloths may contain
salts. Salts can cause rust film on
stainless steel. Wash new sponge
cloths thoroughly before use.
■ Always remove any limescale,
residues of coffee or milk, cleaning
or descaling solution
immediately.This residue may cause
corrosion.
Caution!
Not all of the appliance’s components
can be cleaned in the dishwasher.
~ Fig. % — ‘
9
9
Not dishwasher-safe:
Water tank
Cover for water tank
Aroma lid
Brewing unit
Drip tray
Dishwasher-safe:
max.
60°C
Drip plate
Drip grate
Coffee grounds container
Float
Milk frother
Cover for milk frother
Page: 15
en Daily care and cleaning
42
Cleaning the appliance
1. Wipe the outside of the appliance
with a soft, damp cloth.
2. Clean the control panel using a
micro-fibre cloth.
3. Wipe off the coffee dispenser if
required after dispensing each
beverage.
Notes
■ If the appliance is cold when
switched on, or if it is switched off
after dispensing coffee, it rinses
automatically. The system is
therefore self-cleaning.
■ If the appliance has not been used
for a long period of time (e.g. while
you are on holiday), clean the entire
appliance thoroughly, including the
milk frother and brewing unit.
Cleaning the drip tray and
coffee grounds container
~ Fig. %
Note: The drip tray and coffee grounds
container should be emptied and
cleaned every day in order to prevent
deposits.With frequent use also empty
from time to time as soon as the float is
clearly visible if or the relevant symbol
lights up.
1. Open the door.
2. Pull the drip tray with the coffee
grounds container forwards and out.
3. Remove the drip plate with grate.
4. Empty and clean the drip tray and
coffee grounds container.
5. Wipe out the inside of the appliance
(area of drip tray).
Cleaning the milk system
Cleaningthemilksystem ~ Fig. &
The milk system must be cleaned after
each use to remove residues.
:Warning
Risk of burns!
The milk frother gets very hot. Hold only
by the handle. After use, let it cool down
first before touching it.
1. Fill a glass half-full with water and
place under the outlet system.
2. Push the milk frother right down.
3. Touch the Milk button to clean the
milk system.
4. Push the milk frother right up and
allow it to cool down.
5. Dismantle the milk frother into its
individual parts and clean
thoroughly.
6. Dry the individual parts, reassemble
and fit back onto the appliance.
Notes
■ To stop the process before the end,
touch Milk again.
■ All parts of the milk system should
be cleaned in the dishwasher.
Detergent residues in the milk
system must be thoroughly removed
following the rinsing process.
Page: 16
Daily care and cleaning en
43
Cleaning the brewing unit
~ Fig. $, ~ Fig. %
In addition to automatic cleaning, the
brewing unit should be removed
regularly for cleaning.
Caution!
Clean the brewing unit without detergent
or products containing vinegar or acid
and do not place in the dishwasher.
Remove the brewing unit:
1. Switch off the appliance.
2. Open the door to the brewing
chamber.
3. Remove the coffee grounds
container.
4. Push the red lever up, grasp the
brewing unit by the handle and pull
forwards carefully.
5. Rinse the brewing unit thoroughly
under warm, running water.
6. Clean the interior of the appliance
thoroughly with a damp cloth,
removing any coffee residues.
7. Allow the brewing unit and the
interior of the appliance to dry.
Insert the brewing unit:
1. Hold the brewing unit only by the
handle.
2. Push the red lever up, position the
brewing unit underneath and slide
back as far as it will go. The lever
must snap into place.
3. Insert the coffee grounds container
again and close the door.
Important: If the brewing unit has not
been inserted, or the brewing unit or
drip tray not inserted correctly, it will not
be possible to close the door.
Page: 17
en Service programmes
44
. Service programmes
Serviceprogrammes The Calc’nClean button will light up
every so often, with the exact frequency
depending on the water hardness and
usage of the appliance.
The appliance should be immediately
cleaned and descaled using the
programme.
Notes
■ Important: If the appliance is not
cleaned and descaled in good time,
it may be damaged.
■ Caution! For each of the service
programmes, use Calc’nClean
descaling and cleaning agents as
described in the instructions and
observe the (relevant) safety
information.
■ Do not drink the liquids.
■ Never use vinegar, vinegar-based
products, citric acid or citric
acid-based products for descaling.
■ For cleaning and descaling only use
the tablets intended for such
purpose.They have been specially
developed for this appliance, and
new stocks can be ordered through
customer service. ~ «Accessories»
on page 33
■ Never insert descaling tablets or
other products into the brewing unit.
■ Never interrupt the service
programme.
■ Prior to starting a service
programme, remove, clean and
re-insert the brewing unit. Clean the
milk frother.
■ At the end of a service programme,
wipe down the appliance using a
soft, damp cloth to immediately
remove any descaler residue. This
residue may cause corrosion.
■ New sponge cloths may contain
salts. Salts can cause rust film on
stainless steel, so cloths must
always be washed out thoroughly
before use.
■ If the service programme is
interrupted, e.g. by a power failure,
‘and Calc’nClean will light up.
Then proceed as follows:
1. Rinse out the water tank.
2. Pour in fresh, still water up to the
«max» marking.
3. Touch Calc’nClean button.
The programme starts and rinses the
appliance.Duration: approx.
2 minutes.
4. Empty, clean and re-insert the drip
tray. Close door.
The programme has finished. The
appliance is ready for use again.
Page: 18
Service programmes en
45
Starting Calc’nClean
Calc’nCleanserviceprogramme Duration: approx. 40 minutes
1. Press and hold the Calc’nClean
button for approx. 5 seconds.
( symbol lights up.
2. Open the door, remove the drip tray
and coffee grounds container and
empty.
3. Remove and clean the brewing unit.
4. Place a Bosch cleaning tablet in the
brewing unit and re-insert the unit.
5. Re-insert the drip tray and coffee
grounds container and close the
door.
‘ symbol lights up.
6. Remove the water filter (if there is
one).
7. Pour 0.5 litres of lukewarm water
into the empty water tank up to the
mark and dissolve a Bosch
descaling tablet in it.
8. Re-insert the water tank and place a
large container (approx. 1 litre)
under the outlet system.
9. Calc’nClean flashes, touch
Calc’nClean.
The programme starts, cleans and
descales the appliance. Calc’nClean
pulses. Duration approx. 20 minutes.
( symbol lights up.
10. Empty the container, open the door,
empty the drip tray and re-insert.
11. Close the door and place a
container under the outlet system.
‘ symbol lights up.
12. Clean the water tank and replace the
water filter (if removed).
~ Fig. ‘
13. Fill with fresh, still water up to the
«max» mark. Place the container
under the outlet system again.
14. Calc’nClean flashes, touch
Calc’nClean.
The programme starts and then cleans
and rinses the appliance. Calc’nClean
pulses. Duration approx. 20 minutes.
( symbol lights up.
15. Empty, clean and re-insert the drip
tray and coffee grounds container.
The programme has finished. The
appliance is ready for use again.
Page: 19
en Trouble shooting
46
3 Trouble shooting
Troubleshooting Faults often have simple explanations.
Before calling the customer service,
please refer to the fault table and
attempt to correct the fault yourself.
Please read through the safety
information at the beginning of these
instructions.
Fault table
Problem Reason Remedial action
The appliance no longer
responds.
Fault in the appliance. Pull out the mains plug, wait
5 seconds, plug it back in.
Coffee or milk froth quality var-
ies considerably.
Build-up of limescale in the
appliance.
Descale the appliance in accordance
with the instructions.
The individually selected
per-cup quantity is not reached.
Coffee dispensing slows to a
trickle or stops completely
Grinding level is too fine. Set a coarser grinding level.
Heavy build-up of limescale in
the appliance.
Descale the appliance as described in
the instructions.
Air in the water filter. Immerse the water filter into water until
no more air bubbles escape; insert the
filter again.
No coffee dispensed, only
water.
An empty bean container is not
detected by the appliance.
Pour in coffee beans
Note: The appliance will adjust to the
coffee beans upon the next dispensing
process.
The coffee shaft on the brewing
unit is blocked.
Clean the brewing unit. ~ «Cleaning
the brewing unit» on page 43
Beans are not falling into the
grinding unit (beans too oily).
Gently tap the bean container.Possibly
change the type of coffee. When the
bean container is empty, wipe it with a
dry cloth.
Coffee has no “crema”. Unsuitable type of coffee. Use a type of coffee with a higher pro-
portion of robusta beans.
The beans are no longer freshly
roasted.
Use fresh beans.
The grinding level is not suita-
ble for the coffee beans.
Set a finer grinding level.
The coffee is too «acidic». Grinding level set too coarse. Set a finer grinding level.
Unsuitable type of coffee. Use a darker roast.
The coffee is too «bitter». Coffee is ground too fine. Set a coarser grinding level.
Unsuitable type of coffee. Change the type of coffee.
The coffee tastes «burnt». Coffee is ground too fine. Set a coarser grinding level.
Unsuitable type of coffee. Change the type of coffee.
Page: 20
Trouble shooting en
47
Milk/blended milk drinks too
hot.
Milk froth too thin, loud sucking
noise.
Too little milk in glass or cup. Use more milk or adjust frothing time.
Milk/blended milk drinks too
cold.
Too much milk in glass or cup. Use less milk or adjust frothing time.
No milk/milk froth dispensed. The milk frother is soiled.
The milk frother is not inserted
in the milk.
Clean the milk frother in the dish-
washer. ~ «Cleaning the milk
system» on page 42
Use more milk, check whether the milk
frother is inserted in the milk. Slide the
outlet system right down.
The water filter does not stay in
position in the water tank.
The water filter is not mounted
correctly.
Immerse the water filter into water until
no more air bubbles escape; insert the
filter again.
Firmly press the water filter straight
down into the tank connection.
Several buttons flashing, a loud
noise can be heard.
Water tank missing or wrongly
inserted.
Insert water tank correctly.
Water dripped onto the inner
floor of the appliance when the
drip tray was removed.
Drip tray removed too early. Wait a few seconds after the last drink
was dispensed before removing the
drip tray.
The brewing unit cannot be
removed.
The brewing unit is not in the
removal position (e.g. frost pro-
tection activated).
Switch the appliance on again.
The appliance cannot be oper-
ated, LEDs lit up or flashing.
The appliance is in demo mode. Hold k button for at least 5 seconds
to deactivate demo mode.
The grinder will not start. The appliance is too hot. Wait 1 hour so the appliance can cool
down.
( LED flashes. The door is not properly closed. Press the door firmly closed.
The appliance is too hot. Wait 1 hour so the appliance can cool
down.
( LED lit up despite empty
drip tray — what to do?
Emptying is not detected when
the appliance is off.
When the appliance is switched on,
remove and re-insert the drip tray.
Page: 21
en Trouble shooting
48
———
‘ LED lit up despite water
tank being full.
Water tank wrongly inserted. Insert water tank correctly.
Carbonated water in the water
tank.
Fill the water tank with fresh tap water.
Float is stuck in the water tank. Remove the water tank and clean thor-
oughly.
New water filter not rinsed
according to the instructions.
Rinse the water filter according to the
instructions and then switch on.
Air in the water filter. Immerse the water filter (opening up)
in water until no more air bubbles
escape; insert the filter again.
~ «Inserting or replacing a water
filter» on page 38
Water filter is old. Insert a new water filter.
‘ LED flashes and all bever-
age LEDs flashing.
Water tank is missing or not
inserted correctly.
Insert water tank correctly.
The pipe system in the appli-
ance is dry.
Insert water tank correctly.
Fill the water tank with fresh tap water.
Do not fill with carbonated water.
Air in the water filter. Immerse the water filter (opening up)
in water until no more air bubbles
escape; insert the filter again.
~ «Inserting or replacing a water
filter» on page 38
All LEDs flashing. Incorrect voltage in building. Operate the appliance at 220V-240V
only.
‘, ( and Calc’nClean LEDs
flashing.
The ambient temperature is too
cold.
Operate the appliance at temperatures
> 5 °C.
( and % LEDs flashing. Brewing unit very heavily
soiled, or brewing unit cannot
be removed.
Clean brewing unit if possible, and
switch appliance off and back on
again.
% LEDs flashing. Fault in the appliance. Restart appliance.
If you are unable to solve the problem, always call the hotline.
You will find the telephone numbers at the back of these instructions
Page: 22
Customer service en
49
4 Customer service
Customerservice Technical data
E number and FD number
When calling us, please give the full
product number (E no.) and the
production number (FD no.) so that we
can provide you with the correct advice.
These numbers can be found on the
rating plate `. (~ Fig. «)
To save time, you can make a note of
the data for your appliance and the
telephone number for customer service
here, should this be required.
The contact data for customer service in
all countries can be found at the back of
these instructions.
Guarantee
The guarantee conditions for this
appliance are as defined by our
representative in the country in which it
is sold. Details regarding these
conditions can be obtained from the
dealer from whom the appliance was
purchased. The bill of sale or receipt
must be produced when making any
claim under the terms of this guarantee.
Changes reserved.
Power connection (voltage – frequency) 220–240 V ∼, 50/60 Hz
Power rating 1300 W
Maximum static pump pressure 15 bar
Maximum water tank capacity (without filter) 1.3 l
Maximum capacity of the coffee bean container ≈ 250 g
Length of the power cable 100 cm
Dimensions (H x W x D) 37.3 x 24.9 x 42.8 cm
Weight, empty approx. 8–9 kg
Type of grinder Ceramic/steel
E no.
FD
Number
Customer service O
- Brand:
- Bosch
- Product:
- coffee makers
- Model/name:
- VeroCup 100
- Filetype:
- Available languages:
- English, German, French, Italian