ACCESSORIES
Bounty Hunter
Carry Bag
®
Rugged double-stitched construction. – CBAG2
Bounty Hunter
Pouch & Digger Combo
®
Pouch with 2 large pockets & 9″ heavy duty digging tool. – TP-KIT-W
Pinpointer
Pinpoints the exact location of buried metal objects. Audio signal indicator
and vibrator. Runs on (1) 9-Volt Alkaline battery. – PIN POINTER-W
Bounty Hunter
Sand Scoop
®
Large scoop with filtering holes. Made of strong plastic. – SAND SCOOPBH
Accessory Searchcoils
4″ Concentric Round – 4COILPRO
10″ Concentric Elliptical – 10COIL-BH
11″ Biaxial – 11COIL-BH
Searchcoil Covers
Protect your searchcoil from abrasion and damage.
4″ Concentric, Round Cover– 4COVER
10″ Concentric Elliptical Cover – F70COVER
11″ Biaxial Cover – COVER-11DD
9″ Heavy-Duty Digging Tool
Metal blade with comfortable plastic handle and depth gauge. – TROWEL-2
Digging Tool
Light and practical plastic, wide blade digging tool. – TROWEL-W
Rain Cover
Custom made to protect from weather. – RAINCOV-ET
Bounty Hunter
Baseball Cap
®
One size fits all, with Bounty Hunter
logo. – BHCAP
®
Bounty Hunter
T-Shirt
®
100% cotton with Bounty Hunter
Logo.
®
Sizes: S, M, LG, XL & XXL – BHTSHIRT
Gold
Prospecting Kits
FOR COMPLETE DETAILS VISIT WWW.DETECTING.COM • 1-800-413-4131
MPROLONE
071714
OWNER’S MANUAL
Use 9-volt
ALKALINE batteries.
Do not use
«Heavy Duty» batteries.
Do not use
ordinary «Zinc Carbon» batteries.
-
Contents
-
Table of Contents
-
Troubleshooting
-
Bookmarks
Quick Links
OWNER’S MANUAL
Use 9-volt
ALKALINE batteries.
Do not use
«Heavy Duty» batteries.
Do not use
ordinary «Zinc Carbon» batteries.
Related Manuals for Bounty Hunter Lone Star Pro
Summary of Contents for Bounty Hunter Lone Star Pro
-
Page 1
OWNER’S MANUAL Use 9-volt ALKALINE batteries. Do not use “Heavy Duty” batteries. Do not use ordinary “Zinc Carbon” batteries. -
Page 2: Table Of Contents
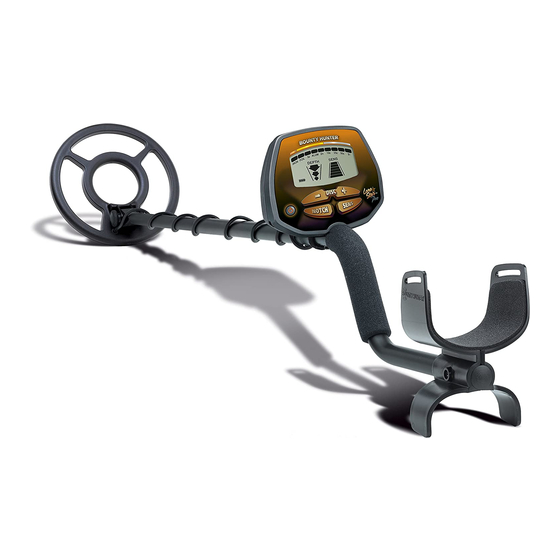
Congratulations on the purchase of your new Bounty Hunter ® Lone Star™ Pro Metal Detector. The Lone Star Pro is the result of nine years of software engineering and features the latest advancements in lightweight design and target accuracy. The Lone Star Pro can be used with its default turn-on-and-go settings, or you can adjust the detector’s settings to match your hunting conditions.
-
Page 3: Terminology
TERMINOLOGY The following terms are used throughout the manual, and are standard terminology among detectorists. RELIC A relic is an object of interest by reason of its age or its association with the past. Many relics are made of iron, but can also be made of bronze or precious metals.
-
Page 4: Contents
CONTENTS OF BOX The following detector components are in the box: 1. S-ROD with Control Housing, Arm Rest 2. Lower Stem 3. Searchcoil 4. Bolt & Knurled Knob 5. This Owner’s Manual…
-
Page 5: Assembly
ASSEMBLING THE DETECTOR Hold S-ROD upright. Insert LOWER STEM into S-ROD and click SILVER BUTTON into a hole. Attach the SEARCHCOIL to the LOWER STEM using the BOLT and KNURLED KNOB. Adjust the LOWER STEM to a length that lets you maintain a comfortable upright posture while holding the detector relaxed at your side with the SEARCHCOIL…
-
Page 6: Batteries (Use Alkaline Batteries Only)
BATTERIES The detector requires a single 9-volt ALKALINE battery (battery not included). Do not use ordinary “Zinc Carbon” batteries Do not use “Heavy Duty” batteries. Rechargeable batteries can also be used. If you use rechargeables, we recommend using a “Nickel Metal Hydride” rechargeable battery. The battery compartment is located on the back side of the Control Housing.
-
Page 7: Quick-Start Demonstration
QUICK-START DEMONSTRATION I. Supplies Needed: a Nail (made of iron) a U.S. Quarter (or silver coin) a U.S. Nickel a Gold Ring a U.S. Dime a U.S. Penny, dated after 1982 (post-1982 pennies are made of Zinc) (Most newer non-U.S. coinage also contains mostly Zinc) II.
-
Page 8: The Basics Of Metal Detecting
THE BASICS OF METAL DETECTING This metal detector is intended for locating buried metal objects. When searching for metals, underground or on the surface, you have the following challenges and objectives: 1. Ignoring signals caused by ground minerals. 2. Ignoring signals caused by metal objects that you do not want to find, like nails.
-
Page 9
THE BASICS OF METAL DETECTING 5. EMI (Electromagnetic Interference) The searchcoil produces a magnetic field and then detects changes in that magnetic field caused by the presence of metal objects. This magnetic field that the detector creates is also susceptible to the electromagnetic energy produced by other electronic devices. -
Page 10: How To Work The Controls
HOW TO WORK THE CONTROLS DEPTH SENS POWER ON/OFF Press SENS to Press NOTCH cycle through to accept or sensitivity levels reject a category along the Target Category Arc Press to CHANGE THE DISCRIMINATION SETTING…
-
Page 11: The Display
THE DISPLAY Target Conductivity Arc (Metal objects are classified by electrical conductivity, the highest to the right) Target DEPTH SENS Category Icons Battery Level Indicator Target Sensitivity Level Depth Indicator Indicator DEPTH INDICATOR Coin-sized objects will be detected up to 8” deep. The 3-arrow graphic indicator is calibrated to coin-sized objects.
-
Page 12: Target Identification
TARGET IDENTIFICATION Target-ID This is a motion detector. When objects are detected, the detector will emit a sound. A segment will illuminate along the Target Conductivity Arc. The illuminated segment indicates the Target-ID of the last object detected. This detector has fast target response and is able to detect different objects in very close proximity.
-
Page 13: Depth And Target Display
DEPTH AND TARGET DISPLAY Please refer to the display on your indicate a worthless item such as a nail, or detector and reference the TARGET-ID a more valuable historic iron relic. categories below applicable to your FOIL: Aluminum foil, such as a gum model (not all detectors include all of these categories).
-
Page 14: Controls
CONTROLS SENS Adjust the sensitivity from 1 to 6. At startup the default sensitivity is level 4. If the detector beeps erratically or beeps when there are no metal objects being detected, reduce the sensitivity. to reduce the sensitivity Lowest sensitivity detects Highest sensitivity detects coins to approximately 2”…
-
Page 15: Controls
CONTROLS Press to program the NOTCH feature. Each press of cycles to a new category and that category icon will flash for 2 seconds. Then the category will reverse status. If the icon had previously been illuminated it will now disappear indicating that the category has been eliminated from detection.
-
Page 16: Pinpointing
PINPOINTING Pinpointing targets after detection “X-ing” the target 1. Sweep over target in narrowing side-to- side patterns. 2. Take note of the spot on the ground where “beep” occurs. 3. Step 90° to the side of the target. 4. Sweep searchcoil over same area, at 90°…
-
Page 17: Characteristics & Limitations
CHARACTERISTICS & LIMITATIONS 1. This detector comes with a waterproof searchcoil. The searchcoil can be completely submerged into water. The control housing is not waterproof and cannot be submerged in water. To use the detector in inclement weather, consider purchasing the optional detector cover. 2.
-
Page 18: Troubleshooting
TROUBLESHOOTING GUIDE SYMPTOM CAUSE SOLUTION Detector chatters, • Using detector • Use detector beeps erratically indoors outdoors only or has low • Using detector near • Move away sensitivity power lines from power lines • Using 2 detectors in • Keep 2 detectors close proximity at least 6 meters (20’) apart…
-
Page 19: Treasure Hunter’s Code Of Ethics
TREASURE HUNTER’S CODE OF ETHICS: • Always check Federal, State, County and local laws before searching. • Respect private property and do not enter private property without the owner’s permission. • Take care to refill all holes and leave no damage. •…
-
Page 20: Accessories
Light and practical plastic, wide blade digging tool. – TROWEL-W Rain Cover Custom made to protect from weather. – RAINCOV-ET Bounty Hunter Baseball Cap ® One size fits all, with Bounty Hunter logo. – BHCAP ® Bounty Hunter T-Shirt ®…
Specifications:73/73998-lone_star_pro.pdf file (10 Feb 2023) |
Accompanying Data:
Bounty Hunter Lone star Pro Metal Detector PDF Owner’s Manual (Updated: Friday 10th of February 2023 08:35:39 PM)
Rating: 4.3 (rated by 48 users)
Compatible devices: Quick Draw II, Mach-1, Legacy 1000, Legacy 2500, Lone Star, Fortune Hunter, Gold, Time Ranger.
Recommended Documentation:
Text Version of Owner’s Manual
(Ocr-Read Summary of Contents of some pages of the Bounty Hunter Lone star Pro Document (Main Content), UPD: 10 February 2023)
-
6, 6 The detector requires a single 9-volt ALKALINE battery (battery not included). Do not use ordinary “Zinc Carbon” batteries Do not use “Heavy Duty” batteries. Rechargeable batteries can also be used. If you use rechargeables, we recommend using a “Nickel Metal Hydride” rechargeable batte…
-
5, 5 ASSEMBLING THE DETECTOR Hand-grip Search coil Cab le Cable Plug S-R od Battery Compart men t (ba ck side) Headphone Jack Armrest Slack in cab le DEP TH SENS Sea rch coi l ● 1 Hold S-ROD upright. ● 2 Insert LOWER STEM into S-ROD and click SILVER BUTTON into a hole. ● 3 Attach the SEARCHCOIL to the LOWE…
-
4, Bounty Hunter Lone star Pro CONTENTS OF BOX The following detector components are in the box: 1. S-ROD with Control Housing, Arm Rest 2. Lower Stem 3. Searchcoil 4. Bolt & Knurled Knob 5. This Owner’s Manual DEP TH SEN S 4 ● 1 ● 2 ● 3 ● 4 ● 5 17 1. This detector comes with a waterproof searchcoil. The search…
-
8, This metal detector is intended for locating buried metal objects. When searching for metals, underground or on the surface, you have the following challenges and objectives: 1. Ignoring signals caused by ground minerals. 2. Ignoring signals caused by metal objects that you do not want to find, like nails. …
-
2, 2 TABLE OF CONTENTS Congratulations! Congratulations on the purchase of your new Bounty Hunter ® Lone Star™ Pro Metal Detector. The Lone Star Pro is the result of nine years of software engineering and features the latest advancements in lightweight design and target accuracy. The Lone Star Pro ca…
-
10, Bounty Hunter Lone star Pro 10 11 HOW TO WORK THE CONTROLS THE DISPLAY DEPTH SENS POWER ON/OFF Press — or + to CHANGE THE DISCRIMINATION SETTING Press SENS to cycle through sensitivity levels Press NOTCH to accept or reject a category along the Target Category Arc DEPTH SENS Target Depth Indicator Sensitivity Level Indicator Bat…
-
Bounty Hunter Lone star Pro User Manual
-
Bounty Hunter Lone star Pro User Guide
-
Bounty Hunter Lone star Pro PDF Manual
-
Bounty Hunter Lone star Pro Owner’s Manuals
Recommended: EX-D11, EFI EXP6000, CGG-2C


-
Bounty Hunter Time Ranger
Time Ranger Manualhttp://web.archive.org/web/20000823212250/www.detecting.com/page26.htm1 of 1911/2/08 2:49 AMBack to HomePage NOTE: Images are excluded due to the memory requirements; therefore, there will be references toillustrations that do not exist in this text only document. All illustrations can be fo …
Time Ranger 19
-
Bounty Hunter Ultra Mag Sharp Shooter
OWNER’S MANUALThe Ultra Mag Sharp Shooter is a professional metal detector. Theconcepts and terminology can be quite unfamiliar if you are new tothe hobby. To understand it quickly and to get the most enjoymentpossible from your detector, we strongly recommend that you:1)Read this manual.Most imp …
Ultra Mag Sharp Shooter 10
-
Loma Superscan Micro ISC
A GUIDE TO COMMISSIONING1LOMA Superscan Micro ISCSERVICE MENU MAPMACHINE DETAILS FOR:Machine Serial No:Line Number:USER OPTIONSSERVICE>✱ TRACKER✱ ISC✱ REJECT TIME✱ MAN SETUP✱ AUX RELAY✱ ACCESS FERR✱ REJ OUT RUN✱ CAL TRIGGER✱ MODE✱ REJ REL✱ REJ CONFIRM✱ BIN FULL✱ DWELL UNITRE …
Superscan Micro ISC 8
-
Bounty Hunter Land Star
OWNER’S MANUALCAREFULLY READ THIS ENTIRE MANUAL BEFORE ATTEMPTING TO OPERATEYOUR NEW LAND STAR METAL DETECTOR.Metal DetectorThis Detector System has two distinct systems in one:1. ALL METAL No-Motion Mode: In this setting, detected targets willcause the detector to sound off for as long as the target i …
Land Star 10
Additional Information:
Product Types by Bounty Hunter:
- Scanner
- Metal Detector
Popular Right Now:
Operating Impressions, Questions and Answers:
Table of Contents for Bounty Hunter Lone star Pro:
-
15 Press to program the NOTCH feature. Each press of cycles to a new category and that category icon will flash for 2 seconds. Then the category will reverse status. If the icon had previously been illuminated it will now disappear indicating that the category has been eliminated from detection. Likewise, an icon that is not visible on the display will re-illuminate, indicating that this category is now “Notched in” (i.e. detected). Use to select the category to NOTCH. Each time you press the category for metal to be no
-
18 TROUBLESHOOTING GUIDE SYMPTOM CAUSE SOLUTION Detector chatters, • Using detector • Use detector beeps erratically indoors outdoors only or has low • Using detector near • Move away sensitivity power lines from power lines • Using 2 detectors in • Keep 2 detectors close proximity at least 6 meters (20’) apart • Environmental • Reduce sensitivity electromagnetic until erratic interference signals cease Low speaker • Discharged battery • Replace battery vo
-
10 HOW TO WORK THE CONTROLS DEPTH SENS POWER ON/OFF Press — or + to CHANGE THE DISCRIMINATION SETTING Press SENS to cycle through sensitivity levels Press NOTCH to accept or reject a category along the Target Category Arc
-
I. Supplies Needed: a Nail (made of iron) a U.S. Quarter (or silver coin) a U.S. Nickel a Gold Ring a U.S. Dime a U.S. Penny, dated after 1982 (post-1982 pennies are made of Zinc) (Most newer non-U.S. coinage also contains mostly Zinc) II. Position the Detector: a.Place the detector on a table with the searchcoil hanging over the edge. Or better, have a friend hold the detector with the searchcoil off the ground. b.Keep the searchcoil aw
-
ACCESSORIES Gold Prospecting Kits FOR COMPLETE DETAILS VISIT WWW.DETECTING.COM • 1-800-413-4131 Bounty Hunter ® Carry Bag Rugged double-stitched construction. – CBAG2 Bounty Hunter ® Pouch & Digger Combo Pouch with 2 large pockets & 9” heavy duty digging tool. – TP-KIT-W Pinpointer Pinpoints the exact location of buried metal objects. Audio signal indicator and vibrator. Runs on (1) 9-Volt Alkaline battery. – PIN POINTER-W Bounty Hunter ® Sa
-
CONTENTS OF BOX The following detector components are in the box: 1. S-ROD with Control Housing, Arm Rest 2. Lower Stem 3. Searchcoil 4. Bolt & Knurled Knob 5. This Owner’s Manual DEP TH SEN S 4 ● 1 ● 2 ● 3 ● 4 ● 5
-
19 5-YEAR LIMITED WARRANTY Register your warranty on-line for a chance to win a FREE DETECTOR. For details, visit www.detecting.com This metal detector is warranted against defects in materials and workmanship under normal use for five years from the date of purchase to the original owner. Damage due to neglect, accidental damage or misuse of this product is not covered under this warranty. Decisions regarding abuse or misuse of the detector are made solely at the discreti
-
6 The detector requires a single 9-volt ALKALINE battery (battery not included). Do not use ordinary “Zinc Carbon” batteries Do not use “Heavy Duty” batteries. Rechargeable batteries can also be used. If you use rechargeables, we recommend using a “Nickel Metal Hydride” rechargeable battery. The battery compartment is located on the back side of the Control Housing. Slide the battery door to the side to remove. Insert battery. Close battery door.
-
OWNER’S MANUAL Use 9-volt ALKALINE batteries. Do not use “Heavy Duty” batteries. Do not use ordinary “Zinc Carbon” batteries.
-
17 1. This detector comes with a waterproof searchcoil. The searchcoil can be completely submerged into water. The control housing is not waterproof and cannot be submerged in water. To use the detector in inclement weather, consider purchasing the optional detector cover. 2. BURIED UTILITY LINES. This hobby metal detector is not designed to locate buried pipes or cables . First Texas Products manufactures a complete line of pipe an
-
13 DEPTH AND TARGET DISPLAY Please refer to the display on your detector and reference the TARGET-ID categories below applicable to your model (not all detectors include all of these categories). READING THE DISPLAY The display shows the PROBABLE identification of the metal detected, as well its PROBABLE depth. The detector will register a target identification, upon each sweep of the searchcoil, when a buried
-
5. EMI (Electromagnetic Interference) The searchcoil produces a magnetic field and then detects changes in that magnetic field caused by the presence of metal objects. This magnetic field that the detector creates is also susceptible to the electromagnetic energy produced by other electronic devices. Cell phones, cell phone towers, power lines, microwave ovens, lighting fixtures, TVs, computers, motors, etc… all produce EMI which can interfere with the detector and cause it to beep when no meta
Questions, Opinions and Exploitation Impressions:
You can ask a question, express your opinion or share our experience of Bounty Hunter Lone star Pro device using right now.

OWNER’S MANUAL
Use 9-volt
ALKALINE batteries.
Do not use
“Heavy Duty” batteries.
Do not use
ordinary “Zinc Carbon” batteries.
Congratulations!
Congratulations on the purchase of your new Bounty Hunter® Lone Star™ Pro
Metal Detector. The Lone Star Pro is the result of nine years of software
engineering and features the latest advancements in lightweight design and
target accuracy.
The Lone Star Pro can be used with its default turn-on-and-go settings, or you
can adjust the detector's settings to match your hunting conditions. Treasure
hunting enthusiasts from around the world were involved in the development
of this revolutionary new detector. This manual has been written to help you
get optimal use of your detector so we hope you will read it thoroughly before
your first outing.
Happy Hunting from First Texas Products!
TABLE OF CONTENTS
Terminology . . . . . . . . . . . . . . . . . . . . . . . . . . . . . . . . . . . . . . . . . . . . . . . . . . . . . . . . .3
Contents . . . . . . . . . . . . . . . . . . . . . . . . . . . . . . . . . . . . . . . . . . . . . . . . . . . . . . . . . . .4
Assembly . . . . . . . . . . . . . . . . . . . . . . . . . . . . . . . . . . . . . . . . . . . . . . . . . . . . . . . . . . .5
Batteries (use alkaline batteries) . . . . . . . . . . . . . . . . . . . . . . . . . . . . . . . . . . . . . . . .6
Quick-Start Demonstration . . . . . . . . . . . . . . . . . . . . . . . . . . . . . . . . . . . . . . . . . . . . .7
The Basics of Metal Detecting . . . . . . . . . . . . . . . . . . . . . . . . . . . . . . . . . . . . . . . .8-9
How to Work the Controls . . . . . . . . . . . . . . . . . . . . . . . . . . . . . . . . . . . . . . . . . . . . .10
The Display . . . . . . . . . . . . . . . . . . . . . . . . . . . . . . . . . . . . . . . . . . . . . . . . . . . . . . . .11
Target Identification . . . . . . . . . . . . . . . . . . . . . . . . . . . . . . . . . . . . . . . . . . . . . . . . .12
Depth and Target Display . . . . . . . . . . . . . . . . . . . . . . . . . . . . . . . . . . . . . . . . . . . . .13
Controls . . . . . . . . . . . . . . . . . . . . . . . . . . . . . . . . . . . . . . . . . . . . . . . . . . . . . . . .14-15
Sensitivity . . . . . . . . . . . . . . . . . . . . . . . . . . . . . . . . . . . . . . . . . . . . . . . . . . . . .14
Discrimination . . . . . . . . . . . . . . . . . . . . . . . . . . . . . . . . . . . . . . . . . . . . . . . . . . .14
Notch . . . . . . . . . . . . . . . . . . . . . . . . . . . . . . . . . . . . . . . . . . . . . . . . . . . . 14-15
Headphones . . . . . . . . . . . . . . . . . . . . . . . . . . . . . . . . . . . . . . . . . . . . . . . . . . . . . . .15
Pinpointing . . . . . . . . . . . . . . . . . . . . . . . . . . . . . . . . . . . . . . . . . . . . . . . . . . . . . . . .16
Characteristics & Limitations . . . . . . . . . . . . . . . . . . . . . . . . . . . . . . . . . . . . . . . . . .17
Troubleshooting . . . . . . . . . . . . . . . . . . . . . . . . . . . . . . . . . . . . . . . . . . . . . . . . . . . .18
Treasure Hunter's Code of Ethics . . . . . . . . . . . . . . . . . . . . . . . . . . . . . . . . . . . . . .19
Warranty . . . . . . . . . . . . . . . . . . . . . . . . . . . . . . . . . . . . . . . . . . . . . . . . . . . . . . . . . .19
Accessories . . . . . . . . . . . . . . . . . . . . . . . . . . . . . . . . . . . . . . . . . . . . . . . . . . . . . . .20
2
TERMINOLOGY
The following terms are used throughout the manual, and are standard
terminology among detectorists.
RELIC
A relic is an object of interest by reason of its age or its association with
the past. Many relics are made of iron, but can also be made of bronze
or precious metals.
IRON
Iron is a common, low-grade metal that is an undesirable target in certain
metal detecting applications. Examples of undesirable iron objects are old
cans, pipes, bolts and nails.
Sometimes, the desired target is made of iron. Property markers, for
instance, contain iron. Valuable relics can also be composed of iron;
cannon balls, old armaments and parts of old structures and vehicles can
also be composed of iron.
FERROUS
Metals which are made of, or contain, iron.
ELIMINATION
Reference to a metal being "eliminated" means that the detector will not
emit a tone, nor display a Target-ID, when a metal object passes through
the searchcoil's detection field.
DISCRIMINATION
When the detector emits different tones for different types of metals, and
when the detector "eliminates" certain metals, we refer to this as the
detector "discriminating" among different types of metals.
Discrimination is an important feature of professional metal detectors.
Discrimination allows the user to ignore trash and otherwise undesirable
objects.
PINPOINTING
Pinpointing is the process of finding the exact location of a buried object.
Long-buried metals can appear exactly like the surrounding soil, and can
therefore be very hard to isolate from the soil.
GROUND CANCELATION
Ground Cancelation is the ability of the detector to ignore, or "see through,"
the earth's naturally occurring minerals, and only sound a tone when a
metal object is detected. This detector incorporates proprietary circuitry to
eliminate false signals from many mineralized soils.
3
CONTENTS OF BOX
The following detector components are in the box:
1. S-ROD with Control Housing, Arm Rest
2. Lower Stem
3. Searchcoil
4. Bolt & Knurled Knob
5. This Owner's Manual
�
�
DE
PT
H
SE
N
S
�
�
�
4
ASSEMBLING THE DETECTOR
� Hold S-ROD upright.
� Insert LOWER STEM into S-ROD
Armrest
and click SILVER BUTTON into a
hole.
� Attach the SEARCHCOIL to the
LOWER STEM using the BOLT
and KNURLED KNOB.
Battery
Compartment
(back side)
Hand-grip
NS
Headphone
Jack
� Wind the CABLE around the
STEM.
Leave slack in the cable at the
bottom to allow the searchcoil to
pivot.
DE
PT
H
length that lets you maintain a
comfortable upright posture while
holding the detector relaxed at
your side with the SEARCHCOIL
parallel to the ground in front of
you.
SE
� Adjust the LOWER STEM to a
S-Rod
Searchcoil
Cable
Cable
Plug
� Align the pins on the CABLE
PLUG to the connector holes on
the rear of the control housing.
� Push in CABLE PLUG.
Slack
in cable
Searchcoil
5
BATTERIES
The detector requires a single 9-volt ALKALINE battery (battery not included).
Do not use ordinary “Zinc Carbon” batteries
Do not use “Heavy Duty” batteries.
Rechargeable batteries can also be used. If you use rechargeables, we
recommend using a “Nickel Metal Hydride” rechargeable battery.
The battery compartment is located on the back side of the Control Housing.
Slide the battery door to the side to remove. Insert battery. Close battery door.
When it's time to replace the battery simply push down firmly on the bottom of
the battery (see illustration).
BATTERY LIFE
Patent Pending
Expect 20 to 25 hours of life from a
9-volt alkaline battery.
Rechargeable batteries provide about 8
hours of usage per charge.
BATTERY INDICATOR
The battery icon has three segments
plus an outline segment.
The amount of battery voltage for an
ALKALINE battery is indicated as
follows:
BATTERY
REMOVAL
3 segments illuminated:
8.1 volts or more
2 segments illuminated:
7.1 to 8.0 volts
1 segment illuminated:
6.5 to 7.0 volts
No segments illuminated: 6.2 to 6.4 volts
Outline Flashing:
6.1 or less
SPEAKER VOLUME AND BATTERY CHARGE
You may notice the speaker volume drop while one battery segment is
illuminated.
With the outline flashing, low speaker volume will be very apparent.
BATTERY DISPOSAL & RECYCLING
Alkaline batteries may be disposed of in a normal waste receptacle or recycled.
Non-Alkaline batteries should be recycled. In the state of California all battery
types must be recycled. Please refer to local municipalities for detailed disposal
and recycling requirements.
6
QUICK-START DEMONSTRATION
I. Supplies Needed:
a Nail (made of iron)
a U.S. Nickel
a U.S. Dime
a U.S. Quarter (or silver coin)
a Gold Ring
a U.S. Penny, dated after 1982 (post-1982
pennies are made of Zinc)
(Most newer non-U.S. coinage also contains mostly Zinc)
II. Position the Detector:
a. Place the detector on a table with the searchcoil hanging over the edge. Or
better, have a friend hold the detector with the searchcoil off the ground.
b. Keep the searchcoil away from walls,
floors and metal objects.
c. Remove watches, rings and jewelry.
d. Turn off lights or appliances whose
electromagnetic emissions may cause
interference.
e. Pivot the searchcoil back.
f. Press
to power on.
III. Demonstrate DISCRIMINATION Feature:
a. Pass all objects over the searchcoil and notice the different tones.
Nail: low tone
Nickel: medium tone
Zinc Penny: medium tone
Gold Ring: most gold rings will register with a medium tone
Dime: high tone
Quarter: high tone
b. Wave objects close, notice depth indicator. Wave objects farther away and
notice depth indicator.
c. Press
once.
d. Wave nail over searchcoil.
It will not be detected because it has been “discriminated out.”
e. Press
4 more times. Wave all objects. The Penny and Nickel will not
be detected. They have been “discriminated out.”
IV. Demonstrate NOTCH Feature:
a. Press
twice until 5¢ flashes.
b. Notice that the 5¢ is now illuminated.
c. Pass the Nickel over the searchcoil and notice it has been detected. The
Nickel has been “notched” back in.
V. Demonstrate DEPTH Indicator:
a. Pass the Nickel close to the searchcoil (about 1” away).
b. Notice the single arrow indicating a shallow target.
c. Wave the Nickel farther away from the searchcoil and notice 2 or 3 arrows
illuminating, indicating a deeper target.
7
THE BASICS OF METAL DETECTING
This metal detector is intended for locating buried metal objects. When
searching for metals, underground or on the surface, you have the following
challenges and objectives:
1. Ignoring signals caused by ground minerals.
2. Ignoring signals caused by metal objects that you do not want
to find, like nails.
3. Identifying a buried metal object before you dig it up.
4. Estimating the size and depth of objects, to facilitate digging them up.
5. Eliminating the effects of electromagnetic interference from other
electronic devices.
Your metal detector is designed with these things in mind.
1. Ground Minerals
All soils contain minerals. Signals from ground minerals can interfere with
the signals from metal objects you want to find. All soils differ, and can differ
greatly, in the type and amount of ground minerals present. This detector
has proprietary circuitry to automatically eliminate interfering signals from
minerals that occur naturally in the ground.
NOTE: This detector will not completely eliminate interference from all types
of minerals. For example, the detector IS NOT designed for use on wet
sand saltwater beaches. Another example of soil this detector will not
eliminate is any soil containing large concentrations of iron oxides, which are
usually red in color.
2. Trash
If searching for coins, you want to ignore items like aluminum foil and nails.
You can see the Target-ID of the buried objects, listen to the sounds and
then decide what you want to dig up. Or you can eliminate unwanted metals
from detection by using the DISCRIMINATION feature.
3. Identifying Buried Objects
Metal objects are identified along the 9-segment Conductivity Arc. This scale is an
indicator of the relative electrical conductivity of different objects. Segments to the
right indicate more conductive targets. Iron objects, which are usually of lesser
value, illuminate on the left-most segments. Silver objects illuminate on the rightmost segments.
4. Size and Depth of Buried Objects
The 3-segment graphic indicates the relative depth of a buried metal object.
This graphic can indicate the relative size of different objects or their distance from
the searchcoil. For a given object, the more distance between it and the searchcoil,
the more arrows illuminated.
8
THE BASICS OF METAL DETECTING
5. EMI (Electromagnetic Interference)
The searchcoil produces a magnetic field and then detects changes in that
magnetic field caused by the presence of metal objects. This magnetic
field that the detector creates is also susceptible to the electromagnetic
energy produced by other electronic devices. Cell phones, cell phone
towers, power lines, microwave ovens, lighting fixtures, TVs, computers,
motors, etc… all produce EMI which can interfere with the detector and
cause it to beep when no metal is present, and sometimes to beep
erratically.
The SENSITIVITY control lets you reduce the strength of this magnetic
field, and therefore lessen its susceptibility to EMI. You may want to
operate at maximum strength, but the presence of EMI may make this
impossible, so if you experience erratic behavior or “false” signals, reduce
the sensitivity.
USING THE DETECTOR
Sweep Method
Sweep the detector side-to-side over
the ground.
Keep the searchcoil parallel to the
ground as you sweep; do not lift the
searchcoil at the ends of your sweeps.
Searchcoil motion is required for target
detection.
CORRECT
WRONG
8” WATERPROOF SEARCHCOIL
This detector is equipped with an 8” diameter concentric waterproof searchcoil.
This lightweight, ruggedly constructed searchcoil can be fully submerged into
water. The bottom portion of the S-Rod can also be submerged, but the control
housing and the searchcoil cable plug connection into the housing must be
kept dry.
Accessory searchcoils are also available for purchase; see back cover or visit
www.detecting.com. A smaller searchcoil offers more precision and fits into
tight spaces. Larger searchcoils provide for more ground coverage on each
sweep and penetrate deeper into the ground. Biaxial searchcoils better
penetrate mineralized soils.
9
HOW TO WORK THE CONTROLS
DEPTH
POWER
ON/OFF
Press NOTCH
to accept or
reject a category
along the Target
Category Arc
SENS
Press SENS to
cycle through
sensitivity levels
-
Press or + to CHANGE
THE DISCRIMINATION
SETTING
10
THE DISPLAY
Target Conductivity Arc
(Metal objects are classified by electrical conductivity,
the highest to the right)
Target
Category
Icons
DEPTH
SENS
Target
Depth
Indicator
Sensitivity
Level
Indicator
Battery
Level
Indicator
DEPTH INDICATOR
Coin-sized objects will be detected up to 8” deep.
The 3-arrow graphic indicator is calibrated to coin-sized objects.
Coin on Surface
Coin is Shallow
Coin is Very Deep
Objects other than coins will still register on the 3-segment depth scale, but the
depth indication will be relative. For example, all 3 arrows illuminated could
indicate a coin buried 8” deep, but could also be a very large object several feet
deep. Use the Depth Indicator in conjunction with the Conductivity Arc to gain
more information.
OVERLOAD WARNING
If a metal object or highly magnetic soil are too close to the searchcoil, the
detector will overload and the screen will be blank except for the battery
indicator. The detector will make a rapid, repeating mid-tone warning sound.
Overload will not harm the detector, but the detector will not function under
these conditions. If overload occurs, raise the searchcoil to detect the target
from a greater distance, or move to a different location.
11
TARGET IDENTIFICATION
Target-ID
This is a motion detector. When objects are detected, the detector will emit a
sound. A segment will illuminate along the Target Conductivity Arc. The
illuminated segment indicates the Target-ID of the last object detected.
This detector has fast target response and is able to detect different objects in
very close proximity. Therefore, the Target-ID displayed may change rapidly as
you sweep the searchcoil.
Three seconds after the last Target-ID is displayed, the Target-ID will time-out
and the segment will disappear.
3-Tone Target Identification
The detector will provide 1 of 3 sounds for any metal object detected: a low,
medium or high tone. This audio feedback system is useful in conjunction with
the visual Target-ID system described above.
LOW
TONES
MEDIUM
TONES
HIGH
TONES
The faceplate label is color-coded above the Conductivity Arc. Ferrous, gold and silver
targets will generally register within their corresponding color-coded ranges. Targets that
are not gold or silver register within the same range according to their electrical
conductivity.
Note that the electrical conductivity of a target depends on both its composition and size.
Silver is more conductive than gold so it registers farther to the right; and the larger the
silver object, the farther it registers to the right.
12
DEPTH AND TARGET DISPLAY
Please refer to the display on your
detector and reference the TARGET-ID
categories below applicable to your
model (not all detectors include all of
these categories).
READING THE DISPLAY
The display shows the PROBABLE
identification of the metal detected, as well
its PROBABLE depth.
The detector will register a target
identification, upon each sweep of the
searchcoil, when a buried target has been
located and identified. If, upon repeated
passes over the same spot, the target
identification reads inconsistently, the
target is probably a trash item. With
practice, you will learn to unearth only the
repeatable signals.
The segment identifications are highly
accurate, when detecting the objects
described on the faceplate. However, if an
object registers in a given category for an
unknown buried object, you could be
detecting a metallic object other than the
object described on the faceplate, but with
the same metallic signature. Also, the
greater the distance between the target
and the searchcoil, the less accurate the
target identification.
GOLD TARGETS Gold objects will generally
register toward the middle or left-of-center
on the scale.
Gold flakes will register under iron.
Small gold items will register under foil
or 5¢.
Large gold items will register toward the
center of the scale.
SILVER TARGETS: Silver objects will
register to the right of the scale, under
dime or higher.
IRON: All sizes of iron objects will register
on the far-left side of the scale. This could
indicate a worthless item such as a nail, or
a more valuable historic iron relic.
FOIL: Aluminum foil, such as a gum
wrapper, will register as foil. A small
broken piece of pull tab may also register
here.
5¢: Most newer pull-tabs from beverage
cans, the type intended to stay attached
to the can, will register here. Many gold
rings will also register here.
ALUM: Older pull-tabs, which always
detached completely from the can, register
here. Many medium-sized gold rings also
register here.
PT (pull-tabs): Pull-tabs from older
beverage cans will register here. Few
newer pull-tabs will also register here.
Many gold rings will also register here.
S-CAP: Older screw caps from glass
bottles will register here. Large gold rings,
like a class ring, could also register here.
Some non-U.S. coins of recent vintage
will also register here.
Zinc: Medium conductivity objects and
many non-U.S. coins of recent vintage are
classified here.
The Target Identification Categories to the
right of the display, such as 10¢, DIME,
25¢, Quarter, 50¢ and $1 accurately
identify these U.S. coins. When used in
areas outside the U.S., these categories
identify coins or metal objects of high
relative conductivity (such as silver coins
or relics), or large objects made of any
type of metal.
Caution: The target indications are
visual references. Many other types of
metal can fall under any one of these
categories. While the detector will
eliminate or indicate the presence of most
common trash items, it is impossible to
accurately classify ALL buried objects.
13
CONTROLS
SENS
Adjust the sensitivity from 1 to 6. At startup the default sensitivity is level 4.
If the detector beeps erratically or beeps when there are no metal objects being
detected, reduce the sensitivity.
USE
to reduce the sensitivity
Lowest sensitivity detects
coins to approximately 2”
Highest sensitivity detects
coins to approximately 8”
WARNING: Reduce the sensitivity if the detector behaves erratically.
In today's wireless & technological environment there is a never-ending variety
of devices emitting EMI (Electromagnetic Interference) that can interfere with
this detector.
DISC
DISCRIMINATION
When the detector emits different tones for different types of metals, and
when the detector "eliminates" certain metals, we refer to this as the detector
"discriminating" among different types of metals.
Discrimination is an important feature of professional metal detectors.
Discrimination allows the user to ignore trash and otherwise undesirable
objects.
and
control the detector's Discrimination function. In its
default setting all metals are detected. Use this
control in order to
eliminate unwanted types of metals from detection. Targets are eliminated
from detection from left to right across the Target Category Arc.
Each time you press
a target category icon will disappear. When an
icon disappears that category is eliminated from detection. Notice that the 4
right-most categories cannot be eliminated. These 4 right-most categories
represent silver or other high-value targets, which are generally desirable;
therefore the detector does not allow them to be discriminated out.
To return categories to detection, press
and categories will be
accepted back for detection from right to left.
NOTCH
The
control is similar to Discrimination in that it allows you to accept
or reject different types of metals. While DISC works left to right, the NOTCH
control allows you to accept or reject individual categories.
Categories eligible for NOTCH are FOIL , 5¢, ALUM, Zn .
14
CONTROLS
Press
to program the NOTCH feature. Each press of
cycles to a new category and that category icon will flash
for 2 seconds. Then the category will reverse status. If the icon
had previously been illuminated it will now disappear indicating
that the category has been eliminated from detection. Likewise,
an icon that is not visible on the display will re-illuminate,
indicating that this category is now “Notched in” (i.e. detected).
Use
to select the category to NOTCH. Each time you
press
the category for metal to be notched flashes on the
screen. Any of the 4 categories can be “Notched” in or out. After
the category icon flashes and times out, the Notch status will
change.
HEADPHONE JACK
This detector has a 1/4” headphone
jack. It works with any stereo
headphone that has a 1/4” plug.
When the headphone jack is
connected, speaker volume is
disabled.
USING HEADPHONES
Using a detector with headphones
facilitates detection of the weakest
signals and also extends battery life.
It also allows you to hear subtle
changes in the sound more clearly,
particularly if searching in a noisy
location. For safety reasons, do not use headphones near traffic or where other
dangers are present. This device is to be used with interconnecting
cables/headphone cables shorter than three meters.
15
PINPOINTING
Pinpointing targets after detection
“X-ing” the target
1. Sweep over target in
narrowing side-toside patterns.
2. Take note of the spot
on the ground where
“beep” occurs.
3. Step 90° to the side
of the target.
4. Sweep searchcoil
over same area, at
90° to the 1st sweep
pattern.
5. This pinpoints the
target location with
an “X”.
When pinpointing a target, try drawing an “X”, as illustrated, over where the tone is induced.
CIRCLING THE TARGET
Crossing the target zone with multiple intersecting sweeps at multiple angles is
another way to verify the repeatability of the signal, and the potential of the buried
target. To use this method, walk around the target area in a circle, sweeping the
coil across the target repeatedly, every 30 to 40 degrees of the circle, about ten
different angles as you walk completely around the target. If a high-tone target
completely disappears from detection at a given angle, chances are that you are
detecting oxidized ferrous metals, rather than a silver or copper object. If the
tone changes at different angles, you may have encountered multiple objects. If
you are new to the hobby, you may want to dig all targets at first. With practice
in the field, you will learn to better discern the nature of buried objects by the
nature of the detector’s response.
WHAT
READS
LIKE THIS
16
…MAY
ACTUALLY
BE THIS
CHARACTERISTICS & LIMITATIONS
1. This detector comes with a waterproof searchcoil. The searchcoil can be
completely submerged into water. The control housing is not waterproof
and cannot be submerged in water. To use the detector in inclement
weather, consider purchasing the optional detector cover.
2. BURIED UTILITY LINES. This hobby metal detector is not designed to
locate buried pipes or cables. First Texas Products manufactures a
complete line of pipe and cable locators for this application. These are
sophisticated instruments with functionality different from your hobby metal
detector.
3. SEVERE SOIL CONDITIONS. While this detector has proprietary circuitry
to cancel out minerals naturally occurring in most soil types, it cannot
penetrate the most severe soils and it is not intended for use on wet
sand saltwater beaches. However, it is well-suited for detecting on dry
sand. Saltwater is highly conductive and requires a more sophisticated
type of detector. First Texas Products offers such types of detectors. Other
highly mineralized soils, such as those found in some gold prospecting
sites, may also limit this detector's capability. If the detector tends to
overload it could indicate you are in an area containing such severe soils.
4. TARGET-ID. The detector's Target-ID system calculates and displays the
most probably identification. Target-ID is affected by soil conditions, the
searchcoil's distance from the target, the length of time the target has been
buried and the target's proximity to other dissimilar targets. Very large
metal objects can overload the detector and may be classified
inaccurately.
5. REDUCE SENSITIVITY. The primary purpose of the Sensitivity control is
to allow the operator to reduce the sensitivity of the detector. All
detectorists desire to find objects at maximum depth. However, in today's
environment there is a never ending variety of devices emitting EMI
(Electromagnetic Interference) that can interfere with this detector.
There will be environments where the detector cannot operate at
maximum sensitivity. This is not a defect. If you find yourself in such an
environment, reduce the sensitivity of the detector. Some environments
may have so much EMI that it is impossible to detect there. Both overhead
power lines and buried power lines can interfere with this detector. Power
line capacity may be quite different during certain times of the day. For
instance, peak hours of electricity use that can occur around 6 p.m. can
lead to a lot of EMI. If you experience power line interference, try returning
to a given area at a different time of day.
17
TROUBLESHOOTING GUIDE
SYMPTOM
CAUSE
SOLUTION
Detector chatters,
beeps erratically
or has low
sensitivity
• Using detector
indoors
• Using detector near
power lines
• Using 2 detectors in
close proximity
• Environmental
electromagnetic
interference
• Use detector
outdoors only
• Move away
from power lines
• Keep 2 detectors
at least 6 meters
(20’) apart
• Reduce sensitivity
until erratic
signals cease
• Discharged battery
• Wrong type of
battery
• Replace battery
• Use alkaline
batteries
Do not mix old and new batteries. Use alkaline batteries.
Do not mix alkaline, standard (zinc-carbon), or
rechargeable (NiCad, NiMH, etc.) batteries.
Low speaker
volume
Display does not lock • Multiple targets
on to one Target-ID
present
or detector emits
• Highly mineralized
multiple tones
soil
• Sensitivity set
too high
No power, no sounds • Dead battery
• Cable not
connected securely
• Sweep coil at
different angles
• Move to a
different area
• Reduce sensitivity
• Replace batteries
• Check connections
Note: This equipment has been tested and found to comply with the limits for a Class B digital device,
pursuant to part 15 of the FCC Rules. These limits are designed to provide reasonable protection
against harmful interference in a residential installation. This equipment generates, uses and can
radiate radio frequency energy and, if not installed and used in accordance with the instructions, may
cause harmful interference to radio communications. However, there is no guarantee that interference
will not occur in a particular installation. If this equipment does cause harmful interference to radio or
television reception, which can be determined by turning the equipment off and on, the user is
encouraged to try to correct the interference by one or more of the following measures:
- Reorient or relocate the receiving antenna.
- Increase the separation between the equipment and receiver.
- Consult the dealer or an experienced radio/TV technician for help.
The manufacturer declares that the minimum ESD performance criteria is 1) the unit shall not
be permanently damaged and 2) operator intervention is allowed.
This product is RoHS compliant.
This product meets the requirements of Industry Canada: CAN ICES-3 B/NMB-3 B.
CE
18
TREASURE HUNTER‘S CODE OF ETHICS:
• Always check Federal, State, County and local laws before searching.
• Respect private property and do not enter private property without the owner‘s permission.
• Take care to refill all holes and leave no damage.
• Remove and dispose of any and all trash and litter found.
• Appreciate and protect our inheritance of natural resources, wildlife and private property.
• Act as an ambassador for the hobby, use thoughtfulness, consideration and couresy at all times.
• Never destroy historical or archaeological treasures.
• All treasure hunters may be judged by the example you set; always conduct yourself with courtesy
and consideration of others.
DISPOSAL
Dispose of the packaging materials properly, according to their type, such as paper or
cardboard.Contact your local waste-disposal service or environmental authority for
information on the proper disposal.
Do not dispose of electronic devices in the household garbage! As per Directive 2002/96/EC of
the European Parliament on waste electrical and electronic equipment and its adaptation into German law, used electronic devices must be collected separately and recycled in an environmentally
friendly manner.
In accordance with the regulations concerning batteries and rechargeable batteries, disposing of
them in the normal household waste is explicitly forbidden. Please make sure to dispose of your
used batteries as required by law — at a local collection point or in the retail market. Disposal in
domestic waste violates the Battery Directive.
EC DECLARATION OF CONFORMITY
Bresser GmbH has issued a „Declaration of Conformity“ in accordance with applicable guidelines
and corresponding standards. This can be viewed any time upon request.
WARRANTY & SERVICE
The regular guarantee period is 2 years and begins on the day of purchase. To benefit from an extended voluntary guarantee period as stated on the gift box, registration on our website is required.
You can consult the full guarantee terms as well as information on extending the guarantee period
and details of our services at www.bresser.de/warranty_terms
These operating instructions are to be considered a component of the device. Please read the
safety instructions and the operating instructions carefully before use. Keep these instructions
for renewed use at a later date. When the device is sold or given to someone else, the instruction
manual must be provided to the new owner/user of the product.
Bresser GmbH
Gutenbergstr. 2
DE-46414 Rhede
www.bresser.de • [email protected]
Errors reserved - technical specifications subject
to change.
Copyright© 2010 by First Texas Products, L.L.C.
All rights reserved. Bounty Hunter® is a registered trademark
of First Texas Products, L.L.C. Made in China.
ACCESSORIES
Bounty Hunter Carry Bag
®
Rugged double-stitched construction. – CBAG2
Bounty Hunter Pouch & Digger Combo
®
Pouch with 2 large pockets & 9” heavy duty digging tool. – TP-KIT-W
Pinpointer
Pinpoints the exact location of buried metal objects. Audio signal indicator
and vibrator. Runs on (1) 9-Volt Alkaline battery. – PIN POINTER-W
Bounty Hunter Sand Scoop
®
Large scoop with filtering holes. Made of strong plastic. – SAND SCOOPBH
Accessory Searchcoils
4” Concentric Round – 4COILPRO
10” Concentric Elliptical – 10COIL-BH
11” Biaxial – 11COIL-BH
Searchcoil Covers
Protect your searchcoil from abrasion and damage.
4” Concentric, Round Cover– 4COVER
10” Concentric Elliptical Cover – F70COVER
11” Biaxial Cover – COVER-11DD
9” Heavy-Duty Digging Tool
Metal blade with comfortable plastic handle and depth gauge. – TROWEL-2
Digging Tool
Light and practical plastic, wide blade digging tool. – TROWEL-W
Rain Cover
Custom made to protect from weather. – RAINCOV-ET
Bounty Hunter Baseball Cap
®
One size fits all, with Bounty Hunter® logo. – BHCAP
Bounty Hunter T-Shirt
®
100% cotton with Bounty Hunter® Logo.
Sizes: S, M, LG, XL & XXL – BHTSHIRT
Gold
Prospecting Kits
FOR COMPLETE DETAILS VISIT WWW.DETECTING.COM • 1-800-413-4131
MPROLONE
Rev2
102814