BRITA Tap P1000 Manual
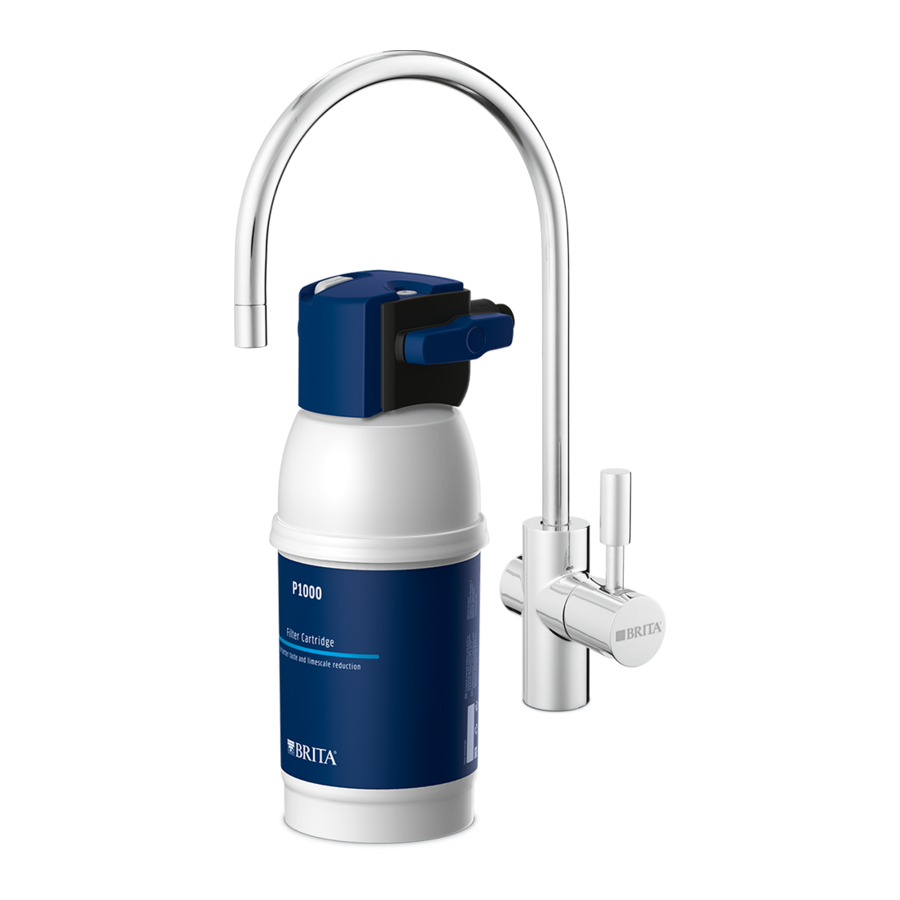
Congratulations on your new BRITA® Tap System
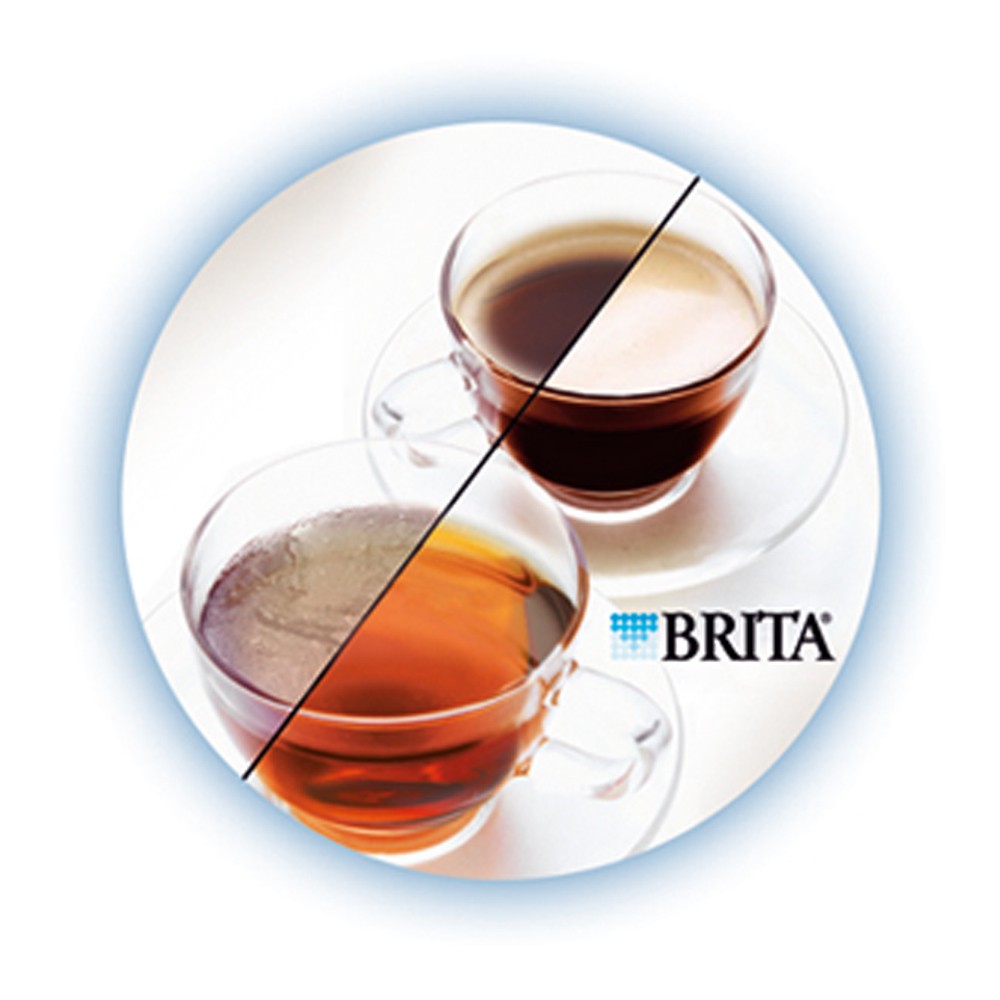
Your BRITA Tap, is the key to cleaner, clearer great tasting filtered water
Next to hot and cold unfiltered water, your BRITA system offers many advantages
- Great tasting filtered water at your fingertips
- Filtered water is ideal for bringing out the full potential of your food and tastes great for everyday drinking
- Water is a fundamental part of food preparation and can influence the results of your cooking at home. The BRITA Tap is easy to install replacing your existing tap and can make a wonderful difference to your cooking.
- Stylish European design will complement any kitchen
- It is economical, convenient and easy to use
- Allows for filtered and unfiltered water
The P1000 Cartridge: BRITA’s advanced filtration technology in a compact and long lasting cartridge.
The P 1000 has a constant filtration performance for limescale reduction thanks to its multilevel BRITA filtration system. The professional filter head allows three filtration settings for medium hard, hard and very hard water.
The P 1000 filter cartridge
- reduces limescale and substances, e.g. chlorine, that affect taste and odour.
- reduces lead and copper in tap water that can result from certain types of household installation.
Lifetime of the P 1000 filter cartridge
The lifetime of the P 1000 cartridge is dependent on your individual volume usage and your water conditions. For optimum BRITA filtration performance, we recommend a minimum exchange of your cartridge every 12 months. Exchange will be prompted by your BRITA Tap Cartridge Status Indicator, shown by the colour of the LED.
For more information regarding the BRITA Tap Cartridge Status Indicator, see chapter 3.

Quality from the very start
Terms of warranty
The BRITA Tap system is subject to the statutory guarantee of 2 years. A guarantee claim may be asserted only if all instructions in this handbook are followed and observed.
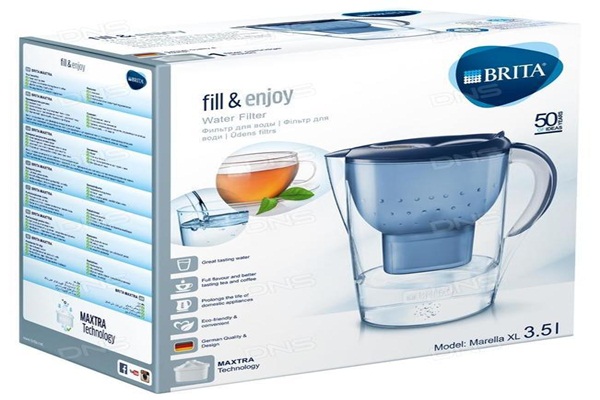
Contents of the BRITA Tap Water Filter Kit
To ensure you get the best result from your BRITA Tap Water Filter Kit, please follow these instructions carefully.
Your BRITA Tap Water Filter Kit includes the following (see fig. 1):
- Filter head with three settings including a convenient locking handle
- Flexible wall mount
- P 1000 water filter cartridge
- BRITA Tap (design may differ from image shown)
- BRITA Tap Cartridge Status Indicator
- Battery (CR2032)
- Hose (1) length = 800 mm, 3/8″ nut on one side and M8 connector on the other side, 2 Hoses (2+3), length = 450 mm, 3/8″ nut on one side and M8 connectors on the other side
- Hose (4), length = 800 mm and 3/8″ nut on both sides
- 2 Adapters 1/2″ female thread to 3/8″ male thread (Only in UK)
- Usage Instructions
- Carbonate hardness testing strip
- T-piece
- Gaskets
Recommended tools for installation: a pipe wrench, an Allen key (4 mm), a wrench and a screwdriver.
For wall mounting the cartridge (optional), you need: two screws (e.g. 5 mm thread diameter) and, if required, two wall plugs suitable for your type of wall.
BRITA Tap – easy installation
Before starting, please check that you have all the components listed above (see fig. 1) as well as the recommended tools.
There are 7 steps to the installation.
Prior to installation, read the «Technical Data» (chapter 7) and the «Important Notes» (chapter 9). The system cannot be installed with a low pressure boiler as this might lead to water damages. After storage and transport below 0°C, the product must be stored in the open original packaging for at least 24 hours at the stated ambient temperatures (chapter 7) for operation.
Selecting the carbonate hardness setting (A/B/C) on the filter head
The filter head offers three settings for medium hard water (A), hard water (B) and very hard water (C). Please follow the instructions below to adjust to the right setting for your local water.
First carry out a carbonate hardness test using the supplied testing strip. The strip can be found in the outer wrapping of these Usage Instructions.
Using the testing strip:
- Immerse all reaction zones of the test strip in a glass of your regular tap water (15 — 30°C) for 1 second (not in running water!). (fig. 2).

- Shake off excess liquid from the strip and after 1 min check how many reaction zones changed their colour on the test strip.

Depending on the number of reaction zones that changed their colour, we recommend setting your filter head as follows:
| Setting | A | B | C | |
| number of reaction zones that changed their colour |   |
 |
 |
|
| capacity | P1000 | up to 1200 L | up to 600 L | up to 400 L |
| P3000 | up to 3400L | up to 1700 L | up to 1100 L | |
| German Carbonate Hardness [°dH] | up to 10 | 10 to 17 | above 17 dH | |
| English Carbonate Hardness [°eH] | up to 13 | 13 to 21 | above 21 | |
| French Carbonate Hardness [°fH] | up to 18 | 18 to 30 | above 30 | |
| Milligram per Litre CaCO3 [mg/L CaCO3] | 178 | 178 to 303 | above 303 |
Now you can change the setting for the hardness of your water. The filter head is set to «B» by default. To change the setting, use an Allen key (4 mm). Turn in the direction of the arrow until the «C» symbol appears in the window. Turn against the direction of the arrow until the «A» symbol appears in the window (fig. 3). The filter head contains a flow regulator already installed. It guarantees smooth water flow from your BRITATap even at higher water pressures.
Starting the BRITA Tap Cartridge Status Indicator
The BRITA Tap Cartridge Status Indicator reminds you through three different coloured flashing lights when to exchange the filter cartridge.
- Commissioning:
Insert the enclosed battery (1x CR2032) into the appropriate compartment of the BRITA Tap Cartridge Status Indicator. Mind the print on the battery for correct implementation (fig. 4). All LEDs should flash shortly. Close the compartment. Keep the Reset Button pushed down for three seconds until a small green light flashes three times at the top.
- Initial programming of the BRITA Tap Cartridge Status Indicator
Depending on the setting you chose for the filter head (step 1), you will programm the BRITA Tap Cartridge Status Indicator as follows (see fig. 5):
- Cartridge Button
- Hardness Button
- Reset Button
- Push the button on the right side (HARDNESS) to choose the water hardness. If you push the button once, two yellow LEDs will flash (default hardness setting: B). Then push the button until your correct water hardness setting appears:
- To choose the water hardness setting C, push the button until one yellow LED flashes.
- To choose the water hardness setting B, push the button until two yellow LEDs flash.
- To choose the water hardness setting A, push the button until three yellow LEDs flash (see table below).
- Push the button on the left side (CARTRIDGE) to set the cartridge you are using. If you push the button once, two yellow LEDs will flash (default cartridge setting: P1000). Then push the button until the correct setting for filter cartridge appears:
- If you are using the filter cartridge A 1000, push the button, until one yellow LED flashes.
- If you are using the filter cartridge P 1000, push the button, until two yellow LEDs flash.
- If you are using the filter cartridge P 3000, push the button, until three yellow LEDs flash (see table below).
- To change a setting, simply push the button until the right number of lights are flashing.
- Insert the BRITA Tap Cartridge Status Indicator into the BRITA tap’s lever (see fig. 4).
| 1 LED | 2 LEDs | 3 LEDs | |
| water hardness setting (HARDNESS) | C | B | A |
| cartridge setting (CARTRIDGE) | A 1000 | P 1000 | P 3000 |
- How the BRITA Tap Cartridge Status Indicator works
To ensure optimal performance, you should change the filter cartridge on a regular basis. The BRITA Tap Cartridge Status Indicator in the BRITA lever tells you when to change the filter cartridge.
- Signals
The three lights in the BRITA lever are only activated in the filtering position. They indicate:
- Green light: The BRITA filter is working at optimum performance.
- Yellow light: 90% of the filter capacity has been used. Remember to buy a new replacement filter cartridge.
- Red light: The filter cartridge needs to be changed.
- Reprogramming the BRITA Tap Cartridge Status Indicator
If the maximum volume is reached or the cartridge has been used for 12 months, the BRITA Tap Cartridge Status Indicator’s LED will start flashing red (only if BRITA lever is in the filtering position).
In this case the filter cartridge should be replaced (chapter 4). Once the cartridge has been replaced the BRITA Tap Cartridge Status Indicator has to be reset. For this purpose push the reset button (fig. 5) of the Cartridge Status Indicator for three seconds until it starts flashing green (for this step, you do not need to remove the BRITA Tap Cartridge Status Indicator from the BRITA lever).
After replacing of the empty battery the commissioning should be followed in accordance with section 3.2.
Technical data:
- Battery: 1x CR2032 (removable)
- lifetime of battery: app. 2 years
Do not immerse Cartridge Status Indicator in water
Installing the BRITA Tap
To install the BRITA Tap, firstly ensure you have all the components required.
Please, make sure that there is enough room and access under the sink to allow for the installation of the filter head and cartridge, and to connect the two supplied hoses.
WD 3020 
- BRITA Tap with 3 hoses
- BRITA Tap Cartridge Status Indicator
- O-Ring
- Shank
- Joint (Is only necessary for installation of the dispenser if you directly mount it onto your sink. If you mount it onto your countertop-plate, you do not necessarily need this part. It helps stabilizing the tap at your sink)
- Flat Gasket
- Flange
- Hex nut
WD 3030/ WD 3040 and WD 3050 
- BRITA Tap (design may differ) with 3 hoses
- BRITA Tap Cartridge Status Indicator
- Base
- Shank
- Joint (Is only necessary for installation of the dispenser if you directly mount it onto your sink. If you mount it onto your countertop-plate, you do not necessarily need this part. It helps stabilizing the tap at your sink)
- Flat Gasket
- Flange
- Hex nut
- First of all, unmount your existing kitchen tap.
- Turn off the cold and hot water supplies
- Please make sure you release any pressure by opening all levers.
No water should run through the existing kitchen tap.
- Unscrew the existing hoses from the cold and hot water supply.
We recommend placing a suitable container under the water supply as there will be water left in the hoses which will run down when you unscrew them.
- Unscrew your kitchen tap – there is no standard mounting but in general a pipe wrench will help you to unmount it.
- Pull out both your kitchen tap and the hoses.
- You’re now ready to install the BRITA Tap.
First of all, screw the shank (4) into the Brita Tap (1).
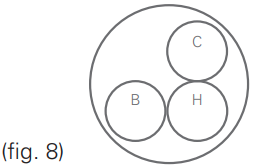
Screw the hoses into the dispenser (see fig. 8).
Screw the M8 connector of the hose with the blue stripe into the hole C.
Screw the M8 connector of the hose with the red stripe into the hole H.
Screw the M8 connector of the 800 mm hose into the hole B.
- First of all, unmount your existing kitchen tap.
WD 3020/WD 3030/WD 3040 and WD 3050 Ensure the connections are screwed tight, but avoid over tightening!
Then put the base or O-Ring (3) over the hole and fix the BRITA Tap (1) in place using the supplied joint (5), the flat gasket (6), flange (7) and the hex nut (8).
Attaching the hoses
We recommend that you arrange all the parts you need in front of you before you begin.
For wall mounting (optional), you will need: two screws (e.g. 5 mm thread diameter) and, if required, two wall plugs suitable for your type of wall.
Please follow the diagram below (see fig. 9) and perform the steps in the right order.
- Connect supplied T-piece on your cold water supply
- Insert one 3/8″ gasket into the female nut of the supplied T-piece.
- Connect this end of the T-piece to your cold water supply.
If you do have an additional free 3/8″ cold water supply for the BRITA Tap in your kitchen, you do not need to install the supplied T-piece!
If your cold water supply does not fit the 3/8″ connector of the T-piece, use the supplied adapter if required. Please insert the 1/2″ gasket into the female nut of the adapter first.
Your Water Filter Kit comes with two 1/2″ adapters. Please go to your nearest supplier for adapters in other sizes.
- Connect the hose with the blue stripe to one side of the T-piece.
- Take the hose with two 3/8″ connectors. Insert the 3/8″ gaskets into the respective female threads of the two hose ends. Connect one end with the free side of the T-Piece.
- Now connect the other end to the filter head inlet. This is labelled «IN» (inlet) and marked with an arrow. Make sure that the gaskets are seated correctly!
- Connect the 800 mm hose which is connected with the dispenser with the outlet of the filter head labelled with an «OUT» arrow. Make sure that also here the gaskets are seated correctly!
- Connect the hose with the red stripe with your hot water supply. If your hot water supply does not fit the 3/8″ connector, use the supplied adapter if required. Please insert the 1/2″ gasket into the female nut of the adapter first.
- Make sure all connections are tightened properly. Avoid over tightening.
The max. tightening torque for the G3/8″ connections may not exceed 14 Nm! Only hose connections with gaskets (13) may be used – hoses with conical screw connections damage the connections of the filter head and invalidate any warranty claims!
Inserting the filter cartridge (see fig. 10)

- Remove protective strap (1).
- Insert the filter cartridge (4) vertically into the filter head (5).
- Turn the locking handle (3) until you feel it engages.
The filter cartridge can only be inserted when the locking handle is open.
Make sure that the filter cartridge is positioned correctly.
Space-saving wall mount to install the cartridge under the sink
(optional) (see fig. 11)
During assembly, note the installation dimensions, bending radii of the hoses and dimensions of the accessories. The system can be operated vertically and horizontally. When using the wall mount, install vertically only!
- Attach the wall mount in place using the two matching screws and use two wall plugs, if necessary, depending on the type of wall.
- Engage the filter head (2) in the wall mount (1). Please use the fixation holes (4).
Commissioning
Before use, make sure that you have followed all the steps correctly and all the parts are fitted. Place a suitable container under the cartridge to catch any leakages.
- Turn on the cold and hot water supplies and check the system carefully for any leaks.
- Open the BRITA Tap and allow water to run until the filtered water runs clear and without any bubbles (at least 2 litres).
Replacing the filter cartridge
If the maximum volume is reached or the cartridge has been used for 12 months from commissioning, the BRITA Tap Cartridge Status Indicator will flash red to remind you that the cartridge needs to be replaced.
Read Important Notes (chapter 9) prior to exchange. After storage and transport below 0°C, the product must be stored in the open original packaging for at least 24 hours at the stated ambient temperatures (chapter 7) for operation.
NOTE: The filter cartridge can be pivoted by 90° in the wall mount for easy removal. When the locking handle is open, the water supply to the cartridge is interrupted and by-passing with direct water flow from the water inlet to the outlet is possible.
Replacing the P 1000 (see fig. 10):
- Open the locking handle (3).
- Place a suitable container under the flush hose to catch the rinse water. Open the flush valve (2) and release pressure from the system. Close the flush valve (2) again.
- Remove the exhausted filter cartridge (4) from the filter head (5) – please be aware, the cartridge is firmly embedded so you can give it a firm pull without worrying about breaking it.
- Insert the new filter cartridge (see chapter 3.5).
- Close the locking handle (3).
- Reset the BRITA Tap Cartridge Status Indicator (chapter 5).
- Open the BRITA branded lever on your BRITA Tap and rinse through until the filtered water runs clear and without any bubbles (at least 2 litres).
Replacing the P 3000 refill cartridge is exactly the same as replacing the P 1000. The P 3000 lasts up to 3400 liters with the A-setting, up to 1700 liters with the B-setting and up 1100 liters with the C-setting. Please take this into consideration while resetting your BRITA Tap Cartridge Status Indicator
Activating the BRITA Tap Cartridge Status Indicator
- Push the Reset Button (see fig. 5) of the BRITA Tap Cartridge Status Indicator for three seconds until the LED-light flashes green.
- The timer starts automatically.
Maintenance
Regularly check the filter system for leaks. Regularly check the hoses for kinks. Kinked hoses must be replaced.
Prior to exchanging the filter system, read the Technical Data (chapter 7) and Important Notes (chapter 9).
Regularly clean the outside of the filter system with a soft, damp cloth.
Do not use any abrasive chemicals, cleaning solutions or astringent cleaning agents.
Technical data of the P 1000 and P 3000 cartridge
| Operating pressure | 2 bar to max. 8.6 bar | ||
| Water intake temperature | 4°C to 30°C | ||
| Ambient temperature for | operation | 4°C to 40°C | |
| storage/transport | –20°C to 50°C | ||
| Capacity up to carbonate hardness 10 °dH at setting «A» | P1000 | 1200 L | |
| P3000 | 3400 L | ||
| Capacity from carbonate hardness 10 to 17 °dH at setting «B» | P1000 | 600 L | |
| P3000 | 1700 L | ||
| Capacity from carbonate hardness 17 to 24 °dH at setting «C» | P1000 | 400 L | |
| P3000 | 1100 L | ||
| Pressure loss by nominal service flow | 0.25 bar | ||
| Weight (dry/wet) | P1000 | 1.0 kg/1.6 kg | |
| P3000 | 1.8 kg/2.8 kg | ||
| Dimensions (Width/Depth/Height) | Filter system (filter head with filter cartridge) | P1000 | 119 mm/108 mm/265 mm |
| P3000 | 117 mm/104 mm/417 mm | ||
| P1000 | 108 mm/108 mm/259 mm | ||
| Filter cartridge | P3000 | 104 mm /104 mm/410 mm | |
| P1000 | 137 mm/130 mm/265 mm | ||
| Installed dimensions (vertical installation with wall mounting bracket) |
P3000 | 137 mm/128 mm/417 mm | |
| Operating position | Horizontal and vertical | ||
| Water inlet connection | G3/8″ | ||
| Water outlet connection | G3/8″ |
Technical data of the BRITA Tap
| Operating pressure | 0.5 bar to max. 10 bar | ||
| cold water connection | 4°C to 30°C | ||
| warm water connection | max. 70°C | ||
| flow rate | ≥ 9 L/min | ||
| acoustics rating | Group II/- | ||
| Weight | Dimensions (Width/ Depth/Height) | Aerator | |
| WD 3020 | 2,07 kg | 17,3 cm x 28,4 cm x 29,4 cm | M24x1 |
| WD 3030 | 2,12 kg | 17,2 cm x 20,5 cm x 36,3 cm | M22x1 |
| WD 3040 | 2,16 kg | 17,2 cm x 23,7 cm x 34,8 cm | M22x1 |
| WD 3050 | 2,12 kg | 17,2 cm x 20,5 cm x 36,2 cm | M22x1 |
Troubleshooting
No water flow
| Cause: | Water intake closed. |
| Troubleshooting: | Open the water intake at the upstream shut-off valve or by closing the locking handle (3) on the filter head (5). Check hoses for kinks. |
No or low water flow in spite of open water intake
| Cause: | Mains pressure too low. |
| Troubleshooting: | Check mains pressure. If the fault continues, check the filter system and filter cartridge and replace if necessary. Check hoses for kinks. |
| Cause: | Filter head not mounted in direction of water flow / hoses wrongly connected. |
| Troubleshooting: | Dismantle filter head and hoses and install in direction of water flow (chapter 3.4). |
Leak
| Cause: | Screwed connections not fitted correctly. |
| Troubleshooting: | Check mains pressure. Check all screwed connections and mount as described in chapter 3.4. |
No LED indication by usage
| Cause: | Battery is not inserted in a correct way or is used up. |
| Troubleshooting: | Check if battery is inserted properly. If necessary, replace the battery. |
For models WD 3030 and WD 3040 only
These models have an aerator with two integrated outlets. The Inner one is for BRITA filtered water, the outer area for hot and cold water. As with every tap aerator, there can be limescale build-up in the outer area. Therefore it is recommended to clean the aerator on a regular basis. For cleaning: Unscrew the cap on the end of the dispensers neck. The aerator is connected to a silicon hose. Detach it carefully and clean the aerator (e.g. with vinegar). After cleaning connect the long, thin part on the back of the aerator carefully with the silicon hose. Place the cap over the aerator and screw it tight. Make sure that the gasket in the cap is seated correctly. When installed correctly there should not be any leaks whilst running hot, cold or BRITA filtered water.
If you want to replace the aerator with a new one, you can order it from BRITA.You can find the contact details for your BRITA customer service team next to your country code on the back of this booklet.
Spare Part Name

| Article No. | Spare Part Name |
| 1004715 | Gasket On Line 3/8″ 2 mm CE + AU |
| 1004713 | Gasket On Line 1/2″ 2 mm CE + AU |
| 1004699 | Hose On Line 3/8″ IT — 3/8″ IT CE |
| 1015771 | filterhead G3/8 3-way LED CE spare part |
| 1004690 | Adapter 1/2″ IT — 3/8″ ET |
| 1005821 | T-piece 3/8″ |
WD 3020 
| Article No. | Spare Part Name |
| 1012554 | Aerator Set WD 3020 CE |
| 1012556 | Spare Part Mixer Cartridge |
| 1012557 | Hose Set WD 3020 CE |
| 1012562 | Spare part Hose DN6 800 mm HF M8x1 — G3-8HN ASM |
| 1013529 | Assembly Set WD3050 |
| 1015754 | BRITA Tap Cartridge Status Indicator spare part |
| 1016311 | Valve LED ASM spare part |
| 1016282 | Cover mixer tap WD3020-3040 spare part |
WD 3030/ WD 3040/ WD 3050 
| Article No. | Spare Part Name |
| 1012550 | Aerator Set WD 3030 CE |
| 1014609 | Aerator Set WD 3050 |
| 1012556 | Spare Part Mixer Cartridge |
| 1012552 | Base Ring Set WD 3030/3040 |
| 1014608 | Base Ring Set WD 3050 |
| 1012557 | Hose Set WD 3020 CE |
| 1013529 | Assembly Set WD 3050 |
| 1012562 | Spare part Hose DN6 800 mm HF M8x1 — G3-8HN ASM |
| 1015754 | BRITA Tap Cartridge Status Indicator spare part |
| 1016311 | Valve LED ASM spare part |
| 1016282 | Cover mixer tap WD3020-3040 spare part |
Important notes
Protect the P 1000 water filter cartridge from direct sunlight and mechanical damage. Do not assemble near sources of heat and open flames. A stop valve must be installed before the filter system intake hose. The BRITA Tap System is only suitable for domestic use.
Only water of drinking water quality may be used as intake water for the BRITA water filter system. The BRITA water filter cartridge is only suitable for cold water use within the supply water temperature stated in chapter 7. No microbiologically impaired water or water of unknown quality may be used without appropriate disinfection.
The system cannot be installed with a low pressure boiler.
Irrespective of the water used, you should use stainless steel utensils or kettles with stainless steel heating elements. This is of particular importance to people who are sensitive to nickel.
In the event: filter first, and then boil
If there are official instructions to boil tap water, the filter system must be decommissioned. When the requirement to boil water comes to an end, the filter cartridge must be replaced and the connections cleaned.
Ultimate hygiene
- For hygiene reasons, the filter material of the cartridge is subjected to a special treatment with silver. A small quantity of silver, which is harmless to health, may be released into the water. This is in compliance with the World Health Organisation (WHO) recommendations for drinking water.
- It is generally recommended to boil tap water for certain groups of people (e.g. people with weak immune systems, babies). This also applies to filtered water.
- Note for people with kidney disease or dialysis patients: The filtering process can cause a small rise in the levels of potassium.
- The water filtrate is classified in Category 2 according to EN 1717
Optimum use
- BRITA recommends that the filter system is not left unused for a long period. If the BRITA Tap is not used for several days (2–3 days), we recommend that the filter system be flushed with the flushing volume X indicated in the table below. After stagnation periods of over 4 weeks, the filter should be flushed with flushing volume Y. Please also note the maximum usage period of the filter cartridge is 12 months, irrespective of the actual volume used.
Similar to the conventional taps, before using you should let water rinse through for a short period so you can enjoy your BRITA filtered water.
| Flushing volume X after 2–3 days stagnation | Flushing volume |
| P 1000 | 2 Litres |
| P 3000 | 3 Litres |
| Flushing volume Y after 4 weeks stagnation | Flushing volume |
| P 1000 | 20 Litres |
| P 3000 | 30 Litres |
- The filter kit must not be opened or dismantled during operation. The filter cartridge must not be opened. The filter kit is designed for a service life of 10 years (counted from the date of installation). BRITA filtered water is designed for human consumption. Use it within 1–2 days.
Sensitive to potassium?
The filtering process can cause a small rise in the levels of potassium. However, one litre of BRITA filtered water contains less potassium than an apple, for example. If you have kidney disease and/or have to observe a special potassium diet, we recommend that you consult your doctor before using the water filter.
Natural traces
As with every natural product, the P 1000 parts can be subject to natural fluctuations. This can lead to a slight abrasion of small carbon particles into your filtered water, noticeable as black bits. These particles have no negative health effects. If ingested, they will not harm the human body. In case you observe carbon particles, BRITA recommends flushing out the P 1000 filter cartridge until the black bits disappear.
BRITA®, quality and satisfaction guaranteed
Correct disposal of the BRITA Tap Cartridge Status Indicator
Every BRITA Tap Cartridge Status Indicator has a useful life of approx. 5 years. At the end of the useful life of the Status Indicator, remember that it must be disposed of according to the applicable regulations and statutory requirements.
Exclusion of liability
BRITA shall not be held liable for any damage, including subsequent damage, arising from the incorrect use of the product.
100% satisfaction: the BRITA guarantee
We are confident that this BRITA product will meet your demands in terms of quality and performance. If this product does not meet your expectations, we will accept its return within 30 days of the date of purchase and reimburse the purchase price. Just send the product with your proof of purchase (receipt) and the grounds for your dissatisfaction, your phone number and bank details to the customer service address for your country (on the back of this booklet).
BRITA recycling: for our environment
To work together in taking responsibility for our environment, you can return your P 1000 filter cartridges to a number of BRITA dealers.
More about BRITA: For details on recycling, please see www.brita.net.
The BRITA service hotline cares
Do you have any questions about your BRITA product?
Or on the subject of water filtration? Give us a call!
You can find the contact details for your BRITA customer service team next to your country code on the back of this booklet.
The best side of water: www.brita.net
Are you looking for your nearest BRITA retailer? Do you want more detailed information about BRITA products? Or about the BRITA company?
Want to make the most of one of BRITA’s service offers? Up-to-date information, consumer tips, seasonal competitions, delicious coffee and tea recipes can be found around the clock at www.brita.net
Registering your product online
Register your product and get benefits at www.register.brita.net
Installation Video

Documents / Resources
References
Download manual
Here you can download full pdf version of manual, it may contain additional safety instructions, warranty information, FCC rules, etc.
Download BRITA Tap P1000 Manual
BRITA MAXTRA+ Универсальный картридж фильтра для воды

Congratulations on your new BRITA® Tap System
Your BRITA Tap, is the key to cleaner, clearer great tasting filtered water
Next to hot and cold unfiltered water, your BRITA system offers many advantages
- Great tasting filtered water at your fingertips
- Filtered water is ideal for bringing out the full potential of your food and tastes great for everyday drinking
- Water is a fundamental part of food preparation and can influence the results of your cooking at home. The BRITA Tap is easy to install replacing your existing tap and can make a wonderful difference to your cooking.
- Stylish European design will complement any kitchen
- It is economical, convenient and easy to use
- Allows for filtered and unfiltered water
The P1000 Cartridge: BRITA’s advanced filtration technology in a compact and long lasting cartridge.
The P 1000 has a constant filtration performance for limescale reduction thanks to its multilevel BRITA filtration system. The professional filter head allows three filtration settings for medium hard, hard and very hard water.
The P 1000 filter cartridge
- reduces limescale and substances, e.g. chlorine, that affect taste and odour.
- reduces lead and copper in tap water that can result from certain types of household installation.
Lifetime of the P 1000 filter cartridge
The lifetime of the P 1000 cartridge is dependent on your individual volume usage and your water conditions. For optimum BRITA filtration performance, we recommend a minimum exchange of your cartridge every 12 months. Exchange will be prompted by your BRITA Tap Cartridge Status Indicator, shown by the colour of the LED.
For more information regarding the BRITA Tap Cartridge Status Indicator, see chapter 3.
Quality from the very start
Terms of warranty
The BRITA Tap system is subject to the statutory guarantee of 2 years. A guarantee claim may be asserted only if all instructions in this handbook are followed and observed.
Contents of the BRITA Tap Water Filter Kit
To ensure you get the best result from your BRITA Tap Water Filter Kit, please follow these instructions carefully.
Your BRITA Tap Water Filter Kit includes the following (see fig. 1):
- Filter head with three settings including a convenient locking handle
- Flexible wall mount
- P 1000 water filter cartridge
- BRITA Tap (design may differ from image shown)
- BRITA Tap Cartridge Status Indicator
- Battery (CR2032)
- Hose (1) length = 800 mm, 3/8″ nut on one side and M8 connector on the other side, 2 Hoses (2+3), length = 450 mm, 3/8″ nut on one side and M8 connectors on the other side
- Hose (4), length = 800 mm and 3/8″ nut on both sides
- 2 Adapters 1/2″ female thread to 3/8″ male thread (Only in UK)
- Usage Instructions
- Carbonate hardness testing strip
- T-piece
- Gaskets
Recommended tools for installation: a pipe wrench, an Allen key (4 mm), a wrench and a screwdriver.
For wall mounting the cartridge (optional), you need: two screws (e.g. 5 mm thread diameter) and, if required, two wall plugs suitable for your type of wall.
BRITA Tap – easy installation
Before starting, please check that you have all the components listed above (see fig. 1) as well as the recommended tools.
There are 7 steps to the installation.
Prior to installation, read the «Technical Data» (chapter 7) and the «Important Notes» (chapter 9). The system cannot be installed with a low pressure boiler as this might lead to water damages. After storage and transport below 0°C, the product must be stored in the open original packaging for at least 24 hours at the stated ambient temperatures (chapter 7) for operation.
Selecting the carbonate hardness setting (A/B/C) on the filter head
The filter head offers three settings for medium hard water (A), hard water (B) and very hard water (C). Please follow the instructions below to adjust to the right setting for your local water.
First carry out a carbonate hardness test using the supplied testing strip. The strip can be found in the outer wrapping of these Usage Instructions.
Using the testing strip:
- Immerse all reaction zones of the test strip in a glass of your regular tap water (15 — 30°C) for 1 second (not in running water!). (fig. 2).
- Shake off excess liquid from the strip and after 1 min check how many reaction zones changed their colour on the test strip.
Depending on the number of reaction zones that changed their colour, we recommend setting your filter head as follows:
| Setting | A | B | C | |
| number of reaction zones that changed their colour | |
|
|
|
| capacity | P1000 | up to 1200 L | up to 600 L | up to 400 L |
| P3000 | up to 3400L | up to 1700 L | up to 1100 L | |
| German Carbonate Hardness [°dH] | up to 10 | 10 to 17 | above 17 dH | |
| English Carbonate Hardness [°eH] | up to 13 | 13 to 21 | above 21 | |
| French Carbonate Hardness [°fH] | up to 18 | 18 to 30 | above 30 | |
| Milligram per Litre CaCO3 [mg/L CaCO3] | 178 | 178 to 303 | above 303 |
Now you can change the setting for the hardness of your water. The filter head is set to «B» by default. To change the setting, use an Allen key (4 mm). Turn in the direction of the arrow until the «C» symbol appears in the window. Turn against the direction of the arrow until the «A» symbol appears in the window (fig. 3). The filter head contains a flow regulator already installed. It guarantees smooth water flow from your BRITATap even at higher water pressures.
Starting the BRITA Tap Cartridge Status Indicator
The BRITA Tap Cartridge Status Indicator reminds you through three different coloured flashing lights when to exchange the filter cartridge.
- Commissioning:
Insert the enclosed battery (1x CR2032) into the appropriate compartment of the BRITA Tap Cartridge Status Indicator. Mind the print on the battery for correct implementation (fig. 4). All LEDs should flash shortly. Close the compartment. Keep the Reset Button pushed down for three seconds until a small green light flashes three times at the top.
- Initial programming of the BRITA Tap Cartridge Status Indicator
Depending on the setting you chose for the filter head (step 1), you will programm the BRITA Tap Cartridge Status Indicator as follows (see fig. 5):
- Cartridge Button
- Hardness Button
- Reset Button
- Push the button on the right side (HARDNESS) to choose the water hardness. If you push the button once, two yellow LEDs will flash (default hardness setting: B). Then push the button until your correct water hardness setting appears:
- To choose the water hardness setting C, push the button until one yellow LED flashes.
- To choose the water hardness setting B, push the button until two yellow LEDs flash.
- To choose the water hardness setting A, push the button until three yellow LEDs flash (see table below).
- Push the button on the left side (CARTRIDGE) to set the cartridge you are using. If you push the button once, two yellow LEDs will flash (default cartridge setting: P1000). Then push the button until the correct setting for filter cartridge appears:
- If you are using the filter cartridge A 1000, push the button, until one yellow LED flashes.
- If you are using the filter cartridge P 1000, push the button, until two yellow LEDs flash.
- If you are using the filter cartridge P 3000, push the button, until three yellow LEDs flash (see table below).
- To change a setting, simply push the button until the right number of lights are flashing.
- Insert the BRITA Tap Cartridge Status Indicator into the BRITA tap’s lever (see fig. 4).
| 1 LED | 2 LEDs | 3 LEDs | |
| water hardness setting (HARDNESS) | C | B | A |
| cartridge setting (CARTRIDGE) | A 1000 | P 1000 | P 3000 |
- How the BRITA Tap Cartridge Status Indicator works
To ensure optimal performance, you should change the filter cartridge on a regular basis. The BRITA Tap Cartridge Status Indicator in the BRITA lever tells you when to change the filter cartridge.
- Signals
The three lights in the BRITA lever are only activated in the filtering position. They indicate:
- Green light: The BRITA filter is working at optimum performance.
- Yellow light: 90% of the filter capacity has been used. Remember to buy a new replacement filter cartridge.
- Red light: The filter cartridge needs to be changed.
- Reprogramming the BRITA Tap Cartridge Status Indicator
If the maximum volume is reached or the cartridge has been used for 12 months, the BRITA Tap Cartridge Status Indicator’s LED will start flashing red (only if BRITA lever is in the filtering position).
In this case the filter cartridge should be replaced (chapter 4). Once the cartridge has been replaced the BRITA Tap Cartridge Status Indicator has to be reset. For this purpose push the reset button (fig. 5) of the Cartridge Status Indicator for three seconds until it starts flashing green (for this step, you do not need to remove the BRITA Tap Cartridge Status Indicator from the BRITA lever).
After replacing of the empty battery the commissioning should be followed in accordance with section 3.2.
Technical data:
- Battery: 1x CR2032 (removable)
- lifetime of battery: app. 2 years
Do not immerse Cartridge Status Indicator in water
Installing the BRITA Tap
To install the BRITA Tap, firstly ensure you have all the components required.
Please, make sure that there is enough room and access under the sink to allow for the installation of the filter head and cartridge, and to connect the two supplied hoses.
WD 3020
- BRITA Tap with 3 hoses
- BRITA Tap Cartridge Status Indicator
- O-Ring
- Shank
- Joint (Is only necessary for installation of the dispenser if you directly mount it onto your sink. If you mount it onto your countertop-plate, you do not necessarily need this part. It helps stabilizing the tap at your sink)
- Flat Gasket
- Flange
- Hex nut
WD 3030/ WD 3040 and WD 3050
- BRITA Tap (design may differ) with 3 hoses
- BRITA Tap Cartridge Status Indicator
- Base
- Shank
- Joint (Is only necessary for installation of the dispenser if you directly mount it onto your sink. If you mount it onto your countertop-plate, you do not necessarily need this part. It helps stabilizing the tap at your sink)
- Flat Gasket
- Flange
- Hex nut
- First of all, unmount your existing kitchen tap.
- Turn off the cold and hot water supplies
- Please make sure you release any pressure by opening all levers.
No water should run through the existing kitchen tap.
- Unscrew the existing hoses from the cold and hot water supply.
We recommend placing a suitable container under the water supply as there will be water left in the hoses which will run down when you unscrew them.
- Unscrew your kitchen tap – there is no standard mounting but in general a pipe wrench will help you to unmount it.
- Pull out both your kitchen tap and the hoses.
- You’re now ready to install the BRITA Tap.
First of all, screw the shank (4) into the Brita Tap (1).
Screw the hoses into the dispenser (see fig. 8).
Screw the M8 connector of the hose with the blue stripe into the hole C.
Screw the M8 connector of the hose with the red stripe into the hole H.
Screw the M8 connector of the 800 mm hose into the hole B.
- First of all, unmount your existing kitchen tap.
WD 3020/WD 3030/WD 3040 and WD 3050 Ensure the connections are screwed tight, but avoid over tightening!
Then put the base or O-Ring (3) over the hole and fix the BRITA Tap (1) in place using the supplied joint (5), the flat gasket (6), flange (7) and the hex nut (8).
Attaching the hoses
We recommend that you arrange all the parts you need in front of you before you begin.
For wall mounting (optional), you will need: two screws (e.g. 5 mm thread diameter) and, if required, two wall plugs suitable for your type of wall.
Please follow the diagram below (see fig. 9) and perform the steps in the right order.
- Connect supplied T-piece on your cold water supply
- Insert one 3/8″ gasket into the female nut of the supplied T-piece.
- Connect this end of the T-piece to your cold water supply.
If you do have an additional free 3/8″ cold water supply for the BRITA Tap in your kitchen, you do not need to install the supplied T-piece!
If your cold water supply does not fit the 3/8″ connector of the T-piece, use the supplied adapter if required. Please insert the 1/2″ gasket into the female nut of the adapter first.
Your Water Filter Kit comes with two 1/2″ adapters. Please go to your nearest supplier for adapters in other sizes.
- Connect the hose with the blue stripe to one side of the T-piece.
- Take the hose with two 3/8″ connectors. Insert the 3/8″ gaskets into the respective female threads of the two hose ends. Connect one end with the free side of the T-Piece.
- Now connect the other end to the filter head inlet. This is labelled «IN» (inlet) and marked with an arrow. Make sure that the gaskets are seated correctly!
- Connect the 800 mm hose which is connected with the dispenser with the outlet of the filter head labelled with an «OUT» arrow. Make sure that also here the gaskets are seated correctly!
- Connect the hose with the red stripe with your hot water supply. If your hot water supply does not fit the 3/8″ connector, use the supplied adapter if required. Please insert the 1/2″ gasket into the female nut of the adapter first.
- Make sure all connections are tightened properly. Avoid over tightening.
The max. tightening torque for the G3/8″ connections may not exceed 14 Nm! Only hose connections with gaskets (13) may be used – hoses with conical screw connections damage the connections of the filter head and invalidate any warranty claims!
Inserting the filter cartridge (see fig. 10)
- Remove protective strap (1).
- Insert the filter cartridge (4) vertically into the filter head (5).
- Turn the locking handle (3) until you feel it engages.
The filter cartridge can only be inserted when the locking handle is open.
Make sure that the filter cartridge is positioned correctly.
Space-saving wall mount to install the cartridge under the sink
(optional) (see fig. 11)
During assembly, note the installation dimensions, bending radii of the hoses and dimensions of the accessories. The system can be operated vertically and horizontally. When using the wall mount, install vertically only!
- Attach the wall mount in place using the two matching screws and use two wall plugs, if necessary, depending on the type of wall.
- Engage the filter head (2) in the wall mount (1). Please use the fixation holes (4).
Commissioning
Before use, make sure that you have followed all the steps correctly and all the parts are fitted. Place a suitable container under the cartridge to catch any leakages.
- Turn on the cold and hot water supplies and check the system carefully for any leaks.
- Open the BRITA Tap and allow water to run until the filtered water runs clear and without any bubbles (at least 2 litres).
Replacing the filter cartridge
If the maximum volume is reached or the cartridge has been used for 12 months from commissioning, the BRITA Tap Cartridge Status Indicator will flash red to remind you that the cartridge needs to be replaced.
Read Important Notes (chapter 9) prior to exchange. After storage and transport below 0°C, the product must be stored in the open original packaging for at least 24 hours at the stated ambient temperatures (chapter 7) for operation.
NOTE: The filter cartridge can be pivoted by 90° in the wall mount for easy removal. When the locking handle is open, the water supply to the cartridge is interrupted and by-passing with direct water flow from the water inlet to the outlet is possible.
Replacing the P 1000 (see fig. 10):
- Open the locking handle (3).
- Place a suitable container under the flush hose to catch the rinse water. Open the flush valve (2) and release pressure from the system. Close the flush valve (2) again.
- Remove the exhausted filter cartridge (4) from the filter head (5) – please be aware, the cartridge is firmly embedded so you can give it a firm pull without worrying about breaking it.
- Insert the new filter cartridge (see chapter 3.5).
- Close the locking handle (3).
- Reset the BRITA Tap Cartridge Status Indicator (chapter 5).
- Open the BRITA branded lever on your BRITA Tap and rinse through until the filtered water runs clear and without any bubbles (at least 2 litres).
Replacing the P 3000 refill cartridge is exactly the same as replacing the P 1000. The P 3000 lasts up to 3400 liters with the A-setting, up to 1700 liters with the B-setting and up 1100 liters with the C-setting. Please take this into consideration while resetting your BRITA Tap Cartridge Status Indicator
Activating the BRITA Tap Cartridge Status Indicator
- Push the Reset Button (see fig. 5) of the BRITA Tap Cartridge Status Indicator for three seconds until the LED-light flashes green.
- The timer starts automatically.
Maintenance
Regularly check the filter system for leaks. Regularly check the hoses for kinks. Kinked hoses must be replaced.
Prior to exchanging the filter system, read the Technical Data (chapter 7) and Important Notes (chapter 9).
Regularly clean the outside of the filter system with a soft, damp cloth.
Do not use any abrasive chemicals, cleaning solutions or astringent cleaning agents.
Technical data of the P 1000 and P 3000 cartridge
| Operating pressure | 2 bar to max. 8.6 bar | ||
| Water intake temperature | 4°C to 30°C | ||
| Ambient temperature for | operation | 4°C to 40°C | |
| storage/transport | –20°C to 50°C | ||
| Capacity up to carbonate hardness 10 °dH at setting «A» | P1000 | 1200 L | |
| P3000 | 3400 L | ||
| Capacity from carbonate hardness 10 to 17 °dH at setting «B» | P1000 | 600 L | |
| P3000 | 1700 L | ||
| Capacity from carbonate hardness 17 to 24 °dH at setting «C» | P1000 | 400 L | |
| P3000 | 1100 L | ||
| Pressure loss by nominal service flow | 0.25 bar | ||
| Weight (dry/wet) | P1000 | 1.0 kg/1.6 kg | |
| P3000 | 1.8 kg/2.8 kg | ||
| Dimensions (Width/Depth/Height) | Filter system (filter head with filter cartridge) | P1000 | 119 mm/108 mm/265 mm |
| P3000 | 117 mm/104 mm/417 mm | ||
| P1000 | 108 mm/108 mm/259 mm | ||
| Filter cartridge | P3000 | 104 mm /104 mm/410 mm | |
| P1000 | 137 mm/130 mm/265 mm | ||
| Installed dimensions (vertical installation with wall mounting bracket) |
P3000 | 137 mm/128 mm/417 mm | |
| Operating position | Horizontal and vertical | ||
| Water inlet connection | G3/8″ | ||
| Water outlet connection | G3/8″ |
Technical data of the BRITA Tap
| Operating pressure | 0.5 bar to max. 10 bar | ||
| cold water connection | 4°C to 30°C | ||
| warm water connection | max. 70°C | ||
| flow rate | ≥ 9 L/min | ||
| acoustics rating | Group II/- | ||
| Weight | Dimensions (Width/ Depth/Height) | Aerator | |
| WD 3020 | 2,07 kg | 17,3 cm x 28,4 cm x 29,4 cm | M24x1 |
| WD 3030 | 2,12 kg | 17,2 cm x 20,5 cm x 36,3 cm | M22x1 |
| WD 3040 | 2,16 kg | 17,2 cm x 23,7 cm x 34,8 cm | M22x1 |
| WD 3050 | 2,12 kg | 17,2 cm x 20,5 cm x 36,2 cm | M22x1 |
Troubleshooting
No water flow
| Cause: | Water intake closed. |
| Troubleshooting: | Open the water intake at the upstream shut-off valve or by closing the locking handle (3) on the filter head (5). Check hoses for kinks. |
No or low water flow in spite of open water intake
| Cause: | Mains pressure too low. |
| Troubleshooting: | Check mains pressure. If the fault continues, check the filter system and filter cartridge and replace if necessary. Check hoses for kinks. |
| Cause: | Filter head not mounted in direction of water flow / hoses wrongly connected. |
| Troubleshooting: | Dismantle filter head and hoses and install in direction of water flow (chapter 3.4). |
Leak
| Cause: | Screwed connections not fitted correctly. |
| Troubleshooting: | Check mains pressure. Check all screwed connections and mount as described in chapter 3.4. |
No LED indication by usage
| Cause: | Battery is not inserted in a correct way or is used up. |
| Troubleshooting: | Check if battery is inserted properly. If necessary, replace the battery. |
For models WD 3030 and WD 3040 only
These models have an aerator with two integrated outlets. The Inner one is for BRITA filtered water, the outer area for hot and cold water. As with every tap aerator, there can be limescale build-up in the outer area. Therefore it is recommended to clean the aerator on a regular basis. For cleaning: Unscrew the cap on the end of the dispensers neck. The aerator is connected to a silicon hose. Detach it carefully and clean the aerator (e.g. with vinegar). After cleaning connect the long, thin part on the back of the aerator carefully with the silicon hose. Place the cap over the aerator and screw it tight. Make sure that the gasket in the cap is seated correctly. When installed correctly there should not be any leaks whilst running hot, cold or BRITA filtered water.
If you want to replace the aerator with a new one, you can order it from BRITA.You can find the contact details for your BRITA customer service team next to your country code on the back of this booklet.
Spare Part Name
| Article No. | Spare Part Name |
| 1004715 | Gasket On Line 3/8″ 2 mm CE + AU |
| 1004713 | Gasket On Line 1/2″ 2 mm CE + AU |
| 1004699 | Hose On Line 3/8″ IT — 3/8″ IT CE |
| 1015771 | filterhead G3/8 3-way LED CE spare part |
| 1004690 | Adapter 1/2″ IT — 3/8″ ET |
| 1005821 | T-piece 3/8″ |
WD 3020
| Article No. | Spare Part Name |
| 1012554 | Aerator Set WD 3020 CE |
| 1012556 | Spare Part Mixer Cartridge |
| 1012557 | Hose Set WD 3020 CE |
| 1012562 | Spare part Hose DN6 800 mm HF M8x1 — G3-8HN ASM |
| 1013529 | Assembly Set WD3050 |
| 1015754 | BRITA Tap Cartridge Status Indicator spare part |
| 1016311 | Valve LED ASM spare part |
| 1016282 | Cover mixer tap WD3020-3040 spare part |
WD 3030/ WD 3040/ WD 3050
| Article No. | Spare Part Name |
| 1012550 | Aerator Set WD 3030 CE |
| 1014609 | Aerator Set WD 3050 |
| 1012556 | Spare Part Mixer Cartridge |
| 1012552 | Base Ring Set WD 3030/3040 |
| 1014608 | Base Ring Set WD 3050 |
| 1012557 | Hose Set WD 3020 CE |
| 1013529 | Assembly Set WD 3050 |
| 1012562 | Spare part Hose DN6 800 mm HF M8x1 — G3-8HN ASM |
| 1015754 | BRITA Tap Cartridge Status Indicator spare part |
| 1016311 | Valve LED ASM spare part |
| 1016282 | Cover mixer tap WD3020-3040 spare part |
Important notes
Protect the P 1000 water filter cartridge from direct sunlight and mechanical damage. Do not assemble near sources of heat and open flames. A stop valve must be installed before the filter system intake hose. The BRITA Tap System is only suitable for domestic use.
Only water of drinking water quality may be used as intake water for the BRITA water filter system. The BRITA water filter cartridge is only suitable for cold water use within the supply water temperature stated in chapter 7. No microbiologically impaired water or water of unknown quality may be used without appropriate disinfection.
The system cannot be installed with a low pressure boiler.
Irrespective of the water used, you should use stainless steel utensils or kettles with stainless steel heating elements. This is of particular importance to people who are sensitive to nickel.
In the event: filter first, and then boil
If there are official instructions to boil tap water, the filter system must be decommissioned. When the requirement to boil water comes to an end, the filter cartridge must be replaced and the connections cleaned.
Ultimate hygiene
- For hygiene reasons, the filter material of the cartridge is subjected to a special treatment with silver. A small quantity of silver, which is harmless to health, may be released into the water. This is in compliance with the World Health Organisation (WHO) recommendations for drinking water.
- It is generally recommended to boil tap water for certain groups of people (e.g. people with weak immune systems, babies). This also applies to filtered water.
- Note for people with kidney disease or dialysis patients: The filtering process can cause a small rise in the levels of potassium.
- The water filtrate is classified in Category 2 according to EN 1717
Optimum use
- BRITA recommends that the filter system is not left unused for a long period. If the BRITA Tap is not used for several days (2–3 days), we recommend that the filter system be flushed with the flushing volume X indicated in the table below. After stagnation periods of over 4 weeks, the filter should be flushed with flushing volume Y. Please also note the maximum usage period of the filter cartridge is 12 months, irrespective of the actual volume used.
Similar to the conventional taps, before using you should let water rinse through for a short period so you can enjoy your BRITA filtered water.
| Flushing volume X after 2–3 days stagnation | Flushing volume |
| P 1000 | 2 Litres |
| P 3000 | 3 Litres |
| Flushing volume Y after 4 weeks stagnation | Flushing volume |
| P 1000 | 20 Litres |
| P 3000 | 30 Litres |
- The filter kit must not be opened or dismantled during operation. The filter cartridge must not be opened. The filter kit is designed for a service life of 10 years (counted from the date of installation). BRITA filtered water is designed for human consumption. Use it within 1–2 days.
Sensitive to potassium?
The filtering process can cause a small rise in the levels of potassium. However, one litre of BRITA filtered water contains less potassium than an apple, for example. If you have kidney disease and/or have to observe a special potassium diet, we recommend that you consult your doctor before using the water filter.
Natural traces
As with every natural product, the P 1000 parts can be subject to natural fluctuations. This can lead to a slight abrasion of small carbon particles into your filtered water, noticeable as black bits. These particles have no negative health effects. If ingested, they will not harm the human body. In case you observe carbon particles, BRITA recommends flushing out the P 1000 filter cartridge until the black bits disappear.
BRITA®, quality and satisfaction guaranteed
Correct disposal of the BRITA Tap Cartridge Status Indicator
Every BRITA Tap Cartridge Status Indicator has a useful life of approx. 5 years. At the end of the useful life of the Status Indicator, remember that it must be disposed of according to the applicable regulations and statutory requirements.
Exclusion of liability
BRITA shall not be held liable for any damage, including subsequent damage, arising from the incorrect use of the product.
100% satisfaction: the BRITA guarantee
We are confident that this BRITA product will meet your demands in terms of quality and performance. If this product does not meet your expectations, we will accept its return within 30 days of the date of purchase and reimburse the purchase price. Just send the product with your proof of purchase (receipt) and the grounds for your dissatisfaction, your phone number and bank details to the customer service address for your country (on the back of this booklet).
BRITA recycling: for our environment
To work together in taking responsibility for our environment, you can return your P 1000 filter cartridges to a number of BRITA dealers.
More about BRITA: For details on recycling, please see www.brita.net.
The BRITA service hotline cares
Do you have any questions about your BRITA product?
Or on the subject of water filtration? Give us a call!
You can find the contact details for your BRITA customer service team next to your country code on the back of this booklet.
The best side of water: www.brita.net
Are you looking for your nearest BRITA retailer? Do you want more detailed information about BRITA products? Or about the BRITA company?
Want to make the most of one of BRITA’s service offers? Up-to-date information, consumer tips, seasonal competitions, delicious coffee and tea recipes can be found around the clock at www.brita.net
Registering your product online
Register your product and get benefits at www.register.brita.net
Installation Video
Documents / Resources
References
Download manual
Here you can download full pdf version of manual, it may contain additional safety instructions, warranty information, FCC rules, etc.
Download BRITA Tap P1000 Manual
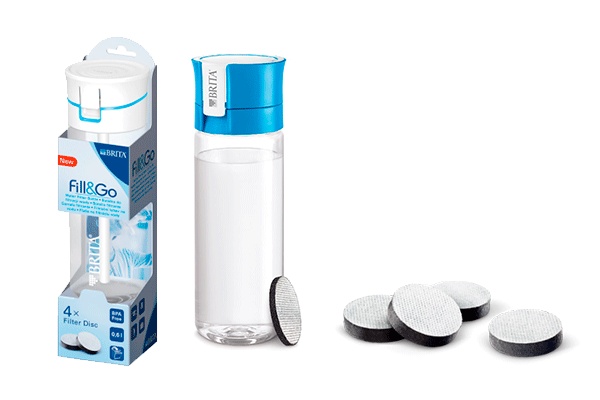
BRITA MAXTRA+ Универсальный картридж фильтра для воды
Простое руководство по обращению
Как подготовить картридж фильтра MAXTRA+, шаг за шагом
- Наполните чистый кувшин с фильтром для воды BRITA холодной водой.
- Погрузите картридж в холодную воду, осторожно встряхивая, чтобы удалить пузырьки воздуха.
- Плотно вставьте картридж в воронку, пока не услышите щелчок.
- Отфильтруйте и выбросьте первые две заливки фильтрованной воды. Теперь ваш картридж готов к фильтрации вкусной воды.
Наконечник: Фильтрующие картриджи MAXTRA+ подходят для MAXTRA и новых фильтров-кувшинов для воды BRITA.
Документы / Ресурсы
Использование фильтров Брита пользуется спросом и популярностью более 50 лет. Продукция немецких производителей в равной мере востребована в частных домовладениях и офисах.
Содержание
- 1 Что отличает фильтры Брита
- 2 Преимущества и недостатки
- 3 Предлагаемые типы систем очистки
- 3.1 Кувшины
- 3.2 Бутылки
- 3.3 Системы разлива
- 4 Инструкция по установке и обслуживания системы для очистки воды Brita
- 4.1 Выбор и замена картриджей
- 5 Альтернативные устройства
- 6 Отзывы
Что отличает фильтры Брита
Изначально, в 1966 году, специальные емкости для выполнения очистки воды были впервые разработан для повышения уровня качества жидкости, заливаемой в автомобильный аккумулятор. Автором изобретения стал немецкий предприниматель Х. Ханкаммер. Система в короткие сроки стала популярна и уже в 1970 году получен патент на первый бытовой фильтр, состоящий расположенную в сосуде воронку.
Следующим этапом разработки стало создание в 1979 году сменных картриджей. В настоящий момент фильтровальные устройства бритта производятся в большинстве европейских стран. Производства Brita Group открыты в Японии, КНР и других государствах Азиатско-Тихоокеанского региона. Уже многие годы они предлагаются покупателям и в России.
Важно! Фильтры Брита доставляются в торговые сети РФ от производителя.
Востребованность у покупателей этой фильтровальной системы объясняется её удобными особенностями:
- бюджетная стоимость;
- простота в эксплуатации, позволяющая заменять картриджи фильтров самостоятельно;
- высокая степень удаления примесей.
Простота применения колбы с фильтровальной системой обеспечивает использование дома и офисе.
Среди производимых моделей:
- бутылки;
- кувшины, оборудованные фильтром кулеры;
- кулеры;
- очистные картриджи.
Важно! В числе продукции Brita Group отсутствуют обратноосматические фильтры, специализированные обезжелезиватели.
Преимущества и недостатки
Производитель из Германии специализируется на выпуске небольших по объему картриджных моделей устройств для удаления вредоносных примесей из воды, фтора, механических загрязнений.
В число преимуществ входит:
- после прохождения через систему очистки вода становится мягче и вкуснее;
- не требует дополнительного кипячения;
- уменьшение хлора и доли тяжелых металлов.
К отрицательным моментам можно отнести небольшой объем сосудов, требующий регулярного наполнения. Владельцы отмечают необходимость самостоятельно проводить замену картриджей и контролировать срок выполнения этой процедуры.
Обратите внимание! Периодичность замены картриджей указывается в инструкции к эксплуатации. При длительном использовании одного картриджа качество очистки снижается. Срок замены показывает электронный индикатор.
Предлагаемые типы систем очистки
Покупатель может самостоятельно выбрать наиболее удобный тип модели в зависимости от частоты использования и других факторов. В продаже представлены три ведущих базовых модели.
Кувшины
Выполняются с откидными и накрывающими крышками. В зависимости от модели могут выполняться в различной цветовой гамме. Корпус выполняется из прозрачного пластика. Модели, за исключением крышки, можно мыть в посудомоечной машине.
Бутылки
Выполняются из прозрачного и непрозрачного пластика. Конструкции комплектуются выдвижными:
- клапаном для питья;
- мундштуком.
Фильтры бутылки удобны в использовании в пути. Плотная крышка обеспечивает герметичность влаги.

Системы разлива
Устанавливаются в офисах или в частных жилых помещениях. Могут использоваться для получения больших количеств очищенной воды. В модельном ряду фильтры:
- напольные;
- настольные;
- мобильные.
Могут оснащаться системой очищения и газирования поды.
Инструкция по установке и обслуживания системы для очистки воды Brita
Представленные в продаже картриджи оснащаются индикаторами, показывающими степень готовности фильтра удалять загрязнения и другие негативные включения. Для замены достаточно открыть крышку выбранной модели фильтра и устранить уже находящийся там старый картридж. Для сохранения эксплуатационных характеристик кувшин или емкость для воды очищается от загрязнений.
Все представленные модели нуждаются в самостоятельном контроле частоты и периодичности замены картриджей. Для очистки емкость заполняется кипяченой или сырой водой. Возможно использование с целью дополнительной доочистки.
Обратите внимание! При мойке емкости рекомендуется отказаться от активных моющих средств или тщательно устранять их остатки.
Выбор и замена картриджей
После подготовки модели устанавливается новый картридж. Фильтр используется сразу для кипяченой и сырой воды. Для успешного использования модель после замены рекомендуется заполнить водой и немного встряхнуть. Это позволит устранить пузырьки воздуха.
Устанавливаются оригинальные модели:
- MAXTRA+ Универсальный (от 350 р/шт);
- MAXTRA+ Жесткость (от 400 р/шт).
При наполнении фильтра используются ионообменные смолы и кокосовый уголь. Ресурс использования достигает 300 л.
Выбор зависит от уровня жесткости воды в регионе использования. Универсальный используется в районах с жесткостью воды менее 9.
Наравне с проверкой работы фильтра с помощью цветовых изменений электронного индикатора на корпусе дополнительно используется так называемый «чайный тест». При заваривании чай на поверхности воды с высокой степенью загрязнений или тяжелых металлов формирует тонкую блестящую, похожую на жировую, пленку. Если она появляется, фильтр кувшин брита или другие модификации требуется срочно менять.
Средний срок использования картриджа зависит от модели устройства:
- в кувшинах и системах замена проводится не реже одного раза каждые 8 недели;
- фильтры в бутылке используются не более 4 недель.
При первом использовании фильтра новый прибор рекомендуется помыть и минимум дважды наполнить, со сливанием после завершения фильтрации.

Альтернативные устройства
В настоящий момент на отечественном рынке представлены и другие варианты фильтров для очистки воды. В числе наиболее популярных у потребителей можно ответить:
- Аквафор, с ресурсом картриджей от 170 до 700 л.
- Барьер, отличающийся значительным количеством моделей сменных кассет, выполняется в максимально большом выборе цветовой гаммы.
- Гейзер, в котором дополнительно используется волокнистый сорбент, включаемый дополнительно к ионообменным смолам и кокосовому углю.
Все модели отличаются снижением качества фильтрации по мере использования. На общем фоне кувшины Брита характеризуются сочетанием бюджетной стоимости и принципов использования.
Отзывы
Большинство владельцев положительно отзываются об использовании любых модификаций фильтров Brita. Отрицательный опыт применения отмечался примерно 10% покупателей. Подобная оценка была связана с неправильной заменой картриджа или креплением крышки.
Все владельцы отмечали заметное улучшение качества воды после использования системы очистки. Это отмечалось даже в регионах с высоким содержанием в воде солей тяжелых металлов или загрязнений.
В заключении стоит отметить качество систем для очистки воды немецкой компании Brita Group. Высокое качество работы обеспечивает использование в любой необходимой ситуации дома, на производстве или лично, при выборе бутылки.
Post Views: 30
Качество воды играет огромную роль в современном мире. К сожалению, далеко не в каждом регионе вода из центрального водопровода имеет необходимые качества для употребления в пищу. В таком случае предпочтительно использовать фильтры для воды. “Брита” является одним из ключевых производителей такого оборудования. Как его использовать, а также преимущества и недостатки очистной системы.
Разновидности модификаций фильтров
Немецкая компания по производству фильтров для воды “Брита” отличается высоким качеством и долговечностью выпускаемого оборудования. На сегодняшний день существует несколько разновидностей очистного оборудования для воды:
- фильтр-бутылка;
- фильтр-кувшин;
- кулер с фильтром;
- очистные картриджи.
Обыкновенный фильтр кувшин является лидером продаж среди всех производимых компанией “Брита”. Это обусловлено удобством использования, а также относительно недорогой стоимостью. Его главная задача — сделать воду мягче и приятнее на вкус.
Фильтр “Брита” в виде кувшина устроен следующим образом: при прохождении жидкости через катионный картридж соли жесткости притягиваются к катионной смоле, которая, в свою очередь, наполняет воду ионами натрия. В результате получается вкусная и мягкая питьевая вода.
Инструкция к использованию
Для того чтобы фильтр-кувшин “Брита” прослужил как можно дольше, рекомендовано придерживаться следующих правил использования:
- Производитель рекомендует держать сменный картридж Brita Maxtra постоянно погруженным в воду для сохранения всех очищающих свойств.
- Среднее количество воды, которое может очистить одна сменная кассета, составляет 100 л. Этот показатель напрямую зависит от качества исходного материала, так, например, для более мягкой воды он будет около 150 л в месяц.
- Компания-производитель рекомендует менять картридж не менее 1 раза в месяц в гигиенических целях.
- Проверить работоспособность можно при помощи обыкновенного чая. Его нужно заварить в отфильтрованной воде и обратить внимание на поверхность жидкости. Если она покроется пленкой, как при использовании неочищенной водопроводной воды, то картридж подлежит замене.
5. При необходимости приостановления использования фильтра-кувшина “Брита” сменный картридж необходимо извлечь и поместить в полиэтиленовом пакете в холодильник. При последующем использовании его нужно замочить на час в холодной воде и произвести 2-3 цикла очистки воды.
6. Если картридж все же высох, нужно также замочить его в воде.
Важно помнить о том, что сменный картриджи Brita Maxtra и другие пригодны к использованию исключительно в холодной воде. Попытка очистить горячую воду приведет к потере работоспособности ионообменника, который насыщает воду.
Особенности работы фильтров «Брита»
В современном мире важна скорость, поэтому производитель позаботился о том, чтобы пользователь получал литр чистой воды за 6 минут. При этом без потери качества фильтр “Брита” способен очистить до 10 л воды в сутки, чего вполне хватит на нужды семьи из 3-4 человек.
Срок годности сменного картриджа составляет 4 года без повреждения герметичной упаковки. При этом на протяжении всего срока он остается пригодным к использованию и не теряет положительных качеств. При этом производитель рекомендует замочить картридж на час в холодной воде, если он не использовался в течение 3-х лет без вскрытия индивидуального пакета.
Новинка — фильтр-бутылка
Производитель фильтров “Брита” предлагает потребителю удобную альтернативу многоразовым бутылкам для воды. Фильтр-бутылка выгодно отличается от них наличием сменного картриджа для очистки воды. При этом сама емкость имеет удобный объем — 0,6 л, что делает ее мобильной.
Данная новинка позволяет всегда иметь под рукой чистую воду вне зависимости о места нахождения, главное условие — наличие центрального водопровода. При этом стоимость литра чистой воды не превышает 5 руб./л, что делает устройство невероятно экономичным. В комплектацию фильтра “Брита” в виде бутылки входит соломинка, которой можно воспользоваться для удобства потребления воды. Такой аксессуар может стать не только полезным, но и стильным дополнением к образу.
Положительные стороны фильтров Брита
Потребители отдают предпочтение фильтрам “Брита” благодаря нескольким плюсам этого производителя:
- Долговечность. При аккуратном использовании кувшин может прослужить долгие годы. Картриджа “Брита” также хватает на достаточно длительное время, так, как менять их рекомендовано всего лишь раз в месяц.
- Экономичность. Стоимость литра чистой отфильтрованной воды составляет всего 2 руб., что на порядок дешевле, нежели приобретать бутилированную воду в магазине.
- Хорошая степень фильтрации, которая достигается благодаря наполнению фильтрующего картриджа (активированный уголь, смолы, силикагель). Например, степень очистки от хлора составляет 85%, свинца 90%, меди 95%, алюминия 67%, нитратов 70%. Кроме того, вода делается мягче на 75%.
- Использование домашнего фильтра-кувшина — это гарантия качества получаемого продукта, так как бутилированная вода из магазина часто подвержена подделкам.
- При использовании компактного фильтра исчезает необходимость ношения тяжелых бутылей с водой в дом.
- Фильтр занимает гораздо меньше пространства, нежели бутыли с водой, которые затем еще нужно утилизировать. Это очень актуально для жилищ с небольшим пространством на кухне.
Все эти положительные стороны использования домашнего фильтра отмечают пользователи в отзывах.
Негативные отзывы
Несмотря на то что подавляющая масса отзывов о фильтрах “Брита” положительные, существуют также и отрицательные. Пользователи чаще всего недовольны следующими моментами:
- Сложность поиска оригинального картриджа на фильтр-кувшин “Брита”. Их можно заказать на официальном сайте, так как в свободной продаже бывают редко.
- На пластике легко появляются царапины даже от малейшего грубого воздействия, при падении кувшин может треснуть.
- Скорость прохождения через сменный картридж высокая, что вводит людей в заблуждение о плохой очистке.
- Если фильтр не до конца пропустил воду через кассету, то при попытке ее налить вода из верхней части кувшина будет просачиваться через щель.
При выборе фильтра нужно обращать внимание как на положительные, так и на отрицательные отзывы, так как только таким образом можно сложить полное впечатление от данного фильтра.
Стоимость фильтра
Цена фильтра “Брита” начинается от 600 руб. и зависит от модификации кувшина, его объема, а также дизайна. Самым дорогим является фильтр Brita Elemaris XL объемом 3,5 л. Стоимость фильтра-бутылки варьируется от 800 до 1000 руб. в зависимости от места продажи.
Данная плата за фильтр является сравнительно небольшой, так как в конечном результате потребитель получает качественную воду по цене ниже рыночной. Кроме того, с фильтром-кувшином чистая вода будет всегда под рукой.

Типовой текст EE Евр. (русский язык) Инструкции по использованию Системы CPD Первая страница обложки: Задняя страница обложки: BRITA GmbH Типовой текст, BRITA CPD – Инструкции по использованию, EE Евр. (русский) Последняя страница инструкций по использованию: Наименования компонентов системы BRITA: Индикатор ресурса картриджа Крышка Воронка Картридж MAXTRA Кувшин Наименования компонентов OPTIMAX: Индикатор ресурса картриджа Крышка Воронка Картридж MAXTRA Резервуар Краник для слива воды Страница 2 / 9 BRITA GmbH Типовой текст, BRITA CPD – Инструкции по использованию, EE Евр. (русский) Стр. 2 [visualized index of intro; here consecutive numbering and title] Поздравляем вас с приобретением новой модели фильтра для воды BRITA ® с картриджем MAXTRA®! Спасибо вам за то, что вы выбрали фильтр BRITA, который обеспечит вас чистой, прозрачной и вкусной водой. ® MAXTRA – ключ к получению Эта модель фильтра для воды BRITA® обладает множеством преимуществ чистой, прозрачной и вкусной воды из фильтра BRITA® Вода из фильтра BRITA ® ® Технология фильтрации MAXTRA уменьшает содержание накипи и улучшает вкус горячих и холодных напитков; других веществ, например, хлора, экономична и удобна; отрицательно влияющих на вкус и увеличивает срок службы бытовых приборов, препятствуя образованию накипи; запах воды; идеальна для приготовления вкусной и здоровой пищи; постоянно поглощает такие придает более насыщенный вкус и аромат чаю и кофе; металлы, как свинец и медь, - благодаря натуральному MicroporeFilter и [placeholder: мощному ProtectFilter. exploded view of a BRITA jugs and BRITA Optimax focussing on the MAXTRA cartridge] ® MAXTRA FlowControl: идеальная фильтрация MAXTRA FlowControl обеспечивает оптимальное время фильтрации для получения наилучшего качества очистки воды благодаря идеальному сочетанию картриджа MAXTRA и воронки фильтра для воды BRITA. ® Ресурс картриджа MAXTRA Ресурс картриджа MAXTRA зависит от качества местной воды, например, от ее жесткости. В местности с жесткой водой (12– 14,5° по немецкой шкале карбонатной жесткости) картридж MAXTRA может быть использован для очистки около 100 литров воды. Для обеспечения высокого качества очистки картридж MAXTRA следует заменять не реже, чем каждые четыре недели. Кувшин фильтра для воды BRITA оснащен индикатором ресурса картриджа, который призван напоминать вам о дате следующей замены картриджа. Страница 3 / 9 BRITA GmbH Типовой текст, BRITA CPD – Инструкции по использованию, EE Евр. (русский) Стр. 3 [visualized index; here consecutive numbering and title “Quality from the very start] Качество с самого начала Для получения оптимальных результатов при использовании фильтра для воды BRITA строго следуйте приведенным ниже инструкциям. ® 1. Инструкции по очистке нового фильтра для воды BRITA перед началом использования купленного вами фильтра и при каждой замене картриджа [Icon] Воронка и кувшин o Вымойте воронку и кувшин в посудомоечной машине или вручную. ® Крышка с индикатором BRITA Meter o Крышка пригодна для мытья в посудомоечной машине. o Прежде чем класть крышку в посудомоечную машину, снимите с крышки индикатор BRITA Meter. Для этого прижмите лепестки фиксаторов к корпусу индикатора и извлеките его из гнезда в крышке. o Мыть снятый BRITA Meter в посудомоечной машине запрещается. Мойте его вручную. Крышка с индикатором BRITA Memo или таймером BRITA Calendar o Мыть крышку в посудомоечной машине запрещается. Мойте крышку вручную. Фильтр для воды BRITA с краником для слива воды o Промывку краника производите теплой водой. Вы можете протереть его внутренние полости с помощью ватной палочки или аналогичного предмета. Для этого необходимо предварительно разобрать краник, отвинтив расположенную под рычагом крышку и вытянув за рычаг клапан. ® ® ® [Graphically stressed] СОВЕТ: используйте мягкие моющие средства и воздержитесь от использования абразивных чистящих средств. Для удаления налета с крышки и индикатора BRITA Meter используйте обычную жидкость для удаления накипи на основе лимонной кислоты. ® 2. Подготовка картриджа MAXTRA [Icon] Наполните чистый кувшин фильтра холодной водой. Снимите с картриджа MAXTRA защитную упаковку (примечание: новый картридж MAXTRA может быть влажным, так как перед упаковкой он прошел стерилизацию паром). Опустите картридж MAXTRA в кувшин с холодной водой и слегка встряхните его для удаления пузырьков воздуха. Выньте картридж MAXTRA из кувшина и слейте использованную воду. ® 3. Установка картриджа MAXTRA [Icon] Вставьте воронку фильтра в кувшин. Установите картридж MAXTRA в гнездо воронки и надавите на него, пока он с характерным щелчком не встанет на место. ® 4. Наполнение воронки фильтра BRITA водой Способ наполнения зависит от конструктивных особенностей крышки вашей модели фильтра для воды BRITA. Вода из воронки, проходя через картридж, фильтруется и стекает в кувшин. Варианты исполнения крышек фильтров [Icons] ® Фильтр для воды BRITA с крышкой, имеющей автоматический клапан в отверстии для заливки воды o Если ваш фильтр имеет индикатор BRITA Meter, то его необходимо установить в гнездо на внутренней стороне крышки фильтра, для чего сначала введите выступ на корпусе индикатора в соответствующий паз в гнезде, а затем, нажав на индикатор, плотно посадите его в гнездо, при этом лепестки фиксаторов индикатора должны встать в соответствующие пазы гнезда с характерным щелчком. o Установите крышку на кувшин, для чего сначала введите выступы крышки в пазы, расположенные у сливного носика кувшина, а затем слегка нажмите на неё, пока она не встанет на место. o Поставьте фильтр в раковину, откройте водопроводный кран и наполните фильтр холодной водой. o Струя воды из крана приводит в действие клапан в отверстии для автоматической заливки воды. o После того, как в воронке будет достигнут максимальный уровень заполнения, клапан автоматически закроется. ® Фильтр для воды BRITA с крышкой, имеющей откидную крышечку в отверстии для заливки воды o Установите крышку на кувшин и слегка нажмите на нее, пока она не встанет на место. o Откройте откидную крышечку и поставьте фильтр под водопроводный кран. o Поставьте фильтр в раковину, откройте водопроводный кран и наполните фильтр холодной водой. ® Фильтр для воды BRITA без отверстия для заливки воды в крышке o Снимите крышку и наполните воронку фильтра холодной водопроводной водой. o Установите крышку на кувшин и слегка нажмите на нее, пока она не встанет на место. 5. Активирование картриджа MAXTRA ® [Icon] Страница 4 / 9 BRITA GmbH Типовой текст, BRITA CPD – Инструкции по использованию, EE Евр. (русский) Картридж MAXTRA следует активировать путем пропускания через него первых двух залитых в воронку порций воды. Слейте первые две порции профильтрованной воды или используйте их для поливки растений. После этого картридж MAXTRA готов к работе, и, начиная с третьей порции, вы сможете насладиться чистой, прозрачной и вкусной водой из фильтра BRITA. Страница 5 / 9 BRITA GmbH Типовой текст, BRITA CPD – Инструкции по использованию, EE Евр. (русский) Стр. 4 [visualized index ; here consecutive numbering and title Quality from the very start”] 6. Регулировка индикатора ресурса картриджа Индикатор ресурса картриджа BRITA будет напоминать вам о необходимости замены картриджа MAXTRA. Индикатор расположен в крышке фильтра для воды BRITA. Для достижения высокого качества очистки воды компания BRITA рекомендует менять картридж MAXTRA не реже, чем раз в четыре недели (30 дней). Варианты конструкции индикаторов [Icons] ® ® a. Фильтр для воды BRITA с индикатором BRITA Meter Чистая, прозрачная и вкусная вода из фильтра BRITA. Уникальный индикатор BRITA Meter, разработанный специально для картриджей MAXTRA, непрерывно производит замеры сразу 3 параметров, а именно: количества заливаемой в воронку фильтра воды, её качества (жесткость) и времени работы установленного в фильтре картриджа. Таким образом, обеспечивается эффективный контроль ресурса картриджа и гарантируется получение чистой, прозрачной и вкусной воды из фильтра BRITA. Дисплей индикатора BRITA Meter показывает оставшийся ресурс картриджа и момент, когда картридж MAXTRA нужно будет заменить. После активации картриджа MAXTRA нажмите кнопку START и удерживайте ее нажатой около шести секунд, пока на дисплее не появятся все четыре полоски и не вспыхнет надпись «O.K.». Пока на дисплее отображается надпись «O.K.», картридж MAXTRA обеспечивает высокое качество очистки воды. Каждая полоска на дисплее соответствует доле оставшегося ресурса картриджа MAXTRA. Капли воды, которые постоянно мигают на дисплее, двигаясь сверху вниз, означают, что происходит активная фильтрация. Если на дисплее появится и начнет мигать символ пустого картриджа «NEW», картридж MAXTRA следует немедленно заменить. ® b. Фильтр для воды BRITA с индикатором Memo Индикатор BRITA Memo напоминает о необходимости замены картриджа MAXTRA через каждые четыре недели (30 дней). После активации картриджа MAXTRA нажмите кнопку START и удерживайте ее нажатой до тех пор, пока на дисплее не появятся и не мигнут дважды все четыре полоски. Мигающая точка в нижнем правом углу дисплея указывает на то, что индикатор BRITA Memo находится в рабочем состоянии. Каждая полоска соответствует примерно недельному сроку службы картриджа. Таким образом, все четыре полоски соответствуют рекомендуемому сроку службы (ресурс) картриджа MAXTRA, равному четырем неделям (30 дням). Каждую неделю будет исчезать одна полоска, показывая время, оставшееся до замены картриджа MAXTRA. Картридж MAXTRA необходимо будет заменить, когда полностью исчезнут все полоски и начнет мигать стрелка. ® c. Фильтр для воды BRITA с таймером Calendar Таймер BRITA Calendar помогает не пропустить дату замены картриджа. После активации картриджа MAXTRA установите на таймере дату следующей замены картриджа. Левый диск показывает день месяца, а правый – месяц. Поворачивая эти два диска, задайте дату следующей замены картриджа MAXTRA. Внимание, на левом диске размещены только четные числа. Поэтому, если дата следующей замены картриджа выпадает на нечетное число, на левом диске установите ближайшее к ней четное. ® 7. Замена картриджа MAXTRA [Icon] Снимите крышку фильтра и потяните за кольцо, расположенное на верхней части картриджа MAXTRA. Следуйте инструкциям, приведенным в разделе «Качество с самого начала» (шаги 1–6). [Graphically stressed] СОВЕТ: промывайте все детали вашего фильтра для воды BRITA при каждой замене картриджа MAXTRA. Следуйте инструкциям, приведенным в разделе «Качество с самого начала» (шаги 1–6). Страница 6 / 9 BRITA GmbH Типовой текст, BRITA CPD – Инструкции по использованию, EE Евр. (русский) Стр. 5 [visualized index ; here consecutive numbering and title “Important Notes”] Важные замечания Идеальное использование xxx Не подвергайте свой фильтр для воды BRITA воздействию прямых солнечных лучей. и тепла от нагревательных приборов (например, плит или кофеварок). Храните свой фильтр для воды BRITA в прохладном месте в тени при температуре 1–50°C и относительной влажности воздуха менее 50%. Вода из фильтра BRITA предназначена исключительно для употребления человеком. Она является скоропортящимся продуктом, поэтому компания BRITA рекомендует использовать отфильтрованную воду в течение 1–2 суток. Срок годности картриджа MAXTRA указан на заводской упаковке и составляет четыре года со дня изготовления. Старайтесь всегда иметь в запасе новый картридж MAXTRA для замены использованного. Компания BRITA рекомендует хранить картриджи MAXTRA в фирменной заводской упаковке в сухом и прохладном помещении. При использовании фильтра для воды BRITA в течение некоторого времени вы можете заметить появление известкового налета на крышке и её деталях. Это объясняется тем, что все они постоянно контактируют с неочищенной водой, которая содержит соли угольной кислоты (накипь). Компания BRITA рекомендует регулярно чистить крышку, индикатор BRITA Meter и механизм автоматического наполнения от этого налета с помощью обычной бытовой жидкости для удаления накипи на основе лимонной кислоты. Если вы не планируете пользоваться фильтром для воды BRITA в течение длительного времени (например, во время отпуска), компания BRITA рекомендует извлечь картридж MAXTRA, слить всю воду, оставшуюся внутри фильтра BRITA, и неплотно вставить картридж MAXTRA обратно. Прежде чем снова начать пользоваться фильтром для воды BRITA, извлеките картридж MAXTRA и снова выполните шаги 1–5, описанные в разделе «Качество с самого начала». Если детали вашего фильтра для воды BRITA случайно имели контакт с пищевыми продуктами, которые могут вызвать изменение их цвета (например, томатный соус или горчица), сразу же вымойте их. Во избежание возможного изменения цвета деталей фильтра, не кладите их в посудомоечную машину вместе с грязной посудой из-под таких продуктов. Если ваш фильтр для воды BRITA имеет краник для слива воды и вы заметили просачивание воды между ним и стенкой резервуара, просто подтяните шестигранную гайку внутри резервуара. Высокое качество очистки воды Фильтруйте только холодную водопроводную воду. В случае необходимости вначале фильтруйте, а затем кипятите! Фильтры для воды BRITA предназначены исключительно для доочистки воды из городской системы водоснабжения (примечание: согласно местному законодательству качество этой воды постоянно контролируется, и она является безопасной для питья) или воды из частных источников, которые были проверены, и вода в них признана пригодной для питья. В случае, если местными властями издана инструкция, согласно которой водопроводную воду перед употреблением необходимо кипятить, воду из фильтра BRITA также следует кипятить. После отмены данной инструкции необходимо тщательно промыть все детали фильтра для воды BRITA и установить новый картридж MAXTRA. Для некоторых групп людей (например, лиц с ослабленным иммунитетом и детей) обычно рекомендуется кипятить водопроводную воду; это относится и к воде из фильтра BRITA. Независимо от качества используемой воды следует использовать приборы с нагревательными элементами из нержавеющей стали или чайники со скрытыми нагревательными элементами. В частности, люди с повышенной чувствительностью к никелю должны использовать электроприборы, изготовленные из нержавеющей стали, или чайники со скрытыми нагревательными элементами. Идеальная гигиена Из соображений гигиены содержимое картриджа MAXTRA подвергается специальной обработке серебром. При этом в воду может попасть весьма незначительное количество серебра. Это количество не превышает нормативов Всемирной организации здравоохранения (ВОЗ) и Директивы ЕС 98/83/EС по качеству питьевой воды, предназначенной для потребления человеком. xx Повышенная чувствительность к калию? В очищенной фильтром BRITA воде может наблюдаться незначительное увеличение содержания калия (для примера, в литре воды из фильтра BRITA калия меньше, чем, например, в одном яблоке средних размеров). Если вы страдаете заболеваниями почек и/или должны соблюдать диету с ограниченным потреблением калия, мы советуем вам, прежде чем начать пользоваться фильтром для воды BRITA, проконсультироваться со своим лечащим врачом. Незначительные естественные примеси Целостность фильтра BRITA MicroporeFilter, как и любого другого натурального продукта, подвержена естественным изменениям. Это может привести к попаданию в воду из фильтра незначительного количества мельчайших частиц угольной пыли, собирающихся на дне кувшина фильтра в виде осадка сероватого цвета. Эти частицы не оказывают никакого отрицательного воздействия на здоровье. При попадании в пищеварительный тракт они не причиняют вреда организму человека. Если вы заметили в воде подобные частицы, компания BRITA рекомендует промыть картридж несколько раз или до их исчезновения. ® ® Правильная утилизация индикаторов BRITA Meter и BRITA Memo [Icon] Срок службы индикаторов BRITA Meter и BRITA Memo составляет около пяти лет. Необходимо помнить, что по окончании срока эксплуатации эти устройства следует утилизировать в соответствии с существующими в вашей стране нормами и правилами. Страница 7 / 9 BRITA GmbH Типовой текст, BRITA CPD – Инструкции по использованию, EE Евр. (русский) Для удаления отработавшего индикатора BRITA Meter выполните шаг 1, описанный в разделе «Качество с самого начала». Для извлечения из гнезда отработавшего индикатора BRITA Memo используйте отвертку. Вставьте ее в углубление рядом с индикатором и вытолкните его из гнезда. Помните, пожалуйста, что индикатор BRITA Memo следует извлекать исключительно с целью его утилизации. Ограничение ответственности Учтите, пожалуйста, что компания BRITA не несет никакой ответственности в случае несоблюдения вами данных инструкций по использованию. Страница 8 / 9 BRITA GmbH Типовой текст, BRITA CPD – Инструкции по использованию, EE Евр. (русский) Стр. 6 [visualized index ; here consecutive numbering and title “BRITA, quality and satisfaction guaranteed”] BRITA® – качество гарантируется Гарантия качества – наш более, чем 40-летний опыт [Icon – TÜV] Более 40 лет компания BRITA обеспечивала постоянное совершенствование и высочайшее качество технических разработок в области фильтров для воды. Чтобы оправдать высокие требования к качеству, в компании BRITA обеспечивается жесткий внутренний и внешний контроль качества. Стабильность качества бытовых фильтров для воды и картриджей регулярно проверяется известным независимым органом TÜV SÜD. TÜV SÜD удостоверяет пригодность фильтров для воды BRITA и картриджей MAXTRA для получения питьевой воды в соответствии с требованиями законодательства Германии и Европейского Сообщества. Кроме того, фильтры для воды BRITA и картриджи MAXTRA проверены на соответствие требованиям ГОСТ. ® Горячая линия поддержки BRITA к вашим услугам! У вас возникли вопросы по поводу приобретенного вами изделия компании BRITA или по поводу фильтрации воды? Позвоните нам! Наш адрес указан на последней странице. Узнайте воду с лучшей стороны: www.brita.net Вы ищете ближайшего дилера компании BRITA? Хотите узнать больше о продукции BRITA или о самой компании BRITA? Хотите воспользоваться нашими многочисленными услугами и предложениями, а также самой свежей информацией, включая идеи рецептов? Посетите сайт www.brita.net. Страница 9 / 9