Язык
Руководство пользователя |
| Заголовок | Описание | Дата выпуска (Bерсия) |
файла (Размер) |
|---|---|---|---|
|
Руководство пользователя |
26.07.2001 (01) |
Загрузка (9.01MB) |
Загрузите и просмотрите документ в формате PDF. Для просмотра документов в формате PDF требуется программное обеспечение Adobe® Acrobat Reader DC®. Если у вас нет данного программного обеспечения, вы можете загрузить его, щёлкнув по ссылке «Adobe® Acrobat Reader DC®».
-
Инструкции по эксплуатации
1

Brother Star 45 инструкция по эксплуатации
(111 страниц)
- Языки:Русский
-
Тип:
PDF -
Размер:
8.95 MB -
Описание:
Электромеханическая швейная машина
Просмотр
На NoDevice можно скачать инструкцию по эксплуатации для Brother Star 45. Руководство пользователя необходимо для ознакомления с правилами установки и эксплуатации Brother Star 45. Инструкции по использованию помогут правильно настроить Brother Star 45, исправить ошибки и выявить неполадки.
Раздел: Швейное Оборудование
Тип: Швейная Машина
Характеристики, спецификации
Тип управления:
электромеханическое
Регулировка скорости шитья:
плавная
Отключение механизма подачи ткани:
есть
Максимальная высота подъема лапки:
10 мм
Система измерения размера пуговиц:
есть
Количество швейных операций:
27
Максимальная длина стежка:
4 мм
Максимальная ширина стежка:
5 мм
Лапки:
для вшивания молнии
Автоматическая вставка нити:
есть
Отсек для аксессуаров:
есть
Инструкция к Швейной Машиной Brother Star 45
Instruction Manual
Bedienungsanleitung
Руководство по эксплуатации
BEDIENUNG IHRER
ПОЛЬЗОВАНИЕ МАШИНОЙ
NÄHMASCHINE
Соединительные штепсели
Kabelanschlüsse
1. Вставьте штепсель ножного контроллера, расположенный
на участке шнура между ножным контроллером и
1. Schließen Sie das Netzkabel an der Maschine an.
штепселем шнура питания, в разъем на швейной машине.
2. Stecken Sie den Netzstecker in eine Netzsteckdose.
2. Вставьте штепсель шнура питания в стенную розетку.
VORSICHT
ПРЕДОСТЕРЕЖЕНИЕ
1. Schalten Sie die Maschine mit dem Netzschalter aus oder ziehen
1. Если Вы оставляете машину без присмотра, выключите
Sie den Netzstecker aus der Steckdose, wenn Sie die Nähmaschine
главный выключатель питания на машине или
nicht benutzen oder unbeaufsichtigt lassen.
отсоедините штепсель шнура питания от розетки.
2 Ziehen Sie den Netzstecker aus der Steckdose, wenn Sie
2. При проведении работ по техническому обслуживанию
KNOWING YOUR SEWING MACHINE
KENNENLERNEN IHRER MASCHINE
Wartungsarbeiten ausführen, Abdeckungen entfernen oder eine
швейной машины, а также при снятии защитных крышек
Glühlampe auswechseln wollen.
или при замене осветительной лампочки отсоедините
3. Nur für USA
КРАТКОЕ ТЕХНИЧЕСКОЕ ОПИСАНИЕ МАШИНЫ
шнур питания машины от стенной розетки.
Dieses Gerät ist mit einem polarisierten Stecker ausgestattet (ein
3. Только для США
Kontakt ist breiter als der andere). Um das Risiko eines elektrischen
Данное изделие оснащено полярным штепселем (один контакт
Schlages zu verringern, kann dieser Stecker nur in eine Richtung
шире другого). В целях снижения риска поражения
in eine polarisierte Steckdose gesteckt werden. Wenn der Stecker
электрическим током такой штепсель можно вставить в
nicht in die Steckdose paßt, drehen Sie den Stecker um. Wenn der
полярную розетку только в одном положении. Если при
Stecker dann immer noch nicht paßt, wenden Sie sich an einen
подсоединении штепсель не полностью вставляется в розетку,
qualifizierten Techniker, der die richtige Steckdose installieren
поверните его.
kann. Verändern Sie auf keinen Fall den Stecker.
Если и после этого штепсель не вставляется в розетку,
необходимо вызвать электрика и заменить розетку.
Запрещается любая самостоятельная модернизация штепселя.
ACHTUNG
• Als Stromquelle darf nur gewöhnlicher Haushaltsstrom
verwendet werden. Das Verwenden andersartiger Stromquellen
ПРЕДУПРЕЖДЕНИЕ
kann Brand, elektrischen Schlag und Beschädigung der
• Подключайте машину только к стандартной бытовой
Maschine zur Folge haben.
электросети. Использование иных источников
• Schalten Sie die Maschine in den folgenden Situationen am
электропитания может привести к возникновению
Netzschalter aus und ziehen Sie den Stecker aus der Steckdose:
пожара, поражению электрическим током или
— Wenn Sie die Maschine unbeaufsichtigt stehen lassen
повреждению машины.
— Wenn Sie die Maschine nicht länger benutzen
• Отключите электропитание и отсоедините шнур
—
Wenn während der Benutzung ein Stromausfall auftritt
питания от розетки в следующих случаях:
— Wenn die Maschine aufgrund eines schlechten oder nicht
— Когда Вы оставляете машину без присмотра
vorhandenen Anschlusses nicht richtig funktioniert
— После окончания работы на машине
— Bei Gewittern
—
При сбое электропитания во время работы машины
— Если машина работает неправильно вследствие
ослабленного подсоединения или отсоединения
от сети питания
VORSICHT
— Во время грозы
• Benutzen Sie diese Maschine nicht mit Verlängerungskabeln
oder Mehrfachsteckdosen, da dies Brandgefahr oder die Gefahr
eines elektrischen Schlags in sich birgt.
• Ziehen Sie den Stecker nicht mit nassen Händen aus der
ПРЕДОСТЕРЕЖЕНИЕ
Steckdose, da dies zu elektrischem Schlag führen kann.
•
Н
е
испол
ьзуйте удлинители или мульти-штепсельные
• Bevor Sie den Stecker aus der Steckdose ziehen, schalten Sie
адаптеры, к которым подключено несколько электроприборов.
den Netzschalter der Maschine aus und ziehen Sie dann den
Это может привести к возникновению пожара или поражению
Stecker aus der Steckdose. Das Ziehen am Netzkabel kann zu
э
лектр
ическим током.
Beschädigungen desselben sowie zu Brand und elektrischem
• Не прикасайтесь к штепселю мокрыми руками. Это
Schlag führen.
может привести к поражению электрическим током.
• Das Netzkabel darf keinesfalls durchtrennt, beschädigt,
•
При отсоединении шнура питания от розетки всегда
verändert, gewaltsam verbogen, gezogen, verdreht oder
предварительно выключайте питание на швейной машине.
aufgerollt werden. Darüber hinaus dürfen keine schweren
При отсоединении шнура питания от розетки всегда
Gegenstände auf das Kabel gestellt werden, oder das Kabel
беритесь за штепсель. Если Вы будете тянуть за сам шнур
hohen Temperaturen ausgesetzt werden, da dies zu
питания, Вы можете повредить его или вызвать пожар
Beschädigungen des Kabels und infolge dessen zu Brand und
или поражение электрическим током.
elektrischem Schlag führen kann. Wenden Sie sich bei
•
Не до
пускайте обрезания, повреждения, модификации и
Beschädigungen des Netzkabels oder –Steckers umgehend an
сгибания шнура питания. Не тяните за шнур, не скручивайте
einen Vertragshändler oder ein autorisiertes
и не заматывайте его в бухту. Не ставьте тяжелые предметы
Kundendienstzentrum in Ihrer Nähe.
на шнур питания. Не подвергайте шнур питания воздействию
• Wenn die Maschine längere Zeit nicht benutzt werden soll,
тепла. Все вышеперечисленные действия могут повредить
ziehen Sie den Stecker aus der Steckdose, da sonst Brandgefahr
шнур питания и вызвать пожар или поражение электрическим
besteht.
током. Если шнур питания или штепсель повреждены, не
пользуйтесь швейной машиной и незамедлительно
обратитесь к Вашему у
полномоченному диле
ру.
• Если Вы не собираетесь пользоваться машиной долгое
время, отсоедините шнур питания. В противном случае
возможно возникновение пожара.
8
КРАТКОЕ ТЕХНИЧЕСКОЕ ОПИСАНИЕ МАШИНЫ
(Model STAR 240E, STAR 230E)
Main Power/Sewing
KENNENLERNEN IHRER MASCHINE
KNOWING YOUR SEWING MACHINE
Light Switch
This switch turns the main power/sewing light on or off.
1 Turn on (toward the “I” mark)
2 Turn off (toward the “O” mark)
1
2
(Model PS-57, PS-55, STAR-50, RSR-55, XRX-55, PS-53)
1
2
Netz- und Nählichtschalter
Главный выключатель питания /
освещения зоны строчки
Dieser Schalter schaltet die Stromversorgung sowie das Nählicht ein und
aus.
Данный выключатель предназначен для включения или
выключения питания и освещения зоны строчки.
1 Einschalten (in Richtung des Symbols “I”)
2 Ausschalten (in Richtung des Symbols “O”)
1 Включено (с символом “I”)
2 Выключено (с символом “O”)
9
Foot Controller
When the foot controller is depressed lightly, the machine will run
at a low speed. When the pressure on the foot controller is
increased, the machine’s speed will increase. When pressure on
the foot controller is released, the machine will stop. Care should be
taken that nothing is placed on the foot controller when the machine
is not in use.
1 Foot controller
CAUTION
Do not allow fabric pieces and dust to collect in the foot
1
controller. Doing so could cause a fire or an electric shock.
KNOWING YOUR SEWING MACHINE
KENNENLERNEN IHRER MASCHINE
(Model STAR 240E, STAR 230E)
КРАТКОЕ ТЕХНИЧЕСКОЕ ОПИСАНИЕ МАШИНЫ
1. With the sewing machine turned off, insert the foot controller
(Model STAR 240E, STAR 230E)
plug into its jack on the sewing machine.
1 Foot controller
2 Foot controller jack
1
* The speed set using the sewing speed controller is the foot
controller’s maximum sewing speed.
* When the foot controller is being used, the Start/Stop button has
no effect on the sewing.
NOTE (For U.S.A. only):
(Model STAR 240E, STAR 230E)
Foot Controller:Model N5V
This foot controller can be used for Model STAR 240E, STAR 230E.
2
(Model PS-57, PS-55, STAR-50, RSR-55, XRX-55, PS-53)
Foot Controller:Model N
This foot controller can be used for Model PS-57, PS-55, STAR-50, RSR-
55, XRX-55, PS-53.
Fußanlasser
Ножной контроллер
Wenn der Fußanlasser leicht gedrückt wird, läuft die Maschine mit geringer
При легком нажатии на педаль контроллера маховик машины начинает
Geschwindigkeit. Wenn der Fußanlasser weiter nach unten gedrückt wird, erhöht
вращаться с малой скоростью. Дальнейшее нажатие на педаль приводит
sich die Nähgeschwindigkeit. Wenn Sie den Fußanlasser loslassen, stoppt die
соответственно к увеличению скорости. После прекращения
Maschine. Achten Sie darauf, daß sich nichts auf dem Fußanlasser befindet, wenn die
воздействия на педаль машина останавливается. Необходимо следить
Maschine nicht in Gebrauch ist.
за тем, чтобы на педаль контроллера не попал какой-либо посторонний
предмет, когда машина не используется.
1 Fußanlasser
1 Ножной контроллер
VORSICHT
Achten Sie darauf, dass sich im Fußanlasser keine Fusseln, Staub und Stoffreste
ПРЕДОСТЕРЕЖЕНИЕ
ansammeln. Dies kann zu Brand und Stomschlag führen.
Не допускайте скопления на ножном контроллере кусочков
ткани и пыли. Это может привести к возникновению пожара
или поражению электрическим током.
(Modell STAR 240E, STAR 230E)
1.
Stecken Sie bei ausgeschalteter Maschine den Stecker des Fußanlasser in die
(Модели STAR 240E, STAR 230E)
entsprechende Anschlußbuchse an der Nähmaschine.
1. Когда машина выключена, вставьте вилку ножного контроллера в
гнездо для подсоединения ножного контроллера, расположенное
1 Fußanlasser
на швейной машине.
2 Buchse für den Fußanlasser
1 Ножной контроллер
* Die Einstellung des Nähgeschwindigkeitsreglers bestimmt die maximale
2 Гнездо для подсоединения ножного контроллера
Nähgeschwindigkeit, die mit dem Fußanlasser erreichbar ist.
* Wenn der Fußanlasser benutzt wird, hat die Taste Start/Stopp keinen Einfluß auf
* Скорость, устанавливаемая с использованием контроллера
das Nähen.
скорости шитья — это максимальная скорость шитья ножным
контроллером.
NOTIZEN (nur für USA):
* Во время использовании ножного контроллера кнопка пуска/
остановки машины не действует.
(Modell STAR 240E, STAR 230E)
Fußanlasser: Modell N5V
ПРИМЕЧАНИЕ (Только для США):
Der Fußanlasser kann führ die Nähmaschinenmodelle STAR 240E, STAR 230E
(Модели STAR 240E, STAR 230E)
benutzt werden.
Ножной контроллер: Модель N5V
(Modell PS-57, PS-55, STAR-50, RSR-55, XRX-55, PS-53)
Данный ножной контроллер предназначен для моделей STAR 240E, STAR 230E.
Fußanlasser: Modell N
(Модели PS-57, PS-55, STAR-50, RSR-55, XRX-55, PS-53)
Der Fußanlasser kann führ die Nähmaschinenmodelle PS-57, PS-55, STAR-50,
Ножной контроллер: Модель N
RSR-55, XRX-55, PS-53 benutzt werden.
Данный ножной контроллер предназначен для моделей PS-57, PS-55, STAR-50,
RSR-55, XRX-55, PS-53.
10
КРАТКОЕ ТЕХНИЧЕСКОЕ ОПИСАНИЕ МАШИНЫ
KENNENLERNEN IHRER MASCHINE
KNOWING YOUR SEWING MACHINE
11
1
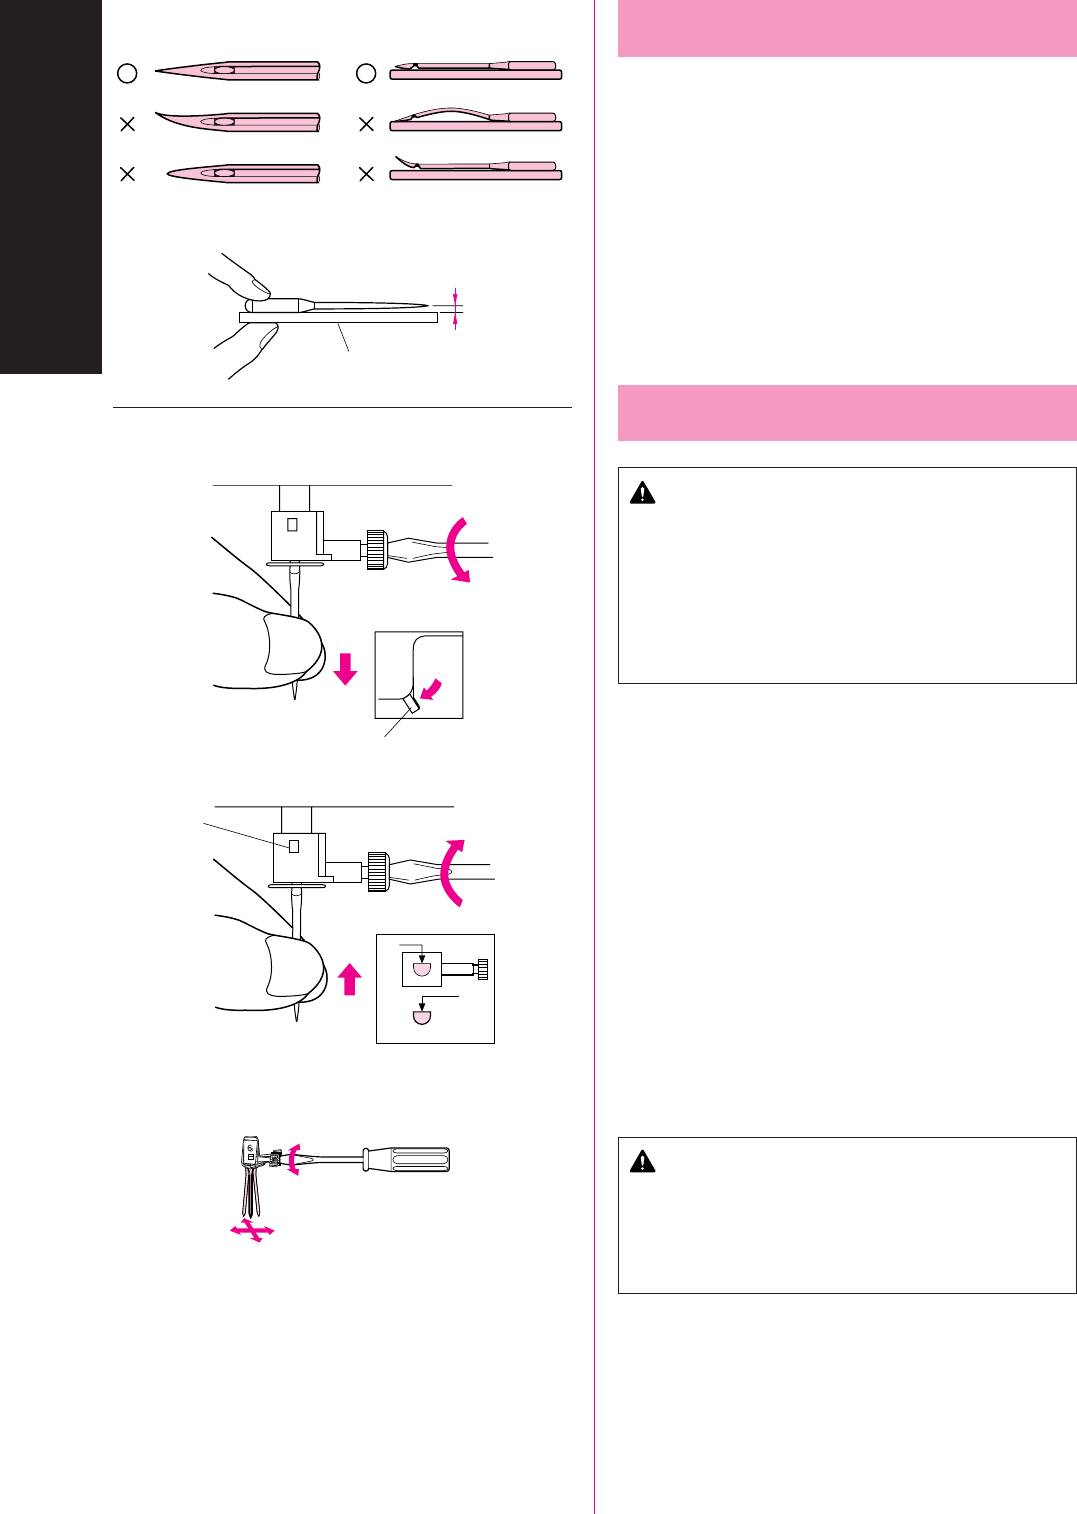
Checking the Needle
The sewing needle must always be straight and sharp for smooth
sewing.
To Check the Needle Correctly:
To check the needle, place the flat side of the needle on a flat
surface. Check the needle from the top and the sides. Throw away
any bent needles.
1 Parallel space
2 Level surface (bobbin cover, glass, etc.)
1
* Place a level surface under the needle.
2
Replacing the Needle
CAUTION
• Turn the main power switch to OFF before changing the
needle. If the main power is left on and Start/Stop button
is pressed or foot controller is stepped on, the machine
will start and injury may result.
• Use only sewing machine needles for home use. Other
needles may bend or break and cause injury.
• Never sew with a bent needle. A bent needle will easily
break and cause injury.
1. Remove the power supply plug from the outlet.
2. Raise the needle bar to its highest position.
3. Lower the presser foot.
4. Remove the needle by loosening the needle clamp screw.
2
1 Presser foot lever
CAUTION
Do not loosen or tighten the needle clamp screw with a strong
force, otherwise it may be damaged.
3
5. With the flat side of the needle facing the back, insert the new
needle all the way to the top of the needle stopper (viewing
4
window) in the needle clamp. Use a screwdriver to securely
tighten the needle clamp screw.
2 Needle stopper
3 Hole for setting needle
4 Flat side of needle
CAUTION
Be sure to push in the needle until it touches the stopper,
and securely tighten the needle clamp screw with a screw-
driver. If the needle is not completely inserted or the needle
clamp screw is loose, the needle may break or the machine
may be damaged.
Nadel prüfen
Проверка иглы
Die Nähnadel muß für problemloses Nähen immer gerade und spitz sein.
Во избежание проблем в процессе шитья швейная игла всегда
должна быть строго прямолинейной и остро заточенной.
Richtiges Überprüfen der Nadel:
Для того, чтобы правильно проверить состояние иглы:
Um die Nadel zu überprüfen, legen Sie sie mit der abgeflachten Seite auf
Для проверки иглы положите ее на ровную поверхность
eine plane Oberfläche. Überprüfen Sie die Nadel von oben und an allen
плоской стороной вниз. Проверьте иглу, осмотрев ее сверху и
Seiten. Verbogene Nadeln müssen entsorgt werden und dürfen keinesfalls
с боков. Выбросьте изогнутые иглы.
verwendet werden.
1 Параллельное расположение
1 Paralleler Abstand
2
Ровная поверхность (крышка шпульки, стекло, и т.д.)
KENNENLERNEN IHRER MASCHINE
2 Plane Oberfäche (Stichplatte, Glas, etc.)
KNOWING YOUR SEWING MACHINE
* Положите иглу на ровную поверхность.
* Legen Sie die Nadel auf eine plane Oberfläche.
КРАТКОЕ ТЕХНИЧЕСКОЕ ОПИСАНИЕ МАШИНЫ
Nadel austauschen
Замена иглы
VORSICHT
ПРЕДОСТЕРЕЖЕНИЕ
• Schalten Sie die Maschine am Netzschalter AUS, bevor Sie die
• Перед заменой иглы установите выключатель
Nadel auswechseln. Wird bei eingeschaltetem Strom
питания в положение ВЫКЛ. Если главный
versehentlich die Start/Stopp-Taste gedrückt, oder das
выключатель питания находится в положении ВКЛ.,
Fußanlasser betätigt beginnt die Maschine zu nähen, und es
то при нажатии кнопки пуска/остановки машины
kann zu Verletzungen kommen.
или при нажатии на ножной контроллер, машина
• Benutzen Sie nur Nadeln des Systems 130/705 H.
включится, и это может привести к травме.
Andere Nadeln können abbrechen und zu Verletzungen führen.
•Для бытового использования рекомендуем
• Verwenden Sie zum Nähen keine verbogenen Nadeln.
применять только швейные иглы для швейных
Verbogene Nadeln können leicht abbrechen und Verletzungen
машин. Использование иных типов игл может
zur Folge haben.
привести к их поломке, изгибам или к получению
травмы.
• Никогда не шейте изогнутой иглой. Изогнутые иглы
1. Ziehen Sie den Netzstecker aus der Steckdose.
легко ломаются, что приводит к травмам.
2. Drehen Sie den Nadelhalter auf die höchste Position.
3. Senken Sie den Nähfuß ab.
1. Отсоедините штепсель шнура питания от розетки.
4. Nehmen Sie die Nadel heraus, nachdem Sie die Nadelschraube gelöst
2. Поднимите игловодитель в крайнее верхнее положение.
haben.
3. Опустите нажимную лапку.
1 Nähfusshebel
4. Снимите иглу, освободив крепежный винт на игловодителе.
VORSICHT
1 Рычаг нажимной лапки
Lösen oder befestigen Sie die Schraube des Nadelhalters nicht mit zu
hoher Kraft. Dies könnte zu Beschädigungen des Nadelhalters der
ПРЕДОСТЕРЕЖЕНИЕ
Nadel oder der Maschine führen.
Не применяйте излишних усилий при отвинчивании или
затягивании крепежного винта на игловодителе во
избежание его повреждений.
5. Stecken Sie die Nadel mit der abgeflachten Seite nach hinten gerichtet
bis zum Nadelanschlag hinein. Ziehen Sie die Schraube mit Hilfe eines
Schraubendrehers fest an.
5. Сориентировав новую иглу плоской стороной назад,
вставьте ее до упора вверх (см. окошко на рисунке).
2 Nadelanschlag
Надежно затяните крепежный винт отверткой.
3 Nadelkanal
4 Abgeflachte Seite der Nadel
2 Игольный упор
3 Отверстие для установки иглы
4 Плоская сторона иглы
VORSICHT
Achten Sie darauf, daß Sie die Nadel bis zum Anschlag eingeführt
und die Nadelklemmschraube fest mit einem Schraubendreher
ПРЕДОСТЕРЕЖЕНИЕ
angezogen haben. Wurde die Nadel nicht richtig eingeführt oder
Обязательно вставьте иглу до упора и затяните
die Schraube nicht fest genug angezogen, kann die Nadel abbrechen
крепежный винт отверткой. Если игла вставлена не
oder die Maschine beschädigt werden.
полностью, или если крепежный винт ослаблен, игла
может сломаться или повредить швейную машину.
12

КРАТКОЕ ТЕХНИЧЕСКОЕ ОПИСАНИЕ МАШИНЫ
Changing the Presser Foot
KENNENLERNEN IHRER MASCHINE
KNOWING YOUR SEWING MACHINE
CAUTION
• Always turn off the power before changing the presser
foot. If the power is on and the Start/Stop button is
pressed or foot controller is stepped on, the machine
will start and may cause injury.
• Always use the correct presser foot for the selected
stitch pattern. If the wrong presser foot is used, the
needle may strike the presser foot and bend or break,
and may cause injury.
• Only use presser feet for this machine. Using other
presser feet may lead to accident or injury.
It may be necessary to change the presser foot according to your
sewing needs.
SNAP-ON TYPE
1. Raise the needle to its highest position by turning the balance
wheel toward you (counter clockwise) and raise the presser foot
lever.
2. Release the foot by raising the lever located at the back of the
holder.
3. Place a different presser foot on the needle plate so that the bar
on the presser foot is in line with the slot on the shank.
4. Lower the presser foot lever and fix the presser foot onto the
shank. If the presser foot is in the correct location, the bar should
snap in.
Nähfuß wechseln
Замена нажимной лапки
VORSICHT
ПРЕДОСТЕРЕЖЕНИЕ
• Schalten Sie die Maschine immer am Netzschalter aus, bevor
• Всегда выключайте питание перед заменой
Sie den Nähfuß auswechseln. Wird bei eingeschaltetem Strom
нажимной лапки. Если главный выключатель
versehentlich die Start/Stopp-Taste gedrückt oder der
питания находится в положении ВКЛ., то при
Fußanlasser betätigt beginnt die Maschine zu nähen, und es
нажатии кнопки пуска/остановки машины или при
kann zu Verletzungen kommen.
нажатии на ножной контроллер, машина включится,
• Benutzen Sie immer den richtigen Nähfuß für das jeweilige
и это может привести к травме.
Stichmuster. Wird der falsche Nähfuß benutzt, kann die Nadel
• Всегда используйте нужный тип нажимной лапки
auf den Nähfuß treffen und sich dadurch verbiegen oder
для выполнения выбранного Вами вида строчки.
abbrechen, so daß es zu Verletzungen kommen kann.
При использовании неправильной нажимной лапки
• Benutzen Sie nur Nähfüße speziell für diese Maschine. Die
игла может ударить нажимную лапку, изогнуться
Verwendung anderer Nähfüße kann Unfälle und Verletzungen
или сломаться, и Вы можете получить травму.
zur Folge haben.
•
Используйте только нажимные лапки,
предназначенные для данной модели швейной машины.
Использование других нажимных лапок может
Es kann nötig sein, den Nähfuß zu wechseln, je nachdem, was Sie nähen
привести к несчастному случаю или получению травмы.
möchten.
В зависимости от характера выполняемой строчки может
SCHNAPPVERSCHLUSS
возникнуть необходимость в замене нажимной лапки.
1. Bringen Sie die Nadel auf die höchste Position, indem Sie das Handrad
auf sich zu bewegen (entgegen dem Uhrzeigersinn). Heben Sie dann
ЛАПКИ С ПРУЖИННОЙ ЗАЩЕЛКОЙ
den Nähfußhebel an.
1. Поднимите иглу в крайнее верхнее положение вращением
2. Lösen Sie den Fuß, indem Sie den Hebel an der Rückseite des
маховика на себя (против часовой стрелки при виде с
Nähfußhalters anheben.
торца) и поднимите рычаг нажимной лапки.
3. Setzen Sie einen anderen Nähfuß auf die Stichplatte, so daß der
2. Освободите лапку подъемом рычага, находящегося в
Querbalken auf dem Nähfuß unter dem Schlitz des Halters sitzt.
задней части механизма держателя лапки.
4. Senken Sie den Nähfußhebel und fixieren Sie den Nähfuß auf den
3. Разместите новую лапку на игольной пластине таким
Nähfußhalter. Wenn der Nähfuß richtig ausgerichtet ist, sollte der
образом, чтобы ось лапки располагалась на одной линии с
Querbalken einrasten.
прорезью на механизме держателя лапки.
4. Опустите рычаг нажимной лапки и зафиксируйте лапку в
держателе. При правильном позиционировании лапки
пружинный фиксатор автоматически защелкнется.
13
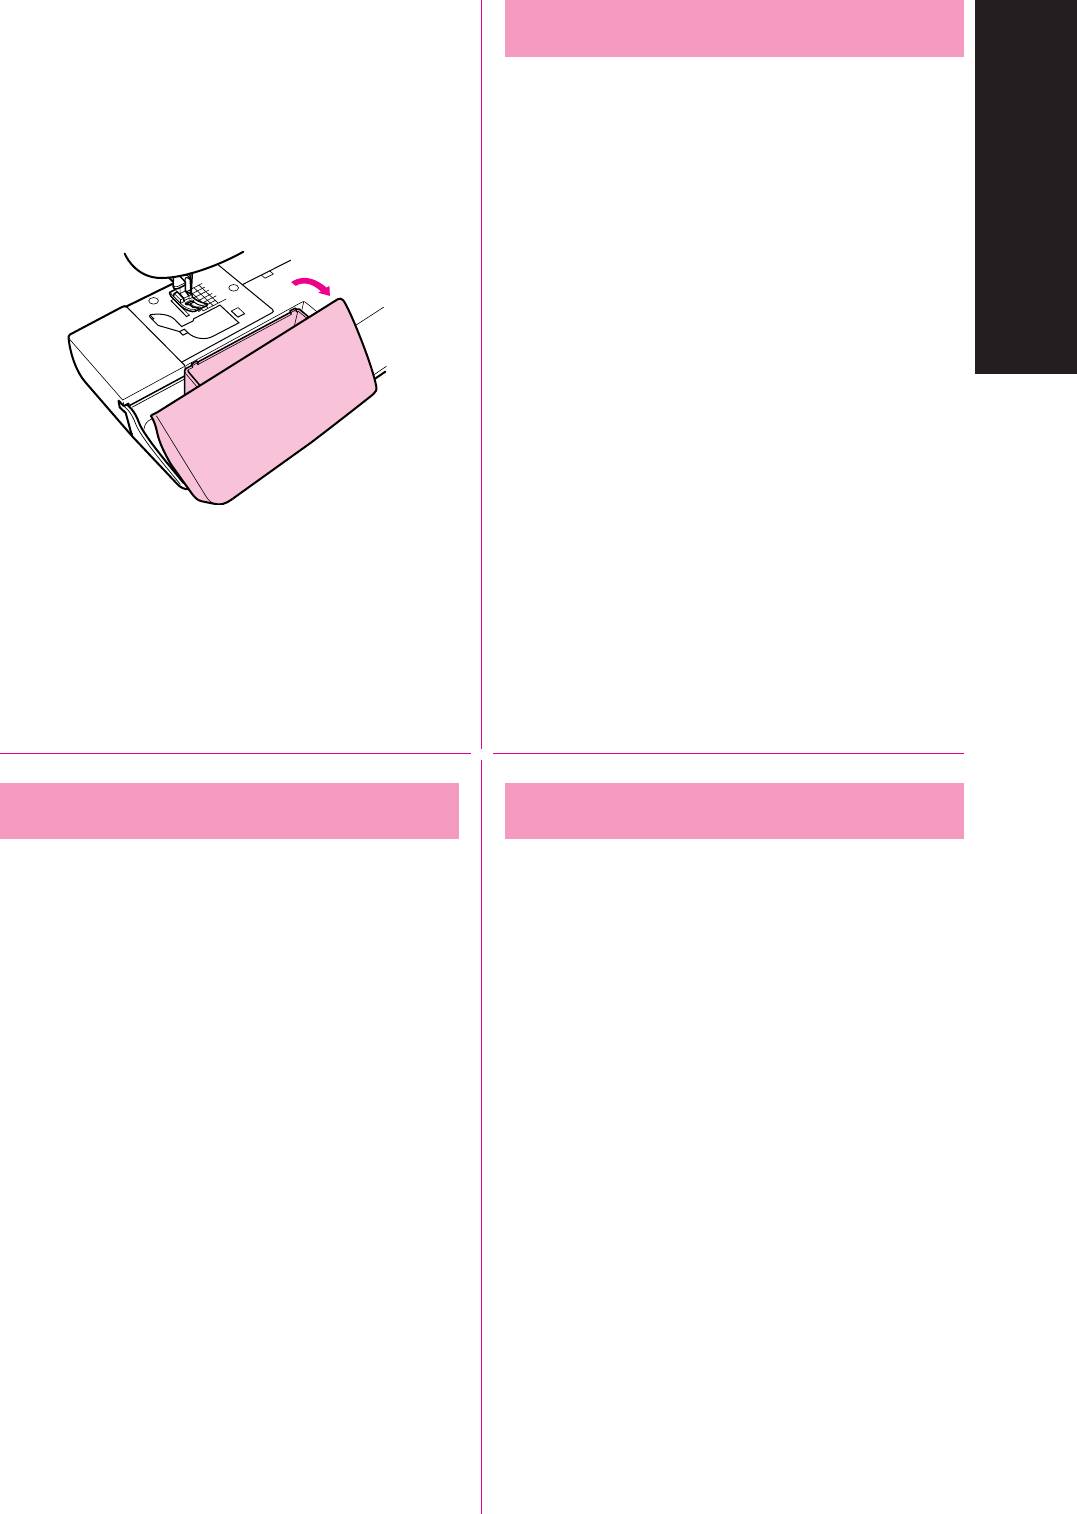
Flat Bed Attachment
The accessories are stored in a compartment under the flat bed
attachment cover, which can be opened by flipping it toward you.
KNOWING YOUR SEWING MACHINE
KENNENLERNEN IHRER MASCHINE
КРАТКОЕ ТЕХНИЧЕСКОЕ ОПИСАНИЕ МАШИНЫ
Anschiebetisch (mit Zubehörfach)
Платформа-приставка
Das Zubehör wird in einem Fach unter der Abdeckung des Anschiebe-
Принадлежности хранятся в специальном отделении,
tisches aufbewahrt. Die Abdeckung kann nach vorne aufgeklappt werden
расположенном под крышкой платформы-приставки,
(siehe Abbildung).
открывающейся на себя.
14
КРАТКОЕ ТЕХНИЧЕСКОЕ ОПИСАНИЕ МАШИНЫ
KENNENLERNEN IHRER MASCHINE
KNOWING YOUR SEWING MACHINE
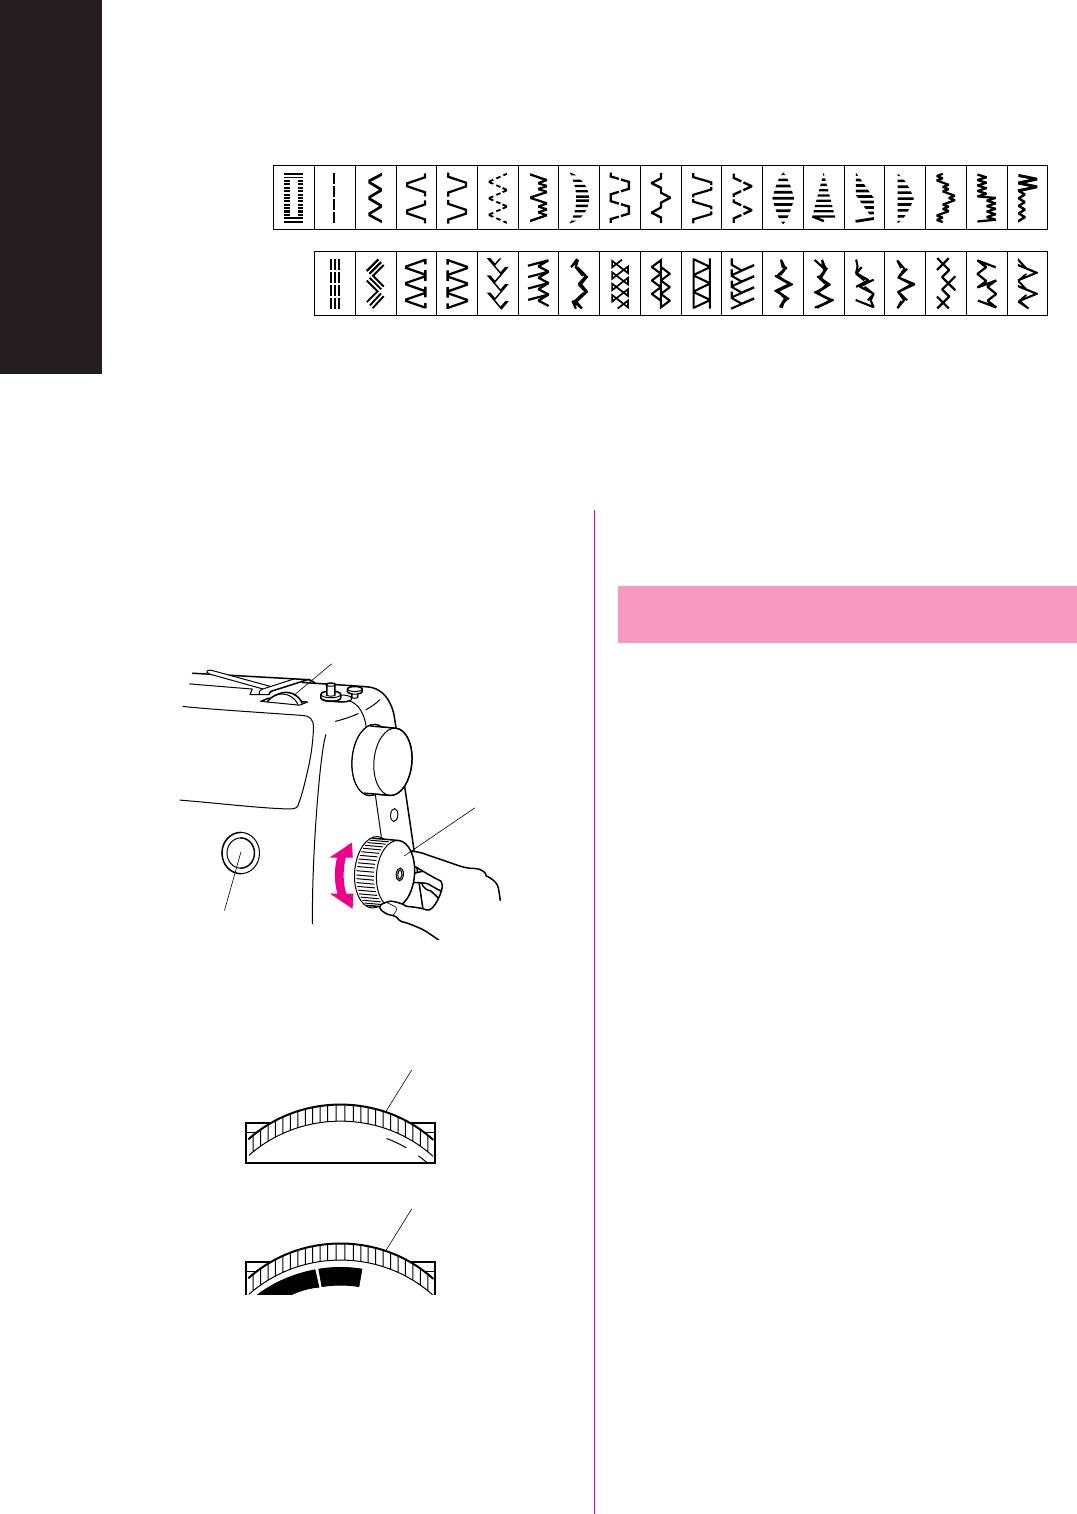
VARIOUS CONTROLS
Pattern Selection Dial
3
CAUTION
When you use the Pattern Selection Dial to select a pattern,
turn the balance wheel to the front (counter-clockwise) by
hand to set the needle in the highest position before selecting
the pattern. If the needle is in the down position when the
Pattern Selection Dial is turned, the needle, presser foot, or
fabric may be damaged.
1
To select a stitch, simply turn the Pattern Selection Dial, located on
the right side of the machine. The Pattern Selection Dial may be
turned in either direction. The following page shows the recom-
mended range of stitch lengths and widths.
2
1 Pattern selection dial
2 Pattern number
The stitches that are available depend on the Stitch Length Dial
setting. If the Stitch Length Dial is set between 0 and 4.5, any of the
3
stitches in the top row can be selected. If the Stitch Length Dial is
set to SS, any of the stitches in the bottom row can be selected.
2
·
3
·
1
3 Stitch length dial
·
F
4
(Model STAR 240E, STAR 230E, PS-57, PS-55, STAR-50,
3
RSR-55, XRX-55)
NOTE:
SS
Since the Pattern Selection Dial is not a continuous dial, it cannot
be turned directly from the last stitch to the first one or from the first
stitch to the last one. To select the first stitch when the last one is
displayed or to select the last stitch when the first one is displayed,
turn the Pattern Selection Dial in the opposite direction until the
desired stitch is displayed.
15
S
TAR 240E
P
12345678910111213141516
17
18
19
S-57
20 21 22 23 24 25 26 27 28 29 30 31 32 33 34
35
36
37
37
KNOWING YOUR SEWING MACHINE
KENNENLERNEN IHRER MASCHINE
КРАТКОЕ ТЕХНИЧЕСКОЕ ОПИСАНИЕ МАШИНЫ
VERSCHIEDENE REGLER
ОРГАНЫ НАСТРОЙКИ
Stichmuster-Einstellrad
Ручка выбора типа стежка
VORSICHT
ПРЕДОСТЕРЕЖЕНИЕ
Wenn Sie das Stichmuster-Einstellrad verwenden, um ein Muster zu
Когда Вы используете ручку выбора типа стежка для
wählen, drehen Sie das Handrad mit der Hand nach vorne (gegen den
выбора требуемого рисунка шва, рукой поверните маховик
Uhrzeigersinn), um die Nadel in die höchste Position zu bringen,
на себя (против часовой стрелки) для того, чтобы поднять
bevor Sie das Muster wählen. Wenn die Nadel in abgesenkter Position
иглу в крайнее верхнее положение. Выбирайте тип стежка
ist, wenn das Stichmuster-Einstellrad gedreht wird, können die Nadel,
только после выполнения данной операции. Если при
der Nähfuß oder der Stoff beschädigt werden.
повороте ручки выбора типа стежка игла опущена, то Вы
можете повредить иглу, нажимную лапку или ткань.
Für die Auswahl eines Stichs drehen Sie einfach das Stichmuster-
Einstellrad, das sich auf der rechten Seite der Maschine befindet. Die
Для выбора требуемого рисунка шва поверните ручку выбора
Stichmuster-Einstellung kann in jeder Richtung gedreht werden. Im
типа стежка, расположенную в правой части машины. Ручку
Folgenden werden die empfohlenen Stichlängen und -breiten jedes
можно поворачивать в любом направлении. На следующей
Stichmusters gezeigt.
странице приводятся рекомендуемые значения длины и
ширины стежка.
1 Stichmuster-Einstellrad
2 Nummer des Stichmusters
1 Ручка выбора типа стежка
2 Номер стежка
Die Anzahl der verfügbaren Stichmuster hängt von der Einstellung der
Имеющиеся типы стежка определяются установками ручки
Stichlänge ab. Wenn das Stichlängen-Einstellrad zwischen 0 und 4,5
регулирования длины стежка. Если ручка регулирования
eingestellt ist, können die Stiche der oberen Reihe gewählt werden. Wenn
длины стежка установлена в пределах от 0 до 4,5, то Вы
das Stichlängen-Einstellrad auf SS eingestellt ist, können die Stiche der
сможете выбрать любой тип стежка верхнего ряда. Если
unteren Reihe gewählt werden.
ручка регулирования длины стежка установлена на SS, то Вы
сможете выбрать любой тип стежка нижнего ряда.
3
Stichlängen-
Einstellrad
3 Ручка регулирования длины стежка
(Modell STAR 240E, STAR 230E, PS-57, PS-55, STAR-50, RSR-55,
XRX-55)
(Модели STAR 240E, STAR 230E, PS-57, PS-55, STAR-50,
RSR-55, XRX-55)
NOTIZEN:
Das Stichmuster-Einstellrad kann nicht über den letzten Stich hinaus auf
ПРИМЕЧАНИЕ:
den ersten Stich (oder umgekehrt) gedreht werden. Drehen Sie das
Так как ручка выбора типа стежка имеет ограничения по
Stichmuster-Einstellrad in diesem Fall ganz in die entgegengesetzte
круговому вращению, Вы не сможете поворотом на одно
Richtung, bis der gewünschte Stich angezeigt wird.
деление повернуть ее с последнего типа стежка на первый
или с первого на последний. Для переключения на первый тип
стежка с последнего или на последний тип стежка с первого,
последовательно поворачивайте ручку выбора типа стежка в
противоположном направлении, пока не будет установлен
нужный Вам тип стежка.
16
S
TAR 230E
P
1234567891011121314
S-55
15 16 17 18 19 20 21 22 23 24 25 26 27
P
1
23
45678
S-53
9101112131415
КРАТКОЕ ТЕХНИЧЕСКОЕ ОПИСАНИЕ МАШИНЫ
RECOMMENDED WIDTHS AND LENGTHS FOR STITCHES
KENNENLERNEN IHRER MASCHINE
KNOWING YOUR SEWING MACHINE
(Model STAR 240E, PS-57)
RECOMMENDED WIDTH
RECOMMENDED INSTRUCTION
PATTERN
STITCH NAME
[mm(inch)]
LENGTH [mm(inch)]
MANUAL PAGE
1-STEP AUTOMATIC 3-5 (Dial 4-7) F-1.5
63
BUTTONHOLE (1/8-3/16) (1/64-1/16)
6.5 1-4.5
STRAIGHT STITCH
50, 73, 75
(1/4) (1/16-3/16)
0-6.5 F-4.5
ZIGZAG STITCH
53, 72, 76, 77
(0-1/4) (1/64-3/16)
3-6.5 F-2
BLIND HEM STITCH
54
(1/8-1/4) (1/64-1/16)
3-6.5 F-3
SHELL TUCK STITCH
55
(1/8-1/4) (1/64-1/8)
3-6.5 F-2.5
ELASTIC STITCH
56
(1/8-1/4) (1/64-3/32)
3-6.5 F-1.5
STRETCH BLIND HEM STITCH
54
(1/8-1/4) (1/64-1/16)
3-6.5 F-1.5
SCALLOP STITCH
58
(1/8-1/4) (1/64-1/16)
DOUBLE ACTION STITCH
3-6.5 F-3
BRIDGING STITCH 57
(1/8-1/4) (1/64-1/8)
RAMPART STITCH
3-6.5 F-3
ELASTIC SHELL TUCK STITCH
61
(1/8-1/4) (1/64-1/8)
BEAD STITCH
ARROWHEAD STITCH 3-6.5 F-1
59
PARALLELOGRAM STITCH (1/8-1/4) (1/64-1/16)
TRIANGLE STITCH
LIGHTNING STITCH
6.5 F-1
SQUARE STITCH 59
(1/4) (1/64-1/16)
DECORATIVE STITCH
6.5
SS
Fixed
TRIPLE STRETCH STITCH
50
(1/4) 2.5 (3/32)
TRIPLE ZIGZAG STRETCH 3-6.5
SS
Fixed
62
STITCH (1/8-1/4) 2.5 (3/32)
3-6.5
SS
Fixed
ELASTIC OVERLOCK STITCH
61
(1/8-1/4) 2.5 (3/32)
3-6.5
SS
Fixed
ELASTIC OVERLOCK STITCH
61
(1/8-1/4) 2.5 (3/32)
3-6.5
SS
Fixed
FEATHER STITCH
62
(1/8-1/4) 2.5 (3/32)
3-6.5
SS
Fixed
COMB STITCH
61
(1/8-1/4) 2.5 (3/32)
6.5
SS
Fixed
DECORATIVE STITCH
59
(1/4) 2.5 (3/32)
3-6.5
SS
Fixed
FAGOTING STITCH
60
(1/8-1/4) 2.5 (3/32)
3-6.5
SS
Fixed
DECORATIVE STITCH
59
(1/8-1/4) 2.5 (3/32)
3-6.5
SS
Fixed
DECORATIVE HEM STITCH
57
(1/8-1/4) 2.5 (3/32)
6.5
SS
Fixed
DECORATIVE STITCH
59
(1/4) 2.5 (3/32)
3-6.5
SS
Fixed
LINK STITCH
60
(1/8-1/4) 2.5 (3/32)
17
RECOMMENDED WIDTHS AND LENGTHS FOR STITCHES
(Model STAR 230E, PS-55, STAR-50, RSR-55, XRX-55)
RECOMMENDED WIDTH
RECOMMENDED INSTRUCTION
PATTERN
STITCH NAME
[mm(inch)]
LENGTH [mm(inch)]
MANUAL PAGE
1-STEP AUTOMATIC 3-5 (Dial 4-7) F-1.5
63
BUTTONHOLE (1/8-3/16) (1/64-1/16)
6.5 1-4.5
STRAIGHT STITCH
50, 73, 75
(1/4) (1/16-3/16)
0-6.5 F-4.5
ZIGZAG STITCH
53, 72, 76, 77
(0-1/4) (1/64-3/16)
3-6.5 F-2
BLIND HEM STITCH
54
(1/8-1/4) (1/64-1/16)
KNOWING YOUR SEWING MACHINE
KENNENLERNEN IHRER MASCHINE
3-6.5 F-3
SHELL TUCK STITCH
55
(1/8-1/4) (1/64-1/8)
КРАТКОЕ ТЕХНИЧЕСКОЕ ОПИСАНИЕ МАШИНЫ
3-6.5 F-2.5
ELASTIC STITCH
56
(1/8-1/4) (1/64-3/32)
3-6.5 F-1.5
STRETCH BLIND HEM STITCH
54
(1/8-1/4) (1/64-1/16)
3-6.5 F-1.5
SCALLOP STITCH
58
(1/8-1/4) (1/64-1/16)
DOUBLE ACTION STITCH
3-6.5 F-3
BRIDING STITCH 57
(1/8-1/4) (1/64-1/8)
RAMPART STITCH
3-6.5 F-3
ELASTIC SHELL TUCK STITCH
61
(1/8-1/4) (1/64-1/8)
BEAD STITCH 3-6.5 F-1
59
ARROWHEAD STITCH (1/8-1/4) (1/64-1/16)
6.5
SS
Fixed
TRIPLE STRETCH STITCH
50
(1/4) 2.5 (3/32)
TRIPLE ZIGZAG STRETCH 3-6.5
SS
Fixed
62
STITCH (1/8-1/4) 2.5 (3/32)
3-6.5
SS
Fixed
ELASTIC OVERLOCK STITCH
61
(1/8-1/4) 2.5 (3/32)
3-6.5
SS
Fixed
ELASTIC OVERLOCK STITCH
61
(1/8-1/4) 2.5 (3/32)
3-6.5
SS
Fixed
FEATHER STITCH
62
(1/8-1/4) 2.5 (3/32)
3-6.5
SS
Fixed
COMB STITCH
61
(1/8-1/4) 2.5 (3/32)
6.5
SS
Fixed
DECORATIVE STITCH
59
(1/4) 2.5 (3/32)
3-6.5
SS
Fixed
FAGOTING STITCH
60
(1/8-1/4) 2.5 (3/32)
3-6.5
SS
Fixed
DECORATIVE STITCH
59
(1/8-1/4) 2.5 (3/32)
3-6.5
SS
Fixed
DECORATIVE HEM STITCH
57
(1/8-1/4) 2.5 (3/32)
6.5
SS
Fixed
DECORATIVE STITCH
59
(1/4) 2.5 (3/32)
18
«IMPORTANT SAFETY INSTRUCTIONS»
When using this machine, basic safety precautions should always be taken ,
including the following:
«Read all instructions before using.»
DANGER – To reduce the risk of electric shock:
1. The machine should never be left unattended when plugged in. Always unplug this machine from the electrical outlet
immediately after using and before cleaning.
2. Always unplug before changing the light bulb.
Replace bulb with same type rated 12 volts 5 watts (for Model STAR 240E, STAR 230E).
Replace bulb with same type rated 15 watts (for Model PS-57, PS-55, STAR-50, RSR-55, XRX-55, PS-53).
WARNING – To reduce the risk of burns, fire, electric shock, or injury to persons:
1. Do not allow this machine to be used as a toy. Close attention is necessary when the machine is used by or near children.
2. Use this machine only for its intended use as described in this manual. Use only accessories recommended by the
manufacturer as contained in this manual.
3. Never operate this machine if it has a damaged cord or plug, if it is not working properly, if it has been dropped or damaged,
or dropped into water. Return the machine to the nearest authorized dealer or service center for examination, repair,
electrical or mechanical adjustment.
4. Never operate the machine with any air openings blocked. Keep ventilation openings of the machine and foot control free
from the accumulation of lint, dust, and loose cloth.
5. Never drop or insert any object into any opening.
6. Do not use outdoors.
7. Do not operate where aerosol (spray) products are being used or where oxygen is being administered.
8. To disconnect, turn the main switch to the symbol “O” position which represents off, then remove plug from outlet.
9. Do not unplug by pulling on cord. To unplug, grasp the plug, not the cord.
10.Keep fingers away from all moving parts. Special care is required around the machine needle.
11.Always use the proper needle plate. The wrong plate can cause the needle to break.
12.Do not use bent needles.
13.Do not pull or push fabric while stitching. It may deflect the needle causing it to break.
14.Switch the machine to the symbol “O” position when making any adjustments in the needle area, such as threading needle,
changing needle, threading bobbin, or changing the presser foot, and the like.
15.Always unplug the machine from the electrical outlet when removing covers, lubricating, or when making any of the user
service adjustments mentioned in the instruction manual.
16.The machine is not intended for use by young children or infirm persons without supervision.
17.Young children should be supervised to ensure that do not play with this machine.
«SAVE THESE INSTRUCTIONS»
«This machine is intended for household use.»
Оглавление
Аннотации для Швейной Машиной Brother Star 45 в формате PDF
Топ 10 инструкций
Другие инструкции
Швейная машина Brother STAR 45 — инструкция пользователя по применению, эксплуатации и установке на русском языке. Мы надеемся, она поможет вам решить возникшие у вас вопросы при эксплуатации техники.
Вы можете скачать инструкцию к Brother STAR 45 по ссылке ниже, если не хотите ждать загрузки. Если остались вопросы, задайте их в комментариях после инструкции.
«Загружаем инструкцию», означает, что нужно подождать пока файл загрузится и можно будет его читать онлайн. Некоторые инструкции очень большие и время их появления зависит от вашей скорости интернета.
Полезные видео
Характеристики
Остались вопросы?
Не нашли свой ответ в руководстве или возникли другие проблемы? Задайте свой вопрос в форме ниже с подробным описанием вашей ситуации, чтобы другие люди и специалисты смогли дать на него ответ. Если вы знаете как решить проблему другого человека, пожалуйста, подскажите ему


Часто задаваемые вопросы

Как посмотреть инструкцию к Brother STAR 45?
Необходимо подождать полной загрузки инструкции в сером окне на данной странице или скачать кликнув по специальной кнопке.
Руководство на русском языке?
Все наши руководства представлены на русском языке или схематично, поэтому вы без труда сможете разобраться с вашей моделью
Как можно распечатать инструкцию?
Скачайте ее по специальной кнопке над формой чтения на ваше устройства и отправьте на печать.
Instruction Manual Bedienungsanleitung Руководство по эксплуатации
Kabelanschlüsse 1. Schließen Sie das Netzkabel an der Maschine an. 2. Stecken Sie den Netzstecker in eine Netzsteckdose. VORSICHT 1. Schalten Sie die Maschine mit dem Netzschalter aus oder ziehen Sie den Netzstecker aus der Steckdose, wenn Sie die Nähmaschine nicht benutzen oder unbeaufsichtigt
KNOWING YOUR SEWING MACHINE KENNENLERNEN IHRER MASCHINE КРАТКОЕ ТЕХНИЧЕСКОЕ ОПИСАНИЕ МАШИНЫ (Model STAR 240E, STAR 230E) Main Power/Sewing Light Switch This switch turns the main power/sewing light on or off. 1 Turn on (toward the “I” mark) 2 Turn off (toward the “O” mark) 1 2 (Model PS-57, PS-55,
When the foot controller is depressed lightly, the machine will run at a low speed. When the pressure on the foot controller is increased, the machine’s speed will increase. When pressure on the foot controller is released, the machine will stop. Care should be taken that nothing is placed on the
KNOWING YOUR SEWING MACHINE KENNENLERNEN IHRER MASCHINE КРАТКОЕ ТЕХНИЧЕСКОЕ ОПИСАНИЕ МАШИНЫ Checking the Needle The sewing needle must always be straight and sharp for smooth sewing. To Check the Needle Correctly: To check the needle, place the flat side of the needle on a flat surface. Check the
Проверка иглы Die Nähnadel muß für problemloses Nähen immer gerade und spitz sein. Во избежание проблем в процессе шитья швейная игла всегда должна быть строго прямолинейной и остро заточенной. Richtiges Überprüfen der Nadel: Um die Nadel zu überprüfen, legen Sie sie mit der abgeflachten Seite auf
KNOWING YOUR SEWING MACHINE KENNENLERNEN IHRER MASCHINE КРАТКОЕ ТЕХНИЧЕСКОЕ ОПИСАНИЕ МАШИНЫ Changing the Presser Foot CAUTION • • • Always turn off the power before changing the presser foot. If the power is on and the Start/Stop button is pressed or foot controller is stepped on, the machine will
The accessories are stored in a compartment under the flat bed attachment cover, which can be opened by flipping it toward you. Anschiebetisch (mit Zubehörfach) Платформа-приставка Das Zubehör wird in einem Fach unter der Abdeckung des Anschiebetisches aufbewahrt. Die Abdeckung kann nach vorne
KNOWING YOUR SEWING MACHINE KENNENLERNEN IHRER MASCHINE КРАТКОЕ ТЕХНИЧЕСКОЕ ОПИСАНИЕ МАШИНЫ 1 2 3 4 5 6 7 8 9 10 11 12 13 14 15 16 17 18 19 STAR 240E PS-57 20 21 22 23 24 25 26 27 28 29 30 31 32 33 34 35 36 37 VARIOUS CONTROLS Pattern Selection Dial 3 1 CAUTION When you use the Pattern Selection
2 3 4 5 6 7 8 9 KNOWING YOUR SEWING MACHINE KENNENLERNEN IHRER MASCHINE КРАТКОЕ ТЕХНИЧЕСКОЕ ОПИСАНИЕ МАШИНЫ 1 10 11 12 13 14 STAR 230E PS-55 15 16 17 18 19 20 21 22 23 24 25 26 27 1 2 3 4 5 6 7 8 9 10 11 12 13 14 15 PS-53 VERSCHIEDENE REGLER ОРГАНЫ НАСТРОЙКИ Stichmuster-Einstellrad Ручка выбора
KNOWING YOUR SEWING MACHINE KENNENLERNEN IHRER MASCHINE КРАТКОЕ ТЕХНИЧЕСКОЕ ОПИСАНИЕ МАШИНЫ RECOMMENDED WIDTHS AND LENGTHS FOR STITCHES (Model STAR 240E, PS-57) PATTERN RECOMMENDED WIDTH [mm(inch)] RECOMMENDED LENGTH [mm(inch)] 3-5 (Dial 4-7) (1/8-3/16) 6.5 (1/4) 0-6.5 (0-1/4) F-1.5 (1/64-1/16)
KNOWING YOUR SEWING MACHINE KENNENLERNEN IHRER MASCHINE КРАТКОЕ ТЕХНИЧЕСКОЕ ОПИСАНИЕ МАШИНЫ RECOMMENDED WIDTHS AND LENGTHS FOR STITCHES (Model STAR 230E, PS-55, STAR-50, RSR-55, XRX-55) PATTERN RECOMMENDED WIDTH [mm(inch)] RECOMMENDED LENGTH [mm(inch)] 3-5 (Dial 4-7) (1/8-3/16) 6.5 (1/4) 0-6.5
«IMPORTANT SAFETY INSTRUCTIONS» When using this machine, basic safety precautions should always be taken , including the following: «Read all instructions before using.» DANGER – To reduce the risk of electric shock: 1. The machine should never be left unattended when plugged in. Always unplug this
ANSCHLIESSEN AN DAS STROMNETZ ACHTUNG • • Als Stromquelle darf nur gewöhnlicher Haushaltsstrom verwendet werden. Das Verwenden andersartiger Stromquellen kann Brand, elektrischen Schlag und Beschädigungen der Maschine zur Folge haben. Schalten Sie die Maschine in den folgenden Situationen am
«УКАЗАНИЯ ПО ТЕХНИКЕ БЕЗОПАСНОСТИ» При пользовании швейной машиной всегда необходимо соблюдать рекомендации по технике безопасности, включающие следующие положения: “Перед началом работы на машине внимательно изучите настоящее руководство.” ВНИМАНИЕ – Для того, чтобы уменьшить риск поражения
FOR USERS IN UK, EIRE, MALTA AND CYPRUS ONLY. If this machine is fitted with a 3 pin non-rewireable BS plug then please read the following. IMPORTANT (in the United Kingdom) Main supply (AC 230/240V~, 50Hz) DO NOT cut off the main plug from equipment. If the plug fitted is not suitable for the
(Model PS-57, PS-55, STAR-50, RSR-55, XRX-55, PS-53) 1 2 1. Connect the power cord or three-prong plug into the machine. 2. Connect the electrical supply plug into a wall outlet. — When leaving the machine unattended, the main switch of the machine should be switched off or the plug must be removed
PLEASE READ BEFORE USING THIS MACHINE For safe operation 1. Be sure to keep your eye on the needle while sewing. Do not touch the balance wheel, thread take-up, needle, or other moving parts. 2. Remember to turn off the power switch and unplug the cord when: • Operation is completed • Replacing or
BITTE VOR BENUTZUNG DIESER MASCHINE LESEN Für sicheren Betrieb: 1. Behalten Sie während des Nähens immer die Nadel im Auge. Handrad, Fadenhebel, Nadel und andere bewegliche Teile dürfen nicht berührt werden. 2. Denken Sie daran, den Netzschalter auszuschalten und den Stecker aus der Steckdose zu
ПОЖАЛУЙСТА, ПРОЧИТАЙТЕ ПЕРЕД НАЧАЛОМ ЭКСПЛУАТАЦИИ МАШИНЫ В целях безопасности 1. Всегда следите за иглой во время шитья. Не прикасайтесь к маховику, механизму подтягивания нитки, игле или иным движущимся деталям машины. 2. Помните о необходимости выключить выключатель питания и отсоединить шнур
TABLE OF CONTENTS KNOWING YOUR SEWING MACHINE PRINCIPAL PARTS ………………………………………………… 1 ACCESSORIES ……………………………………………………… 5 Optional Accessories ………………………………………. 5 OPERATING YOUR SEWING MACHINE
INHALT KENNENLERNEN IHRER MASCHINE KNOPFLÖCHER UND KNÖPFE NÄHEN HAUPTBESTANDTEILE ……………………………………………….. 2 ZUBEHÖR …………………………………………………………………….. 6 Optionales Zubehör
ОГЛАВЛЕНИЕ КРАТКОЕ ТЕХНИЧЕСКОЕ ОПИСАНИЕ МАШИНЫ ОСНОВНЫЕ ЧАСТИ МАШИНЫ ……………………………… 2 ПРИНАДЛЕЖНОСТИ …………………………………………….. 6 Дополнительные принадлежности ………………… 6 ПОЛЬЗОВАНИЕ МАШИНОЙ ………………………………….. 8
KNOWING YOUR SEWING MACHINE KENNENLERNEN IHRER MASCHINE КРАТКОЕ ТЕХНИЧЕСКОЕ ОПИСАНИЕ МАШИНЫ 5 4 3 2 PRINCIPAL PARTS 1 (Model STAR 240E, STAR 230E) 1 BOBBIN WINDER (Page 33) Winds the thread onto the bobbin to be used for the lower thread. 2 STITCH LENGTH DIAL (Page 15, 26) Controls the length of
ОСНОВНЫЕ ЧАСТИ МАШИНЫ (Modell STAR 240E, STAR 230E) (Модели STAR 240E, STAR 230E) 1 SPULER (Seite 34) Spult den Faden auf die Unterfadenspule. 2 STICHLÄNGEN-EINSTELLRAD (Seite 16, 27) Stellt die Stichlänge ein. 3 GARNROLLENSTIFT UND -HALTER (Seite 34, 40) 4 STICHBREITEN-EINSTELLRAD (Seite 28)
KNOWING YOUR SEWING MACHINE KENNENLERNEN IHRER MASCHINE КРАТКОЕ ТЕХНИЧЕСКОЕ ОПИСАНИЕ МАШИНЫ 5 4 3 2 1 PRINCIPAL PARTS (Model PS-57, PS-55, STAR-50, RSR-55, XRX-55, PS-53) 1 BOBBIN WINDER (Page 33) Winds the thread onto the bobbin to be used for the lower thread. 2 STITCH LENGTH DIAL (Page 15, 26)
ОСНОВНЫЕ ЧАСТИ МАШИНЫ (Модели PS-57, PS-55, STAR-50, RSR-55, XRX-55, PS-53) 1 SPULER (Seite 34) Spult den Faden auf die Unterfadenspule. 2 STICHLÄNGEN-EINSTELLRAD (Seite 16, 27) Stellt die Stichlänge ein. 3 GARNROLLENSTIFT UND -HALTER (Seite 34, 40) 4 STICHBREITEN-EINSTELLRAD (Seite 28) Regelt die
KNOWING YOUR SEWING MACHINE KENNENLERNEN IHRER MASCHINE КРАТКОЕ ТЕХНИЧЕСКОЕ ОПИСАНИЕ МАШИНЫ 1 X59370-051 3 X57117-051 2 SA156 XA5539-051 4 X57521-001 5 XA4911-151 (STAR 240E, STAR 230E PS-57, PS-55, STAR-50, RSR-55, XRX-55) X59369-251 (PS-53) ACCESSORIES 1 Zipper Foot (1 pc.) 2 Bobbin (3 pcs.)
ПРИНАДЛЕЖНОСТИ 1 Reißverschlußfuß (1 St.) 2 Spule (3 St.) SA156 (für die USA) XA5539-051 (andere Länder) Ersatzteile (10-teiliges Set) 3 Nadel-Set (Normale Einfach-Nadel Nr. 14) (3 St.) 4 Doppelnadel (1 St.) 5 Knopflochfuß (1 St.) 6 Garnrollenkappe (Groß) (1 St.) 7 Garnrollenkappe (Klein) (1 St.) 8
KNOWING YOUR SEWING MACHINE KENNENLERNEN IHRER MASCHINE КРАТКОЕ ТЕХНИЧЕСКОЕ ОПИСАНИЕ МАШИНЫ OPERATING YOUR SEWING MACHINE (Model STAR 240E, STAR 230E) Connecting Plugs 1. Connect the power cord plug into the machine. 2. Connect the power supply plug into a wall outlet. (Model PS-57, PS-55, STAR-50,
KNOWING YOUR SEWING MACHINE KENNENLERNEN IHRER MASCHINE КРАТКОЕ ТЕХНИЧЕСКОЕ ОПИСАНИЕ МАШИНЫ RECOMMENDED WIDTHS AND LENGTHS FOR STITCHES (Model PS-53) PATTERN RECOMMENDED WIDTH mm (inch) RECOMMENDED LENGTH mm (inch) ZIGZAG STITCH 3-5 (Dial 4-7) (1/8-3/16) 6.5 (1/4) 0-6.5 (0-1/4) F-1.5 (1/64-1/16)
KNOWING YOUR SEWING MACHINE KENNENLERNEN IHRER MASCHINE КРАТКОЕ ТЕХНИЧЕСКОЕ ОПИСАНИЕ МАШИНЫ EMPFOHLENE STICHLÄNGEN UND STICHBREITEN (Modell STAR 240E, PS-57) STICHMUSTER VOREINGESTELLTE BREITE [mm (Zoll)] EMPFOHLENE LÄNGE [mm (Zoll)] 3-5 (Drehschalter 4-7) (1/8-3/16) 6,5 (1/4) 0-6,5 (0-1/4) F-1,5
KNOWING YOUR SEWING MACHINE KENNENLERNEN IHRER MASCHINE КРАТКОЕ ТЕХНИЧЕСКОЕ ОПИСАНИЕ МАШИНЫ EMPFOHLENE STICHLÄNGEN UND STICHBREITEN (Modell STAR 230E, PS-55, STAR-50, RSR-55, XRX-55) STICHMUSTER VOREINGESTELLTE BREITE [mm (Zoll)] EMPFOHLENE LÄNGE [mm (Zoll)] 3-5 (Drehschalter 4-7) (1/8-3/16) 6,5
KNOWING YOUR SEWING MACHINE KENNENLERNEN IHRER MASCHINE КРАТКОЕ ТЕХНИЧЕСКОЕ ОПИСАНИЕ МАШИНЫ EMPFOHLENE STICHLÄNGEN UND STICHBREITEN (Modell PS-53) STICHMUSTER VOREINGESTELLTE BREITE [mm (Zoll)] EMPFOHLENE LÄNGE [mm (Zoll)] ZICKZACKSTICH 3-5 (Drehschalter 4-7) (1/8-3/16) 6,5 (1/4) 0-6,5 (0-1/4)
KNOWING YOUR SEWING MACHINE KENNENLERNEN IHRER MASCHINE КРАТКОЕ ТЕХНИЧЕСКОЕ ОПИСАНИЕ МАШИНЫ РЕКОМЕНДУЕМАЯ ДЛИНА СТЕЖКА (Модели STAR 240E, PS-57) СТРОЧКА 23 НАИМЕНОВАНИЕ СТЕЖКА ЗАДАННАЯ ШИРИНА [мм(дюймы)] РЕКОМЕНДУЕМАЯ ДЛИНА [ мм(дюймы)] НОМЕР СТРАНИЦЫ РУКОВОДСТВА 1-СТУПЕНЧАТОЕ АВТОМАТИЧЕСКОЕ 3-5
(Модели STAR 230E, PS-55, STAR-50, RSR-55, XRX-55) СТРОЧКА НАИМЕНОВАНИЕ СТЕЖКА ЗАДАННАЯ ШИРИНА [мм(дюймы)] 1-СТУПЕНЧАТОЕ АВТОМАТИЧЕСКОЕ 3-5 (Отметки на ручке 4-7) ОБМЕТЫВАНИЕ ПЕТЛИ (1/8-3/16) 6,5 ПРЯМОЙ СТЕЖОК (1/4) ЗИГЗАГООБРАЗНЫЙ 0-6,5 СТЕЖОК (0-1/4) ПОТАЙНОЙ ПОДРУБОЧНЫЙ ШОВ РЕКОМЕНДУЕМАЯ ДЛИНА [
KNOWING YOUR SEWING MACHINE KENNENLERNEN IHRER MASCHINE КРАТКОЕ ТЕХНИЧЕСКОЕ ОПИСАНИЕ МАШИНЫ РЕКОМЕНДУЕМАЯ ДЛИНА СТЕЖКА (Модели PS-53) СТРОЧКА НАИМЕНОВАНИЕ СТЕЖКА ЗАДАННАЯ ШИРИНА [мм(дюймы)] 4-СТУПЕНЧАТОЕ АВТОМАТИЧЕСКОЕ 3-5 (Отметки на ручке 4-7) ОБМЕТЫВАНИЕ ПЕТЛИ (1/8-3/16) 6,5 ПРЯМОЙ СТЕЖОК (1/4)
Depending on your selected stitch, you may need to adjust the stitch length for best results. The numbers marked on the Stitch Length Dial represent the length of the stitch in millimeters (mm). THE HIGHER THE NUMBER, THE LONGER THE STITCH. The “0” setting does not feed the material. This is used
KNOWING YOUR SEWING MACHINE KENNENLERNEN IHRER MASCHINE КРАТКОЕ ТЕХНИЧЕСКОЕ ОПИСАНИЕ МАШИНЫ 1 2 3 4 3 · 2 · 1 A · 4 · 3 · 2 · 1 · F · 0 …………….. SS Stichlängen-Einstellrad Ручка регулирования длины стежка Abhängig vom gewählten Stich kann es sein, daß Sie für beste Ergebnisse die
Depending on the stitch selected, you may need to adjust the stitch width. The numbers marked on the dial represent the stitch width. THE HIGHER THE NUMBER, THE WIDER THE STITCH. 1 1 Stitch width dial CAUTION Do not adjust the stitch width while the needle is in the fabric. Otherwise, the needle or
KNOWING YOUR SEWING MACHINE KENNENLERNEN IHRER MASCHINE КРАТКОЕ ТЕХНИЧЕСКОЕ ОПИСАНИЕ МАШИНЫ Reverse Sewing Lever Reverse sewing is used for back tacking and reinforcing seams. (Model PS-57, PS-55, STAR-50, RSR-55, XRX-55, PS-53) To sew in reverse, push the Reverse Sewing Lever in as far as possible
Use the Feed Dog Position Switch to raise or lower the feed dogs according to the job that is being done. When monogramming, embroidering, darning or sewing on buttons, the feed dogs should be lowered. (The garment will not be fed.) NOTE: When raising or lowering the feed dogs, move the Feed Dog
KNOWING YOUR SEWING MACHINE KENNENLERNEN IHRER MASCHINE КРАТКОЕ ТЕХНИЧЕСКОЕ ОПИСАНИЕ МАШИНЫ (Model STAR 240E, STAR 230E) Start/Stop Button Pressing the Start/Stop Button once starts the machine; pressing the button again stops the machine. • • 1 The machine sews at a slow speed when sewing with the
Sewing Speed Controller Controls the speed range. When the foot controller is used, you can control maximum speed with the sewing speed controller. The sewing speed controller should be set at right (fastest) position for normal usage with foot controller. 1 Sewing speed controller 1 Converting to
KNOWING YOUR SEWING MACHINE KENNENLERNEN IHRER MASCHINE КРАТКОЕ ТЕХНИЧЕСКОЕ ОПИСАНИЕ МАШИНЫ THREADING THE MACHINE 1 Winding the Bobbin 2 CAUTION • • (Model STAR 240E, STAR 230E) If the thread spool and/or spool cap are set incorrectly, the thread may tangle on the spool pin. Use the spool cap
ЗАПРАВКА НИТОК Aufspulen Намотка ниток на шпульку VORSICHT • • Inkorrektes Aufsetzen der Garnrolle bzw. Garnrollenkappe kann dazu führen, daß der Faden sich auf dem Garnrollenstift verwickelt. Verwenden Sie eine Garnrollenkappe (groß, mittel oder klein), die in ihrer Größe am besten zur Garnrolle
KNOWING YOUR SEWING MACHINE KENNENLERNEN IHRER MASCHINE КРАТКОЕ ТЕХНИЧЕСКОЕ ОПИСАНИЕ МАШИНЫ (Model STAR 240E, STAR 230E) (Model STAR 240E, STAR 230E) 4. Slide the sewing speed controller to its maximum (as far to the right as possible). 5. Push the Start/Stop button. The machine will stop
1 Hebel für den Geschwindigkeitsbereich VORSICHT Zerren Sie beim Abnehmen der Spule nicht zu fest an der Spulenträgerplatte. Der Spuler könnnte beschädigt werden. 7. Schneiden Sie Faden ab, schieben Sie den Spuler zurück nach links und entnehmen Sie die volle Spule. (Модели STAR 240E, STAR 230E) 4.
KNOWING YOUR SEWING MACHINE KENNENLERNEN IHRER MASCHINE КРАТКОЕ ТЕХНИЧЕСКОЕ ОПИСАНИЕ МАШИНЫ Lower Threading CAUTION Setting the bobbin improperly may cause the thread tension to loosen, breaking the needle and resulting in injury. 1 1 Wound evenly 2 Wound poorly 2 CAUTION Be sure to turn off the
VORSICHT Fehlerhaftes Einsetzen der Spule kann zur Folge haben, dass die Fadenspannung zu locker ist und die Nadel hierdurch abbricht, was zu Verletzungen führen kann. 1 Gleichmäßig gewickelt 2 Ungleichmäßig gewickelt VORSICHT Immer die Maschine ausschalten. Falls Sie versehentlich die Start/
KNOWING YOUR SEWING MACHINE KENNENLERNEN IHRER MASCHINE КРАТКОЕ ТЕХНИЧЕСКОЕ ОПИСАНИЕ МАШИНЫ 1 4 5 2 3 Upper Threading 1. Raise the presser foot using the Presser Foot Lever. 2. Raise the needle to its highest position by turning the balance wheel toward you (counterclockwise). 1 Presser foot lever
KNOWING YOUR SEWING MACHINE KENNENLERNEN IHRER MASCHINE КРАТКОЕ ТЕХНИЧЕСКОЕ ОПИСАНИЕ МАШИНЫ 1 4 5 2 3 Oberfadenführung Заправка верхней нитки 1. Heben Sie den Nähfuß mit dem Nähfußhebel. 2. Bringen Sie die Nadel auf die höchste Position, indem Sie das Handrad auf sich zu bewegen (entgegen dem
KNOWING YOUR SEWING MACHINE KENNENLERNEN IHRER MASCHINE КРАТКОЕ ТЕХНИЧЕСКОЕ ОПИСАНИЕ МАШИНЫ Using Needle Threader 1 Turn power switch to “O”. 1. Lower the presser foot lever. 2. Turn the balance wheel toward you (counter-clockwise) to raise the needle holder to the highest position. 2 1 Needle
Hauptschalter auf “O” stellen. 1. Senken Sie den Nähfußhebel. 2. Drehen Sie das Handrad zu sich hin (gegen den Uhrzeigersinn), um den Nadelhalter in höchste Position zu bringen. 1 Nadelhalter 2 Fadeneinfädelungshebel VORSICHT Bei Verwendung der Fadeneinfädelung achten Sie bitte immer darauf, daß
KNOWING YOUR SEWING MACHINE KENNENLERNEN IHRER MASCHINE КРАТКОЕ ТЕХНИЧЕСКОЕ ОПИСАНИЕ МАШИНЫ Manually Drawing Up Lower Thread When sewing gathers or darts, the lower thread can be manually drawn up so that it will have some excess. 1. Pass the thread along the groove in the direction of the arrow,
Your machine is designed for twin needle sewing, which allows you to sew with two top threads. You can use the same color or two different colors of thread for making decorative stitches. Any of the patterns, except the buttonhole pattern, can be sewn with the twin needle. When using the Straight
KNOWING YOUR SEWING MACHINE KENNENLERNEN IHRER MASCHINE КРАТКОЕ ТЕХНИЧЕСКОЕ ОПИСАНИЕ МАШИНЫ PLACING THE EXTRA SPOOL PIN Place the vertical spool pin in the hole found on top of the machine near the horizontal spool pin. Place the second spool of thread onto the vertical spool pin as shown in fig.
Thread Tension 2 Thread tension will affect the quality of your stitches. It may need to be adjusted when you change fabric or thread type. 1 5~4~ 3 3 5 NOTE: It is recommended that a test sample be made on a fabric scrap before sewing on your project. 4 B Possible misadjustments and their results.
KNOWING YOUR SEWING MACHINE KENNENLERNEN IHRER MASCHINE КРАТКОЕ ТЕХНИЧЕСКОЕ ОПИСАНИЕ МАШИНЫ FABRIC/THREAD/NEEDLE COMBINATIONS Thread Type Fabric Medium weight fabric Lightweight fabric Heavyweight fabric Stretch fabric Broadcloth Taffeta Flannel, Gabardine Lawn, Batiste Georgette Challis, Satin
Ткань Ткани среднего веса Легкие ткани Тяжелые ткани Трикотаж Тонкое сукно Тафта Фланель, Габардин Батист Жоржет Шелковая, Атласная Хлопчатобумажная ткань с саржевым переплетением Обычная ткань с продольным рубчиком Твид Джерси Трико Для обработки лицевой стороны ткани Швейная нитка Тип Хлопковая
PLEASE READ BEFORE SEWING CAUTION • • • • • • • To avoid injury, pay special attention to the needle while the machine is in operation. Keep your hands away from moving parts while the machine is in operation. Do not stretch or pull the fabric during sewing. Doing so may lead to injury. Do not use
Straight Stitching Pattern (Straight Stitch) Stitch Length Stitch Width 1-4.5 6.5 SS STARTING SEWING 1. Turn the Pattern Selection Dial to show your desired stitch in the Pattern Indication Window. Setting the Pattern Selection Dial to Straight Stitch or Triple Stretch Stitch is required. 2. Raise
Geradstich Stichmuster STRAIGHT AND ZIGZAG STITCHING GERAD- UND ZICKZACKSTICH НОРМАЛЬНАЯ ПРЯМАЯ И ЗИГЗАГООБРАЗНАЯ СТРОЧКА (Geradstich) Stichlänge Прямой стежок Stichbreite Стежок 1-4,5 (Прямой стежок) Длина стежка Ширина стежка 1-4,5 6,5 (Stretch-Geradstich) NÄHBEGINN 1. Drehen Sie am
REMOVING THE MATERIAL FROM THE MACHINE (Model PS-57, PS-55, STAR-50, RSR-55, XRX-55, PS-53) 1. Stop the machine. Raise the needle to its highest position and make sure that the thread take-up lever is also in its highest position. (Model PSTAR 240E, STAR 230E) 1. Press the Start/Stop Button again.
Zigzag Stitching Pattern (Zigzag Stitch) Stitch Length Stitch Width F-4.5 0-6.5 ZIGZAG STITCH Select the Zigzag Stitch using the Pattern Selection Dial. Then, select the Stitch Length and the Stitch Width. It is recommended to sew using the Straight Stitch at the beginning and end of the Zigzag
Blind Hem Stitching Pattern Stitch Length (Blind Hem Stitch) Stitch Width F-2 3-6.5 (Stretch Blind Hem Stitch) F-1.5 The Blind Hem Stitch is used to finish the edge of a project like the hem of a pair of pants without the stitch showing. Use the Blind Hem Stitch for any non-stretch fabrics and the
Shell Tuck Stitching Pattern (Shell Tuck Stitch) Stitch Length Stitch Width F-3 3-6.5 The Shell Tuck Stitch can be used to sew a picot (lace like) edge on a lightweight fabric. 1. Set the Pattern Selection Dial to Shell Tuck Stitch. 2. Sew the fabric on the bias, placing it under the presser foot
A Elastic Stitching Pattern Stitch Length Stitch Width F-2.5 3-6.5 (Elastic Stitch) The Elastic Stitch can be used for 3 functions: mending, sewing elastic or joining fabric. Each is explained below. Set the Pattern Selection Dial to Elastic Stitch. B MENDING 1. Place the reinforcement fabric under
Double Action Stitching Pattern Stitch Length Stitch Width F-3 3-6.5 SS 3-6.5 (Double Action Stitch) (Bridging Stitch) (Rampart Stitch) (Decorative Hem Stitch) These stitches are used for joining two pieces of fabric, for example, when making patchwork. Set the Pattern Selection Dial to Double
Scallop Stitching Pattern (Scallop Stitch) Stitch Length Stitch Width F-1.5 3-6.5 This machine automatically produces a Scallop Stitch which may be used as a decorative edging. 1. Set the Pattern Selection Dial to Scallop Stitch. 2. Sew the Scallop Stitch along the edge of the material. 3. If
Decorative Stitching Pattern Stitch Length Stitch Width (Bead Stitch) (Arrowhead Stitch) 3-6.5 (Parallelogram Stitch) (Triangle Stitch) F-1 (Lighting Stitch) (Square Stitch) 6.5 (Decorative Stitch) (Decorative Stitch) (Decorative Stitch) 3-6.5 SS 6.5 These stitches can be used for making decorative
Patchwork Pattern Stitch Length Stitch Width SS 3-6.5 (Fagoting Stitch) (Link Stitch) These stitches are used to join two pieces of fabric while leaving a space between their edges. 1. Fold over the edges of the two pieces of fabric for the hem and baste the edges to a thin piece of paper leaving a
A Overedge Stitching Pattern (Elastic Shell Tuck Stitch) Stitch Length Stitch Width F-3 (Elastic Overlock Stitch)* (Elastic Overlock Stitch) 3-6.5 SS (Comb Stitch) B These stitches are used to join together seams and finish them in one operation. The Elastic Overlock Stitches are useful when sewing
Feather Stitching Pattern (Feather Stitch) Stitch Length Stitch Width SS 3-6.5 Use the Feather Stitch as a decorative top stitch or when hemming blankets, tablecloths or draperies or when embroidering. 1. Set the Pattern Selection Dial to Feather Stitch. 2. Place the fabric right side up and sew 1
A (Model STAR 240E, STAR 230E, PS-57, PS-55, STAR-50, RSR-55, XRX-55) Making a Buttonhole (For 1-step BH Type) A 1 2 Pattern B Stitch Length Stitch Width Foot F-1.5 3-5 (Dial 4-7) Buttonhole Foot NOTE: 1. It is recommended to practice making a buttonhole on a scrap piece of fabric before attempting
(Modell STAR 240E, STAR 230E, PS-57, PS-55, STAR-50, RSR-55, XRX-55) (Модели STAR 240E, STAR 230E, PS-57, PS-55, STAR-50, RSR-55, XRX-55) Knopfloch nähen (Für 1-Stufen-Knopfloch BH-Typ) Обметывание петель (Для 1-ступенчатого обметывания петли) Stichlänge Stichbreite Fuß F-1,5 3-5 (Drehschalter 4-7)
(Model STAR 240E, STAR 230E, PS-57, PS-55, STAR-50, RSR-55, XRX-55) Odd-shaped buttons that do not fit into the button holder plate Add the button diameter to its thickness, then set the buttonhole presser foot scale to this measurement. The distance in the scale between two lines of the same
(Model PS-53) Making a Buttonhole (For 4-step BH Type ) Pattern Stitch Length Stitch Width Foot F-1.5 3-5 (Dial 4-7) Buttonhole Foot NOTE: 1. It is recommended to practice making a buttonhole on a scrap piece of fabric before attempting it on the actual garment. 2. When making buttonholes on soft
MAKING A BUTTONHOLE Step Sewn Portion Step 1 (Front bar tack) Pattern 1. Set the pattern selection dial to “a”. 2. Lower the presser foot and sew 5 to 6 stitches. 3. Stop the machine when the needle is at the left side of the stitches, then raise the needle from the material. a 1. Turn the pattern
(Model STAR 240E, STAR 230E, PS-57, PS-55, STAR-50, RSR-55, XRX-55, PS-53) SECURING THE STITCHING AND CUTTING THE BUTTONHOLE 1. To secure the stitching, turn the material 90 degrees counterclockwise and sew Straight Stitches to the end of the front bar tack of the buttonhole. 2. Remove the material
Buttonhole Fine Adjustment If the stitching on the two sides of the buttonhole do not appear uniform, the following adjustments can be made. 1 2 3 1. Set the Stitch Length Dial at “F-1.5” and stitch the right side of the buttonhole on a scrap of fabric while observing how the material is fed. 2. If
Wenn die Stiche zu beiden Seiten des Knopfloches nicht einheitlich erscheinen, können die folgenden Einstellungen vorgenommen werden. 1. Stellen Sie den Stichlängen-Einstellrad auf “F-1,5” und nähen Sie auf einem Stoffrest die rechte Raupe des Knopfloches, während Sie beobachten, wie das Material
A B For 1-Step BH Type (Model STAR 240E, STAR 230E, PS-57, PS-55, STAR-50, RSR-55, XRX-55) When the buttonhole is not sewn correctly: There are two different procedures for correcting buttonhole sewing, depending on which part of the buttonhole is not sewn correctly. Correction Procedure 1 (See
Button Sewing Pattern Stitch Length (Zigzag Stitch) Stitch Width Foot Less than 6.5 Zigzag Presser Foot 0 1. Measure the distance between the holes and set the appropriate stitch width using the Stitch Width Dial. For example, if the distance between the holes is 1.5 mm, set the stitch width to
USING ATTACHMENTS AND APPLICATIONS HEFTEN UND APPLIZIEREN ИСПОЛЬЗОВАНИЕ ПРИСПОСОБЛЕНИЙ И ИЗГОТОВЛЕНИЕ АППЛИКАЦИЙ Zipper Insertion A Pattern 1 2 3 B Stitch Length Stitch Width Foot 2-3 3.5 (center) Zipper Foot (Straight Stitch) The zipper foot is used to sew various types of zippers and can easily
Stichmuster Stichlänge Stichbreite 2-3 3,5 (Mitte) (Geradstich) Вшивание застежек-молний Fuß Cтежок Reißverschlußfuß (Прямой стежок) Der Reißverschlußfuß wird benutzt, um verschiedene Reißverschlüsse einzunähen und kann einfach auf der linken oder rechten Seite der Nadel montiert werden. Wenn Sie
USING ATTACHMENTS AND APPLICATIONS HEFTEN UND APPLIZIEREN ИСПОЛЬЗОВАНИЕ ПРИСПОСОБЛЕНИЙ И ИЗГОТОВЛЕНИЕ АППЛИКАЦИЙ Darning Pattern (Straight Stitch) Stitch Length Any Foot Feed Dog Zigzag Presser Down Position Foot 1. Lower the feed dogs by setting the Feed Dog Position Switch to the Down Position as
Pattern Stitch Length (Zigzag Stitch) F-2 An appliqué is created by cutting a contrasting piece of fabric into a shape to be used as a decoration on a garment or project. 1. Baste the cut design to the fabric in the location where desired. 2. Carefully sew around the edge of the cutout design with
USING ATTACHMENTS AND APPLICATIONS HEFTEN UND APPLIZIEREN ИСПОЛЬЗОВАНИЕ ПРИСПОСОБЛЕНИЙ И ИЗГОТОВЛЕНИЕ АППЛИКАЦИЙ Monogramming and Embroidering Pattern (Zigzag Stitch) Stitch Length Stitch Width Foot Any Any Feed Dog None Down Position PREPARING FOR MONOGRAMMING AND EMBROIDERING 1. Lower the feed
Stichmuster (Zickzackstich) Stichläng Stichbreite Fuß Transporteur Beliebig Beliebig Kein Position unten VORBEREITUNG FÜR MONOGRAMME UND STICKARBEITEN 1. Versenken Sie den Transporteur, indem Sie den Transporteurhebel in die Absenkposition stellen, wie auf Seite 30 gezeigt. 2. Stellen Sie das
USING ATTACHMENTS AND APPLICATIONS HEFTEN UND APPLIZIEREN ИСПОЛЬЗОВАНИЕ ПРИСПОСОБЛЕНИЙ И ИЗГОТОВЛЕНИЕ АППЛИКАЦИЙ OPTIONAL ACCESSORIES Using the Walking Foot A 1 Pattern Stitch Length (Straight Stitch) Stitch Width 3-4 1-4.5 (Zigzag Stitch) 0-6.5 This foot is very useful for sewing materials such as
ДОПОЛНИТЕЛЬНЫЕ ПРИНАДЛЕЖНОСТИ Einsatz des Obertransporteurs Использование шагающей лапки Stichmuster Stichlänge (Geradstich) Stichbreite 3-4 Стежок 1-4,5 (Zickzackstich) 0-6,5 NOTIZEN: Diesen Fuß können Sie nur für Geradstich und Zickzackstich und nicht für andere Stichmuster verwenden. 1. Schalten
USING ATTACHMENTS AND APPLICATIONS HEFTEN UND APPLIZIEREN ИСПОЛЬЗОВАНИЕ ПРИСПОСОБЛЕНИЙ И ИЗГОТОВЛЕНИЕ АППЛИКАЦИЙ A OPTIONAL ACCESSORIES Using the Spring-action Quilting Foot Pattern Stitch Length Stitch Width Feed Dog Any 3.5 (center) Down position (Straight Stitch) The Spring -action Quilting Foot
ДОПОЛНИТЕЛЬНЫЕ ПРИНАДЛЕЖНОСТИ Einsatz des Stopffußes Использование лапки штопкивышивки Stichmuster (Geradstich) Stichlänge Stichbreite Transporteur Beliebig 3,5 (Mitte) Position unten Der Stopffuß eignet sich für Stopfarbeiten und für manuelles Steppen. 1. Ziehen Sie den Netzstecker aus der
USING ATTACHMENTS AND APPLICATIONS HEFTEN UND APPLIZIEREN ИСПОЛЬЗОВАНИЕ ПРИСПОСОБЛЕНИЙ И ИЗГОТОВЛЕНИЕ АППЛИКАЦИЙ OPTIONAL ACCESSORIES A Using the 1/4-Inch Quilting Foot Pattern (Straight Stitch) Stitch Length Stitch Width 2-2.5 3.5 (center) The 1/4-Inch Quilting Foot is used to sew fixed seam
ДОПОЛНИТЕЛЬНЫЕ ПРИНАДЛЕЖНОСТИ Einsatz des Patchworkfuß Использование направляющей лапки 1/4 дюйма (6,5 мм) Stichmuster Stichlänge Stichbreite 2-2,5 3,5 (Mitte) (Geradstich) Der Patchworkfuß wird benutzt, um z. B. bei Stepparbeiten mit einer festen Nahtzugabe von 6,5 mm zu nähen (siehe Abb. A). 1.
Changing the Light Bulb CAUTION • • A Turn off the main power switch and unplug the machine before changing the light bulb. If the main power switch is on when the light bulb is changed, an electric shock may result. If the machine is on and Start/Stop button is pressed or foot controller is
VORSICHT • • Schalten Sie den Netzschalter aus und ziehen Sie vor dem Auswechseln der Glühbirne den Netzstecker aus der Steckdose. Wenn der Netzschalter auf Ein “ON” steht, wenn die Glühlampe gewechselt wird, besteht die Gefahr elektrischer Schläge. Wenn die Maschine eingeschaltet ist und die
A Cleaning CAUTION Be sure to unplug the machine before cleaning it. Otherwise, electric shock or injury may result. 1. Remove the power supply plug from the outlet. 2. Raise the needle and the presser foot. 3. Loosen the presser foot screw and the needle clamp screw to remove the presser foot
Reinigung VORSICHT Ziehen Sie zum Reinigen der Nähmaschine das Netzkabel aus der Steckdose, da Sie sonst der Gefahr von Verletzung und Stromschlag ausgesetzt sind. 1. Ziehen Sie den Netzstecker aus der Steckdose. 2. Bringen Sie die Nadel auf die höchste Position und heben Sie den Nähfuß an. 3.
PERFORMANCE CHECK LIST Whenever sewing difficulties are encountered, review the section in this instruction manual that details the operation you are performing to make sure you are correctly using the machine. If the problem continues, the following check list may help you to improve the
NEEDLE BREAKS MACHINE IS NOISY OR SLOW MACHINE DOES NOT START Stitch Length Dial is set at no feeding. («0») Needle is not correctly inserted. Lint is clinging to the bottom of the needle plate. Power supply plug is removed from outlet. Page 26 No The combination of needle size/thread size/fabric
CHECKLISTE Wann immer Sie beim Nähen auf Schwierigkeiten stoßen, lesen Sie den Abschnitt dieser Anleitung, die den Vorgang beschreibt, den Sie gerade durchführen, um sicherzugehen, daß Sie die Nähmaschine richtig bedienen. Wenn das Problem dadurch nicht gelöst wurde, kann die folgende Checkliste
NADEL BRICHT MASCHINE IST LAUT ODER LANGSAM MASCHINE LÄUFT NICHT AN StichlängenEinstellrad ist auf niedrigster Stellung. (“0”) Nadel ist nicht richtig eingesetzt. Unter der Stichplatte befinden sich Fasern oder Fusseln. Der Netzstecker steckt nicht in der Steckdose. Seite 27 Nein Die Kombination
ТАБЛИЦА ВОЗМОЖНЫХ НЕИСПРАВНОСТЕЙ Если в процессе работы возникли какие-либо проблемы, обратитесь к соответствующему разделу настоящего руководства, чтобы убедиться в том, что та или иная операция выполняется Вами правильно. Если и после этого не удается устранить возникшие проблемы, обратитесь к
ПОЛОМКА ИГЛЫ ЧРЕЗМЕРНЫЙ ШУМ И НИЗКАЯ СКОРОСТЬ В РАБОТЕ МАШИНЫ МАШИНА НЕ ЗАПУСКАЕТСЯ Ручка регулирования длины стежка установлена в положение нулевой подачи. (“0”) Игла установлена неправильно. Налипание пуха на нижнюю поверхность игольной пластины. Штепсель шнура питания не вставлен в розетку.
(Model PS-57, PS-55, PS-53) Repacking the Machine Keep the carton and packing materials for future use. It may become necessary to reship the machine. Improper packing or improper packing material could result in damage during shipping. Instructions for repacking the machine are illustrated. * Hard
A Page N Accessories ………………………………………………………….. 5 Appliqués …………………………………………………………… 76 Arrowhead Stitch …………………………………………………. 59 Needle Inspection
Seite Seite A N Anschiebetisch & Zubehörfach ………………………………… 14, 32 Applizieren …………………………………………………………………. 76 Aufspulen …………………………………………………………………… 34 Automatischer Einfädler
Страница Страница А О Аппликации ……………………………………………………….. 76 Обметочный стежок ………………………………………….. 61 Обметывание петель …………………………………………. 64 Обойма
ENGLISH DEUTSCH 194277-213 Printed in Taiwan