У вас уже есть продукция Canon? Зарегистрируйте свои продукты для доступа к программному обеспечению и обновлениям встроенного ПО, а также подпишитесь на рассылку, чтобы получать персонализированные советы и эксклюзивные предложения
Поддержка
Canon PIXMA MP150
Загружайте драйверы, ПО, встроенное ПО и руководства, а также получите доступ к материалам поддержки для вашего продукта серии PIXMA.
Драйверы
Для выполнения подключения некоторых устройств к компьютеру может потребоваться драйвер. На этой вкладке вы найдете соответствующие драйверы для своего устройства или, в случае отсутствия драйверов, описание совместимости устройства с каждой операционной системой.
Полезная информация. Доступ к программному обеспечению, руководствам и другим материалам можно получить с помощью вкладок, расположенных выше.
Операционная система Обнаруженная операционная система
Программное обеспечение
Программное обеспечение загружать необязательно, но оно обеспечивает дополнительные функции и позволяет максимально эффективно пользоваться возможностями устройства. На этой вкладке можно просмотреть и загрузить доступное программное обеспечение для вашего устройства.
Операционная система Обнаруженная операционная система
Программное обеспечение
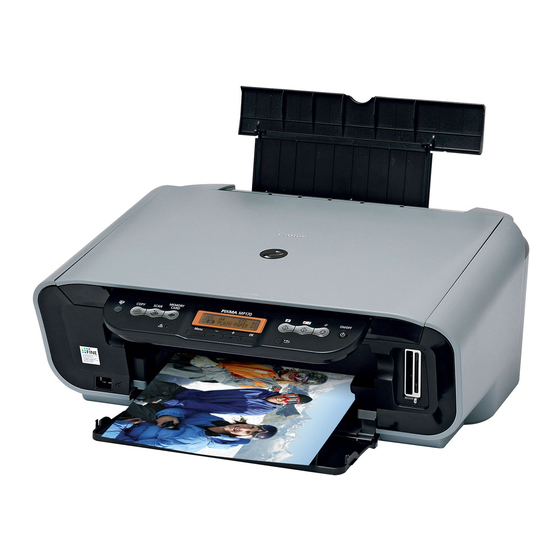
Программное обеспечение загружать необязательно, но оно обеспечивает дополнительные функции и позволяет максимально эффективно пользоваться возможностями устройства. На этой вкладке можно просмотреть и загрузить доступное программное обеспечение для вашего устройства.
Операционная система Обнаруженная операционная система
Руководства пользователя
Руководства для вашего устройства или программного обеспечения перечислены ниже.
Приложения и функции
На этой вкладке можно посмотреть доступные приложения и функции, совместимые с вашим устройством.
Встроенное ПО
Встроенное ПО — это постоянное программное обеспечение, установленное на устройстве и обеспечивающее его корректную работу. Canon может периодически выпускать обновления для этого встроенного ПО, и если обновление доступно, его можно загрузить ниже.
FAQs
На этой вкладке вы найдете ответы на часто задаваемые вопросы и другую полезную информацию, которая поможет вам в решении вопросов и проблем.
Важная информация
На этой вкладке вы найдете подборку часто задаваемых вопросов, которые, на наш взгляд, будут вам интересны.
Коды ошибок
Код ошибки или сообщение об ошибке может появиться на устройстве по различным причинам. С помощью поля поиска можно найти полезную информацию о конкретном коде ошибки, где будут указаны причина ошибки и необходимые действия по ее устранению.
Технические характеристики
Ниже приведены все технические характеристики данного продукта.
Полезные ссылки
-
-
Ремонт
Поиск центров по ремонту оборудования, полезная информация по процессу ремонта
-
Переработка
Узнайте больше о программе утилизации картриджей Canon
-
Canon ID
Регистрация продукта и управление аккаунтом Canon ID

РУССКИЙ
Lis1QSG_GB.book Page 1 Wednesday, July 13, 2005 5:06 PM
Краткое руководство
по началу работы
Оглавление
Введение
12
Копирование
17
Печать с компьютера
19
Сканирование
20
Печать фотографий непосредственно с цифровой камеры
21
Обслуживание
22
Поиск и устранение неисправностей
25
Lis1QSG_GB.book Page 2 Wednesday, July 13, 2005 5:06 PM
X Подготовка аппарата к использованию
Выньте аппарат из упаковки
Проверьте комплектность по изображению на внутренней стороне крышки коробки.
РУССКИЙ
ВАЖНО
• Кабель USB нельзя подключать до установки программного обеспечения.
• Кабель принтера не прилагается. Для подключения аппарата к компьютеру необходимо
приобрести кабель USB (длиной не более 3 м).
1
2
3
2
Включите аппарат.
Подготовьте картриджи FINE (чернильные).
• Если блок сканирования (крышка принтера) останется открытым в течение более 10 минут,
держатель картриджа FINE переместится вправо. Для возвращения держателя в центральное
положение следует закрыть и снова открыть блок сканирования (крышку принтера).
• Не прикрепляйте снятую защитную ленту обратно.
Установите картридж FINE.
• Картриджи FINE должны быть установлены в порядке, указанном на этикетке. Аппарат можно
использовать, только если установлены все картриджи FINE.
• В целях безопасности храните картриджи FINE в местах, недоступных для детей.
• Не трясите и не роняйте картриджи FINE, так как в результате этого чернила могут вытечь и
испачкать одежду или руки.
• Если картридж FINE установлен неправильно, индикатор аварийного сигнала будет гореть
оранжевым цветом. Откройте блок сканирования (крышку принтера) и установите все
картриджи FINE в правильном порядке, указанном на этикетке.
Lis1QSG_GB.book Page 3 Wednesday, July 13, 2005 5:06 PM
X Установка программного обеспечения
ВАЖНО
• Перед установкой временно отключите брандмауэр и закройте все приложения,
в том числе антивирусные программы. Программы, обеспечивающие
безопасность компьютера, можно запустить по завершении установки
программного обеспечения.
Установка драйвера принтера в системе Windows
• Если на компьютере установлена более ранняя версия программы MultiPASS
Suite, удалите ее, а затем установите новую версию. Инструкции по удалению
представлены в руководствах для конкретной версии программы MultiPASS Suite.
• Для установки программного обеспечения в системе Windows XP или Windows
2000 необходимо выполнить вход под учетной записью администратора.
• Если появится следующий экран, значит, кабель USB
подсоединен.
Выполните следующие действия.
1. Отсоедините кабель USB.
2. Нажмите [Cancel] (Отмена).
• Во время установки нельзя выполнять смену пользователя.
Установка драйвера принтера на компьютере Macintosh
• Не подключайте аппарат к компьютеру с системой Mac OS 9 или Mac OS X
Classic, так как эти системы не поддерживаются.
• Введите имя и пароль учетной записи администратора.
Чтобы убедиться в правильности установки драйвера, выполните следующие
действия:
1. Выберите [Applications] (Приложения) в меню [Go] (Перейти).
2. Дважды нажмите папку [Utilities] (Утилиты), затем значок [Printer Setup Utility]
(Утилита настройки принтера) ([Print Center] (Центр печати) при использовании
Mac OS X v.10.2.x).
В случае надлежащей установки драйвера принтер должен отображаться в окне
[Printer List] (Список принтеров).
Если принтер не отображается в окне [Printer List] (Список принтеров), нажмите
[Add] (Добавить) в окне [Printer List] (Список принтеров) и выберите во
всплывающем меню [USB] (USB). Выберите [MP150] в списке [Product]
(Продукт) и нажмите [Add] (Добавить).
Аппарат подсоединен к компьютеру с системой Mac OS X v.10.3.3 или более
ранней версии:
Возможно, после перезагрузки подключенный аппарат не будет обнаружен. Для
решения этой проблемы следует либо отсоединить кабель USB и подсоединить его
обратно, либо выключить и снова включить аппарат.
3
РУССКИЙ
Для установки программного обеспечения, руководства по экранным меню и
“Драйверов MP” следует выбрать параметр “Простая установка”. Чтобы указать
набор необходимых компонентов, можно выбрать параметр “выборочный”.
Lis1QSG_GB.book Page 4 Wednesday, July 13, 2005 5:06 PM
РУССКИЙ
Отказ от прав
Специалистами компании Canon Inc. была проведена большая работа по
редактированию настоящего Руководства с целью создания удобного справочника для
пользователей аппарата Canon MP150. Все положения, технические сведения и
рекомендации данного Руководства и любых иных руководств или относящихся к
нему документов считаются достоверными, но их точность и полнота не
гарантируются, и они не предназначены и не должны рассматриваться как
гарантийные документы на описываемую продукцию. Технические характеристики
могут быть изменены без предварительного уведомления.
В качестве участника программы Energy star® корпорация
Canon объявляет, что данный аппарат удовлетворяет
требованиям Energy star® по экономии электроэнергии.
Данный аппарат поддерживает стандарт Exif 2.21 (также
называемый «Exif Print»). Exif Print является стандартом,
предназначенным для улучшения связи между цифровыми
камерами и принтерами.При подключении к цифровой
камере, совместимой со стандартом Exif Print,
используются и оптимизируются данные изображения,
полученные камерой в момент съемки, что обеспечивает
чрезвычайно высокое качество печати.
Сведения о товарных знаках
• Windows является зарегистрированным товарным знаком Microsoft Corporation в
США и других странах.
• Macintosh и Mac являются зарегистрированными товарными знаками Apple
Computer, Inc. в США и других странах.
©2005 CANON INC.
Все права защищены. Ни одна из частей настоящего документа не может
передаваться или копироваться в какой-либо форме без явного письменного
разрешения Canon Inc.
4
Lis1QSG_GB.book Page 5 Wednesday, July 13, 2005 5:06 PM
X Работа с прилагаемой документацией
Краткая инструкция по установке (печатная документация):
РУССКИЙ
Этот документ следует прочитать перед началом работы.
Он содержит инструкции по установке и настройке аппарата. Перед работой с
аппаратом необходимо выполнить все указания.
Краткое руководство по началу работы (настоящее руководство):
Это руководство следует прочитать перед началом использования аппарата.
После выполнения действий, описанных в Краткая инструкция по установке,
рекомендуется прочитать настоящее руководство с целью ознакомления с
основными функциями аппарата.
Руководство пользователя (руководство по экранным меню):
Это руководство находится на установочном диске для настройки аппарата.
Оно содержит инструкции по печати с компьютера или непосредственно с
цифровой камеры, а также указания по копированию. Здесь содержатся подробные
рекомендации, не включенные в Краткое руководство по началу работы, и
сведения о дополнительных функциях.
Руководство по драйверу принтера и Руководство по сканированию (руководство по
экранным меню):
Эти руководства находятся на установочном диске для настройки аппарата.
Они содержат исчерпывающие инструкции по печати и сканированию с помощью
компьютера. В этих руководствах подробно описана каждая функция, а также
методы использования “Драйверов MP” и “Диспетчера MP”.
Руководство по приложению для работы с фотографиями (руководство по экранным
меню):
Это руководство находится на установочном диске для настройки аппарата.
Оно содержит сведения о программном обеспечении на установочном диске для
настройки аппарата, например об утилитах Easy-PhotoPrint и Easy-WebPrint. Кроме
того, в этом файле описаны инструкции по сканированию данных, различным
способам печати и функциям.
Комплект поставки для некоторых стран не поддерживает установку руководств по
экранным меню. При необходимости их можно выбрать в папке “Вручную” на
установочном диске для настройки аппарата и скопировать на жесткий диск
компьютера.
5
Lis1QSG_GB.book Page 6 Wednesday, July 13, 2005 5:06 PM
X
Работа с руководством по экранным меню,
записанным на установочном диске для настройки
аппарата
РУССКИЙ
Установку руководств по экранным меню с установочного диска для настройки
аппарата можно выполнить одним из следующих способов.
• Выберите “Простая установка”, чтобы установить руководства по экранным
меню вместе с драйвером принтера и приложениями.
• Выберите “Руководство по экранным меню” в меню “выборочный”, чтобы
установить только руководства по экранным меню. Если руководства по
экранным меню не были установлены или были случайно удалены, установите
их одним из указанных выше способов.
• После установки программного обеспечения в режиме “Простая установка” на
рабочем столе появится значок запуска руководства по экранным меню.
• Дважды нажмите его, а затем выберите во всплывающем меню название каждого
необходимого руководства.
При использовании различных веб-браузеров для просмотра файлов HTML один и
тот же текст или изображение может выглядеть по-разному. Руководства по
экранным меню в формате HTML созданы с учетом следующих требований к
компьютеру.
Компьютер с системой Windows:
• Браузер: средство просмотра справки Windows HTML
• Примечание. Используйте Microsoft Internet Explorer 5.0 или более поздней
версии.
• В зависимости от операционной системы или версии браузера Internet Explorer
руководство по экранным меню может отображаться неправильно.
Рекомендуется своевременно обновлять систему посредством службы Windows
Update.
Компьютер Macintosh:
• Браузер: средство просмотра справки
• Примечание. В зависимости от операционной системы руководство по экранным
меню может отображаться неправильно. Рекомендуется своевременно
обновлять систему.
6
Lis1QSG_GB.book Page 7 Wednesday, July 13, 2005 5:06 PM
X Чтение настоящего документа
Символы, используемые в руководстве
ВАЖНО
Обозначает действия, которые необходимо выполнять с особой
осторожностью, поскольку в противном случае может быть нанесен
физический или материальный ущерб. Для безопасной работы с
аппаратом такие предупреждения всегда следует учитывать.
РУССКИЙ
ПРЕДУПРЕЖДЕНИЕ
Обозначает предупреждения и ограничения относительно работы с
аппаратом. Для правильного обращения с аппаратом и во избежание его
повреждения эти предупреждения необходимо обязательно читать.
Указывает на примечания для работы или дополнительные объяснения.
Их настоятельно рекомендуется читать.
Указывает на то, что текущее описание относится к аппарату,
подключенному к компьютеру.
Эти сведения следует читать, если аппарат подключен к компьютеру с
системой Windows.
Эти сведения следует читать, если аппарат подключен к компьютеру
Macintosh.
z(Заголовок для
последовательности
действий)
Обозначает процедуру, состоящую из последовательных действий.
Названия кнопок, используемые в руководстве
[название кнопки]
Текст, заключенный в такие скобки, обозначает кнопку на панели
управления аппарата или параметр, отображаемый на экране компьютера.
Пример: [Цветное]
<буква>
Текст, заключенный в такие скобки, обозначает букву или цифру,
отображаемую на LED.
Пример: <P>, <3>
Термины, используемые в руководстве
аппарат
Общий термин для обозначения принтера MP150.
по умолчанию
Заводской параметр, который используется изначально.
документ
Исходный материал, страница книги или фотография, копируемые или
сканируемые на аппарате.
бумага
Бумага, на которой аппарат выполняет печать.
7
Lis1QSG_GB.book Page 8 Wednesday, July 13, 2005 5:06 PM
X Меры предосторожности
РУССКИЙ
Для обеспечения безопасной эксплуатации аппарата ознакомьтесь с
предупреждениями и предостережениями по технике безопасности, приведенными
в данном Руководстве. Используйте аппарат только в соответствии с
инструкциями, приведенными в данном Руководстве. Для получения подробной
информации о мерах предосторожности см. Руководство пользователя.
ВНИМАНИЕ
Игнорирование этих предупреждений по технике безопасности может
привести к поражению электрическим током, пожару или повреждению
аппарата.
z Расположение аппарата
• Не устанавливайте аппарат вблизи от мест хранения воспламеняемых
жидкостей, таких как спирт или растворители.
z Питание
• Запрещается подключать аппарат к сети электропитания или отключать его от
сети влажными руками.
• Необходимо полностью вставлять вилку в розетку электропитания.
• Не допускается повреждение, модификация, вытягивание или слишком сильное
изгибание, либо перекручивание шнура питания. Не ставьте на шнур питания
тяжелые предметы.
• Запрещается подключать аппарат к розетке электропитания совместно с другим
оборудованием (через удлинитель, тройник и т.п.).
• Запрещается использовать аппарат со скрученным или завязанным в узел
шнуром питания.
• Если в месте установки аппарата обнаружен дым, непривычный запах или
необычный шум, немедленно отсоедините шнур питания от розетки и
обратитесь к местному авторизованному дилеру Canon или в справочную службу
Canon.
Эксплуатация аппарата в таких условиях может привести к пожару или
поражению электрическим током.
• Периодически отсоединяйте аппарат от розетки электропитания и сухой тканью
удаляйте всю пыль и загрязнения, скопившиеся на вилке и розетке.
Если аппарат установлен в помещении с повышенным содержанием пыли, дыма
или влаги, пыль, скопившаяся на вилке, поглощает влагу и может привести к
нарушению изоляции и возгоранию.
8
z Техническое обслуживание
• Аппарат следует чистить влажной тканью. Запрещается использовать
огнеопасные растворители, такие как спирт, бензол или растворители. Если
огнеопасные растворители попадут на находящиеся под напряжением
электрические детали внутри аппарата, это может привести к пожару или
поражению электрическим током.
• Перед чисткой аппарата обязательно отключите питание и отсоедините аппарат
от розетки сети. Если во время чистки аппарат случайно включится, возникнет
опасность получения травмы или повреждения аппарата.
z Эксплуатация аппарата
• Не пытайтесь разобрать аппарат или что-либо изменить в нем. Внутри аппарата
нет деталей, подлежащих обслуживанию пользователем.
Некоторые компоненты аппарата находятся под высоким напряжением.
Запрещается выполнять любые операции по техническому обслуживанию, не
описанные в данном Руководстве. Неправильное выполнение операций по
техническому обслуживанию может привести к повреждению аппарата, пожару
или поражению электрическим током.
• Запрещается пользоваться огнеопасными аэрозолями рядом с аппаратом.
Если аэрозоль попадет на электрические компоненты внутри аппарата, это
может привести к пожару или поражению электрическим током.
z Прочее
• Данный аппарат создает слабое магнитное поле. Если Вы пользуетесь
кардиостимулятором и в его работе возникают какие-либо отклонения,
немедленно отойдите от аппарата и обратитесь к лечащему врачу.
• Размещайте аппарат на расстоянии не менее 15 см от электрических устройств,
оснащенных люминесцентными лампами. При установке вблизи от такого
оборудования возможны сбои в работе аппарата из-за шумов от
флуоресцентного освещения.
• При отключении питания не забудьте нажать клавишу [ON/OFF] и убедиться,
что лампочка аварийной сигнализации погасла. Если кабель питания будет
отсоединен от сетевой розетки во время мигания Индикатора аварийного
сигнала, Картридж FINE может быть поврежден, что не позволит выполнять
печать в дальнейшем.
9
РУССКИЙ
Lis1QSG_GB.book Page 9 Wednesday, July 13, 2005 5:06 PM
Lis1QSG_GB.book Page 10 Wednesday, July 13, 2005 5:06 PM
ПРЕДУПРЕЖДЕНИЕ
Игнорирование этих предупреждений по технике безопасности может
привести к травме пользователя или повреждению аппарата.
РУССКИЙ
z Расположение аппарата
• Устанавливайте аппарат на ровную, устойчивую, не подверженную вибрациям
поверхность, достаточно прочную, чтобы выдержать вес аппарата.
• Не устанавливайте аппарат в помещениях с высокой влажностью или
запыленностью, под прямыми солнечными лучами, вне помещения или рядом с
нагревательными приборами. Установка в таких местах может привести к
пожару или поражению электрическим током. Во избежание этого установите
аппарат в помещении с температурой окружающей среды от 5°C до 35°C и
влажностью от 10 % до 90 % (без образования конденсата).
• Не устанавливайте аппарат на толстую подстилку или ковер. При попадании
внутрь аппарата волокон ткани или пыли возможен пожар.
z Питание
• Запрещается при отсоединении вилки шнура питания тянуть за шнур.
В этом случае возможно повреждение шнура питания и, как следствие, пожар
или поражение электрическим током.
• Не используйте удлинитель, поскольку он может стать причиной пожара или
поражения электрическим током.
• Область около розетки электропитания должна быть всегда свободной, чтобы
при необходимости можно было легко отключить вилку шнура питания от
розетки. В противном случае Вы не сможете быстро отсоединить шнур питания
при чрезвычайных обстоятельствах.
• Запрещается использовать любое другое электропитание, кроме номинального
питания аппарата в соответствии со страной его приобретения. В противном
случае возможен пожар или поражение электрическим током.
Для данного аппарата требуется следующее электропитание:
110-127 В пер. тока, 50/60 Гц или 200-240 В пер. тока, 50/60 Гц (в зависимости от
местных требований к электросети).
• Розетка сети должна находиться недалеко от оборудования и к ней должен быть
обеспечен свободный доступ.
10
z Эксплуатация аппарата
• Закрывайте крышку документа с осторожностью, чтобы не прищемить руку.
Несоблюдение этого требования может стать причиной травмы.
• Не нажимайте с силой на крышку документа при использования стекла
экспонирования для сканирования толстых книг. При этом можно повредить
стекло экспонирования и крышку документа и/или получить травму.
• При перемещении аппарата держите его с двух сторон.
• Во время печати запрещается что-либо делать руками внутри аппарата.
Движущиеся части внутри аппарата могут стать причиной травмы.
• Не переворачивайте аппарат. Чернила могут пролиться и испачкать одежду или
мебель.
z Картриджи FINE (чернильные)
• В целях безопасности храните Картриджи FINE (чернильные) в местах,
недоступных для детей. Если ребенок проглотит чернила, немедленно
обращайтесь к врачу.
• Не трясите Картриджи FINE (чернильные). Чернила могут пролиться и
испачкать одежду или мебель.
• Не дотрагивайтесь до сопел или позолоченных контактов.
X Юридические ограничения на использование
аппарата, а также на использование изображений
Воспроизведение, копирование, сканирование и печать нижеприведенных
документов могут быть запрещены законом. Это список не является
исчерпывающим. Если у Вас есть сомнения, проконсультируйтесь у местного
юриста.
.
• Банкноты
• Почтовые переводы
• Депозитные сертификаты
• Почтовые марки
(гашеные и негашеные)
• Именные жетоны и знаки различия
• Документы с грифом ”для
служебного пользования”
• Чеки или векселя, выпускаемые
правительственными организациями
• Водительские удостоверения и
правоустанавливающие документы
• Дорожные чеки
• Талоны на льготную покупку
продуктов
• Паспорта
• Иммиграционные документы
• Гербовые марки
(гашеные и негашеные)
• Долговые обязательства и
сертификаты
• Биржевые сертификаты
• Произведения, охраняемые
авторским правом/произведения
искусства без разрешения владельца
авторских прав
11
РУССКИЙ
Lis1QSG_GB.book Page 11 Wednesday, July 13, 2005 5:06 PM
Lis1QSG_GB.book Page 12 Wednesday, July 13, 2005 5:06 PM
1 Введение
X Функции аппарата
РУССКИЙ
Благодарим вас за приобретение принтера Canon MP150. Этот универсальный и
простой в обращении аппарат обладает следующими функциями:
Настольный
фотопринтер
Печать высококачественных фотографий непосредственно с
цифровой камеры без использования компьютера.
Копировальное
устройство
Создание цветных или черно-белых копий и возможность
применения для них дополнительных параметров копирования.
Принтер
Печать фотографий, а также полноцветных и четких черно-белых
документов, сохраненных на компьютере.
Сканер
Сканирование изображений с высоким разрешением на компьютер
и их обработка с помощью удобного программного обеспечения
аппарата.
Таким образом, данный аппарат можно использовать как автономное устройство
для копирования и печати фотографий, а при подключении к компьютеру он
служит универсальным принтером, копировальным аппаратом и сканером. К этому
аппарату прилагается компьютерное программное обеспечение для простого и
эффективного решения самых разных задач.
12
Введение
Глава 1
Lis1QSG_GB.book Page 13 Wednesday, July 13, 2005 5:06 PM
X Элементы аппарата и их функции
Аппарат
z Внешний вид
(2)
(3)
(4)
(5)
РУССКИЙ
(1)
(8)
(9)
(7)
(6)
(1) Крышка документа
Закрывает стекло экспонирования. При загрузке документа на стекло экспонирования
крышку необходимо поднять.
(2) Подставка для бумаги
Поддерживает бумагу, загружаемую в устройство автоподачи. Перед загрузкой бумаги ее
следует открыть.
(3) Удлинитель подставки для бумаги
Поддерживает бумагу, загружаемую в устройство автоподачи. Перед загрузкой бумаги его
следует вытянуть.
(4) Направляющая бумаги
Левый край загружаемой бумаги должен слегка касаться этой направляющей.
(5) Устройство автоподачи
Предназначено для загрузки бумаги, которая подается автоматически по одному листу.
(6) Лоток вывода бумаги
После печати бумага попадает в этот лоток. Перед началом копирования или печати его
необходимо открывать, а если он не используется, то должен оставаться в аппарате.
(7) Порт автономной печати
Предназначен для подключения к аппарату устройства, поддерживающего технологию
PictBridge или Canon Bubble Jet Direct, с целью печати изображений непосредственно с
камеры.
(8) Стекло экспонирования
На него загружается обрабатываемый документ.
(9) Панель управления
Отображает рабочее состояние аппарата, а также используется для изменения или проверки
параметров каждой функции. Для получения дополнительной информации см. стр. 15.
Глава 1
Введение
13
Lis1QSG_GB.book Page 14 Wednesday, July 13, 2005 5:06 PM
z Вид сзади и вид внутренних компонентов
(11)
(10)
(12)
РУССКИЙ
(14)
(13)
(15)
(16)
(10) Держатель картриджа FINE
Сюда устанавливаются картриджи FINE.
(11) Картриджи FINE (чернильные)
Заменяемые картриджи с интегрированной печатающей головкой и чернильницей.
(12) Блок сканирования
Предназначен для сканирования документов.
(13) Опора блока сканирования
Используется для фиксации блока сканирования в открытом положении.
(14) Регулятор толщины бумаги
Предназначен для регулировки расстояния между картриджем FINE и поверхностью бумаги.
(15) Разъем питания
Предназначен для подсоединения кабеля питания к аппарату.
(16) Порт USB
Предназначен для подключения аппарата к компьютеру с целью печати или сканирования.
ВАЖНО
• Пока аппарат выполняет печать с компьютера или сканирует изображения на
компьютер, или же компьютер находится в спящем режиме или режиме ожидания, не
отсоединяйте и не подсоединяйте кабель USB.
14
Введение
Глава 1
Lis1QSG_GB.book Page 15 Wednesday, July 13, 2005 5:06 PM
Панель управления
(4) (5)
(6)
(7)
(8)
(9)
(10)
РУССКИЙ
(1) (2) (3)
(11)
(1) Кнопка [
(12)
(13)
(14)
(Обслуживание)]
Предназначена для доступа в меню MAINTENANCE (ОБСЛУЖИВАНИЕ).
(2) Кнопка [По размеру стр.]
Предназначена для выбора или отмены копирования по размеру бумаги.
(3) Индикатор “По размеру стр.”
Загорается, если выбран режим копирования по размеру бумаги.
(4) Кнопка [СКАНИРОВАТЬ]
Предназначена для открытия “Диспетчера MP” с целью сканирования документа на
компьютер в соответствии с выбранными параметрами. Кнопку можно использовать, только
когда аппарат подключен к компьютеру.
(5) Индикатор аварийного сигнала
Загорается, если возникает ошибка либо заканчивается бумага или чернила.
(6) LED (светодиодный индикатор)
Отображает число копий, номер выбранного элемента меню MAINTENANCE
(ОБСЛУЖИВАНИЕ) или рабочее состояние аппарата.
(7) Кнопка [Черный]*
Предназначена для запуска черно-белого копирования. Кроме того, эта кнопка используется
для подтверждения настроек или операций.
(8) Кнопка [Цветное]*
Предназначена для запуска полноцветного копирования. Кроме того, эта кнопка
используется для подтверждения настроек или операций.
(9) Кнопка [Стоп/Сброс]
Предназначена для отмены операций и перехода в режим ожидания.
(10) Кнопка [ВКЛ./ВЫКЛ.]
Предназначена для включения и выключения аппарата. Перед включением аппарата следует
убедиться, что крышка документа закрыта.
* В программных приложениях или руководствах вместо кнопок [Start] (Пуск) или [OK] (ОК) иногда
используются кнопки [Черный] и/или [Цветное].
Глава 1
Введение
15
Lis1QSG_GB.book Page 16 Wednesday, July 13, 2005 5:06 PM
(11) Индикатор черных и цветных чернил
Загорается, если черные или цветные чернила закончились.
(12) Индикатор бумаги
Отображает выбранный размер и тип бумаги для копирования.
РУССКИЙ
(13) Кнопка [Бумага]
Предназначена для изменения размера и типа бумаги для копирования.
(14) Кнопка [+]
Предназначена для увеличения числа копий.
16
Введение
Глава 1
Lis1QSG_GB.book Page 17 Wednesday, July 13, 2005 5:06 PM
X Загрузка бумаги
1 Откройте подставку для бумаги (1),
РУССКИЙ
2 Копирование
(1)
затем вытяните удлинитель
подтавки для бумаги (2).
(2)
2
Положите стопку бумаги (стороной
для печати вверх) в устройство
автоподачи (1) и, сжав
направляющую бумаги (A) с обеих
сторон, установите ее вплотную к
левой стороне стопки (2).
• Убедитесь, что стопка бумаги не превышает
ограничительную отметку (B).
• Для получения дополнительной информации
о загрузке бумаги см. Руководство
пользователя.
(A)
(B)
A4
(2)
(1)
X Рекомендуемая бумага
• Обычная бумага
• Сверхбелая бумага*
• Глянцевая фотобумага*
• Матовая фотобумага*
• Профессиональная фотобумага*
• Фотобумага с особым глянцем*
• Полуглянцевая фотобумага*
* Специальные типы бумаги Canon.
Для получения дополнительной информации по использованию бумаги см.
Руководство пользователя.
Глава 2
Копирование
17
Lis1QSG_GB.book Page 18 Wednesday, July 13, 2005 5:06 PM
X Установка размера и типа бумаги
Для копирования или печати фотографий с помощью панели управления
необходимо задать размер и тип бумаги, загруженной в устройство автоподачи (см.
стр. 17)
РУССКИЙ
1
Нажимая кнопку [Бумага], выберите размер и тип бумаги.
X Загрузка документов
1 Поднимите крышку документа.
2 Загрузите документ.
• Поместите документ на стекло
экспонирования лицевой стороной вниз.
• Выровняйте левый верхний угол документа
в соответствии с меткой в правом нижнем
углу стекла экспонирования.
3
Аккуратно закройте крышку
документа.
X Создание копий
1 Нажимая кнопку [+], выберите количество копий (не более 9).
2 Нажмите кнопку [Цветное] для полноцветного копирования или
[Черный] – для черно-белого.
• Если удерживать одну из этих кнопок нажатой более 2 секунд, LED мигнет один раз.
Когда кнопка будет отпущена, аппарат выполнит копирование с высокой скоростью
(черновое качество) (только для обычной бумаги размера A4 или Letter).
X Дополнительная функция копирования
Копирование по
размеру бумаги
Изображения копируются в соответствии с размером бумаги.
Для получения дополнительной информации о копировании по размеру бумаги см.
Руководство пользователя.
18
Копирование
Глава 2
Lis1QSG_GB.book Page 19 Wednesday, July 13, 2005 5:06 PM
3
Печать с компьютера
X Печать документов
1
2
Загрузите бумагу в устройство автоподачи (см. стр. 17)
3
Выберите [Print] (Печать) в меню [File] (Файл) приложения.
РУССКИЙ
Процедура печати немного отличается в зависимости от используемого
программного приложения. Ниже описана основная процедура печати.
Создайте документ или откройте файл, предназначенный для
печати.
• Убедитесь, что аппарат выбран в качестве принтера.
4
Выполните необходимые настройки для документа, затем
нажмите кнопку [OK] (ОК).
5
Нажмите [Print] (Печать) или [OK] (ОК).
1
2
Загрузите бумагу в устройство автоподачи (см. стр. 17)
3
Выберите [Page Setup] (Настройка страницы) в меню [File] (Файл)
приложения.
Создайте документ или откройте файл, предназначенный для
печати.
• Убедитесь, что аппарат выбран в качестве принтера.
4
Выберите необходимый размер бумаги в разделе [Paper Size]
(Размер), затем нажмите кнопку [ОК] (ОК).
5
6
Выберите [Print] (Печать) в меню [File] (Файл) приложения.
7
Нажмите [Print] (Печать).
Глава 3
Выполните необходимые настройки для документа, затем
нажмите кнопку [OK] (ОК).
Печать с компьютера
19
Lis1QSG_GB.book Page 20 Wednesday, July 13, 2005 5:06 PM
4
Сканирование
X Способы сканирования
РУССКИЙ
Сканирование с помощью “Диспетчера MP”
С помощью “Диспетчера MP” можно сканировать, обрабатывать и сохранять
документы на компьютере. Для получения дополнительной информации по
использованию “Диспетчера MP” см. Руководство по сканированию.
На рабочем столе Windows дважды нажмите значок [MP Navigator 2.0] для
открытия “Диспетчера MP”.
В меню [Go] (Перейти) выберите [Applications] (Приложения), затем дважды
нажмите значок [MP Navigator 2.0] для открытия “Диспетчера MP”.
Из окна “Диспетчера MP” можно запускать следующие приложения.
• Easy-PhotoPrint (печать фотографий)
• ArcSoft PhotoStudio (Художественная обработка фотографий)
• ScanSoft OmniPage SE* (Преобразование сканированных документов в текст)
*Программа ScanSoft OmniPage SE не поддерживает работу в системе Windows 98 (первое
издание).
Если использовался параметр [Custom Install] (выборочный), при выборе которого
устанавливается только “Драйвер MP” и “Диспетчер MP”, значит, указанные выше
приложения не были установлены и поэтому их не удастся запустить. Для запуска
приложений из окна “Диспетчера MP” снова выберите [Custom Install]
(выборочный) и установите эти приложения.
Сканирование с помощью панели управления аппарата
При нажатии кнопки [СКАНИРОВАТЬ] на аппарате открывается “Диспетчер MP”,
где можно изменить параметры для операций сканирования (см. Руководство по
сканированию)
1
2
Загрузите документ на стекло экспонирования (см. стр. 18)
Нажмите кнопку [СКАНИРОВАТЬ].
• Откроется окно “Диспетчера MP”.
• Описанная ниже процедура может различаться в зависимости от настроек. Для получения
дополнительной информации см. Руководство по сканированию.
Сканирование из программного приложения
Изображения можно сканировать из программного приложения, совместимого с
TWAIN или WIA (только в системе Windows XP), после чего они будут доступны
для обработки. Эта процедура отличается в зависимости от используемого
программного приложения.
Для получения подробного описания процедуры см. руководство по
используемому программному приложению.
20
Сканирование
Глава 4
Lis1QSG_GB.book Page 21 Wednesday, July 13, 2005 5:06 PM
5 Печать фотографий непосредственно с
цифровой камеры
РУССКИЙ
X Подсоединение PictBridge-совместимого устройства
При подсоединении к аппарату PictBridge-совместимого устройства, например
цифровой камеры, видеокамеры или мобильного телефона, печать записанных
изображений можно выполнять без использования компьютера.
1
2
3
Включите аппарат.
Загрузите бумагу в устройство автоподачи (см. стр. 17)
Подсоедините к аппарату PictBridge-совместимое устройство.
• Убедитесь, что устройство выключено.
• Подсоедините к аппарату устройство с помощью прилагаемого к нему кабеля USB
(используется для подключения к компьютеру).
4
Включите устройство и настройте его для печати без
использования компьютера.
Некоторые типы PictBridge-совместимых устройств при подсоединении к аппарату
включаются автоматически. Если устройство не включается автоматически, включите
его вручную.
5
Глава 5
Теперь можно печатать изображения непосредственно с камеры.
Печать фотографий непосредственно с цифровой камеры
21
Lis1QSG_GB.book Page 22 Wednesday, July 13, 2005 5:06 PM
6 Обслуживание
X Замена картриджа FINE
РУССКИЙ
При замене картриджа FINE внимательно проверьте номер его модели.
Этот аппарат также совместим с черными картриджами FINE PG-50 Black (высокое
качество) и цветными картриджами CL-51 Color (высокое качество).
1
2
Обязательно включите питание.
Приподнимите блок сканирования
и установите опору блока
сканирования в нужное
положение.
ПРЕДУПРЕЖДЕНИЕ
• Не пытайтесь передвинуть или остановить
держатель картриджа FINE.
• Не дотрагивайтесь до металлических деталей.
3
Если в картридже FINE закончились
чернила, нажмите на его язычок для
разблокировки фиксаторов, а затем
извлеките картридж FINE.
ПРЕДУПРЕЖДЕНИЕ
• Не дотрагивайтесь до прозрачной пленки (A),
ленточного кабеля (B), контейнера для чернил
(пористый материал) (C) или металлических
деталей.
(A)
22
Обслуживание
(B)
(C)
Глава 6
Lis1QSG_GB.book Page 23 Wednesday, July 13, 2005 5:06 PM
Выньте новый картридж FINE из
упаковки. Затем возьмите
картридж FINE, как показано на
рисунке, и удалите защитную
ленту (A).
РУССКИЙ
4
ПРЕДУПРЕЖДЕНИЕ
• Не дотрагивайтесь до gold terminals
(позолоченные контакты) (B) или nozzles
(сопла) (C).
• Не трясите и не роняйте картридж FINE, так
как в результате этого чернила могут вытечь
и испачкать одежду или руки.
• Не пытайтесь прикрепить обратно снятую
защитную ленту.
• Не допускайте контакта nozzles (сопла) с
какими-либо предметами.
(A)
(B)
(C)
5
Вставьте картридж FINE в
свободный отсек под небольшим
углом.
6
Нажмите на картридж FINE так,
чтобы он зафиксировался в
нужном положении.
Глава 6
Обслуживание
23
Lis1QSG_GB.book Page 24 Wednesday, July 13, 2005 5:06 PM
РУССКИЙ
7
Если потребуется заменить еще один картридж FINE, повторите
шаги с 3 по 6.
8
Приподнимите блок сканирования и, сложив опору блока
сканирования, опустите блок сканирования в исходное
положение.
X Чистка картриджа FINE
Если шаблон проверки сопел не распечатан или распечатан не полностью, а также
если на нем отсутствует какой-либо цвет, выполните чистку картриджа FINE.
1
<H>:
выполнение стандартной чистки картриджа FINE.
<F>:
выполнение глубокой чистки картриджа FINE.
2
24
Нажимая кнопку [Обслуживание], выберите <H> или <F> (в
зависимости от того, что требуется).
Нажмите кнопку [Черный] или [Цветное].
Обслуживание
Глава 6
Lis1QSG_GB.book Page 25 Wednesday, July 13, 2005 5:06 PM
7 Поиск и устранение неисправностей
Если на LED поочередно загорелись индикации <E> и <3>, выполните описанную
ниже процедуру для устранения замятия бумаги.
Устранение замятий со стороны
лотка вывода бумаги
1 Аккуратно удалите застрявшие
листы со стороны лотка вывода
бумаги.
2
Нажмите кнопку [Черный] или
[Цветное].
Устранение замятий бумаги в
устройстве автоподачи
1 Аккуратно удалите из устройства
автоподачи застрявшие листы бумаги.
2
Нажмите кнопку [Черный] или [Цветное].
Устранение замятий бумаги в аппарате
1 Откройте блок сканирования.
2 Осторожно извлеките застрявшую в
роликах бумагу.
3
4
Закройте блок сканирования.
Нажмите кнопку [Черный] или
[Цветное].
X Дополнительная информация
Для получения дополнительной информации о поиске и устранении
неисправностей см. Руководство пользователя.
Глава 7
Поиск и устранение неисправностей
25
РУССКИЙ
X Устранение замятий бумаги
Lis1QSG_GB.book Page 26 Wednesday, July 13, 2005 5:06 PM
РУССКИЙ
Данный аппарат совместим со следующими картриджами FINE.
Данный аппарат также совместим со следующими картриджами FINE (высокое качество).
Для получения дополнительной информации о замене картриджа FINE см. раздел “Замена
картриджа FINE” в настоящем руководстве.
-
Contents
-
Table of Contents
-
Troubleshooting
-
Bookmarks
Quick Links
User’s Guide
ENG
QT7-0059-V02
Related Manuals for Canon PIXMA MP150
Summary of Contents for Canon PIXMA MP150
-
Page 1
User’s Guide QT7-0059-V02… -
Page 2
Canon CarePAK Extended Service Plan is a cost-attractive and easy-to-use extended service program that provides up to three full years of service and support coverage at a very attractive price. CarePAK offers toll-free Canon technical support and includes Canon’s superb InstantExchange product replacement program. For further information about extending your Canon service and support, call (1-800- 385-2155), or visit our Web site at www.canonesp.com. -
Page 3
Disclaimer Canon Inc. has reviewed this manual thoroughly in order that it will be an easy-to-use guide to your Canon MP170/MP150 Series. All statements, technical information and recommendations in this manual and in any guides or related documents are believed… -
Page 4: Table Of Contents
Printing Photographs Directly From A Digital Camera …60 Printing Photographs Directly From A PictBridge-Compliant Device …60 Printing Photographs Directly From A Canon “Bubble Jet Direct” Compatible Digital Camera…64 Changing The Machine Settings (MP170) …65 Changing The Settings …65 PRINT SETTINGS …65 PICTBRIDGE SET…66…
-
Page 5: Safety Precautions
If you detect smoke, unusual smells or strange noises around the machine, immediately unplug the machine at the power supply and contact your local authorized Canon dealer or the Canon help line. Using the machine in such conditions may result in fire or electrical shock.
-
Page 6
If these items are dropped or spilled in the machine, turn OFF the power and unplug the power cord immediately with dry hands. Then contact your local authorized Canon dealer or the Canon help line. -
Page 7
Power supply Never remove the plug by pulling on the cord. Pulling on the power cord may damage the cord and cause a fire or electrical shock. When turning OFF the power, be sure to press [ON/OFF] or unplug the machine. However, if the machine is unplugged during printing, the FINE Cartridge is not protected with the cap that prevents the ink from drying. -
Page 8
Containers of water or other liquids such as glasses, vases, or pot plants If water does spill inside the machine, turn OFF the power immediately by pressing the [ON/ OFF], and disconnect the power cord. Then, contact your local authorized Canon dealer or the Canon help line. -
Page 9
FINE Cartridges (Ink For safety reasons, store FINE Cartridges (Ink Cartridges) out of the reach of small Cartridges) children. If a child ingests any ink, consult a doctor immediately. Do not shake FINE Cartridges (Ink Cartridges). Ink may leak out and stain clothing or the surrounding area. Never touch the nozzle and the gold terminal. -
Page 10: Reading The Document
Reading The Document Symbols Used In This Guide Please read the list below of symbols used in this guide. The following symbols are used to indicate important instructions. Be sure to obey these instructions. Indicates a warning concerning operations that may lead to death or Warning injury to persons if not performed correctly.
-
Page 11: Legal Limitations On Use Of Your Product And Use Of Images
Legal Limitations On Use Of Your Product And Use Of Images It may be unlawful to make copies of, scan, print or use reproductions of the following documents. The list provided is non-exhaustive. When in doubt, check with a legal representative in your jurisdiction.
-
Page 12: Before Printing
Printouts are output to this tray. Open the tray before you start copying or printing. When not being used, keep it closed in the machine. (7) Direct Print Port Used to connect a PictBridge-compliant or Canon Bubble Jet Direct-compatible device to the machine when printing images directly from the device. (8) Platen Glass Used to load a document to be processed.
-
Page 13
Rear view and interior (10) (16) (10) FINE Cartridge Holder Install the FINE Cartridges here. (11) FINE Cartridges (Ink Cartridges) Replaceable cartridge that comprises an integrated Print Head and ink tank. FINE Cartridges are available in two types, Color (on the right) and Black (on the left). (12) Scanning Unit Used to scan a document. -
Page 14: Operation Panel
Operation Panel This section describes the buttons on the Operation Panel, and their functions and locations. (1) [Photo Index Sheet] Button Switches the machine to Photo Index Sheet mode. (2) [COPY] Button Switches the machine to copy mode. (3) [SCAN] Button Switches the machine to scan mode.
-
Page 15
(1) (2) (3) (4) (5) (1) [ (Maintenance)] Button Accesses the Maintenance menu. (2) [Fit to Page] Button Enables/disables the Fit-to-Page copying. (3) Fit-to-Page Lamp Lights when Fit-to-Page copying is enabled. (4) [SCAN] Button Opens the MP Navigator to scan a document to your computer according to the settings selected. -
Page 16: Turning The Machine On/Off
Turning The Machine ON/OFF Press [ON/OFF] to turn the machine ON and OFF. Before turning ON the machine, make sure the Document Cover is closed. Important Note Before Printing Always press [ON/OFF] before disconnecting the power cord. This ensures the FINE Cartridge is covered to prevent it from drying out. If the machine is not used for an extended period of time, we recommend making black &…
-
Page 17: Setting Documents
Setting Documents Document Requirements The documents you load on the Platen Glass for copying or scanning must meet these requirements: Document All types of paper documents Type Photographs Books, catalogs or magazines Size (W x L) Max. 8 Thickness Max. Loading Documents To copy or scan a document, set it on the Platen Glass.
-
Page 18: General Paper Guidelines
Place the paper back into its packet when not using it, and store out of direct sunlight in a place where the temperature and humidity are low. If the printed area is traced with a highlight pen or paint-stick or stained with water or sweat, ink may blur. Before Printing ) other than genuine Canon paper Chapter 1…
-
Page 19: Recommended Paper
Plain paper Approx. 100 sheets (17 lb. or 64 g/m Envelopes Approx. 10 envelopes Canon Specialty Paper Canon recommends that you use genuine Canon paper to insure optimal print quality. Paper Type Model Super White Paper SW-201 High Resolution HR-101N Approx. 80 sheets…
-
Page 20
We do not recommend using plain paper for photo printing. Printing from your You may be able to load other computer envelopes, but Canon cannot guarantee consistent performance. Do not use the following types of envelopes since they may cause… -
Page 21
Canon Specialty Paper Canon recommends that you use genuine Canon paper to insure optimal print quality. Paper Type Size High Letter (8 1/2 in. x 11 in./ Resolution 215.9 mm x 279.4 mm) Paper A4 (8 1/4 in. x 11 3/4 in./… -
Page 22
Paper Type Size Photo Paper Letter (8 1/2 in. x 11 in./ Plus Double 215.9 mm x 279.4 mm) Sided A4 (8 1/4 in. x 11 3/4 in./ 210 mm x 297 mm) 5″ x 7″ (5 in. x 7 in./ 127.0 mm x 177.8 mm) Photo Paper Letter (8 1/2 in. -
Page 23
Paper Type Size Photo Paper Letter (8 1/2 in. x 11 in./ 215.9 mm x 279.4 mm) A4 (8 1/4 in. x 11 3/4 in./ 210 mm x 297 mm) 4″ x 6″ (4 in. x 6 in./ 101.6 mm x 152.4 mm) Photo 4″… -
Page 24
Paper Type Size T-Shirt Letter (8 1/2 in. x 11 in./ Transfers 215.9 mm x 279.4 mm) A4 (8 1/4 in. x 11 3/4 in./ 210 mm x 297 mm) Transparenc Letter (8 1/2 in. x 11 in./ 215.9 mm x 279.4 mm) A4 (8 1/4 in. -
Page 25: Loading Paper
Loading Paper Loading Paper Follow this procedure: Open the Paper Support (1), then pull out the Paper Support Extension (2). Place a stack of paper (print side up) in the Auto Sheet Feeder (1), pinch the Paper Guide (A) and adjust it to the left side of the stack (2). Set the Paper Thickness Lever to the correct position for the paper.
-
Page 26: Loading Envelopes
Loading Envelopes Follow this procedure: Open the Paper Support, then pull out the Paper Support Extension. Prepare the envelopes for loading. Important Before Printing Press down firmly on the edges of the envelopes to make the folds crisp. Also, press firmly on the area that corresponds to the edges of the back flap.
-
Page 27
Place the stack of envelopes (print side up) in the Auto Sheet Feeder (1), pinch the Paper Guide (A) and adjust it to the left side of the stack (2). Load the envelopes in the Auto Sheet Feeder with the short side down. Set the Paper Thickness Lever to the right. -
Page 28: Copying
Chapter 2 Copying Making Copies This section describes the basic procedure to make copies. Load the paper in the Auto Sheet Feeder. For details on paper, see page 17. Note Press [COPY]. Use [ ] or [ ] to select the number of copies (max. 99 copies). 100% PLAIN For the maximum load limit for the paper you are using in the Auto Sheet…
-
Page 29
Load the paper in the Auto Sheet Feeder. (See page 23) Press [+] repeatedly to select the number of copies (max. 9 copies). Press [Paper] repeatedly to select the paper size and type. The Paper Lamp indicates the selected paper size and type. A4 or Letter Photo Paper/A4 or Letter Plain Paper/4″x6″… -
Page 30: Changing The Copy Settings (Mp170)
PLAIN PAPER/PHOTO PAPER PRO/PHOTO PAPER PLUS/MATTE PHOTO PAPR/ GLOSSY In order to obtain optimal quality print results, when copying photographs, Note use Canon-recommended Photo Paper Pro or Photo Paper Plus Glossy. For details on paper, see page 17. Press [OK]. Copying…
-
Page 31: Adjusting Image Quality
Adjusting Image Quality You can adjust the image quality according to the document to be copied. Follow this procedure: Press [COPY]. Press [Menu] repeatedly until <IMAGE QUALITY> appears. 5.IMAGE QUALITY STANDARD Use [ ] or [ ] to select the image quality. <STANDARD>: Suitable for text-only documents.
-
Page 32: Reducing Or Enlarging A Copy
Reducing Or Enlarging A Copy You can reduce or enlarge copies using three different methods: Preset copy ratios You can select one of the preset ratios to reduce or enlarge copies. Custom copy ratios You can specify the copy ratio as a percentage to reduce or enlarge (Zoom) copies.
-
Page 33
Using Custom Copy Ratios (Zoom) In addition to making reduction and enlargement decisions using preset copy ratios, you can use customized 1% increments. Follow this procedure: Press [COPY]. Press [Menu] repeatedly until <ENLARGE/REDUCE> appears. Use [ ] or [ ] to select <ZOOM>. 1.ENLARGE/REDUCE ZOOM Press [OK]. -
Page 34: Advanced Copy Functions
Fit-to-Page copying (MP150) The following section describes how to use this feature. Sticker Copying You can easily make 16 stickers from L (3.5″ x 5″) photos or graphics using Canon sticker paper. (1) Platen Glass (Place document face down) (2) 16 stickers Follow this procedure: Load one sheet of stickers in the Auto Sheet Feeder.
-
Page 35: Borderless Copying
Borderless Copying This feature enables you to copy the images so that they fill the entire page without borders. Note Follow this procedure: Load the paper in the Auto Sheet Feeder. Press [COPY]. Use [ ] or [ ] to select the number of copies (max. 99 copies). Adjust the settings for your document as necessary.
-
Page 36
Press [Color] for color copying, or press [Black] for black & white copying. Repeating An Image On A Page (Image Repeat) This feature enables you to copy an image multiple times onto a single page. You can set the machine to automatically select the number of times it repeats the image, or you can specify the number. -
Page 37
Press [Color] for color copying, or press [Black] for black & white copying. Important Note Fit-to-Page Copying (MP150) This feature enables you to copy images so that they are automatically reduced or enlarged to fit the paper size you select. Follow this procedure: Load the paper in the Auto Sheet Feeder. -
Page 38: Printing From A Memory Card (Mp170)
Chapter 3 Printing From A Memory Card (MP170) Using A Memory Card Let’s take a look at different types of memory cards and how to insert and remove them. Memory Cards Supported By This Machine Supported memory cards are as follows: Memory Cards which can be inserted directly Memory Cards which can be used through a special adapter Purchase a CompactFlash Card Adapter for xD-Picture Card separately.
-
Page 39: Inserting A Memory Card
This machine accepts images taken with a camera compatible with the Important Design rule for Camera File system (Exif 2.21 compliant) and DPOF (Ver. 1.00 compliant). Photos stored in a memory card not supported by the digital camera may fail to load or be damaged.
-
Page 40: Removing A Memory Card
Install the memory card in the appropriate Card Slot. Type of card CompactFlash (CF) Card Microdrive xD-Picture Card* Install these cards into the left card slot. SmartMedia Card Install this card into the right card slot. MEMORY STICK MEMORY STICK PRO MEMORY STICK DUO* MEMORY STICK PRO DUO*…
-
Page 41: Printing Photograph
Printing Photograph Printing By Using The Photo Index Sheet With this machine, you can easily print photographs using a Photo Index Sheet, by filling in the appropriate circles to select print options and photographs you want to print. Simply scanning a Photo Index Sheet prints the selected photographs according to the selections you have made.
-
Page 42
Use [ ] or [ ] to select the range of photographs to print on the Photo Index Sheet. <PRINT ALL PHOTOS>: Prints all image data stored on the memory card. <LAST PHOTO>: <SELECT RANGE>: If you select <PRINT ALL PHOTOS>: Go to step 7. -
Page 43
Press [OK]. INDX PRINTING The machine prints the Photo Index Sheets. If more than 37 photographs are to be printed, the machine prints them Note on more than one Photo Index Sheet. (1) Select the paper size and type. (2) Select date printing as necessary. (3) Mark this to print one copy of each photograph. -
Page 44
Fill in the appropriate circles ( to print and print settings. Good (1) Check mark (2) Line only (3) Light Important Load the paper selected on the Photo Index Sheet in the Auto Sheet Feeder. When printing image data using a Photo Index Sheet, you can select 4″ x Note 6″, 5″… -
Page 45
Press [OK]. The machine reads the Photo Index Sheet, and prints photographs according to the settings. Important Note Print Index You can print an index of all photos saved in the memory card on what is known as an index print. -
Page 46: Print All Photos
Print All Photos You can print all photos saved on a memory card. Turn ON the machine and load the paper in the Auto Sheet Feeder. Insert the memory card into the Card Slot. See “Inserting A Memory Card” on page 37. Press [MEMORY CARD] and then press [Menu].
-
Page 47: Printing A Range Of Photos
Printing A Range Of Photos You can print a range of photos in sequence on a memory card. To select the photos to print, first print the index and note the photo numbers assigned to them. You can also print a range of photos according to the shooting dates of photos you select.
-
Page 48
Printing On Stickers — Sticker Print You can print your favorite photos on Canon sticker paper. Turn ON the machine and load a sheet of stickers in the Auto Sheet Feeder. You can load only one sheet of stickers at a time. -
Page 49: Dpof Print
DPOF Print If DPOF (Digital Print Order Format) settings are made on the camera, photos are printed automatically according to those settings. Note Turn ON the machine and load the paper in the Auto Sheet Feeder. Insert the memory card containing the DPOF information into the Card Slot. See “Inserting A Memory Card”…
-
Page 50: Print Settings
Print Settings This section describes the print settings you can change in Memory Card Mode, such as paper size, paper type or print quality. The settings below appear on the LCD when you press [Menu] repeatedly in Memory Card Mode. Depending on the functions you use, some setting items cannot be specified in Note combination.
-
Page 51: Reading From And Writing To A Memory Card (Mp170)
Chapter 4 Reading From And Writing To A Memory Card (MP170) Setting Up The Card Slot As The Memory Card Drive Of The Computer Connecting the machine to a computer results in the memory card drive (removable hard disk) being displayed under [My Computer].
-
Page 52
Important To change the write protect setting while a card is inserted in the Card Note Slot, unplug the USB cable before changing the setting, then plug it back in afterwards. The new setting is not applied unless you plug the USB cable back in. -
Page 53: Printing From Your Computer
Chapter 5 Printing From Your Computer This chapter describes the basic printing procedure, taking the steps to print documents as an example. Printing With Windows Menu and command names may differ between software applications, and Note more steps may be required. For details, refer to the documentation for each software application you use.
-
Page 54
Specify the required settings. (1) Click [Media Type] to select the type of media loaded in the machine (1). (2) Specify the print quality and other settings in [Print Quality] or [Color/Intensity] (2). For print settings, see the On-screen Manual. Note (3) Click [OK] (3). -
Page 55
You can cancel a print job in progress by simply pressing [Stop/Reset] on the machine. Click [Cancel Printing] on [Canon IJ Status Monitor] to stop printing. To show [Canon IJ Status Monitor], click [Canon PIXMA MP170 Series Printer] on the taskbar. -
Page 56: Printing With Macintosh
Printing With Macintosh Menu and command names may differ between software applications, and Note more steps may be required. For details, refer to the documentation for each software application you use. The steps described in this section are for printing in Mac OS X v.10.3x. Press [ON/OFF] to turn ON the machine.
-
Page 57
Specify the required settings. (1) Select [Print] from the application software’s [File] menu. The [Print] dialog box opens. (2) Select [Quality & Media] from the pop-up menu (1). (3) Select the desired media type from [Media Type] (2). (4) Select the print mode appropriate to your document from [Print Mode] (3). Note Chapter 5 When you select the print mode appropriate to your document from… -
Page 58
Print the document. (1) Click [Print]. Note Printing From Your Computer You can cancel a print job in progress by simply pressing [Stop/Reset] on the machine. Double-clicking the name of your machine in the [Printer list] of the [Printer Setup Utility] (When using Mac OS X v.10.2, double-clicking the name of your machine in the [Printer list] of the [Print Center]) displays a dialog that prompts you to confirm the status of the print job. -
Page 59: Scanning Images
Chapter 6 Scanning Images About Scanning Images You can scan images from the machine into a computer, and save them in JPEG, TIFF, or Bitmap format. Then you can process that data by using the supplied application software to create original images.
-
Page 60
Scanning With The Operation Panel Of The Machine With the operation panel of the machine, you can open the MP Navigator and change the settings for the scanning operations. (See the Scan Guide) If you are using Windows XP The program selection screen is displayed the first time you press [Black] / [Color] (MP170) or [SCAN] (MP150) on the machine. -
Page 61
Scanning From An Application Software You can scan an image from TWAIN- or WIA- (Windows XP only) compliant application software and use the image in that application software. This procedure varies depending on the application software. For the detailed procedure, refer to the manual of the application software you are using. Chapter 6 Scanning Images… -
Page 62: Printing Photographs Directly From A Digital Camera
Do not connect any equipment other than PictBridge-compliant devices Caution or Canon Bubble Jet Direct-compatible cameras to the Direct Print Port of the machine. Doing so may result in an electric shock, fire, or damage to the device. Note Turn ON the machine.
-
Page 63
A PictBridge-compliant device. * This mark indicates that the product is PictBridge-compatible. A Canon “Bubble Jet Direct” compatible digital camera. Confirming Or Changing The Device Settings To change the paper size or paper type, operate the device to select the PictBridge print setup mode and confirm or change the settings. -
Page 64
This paper is exclusively used to print photo stickers. When printing on sticker paper, select “10×15 cm/4″ x 6″” in “Page size”. This size can be selected only for Canon PictBridge compatible devices (note that it cannot be selected for some models). -
Page 65
When “Default setting” (selections based on the machine setting) is selected, the machine operates based on the “IMAGE ENHANCEMENT” settings mode using the controls of the machine. If you use a Canon PictBridge-compliant device, you can select “VIVID”, “NR”, “VIVID+NR” or “FACE”. (Note that these options cannot be selected for some models.) Note About “Date/File No. -
Page 66: Printing Photographs Directly From A Canon «Bubble Jet Direct» Compatible Digital Camera
Printing Photographs Directly From A Canon “Bubble Jet Direct” Compatible Digital Camera Media Types For Digital Cameras When you connect a digital camera, you can use the following media: Digital Camera Setting Card #1 Card #2 Card #3 Note Printing Photographs Directly From A Digital Camera Media Type Photo Paper Pro 4″…
-
Page 67: Changing The Machine Settings (Mp170)
Chapter 8 Changing The Machine Settings (MP170) Changing The Settings This section describes the procedure to change the settings in the <SYSTEM SETTINGS> menu, taking the steps to specify <EXTENDED AMOUNT> as an example. Press [ON/OFF] to turn ON the machine. (See page 14) Press [Menu] repeatedly until <SYSTEM SETTINGS>…
-
Page 68: Pictbridge Set
PICTBRIDGE SET PAGE SIZE Selects the paper size: 8.5×11/A4/4″x6″/5″x7″/C-CARD MEDIA TYPE Selects the paper type: PLAIN PAPER/PHOTO PAPER PRO/PHOTO PAPER PLUS/MATTE PHOTO PAPR/GLOSSY PRINT QLTY Selects the print quality: STANDARD/HIGH BORDERLESS PRINT Selects bordered or borderless print: ON/OFF IMAGE ENHANCEMENT Selects whether to optimize photos or not: SKIP/SET (VIVID/POP/REMOVE NOISE/FACE BRIGHT) (See page 48) OTHERS…
-
Page 69: Restore Default
RESTORE DEFAULT Changes the settings back to the default, except for the language for LCD messages and the position of the FINE Cartridge: YES/NO SAVE CONFGURATION Saves the current media settings for the size, type, quality, magnification, intensity and image optimize: YES/NO LOAD CONFGURATION Loads the saved media settings: YES/NO…
-
Page 70: Routine Maintenance
Chapter 9 Routine Maintenance Replacing A FINE Cartridge If there is no improvement with the quality of printing following such maintenance as FINE Cartridge Cleaning, one of the FINE Cartridges is probably empty. Replace the empty FINE Cartridge with a new one.
-
Page 71
Remove the empty FINE Cartridge. (1) Push the FINE Cartridge down. (2) Remove the FINE Cartridge. Important Do not touch the transparent film (A), film cable (B), ink absorber (sponge Caution part) (C), or any metal parts. Chapter 9 Handle FINE Cartridges carefully to avoid staining your clothes or the surrounding work area. -
Page 72
Prepare a replacement FINE Cartridge. * To the Cartridge Holder. (1) Unpack a new FINE Cartridge and remove the Protective Tape. Important Insert the new FINE Cartridge. Black FINE Cartridge should be installed into the left holder (B) and Color FINE Cartridge should go into the right holder (C). -
Page 73
See “Aligning The FINE Cartridge” on page 80. Important Chapter 9 To maintain optimal print quality, we recommend that you use Canon brand FINE Cartridge. Replenishing ink only is also not recommended. Replace the FINE Cartridge promptly. Do not leave with the FINE Cartridge removed. -
Page 74
Knowing When To Replace A FINE Cartridge It is important to identify the empty Cartridge using the LCD/LED and replace it. Should missing characters or white streaks appear despite sufficient ink Note levels, see “When Printing Becomes Faint Or Color Is Incorrect” on page 76. -
Page 75
[View Printer Status]. Canon IJ Status Monitor appears. It also appears automatically during printing. Open the [Canon IJ Printer Utility] dialog box, and then select [Ink Level Information] from the pop-up menu. When the “!” mark appears on the Low Ink Warning The ink level of the FINE Cartridge showing the “!”… -
Page 76
Setting of FINE Cartridges Note If a FINE Cartridge runs out of ink, you can print with either the Color or Black FINE Cartridge only for a while. However the same printing quality cannot be expected, compared to printing with both cartridges. The [Black only] setting can be used when you select [Plain Paper] in [Media Type]. -
Page 77
When the “?” mark appears on the Low Ink Warning If you install an old FINE Cartridge, the “?” icon appears for the FINE Cartridge in question. In this case, the remaining level of ink cannot be calculated correctly. If you try printing when “?” mark appears, the following message appears and printing stops. In either case, clicking [OK] cancels the error indication and enables continuation of printing. -
Page 78: When Printing Becomes Faint Or Color Is Incorrect
When Printing Becomes Faint Or Color Is Incorrect When printing becomes faint or colors are incorrect, the FINE Cartridge Nozzles are probably clogged. Follow the procedures below to clean these nozzles. Before Performing Maintenance Note Remove the FINE Cartridge once, then reinsert it into place. See “Replacing A FINE Cartridge”…
-
Page 79: Printing The Nozzle Check Pattern
Printing The Nozzle Check Pattern Print the nozzle check pattern to determine whether the ink is being ejected properly from the FINE Cartridge Nozzles. Use this function when the printed results are blurred or the color is incorrect. Printing The Nozzle Check Pattern Load A4- or Letter-sized plain paper in the Auto Sheet Feeder.
-
Page 80
Confirming The Nozzle Check Pattern This section describes how to confirm the nozzle check pattern and the FINE Cartridge position pattern. If the ink level is low, the nozzle check pattern is not printed correctly. If Note the ink level is low, replace the relevant FINE Cartridge. (See page 68) If the lines are broken (1), or white lines (2) are present in the pattern (A), clean the FINE Cartridge. -
Page 81: Fine Cartridge Cleaning
] to select <DEEP CLEANING>. 8.MAINTENANCE DEEP CLEANING Press [OK]. Press [Maintenance] repeatedly until <F> appears. Press [Black] or [Color]. If deep FINE Cartridge cleaning does not improve the print quality, Note contact a Canon service representative. Chapter 9 Routine Maintenance…
-
Page 82: Aligning The Fine Cartridge
Aligning The FINE Cartridge If ruled lines are misaligned or a printout is unsatisfactory, FINE Cartridge Alignment is required. Aligning The FINE Cartridge Press [Menu] repeatedly until <MAINTENANCE> appears. Use [ ] or [ ] to select <ALIGN PRINT HEAD>. Press [OK].
-
Page 83
Load the checked sheet on the Platen Glass. When loading the checked sheet, place the front side down, and align the upper left corner of the sheet with the alignment mark on the lower right corner of the Platen Glass. Press [OK]. -
Page 84: Cleaning Your Machine
Cleaning Your Machine This section describes the necessary cleaning procedures for your machine. Be sure to turn OFF the power and disconnect the power cord before cleaning Caution the machine. Do not use tissue paper, paper towels, or similar materials for cleaning; they can stick to the components or generate static charges.
-
Page 85: Cleaning The Roller
Repeat steps 2 to 3 three times. The sheet of paper is automatically fed in and then out of the machine. If there are no signs of improvement after performing three times, contact a Note Canon service representative. Chapter 9 Routine Maintenance…
-
Page 86
Cleaning The Bottom Plate If the printed paper is smudged, the inside of the machine may be dirty. Periodic cleaning of certain parts on the inside of your machine is recommended to maintain a high standard of printing quality. The parts can be cleaned in the following ways: See “Cleaning The Bottom Plate”… -
Page 87: Cleaning The Protrusions Inside The Machine
Cleaning The Bottom Plate Proceed steps 1 to 3 for MP170 on page 84. Press [Maintenance] repeatedly until <J> appears. Press [OK]. Inspect the discharged paper. If dust or dirt can be seen on the paper, repeat the cleaning process. If the discharged paper still appears dirty after you have run this clean Note process, the inside of your machine is probably extremely dirty.
-
Page 88: Troubleshooting
Chapter 10 Troubleshooting This chapter provides troubleshooting tips for problems you may encounter when using the machine. This section provides troubleshooting tips for the most common printing Note problems. If you cannot find appropriate tips for your problem, refer to the on- screen manuals.
-
Page 89: An Error Message Is Displayed On The Lcd/Led
Canon recommends to contact a Canon service representative as soon as possible. Depending on the model or brand of your device, you may have to select a print mode compliant with PictBridge before connecting the device.
-
Page 90
If you want to continue printing without this function, press [OK]. Canon recommends to use new genuine Canon Cartridges in order to obtain optimum qualities. The FINE Cartridge may not be the compatible with this machine. Install the appropriate FINE Cartridge. -
Page 91: Cannot See The Display On The Lcd/Led
If you want to continue printing without this function, press [Black] or [Color]. Canon recommends to use new genuine Canon Cartridges in order to obtain optimum qualities. The size of the document cannot be correctly detected or the document is too small when the Fit-to-Page copying is selected.
-
Page 92: Ink Does Not Come Out/Printing Is Blurred/Colors Are Wrong/White Streaks/Straight Lines Are Misaligned/Cannot Print To End Of Job
Ink Does Not Come Out/Printing Is Blurred/Colors Are Wrong/White Streaks/Straight Lines Are Misaligned/Cannot Print To End Of Job Cause FINE Cartridge is empty. FINE Cartridge is not installed correctly. Incorrect paper type. FINE Cartridge nozzles clogged or shifted. Print Quality is not set properly. Media not loaded printside up.
-
Page 93
Open the Paper Output Tray. Restart your computer. It may solve the problem. Delete an undesired print job, if there is any. Use [Canon IJ Status Monitor] in Windows or [Printer Setup Utility] (or [Print Center]) in Macintosh for the deletion. -
Page 94
Cause The size of the print data is too large. The hard disk does not have enough available space. When Copying Cause The document is not loaded correctly. The quality (image quality) displayed on the LCD is not suitable for the document. -
Page 95: Back Of Paper Is Smudged/Paper Does Not Feed Properly/Printed Surface Is Scratched
Back Of Paper Is Smudged/Paper Does Not Feed Properly/Printed Surface Is Scratched Cause Inside of the machine is dirty. Paper feed roller is dirty. Chapter 10 Action If the inside of the machine is dirty, printed paper may be smudged. Follow the steps described below to clean the inside of the machine.
-
Page 96
Cause Inappropriate paper type is used. Thick paper is used. Media is curled. The media type is not selected correctly in the printer driver. Paper is loaded incorrectly. Troubleshooting Action Check to see if the paper you are printing on is too thick. See “General Paper Guidelines”… -
Page 97: Paper Jams
Auto Sheet Feeder. Chapter 10 Action Use Photo Paper Pro or other Canon specialty paper to print images that have a high color saturation. See “Paper Types You Cannot Use” on page 16. Ensure that the media type selected on the Operation Panel matches that of the paper loaded.
-
Page 98: Cannot Print Properly From A Photo Index Sheet (Mp170)
The paper is fed and the jammed paper is ejected accordingly. If you cannot remove the jammed paper or the error still persists, contact a Canon service representative. Action Make sure all required boxes on the Photo Index Sheet are filled in, and that the sheet is set in the correct position and orientation on the Platen Glass.
-
Page 99: Cannot Print Properly From The Digital Camera
If you are using a non- Canon PictBridge compatible camera and not sure how to clear the error from the camera, confirm the message displayed on the LCD of the machine and clear the error.
-
Page 100
However, because printing is disabled once the waste ink absorber becomes completely full and until the waste ink absorber is replaced, you are recommended to contact a Canon service representative as early as possible. Prepare a new FINE Cartridge. -
Page 101: Cannot Install The Mp Driver
CD-ROM icon. Double-click the CD-ROM icon on your desktop to start installation. If the CD-ROM icon is not displayed on the desktop, there is a problem with the CD-ROM. Contact a Canon service representative. Chapter 10 Action Troubleshooting…
-
Page 102: Cannot Connect To Pc Properly
Uninstall the old version of the software following the instructions in the manual of that version, and reinstall the new version. The computer has an old version of the software installed. (Canon MultiPASS is registered as a program in the [Start] menu.) Installation procedure not Follow the Easy Setup Instructions packaged with your machine for proper MP followed correctly.
-
Page 103: Problems With Scanning
When You Connect To A Computer Running Windows XP, The Screen Shows The Warning Message “High-SPEED USB Device Plugged Into Non-High-SPEED USB Hub” Cause You connect to a computer Your environment is not fully compatible with USB 2.0. that does not support USB See “Printing Speed Is Slow / USB 2.0 Hi-Speed Connection Does Not Work”…
-
Page 104: Computer Stops Operating During Scanning
Computer Stops Operating During Scanning Cause Output Resolution set too Reboot the computer, lower the Output Resolution and rescan. high. Insufficient hard disk space. Multiple devices connected Disconnect all other devices but the machine from the port. to the USB port. Scan Quality Is Poor (Poor Image Displayed On The Monitor) Cause Incorrect scan settings.
-
Page 105: Slow Scanning Speed
Trouble scanning with Multi-Scan or Multi-Crop function Cause The original is positioned Check the position of the original on the document glass. Observe the following outside the supported area. when using the Multi-Scan or Multi-crop function. Error arising from Some application softwares do not support multiple image scanning. Scan each application software item individually without using the Multi-Scan or Multi-Crop function.
-
Page 106: An Error Message Appears On The Screen
“There Is Not Enough Memory.” Message Is Displayed Cause There is not enough Exit any application that are running, and try to run this program again. memory to continue scanning. Scanned Image Is Not Displayed Properly Cause Scanned image prints out Set the printing size in the application program.
-
Page 107
3. Open the [File] menu and select [Properties]. 4. Click the [Ports] tab (or the [Details] tab) to confirm the port settings. A USB port is selected if either USBnnn (Canon MP170/MP150) or MPUSBPRNnn (Canon MP170/MP150) (where n is a number) is indicated. -
Page 108: Error No.: 300 Is Displayed
Press [OK] to cancel the error so that you can continue printing. Once the waste ink absorber becomes completely full, printing cannot be done until the waste ink absorber is replaced. Canon recommends to contact a Canon service representative as soon as possible. Error No.: 2001 Is Displayed…
-
Page 109: For Windows Users
Error No.: 2500 Is Displayed Cause FINE Cartridge Alignment has failed. If the machine is connected to the computer, you can align the FINE Cartridge using the MP Driver. Follow the procedures described in the Printer Driver Guide. For Windows Users Cause The [Instructions] button is The [Instructions] button on the printer driver screen is not displayed if the On-…
-
Page 110: If You Cannot Solve The Problem
If you cannot solve the problem with any of the workarounds in this chapter, please contact the seller of the machine or a Canon service representative. Canon support staff are trained to be able to provide technical support to satisfy customers. Attempts by customers to repair or take apart the machine will invalidate any Caution warranty regardless of whether the warranty has expired.
-
Page 111: Appendix
* This is available in A4/Letter, 4″ x 6″ /101.6 x 152.4 mm, 4″ x 8″ /101.6 x 203.2 mm, 5″ x 7″/127.0 x 177.8 mm and Credit Card paper sizes (MP170). Recommended printing Canon recommends that you print within this area. ( area (dark blue): Printable area (light The area where it is possible to print.
-
Page 112
A4, B5, A5, 4″ x 6″, 4″ x 8″, 5″ x 7″, Credit Card Size 4″ x 6″/101.6 x 152.4 mm 4″ x 8″/101.6 x 203.2 mm 5″ x 7″/127.0 x 177.8 mm Credit Card Recommended printing area Printable area When Printing on Glossy Photo Paper GP-401/GP-501/Matte Photo Note Paper MP-101/Photo Paper Plus Double Sided PP-101D/Photo Paper… -
Page 113
Letter, Legal Size Letter Legal Recommended printing area Printable area When Printing on Glossy Photo Paper GP-401/GP-501/Matte Photo Note Paper MP-101/Photo Paper Plus Double Sided PP-101D/Photo Paper Plus Glossy PP-101/Photo Paper Plus Semi-Gloss SG-101 and Photo Paper Pro PR-101, selection of “Borderless Printing” enables you to make prints with no margins. -
Page 114: Uninstalling The On-Screen Manual
Follow the steps described below to uninstall the installed on-screen manuals from your computer. Note that this uninstall procedure will uninstall all guides. Click [Start], select [All Programs] (or [Programs]), [Canon MP170 Manual/MP150 Manual] and [Uninstall]. When the uninstall message appears, click [OK].
-
Page 115: Transporting The Machine
Transporting The Machine When relocating the machine or storing the machine for prolonged periods, pack the machine using the original packing materials. If you do not have the original packing materials, pack the machine carefully using protective material and a sturdy box. Turn the machine OFF and unplug the machine.
-
Page 116: Specifications
MP150: Approx. 5.4 kg (11.90 lb) Standard Canon FINE Cartridges Black: Canon FINE Cartridge PG-40 Color: Canon FINE Cartridge CL-41 High Yield Canon FINE Cartridges (Option) Black: Canon FINE Cartridge PG-50 Color: Canon FINE Cartridge CL-51 Nozzles: Black: 320 nozzles (600 dpi)
-
Page 117: Density Adjustment
Photo Paper Plus Semi-gloss A4/Letter, Glossy Photo Paper A4/Letter, Plain Paper A4/Letter) 5.4 x 8.6 cm/Credit Card (Glossy Photo Paper Card Size) Canon-brand sticker. Printing on this paper is available only when the Layout function on your camera has a 16-up option. See “Recommended Paper” on page 17.
-
Page 118
Default (Off: No trimming), On (follow camera’s setting), Off Default (ExifPrint), On, Off, “VIVID”*, “NR” (Noise Reduction)*, “VIVID+NR”*, “FACE”* * If using a Canon PictBridge-compatible camera, you can select it. Scan Specifications TWAIN / WIA (Windows XP) 216 mm / 8.5 inches… -
Page 119
Available hard-disk space for printer driver installation Windows XP/Windows 2000/Windows Me/Windows 98: 650 MB Canon IJ Status Monitor cannot be used under the following conditions: – When sharing this machine on a network (Windows Me, Windows 98) Additional Systems Requirements for On-screen Manuals Browser: Windows HTML Help Viewer * Microsoft Internet Explorer 5.0 or later must be… -
Page 120: Users In The U.s.a
If such changes or modifications should be made, you could be required to stop operation of the equipment. Canon U.S.A. Inc. One Canon Plaza, Lake Success, NY 11042, U.S.A. TEL No. (516) 328-5600 Appendix Chapter 11…
-
Page 121: Limited Warranty
Separate Warranty. Non-Canon brand equipment and software that may be distributed with the Product are sold “as is” and without warranty of any kind by Canon USA, including any implied warranty regarding merchantability or fitness for a particular purpose, and all such warranties are disclaimed.
-
Page 122
BY THE USE, MISUSE, OR INABILITY TO USE THE PRODUCT REGARDLESS OF THE LEGAL THEORY ON WHICH THE CLAIM IS BASED, AND EVEN IF CANON USA OR ITS ASF HAS BEEN ADVISED OF THE POSSIBILITY OF SUCH DAMAGES. NOR SHALL RECOVERY OF ANY KIND AGAINST CANON USA OR ITS ASF BE GREATER IN AMOUNT THAN THE PURCHASE PRICE OF THE PRODUCT CAUSING THE ALLEGED DAMAGE. -
Page 123
** InstantExchange warranty service is subject to the availability of refurbished or new replacement units. Canon U.S.A., Inc. One Canon Plaza Lake Success, NY 11042 Canon is a registered trademark of Canon Inc. in the United States and may also be a registered trademark or trademarks in other countries. Chapter 11 Appendix… -
Page 124: Users In Canada
Free live technical support Mon — Fri 9am-8pm EST (excluding holidays) for products still under warranty (1-800-OK-CANON) The location of the authorized service facility nearest you (1-800-OK-CANON) If the problem cannot be corrected by using one of the above technical support options, repair options are available at the time of your call to the Free live technical support number above or via the website at www.canon.ca…
-
Page 125: Index
Printing Becomes Faint Or Color Is Incorrect 76 Printing From Your Computer 51 Printing With Macintosh 54 Printing With Windows 51 Printing Photographs From A Digital Camera 60 From A Canon Bubble Jet Direct Compatible Digital Camera 64 From A PictBridge Compliant Device 60 Index…
-
Page 126
Printing Photographs From A Memory Card (MP170) 36 All Photos 44 DPOF Print 47 Index 43 Multi-Photo Print 45 Photo Index Sheet 39 Print Settings 48 Single-Photo Print 44 Sticker Print 46 Recommended Paper 17 Routine Maintenance 68 FINE Cartridge Alignment 80 FINE Cartridge Cleaning 79 FINE Cartridge Deep Cleaning 79 Replacing A FINE Cartridge 68… -
Page 127
This product uses the following copyrighted software: exit.c Copyright © 1990 The Regents of the University of California. All rights reserved. Redistribution and use in source and binary forms are permitted provided that the above copyright notice and this paragraph are duplicated in all such forms and that any documentation, advertising materials, and other materials related to such distribution and use acknowledge that the software was developed by the University of California, Berkeley. -
Page 128
© 2005 Canon U.S.A., Inc. Canon is a registered trademark of Canon Inc. in the United States and may be a registered trademark or trademarks in other countries. All other product and brand names are trademarks of their respective owners. As an ENERGY STAR®… -
Page 129
Canon U.S.A., Inc. One Canon Plaza, Lake Success, NY 11042, U.S.A. Canon Inc. 30-2, Shimomaruko 3-chome, Ohta-ku, Tokyo 146-8501, Japan Canon Canada, Inc. 6390 Dixie Road, Mississauga, Ontario, L5T 1P7, Canada Canon Latin America, Inc. 703 Waterford Way, Suite 400, Miami, FL 33126, U.S.A.
- Page 1
User’s Guide QT7-0059-V02… - Page 2
Canon CarePAK Extended Service Plan is a cost-attractive and easy-to-use extended service program that provides up to three full years of service and support coverage at a very attractive price. CarePAK offers toll-free Canon technical support and includes Canon’s superb InstantExchange product replacement program. For further information about extending your Canon service and support, call (1-800- 385-2155), or visit our Web site at www.canonesp.com. - Page 3
Disclaimer Canon Inc. has reviewed this manual thoroughly in order that it will be an easy-to-use guide to your Canon MP170/MP150 Series. All statements, technical information and recommendations in this manual and in any guides or related documents are believed… -
Page 4: Table Of Contents
Printing Photographs Directly From A Digital Camera …60 Printing Photographs Directly From A PictBridge-Compliant Device …60 Printing Photographs Directly From A Canon “Bubble Jet Direct” Compatible Digital Camera…64 Changing The Machine Settings (MP170) …65 Changing The Settings …65 PRINT SETTINGS …65 PICTBRIDGE SET…66…
-
Page 5: Safety Precautions
If you detect smoke, unusual smells or strange noises around the machine, immediately unplug the machine at the power supply and contact your local authorized Canon dealer or the Canon help line. Using the machine in such conditions may result in fire or electrical shock.
- Page 6
If these items are dropped or spilled in the machine, turn OFF the power and unplug the power cord immediately with dry hands. Then contact your local authorized Canon dealer or the Canon help line. - Page 7
Power supply Never remove the plug by pulling on the cord. Pulling on the power cord may damage the cord and cause a fire or electrical shock. When turning OFF the power, be sure to press [ON/OFF] or unplug the machine. However, if the machine is unplugged during printing, the FINE Cartridge is not protected with the cap that prevents the ink from drying. - Page 8
Containers of water or other liquids such as glasses, vases, or pot plants If water does spill inside the machine, turn OFF the power immediately by pressing the [ON/ OFF], and disconnect the power cord. Then, contact your local authorized Canon dealer or the Canon help line. - Page 9
FINE Cartridges (Ink For safety reasons, store FINE Cartridges (Ink Cartridges) out of the reach of small Cartridges) children. If a child ingests any ink, consult a doctor immediately. Do not shake FINE Cartridges (Ink Cartridges). Ink may leak out and stain clothing or the surrounding area. Never touch the nozzle and the gold terminal. -
Page 10: Reading The Document
Reading The Document Symbols Used In This Guide Please read the list below of symbols used in this guide. The following symbols are used to indicate important instructions. Be sure to obey these instructions. Indicates a warning concerning operations that may lead to death or Warning injury to persons if not performed correctly.
-
Page 11: Legal Limitations On Use Of Your Product And Use Of Images
Legal Limitations On Use Of Your Product And Use Of Images It may be unlawful to make copies of, scan, print or use reproductions of the following documents. The list provided is non-exhaustive. When in doubt, check with a legal representative in your jurisdiction.
-
Page 12: Before Printing
Printouts are output to this tray. Open the tray before you start copying or printing. When not being used, keep it closed in the machine. (7) Direct Print Port Used to connect a PictBridge-compliant or Canon Bubble Jet Direct-compatible device to the machine when printing images directly from the device. (8) Platen Glass Used to load a document to be processed.
- Page 13
Rear view and interior (10) (16) (10) FINE Cartridge Holder Install the FINE Cartridges here. (11) FINE Cartridges (Ink Cartridges) Replaceable cartridge that comprises an integrated Print Head and ink tank. FINE Cartridges are available in two types, Color (on the right) and Black (on the left). (12) Scanning Unit Used to scan a document. -
Page 14: Operation Panel
Operation Panel This section describes the buttons on the Operation Panel, and their functions and locations. (1) [Photo Index Sheet] Button Switches the machine to Photo Index Sheet mode. (2) [COPY] Button Switches the machine to copy mode. (3) [SCAN] Button Switches the machine to scan mode.
- Page 15
(1) (2) (3) (4) (5) (1) [ (Maintenance)] Button Accesses the Maintenance menu. (2) [Fit to Page] Button Enables/disables the Fit-to-Page copying. (3) Fit-to-Page Lamp Lights when Fit-to-Page copying is enabled. (4) [SCAN] Button Opens the MP Navigator to scan a document to your computer according to the settings selected. -
Page 16: Turning The Machine On/Off
Turning The Machine ON/OFF Press [ON/OFF] to turn the machine ON and OFF. Before turning ON the machine, make sure the Document Cover is closed. Important Note Before Printing Always press [ON/OFF] before disconnecting the power cord. This ensures the FINE Cartridge is covered to prevent it from drying out. If the machine is not used for an extended period of time, we recommend making black &…
-
Page 17: Setting Documents
Setting Documents Document Requirements The documents you load on the Platen Glass for copying or scanning must meet these requirements: Document All types of paper documents Type Photographs Books, catalogs or magazines Size (W x L) Max. 8 Thickness Max. Loading Documents To copy or scan a document, set it on the Platen Glass.
-
Page 18: General Paper Guidelines
Place the paper back into its packet when not using it, and store out of direct sunlight in a place where the temperature and humidity are low. If the printed area is traced with a highlight pen or paint-stick or stained with water or sweat, ink may blur. Before Printing ) other than genuine Canon paper Chapter 1…
-
Page 19: Recommended Paper
Plain paper Approx. 100 sheets (17 lb. or 64 g/m Envelopes Approx. 10 envelopes Canon Specialty Paper Canon recommends that you use genuine Canon paper to insure optimal print quality. Paper Type Model Super White Paper SW-201 High Resolution HR-101N Approx. 80 sheets…
- Page 20
We do not recommend using plain paper for photo printing. Printing from your You may be able to load other computer envelopes, but Canon cannot guarantee consistent performance. Do not use the following types of envelopes since they may cause… - Page 21
Canon Specialty Paper Canon recommends that you use genuine Canon paper to insure optimal print quality. Paper Type Size High Letter (8 1/2 in. x 11 in./ Resolution 215.9 mm x 279.4 mm) Paper A4 (8 1/4 in. x 11 3/4 in./… - Page 22
Paper Type Size Photo Paper Letter (8 1/2 in. x 11 in./ Plus Double 215.9 mm x 279.4 mm) Sided A4 (8 1/4 in. x 11 3/4 in./ 210 mm x 297 mm) 5″ x 7″ (5 in. x 7 in./ 127.0 mm x 177.8 mm) Photo Paper Letter (8 1/2 in. - Page 23
Paper Type Size Photo Paper Letter (8 1/2 in. x 11 in./ 215.9 mm x 279.4 mm) A4 (8 1/4 in. x 11 3/4 in./ 210 mm x 297 mm) 4″ x 6″ (4 in. x 6 in./ 101.6 mm x 152.4 mm) Photo 4″… - Page 24
Paper Type Size T-Shirt Letter (8 1/2 in. x 11 in./ Transfers 215.9 mm x 279.4 mm) A4 (8 1/4 in. x 11 3/4 in./ 210 mm x 297 mm) Transparenc Letter (8 1/2 in. x 11 in./ 215.9 mm x 279.4 mm) A4 (8 1/4 in. -
Page 25: Loading Paper
Loading Paper Loading Paper Follow this procedure: Open the Paper Support (1), then pull out the Paper Support Extension (2). Place a stack of paper (print side up) in the Auto Sheet Feeder (1), pinch the Paper Guide (A) and adjust it to the left side of the stack (2). Set the Paper Thickness Lever to the correct position for the paper.
-
Page 26: Loading Envelopes
Loading Envelopes Follow this procedure: Open the Paper Support, then pull out the Paper Support Extension. Prepare the envelopes for loading. Important Before Printing Press down firmly on the edges of the envelopes to make the folds crisp. Also, press firmly on the area that corresponds to the edges of the back flap.
- Page 27
Place the stack of envelopes (print side up) in the Auto Sheet Feeder (1), pinch the Paper Guide (A) and adjust it to the left side of the stack (2). Load the envelopes in the Auto Sheet Feeder with the short side down. Set the Paper Thickness Lever to the right. -
Page 28: Copying
Chapter 2 Copying Making Copies This section describes the basic procedure to make copies. Load the paper in the Auto Sheet Feeder. For details on paper, see page 17. Note Press [COPY]. Use [ ] or [ ] to select the number of copies (max. 99 copies). 100% PLAIN For the maximum load limit for the paper you are using in the Auto Sheet…
- Page 29
Load the paper in the Auto Sheet Feeder. (See page 23) Press [+] repeatedly to select the number of copies (max. 9 copies). Press [Paper] repeatedly to select the paper size and type. The Paper Lamp indicates the selected paper size and type. A4 or Letter Photo Paper/A4 or Letter Plain Paper/4″x6″… -
Page 30: Changing The Copy Settings (Mp170)
PLAIN PAPER/PHOTO PAPER PRO/PHOTO PAPER PLUS/MATTE PHOTO PAPR/ GLOSSY In order to obtain optimal quality print results, when copying photographs, Note use Canon-recommended Photo Paper Pro or Photo Paper Plus Glossy. For details on paper, see page 17. Press [OK]. Copying…
-
Page 31: Adjusting Image Quality
Adjusting Image Quality You can adjust the image quality according to the document to be copied. Follow this procedure: Press [COPY]. Press [Menu] repeatedly until <IMAGE QUALITY> appears. 5.IMAGE QUALITY STANDARD Use [ ] or [ ] to select the image quality. <STANDARD>: Suitable for text-only documents.
-
Page 32: Reducing Or Enlarging A Copy
Reducing Or Enlarging A Copy You can reduce or enlarge copies using three different methods: Preset copy ratios You can select one of the preset ratios to reduce or enlarge copies. Custom copy ratios You can specify the copy ratio as a percentage to reduce or enlarge (Zoom) copies.
- Page 33
Using Custom Copy Ratios (Zoom) In addition to making reduction and enlargement decisions using preset copy ratios, you can use customized 1% increments. Follow this procedure: Press [COPY]. Press [Menu] repeatedly until <ENLARGE/REDUCE> appears. Use [ ] or [ ] to select <ZOOM>. 1.ENLARGE/REDUCE ZOOM Press [OK]. -
Page 34: Advanced Copy Functions
Fit-to-Page copying (MP150) The following section describes how to use this feature. Sticker Copying You can easily make 16 stickers from L (3.5″ x 5″) photos or graphics using Canon sticker paper. (1) Platen Glass (Place document face down) (2) 16 stickers Follow this procedure: Load one sheet of stickers in the Auto Sheet Feeder.
-
Page 35: Borderless Copying
Borderless Copying This feature enables you to copy the images so that they fill the entire page without borders. Note Follow this procedure: Load the paper in the Auto Sheet Feeder. Press [COPY]. Use [ ] or [ ] to select the number of copies (max. 99 copies). Adjust the settings for your document as necessary.
- Page 36
Press [Color] for color copying, or press [Black] for black & white copying. Repeating An Image On A Page (Image Repeat) This feature enables you to copy an image multiple times onto a single page. You can set the machine to automatically select the number of times it repeats the image, or you can specify the number. - Page 37
Press [Color] for color copying, or press [Black] for black & white copying. Important Note Fit-to-Page Copying (MP150) This feature enables you to copy images so that they are automatically reduced or enlarged to fit the paper size you select. Follow this procedure: Load the paper in the Auto Sheet Feeder. -
Page 38: Printing From A Memory Card (Mp170)
Chapter 3 Printing From A Memory Card (MP170) Using A Memory Card Let’s take a look at different types of memory cards and how to insert and remove them. Memory Cards Supported By This Machine Supported memory cards are as follows: Memory Cards which can be inserted directly Memory Cards which can be used through a special adapter Purchase a CompactFlash Card Adapter for xD-Picture Card separately.
-
Page 39: Inserting A Memory Card
This machine accepts images taken with a camera compatible with the Important Design rule for Camera File system (Exif 2.21 compliant) and DPOF (Ver. 1.00 compliant). Photos stored in a memory card not supported by the digital camera may fail to load or be damaged.
-
Page 40: Removing A Memory Card
Install the memory card in the appropriate Card Slot. Type of card CompactFlash (CF) Card Microdrive xD-Picture Card* Install these cards into the left card slot. SmartMedia Card Install this card into the right card slot. MEMORY STICK MEMORY STICK PRO MEMORY STICK DUO* MEMORY STICK PRO DUO*…
-
Page 41: Printing Photograph
Printing Photograph Printing By Using The Photo Index Sheet With this machine, you can easily print photographs using a Photo Index Sheet, by filling in the appropriate circles to select print options and photographs you want to print. Simply scanning a Photo Index Sheet prints the selected photographs according to the selections you have made.
- Page 42
Use [ ] or [ ] to select the range of photographs to print on the Photo Index Sheet. <PRINT ALL PHOTOS>: Prints all image data stored on the memory card. <LAST PHOTO>: <SELECT RANGE>: If you select <PRINT ALL PHOTOS>: Go to step 7. - Page 43
Press [OK]. INDX PRINTING The machine prints the Photo Index Sheets. If more than 37 photographs are to be printed, the machine prints them Note on more than one Photo Index Sheet. (1) Select the paper size and type. (2) Select date printing as necessary. (3) Mark this to print one copy of each photograph. - Page 44
Fill in the appropriate circles ( to print and print settings. Good (1) Check mark (2) Line only (3) Light Important Load the paper selected on the Photo Index Sheet in the Auto Sheet Feeder. When printing image data using a Photo Index Sheet, you can select 4″ x Note 6″, 5″… - Page 45
Press [OK]. The machine reads the Photo Index Sheet, and prints photographs according to the settings. Important Note Print Index You can print an index of all photos saved in the memory card on what is known as an index print. -
Page 46: Print All Photos
Print All Photos You can print all photos saved on a memory card. Turn ON the machine and load the paper in the Auto Sheet Feeder. Insert the memory card into the Card Slot. See “Inserting A Memory Card” on page 37. Press [MEMORY CARD] and then press [Menu].
-
Page 47: Printing A Range Of Photos
Printing A Range Of Photos You can print a range of photos in sequence on a memory card. To select the photos to print, first print the index and note the photo numbers assigned to them. You can also print a range of photos according to the shooting dates of photos you select.
- Page 48
Printing On Stickers — Sticker Print You can print your favorite photos on Canon sticker paper. Turn ON the machine and load a sheet of stickers in the Auto Sheet Feeder. You can load only one sheet of stickers at a time. -
Page 49: Dpof Print
DPOF Print If DPOF (Digital Print Order Format) settings are made on the camera, photos are printed automatically according to those settings. Note Turn ON the machine and load the paper in the Auto Sheet Feeder. Insert the memory card containing the DPOF information into the Card Slot. See “Inserting A Memory Card”…
-
Page 50: Print Settings
Print Settings This section describes the print settings you can change in Memory Card Mode, such as paper size, paper type or print quality. The settings below appear on the LCD when you press [Menu] repeatedly in Memory Card Mode. Depending on the functions you use, some setting items cannot be specified in Note combination.
-
Page 51: Reading From And Writing To A Memory Card (Mp170)
Chapter 4 Reading From And Writing To A Memory Card (MP170) Setting Up The Card Slot As The Memory Card Drive Of The Computer Connecting the machine to a computer results in the memory card drive (removable hard disk) being displayed under [My Computer].
- Page 52
Important To change the write protect setting while a card is inserted in the Card Note Slot, unplug the USB cable before changing the setting, then plug it back in afterwards. The new setting is not applied unless you plug the USB cable back in. -
Page 53: Printing From Your Computer
Chapter 5 Printing From Your Computer This chapter describes the basic printing procedure, taking the steps to print documents as an example. Printing With Windows Menu and command names may differ between software applications, and Note more steps may be required. For details, refer to the documentation for each software application you use.
- Page 54
Specify the required settings. (1) Click [Media Type] to select the type of media loaded in the machine (1). (2) Specify the print quality and other settings in [Print Quality] or [Color/Intensity] (2). For print settings, see the On-screen Manual. Note (3) Click [OK] (3). - Page 55
You can cancel a print job in progress by simply pressing [Stop/Reset] on the machine. Click [Cancel Printing] on [Canon IJ Status Monitor] to stop printing. To show [Canon IJ Status Monitor], click [Canon PIXMA MP170 Series Printer] on the taskbar. -
Page 56: Printing With Macintosh
Printing With Macintosh Menu and command names may differ between software applications, and Note more steps may be required. For details, refer to the documentation for each software application you use. The steps described in this section are for printing in Mac OS X v.10.3x. Press [ON/OFF] to turn ON the machine.
- Page 57
Specify the required settings. (1) Select [Print] from the application software’s [File] menu. The [Print] dialog box opens. (2) Select [Quality & Media] from the pop-up menu (1). (3) Select the desired media type from [Media Type] (2). (4) Select the print mode appropriate to your document from [Print Mode] (3). Note Chapter 5 When you select the print mode appropriate to your document from… - Page 58
Print the document. (1) Click [Print]. Note Printing From Your Computer You can cancel a print job in progress by simply pressing [Stop/Reset] on the machine. Double-clicking the name of your machine in the [Printer list] of the [Printer Setup Utility] (When using Mac OS X v.10.2, double-clicking the name of your machine in the [Printer list] of the [Print Center]) displays a dialog that prompts you to confirm the status of the print job. -
Page 59: Scanning Images
Chapter 6 Scanning Images About Scanning Images You can scan images from the machine into a computer, and save them in JPEG, TIFF, or Bitmap format. Then you can process that data by using the supplied application software to create original images.
- Page 60
Scanning With The Operation Panel Of The Machine With the operation panel of the machine, you can open the MP Navigator and change the settings for the scanning operations. (See the Scan Guide) If you are using Windows XP The program selection screen is displayed the first time you press [Black] / [Color] (MP170) or [SCAN] (MP150) on the machine. - Page 61
Scanning From An Application Software You can scan an image from TWAIN- or WIA- (Windows XP only) compliant application software and use the image in that application software. This procedure varies depending on the application software. For the detailed procedure, refer to the manual of the application software you are using. Chapter 6 Scanning Images… -
Page 62: Printing Photographs Directly From A Digital Camera
Do not connect any equipment other than PictBridge-compliant devices Caution or Canon Bubble Jet Direct-compatible cameras to the Direct Print Port of the machine. Doing so may result in an electric shock, fire, or damage to the device. Note Turn ON the machine.
- Page 63
A PictBridge-compliant device. * This mark indicates that the product is PictBridge-compatible. A Canon “Bubble Jet Direct” compatible digital camera. Confirming Or Changing The Device Settings To change the paper size or paper type, operate the device to select the PictBridge print setup mode and confirm or change the settings. - Page 64
This paper is exclusively used to print photo stickers. When printing on sticker paper, select “10×15 cm/4″ x 6″” in “Page size”. This size can be selected only for Canon PictBridge compatible devices (note that it cannot be selected for some models). - Page 65
When “Default setting” (selections based on the machine setting) is selected, the machine operates based on the “IMAGE ENHANCEMENT” settings mode using the controls of the machine. If you use a Canon PictBridge-compliant device, you can select “VIVID”, “NR”, “VIVID+NR” or “FACE”. (Note that these options cannot be selected for some models.) Note About “Date/File No. -
Page 66: Printing Photographs Directly From A Canon «Bubble Jet Direct» Compatible Digital Camera
Printing Photographs Directly From A Canon “Bubble Jet Direct” Compatible Digital Camera Media Types For Digital Cameras When you connect a digital camera, you can use the following media: Digital Camera Setting Card #1 Card #2 Card #3 Note Printing Photographs Directly From A Digital Camera Media Type Photo Paper Pro 4″…
-
Page 67: Changing The Machine Settings (Mp170)
Chapter 8 Changing The Machine Settings (MP170) Changing The Settings This section describes the procedure to change the settings in the <SYSTEM SETTINGS> menu, taking the steps to specify <EXTENDED AMOUNT> as an example. Press [ON/OFF] to turn ON the machine. (See page 14) Press [Menu] repeatedly until <SYSTEM SETTINGS>…
-
Page 68: Pictbridge Set
PICTBRIDGE SET PAGE SIZE Selects the paper size: 8.5×11/A4/4″x6″/5″x7″/C-CARD MEDIA TYPE Selects the paper type: PLAIN PAPER/PHOTO PAPER PRO/PHOTO PAPER PLUS/MATTE PHOTO PAPR/GLOSSY PRINT QLTY Selects the print quality: STANDARD/HIGH BORDERLESS PRINT Selects bordered or borderless print: ON/OFF IMAGE ENHANCEMENT Selects whether to optimize photos or not: SKIP/SET (VIVID/POP/REMOVE NOISE/FACE BRIGHT) (See page 48) OTHERS…
-
Page 69: Restore Default
RESTORE DEFAULT Changes the settings back to the default, except for the language for LCD messages and the position of the FINE Cartridge: YES/NO SAVE CONFGURATION Saves the current media settings for the size, type, quality, magnification, intensity and image optimize: YES/NO LOAD CONFGURATION Loads the saved media settings: YES/NO…
-
Page 70: Routine Maintenance
Chapter 9 Routine Maintenance Replacing A FINE Cartridge If there is no improvement with the quality of printing following such maintenance as FINE Cartridge Cleaning, one of the FINE Cartridges is probably empty. Replace the empty FINE Cartridge with a new one.
- Page 71
Remove the empty FINE Cartridge. (1) Push the FINE Cartridge down. (2) Remove the FINE Cartridge. Important Do not touch the transparent film (A), film cable (B), ink absorber (sponge Caution part) (C), or any metal parts. Chapter 9 Handle FINE Cartridges carefully to avoid staining your clothes or the surrounding work area. - Page 72
Prepare a replacement FINE Cartridge. * To the Cartridge Holder. (1) Unpack a new FINE Cartridge and remove the Protective Tape. Important Insert the new FINE Cartridge. Black FINE Cartridge should be installed into the left holder (B) and Color FINE Cartridge should go into the right holder (C). - Page 73
See “Aligning The FINE Cartridge” on page 80. Important Chapter 9 To maintain optimal print quality, we recommend that you use Canon brand FINE Cartridge. Replenishing ink only is also not recommended. Replace the FINE Cartridge promptly. Do not leave with the FINE Cartridge removed. - Page 74
Knowing When To Replace A FINE Cartridge It is important to identify the empty Cartridge using the LCD/LED and replace it. Should missing characters or white streaks appear despite sufficient ink Note levels, see “When Printing Becomes Faint Or Color Is Incorrect” on page 76. - Page 75
[View Printer Status]. Canon IJ Status Monitor appears. It also appears automatically during printing. Open the [Canon IJ Printer Utility] dialog box, and then select [Ink Level Information] from the pop-up menu. When the “!” mark appears on the Low Ink Warning The ink level of the FINE Cartridge showing the “!”… - Page 76
Setting of FINE Cartridges Note If a FINE Cartridge runs out of ink, you can print with either the Color or Black FINE Cartridge only for a while. However the same printing quality cannot be expected, compared to printing with both cartridges. The [Black only] setting can be used when you select [Plain Paper] in [Media Type]. - Page 77
When the “?” mark appears on the Low Ink Warning If you install an old FINE Cartridge, the “?” icon appears for the FINE Cartridge in question. In this case, the remaining level of ink cannot be calculated correctly. If you try printing when “?” mark appears, the following message appears and printing stops. In either case, clicking [OK] cancels the error indication and enables continuation of printing. -
Page 78: When Printing Becomes Faint Or Color Is Incorrect
When Printing Becomes Faint Or Color Is Incorrect When printing becomes faint or colors are incorrect, the FINE Cartridge Nozzles are probably clogged. Follow the procedures below to clean these nozzles. Before Performing Maintenance Note Remove the FINE Cartridge once, then reinsert it into place. See “Replacing A FINE Cartridge”…
-
Page 79: Printing The Nozzle Check Pattern
Printing The Nozzle Check Pattern Print the nozzle check pattern to determine whether the ink is being ejected properly from the FINE Cartridge Nozzles. Use this function when the printed results are blurred or the color is incorrect. Printing The Nozzle Check Pattern Load A4- or Letter-sized plain paper in the Auto Sheet Feeder.
- Page 80
Confirming The Nozzle Check Pattern This section describes how to confirm the nozzle check pattern and the FINE Cartridge position pattern. If the ink level is low, the nozzle check pattern is not printed correctly. If Note the ink level is low, replace the relevant FINE Cartridge. (See page 68) If the lines are broken (1), or white lines (2) are present in the pattern (A), clean the FINE Cartridge. -
Page 81: Fine Cartridge Cleaning
] to select <DEEP CLEANING>. 8.MAINTENANCE DEEP CLEANING Press [OK]. Press [Maintenance] repeatedly until <F> appears. Press [Black] or [Color]. If deep FINE Cartridge cleaning does not improve the print quality, Note contact a Canon service representative. Chapter 9 Routine Maintenance…
-
Page 82: Aligning The Fine Cartridge
Aligning The FINE Cartridge If ruled lines are misaligned or a printout is unsatisfactory, FINE Cartridge Alignment is required. Aligning The FINE Cartridge Press [Menu] repeatedly until <MAINTENANCE> appears. Use [ ] or [ ] to select <ALIGN PRINT HEAD>. Press [OK].
- Page 83
Load the checked sheet on the Platen Glass. When loading the checked sheet, place the front side down, and align the upper left corner of the sheet with the alignment mark on the lower right corner of the Platen Glass. Press [OK]. -
Page 84: Cleaning Your Machine
Cleaning Your Machine This section describes the necessary cleaning procedures for your machine. Be sure to turn OFF the power and disconnect the power cord before cleaning Caution the machine. Do not use tissue paper, paper towels, or similar materials for cleaning; they can stick to the components or generate static charges.
-
Page 85: Cleaning The Roller
Repeat steps 2 to 3 three times. The sheet of paper is automatically fed in and then out of the machine. If there are no signs of improvement after performing three times, contact a Note Canon service representative. Chapter 9 Routine Maintenance…
- Page 86
Cleaning The Bottom Plate If the printed paper is smudged, the inside of the machine may be dirty. Periodic cleaning of certain parts on the inside of your machine is recommended to maintain a high standard of printing quality. The parts can be cleaned in the following ways: See “Cleaning The Bottom Plate”… -
Page 87: Cleaning The Protrusions Inside The Machine
Cleaning The Bottom Plate Proceed steps 1 to 3 for MP170 on page 84. Press [Maintenance] repeatedly until <J> appears. Press [OK]. Inspect the discharged paper. If dust or dirt can be seen on the paper, repeat the cleaning process. If the discharged paper still appears dirty after you have run this clean Note process, the inside of your machine is probably extremely dirty.
-
Page 88: Troubleshooting
Chapter 10 Troubleshooting This chapter provides troubleshooting tips for problems you may encounter when using the machine. This section provides troubleshooting tips for the most common printing Note problems. If you cannot find appropriate tips for your problem, refer to the on- screen manuals.
-
Page 89: An Error Message Is Displayed On The Lcd/Led
Canon recommends to contact a Canon service representative as soon as possible. Depending on the model or brand of your device, you may have to select a print mode compliant with PictBridge before connecting the device.
- Page 90
If you want to continue printing without this function, press [OK]. Canon recommends to use new genuine Canon Cartridges in order to obtain optimum qualities. The FINE Cartridge may not be the compatible with this machine. Install the appropriate FINE Cartridge. -
Page 91: Cannot See The Display On The Lcd/Led
If you want to continue printing without this function, press [Black] or [Color]. Canon recommends to use new genuine Canon Cartridges in order to obtain optimum qualities. The size of the document cannot be correctly detected or the document is too small when the Fit-to-Page copying is selected.
-
Page 92: Ink Does Not Come Out/Printing Is Blurred/Colors Are Wrong/White Streaks/Straight Lines Are Misaligned/Cannot Print To End Of Job
Ink Does Not Come Out/Printing Is Blurred/Colors Are Wrong/White Streaks/Straight Lines Are Misaligned/Cannot Print To End Of Job Cause FINE Cartridge is empty. FINE Cartridge is not installed correctly. Incorrect paper type. FINE Cartridge nozzles clogged or shifted. Print Quality is not set properly. Media not loaded printside up.
- Page 93
Open the Paper Output Tray. Restart your computer. It may solve the problem. Delete an undesired print job, if there is any. Use [Canon IJ Status Monitor] in Windows or [Printer Setup Utility] (or [Print Center]) in Macintosh for the deletion. - Page 94
Cause The size of the print data is too large. The hard disk does not have enough available space. When Copying Cause The document is not loaded correctly. The quality (image quality) displayed on the LCD is not suitable for the document. -
Page 95: Back Of Paper Is Smudged/Paper Does Not Feed Properly/Printed Surface Is Scratched
Back Of Paper Is Smudged/Paper Does Not Feed Properly/Printed Surface Is Scratched Cause Inside of the machine is dirty. Paper feed roller is dirty. Chapter 10 Action If the inside of the machine is dirty, printed paper may be smudged. Follow the steps described below to clean the inside of the machine.
- Page 96
Cause Inappropriate paper type is used. Thick paper is used. Media is curled. The media type is not selected correctly in the printer driver. Paper is loaded incorrectly. Troubleshooting Action Check to see if the paper you are printing on is too thick. See “General Paper Guidelines”… -
Page 97: Paper Jams
Auto Sheet Feeder. Chapter 10 Action Use Photo Paper Pro or other Canon specialty paper to print images that have a high color saturation. See “Paper Types You Cannot Use” on page 16. Ensure that the media type selected on the Operation Panel matches that of the paper loaded.
-
Page 98: Cannot Print Properly From A Photo Index Sheet (Mp170)
The paper is fed and the jammed paper is ejected accordingly. If you cannot remove the jammed paper or the error still persists, contact a Canon service representative. Action Make sure all required boxes on the Photo Index Sheet are filled in, and that the sheet is set in the correct position and orientation on the Platen Glass.
-
Page 99: Cannot Print Properly From The Digital Camera
If you are using a non- Canon PictBridge compatible camera and not sure how to clear the error from the camera, confirm the message displayed on the LCD of the machine and clear the error.
- Page 100
However, because printing is disabled once the waste ink absorber becomes completely full and until the waste ink absorber is replaced, you are recommended to contact a Canon service representative as early as possible. Prepare a new FINE Cartridge. -
Page 101: Cannot Install The Mp Driver
CD-ROM icon. Double-click the CD-ROM icon on your desktop to start installation. If the CD-ROM icon is not displayed on the desktop, there is a problem with the CD-ROM. Contact a Canon service representative. Chapter 10 Action Troubleshooting…
-
Page 102: Cannot Connect To Pc Properly
Uninstall the old version of the software following the instructions in the manual of that version, and reinstall the new version. The computer has an old version of the software installed. (Canon MultiPASS is registered as a program in the [Start] menu.) Installation procedure not Follow the Easy Setup Instructions packaged with your machine for proper MP followed correctly.
-
Page 103: Problems With Scanning
When You Connect To A Computer Running Windows XP, The Screen Shows The Warning Message “High-SPEED USB Device Plugged Into Non-High-SPEED USB Hub” Cause You connect to a computer Your environment is not fully compatible with USB 2.0. that does not support USB See “Printing Speed Is Slow / USB 2.0 Hi-Speed Connection Does Not Work”…
-
Page 104: Computer Stops Operating During Scanning
Computer Stops Operating During Scanning Cause Output Resolution set too Reboot the computer, lower the Output Resolution and rescan. high. Insufficient hard disk space. Multiple devices connected Disconnect all other devices but the machine from the port. to the USB port. Scan Quality Is Poor (Poor Image Displayed On The Monitor) Cause Incorrect scan settings.
-
Page 105: Slow Scanning Speed
Trouble scanning with Multi-Scan or Multi-Crop function Cause The original is positioned Check the position of the original on the document glass. Observe the following outside the supported area. when using the Multi-Scan or Multi-crop function. Error arising from Some application softwares do not support multiple image scanning. Scan each application software item individually without using the Multi-Scan or Multi-Crop function.
-
Page 106: An Error Message Appears On The Screen
“There Is Not Enough Memory.” Message Is Displayed Cause There is not enough Exit any application that are running, and try to run this program again. memory to continue scanning. Scanned Image Is Not Displayed Properly Cause Scanned image prints out Set the printing size in the application program.
- Page 107
3. Open the [File] menu and select [Properties]. 4. Click the [Ports] tab (or the [Details] tab) to confirm the port settings. A USB port is selected if either USBnnn (Canon MP170/MP150) or MPUSBPRNnn (Canon MP170/MP150) (where n is a number) is indicated. -
Page 108: Error No.: 300 Is Displayed
Press [OK] to cancel the error so that you can continue printing. Once the waste ink absorber becomes completely full, printing cannot be done until the waste ink absorber is replaced. Canon recommends to contact a Canon service representative as soon as possible. Error No.: 2001 Is Displayed…
-
Page 109: For Windows Users
Error No.: 2500 Is Displayed Cause FINE Cartridge Alignment has failed. If the machine is connected to the computer, you can align the FINE Cartridge using the MP Driver. Follow the procedures described in the Printer Driver Guide. For Windows Users Cause The [Instructions] button is The [Instructions] button on the printer driver screen is not displayed if the On-…
-
Page 110: If You Cannot Solve The Problem
If you cannot solve the problem with any of the workarounds in this chapter, please contact the seller of the machine or a Canon service representative. Canon support staff are trained to be able to provide technical support to satisfy customers. Attempts by customers to repair or take apart the machine will invalidate any Caution warranty regardless of whether the warranty has expired.
-
Page 111: Appendix
* This is available in A4/Letter, 4″ x 6″ /101.6 x 152.4 mm, 4″ x 8″ /101.6 x 203.2 mm, 5″ x 7″/127.0 x 177.8 mm and Credit Card paper sizes (MP170). Recommended printing Canon recommends that you print within this area. ( area (dark blue): Printable area (light The area where it is possible to print.
- Page 112
A4, B5, A5, 4″ x 6″, 4″ x 8″, 5″ x 7″, Credit Card Size 4″ x 6″/101.6 x 152.4 mm 4″ x 8″/101.6 x 203.2 mm 5″ x 7″/127.0 x 177.8 mm Credit Card Recommended printing area Printable area When Printing on Glossy Photo Paper GP-401/GP-501/Matte Photo Note Paper MP-101/Photo Paper Plus Double Sided PP-101D/Photo Paper… - Page 113
Letter, Legal Size Letter Legal Recommended printing area Printable area When Printing on Glossy Photo Paper GP-401/GP-501/Matte Photo Note Paper MP-101/Photo Paper Plus Double Sided PP-101D/Photo Paper Plus Glossy PP-101/Photo Paper Plus Semi-Gloss SG-101 and Photo Paper Pro PR-101, selection of “Borderless Printing” enables you to make prints with no margins. -
Page 114: Uninstalling The On-Screen Manual
Follow the steps described below to uninstall the installed on-screen manuals from your computer. Note that this uninstall procedure will uninstall all guides. Click [Start], select [All Programs] (or [Programs]), [Canon MP170 Manual/MP150 Manual] and [Uninstall]. When the uninstall message appears, click [OK].
-
Page 115: Transporting The Machine
Transporting The Machine When relocating the machine or storing the machine for prolonged periods, pack the machine using the original packing materials. If you do not have the original packing materials, pack the machine carefully using protective material and a sturdy box. Turn the machine OFF and unplug the machine.
-
Page 116: Specifications
MP150: Approx. 5.4 kg (11.90 lb) Standard Canon FINE Cartridges Black: Canon FINE Cartridge PG-40 Color: Canon FINE Cartridge CL-41 High Yield Canon FINE Cartridges (Option) Black: Canon FINE Cartridge PG-50 Color: Canon FINE Cartridge CL-51 Nozzles: Black: 320 nozzles (600 dpi)
-
Page 117: Density Adjustment
Photo Paper Plus Semi-gloss A4/Letter, Glossy Photo Paper A4/Letter, Plain Paper A4/Letter) 5.4 x 8.6 cm/Credit Card (Glossy Photo Paper Card Size) Canon-brand sticker. Printing on this paper is available only when the Layout function on your camera has a 16-up option. See “Recommended Paper” on page 17.
- Page 118
Default (Off: No trimming), On (follow camera’s setting), Off Default (ExifPrint), On, Off, “VIVID”*, “NR” (Noise Reduction)*, “VIVID+NR”*, “FACE”* * If using a Canon PictBridge-compatible camera, you can select it. Scan Specifications TWAIN / WIA (Windows XP) 216 mm / 8.5 inches… - Page 119
Available hard-disk space for printer driver installation Windows XP/Windows 2000/Windows Me/Windows 98: 650 MB Canon IJ Status Monitor cannot be used under the following conditions: – When sharing this machine on a network (Windows Me, Windows 98) Additional Systems Requirements for On-screen Manuals Browser: Windows HTML Help Viewer * Microsoft Internet Explorer 5.0 or later must be… -
Page 120: Users In The U.s.a
If such changes or modifications should be made, you could be required to stop operation of the equipment. Canon U.S.A. Inc. One Canon Plaza, Lake Success, NY 11042, U.S.A. TEL No. (516) 328-5600 Appendix Chapter 11…
-
Page 121: Limited Warranty
Separate Warranty. Non-Canon brand equipment and software that may be distributed with the Product are sold “as is” and without warranty of any kind by Canon USA, including any implied warranty regarding merchantability or fitness for a particular purpose, and all such warranties are disclaimed.
- Page 122
BY THE USE, MISUSE, OR INABILITY TO USE THE PRODUCT REGARDLESS OF THE LEGAL THEORY ON WHICH THE CLAIM IS BASED, AND EVEN IF CANON USA OR ITS ASF HAS BEEN ADVISED OF THE POSSIBILITY OF SUCH DAMAGES. NOR SHALL RECOVERY OF ANY KIND AGAINST CANON USA OR ITS ASF BE GREATER IN AMOUNT THAN THE PURCHASE PRICE OF THE PRODUCT CAUSING THE ALLEGED DAMAGE. - Page 123
** InstantExchange warranty service is subject to the availability of refurbished or new replacement units. Canon U.S.A., Inc. One Canon Plaza Lake Success, NY 11042 Canon is a registered trademark of Canon Inc. in the United States and may also be a registered trademark or trademarks in other countries. Chapter 11 Appendix… -
Page 124: Users In Canada
Free live technical support Mon — Fri 9am-8pm EST (excluding holidays) for products still under warranty (1-800-OK-CANON) The location of the authorized service facility nearest you (1-800-OK-CANON) If the problem cannot be corrected by using one of the above technical support options, repair options are available at the time of your call to the Free live technical support number above or via the website at www.canon.ca…
-
Page 125: Index
Printing Becomes Faint Or Color Is Incorrect 76 Printing From Your Computer 51 Printing With Macintosh 54 Printing With Windows 51 Printing Photographs From A Digital Camera 60 From A Canon Bubble Jet Direct Compatible Digital Camera 64 From A PictBridge Compliant Device 60 Index…
- Page 126
Printing Photographs From A Memory Card (MP170) 36 All Photos 44 DPOF Print 47 Index 43 Multi-Photo Print 45 Photo Index Sheet 39 Print Settings 48 Single-Photo Print 44 Sticker Print 46 Recommended Paper 17 Routine Maintenance 68 FINE Cartridge Alignment 80 FINE Cartridge Cleaning 79 FINE Cartridge Deep Cleaning 79 Replacing A FINE Cartridge 68… - Page 127
This product uses the following copyrighted software: exit.c Copyright © 1990 The Regents of the University of California. All rights reserved. Redistribution and use in source and binary forms are permitted provided that the above copyright notice and this paragraph are duplicated in all such forms and that any documentation, advertising materials, and other materials related to such distribution and use acknowledge that the software was developed by the University of California, Berkeley. - Page 128
© 2005 Canon U.S.A., Inc. Canon is a registered trademark of Canon Inc. in the United States and may be a registered trademark or trademarks in other countries. All other product and brand names are trademarks of their respective owners. As an ENERGY STAR®… - Page 129
Canon U.S.A., Inc. One Canon Plaza, Lake Success, NY 11042, U.S.A. Canon Inc. 30-2, Shimomaruko 3-chome, Ohta-ku, Tokyo 146-8501, Japan Canon Canada, Inc. 6390 Dixie Road, Mississauga, Ontario, L5T 1P7, Canada Canon Latin America, Inc. 703 Waterford Way, Suite 400, Miami, FL 33126, U.S.A.
Инструкцию для Canon Pixma MP 150 на русском языке, в формате pdf можно скачать с нашего сайта. Наш каталог предоставляем Вам инструкцию производителя фирмы Canon, которая была взята из открытых источников. Ознакомившись с руководством по эксплуатации от Canon, Вы на все 100% и правильно сможете воспользоваться всеми функциями устройства.
Для сохранения инструкции «Струйное МФУ Canon Pixma MP 150» на русском языке на вашем компьютере либо телефоне, нажмите кнопку «Скачать инструкцию». Если активна кнопка «Инструкция онлайн», то Вы можете просмотреть документ (manual), в своём браузере онлайн.
Если у Вас нет возможности скачать инструкцию по эксплуатации либо просмотреть её, Вы можете поделиться ссылкой на эту страницу в социальных сетях и при удобном моменте скачать инструкцию. Либо добавьте эту страницу в закладки Вашего браузера, нажав кнопку «Добавить страницу в закладки браузера».