-
Contents
-
Table of Contents
-
Bookmarks
Quick Links
DT-930
Hardware Manual
(Version 1.00)
CASIO Computer Co., Ltd.
Copyright ©2006. All rights reserved.
May 2006
Related Manuals for Casio DT-930
Summary of Contents for Casio DT-930
-
Page 1
DT-930 Hardware Manual (Version 1.00) CASIO Computer Co., Ltd. Copyright ©2006. All rights reserved. May 2006… -
Page 2: Table Of Contents
Table of Contents Chapter 1. Product Overview Chapter 2. External Views 2.1. DT-930M51E 2.2. DT-930M50E 2.3. DT-964IOE Satellite Cradle 2.4. DT-923LIB Battery Pack Chapter 3. System Configuration 3.1. Available Models 3.2. Accessories 3.3. Consumable Items 3.4. Options Chapter 4. General Specifications 4.1.
-
Page 3
CASIO Computer Co., Ltd. in Tokyo Japan. Information in this document is subject to change without advance notice. CASIO Computer Co., Ltd. makes no representations or warranties with respect to the contents or use of this manual and specifically disclaims any express or implied warranties of merchantability or fitness for any particular purpose. -
Page 4
Editorial Record Manual Version Date edited Page Content 1.00 May 2006 Original version… -
Page 5: Chapter 1. Product Overview
Applications developed for existing the CASIO DT-900 series handheld terminal widely known as the prominent model amongst logistics and distribution business can be ported into the new DT-930 series. The new series has been designed and developed for software compatibility with the DT-900 series in mind.
-
Page 6: Chapter 2. External Views
2. External Views 2.1. DT-930M51E Fig. 2.1 2.2. DT-930M50E Fig. 2.2…
-
Page 7: Dt-964Ioe Satellite Cradle
2.3. DT-964IOE Satellite Cradle Fig. 2.3 2.4. DT-923LIB Battery Pack Fig. 2.4…
-
Page 8: Chapter 3. System Configuration
3. System Configuration 3.1. Available Models Table 3.1 Model No. Reader Port DT-930M50E Angle shape (downward at 60º) DT-930M51E Straight shape 3.2. Accessories Table 3.2 Item Quantity AA-size (LR6) alkaline battery 2 pcs Wrist strap 1 pc Desktop guides L and R 1 set Wall mount guides L and R 1 set…
-
Page 9: Options
3.4. Options Table 3.4 List of the options Model No. Product Specification DT-964IOE Satellite Cradle DT-960IOE Basic Cradle HA-E60IO Bridge Basic Cradle DT-969CHGE Cradle-type Battery Charger DT-923LIB Battery pack Lithium-ion battery pack DT-9020ADP-GS AC adaptor Input 230VAC For DT-960IOE and DT-969CHGE DT-9020ADP-US AC adaptor Input 120VAC For DT-960IOE and DT-969CHGE…
-
Page 10: Chapter 4. General Specifications
4. General Specifications 4.1. Hardware Table 4.1 DT-930 hardware specifications Block Item Specification Remark CPU and memory SH1 (32-bit RISC type) Clock frequency 4.92/2.46/1.23 MHz 4 Mbytes F-ROM 16 Mbytes Clock Clock Year/month/day/hour/minute/ with auto self-start Calendar second/day of the week/leap year…
-
Page 11
EAN, UPCA, UPCE, NW7, ITF, MSI, Industrial 2of5, CODE39, CODE93, CODE128, EAN128, IATA LED for confirmation In green color Communication IrDA Communication mode IrDA Ver. 1.1 compatible and Casio original infrared communication Synchronization Async, Frame Protocol Half-duplex Baud rate (bps) 2400/9600/19200/38400/57600/11 5200/4M Bluetooth Standard Bluetooth Specification Ver.1.2… -
Page 12: Key Layout
4.2. Key Layout The following illustration shows the keyboard viewed from the front on the terminal. Two trigger keys are located on the left and right sides. L R 9 7 8 4 5 6 1 2 3 $/+ %:* 0…
-
Page 13: Compliance
4.3. Compliance Table 4.2 List of the applicable compliance standards Standard Remark EN55022:1998+A1:2000+A2:2003 FCC Part 15 Subpart B EN55024:1998+A1:2001+A2:2003 compatible Safety EN60950-1 UL60950 compatible Bluetooth type approval EN300.328-1/EN300.328-2 FCC Part 15 Subpart EN301.489-1/EN300.489-17 C/RSS-210 compatible Laser EN60825 FDA compatible 4.4. Electrical Table 4.3 Item…
-
Page 14: Reliability
4.7. Reliability Table 4.6 Item Specification Remark MTBF of electronic parts 20,000 hours Backlight 5,000 hours Until the brightness of the backlight becomes half-value of the full brightness. Laser scanner 10,000 hours Power switch 300,000 times Trigger key 1,000,000 times Right and Left sides Other keys 300,000 times…
-
Page 15: Chapter 5. Cables
5. Cables 5.1. Signal and Wiring • DT-881RSC (Straight) Cradle (9-pin female) side External peripheral (25-pin male) side Signal Signal Case Case Fig. 5.1 • DT-882RSC (Cross) Cradle (9-pin female) side External peripheral (25-pin male) side Signal Signal Case Case Fig.
-
Page 16
• DT-887AX (Cross) Cradle (9-pin female) side External peripheral (9-pin female) side Signal Signal Case Case Fig. 5.4 • DT-888RSC (Cross for RS-422) Cradle (C-OUT ) side Cradle (C-IN) side Signal Signal ORS+ IRS+ ORS- IRS- OSD+ ISD+ OSD- ISD- IRD+ ORD+ IRD-… -
Page 17
• DT-787AX (Cross) Cradle (14-pin female) side External peripheral (9-pin female) side Signal Signal Case Case Case Fig. 5.8 • DT-788RSC (Cross for RS-485) Signal Signal TRUE (INVERT) INVERT (TRUE) INVERT (TRUE) TRUE (INVERT) Fig. 5.9… -
Page 18: Chapter 6. Dt-960Ioe Basic Cradle
PC. It has an RS-232C interface for connection to PC and an IR interface using the CASIO original protocol for connection to the terminal. Also, it can supply power to the mounted terminal.
-
Page 19: External Views
6.2. External Views RS-232C connector RS-485 connector AC adaptor jack EIAJ TYPE3 Power switch indicator DIP switch DT-930 detection switch Power supply terminal Wall-mounting unit Rating lable Fig. 6.1 Note: If this page is not printed properly, change the printer graphic property from «Vector Graphic» to…
-
Page 20: Dimensions And Weight
6.3. Dimensions and Weight Table 6.1 Dimensions and weight Item Specification Desk top configuration 110 (W) mm x 220 (D) mm x 100 (H) mm Wall mounting configuration 110 (W) mm x 220 (D) mm x 110 (H) mm Weight Approx.
-
Page 21: Hardware Specifications
I/F level Mark : LED off Pulse width of ON is Space: LED on (pulse width 1.6 usec.approx) fixed irrespective communicati on speed. Usage Connecting DT-930 I/F to Protocol RS-232C Host PC Synchronization Start/Stop bit Method Half duplex Data format…
-
Page 22
(Power LED) While Green in flashing 2-color LED communicating (green is used) SD Power Input voltage DC 9.5V±5% supply Current consumption 300 mA (max.) when supplying power to DT-930 Applicable plug type EIAJ RC5320 type 3 Center pin : Continue. -
Page 23: Electric
AC adaptor Input AC230V DT-9020ADP-G Input AC120V DT-9020ADP-U Power Output voltage 5V±10% supply Output current 300mA block Excess current Drop-type excess current protection circuit (600mA Protection or more) Terminal Layoutf of block terminals Power supply XIRCNT Not used 6.5. Electric Table 6.3 Item Specification…
-
Page 24: Environment
6.6. Environment Table 6.4 Item Specification Remark Temperature Operation 0 ºC to 40 ºC Storage -10 ºC to 50 ºC Humidity Operation 30% to 80%RH At 40ºC. No condensation Storage 30% to 90%RH Electrostatic Malfunction at 5 KV Conditions: Equivalent human body resistance: 100 ohm Destruction at 10 KV Equivalent human body capacity: 250 pF Frequency of application : 10 times…
-
Page 25: Compliance
Safety EN60950 Applicable to DT-9020ADP-G and DT-9020ADP-U. 6.10. Chain Connection 6.10.1. Configurations and Operating Conditions Basic Cradle and Host P/C (with external device connected) DT-930 RS-232C Basic Cradle 115.2 Kbps (max.) HOST PC IR communication 115.2 Kbps (max.) Fig.
-
Page 26
Basic Cradles and Host P/C HOST PC DT-930 DT-930 DT-930 RS-232C cable Basic Cradle Basic Cradle Basic Cradle 115 Kbps (max.) RS-485 RS-485 Modular cable Modular cable RS-232C connct. IR comm. IR coom. IR comm. 115 Kbps (max.) 115 Kbps (max.) 115 Kbps (max.) -
Page 27
Multiple Basic Cradles DT-930 DT-930 DT-930 Basic Cradle Basic Cradle Basic Cradle RS-485 RS-485 Modular cable Modular cable IR comm. IR comm. IR comm. 115Kbps (max.) 115Kbps (max.) 115Kbps (max.) Termination At middle Termination Fig. 6.4 DIP Switch Setting Table 6.10… -
Page 28: 6.10.2. Cable Specifications
6.10.2. Cable Specifications Cable for Chain Connection (short distance) A cable for the chain connection within distance of 1 meter or less (between DT-960IOE and DT-960IOE) is available as option. The model number of the cable is DT-788RSC (cable length: 1 View from side Max.
-
Page 29
Cable for Chain Connection (long distance) View from side Max. 1,000 m View from above 1 2 3 4 5 6 1 2 3 4 5 6 Cable Modular plug SK-UTP 100M3P 6/6-6FR SYK Fig. 6.7 Wiring of the cable (cross and twist pair) Cradle at downstream side Cradle at upper stream side Pin no. -
Page 30: 6.10.3. Notes About Chain Connection
Precautions to be observed when manufacturing cables • If the CASIO cables cannot be used, and custom-made cables are required instead, use the manufacturer-specified cramping tool to cramp the modular connector and cable. Note that defective cramping may damage communication.
-
Page 31: Chapter 7. Dt-964Ioe Satellite Cradle
7. DT-964IOE Satellite Cradle The DT-964IOE Satellite Cradle is a cradle dedicated for DT-930. It facilitates non-contact data transfer between a PC and the terminal, and, if multiple cradles are chain-connected, each cradle facilitates connecting the terminal mounted on the cradle to a single PC. It has an RS-232C interface for connection to PC and an IrDA interface for connection to the terminal.
-
Page 32: External Views
7.2. External Views RS-422 connector (C-IN side) RS-232C connector RS-422 connector (C-OUT side) AC adaptor jack EIAJ TYPE4 LED panel DIP switch DT-930 detection switch Charging/ power supply Wall-mounting unit terminal Lithium-Ion battery pack charging compartment Rating label Fig. 7.1 Note: If this page is not printed properly, change the printer graphic property from «Vector Graphic»…
-
Page 33: Dimensions And Weight
7.3. Dimensions and Weight Table 7.1 Dimensions and weight Item Specification Desktop configuration 110 (W) mm x 220 (D) mm x 100 (H) mm Wall mount configuration 110 (W) mm x 220 (D) mm x 110 (H) mm Weight 500 g (approx.) (see notes) Notes: •…
-
Page 34: Hardware Specifications
I/F level Mark : LED off On-pulse width Space: LED on (pulse width 1.6 usec. approx.) is fixed irrespective of the ransmission rate. Usage Connecting DT-930 I/F to Protocol RS-232C Host PC Synchronization Start/Stop bit Method Full duplex/Half duplex Data format…
-
Page 35
Remark Chain Protocol RS-422 Max. length 1 Synchronization Start/Stop bit Same specification as I/F to DT-930. Method Half duplex Data format Data bit : 8 Fixed Stop bit : 1 Parity bit : none Baud rate (bps) 9600, 38.4K, 115.2K… -
Page 36
Power switch Seesaw switch Terminal detection switch Push switch Indicatio READY/POW DT-930 is being mounted. 2-color LED Power LED DT-930 is not being mounted. Green CHG1 While charging 2-color LED Charging is complete. Green (green is used) CHG1 LED Charging ends abnormally. -
Page 37: Electric
Power Charging Voltage to check 2.6V±0.1 V supply module battery anomaly Dark current 4.3 µA Charging time Approx. 5 hours At ambient temperature Power Output voltage DC5V±10% supply Output current 300 mA block Excess current Drop type excess current protection protection circuit (600 mA or greater) Terminal…
-
Page 38: Environment
50 times Connection/removing of RS-232C 500 times the respective connectors RS-422 500 times DC jack 500 times Mounting and removing DT-930 power 20,000 times terminal on/from cradle supply/charging terminals Installing and removing Charging spring 5,000 times battery pack in/from the compartment Notes: •…
-
Page 39: Compliance
7.9. Compliance Table 7.7 Standard Remark Radio interference EN55022:1994, A2:1997 Class B Tested with AD-S42120AE CISPR Pub.22:1993, A2:1996 Class B Electromagnetic EN50082-1: 1997 Tested with AD-S42120AE compatibility generic immunity Safety EN60950 Applicable only to AD-S42120AE…
-
Page 40: Chain Connection
115.2 Kbps (max) Fig. 7.2 DIP Switch Setting Table 7.8 Use of Switch Destination Switch Setting Remark Baud rate DT-930 and To GA/to CPU PB6 IRSPEED0 115.2Kbps switching 0 Cradle Baud rate DT-930 and To GA/to CPU PB7 IRSPEED1 Note 1…
-
Page 41
Fig. 7.3 DIP Switch Setting Table 7.9 Setting Use of Switch Destination Switch Remark At end middle Baud rate DT-930 and To GA/to CPU PB6 IRSPEED0 115.2Kbps switching 0 Cradle Baud rate DT-930 and To GA/to CPU PB7 IRSPEED1 Note 1… -
Page 42
Multiple Satellite Cradles and Host P/C DT-930 DT-930 DT-930 HOST PC RS-232C Satellite Cradle Satellite Cradle Satellite Cradle 115.2 Kbps (max) RS-422 RS-422 Modular cable Modular cable Active operation Passive operation Passive operation IR comm. IR comm. IR comm. 115.2 Kbps (max) 115.2 Kbps (max) -
Page 43
DIP Switch Setting Table 7.11 Setting Passive Use of Switch Destination Switch Remark Through At end middle Baud rate DT-930 and To GA/to CPU IRSPEED 115.2Kbps switching 0 Cradle Baud rate DT-930 and To GA/to CPU IRSPEED switching 1 Cradle… -
Page 44: Cable Specifications
7.10.2. Cable Specifications Cable for Short Distance (1 m or less) View from side Max. 1 m View from above 1 2 3 4 5 6 1 2 3 4 5 6 Cable (see Table 11.16) Modular plug 6/6-6 FR SYK Fig.
-
Page 45
Cable for Chain Connection View from side Max. 1,000 m View from above 1 2 3 4 5 6 1 2 3 4 5 6 Modular plug Cable 6/6-6 FR SYK50 SK-UTP 100M3P Fig. 7.8 Wiring of the cable (straight connection, pin-to-pin) Cradle at downstream side Cradle at upper stream side Pin no. -
Page 46: Precautions
Precaution to be observed when manufacturing cables • If CASIO cables cannot be used, and custom-made cables are required, use the manufacturer- specified cramping tool to cramp the modular connector and cable. Note that defective cramping may damage communication.
-
Page 47: Chapter 8. Ha-E60Io Bridge Basic Cradle
8. HA-E60IO Bridge Basic Cradle The HA-E60IO Bridge Basic Cradle is a cradle dedicated for DT-930. It facilitates non-contact data transfer between PC and the terminal. Also, it can supply power to the mounted terminal. 8.1. Features at a Glance •…
-
Page 48: External Views
8.2. External Views Fig. 8.1 Note: If this page is not printed properly, change the printer graphic property from «Vector Graphic» to «Raster Graphic».
-
Page 49: Dimensions And Weight
Hardware Specifications Table 8.2 Block Item Specification Remark I/F to Protocol Original Ir Interface (IrDA device) DT-930 Conforms to Version 1.1 Synchronizatio Asynchronous, Frame synchronous Method Half duplex Baud rate (bps) 4Mbps ( MAX ) I/F to Protocol USB Ver. 1.1 conformity…
-
Page 50: Electric
8.5. Electric Table 8.3 Item Specification Remark Power consumption 1.0 A With applicable AC adaptor Available power supply AD-S15050A DC 5V±5% Line noise strength Malfunction at 1000V Pulse frequency : 5KHz Burst cycle : 300 milliseconds No. of pulses : 75 Burst term : 15 milliseconds Instantaneous power line off Malfunction after 10…
-
Page 51: Compliance
8.9. Compliance Table 8.7 Standard Remark EN55022:1998+A1:2000+A2:2003 Class B EN55024:1998+A1:2001+A2:2003 EN61000-3-2:2000 EN61000-3-3:1995+A1:2001…
-
Page 52: Chapter 9. Dt-969Chge Cradle-Type Battery Charger
Features at a Glance • Charging battery pack and supplying power to DT-930. It has integrated charge circuit to charge the battery pack and to supply power preventing battery’s power being consumed by the terminal. A period of approximately five hours is required to fully charge the battery pack.
-
Page 53: External Views
9.2. External Views AC adaptor jack EIAJ Type 3 LED panel DT-930 detection switch Charging/po wer supply Wall-mounting unit terminal Lithium-Ion battery pack charging compartment Rating label Fig. 9.1 Note: If this page is not printed properly, change the printer graphic property from «Vector Graphic» to…
-
Page 54: Dimensions And Weight
If the hook and cover for wall mounting are used, the product weight is increased by approximately 10 g. • If the nose guide for straight opening is used, the product weight is increased by approximately 5 g. 9.4. Circuit Block Diagram Charge Module DT-930 HTON HTSW AC adaptor Power Management HTADP Fig. 9.2…
-
Page 55: Hardware Specifications
When charging is complete. Green CHG1 LED Charging ends abnormally CHG2 While charging 2-color LED (while Wait for charging charging the battery in DT-930) CHG2 LED When charging is complete. Green Charging ends abnormally Power Input voltage DC9.5V±5% block Power consumption current 600 mA (max.) (25 mA when not…
-
Page 56: Electric
9.6. Electric Table 9.4 Item Specification Remark Power consumption 5.7 W With applicable AC adaptor Available power supply DC 9.5V±5% With EIAJ RC5320 type 3 plug DT-9020ADP-G Input: AC 220 to 240V, 50/60 Hz Input conditions: Voltage: ±10% of rated input voltage DT-9020ADP-U Input: AC 100 to 120V, 50/60 Hz Frequency: ±1 Hz of rated input…
-
Page 57: Reliability
Power switch 3,000 times Terminal detection switch 20,000 times Connecting/disconnecting DC jack 500 times AC adaptor Mounting and removing DT-930 power supply/charging 20,000 times the terminal on/from terminals cradle Installing and removing the battery pack in/from the 5,000 times compartment Notes: •…
-
Page 58: Chapter 10. Product Identification And Reference Numbers
10. Product Identification and Reference Numbers On the back of the DT-930 and the dedicated option, there is a bar code and numbers printed on label as shown in the figure. This bar code is represented by 15 digits of Code128 symbology and by alphanumeric characters beneath the bar code.
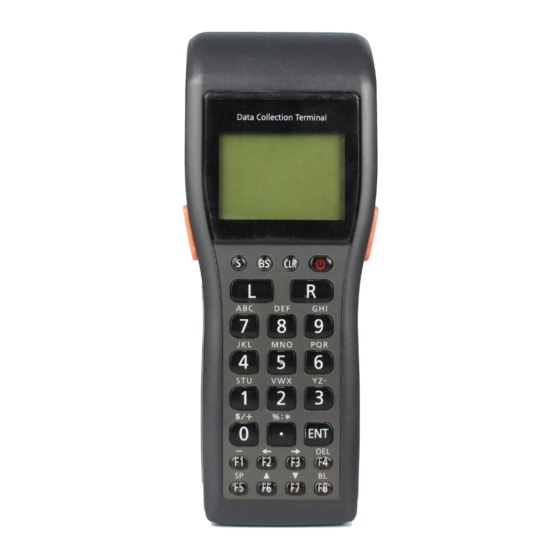
Терминал сбора данных Casio DT-930 может использоваться для решения учетных задач как в обычных, так и в промышленных условиях. От терминалов подобного класса его отличает высокий объем памяти, встроенный беспроводной интерфейс Bluetooth, большой дисплей, возможность выбора между пальчиковыми батареями и аккумулятором, удобная клавиатура, малый вес при высокой ударопрочности. Синхронизация терминала с ПК производится через инфракрасный порт: с помощью коммуникационной подставки или любого другого инфракрасного порта, подключенного к ПК. В целом можно сказать, что общая функциональность модели превышает функциональность любого другого терминала его ценовой категории.
Коммуникационные подставки
• Коммуникационная/зарядная подставка (RS-232). Позволяет синхронизировать терминал с ПК и одновременно производить зарядку аккумулятора без извлечения его из корпуса терминала. Подключается к COM порту ПК.
• Коммуникационная/зарядная подставка (USB). Позволяет синхронизировать терминал с ПК и одновременно производить зарядку аккумулятора без извлечения его из корпуса терминала..
• Коммуникационная подставка (RS-232). Позволяет синхронизировать терминал с ПК. Подключается к COM порту ПК.
Аккумулятор
• Аккумулятор Li-Ion, 600 мА*ч. В зависимости от режима эксплуатации обеспечивает работу терминала в течение 30 часов.
Зарядные устройства
• Зарядная подставка. Позволяет выполнять зарядку аккумулятора без извлечения его из корпуса терминала.
Адаптер
• Зарядная подставка. Позволяет выполнять зарядку аккумулятора без извлечения его из корпуса терминала.
Кабели
• Модемный кабель коммуникационной/зарядной подставки.
• Кабель для соединения коммуникационных/зарядных подставок. Позволяет последовательно соединять до 8 подставок по интерфейсу RS-422.
ПОДКЛЮЧЕНИЕ ТЕРМИНАЛА
Подключение по интерфейсу RS-232C
Использование подставки обеспечивает возможность передачи данных из ТСД в ПК. Для подключения подставки к персональному компьютеру используется кабель RS-232С. Подставка может размещаться на столе или крепиться к стене.
Для подключения подставки к электрической сети используйте только специальный адаптер переменного тока. Перед выполнением любой операции по обмену данными убедитесь, что адаптер подключен к сети и подставка включена, поскольку в момент передачи данных терминал получает питание от подставки.
1. Вставьте вилку адаптера в розетку.
2. Убедившись, что выключатель питания подставки находится в положении OFF, вставьте другой конец провода адаптера в разъем для адаптера в верхней части подставки.
3. Убедившись, что подставка и ПК отключены, снимите крышку и подсоедините один конец кабеля RS-232С к разъему в верхней части подставки, а другой к последовательному порту ПК.
4. Включите подставку, индикатор питания загорится красным цветом.
5. Установите ТСД в подставку, обеспечив прямой контакт инфракрасных портов. В случае надлежащего соединения цвет индикатора подставки изменится на зеленый. Когда начнется обмен данными, индикатор передачи данных начнет мигать зеленым цветом.
Подключение по интерфейсу USB
Для подключения подставки к электрической сети используйте только специальный адаптер переменного тока. Перед выполнением любой операции по обмену данными убедитесь, что адаптер подключен к сети и подставка включена, поскольку в момент передачи данных терминал получает питание от подставки.
1. Убедившись, что выключатель питания подставки находится в положении OFF, вставьте провод адаптера в разъем питания в нижней части подставки и подключите адаптер к источнику питания.
2. Убедившись, что подставка и ПК отключены, подсоедините один конец USB кабеля к разъему в верхней части подставки, а другой к USB порту ПК.
3. Включите подставку, индикатор питания загорится красным цветом.
4. Установите ТСД в подставку, обеспечив прямой контакт инфракрасных портов. В случае надлежащего соединения цвет индикатора подставки изменится на зеленый..
Включение терминала
Для включения терминала необходимо установить в него элементы питания и нажать в течение 1.5 с кнопку [PW]. Установка элементов питания описана в подразделе «Установка элементов питания». После включения терминал издаст короткий звуковой сигнал.
Сканирование штрих кодов
Выполнение операции считывания
1. Нажмите клавишу включения питания [PW] для включения терминала.
2. Поднесите терминал сбора данных к штрих-коду и нажмите на кнопку считывания.
3. Сканер излучает лазерный луч для считывания штрихового кода. В случае успешного считывания индикатор загорается зеленым цветом.
Примечание: если в процессе считывания возникнут проблемы, измените угол между кодом и терминалом или поднесите его ближе и повторите попытку.
При считывании штриховых кодов небольших размеров необходимо сократить расстояние между терминалом сбора данных и штрихкодом. При больших размерах кода необходимо удерживать терминал сбора данных на расстоянии, при котором код не будет выходить за границы лазерного луча.
Обмен данными между двумя терминалами
Обмен по инфракрасному каналу.
Обмен данными между двумя терминалами DT-930 возможен с помощью инфракрасного порта, расположенного в нижней части устройства. Расположите терминалы на одной линии, так чтобы их положение не менялось во время передачи данных, на расстоянии до 30 см.
Обмен по интерфейсу Bluetooth
Терминал DT-930 может обмениваться данными с помощью интерфейса Bluetooth. Для этого необходимо расположить терминал и устройство с Bluetooth интерфейсом на расстоянии не более 3 метров друг от друга.
Купить терминал сбора данных Casio DT-930 вы можете в нашем интернет-магазине
-
Страница 1
Data Collection Terminal Handheld T erminal User’ s Guide Series • Be sure to read «Safety Precautions» inside this guide before trying to use your Handheld T erminal. After reading this guide, keep it in a safe place for future reference. Data Collection Terminal Printed in China AB0302-046021D CASIO COMPUTER CO., L TD. 6-2, Hon-mach[…]
-
Страница 2
C-2 E-2 BLUETOOTH is a registered trademark owned by Bluetooth SIG. Inc. and licensed to CASIO COMPUTER CO., L TD. _irbqllqe !»#$ _äìÉíççíÜ=pfdK=fåÅK !»#$%&'()*+, !»#$%[…]
-
Страница 3
E-3 Congratulations upon your selection of this CASIO Product. Be sure to read the following Safety Precautions before trying to use it for the first time. Keep this manual in a handy place for future reference. Safety Precautions The following are the meanings of the markings and symbols used in these Safety Precautions to warn you against the pos[…]
-
Страница 4
E-4 Danger! ■ Lithium-ion Battery Pack The Lithium-ion Battery Pack is available as an option. ● Never allow the battery pack to become wet. W ater can create the danger of battery pack heat emission, explosion, and fire. ● Never use or leave the battery pack next to open flame, near a stove, or any other area exposed to high heat. Doing so c[…]
-
Страница 5
E-5 W arning! ■ Disassembly and Modification ● Never try to disassemble or modify the unit in any way . High voltage inside creates the danger of electrical shock. ■ Interior Parts and Components ● Never touch interior high-voltage parts or components. Doing so creates the danger of electrical shock. ■ Abnormal Conditions ● Should the u[…]
-
Страница 6
E-6 W arning! ■ Interference with the Operation of Other Equipment (Using Wireless Communication) ● Keep your Handheld T erminal at least 22 centimeters (8′ 1/10″) away from anyone wearing a pacemaker . Radio waves emitted by the Handheld T erminal can affect the operation of a pacemaker . ● In order to protect someone wearing a pac[…]
-
Страница 7
E-7 W arning! ■ Handling the Coin T ype Lithium Battery ● Do not recharge coin type lithium battery . Doing so may cause it to leak fluid, overheat, explode or burst into flames. ● Do not put the coin type lithium battery in open flame, or apply solder directly to the coin type lithium battery . Doing so may cause it to leak fluid, overheat, […]
-
Страница 8
E-8 W arning! ■ Optional Bridge Basic Cradle, Basic Cradle, Satellite Cradle and Cradle-type Battery Charger ● Power these cradles and Cradle-type battery charger only with a power outlet whose voltage matches that marked on the rating plate of each option. Do not plug these options into an extension shared by other appliances. Doing so creates[…]
-
Страница 9
E-9 Caution! ■ LCD Screen ● Never apply strong pressure to the screen or subject it to strong impact. Doing so can crack the LCD panel glass and create the danger of personal injury. ● Should the LCD panel glass ever break, never touch the liquid inside. Doing so can cause skin irritation and inflammation. • Should liquid from the LCD panel[…]
-
Страница 10
E-10 Caution! ■ Handling Alkaline Batteries ● Store batteries someplace out of direct sunlight where the temperature and humidity are not high. Not doing so may cause the batteries to leak fluid, overheat or explode. Also, it may cause the life and performance of the batteries to decline. ● These batteries can be disposed of as regular garbag[…]
-
Страница 11
E-11 Make back-up copies of all important data Caution! ■ Optional Bridge Basic Cradle, Basic Cradle, Satellite Cradle and Cradle-type Battery Charger ● Keep the power cord away from stoves and other sources of extreme heat. Heat can melt the insulation of the power cord and create the danger of fire and electrical shock. ● Never pull on the […]
-
Страница 12
E-12 Introduction Make sure you carefully read the following information to ensure that your Handheld T erminal is able to perform at the level for which it is designed. Handling Precautions • Do not throw or drop the Handheld T erminal or otherwise subject it to strong impact, which can damage the LCD screen, interrupt program execution, corrupt[…]
-
Страница 13
E-13 Product description/Intended use EU/EFT A member states intended EU: Austria, Belgium, Denmark, Finland, France, Germany , Greece, Ireland, Italy , Luxembourg, The Netherlands, Portugal, Spain, Sweden, United Kingdom, Czech Republic, Hungary , Poland, Slovenia, Slovakia, Estonia, Latvia, Lithuania, Cyprus, Malta EFT A: Switzerland, Iceland, Li[…]
-
Страница 14
E-14 • The contents of this manual are subject to change without notice. • The term “Handheld T erminal” as used in this User ’ s Guide refers to the CASIO DT -930 Handheld T erminal unless otherwise noted. • CASIO COMPUTER CO., L TD. assumes no responsibility for any loss or claims by third parties which may arise from the use of this […]
-
Страница 15
E-15 Using the Basic Cradle ………………………………… E-42 General Guide …………………………………………………………… E-42 When Y ou Are Using the Down-facing Reader Port Model .. E-44 Setting up the Basic Cradle …………………………………………. E-44 Serial Connection of Multiple Basic Cradles[…]
-
Страница 16
E-16 Unpacking When unpacking the Handheld T erminal (either DT -930M50E or DT -930M51E), check carefully that all of the items shown belo w are included. If an ything is missing or damaged, contact your original dealer or y our nearest CASIO Ser vice Pro vider . • Handheld Terminal (down-facing reader port) (forward-facing reader port) DT -930 M[…]
-
Страница 17
E-17 A v ailab le Models and Options Options Basic Cradle DT -960IOE Cradle-type Battery Charger DT -969CHGE Satellite Cradle DT -964IOE Lithium-ion Battery Pack DT -923LIB DT -930 M50E DT -930 M51E Cables W all Mount Unit f or Bridge Basic Cradle Bridge Basic Cradle HA-E60IO[…]
-
Страница 18
E-18 RS-232Ccable DT -782RSC Cross-cable for Basic Cradle 14Pin-25Pin (Male) RS-232Ccable DT -783RSC Cross-cable for Basic Cradle 14Pin-25Pin (female) RS-232Ccable DT -787AX Cross-cable for Basic Cradle 14Pin-9Pin (female) RS-232Ccable DT -881RSC Straight cable for Satellite Cradle For modem connection RS-232Ccable DT -882RSC Cross-cable for connec[…]
-
Страница 19
E-19 4 7 7 3 1 2 4 7 5 12 7 1 9 8 10 6 11 13 14 General Guide 1 Reader port Emits a laser for bar code reading. 2 Read indicator Indicates the status of the read operation: green for a successful read, red when the read is no good. 3 LCD screen Displays various data when a program is being run. 4 Trigger keys Executes the bar code read operation. 5[…]
-
Страница 20
E-20 Power Supply The Handheld T erminal has both operating power supply provided by either two AA (LR6)-size alkaline batteries or lithium-ion battery pack, and memory backup power supply provided by lithium battery . In this manual, the words «main battery» refer to both alkaline batteries and the lithium-ion battery pack, unless otherw[…]
-
Страница 21
E-21 Loading and Removing the AA (LR6)-size alkaline batteries Important! When you load the AA (LR6)-size alkaline batteries, make sure that their positive (+) and negative (–) ends are facing the correct directions. Loading the alkaline batteries 1 Slide the main battery compartment cover lock to the FREE position and remove the cover . 2 Load t[…]
-
Страница 22
E-22 Power Supply Loading and Removing the Lithium-ion Battery Pack Loading the Lithium-ion Battery Pack 1 Slide the main battery compartment cover lock to the FREE position and remove the cover . 2 Load a lithium-ion battery pack into the main battery compartment in the direction shown in the figure. Load the battery while sliding it in with the ?[…]
-
Страница 23
E-23 Replacing the Backup Lithium Battery When the backup lithium battery low voltage message appears on the LCD screen, immediately replace the backup battery (lithium). Use a CR2032 lithium battery as the replacement battery . Be sure to turn the Handheld T erminal OFF before you do this. [Caution] ■ For Important Data • When you remove the b[…]
-
Страница 24
E-24 3 Carefully wipe the backup battery (lithium battery) with a dry cloth before inserting it with the plus (+) side up as shown in the diagram. 4 Push the lithium battery in the direction shown by the arrow to hook it. 5 Close the backup battery cover and tighten the screws. Removing the battery 1 Open the backup battery cover and use a ballpoin[…]
-
Страница 25
E-25 About the LCD Screen The LCD screen of the Handheld T erminal shows program settings, operational procedures, calculation results and other information. • Display Area 64 dots (V) x 128 dots (H) • Display Characters 6-dot, 8-dot and 10-dot mode Reduced ANK 21 columns x 10 lines, 16 columns x 8 lines, 12 columns x 6 lines ANK 21 columns x 5[…]
-
Страница 26
E-26 The wrist strap protects the Handheld T erminal from being damaged as a result of it being dropped by mistake during movement. Follow the procedure below to attach the wrist strap. T o attach the wrist strap 1 Pass the thin end of the wrist strap through the metal hand strap mount (two possible locations) on the bottom side of the Handheld T e[…]
-
Страница 27
E-27 1 2 3 1 5 4 6 7 Keys and Their Functions Keys available on the Handheld T erminal and their functions are as follows. 1 T rigger keys T rigger a bar code read operation. 2 Control keys CLR key: Cancels input. BS key: Backspaces and deletes one character . S key: Switches between the character input mode and the number input mode. lit on the LC[…]
-
Страница 28
E-28 Performing a Bar Code Read Operation 1 Press the [PW] key to turn power on. Hold the Handheld T erminal close to the bar code and press the trigger key . 2 The reader port emits a laser to read the bar code. The read indicator lights green when the read is successful. Important! • If you have problems with the read operation, change the angl[…]
-
Страница 29
E-29 When reading a small bar code, decrease the distance between the Handheld T erminal and the bar code. For larger bar codes, position the Handheld T erminal so that the bar code fits into the laser beam. Sample Bar Codes W arning! ■ Laser Beam ● Never look directly into the laser beam. Doing so can cause serious eye damage. L **[…]
-
Страница 30
E-30 Using the Bar Code Reader Adjusting the Laser Beam Width The width of the laser beam emitted from the Handheld T erminal can be adjusted to match the width of the bar code that is being read. When you switch the laser beam width, you must set the beam’s reference point beforehand. 1 T urn the Handheld T erminal ON with the and keys held down[…]
-
Страница 31
E-31 Beam Width Adjustment Bar Code For down-facing reader port model For forward-facing reader port model [Handling Precautions] • The Handheld T erminal is shipped with the laser beam width already adjusted. So, the laser beam width need not be adjusted. Adjustment is necessary only when the laser beam does not switch to the correct position wh[…]
-
Страница 32
E-32 IR Communication Application software and input data can be transferred between two DT -930 units using the infrared ports on the bottom of the units. Position the two DT -930 units so they will not accidently move during communication. The orientation of the two units depends on the type of communication you plan to perform. • Conformed IrD[…]
-
Страница 33
E-33 Bluetooth ® Comm unication The Bluetooth ® interf ace can be used to transf er data to and from a Bluetooth ® compatible printer . Data can be transf erred if the Handheld T erminal is located within three meters of the target de vice (and nothing is bloc king the signal). Important! Observe the following precautions to help ensure that Blu[…]
-
Страница 34
E-34 Specifications • General CPU: 32-bit RISC T ype Memory: RAM : 4MB (User area 1.6 MB) FROM : 16MB (User area 12.5 MB) • Display T ype: STN LCD with phase correction film Capacity: 128 x 64 dots Display contrast: Manually adjustable Backlight: LED • Laser Scanner Readable Symbologies: EAN, JAN, UPC, NW -7, CODE39, ITF , CODE93, CODE128, MS[…]
-
Страница 35
E-35 • Power Supply Main: T wo AA (LR6)-size alkaline dry cells or one lithium-ion battery pack Alkaline Battery life: — Approx. 200 hours (using a new set of AA(LR6)-size alkaline batteries, at normal temperature, and in scanning bar code twice per 10 seconds) — Approx. 175 hours (using a new set of AA (LR6)-size alkaline batteries at normal tem[…]
-
Страница 36
E-36 Using the Bridge Basic Cradle 1 LED power indicator Indicates the charge status of the battery and whether the DT -930 is mounted. Off: Power OFF Lit Green: Power is ON and the DT -930 is correctly mounted. Lit Red: Power is ON and the DT -930 is not correctly mounted. 2 USB connection status Indicates that the USB connection is normal. Off: U[…]
-
Страница 37
E-37 Setting up the Bridge Basic Cradle 1 Make sure that the Bridge Basic Cradle’s power switch is turned off and then plug the optional AC adaptor (AD-S15050AE) into the AC adaptor jack on the back of the Bridge Basic Cradle. 2 Connect the power cord to the AC adaptor before connecting the power cord to the electrical outlet. 3 Connect the USB c[…]
-
Страница 38
E-38 Setting up the Bridge Basic Cradle Connecting without Using the AC Adaptor • It is possible to draw power from the personal computer in the bus power mode. This makes it possible to operate the Bridge Basic Cradle without using the AC adaptor. • Power is not supplied to the DT -930 when the USB connection is used to supply power. Replace t[…]
-
Страница 39
E-39 Mounting on a W all 1 Remove the screws on the bottom of the desktop unit to remove it. 2 Attach the wall mount unit and tighten the screws for the wall mount unit. 3 Insert the screw provided into the location where the hole on the top of the wall mount unit is to be fixed. Do not screw the screw all the way in. Leave about 2 mm between the w[…]
-
Страница 40
E-40 4 Hang the wall mount unit from the screw through the hole on its top. 5 Insert the screw provided into the top part of the lower hole of the wall mount unit. 6 T ighten both the upper and lower screws. Removing the W all Mount Unit 1 Loosen both the upper and lower screws. 2 Slide the wall mount unit up to remove it. Important! • Check the […]
-
Страница 41
E-41 HA-E60IO Bridge Basic Cradle specifications 1. Infrared Inte rfac e: Infrared interface Standard: Conforms to IrDA Ver 1.1 Synchronization: Asynchronous, frame synchronizing Speed: 4 Mbps (MAX) 2. USB Standard: Conforms to USB V er 1.1 Speed: 12 Mbps (MAX) 3. Power supply Power Source: AC adaptor (AD-S15050AE) USB bus power Rated input: When u[…]
-
Страница 42
E-42 CASIO DATA POWER OFF POWER ON RS-232C RS-485-1 RS-485-2 AC ADAPTOR CASIO 4 5 8 11 14 13 14 10 12 8 6 7 1 3 2 9 Using the Basic Cradle Basic Cradle (DT -960IOE) makes it possible to upload system data and file data between the Handheld T erminal and a personal computer . Y ou can use optional 6-6 pin Modular Cables (DT -788RSC) to connect up to[…]
-
Страница 43
E-43 1 RS-232C Interface For connection of a PC and uploading/downloading of system data and file data. 2 RS-485 Interface For connection of multiple optional Basic Cradles. 3 AC adaptor jack For connection of the dedicated AC adaptor to supply power . 4 Nose Guide Remove this guide when you are using the down-facing reader port model. 5 T erminal […]
-
Страница 44
E-44 Using the Basic Cradle When Y ou Are Using the Down-facing Reader Port Model When you are using a down-facing reader port model, remove the nose guide before use. T o remove the nose guide, remove the two screws using a screwdriver . Setting up the Basic Cradle Use only the dedicated AC adaptor for Basic Cradle to connect to an electrical outl[…]
-
Страница 45
E-45 3 Plug the AC adaptor into an electrical outlet. 4 After making sure that the pow er switch of the Basic Cradle is in the OFF position, plug the other end of the A C adaptor into the A C terminal at the top of the Basic Cradle. 5 After making sure that the power of the Basic Cradle and personal computer is OFF , remov e the cov er and connect […]
-
Страница 46
E-46 Using the Basic Cradle 12345678 Serial Connection of Multiple Basic Cradles Y ou can use optional 6-6 pin Modular Cables (DT -788RSC) to connect up to 16 Basic Cradles in a serial configuration. This configuration makes it possible to exchange data between multiple Handheld T erminals and a personal computer . Connections First connect Basic C[…]
-
Страница 47
E-47 DT -960IOE Basic Cradle Specifications Infrared Interface: Infrared Standard: CASIO original Control Protocol: Half-duplex Synchronization: Asynchronous Speed: 2,400 to 1 15,200 bps RS-232C Control Protocol: Half-duplex Synchronization: Asynchronous Speed: 2,400 to 1 15,200 bps RS-485 Control Protocol: Half-duplex Synchronization: Asynchronous[…]
-
Страница 48
E-48 Using the Satellite Cradle Satellite Cradle (DT -964IOE) makes it possible to upload system data and file data between the Handheld T erminal and a personal computer . It can also be used as the charger for the lithium-ion battery pack. Use the RS-232C cable (DT -881RSC/DT -882RSC/DT -883RSC/DT -887AX/AXA) for connecting the Satellite Cradle t[…]
-
Страница 49
E-49 1 RS-232C Interface For connection to a PC and uploading/downloading of system data and file data. 2 RS-422 Interface For connection of multiple Satellite Cradles. 3 AC adaptor jack For connection of the AC adaptor to supply power . 4 Nose Guide Remove this guide when you are using the down-facing reader port model. 5 T erminal detection switc[…]
-
Страница 50
E-50 Using the Satellite Cradle When Y ou Are Using the Down-facing Reader Port Model When you are using a down-facing reader port model, remove the nose guide before use. T o remove the nose guide, remove the two screws using a screwdriver . Setting up the Satellite Cradle Use only the dedicated AC adaptor for Satellite Cradle to connect to an ele[…]
-
Страница 51
E-51 3 Connect the power cord to the AC adaptor before connecting the power cord to the power outlet. 4 After making sure that the power switch of the Satellite Cradle is in the OFF position, plug the other end of the AC adaptor into the AC terminal at the top of the Satellite Cradle. 5 After making sure that the power of the Satellite Cradle and p[…]
-
Страница 52
E-52 Using the Satellite Cradle Important! • High-sensitivity communications devices are used for the IrDA communications function. A void using units or equipment such as a cellular phone emits radio waves during communication. T o ensure uninterrupted communication, keep the Satellite Cradle away from the equipment (at least 30 centimeters from[…]
-
Страница 53
E-53 Charging the Battery Pack The follo wing procedure can be used only when a lithium-ion battery pack is loaded in the Handheld T er minal. 1 T ur n on the pow er of the Satellite Cradle, and confirm that its power indicator lights up red. 2 Attach the Handheld T er minal to the Satellite Cradle, making sure that the charge terminals on the bott[…]
-
Страница 54
E-54 Using the Satellite Cradle Charging the Battery Pack (charging the lithium-ion battery pack separately) 1 Set the power switch of the Satellite Cradle to the ON position. The power indicator of the Satellite Cradle lights red. 2 Load the battery pack in the spare battery compartment on the Satellite Cradle, making sure that the terminals on th[…]
-
Страница 55
E-55 Serial Connection of Multiple Satellite Cradles Y ou can use optional 6-6 pin Modular Cables (DT -888RSC) to connect up to 7 Satellite Cradles in a serial configuration. This configuration makes it possible to exchange data between multiple Handheld T erminals and a personal computer via the cradles. Connections Connect C-OUT on the Satellite […]
-
Страница 56
E-56 Using the Satellite Cradle 123 45678 9 1 0 DIP Switch Settings The following table shows the various settings that are available with the DIP switches located on the back of the Satellite Cradle. Important! • Other settings not shown here are used for special-purpose modes, and should not be used. Handheld T erminal — Satellite Cradle Commun[…]
-
Страница 57
E-57 DT -964IOE Satellite Cradle Specifications Infrared Interface: Infrared Standard: Conforms to IrDA V er . 1.2 Original Synchronization: Asynchronous Speed: 9,600/38,400/1 15,200bps RS-232C Control Protocol: Full-duplex Synchronization: Asynchronous Speed: 1,200 to 1 15,200bps RS-422 Control Protocol: Full-duplex Synchronization: Asynchronous S[…]
-
Страница 58
E-58 CHG2 CHG1 CASIO POWER OFF POWER ON AC ADAPTOR CASIO 2 3 7 10 12 12 8 9 11 7 4 5 6 1 Using the Cradle-type Battery Charger The Cradle-type Battery Charger (DT -969CHGE) makes it possible to separately charge battery pack installed in the Handheld T erminal and a spare battery pack (DT -923LIB) installed in the spare battery compartment on the c[…]
-
Страница 59
E-59 1 AC adaptor jack For connection of the AC adaptor to supply power 2 Nose Guide Remove this guide when you are using the down-facing reader port model. 3 T erminal detection switch Detects whether or not the Handheld T erminal is mounted correctly on the Cradle-type Battery Charger 4 Spare battery pack charge Indicates the charge status of a s[…]
-
Страница 60
E-60 Using the Cradle-type Battery Charger When Y ou Are Using the Down-facing Reader Port Model When you are using a down-facing reader port model, remove the nose guide before use. T o remove the nose guide, remove the two screws using a screwdriver . Setting up the Cradle-type Battery Charger Use only the AC adaptor specified for use with the Ha[…]
-
Страница 61
E-61 Charge terminals Power switch (ON) Power indicator Spare Battery Pack Charge Indicator (“CHG 2”) Battery Pack Charge Indicator (“CHG 1”) 3 Plug the AC adaptor into an electrical outlet. 4 After making sure that the power switch of the Cradle-type Battery Charger is at the OFF position, plug the other end of the AC adaptor into the AC a[…]
-
Страница 62
E-62 Using the Cradle-type Battery Charger [Caution] ■ Ambient T emperature Ranges for the Battery Pack • T emperature ranges for battery pack use in the Handheld T erminal, charging, and storage are specified below . T emperatures outside these ranges create the danger of deterioration of battery pack performance and shortening of its service […]
-
Страница 63
E-63 Charging the Battery Pack (charging the lithium-ion battery pack separately) 1 Set the power switch of the Cradle-type Battery Charger to the ON position. The power indicator of the Cradle-type Battery Charger lights red. 2 Load a battery pack in the spare battery compartment on the charger , making sure that the terminals on the side and rear[…]
-
Страница 64
E-64 Using the Cradle-type Battery Charger [Caution] ■ Ambient T emperature Ranges for the Battery Pack • T emperature ranges for battery pack use in the Handheld T erminal, charging, and storage are specified below . T emperatures outside these ranges create the danger of deterioration of battery pack performance and shortening of its service […]
-
Страница 65
E-65 DT -969CHGE Cradle-type Battery Charger Specifications Charger Charge Method: Fixed voltage (with current limiter) Charge T ime: Approx. 6 hours Power Supply Power Source: AC adaptor (DT -9020ADP-GS or DT -9020ADP-US) Power Requirements: 230 V AC (DT -9020ADP-GS) 120 V AC (DT -9020ADP-US) Rated Input: DC 9.5 V , approx. 1,000 mA Dimensions and[…]
-
Страница 66
E-66 CA L D P H P A B The following installation methods describe how to install the Basic Cradle, Satellite Cradle and Cradle-type Battery charger either on a flat surface place or on a wall. T o hang the cradles and charger on a wall The following installation method is described with the Satellite Cradle as its reference. 1 Attach the wall unit […]
-
Страница 67
E-67 2 Remove the desktop guides (L, R). 3 Attach the wall mount guides provided with the DT -930. Insert the wall mount guides into the slits, and then fix them in place by sliding them downwards. 4 Remove the two screws (one each at the top and bottom) that secure the base to the Satellite Cradle. 5 Pressing down on the four corners of the Satell[…]
-
Страница 68
E-68 6 Position the base on the wall where you want to hang the Satellite Cradle, and use an awl or some other sharp object to mark the positions of the two wood screws. 7 Slip a spacer over each of the wood screws and then drive the screws into the wall at the positions you marked in the previous step. Make sure that the spacers are oriented corre[…]
-
Page 1: Casio DT-930
Data Collection Terminal Handheld T erminal User’ s Guide Series • Be sure to read «Safety Precautions» inside this guide before trying to use your Handheld T erminal. After reading this guide, keep it in a safe place for future reference. Data Collection Terminal Printed in China AB0302-046021D CASIO COMPUTER CO., L TD. 6-2, Hon-mach[…]
-
Page 2: Casio DT-930
C-2 E-2 BLUETOOTH is a registered trademark owned by Bluetooth SIG. Inc. and licensed to CASIO COMPUTER CO., L TD. _irbqllqe !»#$ _äìÉíççíÜ=pfdK=fåÅK !»#$%&'()*+, !»#$%[…]
-
Page 3: Casio DT-930
E-3 Congratulations upon your selection of this CASIO Product. Be sure to read the following Safety Precautions before trying to use it for the first time. Keep this manual in a handy place for future reference. Safety Precautions The following are the meanings of the markings and symbols used in these Safety Precautions to warn you against the pos[…]
-
Page 4: Casio DT-930
E-4 Danger! ■ Lithium-ion Battery Pack The Lithium-ion Battery Pack is available as an option. ● Never allow the battery pack to become wet. W ater can create the danger of battery pack heat emission, explosion, and fire. ● Never use or leave the battery pack next to open flame, near a stove, or any other area exposed to high heat. Doing so c[…]
-
Page 5: Casio DT-930
E-5 W arning! ■ Disassembly and Modification ● Never try to disassemble or modify the unit in any way . High voltage inside creates the danger of electrical shock. ■ Interior Parts and Components ● Never touch interior high-voltage parts or components. Doing so creates the danger of electrical shock. ■ Abnormal Conditions ● Should the u[…]
-
Page 6: Casio DT-930
E-6 W arning! ■ Interference with the Operation of Other Equipment (Using Wireless Communication) ● Keep your Handheld T erminal at least 22 centimeters (8′ 1/10″) away from anyone wearing a pacemaker . Radio waves emitted by the Handheld T erminal can affect the operation of a pacemaker . ● In order to protect someone wearing a pac[…]
-
Page 7: Casio DT-930
E-7 W arning! ■ Handling the Coin T ype Lithium Battery ● Do not recharge coin type lithium battery . Doing so may cause it to leak fluid, overheat, explode or burst into flames. ● Do not put the coin type lithium battery in open flame, or apply solder directly to the coin type lithium battery . Doing so may cause it to leak fluid, overheat, […]
-
Page 8: Casio DT-930
E-8 W arning! ■ Optional Bridge Basic Cradle, Basic Cradle, Satellite Cradle and Cradle-type Battery Charger ● Power these cradles and Cradle-type battery charger only with a power outlet whose voltage matches that marked on the rating plate of each option. Do not plug these options into an extension shared by other appliances. Doing so creates[…]
-
Page 9: Casio DT-930
E-9 Caution! ■ LCD Screen ● Never apply strong pressure to the screen or subject it to strong impact. Doing so can crack the LCD panel glass and create the danger of personal injury. ● Should the LCD panel glass ever break, never touch the liquid inside. Doing so can cause skin irritation and inflammation. • Should liquid from the LCD panel[…]
-
Page 10: Casio DT-930
E-10 Caution! ■ Handling Alkaline Batteries ● Store batteries someplace out of direct sunlight where the temperature and humidity are not high. Not doing so may cause the batteries to leak fluid, overheat or explode. Also, it may cause the life and performance of the batteries to decline. ● These batteries can be disposed of as regular garbag[…]
-
Page 11: Casio DT-930
E-11 Make back-up copies of all important data Caution! ■ Optional Bridge Basic Cradle, Basic Cradle, Satellite Cradle and Cradle-type Battery Charger ● Keep the power cord away from stoves and other sources of extreme heat. Heat can melt the insulation of the power cord and create the danger of fire and electrical shock. ● Never pull on the […]
-
Page 12: Casio DT-930
E-12 Introduction Make sure you carefully read the following information to ensure that your Handheld T erminal is able to perform at the level for which it is designed. Handling Precautions • Do not throw or drop the Handheld T erminal or otherwise subject it to strong impact, which can damage the LCD screen, interrupt program execution, corrupt[…]
-
Page 13: Casio DT-930
E-13 Product description/Intended use EU/EFT A member states intended EU: Austria, Belgium, Denmark, Finland, France, Germany , Greece, Ireland, Italy , Luxembourg, The Netherlands, Portugal, Spain, Sweden, United Kingdom, Czech Republic, Hungary , Poland, Slovenia, Slovakia, Estonia, Latvia, Lithuania, Cyprus, Malta EFT A: Switzerland, Iceland, Li[…]
-
Page 14: Casio DT-930
E-14 • The contents of this manual are subject to change without notice. • The term “Handheld T erminal” as used in this User ’ s Guide refers to the CASIO DT -930 Handheld T erminal unless otherwise noted. • CASIO COMPUTER CO., L TD. assumes no responsibility for any loss or claims by third parties which may arise from the use of this […]
-
Page 15: Casio DT-930
E-15 Using the Basic Cradle ………………………………… E-42 General Guide …………………………………………………………… E-42 When Y ou Are Using the Down-facing Reader Port Model .. E-44 Setting up the Basic Cradle …………………………………………. E-44 Serial Connection of Multiple Basic Cradles[…]
-
Page 16: Casio DT-930
E-16 Unpacking When unpacking the Handheld T erminal (either DT -930M50E or DT -930M51E), check carefully that all of the items shown belo w are included. If an ything is missing or damaged, contact your original dealer or y our nearest CASIO Ser vice Pro vider . • Handheld Terminal (down-facing reader port) (forward-facing reader port) DT -930 M[…]
-
Page 17: Casio DT-930
E-17 A v ailab le Models and Options Options Basic Cradle DT -960IOE Cradle-type Battery Charger DT -969CHGE Satellite Cradle DT -964IOE Lithium-ion Battery Pack DT -923LIB DT -930 M50E DT -930 M51E Cables W all Mount Unit f or Bridge Basic Cradle Bridge Basic Cradle HA-E60IO[…]
-
Page 18: Casio DT-930
E-18 RS-232Ccable DT -782RSC Cross-cable for Basic Cradle 14Pin-25Pin (Male) RS-232Ccable DT -783RSC Cross-cable for Basic Cradle 14Pin-25Pin (female) RS-232Ccable DT -787AX Cross-cable for Basic Cradle 14Pin-9Pin (female) RS-232Ccable DT -881RSC Straight cable for Satellite Cradle For modem connection RS-232Ccable DT -882RSC Cross-cable for connec[…]
-
Page 19: Casio DT-930
E-19 4 7 7 3 1 2 4 7 5 12 7 1 9 8 10 6 11 13 14 General Guide 1 Reader port Emits a laser for bar code reading. 2 Read indicator Indicates the status of the read operation: green for a successful read, red when the read is no good. 3 LCD screen Displays various data when a program is being run. 4 Trigger keys Executes the bar code read operation. 5[…]
-
Page 20: Casio DT-930
E-20 Power Supply The Handheld T erminal has both operating power supply provided by either two AA (LR6)-size alkaline batteries or lithium-ion battery pack, and memory backup power supply provided by lithium battery . In this manual, the words «main battery» refer to both alkaline batteries and the lithium-ion battery pack, unless otherw[…]
-
Page 21: Casio DT-930
E-21 Loading and Removing the AA (LR6)-size alkaline batteries Important! When you load the AA (LR6)-size alkaline batteries, make sure that their positive (+) and negative (–) ends are facing the correct directions. Loading the alkaline batteries 1 Slide the main battery compartment cover lock to the FREE position and remove the cover . 2 Load t[…]
-
Page 22: Casio DT-930
E-22 Power Supply Loading and Removing the Lithium-ion Battery Pack Loading the Lithium-ion Battery Pack 1 Slide the main battery compartment cover lock to the FREE position and remove the cover . 2 Load a lithium-ion battery pack into the main battery compartment in the direction shown in the figure. Load the battery while sliding it in with the ?[…]
-
Page 23: Casio DT-930
E-23 Replacing the Backup Lithium Battery When the backup lithium battery low voltage message appears on the LCD screen, immediately replace the backup battery (lithium). Use a CR2032 lithium battery as the replacement battery . Be sure to turn the Handheld T erminal OFF before you do this. [Caution] ■ For Important Data • When you remove the b[…]
-
Page 24: Casio DT-930
E-24 3 Carefully wipe the backup battery (lithium battery) with a dry cloth before inserting it with the plus (+) side up as shown in the diagram. 4 Push the lithium battery in the direction shown by the arrow to hook it. 5 Close the backup battery cover and tighten the screws. Removing the battery 1 Open the backup battery cover and use a ballpoin[…]
-
Page 25: Casio DT-930
E-25 About the LCD Screen The LCD screen of the Handheld T erminal shows program settings, operational procedures, calculation results and other information. • Display Area 64 dots (V) x 128 dots (H) • Display Characters 6-dot, 8-dot and 10-dot mode Reduced ANK 21 columns x 10 lines, 16 columns x 8 lines, 12 columns x 6 lines ANK 21 columns x 5[…]
-
Page 26: Casio DT-930
E-26 The wrist strap protects the Handheld T erminal from being damaged as a result of it being dropped by mistake during movement. Follow the procedure below to attach the wrist strap. T o attach the wrist strap 1 Pass the thin end of the wrist strap through the metal hand strap mount (two possible locations) on the bottom side of the Handheld T e[…]
-
Page 27: Casio DT-930
E-27 1 2 3 1 5 4 6 7 Keys and Their Functions Keys available on the Handheld T erminal and their functions are as follows. 1 T rigger keys T rigger a bar code read operation. 2 Control keys CLR key: Cancels input. BS key: Backspaces and deletes one character . S key: Switches between the character input mode and the number input mode. lit on the LC[…]
-
Page 28: Casio DT-930
E-28 Performing a Bar Code Read Operation 1 Press the [PW] key to turn power on. Hold the Handheld T erminal close to the bar code and press the trigger key . 2 The reader port emits a laser to read the bar code. The read indicator lights green when the read is successful. Important! • If you have problems with the read operation, change the angl[…]
-
Page 29: Casio DT-930
E-29 When reading a small bar code, decrease the distance between the Handheld T erminal and the bar code. For larger bar codes, position the Handheld T erminal so that the bar code fits into the laser beam. Sample Bar Codes W arning! ■ Laser Beam ● Never look directly into the laser beam. Doing so can cause serious eye damage. L **[…]
-
Page 30: Casio DT-930
E-30 Using the Bar Code Reader Adjusting the Laser Beam Width The width of the laser beam emitted from the Handheld T erminal can be adjusted to match the width of the bar code that is being read. When you switch the laser beam width, you must set the beam’s reference point beforehand. 1 T urn the Handheld T erminal ON with the and keys held down[…]
-
Page 31: Casio DT-930
E-31 Beam Width Adjustment Bar Code For down-facing reader port model For forward-facing reader port model [Handling Precautions] • The Handheld T erminal is shipped with the laser beam width already adjusted. So, the laser beam width need not be adjusted. Adjustment is necessary only when the laser beam does not switch to the correct position wh[…]
-
Page 32: Casio DT-930
E-32 IR Communication Application software and input data can be transferred between two DT -930 units using the infrared ports on the bottom of the units. Position the two DT -930 units so they will not accidently move during communication. The orientation of the two units depends on the type of communication you plan to perform. • Conformed IrD[…]
-
Page 33: Casio DT-930
E-33 Bluetooth ® Comm unication The Bluetooth ® interf ace can be used to transf er data to and from a Bluetooth ® compatible printer . Data can be transf erred if the Handheld T erminal is located within three meters of the target de vice (and nothing is bloc king the signal). Important! Observe the following precautions to help ensure that Blu[…]
-
Page 34: Casio DT-930
E-34 Specifications • General CPU: 32-bit RISC T ype Memory: RAM : 4MB (User area 1.6 MB) FROM : 16MB (User area 12.5 MB) • Display T ype: STN LCD with phase correction film Capacity: 128 x 64 dots Display contrast: Manually adjustable Backlight: LED • Laser Scanner Readable Symbologies: EAN, JAN, UPC, NW -7, CODE39, ITF , CODE93, CODE128, MS[…]
-
Page 35: Casio DT-930
E-35 • Power Supply Main: T wo AA (LR6)-size alkaline dry cells or one lithium-ion battery pack Alkaline Battery life: — Approx. 200 hours (using a new set of AA(LR6)-size alkaline batteries, at normal temperature, and in scanning bar code twice per 10 seconds) — Approx. 175 hours (using a new set of AA (LR6)-size alkaline batteries at normal tem[…]
-
Page 36: Casio DT-930
E-36 Using the Bridge Basic Cradle 1 LED power indicator Indicates the charge status of the battery and whether the DT -930 is mounted. Off: Power OFF Lit Green: Power is ON and the DT -930 is correctly mounted. Lit Red: Power is ON and the DT -930 is not correctly mounted. 2 USB connection status Indicates that the USB connection is normal. Off: U[…]
-
Page 37: Casio DT-930
E-37 Setting up the Bridge Basic Cradle 1 Make sure that the Bridge Basic Cradle’s power switch is turned off and then plug the optional AC adaptor (AD-S15050AE) into the AC adaptor jack on the back of the Bridge Basic Cradle. 2 Connect the power cord to the AC adaptor before connecting the power cord to the electrical outlet. 3 Connect the USB c[…]
-
Page 38: Casio DT-930
E-38 Setting up the Bridge Basic Cradle Connecting without Using the AC Adaptor • It is possible to draw power from the personal computer in the bus power mode. This makes it possible to operate the Bridge Basic Cradle without using the AC adaptor. • Power is not supplied to the DT -930 when the USB connection is used to supply power. Replace t[…]
-
Page 39: Casio DT-930
E-39 Mounting on a W all 1 Remove the screws on the bottom of the desktop unit to remove it. 2 Attach the wall mount unit and tighten the screws for the wall mount unit. 3 Insert the screw provided into the location where the hole on the top of the wall mount unit is to be fixed. Do not screw the screw all the way in. Leave about 2 mm between the w[…]
-
Page 40: Casio DT-930
E-40 4 Hang the wall mount unit from the screw through the hole on its top. 5 Insert the screw provided into the top part of the lower hole of the wall mount unit. 6 T ighten both the upper and lower screws. Removing the W all Mount Unit 1 Loosen both the upper and lower screws. 2 Slide the wall mount unit up to remove it. Important! • Check the […]
-
Page 41: Casio DT-930
E-41 HA-E60IO Bridge Basic Cradle specifications 1. Infrared Inte rfac e: Infrared interface Standard: Conforms to IrDA Ver 1.1 Synchronization: Asynchronous, frame synchronizing Speed: 4 Mbps (MAX) 2. USB Standard: Conforms to USB V er 1.1 Speed: 12 Mbps (MAX) 3. Power supply Power Source: AC adaptor (AD-S15050AE) USB bus power Rated input: When u[…]
-
Page 42: Casio DT-930
E-42 CASIO DATA POWER OFF POWER ON RS-232C RS-485-1 RS-485-2 AC ADAPTOR CASIO 4 5 8 11 14 13 14 10 12 8 6 7 1 3 2 9 Using the Basic Cradle Basic Cradle (DT -960IOE) makes it possible to upload system data and file data between the Handheld T erminal and a personal computer . Y ou can use optional 6-6 pin Modular Cables (DT -788RSC) to connect up to[…]
-
Page 43: Casio DT-930
E-43 1 RS-232C Interface For connection of a PC and uploading/downloading of system data and file data. 2 RS-485 Interface For connection of multiple optional Basic Cradles. 3 AC adaptor jack For connection of the dedicated AC adaptor to supply power . 4 Nose Guide Remove this guide when you are using the down-facing reader port model. 5 T erminal […]
-
Page 44: Casio DT-930
E-44 Using the Basic Cradle When Y ou Are Using the Down-facing Reader Port Model When you are using a down-facing reader port model, remove the nose guide before use. T o remove the nose guide, remove the two screws using a screwdriver . Setting up the Basic Cradle Use only the dedicated AC adaptor for Basic Cradle to connect to an electrical outl[…]
-
Page 45: Casio DT-930
E-45 3 Plug the AC adaptor into an electrical outlet. 4 After making sure that the pow er switch of the Basic Cradle is in the OFF position, plug the other end of the A C adaptor into the A C terminal at the top of the Basic Cradle. 5 After making sure that the power of the Basic Cradle and personal computer is OFF , remov e the cov er and connect […]
-
Page 46: Casio DT-930
E-46 Using the Basic Cradle 12345678 Serial Connection of Multiple Basic Cradles Y ou can use optional 6-6 pin Modular Cables (DT -788RSC) to connect up to 16 Basic Cradles in a serial configuration. This configuration makes it possible to exchange data between multiple Handheld T erminals and a personal computer . Connections First connect Basic C[…]
-
Page 47: Casio DT-930
E-47 DT -960IOE Basic Cradle Specifications Infrared Interface: Infrared Standard: CASIO original Control Protocol: Half-duplex Synchronization: Asynchronous Speed: 2,400 to 1 15,200 bps RS-232C Control Protocol: Half-duplex Synchronization: Asynchronous Speed: 2,400 to 1 15,200 bps RS-485 Control Protocol: Half-duplex Synchronization: Asynchronous[…]
-
Page 48: Casio DT-930
E-48 Using the Satellite Cradle Satellite Cradle (DT -964IOE) makes it possible to upload system data and file data between the Handheld T erminal and a personal computer . It can also be used as the charger for the lithium-ion battery pack. Use the RS-232C cable (DT -881RSC/DT -882RSC/DT -883RSC/DT -887AX/AXA) for connecting the Satellite Cradle t[…]
-
Page 49: Casio DT-930
E-49 1 RS-232C Interface For connection to a PC and uploading/downloading of system data and file data. 2 RS-422 Interface For connection of multiple Satellite Cradles. 3 AC adaptor jack For connection of the AC adaptor to supply power . 4 Nose Guide Remove this guide when you are using the down-facing reader port model. 5 T erminal detection switc[…]
-
Page 50: Casio DT-930
E-50 Using the Satellite Cradle When Y ou Are Using the Down-facing Reader Port Model When you are using a down-facing reader port model, remove the nose guide before use. T o remove the nose guide, remove the two screws using a screwdriver . Setting up the Satellite Cradle Use only the dedicated AC adaptor for Satellite Cradle to connect to an ele[…]
-
Page 51: Casio DT-930
E-51 3 Connect the power cord to the AC adaptor before connecting the power cord to the power outlet. 4 After making sure that the power switch of the Satellite Cradle is in the OFF position, plug the other end of the AC adaptor into the AC terminal at the top of the Satellite Cradle. 5 After making sure that the power of the Satellite Cradle and p[…]
-
Page 52: Casio DT-930
E-52 Using the Satellite Cradle Important! • High-sensitivity communications devices are used for the IrDA communications function. A void using units or equipment such as a cellular phone emits radio waves during communication. T o ensure uninterrupted communication, keep the Satellite Cradle away from the equipment (at least 30 centimeters from[…]
-
Page 53: Casio DT-930
E-53 Charging the Battery Pack The follo wing procedure can be used only when a lithium-ion battery pack is loaded in the Handheld T er minal. 1 T ur n on the pow er of the Satellite Cradle, and confirm that its power indicator lights up red. 2 Attach the Handheld T er minal to the Satellite Cradle, making sure that the charge terminals on the bott[…]
-
Page 54: Casio DT-930
E-54 Using the Satellite Cradle Charging the Battery Pack (charging the lithium-ion battery pack separately) 1 Set the power switch of the Satellite Cradle to the ON position. The power indicator of the Satellite Cradle lights red. 2 Load the battery pack in the spare battery compartment on the Satellite Cradle, making sure that the terminals on th[…]
-
Page 55: Casio DT-930
E-55 Serial Connection of Multiple Satellite Cradles Y ou can use optional 6-6 pin Modular Cables (DT -888RSC) to connect up to 7 Satellite Cradles in a serial configuration. This configuration makes it possible to exchange data between multiple Handheld T erminals and a personal computer via the cradles. Connections Connect C-OUT on the Satellite […]
-
Page 56: Casio DT-930
E-56 Using the Satellite Cradle 123 45678 9 1 0 DIP Switch Settings The following table shows the various settings that are available with the DIP switches located on the back of the Satellite Cradle. Important! • Other settings not shown here are used for special-purpose modes, and should not be used. Handheld T erminal — Satellite Cradle Commun[…]
-
Page 57: Casio DT-930
E-57 DT -964IOE Satellite Cradle Specifications Infrared Interface: Infrared Standard: Conforms to IrDA V er . 1.2 Original Synchronization: Asynchronous Speed: 9,600/38,400/1 15,200bps RS-232C Control Protocol: Full-duplex Synchronization: Asynchronous Speed: 1,200 to 1 15,200bps RS-422 Control Protocol: Full-duplex Synchronization: Asynchronous S[…]
-
Page 58: Casio DT-930
E-58 CHG2 CHG1 CASIO POWER OFF POWER ON AC ADAPTOR CASIO 2 3 7 10 12 12 8 9 11 7 4 5 6 1 Using the Cradle-type Battery Charger The Cradle-type Battery Charger (DT -969CHGE) makes it possible to separately charge battery pack installed in the Handheld T erminal and a spare battery pack (DT -923LIB) installed in the spare battery compartment on the c[…]
-
Page 59: Casio DT-930
E-59 1 AC adaptor jack For connection of the AC adaptor to supply power 2 Nose Guide Remove this guide when you are using the down-facing reader port model. 3 T erminal detection switch Detects whether or not the Handheld T erminal is mounted correctly on the Cradle-type Battery Charger 4 Spare battery pack charge Indicates the charge status of a s[…]
-
Page 60: Casio DT-930
E-60 Using the Cradle-type Battery Charger When Y ou Are Using the Down-facing Reader Port Model When you are using a down-facing reader port model, remove the nose guide before use. T o remove the nose guide, remove the two screws using a screwdriver . Setting up the Cradle-type Battery Charger Use only the AC adaptor specified for use with the Ha[…]
-
Page 61: Casio DT-930
E-61 Charge terminals Power switch (ON) Power indicator Spare Battery Pack Charge Indicator (“CHG 2”) Battery Pack Charge Indicator (“CHG 1”) 3 Plug the AC adaptor into an electrical outlet. 4 After making sure that the power switch of the Cradle-type Battery Charger is at the OFF position, plug the other end of the AC adaptor into the AC a[…]
-
Page 62: Casio DT-930
E-62 Using the Cradle-type Battery Charger [Caution] ■ Ambient T emperature Ranges for the Battery Pack • T emperature ranges for battery pack use in the Handheld T erminal, charging, and storage are specified below . T emperatures outside these ranges create the danger of deterioration of battery pack performance and shortening of its service […]
-
Page 63: Casio DT-930
E-63 Charging the Battery Pack (charging the lithium-ion battery pack separately) 1 Set the power switch of the Cradle-type Battery Charger to the ON position. The power indicator of the Cradle-type Battery Charger lights red. 2 Load a battery pack in the spare battery compartment on the charger , making sure that the terminals on the side and rear[…]
-
Page 64: Casio DT-930
E-64 Using the Cradle-type Battery Charger [Caution] ■ Ambient T emperature Ranges for the Battery Pack • T emperature ranges for battery pack use in the Handheld T erminal, charging, and storage are specified below . T emperatures outside these ranges create the danger of deterioration of battery pack performance and shortening of its service […]
-
Page 65: Casio DT-930
E-65 DT -969CHGE Cradle-type Battery Charger Specifications Charger Charge Method: Fixed voltage (with current limiter) Charge T ime: Approx. 6 hours Power Supply Power Source: AC adaptor (DT -9020ADP-GS or DT -9020ADP-US) Power Requirements: 230 V AC (DT -9020ADP-GS) 120 V AC (DT -9020ADP-US) Rated Input: DC 9.5 V , approx. 1,000 mA Dimensions and[…]
-
Page 66: Casio DT-930
E-66 CA L D P H P A B The following installation methods describe how to install the Basic Cradle, Satellite Cradle and Cradle-type Battery charger either on a flat surface place or on a wall. T o hang the cradles and charger on a wall The following installation method is described with the Satellite Cradle as its reference. 1 Attach the wall unit […]
-
Page 67: Casio DT-930
E-67 2 Remove the desktop guides (L, R). 3 Attach the wall mount guides provided with the DT -930. Insert the wall mount guides into the slits, and then fix them in place by sliding them downwards. 4 Remove the two screws (one each at the top and bottom) that secure the base to the Satellite Cradle. 5 Pressing down on the four corners of the Satell[…]
-
Page 68: Casio DT-930
E-68 6 Position the base on the wall where you want to hang the Satellite Cradle, and use an awl or some other sharp object to mark the positions of the two wood screws. 7 Slip a spacer over each of the wood screws and then drive the screws into the wall at the positions you marked in the previous step. Make sure that the spacers are oriented corre[…]
Скачать
Data Collection Terminal
Handheld Terminal
User’s Guide
Series
• Be sure to read «Safety Precautions»
inside this guide before trying to use
your Handheld Terminal. After reading
this guide, keep it in a safe place for
future reference.
Data Collection Terminal
Printed in China
AB0302-046021D
CASIO COMPUTER CO., LTD.
6-2, Hon-machi 1-chome
Shibuya-ku, T
okyo 151-8543, Japan
PN430041-001