Call Manager или CUCM поражает своим размахом и обилием настроек. CUCM мало чем похож на его «собрата» Call Manager Express (CUCME), и иногда кажется что и называться они должны по другому, — настолько различны их настройки. Но от него могут звонить те же самые телефоны, а из океана мануалов можно вычленить некий сухой остаток того с чего следует начать, избежав множества ошибок и подводных камней.
В данной статье обсуждается краткая теория, а также практические шаги, необходимые для подготовки к настройке базовой конфигурации CUCM на примере версии 8.5. Статья также подойдет и для версий CUCM 6.x и 7.x, а также всех более поздних версий 9.x и 10.x, которые очень похожи.
Раннее нами обсуждались вопросы настройки CUCME или Call Manager Express в двух частях:
Настройка CUCME с нуля Часть 1
Настройка CUCME с нуля Часть 2
Как уже было отмечено, имеются существенные отличия в настройках продуктов CUCME и CUCM, но базовые принципы работы все равно те же: работают те же телефоны, те же протоколы и т.д.
CUCM — может быть установлен в двух видах:
- в виде Appliance, т.е. сервер под Linux с установленным приложением.
- в виде виртуальной машины всё того же сервера Linux.
Установочный диалог CUCM
Итак, к вам приехали коробки с оборудованием Call Manager или CUCM. Обычно его поставляют в виде кластера. В кластер чаще всего входят два сервера:
— Publisher — на нем производятся все изменения конфигурации
— Subscriber — «подсасывает» копию базы от Publisher.
Оба сервера из коробки должны иметь предустановленное ПО, и при их включении нужно будет пройти «установочный» диалог.
Для того чтобы сервер вернуть в это предустановочное состояние, нужно его загрузить с установочного диска, после установки ОС и последующей перезагрузки сервер будет готов к «установочному» диалогу. Роль сервера (Publisher/Subscriber) определяется этим диалогом.
Установка Publisher
Более подробно см. статью Пошаговая начальная установка CUCM 8.x
При вопросе Is this server first node in the cluster отвечаем YES
В процессе диалога спросят три пароля которые нужно записать и хранить в надежном месте:
— Platform Admin
Используется для доступа к консоли SSH, Disaster Recovery system
— Application User
Используется для доступа к Cisco Unified CM Administration, Cisco Unified Serviceability, Cisco Unified Reporting
— Пароль для БД
Используется внутри системы и в повседневной деятельности не нужен. Может понадобиться при восстановлении.
Так же мастер установки спросит:
— Имя сервера
— IP адрес
— Primary DNS server
— Secondary DNS server
— Domain
— Default Gateway
В среде, где будет работать CUCM, нужно чтобы клиенты могли разрешать его имя в адрес как с доменным суффиксом так и без него.
Т.е. в DNS серверах нужно вбить запись нашего CUCM
Это нужно обязательно проверить с помощью nslookup.
Например если имя сервера cucmsrv1 а домен office.local, то разрешать в его адрес должны имена:
— cucmsrv1
— cucmsrv1.office.local
В противном случае возможно кривизна в работе телефонов и их переключении при сбое основного CUCM.
Также отмечу может не для всех очевидную вещь:
Все компоненты комплекса VOIP должны иметь связь друг с другом.
Если у вас есть межсетевые экраны то лучше их отключить на время установки и «затягивать гайки» когда все заработает, а еще лучше вообще убрать все ограничения для связи между всеми компонентами, а именно:
— IP телефоны
— Ноды кластера CUCM
— VoIP Gateway
— Conference Bridge
и т.д.
Итак после того как мы пройдем установочный диалог, мы уже сможем подключаться к серверу через HTTPs. Вообще, в отличие от CUCME подавляющее количество операций можно делать только через WEB.
Существуют шесть отдельных интерфейсов:
■ Cisco Unified Communications Manager Administration (https://ip_address/ccmadmin)
■ Cisco Unified Serviceability (https://ip_address/ccmservice)
■ Disaster Recovery System (https://ip_address/drf)
■ Cisco Unified Operating System Administration (https://ip_address/cmplatform)
■ Cisco Unified Reporting (https://ip_address/cucreports)
■ Command-Line Interface (CLI)
Установка лицензий CUCM
Обычно лицензия из себя представляет pdf файл, в котором мы найдем PAK Number
Также нам понадобится MAC адрес Паблишера:
Cisco Unified Communications Manager Administration -> System -> Server -> выбираем сервер, в его свойствах должно быть написано:
Database Replication Издатель (или Publisher)
Копируем из того же окна его MAC адрес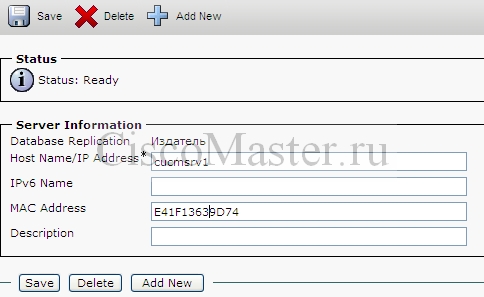
Далее идем на http://www.cisco.com/go/license и логинимся под логином, который должны дать при покупке CUCM
— Вводим PAK number
— Вводим MAC адрес publisher
— Скачиваем файлы лицензий. Если они в архиве, то нужно разархивировать. Файл должен быть в формате *.lic
— подгружаем файлы лицензий:
Cisco Unified Communications Manager Administration -> System -> licensing -> License file upload
Если лицензии успешно загрузились, это отразится на их количестве в:
Cisco Unified Communications Manager Administration -> System -> licensing -> lisence unit report
Активируем необходимые сервисы
Cisco Unified Serviceability -> Tools -> Service Activation -> Выбираем сервер
Активируем там все сервисы кроме Cisco Messaging Interface (используется для внешних серверов Voice mail)
Конечно, в большой организации, с большим количеством серверов и с большой загрузкой по хорошему надо распределять роли между серверами. Но практика показывает, что железо прекрасно несет все функции одновременно, а утилита RTMT (Real Time Monitoring Tool) позволяет мониторить загрузку CPU и памяти.
Установка Subscriber
При установке Subscriber происходит репликация БД на него, поэтому Publisher должен его «знать».
Для ввода Subscriber подключимся к Publisher:
SUCM Administration -> System -> Server
Выбираем Add new и вбиваем имя.
При установке мы вводим аналогичные параметры
-При вопросе Is this server first node in the cluster – NO
-Вводим данные First Node Server
После установки аналогично активируем все доступные сервисы
Проверка репликации
Для проверки установки Subscriber проверим репликацию баз. Если репликация в порядке, скорее всего все остальное тоже прошло нормально.
Узнать статус репликации мы можем из нескольких источников:
RTMT
RTMT (Real Time Monitoring Tool) — очень полезный инструмент не только для проверки репликации но и многих других задач.
На левой панели выбираем Call Manager, затем Database summary.
Нас интересует «replication status» — если его значение одинаковое для всех нодов, значит все нормально.
CUCM Unified Reporting
Unified Reporting > System Reports > Unified CM Database Status > Generate new Report
Если все нормально мы должны там найти фразу All servers have a good replication status
CUCM OS Admin CLI
Даем команду:
admin:utils dbreplication status
No Errors or Mismatches found.
Replication status is good on all available servers.
Итак, начальная установка закончена. Сервера готовы к работе и дальнейшей настройке. Со следующего этапа настройки у же будут различаться в зависимости от конкретных требований.
Разработка Диал Плана (DialPlan)
Dial plan — это один из ключевых элементов системы IP Telephony. Его планирование можно сравнить с планированием IP адресации: чем больше организация тем более важен хорошо продуманный диалплан.
Как будет выглядеть номер телефона в центральном офисе и филиалах? Как они будут звонить друг другу? Как производить выход в город?
Шаг 1
Первое что нужно — это прикинуть каково общее количество абонентов сейчас и сколько будет в будущем.
Сколько абонентов может быть в каждом филиале.
Шаг 2
Понять какую адресацию использовать:
— Flat addressing
Каждый телефон в организации имеет уникальный номер. Например:
1XXX Филиал 1
2XXX Филиал 2
3XXX Филиал 3
Т.е. независимо от того, звоним мы в своем офисе или в филиале, мы набираем4-х значный номер.
Какой тип адресации прост и потому называется Flat, плоский (также он встречается под терминами Uniform, Non-Overlapping). Например такой тип адресации используется в мобильных телефонах, все номера имеют длину 10 знаков. При этой адресации проще дебагить проблемы и такая адресация рекомендуется cisco.
Неудобство начинается когда количество абонентов становится слишком большим и требуется длина номера уже не 4 цифры, а 5 и выше.
«Зачем мне набирать 6-значный номер чтобы дозвониться в соседнюю комнату?» — спросит начальство.
Тут конечно можно использовать методы трансляции, но длинный номер всегда будет смущать неподготовленного пользователя.
— Partitioned addressing
При таком типе адресации в организации телефоны в разных филиалах могут иметь идентичные номера, а для звонка в другой филиал нужно будет набрать код этого филиала.
Такой тип адресации позволяет использовать короткие номера при внутренних звонках независимо от размера организации.
Это может быть удобно пользователям, но с точки зрения системы и администрирования гораздо сложнее:
— В логах нужно будет учитывать не только номер, но и партицию. Не все программы это умеют делать, например Tariscope в отчетах подставляет только внутренний номер и совершенно непонятно куда производился звонок.
— Для звонков между филиалами нужно создавать два правила трансяции для каждой пары филиалов. Если число филиалов будет более 20 число шаблонов будет исчисляться сотнями
Планирование диалплана при использовании Flat addressing
Благодаря простоте этого типа и диалплан будет тоже простой. Все что нам нужно знать — заложиться на максимальное число всех абонентов.
Например если у нас центральный офис 500 человек и 20 филиалов по 100, то нужно заложиться на 2500 номеров. Получаем что нам требуется четырехзначный диалплан, который обеспечивает до 10000 номеров, его можно сделать например таким:
0XXX — зарезервирован для выхода в город
1XXX — большой филиал 1
2XXX — большой филиал 2
3XXX — большой филиал 3
4[0-4]XX- средний филиал 1
4[5-9]XX- средний филиал 2
51XX — Малый филиал 1
52XX — Малый филиал 2
……..
59XX — Малый филиал 9
6XXX — Для будущего развития
7XXX — Для будущего развития
8XXX — Для будущего развития
9XXX — Зарезервирован для выхода в город
Как видно в данном типе диалплана для системы абсолютно не важно какой номер будет находиться в каком городе. Распределение делается только для удобства.
Планирование диалплана при использовании Partitioned addressing
В данном случае нам нужно знать максимальное ожидаемое количество абонентов в одном филиале и максимально возможно количество филиалов.
Например если в филиале ожидается не более 300 абонентов, и всего не более 20 филиалов:
0 — зарезервирован для выхода в город
[1-5]XX — внутренняя номерация
[6-7]X — код филиала
8 — Для будущего развития
9 — зарезервирован для выхода в город
Таким образом внутренний звонок будет выглядеть как трехзначный номер [1-5]XX, а звонок в другой филиал как пятизначный номер [6-7]X[1-5]XX
Partitions и Calling Search Spaces
Мы разработали диалплан, т.е. как звонки должны ходить в теории.
Для практического внедрения диалплана важную роль играют Partitions и Calling Search Spaces — фундаментальные понятия системы CUCM, благодаря которым тысячи телефонов, находящиеся в десятках разных городов, могут управляться с одного кластера. Этот раздел статьи довольно объемный, но автор очень рекомендует все прочесть и понять. Если вы поймете что такое CSS и партиции, вы сможете планировать и затем «жонглировать» (не побоюсь этого слова) звонками из города в город.
Как обеспечить, чтобы в каждом городе при наборе «9» звонок выходил на свой локальный шлюз?
Как реализовать перекрывающуюся номерацию при Partitioned addressing?
Как сделать бесплатными звонки из одного города в другой не платя за межгород, но используя внутреннюю сеть?
Здесь нам как раз и приходят на помощь Partition и CSS.
Partition
Каждый номер телефона (DN), т.е. ТО, куда можно позвонить — ассоциируется со своей партицией.
Можно сказать, что партиция ассоциируется с объектами на которые можно позвонить (например номера телефона).
Партиция — это группа номеров с одинаковой доступностью и её можно сравнить с понятием VLAN. Телефоны находящиеся в разных партициях недосягаемы друг для друга и могут иметь идентичные номера.
Можно сказать, что «обычные» офисные телефонные станции оперируют в одной партиции.
По умолчанию существует только одна партиция «none», но использовать ее не рекомендуется, т.к. данная партиция доступна для всех телефонов. Конфигурация с партицией «none» вполне работоспособна при работе только с одним офисом, но и в самый неожиданный момент могут происходить разнообразные пренеприятные чудеса в маршрутизации, т.к. партиция «none» доступна для любого CSS. Даже если у вас только один офис, создайте отдельную партицию и работайте с ней.
Никогда не помещайте DN в партицию «none».
В общем случае с партицией могут быть ассоциированы:
■ DNs
■ Route Patterns
■ Translation Patterns
■ Voicemail Ports
■ Meet-Me Conference Numbers
Calling Search Space (CSS)
Как понятно из названия, CSS определяет то куда можно сделать звонок.
Можно сказать, что CSS ассоциируется с объектами, которые могут совершать звонок (например телефон)
CSS подобно группам могут в себя включать партиции. Для объекта с данной CSS становятся доступны объекты ассоциированные с указанными партициями.
Как и с партициями, мы можем для телефона выставить CSS . Такая CSS имеет доступ только к партиции none.
Не ассоциируйте никакие девайсы с CSS =
Пример1
Например пусть у нас будет два офиса в Москве и в Питере.
Для построения схемы Flat addressing мы создадим следующее:
— Партицию Oncluster_pt
Все телефоны организации будут ассоциированы с этой партицией и соответственно доступны друг для друга при наборе DN
— В Москве создадим партицию MSK_PSTN_pt
С этой партиций будут ассоциированы шаблоны для выхода в город, межгород и зарубеж для московских телефонов.
— В Питере создадим партицию PTR_PSTN_pt/
Как уже понятно, эта партиция для ассоциацией с шаблонами питерских телефонов
Теперь самое интересное — создадим CSS-ы
— В Москве мы создадим MSK_Internal_CSS. В него, как в группу мы включаем партиции:
Oncluster_pt
MSK_PSTN_pt
Также с этим CSS мы будем ассоциировать все московские телефоны.
— В Питере мы создадим PTR_Internal_CSS. В него включим
Oncluster_pt
PTR_PSTN_pt
И с ним ассоциируем все питерские телефоны.
Что у нас получилось: Всем телефонам доступна Oncluster_pt, т.е. партиция с которой ассоциированы все телефоны. Поскольку MSK_Internal_CSS включает в себя MSK_PSTN_pt, но не включает PTR_PSTN_pt, то при наборе «девятки» московские телефоны будут попадать в свой PSTN-шаблон, а соответственно на свой PSTN-шлюз. Питерские же пойдут на свой.
Таким образом мы добиваемся, что при наборе одной и той же «девятки» телефоны идут на разные шлюзы.
Работу партиций и CSS можно (и нужно) изображать схематично.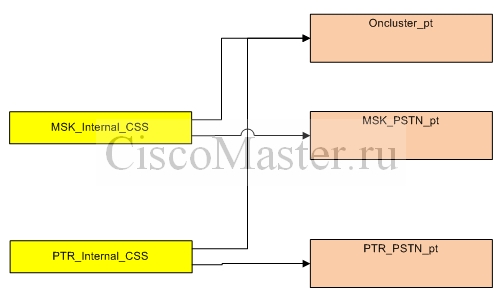
Кстати нам ничто не помешает ассоциировать питерский телефон с MSK_Internal_CSS и тогда он пойдет на московский шлюз. Телефону абсолютно все равно где он находится, какой у него IP адрес, в скольких сотнях километров он удален от CUCM, главное чтобы правильно были настроены Partitions и CSS.
А что будет если мы включим в MSK_Internal_CSS обе партиции PTR_PSTN_pt и MSK_PSTN_pt? Получится что при наборе 9 будут доступны оба шаблона и поскольку они равноценны система будет отправлять звонки согласно приоритету, в котором выставлены партиции в CSS MSK_Internal_CSS. Хотя подобная ситуация «разрулится», следует избегать подобных случаев пересечения, поскольку это очень сложно дебагить.
Структуру партиций и CSS нужно тщательно планировать. Даже в небольшом предприятии можно необдуманно нагородить такое, в чём разобраться будет очень сложно. Структура партиций и CSS должна четко соответствовать диалплану.
В структуре партиций и Calling Search spaces легко запутаться, поэтому DialPlan изображают схематично.
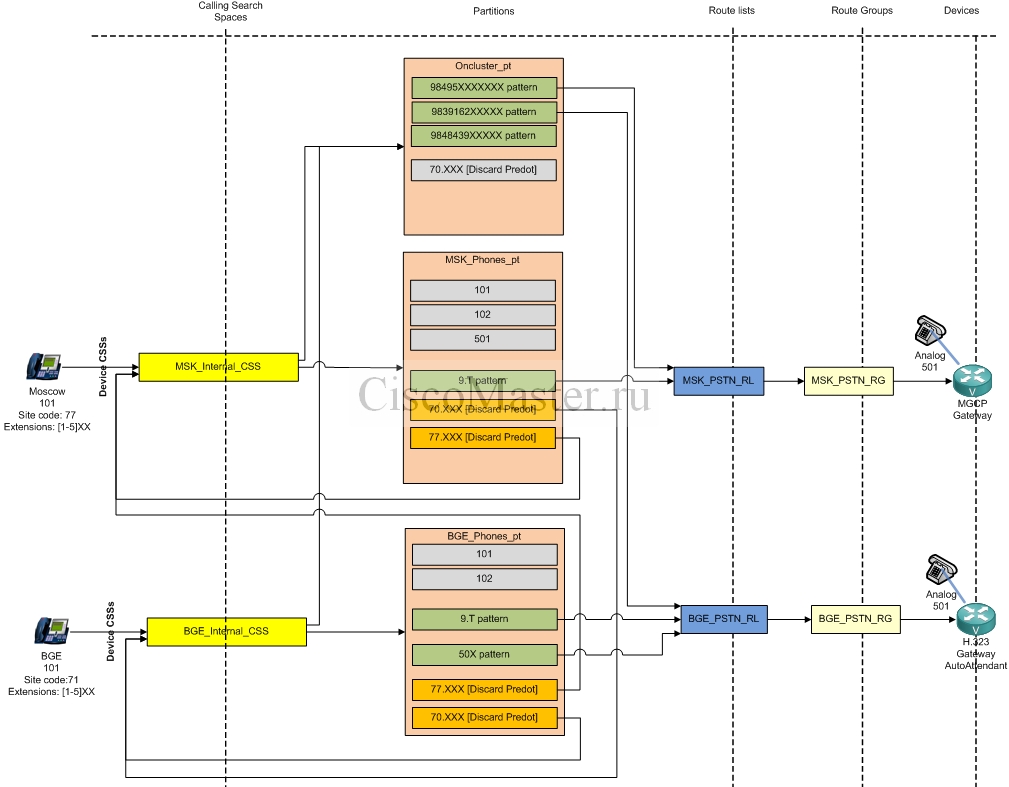
Пример схемы Flat addressing
На данной схеме все номера находятся в общей партиции Oncluster_pt.
Партиция Oncluster_pt входит во все CSS организации и потому все ассоциированные с ней номера и шаблоны доступным всем телефонам организации. Например это можно использовать для междугородних звонков: шаблон 98687XXX (междугородний номер города филиала REMO) доступен всем и при наборе номера, удовлетворяющего его условиям, звонок идет не по платному межгороду МГТС а напрямую через IP телефонию на шлюз REMO.
Для того, чтобы у каждого филиала была своя «девятка» (выход в город), для каждого сделан свой шаблон 9.T (9 и далее), который входит только в свой CSS.
MSK_Translations_pt используется для того чтобы внутри офиса можно было использовать 3-х значные номера, вместо 5-ти. При наборе [1-5]XX к номеру добавляется 77, и он становится пятизначным и понятным для системы.
На схеме фигурируют также Route Lists и Route Groups, эти понятия будут освещены в последующих статьях.
Пример схемы Partitioned Addressing
В данном примере отображена классическое решение для нескольких офисов и с применением Partitioned Addressing.
Здесь отображен новый элемент — Translation Pattern.
С помощью Translation Pattern мы можем получить возможность дозваниваться на телефоны из другой партиции.
Если продолжить аналогию Partition и VLAN, Translation Pattern подобен маршрутизатору.
При наборе номера из Москвы 70101, этот номер попадает под обработку соответствующего Translation Pattern, поскольку он находится в партиции MSK_Phones_pt.
Translation Pattern производит трансляции с двумя параметрами для нашего звонка:
— Called Party Transformation: Поскольку в партиции BGE_Phones_pt номера телефонов трехзначные, мы отнимаем от номера «70».
— Calling Party Transformation: Для того, чтобы номер звонящего нормально отображался, и на него можно было легко перезвонить, мы должны добавить к нему «77».
Далее, после произведения необходимых трансляций, звонок отдаётся уже в другую CSS, соответствующую данному Translation Pattern и повторно производится процесс Call-Routing Decision, но уже применительно к новой партиции.
Поток данных при звонке
Для того чтобы совершить звонок с одного телефона на другой, используются протоколы сигнализации, а также собственно сам аудио поток.
Сигнализация — это служебная информация, включающая номер телефона абонента, номер источника, кодек и другие данные, необходимые для того чтобы мог состояться сам звонок. Важно понимать, что CUCM является посредником между двумя аппаратами для передачи сигнализации. Даже для подачи гудка, который мы слышим при поднятии трубки, Call Manager передает соответствующий «приказ» телефонному аппарату.
Аудио поток — это собственно разговор абонентов. Важно понимать, что поток имеет место быть только непосредственно между двумя телефонами, Call Manager никак не участвует.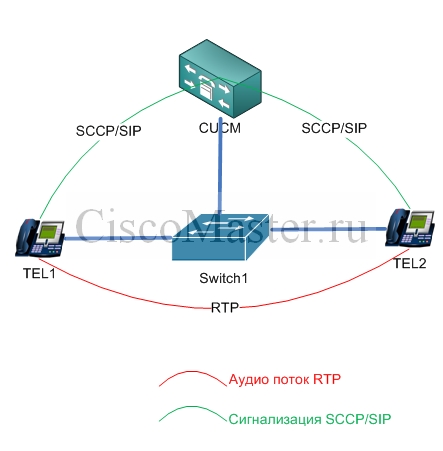
Централизованная топология
Существуют различные топологии, в которой может работать CUCM.
Можно в каждый офис поставить по кластеру CUCM, можно в центральный поставить CUCM а в филиалы CUCME и т.д.
Наиболее распространенным и недорогим вариантом является централизованная топология, в которой в центральном офисе расположен кластер CUCM, который осуществляет управление звонками как в центральном офисе, так и в филиалах.
Мы будем рассматривать разворачивание именно этой топологии, т.к. в ней будут задействованы все основные элементы маршрутизации CUCM.
Даже если в задачу входит развернуть телефонию в одном офисе, отталкиваться следует именно из общей топологии, т.е. полноценное создание партиций и CCS (хотя все это в принципе не нужно в одном офисе) — она позволяет при необходимости легко расширяться без перестройки диалплана, партиций и других фундаментальных элементов.
Централизованная топология подразумевает участие центрального Call Manager во всех звонках. Например даже для того чтобы в филиале могли созвониться два телефона, необходимо участие центрального CUCM.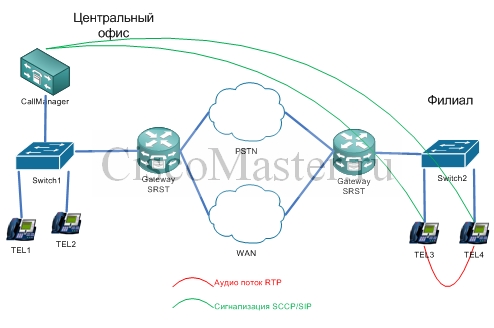
Заключение
В статье были освящены шаги по установке серверов CUCM, а также необходимое планирование.
Следующим этапом будет собственно настройка комплекса телефонии, что будет описано в следующих статьях.
Настройка Call Manager CUCM с нуля: основные настройки (Часть 2)
Самоваров Владимир
Administration Overview
Cisco Unified CM Administration Overview
Cisco Unified CM Administration, a web-based application, is the main administration and configuration interface for Cisco
Unified Communications Manager. You can use Cisco Unified CM Administration to configure a wide range of items for your system
including general system components, features, server settings, call routing rules, phones, end users, and media resources.
Configuration Menus
The configuration windows for Cisco Unified CM Administration are organized under the following menus:
-
System—Use the configuration windows under this menu to configure general system settings such as server information, NTP
settings, Date and Time groups, Regions, DHCP, LDAP integration, and enterprise parameters. -
Call Routing-—Use the configuration windows under this tab to configure items related to how Cisco Unified Communications
Manager routes calls, including route patterns, route groups, hunt pilots, dial rules, partitions, calling search spaces,
directory numbers, and transformation patterns. -
Media Resources—Use the configuration windows under this tab to configure items such as media resource groups, conference
bridges, annunciators, and transcoders. -
Advanced Features—Use the configuration windows under this tab to configure features such as voice-mail pilots, message waiting,
and call control agent profiles. -
Device—Use the configuration windows under this tab to set up devices such as phones, IP phone services, trunks, gateways,
softkey templates, and SIP profiles. -
Application—Use the configuration windows under this tab to download and install plug-ins such as Cisco Unified JTAPI, Cisco
Unified TAPI, and the Cisco Unified Real-Time Monitoring Tool. -
User Management—Use the configuration windows under the User Management tab to configure end users and application users for
your system. -
Bulk Administration-—Use the Bulk Administration Tool to import and configure large numbers of end users or devices at a time.
-
Help—Click this menu to access the online help system. The online help system contains documentation that will assist you
in configuring settings for the various configuration windows on your system.
Operating System Administration Overview
Use Cisco Unified Communications Operating System
Administration to configure and manage your operating system and perform the following administration tasks:
- Check software and hardware status
- Check and update IP addresses
- Ping other network devices
- Manage NTP servers
- Upgrade system software and options
- Manage node security, including IPsec and certificates
- Manage remote support accounts
- Restart the system
Operating System Status
You can
check the status of various operating system components,
including the following:
- Clusters and nodes
- Hardware
- Network
- System
- Installed software and options
Operating System Settings
You can view and update the following operating system
settings:
-
IP—Updates the IP addresses and DHCP client settings that ypu entered when the
application was installed. -
NTP Server settings—Configures the IP addresses of an external
NTP server; adds an NTP server. -
SMTP settings—Configures the simple mail transfer protocol (SMTP) host that the operating
system will use for sending email notifications.
Operating System Security Configuration
You can manage security certificates and IPsec settings. From the Security menu, you can choose the following security options:
-
Certificate Management—Manages certificates and certificate signing requests (CSRs). You can display, upload, download, delete,
and regenerate certificates. Through certificate management, you can also monitor the expiration dates of the certificates
on the node. -
IPsec Management—Displays or updates existing IPsec policies; sets up new IPsec policies and associations.
Software Upgrades
You can upgrade the software
version that is running on the operating system or to install
specific software options, including Cisco Unified
Communications Operating System locale installers, dial
plans, and TFTP server files.
From the Install/Upgrade menu option, you can
upgrade system software from either a local disc or a remote
server. The upgraded software is installed on the inactive
partition, and you can then restart the system and switch
partitions, so the system starts running on the newer software
version. For more information, see the Upgrade Guide for the Cisco Unified
Communications Manager at http://www.cisco.com/c/en/us/support/unified-communications/unified-communications-manager-callmanager/products-installation-guides-list.html.
 Note |
You must perform all software installations and upgrades through the software upgrade features that are included in the Cisco |
Services
The application provides the following operating system utilities:
-
Ping—Checks connectivity with other network devices.
-
Remote Support—Sets up an account that Cisco support personnel can use to access the system. This account automatically expires
after the number of days that you specify.
CLI
You can access the CLI from
the Operating System or through a secure shell connection to the server. For
more information, see the
Command Line Interface
Reference Guide for Cisco Unifed Communications
Solutions at http://www.cisco.com/c/en/us/support/unified-communications/unified-communications-manager-callmanager/products-maintenance-guides-list.html.
Cisco Unified Serviceability Overview
Cisco Unified Serviceability is a web-based troubleshooting tool that provides a host of services, alarms, and tools that
assist administrators in managing their systems. Among the features that Cisco Unified Serviceability offers to administrators
are:
-
Start and Stop Services—Administrators can set up an assortment of services that help administrators manage their systems.
For example, you can start the Cisco CallManager Serviceability RTMT service thereby allowing administrators to use the Real-Time
Monitoring Tool to monitor the health of your system. -
SNMP—SNMP facilitates the exchange of management information among network devices, such as nodes, routers, and so on. As
part of the TCP/IP protocol suite, SNMP enables administrators to remotely manage network performance, find and solve network
problems, and plan for network growth. -
Alarms—Alarms provide information on the runtime status and state of your system, so that you can troubleshoot problems that
are associated with your system. -
Traces—Trace tools help you to troubleshooting issues with voice applications.
-
Cisco Serviceability Reporter—The Cisco Serviceability Reporter generates daily reports in Cisco Unified Serviceability.
-
SNMP—SNMP facilitates the exchange of management information among network devices, such as nodes, routers, and so on. As
part of the TCP/IP protocol suite, SNMP enables administrators to remotely manage network performance, find and solve network
problems, and plan for network growth. -
CallHome—Configure the Cisco Unified Communications Manager Call Home feature, allowing Cisco Unified Communications Manager
to communicate and send the diagnostic alerts, inventory, and other messages to the Smart Call Home back-end server
Additional Administrative Interfaces
Using Cisco Unified Serviceability, you can start services that allow you to use the following additional administrative interfaces:
-
Real-Time Monitoring Tool—The Real-Time Monitoring Tool is a web-based interface that helps you to monitor the health of your
system. Using RTMT, you can view alarms, counters and reports that contain detailed information on the health of your system. -
Dialed Number Analyzer—The Dialed Number Analyzer is a web-based interface that helps administrators to troubleshoot issues
with the dial plan. -
Cisco Unified CDR Analysis and Reporting—CDR Analysis and Reporting collects call details records showing the details of the
calls that are placed on your system.
For details about how to use Cisco Unified Serviceability, see the Cisco Unified Serviceability Administration Guide at http://www.cisco.com/c/en/us/support/unified-communications/unified-communications-manager-callmanager/products-maintenance-guides-list.html.
Cisco Unified Reporting Overview
The Cisco Unified Reporting web application generates consolidated reports for troubleshooting or inspecting cluster data.
You can access the application at the Unified Communications Manager and Unified Communications Manager IM and Presence Service
consoles.
This tool provides an easy way to take a snapshot of cluster data. The tool gathers data from existing sources, compares the
data, and reports irregularities. When you generate a report in Cisco Unified Reporting, the report combines data from one
or more sources on one or more servers into one output view. For example, you can view the following reports to help you administer
your system:
-
Unified CM Cluster Overview—View this report to get a snapshot of your cluster, including Cisco Unified Communications Manager
and IM and Presence Service versions, server hostnames, and hardware details. -
Phone Feature List—View this report if you are configuring features. This report provides a list of which phones support which
Cisco Unified Communications Manager features. -
Unified CM Phones Without Lines—View this report to see which phones in your cluster do not have a phone line.
For a full list of reports offered through Cisco Unified Reporting, as well as instructions on how to use the application,
see the Cisco Unified Reporting Administration Guide at http://www.cisco.com/c/en/us/support/unified-communications/unified-communications-manager-callmanager/products-maintenance-guides-list.html.
Disaster Recovery
System Overview
The Disaster Recovery System (DRS), which can be invoked from
Cisco Unified Communications Manager Administration,
provides full data backup and restore capabilities. The Disaster Recovery
System allows you to perform regularly scheduled automatic or user-invoked data
backups.
DRS restores its own settings (backup device settings and
schedule settings) as part of the platform backup/restore. DRS backs up and
restores the
drfDevice.xml and
drfSchedule.xml files. When the server is restored
with these files, you do not need to reconfigure DRS backup device and
schedule.
The Disaster Recovery System includes the following
capabilities:
-
A user interface for performing backup and restore tasks.
-
A distributed system architecture for performing backup and restore
functions. -
Scheduled backups.
-
Archive backups to a physical tape drive or remote SFTP server.
Bulk
Administration Tool Overview
In Cisco Unified CM Administration, uses the Bulk Administration menu and submenu options to configure entities in Unified
Communications Manager through use of the Bulk Administration Tool.
The Unified Communications Manager Bulk Administration Tool (BAT), a web-based application, lets administrators perform bulk
transactions to the Unified Communications Manager database. BAT lets you add, update, or delete a large number of similar
phones, users, or ports at the same time. When you use Cisco Unified CM Administration, each database transaction requires
an individual manual operation, while BAT automates the process and achieves faster add, update, and delete operations.
You can use BAT to
work with the following types of devices and records:
-
Add, update, and delete Cisco IP Phones, gateways, phones, computer telephony interface (CTI) ports, and H.323 clients
-
Add, update,
and delete users, user device profiles, Cisco Unified Communications Manager
Assistant managers and assistants -
Add or delete
Forced Authorization Codes and Client Matter Codes -
Add or delete
call pickup groups -
Populate or
depopulate the Region Matrix -
Insert,
delete, or export the access list -
Insert,
delete, or export remote destinations and remote destination profiles -
Add Infrastructure Devices
For details on how
to use the Bulk Administration Tool, refer to the
Bulk
Administration Guide for Cisco Unified Communications Manager.
-
Contents
-
Table of Contents
-
Troubleshooting
-
Bookmarks
Quick Links
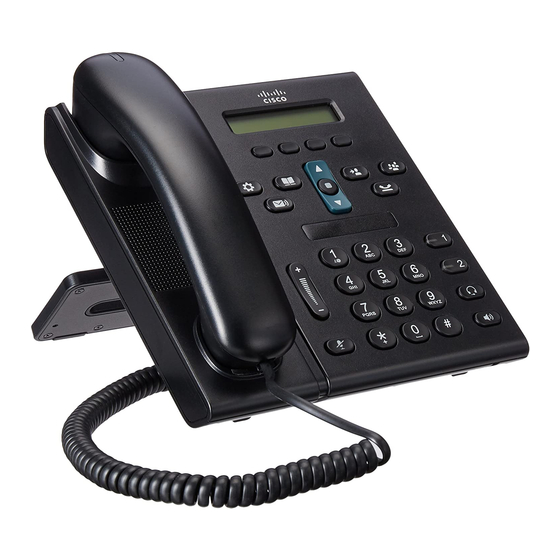
Cisco Unified IP Phone 6921, 6941, 6945,
and 6961 Administration Guide for Cisco
Unified Communications Manager 8.6
(SCCP and SIP)
Americas Headquarters
Cisco Systems, Inc.
170 West Tasman Drive
San Jose, CA 95134-1706
USA
http://www.cisco.com
Tel: 408 526-4000
800 553-NETS (6387)
Fax: 408 527-0883
Text Part Number: OL-24567-01
Related Manuals for Cisco 6921
Summary of Contents for Cisco 6921
-
Page 1: Unified Communications Manager
Cisco Unified IP Phone 6921, 6941, 6945, and 6961 Administration Guide for Cisco Unified Communications Manager 8.6 (SCCP and SIP) Americas Headquarters Cisco Systems, Inc. 170 West Tasman Drive San Jose, CA 95134-1706 http://www.cisco.com Tel: 408 526-4000 800 553-NETS (6387)
-
Page 2
United States and certain other countries. Cisco and the Cisco logo are trademarks or registered trademarks of Cisco and/or its affiliates in the U.S. and other countries. To view a list of Cisco trademarks, go to this URL: www.cisco.com/go/trademarks. -
Page 3: Table Of Contents
Understanding How the Cisco Unified IP Phone Interacts with Cisco Unified CM Understanding How the Cisco Unified IP Phone Interacts with the VLAN Cisco Unified IP Phone 6921, 6941, 6945, and 6961 Administration Guide for Cisco Unified Communications Manager 8.6 (SCCP and SIP) OL-24567-01…
-
Page 4
Verifying the Phone Startup Process 3-14 Configuring Startup Network Settings 3-15 Configuring Security on the Cisco Unified IP Phone 3-15 Cisco Unified IP Phone 6921, 6941, 6945, and 6961 Administration Guide for Cisco Unified Communications Manager 8.6 (SCCP and SIP) OL-24567-01… -
Page 5
Customizing and Modifying Configuration Files Creating Custom Phone Rings DistinctiveRingList File Format Requirements PCM File Requirements for Custom Ring Types Cisco Unified IP Phone 6921, 6941, 6945, and 6961 Administration Guide for Cisco Unified Communications Manager 8.6 (SCCP and SIP) OL-24567-01… -
Page 6
Verifying that the Phones Have Not Been Intentionally Reset Eliminating DNS or Other Connectivity Errors Checking Power Connection Troubleshooting Cisco Unified IP Phone Security Cisco Unified IP Phone 6921, 6941, 6945, and 6961 Administration Guide for Cisco Unified Communications Manager 8.6 (SCCP and SIP) OL-24567-01… -
Page 7
Installing the Wall Mount Kit for the Cisco Unified IP Phone 6921, 6941, 6945, and 6961 A P P E N D I X Before You Begin Installing the Bracket Cisco Unified IP Phone 6921, 6941, 6945, and 6961 Administration Guide for Cisco Unified Communications Manager 8.6 (SCCP and SIP) OL-24567-01… -
Page 8
Feature Support by Protocol for the Cisco Unified IP Phone 6921, 6941, 6945, and 6961 A P P E N D I X N D E X Cisco Unified IP Phone 6921, 6941, 6945, and 6961 Administration Guide for Cisco Unified Communications Manager 8.6 (SCCP and SIP) viii OL-24567-01… -
Page 9
Chapter 3, “Setting Up the Cisco Unified IP Phone” Describes how to install and configure the Cisco Unified IP Phone on your network properly and safely. Cisco Unified IP Phone 6921, 6941, 6945, and 6961 Administration Guide for Cisco Unified Communications Manager 8.6 (SCCP and SIP) OL-24567-01… -
Page 10: Related Documentation
These publications are available at the following URL: http://www.cisco.com/en/US/products/ps10326/tsd_products_support_series_home.html Cisco Unified Communications Manager Administration Related publications are available at the following URL: http://www.cisco.com/en/US/products/sw/voicesw/ps556/tsd_products_support_series_home.html Cisco Unified IP Phone 6921, 6941, 6945, and 6961 Administration Guide for Cisco Unified Communications Manager 8.6 (SCCP and SIP) OL-24567-01…
-
Page 11: Cisco Product Security Overview
Terminal sessions and information the system displays are in font. screen screen font Information you must enter is in font. boldface screen boldface screen Cisco Unified IP Phone 6921, 6941, 6945, and 6961 Administration Guide for Cisco Unified Communications Manager 8.6 (SCCP and SIP) OL-24567-01…
-
Page 12
Statement 1071 SAVE THESE INSTRUCTIONS Cisco Unified IP Phone 6921, 6941, 6945, and 6961 Administration Guide for Cisco Unified Communications Manager 8.6 (SCCP and SIP) OL-24567-01… -
Page 13: An Overview Of The Cisco Unified Ip Phone
Using a cell, mobile, or GSM phone, or two-way radio in close proximity to a Cisco Unified IP Phone Caution may cause interference. For more information, refer to the manufacturer’s documentation of the interfering device. Cisco Unified IP Phone 6921, 6941, 6945, and 6961 Administration Guide for Cisco Unified Communications Manager 8.6 (SCCP and SIP) OL-24567-01…
-
Page 14: Understanding The Cisco Unified Ip Phone 6921, 6941, 6945, And 6961
Softkey buttons Enables softkey options displayed on the phone screen. Transfer button Transfers a call. Cisco Unified IP Phone 6921, 6941, 6945, and 6961 Administration Guide for Cisco Unified Communications Manager 8.6 (SCCP and SIP) OL-24567-01…
-
Page 15
Opens/closes the Applications menu. Use it to access call history, user button preferences, phone settings, administration settings, and phone information. Cisco Unified IP Phone 6921, 6941, 6945, and 6961 Administration Guide for Cisco Unified Communications Manager 8.6 (SCCP and SIP) OL-24567-01… -
Page 16
Shows information about your phone such as directory number, active call and line status, softkey options, speed dials, placed calls, and phone menu listings. Cisco Unified IP Phone 6921, 6941, 6945, and 6961 Administration Guide for Cisco Unified Communications Manager 8.6 (SCCP and SIP) OL-24567-01… -
Page 17
12 Mute button Toggles the microphone on or off. When the microphone is muted, the button is lit. Cisco Unified IP Phone 6921, 6941, 6945, and 6961 Administration Guide for Cisco Unified Communications Manager 8.6 (SCCP and SIP) OL-24567-01… -
Page 18
16 Contacts button Opens/closes the Directories menu. Use it to access personal and corporate directories. 17 Handset Phone handset. Cisco Unified IP Phone 6921, 6941, 6945, and 6961 Administration Guide for Cisco Unified Communications Manager 8.6 (SCCP and SIP) OL-24567-01… -
Page 19
Enables softkey options displayed on the phone screen. Transfer button Transfers a call. Conference button Creates a conference call. Cisco Unified IP Phone 6921, 6941, 6945, and 6961 Administration Guide for Cisco Unified Communications Manager 8.6 (SCCP and SIP) OL-24567-01… -
Page 20
Opens/closes the Applications menu. Use it to access call history, user button preferences, phone settings, administration settings, and phone information. Cisco Unified IP Phone 6921, 6941, 6945, and 6961 Administration Guide for Cisco Unified Communications Manager 8.6 (SCCP and SIP) OL-24567-01… -
Page 21: What Networking Protocols Are Used?
Using CDP, a device can advertise its Cisco Catalyst switch. existence to other devices and receive information about other devices in the network. Cisco Unified IP Phone 6921, 6941, 6945, and 6961 Administration Guide for Cisco Unified Communications Manager 8.6 (SCCP and SIP) OL-24567-01…
-
Page 22
The Cisco Unified IP Phone supports LLDP on the Protocol (LLDP) protocol (similar to CDP) that is supported PC port. on some Cisco and third-party devices. Cisco Unified IP Phone 6921, 6941, 6945, and 6961 Administration Guide for Cisco Unified Communications Manager 8.6 (SCCP and SIP) 1-10 OL-24567-01… -
Page 23
Cisco Unified IP Phones use TCP to connect to Protocol (TCP) protocol. Cisco Unified CM and to access XML services. Cisco Unified IP Phone 6921, 6941, 6945, and 6961 Administration Guide for Cisco Unified Communications Manager 8.6 (SCCP and SIP) 1-11 OL-24567-01… -
Page 24: What Features Are Supported On The Cisco Unified Ip Phone 6921, 6941, 6945, And 6961?
Configuring Network Parameters Using the Cisco Unified IP Phone, page 1-14 • Providing Users with Feature Information, page 1-14 • Cisco Unified IP Phone 6921, 6941, 6945, and 6961 Administration Guide for Cisco Unified Communications Manager 8.6 (SCCP and SIP) 1-12 OL-24567-01…
-
Page 25: Feature Overview
You can access Cisco Unified Communications Manager Business Edition documentation at this location: http://www.cisco.com/en/US/products/ps7273/tsd_products_support_series_home.html Related Topic • Telephony Features Available for the Cisco Unified IP Phone, page 5-1 Cisco Unified IP Phone 6921, 6941, 6945, and 6961 Administration Guide for Cisco Unified Communications Manager 8.6 (SCCP and SIP) 1-13 OL-24567-01…
-
Page 26: Configuring Network Parameters Using The Cisco Unified Ip Phone
Files” chapter in Cisco Unified Communications Manager Security Guide. Table 1-5 shows where you can find additional information about security in this and other documents. Cisco Unified IP Phone 6921, 6941, 6945, and 6961 Administration Guide for Cisco Unified Communications Manager 8.6 (SCCP and SIP) 1-14 OL-24567-01…
-
Page 27
Deleting the CTL file from the phone See the “Resetting or Restoring the Cisco Unified IP Phone” section on page 9-12 Cisco Unified IP Phone 6921, 6941, 6945, and 6961 Administration Guide for Cisco Unified Communications Manager 8.6 (SCCP and SIP) 1-15 OL-24567-01… -
Page 28: Overview Of Supported Security Features
Security Configuration menu on the phone. See the “Configuring Security on the Cisco Unified IP Phone” section on page 3-15 for more information. Cisco Unified IP Phone 6921, 6941, 6945, and 6961 Administration Guide for Cisco Unified Communications Manager 8.6 (SCCP and SIP) 1-16 OL-24567-01…
-
Page 29
See the “Disabling and Enabling Web Page Access” section on page 8-3. Cisco Unified IP Phone 6921, 6941, 6945, and 6961 Administration Guide for Cisco Unified Communications Manager 8.6 (SCCP and SIP) 1-17 OL-24567-01… -
Page 30: Understanding Security Profiles
If the call is routed through non-IP call legs, for example, PSTN, the call may be nonsecure even though it is encrypted within the IP network and has a lock icon associated with it. Cisco Unified IP Phone 6921, 6941, 6945, and 6961 Administration Guide for Cisco Unified Communications Manager 8.6 (SCCP and SIP) 1-18…
-
Page 31
If the call is connected to a non-protected phone, then the secure tone is not played. Cisco Unified IP Phone 6921, 6941, 6945, and 6961 Administration Guide for Cisco Unified Communications Manager 8.6 (SCCP and SIP) 1-19… -
Page 32
Secure MeetMe Minimum security level is Only secure conference bridge nonsecure available and used Conference accepts all calls Cisco Unified IP Phone 6921, 6941, 6945, and 6961 Administration Guide for Cisco Unified Communications Manager 8.6 (SCCP and SIP) 1-20 OL-24567-01… -
Page 33: Supporting 802.1X Authentication On Cisco Unified Ip Phones
Unified IP Phones, be sure that you have properly configured the other components before enabling it on the phone. See the “802.1X Authentication and Status” section on page 4-10 for more information. Cisco Unified IP Phone 6921, 6941, 6945, and 6961 Administration Guide for Cisco Unified Communications Manager 8.6 (SCCP and SIP) 1-21 OL-24567-01…
-
Page 34: Security Restrictions
(power down) and wake (power up) on a schedule to further reduce your power consumption. Cisco Unified IP Phone 6921, 6941, 6945, and 6961 Administration Guide for Cisco Unified Communications Manager 8.6 (SCCP and SIP) 1-22 OL-24567-01…
-
Page 35: Overview Of Configuring And Installing Cisco Unified Ip Phones
Cisco Unified IP Phone Configuration, Cisco Unified Communications Manager Administration Guide • Autoregistration Configuration, Cisco Unified Communications Manager Administration Guide Cisco Unified IP Phone 6921, 6941, 6945, and 6961 Administration Guide for Cisco Unified Communications Manager 8.6 (SCCP and SIP) 1-23 OL-24567-01…
-
Page 36
Service URL buttons or adds a Privacy button to meet user needs. See the “Modifying Phone Button Templates” section on page 5-19. Cisco Unified IP Phone 6921, 6941, 6945, and 6961 Administration Guide for Cisco Unified Communications Manager 8.6 (SCCP and SIP) 1-24 OL-24567-01… -
Page 37
Communications Manager Administration Guide, Cisco Provides access to an IP phone service or URL. Unified IP Phone Configuration. Cisco Unified IP Phone 6921, 6941, 6945, and 6961 Administration Guide for Cisco Unified Communications Manager 8.6 (SCCP and SIP) 1-25 OL-24567-01… -
Page 38
Some phones, such as those in conference Note rooms, do not have an associated user. Cisco Unified IP Phone 6921, 6941, 6945, and 6961 Administration Guide for Cisco Unified Communications Manager 8.6 (SCCP and SIP) 1-26 OL-24567-01… -
Page 39: Installing Cisco Unified Ip Phones
Adds primary and secondary directory numbers and features associated with directory numbers to the phone. Verifies that phone is configured properly. Cisco Unified IP Phone 6921, 6941, 6945, and 6961 Administration Guide for Cisco Unified Communications Manager 8.6 (SCCP and SIP) 1-27 OL-24567-01…
-
Page 40
Website.” Ensures that users have adequate information to successfully use their Cisco Unified IP Phones. Cisco Unified IP Phone 6921, 6941, 6945, and 6961 Administration Guide for Cisco Unified Communications Manager 8.6 (SCCP and SIP) 1-28 OL-24567-01… -
Page 41: Terminology Differences
Message Waiting Lamp Programmable Feature Button Programmable Line Button or Programmable Line Key (PLK) Voicemail System Voice Messaging System Cisco Unified IP Phone 6921, 6941, 6945, and 6961 Administration Guide for Cisco Unified Communications Manager 8.6 (SCCP and SIP) 1-29 OL-24567-01…
-
Page 42
Chapter Terminology Differences Cisco Unified IP Phone 6921, 6941, 6945, and 6961 Administration Guide for Cisco Unified Communications Manager 8.6 (SCCP and SIP) 1-30 OL-24567-01… -
Page 43: Understanding Interactions With Other Cisco Unified Ip Telephony Products
Understanding How the Cisco Unified IP Phone Interacts with Cisco Unified CM, page 2-2 Understanding How the Cisco Unified IP Phone Interacts with the VLAN, page 2-2 • Cisco Unified IP Phone 6921, 6941, 6945, and 6961 Administration Guide for Cisco Unified Communications Manager 8.6 (SCCP and SIP) OL-24567-01…
-
Page 44: Manager Express
Cisco Unified IP Phone 6921, 6941, 6945, and 6961 Administration Guide for Cisco Unified Communications Manager 8.6 (SCCP and SIP) OL-24567-01…
-
Page 45
The phone firmware disables the Swap softkey. Prevents the user from creating the Conference and Transfer calls across different lines. • Cisco Unified IP Phone 6921, 6941, 6945, and 6961 Administration Guide for Cisco Unified Communications Manager 8.6 (SCCP and SIP) OL-24567-01… -
Page 46: Providing Power To The Cisco Unified Ip Phone
The inline power patch panel WS-PWR-PANEL is compatible with the Cisco Unified through inline power patch IP Phone 6921, 6941, 6945, and 6961. panel WS-PWR-PANEL Cisco Unified IP Phone 6921, 6941, 6945, and 6961 Administration Guide for Cisco Unified Communications Manager 8.6 (SCCP and SIP) OL-24567-01…
-
Page 47: Power Outage
Cisco Unified CM, the phone establishes a TLS connection to Cisco Unified CM. Otherwise, the phone establishes a TCP connection. Cisco Unified IP Phone 6921, 6941, 6945, and 6961 Administration Guide for Cisco Unified Communications Manager 8.6 (SCCP and SIP) OL-24567-01…
-
Page 48
Cisco Communications Manager Administration Guide. For more information also refer to the Cisco Unified Communications Manager Security Guide. Cisco Unified IP Phone 6921, 6941, 6945, and 6961 Administration Guide for Cisco Unified Communications Manager 8.6 (SCCP and SIP) OL-24567-01… -
Page 49: Understanding The Phone Startup Process
The CTL file contains the certificates necessary for establishing a secure connection between the phone and Cisco Unified CM. Cisco Unified IP Phone 6921, 6941, 6945, and 6961 Administration Guide for Cisco Unified Communications Manager 8.6 (SCCP and SIP) OL-24567-01…
-
Page 50: Adding Phones To The Cisco Unified Cm Database
Adding Phones with Auto-Registration and TAPS, page 2-10 • Adding Phones with Cisco Unified CM Administration, page 2-10 • Adding Phones with BAT, page 2-11 • Cisco Unified IP Phone 6921, 6941, 6945, and 6961 Administration Guide for Cisco Unified Communications Manager 8.6 (SCCP and SIP) OL-24567-01…
-
Page 51: Adding Phones With Auto-Registration
For information about enabling auto-registration, go to the “Enabling Auto-Registration” section in the Cisco Unified Communications Manager Administration Guide. Cisco Unified IP Phone 6921, 6941, 6945, and 6961 Administration Guide for Cisco Unified Communications Manager 8.6 (SCCP and SIP) OL-24567-01…
-
Page 52: Adding Phones With Auto-Registration And Taps
You can add phones individually to the Cisco Unified CM database by using Cisco Unified CM Administration. To do so, you first need to obtain the MAC address for each phone. Cisco Unified IP Phone 6921, 6941, 6945, and 6961 Administration Guide for Cisco Unified Communications Manager 8.6 (SCCP and SIP) 2-10…
-
Page 53: Adding Phones With Bat
A new, unused phone is set for SCCP by default. To convert this phone to SIP, perform these steps: Cisco Unified IP Phone 6921, 6941, 6945, and 6961 Administration Guide for Cisco Unified Communications Manager 8.6 (SCCP and SIP) 2-11…
-
Page 54: Converting An In-Use Phone From One Protocol To The Other Protocol
Step 2 Change the Auto Registration Protocol enterprise parameter to SIP. Step 3 Auto-register the SIP phones. Step 4 Cisco Unified IP Phone 6921, 6941, 6945, and 6961 Administration Guide for Cisco Unified Communications Manager 8.6 (SCCP and SIP) 2-12 OL-24567-01…
-
Page 55: Determining The Mac Address For A Cisco Unified Ip Phone
For information about accessing the web page, see the “Accessing the Web Page for a Phone” section on page 8-2. Cisco Unified IP Phone 6921, 6941, 6945, and 6961 Administration Guide for Cisco Unified Communications Manager 8.6 (SCCP and SIP) 2-13 OL-24567-01…
-
Page 56
Chapter Determining the MAC Address for a Cisco Unified IP Phone Cisco Unified IP Phone 6921, 6941, 6945, and 6961 Administration Guide for Cisco Unified Communications Manager 8.6 (SCCP and SIP) 2-14 OL-24567-01… -
Page 57: Before You Begin
Cisco UnifiedCM installed in your network and configured to handle call processing – IP network that supports DHCP or manual assignment of IP address, gateway, and subnet mask • Cisco Unified IP Phone 6921, 6941, 6945, and 6961 Administration Guide for Cisco Unified Communications Manager 8.6 (SCCP and SIP) OL-24567-01…
-
Page 58: Cisco Unified Communications Manager Configuration
The back of the Cisco Unified IP Phone 6921, 6941, 6945, and 6961 includes these ports: • Network port—Labeled network • Access port—Labeled computer Cisco Unified IP Phone 6921, 6941, 6945, and 6961 Administration Guide for Cisco Unified Communications Manager 8.6 (SCCP and SIP) OL-24567-01…
-
Page 59: Handset
The Cisco Unified IP Phone 6945 supports wideband headsets. Note Cisco Unified IP Phone 6921, 6941, 6945, and 6961 Administration Guide for Cisco Unified Communications Manager 8.6 (SCCP and SIP) OL-24567-01…
-
Page 60
Connecting a Headset To connect a wired headset to the Cisco Unified IP Phone, plug it into the Headset port on the back of the phone. Press the Headset button on the phone to place and answer calls using the headset. -
Page 61: Installing The Cisco Unified Ip Phone
You can use either Category 3/5/5e cabling for 10-Mbps connections, but you must use Category 5/5e for 100 Mbps connections. Cisco Unified IP Phone 6921, 6941, 6945, and 6961 Administration Guide for Cisco Unified Communications Manager 8.6 (SCCP and SIP) OL-24567-01…
-
Page 62
Chapter Installing the Cisco Unified IP Phone Figure 3-1 Cisco Unified IP Phone 6921 and 6941 Cable Connections Cisco Unified IP Phone 6921, 6941, 6945, and 6961 Administration Guide for Cisco Unified Communications Manager 8.6 (SCCP and SIP) OL-24567-01… -
Page 63
Handset connection AC power wall plus (optional) Analog headset connection (optional) Network port (10/100 SW) connection. IEEE 802.3af power enabled Cisco Unified IP Phone 6921, 6941, 6945, and 6961 Administration Guide for Cisco Unified Communications Manager 8.6 (SCCP and SIP) OL-24567-01… -
Page 64
Footstand, page 3-9 • Verifying the Phone Startup Process, page 3-14 • Configuring Startup Network Settings, page 3-15 • Cisco Unified IP Phone 6921, 6941, 6945, and 6961 Administration Guide for Cisco Unified Communications Manager 8.6 (SCCP and SIP) OL-24567-01… -
Page 65: Reducing Power Consumption On The Phone
Cisco Unified IP Phone 6961. Cisco Unified IP Phone 6921, 6941, 6945, and 6961 Administration Guide for Cisco Unified Communications Manager 8.6 (SCCP and SIP) OL-24567-01…
-
Page 66
Cisco Unified IP Phone 6921 and 6941 Footstand slots for a higher viewing angle Footstand slots for a lower viewing angle Cisco Unified IP Phone 6921, 6941, 6945, and 6961 Administration Guide for Cisco Unified Communications Manager 8.6 (SCCP and SIP) 3-10 OL-24567-01… -
Page 67
Cisco Unified IP Phone 6945 Footstand slots for a higher viewing angle Footstand slots for a lower viewing angle Cisco Unified IP Phone 6921, 6941, 6945, and 6961 Administration Guide for Cisco Unified Communications Manager 8.6 (SCCP and SIP) 3-11 OL-24567-01… -
Page 68
Cisco Unified IP Phone 6961 CISCO Footstand slots for a higher viewing angle Footstand slots for a lower viewing angle Cisco Unified IP Phone 6921, 6941, 6945, and 6961 Administration Guide for Cisco Unified Communications Manager 8.6 (SCCP and SIP) 3-12 OL-24567-01… -
Page 69: Higher Viewing Angle
Chapter Footstand Higher Viewing Angle Cisco Unified IP Phone 6921, 6941, 6945, and 6961 Administration Guide for Cisco Unified Communications Manager 8.6 (SCCP and SIP) 3-13 OL-24567-01…
-
Page 70: Lower Viewing Angle
The following LED buttons flash on and off during the various stages of boot up as the phone checks its hardware. See Table 3-2 for a list of the hardware test and the LED diagnostic status. Cisco Unified IP Phone 6921, 6941, 6945, and 6961 Administration Guide for Cisco Unified Communications Manager 8.6 (SCCP and SIP) 3-14 OL-24567-01…
-
Page 71: Configuring Startup Network Settings
“Understanding Security Features for Cisco Unified IP Phones” section on page 1-14. Also, refer to Cisco Unified Communications Manager Security Guide. Cisco Unified IP Phone 6921, 6941, 6945, and 6961 Administration Guide for Cisco Unified Communications Manager 8.6 (SCCP and SIP) 3-15 OL-24567-01…
-
Page 72
Information and ensuring that the LSC setting shows Installed. Related Topic Understanding Security Features for Cisco Unified IP Phones, page 1-14 Cisco Unified IP Phone 6921, 6941, 6945, and 6961 Administration Guide for Cisco Unified Communications Manager 8.6 (SCCP and SIP) 3-16 OL-24567-01… -
Page 73: Configuration Menus On The Cisco Unified Ip Phone
• Displaying a Configuration Menu, page 4-2 • Unlocking and Locking Options, page 4-3 • Editing Values, page 4-3 Cisco Unified IP Phone 6921, 6941, 6945, and 6961 Administration Guide for Cisco Unified Communications Manager 8.6 (SCCP and SIP) OL-24567-01…
-
Page 74: Displaying A Configuration Menu
• To display a submenu repeat Step Step 5 To exit a menu, press the Exit softkey. Step 6 Cisco Unified IP Phone 6921, 6941, 6945, and 6961 Administration Guide for Cisco Unified Communications Manager 8.6 (SCCP and SIP) OL-24567-01…
-
Page 75: Unlocking And Locking Options
“Resetting or Restoring the Cisco Unified IP Phone” section on page 9-12. Related Topics Displaying a Configuration Menu, page 4-2 • Cisco Unified IP Phone 6921, 6941, 6945, and 6961 Administration Guide for Cisco Unified Communications Manager 8.6 (SCCP and SIP) OL-24567-01…
-
Page 76: Network Setup Menu
Edit softkey, and then enter a new domain name. Press the Apply softkey, then press Save. Cisco Unified IP Phone 6921, 6941, 6945, and 6961 Administration Guide for Cisco Unified Communications Manager 8.6 (SCCP and SIP) OL-24567-01…
-
Page 77
PC Port Configuration option to the same setting. Switch Port Remote Configuration in Unified CM, the data cannot be changed on the phone. Cisco Unified IP Phone 6921, 6941, 6945, and 6961 Administration Guide for Cisco Unified Communications Manager 8.6 (SCCP and SIP) OL-24567-01… -
Page 78: Ipv4 Setup Menu Options
The IPv4 Setup menu is a submenu of the Network Setup menu. To reach the IPv4 Setup menu, select the IPv4 option on the Network Setup menu. Cisco Unified IP Phone 6921, 6941, 6945, and 6961 Administration Guide for Cisco Unified Communications Manager 8.6 (SCCP and SIP) OL-24567-01…
-
Page 79
Server option, press the Edit softkey, and then enter a new DNS server IP address. Press the Apply softkey, then press Save. Cisco Unified IP Phone 6921, 6941, 6945, and 6961 Administration Guide for Cisco Unified Communications Manager 8.6 (SCCP and SIP) OL-24567-01… -
Page 80: Ipv6 Setup Menu Options
The IPv6 Setup menu is a submenu of the Network Setup menu. To reach the IPv6 Setup menu, select the IPv6 option on the Network Setup menu. Cisco Unified IP Phone 6921, 6941, 6945, and 6961 Administration Guide for Cisco Unified Communications Manager 8.6 (SCCP and SIP) OL-24567-01…
-
Page 81
• Displaying a Configuration Menu, page 4-2 • Unlocking and Locking Options, page 4-3 Editing Values, page 4-3 • Cisco Unified IP Phone 6921, 6941, 6945, and 6961 Administration Guide for Cisco Unified Communications Manager 8.6 (SCCP and SIP) OL-24567-01… -
Page 82: Security Configuration Menu
These options are described in Table 4-6. To exit these menus, press the Exit softkey. Cisco Unified IP Phone 6921, 6941, 6945, and 6961 Administration Guide for Cisco Unified Communications Manager 8.6 (SCCP and SIP) 4-10 OL-24567-01…
-
Page 83
To view the transaction status of your 802.1X 802.1X Authentication. Authentication, choose Applications > Admin Settings > Security Configuration > 802.1X Authentication Status. Cisco Unified IP Phone 6921, 6941, 6945, and 6961 Administration Guide for Cisco Unified Communications Manager 8.6 (SCCP and SIP) 4-11 OL-24567-01… -
Page 84
Chapter Security Configuration Menu Cisco Unified IP Phone 6921, 6941, 6945, and 6961 Administration Guide for Cisco Unified Communications Manager 8.6 (SCCP and SIP) 4-12 OL-24567-01… -
Page 85: Telephony Features Available For The Cisco Unified Ip Phone
Cisco Unified Communications Manager Administration. The Reference column lists Cisco Unified Communications Manager and other documentation that contains configuration procedures and related information. Cisco Unified IP Phone 6921, 6941, 6945, and 6961 Administration Guide for Cisco Unified Communications Manager 8.6 (SCCP and SIP) OL-24567-01…
-
Page 86: Telephony Features For The Cisco Unified Ip Phone
Communications Manager Features and routed to the phone. Services Guide, “Call Pickup Configuration.” Cisco Unified IP Phone 6921, 6941, 6945, and 6961 Administration Guide for Cisco Unified Communications Manager 8.6 (SCCP and SIP) OL-24567-01…
-
Page 87
Cisco Unified CM, if the phone is powered by PoE. Cisco Unified IP Phone 6921, 6941, 6945, and 6961 Administration Guide for Cisco Unified Communications Manager 8.6 (SCCP and SIP) OL-24567-01… -
Page 88
Cisco Unified IP Phone. “Specifying Options that Appear on the • User Options Web Pages” section on page 5-26 Cisco Unified IP Phone 6921, 6941, 6945, and 6961 Administration Guide for Cisco Unified Communications Manager 8.6 (SCCP and SIP) OL-24567-01… -
Page 89
This alert notifies the users that a call is ringing in their pickup group. Cisco Unified IP Phone 6921, 6941, 6945, and 6961 Administration Guide for Cisco Unified Communications Manager 8.6 (SCCP and SIP) OL-24567-01… -
Page 90
Cisco Unified Communications Manager • identification enabled. System Guide, Understanding Route Plans. • Cisco Unified Communications Manager Administration Guide, Directory Number Configuration. Cisco Unified IP Phone 6921, 6941, 6945, and 6961 Administration Guide for Cisco Unified Communications Manager 8.6 (SCCP and SIP) OL-24567-01… -
Page 91
Allows users to make calls from web and desktop For more information, see the Cisco Unified applications. Communications Manager Features and Services Guide, Cisco Web Dialer. Cisco Unified IP Phone 6921, 6941, 6945, and 6961 Administration Guide for Cisco Unified Communications Manager 8.6 (SCCP and SIP) OL-24567-01… -
Page 92
Allows a user to answer a call that is ringing on a For more information, see the Cisco Unified particular directory number. Communications Manager Features and Services Guide, Call Pickup. Cisco Unified IP Phone 6921, 6941, 6945, and 6961 Administration Guide for Cisco Unified Communications Manager 8.6 (SCCP and SIP) OL-24567-01… -
Page 93
For more information, see the Cisco Unified directory number in another group. Communications Manager Features and Services Guide, Call Pickup. Cisco Unified IP Phone 6921, 6941, 6945, and 6961 Administration Guide for Cisco Unified Communications Manager 8.6 (SCCP and SIP) OL-24567-01… -
Page 94
Cisco Unified IP Phone 6921, 6941, 6945, and 6961 Administration Guide for Cisco Unified Communications Manager 8.6 (SCCP and SIP) 5-10 OL-24567-01… -
Page 95
Communications Manager Administration number at a scheduled time. Guide, Meet-Me Number/Pattern Configuration. Cisco Unified IP Phone 6921, 6941, 6945, and 6961 Administration Guide for Cisco Unified Communications Manager 8.6 (SCCP and SIP) 5-11 OL-24567-01… -
Page 96
Plays music while callers are on hold. For more information, see the Cisco Unified Communications Manager Features and Services Guide, Music On Hold. Cisco Unified IP Phone 6921, 6941, 6945, and 6961 Administration Guide for Cisco Unified Communications Manager 8.6 (SCCP and SIP) 5-12 OL-24567-01… -
Page 97
Allows users to call the most recently dialed phone Requires no configuration. number by pressing a button or the Redial softkey. Cisco Unified IP Phone 6921, 6941, 6945, and 6961 Administration Guide for Cisco Unified Communications Manager 8.6 (SCCP and SIP) 5-13 OL-24567-01… -
Page 98
Conference List. (Non-initiators can add or Security Guide. remove conference participants if the Advanced Adhoc Conference Enabled parameter is set.) Cisco Unified IP Phone 6921, 6941, 6945, and 6961 Administration Guide for Cisco Unified Communications Manager 8.6 (SCCP and SIP) 5-14 OL-24567-01… -
Page 99
Administration Guide, Cisco Unified IP Phone Configuration. • Cisco Unified Communications Manager System Guide, Cisco Unified IP Phone. Cisco Unified IP Phone 6921, 6941, 6945, and 6961 Administration Guide for Cisco Unified Communications Manager 8.6 (SCCP and SIP) 5-15 OL-24567-01… -
Page 100
For more information, see the Cisco Unified Communications Manager System Guide, Understanding Directory Numbers. Cisco Unified IP Phone 6921, 6941, 6945, and 6961 Administration Guide for Cisco Unified Communications Manager 8.6 (SCCP and SIP) 5-16 OL-24567-01… -
Page 101: Join And Direct Transfer Policy
To determine the proper setting for this parameter, refer to the documentation of the JTAPI/TAPI application. Cisco Unified IP Phone 6921, 6941, 6945, and 6961 Administration Guide for Cisco Unified Communications Manager 8.6 (SCCP and SIP) 5-17 OL-24567-01…
-
Page 102: Configuring Corporate And Personal Directories
To configure Personal Directory from a web browsers, users must access their User Options web pages. You must provide users with a URL and login information. Cisco Unified IP Phone 6921, 6941, 6945, and 6961 Administration Guide for Cisco Unified Communications Manager 8.6 (SCCP and SIP) 5-18…
-
Page 103: Modifying Phone Button Templates
Step 2 Click Add New. The IP Phone Services Configuration window displays. Enter the following settings: Step 3 Cisco Unified IP Phone 6921, 6941, 6945, and 6961 Administration Guide for Cisco Unified Communications Manager 8.6 (SCCP and SIP) 5-19 OL-24567-01…
-
Page 104
The phone user can now access the User Options pages and associate the service with a button on the phone. Cisco Unified IP Phone 6921, 6941, 6945, and 6961 Administration Guide for Cisco Unified Communications Manager 8.6 (SCCP and SIP) 5-20… -
Page 105: Configuring Softkey Templates
Conference is a dedicated button. Conference List Conference List (ConfList) Phone displays Detail. Divert Immediate Divert (iDivert) Phone displays Divert. Cisco Unified IP Phone 6921, 6941, 6945, and 6961 Administration Guide for Cisco Unified Communications Manager 8.6 (SCCP and SIP) 5-21 OL-24567-01…
-
Page 106
Product Specific Configuration Layout section in Phone Configuration. Video Mode Command Video Mode Command — (VidMode) Cisco Unified IP Phone 6921, 6941, 6945, and 6961 Administration Guide for Cisco Unified Communications Manager 8.6 (SCCP and SIP) 5-22 OL-24567-01… -
Page 107: Setting Up Services
To add users in batches, use the Bulk Administration Tool. This method also enables you to set an • identical default password for all users. Cisco Unified IP Phone 6921, 6941, 6945, and 6961 Administration Guide for Cisco Unified Communications Manager 8.6 (SCCP and SIP) 5-23 OL-24567-01…
-
Page 108: Managing The User Options Web Pages
The list of search results does not display end users that already belong to the user group. Note Cisco Unified IP Phone 6921, 6941, 6945, and 6961 Administration Guide for Cisco Unified Communications Manager 8.6 (SCCP and SIP) 5-24 OL-24567-01…
-
Page 109: Associating A Phone With A User
Cisco Unified Communications Manager Administration Guide, User Group Configuration. • Cisco Unified Communications Manager Administration Guide, End User Configuration. Cisco Unified IP Phone 6921, 6941, 6945, and 6961 Administration Guide for Cisco Unified Communications Manager 8.6 (SCCP and SIP) 5-25 OL-24567-01…
-
Page 110: Specifying Options That Appear On The User Options Web Pages
On an unassigned programmable button on the phone, configure an additional line by either assigning the same directory number on a different partition or by assigned a different directory number. Cisco Unified IP Phone 6921, 6941, 6945, and 6961 Administration Guide for Cisco Unified Communications Manager 8.6 (SCCP and SIP) 5-26 OL-24567-01…
-
Page 111: Setting Up Call Forward Notification
D, then the notification box that D sees contains the phone information for caller B. By default, this checkbox is not selected. Cisco Unified IP Phone 6921, 6941, 6945, and 6961 Administration Guide for Cisco Unified Communications Manager 8.6 (SCCP and SIP) 5-27 OL-24567-01…
-
Page 112: Enabling Energywise On The Cisco Unified Ip Phone 6921, 6941, 6945, And 6961
The user can wake up the phone by pressing the Select key. At the scheduled wake time, the system restores power to the phone, waking it up. Cisco Unified IP Phone 6921, 6941, 6945, and 6961 Administration Guide for Cisco Unified Communications Manager 8.6 (SCCP and SIP) 5-28…
-
Page 113
Timeout down. The range of the field is 20 to 1440 minutes. The default value is 60 minutes. Cisco Unified IP Phone 6921, 6941, 6945, and 6961 Administration Guide for Cisco Unified Communications Manager 8.6 (SCCP and SIP) 5-29 OL-24567-01… -
Page 114: Setting Up Ucr 2008
The parameters that support UCR 2008 reside in Cisco Unified Communications Manager Administration. The following table describes the parameters and indicates the procedure to change the setting. Cisco Unified IP Phone 6921, 6941, 6945, and 6961 Administration Guide for Cisco Unified Communications Manager 8.6 (SCCP and SIP) 5-30 OL-24567-01…
-
Page 115
Step 4 Configuring UCR 2008 in Common Phone Profile Use this procedure to set the following UCR 2008 parameters: Cisco Unified IP Phone 6921, 6941, 6945, and 6961 Administration Guide for Cisco Unified Communications Manager 8.6 (SCCP and SIP) 5-31 OL-24567-01… -
Page 116
Set the IP Addressing Mode parameter. Step 3 Set the IP Addressing Mode Preference for Signaling parameter. Step 4 Click Save. Cisco Unified IP Phone 6921, 6941, 6945, and 6961 Administration Guide for Cisco Unified Communications Manager 8.6 (SCCP and SIP) 5-32 OL-24567-01… -
Page 117: Chapter 6 Customizing The Cisco Unified Ip Phone
– file view – file search – file get – file dump – file tail – file delete – Cisco Unified IP Phone 6921, 6941, 6945, and 6961 Administration Guide for Cisco Unified Communications Manager 8.6 (SCCP and SIP) OL-24567-01…
-
Page 118: Creating Custom Phone Rings
50 ring types. Each ring type contains a pointer to the PCM file that is used for that ring type and the text that will appear on the Ring Type menu on a Cisco Unified IP Phone for that ring.
-
Page 119: Pcm File Requirements For Custom Ring Types
Serviceability or disable and re-enable the “Enable Caching of Constant and Bin Files at Startup” TFTP service parameter (located in the Advanced Service Parameters). Cisco Unified IP Phone 6921, 6941, 6945, and 6961 Administration Guide for Cisco Unified Communications Manager 8.6 (SCCP and SIP) OL-24567-01…
-
Page 120: Configuring The Idle Display
Administration in the Product Specific configuration window. (You access this window by choosing Device > Phone from Cisco Unified Communications Manager Administration.) Cisco Unified IP Phone 6921, 6941, 6945, and 6961 Administration Guide for Cisco Unified Communications Manager 8.6 (SCCP and SIP) OL-24567-01…
-
Page 121
For example, to turn the backlight off when the phone is idle for 1 hour and 30 minutes after an end-user turns the backlight on, enter 1:30. The default value is 0:30. Cisco Unified IP Phone 6921, 6941, 6945, and 6961 Administration Guide for Cisco Unified Communications Manager 8.6 (SCCP and SIP) OL-24567-01… -
Page 122
Chapter Automatically Disabling the Cisco Unified IP Phone Backlight Cisco Unified IP Phone 6921, 6941, 6945, and 6961 Administration Guide for Cisco Unified Communications Manager 8.6 (SCCP and SIP) OL-24567-01… -
Page 123: Chapter 7 Viewing Model Information, Status, And Statistics On The Cisco Unified Ip Phone
IP Address IP address of the phone. Display only—cannot configure. MAC Address MAC address of the phone. Display only—cannot configure. Cisco Unified IP Phone 6921, 6941, 6945, and 6961 Administration Guide for Cisco Unified Communications Manager 8.6 (SCCP and SIP) OL-24567-01…
-
Page 124: Status Menu
Table 7-2 describes the status messages that might appear. This table also includes actions you can take to address errors. Cisco Unified IP Phone 6921, 6941, 6945, and 6961 Administration Guide for Cisco Unified Communications Manager 8.6 (SCCP and SIP) OL-24567-01…
-
Page 125
TFTPPath directory. You should only copy files into this directory when the TFTP server software is shut down, otherwise the files may be corrupted. Cisco Unified IP Phone 6921, 6941, 6945, and 6961 Administration Guide for Cisco Unified Communications Manager 8.6 (SCCP and SIP) OL-24567-01… -
Page 126
– Located in subdirectory with same name as user • locale: glyphs.xml – dictionary.xml – kate.xml – Cisco Unified IP Phone 6921, 6941, 6945, and 6961 Administration Guide for Cisco Unified Communications Manager 8.6 (SCCP and SIP) OL-24567-01… -
Page 127
TFTP error The phone does not recognize an error Contact the Cisco TAC. code provided by the TFTP server. Cisco Unified IP Phone 6921, 6941, 6945, and 6961 Administration Guide for Cisco Unified Communications Manager 8.6 (SCCP and SIP) OL-24567-01… -
Page 128: Network Statistics Screen
To display the Network Statistics screen, follow these steps: Procedure Press the Applications button. Step 1 Select Admin Settings. Step 2 Select Status. Step 3 Cisco Unified IP Phone 6921, 6941, 6945, and 6961 Administration Guide for Cisco Unified Communications Manager 8.6 (SCCP and SIP) OL-24567-01…
-
Page 129
PC port is in a link-up 100 Mb Full-Duplex state and has auto-negotiated a full-duplex, 100-Mbps connection) Cisco Unified IP Phone 6921, 6941, 6945, and 6961 Administration Guide for Cisco Unified Communications Manager 8.6 (SCCP and SIP) OL-24567-01… -
Page 130: Call Statistics Screen
When the call resumes, a new voice packet stream begins, and the new call data overwrites the former call data. Cisco Unified IP Phone 6921, 6941, 6945, and 6961 Administration Guide for Cisco Unified Communications Manager 8.6 (SCCP and SIP) OL-24567-01…
-
Page 131
Total number of concealment frames divided by total number of speech frames Conceal Ratio received from start of the voice stream. Cisco Unified IP Phone 6921, 6941, 6945, and 6961 Administration Guide for Cisco Unified Communications Manager 8.6 (SCCP and SIP) OL-24567-01… -
Page 132: Security Configuration
Select Security. For more information, refer “Configuring Security on the Cisco Unified IP Phone” section on page 3-15. Cisco Unified IP Phone 6921, 6941, 6945, and 6961 Administration Guide for Cisco Unified Communications Manager 8.6 (SCCP and SIP) 7-10 OL-24567-01…
-
Page 133
The Trust List is a top-level menu that provides submenus for the CTL Signature and Call manager/TFTP Server. 802.1x Authentication Allows you to enable 802.1X authentication for the phone. Cisco Unified IP Phone 6921, 6941, 6945, and 6961 Administration Guide for Cisco Unified Communications Manager 8.6 (SCCP and SIP) 7-11 OL-24567-01… -
Page 134
Chapter Status Menu Cisco Unified IP Phone 6921, 6941, 6945, and 6961 Administration Guide for Cisco Unified Communications Manager 8.6 (SCCP and SIP) 7-12 OL-24567-01… -
Page 135: Monitoring The Cisco Unified Ip Phone Remotely
Network Setup, page 8-4 • Network Statistics, page 8-8 • Device Logs, page 8-10 Streaming Statistics, page 8-10 • Cisco Unified IP Phone 6921, 6941, 6945, and 6961 Administration Guide for Cisco Unified Communications Manager 8.6 (SCCP and SIP) OL-24567-01…
-
Page 136: Accessing The Web Page For A Phone
Debug Display—Displays debug messages that might be useful to Cisco TAC if you require assistance with troubleshooting. For more information, see the “Device Logs” section on page 8-10. Cisco Unified IP Phone 6921, 6941, 6945, and 6961 Administration Guide for Cisco Unified Communications Manager 8.6 (SCCP and SIP) OL-24567-01…
-
Page 137: Disabling And Enabling Web Page Access
Phone DN Directory number assigned to the phone App Load ID Identifier of the firmware running on the phone Cisco Unified IP Phone 6921, 6941, 6945, and 6961 Administration Guide for Cisco Unified Communications Manager 8.6 (SCCP and SIP) OL-24567-01…
-
Page 138: Network Setup
Media Access Control (MAC) address of the phone. Host Name Host name that the DHCP server assigned to the phone. Cisco Unified IP Phone 6921, 6941, 6945, and 6961 Administration Guide for Cisco Unified Communications Manager 8.6 (SCCP and SIP) OL-24567-01…
-
Page 139
Number of seconds that the phone has not been used and no menu is open before the XML service specified by Idle URL is activated. Cisco Unified IP Phone 6921, 6941, 6945, and 6961 Administration Guide for Cisco Unified Communications Manager 8.6 (SCCP and SIP) OL-24567-01… -
Page 140
Indicates whether the speakerphone is enabled on the phone. GARP Enabled Indicates whether the phone learns MAC addresses from Gratuitous ARP responses. Cisco Unified IP Phone 6921, 6941, 6945, and 6961 Administration Guide for Cisco Unified Communications Manager 8.6 (SCCP and SIP) OL-24567-01… -
Page 141
The EnergyWise domain that the phone is in. FIPS Mode Enabled Indicates whether the FIPS Mode parameter is enabled. Cisco Unified IP Phone 6921, 6941, 6945, and 6961 Administration Guide for Cisco Unified Communications Manager 8.6 (SCCP and SIP) OL-24567-01… -
Page 142: Network Statistics
Total number of broadcast packets received by the phone Rx unicast Total number of unicast packets received by the phone Cisco Unified IP Phone 6921, 6941, 6945, and 6961 Administration Guide for Cisco Unified Communications Manager 8.6 (SCCP and SIP) OL-24567-01…
-
Page 143
Software Reset (memory controller not reset) • • Watchdog Reset • Unknown Port Information Speed and duplex information. IPv4 Information on the DHCP status. Cisco Unified IP Phone 6921, 6941, 6945, and 6961 Administration Guide for Cisco Unified Communications Manager 8.6 (SCCP and SIP) OL-24567-01… -
Page 144: Device Logs
Number of times the RTCP Sender Report have been sent. Sender Report Time Sent Internal time stamp indication when the last RTCP Sender Report was sent. Cisco Unified IP Phone 6921, 6941, 6945, and 6961 Administration Guide for Cisco Unified Communications Manager 8.6 (SCCP and SIP) 8-10 OL-24567-01…
-
Page 145
Total number of concealment frames divided by total number of speech frames received from start of the voice stream. Cisco Unified IP Phone 6921, 6941, 6945, and 6961 Administration Guide for Cisco Unified Communications Manager 8.6 (SCCP and SIP) 8-11… -
Page 146
1. When the RTP Control Protocol is disabled, no data generates for this field and thus displays as 0. Related Topics • “Configuring Settings on the Cisco Unified IP Phone” chapter Cisco Unified IP Phone 6921, 6941, 6945, and 6961 Administration Guide for Cisco Unified Communications Manager 8.6 (SCCP and SIP) 8-12 OL-24567-01… -
Page 147: Resolving Startup Problems
Symptom: Cisco Unified IP Phone Unable to Obtain IP Address, page 9-5 • Symptom: The Cisco Unified IP Phone Displays the Message Security Error, page 9-6 Cisco Unified IP Phone 6921, 6941, 6945, and 6961 Administration Guide for Cisco Unified Communications Manager 8.6 (SCCP and SIP) OL-24567-01…
-
Page 148: Symptom: The Cisco Unified Ip Phone Does Not Go Through Its Normal Startup Process
Checking Network Connectivity, page 9-3 • Verifying TFTP Server Settings, page 9-3 • Verifying IP Addressing and Routing, page 9-3 • Cisco Unified IP Phone 6921, 6941, 6945, and 6961 Administration Guide for Cisco Unified Communications Manager 8.6 (SCCP and SIP) OL-24567-01…
-
Page 149: Manager
See the “Network Setup Menu” section on page 4-4 for instructions. Cisco Unified IP Phone 6921, 6941, 6945, and 6961 Administration Guide for Cisco Unified Communications Manager 8.6 (SCCP and SIP) OL-24567-01…
-
Page 150
If you continue to have problems with a particular phone that other suggestions in this chapter do not resolve, the configuration file may be corrupted. To create a new configuration file, follow these steps: Cisco Unified IP Phone 6921, 6941, 6945, and 6961 Administration Guide for Cisco Unified Communications Manager 8.6 (SCCP and SIP) OL-24567-01… -
Page 151: Symptom: Cisco Unified Ip Phone Unable To Obtain Ip Address
Make sure that the network or VLAN to which the phone is connected has access to the DHCP server, and make sure that the switch port is enabled. Cisco Unified IP Phone 6921, 6941, 6945, and 6961 Administration Guide for Cisco Unified Communications Manager 8.6 (SCCP and SIP) OL-24567-01…
-
Page 152: Symptom: The Cisco Unified Ip Phone Displays The Message Security Error
If you are experiencing problems with the voice network, you should investigate whether an existing problem is simply being exposed. Cisco Unified IP Phone 6921, 6941, 6945, and 6961 Administration Guide for Cisco Unified Communications Manager 8.6 (SCCP and SIP) OL-24567-01…
-
Page 153: Verifying Dhcp Settings
Use the Reset Settings menu to reset phone settings to their default values. See the “Resetting or Step 1 Restoring the Cisco Unified IP Phone” section on page 9-12 for details. Cisco Unified IP Phone 6921, 6941, 6945, and 6961 Administration Guide for Cisco Unified Communications Manager 8.6 (SCCP and SIP) OL-24567-01…
-
Page 154: Checking Power Connection
Unified Communications Manager server. Phone does not request signed configuration The CTL file does not contain any TFTP entries with certificates. files. Cisco Unified IP Phone 6921, 6941, 6945, and 6961 Administration Guide for Cisco Unified Communications Manager 8.6 (SCCP and SIP) OL-24567-01…
-
Page 155: General Troubleshooting Tips
802.1X configuration menus and re-enter the shared secret. General Troubleshooting Tips Table 9-2 provides general troubleshooting information for the Cisco Unified IP Phone. Cisco Unified IP Phone 6921, 6941, 6945, and 6961 Administration Guide for Cisco Unified Communications Manager 8.6 (SCCP and SIP) OL-24567-01…
-
Page 156
See the “Call Statistics Screen” section on page 7-8 for information about displaying these statistics. Cisco Unified IP Phone 6921, 6941, 6945, and 6961 Administration Guide for Cisco Unified Communications Manager 8.6 (SCCP and SIP) 9-10 OL-24567-01… -
Page 157
Both phones are registered to the same Cisco Unified Communications Manager. Audio server debug and capture logs are enabled for both phones. If needed, enable Java debug. Cisco Unified IP Phone 6921, 6941, 6945, and 6961 Administration Guide for Cisco Unified Communications Manager 8.6 (SCCP and SIP) 9-11 OL-24567-01… -
Page 158: Resetting Or Restoring The Cisco Unified Ip Phone
To perform a factory reset of a phone, you can press the Applications button and choose Admin Settings > Reset Settings > All. Alternatively, you can also follow these steps: Cisco Unified IP Phone 6921, 6941, 6945, and 6961 Administration Guide for Cisco Unified Communications Manager 8.6 (SCCP and SIP) 9-12 OL-24567-01…
-
Page 159: Monitoring The Voice Quality Of Calls
“Call Statistics Screen” section on page 7-8) or remotely by using Streaming Statistics (see the Monitoring the Cisco Unified IP Phone Remotely chapter). Cisco Unified IP Phone 6921, 6941, 6945, and 6961 Administration Guide for Cisco Unified Communications Manager 8.6 (SCCP and SIP) 9-13 OL-24567-01…
-
Page 160: Troubleshooting Tips
Cisco Unified IP Phone 6921, 6941, 6945, and 6961: G.711: 4.5 MOS LQK • • G.722: 4.5 MOS LQK Cisco Unified IP Phone 6921, 6941, 6945, and 6961 Administration Guide for Cisco Unified Communications Manager 8.6 (SCCP and SIP) 9-14 OL-24567-01…
-
Page 161: Where To Go For More Troubleshooting Information
Cleaning the Cisco Unified IP Phone To clean your Cisco Unified IP phone, use only a dry soft cloth to gently wipe the phone and the LCD screen. Do not apply liquids or powders directly on the phone. As with all non-weather-proof electronics, liquids and powders can damage the components and cause failures.
-
Page 162
Chapter Cleaning the Cisco Unified IP Phone Cisco Unified IP Phone 6921, 6941, 6945, and 6961 Administration Guide for Cisco Unified Communications Manager 8.6 (SCCP and SIP) 9-16 OL-24567-01… -
Page 163: Appendix
Cisco Unified Communications Manager Administration Guide • Role Configuration chapter in the Cisco Unified Communications Manager Administration Guide Cisco Unified IP Phone 6921, 6941, 6945, and 6961 Administration Guide for Cisco Unified Communications Manager 8.6 (SCCP and SIP) OL-24567-01…
-
Page 164: How Users Subscribe To Services And Configure Phone Features
For information using a voice messaging system, refer to Cisco Unified IP Phone 6921, 6941, 6945, and 6961 User Guide for Cisco Unified Communications Manager. Cisco Unified IP Phone 6921, 6941, 6945, and 6961 Administration Guide for Cisco Unified Communications Manager 8.6 (SCCP and SIP) OL-24567-01…
-
Page 165: How Users Configure Personal Directory Entries
The installation wizard installs the application to your computer. When the installation is complete, the InstallShield Wizard Complete window displays. Step 8 Click Finish. Cisco Unified IP Phone 6921, 6941, 6945, and 6961 Administration Guide for Cisco Unified Communications Manager 8.6 (SCCP and SIP) OL-24567-01…
-
Page 166
Book Synchronizer. To verify if the synchronization worked, log in to your User Options web pages and choose Personal Address Book. The users from your Windows address book should be listed. Cisco Unified IP Phone 6921, 6941, 6945, and 6961 Administration Guide for Cisco Unified Communications Manager 8.6 (SCCP and SIP) OL-24567-01… -
Page 167: Appendix
Cisco Unified IP Phone 6921, 6941, 6945, and 6961 Administration Guide for Cisco Unified Communications Manager 8.6 (SCCP and SIP) OL-24567-01…
-
Page 168
Appendix Support for International Call Logging Cisco Unified IP Phone 6921, 6941, 6945, and 6961 Administration Guide for Cisco Unified Communications Manager 8.6 (SCCP and SIP) OL-24567-01… -
Page 169: Appendix
As supported by the Ethernet Specification, it is assumed that the maximum cable length between each Cisco Unified IP Phone and the switch is 100 meters (330 feet). Cisco Unified IP Phone 6921, 6941, 6945, and 6961 Administration Guide for Cisco Unified Communications Manager 8.6 (SCCP and SIP) OL-24567-01…
-
Page 170: Cable Specifications
“BI” stands for bidirectional, while DA, DB, DC and Note DD stand for “Data A”, “Data B”, “Data C” and “Data D”, respectively. Cisco Unified IP Phone 6921, 6941, 6945, and 6961 Administration Guide for Cisco Unified Communications Manager 8.6 (SCCP and SIP) OL-24567-01…
-
Page 171
“BI” stands for bi-directional, while DA, DB, DC and DD stand for “Data A”, “Data B”, “Data C” and “Data D”, respectively. Cisco Unified IP Phone 6921, 6941, 6945, and 6961 Administration Guide for Cisco Unified Communications Manager 8.6 (SCCP and SIP) OL-24567-01… -
Page 172
Appendix Network and Access Port Pinouts Cisco Unified IP Phone 6921, 6941, 6945, and 6961 Administration Guide for Cisco Unified Communications Manager 8.6 (SCCP and SIP) OL-24567-01… -
Page 173: Appendix
Phone model: 6921 • Protocol: SCCP • MAC address listed on phone: 00127F576611 • Five-digit internal telephone number: 26640 • Cisco Unified IP Phone 6921, 6941, 6945, and 6961 Administration Guide for Cisco Unified Communications Manager 8.6 (SCCP and SIP) OL-24567-01…
-
Page 174: Adding A User To Cisco Unified Cm
ID after it is created. You may use the following special characters: =, +, <, >, #, ;, , , «», and blank spaces. Example: johndoe Cisco Unified IP Phone 6921, 6941, 6945, and 6961 Administration Guide for Cisco Unified Communications Manager 8.6 (SCCP and SIP) OL-24567-01…
-
Page 175: Configuring The Phone
Device Pool—Choose the device pool to which you want this phone assigned. The device pool defines sets of common characteristics for devices, such as region, date/time group, softkey template, and MLPP information. Cisco Unified IP Phone 6921, 6941, 6945, and 6961 Administration Guide for Cisco Unified Communications Manager 8.6 (SCCP and SIP) OL-24567-01…
-
Page 176
In the Extension Information pane of this window, check the Enable Extension Mobility box if this phone supports Cisco Extension Mobility. Click Save. Cisco Unified IP Phone 6921, 6941, 6945, and 6961 Administration Guide for Cisco Unified Communications Manager 8.6 (SCCP and SIP) OL-24567-01… -
Page 177
Click Save. The user is now associated with Line 1 on the phone. If your phone has a second line, configure Line 2. Cisco Unified IP Phone 6921, 6941, 6945, and 6961 Administration Guide for Cisco Unified Communications Manager 8.6 (SCCP and SIP) OL-24567-01… -
Page 178: Performing Final End User Configuration Steps
“Standard CCM End User Group.” To view all configured user groups, choose User Management > User Group. Step 4 Click Save. Cisco Unified IP Phone 6921, 6941, 6945, and 6961 Administration Guide for Cisco Unified Communications Manager 8.6 (SCCP and SIP) OL-24567-01…
-
Page 179: Appendix
Two 4-40×1/4 inch machine screws • One 6-inch Ethernet cable • One key if the bracket includes the optional lock • Cisco Unified IP Phone 6921, 6941, 6945, and 6961 Administration Guide for Cisco Unified Communications Manager 8.6 (SCCP and SIP) OL-24567-01…
-
Page 180: Before You Begin
Screw the anchor clockwise into the wall until it is seated flush. Use the included screws and a #2 Phillips-head screwdriver to attach the bracket to the wall. Cisco Unified IP Phone 6921, 6941, 6945, and 6961 Administration Guide for Cisco Unified Communications Manager 8.6 (SCCP and SIP) OL-24567-01…
-
Page 181
Screw bracket to wall using Phillips head Insert anchors into wall screws Cisco Unified IP Phone 6921, 6941, 6945, and 6961 Administration Guide for Cisco Unified Communications Manager 8.6 (SCCP and SIP) OL-24567-01… -
Page 182
Remove the handset wall hook in the handset rest, rotate the hook 180 degrees, and reinsert the hook. The hook should have a lip on which the handset catches when the phone is vertical (Figure E-4). Cisco Unified IP Phone 6921, 6941, 6945, and 6961 Administration Guide for Cisco Unified Communications Manager 8.6 (SCCP and SIP) OL-24567-01… -
Page 183
If you are using an external power supply, plug the power cord into the phone and dress the cord by clipping it into the clips incorporated into the phone body next to the 10/100 PC port (Figure E-5). Cisco Unified IP Phone 6921, 6941, 6945, and 6961 Administration Guide for Cisco Unified Communications Manager 8.6 (SCCP and SIP) OL-24567-01… -
Page 184
(Figure E-6). Step 6 Use the locking key to lock the phone to the wall bracket. Cisco Unified IP Phone 6921, 6941, 6945, and 6961 Administration Guide for Cisco Unified Communications Manager 8.6 (SCCP and SIP) OL-24567-01… -
Page 185
Appendix Installing the Bracket Figure E-6 Attaching the Phone to the Wall Bracket Cisco Unified IP Phone 6921, 6941, 6945, and 6961 Administration Guide for Cisco Unified Communications Manager 8.6 (SCCP and SIP) OL-24567-01… -
Page 186
Appendix Installing the Bracket Cisco Unified IP Phone 6921, 6941, 6945, and 6961 Administration Guide for Cisco Unified Communications Manager 8.6 (SCCP and SIP) OL-24567-01… -
Page 187: Appendix
The following figure shows the wall mount kit installed on the phone. Figure F-1 Back View of ADA Non-Lockable Wall Mount Kit Installed on Phone Cisco Unified IP Phone 6921, 6941, 6945, and 6961 Administration Guide for Cisco Unified Communications Manager 8.6 (SCCP and SIP) OL-24567-01…
-
Page 188: Components
The following figure shows the contents of the Wall Mount kit. Figure F-3 Components Screws Anchors Machine Phone bracket Wall bracket screws Ethernet cable The package includes these items: Cisco Unified IP Phone 6921, 6941, 6945, and 6961 Administration Guide for Cisco Unified Communications Manager 8.6 (SCCP and SIP) OL-24567-01…
-
Page 189: Before You Begin
Use the included screws and a #2 Phillips-head screwdriver to attach the bracket to the wall. The following figure shows the steps to mount the wall bracket. Cisco Unified IP Phone 6921, 6941, 6945, and 6961 Administration Guide for Cisco Unified Communications Manager 8.6 (SCCP and SIP) OL-24567-01…
-
Page 190
Thread the handset cord (and headset cord, if using one). Reattach the cords and seat them in the clips incorporated into the phone body. The following figure shows how to attach the phone bracket. Cisco Unified IP Phone 6921, 6941, 6945, and 6961 Administration Guide for Cisco Unified Communications Manager 8.6 (SCCP and SIP) OL-24567-01… -
Page 191
10/100 PC port. The following figure shows the cable attachment. Cisco Unified IP Phone 6921, 6941, 6945, and 6961 Administration Guide for Cisco Unified Communications Manager 8.6 (SCCP and SIP) OL-24567-01… -
Page 192: Remove Phone From Non-Lockable Wall Mount
The phone mounting plate contains two tabs to lock the plate into the wall bracket. The following figure shows the location and shape of the tabs. The following figure shows the tab location. Cisco Unified IP Phone 6921, 6941, 6945, and 6961 Administration Guide for Cisco Unified Communications Manager 8.6 (SCCP and SIP) OL-24567-01…
-
Page 193
The following figure shows how to disengage the tabs. Cisco Unified IP Phone 6921, 6941, 6945, and 6961 Administration Guide for Cisco Unified Communications Manager 8.6 (SCCP and SIP) OL-24567-01… -
Page 194
Appendix ADA Non-Lockable Wall Mount Kit for 6900 Series Figure F-8 Disengage tabs Cisco Unified IP Phone 6921, 6941, 6945, and 6961 Administration Guide for Cisco Unified Communications Manager 8.6 (SCCP and SIP) OL-24567-01… -
Page 195: Appendix
Speakerphone—Using Auto Answer Auto-pickup Supported Supported Automatic Port Supported Supported Synchronization cBarge Supported Supported Advanced Call Handling—Using a Shared Line Cisco Unified IP Phone 6921, 6941, 6945, and 6961 Administration Guide for Cisco Unified Communications Manager 8.6 (SCCP and SIP) OL-24567-01…
-
Page 196
Supported Cisco Extension Mobility Supported Supported Advanced Call Handling—Using Cisco Extension Mobility Cisco Extension Mobility Supported Supported Cross Cluster Cisco Unified IP Phone 6921, 6941, 6945, and 6961 Administration Guide for Cisco Unified Communications Manager 8.6 (SCCP and SIP) OL-24567-01… -
Page 197
Advanced Call Handling—Answering a Call Mobile Voice Access Supported Supported Multilevel Precedence and Supported Not supported Calling Features—Multilevel Precedence and Preemption (MLPP) Preemption Cisco Unified IP Phone 6921, 6941, 6945, and 6961 Administration Guide for Cisco Unified Communications Manager 8.6 (SCCP and SIP) OL-24567-01… -
Page 198
Configuring Features, Templates, Services, and Users—Setting up UCR 2008 Voice Mail Supported Supported Accessing Voice Messages section of the User Guide Cisco Unified IP Phone 6921, 6941, 6945, and 6961 Administration Guide for Cisco Unified Communications Manager 8.6 (SCCP and SIP) OL-24567-01… -
Page 199: I N D E X
2-10 Busy Lamp Field (BLF) Pickup Cisco Unified IP Phones using auto-registration Busy Lamp Field (BLF) speed dial Cisco Unified IP Phone 6921, 6941, 6945, and 6961 Administration Guide for Cisco Unified Communications Manager 8.6 (SCCP and SIP) IN-1 OL-24567-01…
-
Page 200
1-3, 1-5, 1-7 See CDP conference joining Cisco Extension Mobility Cross Cluster Service configurable call forward display 5-5, G-3 Cisco Unified IP Phone 6921, 6941, 6945, and 6961 Administration Guide for Cisco Unified Communications Manager 8.6 (SCCP and SIP) IN-2 OL-24567-01… -
Page 201
Ethernet Information web page 8-2, 8-8 Device Information web page 8-2, 8-3 extension mobility Cisco Unified IP Phone 6921, 6941, 6945, and 6961 Administration Guide for Cisco Unified Communications Manager 8.6 (SCCP and SIP) IN-3 OL-24567-01… -
Page 202
Call Back mobile connect call back mobile voice access call display restrictions monitoring and recording caller ID Cisco Unified IP Phone 6921, 6941, 6945, and 6961 Administration Guide for Cisco Unified Communications Manager 8.6 (SCCP and SIP) IN-4 OL-24567-01… -
Page 203
Cisco Unified Communications Manager G.722 configuration G.729 network requirements G.729a preparing G.729ab requirements, overview 1-23 group call pickup 5-9, G-3 Cisco Unified IP Phone 6921, 6941, 6945, and 6961 Administration Guide for Cisco Unified Communications Manager 8.6 (SCCP and SIP) IN-5 OL-24567-01… -
Page 204
DHCP Address Released MAC address 2-13 DNS Server 1-5 malicious caller identification (MCID) 5-11, G-3 IP Address 4-7, 4-9 Cisco Unified IP Phone 6921, 6941, 6945, and 6961 Administration Guide for Cisco Unified Communications Manager 8.6 (SCCP and SIP) IN-6 OL-24567-01… -
Page 205
7-6, 8-8 outage Network Statistics screen Network web page power reduction 8-2, 8-8 power over Ethernet Cisco Unified IP Phone 6921, 6941, 6945, and 6961 Administration Guide for Cisco Unified Communications Manager 8.6 (SCCP and SIP) IN-7 OL-24567-01… -
Page 206
9-12 services Cisco Unified IP phone 9-12 configuring for users 5-23 continuously description 5-15 intentionally protocol support Cisco Unified IP Phone 6921, 6941, 6945, and 6961 Administration Guide for Cisco Unified Communications Manager 8.6 (SCCP and SIP) IN-8 OL-24567-01… -
Page 207
Stream 1 web page 8-3, 8-10 conference streaming statistics 8-10 configurable call forward display Subnet Mask directed call park Cisco Unified IP Phone 6921, 6941, 6945, and 6961 Administration Guide for Cisco Unified Communications Manager 8.6 (SCCP and SIP) IN-9 OL-24567-01… -
Page 208
TFTP settings ssh access 5-16 VLAN configuration Time-of-Day Routing 5-16 transfer 5-16 transfer-direct transfer 5-16 voice messaging system 5-17 Cisco Unified IP Phone 6921, 6941, 6945, and 6961 Administration Guide for Cisco Unified Communications Manager 8.6 (SCCP and SIP) IN-10 OL-24567-01… -
Page 209
5-17 voice messaging system, accessing voice VLAN volume button, description of 1-3, 1-6, 1-8 Cisco Unified IP Phone 6921, 6941, 6945, and 6961 Administration Guide for Cisco Unified Communications Manager 8.6 (SCCP and SIP) IN-11 OL-24567-01… -
Page 210
Index Cisco Unified IP Phone 6921, 6941, 6945, and 6961 Administration Guide for Cisco Unified Communications Manager 8.6 (SCCP and SIP) IN-12 OL-24567-01…
Настройка шаблона маршрутизации SIP
Процедура
Шаг 1
Войдите на сайт http://ccm-server/, где ccm-server – это полное доменное имя или IP-адрес сервера
Cisco Unified Communications Manager.
Шаг 2
Выберите Cisco Unified CM Administration.
Шаг 3
Нажмите Маршрутизация вызова > Шаблон маршрутов SIP.
Шаг 4
Нажмите кнопку Добавить.
Шаг 5
Настройте приведенные ниже поля.
• Раздел маршрутов – выберите раздел маршрутов, который входит в область поиска для
вызовов, настроенную для параметра «Повторная маршрутизация области поиска для
вызовов» в разделе «Настройка магистрали SIP для точки приложений» выше. Если для
этого параметра установлено значение < Нет >, для параметра повторной маршрутизации
области поиска для вызовов, настроенной для магистрали SIP для точки приложений,
должно быть установлено значение < Нет >. Дополнительные сведения см. в разделе
«Конфигурация области поиска для вызовов» в Руководстве по администрированию Cisco
Unified Communications Manager или в разделе «Разделы и области поиска дл вызовов» в
Руководстве к системе Cisco Unified Communications Manager.
• Использование шаблона – выберите Маршрутизация IP-адреса.
• Шаблон IPv4 – введите IP-адрес точки приложений. Чтобы узнать IP-адрес, см. таблицу
«Конфигурация SIP» на странице «Аудио сайта администрирования».
• Маршрутизация SIP – выберите ранее настроенную магистраль SIP для точки приложений
из раскрывающегося меню.
Не изменяйте другие поля на этой странице. Оставьте значения по умолчанию.
Примечание
Шаг 6
Нажмите Сохранить.
Совместимость функций CUCM и поддержка
В таблицах ниже представлена информация о совместимости функций поддерживаемых
версий CUCM.
Совместимость функций CUCM
Cisco WebEx Meetings Server поддерживает CUCM версий 7.1, 8.6, 9.0 и 9.1.
В таблице ниже представлена информация о совместимости функций поддерживаемых версий
CUCM. Емкость системы Cisco WebEx Meetings Server не зависит от выбора конфигурации.
Руководство по планированию сервера Cisco WebEx Meetings Server, выпуск 1.1
97
Настройка Cisco Unified Communications Manager (CUCM)
Настройка шаблона маршрутизации SIP
Время на прочтение
5 мин
Количество просмотров 143K
Совсем недавно на нашу организацию вышел клиент, который попросил настроить IP-AТС на основе платформы Cisco 2921 и софта Cisco CallManager Express (CME). Клиентами разбрасываться не прилично в наше время, посему решили данную услугу оказать.
Взялся я за это дело не столько с целью срубить бабла для компании, сколько с целью ознакомиться как у этой самой Cisco устроена Ip-телефония, с целью саморазвития то бишь.
Ознакомился. Тема приятная; для меня как для цискаря работать гораздо удобнее нежели чем с Asterisk.
Писать про возможности CME можно много. Сегодня расскажу про самые его основы.
Попробуем решить простую задачу: есть пара телефонов — один работает по SIP, другой по SCCP, надо заставить их звонить друг на друга. Как это сделать — под катом.
Первоначальная настройка CME
Нулевым пунктом считается настройка dhcp-сервера на маршрутизаторе, так как практически все телефоны по умолчанию настроены на получение IP-адреса именно таким способом. Если кто-то подзабыл или не знал, то на Цисках это делается так:
CME#conf t

CME#(config)ip dhcp pool voicepool

CME#(config-ip-dhcp)network 192.168.101.0 255.255.255.0

CME#(config-ip-dhcp)default-router 192.168.101.1

CME#(config-ip-dhcp)option 150 ip 192.168.101.1

CME#(config-ip-dhcp)lease 0 0 30
Все настройки вроде бы очевидны. За исключением, наверное 150-ой опции. Данная опция передаёт в DHCP-настройках адрес tftp-сервера (про использование tftp-сервера в этой статье я писать не буду, но вещь это очень полезная для работы с телефонами)
По умолчанию, Cisco очень хорошо и с пониманием относится к работе протокола SCCP (в силу того, что данный протокол принадлежит самой Cisco), и не очень дружит с более распространным SIP-ом. Так, например чтобы просто разрешить звонки между SIP-телефонами, подключенными к нашей АТС необходимо сконфигурировать:
CME#conf t

CME#(config)voice service voip

CME#(config-voice)allow-connections sip to sip
Далее конфигурируем срок регистрации SIP-телефонов:
CME#conf t

CME#(config)voice service voip

CME#(config-voice)sip

CME#(config-voice-sip)registrar server expires max 3600 min 3600
Теперь необходимо создать т.н. класс кодеков — набор кодеков, которые планируется использовать:
CME#conf t

CME#(config)voice class codec 1

CME#(config-voice)codec preference 1 g711alaw

CME#(config-voice)codec preference 2 g711ulaw

CME#(config-voice)codec preference 3 g729br8
Первым будет сделана попытка использовть кодек 711alaw, если не удастся, то g711ulaw, ну и дальше интуитивно понятно.
Этих настроек будет достаточно.
Настройка для работы c SCCP
Все настройки касающиеся работы протокола SCCP происходят в разделе telephony-service. Вот необходимый нам минимум:
CME#conf t

CME#(config)telephony-service

CME#(config-telephony)max-ephones 10

CME#(config-telephony)max-dn 10

CME#(config-telephony)ip source-address 192.168.101.1 port 2000
ephone — это такая штука, которая, упрощённо говоря, символизирует собой телефон, ну то есть образ телефонного апарата в понятии CME. Параметр max-ephones отвечает, соответственно за то, какое количество SCCP-телефонов может быть зарегистрировано на данной АТС.
dn — (directory number) это такая штука, которая, упрощённо говоря, символизирует собой телефонный номер. По аналогии ясно, за что отвечает параметр max-dn.
К слову сказать, не очень правильно указывать слишком большое количество ephone и dn, ибо под каждый из этих «юнитов» CME будет выделять оперативную память при инициализации.
Плюс ко всему количество поддерживаемых ephone и dn зависит от модели платформы и версии софта.
ip source-address задаёт IP-адрес (и как следствие интерфейс) и порт, на котором будут слушаться запросы от SCCP-телефонов
Настройка CME для работы с SIP-телефонами
Все настройки касающиеся работы протокола SIP происходят в разделе voice register global. Вот необходимый нам минимум:
CME#conf t

CME#(config)voice register global

CME#(config-voice)mode cme

CME#(config-voice)source-address 192.168.101.1 port 5060

CME#(config-voice)max-dn 50

CME#(config-voice)max-pool 36
Два отличия. Первое — необходимо выполнить команду mode cme, которая как бы намекает роутеру что отныне с SIP-телефонами будет работать CME (это к тому, что с протоколом SIP у Cisco работает не только описываемый нами софт). Второе — теперь вместо ephon-ов мы будем оперировать voice-pool-ами
Регистрируем телефоны
Можно приступать к настройке нумерации и параметров регистрации телефонов.
Технология в обоих протоколах одинакова и достаточно проста — сначала создаётся dn, потом создаётся «телефон», и к телефону привязывается его номер (или несколько).
В нашем примере для авторизации телефонных аппаратов на сервере мы будем использовать их MAC-адреса. Это логично, так как на практике за определённым человеком закрепляется один и тот же телефонный аппарат и телефонный номер, а человек обычно редко перемещает своё рабочее место в офисе, а если и перемещает, то и телефончик с собой переносит.
Регистрируем SCCP-телефон
Создаём телефонный номер:
CME#conf t

CME#(config)ephone-dn 1

CME#(config-ephone-dn)number 100

CME#(config-ephone-dn)description Beauty-User

CME#(config-ephone-dn)name The Real Man
Создали телефонный номер 100, описание внутри CME — «Beauty-User», отображаемое на телефоне имя будет «The Real Man»
Создаём образ телефоного аппарата. привязываем его к MAC-адресу реального аппарата, привязываем к нему номер:
CME#conf t

CME#(config)ephone 1

CME#(config-ephone)mac-address B4A4.E328.BDEC

CME#(config-ephone)button 1:1
Привязывание телефонного аппарата (а точнее телефонной линии нашего аппарата) происходи командой button 1:1. Формат следующий — сначала набираем ключевое слово «button», потом указываем номер этой «кнопки» (первый в нашем примере), потом указываем действие, которое требуется совершить («:» — двоеточие означает, что сейчас мы привяжем к выбранной линии какой-нибудь телефонный номер) и потом параметр соответствующий действию — в нашем случае указываем телефонный номер (то есть номер настроенного заранее dn).
Вы же наверняка видели в жизнина картинках цискофон? Видели там много всяких кнопок возле экранчика? Это и есть те самые button-ы. На самом деле, каждая из этих кнопок отвечает за свою линию. А действий над ними можно совершать много (не только привязывать к какому нибудь номеру). Но это достойно отдельной статьи.
А тем временем мы можем смело включать телефон с указанным МАК-адресом в сеть, подождать пока он прогрузится, увидеть на его экранчике возле первой кнопки номер 100 и заветное имя — «The Real Man». Если мы подымем трубку, то услышым заветный зуммер
Регистрируем SIP-телефон
directory number создаётся следующим образом:
CME#conf t

CME#(config)voice register dn 1

CME#(config-voice-register-dn)number 200
Думаю, всё понятно. Описываем далее параметры для телефона:
CME#conf t

CME#(config)voice register pool 1

CME#(config-voice-register-pool)id mac 1CDF.0F4A.152E

CME#(config-voice-register-pool)number 1 dn 1

CME#(config-voice-register-pool)voice-class codec 1

CME#(config-voice-register-pool)username test password test
Привязка к первой линии первого номера происходит командой number 1 dn 1.
Командой voice-class codec 1 определяем для телефона набор допустимых кодеков (этот набор мы описывали в начале самом).
Далее командой usernamepassword задаём аутентифкационные данные.
Чтобы телефон зарегистрировался, необходимо зайти на его веб-морду и в настройках первой линии указать адрес сервера — 192.168.101.1 и аутентификационные данные. Сохраняем.
Перезагружаем.
…
PROFIT!
IP-адрес телефона можно узнать по информации из dhcp-пула по маку используя команду show ip dhcp binding, либо в настройках самого телефона — голосовое, либо визуально меню.
Вроде бы всё. Были описаны минимальные настройки CME чтобы на нём могли зарегистрироваться два телефона (SIP и SCCP), получив адрес через DHCP.
Источники знаний
Основной источник знаний для начала был видео-курс к CCNA Voice от Jeremy Cioara. Довольно живым языком (английским правда) рассказывается об IP-телефонии вообще и о нюансах настройки этого самого CME. Правда там ни словом не затрагивается настройка SIP-телефонов.
Очень хороший мануал, конечно, есть на cisco.com. Называется он Cisco Unified Communications Manager Express System Administration Guide. Доступен тут. Там же есть ссылка для скачивания в PDF.
В дальнейшем постараюсь рассказывать о разных нюансах настройки IP-телефонии на Cisco в общем, и о CME в частности — настройка tftp сервера для заливания прошивок на телефоны, подключение линий от ТфОП, специфика установки CME и прочие фичи.