Скачиваем образ загрузочного диска Clonezilla с официального сайта или если сомневаетесь в том, какой именно вариант выбрать, то напрямую отсюда.
Записываем этот образ на компакт-диск или создаем загрузочную флешку.
Создание образа раздела или всего жесткого диска целиком.
Загружаемся с только что созданного компакт-диска или флешки.

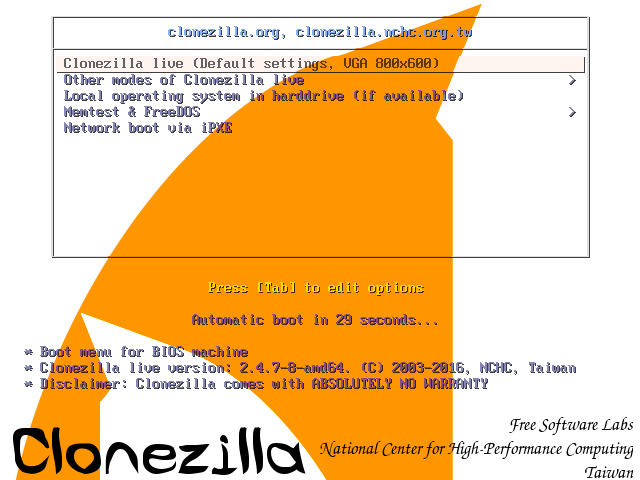
Жмем Enter или ждем полминуты.

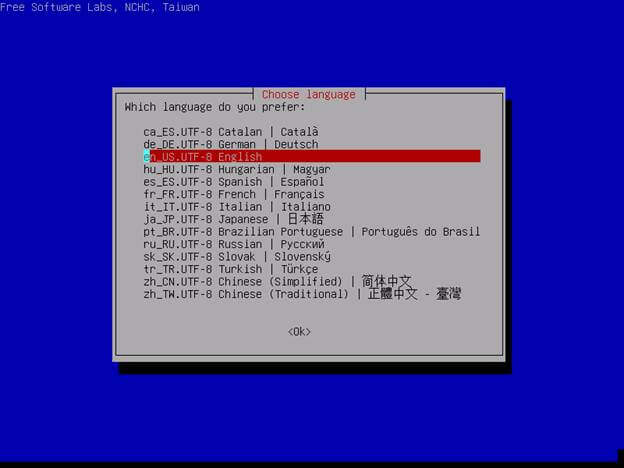
Лучше нажать Enter, т.к. при выборе русского часто отображаются кракозябры.

Enter

Enter

В данном случае мы хотим сделать образ раздела или диска, поэтому жмем Enter

Т.к. мы работаем с локальными, а не сетевыми устройствами, то жмем Enter

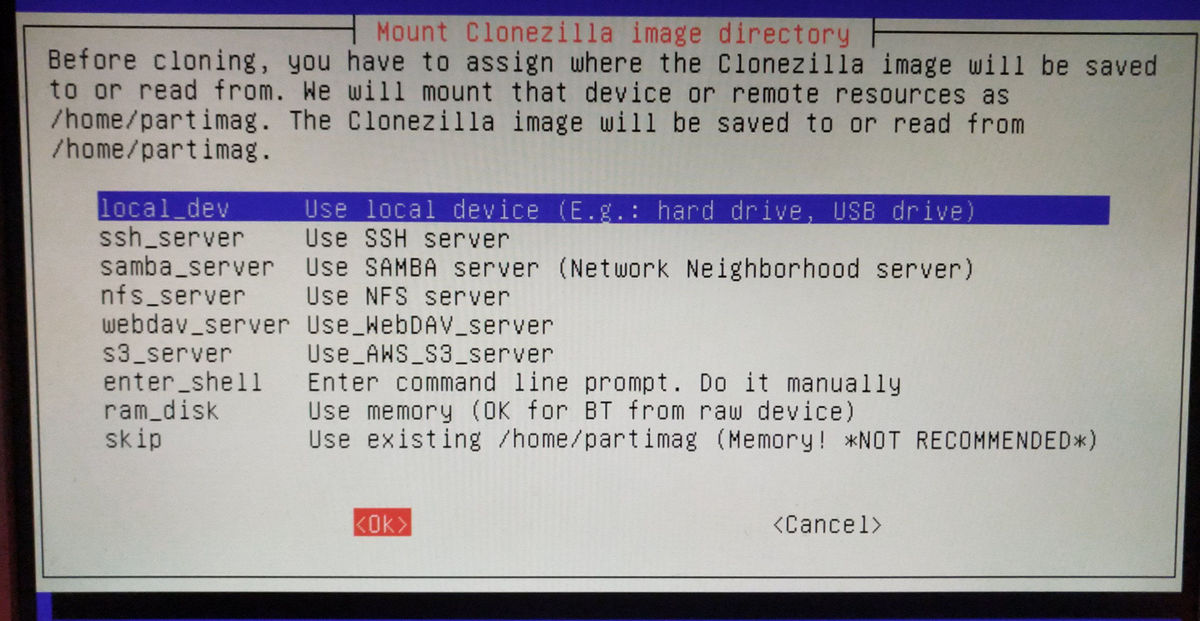
Тут написано, что если Вы хотите сохранить образ на USB-устройство, то подключите его, подождите около 5 секунд и нажмите Enter, если же нет, то нажмите Enter прямо сейчас.

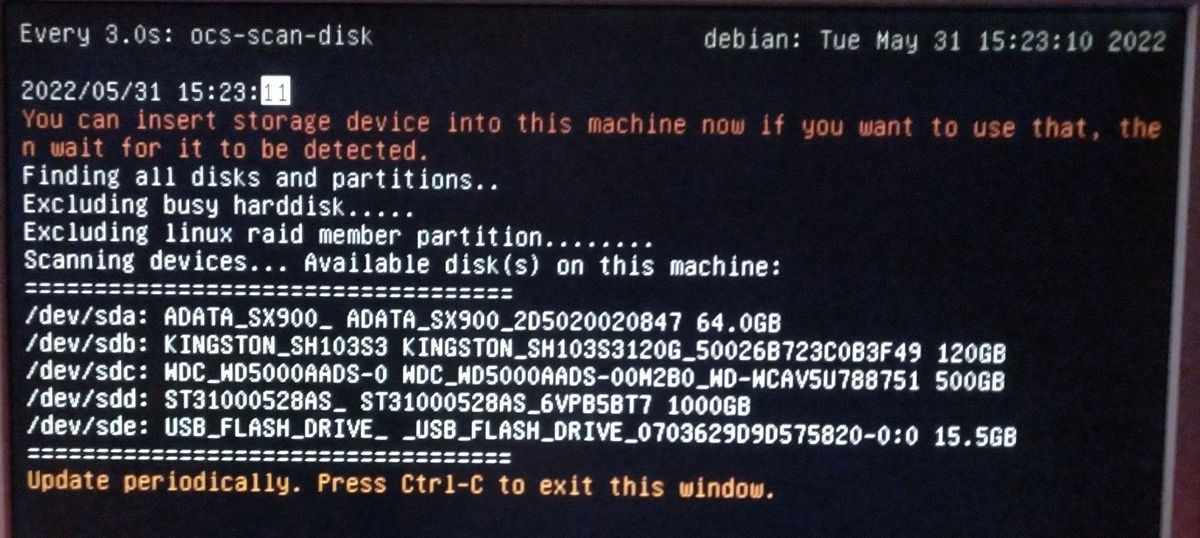
Вы все еще можете успеть подключить USB-устройство, на которое планируете сохранить образ. После того, как подключите USB-устройство, дождитесь, пока оно не появится в списке, после чего жмите Ctrl+C, если же Вы ничего не планируете подключать, то жмите Ctrl+C сразу.

Здесь нам предлагают выбрать раздел, на который будет сохранен образ раздела или диска. Стрелками вверх-вниз выбираем нужный раздел, после чего жмем Enter

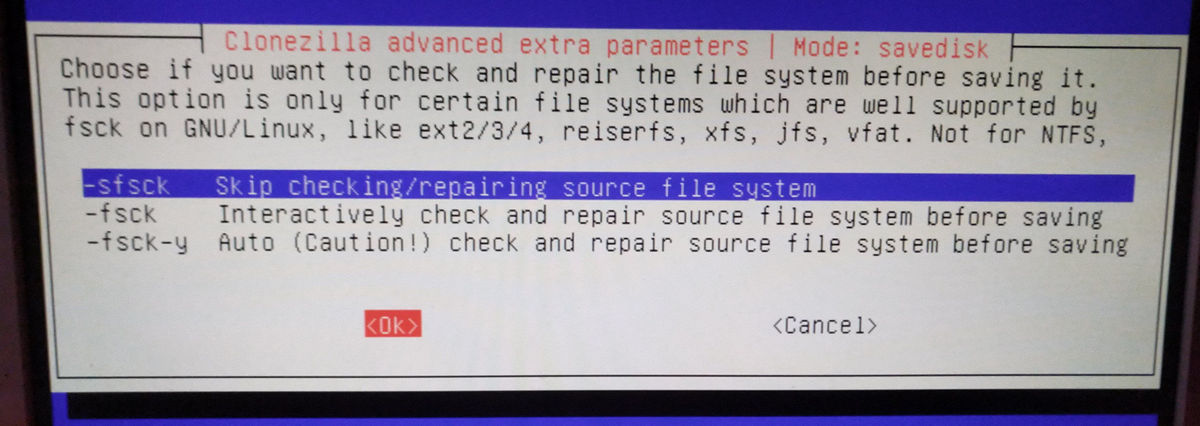
Здесь спрашивают, будем ли мы проверять файловую систему, на которую хотим сохранить образ. Я обычно пропускаю, поэтому жмем Enter

Здесь нам предлагают выбрать папку (директорию), в которую будет сохранен образ. Я рекомендую сохранять образ в корень диска, при необходимости его потом можно будет переместить в любую папку. Поэтому два раза жмем на Tab, чтобы выбрать пункт Done и жмем Enter

В данном окне нам сообщают, сколько места осталось на выбранном разделе. Жмем Enter

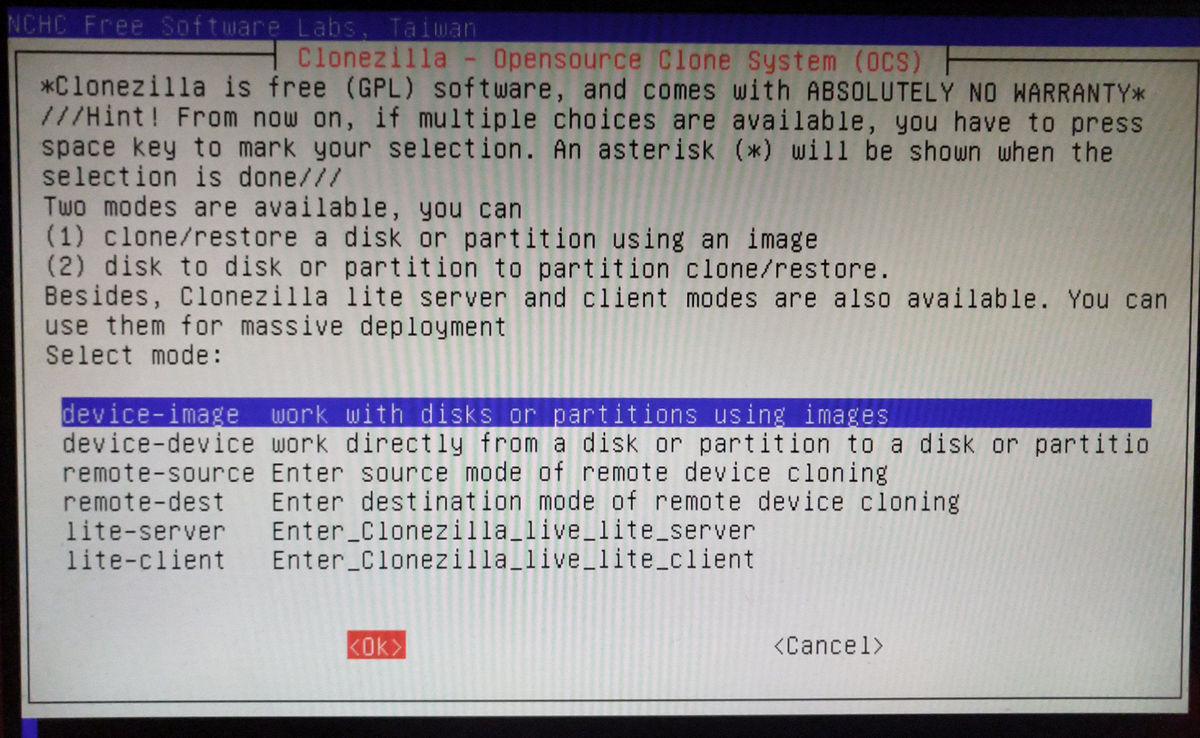
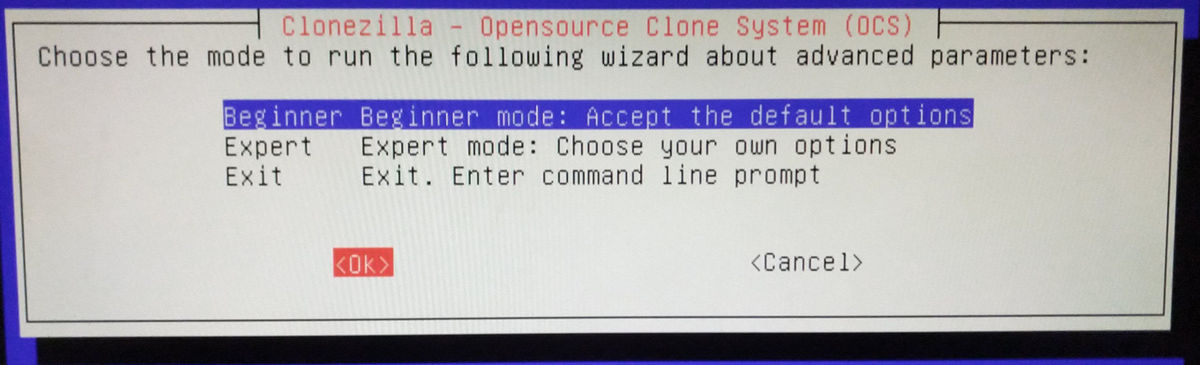
Выбираем режим работы Clonezilla. Если Вы читаете эту инструкцию, то однозначно Ваш уровень — Beginner, соответственно жмем Enter

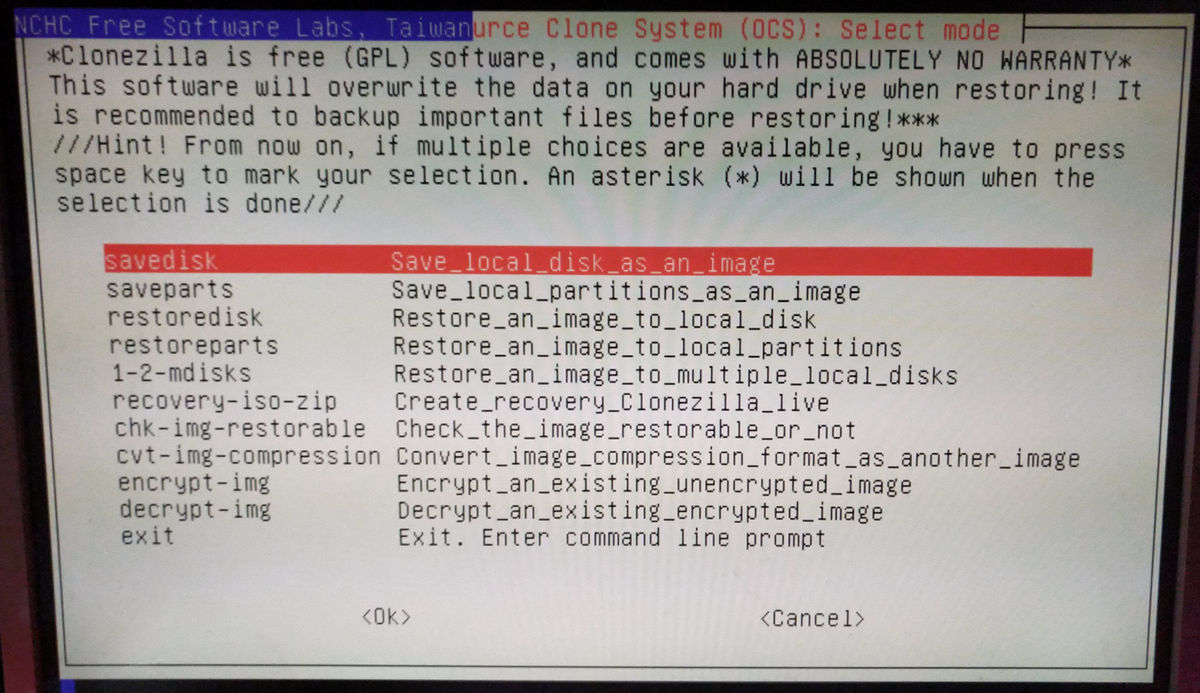
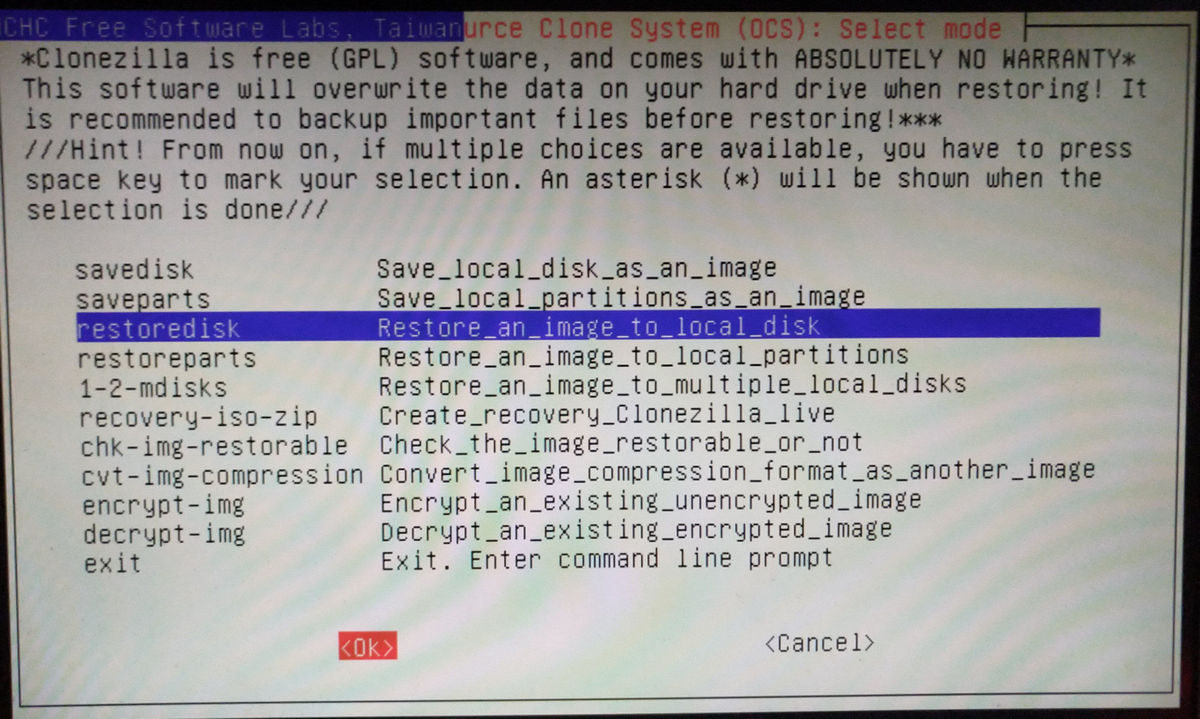
Здесь мы выбираем действие, которое хотим совершить:
savedisk — сохранить весь диск целиком;
saveparts — сохранить раздел;
restoredisk — восстановить диск из образа;
restoreparts — восстановить раздел из образа.
Далее углубляться в рамках данной статьи мы не будем. Пока нас интересует сохранение диска или раздела, поэтому выбираем первый или второй пункт соответственно и жмем Enter

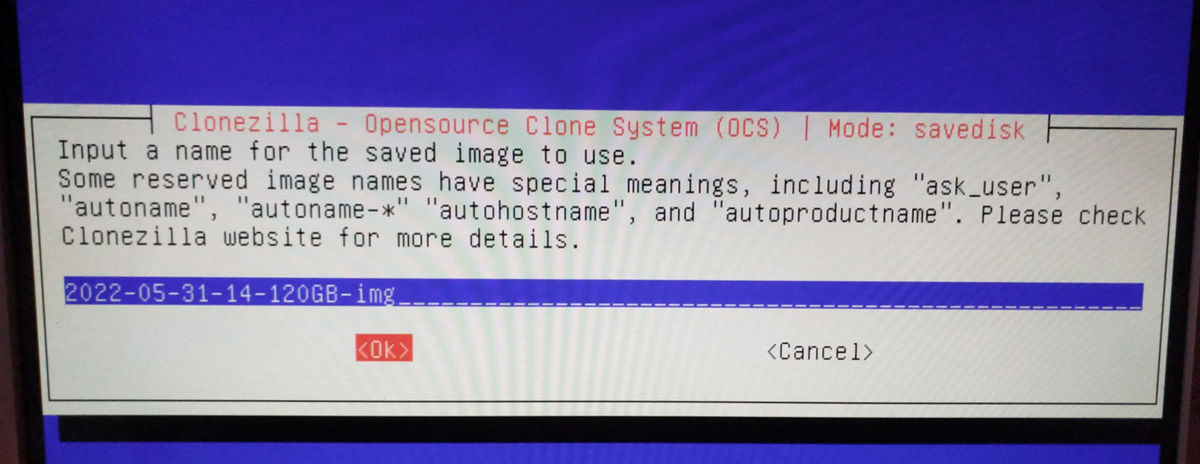
Теперь необходимо ввести название образа, но можно оставить и так, как есть, поэтому просто жмем Enter

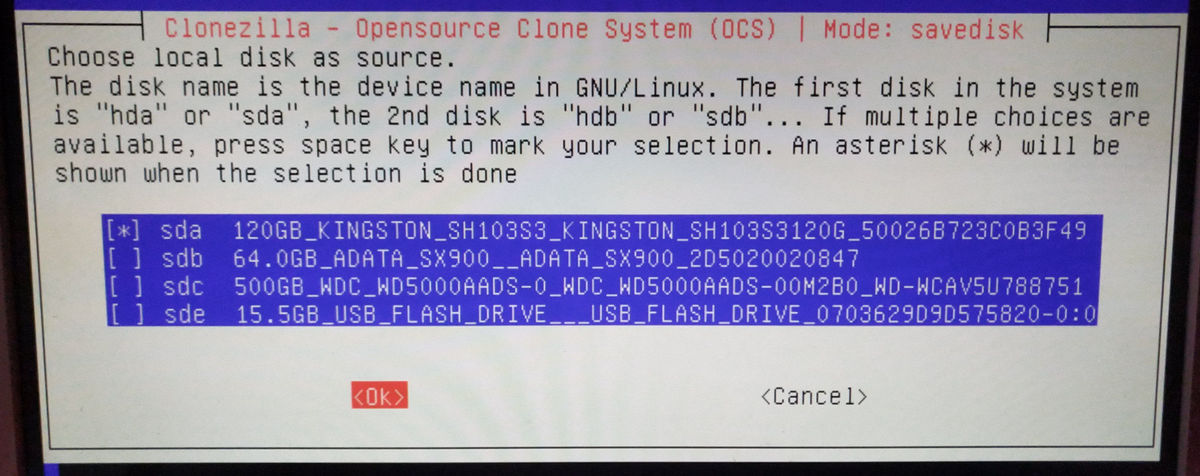
Здесь необходимо выбрать образ какого диска или раздела мы хотим создать. Как правило первый раздел, это загрузочный раздел Windows объемом от 100 до 500 МБ и он нам мало интересен, поэтому жмем кнопку вниз, потом жмем пробел, чтоб поставить звездочку напротив интересующего нас раздела. И снова Enter
Здесь спрашивают, будем ли мы проверять файловую систему, образ которой хотим создать. Если мы создаем образ Windows, то файловую систему лучше не проверять, поэтому жмем Enter

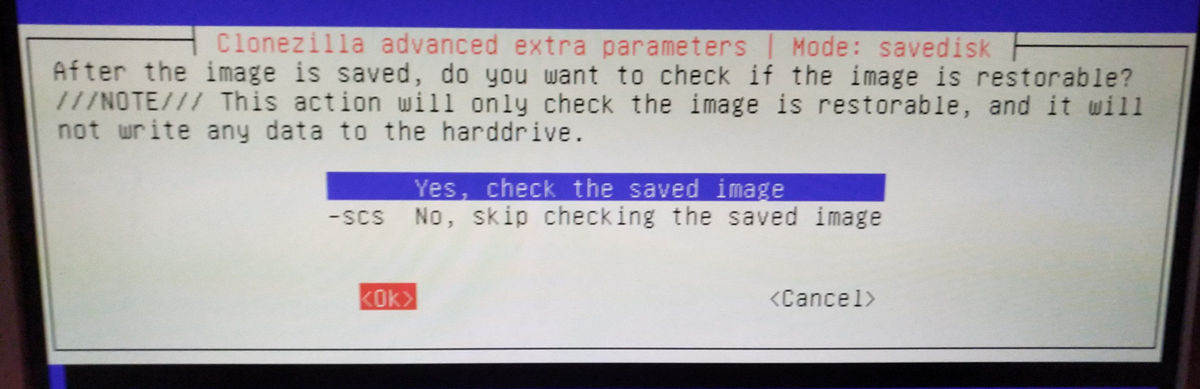
Теперь необходимо определиться, будем ли мы проверять созданный образ. Если Вы сильно торопитесь, то выберите второй пункт, но я все же рекомендовал бы оставить выбранным первый пункт, поэтому просто жмем Enter

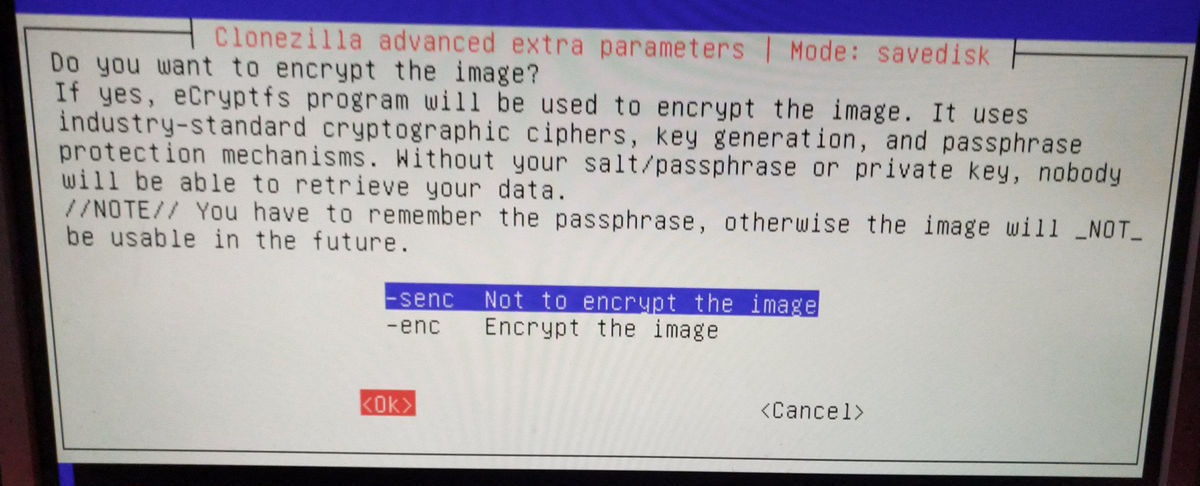
В данном пункте возникает вопрос — будем ли мы шифровать создаваемый образ. Если на диске или разделе, образ которого мы создаем нет никаких секретных данных, то лучше образ не шифровать, поэтому сразу жмем Enter

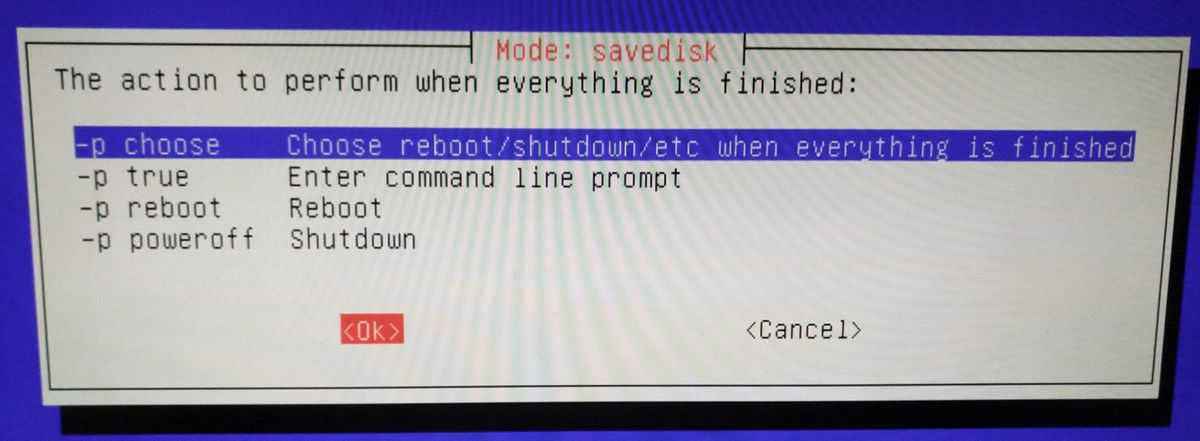
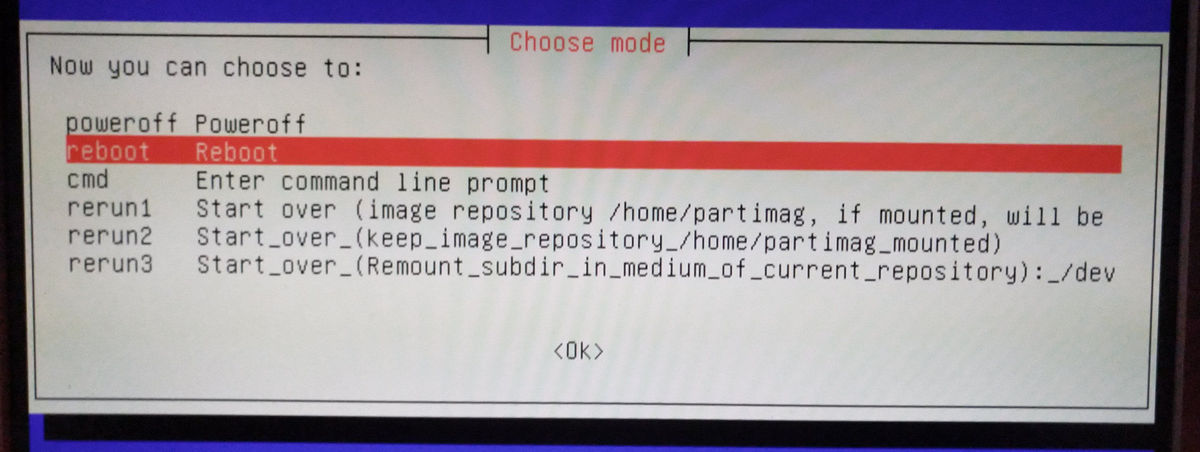
Выбираем, что необходимо сделать после создания образа:
1) отложить решение данного вопроса до окончания создания образа;
2) войти в режим командной строки;
3) перезагрузить компьютер;
4) выключить компьютер.
Лично мне больше нравится последний вариант, поэтому выбираем его и жмем Enter

Enter

Жмем Y (в английской раскладке), после чего — Enter

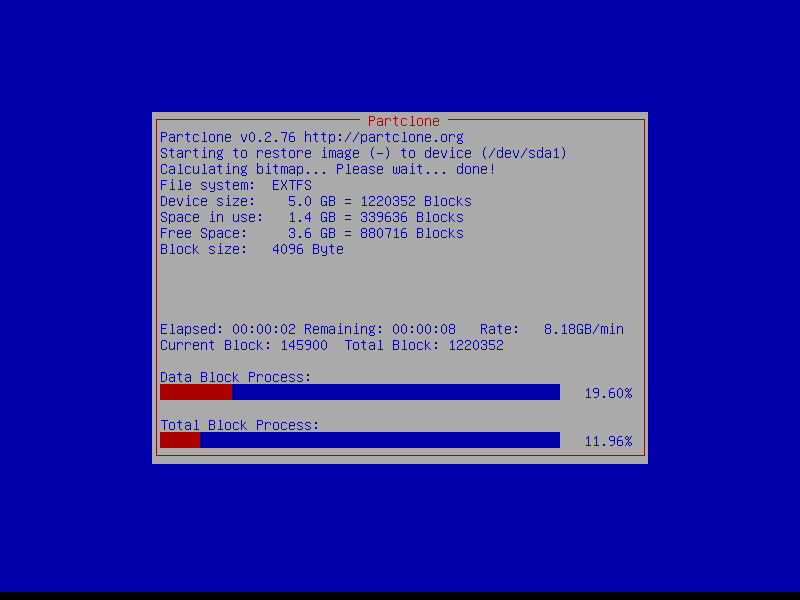
Теперь мы наблюдаем вот такое окно на протяжении нескольких минут или часов — всё зависит от объема раздела и скорости жесткого диска.
Если Вы загружались с флешки, то по завершении этой операции компьютер выключится, если с оптического носителя, то появится вот такой экран:

На этом этапе привод выплюнет диск. Вытаскиваем диск и жмем Enter. Компьютер выключится.
Всё, создание образа раздела или жесткого диска завершено.
Восстановление раздела или диска из ранее созданного образа.
Загружаемся с ранее созданного компакт-диска или флешки.
Жмем Enter или ждем полминуты.
Лучше нажать Enter, т.к. при выборе русского часто отображаются кракозябры.
Enter
Enter
В данном случае мы хотим восстановить раздел или диск из ранее созданного образа, поэтому жмем Enter
Т.к. мы работаем с локальными, а не сетевыми устройствами, то жмем Enter
Тут написано, что если Вы хотите восстановить образ с USB-устройства, то подключите его, подождите около 5 секунд и нажмите Enter, если же нет, то нажмите Enter прямо сейчас.
Вы все еще можете успеть подключить USB-устройство, с которого планируете восстановить образ. После того, как подключите USB-устройство, дождитесь, пока оно не появится в списке, после чего жмите Ctrl+C, если же Вы ничего не планируете подключать, то жмите Ctrl+C сразу.
Здесь нам предлагают выбрать раздел, на котором хранится ранее созданный образ раздела или диска. Стрелками вверх-вниз выбираем нужный раздел, после чего жмем Enter
Здесь спрашивают, будем ли мы проверять файловую систему, с которой будем восстанавливать образ. Я обычно пропускаю, поэтому жмем Enter

Здесь нам предлагают выбрать директорию, в которой хранится образ, созданный ранее. Если вы не вводили свое имя при создании образа, то по умолчанию имя образа имеет вид 2018-04-02-21-img, где 2018 — год создания образа, 04 — месяц, 02 — день, 21 — час. Если в данной директории мы видим наш образ, то нажимаем Tab пока надпись Done не станет красной, затем жмем Enter

Enter

Выбираем режим работы Clonezilla. Если Вы читаете это описание, то однозначно Ваш уровень — Beginner, соответственно жмем Enter

Здесь мы выбираем действие, которое хотим совершить:
savedisk — сохранить весь диск целиком;
saveparts — сохранить раздел;
restoredisk — восстановить диск из образа;
restoreparts — восстановить раздел из образа.
Далее углубляться в рамках данной статьи мы не будем. Пока нас интересует восстановление диска или раздела, поэтому выбираем третий или четвертый пункт соответственно и жмем Enter

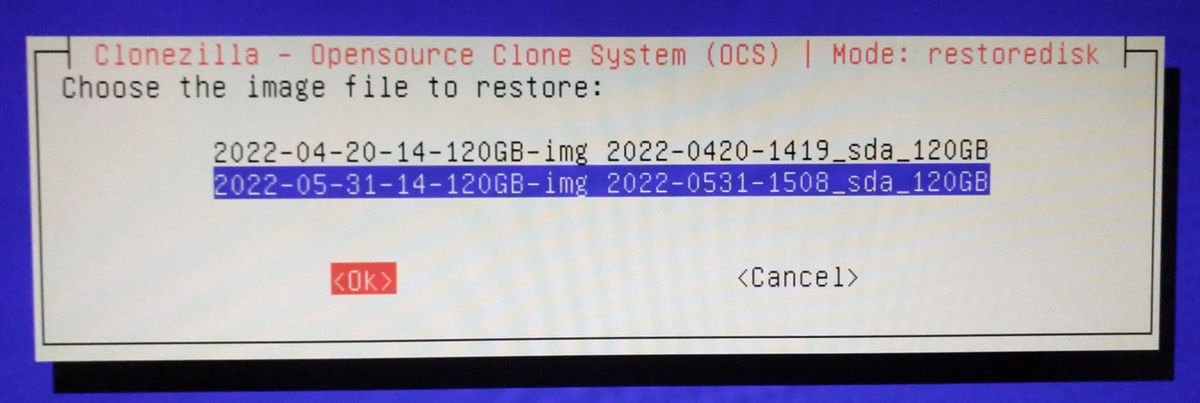
Здесь нас просят выбрать образ, из которого будем восстанавливать диск или раздел. Стрелками вверх и вниз выбираем нужный образ и жмем Enter

Enter

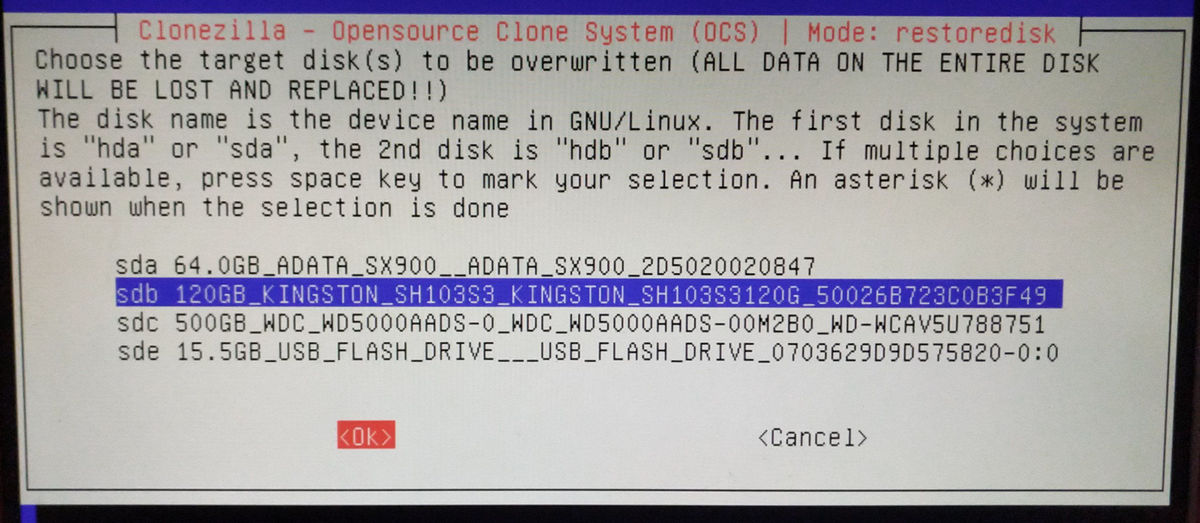
Выбираем раздел, на который будем восстанавливать образ. Как правило это второй раздел, а первый раздел объемом всего от 100 до 500 МБ — загрузочный раздел Windows. Жмем Enter

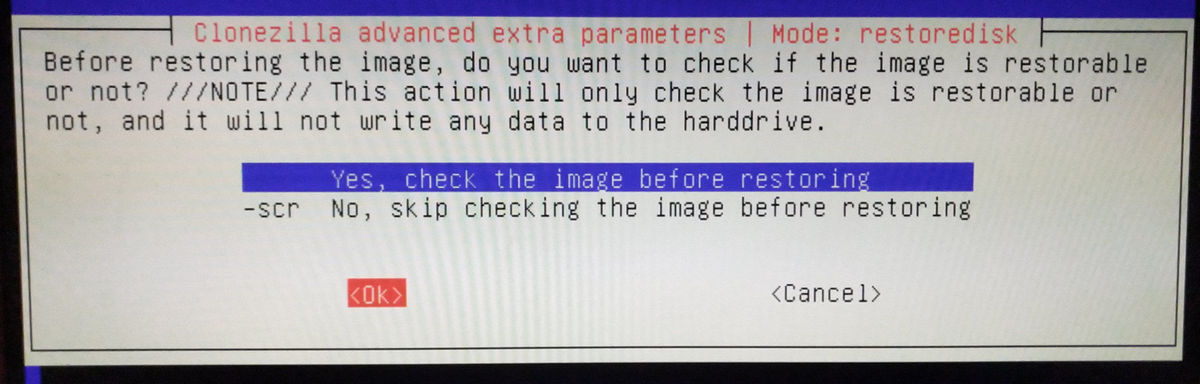
Здесь нас спрашивают, будем ли мы проверять образ, перед тем, как восстанавливать его на раздел или диск. Первый пункт — проверять, второй, соответственно — не проверять. На мой взгляд, лучше все же проверить. Поэтому оставляем выделенным первый пункт и жмем Enter

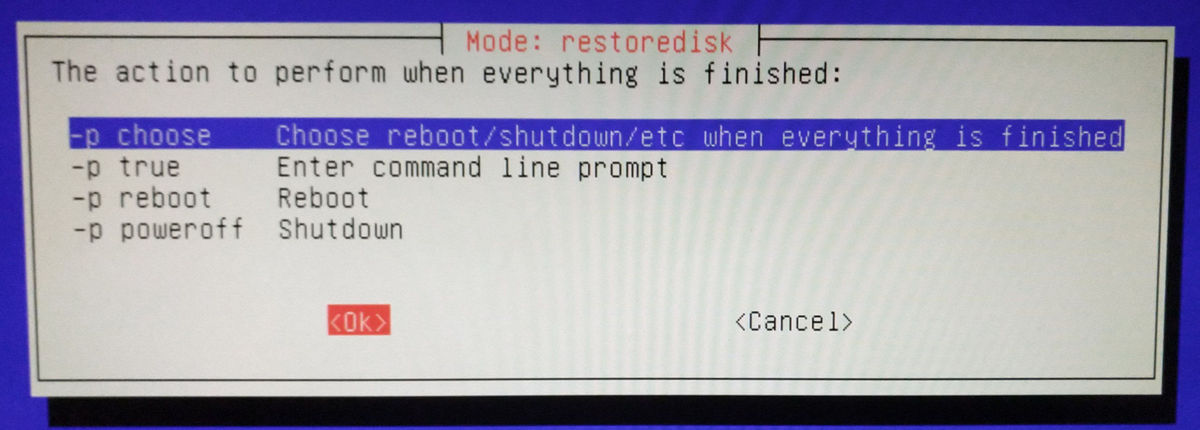
Выбираем, что необходимо сделать после восстановления из образа:
1) отложить решение данного вопроса до окончания восстановления из образа;
2) войти в режим командной строки;
3) перезагрузить компьютер;
4) выключить компьютер.
Лично мне больше нравится последний вариант, поэтому выбираем его и жмем Enter.

Enter

Ждем несколько минут или часов, пока не завершится проверка целостности образа.

Y в английской раскладке, затем Enter

Y в английской раскладке, затем Enter

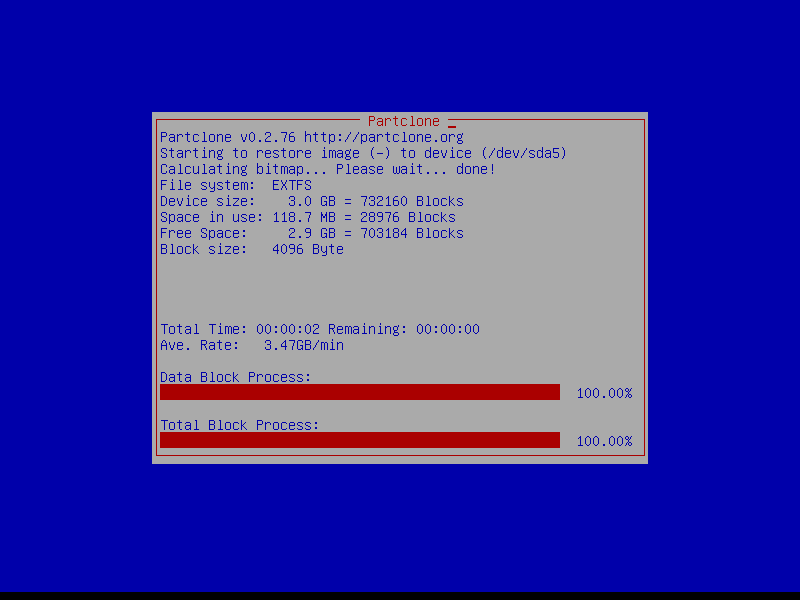
Теперь ждем, пока не завершится процесс восстановления.
Если Вы загружались с флешки, то по завершении этой операции компьютер выключится, если с оптического носителя, то появится вот такой экран:

На этом этапе привод выплюнет диск. Вытаскиваем диск и жмем Enter. Компьютер выключится. Процесс восстановления завершен.
Возможные проблемы и способы их решения.
При попытке сделать образ раздела выскочило сообщение об ошибке:
this disk contains mismatched GPT and MBR partition: /dev/sda
В таком случае надо перейти в режим командной строки и выполнить две команды
sgdisk -z /dev/sda
затем
reboot
После чего компьютер перезагрузится и можно будет успешно создать образ.
При попытке создать образ Windows 8 или Windows 10 может возникнуть ошибка
The image repository directory is read-only, not writable: /home/partimag
Проблема возникает из-за того, что когда мы выключаем компьютер с Windows 8 или Windows 10 обычным способом, то он не выключается, как положено, а переходит в режим так называемой «быстрой загрузки», а для того, чтобы выключить компьютер с Windows 8 или Windows 10 как положено, необходимо удерживать клавишу Shift, во время нажатия на кнопку «Завершить работу».
Продолжение следует… Может быть )
Clonezilla Live on USB flash drive or USB hard drive
Nowadays the PC or laptop mostly comes without CD/DVD drive. In this case, an USB flash drive or USB hard drive is the best way to boot Clonezilla live. You can follow the following to make a bootable Clonezilla live USB flash drive or hard drive using either:
- MS Windows
- GNU/Linux
- MacOS
Requirements:
- Microsoft Windows 7/8/10, GNU/Linux or MacOS.
- Internet access for downloading a distribution to install, or a pre-downloaded ISO file.
- A USB flash drive or USB hard drive has the MBR (msdos) partition table and a free partition. If you want to create a bootable USB flash drive/hard drive only for uEFI boot mode, it can be either GPT (recommended) or MBR (msdos) format.
USB setup with MS Windows
Depends on the boot mode for the machine you want to boot with the USB flash drive, choose one of the following methods to setup Clonezilla Live on your USB flash drive using MS Windows:
- uEFI boot mode (GPT)
- Legacy boot mode (MBR)
- Download the amd64 (x86-64) version of Clonezilla Live zip file.
-
If you already have a partition of at least 500 MB in size on your
USB flash drive formatted with a FAT (not NTFS) file system then skip to
the next step (3).
Otherwise create at least a 500 MB partition on your USB flash
drive and format it with a FAT16/FAT32 (not NTFS) file system. -
Use unzip tool, e.g.,
7-zip,
to extract all the contents of the zip file to the FAT16/FAT32
partition on your USB flash drive. Make sure you have extracted
all the directories and files, including the «.disk» dir and the
files under it. Keep the directory architecture, for example,
file «GPL» should be in the USB flash drive’s
top directory (e.g. G:GPL). - That’s all. You can boot this USB flash drive on a uEFI boot mode machine.
- MS Windows Method A: Manual
- MS Windows Method B: Rufus USB Creator
- MS Windows Method C: Unetbootin
- MS Windows Method D: LinuxLive USB Creator
- Download the Clonezilla Live zip file.
-
If you already have a partition of at least 500 MB in size on your
USB flash drive formatted with a FAT or NTFS file system then skip to the
next step (3).
Otherwise create at least a 500 MB partition on your USB flash
drive and format it with a FAT16/FAT32 or NTFS file system. -
Extract all the contents of the zip file to the FAT16/FAT32 or NTFS
partition on your USB flash drive. Keep the directory
architecture, for example, file «GPL» should be in the USB
flash drive’s top directory (e.g. G:GPL). -
Browse to your USB flash drive and as an administrator,
(On the USB flash key, create a shortcut to the makeboot.bat file.
Then right-clic on the shortcut, Properties, Advanced and check
«Run as administrator».), click the makeboot.bat in the dir utilswin32
(for 32-bit Windows) or makeboot64.bat in the dir utilswin64 (for 64-bit Windows).
WARNING!
Makeboot.bat must be run from your USB flash drive.
If you are an experienced user, open a command prompt as Administrator,
navigate to the root of the USB flash key and enter utilswin32makeboot
or utilswin64makeboot, depending on the flavor of Windows you are running. -
Follow the on-screen instructions.
(PS: The above description is modified from:
http://www.pendrivelinux.com/2007/01/02/all-in-one-usb-dsl.
Thanks to PDLA from http://pendrivelinux.com) -
If you already have Rufus installed on your computer then
skip to the next step (2).
Otherwise download and
install Rufus on your MS Windows computer. - Download the Clonezilla Live iso file.
-
From MS Windows, run the Rufus program and follow the
instructions in the GUI to install Clonezilla Live on your USB flash
drive. -
If you already have Unetbootin installed on your computer then
skip to the next step (2).
Otherwise download and
install Unetbootin on your MS Windows computer. - Download the Clonezilla Live iso file.
-
From MS Windows, run the Unetbootin program and follow the
instructions in the GUI to install Clonezilla Live on your USB flash
drive.
NOTE: The boot menu created by Unetbootin is not exactly
the same as the boot menu created in method A. Therefore it is
recommended to use method A. -
If you already have LinuxLive USB Creator installed on your computer then
skip to the next step (2).
Otherwise download and
install LinuxLive USB Creator on your MS Windows computer. - Download the Clonezilla Live iso file.
-
From Windows, install then run the LinuxLive USB Creator program and follow the
instructions in the GUI to install Clonezilla Live on your USB flash
drive.
uEFI boot mode (GPT)
Legacy boot mode (MBR)
Choose one of the following methods to setup Clonezilla Live for legacy boot mode on your USB flash drive using MS Windows:
NOTE: If you use FAT file system in one of the above methods, the installed USB flash drive should be able to boot both on uEFI and legacy boot modes.
MS Windows Method A: Manual
WARNING!
DO NOT RUN makeboot.bat from your local hard drive!
Doing so could cause your MS windows not to boot!!!
MS Windows Method B: Rufus USB Creator
MS Windows Method C: Unetbootin
Windows Method D: LinuxLive USB Creator
USB setup with GNU/Linux
Depends on the boot mode for the machine you want to boot with the USB flash drive, choose one of the following methods to setup Clonezilla Live on your USB flash drive using GNU/Linux:
- uEFI boot mode (GPT)
- Legacy boot mode (MBR)
- Download the amd64 (x86-64) version of Clonezilla Live zip file.
-
If you already have a partition of at least 500 MB in size on your
USB flash drive formatted with a FAT (not NTFS) file system then skip to
the next step (3).
Otherwise create at least a 500 MB partition on your USB flash
drive and format it with a FAT16/FAT32 (not NTFS) file system. -
Mount the FAT16/FAT32 file system of your USB flash drive, e.g.,
assuming the FAT16/FAT32 file system of your USB flash drive is /dev/sdg1,# pmount /dev/sdg1 /media/disk/If you have no pmount, you can run «sudo apt install pmount» to install it. Then unzip the clonezilla live amd64 zip file to the FAT16/FAT32
partition on your USB flash drive, e.g.,# unzip clonezilla-live-2.7.3-21-amd64.zip -d /media/disk/Then unmount the USB flash drive, e.g.,
# pumount /media/disk/ - That’s all. You can boot this USB flash drive on a uEFI boot mode machine.
- GNU/Linux Method A: Manual
- GNU/Linux Method B: Unetbootin
- Download the Clonezilla Live zip file.
-
If you already have a FAT or NTFS partition on your USB flash
drive then skip to the next step (3).Otherwise prepare at least a 500 MB partition formatted with either a FAT16/FAT32 or NTFS file system.
If the USB flash drive or USB hard drive does not have
any partition, you can use a partitioning tool (e.g. gparted, parted, fdisk,
cfdisk or sfdisk) to create a partition with a size of 500 MB or
more.
Here we assume your USB flash drive or USB hard drive is /dev/sdd
(You have to comfirm your device name, since
it’s _NOT_ always /dev/sdd) on your GNU/Linux, so the
partition table is like:# fdisk -l /dev/sdd Disk /dev/sdd: 12.8 GB, 12884901888 bytes 15 heads, 63 sectors/track, 26630 cylinders Units = cylinders of 945 * 512 = 483840 bytes Disk identifier: 0x000c2aa7 Device Boot Start End Blocks Id System /dev/sdd1 * 1 26630 12582643+ b W95 FAT32Then format the partition as FAT with a command such as «mkfs.vfat
-F 32 /dev/sdd1»
WARNING! Executing the mkfs.vfat command
on the wrong partition or device could cause your GNU/Linux not to
boot. Be sure to confirm the command before you run it.# mkfs.vfat -F 32 /dev/sdd1 mkfs.vfat 2.11 (12 Mar 2005) -
Insert your USB flash drive or USB hard drive into the USB port on
your Linux machine and wait a few seconds. Next, run the command
«dmesg» to query the device name of the USB flash drive or USB
hard drive. Let’s say, for example, that you find it is
/dev/sdd1. In this example, we assume /dev/sdd1 has FAT
filesystem, and it is automatically mounted in dir /media/usb/. If
it’s not automatically mounted, manually mount it with commands
such as «mkdir -p /media/usb; mount /dev/sdd1 /media/usb/». -
Unzip all the files and copy them into your USB flash drive or USB
hard drive. You can do this with a command such as: «unzip
clonezilla-live-2.4.2-32-i686-pae.zip -d /media/usb/»). Keep the directory
architecture, for example, file «GPL» should be in the USB
flash drive or USB hard drive’s top directory
(e.g. /media/usb/GPL). -
To make your USB flash drive bootable, first change the working
dir, e.g. «cd /media/usb/utils/linux», then run «bash makeboot.sh
/dev/sdd1» (replace /dev/sdd1 with your USB
flash drive device name), and follow the prompts.
WARNING! Executing makeboot.sh with the
wrong device name could cause your GNU/Linux not to boot. Be sure
to confirm the command before you run it.NOTE: There is a known problem if you run makeboot.sh on Debian
Etch (4.0), since the program utils/linux/syslinux does not work
properly. Make sure you run it on newer GNU/Linux than that. - Ensure that your USB flash drive contains at least one FAT or NTFS partition.
- Ensure that the partition is marked as «bootable» in the partition table.
-
Ensure that the partition starts on a cylinder boundary.
For the first partition this is usually sector 63. -
If you already have Unetbootin installed on your computer then
skip to step 2.
Otherwise install Unetbootin on your GNU/Linux computer. - Download the Clonezilla Live iso file.
-
From GNU/Linux, run the Unetbootin program and follow the
instructions in the GUI to install Clonezilla Live on your USB flash
drive.
NOTE: The boot menu created by Unetbootin is not exactly
the same as the boot menu created in method A. Therefore it is
recommended to use method A.
uEFI boot mode (GPT)
Legacy boot mode (MBR)
Choose one of the following methods to setup Clonezilla Live on your
USB flash drive using GNU/Linux:
NOTE: If you use FAT file system in one of the above methods, the installed USB flash drive should be able to boot both on uEFI and legacy boot modes.
GNU/Linux Method A: Manual
WARNING!
Confirm you have the correct path name before executing commands!
Failure to do so could cause loss of data or your GNU/Linux not to boot!!!
/dev/sdd is a device path name
/dev/sdd1 is a partition path name
TIP:
If your USB flash drive or USB hard drive is not able to boot, check
the following:
GNU/Linux Method B: Unetbootin
USB setup with MacOS
The following method can be used to setup Clonezilla Live on your
USB flash drive using MacOS:
- MacOS Method: balenaEtcher
MacOS Method: balenaEtcher
- Download the Clonezilla Live iso file.
- Insert a USB flash drive on the Mac machine.
- Erase it using the standard Mac Disk Utility (exFAT works fine).
- Download balenaEtcher for MacOS, then follow its document to burn the image to the USB flash drive.
- Eject the USB drive.
Thanks to Hans Palm for providing this info.
![]() Download Article
Download Article
Make an exact copy of your hard drive with free open source software
![]() Download Article
Download Article
- Setting Up Clonezilla
- Cloning a Drive
- Restoring a Drive
- Video
- Tips
- Warnings
- Things You’ll Need
|
|
|
|
|
|
Clonezilla is a cross-platform, open source hard drive cloning software program. It’s used to make exact an exact copy of a bootable hard drive. In order to use this software, you will need a blank CD/DVD or a USB drive, as well as a spare internal or external hard drive.
Things You Should Know
- Make sure you have an internal or external hard drive installed before rebooting with Clonezilla.
- Select the default Clonezilla mode to begin cloning or restoring a drive.
- Use Beginner mode to complete the process unless you are highly familiar with the software already.
-

1
Download the latest, stable version of Clonezilla Live. You can get the current version of Clonezilla from its Sourceforge page.
- You can also download Clonezilla from the Clonezilla website.
-
2
Burn the ISO file onto a blank CD or DVD.[1]
The process for burning Clonezilla onto a CD/DVD will differ, depending on what operating system you’re using.- If you want to use a USB drive, download Clonezilla Live as a zip file.[2]
- If you’d rather not create your own Clonezilla Live CD/DVD or USB drive, you can purchase Clonezilla CDs and USB drives from authorized Clonezilla vendors.
Advertisement
- If you want to use a USB drive, download Clonezilla Live as a zip file.[2]
-
3
Install an external or internal drive. Before rebooting with Clonezilla, make sure that a blank external or internal hard drive is connected to your computer.
- In order for the disk clone to work, the cloning destination drive needs to as big or bigger than the source drive being cloned.
-
4
Boot from the Clonezilla CD/DVD or USB drive. The process for booting from a CD/DVD or USB drive will be different depending on your operating system and computer.[3]
- On a Windows or Linux machine, put the Clonezilla Live CD/DVD into your computer, and then reboot your computer. Press F2, F10, F12, or Del to enter your computer BIOS menu. In the BIOS menu, go to the Boot submenu, and then change the first boot device to CD-ROM.
- On a Mac, put the Clonezilla Live CD/DVD into your computer, and then reboot your computer. While the computer reboots, press and hold the C key until you see the boot sequence starting.


Advertisement
-
1
Select the default Clonezilla mode. Once Clonezilla Live loads, it will automatically boot using the default mode options.[4]
- If you want other modes, use the up or down arrow keys to navigate to different menu options, and then press Enter.
-
2
Choose a language. On the Choose language screen, use the up or down arrow keys to select your language, and then press the Enter key.
-
3
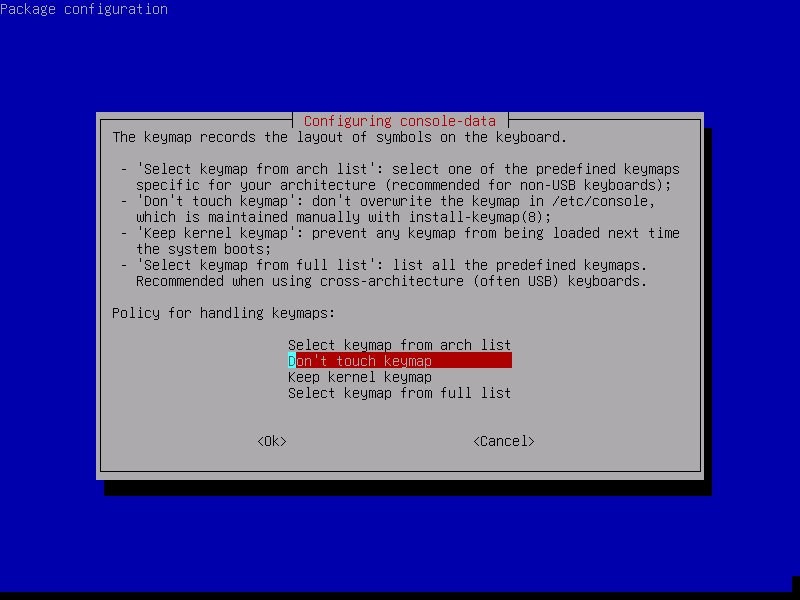
Select the default keyboard layout. On the Configuring console-data screen, select the Don’t touch keymap menu option, and then press the Enter key.
- Clonezilla’s default keyboard layout is the US keyboard. If you’re using another keyboard layout, choose the Select keymap from arch list or Select keymap from full list options.
-
4
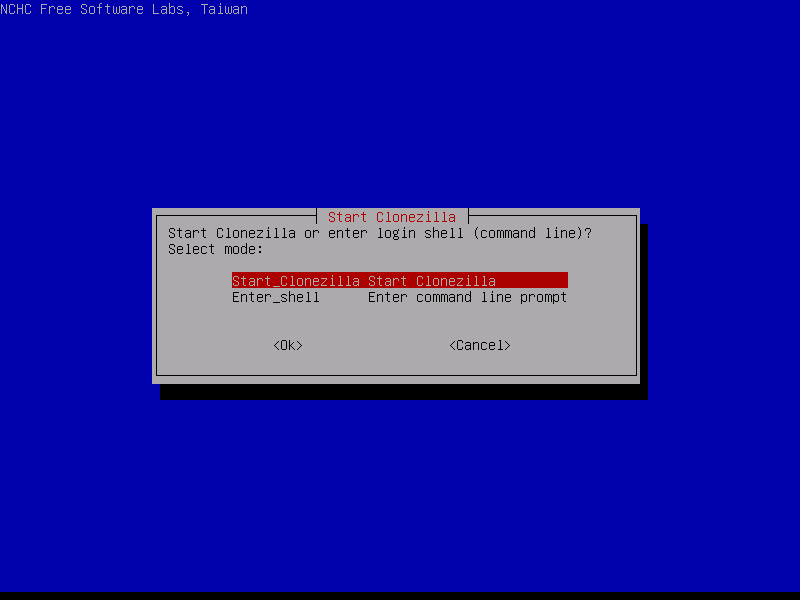
Start Clonezilla. On the Start Clonezilla screen, choose the Start Clonezilla option, and then press the Enter key.
-
5
Choose the device-image option. Move the cursor to the device-image option, and then press the spacebar to select it. An asterisk is added to show it’s selected. Press the Enter key.
- This option will clone the hard disk as an image on another drive instead of on a partition.
-
6
Choose the local_dev option. Move the cursor to the local_dev option, and then press the spacebar to select it. An asterisk is added to show it’s selected. Press the Enter key.
- This option will let your clone the hard disk to an internal or external hard disk.
-
7
Choose the sdb1 8G_ext4 option. Move the cursor to the sdb1 8G_ext4 option, and then press the space to select it. An asterisk is added to show it’s selected. Press the Enter key.
- This option will clone the disk to the first partition on the second internal or external disk.
-
8
Choose the directory for the Clonezilla image. Move the cursor to the / Top_directory_in_the_local_device option, and then press the spacebar to select it. Press the Enter key. Review the disk usage report, and then press the Enter key to continue.
-
9
Choose Beginner mode. Move the cursor to the Beginner option, and then press the spacebar to select it. An asterisk is added to show it’s selected. Press the Enter key.
- Expert mode options aren’t covered in this article.[5]
- Expert mode options aren’t covered in this article.[5]
-
10
Choose the save disk option. Move the cursor to the save disk option, and then press the spacebar to select it. Press the Enter key.
-
11
Type a name for the disk image. In the Input a name field, type a meaningful name for the saved image, and then press the Enter key.
- It’s usually helpful to include the date in the saved disk image name.
-
12
Select the disk you want to clone. Move the cursor to the name of the disk you’d like to clone, and then press the spacebar to select it. Press the Enter key.
- It’s important that you know the name of the drive that you want to clone. If you don’t know, it’s better to Cancel the process, check the disk name, and restart the process from the beginning.
-
13
Skip checking the file system. Choose the Skip checking/repairing file system option, press the spacebar to select it, and then press the Enter key.
- If you’re worried that the source drive is damaged or corrupted, choose the -fscj-src-part option to complete an interactive file system check before cloning the disk.
-
14
Check the saved image. Choose the Yes, check the saved image option, press the space to select it, and then press the Enter key.
-
15
Decide whether to continue. This is the final step before starting the cloning process. If you’re not sure you’d like to continue, type N, and then press the Enter key. If you want to clone the hard disk, type Y, and then press the Enter key.
- If you choose to continue, Clonezilla begins the cloning process.
-
16
Quit Clonezilla. When the hard disk cloning is completed, type 2, and then press the Enter key to start exiting Clonezilla. On the Choose mode screen, choose the Poweroff option, press the spacebar, and then press the Enter key. Before the computer finishes powering down, Clonezilla will prompt you to remove the CD/DVD or USB drive. Do so, and then press the Enter key. Your computer will power off.


Advertisement
-
1
Select the default Clonezilla mode. Once Clonezilla Live loads, it will automatically boot using the default mode options.[6]
- If you want other modes, use the up or down arrow keys to navigate to different menu options, and then press Enter.
-
2
Choose a language. On the Choose language screen, use the up or down arrow keys to select your language, and then press the Enter key.
-
3
Select the default keyboard layout. On the Configuring console-data screen, select the Don’t touch keymap menu option, and then press the Enter key.
- Clonezilla’s default keyboard layout is the US keyboard. If you’re using another keyboard layout, choose the Select keymap from arch list or Select keymap from full list options.
-
4
Start Clonezilla. On the Start Clonezilla screen, choose the Start Clonezilla option, and then press the Enter key.
-
5
Choose the device-image option. Move the cursor to the device-image option, and then press the spacebar to select it. An asterisk is added to show it’s selected. Press the Enter key.
- This option will clone the hard disk as an image on another drive instead of on a partition.
-
6
Choose the local_dev option. Move the cursor to the local_dev option, and then press the spacebar to select it. An asterisk is added to show it’s selected. Press the Enter key.
- This option will let your clone the hard disk to an internal or external hard disk.
-
7
Choose the sdb1 8G_ext4 option. Move the cursor to the sdb1 8G_ext4 option, and then press the space to select it. An asterisk is added to show it’s selected. Press the Enter key.
- This option will clone the disk to the first partition on the second internal or external disk.
-
8
Choose the directory for the Clonezilla image. Move the cursor to the / Top_directory_in_the_local_device option, and then press the spacebar to select it. Press the Enter key. Review the disk usage report, and then press the Enter key to continue.
-
9
Choose Beginner mode. Move the cursor to the Beginner option, and then press the spacebar to select it. An asterisk is added to show it’s selected. Press the Enter key.
- In order to restore a drive, you’ll need the source and destination drives both connected to your computer and turned on.
-
10
Restore a cloned disk. Choose the restore disk option, press the spacebar, and then press the Enter key.
-
11
Select the cloned disk image to restore. Choose the cloned disk image you want to restore, press the spacebar, and then press the Enter key.
-
12
Select the target disk. Choose the target disk for restoring, press the spacebar, and then press the Enter key. On the next screen, choose the target disk for restoring again, press the spacebar, and then press the Enter key.
- When you restore a cloned drive to a target disk, it will overwrite any content that’s on the target disk with the cloned drive.
-
13
Confirm the restore. Clonezilla will ask you twice if you want to restore the cloned disk. When it prompts you to, type Y, and then press the Enter key. When it prompts you again, type Y, and then press the Enter key.
-
14
Quit Clonezilla. When the hard disk cloning is completed, type 2, and then press the Enter key to start exiting Clonezilla. On the Choose mode screen, choose the Poweroff option, press the spacebar, and then press the Enter key. Before the computer finishes powering down, Clonezilla will prompt you to remove the CD/DVD or USB drive. Do so, and then press the Enter key. Your computer will power off.


Advertisement
Ask a Question
200 characters left
Include your email address to get a message when this question is answered.
Submit
Advertisement
Video
-
Clonezilla can be used with Windows, Linux, and Mac operating systems.
Thanks for submitting a tip for review!
Advertisement
-
If you make a mistake you can wipe the wrong partition.
-
This is intended for experts.
-
Never do this with older Mac computers which use Power PC Processors.
Advertisement
Things You’ll Need
- Blank CD/DVD or USB Drive.
- A blank hard drive at least as large as the drive you’d like to clone.
- A read/write CD/DVD drive or USB port.
About This Article
Thanks to all authors for creating a page that has been read 160,386 times.
Is this article up to date?
- << Назад
Clonezilla является свободным программным обеспечением с открытым исходным кодом, которое позволяет делать бэкапы целых дисков или их разделов.
Бэкапы делаются с помощью unix утилиты dd, что позволяет делать полный побайтовый бэкап диска в специальный образ. В дальнейшем из этого же образа происходит восстановление информации.
Один из способов применения Clonezilla например когда системный диск выходит из строя, можно сохранить полную его копию в специальный образ, а затем полностью воссоздать её на другом рабочем диске. Единственным условием для этого будет чтобы диск на который мы восстанавливаем был такого же размера или больше, чем тот диск с которого сняли образ.
Кто то переносит свою рабочую систему с HDD диска на SSD. А кто то просто делает регулярный бэкап, например перед установкой какого то нового софта или драйвера. Меня Clonezilla спасла когда у меня была проблема, при установке драйвера nVidia переставал работать второй монитор, при этом на драйверах которые ставились по стандарту с 10 виндой работали оба.
Сразу хочу извиниться за качество картинок, я снимал на то что было под рукой. Зато делал всё на реальном оборудовании, а не на виртуалке.
Предупреждение
Перед тем как продолжить, обратите внимание, что я не гарантирую 100% работоспособность этого метода. Все дальнейшие действия Вы выполняете на свой страх и риск.
Подготовка
Скачиваем образ Clonezilla и прожигаем на флешку или диск любым удобным способом.
Выбираем нашу загрузочную флешку или диск в биосе и загружаемся с неё. У меня это выглядит так
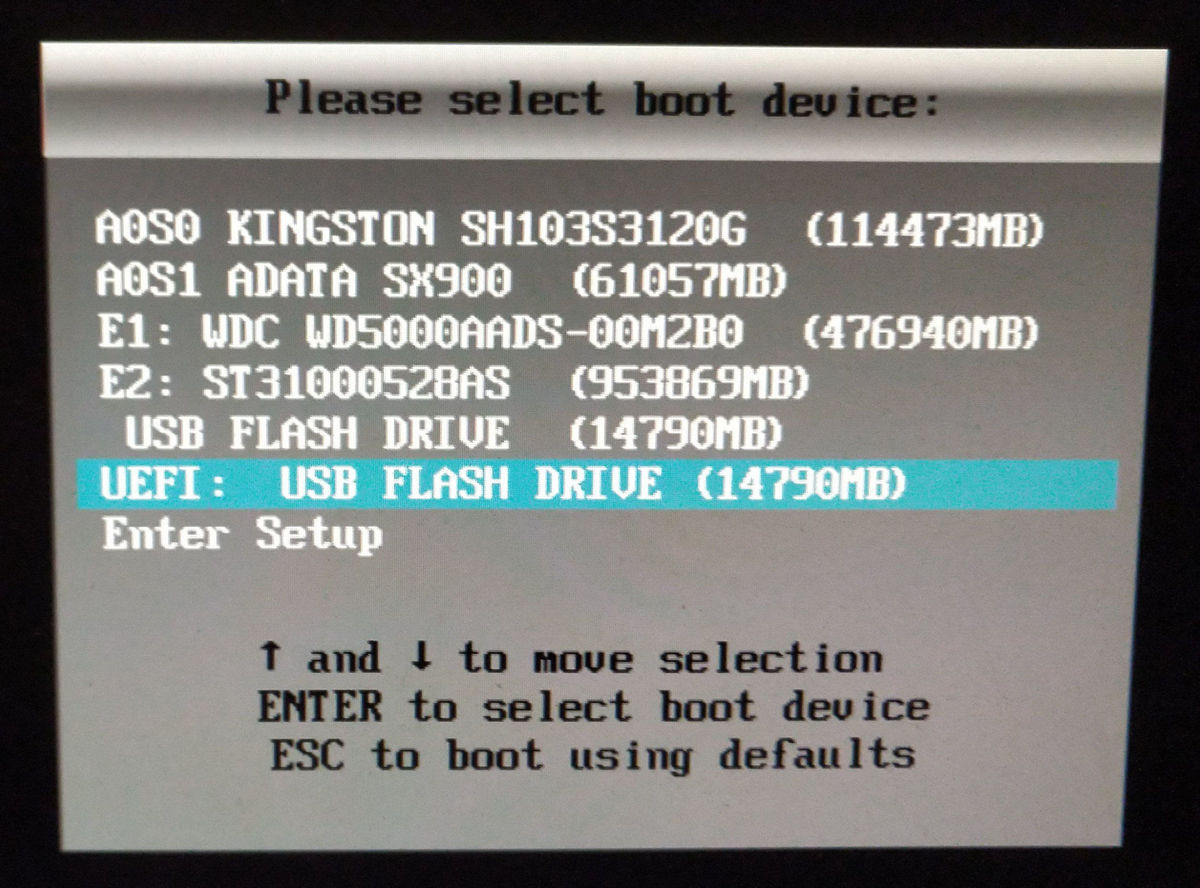
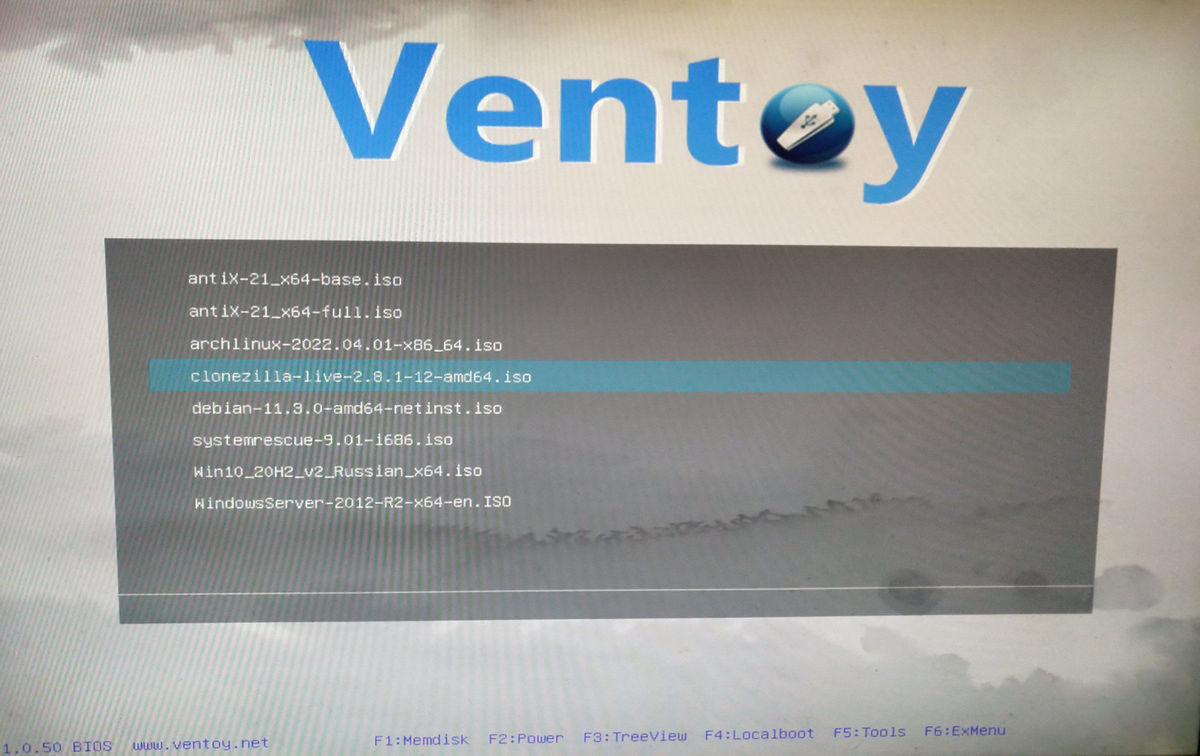
Я пользуюсь мультизагрузочной флешкой Ventoy поэтому выбираю из списка дистрибутив Clonezilla. У вас скорее всего не будет этого пункта, а вместо него будет сразу грузиться дистрибутив.
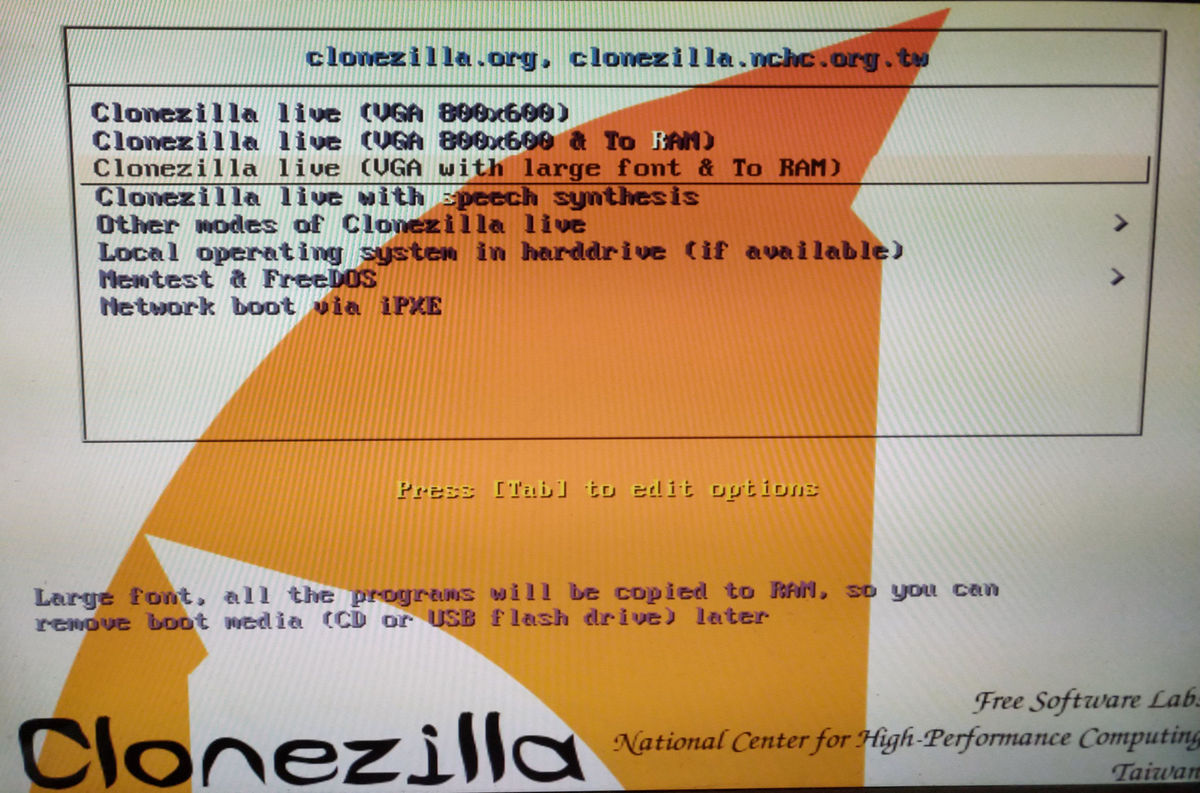
Выбираем параметры запуска Clonezilla. Я рекомендую выбрать Clonezilla live (VGA with large font & To RAM).
Начнётся процесс загрузки Clonezilla. Первое что у нас спросят — хотим ли мы изменить настройки клавиатуры. Оставляем по умолчанию.

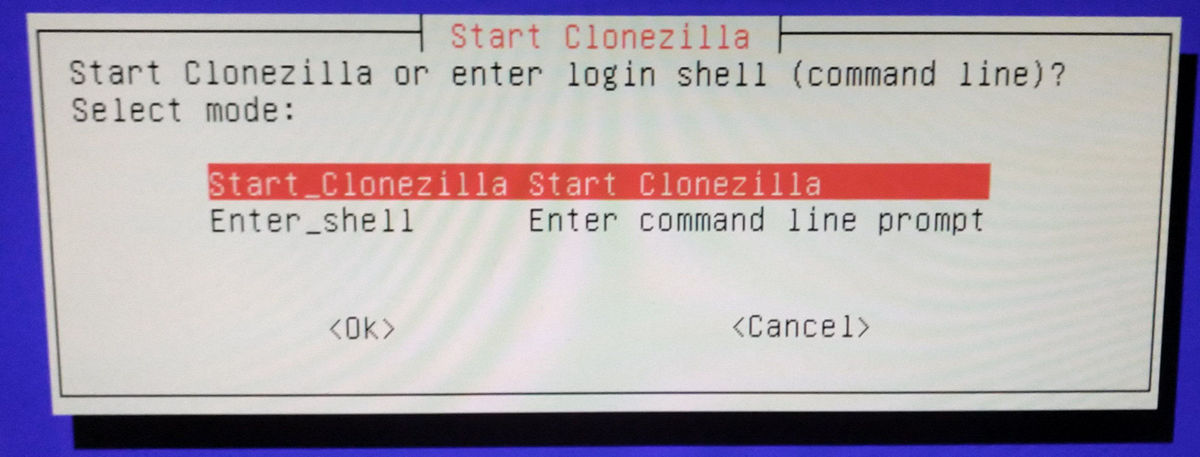
Выбираем Start Clonezilla. Выбор как и в большинстве TUI происходит с помощью стрелок, кнопки TAB и ENTER.
Бэкап
В меню выбираем пункт device-image
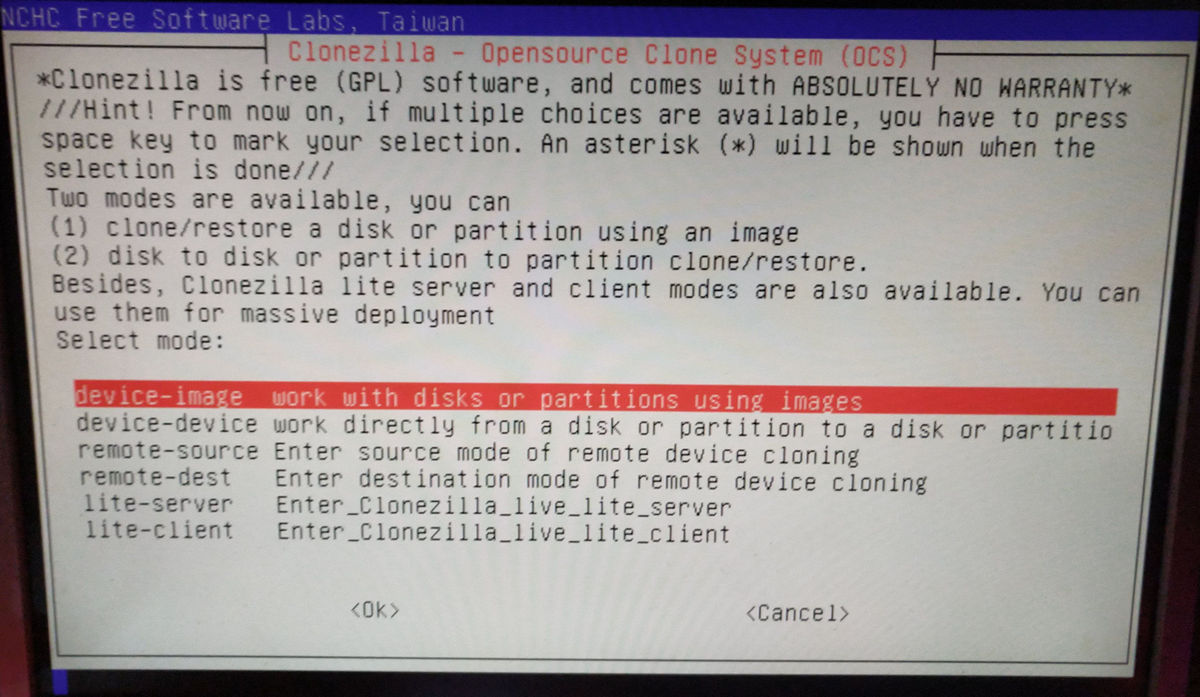
Далее выбираем пункт local_dev
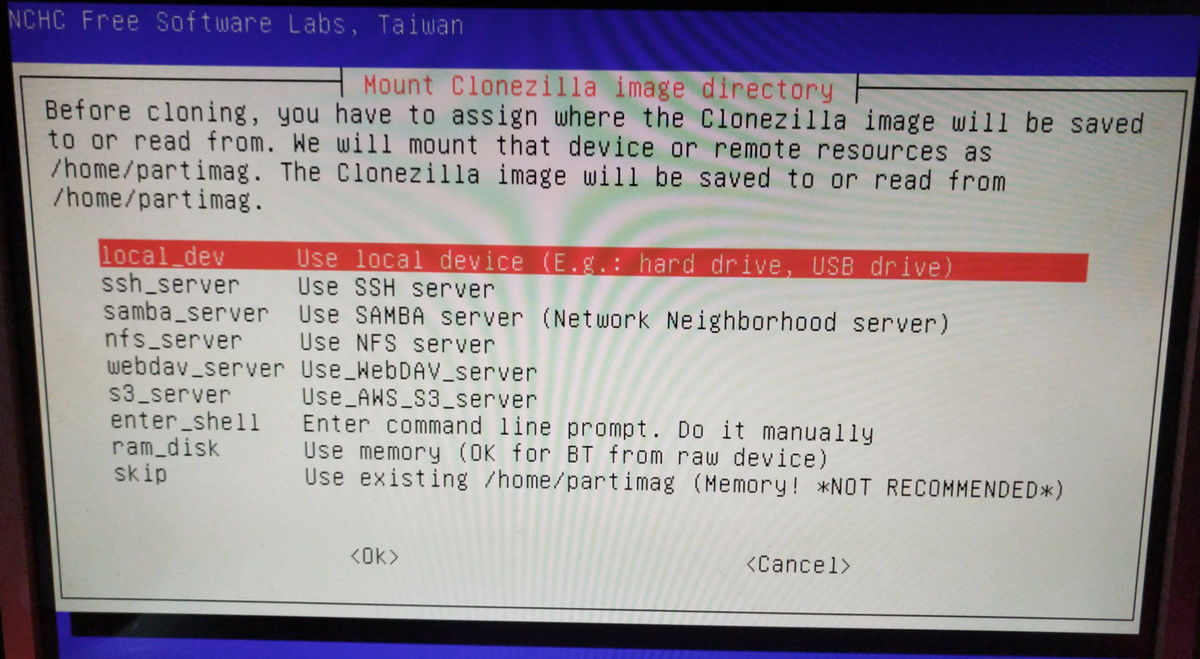
Если в качестве устройства для бэкапа Вы планируете использовать USB, то после того как Вы выбрали пункт local_dev снизу высветится уведомление, которое предлагает вставить устройство в компьютер и подождать примерно 5 секунд для обнаружения всех устройств. После чего необходимо нажать ENTER.
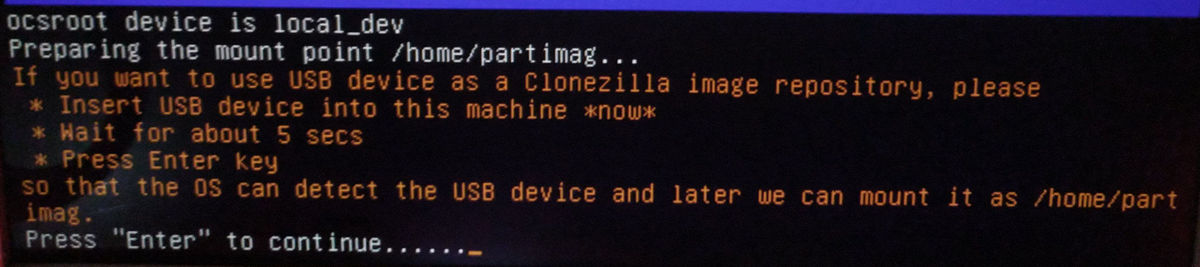
Следующий этап — сканирования устройств на которые будет производиться бэкап. Когда нужное устройство появится в списке необходимо нажать CTRL + C
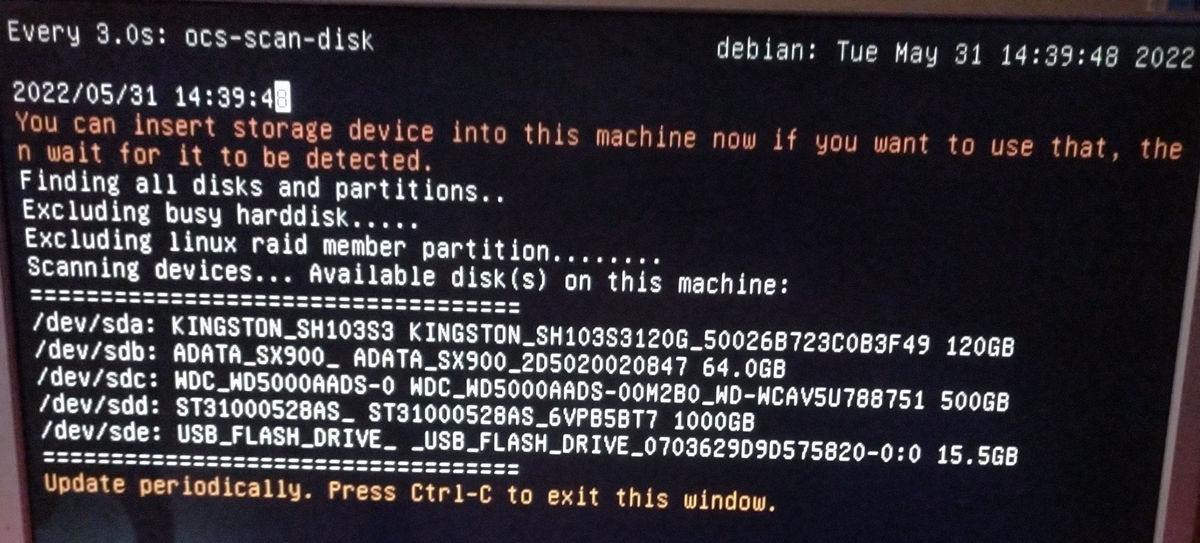
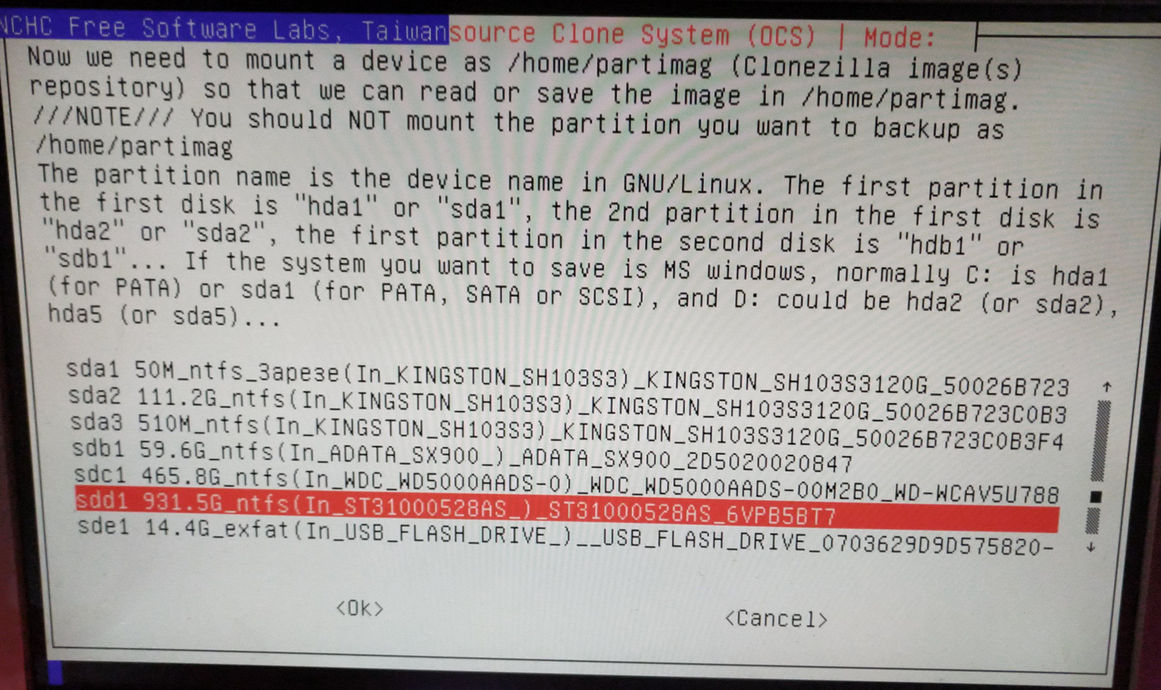
Выбираем устройство на которое будет производиться бэкап.
Проверять и восстанавливать фаиловую систему? Тут по желанию, я рекомендую не проверять, т.к. непонятно что будет записано вместо бед блоков.
Выбираем папку, куда будет сохранён бэкап (образ диска)
Выбор уровня
Выбираем действие savedisc
Задаём имя для образа бэкапа
Наконец то дошли до выбора диска который мы хотим забэкапить
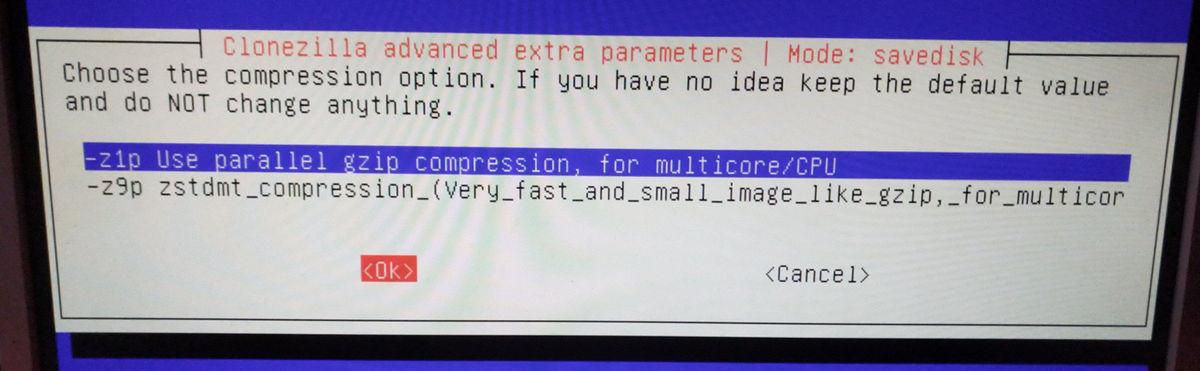
Выбор компрессии для образа
Делать ли попытку восстановления фаиловой системы перед сохранением
Проверять образ на ошибки?
Шифровать ли данные
Выбор действия после завершения процедуры бэкапа
После выбора будет выведена дополнительная информация — содержащая строку с командой для выполнения бэкапа. Нажимаем ENTER

Внимательно проверяем данные и если всё правильно — соглашаемся, нажав Y
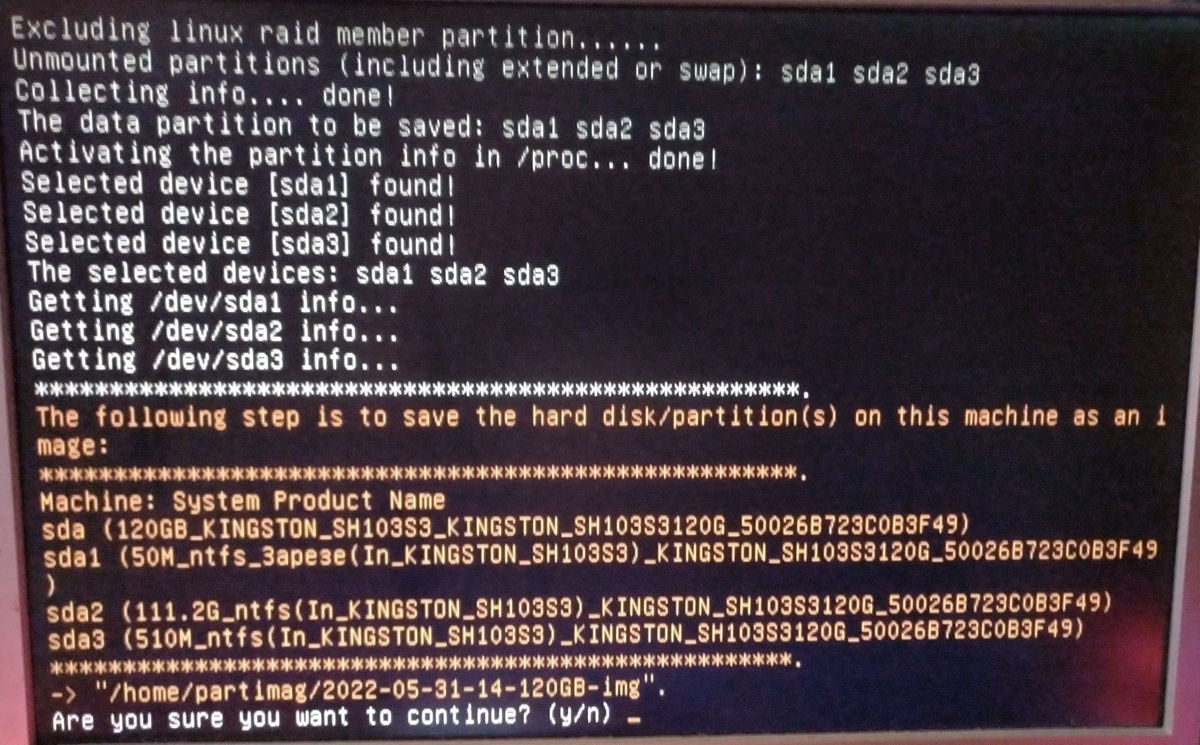
Начнётся процесс бэкапа. В конце нас оповестят о его успешном завершении.
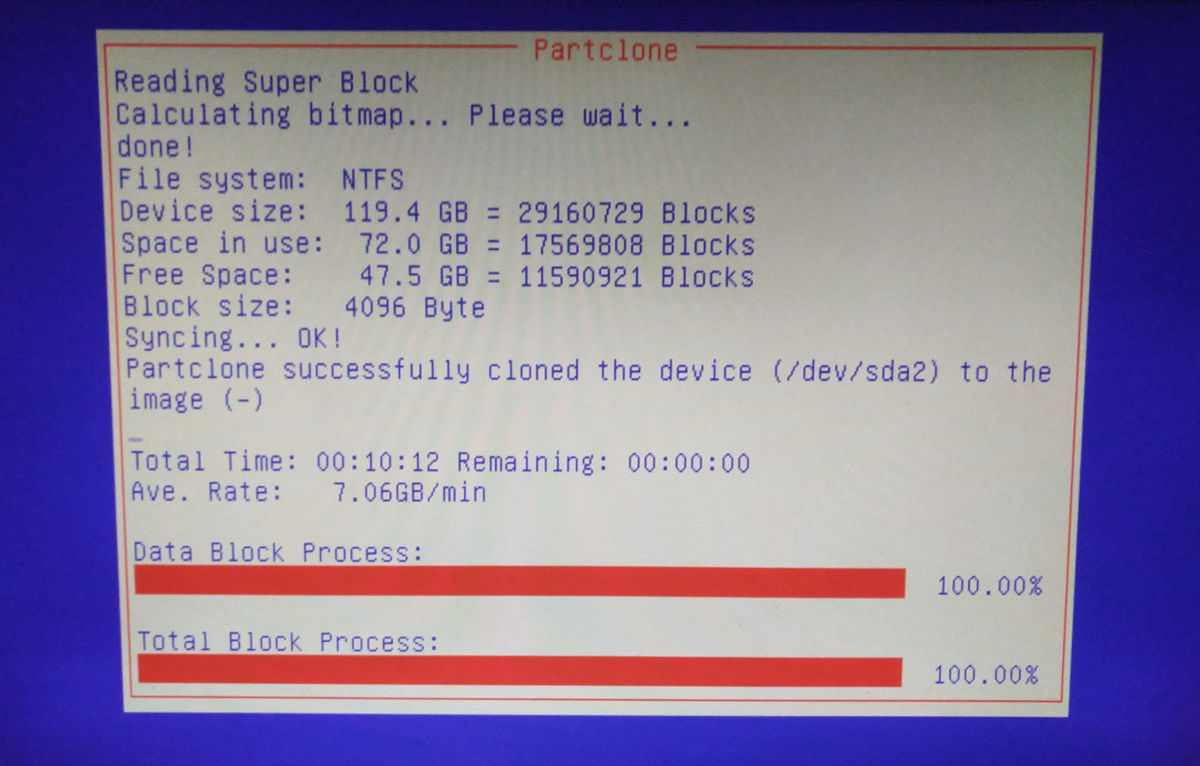
Если ранее мы выбирали проверку образа бэкапа, то вслед за бэкапом последует эта самая проверка.
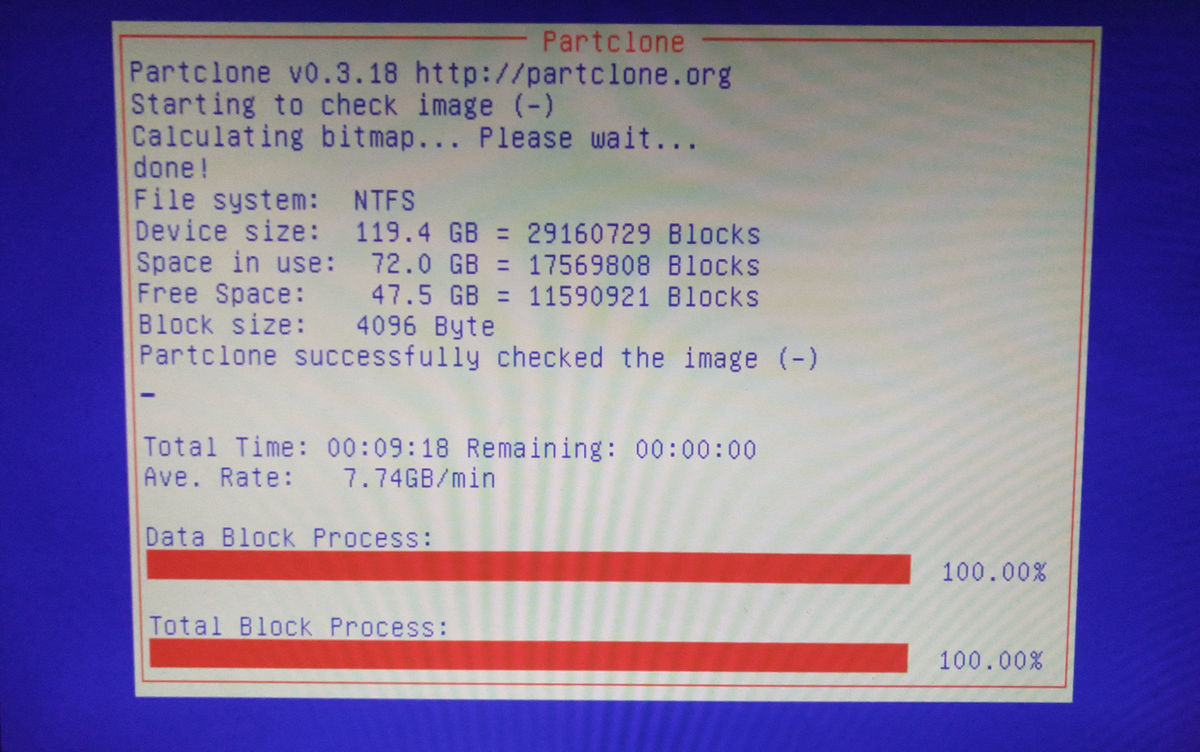
И будет выведена информация о проверке
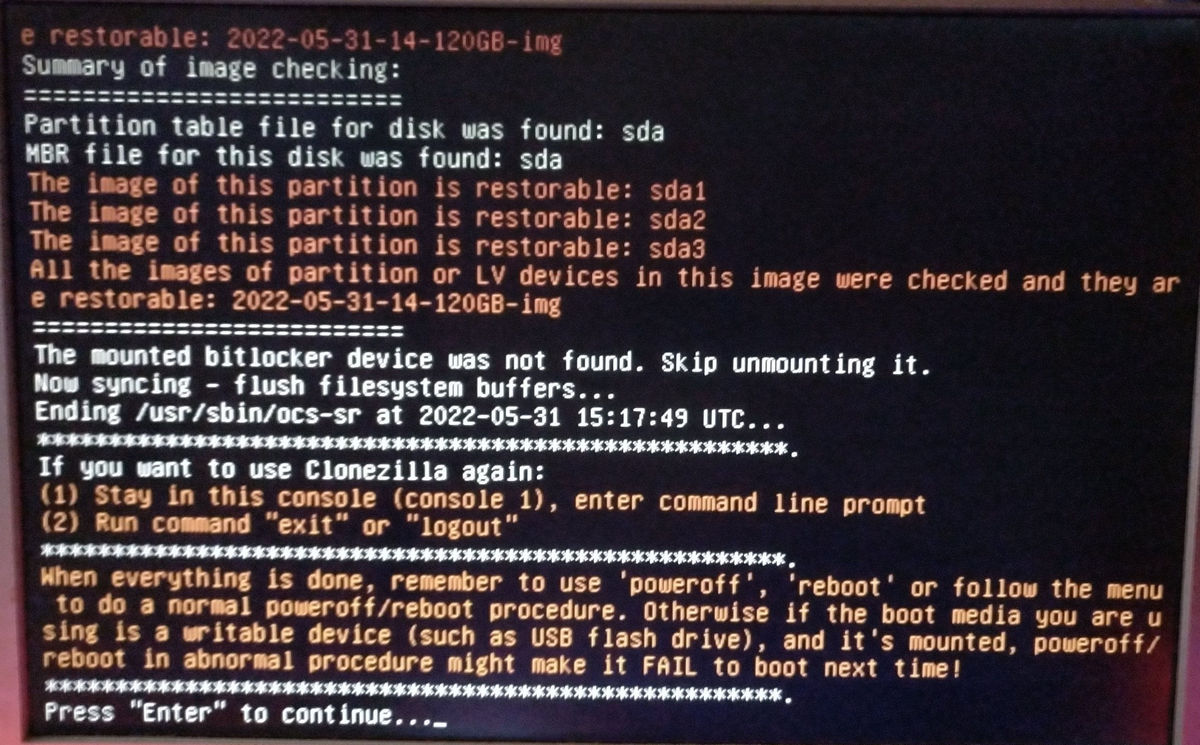
Бэкап завершён, выбираем нужное действие. Я выбираю reboot.
Восстановление
Грузим образ Clonezilla. Выбираем раскладку клавиатуры. В меню нажимаем start clonezilla.
Выбираем пункт local-dev
Если образ для восстановления находится на USB — вставляем его и после 5-10 секунд нажимаем ENTER, либо пропускаем этот шаг нажатием ENTER.

Начнётся процесс сканирования устройств. Прекращаем сканирование сочетанием клавиш CTRL + C.
Выбираем устройство / диск на котором находится образ для восстановления / бэкапа.
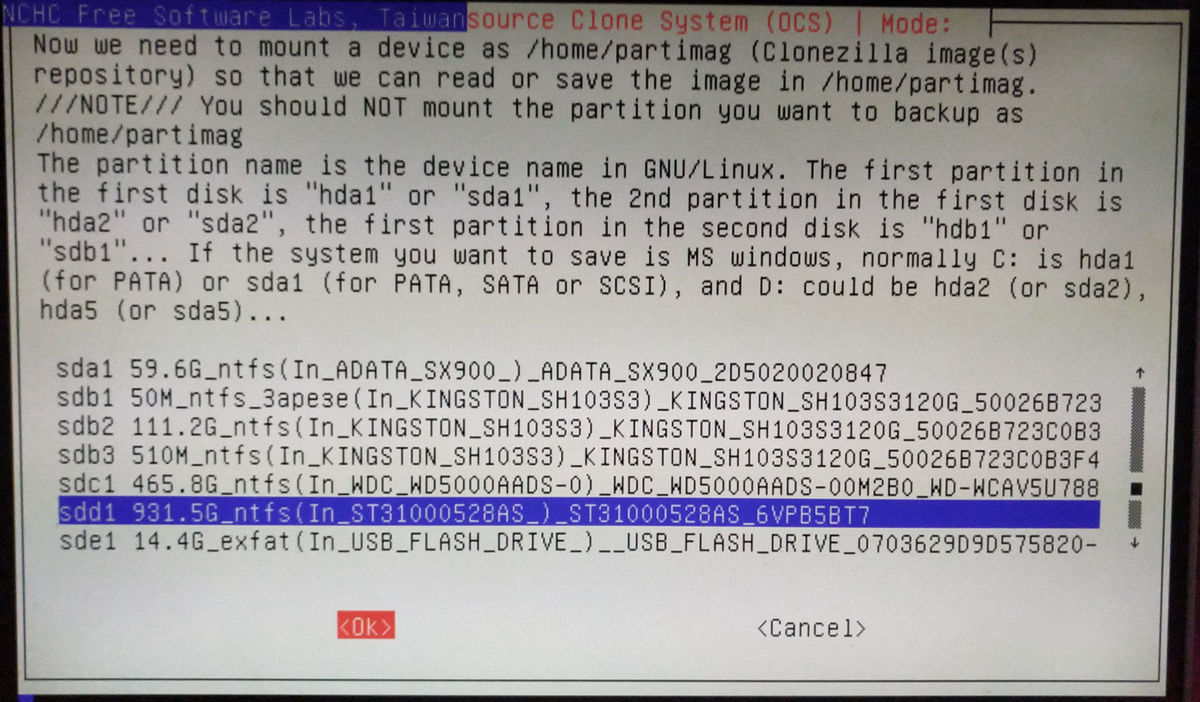
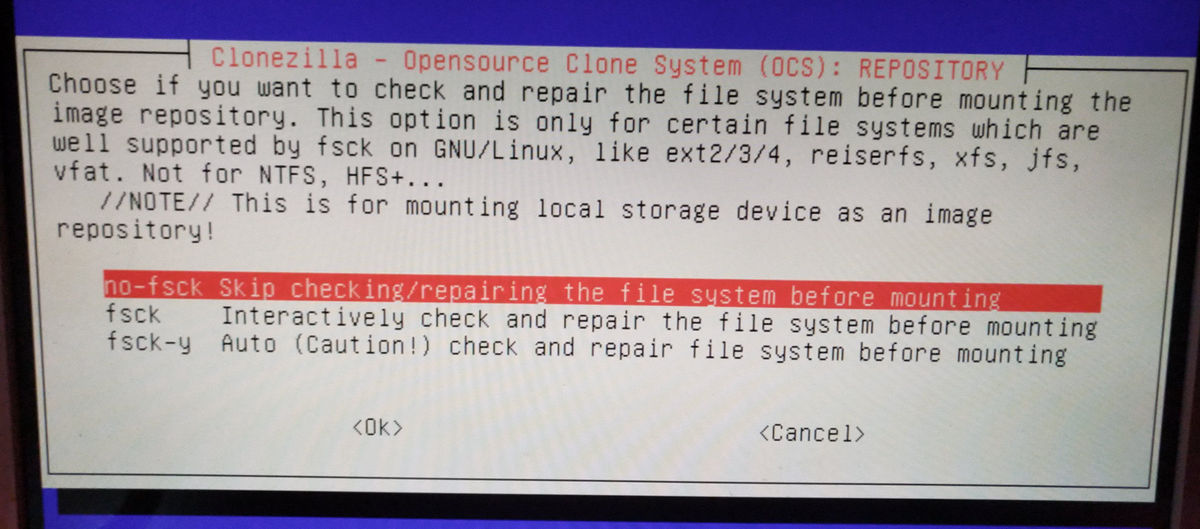
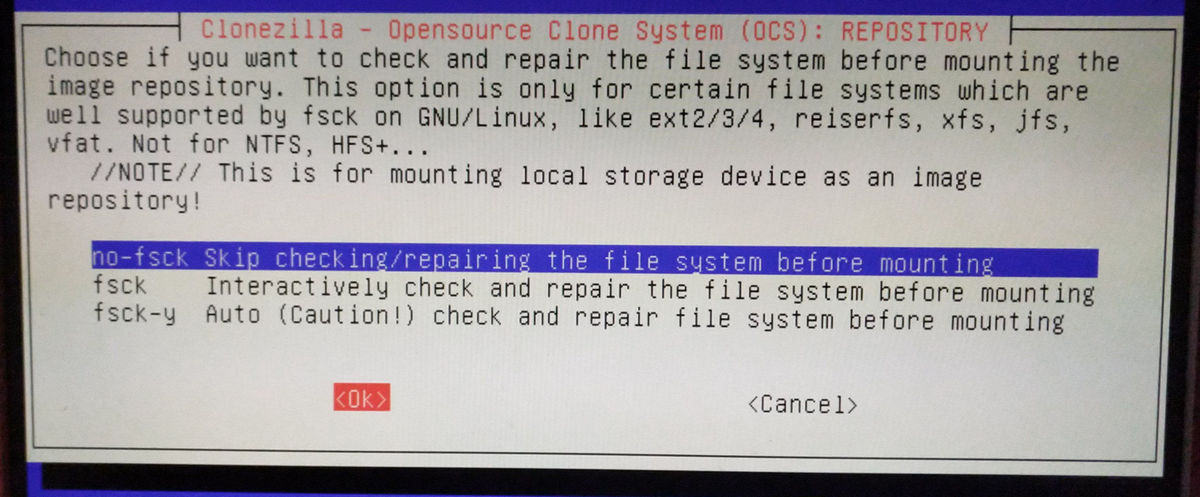
Хотим ли мы чтобы Clonezilla пытался восстановить файловую систему в случае ошибок? Для NTFS выбираем no-fsck.
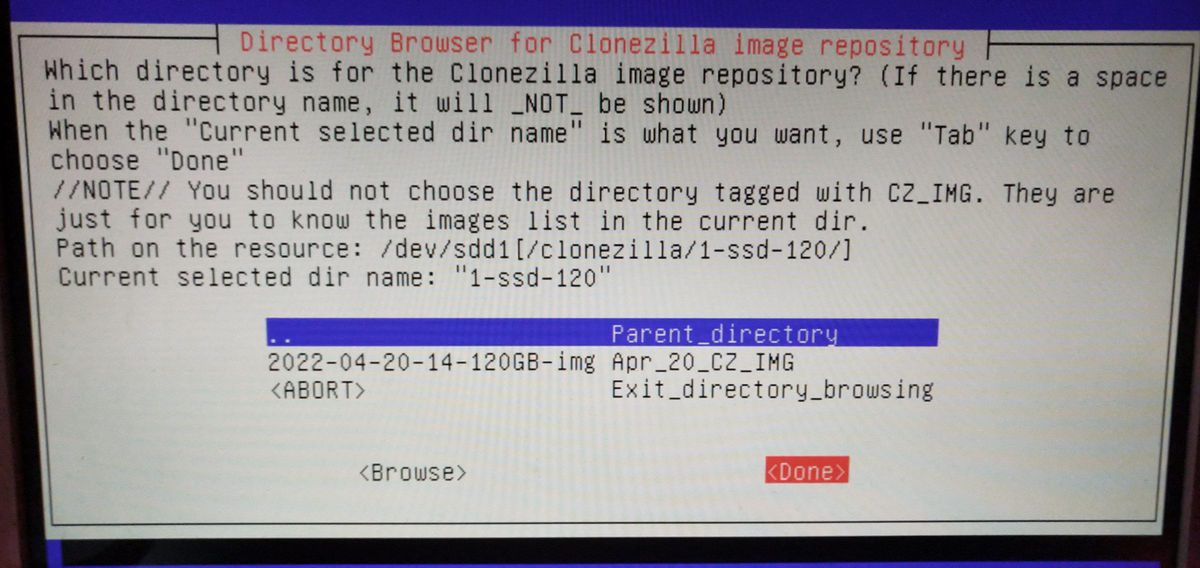
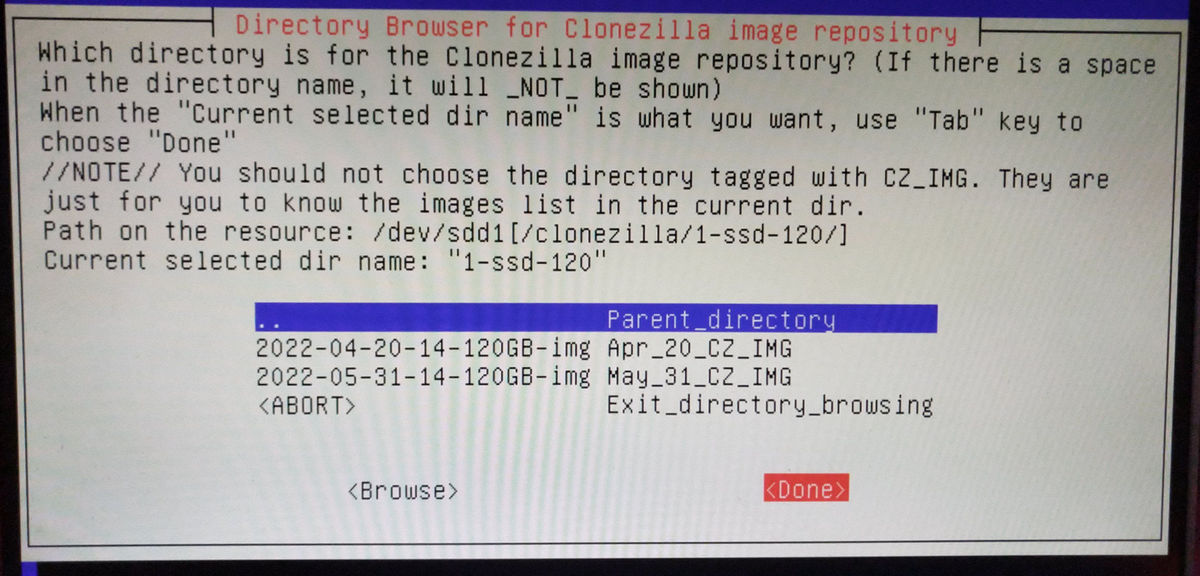
Выбираем папку в которой находится образ(ы) для восстановления. Обратите внимание именно папку а не сам образ. Папку лёгко определить т.к. в ней находится CZ_IMG. Сам CZ_IMG выбирать не нужно см. скриншот. У меня в папке по пути G:clonezilla1-ssd-120 находятся 2 бэкапа:
2022-04-20-14-120GB-img
2022-05-31-14-120GB-img
Я выбираю именно эту папку и нажимаю DONE
Если вы зайдёте внутрь папки CZ_IMG и выберите её для восстановления то у вас ничего не восстановится!
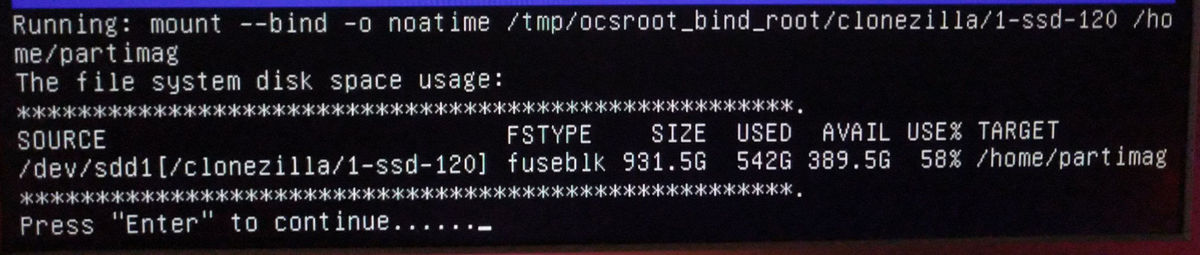
Нам покажут информацию об устройстве, нажимаем ENTER.
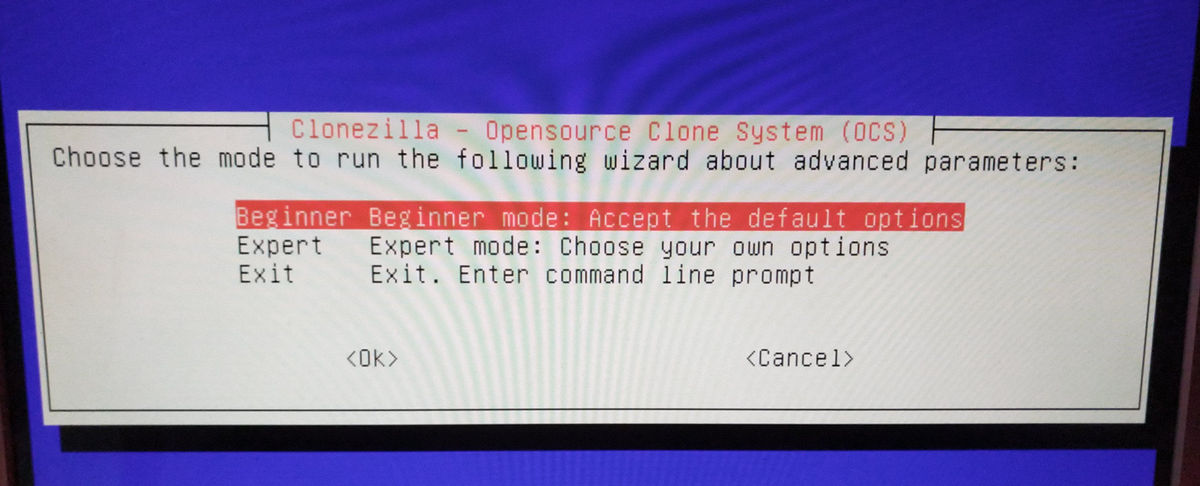
Выбираем наш уровень. Если вы не уверены советую выбрать уровень Beginner.
Выбираем желаемый способ для восстановления. Т.к. бэкап мы делали в образ(image) то тут выбираем действие restoredisk.
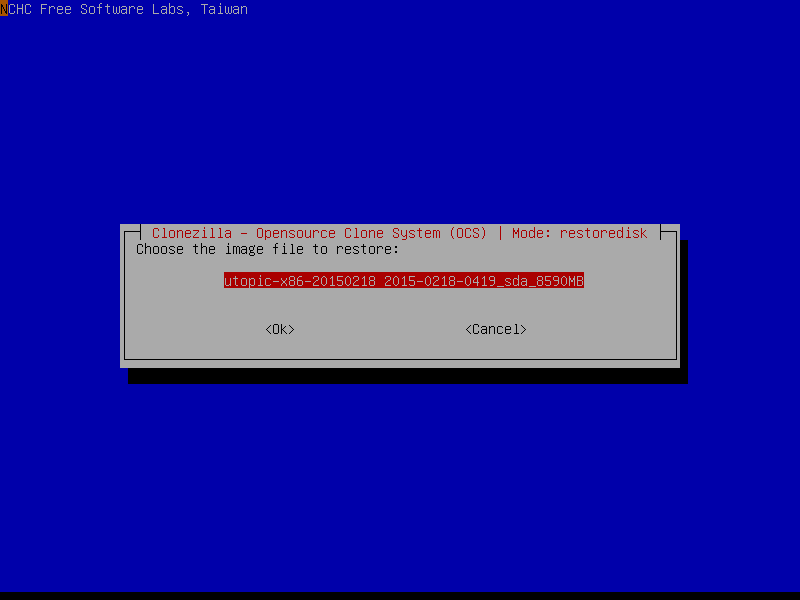
Выбираем образ для восстановления
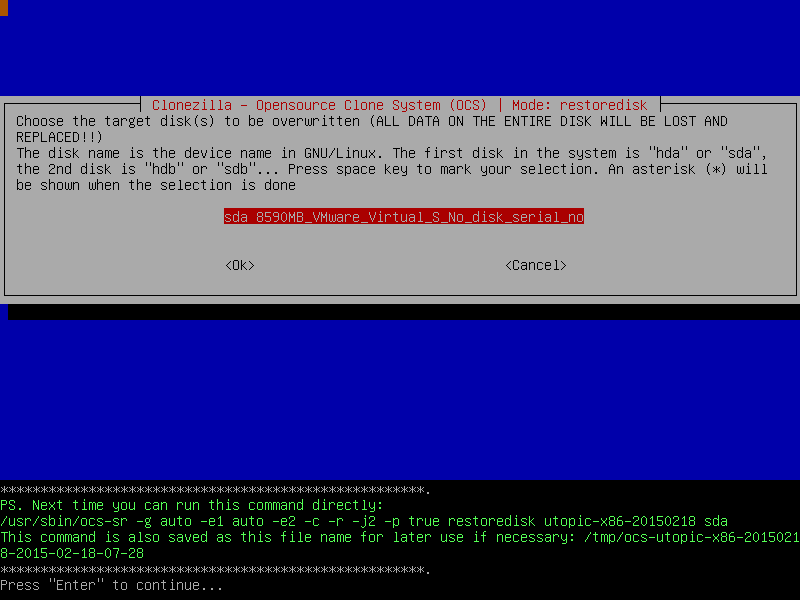
Выбираем диск, на который будет выполнено восстановление из выбранного ранее образа.
Проверять ли образ перед процедурой восстановления?
Выбор действия по умолчанию после завершения процедуры восстановления. Советую выбрать choose.
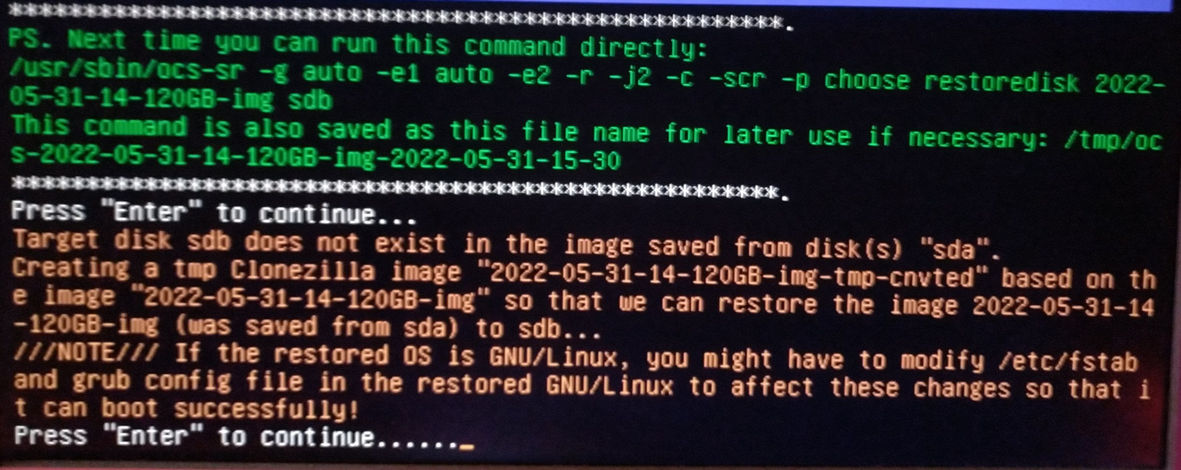
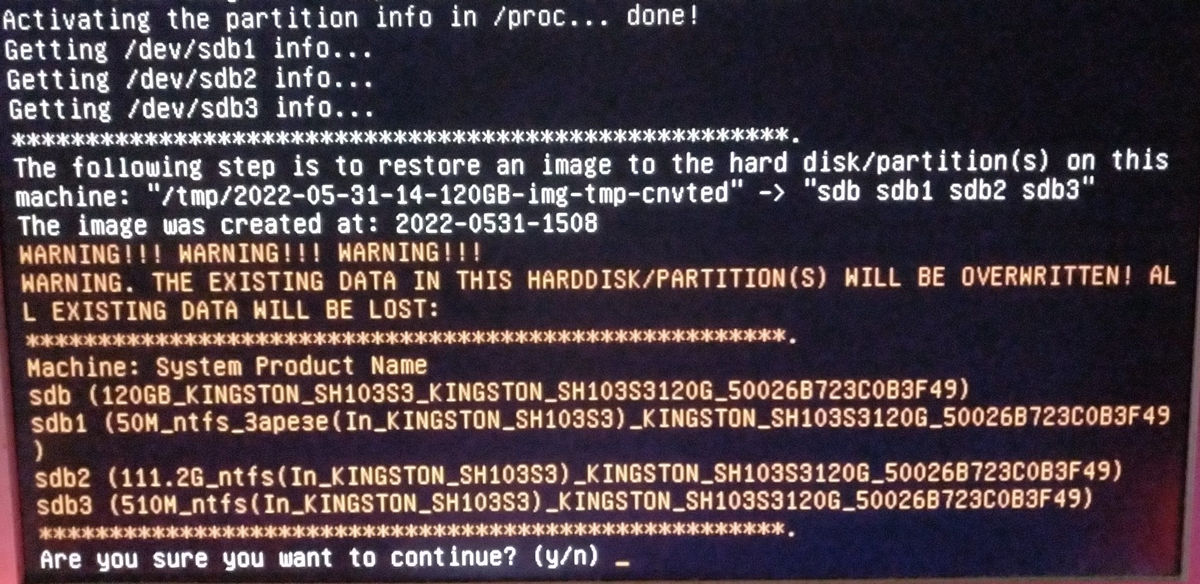
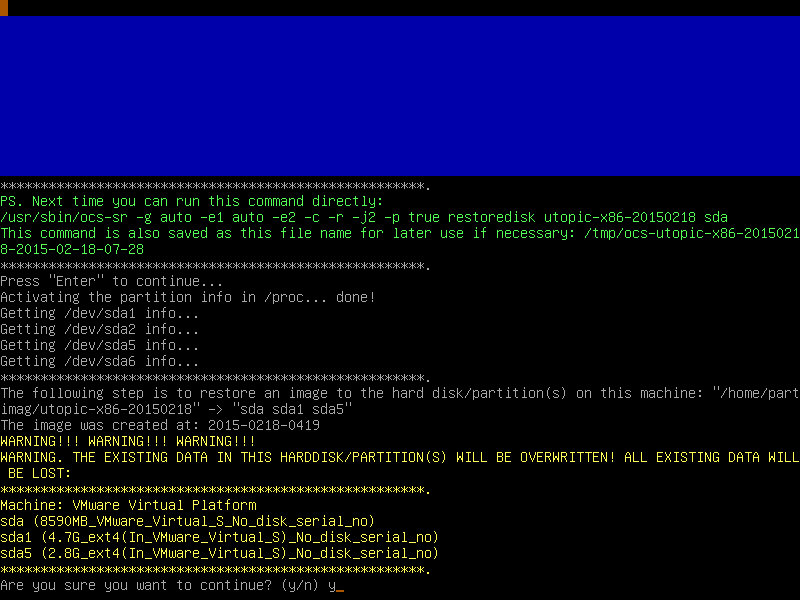
Конечная, подтверждаем действительно ли мы хотим выполнить восстановление. Внимательно читаем после чего нажимаем ENTER 2 раза.
Как видно у меня написало ворнинг про sdb, однако, я всё таки рискнул и нажал ENTER, после чего всё успешно восстановилось. Напоминаю, Вы выполняете все эти действия на свой страх и риск, если у Вас что то не восстановиться то я за это никакой ответственности не несу.
Последнее подтверждение
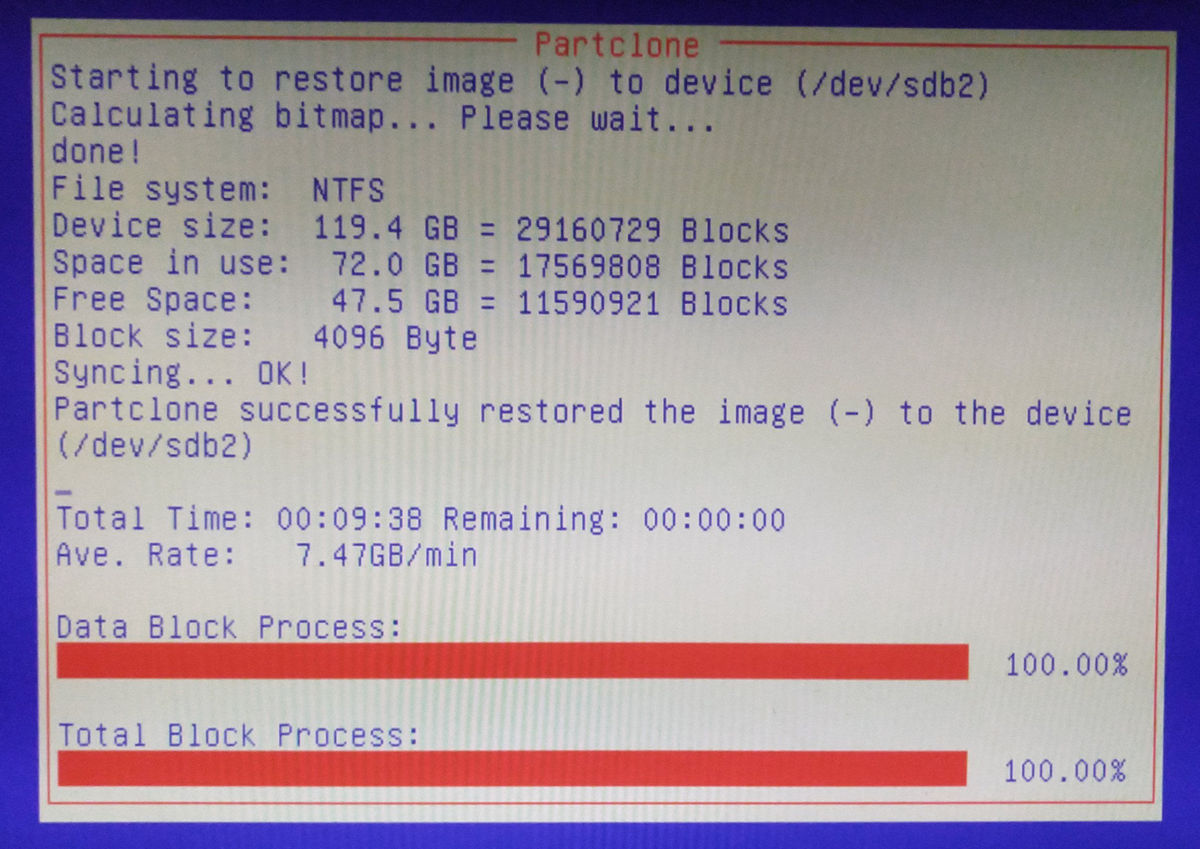
Начнётся процедура восстановления. На скриншоте показано её успешное окончание.
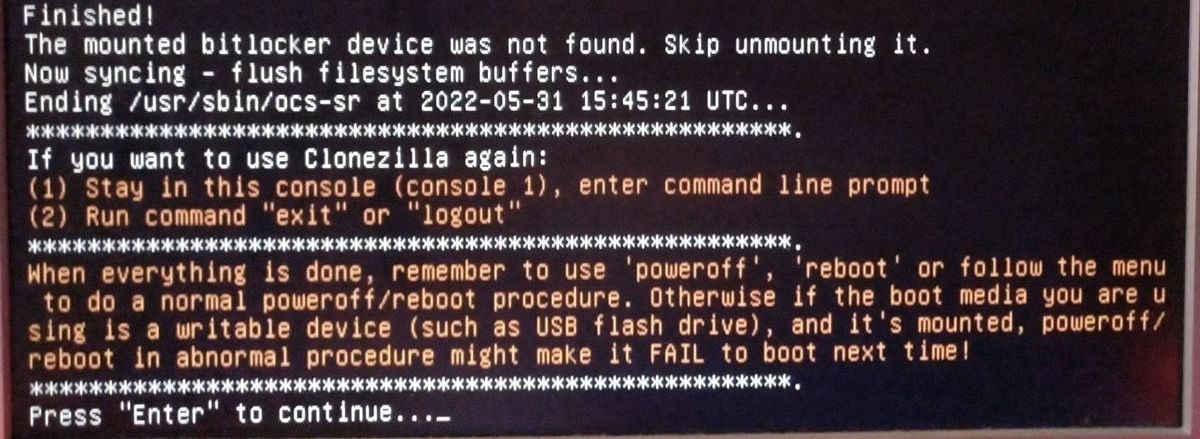
Готово, смотрим информацию, нажимаем ENTER
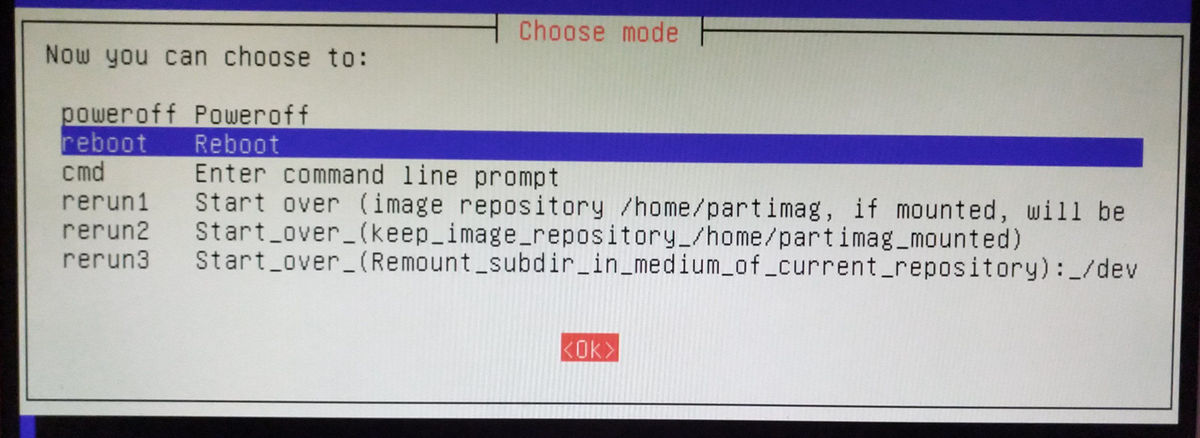
Наконец выбираем пункт reboot и перезагружаемся в восстановленную систему.
После перезагрузки попадаем в восстановленную систему
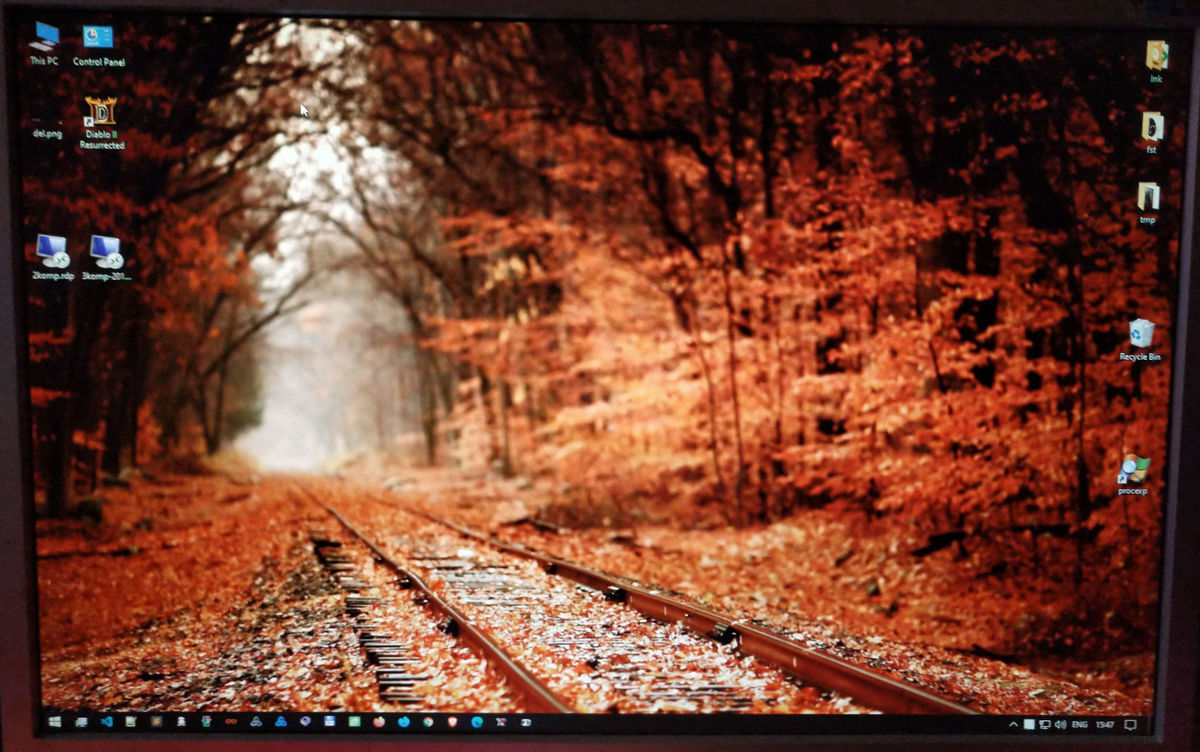
Mission Completed!
CloneZilla — это один из лучших инструментов для резервного копирования системы с открытым исходным кодом для Linux. Отсутствие графического интерфейса ничуть не делает его хуже. Наоборот, здесь есть интуитивно понятный, легкий и быстрый мастер командной строки, с помощью которого вы можете сделать все что нужно. Это идеальный инструмент для каждого системного администратора.
С помощью CloneZilla вы можете полностью скопировать раздел жесткого диска на другой жесткий диск и затем его очень просто восстановить. Кроме того, вы можете выполнять резервное копирование clonezilla по сети, с помощью ssh, samba или NFS и сохранять такие образы в локальном хранилище.
В случае возникновения каких-либо проблем, вы можете очень просто восстановить все данные с резервного диска. Например, при поломке системы, если была копия вы сможете развернуть раньше созданный образ и вернуть работоспособность системы в считаные минуты.
В этой статье мы рассмотрим как выполняется клонирование диска CloneZilla, причем нас будут интересовать любые блочные устройства. Неважно что вы будете клонировать раздел или целый жесткий диск, подойдут любые блочные устройства. Дистрибутив тоже неважен, поскольку все будет выполняться с помощью образа LiveCD CloneZilla.
Что нам понадобится?
Во-первых, нам нужен образ LiveCD CloneZilla, который можно скачать на официальном сайте. Образ нужно записать на флешку или диск. Я не буду останавливаться на том, как это сделать.
Во-вторых, чтобы выполнить резервное копирование жесткого диска в Linux, нам понадобится еще один физический жесткий диск, подключенный к этой же системе. Причем он должен быть такого же объема или больше, нежели тот диск, который мы хотим скопировать. Для клонирования раздела CloneZilla будет достаточно свободного раздела с таким же размером. Это нужно для записи образа.
Когда все готово, вы можете начать создание образа clonezilla. Мы разделим все действия на шаги, чтобы вам было проще ориентироваться, что нужно делать.
Шаг 1. Загрузка CloneZilla
После того как образ LiveCD скачан и записан на флешку, подключите этот носитель к компьютеру и выполните перезагрузку. Во время заставки BIOS нажмите кнопку F11, F12, Del, F2 или Shift+F2, чтобы войти в меню Bios и настройте там загрузку с вашего носителя.
Шаг 2. Экран загрузчика
После этого на экране появится загрузчик. В нем выберите первый пункт, чтобы запустить Clonezilla Live со стандартными параметрами и разрешением экрана 800х600. Для выбора нажмите Enter.
Шаг 3. Выбор языка
Когда система загрузится в оперативную память, появится мастер, в котором вам предстоит выбрать язык системы. Для перемещения по пунктам используйте стрелки вверх/вниз, а для выбора Enter:
Шаг 4. Настройка раскладки
На этом экране вы можете настроить раскладку клавиатуры. Просто выберите Do’nt touch keymap и нажмите Enter:
Шаг 5. Запуск CloneZilla
На этом экране можно запустить интерактивный мастер CloneZilla или перейти в консоль. Выберите Start Clonezilla:
Шаг 6. Выбор способа работы
Можно выполнять клонирование жесткого диска linux прямо с диска на диск или же с диска на образ. Выберите вариант, который будет вам удобнее, в этой статье мы выберем с диска на диск:
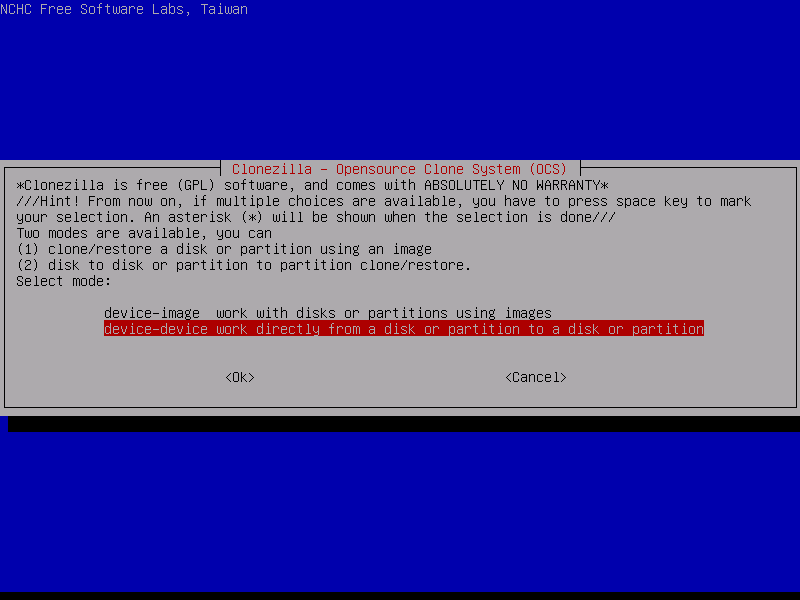
Убедитесь что оба диски подключены к компьютеру, если собираетесь клонировать жесткий диск в Linux.
Шаг 7. Количество настроек
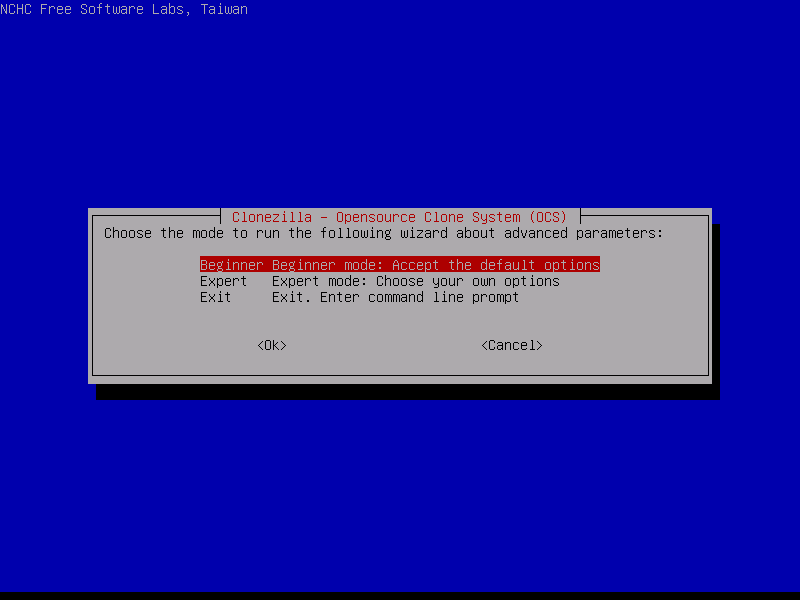
На следующем экране вы можете выбрать насколько подробно вы хотите настраивать процесс. Для начала выберите режим для начинающих, с настройками по умолчанию. Beginer Mode.
Затем на следующей вкладке выберите что нужно сделать. В нашем случае первый пункт, сохранить диск. Savedisk.
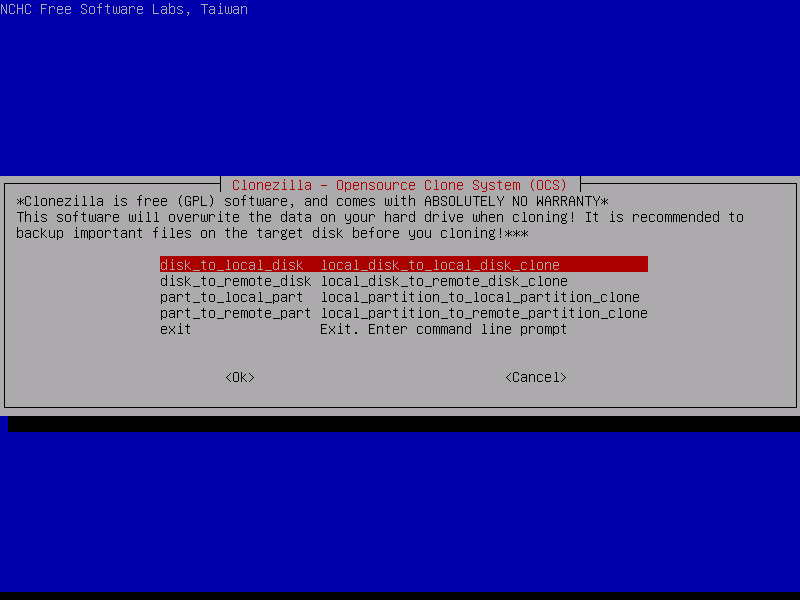
Шаг 8. Выбор режима копирования
Доступно четыре режима клонирования диска:
- disk_to_local_disk — локальный диск на другой локальный диск;
- disk_to_remote_disk — локальный диск на удаленный диск;
- part_to_local_part — раздел на локальный раздел;
- part_to_remote_part — раздел на удаленный раздел.
Если бы мы на шестом шаге выбрали диск на образ, то у нас бы были другие варианты. Мы скопируем наш локальный диск на другой жесткий диск, подключенный к этому компьютеру. Программа выполнить полное клонирование диска Clonezilla, будут скопированы все разделы, а также область MBR или GPT.
Шаг 9. Выбор источника
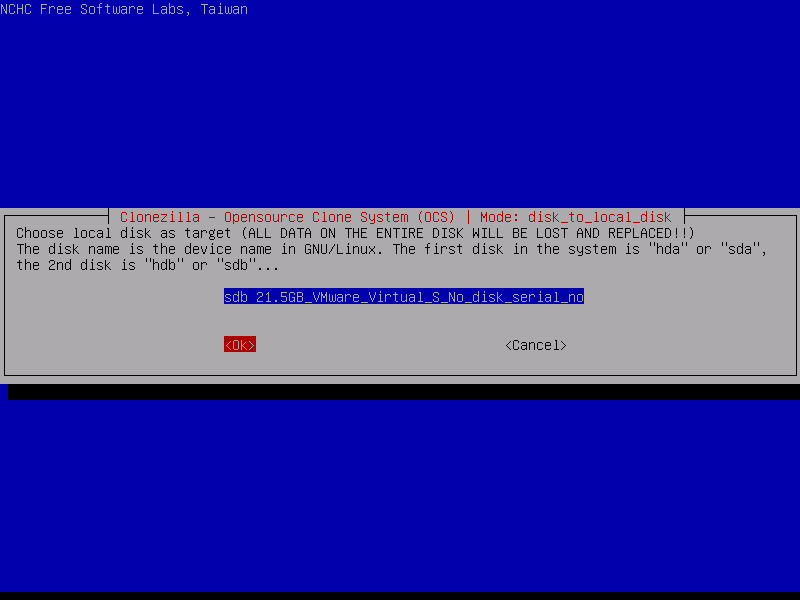
На этом шаге мастера нам нужно выбрать диск-источник, который будет использоваться для клонирования. Здесь кроме номера диска в системе (sda,sdb), отображается его имя и серийный номер, поэтому вы сможете выбрать нужный диск без труда.
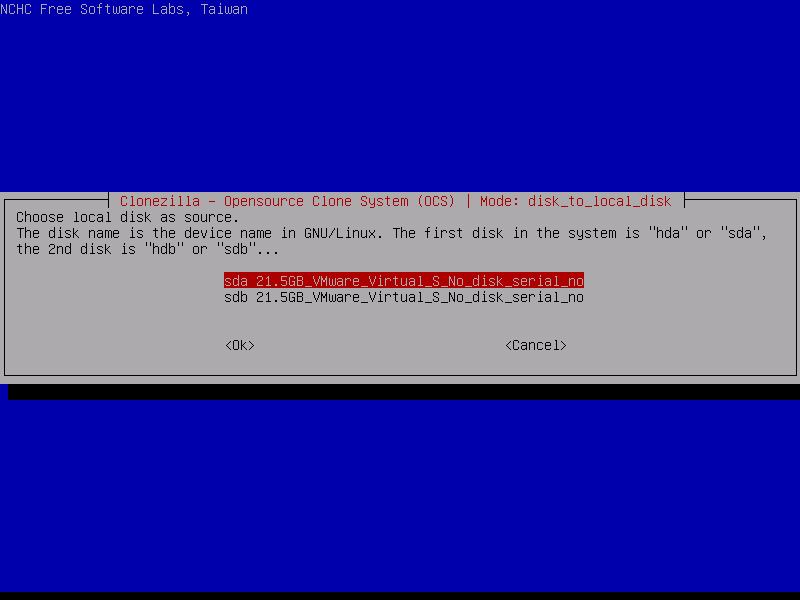
После выбора диска, нажмите Enter.
10. Выбор диска для записи
Дальше выберите второй диск, на который будет вестись запись. Будьте очень внимательны, потому что программа сотрет все данные на это диске. И если вы ошиблись, получится совсем обратное, от того что планировалось.
11. Проверка файловой системы
Если вы уверены что файловая система не повреждена, можете выбрать пропустить проверку Skip checking:

После этого нужно будет еще раз нажать Enter.
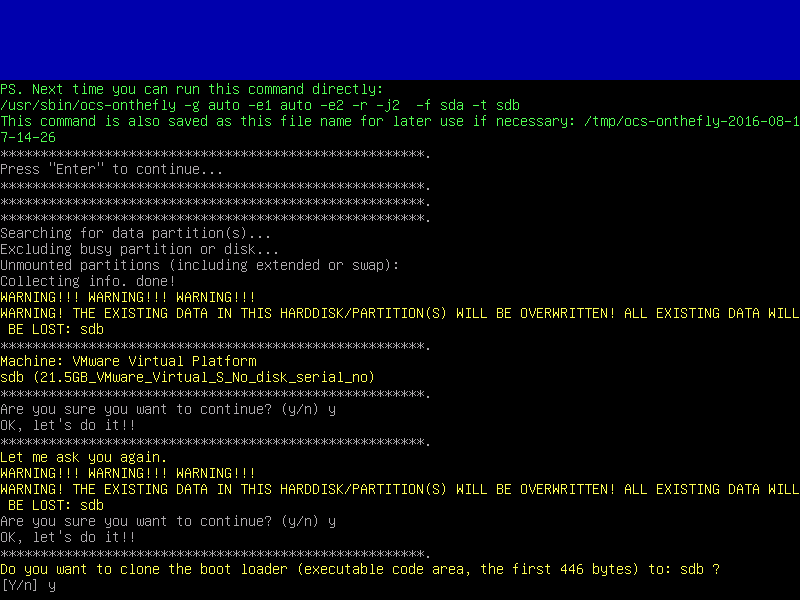
Шаг 12. Подтверждение
Перед тем как начать резервное копирование, утилита отобразит некоторые сведения о выбранных дисках и своей работе. Вам нужно будет нажать два раза Y:
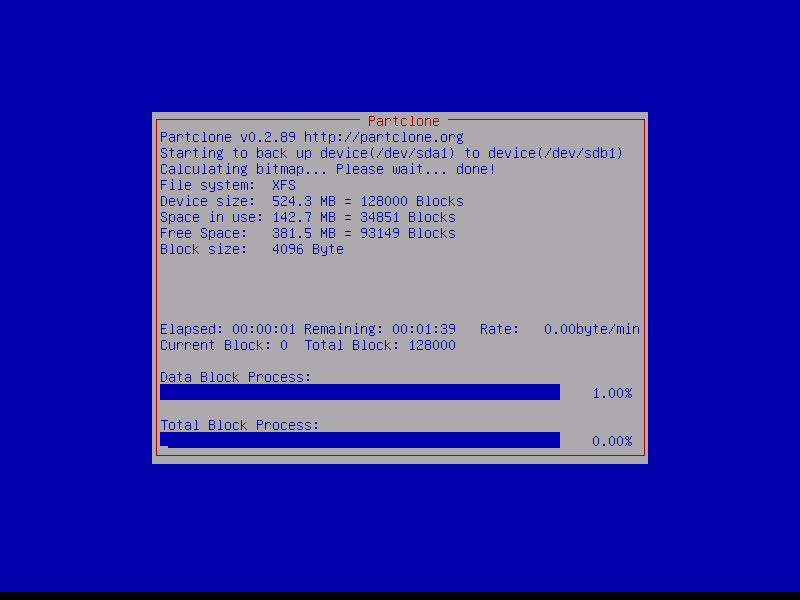
Шаг 13. Копирование
Дальше, после вашего согласия процесс пойдет автоматически. Все данные с исходного диска (или раздела) будут перенесены на другой раздел без вашего вмешательства.
Во время копирования диска Clonezilla отобразит строку процесса, по которой вы сможете оценить сколько осталось данных и времени.
Шаг 14. Завершение
После того как копирование будет завершено, вам будет предоставлена информация обо всем процессе и результате. Нажмите Enter и в появившемся меню вы можете выбрать что нужно делать дальше. Для выключения выберите poweroff.


Вот и все. В случае поломки, вы можете использовать этот диск вместо поврежденного или при неудачном эксперименте можете восстановить из него все данные. Точно так же само выполняется клонирование раздела и клонирование на образ Clonezilla. Дальше рассмотрим восстановление образа Clonezilla.
Восстановление диска Clonezilla
Начальная загрузка и все шаги по подготовке системы к работе выполняются так же как и для клонирования жесткого диска clonezilla в Linux. Все до шага 7. Только нужно выбрать не disk_to_disk, а disk_to_image, чтобы работать с образами дисков.
Шаг 1. Выбор действия.
Дальше нужно выбрать также режим для начинающих и вариант действия restore disk — восстановить диск или restore parrs для восстановления раздела.

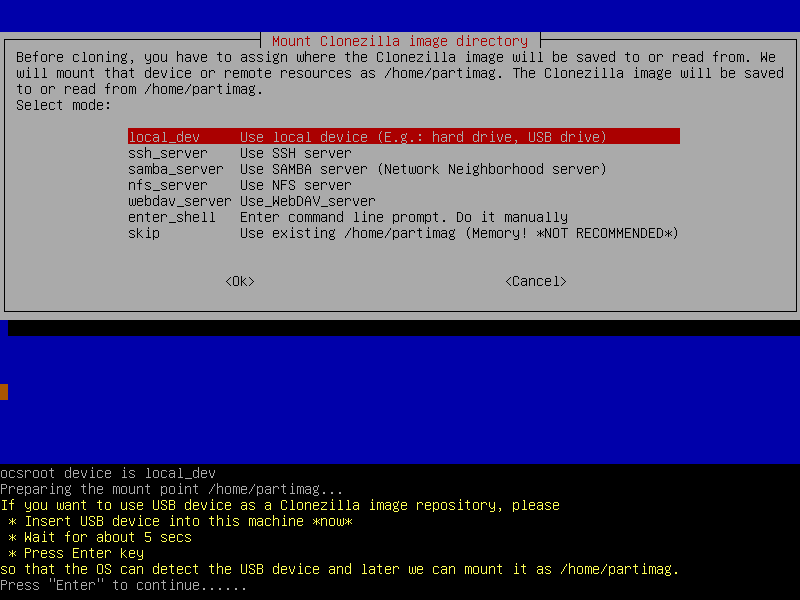
Шаг 2. Расположение
Выбираем откуда будем брать образ, local_dev, локальное устройство:
Шаг 2. Выбор образа
На этом шаге вам предстоит выбрать образ или диск, из которого будем восстанавливать:
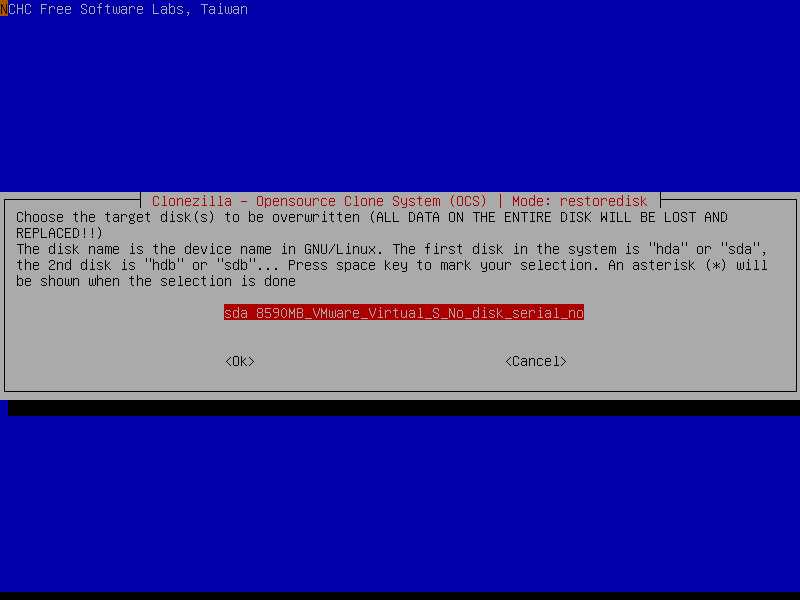
Шаг 3. Диск для записи
Дальше выберите диск или раздел, на который будут вестись запись:
Шаг 4. Подтверждение
Осталось несколько раз нажать Y для подтверждения действия и пойдет процесс восстановления.
Выводы
Вот и все, теперь вы знаете как выполняется резервное копирование clonezilla, а также восстановление из образа clonezilla. После этого вы всегда будете в безопасности и созданная копия может не раз вас спасти от ошибок или неудачных экспериментов с системой. Если у вас остались вопросы, спрашивайте в комментариях!
Обнаружили ошибку в тексте? Сообщите мне об этом. Выделите текст с ошибкой и нажмите Ctrl+Enter.