инструкцияZhiyun CRANE 3 LAB

Во время просмотра этого PDF-
документа вы можете пользоваться
указанными ниже функциями.
Быстрый поиск по
ключевым словам
Введите нужное слово в поле
поиска и нажмите кнопку «Найти».
Быстрый переход между
разделами
Чтобы перейти к нужному разделу,
нажмите на его заголовок в
Содержании.
* Для использования перечисленных выше
функций требуется программа для чтения файлов,
например Adobe Reader.
- Manuals
- Brands
- Zhiyun Manuals
- Camera Accessories
- Crane 3 Lab
- User manual
-
Contents
-
Table of Contents
-
Troubleshooting
-
Bookmarks
Quick Links
The following features are available in
this PDF document.
Quick Keyword Search
Enter the keyword in the search box
and hit the search button
Quick Jump between
Chapters
Click the title of a specific chapter on
the Contents to jump to it
*Reading software such as Adobe Reader is
needed to support the functions above.
Related Manuals for Zhiyun Crane 3 Lab
Summary of Contents for Zhiyun Crane 3 Lab
-
Page 1
The following features are available in this PDF document. Quick Keyword Search Enter the keyword in the search box and hit the search button Quick Jump between Chapters Click the title of a specific chapter on the Contents to jump to it *Reading software such as Adobe Reader is needed to support the functions above. -
Page 2
CRANE 3 LAB User Guide… -
Page 3: Table Of Contents
Contents Packing List ■ Get to Know CRANE 3 LAB ■ Get to Know CRANE 3 LAB ··············································· 2 Interfaces Instruction ■ Camera Image Transmission and Control Module ··················· 3 Charging Procedure ■ Charger and Battery Description ········································· 4 Charging Procedure ························································· 5 Installation ■…
-
Page 4
Download APP ································································ 20 How to Connect Stabilizer to Smartphone/Tablet ···················· 21 ZY Play Main Functions ····················································· 21 Calibration and Firmware Upgrade ■ When do you need to calibrate the stabilizer? ························ 22 Initialization Method ·························································· 22 Calibration and Firmware Upgrade ■… -
Page 5
Packing List The product package comes with the following items. In case that any item is found missing, please contact ZHIYUN or your local selling agent. CRANE 3 LAB Stabilizer Tripod × 1 Quick Release Plate × 1 × 1… -
Page 6: Get To Know Crane 3 Lab
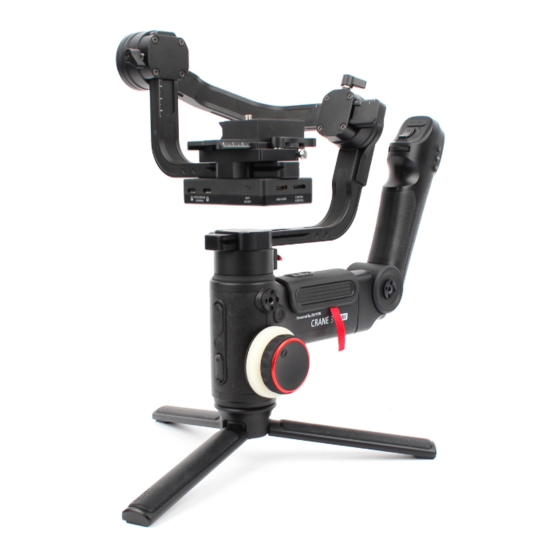
Get to Know CRANE 3 LAB Get to Know CRANE 3 LAB 1. Quick Release Plate 12. Roll Axis Motor 2. Quick Release Plate Latch 13. Roll Axis Latch 3. Quick Release Plate Thumb Screw 14. Control Stick (see more on Page 12 4.
-
Page 7: Interfaces Instruction
Receive HDMI video signals Mini HDMI Interface from the camera 1. Connect and control the camera via the control ca- ble. For more information please refer to ZHIYUN Camera Control Camera Control Cable 5V/1A Forbidden Interface Instruction (see more on Page 8 2.
-
Page 8: Charging Procedure
Charging Procedure When using CRANE 3 LAB for the first time, please fully charge and activate the batteries with the dedicated charging device contained in the package to ensure normal use of the product. Charger and Battery Description Charger Specifications…
-
Page 9: Charging Procedure
2. This stabilizer comes standard with dedicated high-discharge-rate batteries. Please use batteries provided or approved by ZHIYUN only. 3. Please make sure the batteries are fully charged. Undercharged battery or…
-
Page 10: Installation
Installation Tripod Installation • Mount the tripod to the bottom of the stabilizer, then unfold the tripod on a flat surface. Place one tripod leg in parallel with the handle of the stabilizer to achieve maximum stability (as shown above). Battery Installation •…
-
Page 11: Camera Installation
Installation Locked for installation Locked for storage • Each axis of the stabilizer is equipped with a latch. You can use these latches to lock the axes for convenient installation and storage. Camera Installation a. Take out the quick release plate, mount the camera on the quick release plate then tighten the 1/4″…
-
Page 12: Data Cable Connection
2. Image transmission is available only for cameras whose HDMI output are 720P or 1080P. 3. If your camera uses HD HDMI cable , please consult ZHIYUN service team for available sellers. 4. When applying the image transmission function of the stabilizer or using external monitor with Sony cameras, it is not recommended to use video mode as there will be no output from the HDMI port.
-
Page 13
Installation To protect the stabilizer from being interfered with by the cables, you can tie up the cables with the magic strap that comes standard with CRANE 3 LAB as shown below. -
Page 14: Balance Adjustment
Installation Balance Adjustment To facilitate the adjustment procedure, we recommend locking the three axes before the adjustment and unlock and adjust them one by one. • Loosen the quick release plate thumb screw and make the camera grip as close to the tilt axis motor as possible.
-
Page 15
Installation • Unlock the roll axis, slightly loosen the thumb screw of it, push the camera to move left or right until the camera can stay still and hori- zontal to the ground (as shown on the right). Complete this step by tightening up thumb screw. -
Page 16: How To Use
How to Use Buttons Description 1. Power Button[ • Long press for 3 seconds to power on/off the stabilizer. • Double press to enter or exit standby mode. 2. Pan Following Mode Single click to enter Pan Following Mode. 3. Locking Mode Single click to enter Locking Mode.
-
Page 17
How to Use cameras with non-motorized lens, the zoom controller will be able to operate digital zooming. For more information please refer to CRANE 3 LAB Compati- ble List. 7. Parameter Dial Rotate the dial to quickly set camera parameters. -
Page 18: Oled Display Description
How to Use OLED Display Description Interface where camera Interface where camera Menu Interface params settings are params settings are available unavailable Icon Description: Camera successfully connected to stabilizer Video Mode Photo Mode Battery Level (stabilizer) Pan Following Mode Locking Mode Point Of View Mode Following Mode PhoneGo Mode…
-
Page 19: Menu Option Description
Bluetooth. Press Right button for stabilizer firmware version. “1” AB point settings are only available when connecting to ZHIYUN Servo Follow Focus cor- rectly. “2” External control refers to remote control via Bluetooth or cable controls other than local con- trols via the stabilizer.
-
Page 20: Motor Torque Adjustment
How to Use Motor Torque Adjustment The motor torque of the stabilizer needs to be adjusted (3 levels) to adapt the sta- bilizer to cameras and lens of different weight for ideal use. How to adjust: 1. Single press the Menu button and rotate the dial to «motor», then press Right button to enter motor torque setting.
-
Page 21: Control Mode Description
How to Use Control Mode Description Motors circled in red are free to move in line with the movement of the stabi- lizer handle while motors circled in grey are locked. Tilt Axis Tilt Axis Roll Axis Roll Axis Pan Axis Pan Axis Pan Following Mode (PF): Single…
-
Page 22: Manual Angle Lock
How to Use Tilt Axis Tilt Axis Roll Axis Roll Axis Pan Axis Pan Axis PhoneGo Mode (GO): Press and Vortex Mode (V): Double click POV hold PhoneGo mode button to enter mode button to enter The camera pans left/right and tilts up/ The camera tilts with a 90°…
-
Page 23: Dc 8.0 V Power Outlet Usage
How to Use DC 8.0 V Power Outlet Usage The DC 8.0 V power outlet on the side of the stabilizer can be used for charging the Canon 5D camera through a DC connector DR-E6 (purchase separately). Charging 5D3/5D4 camera: Powering on: 1.
-
Page 24: App Operations
APP Operations Instruction of Image Transmission System and ZY Play 1. CRANE 3 LAB image transmission system can only be applied when combined with ZY Play. 2. Before applying image transmission function, please confirm that the camera control cable and HDMI cable are properly connected.
-
Page 25: How To Connect Stabilizer To Smartphone/Tablet
HDMI cable. After balance adjustment, power on the stabilizer. Turn on Bluetooth and WiFi on the mobile device. 2. Open ZY Play and select the product page of CRANE 3 LAB. Click «connect device», and select the stabilizer with the corresponding Bluetooth name (check the name of your Bluetooth in About, naming format: CRANE 3 LAB_XXXX ).
-
Page 26: Calibration And Firmware Upgrade
Calibration and Firmware Upgrade When do you need to calibrate the stabilizer? Please calibrate the stabilizer when necessary. When 1. Slight deviation is found in the tilt angle of the camera in level position after turning on. 2. Slight deviation is found in the roll angle of the camera in level Initializing the position after turning on.
-
Page 27: Calibration And Firmware Upgrade
Calibration and Firmware Upgrade Six-side Calibration A. Six-side calibration via OLED display guide: 1. Power on the stabilizer and enter standby mode, then press Menu and rotate the dial to «Calibration» option. Press right to confirm. 2. As seen below, conduct six-side calibration following the 6 steps shown in the graphs, finish by pressing any button to exit the menu.
-
Page 28: Calibration And Firmware Upgrade
Calibration and Firmware Upgrade STEP 4 Press the latch on the tilt axis arm against a level surface and wait until the display of the stabilizer shows “STEP 5” (as shown above). STEP 5 Press another side of the camera image transmission and control module against a level surface and wait until the display of the stabilizer shows “STEP 6”…
-
Page 29: Calibration And Firmware Upgrade
Calibration and Firmware Upgrade Motor Fine-tuning Fine tune the motor through stabilizer: 1. Power on the stabilizer and enter standby mode, then rotate the dial and press right to enter the «angle» option; 2. Adjust the value of the tilt and roll axis angle to your actual needs. Fine tune the motor through APP: Connect the stabilizer to ZY Play.
-
Page 30: Trouble Shooting
After the stabilizer starts Internal problem of Please contact the after-sales ser- up, the motor is «weak». stabilizer vice for return. *If the above troubles cannot be eliminated or others occur, please contact ZHIYUN official after-sales service.
-
Page 31: Product Specifications
Sony A7 and 16-35mm F2.8 lens in- stalled. The ambient temperature is 25-degree Celsius and the combo is placed at rest throughout the test session. Note: Data in this user guide are collected through lab tests carried out by ZHIYUN.
-
Page 32: Disclaimer And Warning
Guilin Zhishen Information Technology Co., Ltd. reserves all rights for final explanation on this instruction and other documents related to CRANE 3 LAB. The information is subject to update without notice. Please visit www. zhiyun-tech.com to obtain the latest product information.
-
Page 33
CAUTION: 1. CRANE 3 LAB is a high-precision device. Damage may be caused to CRANE 3 LAB if it is dropped or subject to external force, and this may re- sult in malfunction. 2. Make sure the rotation of the stabilizer axes is not blocked by external force when CRANE 3 LAB is turned on. -
Page 34
2. Do not attach the batteries to a wall outlet or car charger socket directly. Always use a ZHIYUN approved adapter for charging. ZHIYUN takes no responsibility if the battery is charged using a non-ZHIYUN charger. -
Page 35: Warranty Terms
1. Customers are entitled to replacement or free repair service in case of quality de- fect(s) found in the product within 15 days upon receipt of the product. 2. Customers are entitled to free repair service from ZHIYUN for any product proven defective in material or workmanship that results in product failure during normal consumer usage and conditions within the valid warranty period, which is 12 months counting from the date of selling.
-
Page 36: Contact Card
Contact Card Search and follow “Zhiyun Tech” on Facebook, Instagram, Twitter, YouTube and Vimeo to connect with us. Tel: +86- 773-3561275 USA Hotline: +1 808-319-6137,9:00-18:00 GMT-7,Mon-Fri Europe Hotline: 0031-297303057,10:00-17:00 GMT+1,Mon-Fri Web: www.zhiyun-tech.com E-mail: service@zhiyun-tech.com Address: 6th floor Building No.13 Creative Industrial Park, GuiMo Road, Qixing District, Guilin CertificateofQuality…
Инструкцию для Zhiyun Crane 3 Lab (CR103) на русском языке, в формате pdf можно скачать с нашего сайта. Наш каталог предоставляем Вам инструкцию производителя фирмы Zhiyun, которая была взята из открытых источников. Ознакомившись с руководством по эксплуатации от Zhiyun, Вы на все 100% и правильно сможете воспользоваться всеми функциями устройства.
Для сохранения инструкции «Стабилизатор Zhiyun Crane 3 Lab (CR103)» на русском языке на вашем компьютере либо телефоне, нажмите кнопку «Скачать инструкцию». Если активна кнопка «Инструкция онлайн», то Вы можете просмотреть документ (manual), в своём браузере онлайн.
Если у Вас нет возможности скачать инструкцию по эксплуатации либо просмотреть её, Вы можете поделиться ссылкой на эту страницу в социальных сетях и при удобном моменте скачать инструкцию. Либо добавьте эту страницу в закладки Вашего браузера, нажав кнопку «Добавить страницу в закладки браузера».
Стабилизатор Zhiyun Crane 3 Lab Creator Package
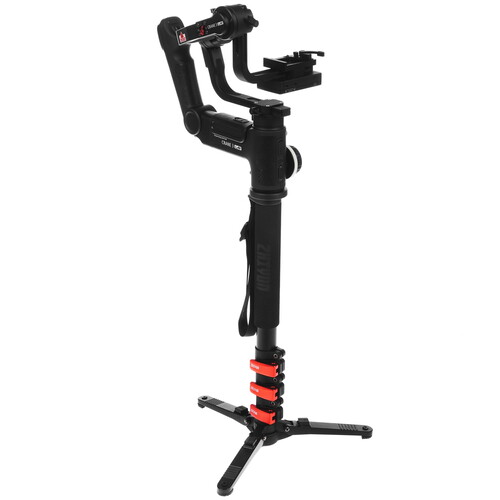
3х-осевой, электронный, макс.грузоподъемность — 4.5 кг, BT
подробнее

нет отзывов
Код товара: 1354836