Ярослав писал(а):
Зайдите на сайт Yaskawa. Там есть собственная утилита общения с частотниками, возможно там найдете и прошивку.
Утилиту скачал еще раньше. там да, есть 1022
Но вопрос в чем:
на конвейере стоят частотники, недавно работаю, на всякий случай, сразу, из частотнтков скачал настройки, создал базу (прг у всех 1014). Скачивал программой CX — Drive,
часть частотников (V1000 омрон) вышли из строя, купили новые (яскава), там PRG 1022, а в CX-DRIVE максимум 1021.
(обновления скачал здесь на сайте, потом пробовал скачать с официального сайта,
в списке предлагаемых обновлений есть все программы CX-ONE, но CX-Drive нет)
может, то что яскава с омроном больше не работает, поэтому нет новых обновлений для частотников яскава, или я что-то не так делаю?
сейчас пробовал из CX-Drive загрузить скачанные настройки в новые частотники, внизу красная полоса о несоответствии прошивки.
вопрос:принципиально ли это, так понял, что добавлены несколько новых параметров в новой прошивке (1022) и по идее все должно работать?
если нет придется вручную перенести в яскавовскую утилиту параметры и загрузиться с нее?
Фирма OMRON для настройки своих приводов предлагает программное обеспечение CX-Drive. Оно позволяет производить параметрирование частных преобразователей, сервоприводов и мониторинг их работы.
Внешний вид CX-Drive.
CX-Drive входит в комплект поставки общего пакета программного обеспечения CX-One фирмы OMRON. Также CX-Drive можно приобрести отдельно по стоимости что-то около 200 евро. При поставке самостоятельной версии в комплект поставки входит соединительный кабель для подключения к преобразователям. Кабедь ничего, сильно страшного, не представляет. С одной стороны обычный разъем DB-9 для COM-порта, с другой сетевая вилка RJ-45. При желании такой кабель можно изготовить самостоятельно. Напрягает только использование COM-порта. В современных ноутбуках, как правило, его нет. Требуется дополнительный переходник. При этом CX-Drive может отказаться работать с некоторыми моделями. Я использую простой преобразователь USB-COM от МастерКит. С программами для оборудования SIEMENS проблем не возикло, а CX-Drive не смог запустить обмен с инвертором, хотя и обнаруживал его. Проблема решилась установкой последних версий драйвера USB-COM.
Работа с CX-Drive достаточно проста, особенно если есть опыт общения с другим ПО от OMRON. К тому же моя версия 1.5 оказалась русифицированной, что еще больше упростило ее освоение. Некоторые сложности возникли при настройках модели привода перед началом работы, но их можно избежать если воспользоваться функцией «Автоопределение». При ее активации, программа сканирует все возможные каналы связи с преобразователем и определяет тип последнего.
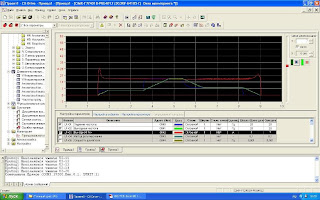
Одной из самых интересных функций программного пакета является возможность мониторинга внутренних параметров с построением графиков. При этом для инверторов можно увидеть даже такие расчетные параметры как активная и индуктивная составляющие тока при векторном управлении.
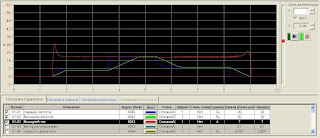
Графики тока и выходной частоты.
К сожалению, имеющаяся у меня версия 1.5, уже устарела. Например не получилось установить соединение с преобразователем F7 со специальной прошивкой S8152. Программа привод видела, но общаться с ним отказалась, ссылаясь на несовместимость прошивки. Очевидно не будут поддерживаться и новые модели инверторов. Остается надеятся, что с официального сайта www.omron.com можно загрузть обновление.
-
Contents
-
Table of Contents
-
Bookmarks
Quick Links
Related Manuals for Omron CX-ONE — INTRODUCTION GUIDE 1
Summary of Contents for Omron CX-ONE — INTRODUCTION GUIDE 1
-
Page 1
Cat. No. R135-E1-02… -
Page 2
Disk1: CX-One_Manuals English CX-One Setup Manual W444-E1-02.pdf Before using this product, you must read “Introduction” and “Safety Cautions”. Cautions and detailed explanation are available on Help and PDF Manual. * Acrobat Reader 4.0 or later is required to read the PDF file. -
Page 3: Table Of Contents
3. Start-Up / Adjustment On-site 3-1. Program Modification 2-23 2-25 3-2. Unit Parameter Change Chapter 3 Example of PLC Network System Construction by CX-One Workflow in This Chapter 1. PLC Network Start-Up 1-1. PLC Start-Up 1-2. DeviceNet Start-Up 1-3. NT Link Start-Up 1-4.
-
Page 6: What Is Cx-One
CPS (Component and network Profile Sheet) is definition information of CS/CJ series Unit/Components in CX-One. It is provided as a CPS file (XML format file). CX-One recognizes CS/CJ series Unit by information in this CPS file. CPU Bus Units and Special I/O Units setting is created based on this CPS file.
-
Page 7: Cx-One Component Checklist
3. CX-One Component Checklist 3. CX-One Component Checklist CX-One consists of the following items. Check if they are included in the package. CX-One Components Setup Disk (CD-ROM) 3 disks CX-One Introduction Guide (this document No.R135) Printed document and PDF data on CD-ROM CX-Programmer Introduction Guide (No.R132)
-
Page 8: Cx-One Installation Procedure
Check if the language is appropriate, then click the [OK] button. Click [OK] The CX-One splash screen is displayed and CX-One installation starts. Uninstall older version of tools such as PLC Tools (PLC System setting and I/O Table), CX-Server, and CX-Programmer if they have been installed. Always click [OK]…
-
Page 9
Click [Next] The [License Agreement] dialog box is displayed. Read the software license agreement carefully. If you agree with all items, select the [I accept the terms of the license agreement] radio button and click the [Next] button. Select the radio button Click [Next] The [User information] dialog box is displayed. -
Page 10
The [Installation Folder Selection] dialog box and [Setup Type] dialog box are displayed. Select an installation folder, then click [Next] By selecting [Custom], you can individually select and Select the radio button install Support Software [Complete] from the CD-ROM. Click [Next]… -
Page 11
CX-One Support Software is started. *2: If you do not have an Internet connection, or you do not want to register online, fill out and send the user registration card that comes with the product. -
Page 14: Chapter 2 Example Of Plc System Construction By Cx-One
This chapter describes an example of PLC System construction from design, online debugging on the actual machine, and start-up/adjustment on-site as shown below. CX-Programmer is used for ladder program creation and CPU Bus Units and Special I/O Units (SIOU) setting, while CX-Designer is used for indicator screen generation. Also, a program simulation Support Software CX- Simulator is used as a debugging example.
-
Page 15: Design
Project Units/SIOU Starting CX-Programmer Starting CX-Programmer From the [Start] menu, select [Programs] > [OMRON] > [CX-One] > [CX-Programmer] > [CX- Programmer] to start CX-Programmer. (Or select [All Programs] > [OMRON] > [CX-One] > Starting CX-Programmer [CX-Programmer] > [CX-Programmer]) Creating a New Project Click this button to create a new CX-Programmer project.
-
Page 16: Checking I/O Assignment
Double-click [ I/O Table and Unit Setup] Double-click [ I/O Table and Unit Setup]. Right-click Empty Slot, select [Add Unit] and determine CPU type. Then select [General Purpose Analog I/O] from Unit selection window. Right-click Select [Add Unit] Click + symbol on…
-
Page 17: Offline Debug
Setting Starting CX- Creating Unit Checking I/O Saving Design CPU Bus Programming Offline Debug Programmer Configuration Assignment a Project Units/SIOU Select Unit Type. Click Select Unit and Number. Enter Unit number. Click…
-
Page 18
Programmer Configuration Assignment a Project Units/SIOU The Analog Unit is registered to the I/O Table as shown below. Set up the next analog Unit’s parameter. Double-click the analog Unit The Analog Unit Setup Screen is displayed. CPU Bus Units and Special I/O Units Setting… -
Page 19: Saving A Project
The NCF Unit resides within a position control Unit. Nest, start CX-Motion-NCF using [Start with Settings Inherited]. When opening a stored project file after starting the dedicated tool, select [Start Only]. If [Start with Setting Inherited] is selected, a new project is created.
-
Page 20
Set axis parameters for axis 01. Click Edit servo parameters. Double-click the servo driver Set servo parameters for axis 01 as shown below. Pn50A(input signal selection 1): 2881 Click Pn50B(input signal selection 2): 8883 Pn511(input signal selection 5): 6541 Save the project… -
Page 21
Using the MCH Unit Using the MCH Unit When using the MCH Unit (CJ1W-MCH71) instead of the NCF Unit, use the following settings. As with Analog Unit, register the MC Unit to the I/O table. The MCH resides within the Motion Controller. -
Page 22
By registering Units to the I/O Table, you can check I/O assignment status. Check I/O assignment In addition, you can check addresses assigned to actual I/O with a print out. This I/O assignment information can also be checked by IQ indication (IN:I, OUT:Q) during ladder programming. -
Page 23
OMRON FB Library is a collection of Components that OMRON provides as a Function Block to use functions of OMRON’s Units for PLC and FA Components much easier on a PLC program. * For details, see FB Introduction Guide, Chapter 1. -
Page 24
Project Units/SIOU How to use Smart Active Parts How to use Smart Active Parts This section describes how to use Smart Active Parts. In this example, NCF Smart Active Parts See Library See Library “Adjust Operation” is used. From [Start] menu, select [Programs] > [OMRON] > [CX-One] > [CX-Designer] > [CX-Designer Ver.1.0] to start CX-Designer. -
Page 25
Assignment a Project Units/SIOU Offline Debug Offline Debug This section describes how to debug a program using CX-Simulator, a ladder simulation tool, without the PLC. Additionally, Switch Box Utility is used as a virtual input tool. Click (Simulator connection button) Program transfer starts. -
Page 26
If you run a dedicated Support Software such as CX-Motion-NCF or CX-Designer when CX- Programmer is started, the same default folder location as that of CX-Programmer is used for Programmer is started, the same default folder location as that of CX-Programmer is used for reading and saving files. -
Page 27: Online Debug On A Machine
Use CX-Programmer to read the project “Sample1” saved in the previous section. the file name “Sample1” Click Ladder program “Sample1” is retrieved. In I/O Table Unit setting function, the Unit parameter setting configured in the previous section is also retrieved. Double-click the I/O Table Unit setting…
-
Page 28: Online Connection To Plc
Project Debug to PLC Machine Online Connection to PLC Online Connection to PLC Verify that PLC model and communications setting created offline and the actual PLC are correct. Double-click PLC Check communications setting. Check PLC model. Confirm that automatic Confirm that automatic…
-
Page 29
Transferring to the Machine Transfer programs and Unit setting parameters created by offline project to the PLC. In this example, data is sent at the same time to various Units using the batch transfer function. [Data to be sent] CPU Unit: Ladder program and PLC System setting data, I/O Table data… -
Page 30
Project Debug to PLC Machine Then data is sent at the same time to NCF Unit and the servo driver connected to NCF Unit. [Data to be sent] NCF Unit: Common parameters, axis parameters Servo Driver: Servo parameters From CX-Programmer, display the I/O Table, then start CX-Motion-NCF by [Start Only]. -
Page 31
The Unit restart confirmation screen will be displayed during data transfer. Click the [OK] button after confirming safety. Also, in the case of communication was not established between the NCF Unit and the servo driver, confirm the axis number and restore power to the NCF Unit and servo driver. -
Page 32
The Unit restart confirmation screen will be displayed during data transfer. Click the [OK] button after confirming safety. Also, in the case of communication was not established between the MCH Unit and the servo driver, confirm the axis number and restore power to the MCH Unit and servo driver. -
Page 33
Project Debug to PLC Machine Transferring NS screen data Transferring NS screen data This section describes how to transfer screen data to the NS through PLC without changing Start NS transfer Start NS transfer cables. program program From [Start] menu, select [Programs] > [OMRON] > [CX-One] > [CX-Designer] > [CX-Designer Ver.1.0] to start CX-Designer. -
Page 34: Program Debug
Program Debug Transfer programs and Unit setting parameters created by an offline project to the PLC. In this example, data is sent at the same time to various Units using the batch transfer function. Monitoring Monitor ON/OFF status of contacts and coils.
-
Page 35
PLC Machine Monitoring -2 Changing the Current Parameter Value Monitoring -2 Changing the Current Parameter Value Change the current value of contact or channel through conductive monitoring. Move the cursor to D100 of input parameters Right-click, then select [Set/Reset (S)] > [Value… -
Page 36: Start-Up / Adjustment On-Site
[Online Edit] > [Start] Shortcut [Ctrl]+[E] Double-click Double-click Move the cursor on the contact you want to modify and double-click Enter the contact number you want to modify (W20.01 in a circuit example). Select [Program] > [Online Edit] > [Transfer Change] Shortcut [Ctrl]+[Shift]+[E]…
-
Page 37
Verifying Program Verifying Program After modification on-site, you can verify it with the designed program and display the differences graphically. This allows for easier checking of the parts modified on-site. 1. Read the designed program. In this example, read “Sample1”. -
Page 38: Unit Parameter Change
This allows for easier checking of the parts modified on-site. 1. Read the designed program. In this example, read “Sample1”. Then connect online. (If you have already read it in the previous section’s operation, this is not required) Click [I/O Table/Unit Open the I/O Table/ Unit setting, then double-click the AD Unit.
-
Page 40: Workflow In This Chapter
Workflow in This Chapter Workflow in This Chapter This chapter describes an example of PLC network System construction from start-up to reassembly and on-site adjustment as shown below. This chapter mainly describes how to start up the System using CX-Integrator, an integrated start-up Support Software for various PLC networks.
-
Page 41: Plc Network Start-Up
Online Connection to PLC (Automatic Online Connection) Online Connection to PLC (Automatic Online Connection) 1. From the [Start] menu, select [Programs] > [OMRON] > [CX-One] > [CX-Integrator] > [CX- Integrator] to start CX-Integrator. (Or select [All Programs] > [OMRON] > [CX-One] > [CX- Integrator] >…
-
Page 42
PLC and right-click Select [Error Log] (2) Check the PLC error. Examples of IO settings error and CPU Bus Units and Special I/O Units number overlap error are shown below. You can check an error in a CPU You can check an error in a CPU Unit and error history. -
Page 43
Verification Diagnosis • To change the Unit number, change the rotary switch of CPU Bus Units and Special I/O Units and restart power. • Check if any error occurs in the PLC (CPU Bus Units and Special I/O Units number overlap error should be solved). -
Page 44: Devicenet Start-Up
The Controller Link network number is same for other PLCs. (4) Check if the error is solved. Reconnecting CX-Integrator • Re-connect to the PLC. • All errors should be solved and no error messages should be displayed. • The network number is displayed on the communications Unit.
-
Page 45: Nt Link Start-Up
Create a scan list of DeviceNet and determine the memory map. Create a scan list of DeviceNet and determine the memory map. (1) Connect to PLC online, then connect to DeviceNet through the online connection information Right-click a DeviceNet window.
-
Page 46
I/O communications have been recognized and communications have been established. (7) Configure DeviceNet remote I/O communications (free assignment) and register the Slave to the Master. Double-click a Master Unit (CJ1W-DRM21) icon Two Slaves are now registered to the Master. -
Page 47
⇒ Release NS Connecting . . . message. ⇒ Check NS configuration through CX-Integrator. ⇒ Check NS configuration through CX-Integrator. (1) Connect to PLC online, then connect to a CPU Unit through the online connection information window. Right-click a CPU Unit… -
Page 48
(5) Screen message Connecting . . . is now cleared. (6) Next, upload the network configuration information of NT Link. Select [Transfer [Network to PC]] Click [Yes] (7) After the transfer is confirmed, connected devices on the current NT Link network are displayed as shown below. -
Page 49
⇒ ON state of Controller Link Master Unit’s INS LED ⇒ Check Controller Link configuration through CX-Integrator. ⇒ Check Controller Link configuration through CX-Integrator. (1) Connect to PLC online, then connect to Controller Link Unit through the online connection information window. Right-click a Controller… -
Page 50
Verification Diagnosis の立ち上げ (3) After the transfer is confirmed, connected devices on the current Controller Link network are displayed as shown below. In this example, although three PLCs are actually connected through the Controller Link, in this start-up example explanation assume that only two PLCs are displayed. -
Page 51
• Communication settings of the serial communications Unit and the two temperature controllers are unmatched. • Communication settings between the two temperature controllers are unmatched as well. (1) Connect to PLC online, then connect to a CPU Unit through the online connection information window. Right-click an SCU port in… -
Page 52
(4) Re-upload the network configuration information of CompoWay/F. Perform the step (2) previous page from the previous page. Click [OK] button in a dialog Only the Units for which connection is established are displayed in the [Network Structure] box indicating completion of window, as shown on the next page. transmission… -
Page 53
Units with incorrect communications setting are not displayed. (5) Check the settings of the temperature controller that is not displayed in the [Network Check the temperature Structure] window (baud rate, data length, stop bit, parity, Unit number), configure it correctly, controller that is not then re-upload (Perform step (2) from two pages ago). -
Page 54: Saving System Configuration
[Transfer [Network to PC]] (3) Send the network configuration of NT Link to the personal computer. Select the connection menu on the CPU port, then select upper link port and NT Link. Next, select the transmission menu on the CPU port.
-
Page 55
Saving System Configuration (2) (5) Connect to a PLC on the Controller Link network. Select a remote PLC on the Controller Link network configuration screen (a PLC without a square symbol) to switch the connection destination to the PLC. Destination PLC communication device configuration is displayed in the online connection information window. -
Page 56: System Configuration Verification
Connect to a target DeviceNet from the workspace and verify the network Structure. Select [Connect] Select [Compare] (3) Any error found in the configuration verification will be displayed in the verification result dialog box. If you find a Slave that is not on…
-
Page 57
Select [Compare] (7) Connect to a PLC on the Controller Link network. Connect to a remote PLC using the same procedure as the step (5) for saving a System configuration. Use steps from (2) to (4) to verify the DeviceNet network. -
Page 58: Controller Link Diagnosis
Confirm that the Controller Link connection is correct with an upper level System. ⇒ Diagnosis result check OK ⇒ Diagnosis result check OK (1) Connect to PLC online, then connect to Controller Link Unit through the online connection information window. Right-click a DeviceNet…
-
Page 59: Servo/Inverter Settings
Select Settings to set detailed Inverter specifications. Click and save the data. Save data If more than one drive setting data is edited, drive data is saved by drive type and a total overview is saved in a work file.
-
Page 60
Connecting a Servo or Inverter to a Personal Computer Serially. Connecting a Servo or Inverter to a Personal Computer Serially. From the [Start] menu, select [Programs] > [OMRON] > [CX-One] > [CX-Drive] > [CX-Drive] to start CX-Drive when you connect Servo or Inverter with serial connection to your computer. -
Page 62: Chapter 4 Appendix 1. Personal Computer Requirements
The required memory depends on the CX-One Support Software. See the User’s manual for details. (Note 3): An RS-232C port is required for connection with a PLC using CX-One Support Software. If you only have USB on your personal computer, use a USB-RS-232C conversion cable (CS1W-CIF31).
-
Page 63: List Of Software To Be Installed
Middleware required for communications between CX-One Support Software and OMRON’s Components such as PLC, indicator, or temperature controller. About 1.8GB of free hard drive space is required on your personal computer to install all CX-One Support Software. Make sure that sufficient free space is available.
-
Page 64: Comparison Of Functions Between Conventional Support Software And Cx-One
Setup data can be saved in a parameter way as other I/O memory areas for saving setting data file for each Unit, or into a CXP into a CXP project file or as a data file of project file for entire Units’ parameter settings. file memory.
-
Page 65
[Edit Parameters] to edit. Routing Table By CX-Net (Routing Table By selecting [Tools] > [Start Routing Table] Component) in CX-Programmer. from CX-Integrator to use Routing Table Component. (Note) I/O Table can be started from CX-Programmer or CX-Integrator on CX-One.
This manual is also suitable for:
Cx-one
2
11
СОДЕРЖАНИЕ
Введение
. . . . . . . . . . . . . . . . . . . . . . . . . . . . . . . . . . . . . . . . . . . . . . . . . . . . . . . . . . .
. . . .
3
Составные
части
ингалятора
. . . . . . . . . . . . . . . . . . . . . . . . . . . . . . . . . . . . . . . . . . . .
4
Меры
предосторожности
. . . . . . . . . . . . . . . . . . . . . . . . . . . . . . . . . . . . . . . . . . . . . . . .
5
Важные
указания
по
применению
ингалятора
. . . . . . . . . . . . . . . . . . . . . . . . . . .
6
Подготовка
к
работе
. . . . . . . . . . . . . . . . . . . . . . . . . . . . . . . . . . . . . . . . . . . . . . . . . . . . .
6
Чистка
ингалятора
. . . . . . . . . . . . . . . . . . . . . . . . . . . . . . . . . . . . . . . . . . . . . . . . . . . . . .
8
Замена
фильтра
. . . . . . . . . . . . . . . . . . . . . . . . . . . . . . . . . . . . . . . . . . . . . . . . . . . . . . . .
8
Возможные неисправности
и
способы
их
устранения
. . . . . . . . . . . . . . . . . . . . . . . . . . . . . . . . . . . . . . . . . . . . . . . .
9
Технические
характеристики
. . . . . . . . . . . . . . . . . . . . . . . . . . . . . . . . . . . . . . . . . . . .
9
Адреса региональных торговых представительств
и
центров
технического
обслуживания
OMRON
в
России
. . . . . . . . . . . . . .
1
1
Гарантийный талон
ПРЕДСТАВИТЕЛЬСТВА OMRON В РОССИИ И ЦЕНТРЫ
ТЕХНИЧЕСКОГО ОБСЛУЖИВАНИЯ OMRON В РОССИИ
1.
Официальным представителем OMRON Healthcare в России является ЗАО «КомплектСервис»,
103006, Москва, Воротниковский пер., д. 7, стр. 3, тел.: (095) 299/40/64, 209/37/31,
e/mail: omron@dol.ru, www.omron/med.ru.
Часы работы торгового центра и отдела технического обслуживания OMRON: с 10.00 до 18.00,
кроме субботы и воскресенья
2.
Братск, филиал «ОМРОН/Восток», тел.: (3953) 36/24/24
3.
Волгоград, «ОМРОН/Нижняя Волга», ул. Землянского, д. 7, оф. 4, тел.: (8442) 34/40/77
4.
Воронеж, «ОМРОН/Воронеж», ул. Грамши, д. 73а, тел.: (0732) 51/98/47, 76/74/76
5.
Екатеринбург, OOO «Мединвест/Регион», ул. 8 Марта, д. 13, оф. 513, тел.: (3432) 56/31/87
6.
Иркутск, «ОМРОН/Восток», ул. Трилиссера, д. 87, тел.: (3952) 20/66/87, 20/51/41,
postmaster@omron.irkutsk.ru
7.
Иваново, Аптечный склад «Новый», ул. Колесанова, д. 11/2, тел.: (0932) 23/67/94, 42/61/43
8.
Калуга, ЗАО «МТК», Правобережье, 2/й Академический пр., д. 13, тел.: (0842) 72/98/76, 72/81/81
9.
Кемерово, филиал «ОМРОН/Сибирь», ул. Тайшетская, д. 1, тел.: (3842) 22/06/46
10.
Киров, ООО «Электромаш/2», ул. Производственная, д. 33а, тел.: (8332) 25/45/09, 29/37/14
11
Краснодар, «Медтехника ОМРОН/Кубань», ул. Московская, д. 5, тел.: (8612) 75/92/68
12.
Красноярск, фирма «ОМРОН/Енисей», ул. Красной Гвардии, д. 21, оф. 602,
тел.: (3912) 21/13/82, 21/24/83, 55/70/97
13.
Минск (Беларусь), СП «Группа МБЛ/Бел», ул. Немига, д. 8,
тел.: (1037517) 226/56/54, 227/74/34, 227/81/24
14.
Нижний Новгород, «Медтехника ОМРОН Нижний Новгород», ул. Торговая, д. 12,
тел.: (8312) 78/06/84, 78/06/89, omron@r52.ru, www.omron.r52.ru
15.
Новосибирск, «ОМРОН/Сибирь», ул. Немировича/Данченко, д. 169,
тел.: (3832) 46/18/11, 46/20/68, sbc@telefun.ru
16.
Ростов/на/Дону, «ОМРОН/Ростов/на/Дону», ул. Вавилова, д. 54, тел.: (8632) 77/97/41
17.
Самара, филиал ЗАО «КомплектСервис», ул. Самарская, д. 140, тел.: (8462) 32/81/52
18.
Санкт/Петербург, продажа: ЗАО «Генезис», В. О., 24 линия, д. 27а,
тел.: (812) 329/81/53, 329/56/88;
техническое обслуживание: «ОМРОН/Оптисервис», просп. Просвещения, д. 78,
тел.: (812) 557/11/50
19.
Смоленск, фирма «Партнёр/Март», ул. Твардовского, д. 1в, тел.: (0812) 52/87/00, 52/66/68
20.
Тула, ТПГПВТ «Здравэкспорт», тел.: (0872) 20/01/87, 27/96/25
21.
Тюмень, филиал «ОМРОН/Сибирь», пейдж.: (3452) 45/10/77, аб. 5927
22.
Уфа, OOO «Фирма МЕГИ», б/р Х. Давлетшиной, д. 30, тел.: (3472) 52/08/63, 53/35/88
Маяковская
300 м
ул. Садовая/Триумфальная
Воротниковский пер.
Аптека
Воротниковский пер., д. 7
стр. 3
авт.
шлагбаум
Компания OMRON ведет свою историю с 1933 года. Сегодня она
входит в десятку крупнейших японских фирм и насчитывает около
100 подразделений по всему миру.
OMRON — официальный спонсор Всемирной Лиги Гипертонии,
мировой лидер по производству приборов для измерения артериаль-
ного давления (тонометров).
Медицинские приборы OMRON:
—
тонометры
для домашнего контроля артериального давления;
—
небулайзеры
для лечения заболеваний органов дыхания;
—
медицинские массажеры
;
—
определители жировых отложений
;
—
шагомеры
заслужили самые добрые отзывы как за рубежом, так и в России (в
том числе у врачей Медицинской Академии им. И. М. Сеченова,
Детской клинической больницы № 13 им. Н. Ф. Филатова, Цент-
рального Военного Туберкулезного госпиталя).
Будьте здоровы вместе с OMRON!
Контакты
(383)383-25-35
г.Новосибирск, ул. Петухова 63/4, 2 этаж, офис 14
- Главная
- Каталог продукции
- Омрон
- Программное обеспечение
- CX-Drive
- Особенности
- Регистрация и загрузка
- Загрузка
Единый программный инструмент для настройки и обслуживания преобразователей частоты (инверторов) и сервоприводов
Сэкономьте свое время и упростите конфигурирование, пуско-наладку и обслуживание инверторов и сервоприводов, используя единый программный инструмент. CX-Drive поддерживает особенности новых серий сервоприводов Accurax G5 и инвертора MX2.
- Поддерживает весь модельный ряд сервоприводов и инверторов Omron
- Мастер автоматической настройки
- Функция FFT, анализ частоты резонанса механической системы
- Простое конфигурирование приводов и мониторинг
- Графики в режиме реального времени и трассировка данных
- Полный доступ к устройствам по одному соединению
- Удаленный доступ
Регистрация и загрузка программного обеспечения

В этом разделе на нашем веб-сайте вы сможете зарегистрировать ваше программное обеспечение Omron. После регистрации номера лицензии вы получите доступ к соответствующим файлам обновления и поддержки. Также в этом разделе можно бесплатно загрузить несколько программных приложений и инструментов.