На чтение 9 мин Просмотров 17.6к.

Юрий Санаев
Системный администратор. Менеджер по продажам компьютеров и wi-fi оборудования. Опыт работы – 10 лет. Знает о «железе» и софте все и даже больше.
D-Link DIR-842 – двухдиапазонный беспроводной маршрутизатор, один из лучших в модельном ряду известного производителя. Среди достоинств устройства – надежность, простота установки и настройки, легкость управления. Роутер D-Link DIR-842 поможет быстро создать проводную и беспроводную сеть дома или в офисе. О технических характеристиках, возможностях, подключении модели поговорим в этом обзоре.
Содержание
- Обзор модели: опции и технические характеристики
- Установка и подключение
- Настройка Wi-Fi
- Защита и смена пароля
- Прошивка
- Сброс настроек
- Отзывы
Обзор модели: опции и технические характеристики
Стоимость маршрутизатора D-Link DIR-842 – от 3500 до 4000 рублей. За эту цену покупатель получает устройство со следующими техническими характеристиками:
| Беспроводные протоколы | IEEE 802.11 a/n/ac, IEEE 802.11 b/g/n |
| Разъем WAN (для подключения Интернета) | 1 |
| Разъемы LAN (для подключения пользовательских устройств) | 4 |
| Индикаторы | Питание, Интернет, 4 индикатора локальной сети, 2 индикатора беспроводной сети (2,5 G и 5 G), WPS |
| Кнопки | Power, Wi-Fi, WPS, RESET |
| Количество антенн | 4, внешние, несъемные, коэффициент усиления – 5 Дб |
Подробные технические характеристики — под спойлером.
Все характеристики роутера

В маршрутизаторе D-Link DIR-842 реализовано множество интересных возможностей. Устройство поддерживает ряд стандартов безопасности (WEP, WPA/WPA2), фильтрацию подключенной техники по MAC-адресу. Для простого и удобного подключения есть технология WPS.
На корпусе устройства находится кнопка для отключения Wi-Fi. Это позволяет отключить беспроводное вещание, при этом оставив в сети все устройства, подключенные через Ethernet.
В роутере D-Link используется технология Multi-user MIMO. Она равномерно распределяет сигнал между несколькими беспроводными устройствами, обеспечивая высокую скорость для потокового воспроизведения видео, загрузки файлов большого размера, игровых сессий.
В маршрутизаторе D-Link DIR-842/ru/r1a задействована технология Transmit Beamforming. Она позволяет устройству изменить направление передачи сигнала и распределить его точно на беспроводную технику, сопряженную с роутером.
Удобство и простота настройки
10
Итого
Удачная модель в своей ценовой категории.
Другие функции D-Link DIR-842:
- настройка гостевой сети с персональными параметрами безопасности и ограничением предельной скорости;
- встроенный межсетевой экран, предотвращающий действия злоумышленников и доступ пользователей внутри сети к ненадежным сайтам;
- поддержка протокола IPsec и организация защищенных VPN-туннелей;
- сервер Яндекс.DNS для защиты от потенциально опасных сайтов, а также для ограничения детей от контента для взрослых;
- управление роутером в приложении для iOS и Android;
- 4 режима работы – маршрутизатор, повторитель-WISP, точка доступа, повторитель.
В сетях из нескольких маршрутизаторов или точек доступа D-Link будет полезна функция интеллектуального распределения Wi-Fi клиентов. Она обеспечивает сопряжение устройства с точкой с максимальной мощностью сигнала.
Установка и подключение
Чтобы подключить маршрутизатор к компьютеру через Ethernet, необходимо:
- Интернет-кабель от провайдера вставить в порт WAN роутера.
- Соединить Ethernet-кабелем разъемы LAN на D-Link DIR-842 и системном блоке.
- Подключить питание к маршрутизатору.
- Включить устройство, нажав на кнопку «Power».
Если выполняется подключение по Wi-Fi к ноутбуку, компьютеру или смартфону, нужно подсоединить интернет-кабель к разъему WAN, питание к соответствующему входу, а затем запустить маршрутизатор. Для установки соединения Wi-Fi на ПК или другом устройстве должен быть включен.
При подключении через Ethernet роутер устанавливается поблизости от системного блока. Если же выполняется настройка беспроводного соединения, роутер рекомендуется разместить так, чтобы он находился на равном удалении от всех комнат в доме или квартире. Так обеспечивается одинаковый прием сигнала во всех помещениях. При необходимости устройство можно повесить на стену с помощью специальных отверстий на тыльной стороне корпуса.
Настройка Wi-Fi
При первом запуске маршрутизатор предложит выполнить настройку, без которой получить доступ к Интернету невозможно. Все действия выполняются в веб-интерфейсе, страница которого открывается автоматически при подключении к роутеру. Если этого не произошло, нужно запустить браузер и в адресной строке ввести 192.168.0.1. Логин и пароль для входа по умолчанию «admin/admin».

Сначала маршрутизатор предложит изменить язык.

Далее система предоставит возможность продолжить работу мастера установки или перейти к расширенным параметрам. Нужно выбрать первый вариант.

В новом окне необходимо установить способ подключения к провайдеру – проводное. В разделе «Режим работы» выбрать «Маршрутизатор».

Следующий шаг – определение типа подключения. Выбрать «Динамический IPv4». Это позволит автоматически получить IP-адрес. Метки напротив строк ниже устанавливать не нужно.

Если провайдер поддерживает только статический IP, нужно выбрать «Статический IPv4» и в открывшихся полях ввести IP-адрес, IP-адрес шлюза, Маску подсети и IP-адрес DNS-сервера. Уточнить тип соединения и данные для ввода нужно у провайдера перед тем, как приступить к настройке роутера.

Далее выполняется настройка сети в диапазоне 2,4 Ггц. Здесь можно ничего не менять (пароль от сети по умолчанию указывается на тыльной стороне маршрутизатора). В целях безопасности все же рекомендуется изменить логин и пароль от сети на более сложные.

В следующем окне нужно выполнить такие же действия для сети в диапазоне 5 ГГц.

Шаг с подключением IPTV-приставки и IP-телефона пропустить.
Появится окно с предложением изменить пароль для входа в веб-интерфейс. По умолчанию это «admin». Нужно поменять его на более сложный, чтобы посторонние лица не получили доступ к настройкам маршрутизатора.

Откроется страница, в которой будут указаны внесенные настройки. Необходимо перепроверить все значения и, если они верны, нажать «Применить», чтобы изменения вступили в силу.

Защита и смена пароля
Если при первоначальной настройке шаги по изменению пароля были пропущены, то в дальнейшем установить более сложный пароль можно, открыв раздел «Wi-Fi», а затем «Основные настройки».
В открывшемся окне можно выбрать одну из двух сетей, сменить ее имя, установить канал, ограничение скорости.

Ниже доступна настройка безопасности. Можно выбрать тип безопасности и задать пароль для беспроводного соединения.

Если пользователю нужно изменить пароль для доступа к веб-интерфейсу, ему необходимо открыть раздел «Система» и выбрать подраздел «Конфигурация».

Прошивка
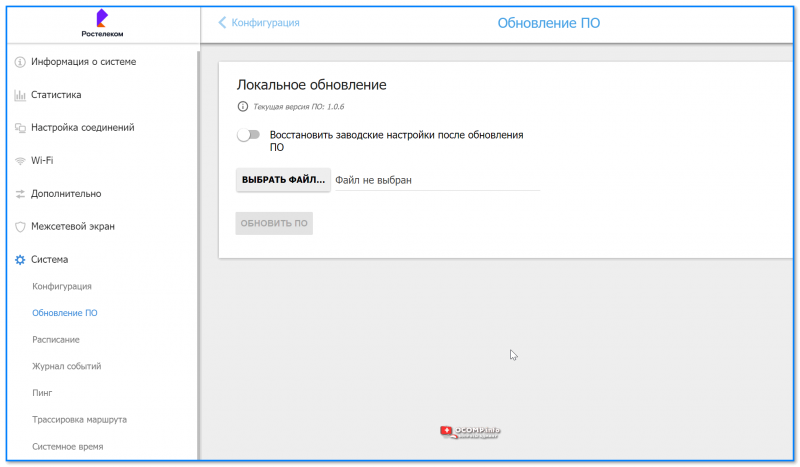
Обновить прошивку маршрутизатора D-Link DIR-842 можно, открыв раздел «Информация о системе» («Система»), а в нем – «Обновление ПО». Здесь же доступен автоматический поиск обновлений для устройства.

Обновление программного обеспечения роутера рекомендуется выполнять только при проводном соединении устройства с компьютером.
Открыв нужный раздел, пользователь может посмотреть установленную версию программного обеспечения в разделе «Текущая версия ПО».

По умолчанию для маршрутизатора предусмотрена автоматическая проверка последних версий ПО. Если они обнаружены, в верхней части страницы справа появится уведомление.
Для отключения поиска обновлений системой нужно сдвинуть влево переключатель напротив строки «Автоматически проверять обновления», а затем нажать «Применить настройки». Для включения функции следует переместить переключатель вправо и сохранить изменения. Адрес сервера, на котором выполняется поиск актуальных версий ПО, по умолчанию «fwupdate.dlink.ru».
Установить актуальную версию программного обеспечения можно не только онлайн, но и из памяти компьютера. Для этого предусмотрен раздел «Локальное обновление». Инструкция:
- Скачать свежую версию ПО на сайте http://dlink.ru/ch/products/5/2352_d.html.
- Открыть веб-интерфейс маршрутизатора, перейти во вкладку «Система», затем в «Обновление ПО».
- В разделе «Локальное обновление» нажать «Выбрать файл».
- Указать путь к папке с загруженным программным обеспечением.
- Кликнуть «Обновить ПО».
- Подождать несколько минут, пока маршрутизатор не перезагрузится.
- Авторизоваться в веб-интерфейсе, указав текущие логин и пароль.
Во время обновления программного обеспечения запрещается отключать питание роутера. Это приведет к поломке устройства.
Если после обновления программного обеспечения маршрутизатор работает некорректно, нужно выполнить возврат роутера к заводским настройкам.
Сброс настроек
Чтобы сбросить настройки маршрутизатора до заводских, необходимо:
- Открыть веб-интерфейс, авторизоваться, перейти в раздел «Система».
- Выбрать вкладку «Конфигурация».
- Кликнуть «Заводские настройки».
После этих действий нужно дождаться перезагрузки устройства.

Сброс маршрутизатора к начальным установкам можно другим способом. Нужно взять в руки включенный роутер, найти на нижней панели кнопку «Reset», нажать на нее и удерживать в течение 10 секунд до перезапуска прибора.
D-Link DIR-842 – одна из дорогих, но качественных и функциональных моделей маршрутизаторов от известного производителя. Она привлекает внимание работой в двух диапазонах 2,4 ГГц и 5 ГГц, наличием множества нужных функций, техническими характеристиками. Маршрутизатор прост в установке и настройке, обновляется в автоматическом режиме. D-Link DIR-842 — одно из лучших решений для быстрого и легкого создания беспроводной и проводной сети дома и в офисе.
Отзывы
В отзывах к модели D-Link DIR-842 покупатели отмечают приятный дизайн, скорость, приличное покрытие (хватает на площадь трехкомнатой квартиры). «Стабильный и быстрый» — пишут в отзывах пользователи.

Приветствую!
Волею случая, намедни, мне подвернулось настраивать один бюджетный небольшой роутер от D-link — DIR-842 (в последнее время устройства от D-link пользуются куда меньше популярностью, чем те же TP-Link или Xiaomi, а потому решил всё заскринить и опубликовать в этой небольшой заметке…). 😉
Забегая вперёд, могу сказать, что роутер приятно удивил: работает стабильно, без неожиданных перезагрузок, прошивка полностью переведена на русский (настроек в веб-интерфейсе для всех основных дом. задач хватает с лихвой. Кстати, я сделал скрины всех разделов, думаю, будет полезно, если кто-то решит приобрести себе такую же или похожую модельку).
Итак, после вступления, перейдем к делу… 👌
*
Примечание: в заметке рассмотрен D-Link DIR-842, AC1200, но инструкция актуальна и для похожих устройств из этого мод. ряда: DIR-843, 853, 825, 615 и др.
*
Содержание статьи
- 1 Подключение и настройка домашнего Wi-Fi роутера D-Link (DIR-842)
- 1.1 ШАГ 1: распаковка, комплектация, основные тех. характеристики
- 1.2 ШАГ 2: подключение к сети (начало)
- 1.3 ШАГ 3: вход в веб-интерфейс
- 1.4 ШАГ 4: настройка подключения к Интернет и Wi-Fi сети
- 1.5 📌 Полный перечень настроек роутера (скрины из личного кабинета / веб-интерфейса)
- 1.5.1 Информация о системе
- 1.5.2 Статистика
- 1.5.3 Настройка соединений
- 1.5.4 Wi-Fi
- 1.5.5 Дополнительно
- 1.5.6 Межсетевой экран
- 1.5.7 Система

→ Задать вопрос | дополнить
Подключение и настройка домашнего Wi-Fi роутера D-Link (DIR-842)
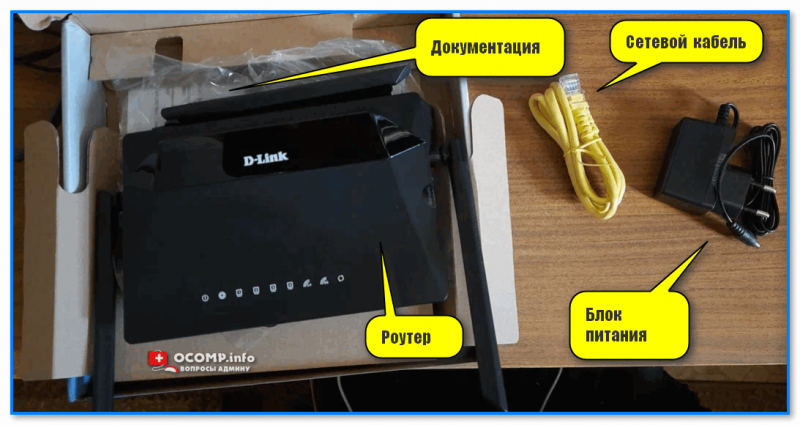
ШАГ 1: распаковка, комплектация, основные тех. характеристики
Роутер запакован в «стандартную» (для такого типа товаров) коробку, внутри которой находятся:
- само устройство (антенны уже подключены);
- документация (может пригодиться для подключения и настройки устройства. Об этом я скажу пару слов далее);
- блок питания (не стандартный! Отметил бы узкий штекер, который не подходит ко многим др. роутерам);
- сетевой кабель для подкл. ПК/ноутбука (если планируете подключаться только по беспроводной сети Wi-Fi — то он не нужен). 👇👇
Коробка. Роутер Wi-Fi, D-Link DIR-842
Комплектация. Роутер WiFi, D-Link DIR-842
Что касается тех. характеристик — то я привожу их из инф. с офиц. сайта (Перепроверяйте! См. табличку ниже, почему-то офиц. сайт открывается не всегда, взял ее из кэша Google).
| Аппаратное обеспечение | |
| Процессор | • RTL8197FH-VG (1 ГГц) |
| Оперативная память | • 128 MБ, DDR2, встроенная в процессор |
| Flash-память | • 128 МБ, SPI NAND |
| Интерфейсы | • Порт WAN 10/100/1000BASE-T |
| • 4 порта LAN 10/100/1000BASE-T | |
| Индикаторы | • Питание |
| • Интернет | |
| • 4 индикатора Локальная сеть | |
| • Беспроводная сеть 2.4G | |
| • Беспроводная сеть 5G | |
| • WPS | |
| Кнопки | • Кнопка POWER для включения/выключения питания |
| • Кнопка WIFI для включения/выключения беспроводной сети | |
| • Кнопка WPS для подключения устройств mesh-сети и установки беспроводного соединения | |
| • Кнопка RESET для возврата к заводским настройкам | |
| Антенна | • Четыре внешние несъемные антенны с коэффициентом усиления 5 дБи |
| Схема MIMO | • 2 x 2, MU-MIMO |
| Разъем питания | • Разъем для подключения питания (постоянный ток) |
| Программное обеспечение | |
| Типы подключения WAN | • PPPoE |
| • IPv6 PPPoE | |
| • PPPoE Dual Stack | |
| • Статический IPv4 / Динамический IPv4 | |
| • Статический IPv6 / Динамический IPv6 | |
| • PPPoE + Статический IP (PPPoE Dual Access) | |
| • PPPoE + Динамический IP (PPPoE Dual Access) | |
| • PPTP/L2TP + Статический IP | |
| • PPTP/L2TP + Динамический IP | |
| Сетевые функции | • DHCP-сервер/relay |
| • Расширенная настройка встроенного DHCP-сервера | |
| • Назначение IPv6-адресов в режиме Stateful/Stateless, делегирование префикса IPv6 | |
| • Автоматическое получение LAN IP-адреса (в режимах точка доступа, повторитель, клиент) | |
| • DNS relay | |
| • Dynamic DNS | |
| • Статическая IPv4/IPv6-маршрутизация | |
| • IGMP/MLD Proxy | |
| • RIP | |
| • Поддержка UPnP IGD | |
| • Поддержка VLAN | |
| • Поддержка функции ping со стороны внешней сети (WAN ping respond) | |
| • Поддержка механизма SIP ALG | |
| • Поддержка RTSP | |
| • Резервирование WAN | |
| • Настройка скорости, режима дуплекса и функции управления потоком (flow control) в режиме автоматического согласования / Ручная настройка скорости и режима дуплекса для каждого Ethernet-порта | |
| Функции межсетевого экрана | • Преобразование сетевых адресов (NAT) |
| • Контроль состояния соединений (SPI) | |
| • IPv4/IPv6-фильтр | |
| • MAC-фильтр | |
| • URL-фильтр | |
| • Функция блокировки рекламы | |
| • DMZ-зона | |
| • Виртуальные серверы | |
| • Встроенный сервис контентной фильтрации SkyDNS | |
| VPN | • IPsec/PPTP/L2TP/PPPoE pass-through |
| • PPTP/L2TP-туннели | |
| • Клиент L2TP/IPsec (L2TP over IPsec) | |
| • IPsec-туннели | |
| • Транспортный/туннельный режим | |
| • Поддержка протокола IKEv1/IKEv2 | |
| • Шифрование DES | |
| • Функция NAT Traversal | |
| • Поддержка протокола DPD (функция Keep-alive для VPN-туннелей) | |
| Управление и мониторинг | • Локальный и удаленный доступ к настройкам по SSH/TELNET/WEB (HTTP/HTTPS) |
| • Web-интерфейс настройки и управления на двух языках (русский и английский) | |
| • Поддержка приложения D-Link Assistant для устройств под управлением ОС Android и iOS | |
| • Уведомление о проблемах с подключением и автоматическое перенаправление к настройкам | |
| • Обновление ПО маршрутизатора через web-интерфейс | |
| • Автоматическое уведомление о наличии новой версии ПО | |
| • Сохранение и загрузка конфигурации | |
| • Возможность передачи журнала событий на удаленный сервер | |
| • Автоматическая синхронизация системного времени с NTP-сервером и ручная настройка даты и времени | |
| • Утилита ping | |
| • Утилита traceroute | |
| • Клиент TR-069 | |
| • Расписания для правил и настроек межсетевого экрана, автоматической перезагрузки, включения/выключения беспроводной сети и Wi-Fi-фильтра | |
| • Автоматическая загрузка файла конфигурации с сервера провайдера (Auto Provision) | |
| Параметры беспроводного модуля | |
| Стандарты | • IEEE 802.11ac Wave 2 |
| • IEEE 802.11a/b/g/n | |
| • IEEE 802.11k/v | |
| • IEEE 802.11w | |
| Диапазон частот | • 2400 ~ 2483,5 МГц |
| Диапазон частот будет изменяться в соответствии с правилами радиочастотного регулирования в Вашей стране | • 5150 ~ 5350 МГц |
| • 5650 ~ 5850 МГц | |
| Безопасность беспроводного соединения | • WEP |
| • WPA/WPA2 (Personal/Enterprise) | |
| • WPA3 (Personal) | |
| • МАС-фильтр | |
| • WPS (PBC/PIN) | |
| Дополнительные функции | • Функция EasyMesh |
| • Режим «клиент» | |
| • WMM (Wi-Fi QoS) | |
| • Информация о подключенных Wi-Fi-клиентах | |
| • Расширенные настройки | |
| • Гостевая Wi-Fi-сеть / поддержка MBSSID | |
| • Ограничение скорости для беспроводной сети/ отдельного MAC-адреса | |
| • Периодическое сканирование каналов, автоматический переход на более свободный канал | |
| • Поддержка TX Beamforming для диапазона 5 ГГц | |
| • Автоматическое согласование ширины канала с условиями окружающей среды (20/40 Coexistence) | |
| • Поддержка технологии STBC | |
| Скорость беспроводного соединения | • IEEE 802.11a: 6, 9, 12, 18, 24, 36, 48 и 54 Мбит/с |
| • IEEE 802.11b: 1, 2, 5,5 и 11 Мбит/с | |
| • IEEE 802.11g: 6, 9, 12, 18, 24, 36, 48 и 54 Мбит/с | |
| • IEEE 802.11n (2,4 ГГц): от 6,5 до 300 Мбит/с (MCS0–MCS15) | |
| • IEEE 802.11n (5 ГГц): от 6,5 до 300 Мбит/с (от MCS0 до MCS15) | |
| • IEEE 802.11ac (5 ГГц): от 6,5 до 867 Мбит/с (от MCS0 до MCS9) | |
| Параметры беспроводного модуля | |
| Чувствительность приемника | • 802.11a (типичная при PER = 10% для пакета размером 1000 байт при комнатной температуре 25 °C) |
| • 802.11b (типичная при PER = 8% для пакета размером 1000 байт при комнатной температуре 25 °C) | |
| • 802.11g (типичная при PER < 10% для пакета размером 1000 байт при комнатной температуре 25 °C) | |
| • 802.11n (типичная при PER = 10% для пакета размером 1000 байт при комнатной температуре 25 °C) | |
| Схемы модуляции | • 802.11a: BPSK, QPSK, 16QAM, 64QAM с OFDM |
| Питание | • Выход: 12 В постоянного тока, 1 А |
| Температура | • Рабочая: от 0 до 40 °C |
| • Хранения: от -20 до 65 °C | |
| Влажность | • При эксплуатации: от 10% до 90% (без конденсата) |
| • При хранении: от 5% до 95% (без конденсата) |
*
ШАГ 2: подключение к сети (начало)
Прежде чем вы будете соединять роутер с какими-либо проводами — я бы очень рекомендовал сделать пару вещей… 😉
Для начала нажмите кнопку питания «Power» (прим.: такой кнопки нет на многих др. моделях, а потому многие пользователи забывают про нее и «предполагают», что им продали неисправное устройство).
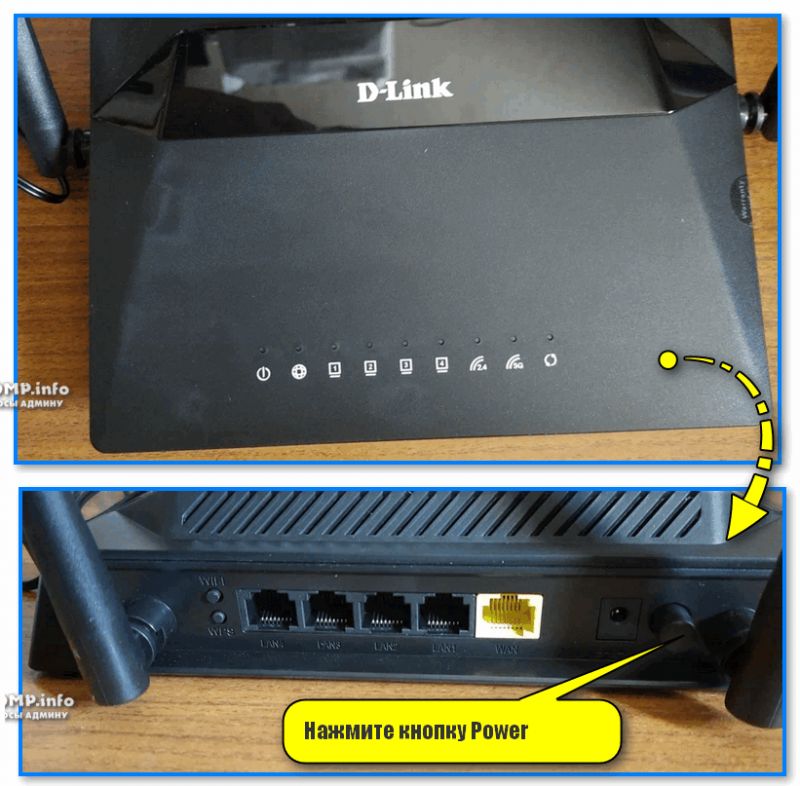
Нажмите кнопку Power — D-Link DIR
Во-вторых, на роутере должна быть наклейка (этикетка) — на ней будет указан пароль от Wi-Fi сети, IP-адрес для доступа к веб-интерфейсу, пароль и логин (я их выделил).
Кстати, подобная информация дублируется в инструкции (документации) на первой странице.
📌Рекомендую информацию с наклейки роутера переписать на листочек (или сфотографировать на телефон, она понадобится в последствии).
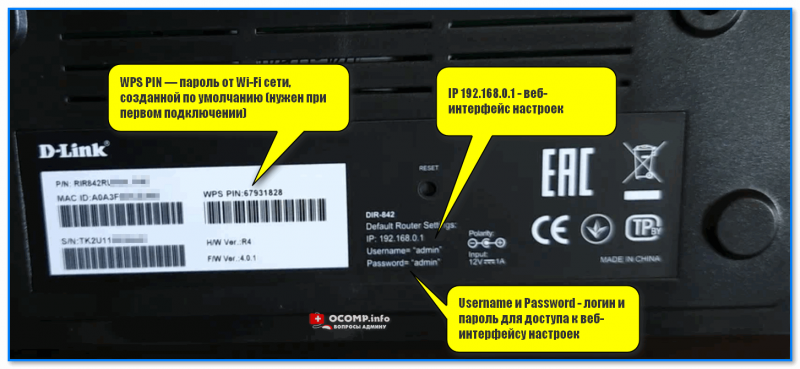
WPS PIN — пароль от Wi-Fi сети, созданной по умолчанию (нужен при первом подключении)
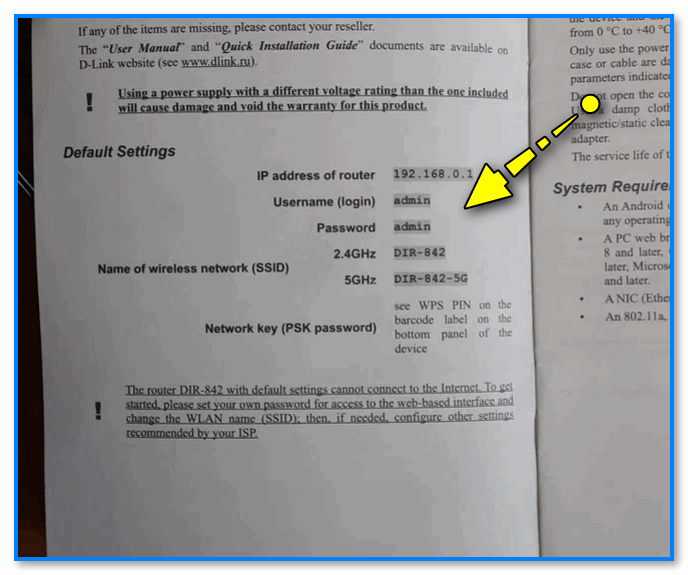
Данные для доступа к настройкам роутера есть в инструкции!
👉 Собственно, далее можно подкл. к роутеру сетевой кабель от вашего Интернет-провайдера (к порту WAN, он оранжевый/желтый) и блок питания. 👇
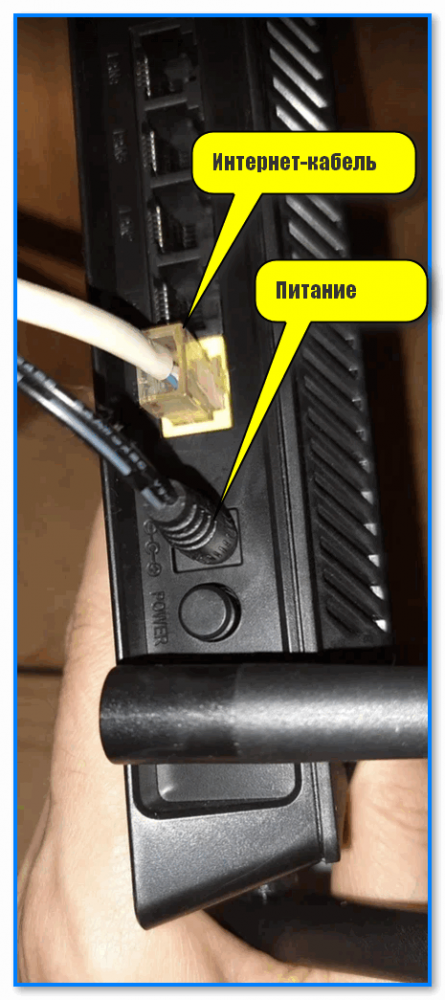
Подкл. Интернет-кабель (Ethernet) и питание
Если роутер начал работать — на его корпусе должны начать светиться/мигать светодиоды (если у вас ничего не «мигает» — проверьте нажата ли кнопка «Power»).
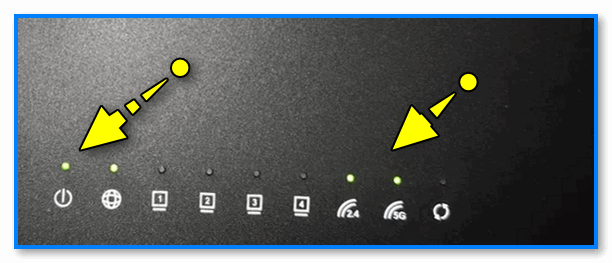
Светодиоды начали моргать — значит роутер заработал!
*
ШАГ 3: вход в веб-интерфейс
В своем примере я буду подключаться к роутеру через Wi-Fi сеть (если вы подключены к роутеру сетевым кабелем напрямую — то следующие три скрина вам можно пропустить 😉).
Итак… Включаем ноутбук, и кликаем мышкой по сетевому значку в трее Windows (рядом с часами).
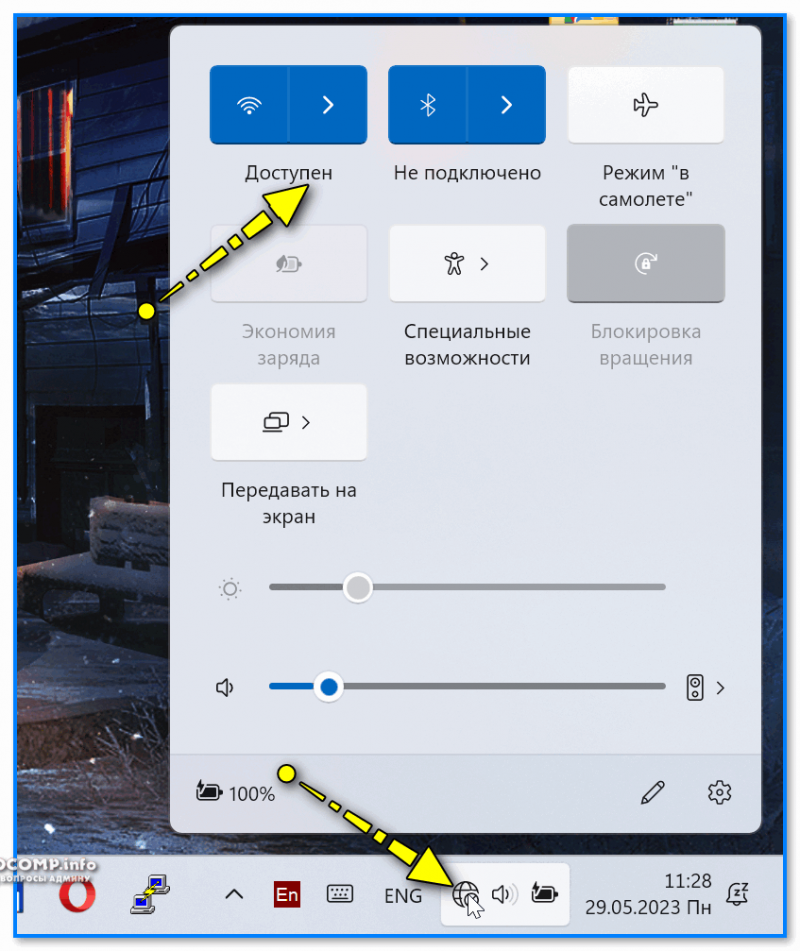
На компьютере кликаем по значку Wi-Fi и пытаемся подключится к дефолтной Wi-Fi сети
Среди списка доступных Wi-Fi сетей должны отобразиться те, которые роутер «запускает» по умолчанию — в моем случае «DIR-842» и «DIR-842-5g». Для подключения к одной из них необходимо ввести тот пароль, что указан у вас на наклейке роутера (чуть выше я рекомендовал его переписать или сфотографировать). 👇

Вводим тот пароль, который был указан на наклейке на корпусе роутера
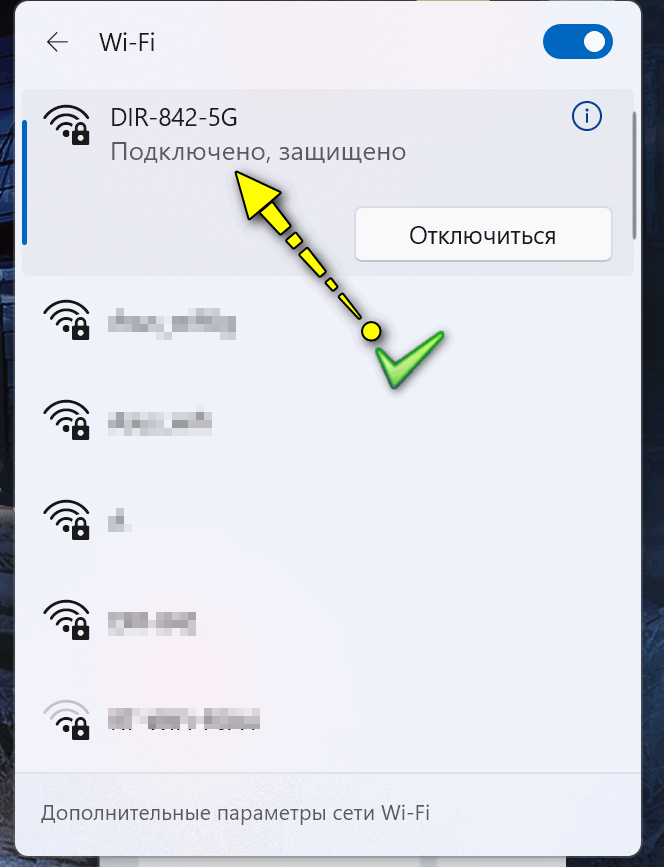
Подключено, защищено
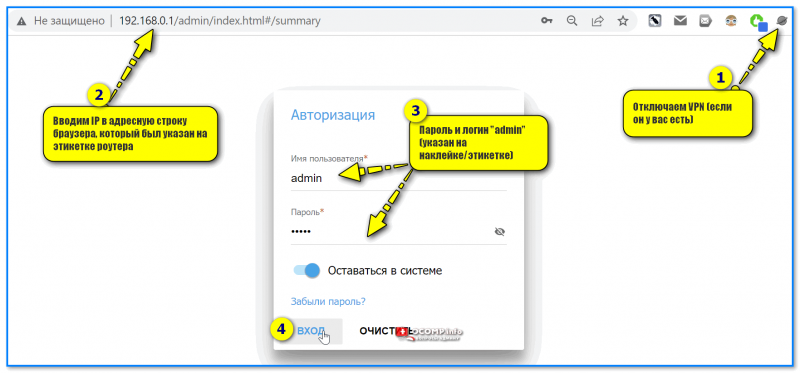
Если к сети вы успешно подключились — можно переходить к веб-интерфейсу… Чтобы в него войти необходимо:
- запустить браузер (Chrome, например);
- отключить VPN (если у вас есть. Вообще, т.к. к Интернет мы пока не подкл., — он не должен работать, но плагины могут нам «помешать»…);
- ввести в адресную строку браузера IP 192.168.0.1 и нажать Enter (IP тоже указан на наклейке на корпусе роутера); 👇
- далее появится форма, в которой в качестве имени пользователи и пароля необходимо ввести admin и нажать Enter. 👇
Вводим IP в адресную строку браузера, который был указан на этикетке роутера
Если вам удалось войти в настройки роутера (веб-интерфейс / личный кабинет) — вы увидите информационное окно с текущим состоянием устройства. Теперь можно будет переходить к настройкам доступа к Интернет…
См. пример ниже. 👇
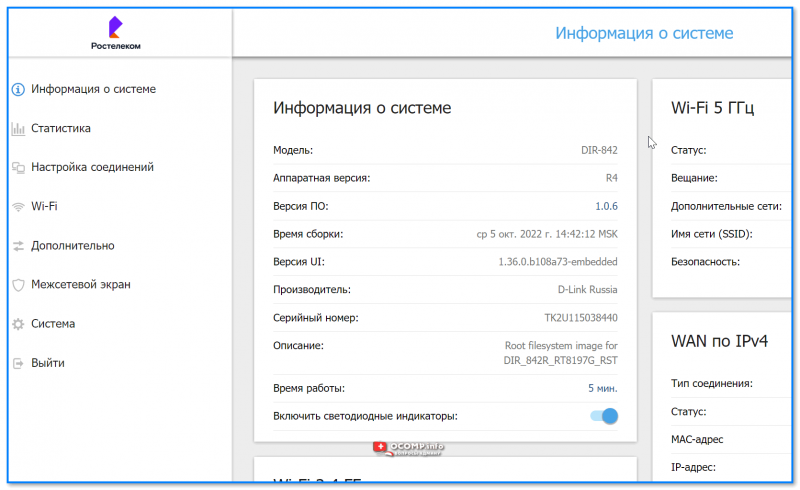
Вошли в главное меню
Если у вас не получилось войти в настройки роутера — ознакомьтесь с нижеприведенной заметкой, в ней я рассмотрел основные причины этой проблемы.
Как войти в настройки роутера (таблица с IP-адресами для Tp-Link, Mercusys, Xiaomi, Zyxel / ZBT и др.). Что делать, если кабинет Wi-Fi роутера не открывается?
*
ШАГ 4: настройка подключения к Интернет и Wi-Fi сети
Для начала необходимо открыть раздел «Настройка соединения WAN» — в зависимости от типа вашего подключения к Интернет — здесь может быть 2 варианта развития событий:
- первый: роутер может автоматически подключиться к сети Интернет (особенно, в случае с динам. IP, как это бывает у некоторых провайдеров, скажем у «Ростелекома»). См. мой пример ниже. В этом случае ничего более делать не нужно! 👇
- второй: вам необходимо будет создать новое подключение самостоятельно (см. стрелку рядом с заголовком «Список соединений»), затем указать его тип, ввести логин, пароль (если нужно), и т.д. Данная информация для настройки подключения должна быть указана в договоре на оказание услуг с вашим Интернет-провайдером!
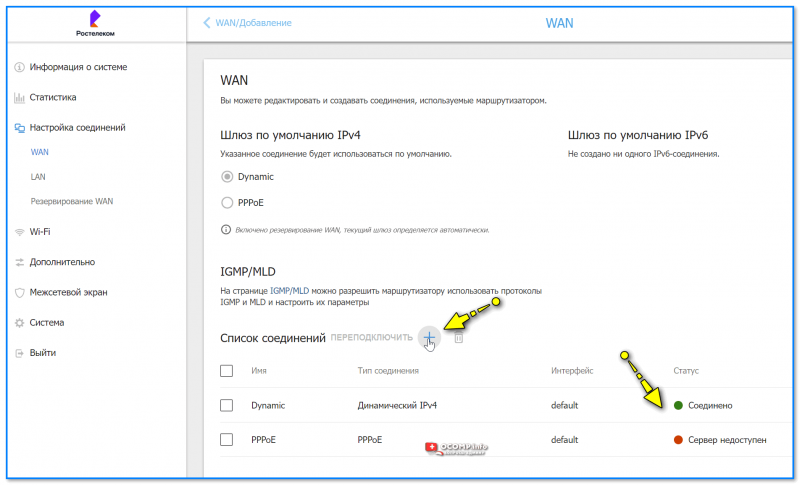
В моем случае роутер заработал автоматически, в вашем — возможно нужно будет создать новое подключение
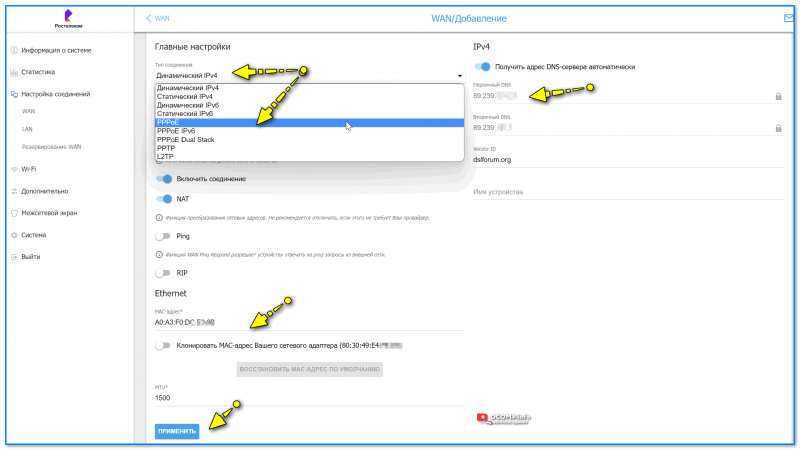
Настройка соединения — тип, MAC-адрес и т.п.
📌 Важно: после задания вышеприведенных настроек в разделе WAN — роутер должен установить соединение и появиться доступ в Интернет. 👌
Кстати, что касается Wi-Fi: название сети по умолчанию и ее пароль желательно сменить на другие (может быть те, к которым вы привыкли). Делается это в следующих разделах:
- «Wi-Fi / Основные настройки» — здесь можно поменять имя сети, пароль, диапазон и пр.;
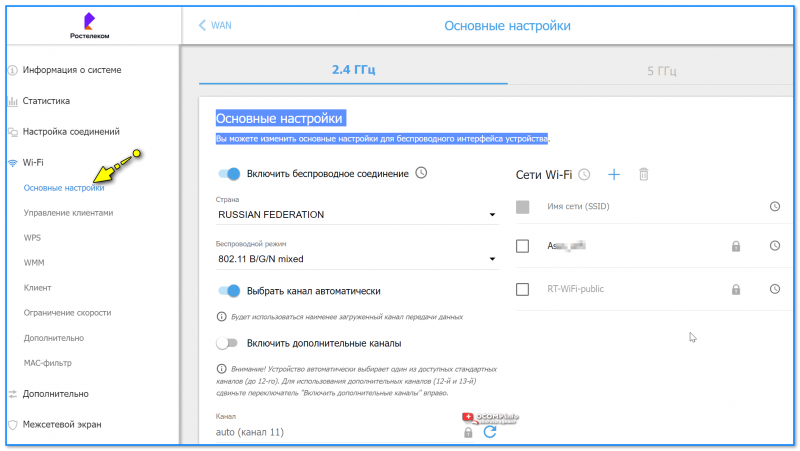
- «Wi-Fi / Дополнительно»— здесь можно отрегулировать уровень сигнала, выбрать канал и др. См. пример ниже. 📌
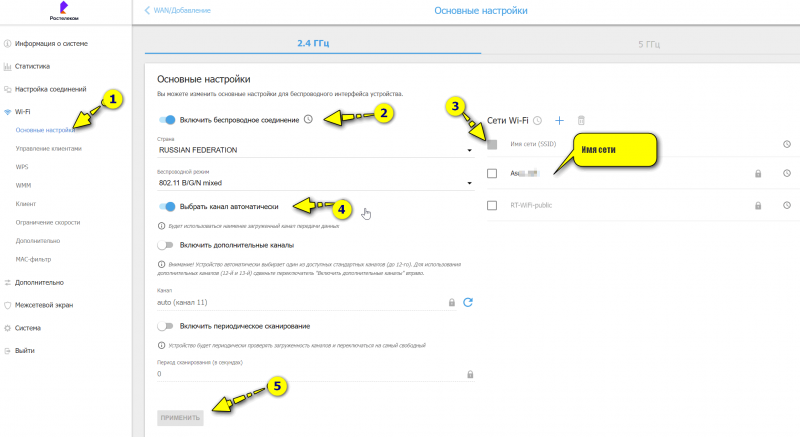
Основные настройки Wi-Fi
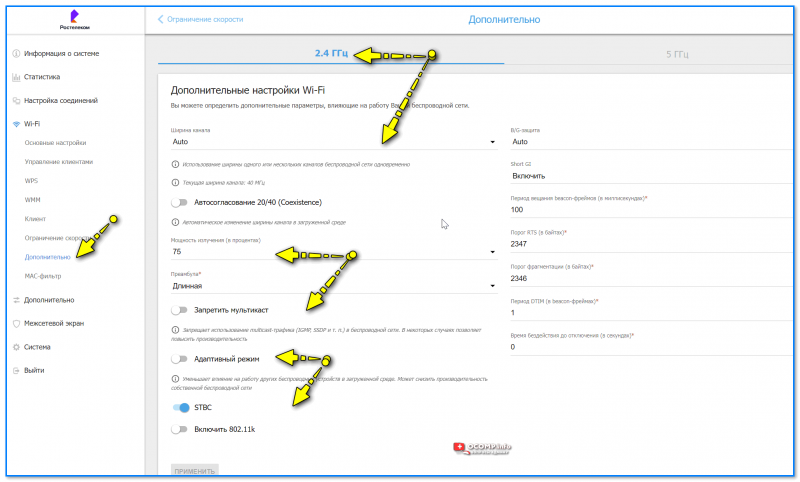
Дополнительные настройки Wi-Fi
*
📌 Полный перечень настроек роутера (скрины из личного кабинета / веб-интерфейса)
Информация о системе
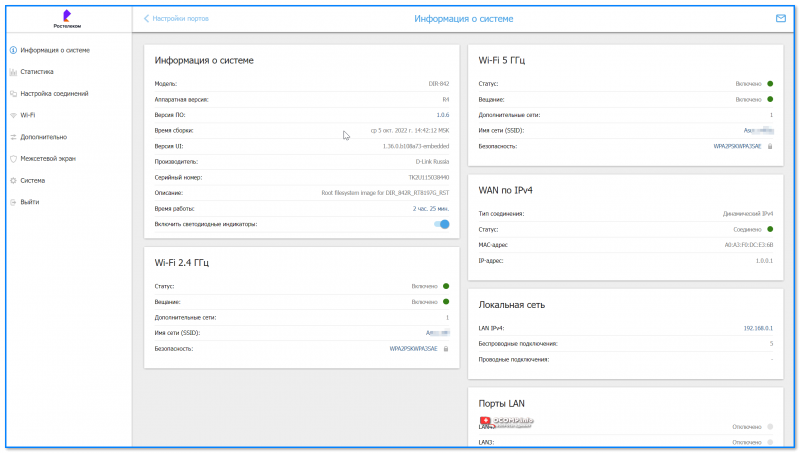
Информация о системе — DIR 842
*
Статистика
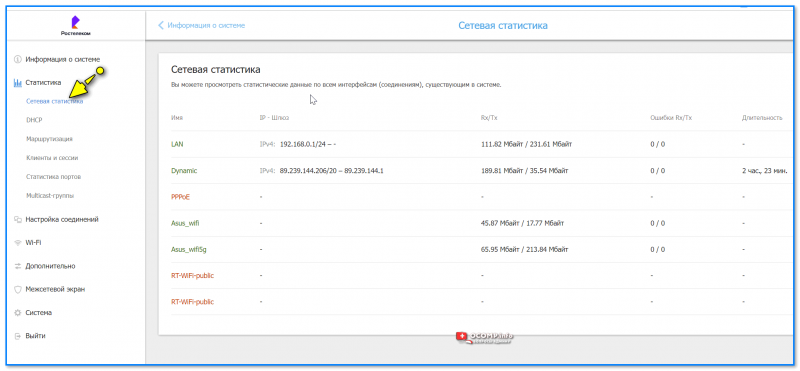
Сетевая статистика — DIR 842 (Вы можете просмотреть статистические данные по всем интерфейсам (соединениям), существующим в системе)

DHCP (Вы можете просмотреть список IP-адресов)
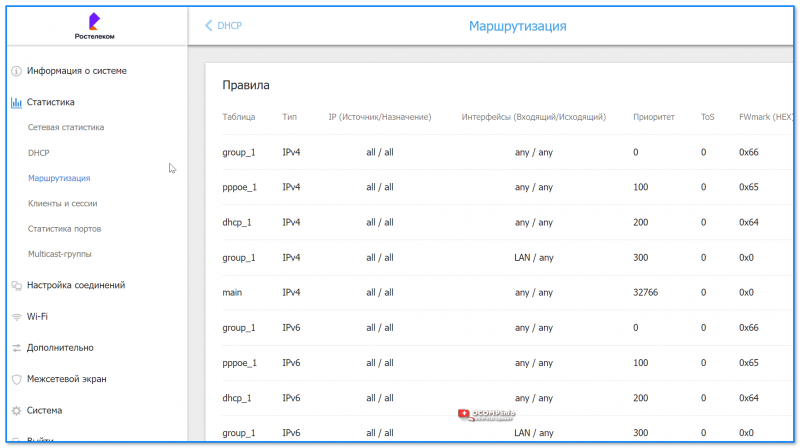
Маршрутизация
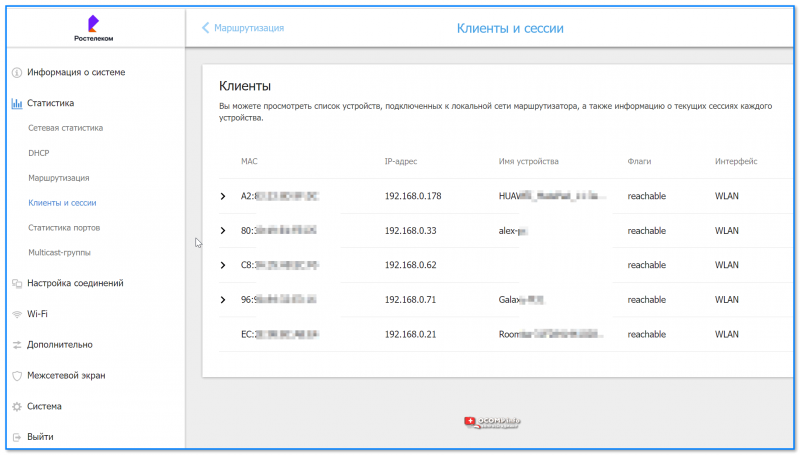
Клиенты и сессии (Вы можете просмотреть список устройств, подключенных к локальной сети маршрутизатора, а также информацию о текущих сессиях каждого устройства)

Статистика портов (Вы можете просмотреть статистические данные по трафику, проходящему через порты устройства)
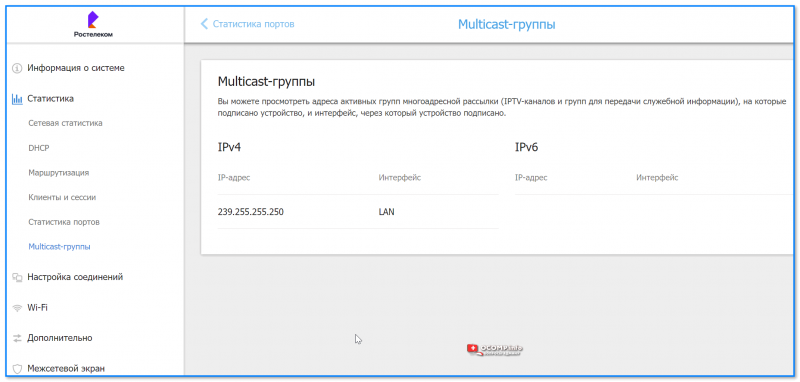
Мультикаст-группы (Вы можете просмотреть адреса активных групп многоадресной рассылки)
*
Настройка соединений

WAN (Вы можете редактировать и создавать соединения, используемые маршрутизатором)

Вкладка LAN
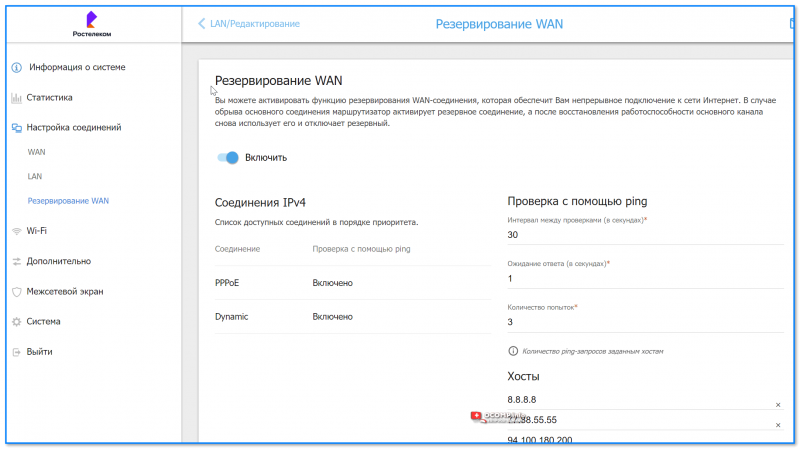
Резервирование WAN (Вы можете активировать функцию резервирования WAN-соединения, которая обеспечит Вам непрерывное подключение к сети Интернет. В случае обрыва основного соединения маршрутизатор активирует резервное соединение, а после восстановления работоспособности основного канала снова использует его и отключает резервный)
*
Wi-Fi
Основные настройки Wi-Fi DIR 842
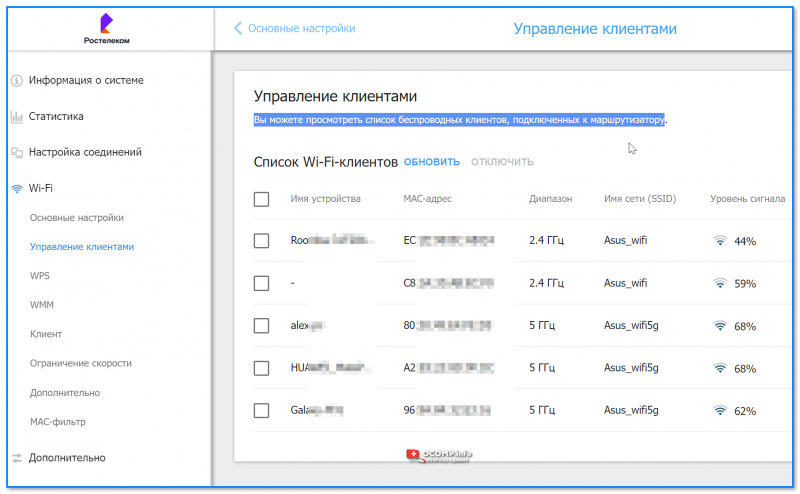
Управление клиентами. Вы можете просмотреть список беспроводных клиентов, подключенных к маршрутизатору
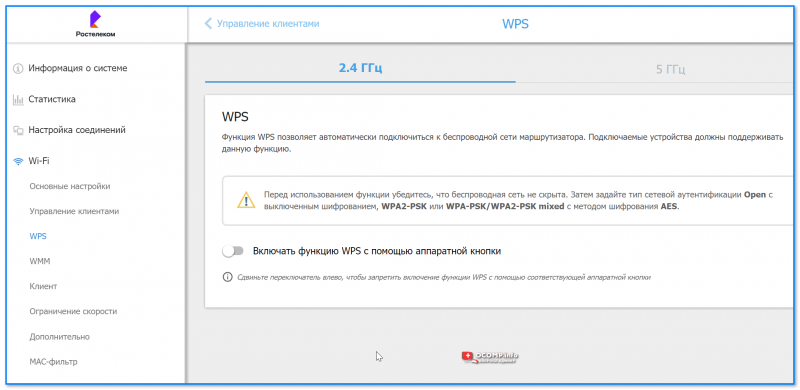
WPS. Позволяет автоматически подкл. к беспроводной сети маршрутизатора
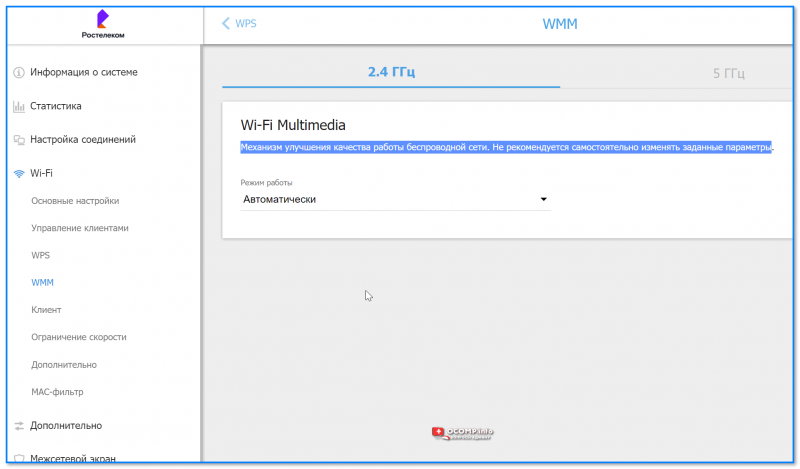
WMM (для улучшения качества работы беспроводной сети)
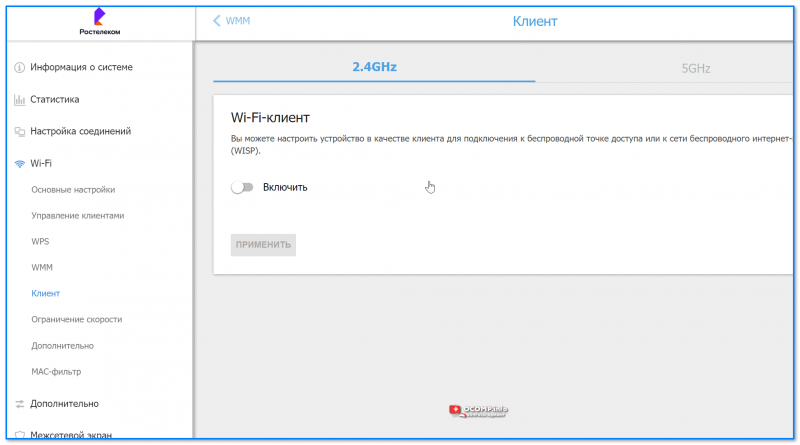
Вы можете настроить устройство в качестве клиента для подключения к беспроводной точке доступа или к сети беспроводного интернет-провайдера (WISP)
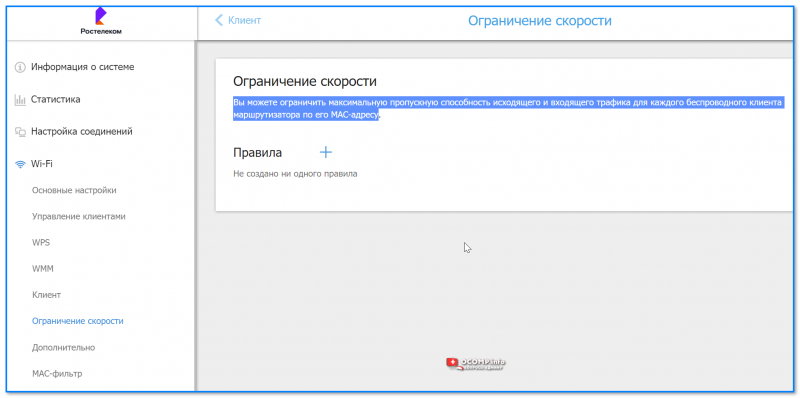
Вы можете ограничить максимальную пропускную способность исходящего и входящего трафика для каждого беспроводного клиента маршрутизатора по его MAC-адресу
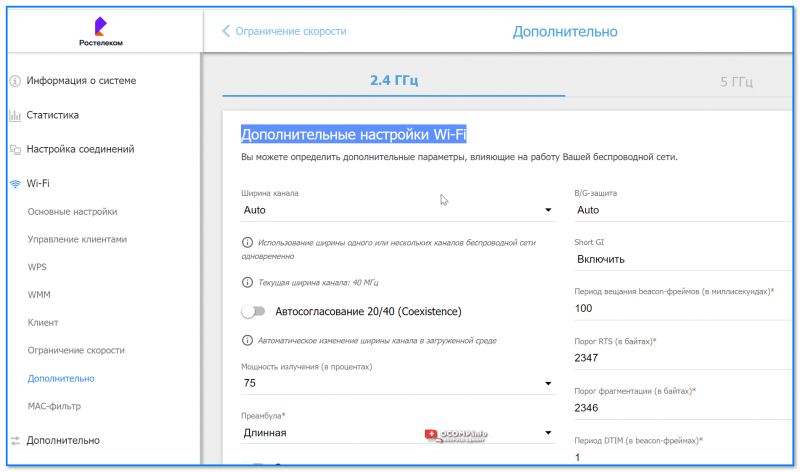
Дополнительные настройки Wi‑Fi
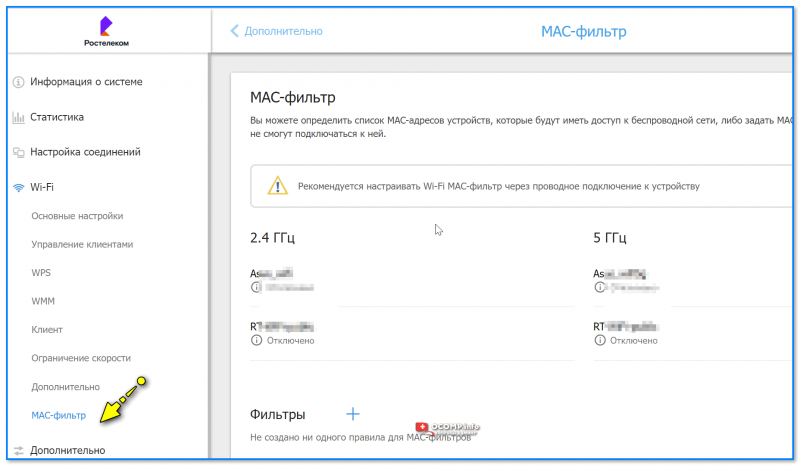
MAC-фильтр
*
Дополнительно
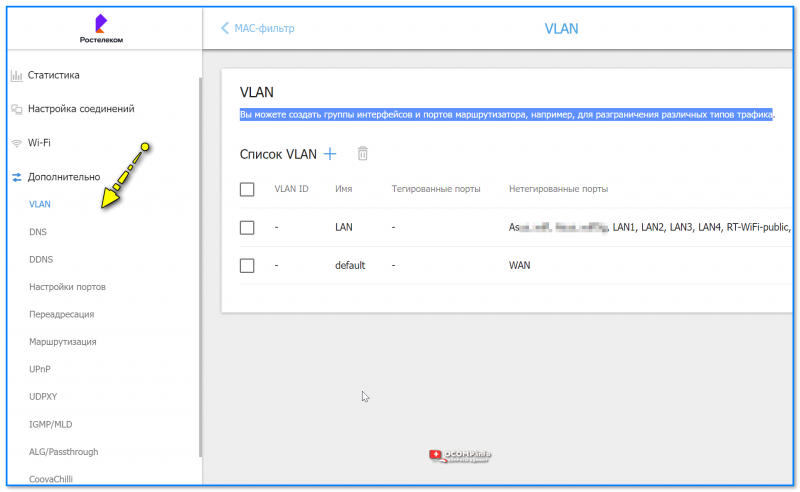
VLAN Вы можете создать группы интерфейсов и портов маршрутизатора, например, для разграничения различных типов трафика
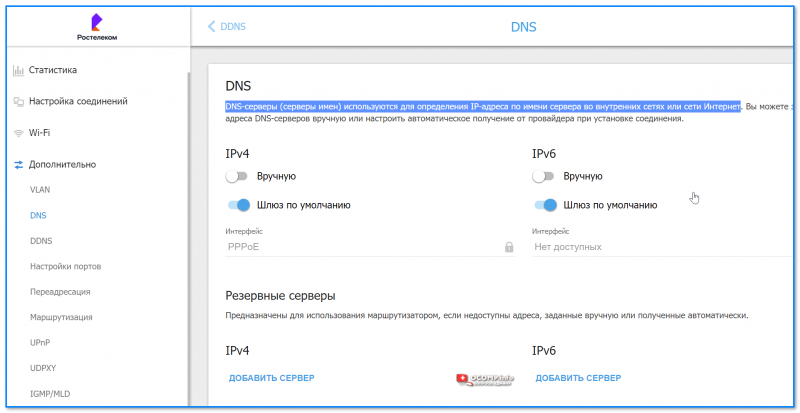
DNS-серверы (серверы имен) используются для определения IP-адреса по имени сервера во внутренних сетях или сети Интернет
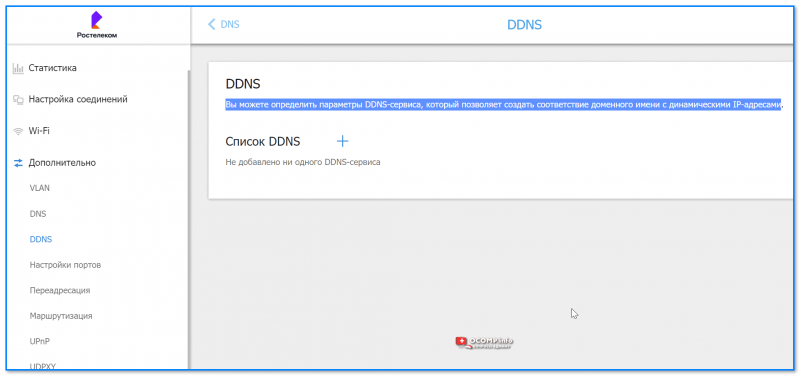
Вы можете определить параметры DDNS-сервиса, который позволяет создать соответствие доменного имени с динамическими IP-адресами
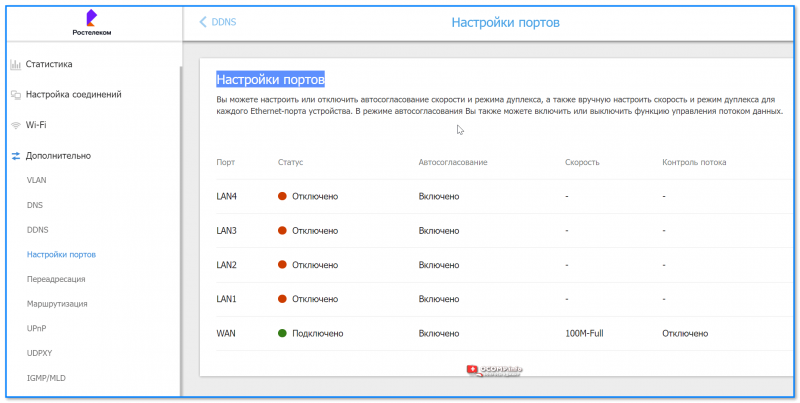
Настройки портов
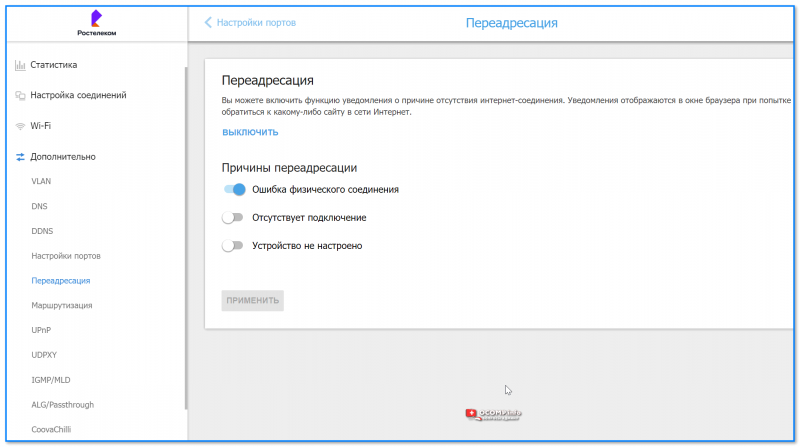
Переадресация
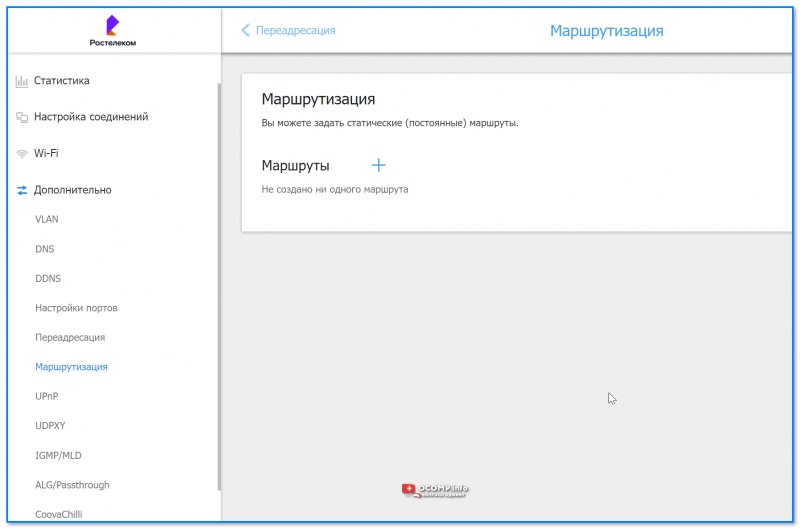
Маршрутизация — DIR 842
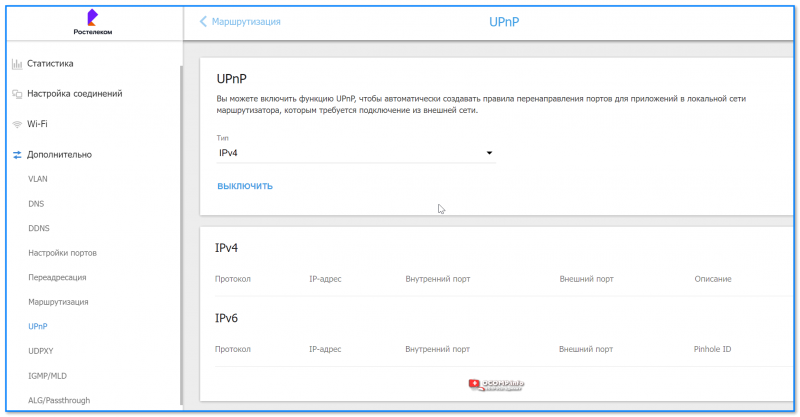
UPnP
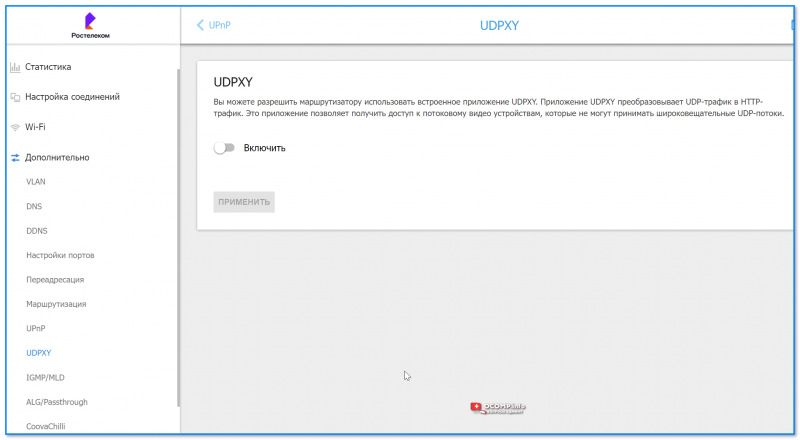
Вы можете разрешить маршрутизатору использовать встроенное приложение UDPXY. Приложение UDPXY преобразовывает UDP-трафик в HTTP-трафик
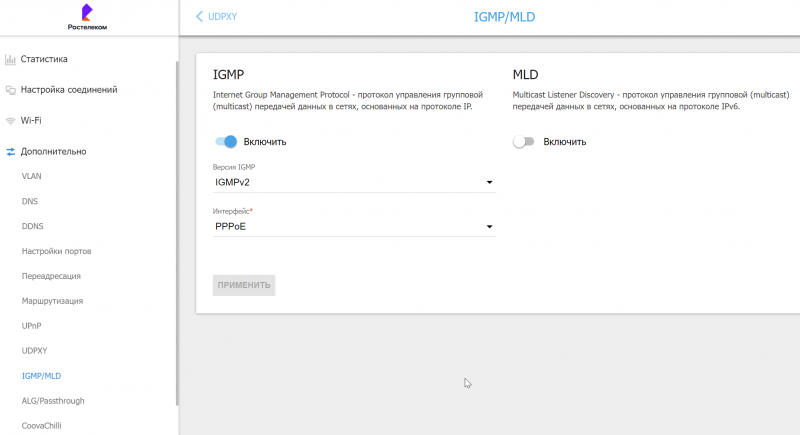
Internet Group Management Protocol — протокол управления групповой (multicast) передачей данных в сетях, основанных на протоколе IP
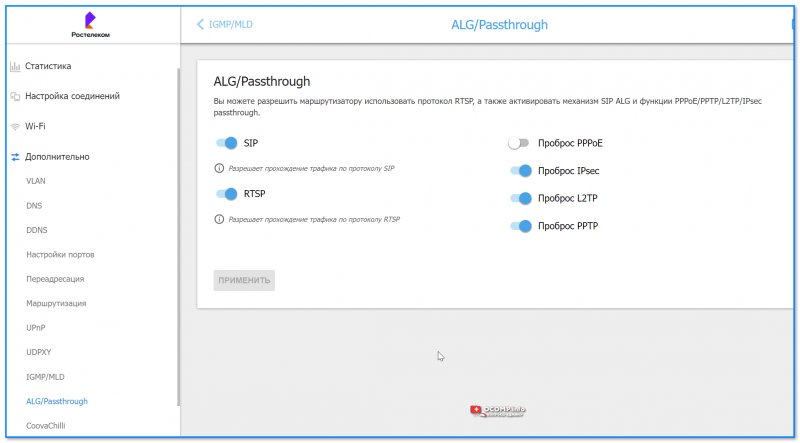
Вы можете разрешить маршрутизатору использовать протокол RTSP, а также активировать механизм SIP ALG и функции PPPoE, PPTP, L2TP, IPsec passthrough
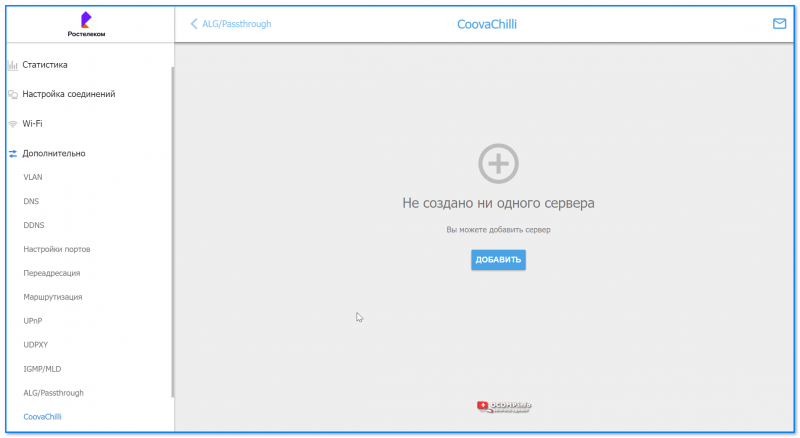
CoovaChili
*
Межсетевой экран
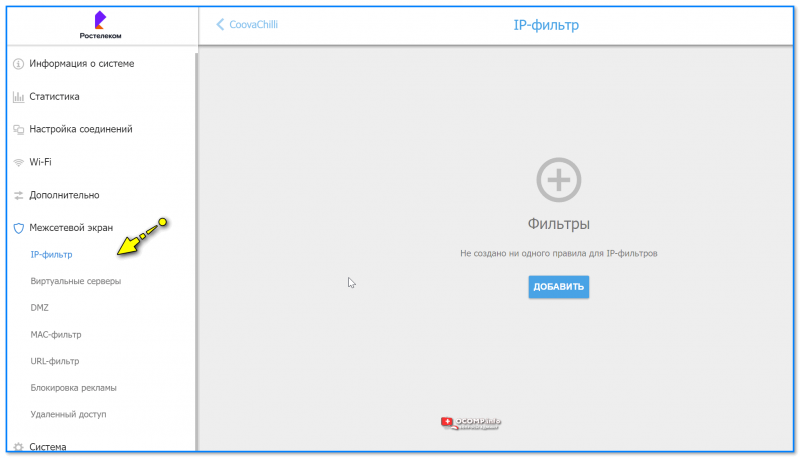
IP-фильтр

Виртуальные серверы
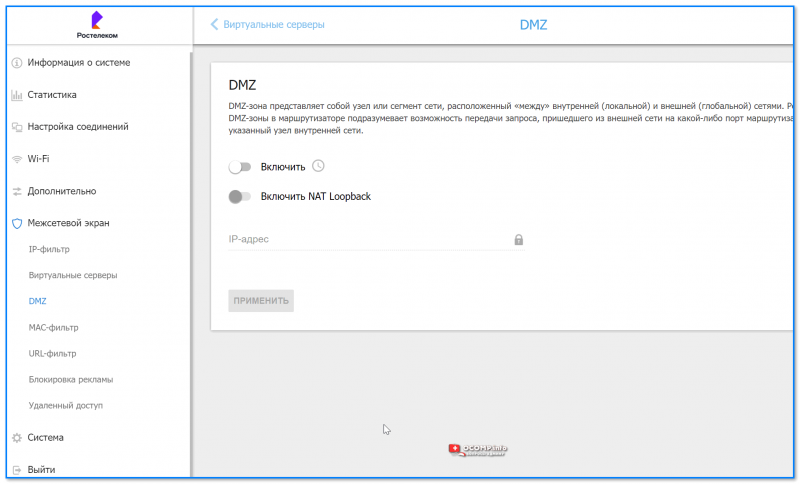
DMZ
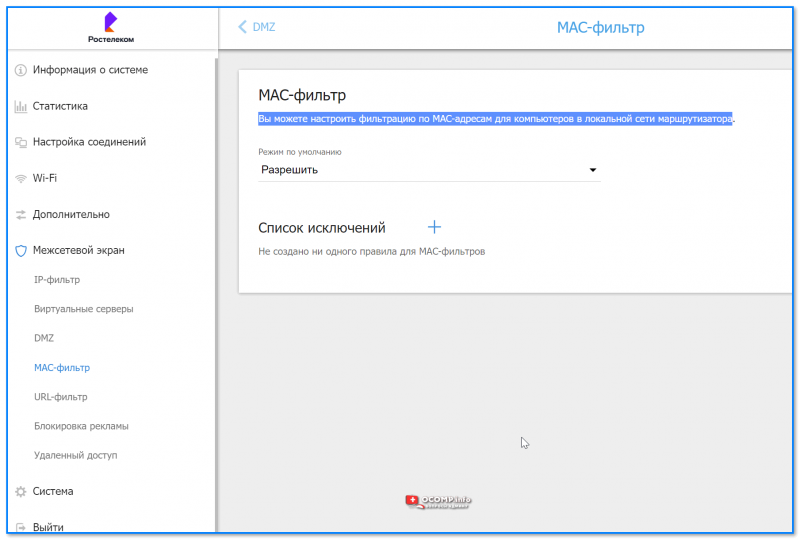
MAC-фильтр — Dir 842
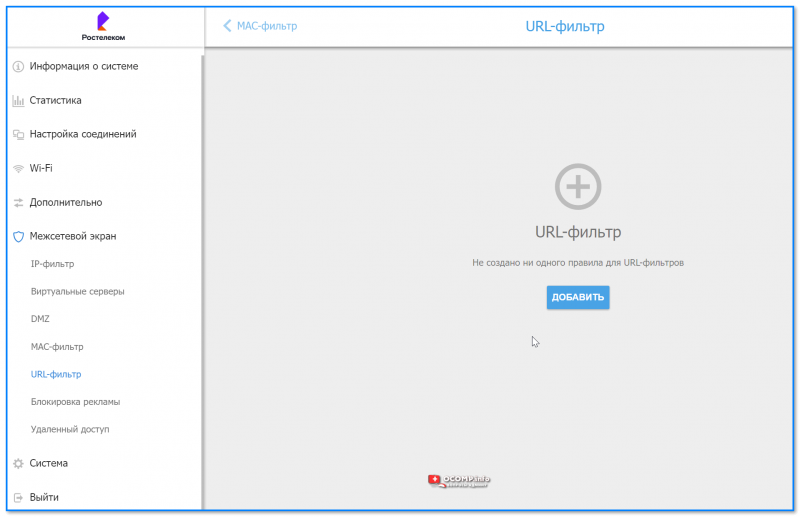
URL-фильтр
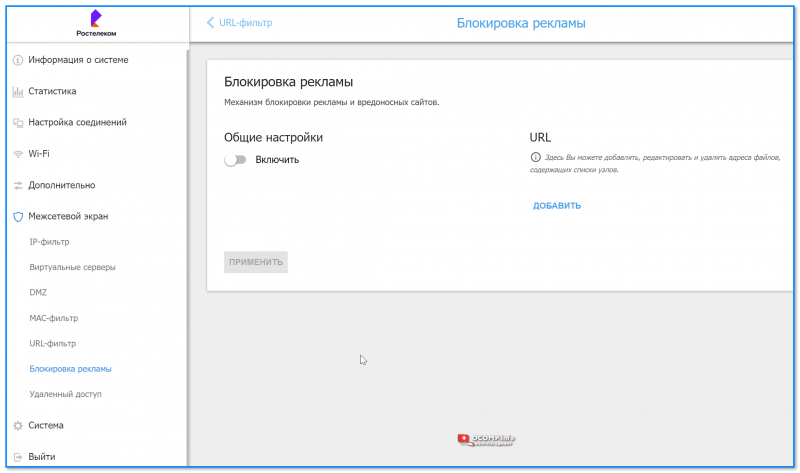
Блокировка рекламы
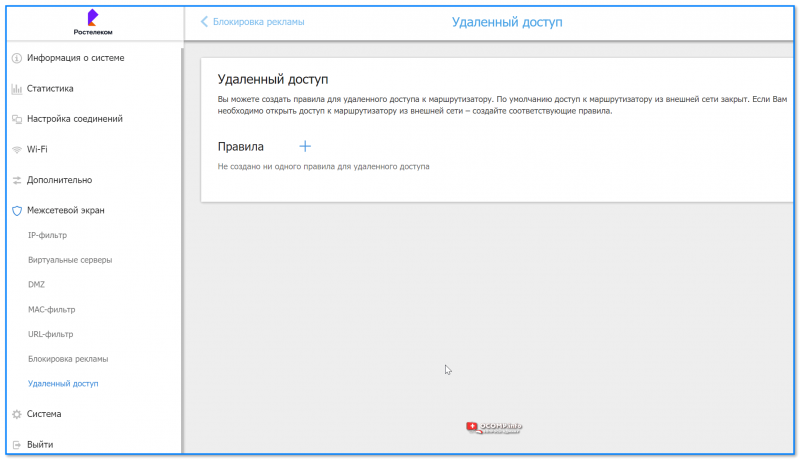
Удаленный доступ к маршрутизатору
*
Система

Конфигурация
Обновление ПО
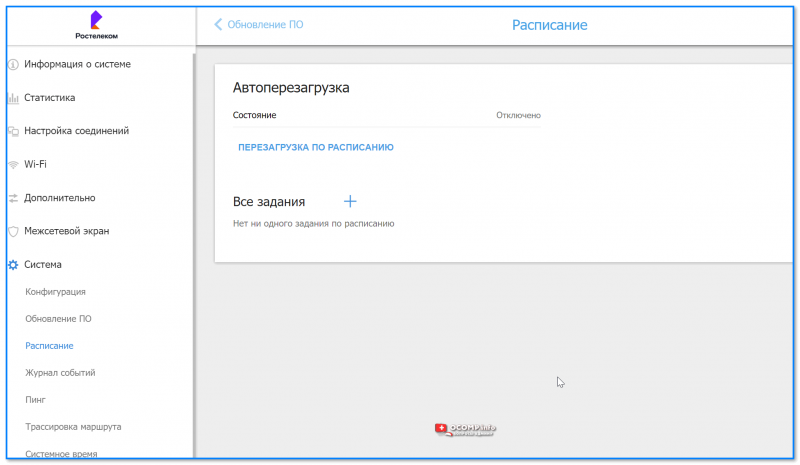
Расписание
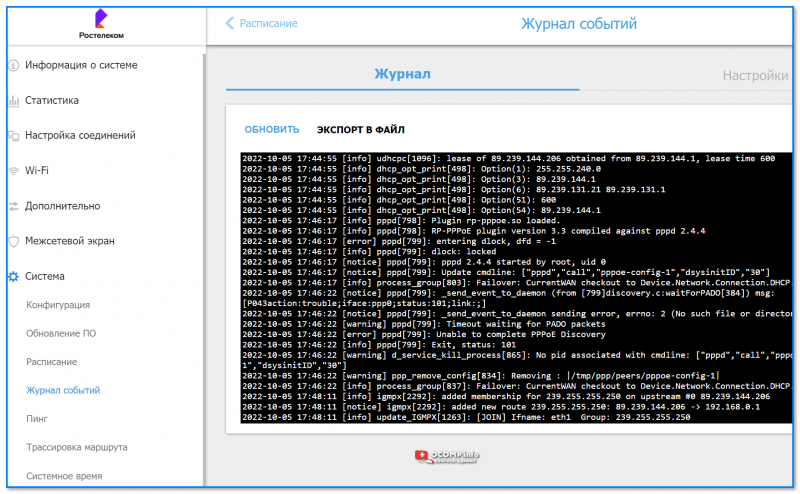
Журнал событий
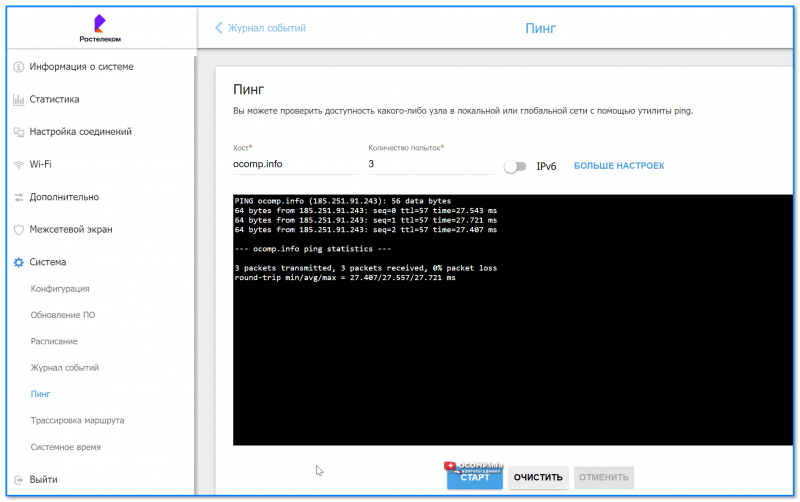
Пинг
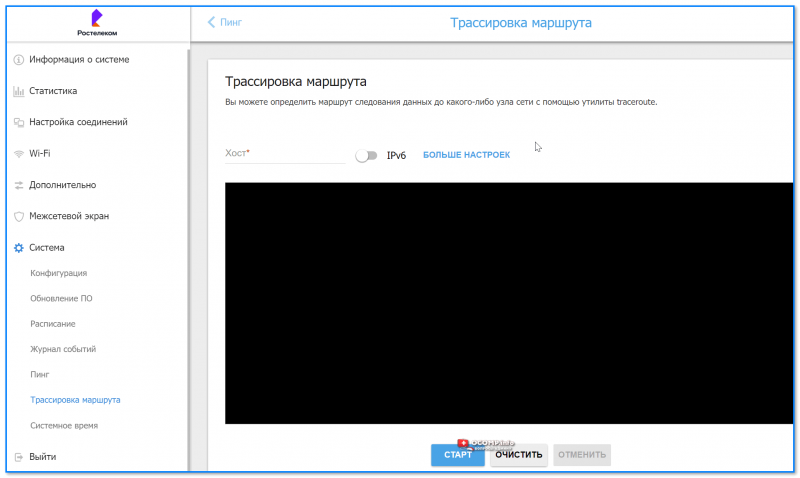
Трассировка маршрута
*
У меня на этом пока всё, благодарю за внимание!
Дополнения и комментарии можно оставить ниже.
Удачи!
🙂


Полезный софт:
-

- Видео-Монтаж

Отличное ПО для создания своих первых видеороликов (все действия идут по шагам!).
Видео сделает даже новичок!
-
- Ускоритель компьютера

Программа для очистки Windows от «мусора» (удаляет временные файлы, ускоряет систему, оптимизирует реестр).

-
Contents
-
Table of Contents
-
Troubleshooting
-
Bookmarks
Quick Links
Version 1.0 | 07/06/2015
User Manual
AC1200 Wi-Fi Gigabit Router
DIR-842
Related Manuals for D-Link DIR-842
Summary of Contents for D-Link DIR-842
-
Page 1: User Manual
Version 1.0 | 07/06/2015 User Manual AC1200 Wi-Fi Gigabit Router DIR-842…
-
Page 2: Preface
Preface D-Link reserves the right to revise this publication and to make changes in the content hereof without obligation to notify any person or organization of such revisions or changes. Manual Revisions Revision Date Description July 06, 2015 • Initial release…
-
Page 3: Table Of Contents
Time & Schedule …………..63 QRS Mobile App …………….15 Time ………………63 Configuration …………..19 Schedule …………….64 Home ………………..20 System Log …………….65 Internet ……………….20 Admin ………………66 DIR-842 ……………….21 System …………….67 Connected Clients …………..22 Upgrade ……………..68 Settings ………………23 Statistics ……………..69 Wizard ………………23 D-Link DIR-842 User Manual…
-
Page 4
WPA/WPA2 …………….84 Troubleshooting …………..86 Wireless Basics …………..90 What is Wireless? ……………..91 Tips ………………..93 Wireless Modes …………….94 Networking Basics …………95 Check your IP address ……………95 Statically Assign an IP address ……….96 Technical Specifications ……….97 Regulatory Information ……….98 D-Link DIR-842 User Manual… -
Page 5: Package Contents
Wi-Fi Configuration Note If any of the above items are missing, please contact your reseller. Note: Using a power supply with a different voltage rating than the one included with the DIR-842 will cause damage and void the warranty for this product.
-
Page 6: System Requirements
Windows Users: Make sure you have the latest version of Java ® installed. Visit www.java.com to download the latest version. • iPhone®/iPad®/iPod Touch® (iOS 6.0 or higher) QRS Mobile Requirements • Android™ device (2.33 or higher) D-Link DIR-842 User Manual…
-
Page 7: Introduction
Introduction The D-Link DIR-842 is an IEEE 802.11ac compliant device that delivers up to 3x faster speeds than 802.11n while staying backward compatible with 802.11n/g/b/a devices. Connect the DIR-842 to a cable or DSL modem and provide high-speed Internet access to multiple computers, game consoles, and media players.
-
Page 8: Features
Section 1 — Product Overview Features • Ultimate Gigabit Wireless Networking — The DIR-842 provides up to 300 Mbps wireless connection in the 2.4 GHz band, and up to 867 Mbps wireless connection in the 5 GHz band with other 802.11ac and 802.11n wireless clients.
-
Page 9: Hardware Overview
Receptor for the supplied power adapter. Power Button Press the power button to power the DIR-842 on and off. WPS / Reset Button Short press to start the WPS process. Long press for 8 seconds to reset the router to default settings.
-
Page 10: Leds
A solid light indicates that the WPS handshake has been completed. The light will blink while the WPS WPS LED handshake is processing. WLAN LED A solid light indicates that the wireless is operating. LAN LEDs 1-4 A solid light indicates a connection to an Ethernet-enabled computer on ports 1-4 respectively. D-Link DIR-842 User Manual…
-
Page 11: Installation
• If you have DSL and are connecting via PPPoE, make sure you disable or uninstall any PPPoE software such as WinPoET, BroadJump, or EnterNet 300 from your computer or you will not be able to connect to the Internet. D-Link DIR-842 User Manual…
-
Page 12: Wireless Installation Considerations
1. Keep the number of walls and ceilings between the D-Link router and other network devices to a minimum — each wall or ceiling can reduce your adapter’s range from 3-90 feet (1-30 meters.) Position your devices so that the number of walls or ceilings is minimized.
-
Page 13: Manual Setup
3. Unplug the Ethernet cable from your modem (or existing router if upgrading) that is connected to your computer. Plug it into the LAN port labeled 1 on the back of your router. The router is now connected to your computer. Computer DIR-842 D-Link DIR-842 User Manual…
-
Page 14
Press the power button and verify that the power LED is lit. Allow 1 minute for the router to boot up. Power Outlet INTERNET 7. If you are connecting to a broadband service, you may be online already and further configuration will be optional. D-Link DIR-842 User Manual… -
Page 15: Configuration
There are several different ways you can configure your router to connect to the Internet and connect to your clients: • D-Link Setup Wizard — This wizard will launch when you log into the router for the first time. Refer to page 12.
-
Page 16: Setup Wizard
Configuration on page 19. The wizard is designed to guide you through a step-by-step process to configure your new D-Link router and connect to the Internet. Click Next to continue. Please wait while your router detects your Internet connection type. After the router detects your Internet connection, you may need to enter your ISP information such as your username and password.
-
Page 17
The software is no longer needed and will not work through a router. If the router detected or you selected Static, enter the IP and DNS settings supplied by your ISP. Click Next to continue. D-Link DIR-842 User Manual… -
Page 18
Click Next to continue. The Summary window will display your settings. Click Next if you are satisfied, or click Back to make changes to them. D-Link DIR-842 User Manual… -
Page 19: Qrs Mobile App
Note: The following steps show the Android interface of the QRS Mobile app. If you are using an iPhone, iPad, or iPod touch, the appearance may be different to that of the screenshots, but the process is the same. D-Link DIR-842 User Manual…
-
Page 20
Plug one end of the provided Ethernet cable into your DSL or cable modem, and plug the other end into the port marked INTERNET on the DIR-842. Tap Next to automatically detect your Internet connection and proceed to the next step. -
Page 21
Enter the administrator password of your choice. Unlike the Wi-Fi password, this password is only required when you need to configure the router. See Configuration on page 19 for details of when this password is used. Tap Next to proceed. D-Link DIR-842 User Manual… -
Page 22
Tap Save to complete the setup and wait for your device to reboot. Congratulations, your device has been successfully configured! You can share this information by tapping Share By E-mail, or tap Finish to exit the app. D-Link DIR-842 User Manual… -
Page 23: Configuration
The bar at the top of the page has quick access to Settings and Management functions. You may quickly jump back Home at any time. Note: The system will automatically log out after a period of inactivity. D-Link DIR-842 User Manual…
-
Page 24: Home
Internet icon. Click IPv4 or IPv6 to see details of the IPv4 connection and IPv6 connection respectively. Click Release to disconnect from the Internet. If you do this and wish to reconnect, click Renew. To reconfigure the Internet settings, refer to Internet on page 23. D-Link DIR-842 User Manual…
-
Page 25
Section 4 — Configuration DIR-842 Click on the DIR-842 icon to view details about the router and its wireless settings. Here you can see the router’s current wireless settings, as well as its MAC address and IPv4/IPv6 addresses. To reconfigure the network settings, either click Go to settings on the lower left, or click Settings (at the top of the page) and then Network on the menu that appears. -
Page 26: Connected Clients
The schedule may be set to Always OFF to indefinitely deny network access to the client, or you can create your own schedules in the Schedules section (refer to Time & Schedule on page 63) Click Save when you are done. D-Link DIR-842 User Manual…
-
Page 27: Settings
For PPTP refer to PPTP on page 27 For L2TP refer to L2TP on page 29 For DS-Lite refer to DS-Lite on page 31 To configure an IPv6 connection, click the IPv6 link. Refer to IPv6 on page 60. D-Link DIR-842 User Manual…
-
Page 28
The default MAC address is set to the physical MAC address of the Clone: router. You can use the drop-down menu to replace the Internet port’s MAC address with the MAC address of a connected client. Click Save when you are done. D-Link DIR-842 User Manual… -
Page 29
The default MAC address is set to the physical MAC address of the router. You can use drop-down menu to replace the Internet port’s MAC address with the MAC address of a connected client. Click Save when you are done. D-Link DIR-842 User Manual… -
Page 30
Enter the secondary DNS server IP address assigned by your ISP. Server: MTU: Maximum Transmission Unit — you may need to change the MTU for optimal performance with your ISP. Click Save when you are done. D-Link DIR-842 User Manual… -
Page 31
Enter the subnet mask provided by your ISP (Static IP only). Mask: PPTP Gateway Enter the gateway IP address provided by your ISP (Static IP only). IP Address: Primary DNS Enter the primary DNS server IP address assigned by your ISP. Server: D-Link DIR-842 User Manual… -
Page 32
Enter the secondary DNS server IP address assigned by your ISP. Server: MTU: Maximum Transmission Unit — you may need to change the MTU for optimal performance with your ISP. Click Save when you are done. D-Link DIR-842 User Manual… -
Page 33
Enter the subnet mask provided by your ISP (Static IP only). Mask: L2TP Gateway Enter the gateway IP address provided by your ISP (Static IP only). IP Address: Primary DNS Enter the primary DNS server IP address assigned by your ISP. Server: D-Link DIR-842 User Manual… -
Page 34
Enter the secondary DNS server IP address assigned by your ISP. Server: MTU: Maximum Transmission Unit — you may need to change the MTU for optimal performance with your ISP. Click Save when you are done. D-Link DIR-842 User Manual… -
Page 35
Address: WAN IPv6 Once connected, the WAN IPv6 address will be displayed here. Address: IPv6 WAN Once connected, the IPv6 WAN default gateway address will be Default displayed here. Gateway: Click Save when you are done. D-Link DIR-842 User Manual… -
Page 36: Ipv6
For IPv6 in IPv4 Tunnel refer to IPv6 in IPv4 Tunnel on page 41. For 6 to 4 refer to 6 to 4 on page 43. For 6rd refer to 6rd on page 44 For Local Connectivity Only refer to Local Connectivity Only on page 46. D-Link DIR-842 User Manual…
-
Page 37: Auto Detection
Enable or disable DHCP-PD for other IPv6 routers connected to the Automatic LAN interface. DHCP-PD in LAN: Note: This feature requires a smaller subnet prefix than /64 (i.e. allowing for a larger address allocation), such as /63. Contact your ISP for more information. D-Link DIR-842 User Manual…
-
Page 38
Section 4 — Configuration Autoconfiguration Select Stateful (DHCPv6), SLAAC + RDNSS or SLAAC + Stateless Type: DHCPv6. Router Enter the IPv6 address lifetime (in minutes). Advertisement Lifetime: Click Save when you are done. D-Link DIR-842 User Manual… -
Page 39: Static Ipv6
LAN IPv6 Enter the LAN (local) IPv6 address for the router. Address: LAN IPv6 Link- Displays the router’s LAN link-local address. Local Address: Enable Check to enable the Automatic IPv6 Address Assignment feature. Automatic IPv6 Address Assignment: D-Link DIR-842 User Manual…
-
Page 40
Section 4 — Configuration Autoconfiguration Select Stateful (DHCPv6), SLAAC + RDNSS or SLAAC + Stateless Type: DHCPv6. Router Enter the IPv6 address lifetime (in minutes). Advertisement Lifetime: Click Save when you are done. D-Link DIR-842 User Manual… -
Page 41
Enable or disable DHCP-PD for other IPv6 routers connected to the Automatic LAN interface. DHCP-PD in LAN: Note: This feature requires a smaller subnet prefix than /64 (i.e. allowing for a larger address allocation), such as /63. Contact your ISP for more information. D-Link DIR-842 User Manual… -
Page 42
Section 4 — Configuration Autoconfiguration Select Stateful (DHCPv6), SLAAC + RDNSS or SLAAC + Stateless Type: DHCPv6. Router Enter the IPv6 address lifetime (in minutes). Advertisement Lifetime: Click Save when you are done. D-Link DIR-842 User Manual… -
Page 43
DNS server addresses. In most cases, select Dynamic IP. MTU: Maximum Transmission Unit — you may need to change the MTU for optimal performance with your ISP. Select either Obtain DNS server address automatically or Use the DNS Type: following DNS address. D-Link DIR-842 User Manual… -
Page 44
/63. Contact your ISP for more information. Auto Select SLAAC + RDNSS or SLAAC + Stateless DHCP, Stateful Configuration (DHCPv6). Type: Router Enter the IPv6 address lifetime (in minutes). Advertisement Lifetime: Click Save when you are done. D-Link DIR-842 User Manual… -
Page 45: Ipv6 In Ipv4 Tunnel
If you selected Use the following DNS address above, enter the Secondary DNS Server: secondary DNS server address. Enable DHCP- Enable or disable prefix delegation services. LAN IPv6 If you disabled DHCP-PD, enter the LAN (local) IPv6 address for the Address: router. D-Link DIR-842 User Manual…
-
Page 46
/63. Contact your ISP for more information. Auto Select Stateful (DHCPv6), SLAAC + RDNSS or SLAAC + Stateless Configuration DHCPv6. Type: Router Enter the IPv6 address lifetime (in minutes). Advertisement Lifetime: Click Save when you are done. D-Link DIR-842 User Manual… -
Page 47
Check to enable the Automatic IPv6 Address Assignment feature. IPv6 Address Assignment: Select Stateful (DHCPv6), SLAAC + RDNSS or SLAAC + Stateless Autoconfiguration Type: DHCPv6. Router Enter the IPv6 address lifetime (in minutes). Advertisement Lifetime: Click Save when you are done. D-Link DIR-842 User Manual… -
Page 48
Choose the 6rd DHCPv4 Option to automatically discover and populate the data values, or Manual Configuration to enter the Configuration: settings yourself. LAN IPv6 Link- Displays the router’s LAN link-local address. Local Address: D-Link DIR-842 User Manual… -
Page 49
Check to enable the Automatic IPv6 Address Assignment feature. Automatic IPv6 Address Assignment: Auto Select Stateful (DHCPv6), SLAAC + RDNSS or SLAAC + Stateless Configuration DHCPv6. Type: Router Enter the IPv6 address lifetime (in minutes). Advertisement Lifetime: Click Save when you are done. D-Link DIR-842 User Manual… -
Page 50: Local Connectivity Only
Current IPv6 This section will display the current settings for your IPv6 ULA. ULA Settings: LAN IPv6 This section will display the current settings for your LAN IPv6 ULA. ULA: Click Save when you are done. D-Link DIR-842 User Manual…
-
Page 51: Wireless
Select the optimum channel width for your wireless network from the drop-down menu. Visibility Status: The default setting is Visible. Select Invisible if you do not want to broadcast the SSID of your wireless network. D-Link DIR-842 User Manual…
-
Page 52
The schedule may be set to Always Enable, or you can create your own schedules in the Schedules section (refer to Schedule on page 64). Click Save when you are done. D-Link DIR-842 User Manual… -
Page 53: Guest Zone
Internet Access Enabling this option will confine connectivity to the Internet, Only: disallowing guests from accessing other local network devices and any other service provided by the router itself. Click Save when you are done. D-Link DIR-842 User Manual…
-
Page 54: Network
Enter the starting and ending IP addresses for the DHCP server’s IP Address Range: assignment. Note: If you statically (manually) assign IP addresses to your computers or devices, make sure the IP addresses are outside of this range or you may have an IP conflict. D-Link DIR-842 User Manual…
-
Page 55
Enable to allow IPv4 multicast traffic to pass through the router from Stream: the Internet. IPv6 Multicast Enable to allow IPv6 multicast traffic to pass through the router from Stream: the Internet. Click Save when you are done. D-Link DIR-842 User Manual… -
Page 56: Features
If you want to remove a priority assignment from a device and return it to the All Devices list, click the cross icon in the top right of the device card. Click Save when you are done. D-Link DIR-842 User Manual…
-
Page 57: Firewall Settings
Enable Enable this feature to protect your network from certain kinds of Anti-Spoof “spoofing” attacks. Checking: IPv6 Simple Enable or disable IPv6 simple security. Security: IPv6 Ingress Enable or disable IPv6 ingress filtering. Filtering: D-Link DIR-842 User Manual…
-
Page 58
NAT devices and work around them. This ALG may interfere with the operation of such devices. If you are having trouble making VoIP calls, try turning this ALG off. Click Save when you are done. D-Link DIR-842 User Manual… -
Page 59: Ipv4/Ipv6 Rules
Use the drop-down menu to select the time schedule that the rule will be enabled on. The schedule may be set to Always Enable, or you can create your own schedules in the Schedules section (refer to Schedule on page 64). Click Apply when you are done. D-Link DIR-842 User Manual…
-
Page 60: Port Forwarding
Use the drop-down menu to select the time schedule that the rule will be enabled on. The schedule may be set to Always Enable, or you can create your own schedules in the Schedules section (refer to Schedule on page 64). Click Apply when you are done. D-Link DIR-842 User Manual…
-
Page 61: Virtual Server
Use the drop-down menu to select the time schedule that the rule will be enabled on. The schedule may be set to Always Enable, or you can create your own schedules in the Schedules section (refer to Schedule on page 64). Click Apply when you are done. D-Link DIR-842 User Manual…
-
Page 62: Website Filter
Create New Rule. Next, under Website URL/Domain enter the URL or domain. If you wish to remove a rule, click on its trash can icon in the Delete column. If you wish to edit a rule, simply replace the URL or domain. Click Save when you are done. D-Link DIR-842 User Manual…
-
Page 63: Static Routes
A value 1 is the lowest cost and 15 is the highest cost. Interface: Select the interface that the IP packet must use to transit out of the router when this route is used. Click Apply when you are done. D-Link DIR-842 User Manual…
-
Page 64: Ipv6
Metric: Enter the metric value for this rule here. Interface: Select the interface that the IP packet must use to transit out of the router when this route is used. Click Apply when you are done. D-Link DIR-842 User Manual…
-
Page 65: Dynamic Dns
Enter a timeout time (in hours). Click Save when you are done. At the bottom of the page are the IPv6 host settings. To configure an IPv6 dynamic DNS host, refer to IPv6 Host on page 62. D-Link DIR-842 User Manual…
-
Page 66: Ipv6 Host
Enter the host name that you registered with your dynamic DNS service provider. IPv6 Address: Enter the IPv6 address of the dynamic DNS server. Alternatively, select the server device in the drop-down menu. Click Apply when you are done. D-Link DIR-842 User Manual…
-
Page 67: Management
Click Save when you are done. To configure and manage your schedules, click Schedule and refer to Schedule on page 64. D-Link DIR-842 User Manual…
-
Page 68: Schedule
You can add multiple days to the schedule, but only one period per day. To remove a time period from the schedule, click on the cross icon. Click Apply when you are done. D-Link DIR-842 User Manual…
-
Page 69: System Log
The schedule may be set to Always Enable, or you can create your own schedules in the Schedules section (refer to Schedule on page 64). Click Save when you are done. D-Link DIR-842 User Manual…
-
Page 70: Admin
Internet by a web browser. A password is still required to access the web management interface. Remote Admin The port number used to access the DIR-842 is used in the URL. Example: Port: http://x.x.x.x:8080 where x.x.x.x is the Internet IP address of the DIR-842 and 8080 is the port used for the web management interface.
-
Page 71: System
If you want to save the current router configuration settings, use the Save Settings To Local Hard Drive button above. Reboot The Click to reboot the router. Device: D-Link DIR-842 User Manual…
-
Page 72: Upgrade
Next, click the Select File button and browse to the Firmware: file to install the new firmware. You can also browse to a language pack file to install a new language pack. D-Link DIR-842 User Manual…
-
Page 73: Statistics
You can view the Internet, LAN, Wi-Fi 2.4GHz, or Wi-Fi 5GHz by clicking on the respective tabs at the top. The graph will update in real time. To clear the information on the graph, click Clear. The traffic counter will reset if the device is rebooted. D-Link DIR-842 User Manual…
-
Page 74: Connect A Wireless Client To Your Router
Blu-ray DVD players, wireless printers, and cameras will have a WPS button (or a software utility with WPS) that you can press to connect to the DIR-842 router. Please refer to your user manual for the wireless device you want to connect to make sure you understand how to enable WPS.
-
Page 75: Windows® 8
Wireless Icon Clicking on this icon will display a list of wireless networks which are within connecting proximity of your computer. Select the desired network by clicking on the network name. D-Link DIR-842 User Manual…
-
Page 76
WPS button on your router at the point to enable the WPS function. When you have established a successful connection a wireless network, the word Connected will appear next to the name of the network to which you are connected. D-Link DIR-842 User Manual… -
Page 77: Windows® 7
If you are joining an existing network, you will need to know the security key or passphrase being used. 1. Click on the wireless icon in your system tray (lower-right corner). Wireless Icon 2. The utility will display any available wireless networks in your area. D-Link DIR-842 User Manual…
-
Page 78
If you get a good signal but cannot access the Internet, check your TCP/IP settings for your wireless adapter. Refer to the Networking Basics section in this manual for more information. 4. The following window appears while your computer tries to connect to the router. D-Link DIR-842 User Manual… -
Page 79
It may take 20-30 seconds to connect to the wireless network. If the connection fails, please verify that the security settings are correct. The key or passphrase must be exactly the same as on the wireless router. D-Link DIR-842 User Manual… -
Page 80: Wps
Section 4 — Connecting to a Wireless Network The WPS feature of the DIR-842 can be configured using Windows® 7. Carry out the following steps to use Windows® 7 to configure the WPS feature: 1. Click the Start button and select Computer from the Start menu.
-
Page 81
Section 4 — Connecting to a Wireless Network 3. Double-click the DIR-842. DIR-842 4. Input the WPS PIN number (on the router label) in the Setup > Wireless Setup menu in the router’s web UI) and click Next. D-Link DIR-842 User Manual… -
Page 82
Section 4 — Connecting to a Wireless Network 5. Type a name to identify the network. 6. To configure advanced settings, click the icon. Click Next to continue. D-Link DIR-842 User Manual… -
Page 83
Make a note of the security key as you may need to provide this security key if adding an older wireless device to the network in the future. 9. Click Close to complete WPS setup. D-Link DIR-842 User Manual… -
Page 84: Windows Vista
Click on a network (displayed using the SSID) and click the Connect button. If you get a good signal but cannot access the Internet, check you TCP/IP settings for your wireless adapter. Refer to the Networking Basics section in this manual for more information. D-Link DIR-842 User Manual…
-
Page 85: Wpa/Wpa2
1. Open the Windows Vista® Wireless Utility by right-clicking on the wireless computer icon in your system tray (lower right corner of screen). Select Connect to a network. 2. Highlight the Wi-Fi name (SSID) you would like to connect to and click Connect. D-Link DIR-842 User Manual…
-
Page 86
It may take 20-30 seconds to connect to the wireless network. If the connection fails, please verify that the security settings are correct. The key or passphrase must be exactly the same as on the wireless router. D-Link DIR-842 User Manual… -
Page 87: Windows® Xp
Click on a Wi-Fi network (displayed using the SSID) and click the Connect button. If you get a good signal but cannot access the Internet, check you TCP/IP settings for your wireless adapter. Refer to the Networking Basics section in this manual for more information. D-Link DIR-842 User Manual…
-
Page 88: Wpa/Wpa2
1. Open the Windows® XP Wireless Utility by right-clicking on the wireless computer icon in your system tray (lower-right corner of screen). Select View Available Wireless Networks. 2. Highlight the Wi-Fi network (SSID) you would like to connect to and click Connect. D-Link DIR-842 User Manual…
-
Page 89
It may take 20-30 seconds to connect to the wireless network. If the connection fails, please verify that the WPA-PSK settings are correct. The Wi-Fi password must be exactly the same as on the wireless router. D-Link DIR-842 User Manual… -
Page 90: Troubleshooting
1. Why can’t I access the web-based configuration utility? When entering the IP address of the D-Link router (192.168.0.1 for example), you are not connecting to a website nor do you have to be connected to the Internet. The device has the utility built-in to a ROM chip in the device itself. Your computer must be on the same IP subnet to connect to the web-based utility.
-
Page 91
• Close your web browser (if open) and open it. • Access the web management. Open your web browser and enter the IP address of your D-Link router in the address bar. This should open the login page for your web management. -
Page 92
• Windows® 95, 98, and Me users type in command (Windows® NT, 2000, XP, Vista®, and 7 users type in cmd) and press Enter (or click OK). • Once the window opens, you’ll need to do a special ping. Use the following syntax: ping [url] [-f] [-l] [MTU value] Example: ping yahoo.com -f -l 1472 D-Link DIR-842 User Manual… -
Page 93
• To change the MTU enter the number in the MTU field and click Save Settings to save your settings. • Test your email. If changing the MTU does not resolve the problem, continue changing the MTU in increments of ten. D-Link DIR-842 User Manual… -
Page 94: Wireless Basics
D-Link wireless products are based on industry standards to provide easy-to-use and compatible high-speed wireless connectivity within your home, business or public access wireless networks. Strictly adhering to the IEEE standard, the D-Link wireless family of products will allow you to securely access the data you want, when and where you want it. You will be able to enjoy the freedom that wireless networking delivers.
-
Page 95: What Is Wireless
D-Link is the worldwide leader and award winning designer, developer, and manufacturer of networking products. D-Link delivers the performance you need at a price you can afford. D-Link has all the products you need to build your network. How does wireless work? Wireless works similar to how cordless phone work, through radio signals to transmit data from one point A to point B.
-
Page 96
Who uses wireless? Wireless technology as become so popular in recent years that almost everyone is using it, whether it’s for home, office, business, D-Link has a wireless solution for it. Home • Gives everyone at home broadband access •… -
Page 97: Tips
The wireless connection in public places is usually called “hotspots”. Using a D-Link CardBus Adapter with your laptop, you can access the hotspot to connect to Internet from remote locations like: airports, hotels, coffee shops, libraries, restaurants, and convention centers.
-
Page 98: Wireless Modes
An Infrastructure network contains an access point or wireless router. All the wireless devices, or clients, will connect to the wireless router or access point. An ad-hoc network contains only clients, such as laptops with wireless CardBus adapters. All the adapters must be in ad-hoc mode to communicate. D-Link DIR-842 User Manual…
-
Page 99: Networking Basics
Check your IP address After you install your new D-Link adapter, by default, the TCP/IP settings should be set to obtain an IP address from a DHCP server (i.e. wireless router) automatically. To verify your IP address, please follow the steps below.
-
Page 100: Statically Assign An Ip Address
Set Primary DNS the same as the LAN IP address of your router (192.168.0.1). The Secondary DNS is not needed or you may enter a DNS server from your ISP. Step 5 Click OK twice to save your settings. D-Link DIR-842 User Manual…
-
Page 101: Technical Specifications
MHz~5825 MHz • IEEE 802.11ac: 5180 MHz~5240 MHz, 5745 MHz~5825 MHz Wireless Bandwidth Rate • IEEE 802.11a: 54, 48, 36, 24, 18, 12, 9, and 6 Mbps • IEEE 802.11b: 11, 5.5, 2, and 1 Mbps D-Link DIR-842 User Manual…
-
Page 102: Regulatory Information
This transmitter must not be co-located or operating in conjunction with any other antenna or transmitter. Country Code selection feature to be disabled for products marketed to the US/CANADA Industry Canada statement: This device complies with Industry Canada’s licence-exempt RSSs. Operation is subject to the following two conditions: D-Link DIR-842 User Manual…
-
Page 103
Cet équipement est conforme aux limites d’exposition aux rayonnements IC établies pour un environnement non contrôlé. Cet équipement doit être installé et utilisé avec un minimum de 20 cm de distance entre la source de rayonnement et votre corps. D-Link DIR-842 User Manual…