-
Contents
-
Table of Contents
-
Troubleshooting
-
Bookmarks
Quick Links
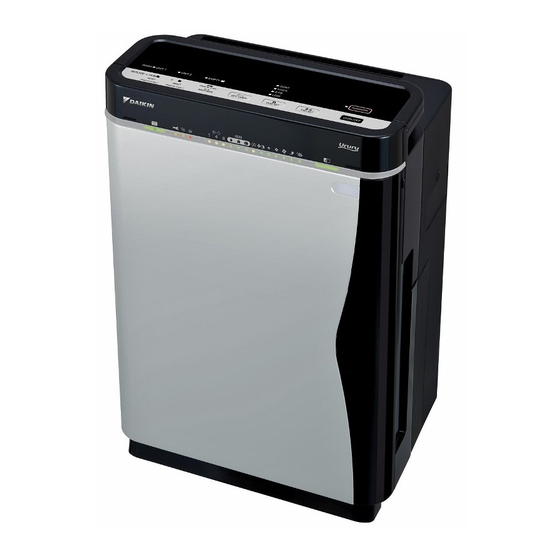
Humidifying air purifi er
Floor Standing Type
Ururu Air Purifi er
OPERATION MANUAL
MODEL
MCK75JVM-K
Related Manuals for Daikin MCK75JVM-K
Summary of Contents for Daikin MCK75JVM-K
-
Page 1: Operation Manual
Humidifying air purifi er Floor Standing Type Ururu Air Purifi er OPERATION MANUAL MODEL MCK75JVM-K…
-
Page 2
Features Features The strong decomposition capacity of streamer discharge assuredly removes unpleasant Deodorization odor-causing components in cigarette smoke, formaldehyde, etc. Dust collection A high airfl ow rate nimbly catches pollen, house dust, etc. Humidifi cation The room is quickly humidifi ed by the humidifying with “Vaporization system of high airfl ow rate”. Streamer discharge nimbly decomposes odors and harmful gases by generating fast-moving electrons of high oxidising strength inside the air purifi… -
Page 3: Table Of Contents
READ FIRST ■ Safety Precautions ………. 3 ■ Names and Operation of Each Parts ….. 7 ■ Sensitivity Settings of the Dust Sensor ..13 PREPARATIONS BEFORE USE ■ Installation …………. 14 ■ Preparation of Remote Controller ….15 ■ Attach the Filter ……….
-
Page 4: Read First
READ FIRST Safety Precautions Before use, read these Safety Precautions to ensure proper use. The precautions used in this manual are classifi ed into the following two types. Both contain important safety information, therefore observe them at all times. Improper handling may lead to injury or property Improper handling may lead to serious injury or damage.
-
Page 5: Power Supply
WARNING • Do not use the unit anywhere there is airborne oil such as machine oil. Airborne oils may lead to cracking, electric shock or ignition. • Do not use the unit anywhere there are abundant oil vapours such as in kitchens, combustible or corrosive gases, or metallic dust. These kinds of environments may lead to fi…
-
Page 6
Safety Precautions CAUTION • Do not use the unit anywhere it is exposed to direct sunlight, rain or wind. Overheating or contact with water may lead to fi re or electric shock. • Do not use the unit anywhere that is hot such as near to heaters. High temperatures may discolour or deform the unit. -
Page 7
CAUTION • If used where pets are kept, be careful that pets do not urinate on the unit or bite the power supply cord. This may lead to electric shock or fi re. In the event of abuse by pets, stop operation, unplug the power supply cord and contact the service shop. -
Page 8: Names And Operation Of Each Parts
Names and Operation of Each Parts Main unit Odor sensor Dust sensor Humidity sensor · Temperature sensor Filter container Holds 6 replacement pleated filters. UNIT2 (Streamer unit) UNIT1 (Plasma ionizer) Ionizing frame Pre-filter (green) Safety guard Removes large dust particles. Deodorizing catalyst unit Absorbs airborne odors and harmful gases using a deodorizing…
-
Page 9: Humidifying Filter
Operating panel Handle Side panel Front indicator Pocket lock lamps Prevents streamer pocket from opening inadvertently. Use a coin to open. Unlock How to use the pocket lock Coin Lock Unlock Lock Pocket lock To lock, turn to where the meet.
-
Page 10
Names and Operation of Each Parts Operating panel Brightness adjustment Use to set lamp brightness for sleeping or as you prefer. Each time the button is pressed, the brightness of the operating panel lamps and front indicator lamps change as follows. Page 13. -
Page 11
ATTENTION OFF TIMER button ● The operating panel is covered in a protective sheet to protect against scratching. Each time pressing this button, the OFF Peel the sheet off before use. time changes as follows. ● If the front panel is opened during operation, the unit stops for safety reasons. If the unit malfunctions during operation <Front indicator lamps>… -
Page 12
Names and Operation of Each Parts Front indicator lamps The readings of room hygrometers and the unit’s humidity indicator lamp may differ. • This is because air currents cause temperature and humidity drifts even in the same room. Consider the humidity indicator lamp as just a reference reading. Child proof lock lamp Regeneration lamp •… -
Page 13
Humidity indicator lamp (For reference only) This lamp indicates the room humidity detected by humidity sensor. :Humidity: 40% or less :Humidity: Approx. 50% :Humidity: 60% or more In case running the unit just to air purifying operation, the lamp also indicates the humidity level. Odor sensor lamp Odor sensor detects the changes in airborne odors. -
Page 14: Sensitivity Settings Of The Dust Sensor
Sensitivity Settings of the Dust Sensor If dust sensor sensitivity is not how you want it, change the setting. Operating panel Press for 10 seconds. While holding down , press • After a short beep sound is emitted and the airfl ow (“ ”…
-
Page 15: Preparations Before Use
PREPARATIONS BEFORE USE Installation How to install Set the unit in a preferred location. Observe the following installation clearances to ensure unit performance. Min. 100cm from ceilings Airflow Min. 10cm from walls Min. 50cm from walls Min. 50cm from walls NOTE ●…
-
Page 16: Preparation Of Remote Controller
Preparation of Remote Controller Remote controller setup Remote controller preparations • Battery is already set in the remote controller. To use the remote controller, pulling out the clear sheet from the battery cover. Receiver Using the remote controller • Point the transmitter of the remote controller towards the receiver of the main unit. If an obstruction to the signal, such as a curtain, exists, the remote controller will not operate.
-
Page 17: Attach The Filter
CAUTION Attach the Filter • Do the following before plugging in the power supply cord. Attach the pleated fi lter Remove the deodorizing catalyst unit. • Holding the deodorizing catalyst unit by the handle, pull the deodorizing catalyst unit upwards and out of the unit. Be sure to attach the pleated fi…
-
Page 18: Water Tank Preparations
Water Tank Preparations Water tank preparations Air purifying operation can be operated even without water in the tank. Open the cap on the water tank. Add water to the tank and close the cap. Use only tap water. • Add water somewhere that can be wet if spilled. •…
-
Page 19
After attaching the fi lter Restore the front panel. Restore the deodorizing catalyst unit. • Fit the tabs (2 locations) at the bottom of the panel into the • Holding the deodorizing catalyst unit by the handle, fi t the grooves at the bottom of the main unit, and close the projections on the unit into the grooves (4 locations) at the panel. -
Page 20: How To Operate
HOW TO OPERATE Air Purifying Operation Socket Plug the power supply cord NOTE Power plug into an electrical socket. ● Do not insert or remove the power plug to turn the unit on/off. Abusive handling may lead to electric shock or fi re because of overheating. Humidification lamp Press •…
-
Page 21: Humidify And Air Purifying Operations
Humidify and Air Purifying Operations Air purifying operation is in active while humidifying operation. (Humidifi cation cannot run by itself.) ● Do not move the unit while it is running. Displacements may cause water leaks, damage or malfunctions. Humidification lamp Press Press to light the humidifi…
-
Page 22: How To Operate With Remote Controller
How to Operate with Remote Controller How to operate with remote controller 1. ON/OFF button 2. Auto fan button 3. Fan setting button 4. Turbo button 5. Anti-pollen button 6. Humidify ON/OFF button 7. Humidify setting button 8. OFF TIMER button 9.
-
Page 23
To switch the humidifying operation ON/OFF Press “ ”. • Each time it is pressed, the humidifying operation ON/OFF will switch. • When the humidifying operation ON/OFF is switched humidity indicator lamp indicate temporarily as shown below. • In case the humidifying operation is turned ON: the humidity indicator lamp will be changed and indicate the setting. •… -
Page 24: How To Use The Recyclable Deodorizing Cartridge
How to Use the Recyclable Deodorizing Cartridge The recyclable deodorizing cartridge can be removed from the air purifi er and used to deodorize remote locations. Deodorizing capacity can be regenerated with the streamer pocket so as to use the cartridge time and time again. Uses The deodorizing cartridge can be used in the below places.
-
Page 25
After about 2 months (reference only), regenerate the recyclable deodorizing cartridge inside How to regenerate the recyclable the streamer pocket. deodorizing cartridge Suffi cient deodorizing effect may not be obtained if the cartridge is not regenerated periodically. Recyclable deodorizing cartridge regeneration is started and stopped by opening and closing the streamer pocket. -
Page 26: Quick Reference Table Of Maintenance
CARE and CLEANING Quick Reference Table WARNING of Maintenance • Before performing maintenance, stop the unit and unplug the power supply cord. If the check lamp lights, check the location that requires attention on the operating panel. • Any of the humidifying filter lamp( ), Air-purifying filter lamp( ), UNIT1/2 lamps, or water supply lamp( ) will light or…
-
Page 27
• Air inlets for Dust/Odor sensors and Temperature/ Humidity sensors Page 27. UNIT2 (Streamer unit) Page 33, 34. Deodorizing catalyst unit Page 28. Pleated filter (front: white, back: blue) Page 30, 31. Front panel Page 27. UNIT1 (Plasma ionizer) Page 33, 34. Pre-filter (green) Page 29. -
Page 28: Care & Cleaning
Care & Cleaning Front panel cleaning Wipe • Wipe off dirt with a piece of cloth or tissue moistened with water. • For stubborn dirt, wipe with a cloth moistened with a neutral liquid detergent. CAUTION • Do not use hard bristle brushes, etc. Tools of the sort may scratch the front panel.
-
Page 29
Recyclable deodorizing cartridge Deodorizing catalyst unit Streamer pocket Recyclable deodorizing cartridge cleaning Cannot be washed with detergent Vacuum cleaner Soak, drain and dry • If dust has accumulated, suck it up with a vacuum cleaner. • If bothered by dirt on the cartridge, soak the cartridge in warm or plain water for about 10 minutes, drain thoroughly and dry in a well- ventilated shade for about 1 day. -
Page 30
Care & Cleaning Pre-fi lter cleaning (About once every 2 weeks) Vacuum cleaner Rinse with water Remove the front panel. Restore the pre-fi lter. • Push the 2 projections (left and right) inwards, and pull the • Align the tabs (4 locations) on the left and right of the front panel upwards and remove. -
Page 31
Pleated fi lter replacement Cannot be rinsed in water WARNING The pleated fi lter does not need • Before performing maintenance, stop the replacing until the Air-purifying fi lter unit and unplug the power supply cord. lamp lights or fl ashes. Replace If the Air-purifying filter lamp lights or flashes Remove the front panel. -
Page 32
Care & Cleaning Restore the deodorizing catalyst unit. Restore the front panel. Page 29. • Holding the deodorizing catalyst unit by the handle, fi t the projections on the unit into the grooves (4 locations) at the bottom of the main unit and press the deodorizing catalyst unit into the main unit. -
Page 33
UNIT1 (Plasma ionizer) removing and attaching CAUTION • Wear rubber gloves to remove and attach the opposite pole plates. Hands can be cut on the opposite pole plates and ionized wires. Remove Attach Remove the front panel. Attach the opposing pole plates. Page 29. -
Page 34
Care & Cleaning Cleaning UNIT1 (plasma ionizer) and UNIT2 (streamer unit) CAUTION • Before performing maintenance, stop the unit and unplug the power supply cord. • Wear rubber gloves to when wiping or rubbing the units. Soak, drain and dry If UNIT lamps light Hands can be cut on the opposite pole plates and ionized wires. -
Page 35
UNIT1 UNIT2 CAUTION (Plasma ionizer) (Streamer unit) There are ionized wires to the rear of the opposite pole plates. Be (1) Ionizing frame careful not to snap these wires when removing and attaching the units. • If the unit is run with broken ionized wires, the “UNIT1” lamp lights. -
Page 36
Care & Cleaning Humidifying fi lter cleaning (About once every 1 week) Soak, drain and dry WARNING How quickly the humidifying fi lter becomes dirty depends on the environment of use. If odors are emitted from the air outlet or if humidifi cation capacity is low (the •… -
Page 37
Attach the humidifying Restore the humidifying tray. filter and waterwheel. Waterwheel Press inward until • Reattach the humidifying fi lter and waterwheel to hearing clicking the humidifying tray, and push the humidifying tray sound. back into the unit until hearing clicking sound. Humidifi… -
Page 38
Care & Cleaning Humidifying fi lter replacement (About every 2 years [2 seasons]) Using the unit without replacing the WARNING humidifying fi lter causes mildew, foul odors and humidifi cation loss. • Before performing maintenance, stop the unit and unplug the power supply cord. Replace If the humidifying filter lamp lights or flashes Remove the front panel and water tank. -
Page 39
Options ATTENTION ● For replacement pleated fi lters, humidifying fi lters or recyclable deodorizing Part Model cartridges contact the service shop. Pleated fi lter (7) KAC998A4E ● If the unit is used with dirty parts Humidifying fi lter (Without frame) (1) KNME998A4E •… -
Page 40: Troubleshooting
TROUBLESHOOTING Frequently Asked Questions Questions & Answers Question: Question: The dust sensor does not change from the Does the deodorizing effect of the recyclable orange or red colour. deodorizing cartridge disappear entirely in 2 months time? Answer: This is due to dusts built up in the dust sensor. Answer: Suck up dust accumulated in the dust sensor hole with a The effect should not completely disappear in 2 months time.
-
Page 41: If These Lamps Light Or Flash
If These Lamps Light or Flash Front indicator lamps If a long beep sound repeat 3 times is emitted and the dust and odor lamps flash (red) at the same time The lamps will blink if the unit is leaned in excess or toppled. Set the unit on a flat floor and press the ON/OFF button.
-
Page 42: Troubleshooting
The following situations have logical explanations. Troubleshooting Before requesting servicing, make the following checks. If this happens Check Humidity in rooms facing north or rooms near plumbing fi xtures such as bathrooms is normally The current humidity remains high. high because moisture readily accumulates. The readings of the room hygrometer and This is because air currents cause temperature and humidity drifts even in the same room.
-
Page 43: During Operation
If this happens Check How to resolve Crackling, buzzing, and Securely set it. Page 18. Is the UNIT1 set securely? fi zzes sounds are audible during operation. Has dust accumulated on the ionized wires of the Page 33, 34. Clean it. ionizing frame? A hissing sound heard from UNIT2 during operation.
-
Page 44
The following situations have logical explanations. Troubleshooting Before requesting servicing, make the following checks. If this happens Check How to resolve The unit does not humidify Press if the lamp is out. Is the humidifi er ON/OFF lamp is lit? despite having added water to the water tank. -
Page 45
MEMO… -
Page 46
Two-dimensional bar code is a code for manufacturing. 3P234570-1 M08B113 (0811) HT…
-
Инструкции по эксплуатации
1

Daikin MCK75J Ururu инструкция по эксплуатации
(47 страниц)
- Языки:Русский
-
Тип:
PDF -
Размер:
3.01 MB -
Описание:
Очиститель воздуха с функцией увлажнения
Просмотр
На NoDevice можно скачать инструкцию по эксплуатации для Daikin MCK75J Ururu. Руководство пользователя необходимо для ознакомления с правилами установки и эксплуатации Daikin MCK75J Ururu. Инструкции по использованию помогут правильно настроить Daikin MCK75J Ururu, исправить ошибки и выявить неполадки.
Уход и очистка
Очистка передней панели
•
Вытрите грязь куском ткани или салфеткой, смоченной в воде.
•
В случае трудноудаляемого загрязнения вытрите его с помощью ткани, смоченной в нейтральном жидком моющем средстве.
Очистка входного отверстия датчика
(Датчики пыли, запахов,
температуры и влажности)
•
Используя насадку для пылесоса с узким отверстием, соберите
пыль, попавшую во входные отверстия и отверстия датчика.
Входные отверстия
для воздуха
ПРИМЕЧАНИЕ
●
Соблюдайте осторожность, чтобы не поцарапать лицевую поверхность передней панели и не повредить выступы на ее задней
стороне во время снятия.
Выступы на задней стороне играют роль аварийного выключателя, который ВЫКЛЮЧАЕТ питание при открывании панели.
В случае их повреждения блок не будет включаться.
Задняя поверхность
передней панели.
27
Вытрите
Входные отверстия
для воздуха
Верхнее отверстие
Выступ
Соблюдайте осторожность, чтобы не
повредить эти выступы.
ПРЕДОСТЕРЕЖЕНИЕ
•
Не используйте жесткие щетки из щетины и т.п.
Подобные инструменты могут поцарапать переднюю панель.
ПРЕДУПРЕЖДЕНИЕ
•
Не используйте моторное топливо, бензин, растворитель,
очищающую пасту, керосин, спирт и т.п.
Использование этих веществ может стать причиной поломки,
поражения электрическим током или воспламенения.
•
Не промывайте решетку блока водой.
Контакт с водой может привести поражению электрическим током,
возгоранию или повреждению.
Очистка решетки
Очистите
пылесосом
блока
•
В случае скопления пыли, соберите ее
пылесосом.
•
На задней стороне отверстия в верхней части
блока есть аварийный выключатель, поэтому не
прикасайтесь к нему.
Прикосновение к выключателю может привести к
поражению электрическим током.
•
В случае повреждения выключателей, в
результате которого блок не будет включаться,
обратитесь в сервисный центр.
Очистите
пылесосом
ПРЕДУПРЕЖДЕНИЕ
1
Функции
Функции
Дезодорация
Сильная способность стримерного разряда к расщеплению надежно удаляет вызывающие
неприятный запах компоненты сигаретного дыма, формальдегид и т.п.
Пылеулавливание
Высокая скорость воздушного потока легко захватывает пыльцу, домашнюю пыль и т.п.
Увлажнение
Помещение быстро увлажняется с помощью “Системы увлажнения с высокой скоростью
воздушного потока”.
Информация о
стримерном
разряде…………………
Стримерный разряд легко расщепляет запахи и вредные газы путем создания внутри воздухоочистителя
быстро движущихся электронов, обладающих высокой окислительной способностью. (Поскольку эти
быстро движущиеся электроны создаются и поглощаются внутри блока, его использование является
абсолютно безопасным.)
Во время работы данного блока может быть слышен шипящий звук стримерного разряда, однако это не
является признаком нарушения его работы. Кроме того, в зависимости от условий эксплуатации этот звук
может становиться тише или менять тон, что также не является признаком неисправности данного блока.
Информация об очистке воздуха
Пыльца
Пыль
Запах
Мощное всасывание при
использовании высокой скорости
воздушного потока позволяет
захватывать пыль, пыльцу и т.п.
Стримерный разряд расщепляет
формальдегид и запахи.
• С увеличением скорости
воздушного потока очищающая
способность возрастает.
Высокая эффективность удаления пыльцы
Благодаря высокой скорости воздушного потока
быстро захватывается даже та пыльца, которая
успела осесть из-за больших размеров частиц.
Воздух
всасывается с
обеих сторон.
Воздух с
высокой скоростью
подается во все части
помещения.
Увлажнение воздуха
Адаптация системы увлажнения
Это система для распыления воды воздушным
потоком.
• Испарения и туман незаметны для глаза.
• С увеличением скорости воздушного потока
увлажняющая способность возрастает.
• Во время подачи воды из емкости с водой в лоток
для увлажнения может издаваться звук, что не
указывает на наличие неисправностей в блоке.
Система подачи воды с помощью
водяного колеса
Водяное колесо зачерпывает воду только при
необходимости и увлажняющий фильтр не
пропитывается водой. Это особая система,
которая поддерживает увлажняющий фильтр
в чистоте и предупреждает плесень.
Емкость с
водой
Влажный воздух
Сухой в
оз
дух
Вращение
(1) Водяное колесо
(2) Увлажняющий
фильтр
Вода зачерпывается из
лотка для увлажнения.
Влага удерживается на
увлажняющем фильтре.
Лоток для
увлажнения
09_RU_3P234570-1.indd 1
09_RU_3P234570-1.indd 1
11/4/2008 6:15:44 PM
11/4/2008 6:15:44 PM
-
Contents
-
Table of Contents
-
Troubleshooting
-
Bookmarks
Quick Links
Humidifying air purifi er
Floor Standing Type
Ururu Air Purifi er
OPERATION MANUAL
MODEL
MCK75JVM-K
Related Manuals for Daikin MCK75JVM-K
Summary of Contents for Daikin MCK75JVM-K
-
Page 1: Operation Manual
Humidifying air purifi er Floor Standing Type Ururu Air Purifi er OPERATION MANUAL MODEL MCK75JVM-K…
- Page 2
Features Features The strong decomposition capacity of streamer discharge assuredly removes unpleasant Deodorization odor-causing components in cigarette smoke, formaldehyde, etc. Dust collection A high airfl ow rate nimbly catches pollen, house dust, etc. Humidifi cation The room is quickly humidifi ed by the humidifying with “Vaporization system of high airfl ow rate”. Streamer discharge nimbly decomposes odors and harmful gases by generating fast-moving electrons of high oxidising strength inside the air purifi… -
Page 3: Table Of Contents
READ FIRST ■ Safety Precautions ………. 3 ■ Names and Operation of Each Parts ….. 7 ■ Sensitivity Settings of the Dust Sensor ..13 PREPARATIONS BEFORE USE ■ Installation …………. 14 ■ Preparation of Remote Controller ….15 ■ Attach the Filter ……….
-
Page 4: Read First
READ FIRST Safety Precautions Before use, read these Safety Precautions to ensure proper use. The precautions used in this manual are classifi ed into the following two types. Both contain important safety information, therefore observe them at all times. Improper handling may lead to injury or property Improper handling may lead to serious injury or damage.
-
Page 5: Power Supply
WARNING • Do not use the unit anywhere there is airborne oil such as machine oil. Airborne oils may lead to cracking, electric shock or ignition. • Do not use the unit anywhere there are abundant oil vapours such as in kitchens, combustible or corrosive gases, or metallic dust. These kinds of environments may lead to fi…
- Page 6
Safety Precautions CAUTION • Do not use the unit anywhere it is exposed to direct sunlight, rain or wind. Overheating or contact with water may lead to fi re or electric shock. • Do not use the unit anywhere that is hot such as near to heaters. High temperatures may discolour or deform the unit. - Page 7
CAUTION • If used where pets are kept, be careful that pets do not urinate on the unit or bite the power supply cord. This may lead to electric shock or fi re. In the event of abuse by pets, stop operation, unplug the power supply cord and contact the service shop. -
Page 8: Names And Operation Of Each Parts
Names and Operation of Each Parts Main unit Odor sensor Dust sensor Humidity sensor · Temperature sensor Filter container Holds 6 replacement pleated filters. UNIT2 (Streamer unit) UNIT1 (Plasma ionizer) Ionizing frame Pre-filter (green) Safety guard Removes large dust particles. Deodorizing catalyst unit Absorbs airborne odors and harmful gases using a deodorizing…
-
Page 9: Humidifying Filter
Operating panel Handle Side panel Front indicator Pocket lock lamps Prevents streamer pocket from opening inadvertently. Use a coin to open. Unlock How to use the pocket lock Coin Lock Unlock Lock Pocket lock To lock, turn to where the meet.
- Page 10
Names and Operation of Each Parts Operating panel Brightness adjustment Use to set lamp brightness for sleeping or as you prefer. Each time the button is pressed, the brightness of the operating panel lamps and front indicator lamps change as follows. Page 13. - Page 11
ATTENTION OFF TIMER button ● The operating panel is covered in a protective sheet to protect against scratching. Each time pressing this button, the OFF Peel the sheet off before use. time changes as follows. ● If the front panel is opened during operation, the unit stops for safety reasons. If the unit malfunctions during operation <Front indicator lamps>… - Page 12
Names and Operation of Each Parts Front indicator lamps The readings of room hygrometers and the unit’s humidity indicator lamp may differ. • This is because air currents cause temperature and humidity drifts even in the same room. Consider the humidity indicator lamp as just a reference reading. Child proof lock lamp Regeneration lamp •… - Page 13
Humidity indicator lamp (For reference only) This lamp indicates the room humidity detected by humidity sensor. :Humidity: 40% or less :Humidity: Approx. 50% :Humidity: 60% or more In case running the unit just to air purifying operation, the lamp also indicates the humidity level. Odor sensor lamp Odor sensor detects the changes in airborne odors. -
Page 14: Sensitivity Settings Of The Dust Sensor
Sensitivity Settings of the Dust Sensor If dust sensor sensitivity is not how you want it, change the setting. Operating panel Press for 10 seconds. While holding down , press • After a short beep sound is emitted and the airfl ow (“ ”…
-
Page 15: Preparations Before Use
PREPARATIONS BEFORE USE Installation How to install Set the unit in a preferred location. Observe the following installation clearances to ensure unit performance. Min. 100cm from ceilings Airflow Min. 10cm from walls Min. 50cm from walls Min. 50cm from walls NOTE ●…
-
Page 16: Preparation Of Remote Controller
Preparation of Remote Controller Remote controller setup Remote controller preparations • Battery is already set in the remote controller. To use the remote controller, pulling out the clear sheet from the battery cover. Receiver Using the remote controller • Point the transmitter of the remote controller towards the receiver of the main unit. If an obstruction to the signal, such as a curtain, exists, the remote controller will not operate.
-
Page 17: Attach The Filter
CAUTION Attach the Filter • Do the following before plugging in the power supply cord. Attach the pleated fi lter Remove the deodorizing catalyst unit. • Holding the deodorizing catalyst unit by the handle, pull the deodorizing catalyst unit upwards and out of the unit. Be sure to attach the pleated fi…
-
Page 18: Water Tank Preparations
Water Tank Preparations Water tank preparations Air purifying operation can be operated even without water in the tank. Open the cap on the water tank. Add water to the tank and close the cap. Use only tap water. • Add water somewhere that can be wet if spilled. •…
- Page 19
After attaching the fi lter Restore the front panel. Restore the deodorizing catalyst unit. • Fit the tabs (2 locations) at the bottom of the panel into the • Holding the deodorizing catalyst unit by the handle, fi t the grooves at the bottom of the main unit, and close the projections on the unit into the grooves (4 locations) at the panel. -
Page 20: How To Operate
HOW TO OPERATE Air Purifying Operation Socket Plug the power supply cord NOTE Power plug into an electrical socket. ● Do not insert or remove the power plug to turn the unit on/off. Abusive handling may lead to electric shock or fi re because of overheating. Humidification lamp Press •…
-
Page 21: Humidify And Air Purifying Operations
Humidify and Air Purifying Operations Air purifying operation is in active while humidifying operation. (Humidifi cation cannot run by itself.) ● Do not move the unit while it is running. Displacements may cause water leaks, damage or malfunctions. Humidification lamp Press Press to light the humidifi…
-
Page 22: How To Operate With Remote Controller
How to Operate with Remote Controller How to operate with remote controller 1. ON/OFF button 2. Auto fan button 3. Fan setting button 4. Turbo button 5. Anti-pollen button 6. Humidify ON/OFF button 7. Humidify setting button 8. OFF TIMER button 9.
- Page 23
To switch the humidifying operation ON/OFF Press “ ”. • Each time it is pressed, the humidifying operation ON/OFF will switch. • When the humidifying operation ON/OFF is switched humidity indicator lamp indicate temporarily as shown below. • In case the humidifying operation is turned ON: the humidity indicator lamp will be changed and indicate the setting. •… -
Page 24: How To Use The Recyclable Deodorizing Cartridge
How to Use the Recyclable Deodorizing Cartridge The recyclable deodorizing cartridge can be removed from the air purifi er and used to deodorize remote locations. Deodorizing capacity can be regenerated with the streamer pocket so as to use the cartridge time and time again. Uses The deodorizing cartridge can be used in the below places.
- Page 25
After about 2 months (reference only), regenerate the recyclable deodorizing cartridge inside How to regenerate the recyclable the streamer pocket. deodorizing cartridge Suffi cient deodorizing effect may not be obtained if the cartridge is not regenerated periodically. Recyclable deodorizing cartridge regeneration is started and stopped by opening and closing the streamer pocket. -
Page 26: Quick Reference Table Of Maintenance
CARE and CLEANING Quick Reference Table WARNING of Maintenance • Before performing maintenance, stop the unit and unplug the power supply cord. If the check lamp lights, check the location that requires attention on the operating panel. • Any of the humidifying filter lamp( ), Air-purifying filter lamp( ), UNIT1/2 lamps, or water supply lamp( ) will light or…
- Page 27
• Air inlets for Dust/Odor sensors and Temperature/ Humidity sensors Page 27. UNIT2 (Streamer unit) Page 33, 34. Deodorizing catalyst unit Page 28. Pleated filter (front: white, back: blue) Page 30, 31. Front panel Page 27. UNIT1 (Plasma ionizer) Page 33, 34. Pre-filter (green) Page 29. -
Page 28: Care & Cleaning
Care & Cleaning Front panel cleaning Wipe • Wipe off dirt with a piece of cloth or tissue moistened with water. • For stubborn dirt, wipe with a cloth moistened with a neutral liquid detergent. CAUTION • Do not use hard bristle brushes, etc. Tools of the sort may scratch the front panel.
- Page 29
Recyclable deodorizing cartridge Deodorizing catalyst unit Streamer pocket Recyclable deodorizing cartridge cleaning Cannot be washed with detergent Vacuum cleaner Soak, drain and dry • If dust has accumulated, suck it up with a vacuum cleaner. • If bothered by dirt on the cartridge, soak the cartridge in warm or plain water for about 10 minutes, drain thoroughly and dry in a well- ventilated shade for about 1 day. - Page 30
Care & Cleaning Pre-fi lter cleaning (About once every 2 weeks) Vacuum cleaner Rinse with water Remove the front panel. Restore the pre-fi lter. • Push the 2 projections (left and right) inwards, and pull the • Align the tabs (4 locations) on the left and right of the front panel upwards and remove. - Page 31
Pleated fi lter replacement Cannot be rinsed in water WARNING The pleated fi lter does not need • Before performing maintenance, stop the replacing until the Air-purifying fi lter unit and unplug the power supply cord. lamp lights or fl ashes. Replace If the Air-purifying filter lamp lights or flashes Remove the front panel. - Page 32
Care & Cleaning Restore the deodorizing catalyst unit. Restore the front panel. Page 29. • Holding the deodorizing catalyst unit by the handle, fi t the projections on the unit into the grooves (4 locations) at the bottom of the main unit and press the deodorizing catalyst unit into the main unit. - Page 33
UNIT1 (Plasma ionizer) removing and attaching CAUTION • Wear rubber gloves to remove and attach the opposite pole plates. Hands can be cut on the opposite pole plates and ionized wires. Remove Attach Remove the front panel. Attach the opposing pole plates. Page 29. - Page 34
Care & Cleaning Cleaning UNIT1 (plasma ionizer) and UNIT2 (streamer unit) CAUTION • Before performing maintenance, stop the unit and unplug the power supply cord. • Wear rubber gloves to when wiping or rubbing the units. Soak, drain and dry If UNIT lamps light Hands can be cut on the opposite pole plates and ionized wires. - Page 35
UNIT1 UNIT2 CAUTION (Plasma ionizer) (Streamer unit) There are ionized wires to the rear of the opposite pole plates. Be (1) Ionizing frame careful not to snap these wires when removing and attaching the units. • If the unit is run with broken ionized wires, the “UNIT1” lamp lights. - Page 36
Care & Cleaning Humidifying fi lter cleaning (About once every 1 week) Soak, drain and dry WARNING How quickly the humidifying fi lter becomes dirty depends on the environment of use. If odors are emitted from the air outlet or if humidifi cation capacity is low (the •… - Page 37
Attach the humidifying Restore the humidifying tray. filter and waterwheel. Waterwheel Press inward until • Reattach the humidifying fi lter and waterwheel to hearing clicking the humidifying tray, and push the humidifying tray sound. back into the unit until hearing clicking sound. Humidifi… - Page 38
Care & Cleaning Humidifying fi lter replacement (About every 2 years [2 seasons]) Using the unit without replacing the WARNING humidifying fi lter causes mildew, foul odors and humidifi cation loss. • Before performing maintenance, stop the unit and unplug the power supply cord. Replace If the humidifying filter lamp lights or flashes Remove the front panel and water tank. - Page 39
Options ATTENTION ● For replacement pleated fi lters, humidifying fi lters or recyclable deodorizing Part Model cartridges contact the service shop. Pleated fi lter (7) KAC998A4E ● If the unit is used with dirty parts Humidifying fi lter (Without frame) (1) KNME998A4E •… -
Page 40: Troubleshooting
TROUBLESHOOTING Frequently Asked Questions Questions & Answers Question: Question: The dust sensor does not change from the Does the deodorizing effect of the recyclable orange or red colour. deodorizing cartridge disappear entirely in 2 months time? Answer: This is due to dusts built up in the dust sensor. Answer: Suck up dust accumulated in the dust sensor hole with a The effect should not completely disappear in 2 months time.
-
Page 41: If These Lamps Light Or Flash
If These Lamps Light or Flash Front indicator lamps If a long beep sound repeat 3 times is emitted and the dust and odor lamps flash (red) at the same time The lamps will blink if the unit is leaned in excess or toppled. Set the unit on a flat floor and press the ON/OFF button.
-
Page 42: Troubleshooting
The following situations have logical explanations. Troubleshooting Before requesting servicing, make the following checks. If this happens Check Humidity in rooms facing north or rooms near plumbing fi xtures such as bathrooms is normally The current humidity remains high. high because moisture readily accumulates. The readings of the room hygrometer and This is because air currents cause temperature and humidity drifts even in the same room.
-
Page 43: During Operation
If this happens Check How to resolve Crackling, buzzing, and Securely set it. Page 18. Is the UNIT1 set securely? fi zzes sounds are audible during operation. Has dust accumulated on the ionized wires of the Page 33, 34. Clean it. ionizing frame? A hissing sound heard from UNIT2 during operation.
- Page 44
The following situations have logical explanations. Troubleshooting Before requesting servicing, make the following checks. If this happens Check How to resolve The unit does not humidify Press if the lamp is out. Is the humidifi er ON/OFF lamp is lit? despite having added water to the water tank. - Page 45
MEMO… - Page 46
Two-dimensional bar code is a code for manufacturing. 3P234570-1 M08B113 (0811) HT…
- Manuals
- Brands
- Daikin Manuals
- Air Cleaner
- MCK75JVM-K
- Operation manual
-
Contents
-
Table of Contents
-
Bookmarks
Quick Links
Humidifying air purifi er
Floor Standing Type
Ururu Air Purifi er
OPERATION MANUAL
MODEL
MCK75JVM-K
Related Manuals for Daikin MCK75JVM-K
Summary of Contents for Daikin MCK75JVM-K
-
Page 1: Operation Manual
Humidifying air purifi er Floor Standing Type Ururu Air Purifi er OPERATION MANUAL MODEL MCK75JVM-K…
- Page 2
Χαρακτηριστικά Χαρακτηριστικά Η ισχυρή ικανότητα αποσύνθεσης της ηλεκτρικής εκκένωσης με σιγουριά αφαιρεί δυσάρεστα Απόσμηση συστατικά που παράγουν οσμή του καπνού τσιγάρου, φορμαλδεΰδης, κ.λπ. Συλλογή Μια ροή αέρος υψηλής ταχύτητας συλλαμβάνει αποτελεσματικά γύρη, οικιακή σκόνη, κ.λπ. σκόνης Το δωμάτιο υγραίνεται γρήγορα με την ύγρανση του “Συστήματος εξάτμισης ροής αέρος υψηλής Ύγρανση… -
Page 3: Table Of Contents
ΔΙΑΒΑΣΤΕ ΠΡΩΤΑ ■ Προφυλάξεις Ασφάλειας …….. 3 ■ Ονόματα και Λειτουργία Κάθε Τμήματος ..7 ■ Ρυθμίσεις Ευαισθησίας του Αισθητήρα Σκόνης …………13 ΠΡΟΕΤΟΙΜΑΣΙΑ ΠΡΙΝ ΑΠΟ ΤΗ ΧΡΗΣΗ ■ Εγκατάσταση ……….14 ■ Προετοιμασία του Τηλεχειριστηρίου …. 15 ■ Προσαρμόστε το Φίλτρο …….
-
Page 4: Διαβαστε Πρωτα
ΔΙΑΒΑΣΤΕ ΠΡΩΤΑ Προφυλάξεις Ασφάλειας Πριν τη χρήση, διαβάστε αυτές τις Προφυλάξεις Ασφάλειας για να διασφαλίσετε κατάλληλη χρήση. Οι προφυλάξεις που χρησιμοποιούνται σε αυτό το εγχειρίδιο είναι ταξινομημένες στους ακόλουθους δύο τύπους. Και οι δύο περιέχουν σημαντικές πληροφορίες ασφάλειας, επομένως ακολουθήστε τις πάντα. Εσφαλμένος…
- Page 5
ΠΡΟΕΙΔΟΠΟΙΗΣΗ • Μην χρησιμοποιήστε την μονάδα σε κάποιο χώρο που υπάρχει αιρούμενο έλαιο όπως μηχανόλαδο. Τα αερομεταφερόμενα έλαια μπορούν να προκαλέσουν πυρκαγιά ή ανάφλεξη. • Μην χρησιμοποιήστε τη μονάδα σε κάποιο χώρο που υπάρχουν άφθονοι ατμοί ελαίου όπως κουζίνες, εύφλεκτα ή διαβρωτικά αέρια, ή μεταλλική σκόνη. Τέτοια… - Page 6
Προφυλάξεις Ασφάλειας ΠΡΟΣΟΧΗ • Μην χρησιμοποιήστε τη μονάδα κάπου που υπάρχει έκθεση στο άμεσο φως του ηλίου, βροχή ή αέρα. Υπερθέρμανση ή επαφή με νερό μπορεί να προκαλέσει πυρκαγιά ή ηλεκτροπληξία. • Μην χρησιμοποιήστε την μονάδα κάπου που υπάρχει θερμότητα όπως… - Page 7
ΠΡΟΣΟΧΗ • Εάν χρησιμοποιηθεί εκεί όπου υπάρχουν κατοικίδια ζώα, δώστε προσοχή ώστε τα κατοικίδια ζώα να μην ουρήσουν στην μονάδα ή να μην δαγκώσουν το καλώδιο παροχής ρεύματος. Αυτό μπορεί να προκαλέσει ηλεκτροπληξία ή πυρκαγιά. Σε περίπτωση κακής χρήσης από τα… -
Page 8: Ονόματα Και Λειτουργία Κάθε Τμήματος
Ονόματα και Λειτουργία Κάθε Τμήματος Κύρια μονάδα Αισθητήρας οσμής Αισθητήρας σκόνης Αισθητήρας υγρασίας · Αισθητήρας θερμοκρασίας Δοχείο φίλτρου Χωράει 6 πτυχωτά φίλτρα αντικατάστασης. ΜΟΝΑΔΑ2 (Μονάδα ηλεκτρικής εκκένωσης) ΜΟΝΑΔΑ1 (Ιονιστής πλάσματος) Πλαίσιο ιονισμού Προ-φίλτρο (πράσινο) Προστατευτικό Αφαιρεί μεγάλα μόρια σκόνης. Μονάδα καταλύτη αποσμητικού…
- Page 9
Πίνακας Πλαϊνό τμήμα Μπροστινές λειτουργίας ενδεικτικές Λαβή Κλείδωμα θυλάκου λυχνίες Αποτρέπει τον θύλακα ηλεκτρικής εκκένωσης από το να ανοίξει κατά λάθος. Χρησιμοποιήστε ένα κέρμα για να τον ανοίξετε. Τρόπος χρήσης του Ξεκλείδωμα κλειδώματος θυλάκου Κέρμα Κλείδωμα Ξεκλείδωμα Κλείδωμα Κλείδωμα θυλάκου Για… - Page 10
Ονόματα και Λειτουργία Κάθε Τμήματος Πίνακας λειτουργίας Ρύθμιση φωτεινότητας Χρησιμοποιήστε το για να ρυθμίσετε την φωτεινότητα λυχνίας για λειτουργία ύπνου ή ανάλογα με τις προτιμήσεις σας. Κάθε φορά που πιέζεται το κουμπί, η φωτεινότητα των λυχνιών του πίνακα λειτουργίας και οι μπροστινές ενδεικτικές λυχνίες αλλάζουν Λυχνία… - Page 11
ΠΡΟΣΟΧΗ Κουμπί ΑΠΕΝΕΡΓΟΠΟΙΗΣΗΣ ΧΡΟΝΟΔΙΑΚΟΠΤΗ ● Ο πίνακας λειτουργίας καλύπτεται σε μια προστατευτική μεμβράνη που προστατεύει από γδαρσίματα. Κάθε φορά που πιέζεται το κουμπί, η ώρα Αφαιρέστε την μεμβράνη πριν από την χρήση. ΑΠΕΝΕΡΓΟΠΟΙΗΣΗΣ αλλάζει ως εξής. ● Εάν ο πίνακας λειτουργίας ανοιχτεί κατά την λειτουργία, η μονάδα σταματά για λόγους ασφαλείας. - Page 12
Ονόματα και Λειτουργία Κάθε Τμήματος Μπροστινές ενδεικτικές λυχνίες Οι ενδείξεις των υγρομέτρων δωματίου και της ενδεικτικής λυχνίας υγρασίας της μονάδας ίσως να διαφέρουν. • Αυτό συμβαίνει επειδή ρεύματα αέρα προκαλούν αποκλίσεις θερμοκρασίας και υγρασίας ακόμη και στο ίδιο δωμάτιο. Θεωρήστε την ενδεικτική λυχνία υγρασίας ως απλή ένδειξη αναφοράς. Λυχνία… - Page 13
Ενδεικτική λυχνία υγρασίας (Μόνο για αναφορά) Αυτή η λυχνία δείχνει την υγρασία του δωματίου που ανιχνεύθηκε από τον αισθητήρα υγρασίας. :Υγρασία: 40% ή λιγότερο :Υγρασία: Περίπου 50% :Υγρασία: 60% ή περισσότερο Σε περίπτωση που λειτουργήσετε τη μονάδα απλά για καθαρισμό αέρα, η λυχνία δείχνει και το επίπεδο υγρασίας. Λυχνία… -
Page 14: Ρυθμίσεις Ευαισθησίας Του Αισθητήρα Σκόνης
Ρυθμίσεις Ευαισθησίας του Αισθητήρα Σκόνης Μπορείτε να αλλάξετε την ευαισθησία του αισθητήρα σκόνης. Πίνακας λειτουργίας Πιέστε για 10 δευτερόλεπτα. Πιέζοντας και κρατώντας το , πιέστε το • Μετά από την εκπομπή ενός σύντομού χαρακτηριστικού ήχου και οι λυχνίες ροής αέρος (“ ”…
-
Page 15: Προετοιμασια Πριν Απο Τη Χρηση
ΠΡΟΕΤΟΙΜΑΣΙΑ ΠΡΙΝ ΑΠΟ ΤΗ ΧΡΗΣΗ Εγκατάσταση Τρόπος εγκατάστασης Τοποθετήστε τη μονάδα σε μια προτιμώμενη θέση. Παρατηρήστε τα ακόλουθα περιθώρια ασφαλείας εγκατάστασης για να εξασφαλίσετε απόδοση μονάδας. Κατ’ ελάχιστο 100cm από ταβάνι Ροή αέρος Κατ’ ελάχιστο 10cm από τοίχο Κατ’ ελάχιστο 50cm από…
-
Page 16: Προετοιμασία Του Τηλεχειριστηρίου
Προετοιμασία του Τηλεχειριστηρίου Ρύθμιση τηλεχειριστηρίου Προετοιμασίες τηλεχειριστηρίου • Η μπαταρία έχει ήδη τοποθετηθεί στο τηλεχειριστήριο. Για να χρησιμοποιήσετε το τηλεχειριστήριο, βγάλτε την διάφανη μεμβράνη από το κάλυμμα της μπαταρίας. Δέκτης Χρήση του τηλεχειριστηρίου • Κατευθύνετε τον πομπό του τηλεχειριστηρίου προς τον δέκτη της κύριας μονάδας. Εάν…
-
Page 17: Προσαρμόστε Το Φίλτρο
ΠΡΟΣΟΧΗ Προσαρμόστε το Φίλτρο • Κάνετε τα ακόλουθα πριν συνδέσετε το καλώδιο παροχής ρεύματος. Προσαρμόστε το πτυχωτό φίλτρο Αφαιρέστε την μονάδα καταλύτη αποσμητικού. • Κρατώντας την μονάδα καταλύτη αποσμητικού από την λαβή, τραβήξτε την μονάδα καταλύτη αποσμητικού προς Βεβαιωθείτε ότι προσαρμόσατε το τα…
-
Page 18: Προετοιμασία Της Δεξαμενής Νερού
Προετοιμασία της Δεξαμενής Νερού Προετοιμασία της δεξαμενής νερού ΣΗΜΕΙΩΣΗ Μην προσθέστε τα ακόλουθα στη δεξαμενή νερού. ● Ζεστό νερό στους 40°C ή περισσότερο, αρωματικά έλαια, Η λειτουργία καθαρισμού αέρα μπορεί να χημικά, βρώμικο νερό, νερό που περιέχει αρωματικά ή γίνει ακόμη και χωρίς νερό στη δεξαμενή. διαλυτικά, κ.λπ.
- Page 19
Μετά από την προσαρμογή του φίλτρου Επανατοποθετήστε το μπροστινό κάλυμμα. Επανατοποθετήστε τη μονάδα καταλύτη • Προσαρμόστε τις ασφάλειες (2 θέσεις) στο κάτω μέρος του αποσμητικού. καλύμματος στις εγκοπές της κύριας μονάδας και κλείστε το κάλυμμα. • Κρατώντας την μονάδα καταλύτη αποσμητικού από την λαβή, προσαρμόστε… -
Page 20: Τροποσ Χειρισμου
ΤΡΟΠΟΣ ΧΕΙΡΙΣΜΟΥ Λειτουργία Καθαρισμού Αέρα Πρίζα Συνδέστε το καλώδιο ΣΗΜΕΙΩΣΗ Ρευματολήπτης παροχής ρεύματος σε μια ● Μην βάλτε ή μην αφαιρέστε τον ρευματολήπτη για να ενεργοποιήσετε/ ηλεκτρική πρίζα. απενεργοποιήσετε τη μονάδα. Βάναυσος χειρισμός μπορεί να προκαλέσει ηλεκτροπληξία ή πυρκαγιά λόγω υπερθέρμανσης. Λυχνία…
-
Page 21: Λειτουργίες Ύγρανσης Και Καθαρισμού Αέρα
Λειτουργίες Ύγρανσης και Καθαρισμού Αέρα Η λειτουργία καθαρισμού αέρα είναι ενεργή για όση διάρκεια η λειτουργία ύγρανσης είναι ενεργοποιημένη. ● Μην μετακινήστε τη μονάδα όταν είναι σε λειτουργία. Μετατοπίσεις (Η λειτουργία ύγρανσης δεν μπορεί μπορούν να προκαλέσουν διαρροές νερού, ζημιά ή δυσλειτουργίες. να…
-
Page 22: Τρόπος Λειτουργίας Του Τηλεχειριστηρίου
Τρόπος Λειτουργίας του Τηλεχειριστηρίου Τρόπος λειτουργίας με τηλεχειριστήριο 1. Κουμπί ΕΝΕΡΓΟΠΟΙΗΣΗΣ/ΑΠΕΝΕΡΓΟΠΟΙΗΣΗΣ 2. Κουμπί αυτομάτου ανεμιστήρα 3. Κουμπί ρύθμισης ανεμιστήρα 4. Κουμπί Τούρμπο 5. Κουμπί κατά της γύρης 6. Κουμπί ύγρανσης ΕΝΕΡΓΟΠΟΙΗΜΕΝΟ/ ΑΠΕΝΕΡΓΟΠΟΙΗΜΕΝΟ 7. Κουμπί ρύθμισης ύγρανσης 8. Κουμπί ΑΠΕΝΕΡΓΟΠΟΙΗΣΗΣ ΧΡΟΝΟΔΙΑΚΟΠΤΗ 9.
- Page 23
Για αλλαγή της λειτουργίας ύγρανσης ΕΝΕΡΓΟΠΟΙΗΜΕΝΗ/ΑΠΕΝΕΡΓΟΠΟΙΗΜΕΝΗ Πιέστε το “ ”. • Κάθε φορά που πιέζεται, η λειτουργία ύγρανσης ΕΝΕΡΓΟΠΟΙΗΣΗΣ/ΑΠΕΝΕΡΓΟΠΟΙΗΣΗΣ θα αλλάζει. • Όταν η λειτουργία ΕΝΕΡΓΟΠΟΙΗΣΗΣ/ΑΠΕΝΕΡΓΟΠΟΙΗΣΗΣ ύγρανσης αλλάζει, η ενδεικτική λυχνία υγρασίας εμφανίζεται προσωρινά όπως φαίνεται πιο κάτω. • Σε περίπτωση που η λειτουργία ύγρανσης ΕΝΕΡΓΟΠΟΙΕΙΤΑΙ: η ενδεικτική λυχνία υγρασίας θα αλλάξει και θα δείχνει τη ρύθμιση. •… -
Page 24: Τρόπος Χρήσης Ανακυκλώσιμης Κασέτας Αποσμητικού
Τρόπος Χρήσης Ανακυκλώσιμης Κασέτας Αποσμητικού Η ανακυκλώσιμη κασέτα αποσμητικού μπορεί να αφαιρεθεί από τον καθαριστήρα αέρα και να χρησιμοποιηθεί για να αποσμήσει μακρινούς χώρους. Η ικανότητα αποσμητικού μπορεί να ανανεώνεται με τον θύλακα ηλεκτρικής εκκένωσης ώστε να χρησιμοποιηθεί η κασέτα ξανά και ξανά. Χρήση…
- Page 25
Μετά από περίπου 2 μήνες (ενδεικτικά και μόνο), ανανεώσετε την ανακυκλώσιμη κασέτα Ανανέωση της ανακυκλώσιμης αποσμητικού μέσα στον θύλακα ηλεκτρικής εκκένωσης. κασέτας αποσμητικού Επαρκής δράση αποσμητικού δεν μπορεί να ληφθεί εάν η κασέτα δεν ανανεώνεται περιοδικά. Η ανανέωση της ανακυκλώσιμης κασέτας αποσμητικού αρχίζει και σταματά με το άνοιγμα και… -
Page 26: Φροντιδα Και Καθαρισμοσ
ΦΡΟΝΤΙΔΑ και ΚΑΘΑΡΙΣΜΟΣ Πίνακας Γρήγορης ΠΡΟΕΙΔΟΠΟΙΗΣΗ Αναφοράς Συντήρησης • Πριν εκτελέσετε τη συντήρηση, σταματήστε την μονάδα και αποσυνδέστε το καλώδιο παροχής ρεύματος. Εάν η λυχνία ελέγχου ανάβει, ελέγξτε τη θέση που απαιτεί προσοχή στον πίνακα λειτουργίας. • Κάποια από τις λυχνίες: φίλτρου ύγρανσης ( ), ), φίλτρου…
- Page 27
• Εισαγωγές αέρα για αισθητήρες σκόνης/οσμής και αισθητήρες θερμοκρασίας/υγρασίας Σελίδα 27. ΜΟΝΑΔΑ2 (Μονάδα ηλεκτρικής εκκένωσης) Σελίδα 33, 34. Μονάδα καταλύτη αποσμητικού Σελίδα 28. Πτυχωτό φίλτρο (εμπρός: άσπρο, πίσω: μπλε) Σελίδα 30, 31. Μπροστινό κάλυμμα Σελίδα 27. ΜΟΝΑΔΑ1 (Ιονιστής πλάσματος) Σελίδα 33, 34. Προ-φίλτρο… -
Page 28: Φροντίδα & Καθαρισμός
Φροντίδα & Καθαρισμός Καθαρισμός του μπροστινού καλύμματος Σκουπίστε • Σκουπίστε την βρομιά με ένα κομμάτι υφάσματος ή χαρτομάντιλο βρεγμένο με νερό. • Για επίμονη βρομιά, σκουπίστε με ένα ύφασμα βρεγμένο με ουδέτερο απορρυπαντικό υγρό. ΠΡΟΣΟΧΗ • Μην χρησιμοποιήστε βούρτσες με σκληρές τριχές, κ.λπ. •…
- Page 29
Ανακυκλώσιμη κασέτα αποσμητικού Μονάδα καταλύτη αποσμητικού Θύλακας ηλεκτρικής εκκένωσης Καθαρισμός ανακυκλώσιμης Δεν μπορεί να πλυθεί με απορρυπαντικό Ηλεκτρική σκούπα Μουλιάστε, στραγγίστε και στεγνώστε κασέτας αποσμητικού • Εάν έχει συσσωρευτεί σκόνη, απορροφήστε την με ηλεκτρική σκούπα. • Αν η κασέτα λερωθεί, μουλιάστε την κασέτα σε χλιαρό ή κανονικό νερό για περίπου 10 λεπτά, στραγγίστε εντελώς και στεγνώστε σε καλά-αερισμένη… - Page 30
Φροντίδα & Καθαρισμός Καθαρισμός του προ-φίλτρου (Περίπου μια φορά κάθε 2 εβδομάδες) Ηλεκτρική σκούπα Ξεπλύνετε με νερό Αφαιρέστε το μπροστινό κάλυμμα. Επανατοποθετήστε το προ-φίλτρο. • Πιέστε τις 2 προεξοχές (αριστερά και δεξιά) προς τα μέσα, • Ευθυγραμμίστε τις ασφάλειες (4 θέσεις) στα αριστερά και τα τραβήξτε… - Page 31
Αντικατάσταση πτυχωτού φίλτρου Δεν μπορεί να ξεπλυθεί στο νερό ΠΡΟΕΙΔΟΠΟΙΗΣΗ Το πτυχωτό φίλτρο δεν χρειάζεται • Πριν εκτελέσετε τη συντήρηση, αντικατάσταση μέχρις ότου η λυχνία φίλτρου σταματήστε την μονάδα και αποσυνδέστε καθαρισμού αέρα ανάψει ή αναβοσβήσει. το καλώδιο παροχής ρεύματος. Αντικαταστήστε… - Page 32
Φροντίδα & Καθαρισμός Επανατοποθετήστε τη μονάδα καταλύτη Επανατοποθετήστε το μπροστινό αποσμητικού. κάλυμμα. Σελίδα 29. • Κρατώντας την μονάδα καταλύτη αποσμητικού από την λαβή, προσαρμόστε τις προεξοχές στην μονάδα στις εγκοπές (4 θέσεις) στο κάτω μέρος της κύριας μονάδας και πιέστε τη μονάδα… - Page 33
Αφαίρεση και επανατοποθέτηση της ΜΟΝΑΔΑΣ1 (Ιονιστής πλάσματος) ΠΡΟΣΟΧΗ • Φοράτε λαστιχένια γάντια για να αφαιρέσετε και να επανατοποθετήστε τις πλάκες αντίθετης πόλωσης. Τα χέρια μπορούν να τραυματιστούν στα πλάκες αντίθετης πόλωσης και τα ιονισμένα καλώδια. Αφαίρεση Τοποθέτηση Αφαιρέστε το μπροστινό κάλυμμα. Τοποθετήστε… - Page 34
Φροντίδα & Καθαρισμός Καθαρισμός της ΜΟΝΑΔΑΣ1 (ιονιστής πλάσματος) και ΜΟΝΑΔΑΣ2 (μονάδα ηλεκτρικής εκκένωσης) ΠΡΟΣΟΧΗ • Πριν εκτελέσετε τη συντήρηση, σταματήστε την μονάδα και αποσυνδέστε το καλώδιο παροχής ρεύματος. Μουλιάστε, στραγγίστε και στεγνώστε Εάν οι λυχνίες της ΜΟΝΑΔΑΣ ανάψουν • Φοράτε λαστιχένια… - Page 35
ΜΟΝΑΔΑ1 ΜΟΝΑΔΑ2 ΠΡΟΣΟΧΗ (Ιονιστής πλάσματος) (Μονάδα ηλεκτρικής εκκένωσης) Υπάρχουν ιονισμένα καλώδια πίσω από τις πλάκες αντίθετης (1) Πλαίσιο ιονισμού πόλωσης. Δώστε προσοχή να μην σπάσετε αυτά τα καλώδια κατά την αφαίρεση και τοποθέτηση των μονάδων. • Εάν η μονάδα λειτουργήσει με σπασμένα ιονισμένα καλώδια, η λυχνία… - Page 36
Φροντίδα & Καθαρισμός Καθαρισμός του φίλτρου ύγρανσης (Περίπου μία φορά κάθε 1 εβδομάδα) Μουλιάστε, στραγγίστε και στεγνώστε Το πόσο γρήγορα το φίλτρο ύγρανσης γίνεται βρώμικο εξαρτάται από το περιβάλλον της χρήσης. Εάν οι οσμές εκπέμπονται από την εξαγωγή αέρα ή εάν η ικανότητα ύγρανσης είναι χαμηλή (η μείωση του νερού… - Page 37
Επανατοποθετήστε τον δίσκο ύγρανσης. • Επανατοποθετήστε το φίλτρο ύγρανσης και τον υδροτροχό στον δίσκο ύγρανσης, και πιέστε τον δίσκο ύγρανσης πίσω στη μονάδα μέχρι να ακούσετε ένα ήχο κλικ. Η ύγρανση δεν μπορεί να λειτουργεί εκτός αν το φίλτρο ύγρανσης τοποθετηθεί κατάλληλα. Τοποθετήστε… - Page 38
Φροντίδα & Καθαρισμός Αντικατάσταση του φίλτρου ύγρανσης (Περίπου κάθε 2 χρόνια [2 σεζόν]) Η χρησιμοποίηση της μονάδας χωρίς ΠΡΟΕΙΔΟΠΟΙΗΣΗ αντικατάσταση του φίλτρου ύγρανσης προκαλεί μούχλα, κακοσμίες και • Πριν εκτελέσετε τη συντήρηση, σταματήστε απώλεια ικανότητας ύγρανσης. την μονάδα και αποσυνδέστε το καλώδιο παροχής… - Page 39
Επιλογές ΠΡΟΣΟΧΗ ● Για αντικατάσταση του πτυχωτού φίλτρου ή ανακυκλώσιμων κασετών Τμήμα Μοντέλο αποσμητικού, επικοινωνήστε με το κατάστημα service. Πτυχωτό φίλτρο (7) KAC998A4E ● Εάν χρησιμοποιηθεί η μονάδα με λερωμένα μέρη Φίλτρο ύγρανσης (χωρίς πλαίσιο) (1) KNME998A4E • Ο αέρα δεν καθαρίζεται. •… -
Page 40: Επιλυση Προβληματων
ΕΠΙΛΥΣΗ ΠΡΟΒΛΗΜΑΤΩΝ Συχνές Ερωτήσεις Ερωτήσεις & Απαντήσεις Ερώτηση: Ερώτηση: Ο αισθητήρας σκόνης δεν αλλάζει από το Η δράση αποσμητικού της ανακυκλώσιμης πορτοκαλί ή το κόκκινο χρώμα. κασέτας αποσμητικού εξαφανίζεται εντελώς στους 2 μήνες; Απάντηση: Απάντηση: Αυτό οφείλεται στις σκόνες που έχουν συσσωρευτεί στον αισθητήρα…
-
Page 41: Εάν Αυτές Οι Λυχνίες Ανάψουν Ή Αναβοσβήσουν
Εάν Αυτές οι Λυχνίες Ανάψουν ή Αναβοσβήσουν Μπροστινές ενδεικτικές λυχνίες Εάν ένας χαρακτηριστικός ήχος μακράς διάρκειας εκπέμπεται 3 φορές και οι λυχνίες σκόνης και οσμής αναβοσβήσουν (σε κόκκινο χρώμα) ταυτόχρονα Οι λυχνίες θα αναβοσβήσουν εάν η μονάδα γύρει υπερβολικά ή αναποδογυρίσει. Τοποθετήστε…
-
Page 42: Επίλυση Προβλημάτων
Οι ακόλουθες καταστάσεις έχουν λογικές εξηγήσεις. Επίλυση Προβλημάτων Πριν ζητήσετε συντήρηση, κάνετε τους ακόλουθους ελέγχους. Εάν αυτό συμβεί Ελέγξτε Υγρασία στα δωμάτια που βλέπουν βόρια ή στα δωμάτια κοντά σε υδραυλικές διαρρυθμίσεις Η τρέχουσα υγρασία παραμένει υψηλή. όπως μπάνια είναι κανονικά υψηλή επειδή η υγρασία συσσωρεύει εύκολα. Οι…
- Page 43
Εάν αυτό συμβεί Ελέγξτε Τρόπος λύσης Ήχοι κροταλίσματος, Τοποθετήστε τον σταθερά. Σελίδα 18. Έχει τοποθετηθεί σωστά η ΜΟΝΑΔΑ1; βόμβου, και αφρίσματος ακούγονται κατά τη Έχει συσσωρευτεί σκόνη στα ιονισμένα καλώδια του Σελίδα 33, 34. Καθαρίστε το. λειτουργία. πλαισίου ιονισμού; Ένας συριστικός ήχος ακούγεται από την ΜΟΝΑΔΑ2 κατά… - Page 44
Οι ακόλουθες καταστάσεις έχουν λογικές εξηγήσεις. Επίλυση Προβλημάτων Πριν ζητήσετε συντήρηση, κάνετε τους ακόλουθους ελέγχους. Εάν αυτό συμβεί Ελέγξτε Τρόπος λύσης Είναι αναμμένη η λυχνία υγραντήρα Η μονάδα δεν υγραίνει Πιέστε το εάν η λυχνία είναι σβησμένη. ΕΝΕΡΓΟΠΟΙΗΣΗΣ/ΑΠΕΝΕΡΓΟΠΟΙΗΣΗΣ; παρά την προσθήκη του νερού… - Page 45
ΣΗΜΕΙΩΣΗ… - Page 46
Two-dimensional bar code is a code for manufacturing. 3P234570-1D M08B113C (1004) HT…
Скидка!

Нажмите на изображение для увеличения
Артикул: MCK75JVM-K
Молокова, 14:
Уточнить
Транзит в Красноярск:
Уточнить
Склад Красноярск:
Уточнить
Склад Новосибирск:
Уточнить
Площадь — до 46 кв.м.
Способ доставки
Курьер
Рассчитываем стоимость доставки…
Самовывоз из магазина
Рассчитываем стоимость доставки…
Еще более продвинутый очиститель воздуха от корпорации DAIKIN сочетающий в себе еще и увлажнитель воздуха. Дополнительная функция увлажнения воздуха является очень актуальной в зимнее время года, когда естественная влажность комнатного воздуха является очень низкой и, как правило, не превышает 10-15%.
Система фильтрации этого очистителя воздуха несколько отличается от предыдущей модели — воздухоочистителя Daikin МС707.
Роль предварительного механического фильтра здесь выполняет катехиновый фильтр, созданный на основе природного антиоксиданта, содержащегося в зеленых частях растений. Поэтому он не только задерживает крупные загрязняющие частицы, но и дополнительно дезактивирует различные вирусы и микробы, а также насыщает воздух природными антиоксидантами.
Затем стоит плазменный ионизатор, придающий загрязняющим
- Модель
- MCK75JVM-K
- Тип увлажнителя
- традиционный
- Площадь, до
- 46 кв. м.
- Функции
- увлажнение, очистка воздуха, ионизация
- Интенсивность увлажнения, г/ч
- 600
- Возможный уровень влажности
- 40-50%
- Регулировка интенсивности увлажнения
- Да
- Гигростат
- не требуется, влажность поддерживается на уровне 40-50%
- Теплый пар
- Нет
- Сменные элементы
- увлажняющая губка
- Требования к качеству воды
- из крана
- Объем бака
- 4 л
- Управление
- электронное
- Уровень шума, Дб(А)
- 16 — 48
- Макс. воздухообмен, м3/час
- 450
- Очистка воздуха
- от пыли, от аллергенов, от автомобильных выхлопов, от промышленных выбросов, от бактерий, от вирусов, от запахов
- Воздушный фильтр
- сетчатый фильтр от крупной пыли, угольный, фотокаталитический, HEPA, электростатический, плазменный
- Ионизатор воздуха
- Да
- Работа в присутствии людей
- Да
- Сенсор пыли
- Да
- Сенсор запаха
- Да
- Макс. потребляемая мощность
- 80 Вт
- Отключение при окончании воды
- Да
- Индикатор окончания воды в баке
- Да
- Пульт ДУ в комплекте
- Да
- Таймер
- Да
- Способ установки
- напольный, настольный
- Напряжение, В
- 220
- Максимальный ток, А
- 0.72 А
- Габариты (В*Ш*Г)
- 590 × 395 × 268 мм
- Высота
- 590 мм
- Ширина
- 395 мм
- Глубина
- 268 мм
- Цвет
- черный
серебро - Производитель
- Daikin
- Страна производства
- Китай
- Вес нетто
- 11 кг
- Вес
- 12 кг
- Срок службы
- 7 года
- Гарантийный срок
- 3 года
- Длина
- 268 мм

Доставка по Красноярске осуществляется собственной курьерской службой. Также возможна доставка до терминала транспортной компании для отправки по Красноярскому краю и в регионы России.
Условия доставки по Красноярску:
- Заказы на общую сумму 5000 р. и более в пределах г. Красноярску доставляются бесплатно. Возможна оплата наличными или банковской картой курьеру, в зависимости от выбранного способы оплаты.
- Стоимость доставки заказов менее 5000 р. в пределах г. Красноярска составляет 300 р.
- Стоимость доставки порталов для электрокаминов и другого крупногабаритного оборудования в пределах г. Красноярска составляет 1000 р.
- Доставка производится до подъезда.
Daikin MCK75JVM-K: Available Instructions
Note for Owners:
Guidesimo.com webproject is not a service center of Daikin trademark and does not carries out works for diagnosis and repair of faulty Daikin MCK75JVM-K equipment. For quality services, please contact an official service center of Daikin company. On our website you can read and download documentation for your Daikin MCK75JVM-K device for free and familiarize yourself with the technical specifications of device.
-
Defender D11G
Congratulations! You are now the proud owner of one of the most advanced and effective room air cleaners available. Your new Defender® helps reduce the many problem-causing pollutants and allergens that can linger in indoor air.The Defender® room air cleaner, working along with the Majestic® surface cleaner, provides you and your family with the cleanest possible indoor air.Health-Mor is dedica …
D11G Air Cleaner, 10
-
Venta Airwasher LW14
Art.-No. 58500-00LW24Das Original 쮕 Bedienungsanleitung Instructions for use Mode d’emploi Manual de instrucciones Istruzioni per l’uso Gebruiksaanwijzing Brugsanvisning Bruksanvisning Bruksanvisning Käyttöohjeཚ Instrukcja obs∏ugi먙 Használati utasításNávod k pouÏitíNávod na pouÏívanieРуководство поэксплуатацииПрави …
LW14 Air Cleaner, 17
-
activTek PURECLOUD
Owner’s ManualPUREINNOVATIVE AIR TREATMENT SYSTEM2’ x 2’ Ceiling Unit with ActivePure® Certified Space Technology™CAUTION: READ MANUAL CAREFULLY FOR PROPER PROCEDURES AND OPERATION.EngFre_65-00636_VA-00983_1017 …
PURECLOUD Air Cleaner, 16
-
Precisionaire Synthetic Media Bag Filters ASHRAE Series
127PA2323 PAPB-101 12x24x12 PAP syn c2 BAG 45% 6P 4PA2324 PAPB-102 12X24X15 PAP syn c2 BAG 45% 6P 6PA2325 PAPB-103 12X24X20 PAP syn c2 BAG 45% 6P 4PA2326 PAPB-104 20x24x12 PAP syn c2 BAG 45% 6P 4PA2327 PAPB-105 20x24x20 PAP syn c2 BAG 45% 6P 3PA2328 PAPB-106 21.5X25.5X21 PAP syn c2 BAG 45% 6P 4PA2329 PAPB-107 22.5X24.5X21 PAP syn c2 BAG 45% 6P 4PA2330 PAPB-108 22x26x15 PAP syn c2 BAG 45% 6P 4PA233 …
Synthetic Media Bag Filters ASHRAE Series Air Cleaner, 1
Popular Air Cleaner User Guides:
Все отзывы
Тихий, легко обслуживается, есть защита от детей, хорошо увлажняет воздух, нет налета на мебели в отличии от ультразвуковых увлажнителей. Стоит своих денег!
Предательски реагирует на «пуки», даже типа «шептун»
Недостатков НЕТ!
Периодическое обслуживание и долив воды не является недостатком!
DAIKIN MCK75JVM-K является наиболее эффективным и передовым устройством в премиум-сегменте рынка очистителей воздуха. Система очистки воздуха, реализованная в DAIKIN Ururu MCK75J, избавит Ваш дом от всех возможных видов загрязнений. Революционные технологии японской компании Daikin гарантируют очистку воздуха на 99,99% как от загрязнений размером до 0,3 микрон (относительно крупных, таких как, пыль, шерсть домашних животных и т. д.), так и от совсем мельчайших загрязнителей (бактерий, вирусов, спор и грибков). Кроме того, DAIKIN MCK75JVM-K успешно нейтрализует все неприятные запахи, а также вредные летучие химические вещества (формальдегиды, тулуол, ксилол и другие).
Технология Ururu (что в переводе с японского означает увлажнение) призвана обеспечить наиболее комфортный уровень влажности в помещении. Сухой воздух негативно влияет на самочувствие и здоровье человека, приводит к развитию респираторных, сердечно-сосудистых заболеваний, снижает иммунитет и негативно сказывается на здоровье людей, страдающих аллергией. Особенно негативно пересушенный воздух влияет на здоровье ребёнка. Разработчики Daikin совместили в климатическом комплексе Ururu MCK75J сразу несколько передовых технологий, которые делают воздух в помещении по-настоящему здоровым, свежим и чистым. Начнём с того, что означает технология Ururu. В очистителе воздуха DAIKIN MCK75JVM-K установлен увлажняющий фильтр, который за счёт скоростного взаимодействия воды и воздуха естественным образом увлажняет и осуществляет.
В воздухоочистителе DAIKIN MCK75JVM-K реализована сложная многоступенчатая система фильтрации. Эта система является запатентованной разработкой и гордостью японской компании Daikin Industries. В неё входят сразу несколько высокоэффективных фильтров и элементов. С крупными частицами успешно справляются такие фильтры, как:
- Предварительный фильтр на основе катехина;
- Плазменный ионизатор совместно с гофрированным фильтром (ионизатор придаёт загрязнениям положительный заряд, а гофрированный фильтр их притягивает).
Все неприятные запахи и химические вещества останавливает система из:
- Фотокаталитического фильтра (данный фильтр с высокой степенью нейтрализует абсорбирует все неприятные запахи и вредные химические вещества);
- Источника стримерного заряда (в нем генерируются быстрые электроны, которые нейтрализуют молекулы формальдегида и других вредных химических веществ);
- И фильтра с титаносодержащим минералом (он уничтожает запахи, а также все вредоносные микроорганизмы — бактерии и вирусы).
Таким образом, данная система обеспечивает на 99,99% очистку воздуха от всех известных видов загрязнений.
Отдельно стоит упомянуть множество различных функций и возможностей, реализованных в DAIKIN Ururu MCK75J. Все функции и режимы работы в воздухоочистителе регулируются при помощи продуманного электронного управления, элементы которого просты и интуитивно понятны. В комплектацию устройства также входит пульт ДУ. Ночной режим предназначен для комфортной, бесшумной работы прибора в ночное время суток. Вы можете менять мощность работы DAIKIN Ururu MCK75J, а можете доверить управление интеллектуальной системе очистителя — DAIKIN сам определит качество воздуха в помещении, запустит необходимый режим работы и скоординирует работу фильтров. Помимо этого, увлажнение так же может происходить в автоматическом режиме — исходя из показаний датчиков влажности и температуры прибор установит наиболее комфортное значение и проконтролирует его поддержание. Полностью автоматизированную работу устройства обеспечивает функция отключения при недостатке воды. Таким образом, Вам не придётся контролировать работу устройства, DAIKIN сам подберёт влажность, проконтролирует чистоту воздуха, сообщит о недостаточном количестве воды и необходимости замены фильтров.
Приятно радует наличие в приборе таймера, сменных лицевых панелей (дополнительный аксессуар), а также специального фильтра, который можно использовать для очистки воздуха в небольших пространствах (например, в шкафу или автомобиле). Подводя итог, можно сказать, что DAIKIN Ururu MCK75J является универсальным климатическим помощником и станет надёжным защитником Вашего дома от всех видов загрязнений. Данная модель наиболее эффективна в помещении до 46 квадратных метров.
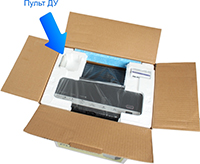
Обратите внимание:
Уважаемые клиенты, обратите внимание, что пульт аппарата находится в специальной нише пенопластовой упаковки прибора. Из-за особенностей такой упаковки некоторые клиенты не находят пульт управления, а иногда даже выбрасывают упаковку товара вместе с пультом. Из-за того, что данная проблема возникает не впервые, мы выкладываем фотографии упаковки прибора:


Инструкция для_модели DAIKIN MCK75JVM-K Климатический комплекс #1.pdf
3.04 mb / Скачать