В этой статье мы расскажем как настроить данный компонент для скрытого слежения за компьютером пользователя в локальной сети.
Итак начнем с самого главного:
Mini Remote Control является частью пакета DameWare Remote Support и дает администраторам возможность подключения и управления к удаленным машинам через интернет или локальную сеть.
Оставим в сторону моральную сторону вопроса «зачем скрытно то?», ответив по простому «задача руководством поставлена — надо исполнять»
Несмотря на то, что утилита позволяет управлять компьютером, мы будем рассматривать настройки именно скрытного ( то есть абсолютно) незаметного для пользователя подключения к его компьютеру, за тем, что бы наблюдать, что же сотрудник делает в это самое время.
Программа не является «хакерской» и если кто то думает, что с помощью этой утилиты он сможет подключиться к компьютеру подружки в другом конце страны, без её «разрешающих» действий тот сильно ошибается.
Что же эти за разрешающие действия ?
1. Вы должны знать параметры учетной записи (логин и пароль), обладающей правами локального администратора на удаленной машине.
2. «File & Printer Sharing» должен быть разрешен на удаленной машине.
3. Общий ресурс Admin$ должен существовать на удаленной машине.
4. Все необходимые порты для File & Printer Sharing (137-139/445) должны быть открыты на всех маршрутизаторах и межсетевых экранах между локальной и удаленной машинами.
5. Все необходимые порты для File & Printer Sharing (137-139/445) должны быть открыты в персональном межсетевом экране на удаленной машине (например, XP-SP2, ZoneAlarm и т.п.).
6. Удаленная машина должна работать под управлением Windows
7. Ну и естественно необходимо открыть на маршрутизаторе(ах) порт, который вы указали в клиентском сервисе Mini Remote Client Agent Service как порт для связи (по умолчанию TCP 6129).
Не маленький список, не правда ли ? 
Ну а если девушка Вам доверилась и дала админский доступ стоит обратить на неё внимание и возможно даже связать с ней свою судьбу. В пору тотального человекаНЕлюбия, доверие девушки Вам, в таком деле, как полный доступ к своему компьютеру, это очень важный признак.
Ну а если девушка самостоятельно выполнила все семь вышеописанных пункта, то это просто мечта, а не девушка.
Хотя, оставим романтику и вернемся на грешную землю.
На работе все не так. Тут «человек человеку — сотрудник» и никаких фривольностей касающейся конфиденциальной информации и коммерческой тайны быть не может. Но с другой стороны именно на работе все 7 пунктов выполняются легко групповыми политиками и применяются на все компьютеры организации.
И у некоторых администраторов появляется непреодолимое желание воспользоваться таким преимуществом и заглядывать во все мониторы других сотрудников, включая, о ужас, компьютеры руководства.
Но мы рассматриваем, правильного администратора принцип которого «чем меньше знаешь, вне своей компетенции — тем крепче спишь» и задача для него, поставленная руководителем, состоит в следующем: «Подключится незаметно к компьютеру другого сотрудника, так что бы он ничего не заметил»
Описание подключения
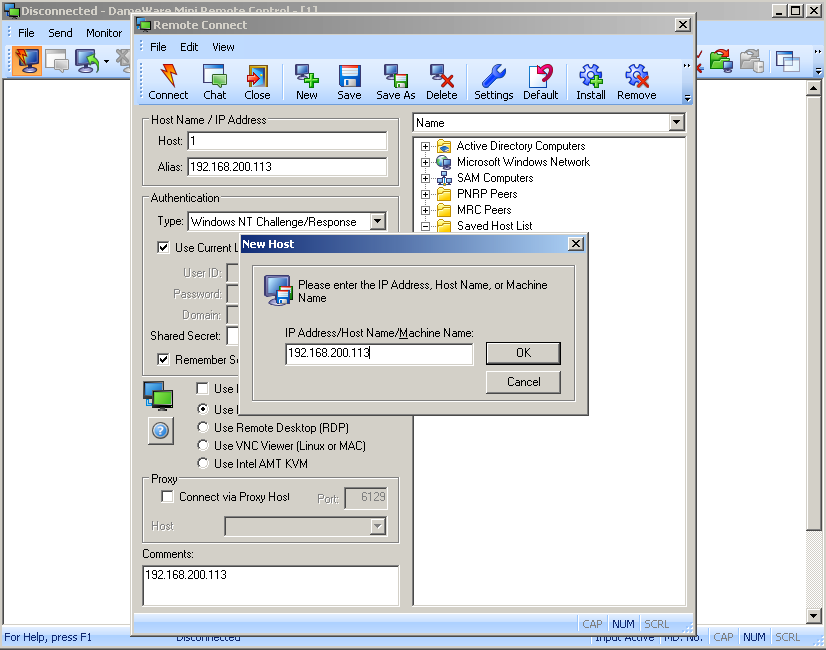
Итак начало простое. Вводим IP адрес удаленного компьютера к которому хотим подключиться
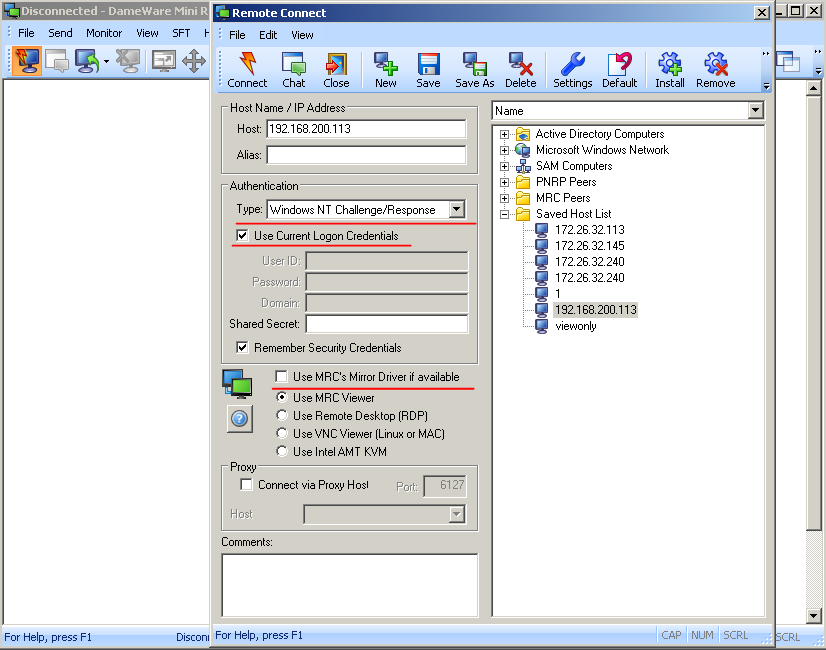
Далее указываем что подключаться будем под текущей учетной записью домена Actrive Directory. Вы же администратор на той машине? Если нет, то смотрите 1 пункт, обязательных для работы с DaweWare Mini Control.
Последнее что надо сделать здесь, это отключить Use MRC`s Mirror Driver if available.
Если Вы этого не сделаете, то при подключении к удаленному компьютеру, пользователь увидит уведомление что его цветовая схема Windows 7 изменилась. А зачем нам так «палиться»?
Далее идем в раздел Settings и изменяем следующее
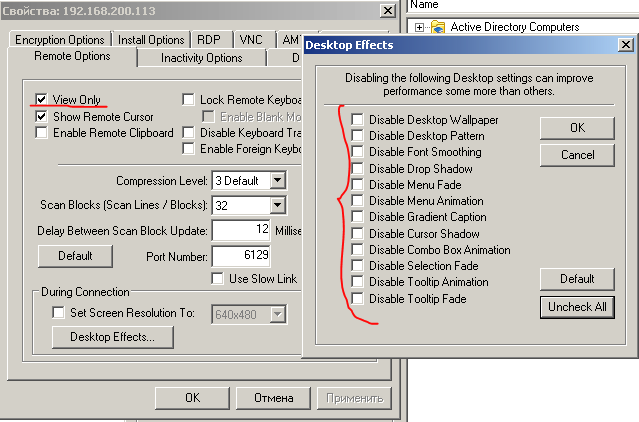
Сначала ставим галочку о том что нам нужен только просмотр удаленного стола, без управления и перехвата мыши, а в разделе Desktop Effects, убираем все галочки, дабы у удаленного пользователя не изменился рабочий стол и исчезла бы его заставка.
И остался последний этап, и конечно же самый важный
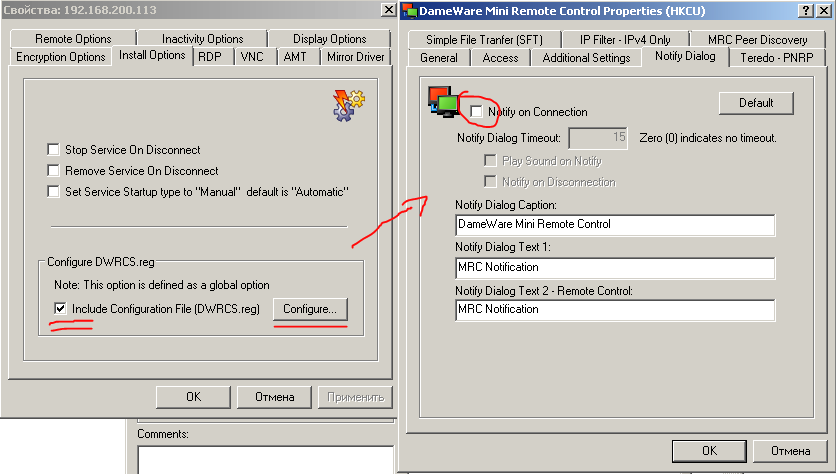
В разделе Install Options сконфигурируем файл DWRCS.reg в частности в окне NotifyDialog отключим показывать уведомление удаленному пользователю, о том что к вам сейчас подключился удаленный компьютер с таким именем и под такой то учеткой.
Сами понимаете ни о какой скрытности подключения не может быть речи если вы забыли снять эту галку.
Но вот в принципе все.
Теперь Вы можете с спокойной душой и не боясь последствий ( кроме угрызений совести), лазать по компьютерам сотрудников.
Удаленный пользователь никогда вас не сможет заметить, он лишь может увидеть в сервисах установленную службу DameWare Mini Control, и понять что теоретически к его компьютеру могут подключится.. Он его конечно же может удалить, но в локальной/доменной сети это не поможет. Эта служба заново незаметно установиться как только администратор захочет увидеть чем сотрудник занимается в данный момент.
На чтение 10 мин Просмотров 2к. Опубликовано 14.03.2020
Содержание
- Описание подключения
- Рассмотрим основные достоинства программы DameWare:
- Пропишем основные настройки DameWare для комфортного администрирования:
- Добавить комментарий Отменить ответ
В этой статье мы расскажем как настроить данный компонент для скрытого слежения за компьютером пользователя в локальной сети.
Итак начнем с самого главного:
Mini Remote Control является частью пакета DameWare Remote Support и дает администраторам возможность подключения и управления к удаленным машинам через интернет или локальную сеть.
Оставим в сторону моральную сторону вопроса «зачем скрытно то?», ответив по простому «задача руководством поставлена — надо исполнять»
Несмотря на то, что утилита позволяет управлять компьютером, мы будем рассматривать настройки именно скрытного ( то есть абсолютно) незаметного для пользователя подключения к его компьютеру, за тем, что бы наблюдать, что же сотрудник делает в это самое время.
Программа не является «хакерской» и если кто то думает, что с помощью этой утилиты он сможет подключиться к компьютеру подружки в другом конце страны, без её «разрешающих» действий тот сильно ошибается.
Что же эти за разрешающие действия ?
1. Вы должны знать параметры учетной записи (логин и пароль), обладающей правами локального администратора на удаленной машине.
2. «File & Printer Sharing» должен быть разрешен на удаленной машине.
3. Общий ресурс Admin$ должен существовать на удаленной машине.
4. Все необходимые порты для File & Printer Sharing (137-139/445) должны быть открыты на всех маршрутизаторах и межсетевых экранах между локальной и удаленной машинами.
5. Все необходимые порты для File & Printer Sharing (137-139/445) должны быть открыты в персональном межсетевом экране на удаленной машине (например, XP-SP2, ZoneAlarm и т.п.).
6. Удаленная машина должна работать под управлением Windows
7. Ну и естественно необходимо открыть на маршрутизаторе(ах) порт, который вы указали в клиентском сервисе Mini Remote Client Agent Service как порт для связи (по умолчанию TCP 6129).
Не маленький список, не правда ли ? 🙂
Ну а если девушка Вам доверилась и дала админский доступ стоит обратить на неё внимание и возможно даже связать с ней свою судьбу. В пору тотального человекаНЕлюбия, доверие девушки Вам, в таком деле, как полный доступ к своему компьютеру, это очень важный признак.
Ну а если девушка самостоятельно выполнила все семь вышеописанных пункта, то это просто мечта, а не девушка.
Хотя, оставим романтику и вернемся на грешную землю.
На работе все не так. Тут «человек человеку — сотрудник» и никаких фривольностей касающейся конфедициальной информации и коммерческой тайны быть не может. Но с другой стороны именно на работе все 7 пунктов выполняются легко групповыми политиками и применяются на все компьютеры организации.
И у некоторых администраторов появляется непреодолимое желание воспользоваться таким преимуществом и заглядывать во все мониторы других сотрудников, включая, о ужас, компьютеры руководства.
Но мы рассматриваем, правильного администратора принцип которого «чем меньше знаешь, вне своей компетенции — тем крепче спишь» и задача для него, поставленная руководителем, состоит в следующем: «Подключится незаметно к компьютеру другого сотрудника, так что бы он ничего не заметил»
Описание подключения
Итак начало простое. Вводим IP адрес удаленного компьютера к которому хотим подключиться
Далее указываем что подключаться будем под текущей учетной записью домена Actrive Directory. Вы же администратор на той машине? Если нет, то смотрите 1 пункт, обязательных для работы с DaweWare Mini Control.
Последнее что надо сделать здесь, это отключить Use MRC`s Mirror Driver if available.
Если Вы этого не сделаете, то при подключении к удаленному компьютеру, пользователь увидит уведомление что его цветовая схема Windows 7 изменилась. А зачем нам так «палиться»?
Далее идем в раздел Settings и изменяем следующее
Сначала ставим галочку о том что нам нужен только просмотр удаленного стола, без управления и перехвата мыши, а в разделе Desktop Effects, убираем все галочки, дабы у удаленного пользователя не изменился рабочий стол и исчезла бы его заставка.
И остался последний этап, и конечно же самый важный 🙂
В разделе Install Options сконфигурируем файл DWRCS.reg в частности в окне NotifyDialog отключим показывать уведомление удаленному пользователю, о том что к вам сейчас подключился удаленный компьютер с таким именем и под такой то учеткой.
Сами понимаете ни о какой скрытности подключения не может быть речи если вы забыли снять эту галку.
Но вот в принципе все.
Теперь Вы можете с спокойной душой и не боясь последствий ( кроме угрызений совести), лазать по компьютерам сотрудников.
Удаленный пользователь никогда вас не сможет заметить, он лишь может увидеть в сервисах установленную службу DameWare Mini Control, и понять что теоретически к его компьютеру могут подключится.. Он его конечно же может удалить, но в локальной/доменной сети это не поможет. Эта служба заново незаметно установиться как только администратор захочет увидеть чем сотрудник занимается в данный момент.
 dameware
После того как сеть моя сеть разрослась свыше 400 компьютеров, администрировать такой зоопарк с помощью бесплатной программы удаленного доступа UltraVNC стало проблематично. Захотелось большего функционала, не только смотреть удаленного, но и производить необходимые настройки скрыто от пользователей, не мешая им работать.
Скачать для ознакомления можно тут. Позже напишу подробные инструкции по работе с программой.
У DameWare потенциал огромен, и для меня самый главный плюс в том, клиентская часть при подключении автоматически устанавливается на удаленном компьютере, и если есть необходимость то можно в настройках при выходе указать автоматически удалять клиента. Нет заморочек с установкой клиента, а это очень полезная штука особенно при огромном зоопарке компьютеров.
Рассмотрим основные достоинства программы DameWare:
1. Устанавливается автоматически при подключении к клиенту, необходимо всего лишь указать логин и пароль учетки с админскими правами.
2. Возможность удаленно править реестр, клиент даже не заметит вашего участия в работе.
3. Возможность удаленно заходить на локальные диски компьютеров, так же очень полезная штука.
4. Возможность удаленно читать логи, ну тут понятно. Особенно полезно, когда прочитать логи нужно скрыто.
5. Запускать команды через командную строку удаленно, так же полезно. К примеру если вы хотите по тихому удалить игрушку у какого нибуть вредного сотрудника:)
6. А что бы узнать код строки для удаления и код строки СКРЫТОГО удаления для этих целей есть диспетчер установленный программ на стороне клиента.
7. Изменять права пользователя удаленно мы так же можем в этой программе.
8. Есть сервис подробных параметров компьютера, штук 8 вкладок с характеристиками.
9. Набор сетевых утилит так же в этой программе присутствует, пропинговать сделать трассировку, без проблем.
Ну и многие другие фишки, каждый для себя сам выберет что для него в приоритете.
Пропишем основные настройки DameWare для комфортного администрирования:
Если вы не ходите, что бы пользователь знал что вы к нему подключились, рекомендую в настройках указать следующие параметры.
В DaweWare Mini Control — это клиент программы, с его помощью мы подключаемся к компьютерам. Выберем раздел Settings и укажем следующие параметры:
Во вкладке Remote options есть пункт Desktop Effects — это отключение эффектов рабочего стола. Так вот, открываем Desktop Effects и убираем все галочки.
Во вкладке Install Options сформируем в разделе Configure DWRCS.reg ставим галочки и у нас формируется файл DWRCS.reg, теперь пункт Configure станет доступным. Открываем пункт Configure и снимаем галочку с NotifyDialog — в активном состоянии этот пункт на рабочем столе показывает оповещение удаленному пользователю, о том что к вам сейчас подключился удаленный компьютер с таким именем и под такой то учеткой.
 dameware Settings
 dameware Desktop Effects
 dameware Install Options
Добавить комментарий Отменить ответ
Для отправки комментария вам необходимо авторизоваться.
Ситуация, которая привела к рассмотрению данного вопроса возникла совершенно неожиданно, знакомый использующий DameWare в какой то момент времени обновился до версии 7.5 при запросе подключения простого пользователя (не администратора системы), и принятия запроса на подключение конечным пользователем, доступ предоставлялся «только для чтения» т.е. подключенный пользователь по факту никаких действий производить не мог, кроме того, как просматривать действия производимые на удаленном экране, данный вопрос решался, со стороны агента конечного пользователя в настройках которого ноебходимо снять флажок — Вкладка Access — View Only for these account types и доступ уже предоставлялся с привилегиями пользователя к машине которого данное подключение производится, тут же встал вопрос о глобальном переконфигурировании всех удаленных клиентов компании:
- Конфигурирование MRC и удаление «старых» и установка «новых» средствами самого MRC
- Создание преднастроенного MSI файла и распространение средствами GPO
- Распространение средствами GPO, REG файла с настройками
Но данные решения содержали ряд недостатков:
- Большое количество машин, распространение средствами MRC весьма затруднительно
- Создание MSI хорошо, но софт мог попросту не установиться по причине того, что уже подобный софт установлен и возиться с установкой данного пакета попросту не хотелось, да и время загрузки ОС бы увеличилось
- Импортирование настроек из REG уже другое дело — наличие установленного ПО можно было проверять скриптом и импортировать в зависимости от результатов, либо просто импортировать без всяких проверок, но время загрузки ОС так же бы было увеличено
Одним словом нужен был простой и в тоже время эффективный вариант, так как настройки все же применялись посредством реестра, было решено написать ADM файл, импортировать его в AD и «забыть» про REG, MSI навсегда.
Итак есть ключевые параметры которые хотелось бы как то контролировать, заблаговременно хотелось бы сказать, есть документ в котором рассказывается про административные шаблоны, но он довольно велик и в подробности вдаваться не буду, кому интересно могут прочитать, поэтому разберу ключевые параметры настроек данного ПО и применяемых параметров, и так нам нужно:
- Разрешения на доступ только Администраторам (Allow only administrators to connect) – по умолчанию (Админы подключаются без участия пользователя)
- Разрешения да доступ не администраторам только для чтения (View Only for these account types) – НЕТ (могут подключаться по Accept пользователя, и действовать в рамках системы от лица пользователя)
- Разрешения на доступ только членам определенных групп безопасности — ДА (подключаются только члены определенных групп)
- Возможность настройки IP фильтрации — добавление нескольких подсетей запрет разрешение работать из этих подсетей
- Возможность настройки номера порта и таймаута
- Отображение значка в системном трее и параметров отображения элементов его меню — НЕТ (отображение отключено)
- Отображение уведомлений о подключения — НЕТ (уведомления отключены)
Всеми этими настройками можно варьировать, при необходимости изменять и дополнять, ниже приведен текст самого административного шаблона в котором указаны настройки мне нужных параметров, данный текст можно скопировать, вставить в пустой файл, сохранить с расширением ADM, после чего данный ADM файл можно импортировать в AD и пользоваться выше приведенными настройками:
После импорта в AD, настройки можно найти по Computer Configuration — Administrative Templates — Classic Administrative Templates (ADM) — DameWare MRC Server Settings, в окне настроек будет отображено несколько политик:
- Connect — настройки порта и таймаута
- Access — настройки касающиеся первых двух пунктов указанных выше
- Access Groups — включение опции доступа только указанным группам (можно добавить две)
- IP Filtering — включении фильтрации по IP, можно добавить 4 подсети, если не поставить галочку Access Granted доступ из указанных подсетей будет запрещен
- System Tray — отображение иконки MRC в системном трее, включение элементов меню Settings, Ivitation, Connect To
- Notify — Включение Отключение уведомлений о подключениях отключениях, возможность добавления текста уведомлений
- File Transfer — путь загрузки Simple File Transfer
В зависимости от требований, некоторые параметры можно отключать полностью, как например Notify выбрав в свойствах политики Disabled.
При работе с компьютерами или серверами часто возникает необходимость удаленного доступа. В этом случае помогает специальное программное обеспечение для удаленного управления, такое как Dameware Mini Remote Control.
Эта программа позволяет администраторам или техническим специалистам удаленно получать доступ к компьютерам и серверам для исправления проблем и управления настройками.
В этой статье мы расскажем, как установить Dameware Mini Remote Control на ваш компьютер по шагам. Обратите внимание, что для установки программы необходимы права администратора на компьютере.
Содержание
- Скачивание установочного файла
- Шаг 1.
- Шаг 2.
- Шаг 3.
- Шаг 4.
- Шаг 5.
- Шаг 6.
- Установка Dameware Mini Remote Control
- Шаг 1: Скачивание программы
- Шаг 2: Установка программы
- Шаг 3: Запуск программы и подключение
- Настройка Dameware Mini Remote Control
- 1. Настройка привилегий пользователя
- 2. Настройка Dameware Mini Remote Control
- 3. Создание соединения
- Подключение к удаленному компьютеру с помощью Dameware Mini Remote Control
- Шаг 1: Запустите программу
- Шаг 2: Введите имя пользователя и пароль
- Шаг 3: Введите данные удаленного компьютера
- Шаг 4: Установите подключение
- Шаг 5: Выполните необходимые задачи
- Вопрос-ответ
- Что такое Dameware Mini Remote Control?
- Какие требования к системе нужно учитывать при установке Dameware Mini Remote Control?
- Могу ли я использовать Dameware Mini Remote Control для подключения к удаленному компьютеру с Mac OS?
- Как защитить соединение с помощью Dameware Mini Remote Control?
- Какие возможности предоставляет Dameware Mini Remote Control?
Скачивание установочного файла
Шаг 1.
Перейдите на официальный сайт Dameware Mini Remote Control.
Шаг 2.
Нажмите на кнопку «Download Now», чтобы начать скачивание установочного файла.
Шаг 3.
Выберите версию программы, которая подходит для вашей операционной системы (Windows или Mac).
Шаг 4.
Нужно ввести ваше имя, фамилию и адрес электронной почты, чтобы начать скачивание.
Также вы можете выбрать, желаете ли подписаться на рассылку новостей компании.
Шаг 5.
Установочный файл будет загружен на ваш компьютер.
Проверьте, что файл загрузился полностью, прежде чем начать установку.
Шаг 6.
После скачивания установочного файла следуйте инструкциям для установки Dameware Mini Remote Control на ваш компьютер.
При необходимости можно обратиться к руководству пользователя, в котором подробно описывается процесс установки и использования программы.
Установка Dameware Mini Remote Control
Шаг 1: Скачивание программы
Перейдите на официальный сайт Dameware и скачайте последнюю версию программы Dameware Mini Remote Control. Выберите соответствующую версию для вашей операционной системы и нажмите на кнопку «Скачать».
Шаг 2: Установка программы
После того как загрузка Dameware Mini Remote Control завершена, откройте загруженный установочный файл. Начнется процесс установки программы. Для успешной установки нужно следовать указаниям программы — нажимать «Далее», «Согласен» и «Установить».
Шаг 3: Запуск программы и подключение
После установки Dameware Mini Remote Control запустите программу. Далее следуйте инструкциям чтобы подключиться к удаленному компьютеру. Необходимо ввести адрес компьютера и учетные данные для подключения.
Итак, теперь у вас есть подробная инструкция по установке Dameware Mini Remote Control. Пользуйтесь программой для удаленного управления компьютерами с настройками безопасности, чтобы быстро и легко управлять удаленными компьютерами и серверами.
Настройка Dameware Mini Remote Control
1. Настройка привилегий пользователя
Перед использованием Dameware Mini Remote Control необходимо убедиться, что у пользователя есть необходимые привилегии для удаленного подключения к компьютерам. Для этого нужно:
- Открыть «Панель управления» и выбрать «Учетные записи пользователей».
- Выбрать «Изменение учетной записи» и убедиться, что текущий пользователь имеет права администратора.
2. Настройка Dameware Mini Remote Control
После установки программы Dameware Mini Remote Control на компьютер, необходимо настроить программу. Для этого:
- Запустите программу и выберите «Настройки».
- В разделе «Общие» выберите язык программы и укажите путь к файлу журнала.
- В разделе «Сервер» введите имя домена и имя пользователя.
- В разделе «Агент» выберите тип установки и установите пароль для удаленного доступа.
3. Создание соединения
После настройки программы можно создавать соединения с удаленными компьютерами. Для этого нужно:
- Запустить программу и выбрать «Создание нового соединения».
- Ввести имя или IP-адрес удаленного компьютера.
- Ввести имя пользователя и пароль для удаленного доступа.
- Нажать кнопку «Подключение».
После выполнения этих шагов можно использовать Dameware Mini Remote Control для удаленного управления компьютерами.
Подключение к удаленному компьютеру с помощью Dameware Mini Remote Control
Шаг 1: Запустите программу
Для того чтобы подключиться к удаленному компьютеру, запустите программу Dameware Mini Remote Control на вашем компьютере.
Шаг 2: Введите имя пользователя и пароль
Введите имя пользователя и пароль, которые вы хотите использовать для подключения к удаленному компьютеру.
Если вы не знаете свои данные для входа, уточните их у администратора компьютерной сети.
Шаг 3: Введите данные удаленного компьютера
Укажите IP-адрес или имя удаленного компьютера, с которым вы хотите подключиться.
Если вы не знаете IP-адрес или имя компьютера, уточните эту информацию у администратора.
Шаг 4: Установите подключение
Нажмите кнопку «Подключиться», чтобы установить соединение с удаленным компьютером.
Если все данные введены корректно, вы должны увидеть рабочий стол удаленного компьютера на экране вашего компьютера.
Шаг 5: Выполните необходимые задачи
После установления соединения, вы можете выполнить любые задачи на удаленном компьютере, такие как управление файлами и настройка программного обеспечения.
В завершении, не забудьте закрыть программу, когда вы закончите работу с удаленным компьютером.
Вопрос-ответ
Что такое Dameware Mini Remote Control?
Dameware Mini Remote Control – это программное обеспечение, предназначенное для удаленного управления компьютером.
Какие требования к системе нужно учитывать при установке Dameware Mini Remote Control?
Система должна быть операционной системой Windows, от XP до Windows 10. Рекомендуется использовать прямое соединение для максимальной скорости и безопасности.
Могу ли я использовать Dameware Mini Remote Control для подключения к удаленному компьютеру с Mac OS?
Нет, Dameware Mini Remote Control поддерживает только операционные системы Windows.
Как защитить соединение с помощью Dameware Mini Remote Control?
Для защищенного сетевого соединения можно использовать SSL-шифрование, включить аутентификацию или настроить доступ только для определенных пользователей.
Какие возможности предоставляет Dameware Mini Remote Control?
Dameware Mini Remote Control предоставляет возможности удаленного управления компьютером, включая возможность просмотра и управления экраном, просмотра системных журналов, управления службами, процессами, файлами и папками, редактирования реестра и многое другое.
DameWare
Mini Remote Control
(Standalone)
Evaluation Guide
Legal
Copyright © 1995-2015 SolarWinds Worldwide, LLC. All rights reserved worldwide.
No part of this document may be reproduced by any means nor modified, decompiled, disassembled, published or distributed, in whole or in part, or translated to any electronic medium or other means without the written consent of SolarWinds. All right, title, and interest in and to the software and documentation are and shall remain the exclusive property of SolarWinds and its respective licensors.
SOLARWINDS DISCLAIMS ALL WARRANTIES, CONDITIONS OR OTHER TERMS, EXPRESS
OR IMPLIED, STATUTORY OR OTHERWISE, ON SOFTWARE AND DOCUMENTATION
FURNISHED HEREUNDER INCLUDING WITHOUT LIMITATION THE WARRANTIES OF
DESIGN, MERCHANTABILITY OR FITNESS FOR A PARTICULAR PURPOSE, AND
NONINFRINGEMENT. IN NO EVENT SHALL SOLARWINDS, ITS SUPPLIERS, NOR ITS
LICENSORS BE LIABLE FOR ANY DAMAGES, WHETHER ARISING IN TORT, CONTRACT OR
ANY OTHER LEGAL THEORY EVEN IF SOLARWINDS HAS BEEN ADVISED OF THE
POSSIBILITY OF SUCH DAMAGES.
The SOLARWINDS, the SOLARWINDS & Design, DAMEWARE, ORION, and other
SolarWinds marks, identified on the SolarWinds website, as updated from SolarWinds from time to time and incorporated herein, are registered with the U.S. Patent and Trademark Office and may be registered or pending registration in other countries. All other
SolarWinds trademarks may be common law marks or registered or pending registration in the United States or in other countries. All other trademarks or registered trademarks contained and/or mentioned herein are used for identification purposes only and may be trademarks or registered trademarks of their respective companies. Microsoft®, Windows®, and SQL Server® are registered trademarks of Microsoft Corporation in the
United States and/or other countries.
The DameWare third party libraries are covered with more accuracy and detail in http://www.solarwinds.com/documentation/3rdPartySoftware/3rdParty.htm
Contact Information
Team
Sales
General Support
Technical Support
Customer Service
User Forums
Contact Information
1.866.270.1449 http://www.dameware.com/customers.aspx
Submit a ticket: http://www.dameware.com/technicalsupport.aspx
Submit a ticket: http://www.dameware.com/customers/customer-service.aspx
Thwack
Note: DameWare only provides technical support by email. If you need technical support, please open a ticket using a link provided in the table.
End-of- Life Policy
In order to continue to drive innovation and new functionality into our products,
SolarWinds must transition customers from legacy versions of software to our current versions. Please review the following support schedule:
l
04/28/2015: End-of-Life (EoL) – will no longer provide technical support for v8.0.1 or older.
l
5/06/2014: End-of-Life announcement (EoL) – Customers on DameWare v7.4 or older should begin transition to DameWare 11.0.
l
12/12/2012: End-of-Life (EoL) – SolarWinds will no longer provide technical support for SolarWinds DameWare v6.9 or older.
Chapter 1
Introduction
Introduction to DameWare Mini Remote Control
DameWare Mini Remote Control is a powerful, centralized remote control application that allows you to seamlessly connect to remote systems. You can securely authenticate to computers, troubleshoot and solve problems, and chat with end users on computers running Windows, Mac OSX, or Linux.
Key features include:
l
Controlling end users’ computers
l
The ability to connect to Windows, Mac OSX, and Linux
l
Multiple authentication types, including CAC
l
The ability to connect to unattended sessions
l
Rapid client agent deployment
Why Install DameWare Mini Remote Control
DameWare Mini Remote Control allows you to quickly connect to remote computers through a client agent using a variety of connection options and privileges to control remote computers. Using true remote desktop sharing, you can control the end user’s computer while the end user is still connected. Mini Remote Control can connect to computers running most versions of Windows (NT, XP, Vista, 7, and 8 and Server 2003, 2008, and 2012), Mac OSX, and Linux.
In addition to being an easy-to-use remote control application, Mini Remote Control provides a rich feature set that complements its main function. Mini Remote Control integrates with highly secure environments by providing multiple authentication methods, including Smart Card authentication. You can quickly connect to unattended sessions or powered-down computers and automatically deploy the remote client agent. Mini Remote
Control also comes with built-in chat functionality and one-click screenshots.
— 1 —
Chapter 1
How DameWare Mini Remote Control Works
DameWare Mini Remote Control is an agent-based remote control application and therefore consists of two parts:
l
The Mini Remote Control application
l
The Mini Remote Control client agent service
The Mini Remote Control application is the program installed on your local system that you use to connect to the Mini Remote Control client agent and control the remote computers.
The Mini Remote Control client agent service is the software component deployed to computers that allows the Mini Remote Control application to control them. This service runs in the background of the remote system under the Local System account. When there is not an active Mini Remote Control connection, the service uses little to none of the remote system’s CPU.
When the Mini Remote Control application attempts to connect to the Mini Remote Control client agent, the client agent authenticates the credentials locally before allowing the connection. The installed client agent service does not pose a security risk to the remote computer because all user privileges are granted by the operating system on the remote computer. Using Mini Remote Control does not provide users with greater privileges than they would have if they logged on to the computer locally. Every privilege the Mini
Remote Control user has must be allowed by the remote computer.
— 2 —
— 3 —
Introduction
Chapter 2
Installation
Installing DameWare Mini Remote Control
The DameWare Mini Remote Control installation is a two step process. You must:
l install the Mini Remote Control application
l deploy the Mini Remote Control client agent
Install the Mini Remote Control application on your computer. Use the application to connect to and control remote computers.
Install the Mini Remote Control client agent on any remote computer to which you need to connect. While the client agent can be deployed each time the application connects to a client, you can also preemptively deploy the client agent to computers.
Use the following topics to install the Mini Remote Control application and deploy the client agent.
l
System Requirements
l
Installing the DameWare Mini Remote Control Application
l
Licensing
l
MRC Client Agent Service Installation Methods
l
Common Error Messages
System Requirements
Before you install the Mini Remote Control application or client agents, review the following system requirements.
— 4 —
Chapter 2
DameWare Mini Remote Control Application
Hardware
Install DameWare Mini Remote Control on a computer that meets the following minimum requirements:
l
1 GHz CPU
l
20 MB RAM
l
150 MB available hard drive space
Operating System
Install DameWare Mini Remote Control on a computer running any of the following operating systems:
l
Windows XP SP2
l
Windows Server 2003
l
Windows Vista
l
Windows Server 2008 (including R2)
l
Windows 7
l
Windows Server 2012
l
Windows 8
DameWare Mini Remote Control Integration
DameWare Mini Remote Control can integrate with SolarWinds Web Help Desk version
12.2.0.
DameWare Mini Remote Control Client Agent
Install the DameWare Mini Remote Control client agent on remote computers running any of the following operating systems:
l
Windows XP SP2
l
Windows Server 2003
l
Windows Vista
l
Windows Server 2008 (including R2)
l
Windows 7
l
Windows Server 2012
l
Windows 8
DameWare Mini Remote Control can also connect to remote computers running any of the following operating systems using the VNC protocol:
l
Debian 5.0 and later with VNC enabled
l
CentOS 5 and 6 with VNC enabled
l
Ubuntu 10.04.1 LTS to 10.04.3 LTS, 11.10, and 12.04 LTS with VNC enabled
l
Red Hat Enterprise Linux 5 and later with VNC enabled
— 5 —
Installation
l
Fedora 15 and 16 with VNC enabled
l
Mac OS X with VNC enabled
A video card on the remote system that supports the following:
l
Bitmap transfers
l
Windows API, SetDIBits and GetDIBits functions
l
A single color plane
Additionally, at least one TCP port must be open so the Mini Remote Control application
can communicate with the Mini Remote Control client agent.
Ports Used for Mini Remote Control
If a remote system is running the DameWare Mini Remote Control client agent service,
Mini Remote Control only uses a single TCP port to connect to it. The default TCP port is
6129; however, you can specify any of the 65,000 valid TCP ports in the Mini Remote
Control application properties. Since TCP 6129 is a well known port for the Mini Remote
Control program, DameWare recommends you choose a different port to ensure the most secure connections.
If a remote system is not running the Mini Remote Control client agent service, Mini
Remote Control attempts to install it over the remote operating system’s installed protocols for File & Printer Sharing.
Microsoft defines File & Printer Sharing as:
l
UDP 137 (Name)
l
UDP 138 (Datagram)
l
TCP 139 (Session)
l
TCP 445 (Direct Hosting)
If you do not want Mini Remote Control to install the client agent service using these ports, or Mini Remote Control is unable to connect to the remote system using these ports, install the service using another installation method. For additional information,
see Mini Remote Control Client Agent Service Installation Methods.
Licensing
Licensing
DameWare standalone software is licensed per user, and each license allows you to install on 3 computers. The Remote Support Client Agent Service is not licensed and there are no additional fees for installing the service on remote systems. For example, if you have 10 computers running Remote Support and you use Remote Support to manage
10,000 remote systems, you only need to license the 10 Remote Support computers to maintain compliance with the SolarWinds End User License Agreement (EULA). To purchase licenses, visit www.dameware.com
.
The DameWare centralized version is licensed per user, but the licensing and activation occur on the DameWare Central Server using the centralized license key. The centralized
— 6 —
Chapter 2 license includes a licensed user count, and each authorized DameWare user reduces the number of available user licenses. For example, if you purchased a 10 user license, you can install and use Remote Support or Mini Remote Control from any computer so long as you can logon to the DameWare Central Server and do not exceed 10 users. The Mini
Remote Control Client Agent Service in the centralized version is not licensed and there are no additional fees for installing it.
Note: To comply with the SolarWinds EULA, you cannot activate both standalone and centralized software at the same time.
Installing the Mini Remote Control Application
DameWare provides an intuitive wizard to guide your installation. You can also install the application using the command line. The following procedure will complete your installation of the DameWare Mini Remote Control Application.
l
Install the application with the installer
l
Install the application from the command line
You need administrator privileges to install the Mini Remote Control application. If the computer on which you are installing Mini Remote Control has previously had a
DameWare product, not including the Mini Remote Control client service, the previous settings are applied unless you delete the DameWare database.
Install the Application with the Installer
To install the DameWare Mini Remote Control application using the installer:
1. Log on as an administrator
2. Navigate to your download location and launch the DameWareMRC executable file.
3. Review the Welcome text, and then click Next to continue.
4. Select I accept the terms in the License Agreement, and then click Next.
— 7 —
Installation
5. If you want to install to a destination folder other than the default, click Browse, select an installation folder, and then click OK.
6. Select which application shortcuts you want the DameWare installer to create.
7. Click Install to begin the installation.
— 8 —
Chapter 2
8. Enter the email address you provided to DameWare when you registered for the software, and then click Continue.
9. When prompted, click Continue Evaluation.
10. Click Close.
11. Click Finish to complete the installation wizard and exit.
After you have completed installing the Mini Remote Control application, launch the application by clicking DameWare Mini Remote Control in Start > Programs
> SolarWinds > DameWare Mini Remote Control to deploy a client agent from the application.
Install the Application from the Command Line
You can use command line options to install the Mini Remote Control application without being prompted for license information.
Notes:
l
You must run the commands with Administrator permissions
l
Use %WINDIR%System32 instead of relative paths
l
You cannot install through a proxy server that also requires authentication
To install Remote Support or Mini Remote Control using the MSI installer in evaluation mode:
— 9 —
Installation
Use the following command at the command line or in an installer script. Replace the variables in this example according to the values in the Arguments section.
msiexec /i fileName.msi /qn APPDIR=»C:Program FilesDameWare programName» reboott=reallysuppress SILENT=yes
To install Remote Support or Mini Remote Control using the EXE installer in evaluation mode:
Use the following command at the command line or in an installer script. Replace the variables in this example according to the values in the Arguments section.
fileName.exe /args «/qn APPDIR=»C:Program FilesDameWare programName» reboott=reallysuppress SILENT=yes»
Arguments
The following is a list of arguments you can use on the command line.
l
/args «argumentsHere» (EXE only) instructs the EXE installer to pass the arguments inside the quotation marks along to the MSI installer.
l
APPDIR=»C:Program FilesDameWare programName» specifies the installation directory. Enter Remote Support or Mini Remote Control in place of programName to use the default installation directory.
l
SILENT=yes instructs the installer to install the program silently.
l
SA_KEY=licenseKey (licensed only) contains the license key for licensed installations. Enter a valid license key in place of licenseKey.
l
SA_EMAIL=emailAddress (licensed only) contains the administrator’s email address for licensed installations. Enter a valid email address in place of emailAddress.
l
SA_FIRST_NAME=firstName (licensed — optional) contains the administrator’s first name. Enter the first name in place of firstName.
l
SA_LAST_NAME=lastName (licensed — optional) contains the administrator’s last name. Enter the last name in place of lastName.
l
SA_PHONE_NUMBER=phoneNumber (licensed — optional) contains the administrator’s phone number. Enter a valid phone number in place of phoneNumber.
l
SA_PROXY_ADDRESS=proxyAddress (licensed — optional) contains the address of the proxy server the program should use to connect to the SolarWinds licensing server.
If applicable, enter the proxy server’s IP address or hostname in place of proxyAddress.
l
SA_PROXY_PORT=proxyPort (licensed — optional) contains the port the program should use to connect to the proxy server. If applicable, enter the proxy port number in place of proxyPort.
l
INSTALLSTANDALONE=1 installs the standalone version. Use 0 to install the centralized version.
l
CENTRALSERVERHOSTNAME=centralServerHostName contains the DameWare Central
Server’s host name.
l
CENTRALSERVERPORT=portNumber contains the port number to the DameWare Central Server. By default, this is 6133.
l
CSUSER=centralServerUser contains the login name of a Central Server user.
l
CSPASSWORD=SWORD=centralServerUserPassword contain the password of the Central Server user.
— 10 —
Chapter 2
Mini Remote Control Client Agent Service Installation Methods
You can deploy the DameWare Mini Remote Control client agent to a single computer as needed or you can deploy to multiple computers at once.
If you want to deploy a single instance, you can deploy it to a remote computer in one of the following ways:
l
Install the service on-demand
l
Install the service from the Mini Remote Control application
l
Manually install the service
If you want to deploy to multiple computers, you can deploy it in one of the following ways:
l
Deploy your own MSI package
Note: The Mini Remote Control application is backwards compatible with Mini Remote
Control client agents from version 7.0. If the Mini Remote Control application connects to an unsupported agent, it prompts you to install a newer version of the client agent.
The Windows operating system requires location Administrator rights to install, remove, start, stop, or upgrade the Mini Remote Control client agent service on remote systems.
Install the Service On-demand
When Mini Remote Control attempts to connect to a computer, it tries to connect through the client agent. If the client agent is not present on the remote computer, you are prompted to install the client agent.
Note:
l
The remote operating system must have the File & Printer Sharing protocols and the File & Printer Sharing ports opened.
To install the client agent service on-demand:
1. Open a remote connection dialog by clicking File > Connect.
2. Enter the Host Name or IP Address and administrative credentials.
3. Click Connect.
4. When prompted to install the client agent service, click OK.
Install the Service from the Mini Remote Control Application
You can push the client agent to a computer using an option in the Mini Remote Control application console.
Note:
l
The remote operating system must have the File & Printer Sharing protocols and the
File & Printer Sharing ports opened.
To install the service from the Mini Remote Control application:
1. Click Install Service… from the File menu.
2. Enter the host name or IP address of the computer on which you want to install the service.
— 11 —
Installation
3. If you want to manually start the service each time a connection is opened, select
Set Service Startup type to «Manual» default is «Automatic».
4. If you want to configure the settings of the Mini Remote Control client agent service
to copy to the remote system, click the Configure… button.
5. If you want to copy the DWRCS.reg file from the local system to the remote system
with pre-configured Mini Remote Control client agent service settings, select
Include Configuration File (DWRCS.reg). This option is available after you have created configuration settings.
6. If you want to connect in FIPS Encryption Mode, select Copy FIPS Modules
(approximately 9 MB).
7. Click OK.
The Mini Remote Control application deploys the service to the remote computer.
Manually Install the Service
To manually install the Mini Remote Control client agent service:
1. Navigate to your DameWare installation folder, usually located at C:Program
FilesSolarWindsDameWare Mini Remote Control.
2. Copy the following files to a location or device you can access from the remote computer:
l
DWRCWXL.dll
l
DWRCST.exe
l
DWRCSh.dll
l
DWRCSET.dll
l
DWRCS.exe
l
DWRCRSS.dll
l
DWRCK.dll
3. On the remote computer, create a new folder in the Windows directory called
«dwrcs» (C:Windowsdwrcs).
4. Place the copied files in the new folder.
Deploy Custom MSI Packages
Install the client agent on your local machine, and then use the DameWare MSI Builder to build a custom MSI package for the Mini Remote Control client agent service, including custom settings. You can then send the file to the remote system via your normal distribution process, such as group policies, or download it from the remote system, and then execute the installer. This installation method also opens the necessary TCP port on the Windows Firewall when it starts up.
Note: Before you create your custom MSI package, you may want to pre-configure the client agent with host names, log settings, authentication choices, or other settings to deploy the custom configuration with the client agent.
To build a custom MSI package for the Mini Remote Control client agent service:
— 12 —
Chapter 2
1. Install and configure the client agent on the computer with the Mini Remote Control application.
2. Open the DameWare Mini Remote Control Package Builder: Start > All Programs
> SolarWinds > DameWare Mini Remote Control > DameWare Mini
Remote Control Client Agent MSI Builder.
3. Complete the following fields in the Package Builder dialog:
l
Profile: Select a pre-defined MSI package profile to populate the rest of the fields with your preferred settings. To save a new profile, complete the rest of the Package Builder dialog, enter a new name in the Profile box, and then click the save icon.
l
Target O/S: The operating system on the target system(s).
l
Include FIPS Modules: Includes the FIPS Modules in the MSI package.
These files are required to run the client agent service in FIPS Encryption
Mode.
l
Install the mirror driver: Includes the Mini Remote Control Mirror Driver in the MSI package.
l
Install the keyboard driver: Includes the Mini Remote Control Virtual Keyboard Driver in the MSI package.
l
Install the smart card driver: Includes the Mini Remote Control Smart
Card Driver in the MSI package.
l
Client Agent Settings: Click the Client Agent icon to open the Mini
Remote Control client agent service settings dialog:
l
When you configure these settings through the Package Builder, the application saves the settings in the installer to deploy to one or more remote systems.
l
Output Folder: Enter or browse to the folder you want to install the service to on the remote system(s).
4. Click Build MSI to build the MSI package and save it to the output folder, which is the DameWare installation folder by default.
You can deploy the custom MSI package as you would any other MSI.
Common Error Messages
The following is a list of common errors encountered when installing DameWareand potential solutions to those errors. These errors are generally related to some type of system or network configuration issue within a network environment and can usually be duplicated outside of DameWare software.
Error Codes
System Error: 5
Error
The credentials for the remote computer were
Potential Solutions
l
The user account must have sufficient rights to logon locally to the remote computer.
l
If the remote computer runs Windows
— 13 —
Installation
Error Codes
System
Error: 51
System
Error: 53
System
Error: 1300
System
Error: 1603
System
Error: 1707
System
Error: 1814
Winsock Connect
Error: 10050
Winsock Connect
Error: 10054
Winsock Connect
Error: 10060
Winsock Connect
Error: 10061
Error
rejected
Potential Solutions
XP Home edition, you must manually install the client agent.
Windows cannot find the network path
A fatal error occurred during installation
The network address is invalid
Verify that the network path is correct and the target computer is turned on
Cannot connect to the remote computer
l
Ensure that File & Network sharing is enabled and the ports are open.
l
Check that the operating system is configured for Names Resolution.
l
Enable NetBios.
Not all privileges or groups referenced are assigned to the caller
This is frequently related to User Access Control or the Windows Firewall. Run the installer as an
Administrator or login to the computer with the
Administrator or Domain Administer account.
If you have uninstalled DameWare and try to reinstall it, you may need to remove the registry keys.
This is related to the Novell Network Client. Try to connect with the host name or deploy the client agent with the MSI builder.
The specified resource name cannot be found in the image file
Some or all of the operating system’s Standard Performance Indexes (counters) are either missing or corrupt. See KB 300092 for more information.
Cannot establish a connection to the remote computer
The connection was forcibly closed by the remote computer
Ensure that the network is up, that you can access the remote computer, and that the firewall has not blocked the connection.
This can be caused if the application has stopped, the remote computer rebooted, the remote computer uses a hard close, or keep-alive activity.
Connection timed out
The remote computer actively refused the connection
This may be due to a firewall configuration issue, a names resolution issue, or a network routing issue.
l
Reset the TCP port on both local and remote computers.
l
Ensure that the default TCP port is the same on both local and remote computers.
l
Ensure that no other program is using the TCP port.
— 14 —
Chapter 2
Error Codes
Winsock Connect
Error: 11001
Winsock Connect
Error: 11004
Error
Host not found
Potential Solutions
The host name could not be found in the database queried. Check that you can access the host with the name or use the IP address
Could not resolve the host name
Check your DNS table or use the IP address instead
For more information on common errors, see KB 300005 .
— 15 —
Chapter 3
Connecting to Agents
Connecting to Agents
After you have installed both the Mini Remote Control application and the client agents, you may need to make other modifications to establish successful connections between them. Use the following sections to help you connect between the application and client agents.
l
What privileges do I need to connect with DMRC
l
Establishing a Remote Connection over the Internet
l
Connecting through a Firewall
l
VNC Setup
What privileges do I need to connect with DMRC?
After the client agent is installed, you do not need administrator privileges to access the remote computers. However, if you wish to modify the client agent service, you must connect with an administrator account.
Note: You must use an administrator account to connect to a 32-bit agent that has been installed on a 64-bit computer.
Non-Administrator Mode
By default, the remote user is prompted to allow a non-administrator access to their computer. If permission is not explicitly granted by the remote user each time you attempt to connect to the computer, you cannot connect to the remote computer through the Mini
Remote Control client agent. You can configure the client agent to allow non-administrator users to connect without the remote user’s permission.
To allow non-administrators to connect without prompting:
— 16 —
Chapter 3
1. On the remote computer, open the client agent’s properties by right-clicking the service in the system tray and selecting Settings…
2. Navigate to the Access tab.
3. Clear the checkbox on Permission required for these account types.
4. Click OK.
When a user connects to the client agent without administrator privileges, a non-dismissible dialog informs users that the client is running in «Non-Administrator Mode».
Administrators Only Mode
You can configure the client agent to require an administrator account. Administrators are any user who is part of the local administrator group.
To allow only administrators to connect:
1. On the remote computer, open the client agent’s properties by right-clicking the service in the system tray and selecting Settings…
2. Navigate to the Access tab.
3. Select Allow only administrators to connect.
4. Click OK.
Establishing a Remote Connection over the Internet
The Mini Remote Control application connects to the client agent service using a direct
TCP connection from the application to the client agents. Although this method may not be as convenient as establishing a VPN or SSL connection to a LAN, for many users it provides a necessary means of providing remote support for customers or administration for remote machines not on a LAN. Since Mini Remote Control uses TCP, the local and remote computers and router/firewalls may need to be configured to allow the connection. If you do not want to modify the router/firewall or cannot modify the router-
/firewall, you can use the Reverse Connection feature — it requires no configuration of the remote site’s router/firewall.
Perform the following steps on the remote computer/network and the local machine respectively.
On the remote computer/network:
1. Configure port forwarding in the hardware router/firewall for the designated TCP port and forward all inbound traffic for this TCP port to the correct Private (LAN) IP address behind the firewall.
2. Open the designated TCP port on any software firewalls that may be present on this machine. This will instruct the DMRC Client Agent Service to listen on this TCP port
(default is 6129). Note that Mini Remote Control configures the Windows Firewall automatically.
On the local computer (with the Mini Remote Control application installed):
1. Open the DMRC application.
2. For the Host Name or IP address, enter the Public (WAN) IP address of the remote site’s router/firewall.
3. Specify the appropriate User ID & Password.
— 17 —
Connecting to Agents
4. Click the Settings button to specify the correct TCP port.
5. Click the OK button.
6. Click the Connect button.
When the remote site’s router/firewall sees the inbound traffic on the designated TCP port it will forward the traffic to the correct machine on the internal network.
If you are simultaneously connecting to multiple machines behind a router/firewall (over the Internet), using the Proxy feature of DMRC eliminates the need to forward a TCP port to each machine behind the router/firewall.
Note: DMRC’s Proxy feature is different from the DameWare Internet Proxy. The
DameWare Internet Proxy is only used with Internet Sessions.
Reversing a Connection
You can use the client agent to initiate an outbound connection to the Mini Remote Control application. This negates the need to open the remote site’s firewall/router and the need to provide credentials to the Mini Remote Control application. However, the router-
/firewall of the Mini Remote Control application user must by configured to receive the reverse connection.
To initiate a Reverse Connection
Note: The client agent must be installed before you can open a reverse connection to the
Mini Remote Control application.
On the local network/machine:
1. Open the DMRC application. Select the File menu and the options in that drop-down menu will include one called, «Accept Incoming Connection».
2. Selecting this option will display a dialog box where the designated TCP Port Number
(default is 6130) can be entered. If the local machine has multiple network cards
— 18 —
Chapter 3
(NICs), choose the appropriate one to use for the reverse connection from the «Bind
Address» options.
On the remote machine:
1. When the DMRC Client Agent Service is installed on a remote machine, the following
SysTray icon becomes visible:
2. Right-clicking this icon will produce a context menu that includes the option to «Connect to Client…» which when selected will bring up a dialog box entitled, «Connect to
Client — Initiate Outgoing Connection».
3. Within this dialog box, enter the Host Name or Public (WAN) IP address (if connecting over the Internet) or Private (LAN) IP address of the Help Desk agent/technician/administrator’s machine as well as the TCP Port Number to be used (must be the same TCP Port Number specified on the local machine). Once this information is entered, select «OK,» which initiates the reverse connection.
Advanced Options
You can pre-populated the Reverse Connection list with a set of IP addresses and port numbers. When a remote user right-clicks the SysTray icon and selects «Connect to Client…,» he or she can choose from a list of IP addresses or host names. To automatically add host names or IP addresses to the «Connect to Client» drop-down list, use the registry keys listed below. These are stored in a profile specific for each user. The values are in groups of two (host name and port number). «Last/Port» is the one that is currently selected within the list.
[HKEY_CURRENT_USERSoftwareDameWare DevelopmentNT UtilitiesDNTUDWRCC SettingsConnect to Client]
«Last»=»192.168.1.100» (IP address)
«Port»=dword:000017f2 (hex for 6130)
«Host0″=»192.168.1.1»
«Port0″=dword:000017f2
«Host1″=»192.168.1.2»
«Port1″=dword:000017f2
……….
……….
«Hostx»=»192.168.1.100»
«Portx»=dword:000017f2
— 19 —
Connecting to Agents
Connecting through a Firewall
If you connect to remote sites through a firewall, you should pre-install the client agent.
After the client agent is installed, you only need one port open in your firewall or router.
If you install the client agent when you first attempt to connect to the remote computer, you must open multiple ports to install the client agent and open the TCP port used to connect the application to the client agent. The client agent is installed using the same ports used to access shared resources, and DameWare does not recommend opening these ports on any perimeter firewall.
The default TCP port for communication is 6129 but can be set to anything from both the application and the client agent.
The TCP ports required for connecting through a firewall are documented by Microsoft and depend on the Operating System version (Windows XP/2003/Vista/Windows 7/2008), the Network protocol installed, and how the network is configured.
Example:
The Windows XP/2003/Vista/Windows 7/2008 redirector and server components support
Direct Hosting over SMB for communicating with other computers running these Operating Systems. Direct Hosting over SMB does not use NetBIOS for name resolution. DNS is used for name resolution and the Microsoft networking communication is sent directly over TCP without a NetBIOS header. Direct Hosting of SMB over TCP/IP uses TCP & UDP port 445 instead of the NetBIOS session TCP port 139. DNS Direct Hosting also uses port
445 (TCP and UDP).
By default, both NetBIOS and Direct Hosting are enabled on Windows XP/2003/Vista, and both are tried in parallel when a new connection is established. The first to succeed in connecting is used for any given attempt. NetBIOS over TCP/IP support can be disabled to force all traffic to use TCP/IP Direct Hosting.
Direct hosting of SMB over TCP/IP
http://support.microsoft.com/default.aspx?scid=kb;en-us;Q204279
Changing the Default Port
You must change the default port to the same port number on both the application and the client agent.
To change the port settings on the application:
1. Click the Default Host Properties… button in the View menu.
2. On the Remote Options tab, change the port number.
3. Click OK.
To change the port settings on the client agent:
1. Right-click on the client agent in the system tray, and select Properties.
2. On the General tab, change the port number.
3. Click OK.
— 20 —
Chapter 3
VNC Setup
The connection settings, Use VNC Viewer and Use Intel AMT KVM, in the Remote Connect dialog allow Mini Remote Control users to connect to remote systems running Linux and Mac operating systems as well as systems running on Intel vPro hardware that supports the AMT KVM feature. For this to work, the remote system must be running a
VNC server, similar to the Remote Desktop service in Windows. In some cases, enabling
VNC is as easy as enabling the option as a setting in the operating system. In other cases, you may have to install a separate VNC server application, such as Real VNC.
For additional information about Real VNC, visit their website: http://www.realvnc.com/ .
Sample Procedures
The procedure to set up a VNC server on a remote system will vary based on the operating system and version the system is running. However, the following procedures illustrate typical scenarios for Linux, Mac, and vPro operating systems.
Linux
To configure a VNC server in Linux using the Gnome Remote Desktop:
1. Open the Gnome desktop preferences. For example, in Fedora distros:
a. Click the Fedora icon.
b. Point to Desktop > Preferences, and then select Remote Desktop
Preferences.
2. Configure the settings according to your preferences.
3. Click Close.
Mac OS X
Note:
l
A VNC server on Mac OS X 10.8 (Mountain Lion) may not work correctly as it has not been signed with an Apple developer certificate.
l
VNC server 5.0.x may not be able to properly wake a Mac display from sleep under
OS X 10.8.
l
VNC server 5.0.x cannot interact with a retina display.
To configure a VNC server in Mac OS X 10.4 or 10.6:
1. Click the Apple menu, and then select System Preferences.
2. In the Internet and Network section, click the Sharing icon.
3. Select Apple Remote Desktop, and then click Start.
4. If necessary, set a password for VNC connections:
a. Click Access Privileges.
b. Select VNC viewers may control screen with password, and then enter a password.
c. Click OK.
To configure a VNC server in Mac OS X 10.7:
— 21 —
Connecting to Agents
1. Click the Apple menu, and then select System Preferences.
2. In the Internet and Network section, click the Sharing icon.
3. Select Screen Sharing.
4. If necessary, set a password for VNC connections:
a. Click Computer Settings...
b. Select VNC viewers may control screen with password, and then enter a password.
c. Click OK.
vPro hosts
To configure Intel vPro hosts for AMT KVM connections:
1. Reboot the host, and then enter its BIOS configuration menu.
2. Under AMT Options, select the following options:
l
Firmware Verbosity
l
AMT Setup Prompt
3. Reboot the host, and then enter the Management Engine BIOS Extension (MBEx):
Just after the BIOS startup screen, press Ctrl+P.
4. If you are prompted for a password, enter the default password, admin, and then create a new password.
5. In the Intel ME Platform Configuration menu, select Activate Network Access.
6. In the Intel ME Network Setup menu, select Intel ME Network Name Settings.
7. Select Host Name, and then enter the hostname for the host.
8. Press Esc to return to the previous menu.
9. Select Manageability Feature Selection, and then ensure it is enabled in the lower pane.
10. Select SOL/IDER.
11. In the SOL/IDER menu, enable the following options:
l
SOL
l
IDER
l
Legacy Redirection Mode
12. Return to the previous menu, and then select KVM Configuration.
13. In the KVM Configuration menu, select KVM Feature Selection, and then ensure it is enabled in the lower pane.
14. In the upper pane, select User Opt-in, and then select User Consent is
required for KVM Session in the lower pane.
15. In the upper pane, select Opt-in Configurable from remote IT, and then select
Enable Remote Control of KVM Opt-In Policy in the lower pane.
16. Press Esc until you are prompted to leave the MEBx menu.
Source: http://www.howtogeek.com/56538/
— 22 —
Chapter 4
Quick Tour
DameWare Mini Remote Control Quick Tour
The following sections guide you through the most common task, such as enabling logging, using DMRC with terminal services, and saving host lists.
l
Enabling Remote Logging
l
Using Smart Cards
l
How to backup and restore the saved host list
l
Forcing Encryption Levels
Enabling Remote Logging
The remote logging feature of the Mini Remote Control client agent enables administrators to send a copy of the Mini Remote Control entries recorded on the remote computer’s Application Event log to a logging server. The log host must have a Mini Remote
Control client agent installed on it. Remote logging is often turned on to comply with PCI logging requirements.
Remote logging requires changes to the client agent and the log host and that both run the same version of the Mini Remote Control client agent.
To enable remote logging:
1. Ensure that the Mini Remote Control client agent server is running.
2. Make the following changes to the client agent:
l
Select the «Enable Remote Logging» setting
l
Enter the IP address, Host Name, or FQDN of log host
l
Enter the TCP port that the Mini Remote Control Client Agent Service is configured to listen on, on the remote machine (Log Host Port Number)
3. Restart the service on the client.
— 23 —
Chapter 4
4. On the log host, make the following changes to the client agent:
l
Select the «Enable Logging to this host» setting
l
Enter the Log Path for the local computer, such as C:DameWare Log Files (a
UNC path is not valid)
l
Enter the Maximum Log File size in bytes
5. Restart the service on the log host.
When the Mini Remote Control Client Agent Service on the machine sees an inbound logging request, it will take in the log entry and then append it to the DWRCS.CSV file in the specified log path folder. If the file does not exist, one will be created.
The DWRCS.CSV log file :
All entries are then recorded or appended to the DWRCS.CSV log file, which is a standard
CSV (Comma Separated Value) formatted file that can be opened using a third-party reporting tool (i.e. Excel, etc.).
Using Smart Cards
Smart cards provide a form of two-factor authentication to securely login. You can use smart cards with Mini Remote Control to log in remotely and interactively. Interactive login allow users of the DMRC software toaccess remote machines and interactively login with their PIN while they are at the Logon Desktop, as if they were physically at the console of the remote machine. Remote Smart Card Authentication and Interactive Login within DameWare Development software also does not require any type of Smart Card middleware, and does not require a Smart Card reader attached to the remote machine.
Requirements
The following is a list of requirements necessary for DameWare Mini Remote Control to authenticate successfully with smart cards.
1. Smart Card Login & Authentication is only supported on Windows XP SP2 and above, including:
l
Windows XP Professional SP2
l
Windows 2003 Server
l
Windows Vista
2. Microsoft’s Smart Card Services (scardsvr) must be installed.
3. The Operating System and network implementation must be configured properly for
Smart Card authentication. The Smart Card & PIN must have sufficient rights to
Login to the remote machine. Unfortunately, DameWare’s support department does not provide training seminars on how to implement and configure a Smart Card environment. However, the following Smart Card documentation on Microsoft’s website may be helpful.
4. A Smart Card reader must be installed on the local machine.
5. According to Microsoft’s Requirements, if the «Net Use» command can be successfully executed to access a remote machine using a Smart Card, the user should also have the ability to install, remove, start, or stop the DMRC Client Agent Service, or successfully use DNTU’s LogonAs feature, via Smart Card authentication.
6. According to Microsoft, Smart Card Authentication to Active Directory requires that
Smart Card workstations, Active Directory, and Active Directory Domain Controllers be configured properly. Active Directory must trust a certification authority to authenticate users based on certificates from that CA. Both Smart Card workstations and Domain Controllers must be configured with correctly configured certificates.
— 24 —
Quick Tour
Notes:
l
A Smart Card reader is not required on the remote machine.
l
When using smart card authentication interactively, a «New Hardware
Found» notification may be displayed on the remote computer.
You can elect to use smart card authentication when you create your host entry on the Mini
Remote Control application, or you can choose to use smart card authentication in the client agent’s settings.
How to Backup and Restore the saved host list
The Saved Host list and settings are saved to a Mini Remote Control database file,
MRCCv2.db. For security, DameWare uses Microsoft’s Security APIs to encrypt and store the credentials associated with each host entry, and the credentials are not transferred or backed up with the saved host list.
The MRCCv2.dbf file is usually found in the application data folder under «DameWare
Development» or in the DameWare installation folder. For example, you can find the file in the following places:
l
For Vista, Windows 7, & 2008 this translates to: C:Users{Username}AppDataRoamingDameWare Development
l
For Windows XP/2003 this translates to: C:Documents and Settings{UserName}
Application DataDameWare Development
Hosts are automatically saved to the Saved Hosts lists. If you wish to ensure that all hosts are saved, click the save button when creating a new host.
Backup the Saved Host List
To backup the saved host list, copy the MRCCv2.dbf file to your backup location.
Restore the Saved Host List
The steps to restore or import the saved host list are the same.
1. Save the MRCCv2.db file to the computer.
2. Open the Mini Remote Control application.
3. Open the Remote Connect dialog by clicking File > Open.
4. In the File menu, select Import… and click from MRCCv2.db File.
5. Browse to the location of the file, and click OK.
Forcing Encryption Levels
MRC encrypts all credentials and other session negotiation information using Microsoft’s built-in Cryptographic Service Providers & CryptoAPIs to support strong encryption for authentication and session negotiation (key exchange). Mini Remote Control always uses multiple encryption algorithms and always tries to negotiate the strongest keys possible based on what the local and remote systems’ Crypto Subsystem can agree upon.
You can choose to encrypt the following:
— 25 —
Chapter 4
l
General data
l
Images
l
Simple File Transfers
You can choose your encryption levels in both the Mini Remote Control application and in the remote client agent. The encryption level selected on the client agent will supercede choices made in the Mini Remote Control application.
These configurable options allow you to comply more easily with government regulations or your organization’s security policy. It also provides a convenient default level of security for your remote computers.
To force encryption levels on the agent client:
1. Ensure that the Mini Remote Control client agent server is running.
2. On the General tab, click the Sessions button.
3. Select Force Encryption.
4. Choose the appropriate encryption level.
5. Restart the service on the client.
If you want to force encryption levels on all your client agents, you can export the client
agent settings to the remote computers using an MSI. See Mini Remote Control Client
Agent Service Installation Methods for more information.
— 26 —