Ребятушки всем Привет. В предыдущей статье мы обновили Baofeng DM-1801 на кастомную прошивку OpenDM. Как я и говорил станция поменялась практически кардинально. Конечно основные функции остались теми же. Но использовать ее стало намного удобнее.
По хорошему все настройки и кнопки интуитивно понятны. Однако для тех, кто впервые столкнулся с этой прошивкой иногда тяжело понять какая кнопка за что отвечает. И в каком пункте меню менять настройки.
Для себя решил, что расписывать весь функционал станции и пункты меню дело не благодарное. Ибо все настройки вытекают из базовых знаний основ DMR. Сама прошивка OpenDM очень хорошо задокументирована. Правда на английском. А вот для использования Hotkey и функциональных кнопок было бы не плохо иметь так называемую «дорожную карту» В итоге родился вот такой туториал.

Это штука на английском для тех кто в нем понимает и будет изучать радиостанцию по официальной документации. Как по мне на английском намного все лаконичнее и понятнее. Но для тех коллег кто только встал на путь освоения DMR или не очень дружит с английским запилил вот такую локализацию.
 Что то еще расписывать не вижу смысла. Как всегда, что не понятно можно спросить в нашей группе в Telegram или дойти эмпирическим путь до истины.
Друзья. Если вам понравилась эта статья, поделитесь ей в социальных сетях. Обязательно напишите комментарий если у вас возникли вопросы. Мне важно ваше мнение. У нас есть групповой чат в Telegram, где вы можете оперативно задать вопрос и узнать о последних новостях. И поддержите проект монеткой.
-
Contents
-
Table of Contents
-
Troubleshooting
-
Bookmarks
Quick Links
Related Manuals for Baofeng DM-1801
Summary of Contents for Baofeng DM-1801
- Page 2
To users Thank you for your favor with our products. We are dedicated to providing high performance and high stability radio communication products. This two-way radio is no exception. The radio is a DMR dual-slot digital walkie-talkie developed and pro- duced by my team with 3000 memory channels, full-color LCD display and full keyboard hand-tuning function. -
Page 3: Main Features
Main Features RF radiation information This product is intended for professional applications that meet RF Broadband walkie talkie ● radiation requirements. Users must be aware of the hazards of RF Support UV double segment, frequency range radiation and take appropriate measures to meet the requirements of RF UHF400.000-480.000MHz / VHF136.000-174.000MHz radiation limit.
- Page 4
User Safety Information High/low power switch ● Meets the power requirements of different call distances to save more Please read the following information in order to use this two-way radio safely and efficiently. energy 1.The maintenance work of the two-way radio can only be carried out by Alarm function ●… - Page 5
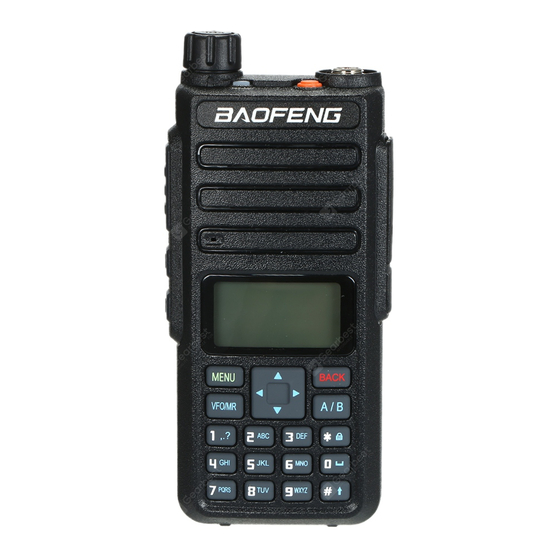
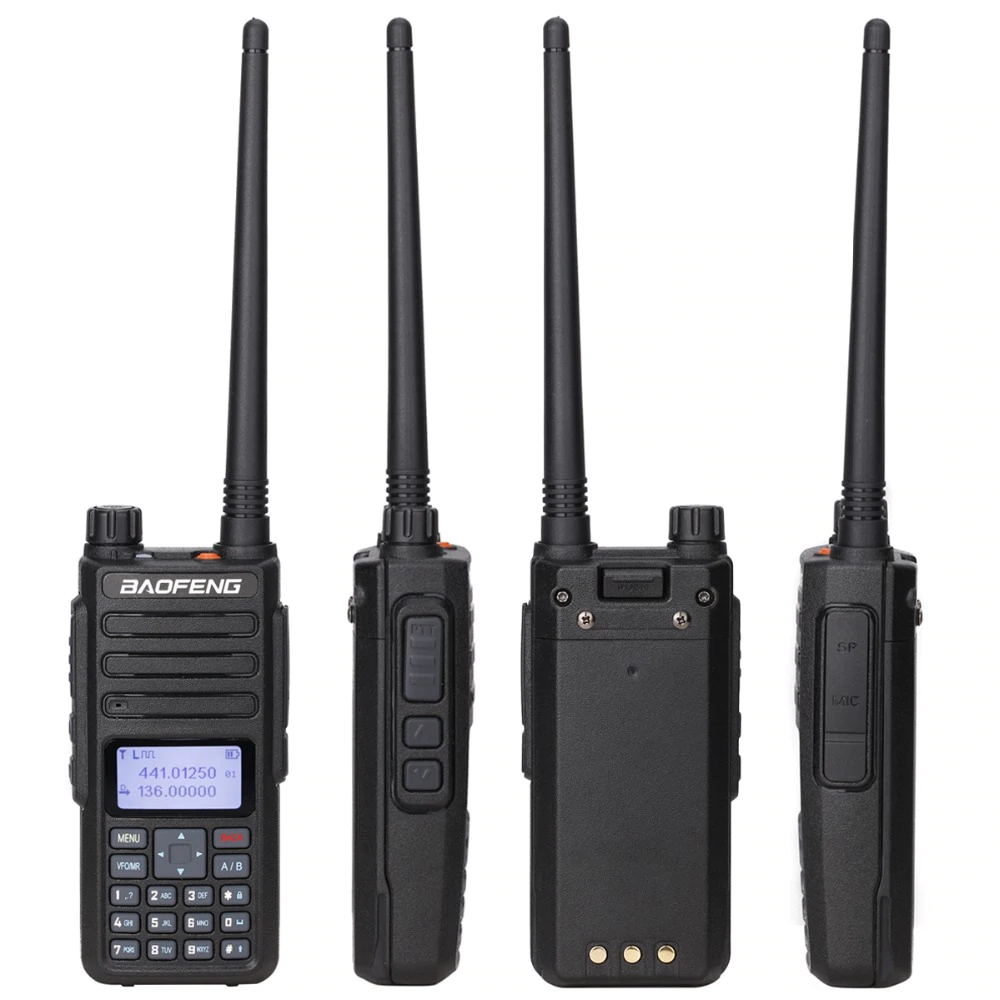
Familiar with this Product Contents You can familiarize yourself with the external structure and the functions Familiar with this machine 01~07 of programmable buttons of this product in this section. Status indication 08~10 Basic Operation 11~28 Antenna Menu operation 29~69 Menu seting State indicator LED Indicator… - Page 6
[BACK]/[Clear] Clear the entered information in input state In analog mode, the DTMF dial code box pops up with a short press of #. At this time, you can manually enter the [ # ]button button In menu mode.return to the previous menu DTMF code word and press PTT to start the DTMF dial [VFO/MR] button Switch the frequency mode and channel mode… - Page 7
Preparation before use Shortcut name Purpose Relay / offline Quickly switch between relay mode and offline mode. Charging Scan on / off Quickly turn the scan function on or off. Note: Note:Be sure to ensure that the product is off when charging. Battery into double-segment double-waiting scan does not work the charger may be charging red flashing constantly flashing, this is the Strict/normal… -
Page 8: Battery Information
Battery information >Under normal circumstances, the charger indicator from red to green ●The first use of the battery when the battery is fully charged, at this time the battery can be Since the battery is not fully charged at the factory, please charge the removed.
-
Page 9: Status Indication
3. Pay attention to the temperature and humidity of the battery storage Description of LCD Icons environment. Store the battery at room temperature in a cool, dry place Icon name Icon Description of product status to minimize self-discharge of the battery. The more signal bars, the stronger the signal is Signal strength icon The current channel transmits at high power…
-
Page 10: Basic Operation
Basic Operation Icon Icon name Description of product status Power on/off The scan is on and is in normal mode To turn on the power, turn the [Power Switch / Volume Control] knob The scan stays on priority channel 1 Scan icon clockwise until you hear a «click»…
- Page 11
●When “ Off ” is selected, the machine operates in single band mode. Note: Write frequency software configuration path: open the write software ● When “ Single Wait ” is selected the machine only works on the main -> Edit -> VFO mode -> VFO A -> digital / analog data -> channel mode -> channel, and the sub channel does not receive signal. - Page 12
● Select from the menu: After entering the “Zone” menu, press [ ]/ [ Single call is a call from an individual two-way radio to another. to select the required zone, and then press [MENU] to switch to the 1. The LED indicator light is green selected zone. - Page 13
6. The walkie talkie returns to the screen before receiving the call. You Start a walkie-talkie call Start a walkie-talkie call can also initiate a group call from your address book. You can choose a channel, user ID or talk group in the following ways: Channel knob Single call •… - Page 14
1. In the channel mode, press the [ ] / [ ] to select the channel using 6. The walkie talkie returns to the screen before receiving the call. the active full call group alias or ID. 2. Hold the walkie talkie in its upright position and keep it at a distance of Analog channel call 1 to 2 inches (2.5 to 5.0 cm) from the mouth. - Page 15
Emergency alarm function After the above configuration, press the corresponding side button, you Emergency alarm can achieve one touch DTMF launch. In the event of an emergency, you can use this feature to ask your fellow or control center for help. Emergency alarm has the highest priority, you PTT ID call can alarm whether the walkie talkie is transmitting or receiving. - Page 16
Alarm Mode the screen displays a prompt that an emergency alert has been received, Except the alarm type “Disable” , other alarm types support the following until an acknowledgment is sent and the emergency mode exits. You will alarm modes. You can ask the dealer to select one of them (Note: The not be able to receive any other prompts or show any other calls until you following methods use “Conventional”… - Page 17
Send emergency alert 4. Hold the walkie talkie in its upright position and keep it at a distance of This feature allows you to send an emergency alert, which belongs to a 1 to 2 inches (2.5 to 5.0 cm) from the mouth. non-voice signal and will trigger a prompt on another transceiver. - Page 18
Note: If you press the [PTT] key during the emergency microphone and Restart emergency mode continue pressing the key after the duration of the emergency micro- It can happened in two situations: phone, the transceiver continues firing until you release the [PTT] key. •… -
Page 19: Menu Operation
● Press the preset [Individual Operation] shortcut to enable this function. If your radio receives encrypted calls with different encryption keys or 2. If you do not operate the radio in the preset response time, the radio different key values and key IDs, you will hear the chaotic transmission will prompt before the response time is up (depending on the dealer sound (basic encryption).
-
Page 20: Menu List
Menu list Level 1 menu Level 2 menu Level 3 menu Options Description of settings Remark View contacts View the contact name and number Contacts Contact list Quick configuration Configure number 0~9 to the contact, select idle state to turn off shortcut configuration Delete current contact Delete current contact…
- Page 21
Level 1 menu Level 2 menu Level 3 menu Options Description of settings Remark Support Chinese and English and special characters, press the # For digital New message Edit interface button to switch input method, and press MENU key to send / save / mode clear only,… - Page 22
Level 1 menu Level 2 menu Level 3 menu Options Description of settings Remark R CTC/DCS Change the decoding of sub audio. Setting method is same as above CTCSS/DCS T CTC/DCS Change the coding of sub audio. Setting method is same as above Strict Squelch The Software… - Page 23
Level 1 menu Level 2 menu Level 3 menu Options Description of settings Remark Single Wait Scan main channel and sub-channel in turn; call is locked when the reception is effective; you can press PTT to talk with the other party Turn off encryption Options can Turn on encryption function, and the two sides must pair the key to… - Page 24
Level 1 menu Level 2 menu Level 3 menu Options Description of settings Remark Input correct password to enter the setup menu; the password can be configured by default on host computer Options: On or Off / Changes boot password Options Enter password ●… - Page 25
Level 1 menu Level 2 menu Level 3 menu Options Description of settings Remark Reception Frequency To set reception frequency; press * to clear all, press BACK to delete one Transmission Frequency To set transmission frequency; press * to clear all, press BACK to delete one Channel Name To set channel name;… -
Page 26: Input Method
Press number button [1] to enter commonly used punctuation and Input Method You can enter user aliases, numbers and text messages via the keypad. special characters. To enter a space, press the [0] button. This product supports the English input method, Simplified Chinese Note: In the input text display area, press [ ] / [ ] / […
- Page 27
The functional description is as follows: View Contact Functional Description You can view the contact details. Call prompt Send call prompt to a contact, and the other party can call back directly Edit Contact Radio Initiate radio detection to a contact without interfering You can modify the number and alias of a contact (single call contacts detection with each other to confirm whether the other party has… - Page 28
> For single call contacts, you can initiate single call, send text message, Receive and confirm call prompt and initiate extended function. Extended functions include: call prompt, When you receive a call alert, the screen displays a call alert, alternating radio detection, remote monitor, activation, and remote kill. - Page 29
You can activate or remote kill any walkie-talkie in the system.For Remote monitor This function works only if the function is set and turned on by example, you might want to disable a stolen walkie-talkie, prevent the writing-frequency software. thief from using it, and enable it when recovered. Initiate remote monitor Set activation and remote kill User menu function:… - Page 30
press [MENU] key. 4. Press [ ] key to “Radio kill” , then press [MENU] key to select 4. Press [ ] key to “Radio active”, then press [MENU] key to select 5. The screen displays “Radio kill” <User alias or ID>, the LED indicator 5. - Page 31
channel is free for you to answer. Press the call key [PTT] to answer. If 8. You will hear a short tone; the screen shows the termination of the call. there is no voice activity during the preprogrammed group call hang-up If you release the PTT key while the walkie talkie is setting up a call, it time, the call is terminated. - Page 32
• press the[ * ]button to delete all contents in the editing area;Press[ # ] to 3. Press the [ ]/ [ ] button, Select “Quick Text” , press the [MENU] switch input methods. button to select. 5.After finish the SMS content, press the [MENU] button to send or save 4. - Page 33
2. The LCD shows the SMS :< User/Call group alias or ID>, confirm that [MENU] button to read this message the SMS is being sent. •When the chosen SMS opened in the inbox and this SMS was sent from 3. If the message sent successfully, a beep sound, and the screen shows Email program, and then it will appear a subject line. - Page 34
shows the message has been sent. Note: Indicates unread message. Indicates read message. — Or if the message has not been sent, the screen shows that the message has failed to be sent. If the message fails to be sent, the radio Reply the SMS in the inbox will return to the re-send selection screen. - Page 35
2.Press the [ ]/ [ ] button, Select “Message ” ,press the [MENU] Forward SMS button to select. Choose forward to send the SMS to another user/call group alias or ID. 3.Press the [ ]/ [ ] button to Inbox, press the [MENU] button to 1. - Page 36
● press the [ * ] button to delete all contents in the editing area;Press button to select. [# ] to switch input methods. 3. Press [ ]/ [ ] o send the Outbox, and then press[MENU] to select 3. After finish the SMS content, press the [MENU] button to send or save. the outbox list. - Page 37
emergency call or an alarm. Or you receive a call alert; the radio will also 5. Press the [MENU] button when delete SMS. And choose “YES” , the exit the re-sent selection screen. The screen list will return to the re-sent screen will indicate the entire sent item is cleared. - Page 38
Call log 3. Press [ ]/ [ ] key to missed call, then press [MENU] key to select. Your transceiver can record all dialed, picked-up and missed calls 4. Press [ ]/ [ ] key to the missed call alias or ID, then press recently. - Page 39
The scan function helps you to receive the communication activity from 3.Press the [ ]/ [ ] button to add channel, then press the [MENU] other channels or groups call, further to know the current activity of the button to select. relative team members. - Page 40
2.Press the [MENU] button to enter into the MENU mode; Menu setting 3.Press the [ ]/ [ ] button to scan, then press the [MENU] button to select; Radio setting 4. If the scan was stopped, the screen will indicate to open, or if the scan You can make the following settings according to your own preferences is activated, the screen will indicate to close. - Page 41
Setting Options Description of operation Setting Options Description of operation options and Range options and Range VOX is turned off; 10.Beep Key Beep Options: Off/On. There is no prompt tone when Off is It is not necessary to press PTT when this option is on; selected 6.VOX you can speak to transmit directly;… - Page 42
The menu functions as follows: Setting Options Description of operation options and Range 8.Press [MENU] to enter menu mode. 17.Lan- English English version, including menu, call tips, call logs and 9.Press [ ]/ [ ] o set, then press [MENU] to select. guage all other interfaces 10.Press [… -
Page 43: Talk Around
channel, the product will beep and display “Transmission failed, Talk around In case of the repeater failure or beyond the coverage of the repeater sub-audio disabled” or “Transmission failed, color code disabled” , station, but both terminals are in the other’s communication range, at this prompting that transmission is disabled at this time.
- Page 44
5.Press [ ]/ [ ] tto “TOT” , then press [MENU] to select. 4.Press [ ]/ [ ] to the VOX, then press [MENU] to select. 6.The screen shows infinity, 15S, 30S… 555S option (additive increase in 5.The screen displays open, press [MENU] to enable the VOX function. the range of 15S), press [ ]/ [ ] tto the corresponding option, then… - Page 45
After the power save function is on, the radio enters the power save 5.Press the [ ]/ [ ] button to “all tones” , then press the [MENU] mode after 10 seconds in standby mode to save battery power.The button to select. power saving ratio is 1:4. -
Page 46: Led Indicator
2.Press [ ]/ [ ] to set, then press [MENU] to select. 8.The screen shows the keyboard unlocking and returns to the home 3.Press [ ]/ [ ] to the radio setting, then press [MENU] to select. screen. 4.Press [ ]/ [ ] to backlight, then press [MENU] to select.
- Page 47
7.If the first line indicates open, press [MENU] to display the power-on In frequency mode, long press [VFO/MR] to switch between frequency password application, and then you need to type the correct password to mode and channel mode. In frequency mode, you can manually type the start the radio at the next boot. - Page 48
4.Use the keyboard to type the correct radio configuration password CTCSS CTCSS can be set only under the simulated channel, includes: (software Settings), then press [MENU] to select. ■ CTCSS encode ■ CTCSS decode 5.Press [ ]/ [ ] to CTCSS, then press [MENU] to select. CTCSS encode 6.Press [ ]/ [… -
Page 49: Radio Configuration
Check radio version Radio configuration Check and indicate this radio’ s Model information, serial number, CPS The product configuration is listed below: version, hardware version, firmware version, DSP version, programming Configuration Operating instructions 1.Reception To set reception frequency; press * to clear all, press BACK to time, etc information.
-
Page 50: Channel Name
The radio configuration is mainly to edit the channel content. Configure 2.Press [ ]/ [ ]to set, then press [MENU] to select. paths: enter the Settings -> radio configuration menu, and select the 3.Press [ ]/ [ ] to the radio configuration, then press [MENU] to corresponding configuration items to configure.
- Page 51
[MENU] to confirm. 6.The screen shows the current channel name, then press[ # ]to switch Press [ ]/ [ ] to find Color code, press [MENU] to confirm. input method to type the related letters, numbers, or Chinese characters, Press [ ]/ [ ] to select the color code, then press [MENU] to confirm. - Page 52
4. Click “Browse” to select the file to be upgraded (provided by the manufacturer), for example: Dm-1801-V1.1.1.sgl; 5. Click “Download “and wait the download to complete. Remember that the power mustn’ t be cut off in the update process, or else the SCM will be scrapped;… - Page 53
Main technological specification Reception VHF:136-174MHz Frequency range UHF:400-470MHz (Dual Band) -120dBm(BER≤5%) 1W Digital receive sensitivity Memory Channel 1024 Audio power <10% Frequency Stability ±1.0ppm +1 ~ -3dB Operating Temperature -30℃~+60℃ Operating Voltage DC 7.4V Demission 133*62*32mm ( no including the antenna) ansmission Weight About 268g (Include in battery and antenna)… -
Page 54: Troubleshooting
Troubleshooting: Note: As above method still cannot solve your problem, or you meet other problem, please get contact with local distributor to get the Problem Reason Solution technological support. The battery doesn’t be Remove and re-install the installed correctly. battery. The radio The battery runs out.
- Page 55
FCC Statement This device complies with Part 15 of the FCC Rules. Operation is subject to the following two conditions: (1) This device may not cause harmful interference, and (2) this device must accept any interference received, including interference that may cause undesired operation. NOTE 1: This equipment has been tested and found to comply with the limits for a Class B digital device , pursuant to part 15 of the FCC Rules.
Рация Baofeng DR-1801UV с гарнитурой в комплекте.
В 2022 году компания Баофенг выпустила обновленную линейку данной модели радиостанции и маркируется она, как Baofeng DR-1801UV.
Новинка полностью сохранила весь функционал предыдущей модели DM-1801, но имеет другое программное обеспечение для программирования. Кабель для подключения к ПК подходит от аналоговых радиостанции Baofeng с K-Plug разъёмом.
Компания Baofeng входит в число ведущих мировых производителей портативных раций. Пользователи таких радиостанций высоко ценят продукцию этой торговой марки в силу таких причин, как:
- регулярное обновление модельного ряда;
- надёжность;
- высокое качество связи;
- удобство и простота пользования;
- более чем приемлемая стоимость для цифровой рации и прочее.
По всем основным эксплуатационным характеристикам Baofeng DR-1801UV является практически копией модели «Баофенг DM-1701». Это цифровая рация, которая будет намного удобнее в эксплуатации, чем аналоговые станции. Цифровой канал позволяет передавать голос без помех на большие расстояния. Различия в качестве здесь такие же, как между обычным эфирным телевидением и цифровым. Расстояние уверенной работы для этой модели – до 10 километров.
Единственные их различия состоят в том, что у Baofeng DR-1801 UV чёрно-белый, а не цветной дисплей, а также новинка получила обновленный чип. Комплектация этой пары раций также одинакова – сам аппарат, антенна, батарея, зарядка, гарнитура, клипса и темляк для ношения рации на поясе и в руке.
Если вы хотите купить рацию, аксессуары и принадлежности к ней по самой выгодной цене, обращайтесь в наш интернет-магазин. Мы поддерживаем гарантийные обязательства производителя, организовываем доставку заказов в любую точку страны.

Переносная VHF/UHF радиостанция Baofeng DM-1801
Полная инструкция по эксплуатации VHF/UHF радиостанции на русском языке.
Текстовой PDF файл.
Ждём предварительные заказы, для начала перевода.
Характеристики инструкции
- Язык инструкции:
Русский - Формат документа:
PDF - Объём документа:
112 стр.
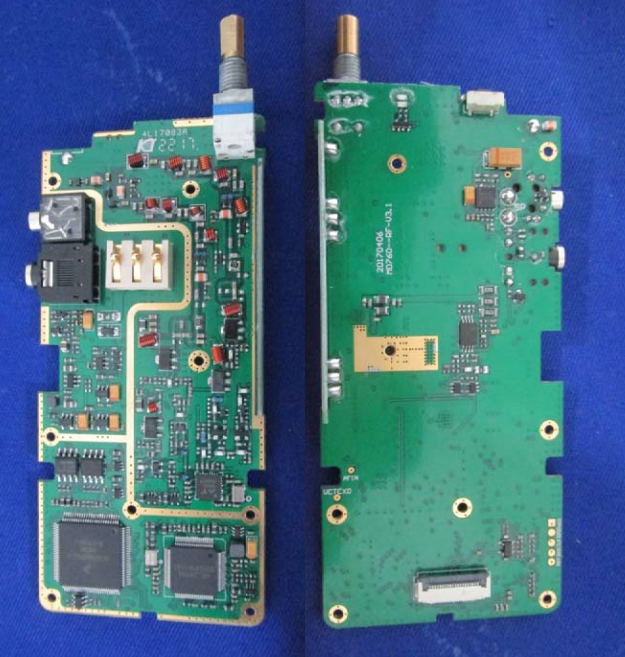
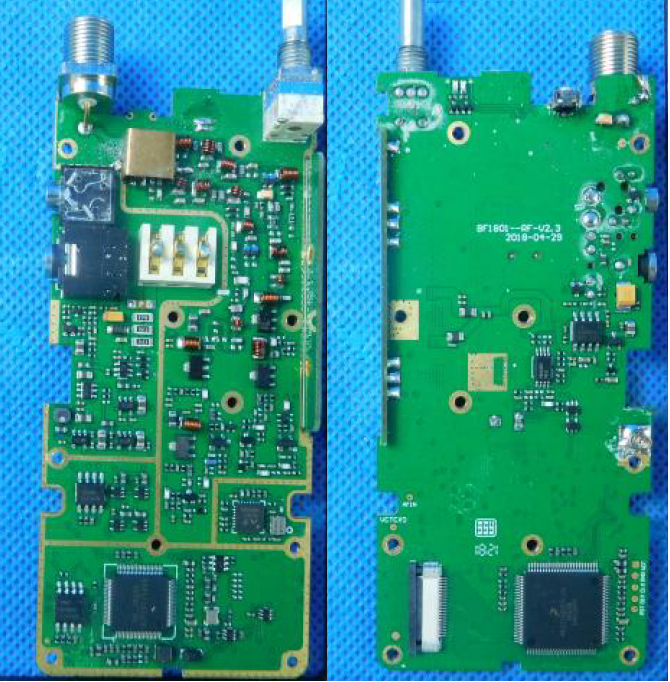
Как говорят «в народе» — лучше поздно, чем никогда. Вот так, довольно поздно «на общем фоне» ко мне добралась эта радиостанция, в качестве новогоднего подарка. Хотя, понятие «поздно» весьма относительно. Около трёх лет назад, я «общался» с Radioddity GD-77 — аппарате идеологически и технически очень схожем. Но надо заметить, несмотря на внешнее сходство, это две совершенно разных радиостанции. С виду — братья, но далеко не близнецы! Это подтверждается тем, что печатные платы абсолютно разные, да и прошивки OpenGD77 для этих радиостанций так же разные. (будьте внимательны!).
Radioddity GD77
Baofeng DM-1801
На снимках отчетливо видна разница. Тем не менее, аккумулятор у этих радиостанций идентичен. Не стану вдаваться в технические подробности, скажу лишь, что по параметрам, аппарат типичный для семейства китайских трансиверов на чипе RDA. А значит ожидать от него каких либо выдающихся параметров не стоит. Однако, он очень популярен среди радиолюбителей и причина этому не в параметрах а в наличии opensource прошивки, значительно меняющий его возможности по сравнению со стоковой прошивкой. Эта особенность позволяет использовать его как обычный трансивер, либо превратить его в мощный хотспот. Данный обзор не претендует на полное описание, таковых в сети предостаточно. Я постараюсь максимально подробно описать именно возможности при использовании прошивки OpenGD77.
Для программирования и использования в качестве хотспота потребуется «родной» кабель, который можно изготовить и самостоятельно воспользовавшись ниже-приведённой схемой:
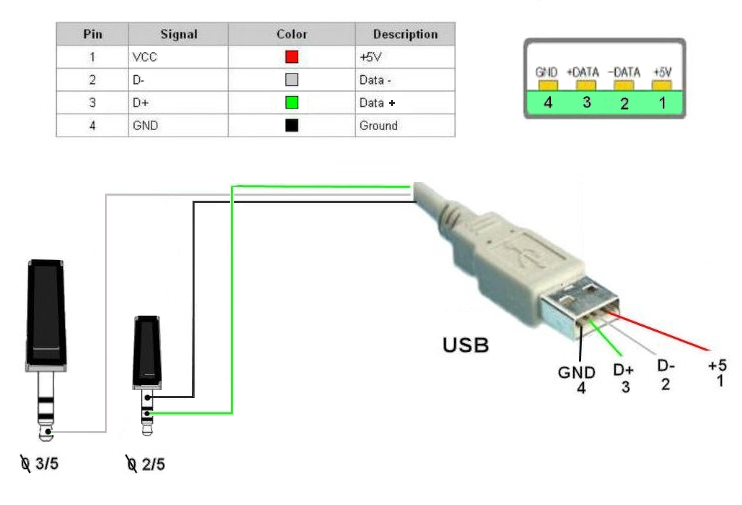
Сразу замечу одну особенность — в режиме хотспота, если включить максимальную мощность (5Вт), радиостанция наводит на кабель довольно серьёзные помехи. Настолько мощные, что вырубает usb порт на «малине»! Ферритовый фильтр очень сильно рекомендуется предусмотреть на самодельном кабеле а к фирменному прикупить защёлкивающийся. Так же замечено, что могут быть проблемы с wifi малины — тоже «падает». По этой причине, не включайте максимальную мощность при работе на штатную антенну. Помимо проблемы с помехами, вы рискуете перегреть и вывести из строя оконечный каскад передатчика.
Для того, чтобы прошить OpenGD77 переходим по ссылке: https://github.com/rogerclarkmelbourne/OpenGD77CPS/releases и скачиваем последний релиз CPS. Установка не должна вызвать проблем. При установке обязательно соглашаемся с установкой драйверов! После установки перезагружаем компьютер, чтобы операционная система «подхватила» и задействовала драйвера. Может получиться прошить и работать со станцией и без перезагрузки, но чтобы точно не «отлавливать» непонятные глюки, проще сразу произвести перезагрузку.
Запускаем CPS, зажимаем две кнопки под кнопкой передачи и включаем радиостанцию, подключаем радиостанцию к компьютеру. В CPS выбираем «Extras» и жмём «Firmware loader».
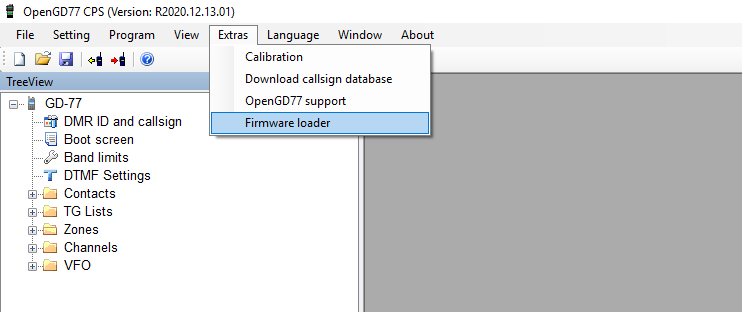
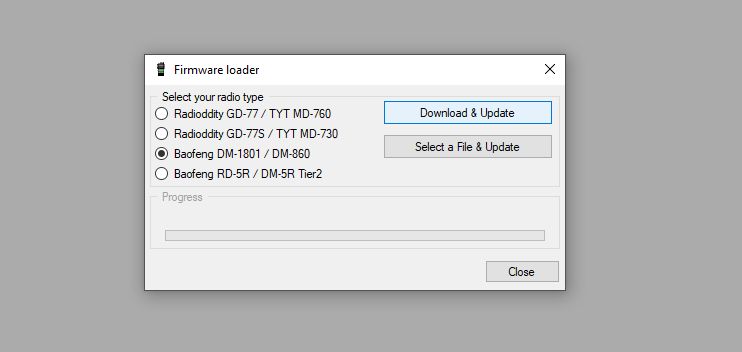
Далее выбираем «Baofeng DM-1801 / DM-860″ и жмём «Download & Update».
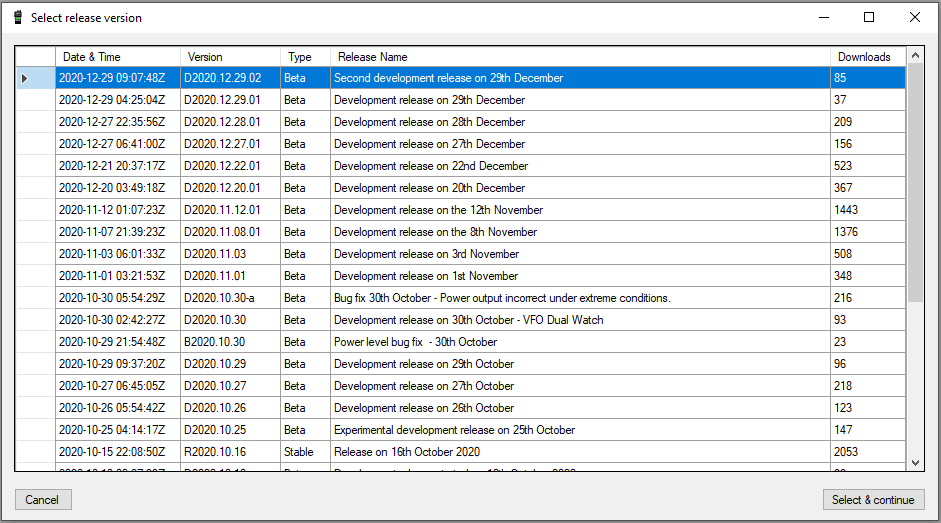
В открывшемся окне необходимо выбрать релиз и нажать «Select & continue». После чего должна начаться загрузка прошивки. По окончании загрузки будет предложено перезагрузить радиостанцию.
Немного о выборе версии прошивки. В третьей колонке (Tupe) указан тип прошивки «Beta» или «Stable». Смысл следующий: Если вы хотите стабильную прошивку, в которой весть заявленный функционал работает — качайте «Stable». В прошивках «Beta» заявленные функции, которые можно и в меню выбрать и настроить, могут не работать или работать с ошибками. Второй тип прошивки подойдёт если вы хотите активно участвовать в тестировании новых функций, появляющихся в процессе работы над прошивкой. Какой тип прошивки выбирать — решать вам. А чтобы проще было решать, можно отслеживать на страничке с релизами нововведения в прошивках. Для этого переходим по ссылке: https://github.com/rogerclarkmelbourne/OpenGD77/releases
Теперь ОБЯЗАТЕЛЬНО делаем следующее:
Открываем меню «Extras» и выбираем «OpenGD77 support». (Естественно радиостанция должна быть подключена!)

В открывшемся окошке поочерёдно нажимаем пункты со словом «Backup». Таким образом поочерёдно сохраняем содержимое EEPROM, Flash, Calibration (Самое важное!), MCU ROM.
После сохранения перекладываем все файлы в одну папочку или просто архивируем и сохраняем в надёжном месте. Например — отправляем себе же на почту. Если вдруг, после каких либо манипуляций с прошивкой вы уничтожите эти данные в радиостанции, вы всегда сможете восстановить их содержимое их этих бэкапов. В Calibration содержатся параметры калибровоки вашей радиостанции. Это персональные параметры именно вашей радиостанции, взяв эти данные от другой и загрузив в свою, вы очень сильно испортите характеристики своей радиостанции! Поэтому важно сохранить эти файлы!
Собственно, всё, что я опишу дальше, это перевод статьи размещенной тут: https://github.com/rogerclarkmelbourne/OpenGD77/blob/master/docs/OpenGD77_User_Guide.md
Если какой либо из приведённых пунктов моего описания не работает, попробуйте свериться с первоисточником, возможно что-либо в прошивке изменено авторами!
-
Contents
-
Table of Contents
-
Troubleshooting
-
Bookmarks
Quick Links
Digital DMR and Analog
UHF/VHF Two Way Radio
MENU
BACK
VFO/MR
A/B
Related Manuals for PO Fung Electronic DR-1801 UV Series
Summary of Contents for PO Fung Electronic DR-1801 UV Series
-
Page 1
Digital DMR and Analog UHF/VHF Two Way Radio MENU BACK VFO/MR… -
Page 2
PREFACE Thank you very much for choosing our Dual Band Digital DMR and Analog two-way radio. This radio adopts the latest advances in technology, providing reliable communication in today’s demanding communication environment. This radio offers both DMR digital and analog communication, introduces innovative DMR digital processing system to achieve SMS, high-audio quality and digital encryption. -
Page 3: Table Of Contents
Table of Contents GETTING STARTED 9. Monitor 1. Regulations and Safety Warnings 10. Emergency Alarm 2. Feature Overview 11. Locking or Unlocking Keypad 3. Unpacking and checking the equipment 12. Inputting via Keypad 4. Battery Information 13. Battery voltage test PREPARATION ADVANCED FEATURES 1.
-
Page 4: Getting Started
GETTING STARTED 1. Regulations and Safety Warnings FCC Licensing Information This device complies with Part 90 and 15 of the federal Communications Commission (FCC) Rules. Operation is subject to the condition that that this device does not cause harmful interference. The radio operates on radio frequencies that are regulated by the Federal Communications Commission (FCC).
-
Page 5
— Increase the separation between the equipment and receiver. — Connect the equipment into an outlet on a circuit different from that to which the receiver is connected. — Consult the dealer or an experienced radio/TV technician for help. Changes or modifications not expressly approved by the party responsible for compliance could void the user’s authority to operate the equipment. -
Page 6
RSS102 Issue 5 March 2015 • Institute of Electrical and Electronic Engineers (IEEE) C95.1:2005 Edition RF Exposure Compliance and Control Guidelines and Operating Instructions To control your exposure and ensure compliance with the occupational/ controlled environmental exposure limits, always adhere to the following procedures. Guidelines: •… -
Page 7
■Precautions for Portable Terminals Operating Prohibitions To protect you against any property loss, bodily injury or even death, be sure to observe the following safety instructions: 1. Do not operate the product in a location containing fuels, chemicals, explosive atmospheres and other flammable or explosive materials. -
Page 8
flammable or explosive materials. 2. Do not charge your battery that is wet. Please dry it with a soft and clean cloth prior to charge. 3. Do not charge your battery suffering deformation, leakage and overheat. 4. Do not charge your battery with an unauthorized charger. 5. -
Page 9: Feature Overview
2. Feature Overview • Large-capacity storage to meet complex application needs 1024 channel storage, 1024 digital contacts can be manually programmed • DMO True 2-Slot Two time slots Direct-mode Dual-Slot communication, enabling two groups of calls to be simultaneously performed at one frequency, to make double communication efficiency;…
-
Page 10: Unpacking And Checking The Equipment
3. Unpacking and checking the equipment Unpack the radio carefully. We recommend that you iden�fy the items listed in the following table before discarding the packing materials. NOTE: If any of these items are missing from the box, contact your place of purchase immediately. Supplied Accessories Antenna Li-ion Battery Pack…
-
Page 11
Use Caution with the Li-ion Battery (1) Do not short the battery terminals or throw the battery into a fire. Never try to remove the case from the battery pack, as our company is not responsible for any accidents caused by modified batteries. (2) The ambient temperature should be between 5℃-40℃… -
Page 12
(5) The radio is fully charged once the charger’s green status LED goes steady. Please remove the radio at that time to avoid over-charging your battery. Charger LED codes Red LED Green LED Green LED Status Standby (charger empty) Flashing Steady Error (charger with radio) Steady… -
Page 13: Preparation
PREPARATION Assembly Before the radio is ready for use we need to attach the antenna and battery pack, as well as charge the battery. 1. Installing / Removing the Battery Before attaching or removing the battery make sure your radio is turn off by turning the power/volume knob all the way counter-clockwise.
-
Page 14: Installing The Additional Speaker/Microphone
4. Installing the Additional Speaker/Microphone (Optional) Pry open the rubber MIC-Headset jack cover and then insert the Speaker / Microphone plug into the double jack. Accessory jack The accessory jack on the radios is a Kenwood compatible two (2)-pin design. Typical 2 pin Kenwood headset configuration.
-
Page 15: The Main Display
1. The main display 2. Description of LCD Icons Description of product status Icon name Icon The more signal bars, the stronger the signal is Signal strength The current channel transmits at high power Transmission power The current channel transmits at low power Digital mode Digital icon Analog mode…
-
Page 16
Work in narrowband mode Narrowband mode Receive a text message, or have an unread message Message icon VOX has been turned on VOX icon The current transmission frequency is the reception frequency plus a frequency bias (positive bias) The current transmission frequency is the reception frequency minus a frequency Relay mode icon bias (negative bias) Currently in offline state… -
Page 17: Status Indications
channel up and down. When double-waiting is turned on and works in analog sub-channel, the icon is In channel mode, the current channel number is 001 (range 1~32) Channel number icon 3. Status Indications The top LED will help you to identify the current radio status. LED Indication Status Flashes Red…
-
Page 18
VOX On/Off To enable or disable the VOX feature. Quickly turn the scan function on or off. Scan on / off Note: double-segment double-waiting scan does not work. Encryption on/off Quickly turn on/off encryption for channel (only for digital mode). VOX On/Off To enable or disable the VOX feature. -
Page 19: Basic Operations
BASIC OPERATIONS 1. Power on the Radio Turn on the radio by turning the [Power/Volume] switch clockwise till a click is heard, and the LCD displays will show a start-up message, and you will hear a beep after 7 seconds. 2.
-
Page 20: Select A Channel
Operation 1: Go to Menu > Zone, press or navigation key to select a zone, and then press [MENU] key to switch to the selected zone. Operation 2: Press the preprogrammed [Zone Select] key to switch to the selected zone. 7.
-
Page 21
• Group Call: a call from an individual user in a group to all the other members in the group. • All Call: a call from an individual user to all the other users on the current channel. You can request your dealer to enable all call feature. 8.1 Making a Call You can make a call in any of the following ways: •… -
Page 22: Monitor
8.2 Receiving and Responding to a Call When receiving a call, you can listen to it without any operation. The radio displays for an incoming private call, group call, and all call respectively. You can press and hold the [PTT] key and speak within call hang time.
-
Page 23: Emergency Alarm
10. Emergency Alarm The top orange function key (Top-Key) is pre-programmed as a panic key. Press the emergency alarm key [TK] to turn on the alarm function, and press this key again to exit the emergency alarm. 11. Locking or Unlocking Keypad When the keypad is not in use, it is recommended that you lock it to avoid accidental operations.
-
Page 24: Advanced Features
ADVANCED FEATURES 1. Access Advanced Features for Private Call Method 1: To Access a Private Call from Contact list (1) Press the [MENU] key. (2) Go to Contact > Contact List. (3) Press the or navigation key to select the required contact ( Private Call). (4) Press MENU key to access the advanced features.
-
Page 25: Main Menu Functions
(4) Radio Active Select Radio Active, and it will send out a active signaling to the killed radio and the target radio will return to standby when it receives this signaling and send back a Active successful message to the transmit radio. (5) Radio Kill Select Radio Kill, and it will send out a kill signaling to the target radio which will be killed (no operation) when receiving the signaling and it will send back a kill successful message to the transmit radio.
-
Page 26: Zone
。 Note: The call Logs only Logs the outgoing, answered and missed calls of the Private Call attributes 4. Zone Select a Zone A Zone is a group of channels grouped together. The DMR radio has 150 Zones. A Zone can have the maximum of 32 analog and/or digital channels.
-
Page 27: Settings
6. Settings 6.1 Radio Set (1) Analog Squelch Level Adjusts the squelch level to receive signal with different signal strength, with normal and strict options available. NOTE: This function is only valid for analog channel. (2) TX Power Set up the TX power for current channel. NOTE: When set to high power, display ‘H’;…
-
Page 28
(6) VOX Enable the VOX, you can speak into the microphone to start transmitting instead of pressing the [PTT] key. A total of 3 levels are provided. (7) Double wait • Off: Single channels mode. • Double Wait: Scan main channel and sub-channel in turn; call is locked when the reception is effective; you can press [PTT] to talk with the other party. -
Page 29
b. Call Permit: Options: Off / Digital / Analog. Pressing the [PTT] key will transmit the signal through the channel and will sound a tone that prompts the user to start speaking. • OFF: Turn off this function; • Digital: Enable this tone only for digital channels; •… -
Page 30
Options: On or Off / Changes boot password. On or Off: Turn on if it is turned off, and turn off if itis turned on; when On is selected, you need to enter the correct password and press the [MENU] key to start the unit. Change boot password: You can enter a new password not more than 6 digits;… -
Page 31: Radio Info
6.2 Radio Info Show the Radio ID, Radio name, serial number, model name, CPS-Version, H-Version, Soft-Version, DSP-Version and Program Time etc. 6.3 Radio Cfg Radio Cfg menu Route: Main Menu > Settings > Radio Cfg. The radio Cfg menu will change accordingly to the channel type. When the channel type is digital, it will automatically hide the analog menus.
-
Page 32
Enables access of repeaters in VFO/Frequency Mode. (8) Freq Step 2.5K, 5K, 6.25K, 10K, 12.5K, 25K, 30K, 50K, total of 8 frequency steps. (9) Channel Type • Analog: Set up to analog channel. • Digital: Set up to digital channel. ※Chan Set (Available in Analog Channel only) When the channel type is analog, it will automatically hide the digital menu, the below listed menus are for analog channel only, unlisted menus are the same as the digital channel, please refer to Chan Set (Digital Channel). -
Page 33: Programming Guide
PROGRAMMING GUIDE (1) Programming Flow The programming flow of the CPS is as follows: If you have the configuration file of the radio locally, you can also open the local configuration file in the CPS for configuration, and then write it into the radio. •…
-
Page 34
(3) Read From Radio This option instructs the PC to read data from radio. Power on the radio and connect it to the PC, select the menu Operation-> Read From Radio, and then a «Read From Radio» window displays. Click «OK» to begin reading. During reading, a progress bar shows the reading process. -
Page 35
• If the message: «Data error detected, please restart the radio. » appears, please restart the radio and try again. • If the message: «Please update CPS software! » appears, please contact your dealer to update the CPS software. • If an incorrect password was given, please give the correct one. Contact the dealer if you forget the password. •… -
Page 37: Appendix B. — Trouble Shooting Guide
Signal imitation ≥70dB Intermediation (Wide/ narrow) ≥62dB/≥58dB Adjacent channel selectivity(Wide/ ≥65dB/≥60dB narrow) Receive Current ≤380mA FM noise ≥45dB@25KHz /≥40dB @12.5KHz Appendix B. – Trouble shooting guide Phenomena Analysis Solution The battery doesn’t be installed correctly. Remove and re-install the battery. The battery runs out.
-
Page 38: Appendix C. — Ctcss Table
Appendix C. — CTCSS Table CTCSS CHART (Hz) Number Frequency Number Frequency Number Frequency Number Frequency Number Frequency 67.0 69.3 71.9 74.4 77.0 79.7 82.5 85.4 88.5 91.5 94.8 97.4 103.5 107.2 110.9 114.8 118.8 123.0 127.3 131.8 136.5 141.3 146.2 151.4 156.7…
-
Page 39: Appendix D. — Dcs Table
Appendix D. — DCS Table DCS CODE LIST Number Code Number Code Number Code Number Code Number Code D023N D025N D026N D031N D032N D036N D043N D047N D051N D053N D054N D065N D071N D072N D073N D074N D114N D115N D116N D122N D125N D131N D132N D134N D143N…
-
Page 40
D731N D732N D734N D743N D754N D023I D025I D026I D031I D032I D036I D043I D047I D051I D053I D054I D065I D071I D072I D073I D074I D114I D115I D116I D122I D125I D131I D132I D134I D143I D145I D152I D155I D156I D162I D165I D172I D174I D205I D212I D223I D225I D226I… -
Page 41
Note to EU users European Users should note that operation of this unit in Transmit mode requires the operator to have a valid Amateur Radio License from their respective Countries Amateur Radio Licensing Authority for the Frequencies and Transmitter Power levels that this Radio transmits on. Failure to comply may be unlawful and liable for prosecution. At this subject, refer to the “EU”… -
Page 42
We do not guarantee, for any par�cular purpose, the accuracy, validity, �meliness, legi�macy or completeness of the third-party products and contents involved in this manual. PO FUNG ELECTRONIC (HK) INTERNATONAL GROUP COMPANY LIMITED Address: Room 1508, 15/F, Office Tower II, Grand Plaza, 625 Nathan Road, Kowloon, Hong Kong www.baofengradio.com…
Новая модель радиостанции Baofeng DR-1801 совместима как с репитерами Tier 2, так и со стандартными аналоговыми репитерами и радиостанциями.
Отличается от классической модели Baofeng DM-5R Tier 2 большим дисплеем, новым поликарбонатным корпусом, влагозащищённостью по стандарту IP54, большими кнопками клавиатуры и увеличенной ёмкостью аккумулятора 2200 mAh.
Помимо стандартного аналогового режима модуляции поддерживает работу в цифровом стандарте радиосвязи — модуляции в режиме DMR! Не вдаваясь в подробности технологии DMR — это означает, что теперь звук стал абсолютно чистым на любом расстоянии где проходит сигнал, т.е. без шипения характерного для аналоговых раций. Использование цифровых технологий для передачи голоса позволяет достоверно воспроизводить речь человека даже при слабом уровне радиосигнала, что обеспечивает высокое качество передачи аудио по всей территории охвата связью. Доступны групповой вызов собеседников, индивидуальный вызовы, общий вызов всех абонентов (общесистемный вызов), цифровое шифрование голоса AMBE+2, отправка СМС сообщений и другие функции. Рация может работать, в том числе, с цифровыми DMR рациями Motorola, что для многих будет важным аргументом.
Кроме того, рация может работать с цифровыми ретрансляторами (стандарт DMR Tier 2). Стандарт ETSI DMR Tier 2 ориентирован на пользователей, нуждающихся в эффективном использовании радиочастот, расширенных возможностях голосовой связи и интегрированных услугах передачи данных в лицензируемых диапазонах частот для мощных коммуникационных систем. Стандарт ETSI DMR Tier II описывает 2-слотовый режим TDMA в одном радиоканале шириной 12,5 кГц. Продукты этого стандарта уже получили коммерческое распространение.
Радиостанция Baofeng DM-1801 может также использовать один тайм-слот и передавать только в 50% времени по сравнению с обычной аналоговой радиостанцией, что позволяет экономить около 40% ёмкости аккумуляторных батарей и продлить срок их работы. В рации увеличена ёмкость аккумулятора до 2200 mAh, что позволяет рации работать до 15,5 часов на передачу и до 33 часов в режиме ожидания, что больше на 66% своих конкурентов.
Новый чип A6, обеспечивает отличное шумоподавление, оптимальное качество звука с переменными условиями приема и потреблением низкого уровня заряда аккумулятора. Благодаря новому чипу усиления мощности, звук на рации чистый и без искажений. Традиционно, как и все рации Baofeng поддерживает такие функции как активация голосом VOX, кодирование сигнала CTCS и DCS, сканирование частот, канальный и частотный режимы.
Технические характеристики и функции:
- Частота приёма и передачи: 136-174 MHz / 400-470 MHz;
- Режимы модуляции: FM (аналоговый), DMR (цифровой);
- Возможность работы с рациями Motorolla и некоторыми другими DMR цифровыми рациями;
- Возможность работы с цифровыми ретрансляторами (стандарт DMS Tier 2);
- Групповой вызов собеседников, индивидуальный вызов, общий вызов всех абонентов, отправка СМС сообщений;
- Цифровое шифрование голоса AMBE+2;
- Li-Ion аккумулятор 2200 mAh, DC 7.4 V;
- Выходная мощность: 5W, 1W;
- Независимая работа двух каналов: А / В;
- Количество каналов: до 128;
- Шаг частотной сетки: 2.5/5/10/12.5/20/25/50 kHz;
- Одна клавиша PTT;
- Выбор режима: узкополосный или широкополосный (25 KHz / 12.5 KHz);
- Отображение на дисплее канального или частотного режима;
- 50 групп CTСSS / 104 группы DSC кодов;
- Поддержка DTMF (тоновые сигналы);
- 2-х частотный дисплей;
- Режим экономии энергии аккумулятора;
- Высокий / Низкий уровень мощности;
- Звуковой сигнал при нажатии кнопок;
- Аварийная сигнализация 1750 Гц;
- Сканирование каналов;
- Возможность общения с обычными канальными станциями LPD диапазона;
- Подключения гарнитуры (специальная родная гарнитура 2-Pin);
- Подсветка ЖК дисплея и клавиатуры;
- Блокировка клавиатуры;
- VOX функция автоматического включения разговора;
- Программирование с ПК (кабель в комплект не входит);
- Тип разъема антенны: SMA Female;
- Диапазон рабочих температур: -20 ~ +60 °C;
- Пыле и влагозащищённость по стандарту IP54;
- И другие функции.
Технические характеристики
| Диапазон частот | 136-174МГц(VHF), 400-470МГц(UHF) |
| Мощность, Вт (2 режима мощности) | 1/5 Вт |
| Аккумулятор, мАч | Li-Ion 2200 |
| Радиус связи, км | до 3 в городе/до 5 лес/до 10 в поле/до 15 на воде |
| Вид модуляции | FM(аналог) / DM(цифра) |
| Активация передачи голосом, VOX | есть |
| CTCSS / DCS /цифровое кодирование | есть |
| Функция прослушивания двух каналов | есть |
| Возможность общения с обычными канальными рациями (128 каналов) | есть |
| LED-фонарик | нет |
| FM-радио FM: 65-108 МГц | нет |
| гарнитура в комплекте | есть |
| Влагозащита, ударопрочность | IP54 |
| Размер, вес | 100 х 52 x 32, 250 гр |
Комплектация:
- — Радиостанция;
- — Антенна двухдиапазонная;
- — Аккумуляторная батарея 7,4 V, 2200 mAh;
- — Зарядный стакан;
- — Блок питания зарядного стакана со шнуром от сети 110-220V;
- — Клипса крепления на пояс;
- — Ремешок на запястье;
- — Инструкция по эксплуатации на английском.
Ниже два наших видео, касающиеся данной радиостанции:
1. Первичный обзор из коробки, основные функции и органы управления.
Цифровые радиостанции становятся всё более популярны у наших радиолюбителей. Сеть DMR ретрансляторов раскинута по всему миру, и наша страна не отстаёт. В Санкт-Петербурге работает ретранслятор диапазона 2 метра и несколько ретрансляторов 70 сантиметрового диапазона. Вашему вниманию предлагается Обзор альтернативной прошивки от автора Роджера Кларка VK3KYY для радиостанции Baofeng 1801.
Радиостанция Baofeng является ближайшим родственником более дорогой модели Radioditty GD-77
Программируя в радиостанцию алтернативную (не заводкскую) прошивку, мы теряем некоторые функции. Такие как:
Dual Capacity Direct operation, Dual Watch operation, отправку и приём текстовых сообщений.
Шифрование теперь отключено по умолчанию, поскольку является запрещённым для использования в любительских радиостанциях.
Dual Watch замечательно заменяется обычным сканированием каналов зоны. Тем более сканирование теперь очень быстрое.
Проект постоянно дорабатывается и сами пользователи могут оставлять свои замечания, которые будут учтены в следующих версиях обновления.
Рация приобретает радиолюбительский вид. С полезными функциями которые будут под рукой.
Добавлен прямой ввод Talk Group, Private Call, удобное переключение Time Slot-ов одной кнопкой. Прямой ввод частоты приёма и передачи с клавиатуры отдельно для работы через ретранслятор. Регулировка мощности от 250 мВт, до 5 Ватт. Возможность задать границы сканирования в режиме VFO
Теперь радиостанция сможет работать как отдельный HotSpot подключенный к компьютеру или смартфону через программы BlueDV, и MMDVM.
Подробнее об альтернативной прошивке радиостанции Baofeng DM-1801 можно узнать из видео на нашем youtube канале (https://www.youtube.com/watch?v=4KlPYn-ESrw), ссылка на данное видео есть в описании товара.
Пользователь предпочёл скрыть свои данные
отличная рация
Ребятушки всем Привет. В предыдущей статье мы обновили Baofeng DM-1801 на кастомную прошивку OpenDM. Как я и говорил станция поменялась практически кардинально. Конечно основные функции остались теми же. Но использовать ее стало намного удобнее.
По хорошему все настройки и кнопки интуитивно понятны. Однако для тех, кто впервые столкнулся с этой прошивкой иногда тяжело понять какая кнопка за что отвечает. И в каком пункте меню менять настройки.
Для себя решил, что расписывать весь функционал станции и пункты меню дело не благодарное. Ибо все настройки вытекают из базовых знаний основ DMR. Сама прошивка OpenDM очень хорошо задокументирована. Правда на английском. А вот для использования Hotkey и функциональных кнопок было бы не плохо иметь так называемую «дорожную карту» В итоге родился вот такой туториал.
Это штука на английском для тех кто в нем понимает и будет изучать радиостанцию по официальной документации. Как по мне на английском намного все лаконичнее и понятнее. Но для тех коллег кто только встал на путь освоения DMR или не очень дружит с английским запилил вот такую локализацию.
Что то еще расписывать не вижу смысла. Как всегда, что не понятно можно спросить в нашей группе в Telegram или дойти эмпирическим путь до истины.
Друзья. Если вам понравилась эта статья, поделитесь ей в социальных сетях. Обязательно напишите комментарий если у вас возникли вопросы. Мне важно ваше мнение. У нас есть групповой чат в Telegram, где вы можете оперативно задать вопрос и узнать о последних новостях. И поддержите проект монеткой.
Рация Baofeng DR-1801UV с гарнитурой в комплекте.
В 2022 году компания Баофенг выпустила обновленную линейку данной модели радиостанции и маркируется она, как Baofeng DR-1801UV.
Новинка полностью сохранила весь функционал предыдущей модели DM-1801, но имеет другое программное обеспечение для программирования. Кабель для подключения к ПК подходит от аналоговых радиостанции Baofeng с K-Plug разъёмом.
Компания Baofeng входит в число ведущих мировых производителей портативных раций. Пользователи таких радиостанций высоко ценят продукцию этой торговой марки в силу таких причин, как:
- регулярное обновление модельного ряда;
- надёжность;
- высокое качество связи;
- удобство и простота пользования;
- более чем приемлемая стоимость для цифровой рации и прочее.
По всем основным эксплуатационным характеристикам Baofeng DR-1801UV является практически копией модели «Баофенг DM-1701». Это цифровая рация, которая будет намного удобнее в эксплуатации, чем аналоговые станции. Цифровой канал позволяет передавать голос без помех на большие расстояния. Различия в качестве здесь такие же, как между обычным эфирным телевидением и цифровым. Расстояние уверенной работы для этой модели – до 10 километров.
Единственные их различия состоят в том, что у Baofeng DR-1801 UV чёрно-белый, а не цветной дисплей, а также новинка получила обновленный чип. Комплектация этой пары раций также одинакова – сам аппарат, антенна, батарея, зарядка, гарнитура, клипса и темляк для ношения рации на поясе и в руке.
Если вы хотите купить рацию, аксессуары и принадлежности к ней по самой выгодной цене, обращайтесь в наш интернет-магазин. Мы поддерживаем гарантийные обязательства производителя, организовываем доставку заказов в любую точку страны.