- Manuals
- Brands
- X-Driven Manuals
- Automobile Electronics
- DRS1100
- Installation and operation manual
-
Contents
-
Table of Contents
-
Bookmarks
Quick Links
Related Manuals for X-Driven DRS1100
Summary of Contents for X-Driven DRS1100
-
Page 2: Main Functions
In addition to accident data replay on PCs, it also simultaneously plays the GPS in- formation and vehicle operation information. A software program is also provided that is simple and easy to use in setting various functions including user-oriented separate storage, printing, and screen shots. UbONE X-Driven…
-
Page 3
Please check if the followings components are included in your package. ≫ If any item is missing or an incorrect item is included, please contact the store where you purchased the product. DRS1100 Camera Rack Power Cable (Glass Attaching Type) -
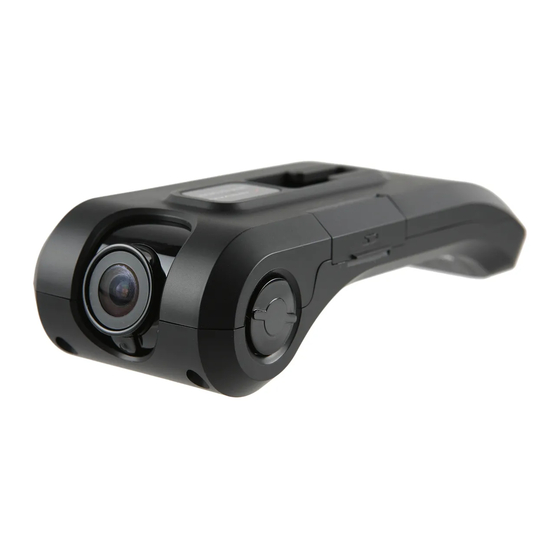
Page 4: Name Of The Parts
LED is constant and does not blink GPS LED(Blue) When GPS normally receives the Emergency Button satellite data, GPS LED is lighted on. Emergency Button is for manual image recording, and when the button is pressed, it records images. UbONE X-Driven…
-
Page 5: Installation Instructions
While the body is fixed into the toggle, it should be able to be turned left and right. Adjust the camera angle to have the camera ◀Checking left and right▶ lens face forward. UbONE X-Driven…
-
Page 6
PC installation program is being copied. If the power is turned off during this operation, it may cause a malfunction. In this case, please contact the manu- facturer or the store where you purchased the product. Initial GPS reception time may vary depending on location. UbONE X-Driven… -
Page 7: Program Installation
Click OK after the installation is completed Click on the X-Driven icon under “All Programs” or on Desktop to start the program. — The program can be accessed through our company’s website at www.ubone.co.kr.
-
Page 8: How To Use The Program
Double-click the selected file, and the image is shown in the main window. After selecting several files while pressing the Shift key, click on on the right-hand upper side to see the selected images as a slide show. UbONE X-Driven…
-
Page 9
GPS-related information window. The graph below the main window shows the degree of front and back, left and right, and up and down impacts when an event occurs. Front-Back movement: X-axis Left-Right movement: Y-axis Up-Down movement: Z-axis UbONE X-Driven… -
Page 10: How To Change The Setting
How to Change the Setting A user can change the default values of the X-Driven Viewer. (When SD memory card is formatted, the settings are changed to default.) Press the Setting icon to open the file named “_systems.cfg”…
-
Page 11
Y-axis : Left-Right movement Set the time (zone) (in which the Z-axis : Up-Down movement device) is used. * Note As resolution, recording quality, and recording speed is set higher, it takes more of the SD memory card storage. UbONE X-Driven… -
Page 12
Save the opened image as another name. Capture an image and save it as a BMP file. It also includes a function to save the title and memo when saving it as a picture file. Print the current screen. UbONE X-Driven… -
Page 13
14. When power is turned off due to a big accident, image data may not be recorded. 15. For smooth GPS reception, make sure to keep GPS receiver horizontal when installing the product and do not put any objects such as electronic products that could interfere the reception. UbONE X-Driven… -
Page 14: Understanding Gps
— When a car rotates by signs in parking the car — When driving a car in rain or snow — When entering a large road after driving a road that is not on the Map Data — When driving among high buildings UbONE X-Driven…
-
Page 15
Memo UbONE X-Driven…

Main Functions
Accident Image Storage
When an accident occurs, this device automatically detects it through an impact
sensor and records and saves images before and after accidents.
Manual Image Storage
Even without physical impact to a vehicle from an accident, the device records and
saves images by a driver manually pushing the Emergency Button.
Location Information Storage
The device records and stores detailed GPS information including the location,
time, and speed of the time of accident.
Vehicle Operation Information Storage
The device records and stores certain vehicle motions including sudden acceleration, braking and sharp turns, as well as back and forth, right and left and up and
down vibrations.
Accident Data Replay
In addition to accident data replay on PCs, it also simultaneously plays the GPS information and vehicle operation information. A software program is also provided
that is simple and easy to use in setting various functions including user-oriented
separate storage, printing, and screen shots.
2
UbONE
X-Driven
Components
check if the followings components are included in your package.
≫ Please
If any item is missing or an incorrect item is included, please contact the
store where you purchased the product.
DRS1100
Camera Rack
(Glass Attaching Type)
Power Cable
SD Memory Card
Cable Holder
Suction Cup (Option)
Specification
DRS 1100 Specification
Camera
1.3 Mega Pixel CMOS
Video Resolution
MPEG-4, 320X240(QVGA), 640X480(VGA) upto 30ips,
1280X960(MEGA) upto 5ips
Audio Recording
Internal Microphone
GPS
Internal GPS Module
G-Sensor
Internal 3D G-sensor (Collision ,Q-break, Q-accel detection)
Data Storage
SD Card (Min 512MB, Max 2GB)
Events
Emergency button, Shock (Collision, Q-break, Q-accel detection)
Power Supply
DC 12V~24V
UbONE
X-Driven
3
Name of the Parts
Camera lens
Please clean the camera lens before
use to avoid foreign matters blocking the lens.
SD Memory Card Slot
After inserting a SD memory card
into the slot, connect the power
cable.
Power Terminal
When power terminal is connected,
the power is automatically turned on.
Recording LED(Red)
Recording LED blinks while imaging
data is being saved, and after
recording, the LED is constant and
does not blink
GPS LED(Blue)
When GPS normally receives the
satellite data, GPS LED is lighted on.
4
UbONE
X-Driven
Emergency Button
Emergency Button is for manual
image recording, and when
the button is pressed, it records images.
Installation Instructions
Installing the device to the windshield of a vehicle
Before attaching the camera to the rack, insert a SD
memory card into the appropriate slot and close the cover
as shown in the pictures on the left. When the power
cable is connected without a memory card inserted, the
device will not turn on, and it may cause serious errors
and damage to the product, so please check the card is
inserted before connecting the device to the power. Also,
when a memory card is ejected with the power on, the
power goes off automatically but it may cause serious
damage to the data.
In order to protect data turn the power off before ejecting the card.
In order to eject the SD memory card open the SD
memory card cover and press the card with a finger and
the SD memory card will be promptly ejected.
* Note
Please use only the SD memory card enclosed with
the product. Using other SD memory cards may cause
malfunctions.
Please do not pull out the SD memory card with fingernails or tweezers. It may cause damage to the product.
⇒
⇒
As shown in the pictures on the left, after
completely inserting the toggle into a hole in the
middle of the body of the camera, tightly fasten it
by pushing it upward.
◀Checking left and right▶
On a spot that does not block a driver’s vision,
attach the base of the toggle with double-sided
tape to the windshield. While the body is fixed into
the toggle, it should be able to be turned left and
right. Adjust the camera angle to have the camera
lens face forward.
UbONE
X-Driven
5
Installation Instructions
Installing the device to the windshield of a vehicle
Horizontal
When GPS receiver is in the horizontal
position, reception rate is better.
* Note
When a radio antenna is a glass-attaching type, it should
be attached with a distance from the GPS part as an
antenna can affect the GPS reception.
Horizontal
While pressing both left and right buttons on the side of
the body, rotate the camera lens to adjust its angle. The
line on the button should be set to a horizontal position
and be parallel to the road surface so that the camera lens
faces the front center of the windshield.
Insert the power cable into the power terminal on
the camera body, and ensure you use the power
cable enclosed in the product package.
After connecting the power cable into the cigarette
lighter jack of the vehicle, turn the ignition, and the
device will also turn on. Please check if the REC and
GPS LED are lighted on.
* Note
After the initial operation begins, do not turn off the power for 2 – 3 minutes until
a continuous beeping sound is heard. This indicates that the SD card is formatted
and the PC installation program is being copied. If the power is turned off during
this operation, it may cause a malfunction. In this case, please contact the manufacturer or the store where you purchased the product.
Initial GPS reception time may vary depending on location.
6
UbONE
X-Driven
Program Installation
Double-click X-driven_Installer.exe in the folder of SD
memory card
- For a PC that does not
support SD memory cards,
a separate USB adapter is
required.
Select a folder to inatall the
program and click the middle
button.
Click OK after the installation
is completed
Click on the X-Driven icon under “All Programs” or on
Desktop to start the program.
- The program can be accessed through our company’s
website at www.ubone.co.kr.
On the homepage, go to Customer Support and S/W
Download to install the program in your computer.
Our company always provides the updated S/W in real
time.
UbONE
X-Driven
7
How to Use the Program
When you start the program, you will see this initial
screen.
After connecting the memory card to PC, click
on
to select the file named “_System.mdb”
under the Data folder of SD memory card and bring
out the data.
When the file is opened, the screen shows a list of
files (with date, time, and event information) on
the right-hand upper pane. (Please note that when
an image is recorded inside a moving vehicle with
poor GPS reception, the recorded time may be
inaccurate.)
Click on a selected file from the file list and the
image of the file is shown in the preview window in
the right-hand lower pane.
Double-click the selected file, and the image is
shown in the main window.
After selecting several files while pressing the Shift
key, click on
on the right-hand upper side
to see the selected images as a slide show.
8
UbONE
X-Driven
How to Use the Program
As shown in the image on the left, the Map is
shown in a small window to display the location of
the vehicle.
(PC users should have access to the Internet to use
this Map function. Also, while recording image in a
moving vehicle and GPS reception is poor, this Map
may not be shown.)
Click on
above the
GPS map to know the
exact location information.
You can also move within
the map and zoom in or
zoom out of the screen.
Click on
window.
Move up
Move left or right
Move down
Zoom in
Zoom out
to close the GPS-related information
The graph below the main window shows the
degree of front and back, left and right, and up
and down impacts when an event occurs.
Front-Back movement: X-axis
Left-Right movement: Y-axis
Up-Down movement: Z-axis
UbONE
X-Driven
9
How to Use the Program
* Note
When the speed of play is not set as a default, the audio is not played.
Button
Function
Button
Function
End the Program
Volume Control
Play Speed Control
Hide the Window
Print
Go to the First
Image
Go to the Last Page
Pause after ReversePlaying One Image
Pause after playing
one image
Fast Reverse Play
Fast Play
Reverse Play
Play
The blue section in the slider bar indicates the recorded image before the occurrence of an event, while the red section indicates the recorded image after the
occurrence of an event.
How to Change the Setting
A user can change the default values of the X-Driven Viewer.
(When SD memory card is formatted, the settings are changed to default.)
Press the Setting icon to open the file
named “_systems.cfg” under the
folder of SD memory card.
10
UbONE
X-Driven
How to Change the Setting
1 This is a part to set
resolution. Default:
VGA
5
*Resolution
1
2
Low
3
QVGA
(320X240)
4
6
7
8
3 Recording Speed (Recorded frames per
second) is set. Default: 5 (1~8)
4 Threshold of Impact Sensor is set.
Default : 0.6G(0.1~1.5G)
If the threshold value is too high, the
sensor is too dull to sense an occurrence of an event, when the threshold
is too low, it becomes too sensitive so
it will detect even slight shocks that
do not need to be detected. Thus,
an appropriate value should be set in
consideration of a user’s vehicle and
the condition of road while driving.
X-axis : Front-Back movement
Y-axis : Left-Right movement
Z-axis : Up-Down movement
High
VGA
(640x480)
MEGA
(1280X960)
2 Recording quality is set.
Default : Standard
(Rough, Low, Standard,
High, Fine)
5 The recording time interval between
pre-event and post-event is set to the
unit of seconds.
Default – Pre-accident : 10 (0~10)
Post-accident : 10 (5~30)
6 Audio recording function is set.
Default: On
7 Alarm function is set. (Default : On)
8 Set the time (zone) (in which the
device) is used.
* Note
As resolution, recording quality, and recording speed is set higher,
it takes more of the SD memory card storage.
UbONE
X-Driven
11
How to Change the Setting
1
2
3
4
5
1 Event Recording is set as either Single-Mode or Multi-Mode.
Single-Mode: When an event occurs, it only records the event image and then
the mode is changed back to standby. However, pressing the Emergency Button resumes recording.
(This mode is to prevent data deletion due to memory shortage and to preserve the recorded images.)
Multi-Mode (Default Mode): Unlike Single Mode, it saves the files whenever an
event occurs. However, when the space of SD memory card is insufficient, the
oldest file is deleted to save a new file.
*Disk Partition for Events
Within a limited space of SD memory card, it can assign a certain capacity to
store event files. Default : 50 (20~50)
Storage space
Normal Recording (50%)
Event Recording (50%)
Storage space for normal recording
files and event recording files is set
to be same.
2 Open a file to see (the) image stored in a certain location.
3 Save the opened image as another name.
4 Capture an image and save it as a BMP file. It also includes a function to save
the title and memo when saving it as a picture file.
5 Print the current screen.
12
UbONE
X-Driven
Warnings
Please read the following carefully to use the product properly and protect the
user’s safety.
1. Do not disassemble, repair, or alter the product. When malfunctions, errors, or other
accidents are found to be attributable to a user, a user may not be eligible for after/sale
service.
2. When cleaning the inside of a vehicle, do not spray water directly on to the product. It
may cause damage to the product, fire or electric shock.
3. Keep away from chemicals or detergents as they may change the surface of the product or spoil the interior of the device.
4. Avoid excessive impact and do not insert any foreign objects into the device. Severe impact or shock or other foreign matters including soda may cause damage to the product.
5. When a foreign matter or sticker blocks the lens, a normal operation is impossible so
always clean the lens before use. Also, when other objects are placed around the camera,
they may be reflected on the window and included in the image, so please do not leave
unnecessary objects around the device.
6. Even though the product operates normally when it is first installed, it may not continue to do so as its position changes. Make sure the product is installed tightly and do not
expose the device to excessive shock or move the device after installation.
7. When a vehicle is parked in an underground parking lot for a long time or when a
vehicle is exposed to severe vibrations on an unpaved road, malfunctions may occur as
the position of the device changes. If the device is positioned differently from the initial
setting after traveling on an even road, correct its position.
8. Staring at or operating the product whilst driving is dangerous and may cause an accident.
9. Keep the product away from excessive impact, humidity, or salt. Pressure or shock after
installing the product may change the position of a device and cause malfunction.
10. This product is a device using a camera. Thus, in extreme cases like when a vehicle enters or exits a tunnel with a sudden change of light, when the light is too strong e.g during
the day, or when there is no source of light e.g at night; images are recorded poorly.
11. Be aware that the data of an accident under a certain impact of acceleration may
not be recorded in this product. In this case, it is possible to record images manually with
Emergency Button.
12. In the case of vehicles with excessively tinted windshields, images recorded by this
product may be poorly defined or distorted.
13. Only use the enclosed cable to connect the product to the power source, and only
as directed in the manual. This product should be connected only to the power inside a
vehicle. When using a cable other than the one provided or connecting the cable to other
power sources, it may cause malfunction or fire.
14. When power is turned off due to a big accident, image data may not be recorded.
15. For smooth GPS reception, make sure to keep GPS receiver horizontal when installing
the product and do not put any objects such as electronic products that could interfere
the reception.
UbONE
X-Driven
13
Understanding GPS
GPS which is used for commercial purposes inherently has the average range error of
more than 15 meters. Near buildings, underground, underpasses, or roadside trees, the
range error may be more than 100 meters.
Satellite reception may take a long time. A certain amount of time is needed from when
an engine of a vehicle is started until GPS satellite reception begins, and this time may vary
depending on weather and environmental conditions.
Do not use GPS with other products that send electromagnetic waves or that use GPS.
This may reduce the performance of the GPS reception in this product.
Depending on GPS satellite accuracy, it may not always show the shape of roads or a current location correctly. Especially in the following cases, an indicator of a current location
may not operate normally due to the shape of a road.
- When roads are closely parallel
- When an angle between split roads is slight
- When, after turning, a close road runs parallel
- When a vehicle meets a course of ferry
- When a road bends sharply
- When a road is very curvy
- When a road inside a mountain is very curvy
- When a car rotates by signs in parking the car
- When driving a car in rain or snow
- When entering a large road after driving a road that is not on the Map Data
- When driving among high buildings
14
UbONE
X-Driven
Memo
UbONE
X-Driven
15

|
|
-
OnStar
TTY
OnStar TTY GuideWelcome to OnStar.The safety and security of OnStar® is available to TTY (Text Telephone) users.16989 R8 8.25.06.indd 116989 R8 8.25.06.indd 1 8/25/06 8:59:39 AM8/25/06 8:59:39 AM …
TTY Automobile Electronics, 8
-
Servonaut
AMO
AMOTechnische Daten / SpecificationsAkkuspannung: 7.2 … 12V NiCd/NiMHOperating voltage: 2s … 3s Li-Ion/LipoSchaltausgänge: 6 x 700mA max. kurzschlussfest, überlastsicherSwitching Outputs: 6 x 700mA max short-circiut & overload protectedServos: 2 x prop, 1 oder 2 geschaltet2 x prop, 1 or 2 min/maxSer …
AMO Automobile Electronics, 16
-
Kuda
179000
RHD Seat Altea ab 05/2004Radio demontieren Remove radioKonsole wie abgebildet positionierenPosition console as illustratedRadio wieder einbauenReinstall radioEinbauanleitunginstallation instruction179000Art.-Nr.:item#02.11.2005Kuda-Phonebase GmbHIndustriestraße 16D-49401 Dammetel: +49 5491 9695 -0fax: +49 5491 9695 — …
179000 Automobile Electronics, 3
-
iDataLink
Maestro RR
NOTICE: Automotive Data Solutions Inc. (ADS) recommends having this installation performed by a certifi ed technician. Logos and trademarks used here in are the properties of their respective owners.WARNINGPressing the printer icon or “quick printing” this document will printall of the guides in this compilation.O …
Maestro RR Receiver, 15
-
Directed
DS4+
TL8INSTALLATION GUIDEThis product is intended for installation by a professional installer only! Attempts to install this product by a person other than a trained professional may result in severe damage to a vehicle’s electrical system and components.2017-08-23© 2017 Directed, Vista CADS4+Designed by Installers for …
DS4+ Automobile Accessories, 37
Recommended Documentation:
Table of Contents for X-Driven DRS1100:
-
Memo UbONE X-Driven 15
-
UbONE X-Driven 14 Understanding GPS GPS which is used for commercial purposes inherently has the average range error of more than 15 meters. Near buildings, underground, underpasses, or roadside trees, the range error may be more than 100 meters. Satellite reception may take a long time. A certain amount of time is needed from when an engine of a vehicle is started until GPS satellite reception begins, and this time may vary depending on weather and environmental c
-
UbONE X-Driven 10 How to Use the Program End the Program Hide the Window Fast Reverse Play Reverse Play Print Go to the Last Page Fast Play Play Volume Control Play Speed Control FunctionButtonFunctionButton * Note When the speed of play is not set as a default, the audio is not played. The blue section in the slider bar indicates the recorded image before the occur- rence of an event, while the red section indicates the recorded image after t
-
UbONE X-Driven 3 Components Camera Video Resolution Audio Recording GPS G-Sensor Data Storage Events Power Supply 1.3 Mega Pixel CMOS Internal Microphone Internal GPS Module Internal 3D G-sensor (Collision ,Q-break, Q-accel detection) SD Card (Min 512MB, Max 2GB) Emergency button, Shock (Collision, Q-break, Q-accel detection) DC 12V~24V MPEG-4, 320X240(QVGA), 640X480(VGA) upto 30ips, 1280X960(MEGA) upto 5ips Specification ≫ Please check if the following
-
How to Use the Program As shown in the image on the left, the Map is shown in a small window to display the location of the vehicle. (PC users should have access to the Internet to use this Map function. Also, while recording image in a moving vehicle and GPS reception is poor, this Map may not be shown.) The graph below the main window shows the degree of front and back, left and right, and up and down impacts when
-
Installation Instructions Before attaching the camera to the rack, insert a SD memory card into the appropriate slot and close the cover as shown in the pictures on the left. When the power cable is connected without a memory card inserted, the device will not turn on, and it may cause serious errors and damage to the product, so please check the card is inserted before connecting the device to the power. A
-
UbONE X-Driven 6 Installation Instructions * Note When a radio antenna is a glass-attaching type, it should be attached with a distance from the GPS part as an antenna can affect the GPS reception. While pressing both left and right buttons on the side of the body, rotate the camera lens to adjust its angle. The line on the button should be set to a horizontal position and be parallel to the road surface so that the camera lens faces the front center of the windshield. Insert the power cable into the power terminal
-
How to Change the Setting 1 2 3 4 5 6 1 This is a part to set resolution. Default: VGA *Resolution QVGA (320X240) VGA (640×480) MEGA (1280X960) Low High 2 Recording quality is set. Default : Standard (Rough, Low, Standard, High, Fine) 3 Recording Speed (Recorded frames per second) is set. Default: 5 (1~8) 4 Threshold of Impact Sensor is set. Default : 0.6G(0.1~1.5G) If the threshold value is too high, the sensor is too dull to sense an occur
-
UbONE X-Driven 8 How to Use the Program When you start the program, you will see this initial screen. Click on a selected file from the file list and the image of the file is shown in the preview window in the right-hand lower pane. After connecting the memory card to PC, click on to select the file named “_System.mdb” under the Data folder of SD memory card and bring out the data. When the file is opened, the screen shows a list of fi
-
UbONE X-Driven 2 Main Functions Accident Image Storage When an accident occurs, this device automatically detects it through an impact sensor and records and saves images before and after accidents. Manual Image Storage Even without physical impact to a vehicle from an accident, the device records and saves images by a driver manually pushing the Emergency Button. Location Information Storage The device records and stores detailed GPS information including the location, time, and speed of the time of
-
UbONE X-Driven 4 Name of the Parts Camera lens Please clean the camera lens before use to avoid foreign matters block- ing the lens. SD Memory Card Slot After inserting a SD memory card into the slot, connect the power cable. Power Terminal When power terminal is connected, the power is automatically turned on. Recording LED(Red) Recording LED blinks while imaging data is being saved, and after recording, the LED is constant and does not blink GPS LED(Blue) When GPS normally receives the satellite data, GPS LED is lighted on. Emergency Button Emerge
-
Warnings Please read the following carefully to use the product properly and protect the user’s safety. 1. Do not disassemble, repair, or alter the product. When malfunctions, errors, or other accidents are found to be attributable to a user, a user may not be eligible for after/sale service. 2. When cleaning the inside of a vehicle, do not spray water directly on to the product. It may cause damage to the product, fire or electric shock. 3. Keep away from chemical
-
Program Installation Double-click X-driven_In- staller.exe in the folder of SD memory card — For a PC that does not support SD memory cards, a separate USB adapter is required. Select a folder to inatall the program and click the middle button. Click OK after the installation is completed Click on the X-Driven icon under “All Programs” or on Desktop to start the program. — The program can be accessed through ou
Questions, Opinions and Exploitation Impressions:
You can ask a question, express your opinion or share our experience of X-Driven DRS1100 device using right now.
Среда, 12.07.2023, 09:40
Приветствую Вас Гость | RSS
Зарегистрируй свое движение!
Главная | Регистрация | Вход
|
Сортировать по: X-driven Installer 1.0.7.6 ENG Обновилась программа xDriven. Версия 1.0.7.6 в англоязычном исполнении. xDriven | Инструкция на X-Driven DRS 1100 PRO Инструкция на русском языке для видеорегистратора xDriven DRS 1100 PRO xDriven | Инструкция на X-Driven DRS 1100 PRO Инструкция на английском языке для видеорегистратора xDriven DRS 1100 PRO xDriven | X-driven Installer 1.0.7.5 RUS xDriven_Installer_7.5_rus русская версия xDriven | Bulents Screen Recorder 4.3.1 InstallBSR_v4 программа для захвата видео с вашего экрана. xDriven | X-driven Installer 1.0.7.4 ENG xDriven_Installer_7.4_eng английская версия xDriven | X-driven Installer 1.0.7.6 KOR xDriven_Installer_7.6_kor корейская версия xDriven | UB1AVI Converter Конвертирует из формата UB1 в AVI (UB1 to AVI). xDriven | |
|

Copyright MyCorp © 2023 | Бесплатный хостинг uCoz