-
Contents
-
Table of Contents
-
Bookmarks
Quick Links
ElEctronIc
2 DIal tap tIMEr
co1701
InstructIon Manual
Related Manuals for Holman CO1701
Summary of Contents for Holman CO1701
-
Page 1
ElEctronIc 2 DIal tap tIMEr co1701 InstructIon Manual… -
Page 2: Table Of Contents
table of contents Technical Data…………..p1 Glossary…………….p2 Applications & Safety Instructions…….. p3 Connecting to the Tap & Operation Modes….p4 Tap Timer Diagram…………p5 Manual Operation (ON / OFF)……… p6 Automatic Programming……….p7 Notes Pages…………..p8 — 9 Warranty…………….Back Page…
-
Page 3: Technical Data
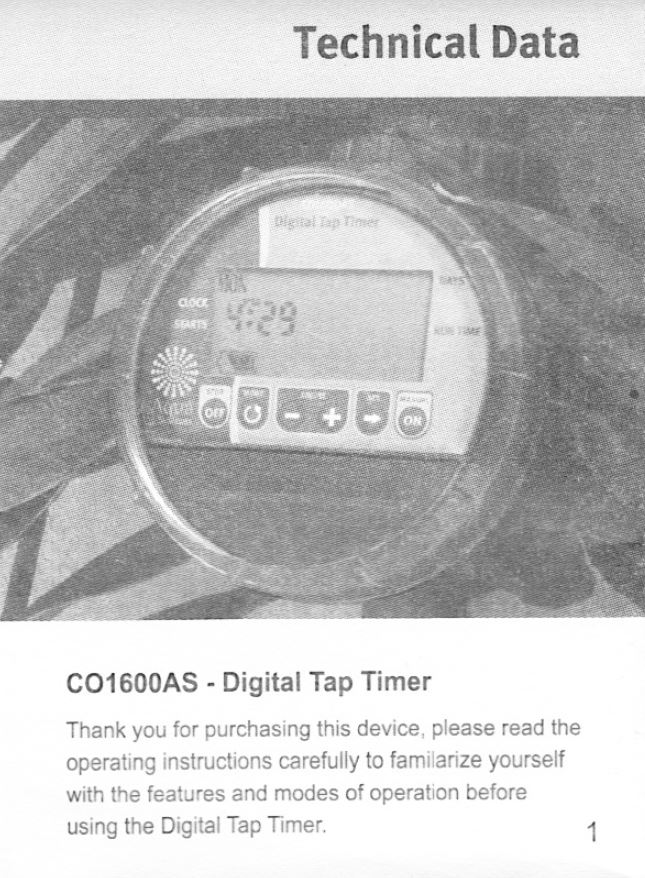
technical Data Tap Connection: 20mm BSP Female Hose Connection: 12mm Hose Snap-on or 20mm BSP Male Water pressures: Max. 8 Bar 800kPa Water Temperature: Max. 40ºC Irrigation Medium: Clean Water Batteries: 2 x 1.5V AAA Alkaline Batteries (Not Supplied)
-
Page 4: Glossary
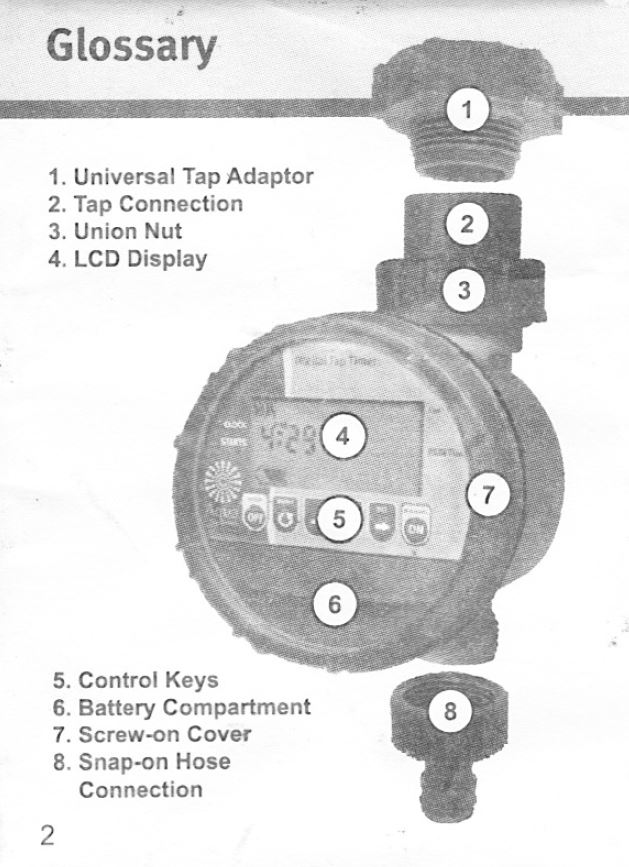
Glossary 1. Universal Tap Adaptor 5. Battery Compartment 2. Tap Connection 6. Clear Screw-on Cover 3. Union Nut 7. Snap-on Hose 4. Control Dials Connection…
-
Page 5: Applications & Safety Instructions
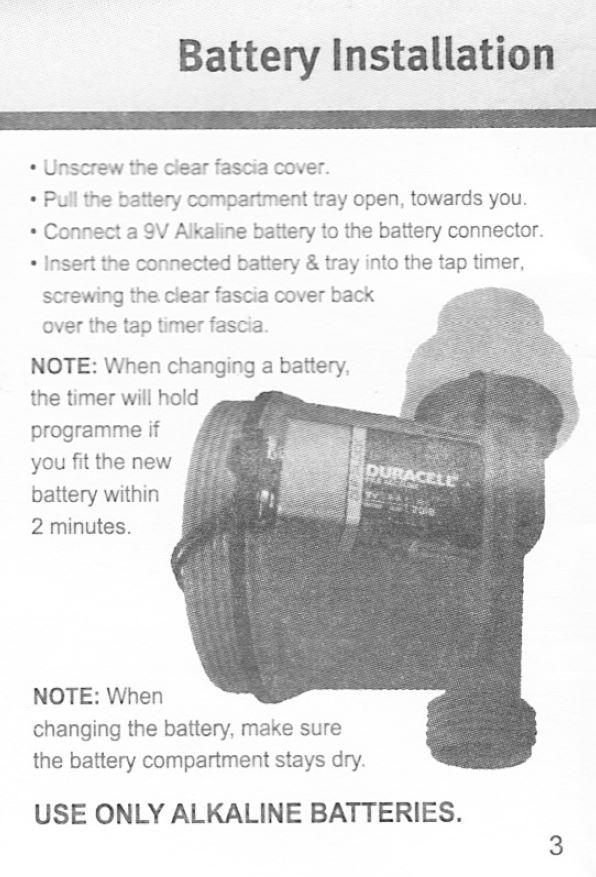
applications & safety Instructions This Electronic 2 Dial Tap Timer is ideal for watering small garden areas, pots & flower beds, fitting directly onto your garden tap. Safety Instructions For reasons of long life reliability, only use good quality ALKALINE batteries. To prevent the tap timer failing through weak batteries during a prolonged absence, the batteries must be replaced before re-use.
-
Page 6: Connecting To The Tap & Operation Modes
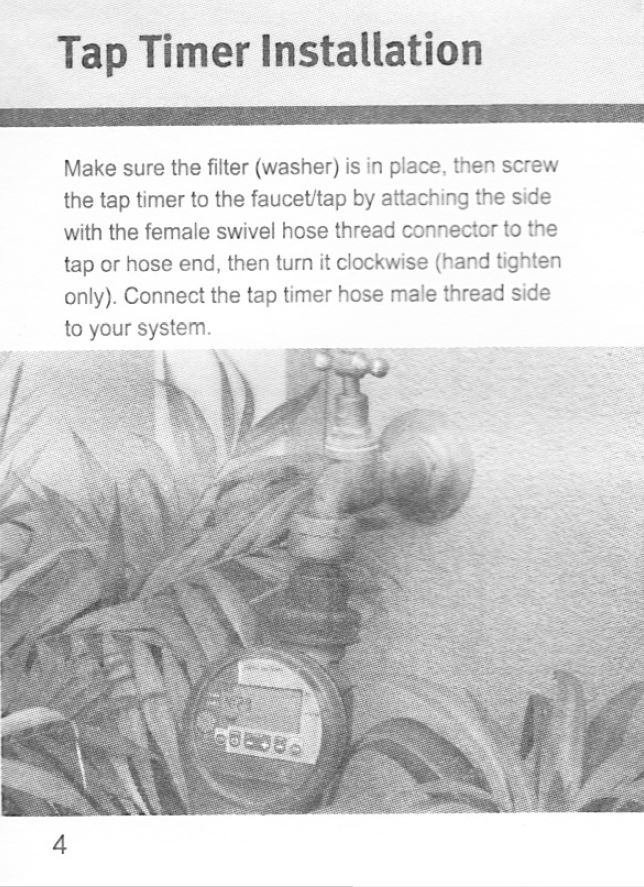
connecting to the tap & operation Modes For connection you need a water tap with a 20mm or 25mm thread. 1. Unscrew the union nut (3) to enable the water tap connection (2) to move freely. 2. Screw the tap timer firmly onto the water tap by the tap connection. Turn the unit to face you so the Control Dials (4) can be easily seen.
-
Page 7: Tap Timer Diagram
tap timer Diagram “How often” Dial “How long” Dial • • Turn the dial to select: Turn the dial to select: from every hour from 1 minute upto to once a week. 120 minutes. • • Select from the Select from the 11 positions 10 positions or Reset.
-
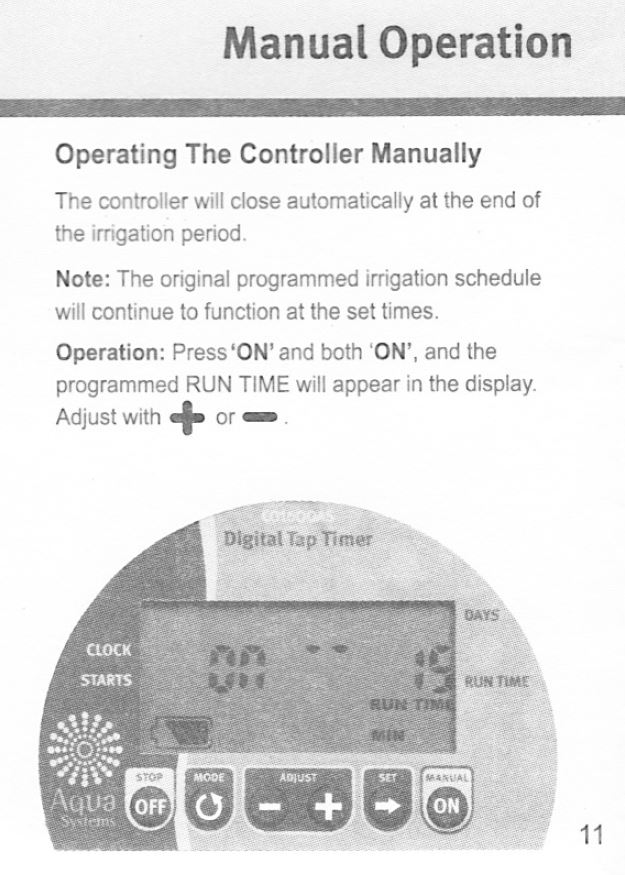
Page 8: Manual Operation (On / Off)
Manual operation: (on / oFF) Turn the “How Long” Dial to “ON”. The unit will water until this dial is turned to “OFF”. NOTE: There is a 10 second delay. oFF: The “OFF” position on the “How Long” Dial will stop an automatic or manual watering cycle.
-
Page 9: Automatic Programming
automatic programming Install the 2 x 1.5V AAA Alkaline batteries in the battery tray. Please note the polarity + and — . Select “How Long” you wish to water (10 position dial from 1 minute to 120 minutes). Select “How Often” you wish to water (11 position dial from every hour, to once a week). The unit will commence watering within 10 seconds to confirm the automatic watering start time.
-
Page 10: Notes Pages
notes page…
-
Page 11
notes page… -
Page 12: Warranty
Manual OFF? Warranty: We will honour all statutory guarantees that this product is of acceptable quality. (including that it is fit for purpose) HOLMAN Industries: 47 Walters Drive, Osborne Park, WA 6017. Ph: +61 8 9204 1011 www.holmanindustries.com.au…
 | Manualzz")
Electronic Tap timer
Owners Manual
Pope® Electronic Tap Timer
This booklet contains all you need to know to install and program
your Pope Electronic Tap Timer.
It’s easy if you follow the steps – but take a moment to read
through the section ”Understanding your Water Timer” before
you start.
Contents:
Understanding your water timer ………………………... 3
Batteries ……………………………………………… … 6
Connecting the Timer ……………………………………. 7
Programming the Timer …………………………………. 8
Manual Watering …………………………………………. 13
Trouble Shooting …………………………………………. ?
If you have any questions or require and assistance in getting
started, please call our
Free Help Line: 1300 134 880
2.
Understanding your Water Timer
The Key Pad
1.
SUMMER/WINTER enables you to adjust the
current time for daylight savings.
2.
on/off ON/OFF is used to select the watering days
when programming the user’s cycle (U) and when
selecting watering duration in the manual mode.
3.
mode MODE is used to select functions (see below)
and is identified on the display by the more bar.
4.
5.
set SET is used to set the current time and day as
well as watering times during the programming
function.
enter
ENTER is used to confirm selected times and
data.
The Display
Functions All functions can be selected by pressing MODE.
6.
CLOCK Symbol: Select this function to set the
current time. Note that the timer operates on a 24 hour
clock. The time in this display is 2.30pm.
7.
A Automatic Function: When this option is
selected watering will take place according to the cycle
and programs programmed by the user.
3.
Understanding your Water Timer
8.
P Programming Function: Enables the user to
program cycles and programs into the timer
9.
Manual: When this function has been selected the
hand symbol appears, enabling the user to water
independently of the programmed times and cycle.
Display Symbols
10.
Day of Week: Indicates the current day of the week
and the days selected for watering by the user in ‘U’
cycle. The current day of the week on this display is
Wednesday.
11.
Off Watering Symbol: Displayed when watering
is not in progress and when setting the finishing time
for watering during the programming function.
4.
Understanding your Water Timer
12.
On Watering Symbol Displayed when watering
in progress and when setting the starting time for
watering during the programming function.
13.
Cycle: The number displayed indicates the watering
frequency that has been selected by the user.
There are 7 available:
1 – Every Day
2 – Every Two Days
3 – Every Three Days
4 – Every Four Days
14.
5 – Every Five Days
6 – Every Six Days
U – User’s own cycle
PROG The number displayed indicated the program
(or watering duration) from 1-6 that has been set by
the user.
Note: If left in the programming mode for one minute,
the mode bar will automatically move to the A symbol
and convert to the automatic mode.
5.
Batteries
Installing the Batteries
•
Remove battery compartment cover and install 3 x AA
size alkaline batteries.
•
Match the +/- signs as indicated on the battery
compartment cover.
•
Replace the battery compartment cover.
•
The timer will automatically run a “Low Battery” Test
Replacing Batteries
•
To prevent corrosion, always remove the batteries when
the timer is not to be used for long periods of time or when
batteries are low.
•
It is recommended that new batteries are installed if you
are going away for an extended period of time. This will
ensure that watering continues as programmed.
•
When removing old batteries “PO” will flash on the display,
indicating that you have two minutes to install the new
batteries without losing any programmed data
•
If batteries are removed or fail during a programmed
watering session, ensure they are replaced within two
minutes otherwise the timer will not turn off the water.
6.
Connecting your Water Timer
Step 1
• Remove reducing bush
from the base of the
Electronic Tap Timer.
Step 2
• Connect reducing bush to
tap (if required).
Step 3
• Screw nut on the top of the
Electronic Tap Timer to the
reducing bush until firm.
7.
Programming the Timer
Step 1
Setting the Time and Day
Setting the Day
•
•
•
Press MODE until mode bar is above the clock
Press SET to move through the days of the week.
Once you have reached the current day, press ENTER to
confirm.
Setting the Time
•
•
Press SET to select the current hour. Press ENTER to
confirm.
Press SET to select the minutes. Press ENTER to confirm.
Adjusting for Daylight Saving
•
Press MODE until mode bar is above the clock
•
Press
Summer/Winter to advance or bring back the
current time by one hour.
Alternatively, adjust the current time according to the
instructions above.
•
8.
or A
Programming the Timer
Step 2
Select the Frequency of Watering
The frequency of watering (CYCLE) determines the day of the
week that the timer will water.
•
Use MODE to select programming function P
Press SET to scroll through the
7 available cycles. Cycle 2 is
shown here.
•
•
See “Understanding your water Timer” for a list of the
available cycles.
You can choose one of the cycles already programmed into
the timer or you can create your own.
To Select a programmed cycle.
•
Select on e of the programmed cycles from 1-6 and then
press ENTER.
This show that Cycle 2 (every
two days) has been selected.
Now proceed to step 3.
•
Note that the first day of watering will be determined by the
start time as entered in Step 3.
9.
Programming the Timer
For example
If the start time is 5 pm and the current time is 8 pm,
watering will not commence until 5 pm the next day.
To Create you own cycle.
•
•
Select the U cycle and press ENTER
Press ON/OFF to switch between [On Watering Symbol] and
[Off Watering Symbol].
Pressing SET now will confirm
Sunday as a watering day.
•
Press ON/OFF to switch to [Off Watering Symbol] and the
bar will move to the next day.
Pressing SET now will confirm
Monday as a non-watering
day.
•
•
Continue until all days have been allocated.
To confirm you complete selection press ENTER.
This show Monday,
Wednesday and Friday as
watering days.
Now proceed to Step 3.
10.
Programming the Timer
Step 3
Select the Watering Duration
This function allows you to set the duration (program) of up to 6
watering sessions per day.
This display indicated that you are
about to enter the start time for
program 1.
Press ENTER to confirm
Press SET to select start hour.
Press ENTER to confirm
Press SET to select the minutes
Press ENTER to confirm
(eg starting time for watering is
2.30pm)
This display indicated that you are
about to enter the finish time for
program 1. Press SET to select the
finish hour. Press ENTER to confirm.
Press SET to select the finish minutes
Press ENTER to confirm (eg finishing
time for watering is 3.30pm)
You can now enter up to five more
programs by repeating this procedure.
This screen is for program 2.
11.
Programming the Timer
•
Once you have set the required programs, press MODE to
return to A
•
Your timer is now ready for use. Re-attach the time faceplate and turn on you tap.
Step 4
•
Reviewing the Program and Making Changes
At any time you can review and change the cycles and
programs that you have in place.
To Review
•
•
Press MODE to select the programming function P
Press ENTER to view the programs you have in place. Any
changes you require can be carried out by performing the
same steps listed in the programming step.
To Clear Programs
To clear any of the programs that you have in place simply:
•
•
Change the off time to the same as the on time.
Press MODE to return to A
12.
Manual Watering
Manual watering can be activated by using the Manual Mode
function or by pressing the Manual Override button.
1. Manual Mode Function
•
When selected, this function overrides the Automatic
function and allows you to water independently of the
programmed times.
•
Using this function, you can commence watering
immediately from 8 hours down to 5 minutes.
Press MODE to select the Manual
Function.
Press ON/OFF until ON appears
Press ON/OFF to scroll through
watering times until you reach the
required time (you can use SET to
adjust the minutes)
This shows manual watering will
continue for 5 hours.
13.
Manual Watering
•
Return the timer to the tape and watering will commence
•
At any time during watering you can remove the timer
and re-wet the watering duration by using ON/OFF
•
Remember that you will need to re-select the Automatic
function by pressing MODE to recommence the
programmed cycles.
2. Manual Override Button
•
Press the ‘Manual Operation’ button on the exterior of the
timer (see “Connecting the Timer” for location). This
function commences watering immediately and continues
until the button is pressed again.
•
This function will not activate if a programmed watering
session is in progress.
•
If a programmed watering session is due to commence
whilst Manual Override is in progress, the timer will revert
back to the programmed times. Thus watering may finish
sooner than required.
14.
Trouble Shooting
If you are experiencing difficulties with your timer, consult the
table below.
Problem
Reason
No LCD
• Batteries flat
• Batteries
incorrectly
installed
• Batteries flat
• Programs lost
during battery
replacement
• Start & finish times
or programs may
be incorrectly
programmed
• Tap turned off
Not watering at
scheduled times
Watering session
not being turned off
by timer
• Batteries failed
during watering
session
• Batteries changed
during watering
and programs lost
15.
Solution
•
• Replace
batteries
• Re-install
batteries
• Replace
batteries
• Re-program
timer
• Check times &
re-enter if
required
• Turn tap on
• Replace
batteries
• Re-program
timer
Was this manual useful for you?
Yes
No
Thank you for your participation!
* Your assessment is very important for improving the workof artificial intelligence, which forms the content of this project
Мини-таймер с цифровым краном
Руководство пользователя
ITV105

Web:www.rainpointus.com
E-mail:service@rainpointus.com
Телефон:1-833-3815659 (офис в США)
Важный! Пожалуйста, прочитайте!
- Если клапан не перекрывает воду, когда он используется в первый раз или используется более 3 месяцев для повторного использования (это потому, что вода в клапане испаряется, что приводит к его слипанию с
Силиконовая диафрагма), нажмите кнопку «ОК» в течение 5 секунд и повторите 7-10 раз, чтобы активировать клапан, после чего устройство вернется в нормальное состояние. - Используйте только с чистой холодной водой.
- Фильтр задерживает частицы грязи, продлевая срок службы продукта. Регулярно очищайте фильтр и заменяйте его, если он изношен.
- Если ожидается отрицательная температура, таймеры следует вынуть из крана шланга и хранить в помещении, чтобы избежать возможного повреждения от замерзания.
Продукт закончилсяview
Сразу

- НАБИРАТЬ НОМЕР: Поверните, чтобы настроить график полива
- Кнопка ОК / РУЧНОЙ: Подтвердите настройку или поливайте вручную
- Кнопка DELAY / +: Отрегулируйте время и настройку системы или отложите программу полива
- — Кнопка: Отрегулируйте время и настройку системы


Спецификация

Установка продукта
Установка батареи

- Снимите батарейный отсек с задней стороны таймера.
- Установите 2 новые щелочные батареи AAA (1.5 В) (не входят в комплект).
- Плотно установите батарейный отсек обратно в таймер.
Примечание:
- Надежно установите лоток для батарей, чтобы обеспечить водонепроницаемость.
- Удалил старые батареи в конце сезона полива и утилизировал должным образом.
- Использованные или разряженные батареи необходимо вынуть из таймера и утилизировать надлежащим образом.
- Не бросайте батарейки в огонь. Батареи могут взорваться или протечь.
- Замените батареи, когда на дисплее появится индикатор низкого заряда батареи.
Установка таймера
- Присоедините таймер к крану для шланга на открытом воздухе.
- Пожалуйста, откройте кран после программирования таймера.

Примечание:
- При программировании таймера закройте кран, чтобы не намокнуть.
- Не используйте инструменты на таймере. Только рука затягивает
- Использованные или разряженные батареи необходимо вынуть из таймера и утилизировать надлежащим образом.
- Беречь от замерзания. Таймер следует снять, чтобы избежать повреждения от замерзания.
- Чтобы продлить срок службы таймера, держите фильтр чистым и на месте при использовании таймера.
ШАГ-1: УСТАНОВИТЕ ЧАСЫ

- Поверните циферблат, чтобы установить ЧАСЫ.
- С помощью кнопок «+» и «-» установите текущее время, включая AM и PM.
- С помощью кнопки «ОК» переключите время (часы или минуты).
- Поверните циферблат, чтобы сохранить изменения. Советы: В конце настройки поверните циферблат, чтобы сохранить изменения.
Если в конце вы нажмете «ОК», произойдет возврат к предыдущему шагу.
ШАГ 2: ВРЕМЯ НАЧАЛА

- Поверните циферблат на ВРЕМЯ НАЧАЛА.
- С помощью кнопок «+» и «-» установите время начала, включая AM и PM.
- Поверните циферблат, чтобы сохранить изменения. Советы: В конце настройки поверните циферблат, чтобы сохранить изменения.
Если в конце вы нажмете «ОК», произойдет возврат к предыдущему шагу.
ШАГ 3: НАСКОЛЬКО

- Поверните циферблат на СКОЛЬКО.
- С помощью кнопок «+» и «-» выберите продолжительность полива от 1 минуты до 3 часов 59 минут.
- Поверните циферблат, чтобы сохранить изменения.
Советы: В конце настройки поверните циферблат, чтобы сохранить изменения.
Если в конце вы нажмете «ОК», произойдет возврат к предыдущему шагу.
ШАГ 4: КАК ЧАСТО

- Поверните циферблат на КАК ЧАСТО.
- С помощью кнопок «+» и «-» установите частоту полива. Вы можете поливать каждые 4–12 часов или от 1 до 7 дней. (ПРИМЕЧАНИЕ: 1 — каждый день, 2 — через день и т. Д.)
- Поверните циферблат, чтобы сохранить изменения.
Советы: В конце настройки поверните циферблат, чтобы сохранить изменения.
Если в конце вы нажмете «ОК», произойдет возврат к предыдущему шагу.
Поздравляем! Теперь ваш таймер запрограммирован. Поверните циферблат в положение ON, чтобы запустить расписание в соответствии с запрограммированным временем, продолжительностью и частотой.
Дополнительные возможности
Полив с задержкой дождя

Задержка дождя позволяет отложить полив на определенный период времени, не прерывая установленный график полива. Чтобы получить доступ к задержке дождя, выполните следующие действия.
- Когда диск находится в положении ON, нажмите кнопку «ЗАДЕРЖКА / +» в течение 3-5 секунд, чтобы запустить функцию отложенного полива.
- На экране отобразятся оставшиеся часы до запрограммированного возобновления.
- Удерживайте кнопку «ЗАДЕРЖКА / +» в течение 3-5 секунд, чтобы убрать задержку дождя.
Примечание:
• Функция отложенного полива продлится до следующего 12:00, после чего автоматически возобновится исходный план полива. Обратный отсчет отображается на экране.
Ручной / ручной полив

Эта функция позволяет поливать, не прерывая установленный график полива. Чтобы получить доступ к этой функции, выполните следующие действия.
- Установите переключатель в положение ON и удерживайте кнопку «OK / MANUAL» в течение 3-5 секунд, чтобы начать полив вручную. Особенность режима ручного полива составляет 10 минут и не может быть изменена.
- 2 способа прекратить полив:
а. Удерживайте кнопку «OK / MANUAL» в течение 3-5 секунд.
б. Поверните циферблат в положение ВЫКЛ, а затем снова в положение ВКЛ.
Примечание:
- Между нажатием кнопки «ОК / РУЧНОЙ» и началом полива будет небольшая задержка.
ВЫКЛЮЧЕННЫЙ РЕЖИМ

- Если вы хотите отменить план полива на длительный период, поверните диск в положение ВЫКЛ. (Ваши настройки сохранены)
- Таймер не будет поливать автоматически в режиме ВЫКЛ. (На экране большими буквами отобразится слово OFF).
- Чтобы снова начать автоматический полив, поверните диск обратно в положение ON, чтобы возобновить запрограммированный график полива.
Заряд батареи
Состояние батареи будет отображаться следующим образом:

Примечание: Когда индикатор низкого заряда батареи ![]() появляется на дисплее. клапан закроется автоматически, чтобы избежать утечки. Пожалуйста, своевременно заменяйте батарею в случае прерывания нормальной работы.
появляется на дисплее. клапан закроется автоматически, чтобы избежать утечки. Пожалуйста, своевременно заменяйте батарею в случае прерывания нормальной работы.
Дополнительные возможности
Предупреждения
- Предназначен только для использования на открытом воздухе.
- Использовать инструменты для затяжки таймера слишком туго, их легко повредить. чтобы не повредить таймер, затягивайте его рукой, а не инструментом
- Перед установкой убедитесь, что шайба надежно вставлена в верхний соединитель, чтобы предотвратить утечку. При необходимости добавьте резиновую шайбу и уплотнительную ленту для резьбы.
- Сетчатый фильтр предотвращает попадание твердых частиц, продлевая срок службы таймера шланга. Регулярно очищайте фильтр и заменяйте его в случае износа.
- При низком уровне заряда своевременно заменяйте батареи, чтобы не прерывать нормальную работу; при замене батарей. пожалуйста, убедитесь, что батарейный отсек сухой.
- Когда они не используются, извлеките батареи, слейте воду и храните в помещении, вдали от замерзания.
- Не используйте воду более 120 ″ F (50–5 I или менее 38 футов (3 ° C)).
- Не подвергайте изделие чрезмерным силам и ударам.
- Если вода попадет в розетки или источники электрического тока, это может привести к серьезному поражению электрическим током. Никогда не погружайте изделие в воду.
Гарантия
Rainpoint предоставляет годовую беспроблемную гарантию на производственные дефекты материалов и изготовления со дня покупки.
В гарантийный период. хорошо замените бесплатно продукт, признанный дефектным, при разумном использовании и обслуживании, определенном исключительно компанией RainPoint.
Чтобы отправить запрос на гарантийное обслуживание, отправьте свой заказ по электронной почте на адрес сервис © rainpointustom и мы ответим в течение 24 часов.
Служба поддержки игроков
По-прежнему возникают проблемы с установкой, поищите «RainPoint» на YouTube, чтобы найти установочные видео!
Если в руководстве пользователя нет того, что вы ищете, или вам нужна помощь, подготовьте ЛОТ №. устройства и свяжитесь с нами перед возвратом товара в магазин.
Телефон: 1-833-3815659 (офис в США)
Электронная почта: service@rainpointus.com
МНОГО НЕ.: xxxxxx на задней стороне таймера)
Документы / Ресурсы
Рекомендации

Цифровые таймеры для шлангов и счетчики воды – Rainpoint
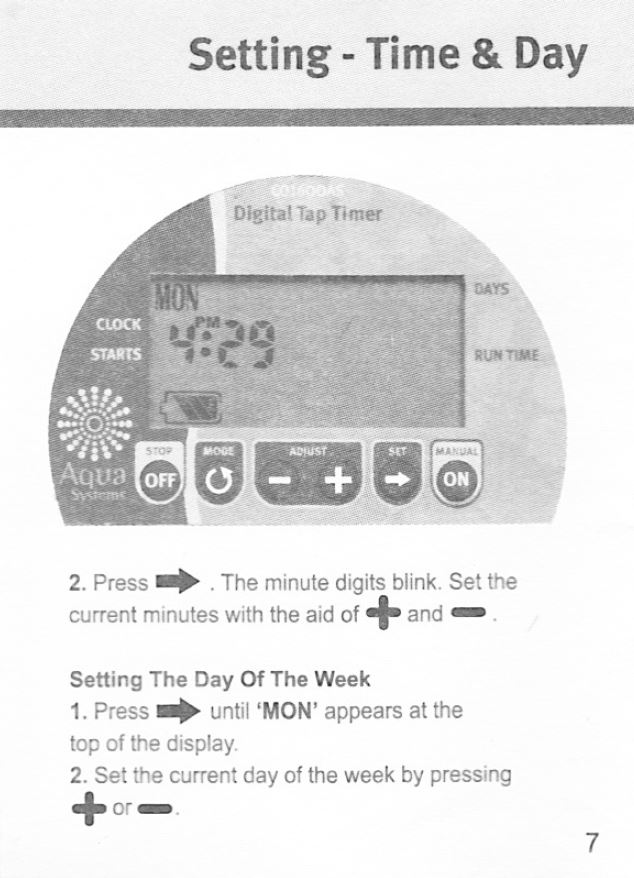
So I bought an Aqua Systems Electronic Digital Tap Timer at Bunnings in Brisbane (Australia). Here’s the link to the item. The main advantage of digital tap timers over the manual ones is that you can set a watering schedule lasting a week, instead of a daily schedule. I wanted my pot plants watered twice in a week for 20 minutes, not every day, and that’s where a digital tap timer comes in. Just a note: the Bunnings blurb says “The timer also has a manual ON – OFF watering feature and also a Rain OFF function which will pause the program during bouts of wet weather.” When I read this I thought it meant that the Rain OFF function automatically stops watering if it is raining. It doesn’t. You need to go to the unit and press the OFF button.
Quick review of the Aqua Systems Digital Tap Timer: Despite being the cheapest digital tap timer at Bunnings it worked brilliantly – easy to set up, easy to install, and most importantly it works – all my pot plants survived the ridiculously hot 2017 summer when we went away for a week thanks to this tap timer. On the downside, you need to unscrew the hazy cover to adjust anything, so it’s a pain to make adjustments, and once the cover is off the battery is right there and it looks rather not waterproof, so I fear you could destroy it just trying to stop a watering cycle. The more expensive ones have buttons that you can access without unscrewing. But if you want a cheap, once a year use, week long programmable timer, this is great. If you want something you will leave in place and can modify often (or pause when it rains), look to the more expensive ones.
Owner’s Manual: Well, as usual, I misplaced the owner’s manual – it is just one sheet of paper folded up to the size of a business card, so it is easy to lose (that’s my excuse anyway). I searched online for instructions on how to set the timer but could not find them. So when I finally found the paper instruction manual again I scanned it in. Below is a copy of the instructions. Sorry the quality isn’t great. The instructions are printed in black and white on cheap (greyish) paper, and are a bit small, so I have enlarged them as well.
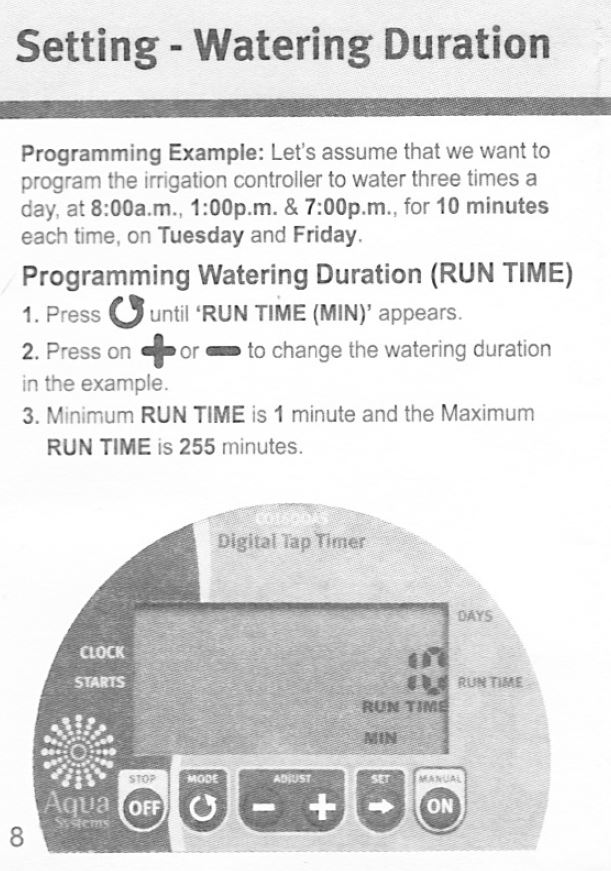
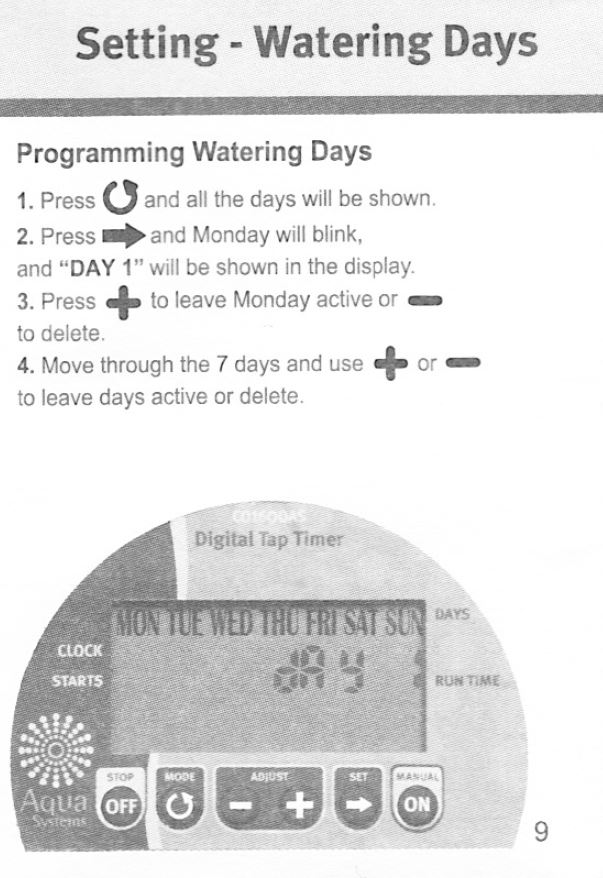
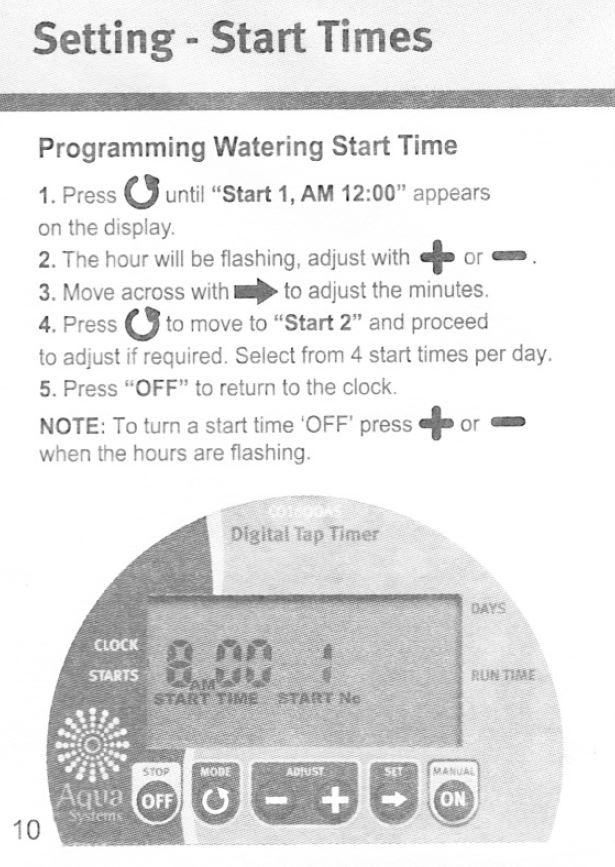
How to Set the Aqua Systems Digital Tap Timer