- Manuals
- Brands
- Endress Manuals
- Portable Generator
- ESE Series
- Translation of the original operating manual
-
Contents
-
Table of Contents
-
Troubleshooting
-
Bookmarks
Quick Links
ESE power generator
TRANSLATION OF THE ORIGINAL OPER-
ATING MANUAL
ESE 1008 HG ES Diesel Silent
ESE 1408 DHG ES Diesel Silent
Article-Nos: 113041 / 113040 / 8008015
Related Manuals for Endress ESE Series
Summary of Contents for Endress ESE Series
-
Page 1
ESE power generator TRANSLATION OF THE ORIGINAL OPER- ATING MANUAL ESE 1008 HG ES Diesel Silent ESE 1408 DHG ES Diesel Silent Article-Nos: 113041 / 113040 / 8008015… -
Page 2
This documentation and parts thereof are subject to copyright. Any use or modi- fication beyond the restrictions of the Copyright Act is forbidden and subject to penalty without the consent of ENDRESS Elektrogerätebau GmbH. This applies in particular to copies, translations, microfilming, as well as storage and processing in electronic systems. -
Page 3: Table Of Contents
Welcome to ENDRESS! ……..
-
Page 4
Inteli-Nano …………. .53 ECOtronic (idle down) . -
Page 5: Directories
Directories Directories List of illustrations Fig. 3-1 Example of a type plate Fig. 3-2 Generator’s scope of delivery Fig. 3-3 Document and tool kit compartment Fig. 3-4 Labels on the device Fig. 6-1 Views of the generator Fig. 6-2 Generator and control side components Fig.
-
Page 6: About This Manual
About this manual About this manual We would like to explain to you the safe and correct use of your generator in the best possible way through this operating manual. To do this we have oriented ourselves to the new European standard DIN EN 82079-1 for preparing the user manuals.
-
Page 7
About this manual the required distinctive warning notices at the correct point in time without impair- ing the legibility and comprehensibility of the operating manual. This is according to the regulations contained in the international standard DIN ISO 3864 de- scribes a fixed rule for all safety and warning notices, as shown in the following example. -
Page 8
About this manual Additional notices for operation or for function of a unit are marked with the adjacent symbol. NOTICE! The adjacent symbol is situated anywhere where the supplier documenta- tion must be read and observed and refers to, ► appropriate information, ►… -
Page 9: Product Identification
Product identification Product identification Welcome to ENDRESS! We are pleased that you have made the decision to purchase a ENDRESS power generator. You have purchased a high-performance product into which we have embodied decades of our experience and have integrated many functions oriented on daily use.
-
Page 10: Foreseeable Misuse
Product identification The unit generates AC (three-phase) current with a nominal voltage of 400V at 50Hz. More detailed technical data can be found in Chapter 13 . An integrated voltage regulator ensures that the stability of the generated voltage is within the nominal rotational speed range.
-
Page 11
Product identification • Never refuel the generator’s own tank when it is hot. Overflowing fuel and ex- haust fuel vapours can ignite on hot parts of the device. • Never open the generator’s tank cover whilst it is running or if it is hot. Over- flowing hot fuel and escaping fuel vapours can ignite on the device’s hot parts. -
Page 12: Included In Delivery
Product identification included in delivery 3.3.1 Generators Apart from the technical documentation listed in Chapter 2.1 the following items are also Scope of delivery of your generator: Included with deliv- Fig. 3-2 Generator’s scope of delivery Item Name Oil drainage hose Engine operating and maintenance manual These supplied products can be found in a separate storage compartment der the engine hood…
-
Page 13: Labels On The Generator
Product identification Labels on the generator An important part of the operating manual is the labelling and notices on your generator. These Labels must not be removed and must always be maintained in legible condition. If there is damage to a Labels can be ordered from our cus- tomer service team.
-
Page 14
Product identification Item Name Meaning Mandatory signs Lifting device must only be attached here (loading eye) Note Oil drainage hose feed- through Warning symbol Do not touch — hot surface when running Note Fill the air filter housing with oil before the initial start-up Mandatory signs Read the operating manual before starting up… -
Page 15
Product identification Item Name Meaning Note Noise emissions Note Earthing / potential equalisation con- nection EMERGENC-STOP smash button, see Chapter 7.7 Tab. 3-1 Labels on the device… -
Page 16: For Your Safety
For your safety For your safety The following chapter describes basic Safety instructions for safe operation of your generator. Your device is a very high-performance electrical machine which is potentially dangerous when operated if it has not been installed, commis- sioned, used, serviced and repaired according to the operating manual.
-
Page 17
For your safety Warning of corrosive substances This warning symbol indicates activities where a risk of chemical burns to the en- vironment as well as people exists, possibly with lethal consequences. Warning of environmentally damaging substances This warning symbol indicates activities where a risk of contaminating the envi- ronment exists, possibly with catastrophic consequences. -
Page 18: General Safety Instructions
Residual risks As a manufacturer of EU-compliant machines, ENDRESS make great ef- forts to create designs which already eliminate possible risk potentials at the design stage. If this is not possible without significantly impairing the functions of a device, we implement suitable protective measures protect the user from injury.
-
Page 19
For your safety four different danger levels in order to be able to reliably assess the dan- gers associated with the individual operating states and action steps when reading the operating manual. DANGER! DANGER describes a danger which represents a high level of risk,which can lead to death or severe injuries,when not avoided. -
Page 20
For your safety DANGER! Engine exhaust gases contain poisonous and partially invisible gases such as carbon monoxide (CO) and carbon dioxide (CO2). Risk of death due to poisoning or asphyxiation. ► Ensure that there is good ventilation during the whole period of operation. ►… -
Page 21
For your safety WARNING! Escaping corrosive acid fumes or sulphuric acid during and after the charging process. A risk of suffering severe or even deadly burns. ► Only work with acid-resistant protective equipment. ► Clean surfaces covered in acid immediately using adequate amounts of wa- ter. -
Page 22
For your safety NOTICE! Excessive heat or moisture can destroy the device. ► Always ensure that there is a good supply of air and heat removal. ► Never operate the generator in rooms or narrow pits. ► Never clean the device with the aid of a strong jet of water or high pressure cleaner. -
Page 23: Authorised Operating Personnel — Qualifications And Obligations
For your safety Authorised operating personnel – qualifications and obligations Your Generators is a complex machine, the operation and maintenance of which requires exact knowledge of its functions and danger potentials. Therefore any work with or on the device, of any kind, may only be per- formed by authorised and instructed operating personnel.
-
Page 24
For your safety Product’s service life phase Danger zone Transport and installation within a radius of 1m around or below the de- vice Operation within the outer limits of the device Service and maintenance Within the outer limits of the device when switched on Generators Tab. -
Page 25: Checking The Electrical Safety
Checking the electrical safety Checking the electrical safety Checking of electrical safety requires different measures to be taken which may only be undertaken by respectively authorised personnel. In doing so the respective, pertinent VDE provisions, EN and DIN standards, in their re- spectively valid versions, must be observed.
-
Page 26
Checking the electrical safety NOTICE! The operator is responsible for defining and adhering to the test intervals . Above all one must ensure observance of the respectively valid national regulations. This responsibility also extends to any additional equipment installed in conjunction with the device. -
Page 27: Description Of The Device
Description of the device Description of the device Power generator view The following section provides an overview of the name and location of the most important components in your Generatorss. It is important that you become familiar with them in order to understand the functions and oper- ating steps explained below and to be able to implement them safely.
-
Page 28: Generator And Control Side Components
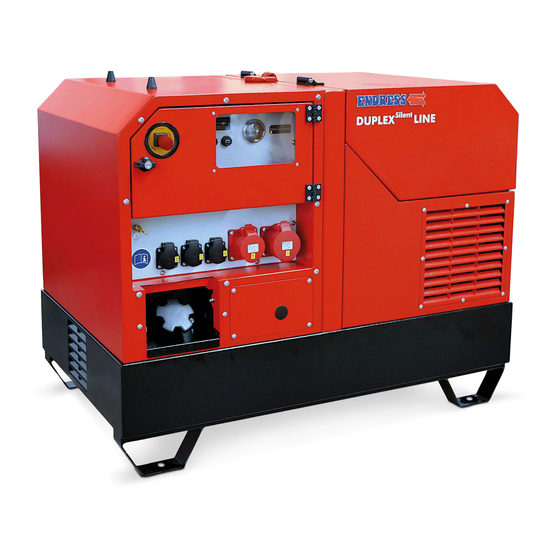
Description of the device Generator and control side components Fig. 6-2 Generator and control side components Crane loading lug Air intake Feedthrough for external refuelling Generator cooling air intake Filling opening Fuel tank Control panel Control panel flap EMERGENCY STOP smash button…
-
Page 29: Engine And Tank Side Components
Description of the device Engine and tank side components Fig. 6-3 Engine and tank side components Engine hood with exhaust outlet Maintenance cover 12V starter battery Feedthrough for oil drainage hose Exhaust outlet Engine cooling exhaust outlet Engine maintenance cover Engine air filter Document compartment with Tool kit Drive engine…
-
Page 30: Control Panel Components
Description of the device Control panel components Fig. 6-4 Control panel components Operating hours counter Tank indicator Battery charge indicator lamp Oil pressure indicator lamp CEE400V/ 32A/3~ socket 400V/ 16A/3~ CEE socket Schuko230V/ 16A/1~ socket Remote start CPC socket Connection Potential equalization / 400V / 16A / 3~ circuit breaker for sock- earthing 400V / 32A / 3~ circuit breaker for CEE…
-
Page 31: Commissioning
Commissioning Commissioning The following chapter explains the basic procedure for initial or repeated generator start-ups in «Manual» mode. Follow the working steps described below when you put your generator into operation for the first time or re- start it again after transporting it. Initial start-up Fig.
-
Page 32
Commissioning the generator must be switched off the generator must be cooled down if fitted, the fuel valve must be in the “OFF” position if connected, the external refuelling device must be disconnected NOTICE! Leaking engine oil and operating fluids can contaminate the soil and groundwater. -
Page 33: Refuelling Your Generator
Commissioning Refuelling your generator Proceed as follows to fit its generator’s own tank: the generator. Conditions The generator is turned off. The generator has cooled down. There must be an adequate air supply and air removal. All power consuming equipment must be disconnected or switched off. DANGER! Leaking engine oil and fuel can burn or explode.
-
Page 34: Starting The Generator
Commissioning Starting the generator Starting the generator for manual operation and with fuel supplied from its own tank is explained here. For automatic remote starting, see Chapter 8.2 , for refuelling using an external refuelling device, see Chapter 8.4 . DANGER! Leaking engine oil and fuel can burn or explode.
-
Page 35
Commissioning Fig. 7-2 Starting the generator Proceed as follows to manually start the generator from its control panel (to start via a remote control, see Chapter 8.2 ): Conditions the electrical safety has been checked (see Chapter 5 ). … -
Page 36: Low Load Diesel Engine Operation
Commissioning NOTICE! Do not apply load to the generator immediately after a cold start. ► Allow the generator engine to warm up for a few minutes before switching on a load when the generator has not been operating for more than eight hours (or for very low external temperatures).
-
Page 37: Turning Off Your Power Generator
Commissioning Turning off your power generator CAUTION! Certain surfaces on the device can get very hot whilst it is running. Risk of burns ► Never touch any engine parts (in particular the exhaust system) for a few min- utes after ceasing operation. ►…
-
Page 38: Turn Off Your Generator In The Event Of An Emergency
Commissioning Turn off your generator in the event of an EMER- GENCY Your power generator is fitted with an EMERGENCY STOP smash button. It enables you to immediately switch the device off in an EMERGENCY. CAUTION! The EMERGENCY-STOP smash button is only to be used in the event of a dangerous situation arising in an emergency.
-
Page 39: Connection Of Power Consuming Equipment
Commissioning Connection of power consuming equipment DANGER! Mortal danger due to an electric shock if live parts are touched. ► Never operate the device if it is in a damaged condition. ► Never operate the electrical consumers and connecting cable (power con- suming equipment) in a damaged condition.
-
Page 40
Commissioning CAUTION! Danger due to malfunctioning of the protective measures against hazard- ous shock voltages with an extended supply network! ► Keep the length of the connecting line as short as possible. ► Use as few sub-distributions as possible. ► Take note of the table below. Line max. -
Page 41: Optional Fittings
Optional fittings Optional fittings The following chapter describes the function and operation of optional equipment features that you either ordered from the factory or purchased later on as accessories. Use your order documents to check which options were fitted to your gen set. Residual current circuit breaker (RCD) The residual current circuit breaker (RCD) protects against dangerous body currents in compliance with DIN VDE 0100-551.
-
Page 42: Remote Start Device
Optional fittings Fig. 8-1 FI circuit breaker (RCD) Testing the RCD The generator is running 1. Move the FI circuit breaker Fig. 8-1 into position. 2. Press the test button Fig. 8-1 The switch position Fig. 8-1 indicates the result: Symbol Meaning POS I…
-
Page 43
Optional fittings All consumer are switched off or disconnected from the generator. Connecting up a re- Proceed as follows to connect up a cable remote control (not included in mote start device the package). 1. Unscrew the protective cap on the CPC remote start socket Fig. 6-4 the counter-clockwise direction. -
Page 44: Wireless Remote Control
Optional fittings NOTICE! Ensure that the generator’s engine start switch (Fig. 6-4 remains in the “STOP“ position. Otherwise the control circuit on the generator will still be energized which can cause the starter battery to discharge. Disconnecting the Proceed as follows to disconnect the cable remote control after the gener- remote start device ator has been switched off: 1.
-
Page 45
Optional fittings Fitting the radio ae- Proceed as follows to connect up the radio aerial. rial 1. Unscrew the protective cap on the CPC remote start socket Fig. 6-4 in the counter-clockwise direction. 2. Insert the plug on the radio aerial’s connecting cable into the correct po- sition in the CPC remote start socket. -
Page 46: Refuelling Device Connection
Optional fittings Disconnecting the Proceed as follows to disconnect the radio aerial after the generator has radio aerial been stopped: 1. Turn the plug’s locking ring counter-clockwise until the lock is released. 2. Now pull out the cable remote control’s plug. 3.
-
Page 47
Optional fittings Fig. 8-5 Refuelling device connection Proceed as follows to run the generator with an external refuelling device: Conditions the external refuelling device is ready and filled. the generator’s own tank is full Connecting the re- 1. Remove the sealing plug Fig. 6-2 — from the opening for the external fuel fuelling device connection. -
Page 48: Selecting The Operating Mode
Optional fittings Selecting the operating mode The following section explains the precise procedure for operating the gen- erator under different operating conditions. Your generator has a change- over device that allows you to use the generator in two different modes: •…
-
Page 49
Optional fittings DANGER! There is NO PERSONAL PROTECTION on the generator’s side when using the power supply socket as no RCD (residual current circuit breaker) is in- stalled! Mortal danger from electrocution ► Installation and commissioning is only to be undertaken by a qualified elec- trician ►… -
Page 50
Optional fittings Figure Meaning CEE socket for feed-in supply (white colour marking) Position 1 Direct supply Position 0. Position 2 Feed-in mode Tab. 8-1 Feed-in mode Create the power Proceed as follows to set up a feed-in connection between the generator and the feed connection feed distributor installed on-site: 1. -
Page 51: Insulation Monitoring, With Switching Off
Optional fittings Insulation monitoring, with switching off The insulation monitoring system provides electrical safety for the gener- ator and to all connected consumers and cable connections during contin- uous operation. WARNING! Change in the hazardous situation when using the insulation monitoring option.
-
Page 52
Optional fittings Lamp Result Meaning lights up red Line circuit breaker jumps to Insulation monitoring POS 0 is OK stays off Line circuit breaker remains Insulation monitoring in POS 1 is defective stays off Line circuit breaker jumps to Lamp defective POS 0 The insulation monitoring function has been successfully tested. -
Page 53: Inteli-Nano
Optional fittings WARNING! Risk of touching surfaces that are live due to faulty insulation. Danger of electric shock if a second insulation fault occurs. ► The relevant consumable is not to be used any more after an insulation fault has been determined. ►…
-
Page 54
Optional fittings NOTICE! Frequent brief operations and/or long operating times without a load will have a negative effect on the operational readiness and the generator’s ser- vice life. ► Try to avoid frequent brief operations, otherwise the starter battery will not be sufficiently charged and it might fail. -
Page 55: Ecotronic (Idle Down)
Optional fittings 1. Turn the main switch into Position “1“. The control panel lighting lights up. The tank indicator now indicates the fuel level. 2. Press the green button on the Inteli-Nano display The Inteli-Nano display lights up. The engine will start. The engine has started.
-
Page 56
Optional fittings the generator is at its operating temperature (heating up phase is approx. 5 minutes). Fig. 8-8 ECOtronic idle speed reduction Switching on Switch on the idle engine speed reduction as follows: ECOtronic 1. Press the button. The indicator light in the button is green. Idle speed reduction is activated. -
Page 57: Maintenance
Maintenance Maintenance Generators maintenance is described in this section. It may only be per- formed by qualified specialist personnel. Maintenance and repair which is neither described in this operating manual nor in the possibly also delivered operating and maintenance instructions may only be undertaken by authorized service personnel from the manu- facturer.
-
Page 58: Starter Battery
Maintenance tenance instructions provided by the engine manufacturer. This operating manual merely describes the instructions that differ from or go beyond those instructions. DANGER! Mortal danger from unintentional generator start up. Danger of burns and being caught by rotating parts. ►…
-
Page 59: Replacing The Battery
Maintenance WARNING! There is a risk of explosion and fire in the case of inappropriate handling and spark development when working with the battery. Danger from spraying sulphuric acid. Danger of suffering severe even deadly burns and chemical burns. Danger of being blinded. ►…
-
Page 60
Maintenance Fig. 9-2 Accessing the starter battery Proceed as follows to remove the starter battery: Conditions the generator is switched off (engine start switch is in the “STOP” position). 1. Undo the eight screws in the maintenance cover over the starter bat- tery. -
Page 61
Maintenance 7. Ensure that all of the connecting cables are neatly laid and, especially, that they cannot chafe against anything. 8. Position the maintenance cover in front of the starter battery’s mainte- nance opening. 9. Insert all of the screws in the maintenance cover 10. -
Page 62: Engine Oil
Maintenance Engine oil The drive motor for your generator, like every internal combustion engine, requires the required engine oil for cooling and inner cooling. It is also very important to use the correct engine oil, both for refilling and when chang- ing the oil, and to adhere the stipulated maintenance intervals.
-
Page 63
Maintenance Check the engine oil level before every start in order to avoid delays and inter- ruptions during operation. Ensure that the following prerequisites are met before you check: CAUTION! The engine and operating equipment on the generator can get very hot while running. -
Page 64: Changing The Engine Oil
Maintenance The engine oil level has been checked. 9.4.2 Changing the engine oil The engine oil changing process differs from the instructions given in the en- gine’s operating and maintenance manual due to the soundproofing hood. The different steps are explained in the following chapter. CAUTION! The engine and operating equipment on the generator can get very hot while running.
-
Page 65
Maintenance wait after previous operation for at least five minutes before changing the oil to allow the oil to flow into the oil sump and for the engine oil to cool off. the generator is switched off (engine start switch is in the “STOP” position). Draining off old oil 1. -
Page 66: 10 Storage
Storage 10 Storage It is important to store the device at a suitable storage location as soon as your generator is no longer being used. • The storage location must be roofed and must not be subjected to standing water, aggressive vapours or soiling as well as major accumulation of dust. •…
-
Page 67: 11 Disposal
Pure b2b devices (devices which, for appropriate use, or exclusively are only used the commercial area) must not be disposed of over public collecting points in Germany and further EU countries. Speak to your authorised ENDRESS gen- erator dealer about handing back your recycling waste electrical equipment. The dealer is also your point of contact for any differing regulations on the respective country of deployment.
-
Page 68: 12 Troubleshooting
Troubleshooting 12 Troubleshooting The following table is an aid for you to use in a case where faults arise during use. Based on experience a number of malfunctions can already be removed by operating personnel or the possible causes limited. In all other cases contact your service partner as described in the table.
-
Page 69
Customer service: Tel. +49 7123 973744 Email: service@endress-stromerzeuger.de Have the item and serial number of your device ready for identification. You will find these details on the type plate (see Fig. 3-4 ). -
Page 70: 13 Technical Data
Technical data 13 Technical data You can find the relevant technical data for your generator in the following table. Name Value Unit ESE 1008 HG ES ESE 1408 DHG ES The Silent One The Silent One Continuous power output [PRP] 3~ 14.0 / 11.2 [kVA / kW] Continuous power output [PRP] 1~…
-
Page 71
Technical data The information given in the table applies to the following operating conditions (standard reference conditions): standard reference conditions Name Value Unit Set-up height above sea level Ambient temperature [°C] Relative Air humidity The usable power output can deviate from the nominal values depending on the actual operating conditions. -
Page 72: 14 Replacement Parts
Replacement parts 14 Replacement parts Maintenance and replacement parts can be obtained quickly and easily from your responsible ENDRESS service partner or ENDRESS dealer. You can alternatively obtain support from our central customer service by telephone: +49 (0) 71239737-44 by email: service@endress-stromerzeuger.de Have the item and serial number of your device ready for identification.
-
Page 73
Replacement parts NOTES… -
Page 74: Keyword Index
Replacement parts Keyword index Air filter 29 Main line circuit breaker 30 Air humidity 71 Maintenance cover 29 Air intake 28 Maintenance hatch 29 Alternator side 27 Maximum line length 40 ambient conditions 71 misuses 10 Ambient temperature 71 automatic low-oil system 36 Noise emissions 15 Changing a fuel source 46 Oil drainage hose 12…
-
Page 75
Replacement parts Tilt angle 71 tool kit 29 Type plate 13 under the operator’s obligations 26 viscosity class 62 Warning notices 18 WEEE directive 67… -
Page 76
Elektrogerätebau GmbH Neckartenzlinger Str. 39 D-72658 Bempflingen, Germany Tel: +49 (0) 7123 /9737-0 Fax: +49 (0) 7123 /9737-50 Email: info@endress-stromerzeuger.de www: www.endress-stromerzeuger.de © 2021, ENDRESS Elektrogerätebau GmbH…
«Шумозащищённый электрогенератор ИНСТРУКЦИЯ ПО ЭКСПЛУАТАЦИИ ESE 900 ESE 850 -2Описание Обозначения на шильдике: • Pmax – максимальная активная мощность • Pnenn – номинальная . »
ИНСТРУКЦИЯ ПО ЭКСПЛУАТАЦИИ
Обозначения на шильдике:
• Pmax – максимальная активная мощность
• Pnenn – номинальная (длительная) мощность
• cos – номинальный коэффициент мощности
• Max** m – максимальная высота установки (над уровнем моря)
• Max 0C – максимально допустимая температура в помещении
ПРЕДУПРЕЖДЕНИЕ:
Пожалуйста, внимательно прочитайте данное руководство перед началом эксплуатации агрегата.
ПРЕДУПРЕЖДЕНИЕ:
неукоснительно следуйте рекомендациям данного руководства, особенно, относящимся к вопросам безопасности, ибо от этого может зависеть здоровье и даже жизнь оператора.
2. Выключатель Выключатель предназначен для размыкания цепи зажигания. Положение «ON» — двигатель может быть запущен. В положении «STOP» — двигатель не запустится или остановится.
ЗАЩИТА ОТ ПЕРЕГРУЗКИ. Защита выключит генератор в случае его перегрузки.
www.endress.ru ПРЕДУПРЕЖДЕНИЕ: Если защита отключила генератор, уменьшите суммарную мощность подключенных к генератору потребителей.
Положения кнопки: «1» — ВКЛЮЧЕНО, «2» — ВЫКЛЮЧЕНО.
ЗАМЕЧАНИЕ: Нажмите кнопку в положение «ВКЛЮЧЕНО» для восстановления сработавшей защиты.
ПЕРЕД ПУСКОМ ДВИГАТЕЛЯ:
Убедитесь в достаточности топлива в быке.
Используйте только смесь бензина с маслом в соотношении 50:1 (2%).
Емкость топливного бака 4 литра.
ПРЕДУПРЕЖДЕНИЕ: Без добавления масла в бензин двигатель перегреется и заклинит поршневую группу. Масла использовать можно любые для 2-тактных двигателей (такие же как для мотоциклов, бензопил).
Помните о пожароопасности топлива
• Не переполняйте топливный бак свыше уровня топливного фильтра, т.к. топливу нужно место для расширения.
• Протрите пролитое топливо немедленно.
• Плотно закрутите крышку горловины.
Процедура смешивания топлива с маслом
1. Отмерьте желаемое количество топлива и залейте его в бак.
2. Используйте крышку топливного бака для отмеривания необходимого количества добавляемого масла (для 2тактных двигателей).
3. Покачайте топливный бак перед пуском для перемешивания масла с топливом.
3. Пуск двигателя ВНИМАНИЕ: До запуска двигателя не подключайте к нему потребителей!
1. Откройте топливный кран, повернув его в положение «ON» (включено).
3. Поверните рычаг воздушной заслонки в влево.
ПРИМЕЧАНИЕ: Во включении заслонки нет необходимости, если двигатель прогрет.
4. Потихоньку потяните пусковой шнур до его зацепления, затем резко дерните.
5. После запуска прогрейте двигатель до тех пор, пока он не будет устойчиво работать с выключенной воздушной заслонкой.
6. Поверните рычаг воздушной заслонки в вправо.
Подключение потребителей (только переменного тока)
• До подключения убедитесь, что кабель и вилка присоединяемого потребителя находятся в хорошем техническом состоянии.
• Проверьте соответствие суммарной мощности подключаемых потребителей выходной мощности генератора.
• Используйте вилочные разъемы соответствующие токовой нагрузке конструкции.
1. Оберните кабель подключаемого инструмента (удлинителя) несколько раз вокруг рукоятки генератора.
3. Воткните вилку в гнездо.
4. Нажмите кнопку токовой защиты и включите подключенный электроаппарат.
ПРЕДУПРЕЖДЕНИЕ:
Уменьшите нагрузку потребителей, если защита от перегрузки отключает генератор.
НАПОМИНАНИЕ: Для повторного включения защиты нажмите кнопку в положение «1».
www.endress.ru НАПОМИНАНИЕ: Выключите потребители.
1. Отсоедините вилку кабеля от гнезда генератора.
2. Выключите зажигание, поставив выключатель в позицию «1».
3. Поверните топливный кран поперек шланга, отключив подачу топлива.
6.2 Глушитель. Избегайте прикосновения к горячим частям двигателя Периодически необходимо очищать отложения нагара.
1. Удалите защитный кожух глушителя.
3. Удалите образовавшийся нагар с помощью металлической щетки.
4. Установите глушитель на место.
1. Удалите крышку воздушного фильтра как показано на рисунке и вытащите фильтрующий элемент.
2. Промойте фильтрующий элемент в моющем растворе и просушите.
Смочите элемент чистым маслом и отожмите его излишки. Элемент должен быть влажным, но не подкапывать.
4. Рекомендуемое масло: или специальное для воздушных фильтров или SAE #20, моторное масло.
5. Вставьте элемент на место.
ПРЕДУПРЕЖДЕНИЕ: Не выкручивайте элемент для отжатия масла.
ПРИМЕЧАНИЕ: Убедитесь в полной посадке крышки перед обжатием ее винтов.
ПРЕДУПРЕЖДЕНИЕ: Никогда не запускайте двигатель без воздушного фильтра, это может привести к повышенному www.endress.ru износу поршня и цилиндра.
ПРЕДУПРЕЖДЕНИЕ: Не курите и не используйте открытый огонь (зажигалку) рядом с бензином или растворителем.
3. Закройте топливный краник.
4. Удалите колпачок и прокладку топливного крана.
Очистите кран растворителем и вытрите насухо.
6. Проверьте прокладку и замените, если это необходимо.
7. Соберите все в обратном порядке.
ПРЕДУПРЕЖДЕНИЕ: Убедитесь в плотном зажатии всех крепежей.
8.2 Двигатель Удалите свечу зажигания, влейте одну столовую ложку моторного масла в отверстие свечи и вверните свечу на 1.
место, проверните на несколько оборотов коленчатый вал двигателя (с включенным зажиганием) для равномерного распределения масла по поверхности цилиндра.
2. Потяните стартовый шнур до тех пор, пока Вы почувствуете сопротивление компрессии. Оставьте поршень в таком положении. Это предохранит цилиндр и клапана от ржавления (так клапана будут закрыты).
3. Очистите поверхность генератора и покройте ее ингибитором коррозии.
4. Храните генератор в сухом, хорошо проветриваемом помещении, накрыв его крышкой.
5. Генератор должен храниться и работать только в вертикальном положении.
Оборудование имеет сертификат соответствия № РОСС DE. МЕ22. В00235 и соответствует требованиям нормативных документов:
ГОСТ 21671-82, п.п. 3.3.2, 3.3.7-3.3.12, 3.6.1, 4.1-4.9, 8.11; ГОСТ 12.1.003-83 раздел 2; ГОСТ 12.1.005-88 п.2.4; ГОСТ Р 51318.12-96;
ГОСТ 30429-96; ГОСТ Р 51317.6.3-99 (МЭК/СИСПР 61000-6-3-96).
Гарантийный срок – 12 месяцев. Срок службы – 5 лет.
 «МОУ Ершичская средняя общеобразовательная школа Материалы конкурса (творческого экспромта) «Лицейская роза Пушкина» 2006 год Положение о творческом конкурсе (литературном экспромте) «Лицейская роза Пушкина»1. Общие положения. Творческий конкурс (. »
«Муниципальное бюджетное общеобразовательное учреждение Оскольская основная общеобразовательная школа Новооскольского района Белгородской области «Согласовано» «Утверждаю» Заместитель директора Директор МБОУ «Оскольская ООШ» МБОУ «Оскольская ООШ» / Лысенко В.Г./ /Капустина Т.П./ Приказ № «31» авгус. »
«Паспорт и инструкция по эксплуатации Контроллеры серии 740 и 760 для клапанов управления Autotrol® Водоочистка, водоподготовка, установка фильтров воды в Дмитровском районе. www.master-dmitrov.ru Содержание Раздел А – Обзор Как пользоваться инструкцией 3 Раздел В – Установка оборудования Предупреждения 3 Внешний. »
«ТИПОВАЯ ТЕХНОЛОГИЧЕСКАЯ КАРТА (ТТК) МОНТАЖ СБОРНОЙ КРЫШИ ИЗ КРУПНОРАЗМЕРНЫХ ЖЕЛЕЗОБЕТОННЫХ ЭЛЕМЕНТОВ I. ОБЩИЕ УКАЗАНИЯ 1. Работы по устройству крыши из сборных предварительно напряженных железобетонных панелей ПР (рис.1), монтир. »
«Все оригинальные аксессуары к вашей технике на одной странице iPad Руководство пользователя Для программного обеспечения iOS 6 Содержание Глава 1: Краткое знакомство 7 iPad: обзор 8 Аксессуары 9 Кнопки 11 Разъем для карты SIM 12 Значки статуса Гла. »
«ИНСТРУКЦИЯ ПО МОНТАЖУ ВОРОТА СЕКЦИОННЫЕ ПРОМЫШЛЕННЫЕ ВЫСОКИЙ МОНТАЖ С НИЖНИМ РАСПОЛОЖЕНИЕМ ВАЛА ИЮЛЬ 2011 ИНСТРУКЦИЯ ПО МОНТАЖУ ВОРОТА ПРОМЫШЛЕННЫЕ ВЫСОКИЙ МОНТАЖ С НИЖНИМ РАСПОЛОЖЕНИЕМ ВАЛА ФЛГУ.ВСП.00.013 ИМ СОДЕРЖАНИЕ 1. Общие указания 1.1. Оптимальная численность монтажной бригады 1.2. Рекомендуемый набор инструментов и п. »
«ЛИСТ АКТУАЛИЗАЦИИ № изменения, дата изменения и № протокола заседания учебнометодической комиссии филиала, номер страницы с изменением СТАЛО БЫЛО Основание: решение заседания ПЦК общеобраз. »
«РОССИЙСКИЙ ГОСУДАРСТВЕННЫЙ УНИВЕРСИТЕТ НЕФТИ и ГАЗА имени И.М. Губкина Утверждена проректором по научной работе проф. А.В. Мурадовым 31 марта 2014 года ПРОГРАММА вступительного испытания по направлению 21.06.01 «Геология, разведка и добыча полезных ископаемых» для поступающих в аспирантуру РГУ нефти и газа имени И.М. Губкина в 2. »
«2016 СПК Настройка обмена по Modbus Руководство для начинающих и продвинутых пользователей Версия: 1.0 Дата: 15.08.2016 Оглавление 1. Цель документа. Cпособы работы с Modbus в CODESYS. »
«Шейх Бахауддин Эфенди. Испрашивайте неба Сохбет от 8 октября 2016 г. Ассаляму алейкум. Аллах Ху, Аллах Ху, Аллах Ху Аллах. Аллах Ху, Аллах Ху, Аллах Ху Аллах. Аллах Ху, Аллах Ху, Аллах Ху Аллах. Аллах Ху, Аллах Ху, Аллах Ху Аллах. Аллах Ху, Аллах Ху, Алл. »
2017 www.kniga.lib-i.ru — «Бесплатная электронная библиотека — онлайн материалы»
Материалы этого сайта размещены для ознакомления, все права принадлежат их авторам.
Если Вы не согласны с тем, что Ваш материал размещён на этом сайте, пожалуйста, напишите нам, мы в течении 1-2 рабочих дней удалим его.
Источник
Бензиновый генератор ENDRESS ESE 900

| Производитель оборудования: | Endress |
| Тип двигателя: | Бензиновый |
| Кожух: | Без кожуха |
| Способ пуска: | Ручной |
| Количество фаз: | 1 |
| Мощность, кВт: | 0.8 |


| Тип двигателя | Бензиновый |
| Количество фаз | однофазные |
| Кожух | в кожухе |
| Способ пуска | ручной |
| Модель двигателя | SHE LUNG |
| Мощность, кВт | 0.8 |
| Выходное напряжение, В | 230 |
| Расход, л | 0,7 |
| Бак, л | 4 |
| Габаритные размеры, мм (ДхШхВ) | 410х340х336 |
| Вес, кг | 21 |
| Уровень шума, дБ | 69 |
| Раздел каталога | генераторы Endress |

Наша компания осуществляет доставку купленного вами товара по всей России. По Москве и области (в зависимости от веса товара) доставка осуществляется либо собственной службой доставки компании (до 100 кг), либо с помощью транспортных компаний. В города и регионы России доставка осуществляется с помощью транспортных компаний (в том числе наложенным платежом). Также вы можете самостоятельно забрать товар из нашего московского офиса.
Доставка в города и регионы России
Мы осуществляем доставку во все города и регионы России. Доставка осуществляется с помощью транспортных компаний: Деловые линии, СДЭК, DHL, Желдорэкспедиция, Pony Express, EMS Почта России.
Оформить доставку товара через транспортную компанию вы можете:
– с помощью нашего менеджера;
– самостоятельно.
В случае оформления доставки с помощью нашего менеджера стоимость доставки рассчитывается по ценам транспортных компаний и оплачивается отдельно. На определенные позиции распространяется бесплатная доставка. Условия уточняйте у нашего менеджера.
В случае самостоятельного оформления доставки воспользуйтесь ссылками на сайты транспортных компаний (см. ниже).
Стоимость доставки в города и регионы России
Стоимость доставки осуществляется по ценам транспортных компаний.
Рассчитать стоимость перевозки можно на сайтах транспортных компаний:
| Деловые линии | Рассчитать стоимость доставки | Отследить груз | |
| СДЭК | Рассчитать стоимость доставки | Отследить груз | |
| DHL | Рассчитать стоимость доставки | Отследить груз | |
| Желдорэкспедиция | Рассчитать стоимость доставки | Отследить груз | |
| Pony Express | Рассчитать стоимость доставки | Отследить груз | |
| EMS Почта России | Рассчитать стоимость доставки | Отследить груз |
Рассчитать ориентировочную стоимость и срок для ТК Деловые Линии
Наша компания осуществляет доставку купленного вами товара по всей России. По Москве и области (в зависимости от веса товара) доставка осуществляется либо собственной службой доставки компании (до 100 кг), либо с помощью транспортных компаний. В города и регионы России доставка осуществляется с помощью транспортных компаний (в том числе наложенным платежом). Также вы можете самостоятельно забрать товар из нашего московского офиса.
Доставка в города и регионы России
Мы осуществляем доставку во все города и регионы России. Доставка осуществляется с помощью транспортных компаний: Деловые линии, СДЭК, DHL, Желдорэкспедиция, Pony Express, EMS Почта России.
Оформить доставку товара через транспортную компанию вы можете:
– с помощью нашего менеджера;
– самостоятельно.
В случае оформления доставки с помощью нашего менеджера стоимость доставки рассчитывается по ценам транспортных компаний и оплачивается отдельно. На определенные позиции распространяется бесплатная доставка. Условия уточняйте у нашего менеджера.
В случае самостоятельного оформления доставки воспользуйтесь ссылками на сайты транспортных компаний (см. ниже).
Стоимость доставки в города и регионы России
Стоимость доставки осуществляется по ценам транспортных компаний.
Рассчитать стоимость доставки можно на сайтах транспортных компаний:
| Деловые линии | Рассчитать стоимость доставки | Отследить груз | |
| СДЭК | Рассчитать стоимость доставки | Отследить груз | |
| DHL | Рассчитать стоимость доставки | Отследить груз | |
| Желдорэкспедиция | Рассчитать стоимость доставки | Отследить груз | |
| Pony Express | Рассчитать стоимость доставки | Отследить груз | |
| Почта России | Рассчитать стоимость доставки | Отследить груз |
Рассчитать ориентировочную стоимость и срок доставки для ТК Деловые Линии
Источник
- Характеристики
- Отзывы
- Видео
Отзывы
— данные скрыты
Плюсы: Отличный помощник в работе и на отдыхе.Мелкие электроприборы, дрель , освещение и даже чайник на 750 Вт тянет на отлично.
Минусы: Нет
Коммент: Отличная модель, служит почти четыре года
Показать все отзывы о ENDRESS ESE 900
Обзоры ENDRESS ESE 900


Показать все обзоры ENDRESS ESE 900
Информация в описании модели носит справочный характер. Всегда перед покупкой уточняйте характеристики и комплектацию товара у менеджера выбранного вами интернет-магазина.
Общие характеристики |
|
| Тип электростанции | бензиновая |
| Число фаз | 1 |
| Число цилиндров | 1 |
| Число тактов | 2 |
| Тип охлаждения | воздушное |
| Тип генератора | синхронный |
| Класс защиты генератора | IP23 |
| Число розеток 12 В | 1 |
Основные параметры |
|
| Объем двигателя | 63 куб.см |
| Объем бака | 4 л |
| Время непрерывной работы | 5 ч |
| Активная мощность | 650 Вт |
| Максимальная мощность | 950 Вт |
| Уровень шума | 64 дБ |
| Ширина | 410 мм |
| Высота | 336 мм |
| Глубина | 440 мм |
| Вес | 20 кг |
Что есть |
|
| Ручной запуск | Да |
| Звукоизоляционный кожух | Да |
| Выход 12 В | Да |
Чего нет |
|
| Инверторная электростанция | Нет |
| Сварочная электростанция | Нет |
| Электрический запуск | Нет |
| Автоматический запуск | Нет |
| Бесщеточный генератор | Нет |
| Колеса | Нет |
| Глушитель | Нет |
| Защита от перегрузок | Нет |
| Вольтметр | Нет |
| Счетчик моточасов | Нет |
Отзывы владельцев
Ожидайте, мы собираем ещё отзывы…
16
К сожалению, больше отзывов не найдено 
Но вы можете поделиться своими мыслями и мнением об этом товаре, нажав на кнопку выше.
Видео обзоры
9.3
Приводному двигателю электрогенератора, как любому двигателю
внутреннего сгорания, для смазки и внутреннего охлаждения
требуется подходящее моторное масло. Также важно использовать
подходящее моторное масло для заправки и замены, соблюдая
предписанные интервалы замены.
Для заправки и замены использовать стандартное универсальное масло с
вязкостью 10W-30 для четырехтактных двигателей, которое применяется в
автомобильных двигателях. Это касается применения электрогенератора в
умеренных климатических зонах. При особо низкой или высокой
температуре наружного воздуха может понадобиться моторное масло с
другой вязкостью. Более точную информацию см. на следующем
информационном графике.
9.3.1
Электрогенератор оснащен системой автоматического отключения при
недостатке
недостаточного уровня масла. Система выполняет две функции:
1) предотвращение пуска двигателя при недостаточном уровне моторного
2) отключение приводного двигателя, если уровень моторного масла во
Если система автоматического отключения констатировала недостаток
масла, загорается желтая сигнальная лампа Рис. 7-3
задержек и сбоев эксплуатации уровеньмоторного масла необходимо
проверять перед каждым вводом в эксплуатацию.
Условия
Перед проведением проверки выполнить следующие действия.
Убедиться, что электрогенератор установлен горизонтально.
По окончании эксплуатации подождать не менее пяти минут, прежде
Моторное масло
Рис. 9-1 Выбор подходящего моторного масла
Проверка уровня масла
масла
во
масла;
время эксплуатации падает ниже минимального.
чем начинать проверку, чтобы моторное масло успело стечь в масляный
картер для правильного измерения.
Техническое обслуживание
избежание
повреждения
RU
двигателя
из-за
. Во избежание
45