
-
Contents
-
Table of Contents
-
Bookmarks
Quick Links
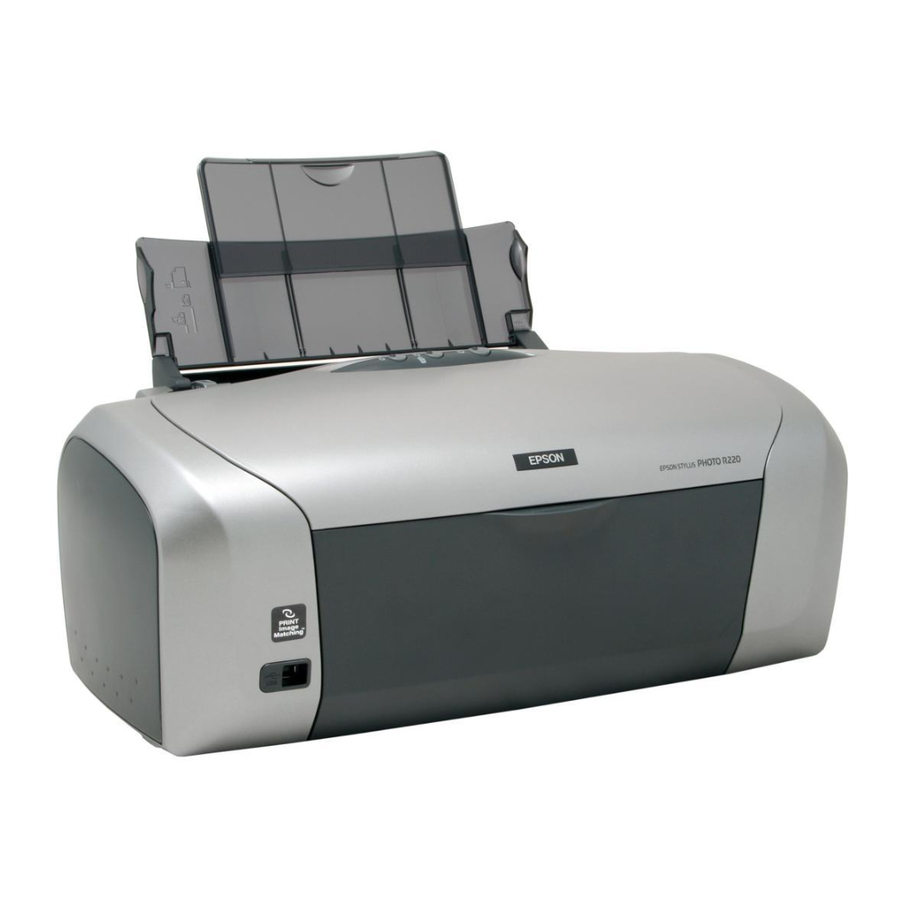
Epson Stylus Photo R220
®
Printer Basics
Related Manuals for Epson Stylus Photo R220
Summary of Contents for Epson Stylus Photo R220
-
Page 1: Printer Basics
Epson Stylus Photo R220 ® Printer Basics…
-
Page 2: Copyright Notice
(excluding the U.S.) failure to strictly comply with Seiko Epson Corporation’s operating and maintenance instructions. Seiko Epson Corporation shall not be liable for any damages or problems arising from the use of any options or any consumable products other than those designated as Original Epson Products or Epson Approved Products by Seiko Epson Corporation.
-
Page 3: Table Of Contents
Adjusting the Print Density ……. 29 Maintaining Your Printer Cleaning the Print Head ……..31 Running the Head Cleaning Utility .
-
Page 4
Transporting the Printer ……..42… -
Page 5: Welcome
Photo R220 is a full-featured photo and CD/DVD printer. You get outstanding prints from these advanced features: ■ Epson’s exclusive 6-color ink technology lets you achieve fine shadow detail, dazzling highlights, and excellent fill across a wide range of colors. Genuine ®…
-
Page 6: About Your Documentation
About Your Documentation To set up your printer and install its software, see the Start Here sheet. ® This book contains instructions on loading paper, printing with Windows ® Macintosh, printing borderless photos, printing on CDs and DVDs, maintaining your printer, and solving basic problems.
-
Page 7: Printing From Start To Finish
If you are just printing a rough draft, plain paper is fine. For the best results, you’ll want to use one of Epson’s special ink jet papers designed for your printer. For example, your photos will look great printed on Epson Ultra Premium Glossy Photo Paper.
-
Page 8
If the paper has a cut corner, position it in the upper right corner as you load it in the sheet feeder. ■ To load Epson ink jet papers, follow these guidelines: Paper Type Premium Bright White Paper Photo Quality Ink Jet Paper… -
Page 9: Printing In Windows
For instructions on printing borderless photos, see page 18. For instructions on printing with Advanced print settings, see your on-screen Reference Guide. 1. From the File menu, click 2. Make sure EPSON Stylus Photo R220 Series 3. Click the Properties button, click it. Then click Options next screen.)
-
Page 10
Photo : For photos or graphics with high print quality Best Photo 5. Make sure the paper the printer. See “Selecting the Correct Paper Type” on page 17. 6. Select Portrait Printing From Start to Finish Select the type of document you’re printing… -
Page 11
7. For more printing options, click the following settings as necessary. Select Paper & Quality Options as necessary Click here to select Photo RPM ® for the best print quality on certain paper types Select Print Options as necessary Note: For more information about advanced settings, or instructions on saving them as a group so you can reuse them later, click 8. -
Page 12: Selecting Default Settings
You can use these buttons to cancel, pause, or resume printing. You can also see how much ink you have left. Tip: You can also cancel printing by pressing the ) paper button on your printer. Selecting Default Settings Your printer settings only apply to the program that you’re currently using. If you want, you can change the Windows default printer settings for all your programs.
-
Page 13: Printing With A Macintosh
Advanced print settings, see your on-screen Reference Guide. Before you begin, make sure you added your printer to the Printer Setup Utility or Print Center as described on the Start Here sheet. 1. From the File menu, select 2.
-
Page 14
■ Cover Page ■ ColorSync color controls or gamma setting, or turn off color adjustments made by the printer driver. ■ Expansion ■ Summary Printing From Start to Finish : To select the number of copies or a page range. -
Page 15
■ Save Custom Settings 10.2.4, select Save As Note: For more information about printer settings, click the ? button. 10. Click the Advanced 11. Click to start printing. Print 12. To monitor the progress of your print job, click the appears in the dock on the bottom of your desktop. -
Page 16
Cancel printing Select the print job Tip: You can also cancel printing by pressing the ) paper button on your printer. 13. When you’re finished, close the printer window or Print Center. Printing From Start to Finish Pause printing Resume printing… -
Page 17: Selecting The Correct Paper Type
Plain paper Epson Iron-On Transfer Paper Epson Ink Jet Transparencies Epson Premium Bright White Paper Epson Photo Quality Ink Jet Paper Epson Photo Quality Ink Jet Cards Epson Photo Quality Self Adhesive Sheets Epson Matte Paper Heavyweight Epson Double-Sided Matte Paper…
-
Page 18: Printing Borderless Photos
You can print your photos with no margins, extending the image all the way to the edges of the page. Although borderless printing is a bit slower, you get beautiful snapshots and enlargements, without trimming, on these papers and sizes: Paper name Epson Matte Paper Heavyweight PremierArt Matte Scrapbook Photo Paper Epson Glossy Photo…
-
Page 19: Windows
“Macintosh” on page 20 Windows 1. Start your photo program and open your photo. 2. From the File menu, select 3. Make sure EPSON Stylus Photo R220 Series Properties Preferences You see the following window: Click here for photos without white borders 4.
-
Page 20: Macintosh
Page Setup window. Printing From Start to Finish checkbox. Read the message and click . You see the Page Setup window: Page Setup Select Stylus Photo R220 from the Format for pop-up menu. to start printing. Print…
-
Page 21
If you need to adjust the amount of image expansion necessary for borderless printing, select Expansion from the pop-up menu and move the Expansion slider. 12. Click to start printing. Print Print in the Printer pop-up menu. from the pop-up menu. Select Stylus Photo R220 Select Print Settings Printing Borderless Photos… -
Page 22: Printing On Cds And Dvds
Your printer includes a special tray that lets you print customized text, graphics, and photos directly on any ink jet-printable CD or DVD. The EPSON Print CD software makes it easy to import your own photos, add text, and modify your designs with a variety of special effects.
-
Page 23: Inserting A Cd Or Dvd
“Adjusting the Print Position” on page 28 and “Adjusting the Print Density” on page 29. Before you insert a CD or DVD, make sure the printer is turned on. Otherwise, the disc may not be positioned correctly. Then follow these steps: 1.
-
Page 24
Make sure you always use the small CD ring when printing on 8-cm CDs and that the CD and ring lay flat on the tray, otherwise the printer may be damaged. 4. Insert the tray carefully, making sure it’s level, not tilted up or down. Push the tray under the tab and the two rollers. -
Page 25: Designing Cds And Dvds
Designing CDs and DVDs You can use EPSON Print CD to create and print a disc design with images, graphics, and text. 1. Start EPSON Print CD by doing one of the following: ■ Windows: Click > EPSON Print CD ■…
-
Page 26
To check your design, it’s a good idea to print it on a sheet of plain paper before printing on a CD or DVD. Make sure you have plain paper loaded in the printer, then follow the instructions in “Printing Your Design” on page 27. -
Page 27: Printing Your Design
After you have created your design and loaded a CD or DVD, you’re ready to print. 1. Open the File menu and select Print 2. Make sure (Windows) or EPSON Stylus Photo R220 Series Stylus Photo (Macintosh) is selected, then click R220 Print Windows…
-
Page 28: Adjusting The Print Position
Use the blank cardboard check disk included with your printer, or an extra CD. You can also use these steps to check the position before you print on a CD or DVD.
-
Page 29: Adjusting The Print Density
1. Insert a test CD or DVD for printing, as described on page 23. 2. Start EPSON Print CD. 3. Select from the File menu. Print 4. Make sure EPSON Stylus Photo R220 Series (Macintosh) is selected, then click R220 (Windows) or Pattern 5. Click…
-
Page 30
9. Remove the CD or DVD and let it dry for at least 24 hours. Then check the saturation levels again. You can also use the Brightness and Contrast settings in EPSON Print CD to adjust color saturation. See the EPSON Print CD on-screen help for instructions. -
Page 31: Maintaining Your Printer
(This only works when the red H ink light is off.) Caution: When you don’t turn on your printer for a long time, print quality can decline, so turn it on and print a few pages at least once a month to maintain good print quality.
-
Page 32
If you don’t see any improvement after cleaning three or four times, refer to “Problems and Solutions” on page 46. You can also turn the printer off and wait overnight—this allows any dried ink to soften—and then try cleaning the print head again. -
Page 33: Replacing An Ink Cartridge
Replacing an Ink Cartridge When the red H ink light flashes, one or more ink cartridges are low on ink. When the red H ink light stays on, you need to replace the cartridge(s). Ink button and light When you print, you’ll also see a message on your screen telling you which cartridge is low or empty.
-
Page 34
Applications EPSON Printer Utility Select in the printer list, click , then select SP R220 Series EPSON StatusMonitor You see a window like this one: Click a cartridge image to display information about the cartridge. Maintaining Your Printer… -
Page 35: Purchasing Ink Cartridges
Color Multipack Caution: To ensure good results, use genuine Epson ink cartridges and do not refill them. Other products may cause damage to your printer not covered by Epson’s warranty. You can purchase genuine Epson ink and paper from an authorized Epson reseller.
-
Page 36: Removing And Installing Ink Cartridges
Be sure you have a new ink cartridge before you begin. Once you start replacing a cartridge, you must complete all the steps in one session. 1. Make sure the printer is turned on (the green P power light should be on, but not flashing). Then open the printer cover.
-
Page 37
5. Press in the tab on the back of the cartridge and lift the cartridge out of the printer. Dispose of it carefully. Warning: Keep ink cartridges out of the reach of children and don’t drink the ink. If ink gets on your hands, wash them thoroughly with soap and water. If ink gets in your eyes, flush them thoroughly with water. -
Page 38
H ink light goes out. Caution: Never turn off the printer while the green P power light is flashing, unless the printer hasn’t moved or made noise for more than 5 mintues. Maintaining Your Printer… -
Page 39: Aligning The Print Head
■ Macintosh: Open the . Select Utility SP R220 Series Print Head Alignment 4. Follow the instructions on the screen to print the alignment pattern. You see a window like this one: 5. On the test page, select the square without any visible bands. You may need to use a magnifying glass or loupe.
-
Page 40
If you can’t find a square without visible bands, choose the one that’s best. Then click Realignment Maintaining Your Printer to print another test page and repeat this step. , follow the instructions on the screen to print the next Next to print another test page and repeat this step. -
Page 41: Cleaning The Printer
3. If the outer case or inside of the sheet feeder are dirty, clean it with a soft cloth dampened with mild detergent. Keep the printer cover closed to prevent water from getting inside. 4. If ink accidentally gets inside of the printer, wipe it off with a damp cloth in the area shown. Clean here Warning: Don’t touch the gears or any other parts inside the printer.
-
Page 42: Transporting The Printer
To avoid damage, always leave the ink cartridges installed when transporting the printer. 1. Open the printer cover and turn on the printer. Wait until the print head locks in the far right position, then turn off the printer. 2. Unplug the power cord from the electrical outlet. Then disconnect the power cord and USB cable from the printer.
-
Page 43: Solving Problems
See “Diagnosing Printer Problems” on page 44 to help determine what the cause of your printer problem may be. If you cannot solve the problem, see “Where To Get Help” on page 54. Printer Parts Paper support extension Paper support…
-
Page 44: Diagnosing Printer Problems
Diagnosing Printer Problems First, check the printer’s lights (see below) or run a printer check (see page 63). Lights Green P power light flashes Red ) paper light is Red ) paper light flashes Red H ink light flashes Red H ink light is on…
-
Page 45: Running A Printer Check
Turn the printer back on again. If the lights are still flashing, contact Epson as described on page 54. The printer may have an internal error. Turn off the printer, wait a few seconds, then turn it on again.
-
Page 46: Problems And Solutions
If the test page doesn’t print, you may have a problem with your printer. Try the suggestions in “Problems and Solutions” below. If nothing works, contact Epson as described in “Where To Get Help” on page 54. 6. Turn off the printer, reconnect the USB cable, then turn on your printer and computer.
-
Page 47: Printer Problems
Make sure the print head nozzles are not clogged. To clean the print head, see page 31. ■ The printer won’t operate properly if it’s tilted or at an angle. Place it on a flat, stable surface that extends beyond the printer base in all directions. Problems and Solutions…
-
Page 48: Print Quality Problems
Your printer makes noise when you turn it on or after it has been sitting for awhile. Your printer is performing routine maintenance. Printing is too slow. Make sure your system meets the requirements listed on page 57. If you’re printing a high-resolution image, you need more than the minimum requirements listed.
-
Page 49
You may need to use an included support sheet or load your paper one sheet at a time. ■ Use Epson papers to ensure proper saturation and absorption of genuine Epson inks. ■ Make sure your paper meets the specifications listed in the on-screen Reference Guide. -
Page 50: Problems With Paper Feeding
Your printed colors can never exactly match your on-screen colors. However, you can use a color management system to get as close as possible. You can also use your printer’s color management features. See your on-screen Reference Guide for more information.
-
Page 51: Cd/Dvd Printing Problems
■ Adjust the print density as described on page 29. ■ Adjust the brightness or contrast. See the EPSON Print CD on-screen Help. Printed CDs or DVDs are dirty. Clean the rollers as described on page 22. Problems and Solutions…
-
Page 52: Miscellaneous Printout Problems
Miscellaneous Printout Problems The image is inverted. Turn off the Mirror Image in your program. (If you’re printing on Epson Iron-On Transfer Paper, the image should be inverted.) The printer prints blank pages. ■ Make sure your printer is selected, or is the active printer in the Printer Setup Utility or Print Center (Macintosh).
-
Page 53: Uninstalling Printer Software
You may need to uninstall and then reinstall your printer driver and utilities. For example, this might be necessary when you upgrade your operating system. You don’t need to uninstall EPSON Print CD or your on-screen Reference Guide. Note: Do not turn off or disconnect the printer while you are uninstalling the software.
-
Page 54: Macintosh
5. Restart your Macintosh, then see the Start Here sheet to reinstall your software. Where To Get Help Epson provides technical assistance 24 hours a day through the electronic support services and automated telephone services listed below: Service World Wide Web…
-
Page 55
Computer configuration and operating system version ■ Description of the problem You can purchase genuine Epson ink and paper from an authorized Epson reseller. To find the nearest reseller, please call 800-GO-EPSON (800-463-7766). To purchase online, visit www.epsonstore.com (U.S. sales only). In Canada, please call 800-463-7766 for reseller referral. -
Page 56
Solving Problems… -
Page 57: Requirements And Notices
Windows System Requirements To use your printer and its software, your system should have: ■ ® A Microsoft Windows compatible PC with a Pentium ■ Microsoft Windows 98SE, Windows Me, Windows 2000, or Windows XP ■ At least 256MB RAM (512MB recommended) ■…
-
Page 58: Important Safety Instructions
Do not let the power cord become damaged or frayed. ■ If you use an extension cord with the printer, make sure the total ampere rating of the devices plugged into the extension cord does not exceed the cord’s ampere rating.
-
Page 59: Ink Cartridge Safety Instructions
If you remove an ink cartridge for later use, protect the ink supply area from dirt and dust and store it in the same environment as the printer. Note that there is a valve in the ink supply port, making covers or plugs unnecessary, but care is needed to prevent the ink from staining items that the cartridge touches.
-
Page 60: Fcc Compliance Statement
FCC Compliance Statement For United States Users This equipment has been tested and found to comply with the limits for a Class B digital device, pursuant to Part 15 of the FCC Rules. These limits are designed to provide reasonable protection against harmful interference in a residential installation. This equipment generates, uses, and can radiate radio frequency energy and, if not installed and used in accordance with the instructions, may cause harmful interference to radio or television reception.
-
Page 61: Declaration Of Conformity
Type of Product: Ink Jet Printer Model: B261A NERGY ® As an E Partner, Epson has determined that NERGY this product meets the E NERGY energy efficiency. The EPA E equipment program is a voluntary partnership with the computer and office equipment industry to promote the…
-
Page 62: Epson America, Inc. Limited Warranty
Epson within five (5) working days of receipt of the replacement. Epson requires a debit or a credit card number to secure the cost of the replacement printer in the event that you fail to return the defective one.
-
Page 63
Epson is not responsible for warranty service should the Epson label or logo or the rating label or serial number be removed or should the product fail to be properly maintained or fail to function properly as a result of misuse,… -
Page 64
Requirements and Notices… -
Page 65: Index
, 29 to 30 Faint images , 28 to 29 Full bleed printing Gamma setting Glossy Photo Paper Grainy prints Head Cleaning utility Help, Epson High Speed setting , 14 , 12 , 14 , 12 , 18 to 21 , 55…
-
Page 66
, 48 Macintosh , 34 Windows , 33 , 42 , 48 , 32 , 13 Epson , 8, 17, 18 feeding problems , 50 to 51 loading , 7 to 8 orientation , 10, 13 size , 10, 13… -
Page 67
, 46 to 47 uninstalling , 53 to 54 Stopping printing Windows , 12 System requirements , 57 Transparencies , 17 Transporting printer , 42 Troubleshooting , 43 to 55 Type setting , 10 Uninstalling software , 53 to 54 , 57 Utilities… -
Page 68
Index… -
Page 69: Epson Ink Jet Papers And Ink Cartridges
Epson Ink Jet Papers and Ink Cartridges Use Epson paper and inks to get the same photo quality results that have earned Epson’s printers all of their awards! Epson papers are specially coated to work with genuine Epson inks. Here are details about just a few of Epson’s papers:…
-
Page 70: How To Order Epson Ink And Paper
How To Order Epson Ink and Paper You can purchase genuine Epson ink and paper from an authorized Epson reseller. To find the nearest reseller, please call 800-GO-EPSON (800-463-7766). To purchase online, visit www.epsonstore.com (U.S. sales only). In Canada, please call (800-463-7766) for dealer referral.
инструкцияEpson Stylus Photo R220
Epson Stylus Photo R220
Printer Basics
®
R220.book Page 1 Sunday, August 7, 2005 3:41 PM
Посмотреть инструкция для Epson Stylus Photo R220 бесплатно. Руководство относится к категории принтеры, 3 человек(а) дали ему среднюю оценку 8.1. Руководство доступно на следующих языках: английский. У вас есть вопрос о Epson Stylus Photo R220 или вам нужна помощь? Задайте свой вопрос здесь
- Front Matter
- Contents
- Welcome
- Printing From Start to Finish
- Maintaining Your Printer
- Solving Problems
- Requirements and Notices
- Index
- Warranty
- Epson Ink Jet Papers and Ink Cartridges
- How To Order Epson Ink and Paper
Главная
| Epson | |
| Stylus Photo R220 | C11C626032 | |
| принтер | |
| 8715946284231 | |
| английский | |
| Руководство пользователя (PDF) |
Свойства
| Число картриджей для печати | 6 |
| Встроенный экран | — |
| Цвет товара | Grey, Silver |
| Позиционирование на рынке | Дом и офис |
Печать
| Максимальное разрешение | 5760 x 1440 DPI |
| Технология печати | Струйная |
| Печать без полей | Да |
Типы и характеристики бумаги
| Максимальные размеры печати | А4 (210 x 297 мм) |
Вес и размеры
| Ширина | 462 mm |
| Глубина | 263 mm |
| Высота | 196 mm |
| Вес | 5000 g |
Порты и интерфейсы
| USB порт | Да |
| Прямая печать | — |
| PictBridge | — |
Сеть
| Bluetooth | Нет |
| Wi-Fi | Нет |
| Подключение Ethernet | Нет |
Энергопитание
Производительность
показать больше
Не можете найти ответ на свой вопрос в руководстве? Вы можете найти ответ на свой вопрос ниже, в разделе часто задаваемых вопросов о Epson Stylus Photo R220.
Какой вес Epson Stylus Photo R220?
Как удалить замятую бумагу из принтера?
Почему после установки оригинального картриджа принтер не работает?
Чем обусловлено плохое качество печати?
В чем разница между лазерным и струйным принтером?
Почему при печати на струйном принтере появляются черные полосы?
Что означает аббревиатура DPI?
Сколько картриджей можно поместить в Epson Stylus Photo R220?
Какая высота Epson Stylus Photo R220?
Какая ширина Epson Stylus Photo R220?
Какая толщина Epson Stylus Photo R220?
Инструкция Epson Stylus Photo R220 доступно в русский?
Не нашли свой вопрос? Задайте свой вопрос здесь
На этой странице вы можете совершенно бесплатно скачать Руководство по эксплуатации Epson Stylus Photo R220.
У документа PDF Руководство по эксплуатации 70 страниц, а его размер составляет 1.74 Mb.
Читать онлайн Принтеры Epson Stylus Photo R220 Руководство по эксплуатации

Скачать файл PDF «Epson Stylus Photo R220 Руководство по эксплуатации» (1.74 Mb)
Популярность:
907 просмотры
Подсчет страниц:
70 страницы
Тип файла:
Размер файла:
1.74 Mb
Прочие инструкции Epson Stylus Photo R220

Прочие инструкции Epson Принтеры


Прочие инструкции Epson


- Manuals
- Brands
- Epson Manuals
- Printer
- R220 — Stylus Photo Color Inkjet Printer
- Service manual
-
Contents
-
Table of Contents
-
Troubleshooting
-
Bookmarks
Quick Links
SERVICE MANUAL
Color Inkjet Printer
EPSON Stylus Photo R220/R230
SEIJ05014
Related Manuals for Epson Stylus Photo R220
Summary of Contents for Epson Stylus Photo R220
-
Page 1: Service Manual
SERVICE MANUAL Color Inkjet Printer EPSON Stylus Photo R220/R230 SEIJ05014…
-
Page 2
SEIKO EPSON CORPORATION. All effort have been made to ensure the accuracy of the contents of this manual. However, should any errors be detected, SEIKO EPSON would greatly appreciate being informed of them. -
Page 3
REPAIRS ON EPSON PRODUCT SHOULD BE PERFORMED ONLY BY AN EPSON CERTIFIED REPAIR TECHNICIAN. MAKE CERTAIN THAT THE SOURCE VOLTAGES IS THE SAME AS THE RATED VOLTAGE, LISTED ON THE SERIAL NUMBER/RATING PLATE. IF THE EPSON PRODUCT HAS A PRIMARY AC RATING DIFFERENT FROM AVAILABLE POWER SOURCE, DO NOT CONNECT IT TO THE POWER SOURCE. -
Page 4: About This Manual
Provides preventive maintenance procedures and the lists of Indicates an operating or maintenance procedure, practice, or C A U T I O N Epson-approved lubricants and adhesives required for condition that, if not strictly observed, could result in damage to, servicing the product.
-
Page 5
Revision Status Revision Issued Date Description August 24, 2005 First Release… -
Page 6: Table Of Contents
EPSON Stylus Photo R220/R230 Revision A CONTENTS Chapter 1 TROUBLESHOOTING Chapter 3 ADJUSTMENT 1.1 Overview ………………….. 8 3.1 Adjustment Items and Overview…………….. 82 3.1.1 Servicing Adjustment Item List…………..82 1.2 Troubleshooting with LED Indications and Status Monitor 3 Message ….9 3.1.2 Replacement Part-Based Adjustment Priorities ………
-
Page 7
C H A P T E R TROUBLESHOOTING… -
Page 8: Chapter 1 Troubleshooting
EPSON Stylus Photo R220/R230 Revision A 1.1 Overview Table 1-2. Motor, Coil Resistance Motor Location Check Point Resistance This chapter describes how to identify troubles in two levels: unit level repair and Pin1 and 3 PF Motor Same as ASF/ 3.0Ω…
-
Page 9: Troubleshooting With Led Indications And Status Monitor 3 Message
EPSON Stylus Photo R220/R230 Revision A 1.2 Troubleshooting with LED Indications and Status Monitor 3 Message This chapter describes the LED Indications and the STM3 messages which are displayed when the printer detects an error in each operation such as power on, paper loading/feeding and ink absorption operation.
-
Page 10
EPSON Stylus Photo R220/R230 Revision A Table 1-4. LED Indications and STM3 LED Indication Printer status STM message Condition of error detection Power Paper This error is detected when; 1. Paper is present in ASF Assy. and CDR Guide Assy. is open while receiving print data. -
Page 11
EPSON Stylus Photo R220/R230 Revision A Table 1-4. LED Indications and STM3 LED Indication Printer status STM message Condition of error detection Power Paper This error is detected when feeding business Card Error Fast Blink card sized paper in landscape orientation. -
Page 12
EPSON Stylus Photo R220/R230 Revision A Table 1-4. LED Indications and STM3 LED Indication Printer status STM message Condition of error detection Power Paper This error is detected when the CD/DVD Tray CD/DVD Tray Error cannot be detected after attempting to print on a CD or DVD. -
Page 13
EPSON Stylus Photo R220/R230 Revision A Table 1-4. LED Indications and STM3 LED Indication Printer status STM message Condition of error detection Power Paper This error is detected when the Ink Cartridge is not installed or not in proper position. -
Page 14
EPSON Stylus Photo R220/R230 Revision A Table 1-4. LED Indications and STM3 LED Indication Printer status STM message Condition of error detection Power Paper This error is detected when; 1. The Ink Cartridge has run out of ink. 2. The Ink Cartridge is faulty. -
Page 15
EPSON Stylus Photo R220/R230 Revision A Table 1-4. LED Indications and STM3 LED Indication Printer status STM message Condition of error detection Power Paper This error is detected when the printer cannot Communication Error communicate with the PC properly. : No Change of the LED Status… -
Page 16: Unit Level Troubleshooting
EPSON Stylus Photo R220/R230 Revision A 1.3 Unit Level Troubleshooting The following is the example of How to use the following tables. ex.) When a fatal error occurs because the CR Motor is out of the home position at You can identify the troubles by using the checklist in this section after confirming the power-on.
-
Page 17: Troubleshooting
EPSON Stylus Photo R220/R230 Revision A Table 1-6. Fatal Error Check Points by Phenomenon Occurrence Faulty Part/ Timing Phenomenon Detail Check Point Remedy Part Name Position of CR 1. Check if the CR Motor Cable is connected to CN5 on the 1.
-
Page 18
EPSON Stylus Photo R220/R230 Revision A Table 1-7. Status and Possible Causes of CD/DVD Guide Error Carriage Unit LED Indication Occurrence Error Status Position Faulty Unit/Part Name Possible Causes Remedy STM3 Message Timing at Power-on Housing, Frame Contact point of the Star Wheel Sensor is cracked. -
Page 19
EPSON Stylus Photo R220/R230 Revision A Table 1-8. CD/DVD Guide Error Check Points by Phenomenon Occurrence Faulty Part/ Timing Phenomenon Detail Check Point Remedy Part Name Position of CR 1. Check if the contact point of the Housing, Frame with the 1. -
Page 20
EPSON Stylus Photo R220/R230 Revision A Table 1-9. Status and Possible Causes of Paper Jam Error Carriage Unit LED Indication Occurrence Error Status Position Faulty Unit/Part Name Possible Causes Remedy STM3 Message Timing at Power-on The PF Motor Cable is disconnected. -
Page 21
EPSON Stylus Photo R220/R230 Revision A Table 1-10. Paper Jam Error Check Points by Phenomenon Occurrence Faulty Part/ Timing Phenomenon Detail Check Point Remedy Part Name Position of CR 1. Check if the PF Motor Connector Cable is connected to 1. -
Page 22
EPSON Stylus Photo R220/R230 Revision A Table 1-10. Paper Jam Error Check Points by Phenomenon Occurrence Faulty Part/ Timing Phenomenon Detail Check Point Remedy Part Name Position of CR The Carriage Unit moves to the home 1. Check if the Torsion Spring, 0.22 for The PE Sensor 1. -
Page 23
EPSON Stylus Photo R220/R230 Revision A Table 1-10. Paper Jam Error Check Points by Phenomenon Occurrence Faulty Part/ Timing Phenomenon Detail Check Point Remedy Part Name Position of CR 1. Check if the Paper Guide, Upper has not detached from 1. -
Page 24
EPSON Stylus Photo R220/R230 Revision A Table 1-11. Status and Possible Causes of Card Error Carriage Unit LED Indication Occurrence Error Status Position Faulty Unit/Part Name Possible Causes Remedy STM3 Message Timing at Power-on The PW Sensor FFC is disconnected. -
Page 25
EPSON Stylus Photo R220/R230 Revision A Table 1-13. Status and Possible Causes of Paper Out Error Carriage Unit LED Indication Occurrence Error Status Position Faulty Unit/Part Name Possible Causes Remedy STM3 Message Timing at Power-on The Compression Spring, 2.51 comes off. -
Page 26
EPSON Stylus Photo R220/R230 Revision A Table 1-14. Paper Out Error Check Points by Phenomenon Occurrence Timing Faulty Part/ Phenomenon Detail Check Point Remedy Position of CR Part Name 1. Check if the Roller, Retard Assy. operates properly while 1. Reassemble the Extension Spring, 0.45 feeding paper. -
Page 27
EPSON Stylus Photo R220/R230 Revision A Table 1-14. Paper Out Error Check Points by Phenomenon Occurrence Timing Faulty Part/ Phenomenon Detail Check Point Remedy Position of CR Part Name 1. Check if the Compression Spring, 2.36 of the Lever, 1. Replace the Ink System with a new one. -
Page 28
EPSON Stylus Photo R220/R230 Revision A Table 1-15. Status and Possible Causes of CD/DVD Tray Error Carriage Unit LED Indication Occurrence Error Status Position Faulty Unit/Part Name Possible Causes Remedy STM3 Message Timing at Power-on Power : — CDR Tray Contact point of the CDR Tray Sensor is cracked. -
Page 29
PC. Cable correctly. displayed on STM3 when a print job is set to the printer. 1. Check if the Stylus Photo R220/R230 Printer Driver is 1. Install the Stylus Photo R220/R230 Printer Printer Driver used for the print job. -
Page 30
EPSON Stylus Photo R220/R230 Revision A Table 1-19. Status and Possible Causes of No Ink Cartridge Error. Carriage Unit LED Indication Occurrence Error Status Position Faulty Unit/Part Name Possible Causes Remedy STM3 Message Timing at Power-on Ink Cartridges The bundled Ink Cartridge is faulty. -
Page 31
EPSON Stylus Photo R220/R230 Revision A Table 1-21. Multi-feed Occurs without LED/STM3 Error Notifications Carriage Unit LED Indication Occurrence Error Status Position Faulty Unit/Part Name Possible Causes Remedy STM3 Message Timing at Power-on Power : — The Extension Spring 0.45 comes off. -
Page 32
EPSON Stylus Photo R220/R230 Revision A Table 1-23. Status and Possible Causes for Abnormal Sound Carriage Unit LED Indication Occurrence Error Status Position Faulty Unit/Part Name Possible Causes Remedy STM3 Message Timing at Power-on Carriage Unit Lubrication is insufficient. Power : — Frame EJ Assy. -
Page 33
EPSON Stylus Photo R220/R230 Revision A Table 1-25. Status and Possible Causes of Print Quality Problems LED Indication Occurrence Error Status Phenomenon Faulty Unit/Part Name Possible Causes Remedy STM3 Message Timing Adherents on the Sealing Rubber. Or the Sealing Rubber is damaged. -
Page 34
EPSON Stylus Photo R220/R230 Revision A Table 1-25. Status and Possible Causes of Print Quality Problems LED Indication Occurrence Error Status Phenomenon Faulty Unit/Part Name Possible Causes Remedy STM3 Message Timing Paper Guide, Front The Porous Pad for borderless print comes off. -
Page 35
EPSON Stylus Photo R220/R230 Revision A Table 1-26. Check Points for Print Quality Problems Occurrence Faulty Part/ Timing Phenomenon Detail Check Point Remedy Part Name Position of CR 1. Check if there is not any foreign matter on the sealing 1. -
Page 36
EPSON Stylus Photo R220/R230 Revision A Table 1-26. Check Points for Print Quality Problems Occurrence Faulty Part/ Timing Phenomenon Detail Check Point Remedy Part Name Position of CR Ink System 7. Check if the Slider Lock Lever is not damaged. -
Page 37
EPSON Stylus Photo R220/R230 Revision A Table 1-26. Check Points for Print Quality Problems Occurrence Faulty Part/ Timing Phenomenon Detail Check Point Remedy Part Name Position of CR 1. Check if the surface of the Frame EJ Assy. is precisely 1. -
Page 38
EPSON Stylus Photo R220/R230 Revision A Table 1-26. Check Points for Print Quality Problems Occurrence Faulty Part/ Timing Phenomenon Detail Check Point Remedy Part Name Position of CR One or more than one traces of the Star 1. Check if the Star Wheels have not detached. -
Page 39
EPSON Stylus Photo R220/R230 Revision A Table 1-26. Check Points for Print Quality Problems Occurrence Faulty Part/ Timing Phenomenon Detail Check Point Remedy Part Name Position of CR 1. Check if there is any ink adhesion on the Frame EJ Assy. -
Page 40
C H A P T E R DISASSEMBLY / ASSEMBLY… -
Page 41: Overview
This chapter describes the procedure for disassembling and reassembling the main cartridge and be sure to secure the Ink Cartridge to the printer components of the Stylus Photo R220/R230. Unless otherwise specified, disassembled cover with tape tightly to keep it from moving.
-
Page 42: Pre-Shipment Checks
EPSON Stylus Photo R220/R230 Revision A 2.1.3 Pre-Shipment Checks Table 2-2. Service Completion Pre-Shipment Check List Classification Item Check Point Status When returning this product to the user after completing printer repair, check that the Checked work is complete using the following table.
-
Page 43: And How To Ensure The Quality Of Reassembled Product
EPSON Stylus Photo R220/R230 Revision A 2.2 Caution regarding assembling/disassembling Ensuring the attaching position in X, Y and Z directions. the printer mechanism, and how to ensure the Installing each part or component of the Printer Mechanism accurately can be made by determining the positions of them in relation to the Lower Housing.
-
Page 44
EPSON Stylus Photo R220/R230 Revision A CDR Guide Assy. Maintaining the levelness of the CDR Guide Assy. Deformation of the CDR Guide Assy. may cause the defective print. [When Servicing] Disassemble/assemble carefully the CDR Guide Assy. Ensuring the quality of reassembled products It can be judged that the quality of the reassembled products is ensured if the printing test with the Adjustment program is successful. -
Page 45: Disassembly
Since a prototype was used to illustrate these disassembly and P O I N T assembly procedures, the appearance of some parts may differ Paper Support Assy./Housing (left/right)/ from those on Stylus Photo R220/R230. Stacker Assy. Removal (2.3.1 P.46) Housing (frame)/Panel Assy./Panel Board Removal (2.3.2…
-
Page 46: Paper Support Assy./Housing (Left/Right)/Stacker Assy. Removal
EPSON Stylus Photo R220/R230 Revision A 2.3.1 Paper Support Assy./Housing (left/right)/Stacker Parts/Units which should be removed before removing the Paper Support Assy./Housing (left/right)/Stacker Assy. Assy. removal None External View Disassembly Procedure Housing, Right Housing, Left Paper Support Assy. Removal Release the two dowels that secure the Paper Support Assy. to the Frame ASF and remove the assy.
-
Page 47
EPSON Stylus Photo R220/R230 Revision A External View Left Front of the Printer Dowel Figure 2-3. Stacker Assy. Removal Stacker Assy. Removal Release the left dowel that secures the Stacker Assy. to the Housing, Lower with a flat-blade screwdriver or similar tool, and remove the Stacker Assy. -
Page 48: Housing, Frame/Panel/Panel Board Removal
EPSON Stylus Photo R220/R230 Revision A 2.3.2 Housing, Frame/Panel/Panel Board Removal Parts/Units which should be removed before removing the Housing, Frame/ Panel/Panel Board. External View Paper Support Assy./Housing (left/right) Right Front of the Printer Left Front of the Printer Disassembly Procedure…
-
Page 49
EPSON Stylus Photo R220/R230 Revision A Panel Removal Panel Board Removal Release the left and right tabs that secure the Panel to the Housing, Frame and Remove the Panel Board lifting upward. remove the Panel. When reinstalling the Housing, Frame… -
Page 50: Asf Assy. Removal
EPSON Stylus Photo R220/R230 Revision A 2.3.3 ASF Assy. Removal Parts/Units which should be removed before removing ASF Assy. Paper Support Assy./Housing (left/right)/Housing, Frame External View Disassembly Procedure Acetate Tape C.B.S. (P4) 3×8 (5-7kgf.cm) Disconnect the connector cables of the PG Sensor and the Sensor, CDR Assy.
-
Page 51
EPSON Stylus Photo R220/R230 Revision A When reassembling the ASF Assy. When reinstalling the ASF Assy. on the Frame, Main Make sure that Extension Spring is hooked on the Frame, Make sure that Compression Spring, 2.51 is correctly ASF and the Roller, Retard Assy. -
Page 52: Cr Motor Removal
EPSON Stylus Photo R220/R230 Revision A 2.3.4 CR Motor Removal Parts/Units which should be removed before removing “CR Motor”. Paper Support Assy./Housing (left/right)/Housing, Frame External View Disassembly Procedure Rear of the Printer Disconnect the CR Motor connector cable from CN5 on the Main Board.
-
Page 53
EPSON Stylus Photo R220/R230 Revision A When having removed the Timing Belt or replace it with a new A D J U S T M E N T R E Q U I R E D one, perform the following adjustments in the order given orders. -
Page 54: Print Head Removal
EPSON Stylus Photo R220/R230 Revision A 2.3.5 Print Head Removal Disassembly Procedure Remove the Ink Cartridges from the Carriage Unit. External View Remove the screw which secures the Holder, FFC to the Carriage Unit with a No.1 screwdriver. Then slightly lift the Holder, FFC to release three tabs and Tabs remove the Holder, FFC by sliding it downward.
-
Page 55: Porous Pad, Paper Guide, Front Removal
EPSON Stylus Photo R220/R230 Revision A 2.3.6 Porous Pad, Paper Guide, Front Removal Disassembly Procedure Removing the following three types of the Porous Pads from the Paper Guide, External View Front with the tweezers. • Porous Pad, Paper Guide, Front •…
-
Page 56
EPSON Stylus Photo R220/R230 Revision A Å@ When reinstalling the Porous Pad, Paper Guide, Front/ the Porous Pad, Paper Guide, Front, Support Fold perpendicularly the left and right sides of the Porous Pad, Paper Guide, Front, Support at the marks and install it to the Paper Guide, Front. -
Page 57: Main Board Assy. Removal
EPSON Stylus Photo R220/R230 Revision A 2.3.7 Main Board Assy. Removal Parts/Units which should be removed before removing Main Board Assy. Paper Support Assy./Housing (left/right)/Housing, Frame/ASF Assy. External View Disassembly Procedure Rear of the Printer M/B Shield Plate Earth Remove the screw that secures the Earth and release the Earth.
-
Page 58
EPSON Stylus Photo R220/R230 Revision A When impossible to read data from the old board, perform A D J U S T M E N T the following adjustments in order shown below after R E Q U I R E D replacing the old board with a new one. -
Page 59: Holder, Shaft Assy./Ld Roller Removal
EPSON Stylus Photo R220/R230 Revision A 2.3.8 Holder, Shaft Assy./LD Roller Removal Disassembly Procedure Holder, Shaft Assy. Removal External View Disconnect the following connector cables from the Main Board Assy. Tabs Rear of the Printer CN7, CN8, CN15 CN5: CR Motor cable…
-
Page 60
EPSON Stylus Photo R220/R230 Revision A External View LD Roller Removal Release the two dowels that secure the Paper, Block to the Holder, Shaft Assy., and remove it. Paper, Block Remove the Shaft, LD Roller and the Clutch from the Holder, Shaft, LD… -
Page 61
EPSON Stylus Photo R220/R230 Revision A When reinstalling the Shaft, LD Roller to the Holder, Shaft, LD Do not damage the teeth of the Spur Gear, 36.8 and the Roller Combination Gear, 27.2, 19.2. Do not touch the LD Roller with bare hands. -
Page 62: Apg Assy. Removal
EPSON Stylus Photo R220/R230 Revision A 2.3.9 APG Assy. Removal Disassembly Procedure Remove the screw that secures the APG Assy. to the Frame, Main, and External View remove the assy. avoiding contact with the Frame, Main. Left Rear Side When reinstalling the APG Assy.
-
Page 63: Paper Guide, Upper Removal
EPSON Stylus Photo R220/R230 Revision A 2.3.10 Paper Guide, Upper Removal Disassembly Procedure External View Make sure to cover the surface of the PF Roller Assy. with a C A U T I O N transparent sheet when removing and reinstalling the Paper Guide, Upper.
-
Page 64: Carriage Unit Removal
EPSON Stylus Photo R220/R230 Revision A 2.3.11 Carriage Unit Removal Parts/Units which should be removed before removing Carriage Unit. Paper Support Assy./Housing (left/right)/Housing, Frame/ASF Assy./ External View Holder, Shaft Assy./Main Board Assy./APG Assy./Print Head Guide Plate, CR Disassembly Procedure Release the Fixed Spring, CR Shaft, Left from the tab of the Frame, Main and Fixed Spring, remove it.
-
Page 65
EPSON Stylus Photo R220/R230 Revision A External View Remove the E Ring, the Holder, Scale Right and the Cam, CR Right from the right side of the CR Guide Shaft. Holder, Scale, Left E Ring Flat Holder, Scale, Right Remove the Fixed Spring, CR Shaft, Right from the tab of the Frame, Main. -
Page 66
EPSON Stylus Photo R220/R230 Revision A External View CR Encoder Sensor Board Removal Remove the screw which secures the CR Encoder Sensor Board to the C.P.B. (P1) 1.7×5 (1.5-2.5kgf.cm) Carriage Unit with a No.0 screwdriver. Disconnect the CR Encoder FFC and the PW Sensor FFC from the connector of the CR Encoder Sensor Board. -
Page 67
EPSON Stylus Photo R220/R230 Revision A When reinstalling the CR Encoder Sensor Board on the Carriage When reinstalling the Carriage Unit Unit Check if the Timing Belt is correctly set to the installing Check if the CR Encoder Sensor Board is correctly secured. -
Page 68
EPSON Stylus Photo R220/R230 Revision A When reinstalling the CR Scale to the Printer Mechanism When replacing the following parts or components with a new A D J U S T M E N T ones, apply specified grease in its adequate dose. -
Page 69: Printer Mechanism/Housing, Lower Removal
EPSON Stylus Photo R220/R230 Revision A 2.3.12 Printer Mechanism/Housing, Lower Removal Parts/Units which should be removed before removing the Printer Mechanism/Housing, Lower. External View Paper Support Assy./Housing (left/right)/Housing, Frame/ASF Assy./ Holder, Shaft Assy./Main Board Assy. C.B.S. 3×6 (6-8kgf.cm) Disassembly Procedure C.B.P.
-
Page 70
EPSON Stylus Photo R220/R230 Revision A Be careful not to leak and drip ink from the end of the Ink Tube When reinstalling the Printer Mechanism to the Housing Lower C A U T I O N (Waste Ink Pads side) when lifting the Printer Mechanism. -
Page 71
EPSON Stylus Photo R220/R230 Revision A Make sure that the six Waste Ink Pads are correctly set to Be careful not to drop and damage the Lever, Change and the rib and dowel of the Housing, Lower. the Combination Gear, 27.2, 19.2. -
Page 72: Power Supply Board Removal
EPSON Stylus Photo R220/R230 Revision A 2.3.13 Power Supply Board Removal Disassembly Procedure Remove the screw that secures the Power Supply Board Unit to the Housing, External View Lower and remove it. Release the two tabs which secure the Shield Plate, Upper first, and remove it Power Supply Board Unit sliding upward.
-
Page 73: Cdr Guide Assy. Removal
EPSON Stylus Photo R220/R230 Revision A 2.3.14 CDR Guide Assy. Removal Disassembly Procedure Remove the three screws that secure the CDR Guide Assy. to the Frame, External View Main. Left Side of the Printer Right Side of the Printer CDR Guide Assy.
-
Page 74: Ink System Unit Removal
EPSON Stylus Photo R220/R230 Revision A 2.3.15 Ink System Unit Removal Parts/Units which should be removed before removing the Ink System Unit Paper Support Assy./Housing (left/right)/Housing, Frame/ASF Assy./ External View Holder, Shaft Assy./Main Board Assy./APG Assy./Print Head/Carriage Unit/ Printer Mechanism/CDR Guide Assy.
-
Page 75
EPSON Stylus Photo R220/R230 Revision A When reinstalling the Ink System Unit Install the Ink Tube to the two grooves at the bottom surface of the Cap Frame. Make sure that the Ink Tube is correctly connected to the point of the Frame, Cap shown in Figure2-42. -
Page 76: Paper Guide, Front/Roller Ej Assy. Removal
EPSON Stylus Photo R220/R230 Revision A 2.3.16 Paper Guide, Front/Roller EJ Assy. Removal Parts/Units which should be removed before removing the Paper Guide, Front/Roller EJ Assy. External View Paper Support Assy./Housing (left/right)/Housing, Frame/ASF Assy./ Holder, Shaft Assy./Main Board Assy./APG Assy./Print Head/Carriage Unit/ Spur Gear, 37.242…
-
Page 77
EPSON Stylus Photo R220/R230 Revision A External View Release the tab which secures the Paper Guide, Front to the Frame, Main and remove it. When Not replacing the Porous Pad, Paper Guide, Front and the C A U T I O N… -
Page 78
EPSON Stylus Photo R220/R230 Revision A When installing the Paper Guide, Front to the Frame, Main When having replaced the Roller EJ Assy., apply G-26 grease to A D J U S T M E N T the specified points in adequate dose. -
Page 79: Pf Motor Removal
EPSON Stylus Photo R220/R230 Revision A 2.3.17 PF Motor Removal Remove the PF Motor from the Frame, Main. C A U T I O N External View Be careful not to damage the Pinion Gear of the PF Motor. Be careful not to lose the PF Motor Grounding Spring.
-
Page 80
EPSON Stylus Photo R220/R230 Revision A Make sure that the PF Motor connector cable is connected to CN6 on the Main Board connector. Tighten the four nuts to secure the PF Motor in the order shown in Figure2-48. Make sure that there is no gap between the Insulator Spacer, insulator, the PF Motor Insulator and the Frame, Main. -
Page 81
C H A P T E R ADJUSTMENT… -
Page 82: Adjustment Items And Overview
EPSON Stylus Photo R220/R230 Revision A 3.1 Adjustment Items and Overview This chapter describes adjustments to be made after the disassembly/reassembly of this product. 3.1.1 Servicing Adjustment Item List The adjustment items of this product are as follows. For details of the adjustment items, refer to the detailed procedures and sketches of the adjustment items.
-
Page 83
EPSON Stylus Photo R220/R230 Revision A Table 3-1. Adjustment Items Function Item Purpose Method Outline Tool Used Media First Dot This adjustment is made to correct the First Dot Position in the Select and execute this function in the exclusive servicing program. -
Page 84
Paper (A4) Print program CD-R Print Check if the center position of CDR is correct. This pattern is used to make a simple print check at the EPSON service Exclusive Sheet, CD, company. servicing Dummy program… -
Page 85
EPSON Stylus Photo R220/R230 Revision A Table 3-5. Appendix Function Item Purpose Adjustment Outline Tool Used Media Save All EEPROM This function is used to analyze defective products. Save the data of all EEPROM addresses. Exclusive Non-target Data servicing program APG Check This function is used to check if APG Assy. -
Page 86: Replacement Part-Based Adjustment Priorities
EPSON Stylus Photo R220/R230 Revision A 3.1.2 Replacement Part-Based Adjustment Priorities Note: «Required» in this table indicates the adjustment items that must be implemented when the corresponding parts/units have been removed or replaced. «Recommended», on the other hand, indicates those which are recommended the adjustment after removing or replacing The following table shows the adjustment items and their order for the replacement them.
-
Page 87
EPSON Stylus Photo R220/R230 Revision A Performance Priority Head CR Motor EEPROM Market USB ID Waste Ink Head ID First dot PW Sensor Bi-d Ink Charge Angular Deviation Data Copy Setting Input Pad Counter Input Adjustment Adjustment Adjustment Adjustment Adjustment Correction Roller EJ Assy. -
Page 88: Adjustment By Using Adjustment Program
EPSON Stylus Photo R220/R230 Revision A 3.2 Adjustment by using adjustment program 3.2.3 Head ID Input [Adjustment Procedure] The procedures of the adjustment items will be explained here. The intended item is as follows. Select the Head ID of the Adjustment Program.
-
Page 89: Bi-D Adjustment
EPSON Stylus Photo R220/R230 Revision A 3.2.5 Bi-d Adjustment [Adjustment Procedure] Select Bi-D Adjustment in the Adjustment Program. Click the [Print] button to print Bi-D Adjustment Pattern. After selecting the pattern that has the smallest misalignment in each variable dot, click the [Go to input page] button in the Adjustment Program.
-
Page 90: Pw Sensor Adjustment
EPSON Stylus Photo R220/R230 Revision A 3.2.6 PW Sensor Adjustment 3.2.7 First Dot Adjustment [Adjustment Procedure] [Adjustment Procedure] Select PW Sensor Adjustment in the Adjustment Program. Select First Dot Adjustment in the Adjustment Program. Click the [Print] button to print PW Sensor Adjustment Pattern.
-
Page 91: Cr Motor Deviation Correction
EPSON Stylus Photo R220/R230 Revision A 3.2.8 CR Motor Deviation Correction [Adjustment Procedure] Select CR Motor Deviation Correction in the Adjustment Program. Check each box of the replaced parts/units checklist and then click the [OK] button. 3.2.9 A4 Normal Paper Print [Adjustment Procedure] Select A4 Normal Paper Print in the Adjustment Program.
-
Page 92: Adjustment Except Adjustment Program
EPSON Stylus Photo R220/R230 Revision A 3.3 Adjustment Except Adjustment Program [Adjustment Procedure] Make both sides of the two Thickness Gauge (1.15mm and 1.31mm) clean by This section explains the adjustments other than those made by the Adjustment wiping with Bemcot with a little alcohol.
-
Page 93
EPSON Stylus Photo R220/R230 Revision A Move the Carriage Unit to the left edge of the printer, then set the Thickness Remove the Thickness Gauge and move the Carriage Unit to the right edge. Then, Gauge (1.15mm) on the three left ribs of the Paper Guide, Front. -
Page 94
EPSON Stylus Photo R220/R230 Revision A After finishing PG Adjustment on the right, move the Carriage Unit to the left 11. Check PGs on both the left and right according to the flowchart in the Figure 3-12. edge of the printer again, then check PG according to the flowchart in the Figure Start 3-11. -
Page 95: Chapter 4 Maintenance
C H A P T E R MAINTENANCE…
-
Page 96: Overview
EPSON Stylus Photo R220/R230 Revision A 4.1 Overview 4.1.2 Service Maintenance If print irregularity (missing dot, white line, etc.) or a maintenance request error This section provides information to maintain the printer in its optimum condition. (indicated as «Service Required» by the Status Monitor) has occurred, take the following actions to clear the error.
-
Page 97
EPSON Stylus Photo R220/R230 Revision A Select EPSON Status Monitor 3 in the Printer Driver Utility. Then make sure that Maintenance Request Error the printer connected to Status Monitor 3 is on standby status. If it is on standby, Ink is used for operations such as Head Cleaning as well as printing. In that case, the following will be displayed. -
Page 98: Lubrication
Revision A 4.1.3 Lubrication Refer to the following figures for the lubrication points. The lubrication used for each components of Stylus Photo R220/R230 has been <Lubrication Point> specified on based on the evaluation carried out by Epson. Therefore, when repairing 1.
-
Page 99: Maintenance Overview
EPSON Stylus Photo R220/R230 Revision A <Lubrication Point> <Lubrication Point> Rear of contact point between the 1. Contact point between the shaft PF Roller and tab of the Paper of the Frame EJ and inside the Paper Guide, Front Guide, Front…
-
Page 100
EPSON Stylus Photo R220/R230 Revision A <Lubrication Point> <Lubrication Point> Contact point between the Guide 1. Surface of contact point Shaft, Frame EJ, Right and the between upper side of the Cam, Cam, CR, Left Paper Guide, Front CR, Left and the Main Frame 2. -
Page 101
EPSON Stylus Photo R220/R230 Revision A <Lubrication Point> <Lubrication Point> 1. Groove on the right side of the Contact point between left side of CR Guide Shaft (The Groove is the CR Guide Shaft and the Fixed for the Fixed Spring, Shaft CR,… -
Page 102
EPSON Stylus Photo R220/R230 Revision A <Lubrication Point> <Lubrication Point> Upper surface Specified points on the Holder, 1. Upper surface of curving area Holder, Scale, Right Scale, Right in the left figure of the Holder, Idle Roller 2. Lower surface of curving area <Lubrication Type>… -
Page 103
EPSON Stylus Photo R220/R230 Revision A <Lubrication Point> <Lubrication Point> On the CR Guide Shaft outer the Contact Point between the Grounding Plate, Head bearings of the Carriage Grounding Plate, Head and the CR Guide Shaft <Lubrication Type> G-63 <Lubrication Type>… -
Page 104
EPSON Stylus Photo R220/R230 Revision A <Lubrication Point> <Lubrication Point> Specified section on the Paper 1. Specified section on the ASF Paper Back Lever Back Lever set in the ASF Assy. Frame in the left figure in the left figure 2. -
Page 105: Chapter 5 Appendix
C H A P T E R APPENDIX…
-
Page 106: Exploded Diagrams
EPSON Stylus Photo R220/R230 Revision A 5.1 Exploded Diagrams The exploded diagrams are shown at the following pages. AppendIx Exploded Diagrams…
-
Page 107
The parts to which no reference number is assigned will not be available as after-sale service parts. PM-G730 /STYLUS PHOTO R220,R230 NO.2 REV.01 C626-CASE-011… -
Page 108
The parts to which no reference number is assigned will not be available as after-sale service parts. PM-G730 / STYLUS PHOTO R220,R230 NO.3 REV.01 C626-ELEC-011… -
Page 109
The parts to which no reference number is assigned will not be available as after-sale service parts. PM-G730 / STYLUS PHOTO R220,R230 NO.4 REV.02 C626-MECH-012… -
Page 110
The parts to which no reference number is assigned will not be available as after-sale service parts. PM-G730 / STYLUS PHOTO R220,R230 NO.5 REV.01 C626-MECH-021… -
Page 111: Parts List
EPSON Stylus Photo R220/R230 Revision A 5.2 Parts List Code Parts Name BOARD ASSY.,PANEL Parts list for EPSON Stylus Photo R220/R230 CABLE,PANEL PRINTER MECHANISM(ASP) Code Parts Name CARRIAGE SHEET CDR ASSY.;D HOLDER,FFC POWER CABLE HOLDER,FFC;B NON FIG I/C WITHOUT INDIVIDUAL BOX B,WST,AS,4CD01C BOARD ASSY.,DETECTOR,PW…
-
Page 112
EPSON Stylus Photo R220/R230 Revision A Code Parts Name Code Parts Name POROUS PAD,PAPER GUIDE,FRONT,SUPPORT;B TORSION SPRING,21.2 POROUS PAD,PAPER GUIDE,FRONT,LEFT;B PRINT HEAD SPUR GEAR,41.38 ASF ASSY.;G EXTENSION SPRING,PUSH UP PLATE,L ROLLER,RETARD,ASSY. COMPRESSION SPRING,1.27 COMPRESSION SPRING,2.51 MOTOR ASSY.,PF;B POROUS PAD,INK EJECT,SMALL;B FRAME EJ,ASSY.,ASP… -
Page 113: Electrical Circuits
EPSON Stylus Photo R220/R230 Revision A 5.3 Electrical Circuits The electric circuit diagrams below are shown at the following pages: Main Board (C546 MAIN) Power Board (C528 PSH) Panel Board (C546PNL) IF Board (C546IF) AppendIx Electrical Circuits…
-
Page 114
Model : Stylus Photo R220/R230 Board : C546MAIN Rev. : L Sheet : 1/1… -
Page 115
Model : Stylus Photo R220/R230 Board : C528PSH Rev. : A Sheet : 1/1… -
Page 116
Model : Stylus Photo R220/R230 Board : C546PNL Rev. : A Sheet : 1/1… -
Page 117
Model : Stylus Photo R220/R230 Board : C546IF Rev. : C Sheet : 1/1…
-
Страница 1
Epson Stylus Photo R220 Printer Basics ® R220.book Page 1 Sunday, Au gust 7, 2005 3:41 PM[…]
-
Страница 2
2 Copyright Notice All rights reserved. No part of th is publicatio n may be repr oduced, stored in a retri eval system, or transmitted in any form or by any means, elec tronic, mechanical, photocopying, recording, or otherwise, without the prior wr itten permission of Seiko Epson Corporation. The information contained herein is designed only for u[…]
-
Страница 3
Contents Welcome . . . . . . . . . . . . . . . . . . . . . . . . . . . . . . . . . . . . . . . . . . . . . . 5 Exif Print . . . . . . . . . . . . . . . . . . . . . . . . . . . . . . . . . . . . . . . . . . . . . . . . 5 About Your Documentation . . . . . . . . . . . . . . . . . . . . . . . . . . . . . . . . . . . 6 Printing From Start to Finish . .[…]
-
Страница 4
4 Contents Aligning the Print Head . . . . . . . . . . . . . . . . . . . . . . . . . . . . . . . . . . . . . 39 Cleaning the Printer . . . . . . . . . . . . . . . . . . . . . . . . . . . . . . . . . . . . . . . 41 Transporting the Printer . . . . . . . . . . . . . . . . . . . . . . . . . . . . . . . . . . . . 42 Solving Problems . . . . . . . . . .[…]
-
Страница 5
Welcome Yo u r E p s o n S t y l u s ® Photo R220 is a full-featur ed photo and CD/D VD printer . Y o u get outstanding p rints from these advanc ed featur es: ■ Epson ’ s ex clusive 6-color ink technology lets you achieve fine shadow detail, dazzling highlights, and excellent fill across a wide range of colors. Genuine Eps o n ® ink and pape[…]
-
Страница 6
6 Welcome About Your Documentation T o set up your printer and install its softwar e, see the Start Here sheet. This book contains instructions on loading paper , prin ting with Windo ws ® and Maci nt osh , ® printing borderless photos, printing on CDs and DVDs, maintaining your printer , and solving basic problems. F or more information about yo[…]
-
Страница 7
Printing From Start to Finish Loading Paper The type of paper you choose affects the way y our printout looks, so be sure to select the correct paper for y our job. I f you ar e just printing a rough draft, plain paper is fine. F or the best r esults, you ’ll want to use one of Epson ’ s special ink jet papers designed for your printer . F or e[…]
-
Страница 8
8 Printing From Start to Finish F ollow these guidelines whe n loading paper: ■ Load the printable side face-up. I t’ s often brighter or whiter than the other side. ■ Load letterhead or preprinted paper into the printer top edge first. ■ Always load the short edge firs t, even when printing in landscape mode. ■ Don ’ t load paper above[…]
-
Страница 9
Printing in Windows 9 Printing in Windows F ollow the instructions in this section to print a document or photo using basic print settings. F or instr uctions on prin ting borderless photos, see page 18. For instructions on printing with Advanced print settings, see your on-screen Reference Guide . 1. F rom the File menu, click Print . 2. Make sure[…]
-
Страница 10
10 Printing From Start to Finish Y ou see th e basic print settings window: 4. Select from these Quality Option settings: Draft : F or rough drafts with reduced print quality Text : F or text-only documents wi th higher text quality Text & Imag e : F or documents w ith text and images with higher quality Photo : F or photos and graphics wi th g[…]
-
Страница 11
Printing in Windows 11 7. F or more printing options, cl ick the Advanced button. Then select the following settings as necessary . Note: For more information about advanced sett ings, or instr uctions on saving them as a group so you can reuse them later , click ? or Help . 8. If you want to change the layout settings, click the Page Layout tab an[…]
-
Страница 12
12 Printing From Start to Finish During printing, this w indow appears an d sho ws the progress of your print job. Y ou can use these buttons to cancel, pause, or resume printing. Y ou can also see how much ink you have left. Tip: Y ou can also canc el printing by pressing the ) paper button on your printer . Selecting Default Settings Y our printe[…]
-
Страница 13
Printing With a Macintosh 13 Printing With a Macintosh F ollow the instructions in this section to print a document or photo using basic print settings. F or instr uctions on prin ting borderless photos, see page 18. For instructions on printing with Advanced print settings, see your on-screen Reference Guide . Before y ou begin, make sure y ou add[…]
-
Страница 14
14 Printing From Start to Finish 8. Select the following P rint Settings as necessary: 9. Y ou can also choose other print settings by selecting these options in the pop-up menu: ■ Copies & Pages : T o select the number of copies or a page range. ■ Layout : T o select page layout opt ions. ■ Output Options : T o save your print job as a P[…]
-
Страница 15
Printing With a Macintosh 15 ■ Extension Sett ing: T o select a wider platen gap if ink smears on sheets or envelopes. ■ Save Custom Settings : T o save your selections for future use. (I n OS X 10.2.4, select Save As from the P resets pop-up men u.) Note: For more information about printer settings, click the ? button. 10. Click the Advanced b[…]
-
Страница 16
16 Printing From Start to Finish Y ou see a screen like this: Tip: Y ou can also canc el printing by pressing the ) paper button on your printer . 13. When you ’ re finished, close the printer windo w or P rint Center . Select the print job Cancel printing Pause printing Resume printing R220.book Page 16 Sunday, Augus t 7, 2005 3:41 PM[…]
-
Страница 17
Selecting the Correct Pape r Type 17 Selecting the Correct Paper Type Sele ct the corr ect paper Type or Media Type setting so your printer knows what kind of paper you ’ re using and adjusts the ink coverage accordingly . For this paper Select this paper Type or Media Type setting Plain paper Epson Iron-On Transfer Paper Epson Ink Jet Transparen[…]
-
Страница 18
18 Printing From Start to Finish Printing Borderless Photos Y ou can print your photos with no margins, extending the image all the way to the edges of the page. Although borderless printing is a bit slo wer , you get beautiful snapshots and enlargement s, without trimming , on these papers an d sizes: Return any unused paper to its original pa cka[…]
-
Страница 19
Printing Borderle ss Photos 19 See these sections for instruction s on selecting printer settings: ■ “W in do ws ” be lo w ■ “Macintosh ” on page 20 Windows 1. S tart your photo program and open y our photo. 2 . Fr o m t h e Fi l e m e n u , s e l e c t Pr int . 3. Make sure EPSON Stylus Phot o R220 Series is selected, then click Proper[…]
-
Страница 20
20 Printing From Start to Finish ■ Premium Lu ster Photo Paper ■ Premium Semigloss Photo Paper 6. Click the Borderless checkbox. Read the message and click OK . Note: If you need to adjust the amount of image expansion necessary for borderless printing, click the Page Layout tab and move the Expansion slider . 7. Select your paper S ize setting[…]
-
Страница 21
Printing Borderle ss Photos 21 7 . Fr o m t h e Fi l e m e n u , s e l e c t Pr int . 8. Select Stylus Photo R220 in the P rinter pop-up menu. 9. Select Print Settings from the pop-up menu. 10. Select one of the follo wing as the Media T ype setting: ■ Matte Paper — Heav yweight ■ Photo Paper ■ Glossy Photo Paper ■ Ultra Premium Glossy Phot[…]
-
Страница 22
22 Printing From Start to Finish Printing on CDs and DVDs Y our printer includes a spec ial tray that lets you print customized text, graphics, and photos directly on any ink jet-printable CD or D VD. The EPSON Print CD software makes it easy to import your o wn photos, add text, and modify your designs with a variety of special effects. Y ou can p[…]
-
Страница 23
Printing on CDs and DVDs 23 Inserting a CD or DVD Make sure the data, music, or video is burned on your ink jet-printable CDs or DVDs before you print. Otherwise, dir t or scratches on the surface may cause errors when you burn the data. If you plan to print a large number of CDs or DVDs, it ’ s a good idea to print a small sample, then wait a da[…]
-
Страница 24
24 Printing From Start to Finish 3. Place the CD or DVD on the CD/D VD tray with the wh ite or printable side face-up. M ake sure the disc lays flat in the tray . T o print on a small CD (8-cm), place the small CD ring on the t ray first, then place the CD inside the ring. Caution: Make sure you always use the small CD ri ng when printing on 8-cm C[…]
-
Страница 25
Printing on CDs and DVDs 25 Designing CDs and DVDs Y ou can use EPSON Print CD to create and print a disc design with images, graphics, and text. 1. S tart EPSON Print CD by doing one of the following: ■ Win dows : Click Start > Programs or All Programs > EPSON Print CD > EPSON Print CD . ■ Mac in to sh : Open the Applications > EPS[…]
-
Страница 26
26 Printing From Start to Finish 4. T o add text , do one of the following: ■ Win dows : Click the button. Enter your text and use the tabs to apply formatting and special effects, and click OK . ( T o open the window again, double-click any block of text.) ■ Mac in to sh : Click the button. I n the T ext Settings windo w , type your text, then[…]
-
Страница 27
Printing on CDs and DVDs 27 Printing Your Design After you have cr eated your design and loaded a CD or DVD, y ou ’ re ready to print. 1. Open the F ile menu and select Print . 2. Make sure EPSON Stylus Photo R220 Series (W ind o ws ) o r Stylus Photo R220 (Macintosh) is selected, then click Print . Note: After you print, hand le the CD or DVD ca[…]
-
Страница 28
28 Printing From Start to Finish Adjusting the Print Position If your printed images and text are not centered or positioned the way you want, you may need to adjust the printing position. Use the blank cardboar d check disk included with your printer , or an extra CD. Y ou can also use these steps to ch eck the position before you print on a CD or[…]
-
Страница 29
Printing on CDs and DVDs 29 7. Open the F ile menu and select Adjust Print Position (W indo ws) or Position Adjustment (Macintosh). Y ou see a screen like this: 8. Make sure Ent er Values (W ind ows ) or Value Entry (M acin tosh) is checked. Input the A distance in the Height (Top) or Top Space bo x. Enter the B distance in the Width (Right) or Rig[…]
-
Страница 30
30 Printing From Start to Finish 6. After the pattern is printed, examine the pri nt and make the Print Color Correction (W indo ws) or Color Correction (Macintosh) setting lighter or darker as necessary . Y ou can print three density patterns on one disc. Each pattern is printed in a different location. 7. After the first pattern is printed, adjus[…]
-
Страница 31
Maintaining Your Printer Cleaning the Print Head If your printouts ar e unexpectedly light or dots or lines are missing, you may need to clean the print head. This unclogs the nozzles so they can de liver ink properly . P rint head cleaning uses ink, so clean it only if quality declines. This section explains how to clean the prin t head using the […]
-
Страница 32
32 Maintaining Your Printer 4. When the green P power light stops flashing, make sure paper is loaded in the printer , then do one of the following: ■ Win dows : Cli ck Print nozzle check pattern , then click Print . ■ Mac in to sh : Click Confirmation , then click Next . The nozzle check pattern prints. 5. If the nozzle check pattern has no wh[…]
-
Страница 33
Replacing an Ink Cartridge 33 Replacing an Ink Cartridge When the red H ink light flashes, one or more ink cartridges are lo w on ink. When the red H ink light stays on, you need to r eplace the cartridge(s). When you print, you ’ll als o see a me ssage o n your sc reen tel ling yo u which cartridge is low or empty . When a cartridge is more than[…]
-
Страница 34
34 Maintaining Your Printer ■ Mac in to sh : Open the Applications fold er and select EPSON Printer Utility . Sel ec t SP R220 Series in the printer list, click OK , then select EPSON StatusMonitor . Y ou see a window like this one: Click a cartridge image to display information about the car tridge. R220.book Page 34 Sunday, Augus t 7, 2005 3:41[…]
-
Страница 35
Replacing an Ink Cartridge 35 Purchasing Ink Cartridges U se these Epson ink cartridges within six months of installing them and before the expiration date on the package: Caution: T o ensure good results, use genuine Epson ink cartridge s and do not refill them. Other products may cause damage to your printer not covered by Epson’ s warranty . Y[…]
-
Страница 36
36 Maintaining Your Printer Removing and Installing Ink Cartridges Be sure you have a new ink cartridge before you begin. Once you start replacing a cartridge, you must complete all the steps in one session. 1 . Ma ke s u r e t h e p r i n t e r i s t u r n e d o n ( t h e g re e n P power light should be on, but not flashing). Then open the printe[…]
-
Страница 37
Replacing an Ink Cartridge 37 5. P ress in the tab on the back of the cart ridge and lift the cartrid ge out of the printer . Dispose of it carefully . Warning: Keep ink cartridges out of the reach of children and don ’t drink the ink. If ink gets on your hands, wash them thoroughly with soap and water . If ink gets in your eyes, flush them thoro[…]
-
Страница 38
38 Maintaining Your Printer 8. If you need to replace another ink cartridge, repeat steps 5 through 7 before continuing with step 9. 9. Close the cartridge co ver . 10. Close the printer cover and press the H ink button. The printer begins charging the ink deliver y system. The green P power light flashes and the printer makes noise. Charging takes[…]
-
Страница 39
Aligning the Print Head 39 Aligning the Print Head If your printouts contain misaligned vertical lines, or you see light or dark horizontal banding, you may ne ed to align the print head. 1. T urn on the printer . 2. Load several sheets of plain, letter-size paper . 3. Do one of the following: ■ Win dows : Right-click the icon on your taskbar (in[…]
-
Страница 40
40 Maintaining Your Printer 6. Select one square each for ro ws 1 to 4 , then enter the number of the bes t square in the corresponding box es on the screen. Then click Next . If you can ’ t find a square without visi ble bands, choose the one that’ s best. Then click Realignment to print another test pa ge and repeat this step. 7. After you cl[…]
-
Страница 41
Cleaning t he Printer 41 Cleaning the Printer T o keep your printer working at its best, you should clean it several times a ye ar . 1. T urn off the printer , unplug the power cord, and disconnect the USB cable. 2. Remo ve all the paper , then use a soft brush to clean th e sheet feeder . 3. If the outer case or inside of the sheet fe eder are dir[…]
-
Страница 42
42 Maintaining Your Printer Transporting the Printer If you need to mo ve your printer some distance, you must prepare it for transportation in its original box or one of a similar size . Caution: T o avoid damage, always leave the ink cartridges installed when transporting the printer . 1. Open the printer co ver and turn on the printer . W ait un[…]
-
Страница 43
Solving Problems See “Diagnosing P rinter P roblems ” on page 44 to help determine what the cause of your printer problem may be. I f you cannot solv e the problem, see “Where T o Get Help ” on pag e 5 4. Printer Parts Paper support extension Sheet feeder Edge g uide Front USB port Output tray Output tray extension Ink button and light Powe[…]
-
Страница 44
44 Solving Problems Diagnosing Printer Problems F irst, check the printer’ s lights (see belo w) or run a printer check (see page 63). Lights Explanation Green P power light flashes The printer is receiving a print job, replacing an ink cartridge, charging ink, or cleaning the print head. Red ) paper light is on If the CD/DVD tray guide is open, […]
-
Страница 45
Diagnosin g Printer Pro blems 45 Running a Printer Check Y ou can r un a printer check to determ ine whether a problem comes from the printer or some other source. 1. T urn off your printer and computer . 2. Disconnect the printer ’ s USB cable. 3. Load letter-size pa per in the printer . 4. Hold down the ) paper button, then press and r elease t[…]
-
Страница 46
46 Solving Problems 5. A nozzle check pattern prints. (If the pattern has gaps, you need to clean the print head as described on page 31.) ■ If the test page prints, the pr oblem prob ably lies in your softwar e settings, USB cable, or computer , or your software may not be installed correctly . ■ If the test page doesn ’ t print, you may hav[…]
-
Страница 47
Problems and Solutions 47 ■ If you are using a Macintosh and you do not see the printer name in the F orm at for menu on the P ag e Setup screen, you may need to set up your printer in the P rinter Setup U til ity or P rinter Center . See the Start Here sheet for instruct ions. ■ F or Windo ws 2000, if you see an error me ssage or you r softwar[…]
-
Страница 48
48 Solving Problems Your printer makes noise when you turn it on or after it has been sitting for awhile. Y our printer is per forming routine maintenance. Printing is too slow. Make sure y our system meets the requirements listed on page 57. If y ou ’ re printing a high-resolution image, y ou need more than the minimum requir ements listed. Yo u[…]
-
Страница 49
Problems and Solutions 49 ■ Make sure the printable side of the paper is face up . It ’ s usually brighter or whiter . ■ The ink car tridges may need replac ing; see page 33 for instructions. ■ Run the P rint Head Alignment utility; see page 39 for instructions. Your printout is blurry or smeared. ■ Make sure y ou load paper with the prin[…]
-
Страница 50
50 Solving Problems ■ Make sure your paper isn ’ t damaged, old, dirty , or loaded face dow n. If it is, reload a new stack of p aper with the printable side up; it is usually brighter or whiter than the other side. Your printout is grainy. ■ T r y using a higher quality paper . ■ Select a higher print quality setting; see page 10 ( Windows[…]
-
Страница 51
Problems and Solutions 51 Paper doesn’t feed correctly or jams in the printer. ■ Make sure the paper support extension is pulled up. ■ If paper doesn ’ t feed, remov e it from the sheet feeder , reload it ag ainst the right edge, then slide th e left edge guide against the paper . ■ If multiple pages feed at once, remove the paper from th[…]
-
Страница 52
52 Solving Problems The CD/DVD won’t feed into the printer. Make sure y ou hold the CD/DVD tray level as you load it into the tray guide without tilting it up or down. Don ’ t push in the tray too far , but line it up with the arrows exactly as described on page pa ge 23. Miscellaneous Printout Problems The image is inverted. T urn off the Mirr[…]
-
Страница 53
Uninstal ling Prin ter Soft ware 53 You see incorrect characters. ■ Make sure the USB cable is secur ely connected and meets the system requir ements on page 57. Then tr y printing again. ■ Make sure y our prin ter is selected in your softwar e, or is set as the active printer in the P rinter Setup U tility or P rint Center (Macintosh). ■ If […]
-
Страница 54
54 Solving Problems Macintosh 1. Open your Applications folder , then open the Utilitie s folder . 2. Double-click the Print Center or Printer Setup Utility icon. 3. Select EPSON Stylus Photo R220 , then click Delete . 4. Close P rint Center or the P rinter Setup Ut ility . 5. Restart your Macintosh, then see the Start Here sheet to reinstall your […]
-
Страница 55
Where To Get Help 55 Please have the following information re ady: ■ P roduct name (Epson S tylus Photo R220) ■ P roduct serial number (located on th e back of the printer and on its box) ■ P roof of purchase (such as a store receipt) and date of purchase ■ Computer configuration and operating system version ■ Description of the problem Y[…]
-
Страница 56
56 Solving Problems R220.book Page 56 Sunday, Augus t 7, 2005 3:41 PM[…]
-
Страница 57
Requirements and Notices Windows System Requirements T o use your printer and its software, your system should have: ■ A Microsoft ® Windows compatible PC with a P entium ® 300 MHz or faste r . ■ Micr oso ft Wi ndow s 9 8SE , Win dow s Me, Wi ndow s 20 00 , or Wind ows XP ■ At least 256MB RAM (512MB recommended) ■ 200MB free har d disk sp[…]
-
Страница 58
58 Requirements a nd Notice s Important Safety Instructions Before using your printer, read the following safety instructions to make sure you use the printer safely and effectiv ely: ■ Be sure to follow all warnings and instructions marked on the printer. ■ Use only the type of power source indicated on the printer’s label. ■ Connect all e[…]
-
Страница 59
Important Safety Instruct ions 59 ■ Unplug the printer and refer ser vicing to qualified service personnel under the following conditions: If the power cord or plug is damaged; if li quid has entered the pr inter; if the printer has been dropped or th e case damaged; if the printer does not operate normally or exhibits a distinct change in perfor[…]
-
Страница 60
60 Requirements a nd Notice s FCC Compliance Statement For United States Users This equipment has been tested and found to comply with the limits for a Class B digital device, pursuant to P ar t 15 of the FCC Rule s. These limits are designed to provide reasonable pr otection against harmful interf erence in a r esidential installation. This equipm[…]
-
Страница 61
Declaration of Conformity 61 Declaration of Conformity Accor ding to 47CFR, P ar t 2 and 15 for Class B P ersonal Computers and P eripherals; and/ or CPU Boards and P ower S upplies used with Class B P ersonal Computers: We : E p s o n A m e r i c a , I n c . Located at: MS: 3-13 3840 Kilroy Airport W ay Long Beach, CA 90806-24 69 T elephone: (562)[…]
-
Страница 62
62 Requirements a nd Notice s Epson America, Inc. Limited Warranty What Is Covered: Epson America, Inc. (“Epson”) warra nts to the original retail purchaser that the EPSON printer covered by this limi ted warranty statement, if purchased and operated only in the United States or Canada, confor ms to the manufacturer’s specifications and will […]
-
Страница 63
Epson America, Inc. Limited Warranty 63 peripheral devices added to the EPSON prod uct after its shipment from Epson, e.g., dealer or user-added boards or components. Epson is not responsible for warranty service should the Epson label or logo or the rating label or serial number be removed or should the product fail to be properly maintained or fa[…]
-
Страница 64
64 Requirements a nd Notice s R220.book Page 64 Sunday, Augus t 7, 2005 3:41 PM[…]
-
Страница 65
Index A Accessories , 55 Aligning print head , 39 to 40 Automatic mode, Macintosh , 14 B Banding , 48 to 49 Basic printing Macintosh , 13 to 16 Windows , 9 to 12 Blank pages , 52 Blurry images , 49 BorderFree printing , 18 to 21 C Cable, printer , 57 Cancelling printing Windows , 12 CDs adjusting print density , 29 to 30 adjusting print position , […]
-
Страница 66
66 Index I Incorrect characters , 53 Incorrect colors , 50 Ink cartridge level of ink in , 33 ordering , 35 replacing , 33 to 38 safety instructions , 37, 59 Ink Jet Transparencies , 17 Ink level, checking Macintosh , 34 Windows , 33 Installation problems , 46 to 47 Inverted image , 52 Iron-On Transfer Paper , 17 J Jams, paper , 51 L Layout problem[…]
-
Страница 67
Index 67 Printing basic , 9 to 16 BorderFree , 18 to 21 CDs and DVDs , 22 to 30 controlling , 12 Printing, slow , 48 Problems CD printing , 51 to 52 installing software , 46 to 47 miscellaneous , 52 to 53 paper feeding , 50 to 51 print quality , 48 to 50 printer , 43 to 53 Q Quality Option setting , 10 Quality/Speed setting , 14 S Safety instructio[…]
-
Страница 68
68 Index R220.book Page 68 Sunday, Augus t 7, 2005 3:41 PM[…]
-
Страница 69
Epson Ink Jet Papers and Ink Cartridges Use Epson paper and inks to get the same photo quality results that have earned Epson’s printers all of their awards! Epson papers are specially coated to work with genuine Epson inks. Here are details about just a few of Epson’s papers: Premium Glossy Photo Paper W ater-resistant, photographic-weight pap[…]
-
Страница 70
Epson Ink Jet Papers and Ink Cartridges Use Epson paper and inks to get the same photo quality results that have earned Epson’s printers all of their awards! Epson papers are specially coated to work with genuine Epson inks. Here are details about just a few of Epson’s papers: Premium Glossy Photo Paper W ater-resistant, photographic-weight pap[…]