[metaslider id=41676]
Чтобы настроить время на ваших часах Casio G-Shock GA-700 нужно вначале ознакомиться с названиями кнопок [смотри буквенные обозначения на картинке]. Только тогда вы сможете правильно понимать дальнейшие действия.
Советуем изучить инструкцию к модулю Casio 5522
- Смотреть онлайн → (без скачивания, удобно на мобильных и планшетах);
- Скачать русскую инструкцию → (типичная “как у всех”, не всегда понятные картинки);
- Скачать английскую инструкцию → (детальная, много фото, более понятная).
Как бы вам не хотелось, но инструкция действительно поможет решить проблемы с настройкой. Важно понимать логику действий.
Режим текущего времени – так называется отображение всех часовых данных, как говорится, “по умолчанию”. Нажимайте кнопку “D” в Режиме Текущего Времени для переключения дисплеев текущей даты и текущего времени.
Установка времени и даты
1. В режиме Текущего времени нажмите и удерживайте кнопку А, пока на экране сначала не отобразится мигающий индикатор SET Hold, затем мигающий индикатор текущего установленного кода города текущего местонахождения.
- Это означает, что часы перешли в режим настройки.
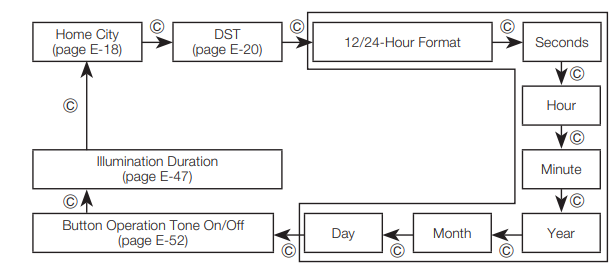
2. С помощью кнопки С выберите параметр, настройку которого необходимо выполнить, в указанной ниже последовательности:
3. С помощью кнопок D и/или B выполните настройку выбранного параметра, как показано в таблице:
4. Для выхода из режима настройки нажмите кнопку А.
Так и не смогли настроить? Спрашивайте на форуме G-Shock →
[box]Последние новости о часах GA-700 на блоге:
[display-posts tag=”GA-700″ posts_per_page=”5″]
Все новости о G-Shock GA-700 →
[/box]
Требуется руководство для вашей Casio G-Shock GA-700-1BER Наручные часы? Ниже вы можете просмотреть и загрузить бесплатно руководство в формате PDF. Кроме того, приведены часто задаваемые вопросы, рейтинг изделия и отзывы пользователей, что позволит оптимально использовать ваше изделие. Если это не то руководство, которое вы искали, – свяжитесь с нами.
Ваше устройство неисправно, и в руководстве отсутствует решение? Перейдите в Repair Café для получения бесплатных ремонтных услуг.
Руководство

Рейтинг
Сообщите нам, что вы думаете о Casio G-Shock GA-700-1BER Наручные часы, оставив оценку продукта. Хотите поделиться вашими впечатлениями от данного изделия или задать вопрос? Вы можете оставить комментарий в нижней части страницы.
Довольны ли вы данным изделием Casio?
Да Нет
Будьте первым, кто оценит это изделие
0 голоса
Часто задаваемые вопросы
Наша служба поддержки выполняет поиск полезной информации по изделиям и отвечает на часто задаваемые вопросы. Если вы заметили неточность в наших часто задаваемых вопросах, сообщите нам об этом с помощью нашей контактной формы.
Мои механические часы быстро бегают, что мне делать? Проверенный
Это может быть вызвано воздействием магнитного поля. Ее можно решить с помощью процесса размагничивания, выполняемого профессиональным часовщиком.
Это было полезно (639)
Аккумулятор в моем устройстве окислился, могу ли я его безопасно использовать? Проверенный
Ja, устройство все еще можно безопасно использовать. Во-первых снимаем оксидизд АКБ. Никогда не используйте для этого голые руки. Затем протрите батарейный отсек ватным тампоном, смоченным уксусом или лимонным соком. Дайте ему высохнуть и вставьте новые батарейки.
Это было полезно (618)
Что означают AM и PM? Проверенный
AM означает Ante Meridiem и указывает на то, что время еще до полудня. PM расшифровывается как Post Meridiem и указывает на то, что время прошло после полудня.
Это было полезно (558)
Что такое хронограф? Проверенный
Хронограф дословно означает «писатель времени». Этим термином называют наручные и другие виды часов, которые не только показывают который час, но и могут измерить определенный промежуток времени, как секундомер.
Это было полезно (500)
Что такое кварцевый механизм? Проверенный
Наручные и другие виды часов с кварцевым механизмом работают на батарейке. Батарейка посылает электрический ток через кристаллы кварца, заставляя их вибрировать. Эти вибрации приводят часовой механизм в действие. Поскольку кварц вибрирует с фиксированной частотой, часы с кварцевым механизмом чрезвычайно точны.
Это было полезно (336)
Что такое GMT? Проверенный
GMT означает среднее время по Гринвичу (иногда его называют UTC, что означает всемирное координированное время). Это время для долготы 0, которая проходит через Гринвич недалеко от Лондона.
Это было полезно (332)
Под стеклом моих часов Casio появилась влага. Что мне делать? Проверенный
Casio утверждают, что если влага появляется после экстремального изменения температуры и впоследствии относительно быстро исчезает, то в этом нет ничего плохого. Если влага не исчезает, необходимо как можно скорее отремонтировать часы.
Это было полезно (45)

Перейти к контенту
Русские электронные инструкции по эксплуатации
Постоянно обновляемый большой каталог документации по эксплуатации и использованию современных устройств и оборудования на русском языке. Бесплатное скачивание файлов.
Поиск:
Главная
Просмотр инструкции в pdf
Инструкция по эксплуатации наручных часов Casio G-SHOCK GA-700-7A.
Скачать инструкцию к наручным часам Casio G-SHOCK GA-700-7A (380,89 КБ)
Инструкции наручных часов Casio
« Инструкция к наручным часам Casio B640WD-1A
» Инструкция к наручным часам Casio Edifice EFR-552GL-2A
Вам также может быть интересно
Инструкция к наручным часам Casio Pro Trek PRG-270-1E
Инструкция к наручным часам Casio BGA-240-7A2
Инструкция к наручным часам Casio BEM-111D-1A
Инструкция к наручным часам Casio W-96H-1A
Инструкция к наручным часам Casio SHE-3056D-7A
Инструкция к наручным часам Casio MTP-1303PD-1A
Инструкция к наручным часам Casio A-158WEA-9E
Инструкция к наручным часам Casio AE-1000W-1A
Добавить комментарий
Имя *
Email *
Сайт
Комментарий


Сохранить моё имя, email и адрес сайта в этом браузере для последующих моих комментариев.
- Добавить инструкцию
- Заказать инструкцию

Operation Guide 5522
E-9
To do this: Enter this mode: See:
x View the current time in one of 48 cities (31 time
zones) around the globe
x Swap Home Time and World Time
World Time Mode
E-39
Set an alarm time Alarm Mode E-43
E-8
Mode Reference Guide
The mode you should select depends on what you want to do.
To do this: Enter this mode: See:
x View the current date in the Home City
x Configure Home City and daylight saving time (DST)
settings
x Configure time and date settings
x Direct timing start from the Timekeeping Mode
x Change the display illumination duration setting
x Enable/disable the button operation tone
Timekeeping Mode
E-17
x Use the stopwatch to measure elapsed time
x Use Target Time Alarm
Stopwatch Mode
E-25
Use the countdown timer Countdown Timer Mode E-36
E-7
Illumination . . . . . . . . . . . . . . . . . . . . . . . . . . . . . . . . . . . . . . . . . . . . . . . . . . . . . E-47
To turn on illumination . . . . . . . . . . . . . . . . . . . . . . . . . . . . . . . . . . . . . . . . . . E-47
To change the illumination duration . . . . . . . . . . . . . . . . . . . . . . . . . . . . . . . . E-48
Adjusting Hand Positions . . . . . . . . . . . . . . . . . . . . . . . . . . . . . . . . . . . . . . . . . E-49
Button Operation Tone . . . . . . . . . . . . . . . . . . . . . . . . . . . . . . . . . . . . . . . . . . . E-52
To turn the button operation tone on and off . . . . . . . . . . . . . . . . . . . . . . . . . E-52
Troubleshooting . . . . . . . . . . . . . . . . . . . . . . . . . . . . . . . . . . . . . . . . . . . . . . . . . E-54
Main Indicators . . . . . . . . . . . . . . . . . . . . . . . . . . . . . . . . . . . . . . . . . . . . . . . . . E-56
Specifications. . . . . . . . . . . . . . . . . . . . . . . . . . . . . . . . . . . . . . . . . . . . . . . . . . . E-58
E-6
To stop the alarm . . . . . . . . . . . . . . . . . . . . . . . . . . . . . . . . . . . . . . . . . . . . . E-38
Checking the Current Time in a Different Time Zone . . . . . . . . . . . . . . . . . . . E-39
To enter the World Time Mode. . . . . . . . . . . . . . . . . . . . . . . . . . . . . . . . . . . . E-40
To view the time in another time zone . . . . . . . . . . . . . . . . . . . . . . . . . . . . . . E-40
To specify standard time or daylight saving time (DST) for a city . . . . . . . . . . . E-41
To swap your Home City and World Time City . . . . . . . . . . . . . . . . . . . . . . . . E-42
Using the Alarm . . . . . . . . . . . . . . . . . . . . . . . . . . . . . . . . . . . . . . . . . . . . . . . . . E-43
To enter the Alarm Mode . . . . . . . . . . . . . . . . . . . . . . . . . . . . . . . . . . . . . . . . E-43
To set an alarm time . . . . . . . . . . . . . . . . . . . . . . . . . . . . . . . . . . . . . . . . . . . E-44
To test the alarm . . . . . . . . . . . . . . . . . . . . . . . . . . . . . . . . . . . . . . . . . . . . . . E-45
To turn an alarm and the Hourly Time Signal on and off . . . . . . . . . . . . . . . . . E-46
To stop the alarm . . . . . . . . . . . . . . . . . . . . . . . . . . . . . . . . . . . . . . . . . . . . . E-46
E-5
Using the Stopwatch . . . . . . . . . . . . . . . . . . . . . . . . . . . . . . . . . . . . . . . . . . . . . E-25
To enter the Stopwatch Mode . . . . . . . . . . . . . . . . . . . . . . . . . . . . . . . . . . . . E-26
To perform an elapsed time operation . . . . . . . . . . . . . . . . . . . . . . . . . . . . . . E-28
To pause at a split time . . . . . . . . . . . . . . . . . . . . . . . . . . . . . . . . . . . . . . . . . E-28
To measure two finishes . . . . . . . . . . . . . . . . . . . . . . . . . . . . . . . . . . . . . . . . E-28
To set a target time . . . . . . . . . . . . . . . . . . . . . . . . . . . . . . . . . . . . . . . . . . . . E-30
To use the target time alarm . . . . . . . . . . . . . . . . . . . . . . . . . . . . . . . . . . . . . E-31
To stop the alert beeper . . . . . . . . . . . . . . . . . . . . . . . . . . . . . . . . . . . . . . . . . E-35
To perform stopwatch timing without using the Target Time Alarm . . . . . . . . . E-35
Countdown Timer . . . . . . . . . . . . . . . . . . . . . . . . . . . . . . . . . . . . . . . . . . . . . . . E-36
To enter the Countdown Timer Mode . . . . . . . . . . . . . . . . . . . . . . . . . . . . . . . E-36
To configure the countdown timer . . . . . . . . . . . . . . . . . . . . . . . . . . . . . . . . . E-37
To perform a countdown timer operation . . . . . . . . . . . . . . . . . . . . . . . . . . . . E-38
E-4
Contents
About This Manual . . . . . . . . . . . . . . . . . . . . . . . . . . . . . . . . . . . . . . . . . . . . . . . . E-2
Things to check before using the watch . . . . . . . . . . . . . . . . . . . . . . . . . . . . . . E-3
Mode Reference Guide . . . . . . . . . . . . . . . . . . . . . . . . . . . . . . . . . . . . . . . . . . . . E-8
Timekeeping . . . . . . . . . . . . . . . . . . . . . . . . . . . . . . . . . . . . . . . . . . . . . . . . . . . . E-17
Configuring Home City Settings . . . . . . . . . . . . . . . . . . . . . . . . . . . . . . . . . . . . E-18
To configure Home City settings . . . . . . . . . . . . . . . . . . . . . . . . . . . . . . . . . . E-18
To change the Daylight Saving Time (summer time) setting . . . . . . . . . . . . . . E-20
Adjusting the Digital Time and Date Settings . . . . . . . . . . . . . . . . . . . . . . . . . E-21
To configure the digital time and date settings . . . . . . . . . . . . . . . . . . . . . . . . E-21
E-3
Things to check before using the watch
1. Check the Home City and the daylight saving time (DST) setting.
Use the procedure under “To configure Home City settings” (page E-18) to configure
your Home City and daylight saving time settings.
Important!
x Proper World Time Mode data depends on correct Home City, time, and date
settings in the Timekeeping Mode. Make sure you configure these settings
correctly.
2. Set the current time.
x See “Adjusting the Digital Time and Date Settings” (page E-21).
The watch is now ready for use.
E-2
About This Manual
x Depending on the model of your watch, display text
appears either as dark figures on a light background, or
light figures on a dark background. All sample displays
in this manual are shown using dark figures on a light
background.
x Button operations are indicated using the letters shown
in the illustration.
x Note that the product illustrations in this manual are
intended for reference only, and so the actual product
may appear somewhat different than depicted by an
illustration.
E-1
ENGLISH
Congratulations upon your selection of this CASIO watch.
MA1609-EA
© 2016 CASIO COMPUTER CO., LTD.
Use the procedure under «To configure Home City settings» to configure your Home City and daylight saving time settings.
The watch is now ready for use.
The mode you should select depends on what you want to do.
If you do not perform any operation for about two or three minutes while configuring settings (setting flashing on the digital display) in any mode, the watch will exit the setting operation and return to normal display.
The B and D buttons are used on the setting mode to scroll through data on the display. In most cases, holding down these buttons during a scroll operation scrolls through the data at high speed.
You can use the procedure below to temporarily move the hour and minute hands out of the way to better view what is on the display.
Use the Timekeeping Mode to set and view the current time and date.
There are two Home City settings: actually selecting the Home City, and selecting either standard time or daylight saving time (DST).
- In the Timekeeping Mode, hold down A until the flashing SET Hold indicator disappears from the display and the currently selected city code flashes on the display. This indicates the Home City setting mode.
- Use D (+) and B (–) to scroll through city codes until the one you want is displayed.
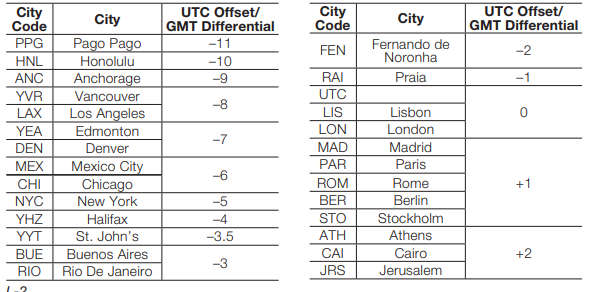
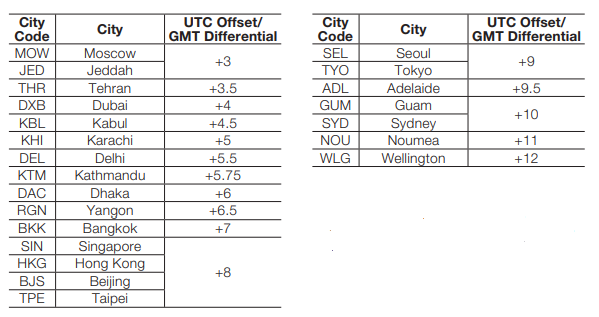
- For details about city codes, see the «City Code Table» at the back of this manual.
- Holding down either button scrolls at high speed.
- After the setting is the way you want, press A to return to the Timekeeping Mode.
Note
- You can check the city code and name (English) of your Home City by pressing A.
- After you specify a city code, the watch will use UTC* offsets in the World Time Mode to calculate the current time for other time zones based on the current time in your Home City.
* Coordinated Universal Time, the world-wide scientific standard of timekeeping.
The reference point for UTC is Greenwich, England.
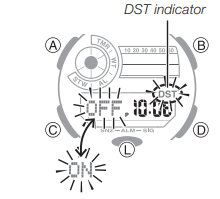
To change the Daylight Saving Time (summer time) setting
- In the Timekeeping Mode, hold down A until the flashing SET Hold indicator disappears from the display and the currently selected city code flashes on the display.
- Press C to display the DST setting mode.
- Press D to toggle between Daylight Saving Time (ON) and Standard Time (OFF).
- Note that you cannot switch between daylight saving time and standard time while UTC is selected as your Home City.
- After the setting is the way you want, press A to return to the Timekeeping Mode.
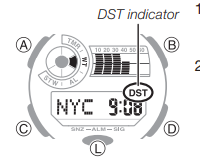
- The DST indicator appears to indicate that Daylight Saving Time is turned on.
Adjusting the Digital Time and Date Settings
Use the procedure below to adjust the digital time and date settings.
To configure the digital time and date settings
- In the Timekeeping Mode, hold down A until the flashing SET Hold indicator disappears from the display and the currently selected city code flashes on the display.
- Press C to move the flashing in the sequence shown below to select the other settings.
-
When the timekeeping setting you want to change is flashing, perform the operation described below.
-
- Press A to exit the setting mode.
Note
- Resetting the seconds to 00 while the current count is in the range of 30 to 59 causes the minutes to be increased by 1.
- The watch’s built-in full automatic calendar makes allowances for different month lengths and leap years. Once you set the date, there should be no reason to change it except after you have the watch’s battery replaced.
- The day of the week changes automatically when the date changes.
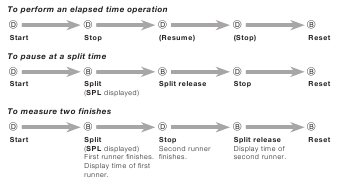
Using the Stopwatch
The stopwatch measures elapsed time, split times, and two finishes.
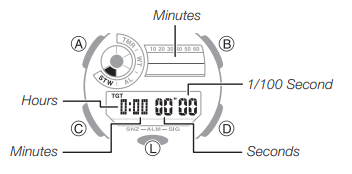
- The measurement range of the stopwatch is 23 hours, 59 minutes, 59.99 seconds. Elapsed time returns to zero automatically and timing continues from there when the maximum limit is reached.
To enter the Stopwatch Mode
You can enter the Stopwatch Mode using any one of the methods below.
Entering Directly from the Timekeeping Mode
If the stopwatch was reset to all zeros the last time you used it, a new elapsed time operation will start as soon as you enter the Stopwatch Mode.
- In the Timekeeping Mode, press D.
This will result in one of the following, depending on the status of the stopwatch the last time you exited the Stopwatch Mode.
- If reset (stopped at 0:00 00″00): Timing starts.
One-press timing start from the Timekeeping Mode (direct timing start from the Timekeeping Mode) - If an ongoing timing operation is paused: Timing remains paused.
- If an ongoing timing operation is in progress*: Timing continues to be performed. * An ongoing stopwatch timing operation continues even if you navigate to another mode from the Stopwatch Mode.
- Now you can perform the same operations.
Entering from Another Mode (including the Timekeeping Mode)
Press C as many times as necessary to navigate to the Stopwatch Mode.
- To enter from the Timekeeping Mode using this method, press C four times.
- This will display the stopwatch screen in the same status as it was the last time you exited the Stopwatch Mode. However, if you exited with a split time displayed, the split time operation will be released when you return.
Note
- Once started, elapsed time measurement continues until you press D to stop it, even if you change to a different mode and even if the stopwatch reaches the elapsed time maximum limit.
Using the Target Time Alarm
You can set a target time in the range of one minute to 24 hours, in units of one minute.
A beeper will sound for 10 seconds when the elapsed timing of the stopwatch reaches the target time.
To set a target time
- Reset the stopwatch to all zeros.
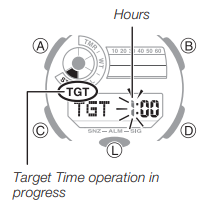
- Hold down A until the flashing SET Hold indicator disappears from the display and the hour digit starts to flash. Release A after the hour digit starts to flash.
- Use D (+) and B (–) to change the hour setting. Holding down either button scrolls at high speed. For a target time of 24 hours, set 00 hours 00 minutes.
- Press C to switch to the minutes setting.
- Use D (+) and B (–) to change the minutes setting. Holding down either button scrolls at high speed.
- Press C to display the target time alarm on/off setting
- Press D to toggle the target alarm between on (
displayed) and off (
displayed).
- The indicator TGT will be displayed in the Stopwatch Mode while the target time is on.
- After all the settings are the way you want, press A to exit the setting screen.
To use the target time alarm
- Reset the stopwatch to all zeros and then press D. This will cause TGT to flash on the display.
- Now you can perform the operations.
-
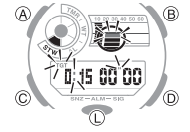
You can get an idea of time elapsed until the target time from changes in the display.
- From start up to half of target time
-
Screen: As shown in the figure, top right indicator that indicates minutes flashes.
-
TGT starts to flash.
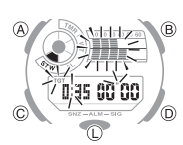
- From target time half until target time is reached
- Screen: As shown in the figure, all of the part that indicates minutes flashes.
- TGT flashes at high speed starting from one minute before the target time.
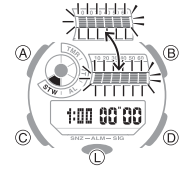
- Target time reached
- Beep for 10 seconds.
- Screen: Changes as shown in the figure.
- TGT becomes unlit.
- After target time is expired
- Screen: The top right indicator that indicates minutes flashes (at slow speed).
- Elapsed time is measured, with TGT remaining unlit.
- Resetting the elapsed stopwatch time automatically causes TGT to re-appear. You can re-use the same target time, if you want.
Note
- TGT flashes in the above operation even if the watch is in another mode.
To stop the alert beeper
- Pressing any button while the alert beeper is sounding will stop it.
- Pressing D or B operates the elapsed time operation
To perform stopwatch timing without using the Target Time Alarm
Use step 7 under «To set a target time» to disable the target time alarm.
Countdown Timer
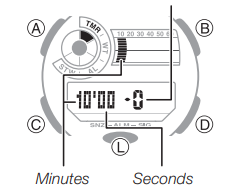
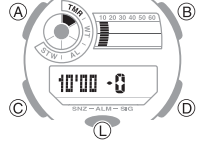
The countdown timer can be set within a range of one minute to 60 minutes. An alarm sounds when the countdown reaches zero.
To enter the Countdown Timer Mode
Use C to select the Countdown Timer Mode
To configure the countdown timer
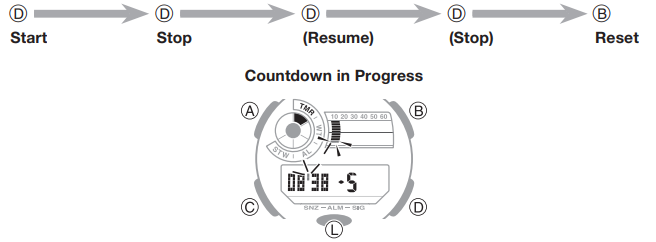
- If a countdown timer operation is in progress, press D to pause it and then press B to reset the target time to its start time.
- If a countdown timer operation is paused, press B to reset the timer to its start time.
- Hold down A until the flashing SET Hold indicator disappears from the display and the minutes digits start to flash. Release A after the digits start to flash.
- Use D (+) and B (–) to change the minutes setting. Holding down either button scrolls at high speed.
- After all the settings are the way you want, press A to exit the setting screen.
To perform a countdown timer operation
To stop the alarm
Press any button.
Checking the Current Time in a Different Time Zone
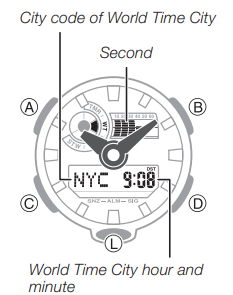
You can use the World Time Mode to view the current time in one of 31 time zones (48 cities) around the globe. The city that is currently selected in the World Time Mode is called the «World Time City».
- The hour and minute hands indicate information for the currently selected Home City.
- When you enter the World Time Mode, the currently selected city code and city name (English) scroll once across the digital display. After that, the city code remains displayed.
- You can view the name (English) of your Home City by pressing A.
To enter the World Time Mode
Use C to select the World Time Mode.
To view the time in another time zone
In the World Time Mode, press D to change the city code setting.
- Holding down D scrolls at high speed.
- To display the UTC city code (differential 0), press B and D at the same time.
To specify standard time or daylight saving time (DST) for a city
- In the World Time Mode, press D to display the city code (time zone) whose Standard Time/Daylight Saving Time setting you want to change.
- Hold down A for about two seconds.
- This toggles the city code you selected in step 1 between Daylight Saving Time (DST indicator displayed) and standard time (DST indicator not displayed).
- Note that you cannot switch between standard time/ daylight saving time (DST) while UTC is selected as the World Time City.
- The standard time/daylight saving time (DST) setting affects only the currently displayed city. Other cities are not affected.
To swap your Home City and World Time City
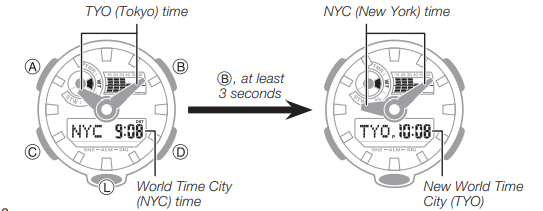
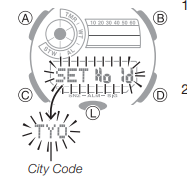
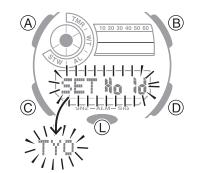
In the World Time Mode, hold down B for at least three seconds. This will cause SWAP Hold to flash on the display, and then your Home City and World Time City will be swapped.
Example: To swap the Home City (TYO) and World Time City (NYC)
Using the Alarm
You can set five independent daily alarms. When a daily alarm is turned on, an alarm tone will sound for about 10 seconds each day when the time in the Timekeeping Mode reaches the preset alarm time. One of the alarms is a snooze alarm that repeats every five minutes, up to seven times.
You can also turn on an Hourly Time Signal, which will cause the watch to beep twice every hour on the hour.
To enter the Alarm Mode
Use C to select the Alarm Mode.
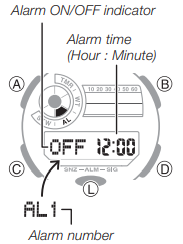
- The snooze alarm screen is indicated by SNZ, while the other alarm screens are numbered AL1 through AL4.
The Hourly Time Signal screen is indicated by SIG. - When you enter the Alarm Mode, the data you were viewing when you last exited the mode appears first.
- If you do not perform any operation for about two or three minutes in the Alarm Mode, the watch will automatically return to the Timekeeping Mode.
To set an alarm time
- In the Alarm Mode, use D to display the alarm whose settings you want to change.
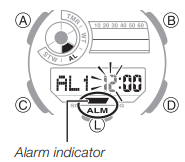
- Hold down A until the flashing SET Hold indicator disappears from the display and the alarm time hour digits start to flash. Release A after the digits start to flash.
- ALM appears on the display, indicating that alarm setting is enabled.
- Press C to move the flashing between the hour and the minute digits. The selected digits are those that are flashing.
- Use D (+) and B (–) to change the hour and minute settings. Holding down either button scrolls at high speed. When setting the alarm time using the 12-hour format, take care to set the time correctly as a.m. (no indicator) or p.m. (P indicator).
- Press A to exit the setting mode.
To test the alarm
In the Alarm Mode, hold down D to sound the alarm.
To turn an alarm and the Hourly Time Signal on and off
In the Alarm Mode, press D to select an alarm or the Hourly Time Signal.
- When the alarm you want or the Hourly Time Signal is displayed, press B to toggle it between on (ON displayed) and off (OFF displayed).
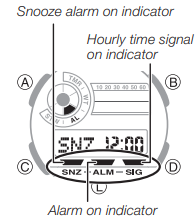
- The alarm on indicator (when any alarm is on), snooze alarm indicator (when the snooze alarm is on), and the Hourly Time Signal on indicator (when the Hourly Time Signal is on) are shown on the display in all modes.
- SNZ and ALM will be displayed while the snooze alarm is turned on.
To stop the alarm
Press any button.
Illumination
The display of the watch is illuminated for easy reading in the dark.
To turn on illumination
Press L in any mode to illuminate the display.
- You can use the procedure below to select either 1.5 seconds or three seconds as the illumination duration.
To change the illumination duration
- In the Timekeeping Mode, hold down A until the flashing SET Hold indicator disappears from the display and the currently selected city code flashes on the display.
- Press C ten times to display the illumination duration setting screen.
- The current illumination duration setting (1 or 3) will be flashing in the display.
- See the sequence in step 2 of the procedure under «To configure the digital time and date settings» for information about how to scroll through setting screens.
- Press D to toggle the illumination duration between three seconds (3 displayed) and 1.5 seconds (1 displayed).
- After all the settings are the way you want, press A to exit the setting screen.
Adjusting Hand Positions
The watch hands can go out of alignment with the time on the digital display if it is exposed to strong magnetism or impact. If this happens, you should adjust the hand positions.
- You do not need to perform the operation below as long as the analog hands indicate the same time as the digital display.
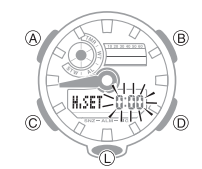
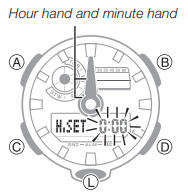
- In the Timekeeping Mode, hold down A for about five seconds until 0:00 starts to flash. Release A after 0:00 flashes.
- This enters the hour and minute hand adjustment mode.
- If the hour and minute hands are not at 12 o’clock, use D (+) and B (–) to adjust them until they are.
- Holding down either button moves the hands at high speed.
- Press A to return to the Timekeeping Mode. Check to make sure that the time indicated by the hands matches the time on the digital display. If the times don’t match, perform the correction procedure above again.
Button Operation Tone
You can turn the button operation tone on or off as desired.
-
Even if you turn off the button operation tone, the Target Time Alarm, alarms, the Hourly Time Signal, and other beepers all operate normally.
To turn the button operation tone on and off
- In the Timekeeping Mode, hold down A until the flashing SET Hold indicator disappears from the display and the currently selected city code flashes on the left side of the lower display.
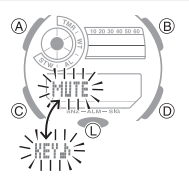
- Press C nine times to display the button operation tone On/Off screen. The screen will show either KEY or MUTE.
- Press D to toggle the setting between KEY (ON) and MUTE (OFF).
- After all the settings are the way you want, press A to exit the setting screen.
Troubleshooting
Hand Movement and Indications
- The time indicated by the hands is different from the digital time.
This could indicate that the watch has been exposed to magnetism or strong impact, which has caused problems with proper hand alignment. Adjust the watch’s hand home position alignment.
Time Setting
-
The current time setting is off by hours.
Your Home City setting may be wrong. Check your Home City setting and correct it, if necessary. - The current time setting is off by one hour. You may need to change your Home City’s standard time/daylight saving time (DST) setting. Use the procedure under «Adjusting the Digital Time and Date Settings» to change the standard time/daylight saving time (DST) setting.
World Time Mode
- The time for my World Time City is off in the World Time Mode.
This could be due to incorrect switching between standard time and daylight saving time. See «To specify standard time or daylight saving time (DST) for a city» for more information.
Main Indicators
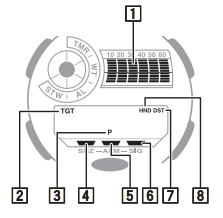
| Number | Name |
| 1 | Graphic* |
| 2 | Target Time operation in progress |
| 3 | PM indicator |
| 4 | Snooze alarm on indicator |
| 5 | Alarm on indicator |
| 6 | Hourly time signal on indicator |
| 7 | DST indicator |
| 8 | Hands shifted indicator |
* Graphic display in each mode occurs as described below.
| Mode | Flashing |
| Timekeeping | Appears and disappears in time with the seconds of the current time. |
| Stopwatch | Flashes in time with the minutes. |
| Countdown Timer | Flashes in time with the minutes. |
| World Time | Appears and disappears in time with the seconds of the current time in the World Time zone. |
Accuracy at normal temperature: ±15 seconds a month
Digital Timekeeping: Hour, minutes, seconds, p.m. (P), month, day, day of the week
Time format: 12-hour and 24-hour
Calendar system: Full Auto-calendar pre-programmed from the year 2000 to 2099
Other: Home City code (can be assigned one of 48 city codes);
Standard Time/Daylight Saving Time (summer time)
Analog Timekeeping: Hour, minutes (hand moves every 20 seconds)
Stopwatch:
Measuring unit: 1/100 second
Measuring capacity: 23:59′ 59.99″
Measuring modes: Elapsed time, split time, two finishes, Direct timing start from the Timekeeping Mode, Target Time Alarm
Countdown Timer:
Measuring unit: 1/10 second
Countdown range: 60 minutes
Countdown start time setting range: 1 to 60 minutes (1-minute increments)
World Time: 48 cities (31 time zones)
Other: Daylight Saving Time/Standard Time; Home City/World Time City switching
Alarms: 5 Daily alarms (with 1 snooze alarm); Hourly time signal
Illumination: LED (light-emitting diode); Selectable illumination duration (approximately 1.5 seconds or 3 seconds)
Other: Button operation tone on/off; Moving the Hands to View the Digital Display
Power Supply: One lithium battery (Type: CR2016)
Approximate battery operating time: 5 years under the following conditions:
- Alarm: 10 seconds/day
- 1 illumination operation (1.5 seconds) per day
Frequent use of illumination runs down the battery.
Specifications are subject to change without notice.
City Code Table
- This table shows the city codes of this watch (As of July 2016).
- The rules governing global times (GMT differential and UTC offset) and summer time are determined by each individual country.


 displayed) and off (
  displayed).