Умные часы Garmin Forerunner 255

Введение
ПРЕДУПРЕЖДЕНИЕ
Предупреждения о продукте и другую важную информацию см. В руководстве «Важная информация о безопасности и продукте» в упаковке продукта.
Всегда консультируйтесь с врачом, прежде чем начинать или изменять любую программу упражнений.
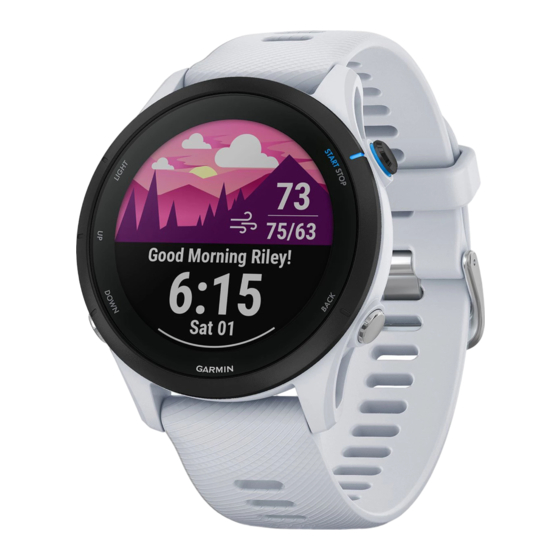
Обзор

- LIGHT
- Нажмите, чтобы включить часы.
- Нажмите, чтобы включить или выключить подсветку.
- Держаться за view меню управления для быстрого доступа к часто используемым функциям.
- UP
- Нажмите для прокрутки обзоров, экранов данных, параметров и настроек.
- Держаться за view меню.
- Удерживайте, чтобы вручную изменить вид спорта во время занятия.
- DOWN
- Нажмите для прокрутки обзоров, экранов данных, параметров и настроек.
- Удерживайте, чтобы открыть элементы управления музыкой (стр. 11).
- НАЗАД
- Нажмите, чтобы вернуться к предыдущему экрану.
- Нажмите, чтобы записать круг, отдых или переход во время занятия.
- НАЧАТЬ · СТОП
- Нажмите, чтобы запустить и остановить таймер активности.
- Нажмите, чтобы выбрать вариант или подтвердить сообщение.
Viewпетля взгляда
Взгляды обеспечивают быстрый доступ к данным о здоровье, информации об активности, встроенным датчикам и многому другому. При сопряжении часов вы можете view
данные с вашего телефона, такие как уведомления, погода и события календаря.
- Нажмите ВВЕРХ или ВНИЗ.
Часы прокручивают петлю взгляда и отображают сводные данные для каждого взгляда.
- Нажмите СТАРТ, чтобы view больше информации.
- Выберите вариант:
- Нажмите ВНИЗ, чтобы view подробности о взгляде.
- Нажмите СТАРТ, чтобы view дополнительные опции и функции на первый взгляд.

Viewменю управления
Меню управления содержит такие параметры, как секундомер, поиск подключенного телефона и выключение часов. Вы также можете открыть кошелек Garmin Pay™.
- На любом экране удерживайте СВЕТ.

- Нажмите ВВЕРХ или ВНИЗ для прокрутки параметров.

Состояние GPS и значки состояния
Для активного отдыха кольцо состояния становится зеленым, когда GPS готов. Мигающий значок означает, что часы ищут сигнал. Сплошной значок означает, что сигнал обнаружен или датчик подключен.
Настройка ваших часов
Чтобы получить полное преимуществоtage из функций, выполните эти задачи.
- Соедините часы с телефоном с помощью приложения Garmin Connect™.
- Настройка сетей Wi‑Fi
- Настройте функции безопасности
- Настроить музыку
- Настройте свой кошелек Garmin Pay
Сопряжение с телефоном
Чтобы использовать подключенные функции часов, необходимо выполнить сопряжение напрямую через приложение Garmin Connect, а не через настройки Bluetooth® на телефоне.
- В магазине приложений на телефоне установите и откройте приложение Garmin Connect.
- Во время первоначальной настройки выберите
 когда вам будет предложено выполнить сопряжение с вашим телефоном.
 - Следуйте инструкциям в приложении, чтобы завершить процесс сопряжения и настройки.
Советы для существующих пользователей Garmin Connect
- В приложении Garmin Connect выберите или.
- Выберите Устройства Garmin> Добавить устройство.
Подключение к сети Wi-Fi
Эта функция доступна только для музыкальных часов.
- Используйте приложение Garmin Connect.
- Используйте приложение Garmin Express™ (www.garmin.com/express).
Собираюсь на пробежку
Первым занятием по фитнесу, которое вы записываете на часы, может быть бег, катание на велосипеде или любое другое занятие на свежем воздухе. Перед началом занятия вам может потребоваться зарядить часы (стр. 14).
- Нажмите СТАРТ и выберите занятие.
- Выйдите на улицу и подождите, пока часы найдут спутники.
- Нажмите старт.
- Пойти на пробежку.
- После завершения пробежки нажмите STOP. 6 Выберите вариант:
- Выберите «Возобновить», чтобы перезапустить таймер активности.
- Выберите Сохранить, чтобы сохранить запуск и сбросить таймер активности. Вы можете выбрать прогон для view Резюме.
Подготовка к гонке
Ваши часы могут предлагать ежедневные тренировки, чтобы помочь вам подготовиться к бегу, если у вас есть VO2 max. оценивать.
Дополнительную информацию см. В руководстве пользователя.
- На телефоне или компьютере перейдите в календарь Garmin Connect и добавьте свое соревнование.
Вы можете искать событие в вашем районе или создать свое собственное событие. - Синхронизируйте часы с учетной записью Garmin Connect.
- На своих часах прокрутите до основного обзора события, чтобы увидеть обратный отсчет времени до следующей гонки.
Информация о погоде для события появляется сразу, а данные местного прогноза появляются примерно за 14 дней до события. - На циферблате нажмите СТАРТ и выберите бег.
ПРИМЕЧАНИЕ: Если вы выполнили хотя бы 1 пробежку на свежем воздухе с данными о частоте сердечных сокращений или 1 поездку с данными о частоте сердечных сокращений и мощности, на ваших часах появятся ежедневные рекомендуемые тренировки.
Настройка списка действий
- На циферблате удерживайте ВВЕРХ.
- Выберите Действия и приложения.
- Выберите вариант:
- Выберите занятие, чтобы настроить параметры, добавить его в избранное, изменить порядок появления и т. д.
- Выберите Добавить, чтобы добавить дополнительные действия или создать собственные действия.
Умные функции
Физиологические измерения
Эти измерения производительности представляют собой оценки, которые могут помочь вам отслеживать и понимать свои тренировочные действия и результаты в гонках. Эти оценки предоставляются и поддерживаются Firstbeat Analytics™.
- Предлагаемые ежедневные тренировки
- Функциональная пороговая мощность (FTP)
- статус вариабельности сердечного ритма
- Порог лактата
- Состояние работоспособности
- Прогнозируемое время гонки
- Время восстановления
- Тренировочный эффект и основное преимущество
- Фокус тренировочной нагрузки
- Статус обучения
- VO2 макс.
ПРИМЕЧАНИЕ: Сначала оценки могут показаться неточными. Часы требуют, чтобы вы выполнили несколько действий, чтобы узнать о своей производительности. Для получения дополнительной информации перейдите на www.garmin.com/performance-data/running/.
Ходовая мощность
Мощность бега Garmin® рассчитывается с использованием измеренной информации о динамике бега, массы пользователя, данных об окружающей среде и других данных датчиков. Измерение мощности оценивает количество энергии, которую бегун прикладывает к поверхности дороги, и отображается в ваттах. Использование мощности бега в качестве меры усилия может подойти некоторым бегунам лучше, чем использование темпа или частоты сердечных сокращений. Мощность бега может быть более чувствительной, чем частота сердечных сокращений, для индикации уровня усилия, и она может учитывать подъемы, спуски и ветер, чего не делает измерение темпа. Дополнительную информацию см. в руководстве пользователя.
Функции с подключением по Bluetooth
Часы имеют несколько функций подключения Bluetooth для вашего совместимого телефона с помощью приложения Garmin Connect.
- Загрузки активности
- Помощь
- Звуковые подсказки
- Connect IQ ™
- Найди мой телефон
- Найди мои часы
- Обнаружение инцидентов
- LiveTrack и обмен событиями в реальном времени
- Управление музыкой
- Телефонные уведомления
- Взаимодействие в социальных сетях
- Обновления программного обеспечения
- Обновления погоды
- Тренировки, курсы и загрузки PacePro
Настройка кошелька Garmin Pay
Функция Garmin Pay позволяет использовать часы для оплаты покупок в участвующих магазинах. Вы можете добавить одну или несколько участвующих кредитных или дебетовых карт в свой кошелек Garmin Pay. Перейдите на сайт garmin.com/garminpay/banks, чтобы найти финансовые учреждения, участвующие в программе.
- В приложении Garmin Connect выберите
 или .
или . - Выберите Garmin Pay > Начать.
- Следуйте инструкциям на экране.
Вы можете открыть кошелек Garmin Pay из меню управления на часах. Дополнительную информацию об использовании функции Garmin Pay см. в руководстве пользователя.
Функции безопасности и отслеживания
ВНИМАНИЕ!
Функции безопасности и отслеживания являются дополнительными функциями, и на них не следует полагаться как на основной метод получения экстренной помощи. Приложение Garmin Connect не связывается со службами экстренной помощи от вашего имени.
Часы имеют функции безопасности и отслеживания, которые необходимо настроить с помощью приложения Garmin Connect.
ВНИМАНИЕ
Чтобы использовать эти функции, часы должны быть подключены к приложению Garmin Connect с помощью технологии Bluetooth. Вы можете ввести контакты для экстренных случаев в своей учетной записи Garmin Connect.
- поддержка: Позволяет отправить сообщение с вашим именем, ссылкой LiveTrack и местоположением GPS (если доступно) вашим контактам для экстренных случаев.
- Обнаружение инцидента: Когда часы обнаруживают инцидент во время определенных мероприятий на свежем воздухе, часы отправляют автоматическое сообщение, ссылку LiveTrack и местоположение GPS (если доступно) вашим контактам для экстренных случаев.
- LiveTrack: позволяет друзьям и семье следить за вашими гонками и тренировками в режиме реального времени. Вы можете приглашать подписчиков с помощью электронной почты или социальных сетей, позволяя им view ваши данные в реальном времени на web стр.
- Обмен событиями в прямом эфире: Позволяет отправлять сообщения друзьям и семье во время мероприятия, предоставляя обновления в режиме реального времени.
ПРИМЕЧАНИЕ: Эта функция доступна, только если ваши часы подключены к совместимому телефону Android™.
Добавление контактов для экстренных случаев
Телефоны экстренных служб используются для обеспечения безопасности и отслеживания.
- В приложении Garmin Connect выберите или.
- Выберите Безопасность и отслеживание > Функции безопасности > Контакты для экстренных случаев > Добавить контакты для экстренных случаев.
- Следуйте инструкциям на экране.
Запрос помощи
Прежде чем вы сможете запросить помощь, вы должны настроить функции безопасности и отслеживания.
- Удерживайте СВЕТ.
- Когда вы почувствуете три вибрации, отпустите кнопку, чтобы активировать функцию помощи. Появится экран обратного отсчета.
НАКОНЕЧНИК: До завершения обратного отсчета вы можете удерживать любую кнопку, чтобы отменить сообщение.
Музыка
На музыкальных часах вы можете загружать аудиоконтент на часы со своего компьютера или от стороннего поставщика, чтобы вы могли слушать, когда вашего телефона нет рядом. Для прослушивания аудиоконтента, хранящегося на ваших часах, вы можете подключить наушники с технологией Bluetooth. Подключение к стороннему провайдеру Перед загрузкой музыки или другого аудио files к вашим часам от поддерживаемого стороннего поставщика, вы должны подключить поставщика к своим часам. Некоторые опции сторонних поставщиков музыки уже установлены на ваших часах. Чтобы получить дополнительные возможности, вы можете загрузить приложение Connect IQ на свой телефон (garmin.com/connectiqapp.
- Удерживайте ВНИЗ на любом экране, чтобы открыть элементы управления музыкой.
- Выберите поставщика музыки.
Подключение наушников Bluetooth
Для прослушивания музыки, загруженной на ваши музыкальные часы, необходимо подключить наушники с помощью технологии Bluetooth.
- Поднесите наушники к часам на расстояние не более 2 м (6.6 фута).
- Включите режим сопряжения на наушниках.
- Задержать.
- Выберите «Музыка» > «Наушники» > «Добавить новый».
- Выберите наушники, чтобы завершить процесс сопряжения.
Слушать музыку
- Удерживайте ВНИЗ на любом экране, чтобы открыть элементы управления музыкой.
- При необходимости подключите наушники с помощью технологии Bluetooth.
- Задержать.
- Выберите «Поставщики музыки» и выберите один из вариантов:
- Чтобы прослушать музыку, загруженную на часы с компьютера, выберите Моя музыка.
- Чтобы управлять воспроизведением музыки на телефоне, выберите «Управление телефоном».
- Чтобы слушать музыку от стороннего поставщика, выберите имя поставщика и выберите список воспроизведения.
- Выбрать>
Информация об устройстве с часами
ВНИМАНИЕ!
У некоторых пользователей может возникнуть раздражение кожи после длительного использования часов, особенно если у пользователя чувствительная кожа или аллергия. Если вы заметили какое-либо раздражение кожи, снимите часы и дайте коже время на заживление. Чтобы предотвратить раздражение кожи, убедитесь, что часы чистые и сухие, и не затягивайте их слишком сильно на запястье. Для получения дополнительной информации перейдите на garmin.com/fitandcare.
- Носите часы выше запястья. ПРИМЕЧАНИЕ. Часы должны быть плотными, но удобными. Для более точных показаний пульса часы не должны смещаться во время бега или тренировки. Для показаний пульсоксиметра вы должны оставаться неподвижными.
 ПРИМЕЧАНИЕ: Оптический датчик расположен на задней части часов.
 - Дополнительную информацию см. В руководстве пользователя.

Зарядка часов
ПРЕДУПРЕЖДЕНИЕ
Это устройство содержит литий-ионный аккумулятор. Предупреждения о продукте и другую важную информацию см. В руководстве «Важная информация о безопасности и продукте» в упаковке продукта.
ВНИМАНИЕ
Для предотвращения коррозии тщательно очистите и просушите контакты и прилегающую территорию перед зарядкой или подключением к компьютеру. См. Инструкции по очистке в руководстве пользователя.
- Вставьте меньший конец USB-кабеля в зарядный порт на часах.

- Подключите большой конец USB-кабеля к USB-порту для зарядки. Часы отображают текущий уровень заряда батареи.

Получение руководства пользователя
Руководство пользователя содержит инструкции по использованию функций часов и доступу к нормативной информации. Перейти к www.garmin.com/manuals.
Дополнительная информация
- Посетите сайт support.garmin.com для получения дополнительных руководств, статей и обновлений программного обеспечения.
- Перейдите на купить.garmin.comили обратитесь к дилеру Garmin для получения информации о дополнительных аксессуарах и запасных частях.
- Перейдите на www.garmin.com/ataccuracy. Это не медицинский прибор. Функция пульсоксиметра доступна не во всех странах.
Характеристики
- Диапазон рабочих температур: От -20º до 60ºC (от -4º до 140ºF)
- Диапазон температур зарядки: От 0º до 45ºC (от 32º до 113ºF)
- Немузыкальные (большие и малые) частоты беспроводной связи: 2.4 ГГц при 3.06 дБм макс.
- Музыкальная (большая) частота беспроводной связи: 2.4 ГГц при 18.64 дБм макс.
- Музыкальная (маленькая) беспроводная частота: 2.4 ГГц при 17.67 дБм максимум
- САР ЕС, Музыка (большой): 0.48 Вт/кг, туловище, 0.47 Вт/кг конечности
- САР ЕС, музыка (маленький): 1.57 Вт/кг, туловище, 1.03 Вт/кг конечности
support.garmin.com
© Garmin Ltd. или ее дочерние компании, 2022 г.
Garmin®, логотип Garmin, являются товарными знаками Garmin Ltd. или ее дочерних компаний, зарегистрированными в США и других странах. Connect IQ™, Firstbeat Analytics™, Garmin Connect™, Garmin Express™ и Garmin Pay™ являются товарными знаками Garmin Ltd. или ее дочерних компаний. Эти товарные знаки нельзя использовать без явного разрешения Garmin. Android™ является товарным знаком Google LLC. Apple® и iTunes® являются товарными знаками Apple Inc., зарегистрированными в США и других странах. Словесный товарный знак и логотипы BLUETOOTH® принадлежат компании Bluetooth SIG, Inc., и любое использование этих знаков компанией Garmin осуществляется по лицензии. Wi-Fi® является зарегистрированным товарным знаком Wi-Fi Alliance Corporation. Windows® является зарегистрированным товарным знаком Microsoft Corporation в США и других странах. Другие товарные знаки и торговые наименования принадлежат их соответствующим владельцам. Артикул: A04308, AA4308, AB4308, AC4308 Эл
Документы / Ресурсы
 |
Умные часы Garmin Forerunner 255 [pdf] Руководство пользователя A4308, IPH-A4308, IPHA4308, A04308, AA4308, AB4308, AC4308, умные часы Forerunner 255, Forerunner 255, Forerunner, умные часы Forerunner, умные часы 255, умные часы |
Рекомендации
- Manuals
- Brands
- Garmin Manuals
- Watch
- FORERUNNER 255 Series
- Owner’s manual
-
Contents
-
Table of Contents
-
Troubleshooting
-
Bookmarks
Quick Links
FORERUNNER
255 SERIES
®
Owner’s Manual
Related Manuals for Garmin FORERUNNER 255 Series
Summary of Contents for Garmin FORERUNNER 255 Series
-
Page 1
FORERUNNER 255 SERIES ® Owner’s Manual… -
Page 2
© 2022 Garmin Ltd. or its subsidiaries All rights reserved. Under the copyright laws, this manual may not be copied, in whole or in part, without the written consent of Garmin. Garmin reserves the right to change or improve its products and to make changes in the content of this manual without obligation to notify any person or organization of such changes or improvements. Go to www.garmin.com… -
Page 3: Table Of Contents
Paying for a Purchase Using Your HIIT Timers……..12 Watch……….34 Using an ANT+® Indoor Trainer..12 Adding a Card to Your Garmin Pay Customizing Activities and Apps..12 Wallet……….35 Adding or Removing a Favorite Changing Your Garmin Pay Activity……….
-
Page 4
Viewing Data Totals……50 Following a Workout From Garmin Viewing Your Time in Each Heart Rate Connect……….39 Zone…………50 Creating a Custom Workout on Garmin Deleting History……..50 Connect……….39 Data Management…….. 50 Sending a Custom Workout to Your Deleting Files…….. -
Page 5
Controlling a VIRB Action Camera Applications……….. 73 During an Activity……65 Garmin Connect………74 User Profile……..65 Using the Garmin Connect App..74 Using Garmin Connect on Your Setting Up Your User Profile….65 Computer……..75 Viewing Your Fitness Age….65 Manually Syncing Data with Garmin About Heart Rate Zones……. -
Page 6
Starting the Countdown Timer….. 79 Troubleshooting……92 Syncing the Time with GPS….80 Setting the Time Manually….80 Product Updates……..92 Setting Up Garmin Express….92 Customizing Your Device….80 Getting More Information….. 92 Activities and App Settings….80 Activity Tracking……..92 Customizing the Data Screens.. -
Page 7
Can I use my Bluetooth sensor with my watch?………… 96 My headphones will not connect to the watch…………. 96 My music cuts out or my headphones won’t stay connected……96 Appendix……..97 Data Fields……….97 VO2 Max. Standard Ratings….106 FTP Ratings……… -
Page 9: Introduction
Always consult your physician before you begin or modify any exercise program. Setting Up Your Watch To take full advantage of the Forerunner features, complete these tasks. • Pair the Forerunner watch with your phone using the Garmin Connect (Pairing Your Phone, page 71).
-
Page 10: Gps Status And Status Icons
BACK • Press to return to the previous screen. • Press to record a lap, rest, or transition during an activity. START · STOP • Press to start and stop the activity timer. • Press to choose an option or to acknowledge a message. GPS Status and Status Icons For outdoor activities, the status ring turns green when GPS is ready.
-
Page 11: Activities And Apps
Connect IQ app (Connect IQ Features, page 75). For more information about activity tracking and fitness metric accuracy, go to garmin.com/ataccuracy. Starting an Activity When you start an activity, GPS turns on automatically (if required). 1 Press START.
-
Page 12: Evaluating An Activity
3 Select how you felt during the activity. You can view evaluations in the Garmin Connect app. Outdoor Activities The Forerunner device comes preloaded with outdoor activities, such as running and cycling. GPS is turned on for outdoor activities.
-
Page 13: Going For A Run
Going for a Run The first fitness activity you record on your watch can be a run, ride, or any outdoor activity. You may need to charge the watch before starting the activity (Charging the Watch, page 89). The device records activity data only while the activity timer is running. 1 Press START, and select an activity.
-
Page 14: Going For A Track Run
Going for a Track Run Before you go for a track run, make sure you are running on a standard-shape, 400 m track. You can use the track run activity to record your outdoor track data, including distance in meters and lap splits. 1 Stand on the outdoor track.
-
Page 15: Triathlon Training
Triathlon Training When you participate in a triathlon, you can use the triathlon activity to quickly transition to each sport segment, to time each segment, and to save the activity. 1 Press START. 2 Select Triathlon. 3 Press START to start the activity timer. 4 Press BACK at the beginning and end of each transition.
-
Page 16: Swimming In Open Water
Swimming in Open Water You can record swim data including distance, pace, and stroke rate. You can add data screens to the default open water swimming activity (Customizing the Data Screens, page 81). 1 Press START. 2 Select Open Water. 3 Go outside and wait while the device locates satellites.
-
Page 17: Swim Terminology
Stroke Types Stroke type identification is available only for pool swimming. Your stroke type is identified at the end of a length. Stroke types appear in your Garmin Connect account. You can also select stroke type as a custom data field (Customizing the Data Screens, page 81).
-
Page 18: Indoor Activities
Indoor Activities The watch can be used for training indoors, such as running on an indoor track or using a stationary bike or indoor trainer. GPS is turned off for indoor activities. When running or walking with GPS turned off, speed and distance are calculated using the accelerometer in the watch.
-
Page 19: Recording A Strength Training Activity
• Turn on automatic set detection to start and stop your sets. • Save and send your strength training activity to your Garmin Connect account. You can use the tools in your Garmin Connect account to view and edit activity details. Activities and Apps…
-
Page 20: Recording A Hiit Activity
Recording a HIIT Activity You can use specialized timers to record a high-intensity interval training (HIIT) activity. 1 Press START. 2 Select HIIT. 3 Select an option: • Select Free to record an open, unstructured HIIT activity. • Select HIIT Timers (HIIT Timers, page 12).
-
Page 21: Adding Or Removing A Favorite Activity
Adding or Removing a Favorite Activity The list of your favorite activities appears when you press START from the watch face, and it provides quick access to the activities you use most frequently. You can add or remove favorite activities at any time. 1 Hold UP.
-
Page 22: Customizing The Watch Face
Customizing the Watch Face Before you can activate a Connect IQ watch face, you must install a watch face from the Connect IQ store (Connect IQ Features, page 75). You can customize the watch face information and appearance, or activate an installed Connect IQ watch face. 1 From the watch face, hold UP.
-
Page 23: Glances
Tracks your floors climbed and progress toward your goal. Displays scheduled workouts when you select a Garmin coach adaptive training plan in Garmin coach your Garmin Connect account. The plan adjusts to your current level of fitness, coaching ® and schedule preferences, and race date. Health Snapshot…
-
Page 24: Viewing The Glance Loop
Name Description RCT camera Allows you to manually take a photo, record a video clip, and customize settingsxref using controls varia. Your current respiration rate in breaths per minute and seven-day average. You can do a Respiration breathing activity to help you relax. Displays total sleep time, a sleep score, and sleep stage information for the previous Sleep night.
-
Page 25: Customizing The Glance Loop
51 to 75 is high reserve energy, and 76 to 100 is very high reserve energy. You can sync your watch with your Garmin Connect account to view your most up-to-date Body Battery level, long-term trends, and additional details (Tips for Improved Body Battery Data, page 18).
-
Page 26: Viewing The Body Battery Glance
Viewing the Body Battery Glance The Body Battery glance displays your current Body Battery level and a graph of your Body Battery level for the last several hours. 1 Press UP or DOWN to view the Body Battery glance. NOTE: You may need to add the glance to your glance loop (Customizing the Glance Loop, page 17).
-
Page 27: Viewing The Heart Rate Glance
• Period and fertility predictions • Health and nutrition information NOTE: You can use the Garmin Connect app to add and remove glances. Using the Stress Level Glance The stress level glance displays your current stress level and a graph of your stress level for the last several hours.
-
Page 28: Performance Measurements
These estimates are provided and supported by Firstbeat Analytics ™ . For more information, go to www.garmin.com/performance-data/running/. NOTE: The estimates may seem inaccurate at first. The watch requires you to complete a few activities to learn about your performance. VO2 max.: VO2 max. is the maximum volume of oxygen (in milliliters) you can consume per minute per kilogram of body weight at your maximum performance (About VO2 Max.
-
Page 29: About Vo2 Max. Estimates
On the device, your VO2 max. estimate appears as a number, description, and position on the color gauge. On your Garmin Connect account, you can view additional details about your VO2 max. estimate, such as where it ranks for your age and gender.
-
Page 30: Viewing Your Predicted Race Times
The watch analyzes several weeks of your training data to refine the race time estimates. TIP: If you have more than one Garmin device, you can enable the Physio TrueUp ™ feature, which allows your…
-
Page 31: Heart Rate Variability Status
No color Poor or No Status Your HRV values are averaging well below the normal range for your age. You can sync your watch with your Garmin Connect account to view your current heart rate variability status, trends, and educational feedback.
-
Page 32: Getting Your Ftp Estimate
Viewing Your Performance Condition This feature requires wrist-based heart rate or a compatible chest heart rate monitor. 1 Add Performance Condition to a data screen (Customizing the Data Screens, page 81). 2 Go for a run or ride. After 6 to 20 minutes, your performance condition appears. 3 Scroll to the data screen to view your performance condition throughout the run or ride.
-
Page 33: Lactate Threshold
Conducting an FTP Test Before you can conduct a test to determine your functional threshold power (FTP), you must pair a chest heart rate monitor and a power meter with your device (Pairing Your Wireless Sensors, page 60), and you must get your VO2 max.
-
Page 34: Syncing Activities And Performance Measurements
Performing a Guided Test to Determine Your Lactate Threshold This feature requires a Garmin chest heart rate monitor. Before you can perform the guided test, you must put on a heart rate monitor and pair it with your device (Pairing Your Wireless Sensors, page 60).
-
Page 35: Training Status
Cycling performance measurements require a heart rate monitor and a power meter. These estimates are provided and supported by Firstbeat Analytics. For more information, go to www.garmin.com/performance-data/running/. NOTE: The estimates may seem inaccurate at first. The watch requires you to complete a few activities to learn about your performance.
-
Page 36: Training Status Levels
Training Status Levels Training status shows you how your training affects your fitness level and performance. Your training status is based on changes to your VO2 max., acute load, and HRV status over an extended time period. You can use your training status to help plan future training and continue improving your fitness level.
-
Page 37
Training Load Focus In order to maximize performance and fitness gains, training should be distributed across three categories: low aerobic, high aerobic, and anaerobic. Training load focus shows you how much of your training is currently in each category and provides training targets. Training load focus requires at least 7 days of training to determine if your training load is low, optimal, or high. -
Page 38: Recovery Time
Recovery Time You can use your Garmin device with wrist-based heart rate or a compatible chest heart rate monitor to display how much time remains before you are fully recovered and ready for the next hard workout. NOTE: The recovery time recommendation uses your VO2 max. estimate and may seem inaccurate at first. The device requires you to complete a few activities to learn about your performance.
-
Page 39: Pausing And Resuming Your Training Status
1 When you want to pause your training status, select an option: • From the training status glance, hold UP, and select Pause Training Status. • From your Garmin Connect settings, select Performance Stats > Training Status > > Pause Training Status.
-
Page 40: Controls
Controls The controls menu lets you quickly access watch features and options. You can add, reorder, and remove the options in the controls menu (Customizing the Controls Menu, page 34). From any screen, hold LIGHT. Icon Name Description Select to enable or disable airplane mode to turn off all wireless communica Airplane Mode tions.
-
Page 41: Viewing The Controls Menu
Select to sync your watch with your paired phone. Timer Select to set a countdown timer (Starting the Countdown Timer, page 79). Select to open your Garmin Pay wallet and pay for purchases with your watch Wallet (Garmin Pay, page 34). Wi-Fi Select to enable or disable Wi‑Fi communications.
-
Page 42: Customizing The Controls Menu
5 If necessary, select Add New to add an additional shortcut to the controls menu. Garmin Pay The Garmin Pay feature allows you to use your watch to pay for purchases in participating locations using credit or debit cards from a participating financial institution.
-
Page 43: Adding A Card To Your Garmin Pay Wallet
• To delete the card, select Changing Your Garmin Pay Passcode You must know your current passcode to change it. If you forget your passcode, you must reset the Garmin Pay feature for your Forerunner watch, create a new passcode, and reenter your card information.
-
Page 44: Training
Race Calendar and Primary Race When you add a race event to your Garmin Connect calendar, you can view the event on your watch by adding the primary race glance (Glances, page 15).
-
Page 45: Auto Goal
Your watch creates a daily step goal automatically, based on your previous activity levels. As you move during the day, the watch shows your progress toward your daily goal If you choose not to use the auto goal feature, you can set a personalized step goal on your Garmin Connect account.
-
Page 46: Using Do Not Disturb Mode
NOTE: You can set your normal sleep hours in the user settings on your Garmin Connect account. You can enable the During Sleep option in the system settings to automatically enter do not disturb mode during your…
-
Page 47: Workouts
During your activity, you can view workout-specific data screens that contain workout step information, such as the workout step distance or average step pace. You can create and find more workouts using Garmin Connect, or select a training plan that has built-in workouts and transfer them to your watch.
-
Page 48: Starting A Workout
The suggested workout updates automatically to changes in training habits, recovery time, and VO2 max. Turning Daily Suggested Workout Prompts On and Off Daily suggested workouts are recommended based on your previous activities saved to your Garmin Connect account. 1 Press START.
-
Page 49: Following A Pool Swim Workout
4 Select Training. 5 Select an option: • Select Workouts to do workouts downloaded from Garmin Connect. • Select Critical Swim Speed to record a Critical Swim Speed (CSS) test or enter a CSS value manually (Recording a Critical Swim Speed Test, page 41).
-
Page 50: About The Training Calendar
Garmin coach glance is added to the glance loop on your Forerunner watch. Starting Today’s Workout After you send a Garmin Coach training plan to your watch, the Garmin Coach glance appears in your glance loop (Customizing the Glance Loop, page 17).
-
Page 51: Customizing An Interval Workout
You can also create a pace band for a known course to optimize your pace effort based on elevation changes. You can create a PacePro plan using the Garmin Connect app. You can preview the splits and elevation plot before you run the course.
-
Page 52: Downloading A Pacepro Plan From Garmin Connect
Downloading a PacePro Plan from Garmin Connect Before you can download a PacePro plan from Garmin Connect, you must have a Garmin Connect account (Garmin Connect, page 74). 1 Select an option: • Open the Garmin Connect app, and select •…
-
Page 53: Starting A Pacepro Plan
Starting a PacePro Plan Before you can start a PacePro plan, you must download a plan from your Garmin Connect account. 1 Press START. 2 Select an outdoor running activity. 3 Hold UP. 4 Select Training > PacePro Plans. 5 Select a plan.
-
Page 54: Creating A Pacepro Plan On Your Watch
Creating a PacePro Plan on Your Watch Before you can create a PacePro plan on your watch, you must create a course (Following a Course on Your Device, page 55). 1 From the watch face, press START. 2 Select an outdoor running activity. 3 Hold UP.
-
Page 55: Setting A Training Target
5 Select an option: • Select From History to select a previously recorded activity from your device. • Select Downloaded to select an activity you downloaded from your Garmin Connect account. 6 Select the activity. The Virtual Partner screen appears indicating your estimated finish time.
-
Page 56: Using The Metronome
Enabling Self Evaluation When you save an activity, you can evaluate your perceived effort and how you felt during the activity. Your self evaluation information can be viewed in your Garmin Connect account. 1 Hold UP. 2 Select Activities & Apps.
-
Page 57: Using History
Using History History contains previous activities you have saved on your watch. The watch has a history glance for quick access to your activity data (Glances, page 15). 1 From the watch face, hold UP. 2 Select History. 3 Select an option: •…
-
Page 58: Restoring A Personal Record
Restoring a Personal Record You can set each personal record back to the one previously recorded. 1 From the watch face, hold UP. 2 Select History > Records. 3 Select a sport. 4 Select a record to restore. 5 Select Previous > NOTE: This does not delete any saved activities.
-
Page 59: Deleting Files
Trash folder to completely remove the files. NOTE: Mac operating systems provide limited support for MTP file transfer mode. You must open the Garmin drive on a Windows operating system. You should use the Garmin Express application to remove ™…
-
Page 60: Turning Off The Wrist-Based Heart Rate Monitor
The watch starts broadcasting your heart rate data. 3 Pair your watch with your compatible device. NOTE: The pairing instructions differ for each Garmin compatible device. See your owner’s manual. 4 Press STOP to stop broadcasting your heart rate data.
-
Page 61: Pulse Oximeter
On the watch, your pulse oximeter reading appears as an oxygen saturation percentage and color on the graph. On your Garmin Connect account, you can view additional details about your pulse oximeter readings, including trends over multiple days. For more information about pulse oximeter accuracy, go to garmin.com/ataccuracy.
-
Page 62: Getting Pulse Oximeter Readings
Getting Pulse Oximeter Readings You can manually begin a pulse oximeter reading by viewing the pulse oximeter glance. The glance displays your most recent blood oxygen saturation percentage, a graph of your hourly average readings for the last 24 hours, and a graph of your elevation for the last 24 hours. NOTE: The first time you view the pulse oximeter glance, the watch must acquire satellite signals to determine your elevation.
-
Page 63: Courses
Courses You can send a course from your Garmin Connect account to your device. After it is saved to your device, you can navigate the course on your device. You can follow a saved course simply because it is a good route. For example, you can save and follow a bike friendly commute to work.
-
Page 64: Viewing Or Editing Course Details
Viewing or Editing Course Details You can view or edit course details before you navigate a course. 1 Press START. 2 Select an activity. 3 Hold UP. 4 Select Navigation > Courses. 5 Press START to select a course. 6 Select an option: •…
-
Page 65: Navigating To Your Starting Point During An Activity
Navigating to Your Starting Point During an Activity You can navigate back to the starting point of your current activity in a straight line or along the path you traveled. This feature is available only for activities that use GPS. 1 During an activity, press STOP.
-
Page 66: Panning And Zooming The Map
Panning and Zooming the Map 1 While navigating, press UP or DOWN to view the map. 2 Hold UP. 3 Select Pan/Zoom. 4 Select an option: • To toggle between panning up and down, panning left and right, or zooming, press START. •…
-
Page 67: Wireless Sensors
(Customizing the Data Screens, page 81). If your watch was packaged with a sensor, they are already paired. For information about specific Garmin sensor compatibility, purchasing, or to view the owner’s manual, go to buy.garmin.com for that sensor. Sensor Type Description You can use your watch with your eBike and view bike data, such as battery and shifting infor…
-
Page 68: Pairing Your Wireless Sensors
The first time you connect a wireless sensor to your watch using ANT+ or Bluetooth technology, you must pair the watch and sensor. If the sensor has both ANT+ and Bluetooth technology, Garmin recommends that you pair using ANT+ technology. After they are paired, the watch connects to the sensor automatically when you start an activity and the sensor is active and within range.
-
Page 69: Training With Running Dynamics
Training with Running Dynamics Before you can view running dynamics, you must put on a running dynamics accessory, such as the HRM-Pro, and pair it with your watch (Pairing Your Wireless Sensors, page 60). 1 Press START, and select a running activity. 2 Press START to start the activity timer.
-
Page 70: Color Gauges And Running Dynamics Data
Elite runners tend to have quick and balanced strides. You can watch the gauge or data field during your run or view the summary on your Garmin Connect account after your run. As with the other running dynamics data, ground contact time balance is a quantitative measurement to help you learn about your running form.
-
Page 71: Vertical Oscillation And Vertical Ratio Data
(3 m) while data downloads. Your heart rate data can be reviewed in the watch history and on your Garmin Connect account. If both wrist-based heart rate and chest heart rate data are available, your watch uses the chest heart rate data.
-
Page 72: Training With Power Meters
You must pair the tempe sensor with your device to display temperature data. See the instructions for your tempe sensor for more information (www.garmin.com/manuals/tempe). VIRB Remote The VIRB remote function allows you to control your VIRB action camera using your device.
-
Page 73: Controlling A Virb Action Camera During An Activity
• To wake the camera from sleep mode, select Wake Camera. User Profile You can update your user profile on your watch or on the Garmin Connect app. Setting Up Your User Profile You can update your gender, date of birth, height, weight, wrist, heart rate zone, power zone, and Critical Swim…
-
Page 74: Fitness Goals
• Run often with the wrist or chest heart rate monitor. • Try a few heart rate training plans, available from your Garmin Connect account. • View your heart rate trends and time in zones using your Garmin Connect account. User Profile…
-
Page 75: Heart Rate Zone Calculations
If you know your functional threshold power (FTP) or threshold power (TP) value, you can enter it and allow the software to calculate your power zones automatically. You can manually adjust your zones on the watch or using your Garmin Connect account. 1 Hold UP.
-
Page 76: Music
Bluetooth headphones. Downloading Personal Audio Content Before you can send your personal music to your watch, you must install the Garmin Express application on your computer (www.garmin.com/express). You can load your personal audio files, such as .mp3 and .m4a files, to a Forerunner music watch from your computer.
-
Page 77: Disconnecting From A Third-Party Provider
Disconnecting from a Third-Party Provider 1 From the Garmin Connect app, select 2 Select Garmin Devices, and select your watch. 3 Select Music. 4 Select an installed third-party provider, and follow the on-screen instructions to disconnect the third-party provider from your watch.
-
Page 78: Music Playback Controls
Music Playback Controls NOTE: Some music playback controls are available on a Forerunner music device only. Select to open the music playback controls. Select to adjust the volume. Select to play and pause the current audio file. Select to skip to the next audio file in the playlist. Hold to fast forward through the current audio file.
-
Page 79: Connectivity
NOTE: If you have a Forerunner non-music watch, hold UP, and select Pair Phone. 3 Select an option to add your watch to your account: • If this is the first time you are pairing a device with the Garmin Connect app, follow the on-screen instructions.
-
Page 80: Receiving An Incoming Phone Call
® ® • If you are using an Android phone, from the Garmin Connect app, select Settings > Notifications. Turning Off the Bluetooth Phone Connection You can turn off the Bluetooth phone connection from the controls menu.
-
Page 81: Playing Audio Prompts During An Activity
Audio prompts play on your connected Bluetooth headphones, if available. Otherwise, audio prompts play on your phone paired through the Garmin Connect app. During an audio prompt, the watch or phone mutes the primary audio to play the announcement.
-
Page 82: Garmin Connect
Garmin Connect You can connect with your friends on Garmin Connect. Garmin Connect gives you the tools to track, analyze, share, and encourage each other. Record the events of your active lifestyle including runs, walks, rides, swims, hikes, triathlons, and more. To sign up for a free account, you can download the app from the app store on your phone, or go to connect.garmin.com.
-
Page 83: Using Garmin Connect On Your Computer
2 Select Sync. Connect IQ Features You can add Connect IQ features to your watch from Garmin and other providers using the Connect IQ app. You can customize your watch with watch faces, device apps, data fields, and music providers.
-
Page 84: Downloading Connect Iq Features Using Your Computer
3 Follow the on-screen instructions. Adding Contacts You can add up to 50 contacts to the Garmin Connect app. Contact emails can be used with the LiveTrack feature. Three of these contacts can be used as emergency contacts (Adding Emergency Contacts, page 76).
-
Page 85: Turning Incident Detection On And Off
Turning On Live Event Sharing Before you can use live event sharing, you must set up the LiveTrack feature in the Garmin Connect app. NOTE: LiveTrack features are available when your Forerunner watch is connected to the Garmin Connect app using Bluetooth technology, with a compatible Android phone.
-
Page 86: Clocks
Clocks Setting an Alarm You can set multiple alarms. You can set each alarm to sound once or to repeat regularly. 1 From the watch face, hold UP. 2 Select Alarm Clock > Add Alarm. 3 Follow the on-screen instructions to set the time. 4 Select the alarm for more options: •…
-
Page 87: Using The Stopwatch
Using the Stopwatch 1 From any screen, hold LIGHT. 2 Select Stopwatch. NOTE: You may need to add this item to the controls menu (Customizing the Controls Menu, page 34). 3 Press START to start the timer. 4 Press to restart the lap timer The total stopwatch time continues running.
-
Page 88: Syncing The Time With Gps
Syncing the Time with GPS Each time you turn on the watch and acquire satellites, the watch automatically detects your time zones and the current time of day. You can also manually sync the time with GPS when you change time zones, and to update for daylight saving time.
-
Page 89: Customizing The Data Screens
Vibration Alerts: Enables alerts that notify you to inhale or exhale during a breathwork activity. Workout Videos: Enables instructive workout animations for a strength, cardio, yoga, or Pilates activity. Animations are available for pre-installed workouts and workouts downloaded from your Garmin Connect account.
-
Page 90: Adding A Map To An Activity
Adding a Map to an Activity You can add the map to the data screens loop for an activity. 1 Hold UP. 2 Select Activities & Apps. 3 Select the activity to customize. 4 Select the activity settings. 5 Select Data Screens > Add New > Map. Activity Alerts You can set alerts for each activity, which can help you to train toward specific goals, to increase your awareness of your environment, and to navigate to your destination.
-
Page 91: Setting An Alert
Setting an Alert 1 Hold UP. 2 Select Activities & Apps. 3 Select an activity. NOTE: This feature is not available for all activities. 4 Select the activity settings. 5 Select Alerts. 6 Select an option: • Select Add New to add a new alert for the activity. •…
-
Page 92: Gps Settings
GPS Settings You can change the GPS settings to customize the satellite systems used for each activity. For more information about satellite systems, go to www.garmin.com/aboutGPS. TIP: The GPS settings can impact battery life (Battery Life Information, page 92). Hold UP, select Activities & Apps, select an activity, select the activity settings, and select GPS.
-
Page 93: Altimeter Settings
Altimeter Settings Hold UP, and select Sensors & Accessories > Altimeter. Calibrate: Allows you to manually calibrate the altimeter sensor. Auto Cal.: Allows the altimeter to self-calibrate each time you use satellite systems. Sensor Mode: Sets the mode for the sensor. The Auto option uses both the altimeter and barometer according to your movement.
-
Page 94: Navigation Settings
Navigation Settings You can customize the map features and appearance when navigating to a destination. Customizing Navigation Data Screens 1 Hold UP. 2 Select Navigation > Data Screens. 3 Select an option: • Select Map > Status to turn on or off the map. •…
-
Page 95: System Settings
The Every Second recording option provides more detailed activity recordings, but may not record entire activities that last for longer periods of time. USB Mode: Sets the watch to use MTP (media transfer protocol) or Garmin mode when connected to a computer.
-
Page 96: Changing The Screen Settings
Changing the Screen Settings 1 Hold UP. 2 Select System > Backlight. 3 Select an option: • Select During Activity. • Select General Use. 4 Select an option: • Select Brightness to set the brightness level of the screen. • Select Keys to turn on the screen for button presses. •…
-
Page 97: Charging The Watch
(Charging the Watch, page 89). You can charge the watch by plugging the USB cable into a Garmin approved AC adapter with a standard wall outlet or a USB port on your computer. Charging a fully depleted battery takes up to two hours.
-
Page 98: Wearing The Watch
Tips for Erratic Pulse Oximeter Data, page 54 for more information about the pulse oximeter sensor. • For more information about accuracy, go to garmin.com/ataccuracy. • For more information about watch wear and care, go to www.garmin.com/fitandcare. Device Care NOTICE Avoid extreme shock and harsh treatment, because it can degrade the life of the product.
-
Page 99: Changing The Bands
EU SAR, Forerunner 255 Music 0.48 W/kg torso, 0.47 W/kg limb EU SAR, Forerunner 255S Music 1.57 W/kg torso, 1.03 W/kg limb The device withstands pressure equivalent to a depth of 50 m. For more information, go to www.garmin.com/waterrating. Device Information…
-
Page 100: Battery Life Information
• Go to support.garmin.com for additional manuals, articles, and software updates. • Go to buy.garmin.com, or contact your Garmin dealer for information about optional accessories and replacement parts. • Go to www.garmin.com/ataccuracy. This is not a medical device. The pulse oximeter feature is not available in all countries.
-
Page 101: My Step Count Does Not Seem Accurate
2 Wait while the device syncs your data. Syncing can take several minutes. NOTE: Refreshing the Garmin Connect app or the Garmin Express application does not sync your data or update your step count. The floors climbed amount does not seem accurate Your watch uses an internal barometer to measure elevation changes as you climb floors.
-
Page 102: Restarting The Watch
Delete Data and Reset Settings. NOTE: If you have set up a Garmin Pay wallet, this option deletes the wallet from your watch. If you have music stored on your watch, this option deletes your stored music.
-
Page 103: My Device Is In The Wrong Language
• Remove your watch from the Garmin Connect app and the Bluetooth settings on your phone to retry the pairing process. • If you bought a new phone, remove your watch from the Garmin Connect app on the phone you intend to stop using.
-
Page 104: Can I Use My Bluetooth Sensor With My Watch
Can I use my Bluetooth sensor with my watch? The watch is compatible with some Bluetooth sensors. The first time you connect a sensor to your Garmin watch, you must pair the watch and sensor. After they are paired, the watch connects to the sensor automatically when you start an activity and the sensor is active and within range.
-
Page 105: Appendix
NOTE: Not all data fields are available for all activity types. Some data fields require ANT+ or Bluetooth accessories to display data. Some data fields appear in more than one category on the watch. TIP: You can also customize the data fields from the watch settings in the Garmin Connect app. Cadence Fields…
-
Page 106
Elevation Fields Name Description Average Ascent The average vertical distance of ascent since the last reset. Average Descent The average vertical distance of descent since the last reset. Elevation The altitude of your current location above or below sea level. Glide Ratio The ratio of horizontal distance traveled to the change in vertical distance. -
Page 107
Graphical Name Description Cadence Gauge Running. A color gauge showing your current cadence range. Compass Gauge The direction you are moving based on the compass. A color gauge showing the left/right balance of ground contact time while GCT Balance Gauge running. -
Page 108
Name Description Interval Maximum %Max. The maximum percentage of maximum heart rate for the current swim interval. Interval Maximum Heart The maximum heart rate for the current swim interval. Rate The average percentage of heart rate reserve (maximum heart rate minus Lap % Heart Rate Reserve resting heart rate) for the current lap. -
Page 109
Other Fields Name Description Active Calories The calories burned during the activity. Ambient Pressure The uncalibrated environmental pressure. Barometric Pressure The current calibrated environmental pressure. Battery Level The remaining battery power. The strength of the GPS satellite signal. Laps The number of laps completed for the current activity. The training load for the current activity. -
Page 110
Pace Fields Name Description 500m Pace The current rowing pace per 500 meters. Average 500m Pace The average rowing pace per 500 meters for the current activity. Average Pace The average pace for the current activity. Interval Pace The average pace for the current interval. Lap 500m Pace The average rowing pace per 500 meters for the current lap. -
Page 111
Rest Fields Name Description Repeat On The timer for the last interval plus the current rest (pool swimming). Rest Timer The timer for the current rest (pool swimming). Run Dynamics Name Description Average GCT Balance The average ground contact time balance for the current session. Average Ground Contact The average amount of ground contact time for the current activity. -
Page 112
Speed Fields Name Description Average Moving Speed The average speed when moving for the current activity. The average speed for the current activity, including both moving and stopped Average Overall Speed speeds. Average Speed The average speed for the current activity. Average Nautical Speed The average speed in knots for the current activity. -
Page 113
Name Description Paddle sports. The average distance traveled per stroke during the last Last Lap Distance Per Stroke completed lap. Swimming. The average number of strokes per minute (spm) during the last Last Lap Stroke Rate completed lap. Paddle sports. The average number of strokes per minute (spm) during the last Last Lap Stroke Rate completed lap. -
Page 114: Vo2 Max. Standard Ratings
Timer Fields Name Description Average Lap Time The average lap time for the current activity. The total time recorded. For example, if you start the activity timer and run for 10 minutes, Elapsed Time then stop the timer for 5 minutes, then start the timer and run for 20 minutes, your elapsed time is 35 minutes.
-
Page 115: Ftp Ratings
FTP Ratings These tables include classifications for functional threshold power (FTP) estimates by gender. Males Watts per Kilogram (W/kg) Superior 5.05 and greater Excellent From 3.93 to 5.04 Good From 2.79 to 3.92 Fair From 2.23 to 2.78 Untrained Less than 2.23 Females Watts per Kilogram (W/kg) Superior…
-
Page 116: Wheel Size And Circumference
Wheel Size and Circumference Your speed sensor automatically detects your wheel size. If necessary, you can manually enter your wheel circumference in the speed sensor settings. The tire size is marked on both sides of the tire. This is not a comprehensive list. You can also measure the circumference of your wheel or use one of the calculators available on the internet.
-
Page 117
Tire Size Wheel Circumference (mm) 27 × 1-1/4 2161 27 × 1-3/8 2169 29 x 2.1 2288 29 x 2.2 2298 29 x 2.3 2326 650 x 20C 1938 650 x 23C 1944 650 × 35A 2090 650 × 38B 2105 650 ×… -
Page 118: Index
Index Garmin Express 92 predicted race time 22 Garmin Pay 34, 35 profiles, user 65 glances 13, 16, 17, 54 pulse oximeter 54, 90 goals 47 accessories 58, 92 GPS 2 activities 3, 4, 6, 12, 13 racing 47 signal 93 custom 7, 13, 55 recovery 30 ground contact time 62 favorites 13 replacement parts 91 saving 3 resetting the watch 94…
-
Page 120
May 2022 GUID-676967A0-1B23-4384-9BC9-76F3D643F1C8 v1…
Посмотреть инструкция для Garmin Forerunner 255 бесплатно. Руководство относится к категории подвесные лодочные моторы, 4 человек(а) дали ему среднюю оценку 9.4. Руководство доступно на следующих языках: английский. У вас есть вопрос о Garmin Forerunner 255 или вам нужна помощь? Задайте свой вопрос здесь
Не можете найти ответ на свой вопрос в руководстве? Вы можете найти ответ на свой вопрос ниже, в разделе часто задаваемых вопросов о Garmin Forerunner 255.
Какой вес Garmin Forerunner 255?
В чем разница между топливом E10 и E5?
Какой размер экрана Garmin Forerunner 255?
Какое разрешение экрана дисплея Garmin Forerunner 255?
Какая ширина Garmin Forerunner 255?
Какая толщина Garmin Forerunner 255?
Инструкция Garmin Forerunner 255 доступно в русский?
Не нашли свой вопрос? Задайте свой вопрос здесь