В статье я расскажу, как установить обновление BIOS загрузкой с флешки через Q-Flash и Q-Flash Plus. Отмечу, что прошить может любой уверенный пользователь, главное соблюдать пошаговую инструкцию.
Актуальная версия BIOS позволяет материнской плате полноценно выполнять свои функции в ногу с нововведениями. Как правило, производители материнских плат рекомендуют обновление биос, Gigabyte же наоборот, просит не обновлять микрокод, если он работает без ошибок и справляется с запросами пользователя.
Содержание
- Как обновить BIOS Gigabyte через Q-Flash
- Как пользоваться Q-Flash Plus Gigabyte
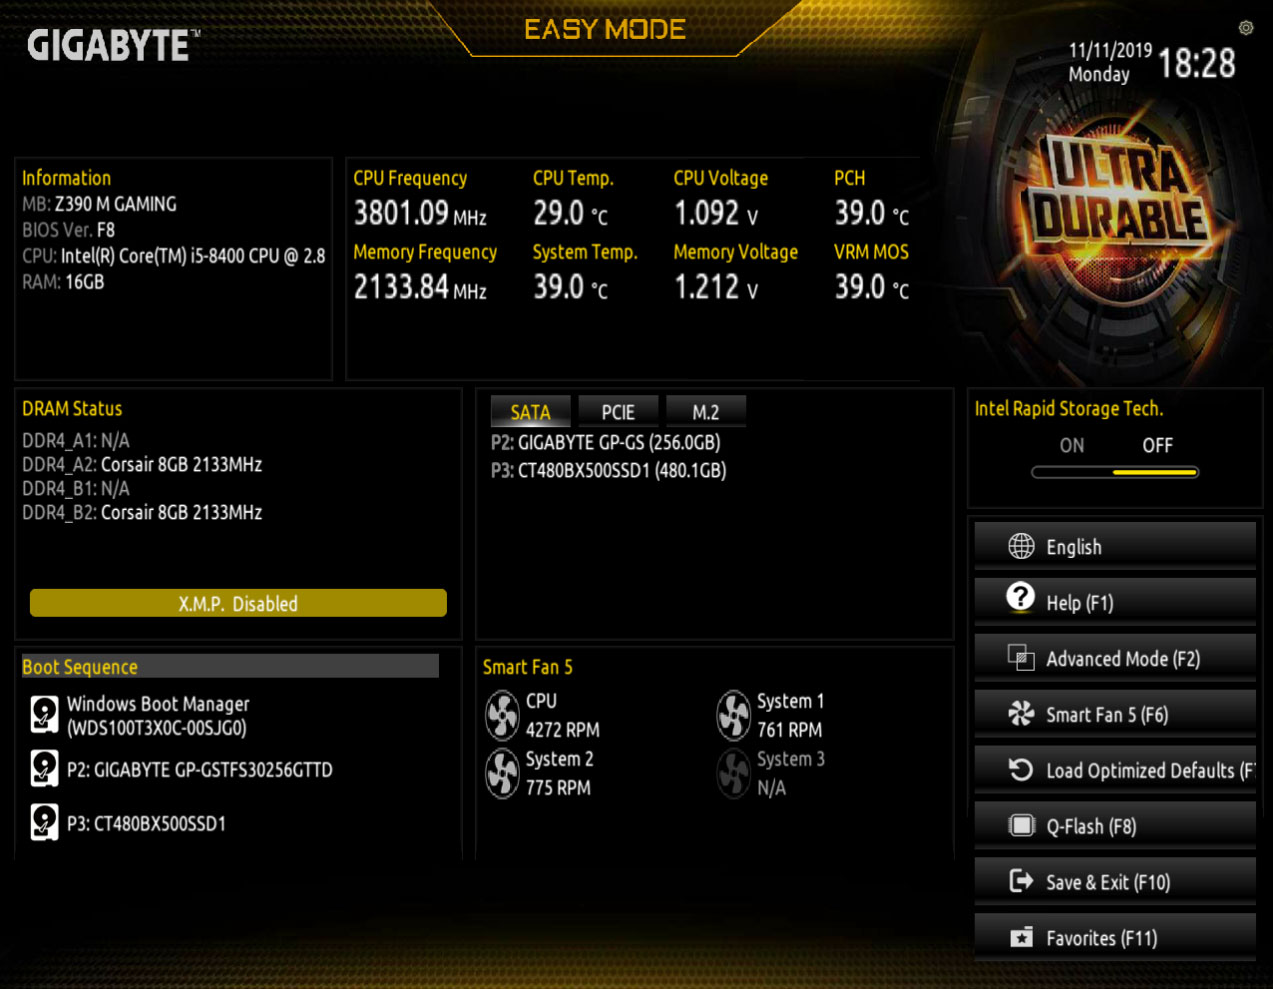
Шаг 1. Для начала необходимо войти в биос, чтобы посмотреть версию вашей микропрограммы, запоминаем. Далее лучше выйти и выключить компьютер с помощью выключателя на блоке питании.
Шаг 2. Откройте левую боковую крышку и выпишите модель материнской платы в плоть до ревизии, например GA-H110M-S2.

Шаг 3. Откройте сайт производителя gigabyte.ru. Щелкните на значок поиска, укажите выписанную модель вашей материнки, нажмите Enter.

Шаг 4. Из представленного списка необходимо найти точную запрашиваемую модель, остальные похожие модели нас не интересуют. Кликните на ссылку Driver.

Шаг 5. В списке загрузок разверните категорию BIOS, выберите любую версию прошивки, рекомендую скачать последнюю (не скачивайте beta-версии). Напротив каждой версии биос в описании вы можете прочитать какие присутствуют изменения (дополнения).

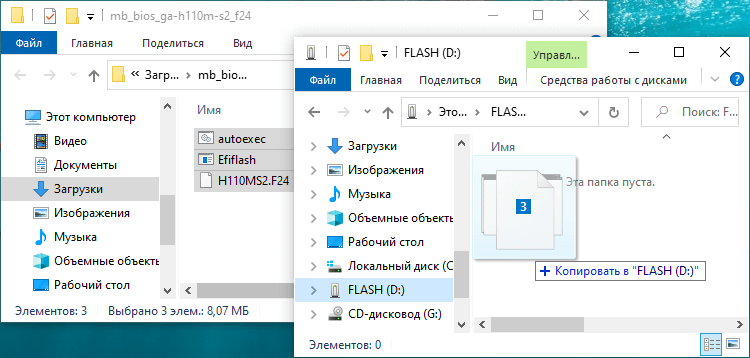
Шаг 6. Распакуйте скачанный архив.

Скопируйте файлы на отформатированную флешку, на самом деле достаточно перенести только один файл с названием материнской платы и версией биос, в нашем примере это «GA-H110M-S2.F24». USB-носитель оставляем подключенным к ПК, на котором требуется прошить микрокод.
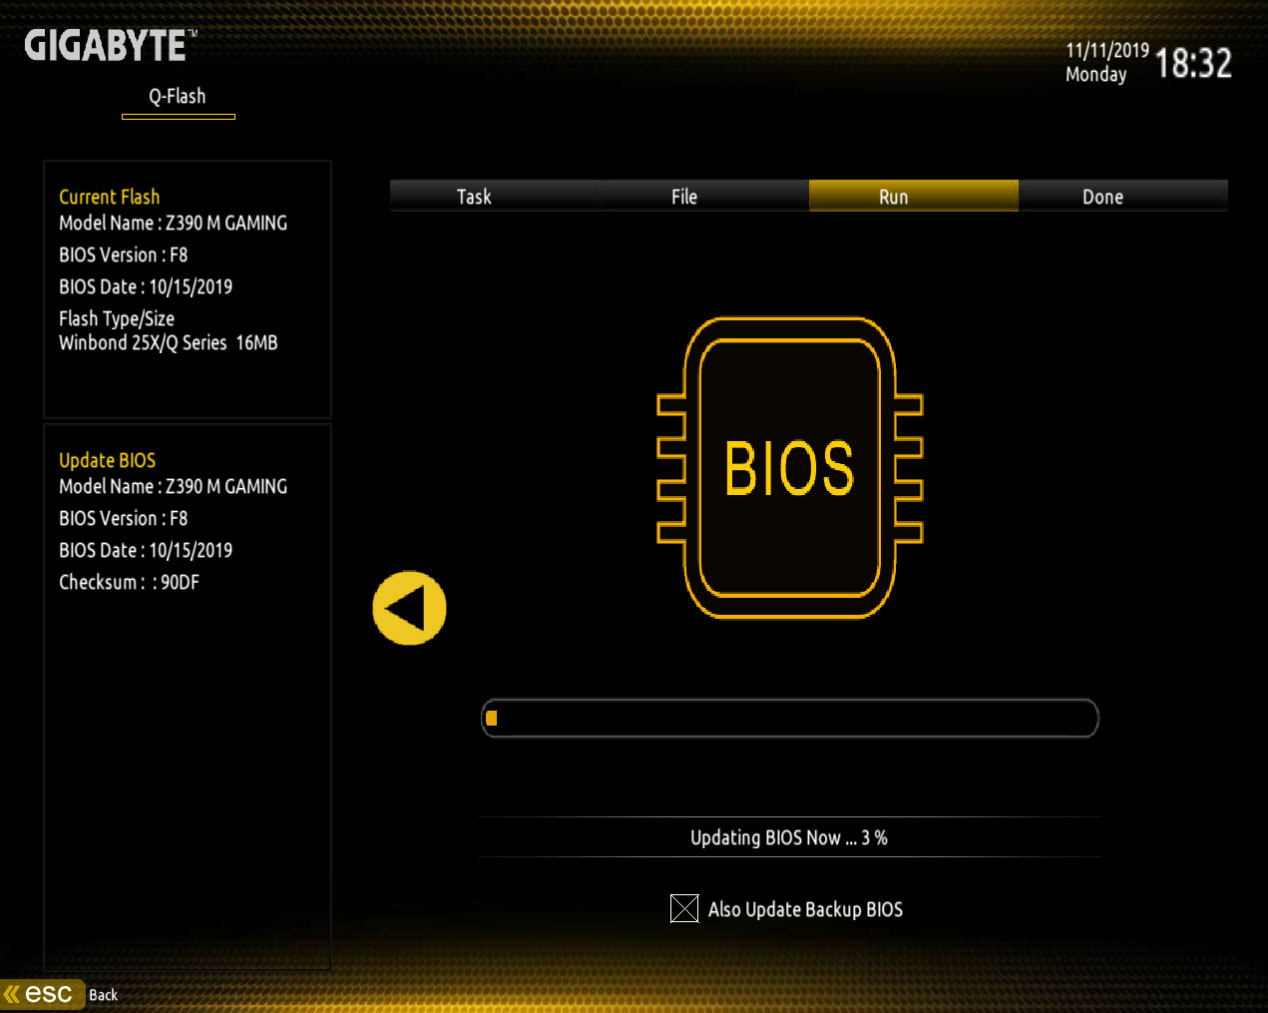
Шаг 7. Перезагрузите компьютер, войдите в BIOS, найдите утилиту Q-Flash.

Если ее там нет, перезагрузите ПК, при запуске нажмите несколько раз на клавиатуре клавишу End или F8 в зависимости от версии вашей микропрограммы, чтобы войти в Q-Flash.

Шаг 8. Здесь есть две опции:
- Uploads BIOS – обновление микрокода с USB-флешки.
- Save BIOS – сохранение существующей версии микрокода на USB-флешку.
Выберите первое – обновление BIOS для платы Gigabyte.
Шаг 9. Микропрограмма автоматически определит вашу новую версию микропрограммы на флешке, щелкните Enter.
Пойдет процесс обновления, ничего не нажимайте, компьютер перезагрузится, затем еще раз с полным выключением, дожидаемся окончания загрузки Windows.
Как пользоваться Q-Flash Plus Gigabyte
Ни так давно Gigabyte внедрил в дорогие материнские платы новую функцию Q-Flash Plus, что значительно упростило обновление BIOS. Это особенно актуально для тех, у кого мать в стоковой прошивке не определяет процессор. Отмечу, что обновить микропрограмму можно без вставленного в материнскую плату процессора и оперативной памяти.
Как пользоваться Q-Flash Plus покажу на примере материнской платы GIGABYTE Z690 AORUS MASTER. Проделываем все шаги с первого по пятый, что описаны в предыдущем подзаголовке.
Шаг 6. Распакуйте архив.
Шаг 7. Перенесите файл BIOS (например, Z690AORUSMASTER.F5) на отформатированный в FAT32 флэш-накопитель.
Шаг 8. Переименуйте ваш файл биос в GIGABYTE.bin. Во всплывающем окне с предупреждением, подтвердите Да. На моем примере, БЫЛО:

СТАЛО:

Шаг 9. Подключите кабели блока питания к разъему питания 12 В (подключите один, если их два – для процессора) и к основному источнику питания 20+4 pin.
Шаг 10. Отключите все подключенные к компьютеру устройства. Включите блок питание перед подключением USB-накопителя к порту Q-Flash Plus на задней панели.

Шаг 11. Нажмите кнопку Q-Flash Plus, и система автоматически найдет и сопоставит файл BIOS на USB-накопителе. QFLED и кнопка Q-Flash Plus на задней панели будут мигать во время процесса сопоставления и перепрограммирования BIOS. Подождите пока светодиоды перестанут мигать (это займет 6-8 минут), погашенные индикаторы означают, что перепрошивка BIOS завершена.
Не прерывайте процедуру установки, даже если вам покажется, что у вас просто черный экран, – ждите! Прерванная операция приведет ваше железо в «кирпич», чтобы реанимировать его, придется обращаться в сервисный центр для прошивки биос через программатор.
Как вы видите, обновить биос материнской платы gigabyte просто, и это под силу практически каждому пользователю.
A. Before you use Q-Flash Plus, follow the steps below in sequence:
1. From GIGABYTE’s website, download the latest compressed BIOS update file that matches your motherboard
model.
2. Uncompress the downloaded BIOS file, save it to your USB flash drive, and rename it to GIGABYTE.bin.
Note: The USB flash drive must use the FAT32/16 file system.
3. Insert the USB flash drive into the white USB port on the back panel.
4. Connect the power cables to the 12V power connector (connect either one if there are two) and main power
connector.
B. Using Q-Flash Plus
Press the Q-Flash Plus button and the system will automatically search and match the BIOS file in the USB
flash drive on the white USB port. The QFLED and the Q-Flash Plus button on the rear panel will flash during
the BIOS matching and flashing process. Wait for 2-3 minutes and the LED will stop flashing when the BIOS
flashing is complete.
• Before using the Q-Flash Plus function, make sure that your system is off (S5 shutdown state).
• If your motherboard has a BIOS switch and a SB switch, reset them to their default settings.
(Default setting for the BIOS switch: Boot from the main BIOS; default setting for the SB switch:
Dual BIOS)
• After the main BIOS is flashed, the system will reboot automatically and then DualBIOS
continue to update the backup BIOS. After completion, the system will reboot again and boot
from the main BIOS.
• Q-Flash Plus will update the main BIOS only if run without the CPU installed. The system will
shut down upon completion.
— 73 —
will
™
Unique Features
FEATURED
December 24 2019
-
#AORUS
#Motherboard
#BIOS
In Part 2 we looked at how to use the @BIOS update utility for updating your BIOS. Although @BIOS is the most user-friendly way to update your motherboards BIOS, a lot of people prefer the option of accessing the BIOS itself to perform the update.
This is where Q Flash comes in.
Using Q Flash, you can run the update from within your motherboards bios. The benefit of this is that it removes Windows from the update process, which can help make the update a bit safer.
Here is how to update your BIOS through Q Flash.
Step 1: Download the BIOS update
First things first, head on over to the product page for your AORUS motherboard and download the compressed file for the latest BIOS update. It is important to double-check that you have downloaded the correct BIOS version for your motherboard model.
Step 2: Prepare your USB drive
Now that you have downloaded the latest BIOS update, it is time to prepare your USB drive. Ensure that your drive is formatted as FAT32.
Open the compressed BIOS update file that you downloaded and extract the content to the root of your USB drive.
Once the files have been copied across, plug the USB drive into a spare USB slot on your computer.
Step 3: Boot into the motherboards BIOS
We are now ready to load the BIOS. Reboot your computer and during the boot process, press the DELETE key on your keyboard to boot into the BIOS.
Step 4: Update the BIOS with Q Flash
Now that you are in the BIOS, press F8 on your keyboard to load Q-Flash. Once Q Flash has been loaded, select the Update Bios option.
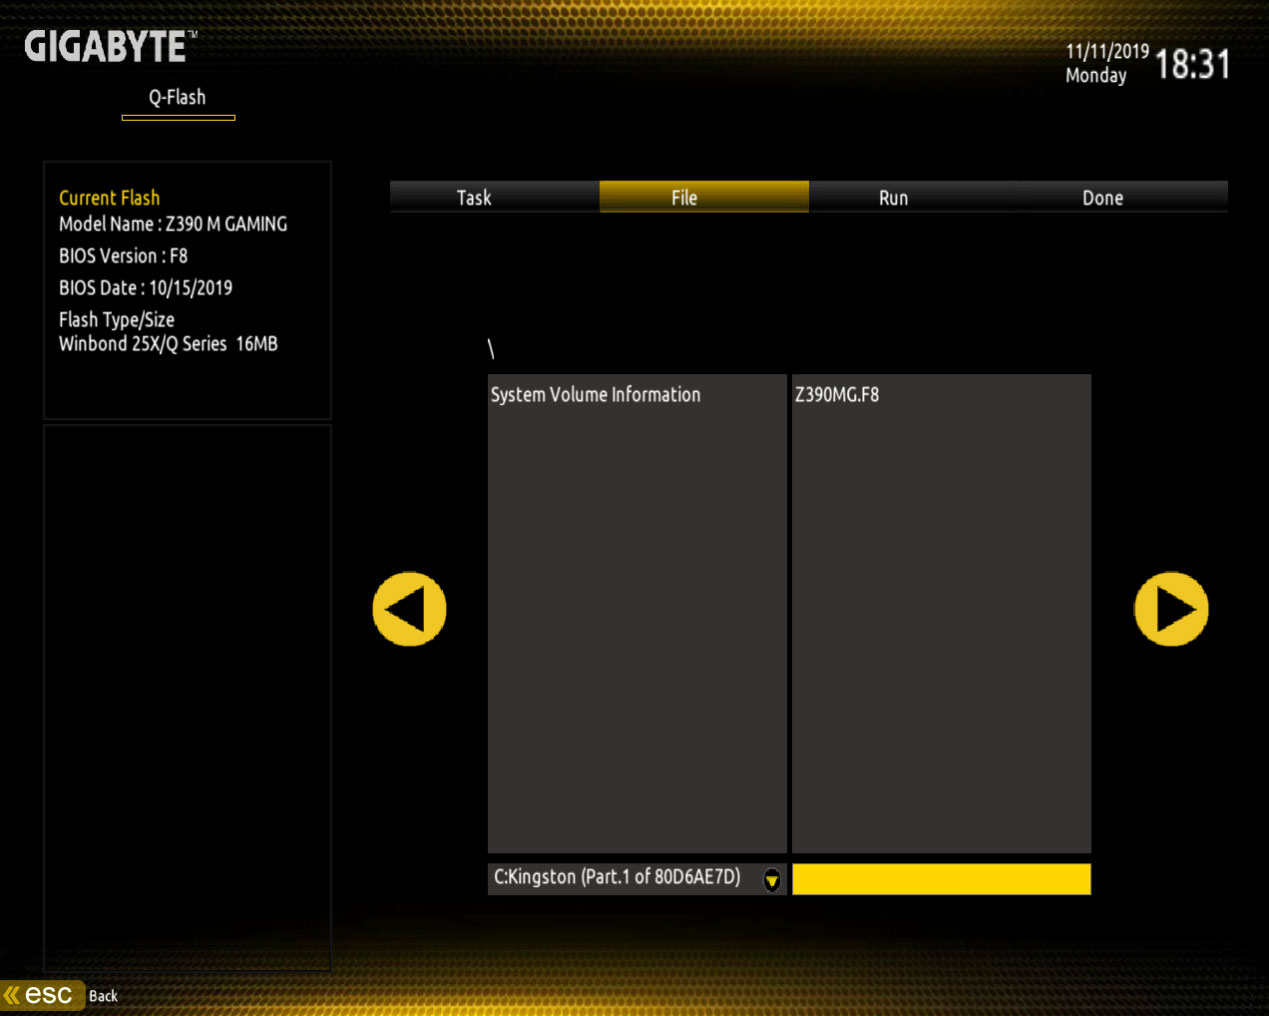
Next, select the BIOS update that you have stored on your USB drive.
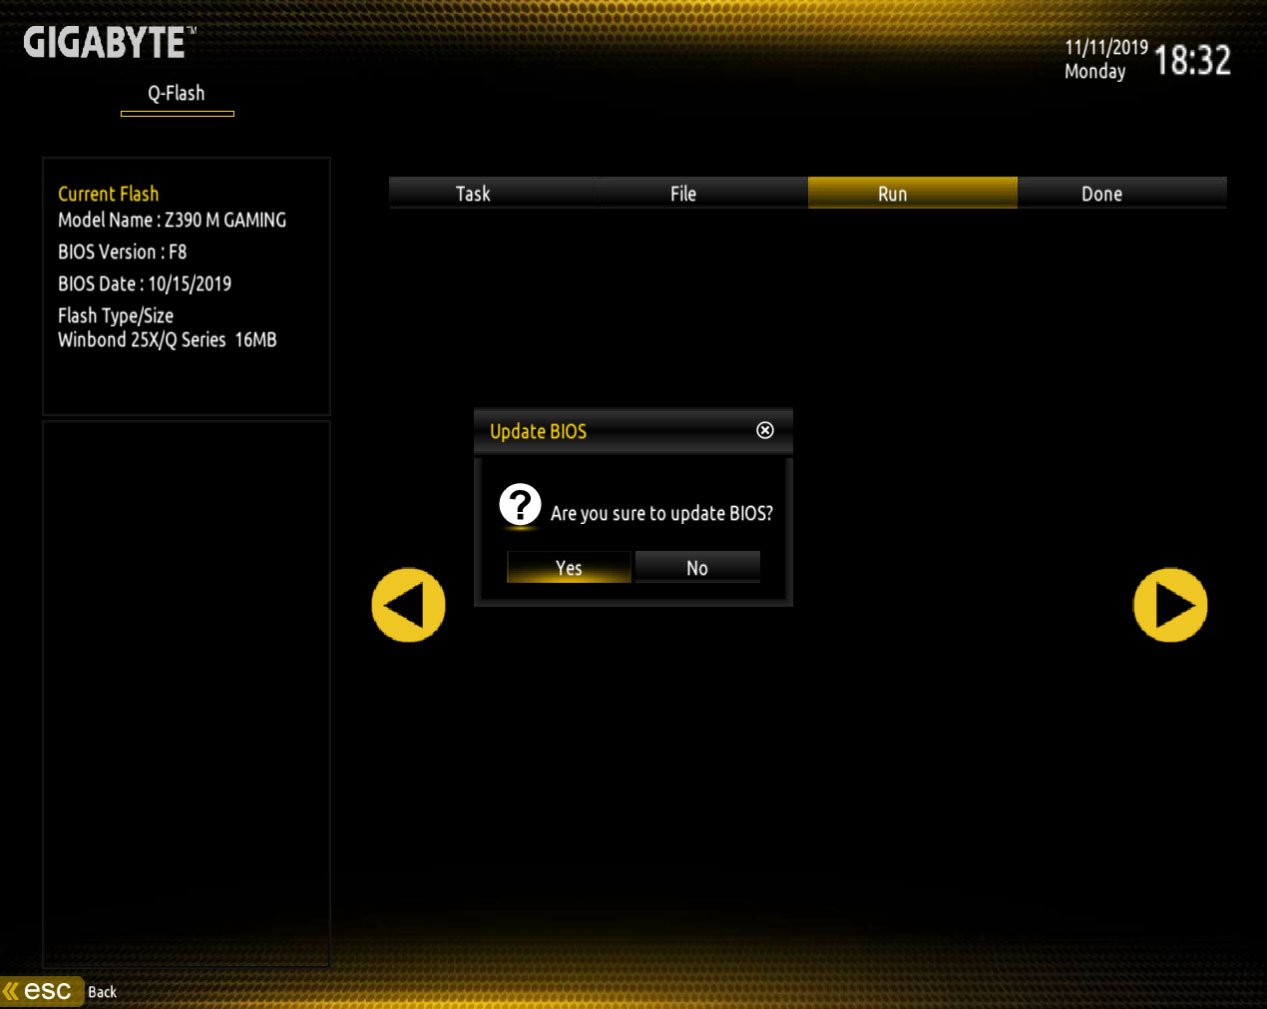
Once you have selected the BIOS update, you will be asked if you would like to proceed with the BIOS update.
Click Yes, and the BIOS update shall be loaded and verified.
Once the file verification process has finished, click the Start button to start the update.
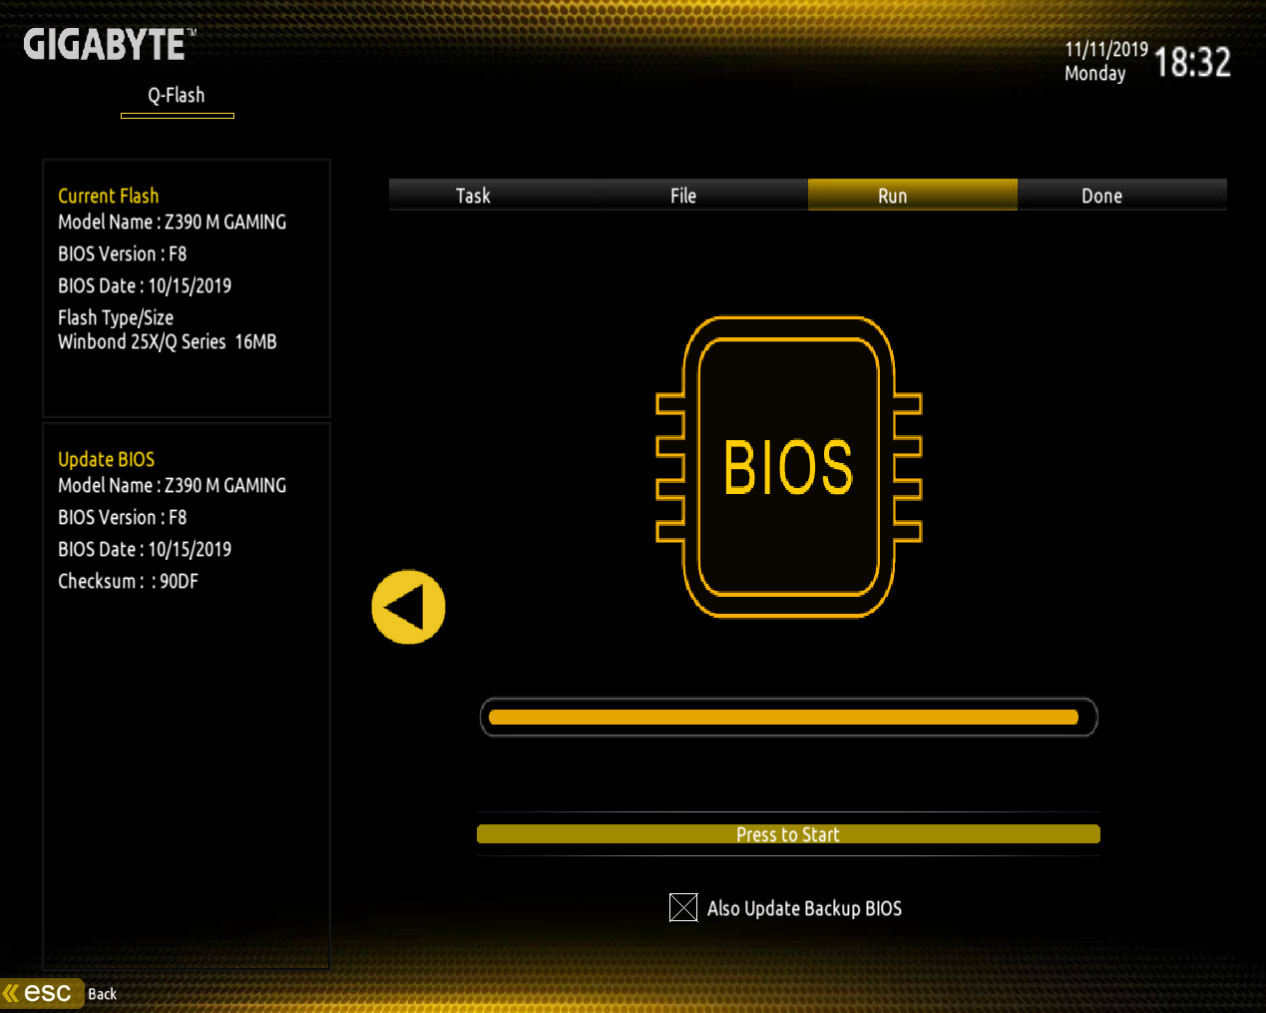
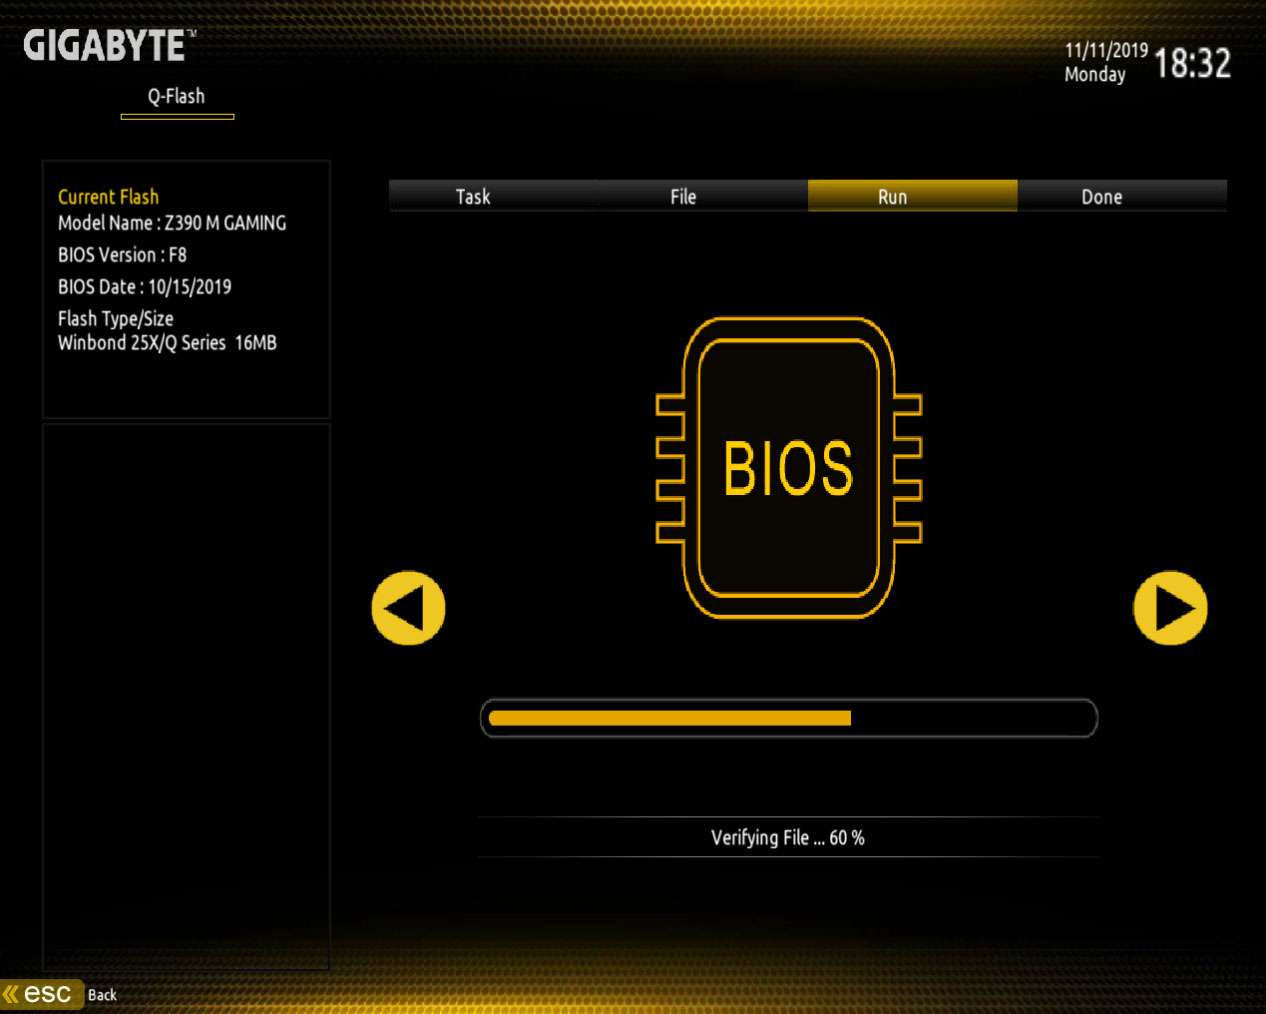
Q Flash shall now update the motherboard BIOS. The update may save several minutes and once completed, your computer will reboot.
Q Flash has now finished updating your motherboards BIOS.
The amazing DualBIOS and how to restore your BIOS should there be an issue
Sometimes things don’t always go according to plan, and mistakes can happen. There is often the time when someone mistakingly flashes the BIOS of the wrong motherboard, or some other unforeseen issue arises. Thankfully, AORUS has got you covered thanks to DualBIOS.
DualBIOS is a great feature whereby your motherboard has two BIOS onboard. There is the main BIOS that you use every day, and there is a backup BIOS.
The backup BIOS is there should your main BIOS ever encounter any issues. Should your main BIOS ever have an issue or become corrupted, the DualBIOS will kick in to save the day.
In the instance that your BIOS becomes corrupted, when you boot your computer, the backup BIOS will be loaded instead. This allows you to resume using your computer and allows you to work on fixing any main BIOS issues.
So, how do you go about fixing your BIOS issues should you encounter any? Well, the first thing to try is reflashing your BIOS with the latest, correct BIOS update using the @BIOS or Q Flash methods that we spoke about earlier. Generally, this is enough to resolve any issues you may be experiencing.
But what if both your main BIOS and the backup BIOS has stopped functioning? This is where Q flash Plus comes in.
Q-Flash Plus allows you to flash a working BIOs even your computer won’t boot. It doesn’t even need a CPU or RAM to be installed!
The steps to utilizing Q-Flash Plus is very simple. Should your computer fail to boot, follow these steps.
Step 1: Prepare the USB drive
Download the latest BIOS version for your motherboard from the motherboard product page. Extract the downloaded BIOS file to the root of your flash drive. We need to rename the BIOS file so that Q-Flash Plus can find it. Rename the BIOS file to GIGABYTE.bin.
Step 2: Plug the USB drive into your computer
Now you need to plug the USB drive into the USB port that supports Q-Flash Plus. You will be able to find this in the manual of your motherboard.
Step 3: Flash the BIOS using Q-Flash Plus
Ensure that your power supply is connected to your motherboard and try and boot your computer. After about 20 seconds, Q-Flash Plus will notice that the computer is not booting correctly and will start the BIOS flashing process automatically.
You will see that the BIOS LED will start flashing on your motherboard which indicates that the BIOS flash is currently in progress. After a few minutes, the LED shall stop flashing which means that the BIOS flash has been completed.
Learn More:
How to Update Your BIOS Part 1: The @BIOS Utility
Skip to content
Introduction
I recently released a new YouTube video, called “How to Flash the Gigabyte B550 AORUS MASTER BIOS with Q-Flash Plus“. This video walks though and demonstrates all of the steps required to use the Q-Flash Plus feature on this motherboard.

Q-Flash Plus is a special feature that lets you flash the BIOS without having a CPU, RAM, or video card installed. The most common reason you would want/need to do this is if you had a new CPU that was not supported by the existing BIOS version on the motherboard.
This situation is happening to a number of people with new Ryzen 5000 Series processors that require a newer BIOS version than was available when the motherboard was manufactured. This feature can also be useful if a more traditional BIOS update (using the Q-Flash BIOS utility or the @BIOS Windows utility) failed.
Here are the high-level steps that I show in the video.

Here is the video.
Final Words
I think this is a useful video right now because the documentation on the product web site and in the motherboard manual is a pretty sparse. Gigabyte also has their own YouTube video showing how to do this, but it uses a different motherboard.
I also have blog post about doing this same type of operation for several MSI motherboards.
- Flashing Your BIOS with No CPU Installed
If you have any thoughts or questions about this post, please ask me here in the comments or on Twitter. You can also follow me on Twitter, where I am @GlennAlanBerry. Thank you for reading!