FreeStyle Freedom Lite Manual

The FreeStyle Freedom Lite Meter and How It Works
System Check Screen
This display always appears when the meter is turned on. You should check that your meter matches the example exactly every time your meter turns on. Do not use the meter if the display check screen does not exactly match the example. If the screen does not match, the meter may show an incorrect result. Please contact Customer Care.
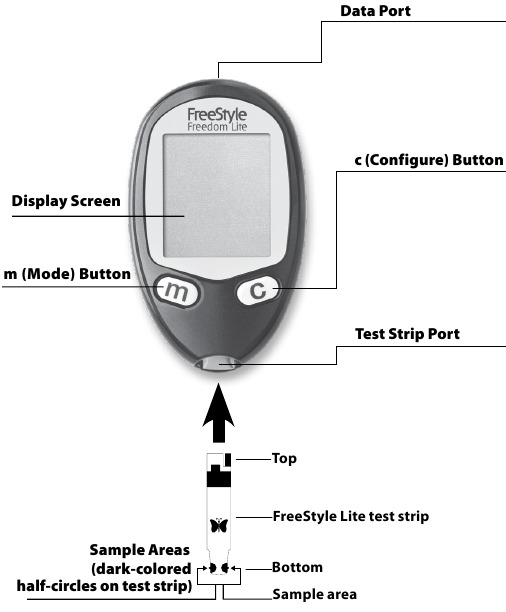
Display Screen
Displays your test results and other important information.
m (Mode) Button
- Moves to different mode settings
- Scrolls backward
- Silences a reminder alarm
Sample Areas (dark-colored half-circles on test strip)
Apply blood or control solution to one sample area only. Insert strip into the meter printed side up (see image above).
Data Port
Downloads test results. Requires a compatible data management system. For more information, please go to our website or contact Customer Care.
c (Configure) Button
- Marks a control solution test
- Scrolls forward
- Silences a reminder alarm
- Changes the date, time, alarm settings, sound options and reviews stored readings
Test Strip Port
Insert the Top end of a new FreeStyle Lite test strip here. The meter powers on when you insert the test strip.
Important Information About Your Blood Glucose Monitoring System
Intended Use
Use outside the body only (in vitro diagnostic use).
The FreeStyle Freedom Lite Blood Glucose Monitoring System is intended for use in the quantitative measurement of glucose in capillary whole blood from the forearm, upper arm, thigh, calf, fingers and hand and venous whole blood. It is intended for self testing and for use by healthcare professionals for people with diabetes mellitus at home as an aid in monitoring the effectiveness of a diabetes control programme. It is not intended for the diagnosis of or screening for diabetes mellitus, and it is not intended for use on neonates or arterial blood.
Use only FreeStyle Lite test strips and FreeStyle control solution with this meter. Other products can produce inaccurate results.
- Test on your fingers if you are testing for low blood glucose (hypoglycaemia) or if you suffer from hypoglycaemia unawareness.
- This system contains small parts that may be dangerous if swallowed.
Please read all the instructions provided in this owner’s booklet and practise the testing procedures before using the FreeStyle Freedom Lite system. Blood glucose monitoring should be done with the guidance of a healthcare professional.
Setting Up the Meter
Purpose
The purpose of this section is to set the meter sound volume, time and date
- With the meter off, press and hold
 for 3 seconds until appears.
 - Press to bypass setting the optional reminder alarms. You may choose to set these later (see Setting Reminder Alarms section).
 for 3 seconds until
  appears.
Set Sound Volume
With the sound volume on, your meter will beep when:
- The test strip is full of blood
- The test result appears on the display
- An error occurs
You may also choose to silence your meter.
- Set sound volume

| If you prefer: | Press  until you see: until you see: |
Then |
| No sound |  |
|
| A low beep |  |
|
| A louder beep |  |
Set Time
Note: Your meter can display either the 12-hour (1:24P) or the 24-hour (13:24) time formats. If you prefer the 12-hour format, there is no «A» for AM. If setting a PM time, continue to press until you see the «P» displayed for PM.
- Set hour
- Set minutes
- Set time format


Set Date
Note: The date format can display either:

OR
The month will flash first
- Set month
- Set day
- Set date format
- Set year
- Press and hold for 3 seconds until meter turns off. Meter set up is complete.


Testing Your Blood Glucose
Purpose
The purpose of this section is to produce an accurate blood glucose test result.
Prepare to Test
Available Test Sites

- Select your test site.
Note: Avoid moles, veins, bones and tendons. Bruising may occur at the test site. If bruising occurs, consider selecting another site.
There are differences in testing on fingers versus alternative sites.
Test on your fingers if you are testing for low blood glucose (hypoglycaemia) or if you suffer from hypoglycaemia unawareness. Check for low blood glucose when:- You feel symptoms such as weakness, sweating, shakiness, headache or confusion
- You eat a delayed meal after taking insulin
- You are following your healthcare professional’s advice
- Wash your hands and the test site with warm soapy water to ensure accurate results.
- Thoroughly dry your hands and the test site.
- Do not use lotion or cream on the test site.
- Check test strip expiry date.
Do not use expired test strips; they may produce inaccurate results.
Use only FreeStyle Lite test strips. Other test strips can produce inaccurate results. The test strips are for single use only.


Important Test Strip Information
Please read the FreeStyle Lite test strip package insert for more information.
- Use the test strips within the meter’s operating range: 40° – 104°F (4° – 40°C).
- Store test strips in a cool, dry place between 40° – 86°F (4° – 30°C).
- Store test strips away from direct sunlight and heat.
- Store test strips in their original vial only.
- Clean and dry your hands before removing a strip from the vial.
- Close the vial cap tightly immediately after removing a test strip.
- Do not transfer test strips to another container.
- Do not store test strips outside the vial.
- Do not bend, cut or alter test strips.
- Do not apply blood to both sides of the test strip.
- Do not press the test strip against the test site.
- Do not scrape the blood onto the test strip.
- Do not apply blood to the flat side of the test strip.
- Do not apply blood to the test strip when the test strip is out of the meter.
- Do not put blood or foreign objects into the meter.
Drying agents in the test strip vial or cap may be harmful if inhaled or swallowed and may irritate skin and eyes.
Performing a Blood Glucose Test
- Remove test strip from vial.
- Insert test strip to turn meter on.
Note: The meter turns off after 2 minutes of inactivity. Remove and reinsert the unused test strip to restart the meter.
If the meter does not turn on, go to Troubleshooting section. - Confirm System Check Screen.
- This display appears when you turn on the meter. Do not use the meter if the display check screen does not exactly match the example. Contact Customer Care.
- See The FreeStyle Freedom Lite Meter and How It Works section for more information.
- If the system check screen does not appear, go to Troubleshooting section.
- Obtain a blood drop.
When the and appears, use the lancing device to obtain a blood drop. (See FreeStyle lancing device insert for instructions.)
The test strip requires only a 0.3 microliter of blood for accurate results. - Apply and hold blood to 1 sample area of the test strip until:
- You see short lines moving clockwise on the display or
- You hear a beep
This indicates the test strip obtained enough blood and the meter is checking your glucose level. If a short line does not appear after 5 seconds, the sample may be too small. You can add blood to the same side only for up to 60 seconds. If the test does not start after applying blood drop, go to Troubleshooting section.
- View result
The result appears on the display when the test is complete. The time that the meter takes to display a result depends on your blood glucose level. Higher glucose levels require more time.
Note: If you see an «Er1, Er2, Er3 or Er4» on the display, it is an error code. Go to Error Codes section. - Remove test strip to turn meter off.
Dispose of used lancet and test strip correctly.


 and
and  appears, use the lancing device to obtain a blood drop. (See FreeStyle lancing device insert for instructions.)

Understanding Blood Glucose Test Results
The meter displays results in mmol/L. The unit of measurement is preset. You cannot change this setting.
The meter displays results from 1.1 – 27.8 mmol/L. Low or high blood glucose results can indicate a potentially serious medical condition.
- The expected normal fasting blood glucose level for an adult without diabetes is less than 6.1 mmol/L.1
- Two hours after meals, the blood glucose level for an adult without diabetes should be less than 7.8 mmol/L.1
- Consult your healthcare professional to determine the range that is appropriate for you.
Reference:
1 Definition and diagnosis of diabetes mellitus and intermediate hyperglycemia: report of a WHO/IDF consultation. World Health Organization, Geneva, Switzerland 2006.
Low and High Blood Glucose Results
| Result | What It Means | What To Do |
| lower than 3.3 mmol/L | Low (hypoglycaemic) | Repeat the test with a new test strip, even if you do not feel that you have low blood glucose. If your blood glucose result is still not consistent with your symptoms, contact your healthcare professional and follow his or her treatment advice. |
| higher than 13.3 mmol/L | High (hyperglycaemic) | Repeat the test with a new test strip, even if you do not feel that you have high blood glucose. If your blood glucose result is still not consistent with your symptoms, contact your healthcare professional and follow his or her treatment advice. |
| Display | What It Means | Symptoms | What To Do |
 Appears when result is: lower than 1.1 mmol/L |
Severe low blood glucose | Weakness Sweating Shakiness Headache Confusion |
Follow your healthcare professional’s advice to treat low blood glucose. If your blood glucose result does not match how you feel, perform a control solution test to confirm that your meter and strips are working properly. |
- Severe dehydration may cause false low results. If you believe you are suffering from severe dehydration, contact your healthcare professional immediately.
- Contact your healthcare professional if you have symptoms that do not match your test result, and you have followed the instructions in this owner’s booklet.
| Display | What It Means | Symptoms | What To Do |
 Appears when result is: higher than 27.8 mmol/L |
Severe high blood glucose | Fatigue Thirst Excess Urination Blurry Vision |
Follow your healthcare professional’s advice to treat high blood glucose. If your blood glucose result does not match how you feel, perform a control solution test to confirm that your meter and strips are working properly. |
Error Codes
| Message | What It Means | What To Do |
 |
|
|
 |
|
|
 |
|
|
 |
|
|
 and
and  appear
 Troubleshooting
| What It Means | What To Do | |
|
|
|
|
|
|
|
|
|
|
|
|
|
|
|
|
|
|
|
|
FreeStyle Control Solution
Purpose
FreeStyle control solution is a red liquid that contains a fixed amount of glucose.
The purpose of doing a control solution test is:
- To practise testing without using your own blood
- To confirm that the meter and test strips work together properly
- When you are unsure of your blood glucose test results
Contact Customer Care for information on how to obtain control solution.
Control Solution Information

- Use only FreeStyle control solution with the meter.
- Replace the cap securely on the bottle immediately after use.
- Control solution results are accurate only between 59° – 104°F (15° – 40°C).
- Do not add water or other liquid to control solution.
- There are three levels of control solution available (Low, Normal, High).
For information on how to obtain control solution, contact Customer Care.
Control solution results should fall within the control solution range printed on the test strip vial. Do not use this range when testing blood glucose.
Out of Range Control Solution Results
- Repeat the test if control solution results are outside the range printed on the test strip vial.
- Stop using the meter if control solution results are consistently outside the range printed on the test strip vial. Contact Customer Care. Causes of out-of-range results include:
- Expired or bad control solution
- Expired or bad test strip
- Testing error
- Watered-down control solution
- Meter malfunction
- Test strip deterioration
- Control solution test done outside 59° – 104°F (15° – 40°C)
Performing a Control Solution Test
- Check control solution expiry date.
Do not use control solution past expiry date. Discard control solution 3 months after opening or on the expiry date printed on the bottle whichever comes first. (Example: open April 15, discard July 15; write the discard date on the side of the bottle.) - Remove test strip from vial.
- Insert test strip to turn meter on.
Note: The meter turns off after 2 minutes of inactivity. Remove and reinsert the unused test strip to restart the meter.
If the meter does not turn on go to Troubleshooting section. - Confirm System Check Screen.
- This display appears when you turn on the meter. Do not use the meter if the display check screen does not exactly match the example. Contact Customer Care.
- See The FreeStyle Freedom Lite Meter and How It Works section for more information.
- If the system check screen does not appear, go to Troubleshooting section.
- Apply and hold control solution to 1 sample area of the test strip until:
- You see short lines moving clockwise on the display or
- You hear a beep
This indicates the test strip obtained enough control solution and the meter is processing. If the test does not start after applying the control solution, go to Troubleshooting section.
If a short line does not appear after 5 seconds, the sample may be too small. Do not add control solution to both sides of the strip. The test strips are for single use only. Do not reuse test strips. Dispose of used test strips.
- View result.
The result appears on the display when the test is complete. - Compare the control solution result to the range printed on the test strip vial. The result should fall within the range.
Note: If you see an «Er1, Er2, Er3 or Er4» on the display, it is an error code. Go to Error Codes section. - Press and hold for 2 seconds until appears on the display to mark the result as a control solution result. To unmark a control solution test result, press and hold for 2 seconds. A value with the indicates you have marked this reading as a control solution test.
- Remove the test strip to turn meter off.


 appears on the display to mark the result as a control solution result. To unmark a control solution test result, press and hold
Using Your Meter Memory
Purpose
The purpose of this section is to review your stored test results and 7-, 14- and 30-day averages.
Viewing Blood Glucose Averages in Memory
Start with the meter off (no test strip inserted). Press  . Your 7-day average appears (control solution, LO and HI readings not included).
Note: To exit meter memory at any time, press and hold .

Viewing Test Results in Memory
Meter memory stores the last 400 test results with time and date. Press  to scroll through the results. The most recent result appears first.
 |
on the display indicates that you are viewing stored test results. |
 |
shows the average value of glucose readings from the last 7-, 14- or 30-days. |
 |
on the display indicates that the test result occurred when it was too hot or too cold to use the meter and may not be accurate. This result is included in 7-, 14- and 30-day averages. |
 |
a test result of under 1.1 mmol/L is included in memory as LO. |
 |
a test result of over 27.8 mmol/L is included in memory as HI. |
 |
indicates a control solution test result. |
Setting Reminder Alarms (optional)
Purpose
The purpose of this section is to set up to four reminder alarms to prompt you to test throughout the day.
- With the meter off, press and hold for 3 seconds until appears and 0 is flashing.
- Press . Reminder alarm 1 flashes.
Note: You are setting time for Reminder Alarm not clock time. - Set hour
- Set minutes
- Set alarm sound volume
If you prefer: Press until you see: Then No sound - Press to save
A low beep A louder beep - Press
- Press and repeat 2, 3, 4 and 5 to set remaining reminder alarms or
- Press and hold for 3 seconds until meter turns off.
 appears and 0 is flashing.
 Purpose Step 1")
 Purpose Step 2")
 Purpose Step 3")
Transferring Test Results To a Computer
 |
appears on the display when you insert a data cable in the data port. The computer must have a compatible data management system to complete the transfer. Remove this cable before performing a test. |
Contact Customer Care to learn more about the data management system.
Maintaining the Meter
Replacing the Battery
The meter comes with a #2032, 3-volt, lithium battery installed. It provides power for about 1000 tests.
- Slide the battery door to the right to open.
- To remove the battery, pull the plastic tab up to release the battery.
- Insert a new battery: (+) facing up.
- To close, slide the battery door in until it snaps into place.


 Note: The European Battery Directive requires separate collection of spent batteries, aiming to facilitate recycling and to protect the environment. The batteries in this product should be removed and disposed of in accordance with local regulations for separate collection of spent batteries.
Cleaning the Meter
Avoid getting dirt, dust, blood, control solution or liquid in the meter test strip and data ports. Clean the outside of the meter using a damp cloth and:
- Mild detergent/soap and water, or
- 70% isopropyl alcohol, or
- A mixture of 1 part household bleach, 9 parts water
Do not immerse the meter in water or other liquid.
Specifications
| Assay method | Coulometric electrochemical sensor |
| Automatic shutoff | 2 minutes of inactivity |
| Battery life | 1000 tests |
| Calibration | Plasma equivalent |
| Haematocrit | 15% to 65% |
| Measurement units | mmol/L |
| Meter storage temperature | – 4° to 140°F (–20° to 60°C) |
| Memory | 400 blood glucose and control solution tests with date and time |
| Operating relative humidity | 5% to 90% (non-condensing) |
| Operating temperature | 40° to 104°F (4° to 40°C) |
| Power source | One CR 2032, 3V lithium battery, replaceable |
| Result range | 1.1 to 27.8 mmol/L |
| Sample | Fresh capillary and venous whole blood samples |
| Sample size | 0.3 microliter (300 nanoliters) |
| Size | 2.0 in (w) x 3.3 in (l) x 0.63 in (d) 5.1 cm (w) x 8.4 cm (l) x 1.6 cm (d) |
| Weight | 1.4 to 1.6 oz. (39.7 to 45.4 g) including battery |
Definition of Symbols
 |
Consult instructions for use |  |
Use by |
 |
Temperature limitation |  |
For in vitro diagnostic medical device |
 |
Manufacturer |  |
Catalogue number |
 |
CE Mark |  |
Recycle |
 |
Authorised representative in the European Community |  |
Serial number |
 |
Batch code |  |
Do not reuse |
 |
The European Battery Directive requires separate collection of spent batteries, aiming to facilitate recycling and to protect the environment. The batteries in this product should be removed and disposed of in accordance with local regulations for separate collection of spent batteries. |
Distributed by:
Abbott Laboratories Ltd.
Abbott Diabetes Care
Abbott House
Vanwall Business Park
Vanwall Road
Maidenhead
Berkshire
SL6 4UD
UK
0500 467 466
Abbott Diabetes Care
666 Doncaster Road
Doncaster 3108
Victoria, Australia
ABN 95000 180 389
1800-801-478
Abbott Laboratories Ireland, Ltd.
Abbott Diabetes Care
4051 Kingswood Drive
Citywest Business Campus
Dublin 24
Ireland
1800 77 66 33
Abbott Laboratories (N. Z.) Ltd.
Ground Floor Bldg. D, 4 Pacific Rise
Mount Wellington
P.O. Box 22-801 Otahuhu
Auckland, New Zealand
0800 106 100
FreeStyle and related brand marks are trademarks of Abbott Diabetes Care Inc. in various jurisdictions.
This product(s) and/or its use are protected by one or more of the following patents: US6,071,391; US6,120,676; US6,143,164; US6,156,173; US6,299,757; US6,338,790; US6,503,381; US6,591,125; US6,616,819; US6,618,934; US6,676,816; US6,749,740; US6,893,545; US6,942,518; US7,058,437; US7,615,637; US7,713,406; US7,740,581; US7,802,467; US7,866,026; US7,895,740; US7,901,554; USD611,854S; USD613,190S; USD615,884S; EP1119637; EP1145000; EP0958495, CA2346415; CA2358993; CA2351796; CA2423837; CA121137. Additional patents may be issued and/or pending.

Abbott Diabetes Care Ltd.
Range Road
Witney, Oxon
OX29 0YL, UK
Manufacturer:
Abbott Diabetes Care Inc.
1360 South Loop Road
Alameda, CA 94502 USA
©2010-2014 Abbott

Videos
FreeStyle Freedom Lite Set Up and Perform Video
Documents / Resources
Download manual
Here you can download full pdf version of manual, it may contain additional safety instructions, warranty information, FCC rules, etc.
Download FreeStyle Freedom Lite Manual
Посмотреть инструкция для Abbott FreeStyle Freedom Lite бесплатно. Руководство относится к категории глюкометры, 9 человек(а) дали ему среднюю оценку 8.1. Руководство доступно на следующих языках: английский. У вас есть вопрос о Abbott FreeStyle Freedom Lite или вам нужна помощь? Задайте свой вопрос здесь
- The FreeStyle Freedom Lite® Meter and How It Works
- Important Information About Your Blood Glucose Monitoring System
- Setting Up the Meter
- Testing Your Blood Glucose
- Understanding Blood Glucose Test Results
- Error Codes
- Troubleshooting
- FreeStyle® Control Solution
- Using Your Meter Memory
- Setting Reminder Alarms (optional)
- Maintaining the Meter
- Specifications
- Definition of Symbols
- El Medidor FreeStyle Freedom Lite® y su Funcionamiento
- Información Importante sobre el Sistema de Control de Glucosa en la Sangre
- Configuración del Medidor
- Realización de Pruebas de Glucosa en la Sangre
- Significado de los Resultados de las Pruebas de Glucosa en la Sangre
- Códigos de Error
- Resolución de Problemas
- Solución de Control FreeStyle®
- Uso de la Memoria del Medidor
- Configuración de las Alarmas de Recordatorio (opcional)
- Mantenimiento del Medidor
- Especificaciones
- Definición de los Símbolos
Нужна помощь?
У вас есть вопрос о Abbott а ответа нет в руководстве? Задайте свой вопрос здесь Дай исчерпывающее описание проблемы и четко задайте свой вопрос. Чем детальнее описание проблемы или вопроса, тем легче будет другим пользователям Abbott предоставить вам исчерпывающий ответ.
Аркадий • 21-1-20211 комментарий
Freedom Lite
Аркадий • 21-1-2021
При вводе тест-полоски всегда появлялся Экран проверки системы. Теперь этот экран не появляется вообще, сразу появляются иконки с полоской и каплей крови.
Ответить на вопрос
Количество вопросов: 1
Display Screen
Displays your test results and other important information.
m (Mode) Button
- Moves to different mode settings
- Scrolls backward
- Silences a reminder alarm
Sample Areas (dark-colored half-circles on test strip)
Apply blood or control solution to one sample area only. Insert strip into the meter printed side up (see image above).
Data Port
Downloads test results. Requires a compatible data management system. For more information, please go to our website or contact Customer Care.
c (Configure) Button
- Marks a control solution test
- Scrolls forward
- Silences a reminder alarm
- Changes the date, time, alarm settings, sound options and reviews stored readings
Test Strip Port
Insert the Top end of a new FreeStyle Lite test strip here. The meter powers on when you insert the test strip.
Important Information About Your Blood Glucose Monitoring System
Intended Use
Use outside the body only (in vitro diagnostic use).
The FreeStyle Freedom Lite Blood Glucose Monitoring System is intended for use in the quantitative measurement of glucose in capillary whole blood from the forearm, upper arm, thigh, calf, fingers and hand and venous whole blood. It is intended for self testing and for use by healthcare professionals for people with diabetes mellitus at home as an aid in monitoring the effectiveness of a diabetes control programme. It is not intended for the diagnosis of or screening for diabetes mellitus, and it is not intended for use on neonates or arterial blood.
Use only FreeStyle Lite test strips and FreeStyle control solution with this meter. Other products can produce inaccurate results.
- Test on your fingers if you are testing for low blood glucose (hypoglycaemia) or if you suffer from hypoglycaemia unawareness.
- This system contains small parts that may be dangerous if swallowed.
Please read all the instructions provided in this owner’s booklet and practise the testing procedures before using the FreeStyle Freedom Lite system. Blood glucose monitoring should be done with the guidance of a healthcare professional.
Setting Up the Meter
Purpose
The purpose of this section is to set the meter sound volume, time and date
- With the meter off, press and hold for 3 seconds until appears.
- Press to bypass setting the optional reminder alarms. You may choose to set these later (see Setting Reminder Alarms section).
Set Sound Volume
With the sound volume on, your meter will beep when:
- The test strip is full of blood
- The test result appears on the display
- An error occurs
You may also choose to silence your meter.
- Set sound volume
| If you prefer: | Press until you see: |
Then |
| No sound | |
|
| A low beep | |
|
| A louder beep | |
Set Time
Note: Your meter can display either the 12-hour (1:24P) or the 24-hour (13:24) time formats. If you prefer the 12-hour format, there is no «A» for AM. If setting a PM time, continue to press until you see the «P» displayed for PM.
- Set hour
- Set minutes
- Set time format
Set Date
Note: The date format can display either:
OR
The month will flash first
- Set month
- Set day
- Set date format
- Set year
- Press and hold for 3 seconds until meter turns off. Meter set up is complete.
Testing Your Blood Glucose
Purpose
The purpose of this section is to produce an accurate blood glucose test result.
Prepare to Test
Available Test Sites
- Select your test site.
Note: Avoid moles, veins, bones and tendons. Bruising may occur at the test site. If bruising occurs, consider selecting another site.
There are differences in testing on fingers versus alternative sites.
Test on your fingers if you are testing for low blood glucose (hypoglycaemia) or if you suffer from hypoglycaemia unawareness. Check for low blood glucose when:- You feel symptoms such as weakness, sweating, shakiness, headache or confusion
- You eat a delayed meal after taking insulin
- You are following your healthcare professional’s advice
- Wash your hands and the test site with warm soapy water to ensure accurate results.
- Thoroughly dry your hands and the test site.
- Do not use lotion or cream on the test site.
- Check test strip expiry date.
Do not use expired test strips; they may produce inaccurate results.
Use only FreeStyle Lite test strips. Other test strips can produce inaccurate results. The test strips are for single use only.
Important Test Strip Information
Please read the FreeStyle Lite test strip package insert for more information.
- Use the test strips within the meter’s operating range: 40° – 104°F (4° – 40°C).
- Store test strips in a cool, dry place between 40° – 86°F (4° – 30°C).
- Store test strips away from direct sunlight and heat.
- Store test strips in their original vial only.
- Clean and dry your hands before removing a strip from the vial.
- Close the vial cap tightly immediately after removing a test strip.
- Do not transfer test strips to another container.
- Do not store test strips outside the vial.
- Do not bend, cut or alter test strips.
- Do not apply blood to both sides of the test strip.
- Do not press the test strip against the test site.
- Do not scrape the blood onto the test strip.
- Do not apply blood to the flat side of the test strip.
- Do not apply blood to the test strip when the test strip is out of the meter.
- Do not put blood or foreign objects into the meter.
Drying agents in the test strip vial or cap may be harmful if inhaled or swallowed and may irritate skin and eyes.
Performing a Blood Glucose Test
- Remove test strip from vial.
- Insert test strip to turn meter on.
Note: The meter turns off after 2 minutes of inactivity. Remove and reinsert the unused test strip to restart the meter.
If the meter does not turn on, go to Troubleshooting section. - Confirm System Check Screen.
- This display appears when you turn on the meter. Do not use the meter if the display check screen does not exactly match the example. Contact Customer Care.
- See The FreeStyle Freedom Lite Meter and How It Works section for more information.
- If the system check screen does not appear, go to Troubleshooting section.
- Obtain a blood drop.
When the and appears, use the lancing device to obtain a blood drop. (See FreeStyle lancing device insert for instructions.)
The test strip requires only a 0.3 microliter of blood for accurate results. - Apply and hold blood to 1 sample area of the test strip until:
- You see short lines moving clockwise on the display or
- You hear a beep
This indicates the test strip obtained enough blood and the meter is checking your glucose level. If a short line does not appear after 5 seconds, the sample may be too small. You can add blood to the same side only for up to 60 seconds. If the test does not start after applying blood drop, go to Troubleshooting section.
- View result
The result appears on the display when the test is complete. The time that the meter takes to display a result depends on your blood glucose level. Higher glucose levels require more time.
Note: If you see an «Er1, Er2, Er3 or Er4» on the display, it is an error code. Go to Error Codes section. - Remove test strip to turn meter off.
Dispose of used lancet and test strip correctly.
Understanding Blood Glucose Test Results
The meter displays results in mmol/L. The unit of measurement is preset. You cannot change this setting.
The meter displays results from 1.1 – 27.8 mmol/L. Low or high blood glucose results can indicate a potentially serious medical condition.
- The expected normal fasting blood glucose level for an adult without diabetes is less than 6.1 mmol/L.1
- Two hours after meals, the blood glucose level for an adult without diabetes should be less than 7.8 mmol/L.1
- Consult your healthcare professional to determine the range that is appropriate for you.
Reference:
1 Definition and diagnosis of diabetes mellitus and intermediate hyperglycemia: report of a WHO/IDF consultation. World Health Organization, Geneva, Switzerland 2006.
Low and High Blood Glucose Results
| Result | What It Means | What To Do |
| lower than 3.3 mmol/L | Low (hypoglycaemic) | Repeat the test with a new test strip, even if you do not feel that you have low blood glucose. If your blood glucose result is still not consistent with your symptoms, contact your healthcare professional and follow his or her treatment advice. |
| higher than 13.3 mmol/L | High (hyperglycaemic) | Repeat the test with a new test strip, even if you do not feel that you have high blood glucose. If your blood glucose result is still not consistent with your symptoms, contact your healthcare professional and follow his or her treatment advice. |
| Display | What It Means | Symptoms | What To Do |
Appears when result is: lower than 1.1 mmol/L |
Severe low blood glucose | Weakness Sweating Shakiness Headache Confusion |
Follow your healthcare professional’s advice to treat low blood glucose. If your blood glucose result does not match how you feel, perform a control solution test to confirm that your meter and strips are working properly. |
- Severe dehydration may cause false low results. If you believe you are suffering from severe dehydration, contact your healthcare professional immediately.
- Contact your healthcare professional if you have symptoms that do not match your test result, and you have followed the instructions in this owner’s booklet.
| Display | What It Means | Symptoms | What To Do |
Appears when result is: higher than 27.8 mmol/L |
Severe high blood glucose | Fatigue Thirst Excess Urination Blurry Vision |
Follow your healthcare professional’s advice to treat high blood glucose. If your blood glucose result does not match how you feel, perform a control solution test to confirm that your meter and strips are working properly. |
Error Codes
| Message | What It Means | What To Do |
|
|
|
| |
|
|
| |
|
|
| |
|
|
Troubleshooting
| What It Means | What To Do | |
|
|
|
|
|
|
|
|
|
|
|
|
|
|
|
|
|
|
|
|
FreeStyle Control Solution
Purpose
FreeStyle control solution is a red liquid that contains a fixed amount of glucose.
The purpose of doing a control solution test is:
- To practise testing without using your own blood
- To confirm that the meter and test strips work together properly
- When you are unsure of your blood glucose test results
Contact Customer Care for information on how to obtain control solution.
Control Solution Information
- Use only FreeStyle control solution with the meter.
- Replace the cap securely on the bottle immediately after use.
- Control solution results are accurate only between 59° – 104°F (15° – 40°C).
- Do not add water or other liquid to control solution.
- There are three levels of control solution available (Low, Normal, High).
For information on how to obtain control solution, contact Customer Care.
Control solution results should fall within the control solution range printed on the test strip vial. Do not use this range when testing blood glucose.
Out of Range Control Solution Results
- Repeat the test if control solution results are outside the range printed on the test strip vial.
- Stop using the meter if control solution results are consistently outside the range printed on the test strip vial. Contact Customer Care. Causes of out-of-range results include:
- Expired or bad control solution
- Expired or bad test strip
- Testing error
- Watered-down control solution
- Meter malfunction
- Test strip deterioration
- Control solution test done outside 59° – 104°F (15° – 40°C)
Performing a Control Solution Test
- Check control solution expiry date.
Do not use control solution past expiry date. Discard control solution 3 months after opening or on the expiry date printed on the bottle whichever comes first. (Example: open April 15, discard July 15; write the discard date on the side of the bottle.) - Remove test strip from vial.
- Insert test strip to turn meter on.
Note: The meter turns off after 2 minutes of inactivity. Remove and reinsert the unused test strip to restart the meter.
If the meter does not turn on go to Troubleshooting section. - Confirm System Check Screen.
- This display appears when you turn on the meter. Do not use the meter if the display check screen does not exactly match the example. Contact Customer Care.
- See The FreeStyle Freedom Lite Meter and How It Works section for more information.
- If the system check screen does not appear, go to Troubleshooting section.
- Apply and hold control solution to 1 sample area of the test strip until:
- You see short lines moving clockwise on the display or
- You hear a beep
This indicates the test strip obtained enough control solution and the meter is processing. If the test does not start after applying the control solution, go to Troubleshooting section.
If a short line does not appear after 5 seconds, the sample may be too small. Do not add control solution to both sides of the strip. The test strips are for single use only. Do not reuse test strips. Dispose of used test strips.
- View result.
The result appears on the display when the test is complete. - Compare the control solution result to the range printed on the test strip vial. The result should fall within the range.
Note: If you see an «Er1, Er2, Er3 or Er4» on the display, it is an error code. Go to Error Codes section. - Press and hold for 2 seconds until appears on the display to mark the result as a control solution result. To unmark a control solution test result, press and hold for 2 seconds. A value with the indicates you have marked this reading as a control solution test.
- Remove the test strip to turn meter off.
Using Your Meter Memory
Purpose
The purpose of this section is to review your stored test results and 7-, 14- and 30-day averages.
Viewing Blood Glucose Averages in Memory
Start with the meter off (no test strip inserted). Press . Your 7-day average appears (control solution, LO and HI readings not included).
Note: To exit meter memory at any time, press and hold .
Viewing Test Results in Memory
Meter memory stores the last 400 test results with time and date. Press to scroll through the results. The most recent result appears first.
|
on the display indicates that you are viewing stored test results. |
|
shows the average value of glucose readings from the last 7-, 14- or 30-days. |
|
on the display indicates that the test result occurred when it was too hot or too cold to use the meter and may not be accurate. This result is included in 7-, 14- and 30-day averages. |
|
a test result of under 1.1 mmol/L is included in memory as LO. |
|
a test result of over 27.8 mmol/L is included in memory as HI. |
|
indicates a control solution test result. |
Setting Reminder Alarms (optional)
Purpose
The purpose of this section is to set up to four reminder alarms to prompt you to test throughout the day.
- With the meter off, press and hold for 3 seconds until appears and 0 is flashing.
- Press . Reminder alarm 1 flashes.
Note: You are setting time for Reminder Alarm not clock time. - Set hour
- Set minutes
- Set alarm sound volume
If you prefer: Press until you see: Then No sound - Press to save
A low beep A louder beep - Press
- Press and repeat 2, 3, 4 and 5 to set remaining reminder alarms or
- Press and hold for 3 seconds until meter turns off.
Transferring Test Results To a Computer
|
appears on the display when you insert a data cable in the data port. The computer must have a compatible data management system to complete the transfer. Remove this cable before performing a test. |
Contact Customer Care to learn more about the data management system.
Maintaining the Meter
Replacing the Battery
The meter comes with a #2032, 3-volt, lithium battery installed. It provides power for about 1000 tests.
- Slide the battery door to the right to open.
- To remove the battery, pull the plastic tab up to release the battery.
- Insert a new battery: (+) facing up.
- To close, slide the battery door in until it snaps into place.
Note: The European Battery Directive requires separate collection of spent batteries, aiming to facilitate recycling and to protect the environment. The batteries in this product should be removed and disposed of in accordance with local regulations for separate collection of spent batteries.
Cleaning the Meter
Avoid getting dirt, dust, blood, control solution or liquid in the meter test strip and data ports. Clean the outside of the meter using a damp cloth and:
- Mild detergent/soap and water, or
- 70% isopropyl alcohol, or
- A mixture of 1 part household bleach, 9 parts water
Do not immerse the meter in water or other liquid.
Specifications
| Assay method | Coulometric electrochemical sensor |
| Automatic shutoff | 2 minutes of inactivity |
| Battery life | 1000 tests |
| Calibration | Plasma equivalent |
| Haematocrit | 15% to 65% |
| Measurement units | mmol/L |
| Meter storage temperature | – 4° to 140°F (–20° to 60°C) |
| Memory | 400 blood glucose and control solution tests with date and time |
| Operating relative humidity | 5% to 90% (non-condensing) |
| Operating temperature | 40° to 104°F (4° to 40°C) |
| Power source | One CR 2032, 3V lithium battery, replaceable |
| Result range | 1.1 to 27.8 mmol/L |
| Sample | Fresh capillary and venous whole blood samples |
| Sample size | 0.3 microliter (300 nanoliters) |
| Size | 2.0 in (w) x 3.3 in (l) x 0.63 in (d) 5.1 cm (w) x 8.4 cm (l) x 1.6 cm (d) |
| Weight | 1.4 to 1.6 oz. (39.7 to 45.4 g) including battery |
Definition of Symbols
|
Consult instructions for use | |
Use by |
|
Temperature limitation | |
For in vitro diagnostic medical device |
|
Manufacturer | |
Catalogue number |
|
CE Mark | |
Recycle |
|
Authorised representative in the European Community | |
Serial number |
|
Batch code | |
Do not reuse |
|
The European Battery Directive requires separate collection of spent batteries, aiming to facilitate recycling and to protect the environment. The batteries in this product should be removed and disposed of in accordance with local regulations for separate collection of spent batteries. |
Distributed by:
Abbott Laboratories Ltd.
Abbott Diabetes Care
Abbott House
Vanwall Business Park
Vanwall Road
Maidenhead
Berkshire
SL6 4UD
UK
0500 467 466
Abbott Diabetes Care
666 Doncaster Road
Doncaster 3108
Victoria, Australia
ABN 95000 180 389
1800-801-478
Abbott Laboratories Ireland, Ltd.
Abbott Diabetes Care
4051 Kingswood Drive
Citywest Business Campus
Dublin 24
Ireland
1800 77 66 33
Abbott Laboratories (N. Z.) Ltd.
Ground Floor Bldg. D, 4 Pacific Rise
Mount Wellington
P.O. Box 22-801 Otahuhu
Auckland, New Zealand
0800 106 100
FreeStyle and related brand marks are trademarks of Abbott Diabetes Care Inc. in various jurisdictions.
This product(s) and/or its use are protected by one or more of the following patents: US6,071,391; US6,120,676; US6,143,164; US6,156,173; US6,299,757; US6,338,790; US6,503,381; US6,591,125; US6,616,819; US6,618,934; US6,676,816; US6,749,740; US6,893,545; US6,942,518; US7,058,437; US7,615,637; US7,713,406; US7,740,581; US7,802,467; US7,866,026; US7,895,740; US7,901,554; USD611,854S; USD613,190S; USD615,884S; EP1119637; EP1145000; EP0958495, CA2346415; CA2358993; CA2351796; CA2423837; CA121137. Additional patents may be issued and/or pending.
Abbott Diabetes Care Ltd.
Range Road
Witney, Oxon
OX29 0YL, UK
Manufacturer:
Abbott Diabetes Care Inc.
1360 South Loop Road
Alameda, CA 94502 USA
©2010-2014 Abbott
Videos
FreeStyle Freedom Lite Set Up and Perform Video
Documents / Resources
Download manual
Here you can download full pdf version of manual, it may contain additional safety instructions, warranty information, FCC rules, etc.
Download FreeStyle Freedom Lite Manual
Посмотреть инструкция для Abbott FreeStyle Freedom Lite бесплатно. Руководство относится к категории глюкометры, 9 человек(а) дали ему среднюю оценку 8.1. Руководство доступно на следующих языках: английский. У вас есть вопрос о Abbott FreeStyle Freedom Lite или вам нужна помощь? Задайте свой вопрос здесь
- The FreeStyle Freedom Lite® Meter and How It Works
- Important Information About Your Blood Glucose Monitoring System
- Setting Up the Meter
- Testing Your Blood Glucose
- Understanding Blood Glucose Test Results
- Error Codes
- Troubleshooting
- FreeStyle® Control Solution
- Using Your Meter Memory
- Setting Reminder Alarms (optional)
- Maintaining the Meter
- Specifications
- Definition of Symbols
- El Medidor FreeStyle Freedom Lite® y su Funcionamiento
- Información Importante sobre el Sistema de Control de Glucosa en la Sangre
- Configuración del Medidor
- Realización de Pruebas de Glucosa en la Sangre
- Significado de los Resultados de las Pruebas de Glucosa en la Sangre
- Códigos de Error
- Resolución de Problemas
- Solución de Control FreeStyle®
- Uso de la Memoria del Medidor
- Configuración de las Alarmas de Recordatorio (opcional)
- Mantenimiento del Medidor
- Especificaciones
- Definición de los Símbolos
Нужна помощь?
У вас есть вопрос о Abbott а ответа нет в руководстве? Задайте свой вопрос здесь Дай исчерпывающее описание проблемы и четко задайте свой вопрос. Чем детальнее описание проблемы или вопроса, тем легче будет другим пользователям Abbott предоставить вам исчерпывающий ответ.
Аркадий • 21-1-20211 комментарий
Freedom Lite
Аркадий • 21-1-2021
При вводе тест-полоски всегда появлялся Экран проверки системы. Теперь этот экран не появляется вообще, сразу появляются иконки с полоской и каплей крови.
Ответить на вопрос
Количество вопросов: 1
Главная
| Abbott | |
| FreeStyle Freedom Lite | |
| глюкометр | |
| английский | |
| Руководство пользователя (PDF) |
Не можете найти ответ на свой вопрос в руководстве? Вы можете найти ответ на свой вопрос ниже, в разделе часто задаваемых вопросов о Abbott FreeStyle Freedom Lite.
Инструкция Abbott FreeStyle Freedom Lite доступно в русский?
Не нашли свой вопрос? Задайте свой вопрос здесь
Нет результатов

Microlife Control Solution
инструкция2 страниц(ы)
Abbott FreeStyle InsuLinx
инструкция58 страниц(ы)
Beurer GL34
инструкция36 страниц(ы)
Beurer BGL60
инструкция56 страниц(ы)

iHealth Align
инструкция26 страниц(ы)
Accu-Chek Aviva
инструкция292 страниц(ы)
Medtronic Minimed Paradigm Link
инструкция40 страниц(ы)

Bayer Breeze 2
инструкция2 страниц(ы)
Accu-Chek Performa
инструкция220 страниц(ы)
Accu-Chek Compact Plus
инструкция212 страниц(ы)
Посмотреть все Abbott руководства Посмотреть все Abbott глюкометр руководства
Содержание
- 1 Особенности и характеристики глюкометра FreeStyle Freedom Lite
- 2 Инструкция по применению
- 2.1 Забор крови
- 2.2 Тест-полоски
Компании, выпускающие глюкометры, внедряют больше новых технологий для облегчения измерений. Лидером считается глюкометр FreeStyle Freedom Lite от компании Abbott. Это подходящий выбор как для тех, кто впервые столкнулся с проблемой измерения уровня сахара в крови, так и для людей, болеющих диабетом уже давно. C Freestyle Freedom каждый способен выполнять тест как профессионал.

Сменные элементы: иглы и тест-полоски — одноразовые.
Freestyle LIte — аппарат средней ценовой категории и несмотря на это, качественный и точный. При покупке глюкометра в комплект идет сам аппарат, 10 тест-полосок, инструкции на нескольких языках, аннотации, чехол, ручка-прокалыватель и набор иголок в количестве 10 штук. Производитель указывает следующие особенности аппарата:
- компактный — 4,6×4,1×2 см, его легко носить с собой;
- измеряет уровень сахара и количество кетоновых тел в крови;
- для проверки не требуется много крови;
- если количество крови недостаточно, то прибор сообщает об этом и человек может добавить ее в течение 60 сек;
- на большом дисплее четко видны измерения, а если в помещении темно, то для этого сделала подсветка экрана;
- аппарат автоматически включается, когда вставляется тест-полоска, и выключается после завершения работы;
- имеет встроенную память и функцию передачи показаний на компьютер.
Глюкометр работает на 2-х батарейках, что тоже говорит о его практичности. Благодаря этим особенностям он и приобрел популярность сначала среди пациентов, а потом и в медицинских учреждениях, позволяя сократить время, потраченное на анализ и ожидание результатов. Кроме того, пациенты могут сохранить свои результаты и приносить их лечащему врачу для контроля.
Вернуться к оглавлению
Инструкция по применению

Использование глюкометра условно можно разделить на этап забора крови и тестирования этого образца на тест-полоске. Глюкометр прост в использовании, поэтому даже интуитивно понятно, что и как делать. А если что-то осталось непонятно, то стоит воспользоваться инструкцией или видеопособиями.
Вернуться к оглавлению
Забор крови
Для забора крови используется ручка-прокалыватель, а сам процесс происходит следующим образом:
- Наконечник ручки снимается, и под ним видно отверстие.
- Одноразовая иголка — ланцет, распаковывается и вставляется в это отверстие.
- Чтобы снять колпачок с игры, другой рукой придержать ланцет.
- Затем колпачок ручки ставится на место.
- С помощью регулятора выставляется необходимая глубина прокола.
- Прокалыватель взводится с помощью механизма на обратной стороне — он оттягивается до щелчка и ручка готова к работе.
Перед забором крови, руки обязательно должны быть чистыми, а место прокола желательно продезинфицировать.
Вернуться к оглавлению
Тест-полоски
Чтобы включить прокалыватель нужно вставить новую тестовую полоску в желтый порт глюкометра. После этой манипуляции на экране появляется значок с капелькой крови — это значит, что аппарат готов к тестированию образца. Ручку-прокалыватель необходимо поднести к коже и с помощь кнопки спуска проколоть кожу, если крови мало, то можно слегка надавить рядом с местом прокола. Далее, глюкометр со вставленным тестом-полоской подносится к месту прокола, сам впитывает необходимое количество крови и через 10 сек. на экране высвечивается готовый результат.

FreeStyle Freedom Lite, ФриСтайл Фриидом Лайт — простой глюкометр с большим, контрастным дисплеем, на котором хорошо виден текст.
Короткое время проведения анализа и очень маленькая капля крови.
Особая форма тест-полосок не дает возможности ошибиться и вставить их неправильно. И есть возможность добавить каплю крови в течении 60 секунд если не хватило для анализа.
Официальных продаж FreeStyle Freedom Lite в России не было, тест полоски можно приобрести в зарубежных интернет магазинах.
- Принцип измерения – Измеряет сахар в плазме крови
- Размер капли крови – 0,3мкл
- Время проведения анализа – 5 секунд
- Диапазон измерения – 1,1-27,7ммоль/л
- Способ введения кода – не требует кодирования
- Память – 400 результатов
- Подсчет среднего значения:
- 7 дней — Есть
- 14 дней — Есть
- 30 дней — Есть
- Размер прибора – 51 x 84 x 16 мм
- Вес прибора – 45г
- Страна производитель – США
UPD: Инструкция FreeStyle Freedom Lite на английском
Официальная страница устройства FreeStyle Freedom Lite на английском языке.