Руководство по настройке и устранению неисправностей HERO11 Black
HERO11 Black. Руководство пользователя
HERO10 Black. Руководство пользователя
HERO9 Black. Руководство пользователя
GoPro HERO8 Black. Руководство пользователя
GoPro MAX. Руководство пользователя.
GoPro Fusion. Руководство пользователя
HERO7 Black. Руководство пользователя
HERO7 Black. Краткая инструкция
HERO7 Silver. Руководство пользователя
HERO7 Silver & White. Краткая инструкция
HERO7 White. Руководство пользователя
GoPro HERO 2018. Руководство пользователя
Квадрокоптер GoPro Karma. Руководство пользователя
GoPro HERO6 Black. Руководство пользователя
Стабилизатор Karma Grip. Краткая инструкция
GoPro HERO5 Black. Руководство пользователя
HERO5 Black. Краткая инструкция
HERO5 Session. Руководство пользователя
HERO5 Session. Краткая инструкция
HERO Session. Руководство пользователя
HERO Session. Краткая инструкция
HERO4 Black. Руководство пользователя
HERO4 Silver. Руководство пользователя
HERO4 Silver Music. Руководство пользователя
HERO4 Silver Music. Краткая инструкция
HERO4 Black Music. Руководство пользователя
HERO4 Black Music. Краткая инструкция
HERO. Руководство пользователя
HERO+. Руководство пользователя
HERO+LCD. Руководство пользователя
HERO+LCD. Краткая инструкция
HERO3+ Black. Руководство пользователя
HERO3+ Black. Краткая инструкция
HERO3+ Silver. Руководство пользователя
HERO3+ Silver. Краткая инструкция
HERO3_Black. Руководство пользователя
HERO3_Silver. Руководство пользователя
HERO3_White. Руководство пользователя
HERO3_ White. Краткая инструкция
HD2. Руководство пользователя
HD_960. Руководство пользователя
HD_HERO. Руководство пользователя
WD My Passport Wireless. Инструкция
WD My Passport . Инструкция
Крепление на ружье SportsmanMount. Инструкция
The Frame_HERO3/3+/4. Инструкция
HERO3+_DualBatteryCharger. Инструкция
HERO4_DualBatteryCharger. Инструкция
Battery BacPac_HD_HERO. Инструкция
Battery BacPac. Инструкция
Соединение HERO3 с пультом Wi-Fi Remote
Присоска_JOBY_Гориллапод. Инструкция
Присоска_JOBY_LockingArm. Инструкция
3D_HERO_System. Инструкция
Набор для замены линз в водонепроницаемом боксе_HERO4. Инструкция
Экшн-камеры GoPro Hero 7 и GoPro Hero 8 имеют обширный функционал, знакомство с которым потребует от вас времени. Поэтому в этой статье мы собрали для вас базовые сведения, которые помогут быстро подключить и настроить камеру, а также воспользоваться основными режимами съемки.
Устройство обеих моделей примерно одинаковое, за исключением некоторых деталей в микрофонах, креплении, расположении крышек и других. Информация в камерах GoPro Hero выводится на сенсорный дисплей и экран состояния. На боковой грани Hero 8 расположена крышка с фиксатором, за которой скрываются порты, слот для карты памяти и аккумулятор. У Hero 7 крышки и порты расположены несколько иначе. Снизу камер идут зажимные кольца для крепления камеры, а сбоку и сверху две управляющие кнопки. В модели Hero 8 кроме динамика и микрофона есть еще один микрофон под объективом.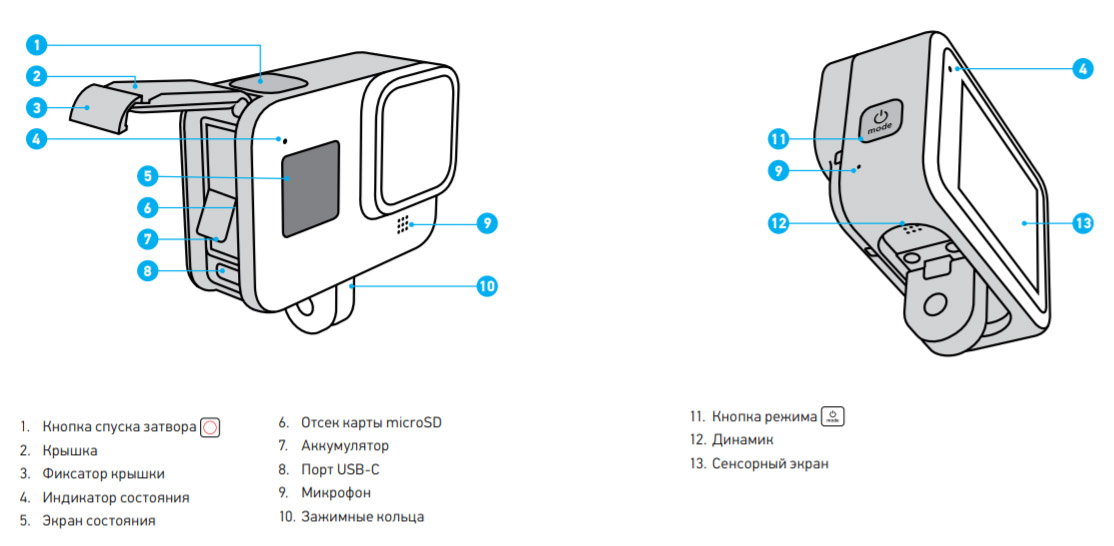
Подготовка SD-карты и зарядка экшн-камер GoPro Hero 7 и 8
До начала работы с камерой вам придется приобрести SD-карту, если ее нет в комплекте или она имеет маленький объем. Для моделей Hero 8 и Hero 7 подойдет далеко не каждая карта памяти. Это должна быть карта типа microSD, microSDHC или microSDXC, соответствующая десятому классу (или с обозначением UHS-I) и емкостью не более 256 ГБ. Вы можете выбрать ее из рекомендуемого списка на официальном сайте компании.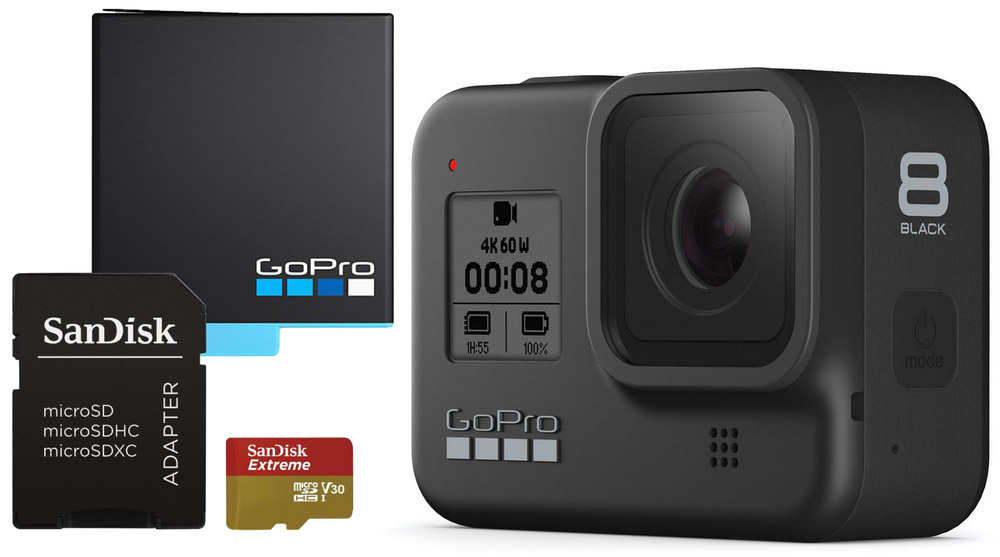
После покупки подходящей карты памяти в модели Hero 8 потяните за фиксатор крышки на корпусе камеры и откройте ее. В модели Hero 7 прижмите кнопку фиксатора и сдвиньте крышку. Камера в обоих случаях должна быть выключена. Вставьте в слот SD-карту таким образом, чтобы она была обращена лицевой стороной к отсеку с аккумулятором.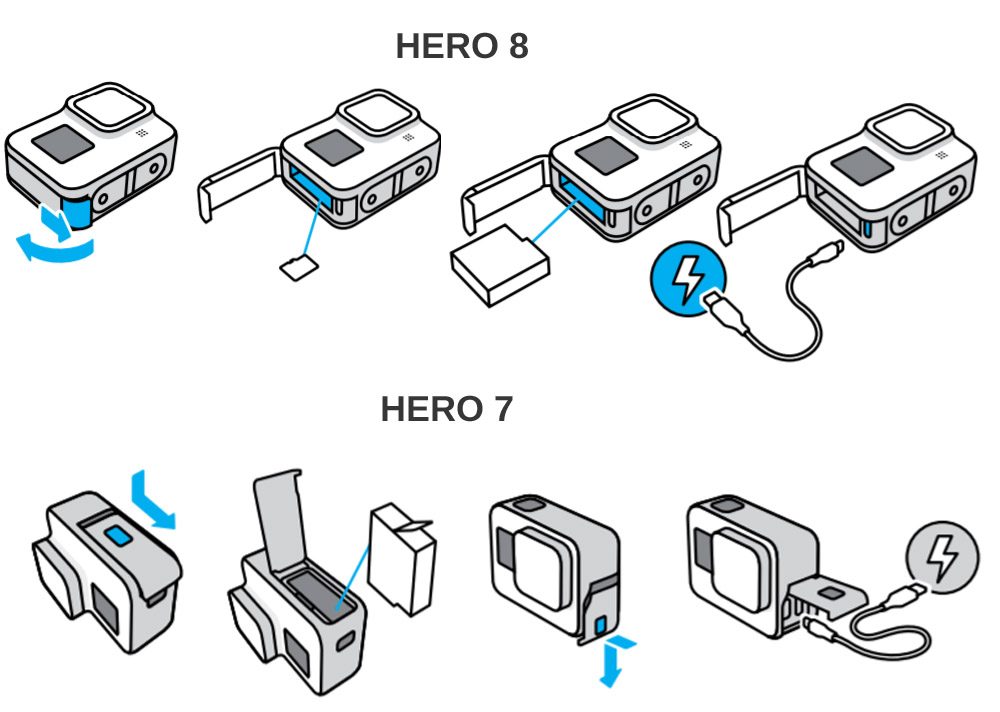
Для зарядки камеры найдите в ее корпусе под крышкой зарядный порт и подготовьте зарядный кабель с соответствующими разъемами. Вы можете заряжать ее от зарядного устройства, а также через USB-порт компьютера или внешнего аккумулятора. На полную зарядку каждой из моделей уйдет около 2 часов, но этот процесс можно ускорить приобретением скоростной зарядки GoPro Supercharger. С ее помощью камера зарядится примерно за 40 минут, причем можно одновременно заряжать два устройства.
Управление камерой
На корпусе камеры есть две кнопки: кнопка питания и затвор. Чтобы включить экшн-камеру, нажмите на кнопку питания, а для выключения нажмите и удерживайте ее около трех секунд. Затвор нужен для того, чтобы вести съемку или останавливать запись. Сам экран сенсорный и реагирует на стандартные для таких экранов жесты. Чтобы выбрать какой-то элемент на дисплее, сделать его активным или неактивным, кликните по его значку. Листая экран в стороны, вы выбираете режимы съемки. Свайп вниз выведет вас в панель управления (при альбомной ориентации дисплея), а вверх поможет посмотреть отснятые материалы. Работает здесь и касание дисплея с удержанием пальца. На экране съемке таким способом вы сможете настроить экспозицию, а такой же жест на стрелке назад вернет вас к главному экрану или другим экранам.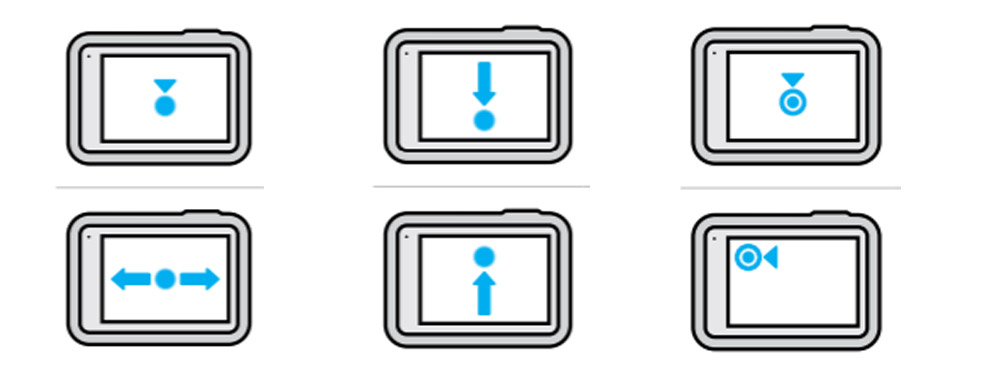
Первое включение
После первого включения камера предложит вам произвести первичные настройки. Выберите язык и примите условия использования девайса. Советуем при первой же съемке в движении включить GPS, чтобы познакомиться с его возможностями. С включенным датчиком GPS на видео отражается скорость движения, пройденное расстояние, прорисовывается маршрут и другие параметры. Однако не забывайте, что датчик заметно нагружает аккумулятор, поэтому держать его включенным без надобности не стоит. Далее, камера предложит скачать мобильное приложение и подключиться к нему, но пока этот шаг можно пропустить. Настройте дату и время и просмотрите подсказки, нажимая на каждый значок экрана. Так вы сможете быстрее освоить возможности камеры.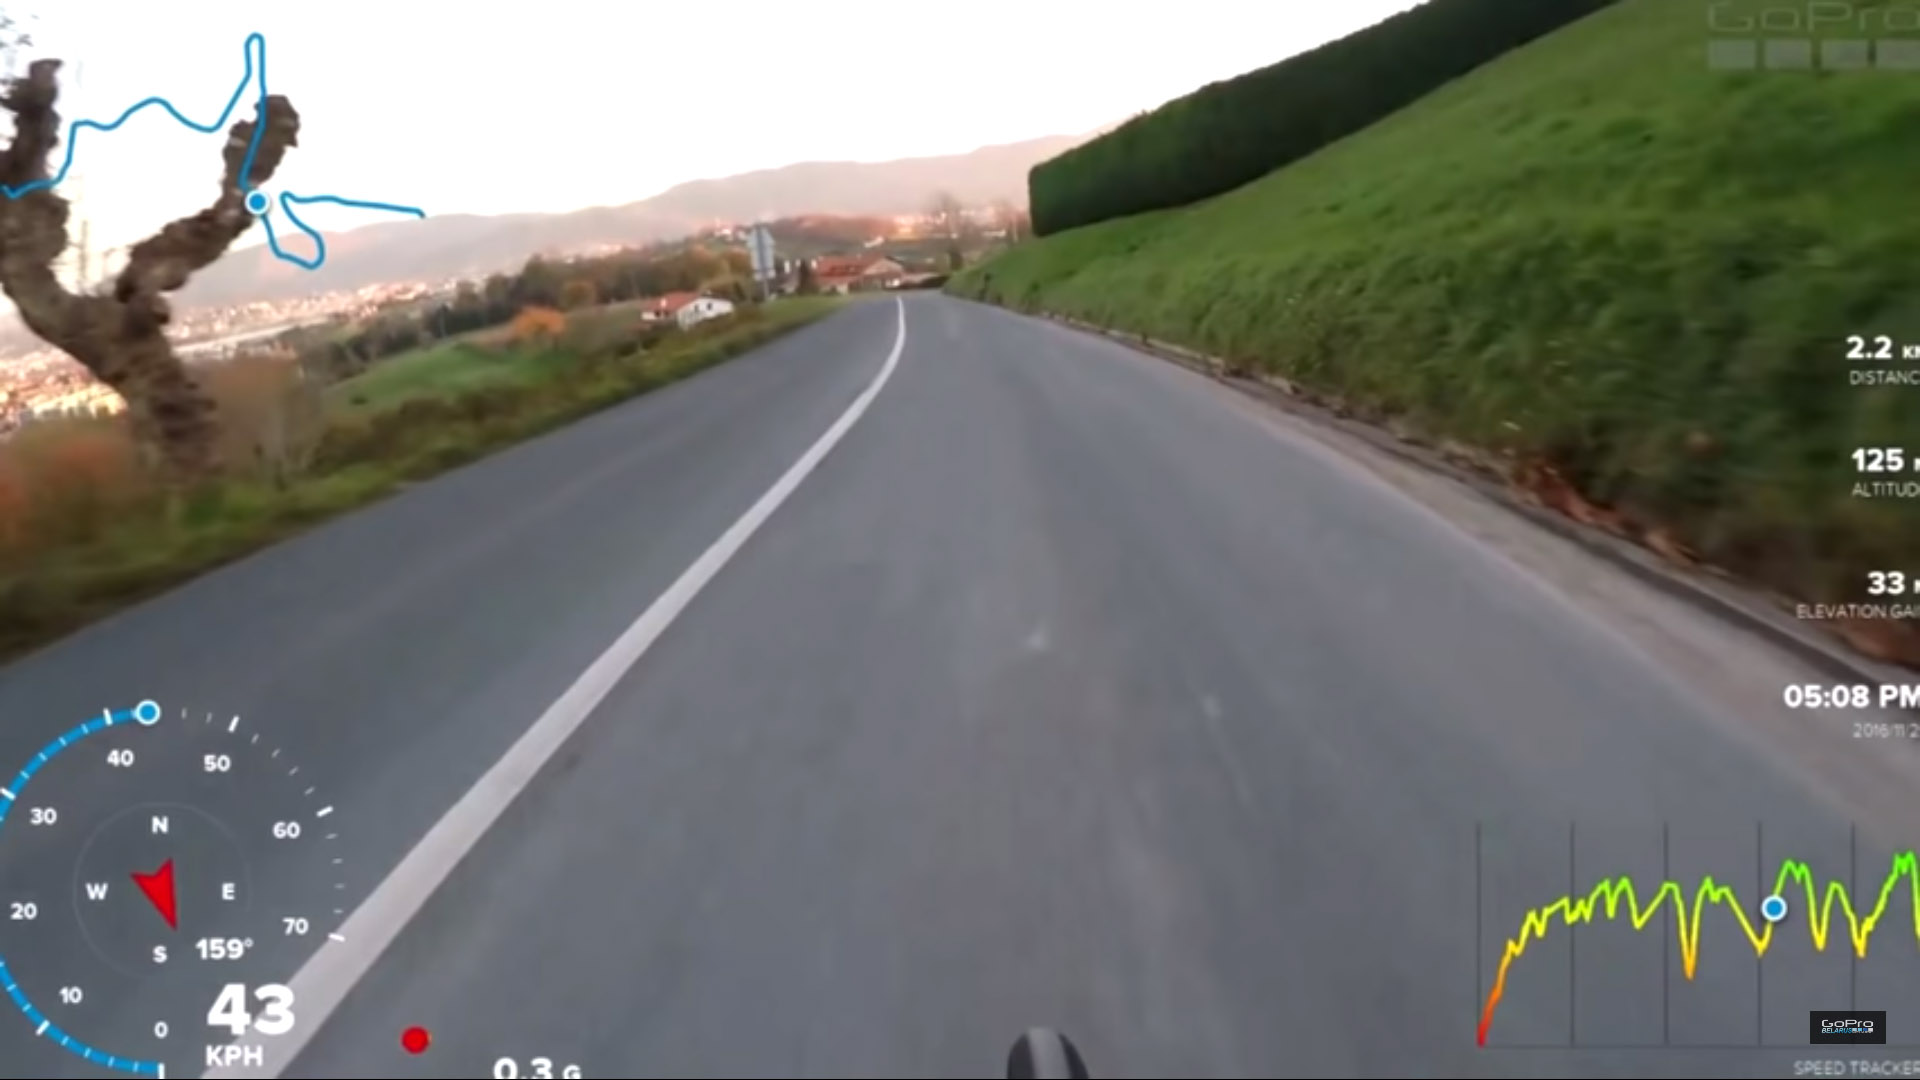
Как подключить GoPro Hero к телефону
Для начала вам нужно скачать на телефон мобильное приложение GoPro и установить его. Проделайте эту процедуру через AppStore или «Play Маркет». После этого проделайте ряд настроек в самой камере. Зайдите в панель управления (горизонтальная ориентация камеры, свайп вниз), найди кнопку «Параметры», выберите «Подключения» и «Подключить устройство». Кликните по кнопке GoPro App для перевода устройства в режим сопряжения.
На следующей шаге откройте мобильное приложение GoPro. Дайте все необходимые разрешения (доступ к геоданным, Bluetooth и пр.) и внизу экрана нажмите кнопку «Найти мою камеру». После этого телефон начнет поиск включенной камеры. Следуйте указаниями на экране. Если вы пропустили предложение найти камеру, кликните внизу по значку с изображением камеры и выберите «Подключите GoPro». Во время сопряжения приложение предложит изменить имя камеры, но вы можете этого не делать, если не хотите. Последующие подключения так же делайте через меню «Подключения» в разделе «Параметры» вашей камеры. По умолчанию камера подключается на частоте 5 ГГц. Если в вашем регионе нужна частота 2,4 ГГц, настройте ее в том же разделе «Подключения» и строке «Частота Wi-Fi».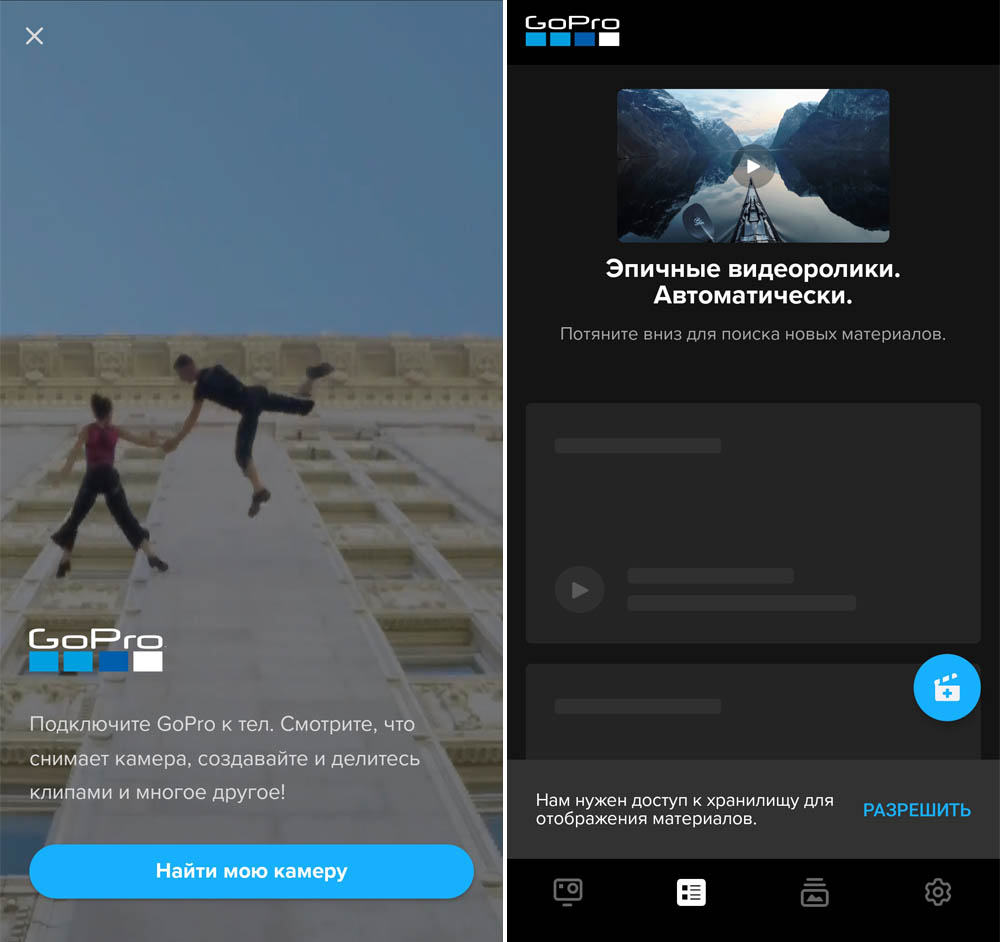
Как подключить GoPro Hero к компьютеру
Для этого воспользуйтесь USB-кабелем, вставив его одним концом в подходящий порт камеры, а другим в USB-порт компьютера. Включите камеру. Когда она обнаружит соединение, на экране состояния появится изображение USB-соединения. Если этого не произошло, нажмите на кнопку питания камеры снова. После этого на компьютере в разделе дисков и устройств найдите камеру или разыщите ее значок на рабочем столе. После подключения вы можете скопировать все необходимые файлы. Но это можно сделать и без подключения устройств, если на вашем компьютере есть картридер. В этом случае вставьте в него карту памяти из камеры и перенесите с нее на компьютер всю желаемую информацию.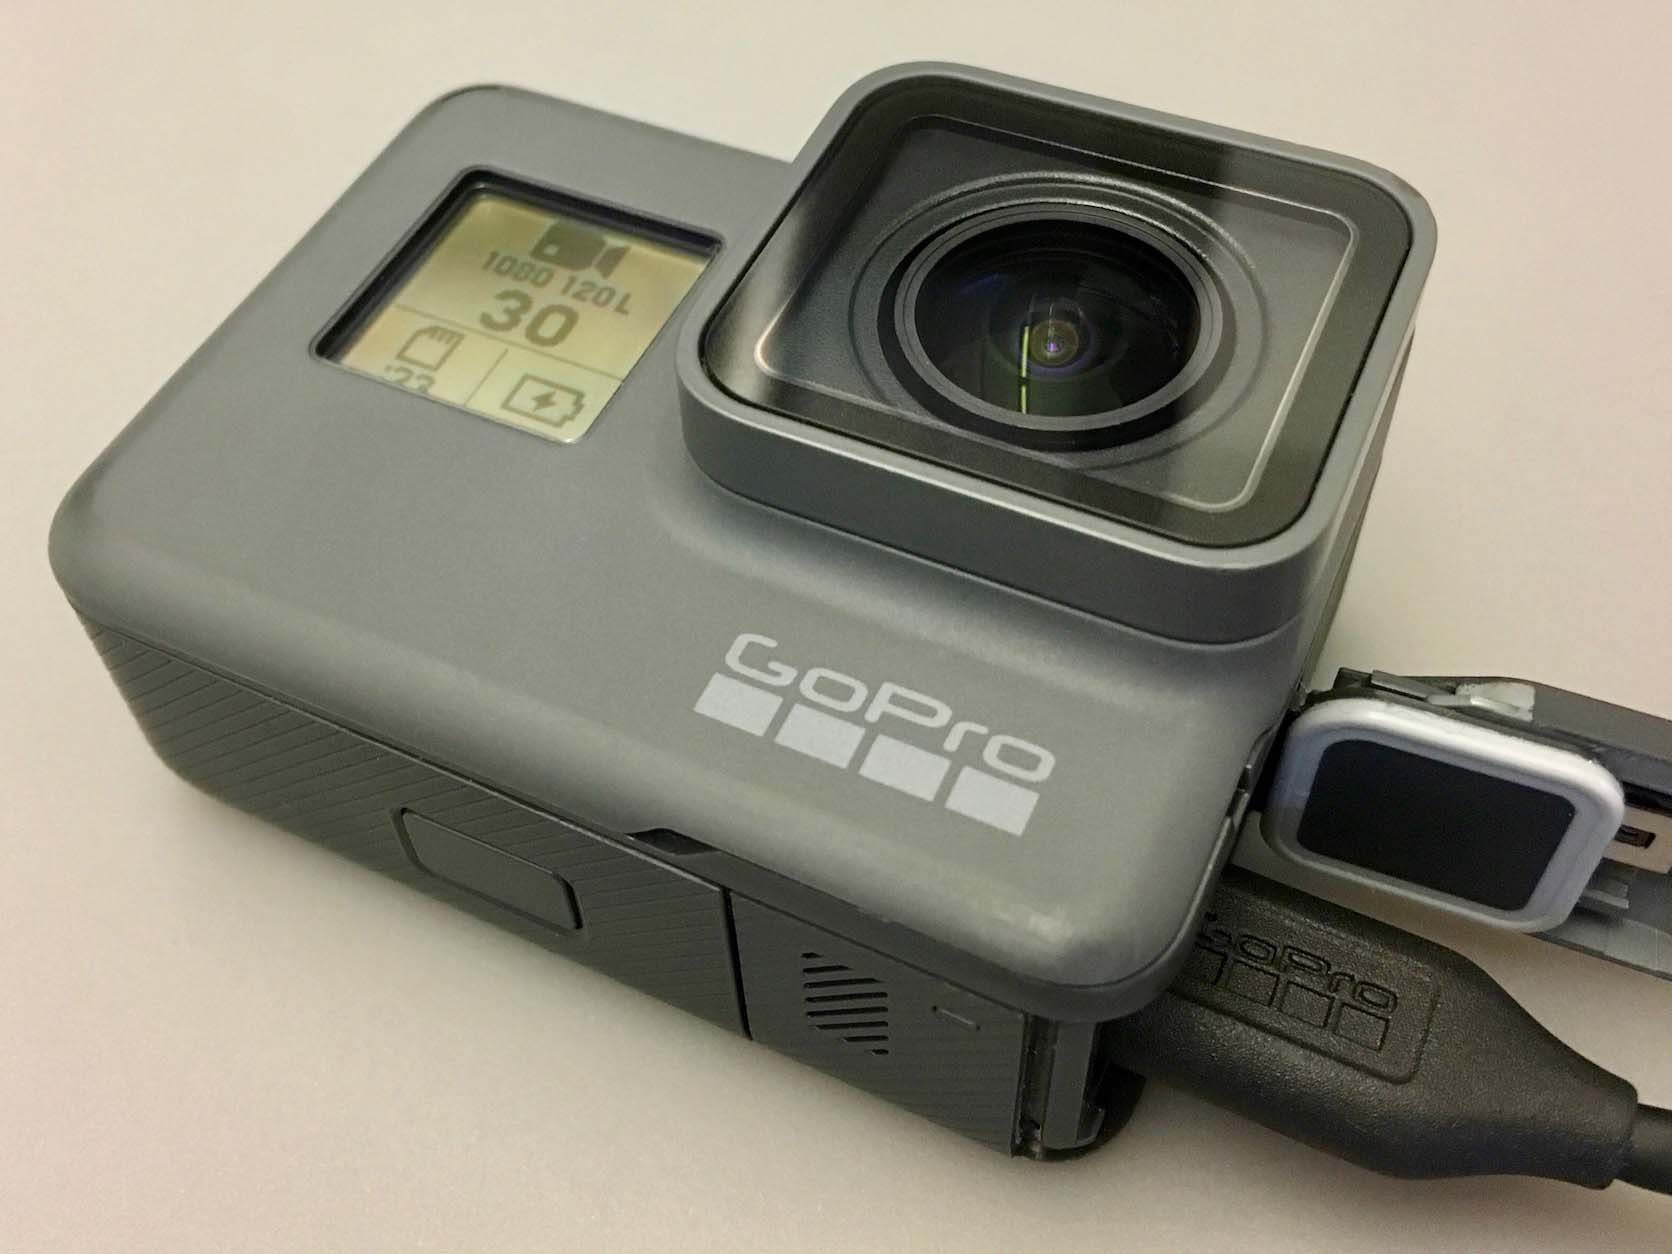
Съемка и настройка режимов
На экране съемки отображается несколько значков. В верхнем ряду вы увидите, сколько времени / фотографий осталось у вас в запасе (на рисунке цифра 2), выбранный режим съемки (1), настройки режима съемки (4), уровень заряда батареи (5) и экранные ярлыки (3), которые зависят от выбранного режима и настраиваются по желанию.
В камере есть три основных режима: таймлапс, видео и фото с конкретными вариантами настроек для каждого из них. Вы можете выбирать эти заданные настройки, менять их, создавать свои и удалять. Для выбора конкретного режима съемки сделайте свайп вправо с экрана съемки и выберите желаемый режим. Для выбора настроек режима кликните в нижнем ряду по центру по названию режима и при желании выберите другой или измените настройки, кликнув на значок карандаша.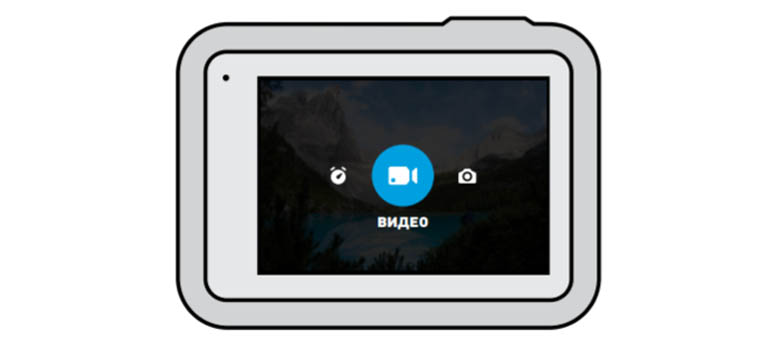
В режиме таймлапс камера делает снимки через заданные промежутки времени и затем сводит их в одно видео. Так получаются интересные ролики, когда камера снимает рассвет, людный городской парк в одном и том же месте или более медленные события вроде распускания бутона или роста цветка. У GoPro Hero есть обычный таймлапс (съемка широким объективом через каждые 0,5 с в разрешении 1080 р), Timewarp 2.0 (те же параметры, но скорость съемки регулируется автоматически) и ночной таймлапс (1080 р, широкий объектив, автонастройка выдержки и подбор интервала съемки).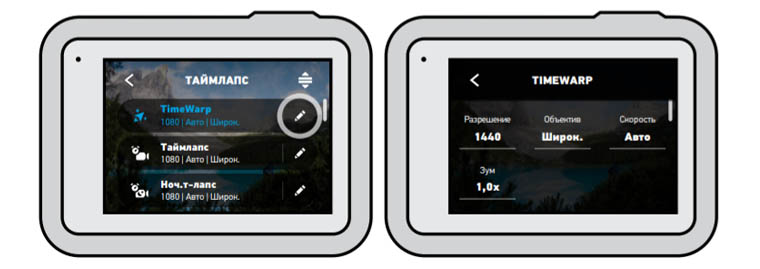
В режиме видео есть четыре варианта настроек. «Стандарт» использует широкий объектив и снимает видео с разрешением 1080 р на скорости 60 кадров в секунду. При настройках «Действие» в дело вступает объектив SuperView, снимающий с разрешением 2,7 К при той же скорости. «Кино» снимает видео в прекрасном качестве 4К со скоростью 30 к/с объективом «Линейный», который смягчает типичные для экшн-камер искажения по краям кадра. «Замедленное» подразумевает запись со скоростью 240 к/с с разрешением 1080 p и дает восьмикратное замедление видео, на котором зрителю открываются неуловимые детали (разрыв воздушного шара, фотофиниш, детали в кадре и пр.).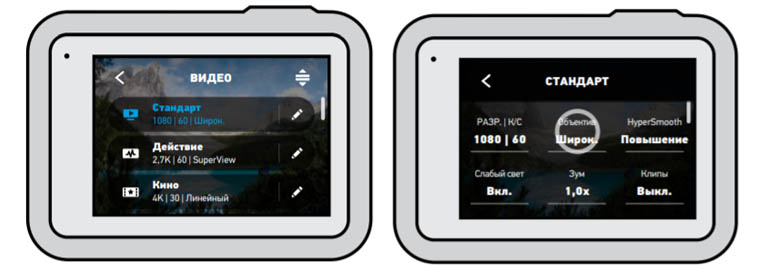
В режиме фото делается ряд настроек и выбирается тип фото. Это может быть «Суперфотка» (камера автоматически подстраивается под условия съемки и обрабатывает изображение), HDR (выбирает лучшие фрагменты из нескольких кадров и сводит их в один кадр), «Стандарт» (стандартный формат с расширением .jpg) и RAW (сохраняет фото в формате, пригодном для программ редактирования).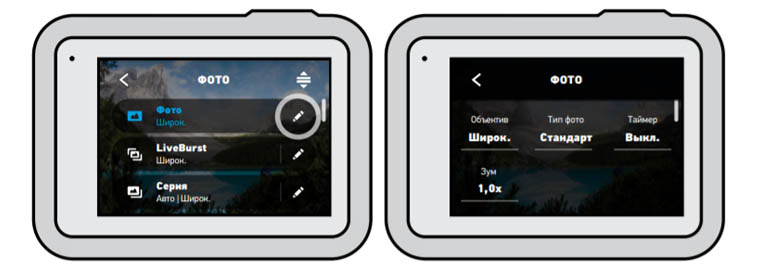
Общие настройки GoPro Hero 7 и 8
Первая группа настроек скрывается в панели управления. По свайпу вниз основного экрана перед вами появится несколько значков и строка «Параметры». Они означают следующее. Раздел со значком говорящего человека активирует возможность отдавать камере команды голосом. Кликнув по значку ноты, вы можете отключить звуковые сигналы камеры для тех случаев, когда хотите вести съемку без привлечения к себе внимания. А если у вас нет времени на включение камеры и ее настройку, тогда подключите опцию QuikCapture (значок зайчика). В этом случае вы сможете сразу начинать съемку кнопкой затвора даже при выключенной камере. Повторное нажатие кнопки остановит запись и выключит камеру. При этом она будет снимать с теми настройками, которые были выставлены до ее последнего выключения. Значок замка — это блокировка экрана, сетка нужна для более точного прицела камеры по горизонтали или вертикали, а значок со стрелками обозначает блокировку ориентации (камера не будет переворачивать изображение при повороте корпуса).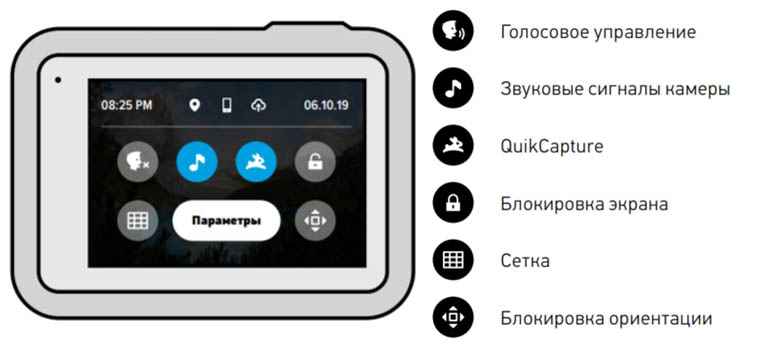
Следующая группа настроек находится в упомянутом разделе «Параметры». Здесь собраны обширные настройки, которые помогут вам настроить гаджет в соответствии с вашим предпочтениями. Так, в разделе «Подключения» настраивается способ соединения, задается частота Wi-Fi, подключаются устройства по Bluetooth (например, пульт для камеры) или отображаются сведения о камере. В разделе «Общее» вы регулируете громкость звуков, настраиваете время автоотключения девайса, отключаете световые индикаторы для тайной съемки и другое.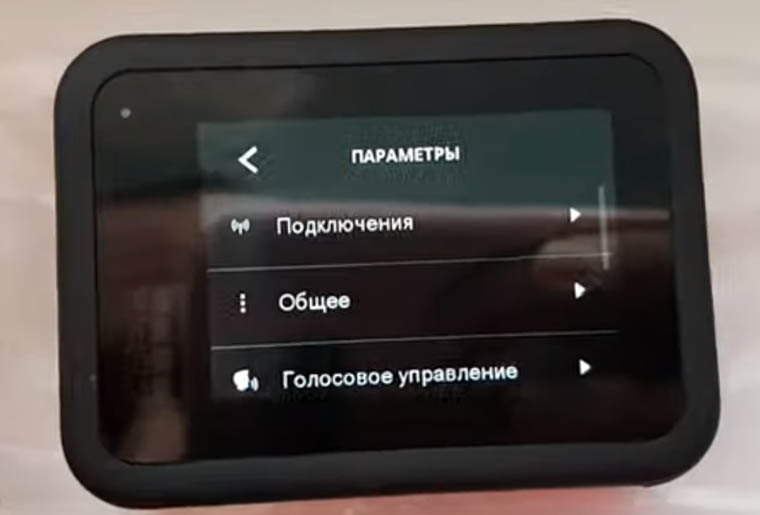
Отдельно скажем, о строке «Устранение мерцания». Если вы правильно выбрали частоту для своего региона, снятое в помещении видео не будет раздражать вас мерцанием на большом экране. При помощи других настроек раздела «Параметры» вы можете настраивать сенсорный экран, включать GPS для добавления меток в видео или отслеживания разных параметров движения, обновлять прошивку и другое.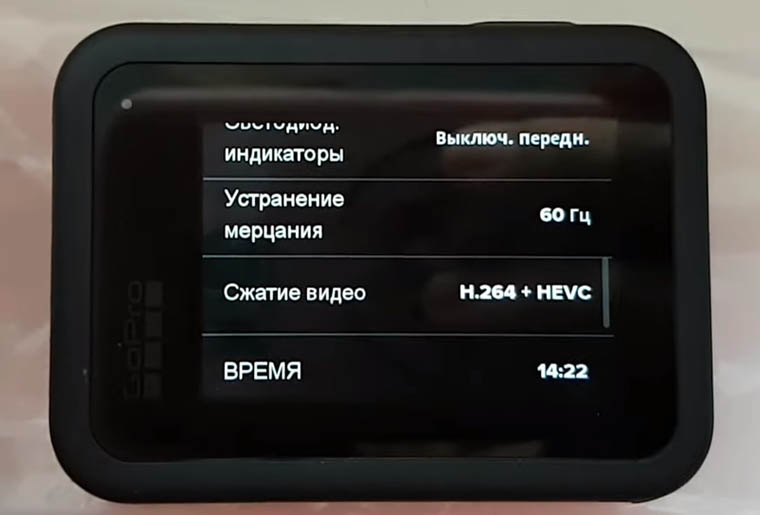
Если вы хотите получить наилучший результат при съемках с экшн-камер GoPro Hero 7 или 8, вам придется неоднократно проводить эксперименты в разных условиях. Но оно того стоит, ведь с приобретением опыта настроек и съемки ваши фотографии или видеоролики будут получаться все более эффектными.
- Manuals
- Brands
- GoPro Manuals
- Action Cameras
- HERO8 Black
- Manual
-
Contents
-
Table of Contents
-
Troubleshooting
-
Bookmarks
Quick Links
Related Manuals for GoPro HERO8 Black
Summary of Contents for GoPro HERO8 Black
-
Page 2
Join the GoPro Movement facebook.com/GoPro youtube.com/GoPro twitter.com/GoPro instagram.com/GoPro… -
Page 3: Table Of Contents
Time Lapse Settings Tech Specs: Protune Live Streaming Customer Support Exposure Control Trademarks Connecting to an External Microphone Regulatory Information Controlling Your GoPro With Your Voice Playing Back Your Media Connecting to Other Devices HERO8 Black – Regulatory Model Number SPJB1…
-
Page 4: Meet Your Hero8 Black
2. Door 13. Touch Screen 8. USB-C Port 3. Door Latch 9. Microphone 4. Status Light 10. Mounting Fingers 5. Status Screen Learn how to use the accessories that came with your GoPro. See Mounting Your GoPro (starting page 97).
-
Page 5: Setting Up Your Camera
Battery (HERO8 Black/HERO7 Black/HERO6 Black) with your new GoPro. • microSD, microSDHC or microSDXC Though older GoPro and non-GoPro batteries may fit in your HERO8 • Class 10 or UHS-I rating Black, they will greatly limit your camera’s performance. • Capacity up to 256 GB PRO TIP: There’s an easy way to check your battery’s status and make…
-
Page 6
It takes about two hours for the battery to fully charge. The camera status light will turn off when it’s done. To learn more, see Battery Information (page 105). PRO TIP: For the fastest charging, use the GoPro Supercharger (sold separately). -
Page 7
UPDATING YOUR CAMERA’S SOFTWARE sure the door latch is closed and locked before using your camera. To get the latest features and best performance from your GoPro, make sure it’s using the most up-to-date software. Updating With the GoPro App 1. -
Page 8: Getting To Know Your Gopro
Swipe Up From the Edge of the Screen See the last photo or video you captured and access WARNING: Use caution when using your GoPro and its mounts the Media Gallery. and accessories. Always be aware of your surroundings to avoid injuring yourself and others.
-
Page 9
Getting to Know Your GoPro Getting to Know Your GoPro CAPTURE MODES Your GoPro has three main capture modes. Press and Hold the Capture Screen Turn on and adjust Exposure Control. Press and Hold Any Back Arrow Skip back to the main capture, Media Gallery or VIDEO Dashboard screen. -
Page 10
Lapse and Live Streaming only). 4. Capture Settings 5. Battery Status Heads Up: The capture settings are not available when you turn your GoPro to take portrait shots. Make sure you choose the settings you want before rotating your camera. -
Page 11
Getting to Know Your GoPro Getting to Know Your GoPro CHANGING PRESETS CUSTOMISING THE PRESETS You can change the settings in your presets with just a few taps. Each capture mode has presets that make it easy to switch back and forth between the best mode and settings for your shot. -
Page 12
Getting to Know Your GoPro Getting to Know Your GoPro The on-screen instructions will give you a list of your options. 4. Tap to save your changes and return to the presets screen. DIGITAL LENS STANDARD Wide Large field of view that… -
Page 13
RESTORING PRESETS TO THEIR ORIGINAL SETTINGS NAVIGATING WITH THE BUTTONS Although your GoPro is waterproof, the touch screen won’t work under You can go back to your preset’s original settings at any time. water. Use the buttons and front screen to change modes and settings. -
Page 14: Customising Your Gopro
Customising Your GoPro Customising Your GoPro HERO8 Black is the most customisable GoPro ever. It lets you create The on-screen instructions will give you a list of your options. For your own presets and personalise your screen for instant access to the…
-
Page 15
Customising Your GoPro Customising Your GoPro 4. Choose an icon and name for your preset. DELETING YOUR PRESET 1. Tap NAME PRESET VIDEO Standard Custom 1080 | 60 | Wide Activity 2.7K | 60 | SuperView Bike Cinematic 4K | 30 | Linear 5. -
Page 16
Customising Your GoPro Customising Your GoPro SUGGESTED SETTINGS Activity Video Photo Here are some of the best modes and settings for capturing your favourite activities. Try them as starting points for your presets, then • 1440p60, Wide Lens • Time Lapse Photo experiment to find what works best for you. -
Page 17
Customising Your GoPro Customising Your GoPro PERSONALISING YOUR ON-SCREEN SHORTCUTS 3. Tap where you’d like to put your new shortcut. On-screen shortcuts give you quick one-tap access to your camera’s capture settings. Each mode has its own default shortcuts, but you can change them to the settings that you use most. -
Page 18: Using Quikcapture
Customising Your GoPro Using QuikCapture QuikCapture is the fastest and easiest way to power on your GoPro and 5. Tap to save your changes and return to the presets screen. get the shot. All it takes is the push of a single button.
-
Page 19: Adding Hilight Tags
3 s You can also add HiLight Tags using the GoPro app or saying “GoPro HiLight” when Voice Control is on. PRO TIP: The GoPro app looks for HiLight Tags when it creates 2.
-
Page 20: Setting The Screen Orientation
You can easily switch between landscape and portrait shots by rotating Your GoPro comes loaded with four video presets. Each has its own your camera. HERO8 Black can even capture photos and videos the right speciality. Once you’ve chosen your preset, press the Shutter button way up when it’s mounted upside down.
-
Page 21
Recording Video Recording Video ON-SCREEN SHORTCUTS 1. Tap before you start recording. The video presets feature four default shortcuts, but you can swap them for any shortcuts you’d like. To learn more, see Personalising Your On-Screen Shortcuts (page 32). 2H:11 100% 100% Heads Up: The Slo-Mo preset does not have default shortcuts. -
Page 22
Recording Video Digital Lenses HyperSmooth Boost Changing digital lenses on your GoPro is just like switching between the Use HyperSmooth Boost to maximise video stabilisation when the terrain lenses on an old-school camera. They affect how much of the scene gets rough. -
Page 23
Recording Video Video Settings Touch Zoom Here’s a breakdown of the video settings. Tap the , then the setting to Touch Zoom helps you capture a closer view of the action. make changes. 1. Tap VIDEO STANDARD Standard RES | FPS Lens HyperSmooth 1080 | 60 | Wide… -
Page 24: Video Settings
INTERVAL (LOOPING) These high-frame rate settings let you slow your footage down to 8x or Choose how long your GoPro records before looping back to record over 4x normal speed during playback. Set the resolution to 1080p and frame the start of the video. The default interval is 5 minutes.
-
Page 25: Taking Photos
Taking Photos Taking Photos Your GoPro has four Photo presets. Simply choose the type of photo ON-SCREEN SHORTCUTS you want and press the Shutter button to get the shot. All photos are The photo presets feature four default shortcuts, but you can swap them captured at 12 MP with the default digital lens set to Wide.
-
Page 26
Taking Photos Taking Photos 2. Choose 3 seconds (great for selfies) or 10 seconds (great for Digital Lenses group shots). Digital lenses affect how much of the scene is captured, as well as the zoom level and fish-eye effect in your photo. Switch between them to see what works best for your shot. -
Page 27
Taking Photos Taking Photos Output 1. Tap HERO8 Black lets you decide how your photos are processed and saved. Photo mode (capturing one photo at a time) gives you the most options. Output Mode Description 999+ 100% 100% Automatically uses advanced image… -
Page 28: Photo Settings
Taking Photos Photo Settings Touch Zoom Here’s an overview of the available photo settings. Tap the to access Touch Zoom helps you capture a closer view of the action. the setting menu, then tap the setting itself to make changes. 1.
-
Page 29: Capturing Time Lapse
Time Lapse turns long events into short shareable videos by taking a Set up a 3- or 10-second timer for your photo. frame of video at set intervals. Your GoPro has three Time Lapse presets. All you have to do is press the Shutter button…
-
Page 30
Capturing Time Lapse Capturing Time Lapse ON-SCREEN SHORTCUTS 2. Scroll through the options to see a live preview of each option, then The time lapse presets include two default shortcuts, but you can swap tap the one that you want. them for any shortcuts you’d like. -
Page 31: Time Lapse Settings
Capturing Time Lapse Time Lapse Settings USING TOUCH ZOOM Here’s where you can make adjustments to your Time Lapse settings. Tap Touch Zoom helps you capture a closer view of the action. , then tap the setting to make changes. 1.
-
Page 32
Set how long your camera’s shutter stays open for night shots. Choose or higher speeds (10x, 15x or 30x) for longer activities. Leave speed on longer exposures for darker shots. Auto (default) to let your GoPro automatically adjust the speed based on motion, scene detection and lighting. To learn more, see Shutter Speed (page 122). -
Page 33: Live Streaming
Exposure Control SETTING UP A LIVE STREAM HERO8 Black scans the entire scene to choose the exposure level for your shot. Exposure Control lets you decide if only a section of the shot should 1. Connect to the GoPro app. For details, see Connecting to the GoPro be used to set the exposure.
-
Page 34
Exposure Control Exposure Control SETTING EXPOSURE CONTROL USING LOCKED EXPOSURE Turning Exposure Control Off With this option, your camera locks the exposure until you cancel it. Exposure Control is automatically turned off when you switch capture modes or restart your camera. It can also be turned off manually. If you’re snowboarding on a sunny day, you might try locking the exposure on your subject’s jacket. -
Page 35: Connecting To An External Microphone
Connecting to an External Microphone Controlling Your GoPro With Your Voice You can use the GoPro Pro 3.5-mm Mic Adapter with the Media Mod Voice Control gives you easy hands-free control of your GoPro. It’s great (HERO8 Black), both sold separately, and an external microphone to when you’re busy with handlebars, ski poles and more.
-
Page 36
Mode Command Description These commands let you switch modes on the move. If you just recorded a video, you can say “GoPro take a photo” to snap a photo without GoPro, Video mode Switches your camera to Video mode manually switching modes. -
Page 37: Playing Back Your Media
TURNING ON YOUR GOPRO WITH YOUR VOICE Swipe up to see the last video, photo or burst you took. Swipe left and With this setting, your GoPro will turn on and respond to voice commands right to flip through the other files on your SD card.
-
Page 38
Playing Back Your Media Playing Back Your Media Add/remove HiLight Tag MEDIA (14) Adjust the playback volume Go to the previous or next photo in a burst or group of continuous photos 01:19 Heads Up: The playback options will vary based on the type of media you’re viewing. -
Page 39: Connecting To Other Devices
Connecting to Other Devices Deleting Multiple Files CONNECTING TO THE GOPRO APP Use the GoPro app to control your HERO8 Black, share videos and photos 1. Tap on the go and automatically transform your footage into stunning video 2. Tap all of the files that you want to delete. Tap a file again if you want stories synced with effects and music.
-
Page 40: Transferring Your Media
2. Tap Preferences > Connections > Wi-Fi Band. favourite moments are included in your stories. HERO8 Black also knows when you face the camera, smile and more. It automatically tags these shots with data so the app can handpick them for your videos.
-
Page 41
1. Subscribe to GoPro Plus: 2. Insert the card into an SD card reader or adapter. a. Download the GoPro app to your device from the Apple App Store or Google Play. 3. Plug the card reader into your computer’s USB port or insert the adapter into the SD card slot. -
Page 42
3. Choose a network. The network can’t be hidden or require an end- user licence agreement (for example, a network in a hotel). 4. Enter the password if needed. PRO TIP: Create a video story with your cloud media. Open the GoPro app, tap , then select GoPro Plus. -
Page 43: Setting Your Preferences
GPS is unavailable (grey) Voice Control Camera is connected to the GoPro app (white) Camera Beeps Camera is not paired to the GoPro app (grey) QuikCapture Camera is not connected to the GoPro app (grey) Screen Lock Auto Upload is on and ready (white)
-
Page 44
Dashboard. Default Preset CONNECTIONS Set the preset your GoPro captures in when you turn it on using the Mode Set all of your GoPro’s wireless connections. button . This setting does not affect QuikCapture. -
Page 45
Turn on GPS to track your speed, distance and more. Add performance stickers in the GoPro app to show how fast, far and high you were going in your videos. For more information and mobile device compatibility, check out gopro.com/telemetry. -
Page 46
Audio Input Battery Info Connect your camera to the GoPro Media Mod (HERO8 Black) or Pro Check your battery’s health here. Make sure you use the GoPro 3.5-mm Mic Adapter, sold separately, then select the type of microphone Rechargeable Battery (HERO8 Black/HERO7 Black/HERO6 Black/ you’ll be using. -
Page 47: Important Messages
Setting Your Preferences Important Messages Problems are rare, but HERO8 Black will let you know if anything comes up. Here are some of the messages you might see. RESET Format your SD card or reset your camera’s settings. CAMERA IS TOO HOT…
-
Page 48: Resetting Your Camera
REPAIRING YOUR FILE for 10 seconds. This will restart your camera. There will be no changes to HERO8 Black will automatically try to fix damaged files. Files can be your settings. damaged if your camera loses power while recording or if there’s a RESTORE PRESETS TO THE DEFAULTS problem saving the file.
-
Page 49: Mounting Your Gopro
RESTORING FACTORY SETTINGS This will restore all of your camera’s original settings, clear all device connections and deregister your camera from GoPro Plus. This is useful if you’re giving your camera to a friend and want to completely reset it to its original state.
-
Page 50
Flip up the mounting buckle plug. Depending on the mount you’re using, you’ll either use a mounting buckle or attach your GoPro directly to the mount itself. b. Slide the buckle into the mount until it clicks into place. -
Page 51
USING YOUR GOPRO IN + AROUND WATER • Only use on clean, dry surfaces. Wax, oil, dirt or other debris will HERO8 Black is waterproof to 10 m with the door locked. You won’t need weaken the bond and you could lose your camera. -
Page 52: Removing The Door
Removing the Door Removing the Door There might be times when you need to remove your camera’s door. REATTACHING THE DOOR 1. Line the door up with the small silver bar. WARNING: Only remove the door in a dry, dust-free 2.
-
Page 53: Maintenance
• Turn off GPS • Make sure your GoPro is dry and clean before opening the door. Rinse • Turn off Wireless Connections your camera with fresh water and dry it with a cloth if needed.
-
Page 54
BATTERY STORAGE + HANDLING BATTERY DISPOSAL HERO8 Black is full of sensitive components, including the battery. Most rechargeable lithium-ion batteries are classified as non-hazardous Avoid exposing your camera to very hot or cold temperatures. Extreme waste and are safe for disposal as normal household waste. -
Page 55: Troubleshooting
• The computer doesn’t work with HEVC files. Try downloading the 8-MP stills from your video. latest version of the Quik desktop app for free at gopro.com/apps. • Your computer doesn’t meet the minimum requirements of the Our highest resolution video. The tall 4:3 aspect software you’re using for playback.
-
Page 56
Tech Specs: Video Tech Specs: Video This chart compares the frame size of each resolution: Video Resolution Description 4K 4:3 Tall 4:3 aspect ratio fits more into the frame than 1440p 1080p. Great for capturing fast action, point-of- view shots and sharing to social media. 2.7K 4:3 Standard HDTV resolution that’s great for all shots and sharing to social media. -
Page 57
ASPECT RATIO Frames per second refers to the number of frames captured in each Aspect ratio refers to the width and height of an image. HERO8 Black second of video. Higher fps values (60, 120 or 240) are better at capturing captures videos and photos in two aspect ratios. -
Page 58
Tech Specs: Video Tech Specs: Video DIGITAL LENSES (VIDEO) HERO8 BLACK VIDEO SETTINGS Digital lenses let you choose how much of the scene is captured by your Here’s a rundown of your camera’s video resolutions along with available camera. The different lenses also affect the zoom level and whether fps, lenses and aspect ratio for each. -
Page 59
1440p 30/25 1920×1440 Narrow 24/24 If heat’s a problem, try recording shorter videos. Also limit your use of features that take a lot of power, such as the GoPro app. The GoPro 1080p 240/200 Wide 1920×1080 16:9 Smart Remote (sold separately) can control your GoPro while using less energy. -
Page 60
AUTO LOW LIGHT HyperSmooth 2.0 delivers ultra-smooth professional footage by HERO8 Black can tell if there isn’t enough light for your shot and correcting for camera shake. It crops your videos while recording, which automatically lower the frame rate to improve video quality. This is lets it buffer the footage to eliminate bumps and jitters. -
Page 61: Tech Specs: Photo
Tech Specs: Photo Tech Specs: Photo SUPERPHOTO Turning SuperPhoto On SuperPhoto automatically analyses the scene and intelligently applies the SuperPhoto is off by default. Here’s how to turn it on. best image processing for the shot. 1. From the Photo settings screen, tap Output. Depending on the lighting, movement in your shot and other conditions, 2.
-
Page 62
Tech Specs: Photo Tech Specs: Photo SHUTTER SPEED (NIGHT + NIGHT LAPSE PHOTO) DIGITAL LENSES (PHOTO) Shutter speed lets you decide how long your camera’s shutter stays open Digital lenses let you choose how much of the scene is captured by your in Night and Night Lapse Photo modes. -
Page 63: Tech Specs: Time Lapse
When this setting is turned on, all photos are saved as a .jpg image (for You can increase TimeWarp Video speed up to 30x to turn longer activities viewing on your camera or sharing with the GoPro app) and a .gpr file. into shareable moments. The default setting is Auto, which automatically The .gpr file is based on the Adobe .dng format.
-
Page 64
VIDEO RESOLUTION (TIMEWARP, TIME LAPSE VIDEO) TIME LAPSE INTERVAL HERO8 Black captures TimeWarp and Time Lapse Video in four The Interval sets how often your camera takes a shot in Time Lapse Video resolutions. Here are all of your options: and Time Lapse Photo modes. -
Page 65
NIGHT LAPSE INTERVAL Use this chart to determine the length of your videos. For example, Choose how often your GoPro snaps a shot in Night Lapse mode. recording for 5 minutes with a 0.5-second interval will give you 20 Available intervals for Night Lapse are Auto, 4, 5, 10, 15, 20 and 30 seconds of time lapse video. -
Page 66: Tech Specs: Protune
High video) for optimal image quality. You can also choose Auto to let your GoPro set the White Balance for you or Native to create a minimally colour-corrected file that allows for more precise adjustments in post-production.
-
Page 67
Tech Specs: Protune Tech Specs: Protune ISO MINIMUM/MAXIMUM SHUTTER ISO Minimum and ISO Maximum let you set a range for the camera’s The Protune Shutter setting only applies to the Video, Photo and sensitivity to light and image noise. Image noise refers to the degree of LiveBurst modes. -
Page 68
Tech Specs: Protune Tech Specs: Protune EXPOSURE VALUE COMPENSATION (EV COMP) SHARPNESS Exposure Value Compensation affects the brightness of your photos and Sharpness controls the quality of details captured in your video footage or videos. Adjusting this setting can improve image quality when capturing photos. -
Page 69
WIND REDUCTION RAW AUDIO Your HERO8 Black uses three microphones to capture sound while This setting creates a separate .wav file for your video, in addition to the standard .mp4 audio track. You can select the level of processing to apply recording video. -
Page 70: Customer Support
Customer Support GoPro is dedicated to providing the best possible service. To reach GoPro Customer Support, visit gopro.com/help. Trademarks GoPro, HERO and their respective logos are trademarks or registered trademarks of GoPro, Inc. in the United States and other countries.
This manual is also suitable for:
Spjb1
Перейти к контенту
![]()
Русские электронные инструкции по эксплуатации
Постоянно обновляемый большой каталог документации по эксплуатации и использованию современных устройств и оборудования на русском языке. Бесплатное скачивание файлов.
Поиск:
Главная
♥ В закладки
Просмотр инструкции в pdf


Инструкция по эксплуатации экшн-камеры GoPro Hero 8.
Скачать инструкцию к экшн-камере GoPro Hero 8 (4,58 МБ)

Инструкции по эксплуатации экшн-камер GoPro
« Инструкция к экшн-камере Sony FDR-X3000-WC
» Инструкция к электрогрилю Haier HG-701
Вам также может быть интересно

Инструкция к экшн-камере GoPro Hero 7 Black Edition

Инструкция к экшн-камере GoPro Hero 7 Silver Edition
.jpg)
Инструкция к смартфону Honor 50 8+128GB Emerald Green (NTH-NX9)

Инструкция к холодильнику Атлант ХМ-4214-000

Инструкция к тонометру B-WELL PRO-35 M

Инструкция к телевизору Samsung QE65Q77TAU

Инструкция к холодильнику Samsung RT46H5340SL

Инструкция к кухонной машине KitchenAid Artisan 5KCF0104ECA
Добавить комментарий
Имя *
Email *
Сайт
Комментарий


![]()


Сохранить моё имя, email и адрес сайта в этом браузере для последующих моих комментариев.
- Добавить инструкцию
- Заказать инструкцию
перейти к содержанию

Главная » GoPro » Водонепроницаемая экшн-камера GoPro HERO8 Black с сенсорным экраном и инструкциями ![]()
Водонепроницаемая экшн-камера GoPro HERO8 Black с сенсорным экраном

Скачать приложение

Установка аккумулятора

USB-подключение

Функции и установкаview


© 2021 GoPro, Inc. Все права защищены. Модель/модель: SPJB1

Документы / Ресурсы
Похожие сообщения
-

-
Руководство пользователя камеры dji Action 2
Краткое руководство по началу работы v1.0 Power Combo https://s.dji.com/ZGppL7 НОВОЕ В DJI ACTION2? http://weixin.qq.com/q/02Y8HiZQ_2eF410000g03M ПОДПИСАТЬСЯ НА БОЛЬШЕ ИНФОРМАЦИИ DJI…
-
-


