- Manuals
- Brands
- Motorola Manuals
- Portable Radio
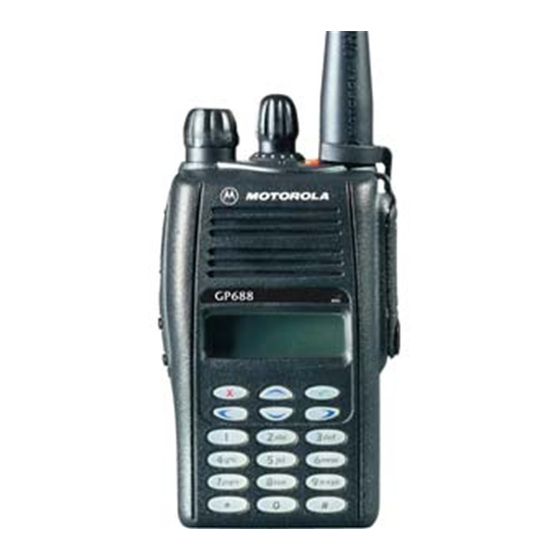
- GP-688
- Manual
-
Contents
-
Table of Contents
-
Bookmarks
Quick Links
Инструкция для
Motorola GP-688
Перейти в карточку товара
8 800 775 98 98
Related Manuals for Motorola GP-688
Summary of Contents for Motorola GP-688
-
Page 1
Инструкция для Motorola GP-688 Перейти в карточку товара 8 800 775 98 98… -
Page 2
GP688/GP688R 6866542D04-P… -
Page 3
MOTOROLA and the Stylized M Logo are registered in the U.S. Patent and Trademark Office. All other product or service names are the property of their respective owners. -
Page 4: Table Of Contents
CONTENTS Attaching the Battery … . . 19 Removing the Battery … . .19 Computer Software Copyrights ..3 Attaching the Antenna .
-
Page 5
Receiving Short Data Messages..36 PERSONALITY ….45 Storing SDMs ….36 MPT . -
Page 6: Computer Software Copyrights
Furthermore, the purchase of Motorola products shall not be deemed to grant either COPYRIGHTS directly or by implication, estoppel, or The Motorola products described in this otherwise, any license under the copyrights, manual may include copyrighted Motorola patents or patent applications of Motorola,…
-
Page 7: Safety
FCC RF energy exposure requirements. Before using this product, read the RF energy awareness information and operating instructions in the Product Safety and RF Exposure booklet enclosed with your radio (Motorola Publication part number 6864117B25) to ensure compliance with RF energy exposure limits. English…
-
Page 8: Radio Overview
RADIO OVERVIEW This user guide covers the operation of the GP688/GP688R Portable Radio. Top Button Rotary Knob (programmable) LED Indicator On/Off/Volume Knob Microphone Push to Talk Button (PTT) LCD Display Clear Button (Side Button 1) Menu Keys Side Button 2 Keypad English…
-
Page 9: Operation And Control Functions
OPERATION AND CONTROL FUNCTIONS Side Button 2 Personality button, otherwise programmable. Radio Controls Top Button (programmable) The numbers below refer to the illustrations on Recommended as Emergency button. the inside front cover. LED Indicator Green: Flashes to indicate NO SERVICE. Rotary Knob Red: On when radio is transmitting.
-
Page 10: Programmable Buttons
The following table shows the features that can Programmable Buttons be assigned to the Top button and Side Button 2. Several of your radio buttons can be programmed (by Customer Programming Software CPS) to activate the radio features. Feature Description To make a call to a pre-determined number.
-
Page 11: Menu Keys
Exit Key x Menu Keys Used to move up to the next higher Menu level. Menu/ Exit When the top level menu is selected this key is Select used to exit the Menu Mode. Also used to cancel/ end calls. Up Key + Used for scrolling when in Menu Mode.
-
Page 12
Menu Navigation Chart (Refer to Menu Navigation guidelines — lower, left-hand corner of this page) Delete Missed Contact Personality Status Contact Contact Calls List select/ select/ ID status select/ select/ enter ID enter ID 1,2..etc User Data Calls Absent search/ select/ edit entry enter ID… -
Page 13: Keypad Keys
Keypad Keys Pressing will toggle between the upper 1 2 3 and lower case of the selected character. If the next character required is on the same 4 5 6 key, press to move the cursor forward one character. 7 8 9 If an error is made, press to delete the * 0 #…
-
Page 14: The Keypad
Entering Characters using the Keypad Number of Times Key is Pressed > < ¿ & “ ‘ £ Ä Å À Æ ß Ç ¥ Á Æ É È Ê Ë Ê 4 G H Ì Í ³ 6 M N Ñ…
-
Page 15: Lcd Display And Icons
LCD Display and Icons Symbol Name and Description Signal Quality Indicator Shows the radio signal quality. Five bars indicates the best signal. Contact List Edit Indicator Indicates user is editing the contact list. Displays channel, menu, and radio status information. The top two screen rows show radio Data Calls List Indicator On, indicates a data call in the list status indicator symbols, explained in the table…
-
Page 16: Audio Signal Tones (Normal)
Audio Signal Tones (Normal) Tone Signal Description High pitched tone Low pitched tone Confidence tone when Key click any key pressed or Tone Signal Description Speech limitation alert. Self test Power up. Hardware error or Fail tone Call timed out Tone A Call clear indication.
-
Page 17: Audio Signal Tones (Alternate)
Audio Signal Tones (Alternate) Tone Signal Description High to Low pitched tones Confidence tone when Key click any key pressed or Tone Signal Description Speech limitation alert. Self test Power up. Hardware error or Fail tone Call timed out Tone A Call clear indication.
-
Page 18: Getting Started
For optimum battery life and operation use only • When charging a battery that is attached to the Motorola brand chargers. They were designed to radio, turn the radio off to ensure a full charge. operate as an integrated energy system.
-
Page 19
Battery chargers will charge only the Motorola authorized batteries listed below; other batteries will not charge Table 1: IP54 Radio Battery List Table 2: IP67 Radio Battery List Part No. Description Part No. Description Slim Li-Ion, 1000 mAh, Li-Ion FM IP67 Standard… -
Page 20: Battery Label
Note: IP67 water submersible radios MUST be Battery Label fitted with Motorola authorized IP67 batteries to ensure proper functionality. IP67 Warning:When charging a IP67 battery, make sure that the IP67 battery (or IP67 battery with IP67 radio) is not wet prior to placing in the charger.
-
Page 21: Recycling Or Disposal Of Batteries
Recycling or Disposal of Batteries Charger LED Status Motorola endorses and encourages the recycling Battery is charging of all re-chargeable batteries. Contact your local Green Battery is fully charged Motorola dealer for further information. Flashing Red * Battery is unchargeable…
-
Page 22: Accessory Information
ACCESSORY INFORMATION Attaching the Battery Removing the Battery Turn off the radio, if it is turned on. Fit the extensions at the bottom of the battery into the slots at the bottom of the radio’s body. Slide the battery latches, on both sides of the battery, downwards.
-
Page 23: Attaching The Antenna
Attaching the Antenna Removing the Antenna Align the threaded end of the antenna with the Turn the antenna counterclockwise until you radio’s antenna connector. can remove it. Turn the antenna clockwise to fasten it. English…
-
Page 24: Draining Water From The Ip67 Gp688R Speaker
RADIO OPERATION DRAINING WATER FROM THE IP67 GP688R SPEAKER Turning The Radio On or Off • To turn the radio on, turn the On/Off//Volume Control knob clockwise. • To turn the radio off, turn the On/Off//Volume Note: If you accidentally drop your GP688R radio Control knob counterclockwise until you hear a into water, pick up the radio, and gently tap click.
-
Page 25: Radio Registration
After this text has been displayed, the radio will scan Radio Registration for system access with the LED on the top of the When turned on, the radio enters a self test routine radio flashing GREEN and the scanning icon H lit. during which time the display is activated, the self When a system is acquired, the green LED will go test tone will sound and the LED will light green.
-
Page 26: Radio Calls
RADIO CALLS The contact list can be entered directly by one click of the rotary knob (1) when the radio is in Making a Call the IDLE STATE. Use the rotary knob to scroll through the list and select the required name The radio is capable of making a variety of or number as indicated in step 4 below.
-
Page 27
To Add an Entry When finished with call. to enter Menu Mode. CLEAR BUTTON until: Add Contact x or to select: Add Contact Call Ended Tone A sounds You will see: Name? Use the keypad to enter the name (see If a contact list number is selected but no call pages 8 and 9). -
Page 28
To Delete an Entry To Edit an Entry to enter Menu Mode. to enter Menu Mode. until: until: Delete Contact Contact List to select: to select: Delete Contact Contact List You will see current until you see the entry you Alias 1 entry e.g.: want to edit… -
Page 29
To Search for an Entry You will see associated number When in Contact List or Delete Contact menu, 01256488116 e.g : you may search for an alias (name) by entering Use the keypad to edit the number (see characters from the keypad. pages 8 and 9) or delete and enter a new number. -
Page 30: User Absent
User Absent Display shows: Idle Freetext User Absent can be selected on your radio When you are able to take calls, ensure that when you are unable to take calls. Any calls to User Absent is switched off by: your radio will be put into the Missed Calls list automatically and the message ‘Will Call Back’…
-
Page 31: Dedicated Calls
enabled, entry into the user absent mode is Manual Dialling automatic and any calls received when you are To make a call from the keypad (12) away from your radio will be put into the Missed Calls list automatically and the Enter Telephone Number message “Will call back”…
-
Page 32: Last Number Redial
Last Number Redial Keypad Edit If the radio is displaying a Contact List number, The last number dialled by the radio is stored a Keypad Dialled number, Status number or in the memory of the radio. Missed Call number, the last digit may be Partially entered numbers are also stored.
-
Page 33: Ending A Call
Cancelling a Call Enter new 12345699 At any time while setting up a call it may be numbers cancelled by: PTT button or # to make radio call. CLEAR BUTTON or x or You will see: Calling Cancelling Note: The edited number is not saved at the end of See «Call Progress — Cancelling a Call».
-
Page 34: Missed Calls
For display Call Type see » Call Progress — Receiving a call on an OACSU system Receiving» When the radio is called: Note: The system may have a limited call time, Tone D sounds CallerID indicated on the display, and the call may be terminated automatically if this call time is Tone B sounds Call Type…
-
Page 35
With the display showing ‘Missed Calls’ , Example: pressing any of the menu buttons provides a Display shows quick access into the Missed Calls List. Reception S The Missed Call List can also be entered where S is a status message associated with directly by pressing the Missed Call button (if the call programmed) when the radio is in the IDLE… -
Page 36
You can call back to any number in the Missed On a successful call set- up, the entry is Call list by: automatically deleted from the list together with an associated voice message. until: Alias Unanswered calls may be deleted from the Missed Call list at any time by pressing: PTT button or # to make the call. -
Page 37: Call Diversion
To exit the Missed Call List: *411* To divert speech calls x button *441* only or MISSED CALL button to exit Menu mode. *412* To divert status/ data calls only Display shows: Idle freetext *442* Note: The calls in the stack are not deleted when Enter ID of radio to which you are the radio is turned off.
-
Page 38
Will redirect all calls from the radio with ID 3 To cancel calls redirected to your radio “234” to the radio with ID“432” #45 followed by 1 or 2 if necessary and If a call is made to a radio whose calls are currently being diverted: Tone D sounds Diverting… -
Page 39: Special Calls
SPECIAL CALLS Storing SDMs Incoming SDMs are stored on receipt in the Short Data Messages (SDM) Short Data Message Calls List. Up to ten Short data messages may be set up, sent and SDMs can be stored by the radio. The data received using the radio keypad and controls.
-
Page 40
To view the calls in the list via the menu To save an SDM to be retained after the radio is switched off. to enter Menu Mode. Read the data message in the Data Calls until: Data Calls List. to select: Data Calls First call in list Alpha Alias… -
Page 41: Data Calls List
Deleting Messages from the Data Calls List Status/Voice Call replies to an SDM Where an SDM contains a calling party To delete data messages from the data number, the radio can respond with a status calls list or while viewing data messages. message or voice call.
-
Page 42: Making An Sdm Call
To initiate a data call via the keypad: Making an SDM Call SDM Calls may be initiated in three different *2* Part of modifier ways: 2 Enter message from keypad in Via the keypad using a Call modifier alphanumeric characters (ref pages 8 & 9) Via the Contact List Note: The maximum data message size is limited Final part of modifier…
-
Page 43: Status Calls
To initiate a Data call via the contact list Note: The maximum data message size is limited to 20 characters which includes address In this method data may consist of alphanumeric information and data selection characters. characters which are preprogrammed into your radio by your dealer.
-
Page 44
4 Enter Called radio address Display shows for Select Contact 10 seconds: 5 Display shows: *005*NNNNN Current entry in or turn rotary contact list knob to display: Where NNNNN is called radio address. Make the call by: until: Alpha Alias (required name or PTT button or # to make radio call. -
Page 45: Receiving A Status Call
Conversely you can dial the number, prefixing Receiving a Status Call it with*9*. Your radio receives a Status Call when: To initiate an emergency call: Tone G sounds Display alternates Status 04 1 Press the Emergency button every 2 second between: On Break 2 *9* followed by the radio…
-
Page 46: Priority Calls
Your radio may receive an emergency call Broadcast Calls when: A broadcast call allows you to make calls to groups of radios. Note that on a broadcast call Tone D or Ring tone only the calling radio can talk and there is no will sound and indication that any radios in the group have Emergency…
-
Page 47: Dtmf
To initiate a DTMF call: DTMF DTMF means Dual Tone Multi Frequency and Enter Access code is used when the radio is required to operate in a radio system with an interface to telephone Press and hold PTT systems. Enter desired number An access code, which is system dependent, is normally needed for DTMF, please contact your dealer or network manager for further…
-
Page 48: Personality
PERSONALITY Talkgroup Talkgroup is an MPT personality following the The personalities described below are same rules or protocol, but is primarily for programmed into your radio by your dealer and talkgroup calls. In talkgroup personality, are accessible either via the personality button talkgroups are contained in a Talkgroup list, or via the menu.
-
Page 49: Conventional Mode
Incoming calls to fixed and dynamic group where xx is the channel number. Use the rotary numbers are detailed in Receiving a Call and knob (1) to display and select the desired displayed under Call Progress — Receiving. channel. To make an outgoing call to a selected Prior to transmission always make sure that talkgroup, press the PTT and speak after the the channel is free (red LED not flashing).
-
Page 50: Personality Selection
Personality Selection The display will be held for 2 seconds Personality selection may be entered directly while your radio retunes to the new by pressing the Personality button (5). You personality. may then scroll using the rotary knob and select a personality as described in step 7 Your radio will below, or scroll and select a personality as return…
-
Page 51: Call Progress
CALL PROGRESS Unit unavailable Unavailable When in operation, your radio monitors each Unit number invalid Invalid Number step in setting up a call whether sending or receiving. These steps are displayed to System Busy System busy, try again provide you with call progress and indicate call types.
-
Page 52
Call Progress — Receiving Talkgroup call received Talkgroup NN Tone Display Comment (NN is list number) A call is being received Caller ID Dynamic group call Dynamic NN on OACSU received (may be alias or number — NN) Ring Caller ID A call is being received on FOACSU. -
Page 53
Call Progress — Cancelling a call Call Progress — Ending a call Tone Display Comment Tone Display Comment Call successfully Call ended, another call D/G Cancelling Call Ended cancelled by user can now be made English… -
Page 55
Mukim 12, S.W.D. 11900 Penang, Malaysia. Printed in Malaysia. MOTOROLA and the Stylized M Logo are registered in the U.S. Patent and Trademark Office. All other product or service names are the property of their respective owners. © 2007 by Motorola, Inc. -
Page 56
Motorola GP-688 Описание Характеристики…
This manual is also suitable for:
Gp688r
В представленном списке руководства для конкретной модели Рации — Motorola GP688. Вы можете скачать инструкции к себе на компьютер или просмотреть онлайн на страницах сайта бесплатно или распечатать.
В случае если инструкция на русском не полная или нужна дополнительная информация по этому устройству, если вам нужны
дополнительные файлы: драйвера, дополнительное руководство пользователя (производители зачастую для каждого
продукта делают несколько различных документов технической помощи и руководств), свежая версия прошивки, то
вы можете задать вопрос администраторам или всем пользователям сайта, все постараются оперативно отреагировать
на ваш запрос и как можно быстрее помочь. Ваше устройство имеет характеристики:Стандарт: UHF, Диапазон частот: 403-470 МГц, Мощность передатчика: 4 Вт, Переключение мощности передатчика: есть, Чувствительность: 0.35 мкВ (12 dB SINAD), Количество каналов: 16, полные характеристики смотрите в следующей вкладке.
Для многих товаров, для работы с Motorola GP688 могут понадобиться различные дополнительные файлы: драйвера, патчи, обновления, программы установки. Вы можете скачать онлайн эти файлы для конкретнй модели Motorola GP688 или добавить свои для бесплатного скачивания другим посетителями.
Если вы не нашли файлов и документов для этой модели то можете посмотреть интсрукции для похожих товаров и моделей, так как они зачастую отличаются небольшим изменениями и взаимодополняемы.
Обязательно напишите несколько слов о преобретенном вами товаре, чтобы каждый мог ознакомиться с вашим отзывом или вопросом. Проявляйте активность что как можно бльше людей смогли узнать мнение настоящих людей которые уже пользовались Motorola GP688.

Как описать, если не пользовался?
Максим
2018-05-04 08:28:28
не пользовался
я начинающий пользователь
владимир
2018-12-07 15:46:02
Удобное управление.Только начинаю пользоваться радиостанцией.
Михаил
2018-12-18 14:04:26
Приобрёл недавно. Взял бывшую в использовании. Предыдущий владелец пользовался 3 года, нареканий нет. Покрутил в руках, очень приятная вещица.
Филюза
2019-04-07 18:23:04
Только начал
dfhzf FNDFN
Андрей Валетов
2019-08-06 19:35:15
хочу инструкцию, чтобы пользоваться
Санчез
2019-08-11 18:11:49
Не пользовался!
Санчез
2019-08-11 18:12:35
Не пользовался!
Пока не пользовался!
Vladimir
2019-08-16 11:46:53
Только приобрёл, начинаю вникать.
;ljhouhiup;
Прохор
2019-09-19 10:18:21
Нет отзыва. Сначала инструкция нужна
Прохор
2019-09-19 10:20:28
Рано отзыв писать
Шатава Алексей
2020-02-18 21:32:36
Я начинающий пользователь
Алексей
2020-02-29 12:38:00
Обалденная рация
Dfjinfsgg do illodsz
подаван
2020-03-26 08:12:03
инструкция нужна
Муслим
2020-07-13 12:47:15
Пока не пользовался
Muslim
2020-07-25 20:31:35
еще не пользовался
Vasilii
2020-12-03 20:30:26
Ещё не знаю . Нужно руководство
Основные и самые важные характеристики модели собраны из надежных источников и по характеристикам можно найти похожие модели.
| Диапазон | |
| Стандарт | UHF |
| Диапазон частот | 403-470 МГц |
| Параметры приемника/передатчика | |
| Мощность передатчика | 4 Вт |
| Переключение мощности передатчика | есть |
| Чувствительность | 0.35 мкВ (12 dB SINAD) |
| Количество каналов | 16 |
| Поддержка кодирования | DTMF |
| Функции | |
| Функция «нажми и говори» (PTT) | есть |
| Сканирование каналов | есть |
| Быстрая настройка на аварийный канал | есть |
| Таймер разговора | есть |
| Конструкция | |
| Антенна | съемная |
| Отображение информации | дисплей с подсветкой |
| Корпус | влагозащищенный, ударопрочный |
| Поддержка стандарта влагозащиты | IPX4 |
| Поддержка стандарта MIL-STD-810 | есть |
| Питание | |
| Время работы | 9 ч |
| Количество элементов питания | 1 |
| Формат | свой собственный |
| Тип аккумулятора | Li-Ion |
| Подключение зарядного устройства | есть |
| Особенности | индикатор заряда, режим сохранения энергии |
| Звук | |
| Шумоподавление | есть |
| Мощность громкоговорителя | 500 мВт |
| Регулировка громкости | есть |
| Подключение гарнитуры | есть |
| Комплектация | |
| Количество раций в комплекте | 1 |
| Аккумуляторы | есть |
| Клипса | есть |
| Дополнительно | |
| Размеры (ШхВхТ) | 58x102x38 мм |
| Вес | 265 г |
| Рабочая температура | -20 — 55 ?C |
Здесь представлен список самых частых и распространенных поломок и неисправностей у Раций. Если у вас такая поломка то вам повезло, это типовая неисправность для Motorola GP688 и вы можете задать вопрос о том как ее устранить и вам быстро ответят или же прочитайте в вопросах и ответах ниже.
| Название поломки | Описание поломки | Действие |
|---|---|---|
| Не Включается | ||
| Хрипит Звук | ||
| Нет Звука | ||
| Нет Сигнала | ||
| Пропало Автосканирование Фм | Перестал Работать Автопоиск Вещательных Радиостанций Фм Диаппазона,В Ручную Станции Находит | |
| Сбиваются Частоты | ||
| Пропадает Связь | Связь Пропадает И Индикатор Мигает А Когда Нажимаю На Большую Кнопку Для Передачи Издаёт Звуки Как Будто Занято. | |
| На Одной Волне Не Слышно Друг Друга | ||
| Тк-3406 | Издает Звуковые Сигналы | |
| Не Работает На Прём | ||
| Во Время Зарядки Красный Свет Мигает | Во Время Зарядки Красный Свет Мигает |
В нашей базе сейчас зарегестрированно 18 353 сервиса в 513 города России, Беларусии, Казахстана и Украины.

AEPERSON
⭐
⭐
⭐
⭐
⭐
Адресс:
Старый Зыковский проезд, дом 3
Телефон:
74952369008
Сайт:
n/a
Время работы
Будни: с 1000 до 1930
Суббота: с 1100 до 1600
Воскресенье: выходной
ГЛАВКОМП
⭐
⭐
⭐
⭐
⭐
Адресс:
Покрышкина дом 8 корпус 3
Телефон:
74952369676
Сайт:
n/a
Время работы
Ежедневно: с 1000 до 2030
АЛЬФА2
⭐
⭐
⭐
⭐
⭐
Адресс:
Пр. Мира 101
Телефон:
Сайт:
n/a
Время работы
Время работы не указано
БСМ ТЕХНОЛОДЖИС
⭐
⭐
⭐
⭐
⭐
Адресс:
Волгоградский проспект 28
Телефон:
74956209820
Сайт:
n/a
Время работы
Будни: с 0900 до 1900
Суббота: выходной
Воскресенье: выходной
СЕРВИСНЫЙ ЦЕНТР
⭐
⭐
⭐
⭐
⭐
Адресс:
Генерала Кузнецова, 28 к1
Телефон:
74957048101
Сайт:
n/a
Время работы
Будни: с 1000 до 2200
Суббота: с 1000 до 2200
Воскресенье: с 1000 до 2000

Инструкция для
Motorola GP-688
Перейти в карточку товара
8 800 775 98 98
л чит т нич
ю н льт цию.
гл т чн . Б з вы дны
www.sotmarket.ru
д бн я инф м ция
тзывы, бз ы и
т в
ы
,
M
GP688/GP688R
6866542D04-P
sfd
MOTOROLA and the Stylized M Logo are registered in the U.S. Patent and
Trademark Office.
All other product or service names are the property of their respective owners.
CONTENTS
Computer Software Copyrights . . . . . . . 3
Product Safety and RF Exposure
Compliance . . . . . . . . . . . . . . . . . . . . . . . . 4
Radio Overview . . . . . . . . . . . . . . . . . . . . 5
Operation and Control Functions . . . . . . . . 6
Radio Controls . . . . . . . . . . . . . . . . . . . 6
Programmable Buttons . . . . . . . . . . . . . 7
Menu Keys . . . . . . . . . . . . . . . . . . . . . . . . . 8
Keypad Keys . . . . . . . . . . . . . . . . . . . . 10
Entering Characters using
the Keypad . . . . . . . . . . . . . . . . . . . . . 11
LCD Display and Icons . . . . . . . . . . . . 12
Audio Signal Tones (Normal) . . . . . . . 13
Audio Signal Tones (Alternate) . . . . . . 14
Getting Started . . . . . . . . . . . . . . . . . . . . 15
Battery Information. . . . . . . . . . . . . . . . . .
Battery Care and Tips . . . . . . . . . . . . .
Battery Label . . . . . . . . . . . . . . . . . . . .
Recycling or Disposal of Batteries . . .
Charging the Battery . . . . . . . . . . . . .
Accessory Information . . . . . . . . . . . . . . .
15
15
17
18
18
19
Radio Calls . . . . . . . . . . . . . . . . . . . . . . . 23
Making a Call . . . . . . . . . . . . . . . . . . . 23
Contact List. . . . . . . . . . . . . . . . . . . . . 23
User Absent . . . . . . . . . . . . . . . . . . . . 27
Dedicated Calls . . . . . . . . . . . . . . . . . 28
Manual Dialling . . . . . . . . . . . . . . . . . . 28
Last Number Redial . . . . . . . . . . . . . . 29
Keypad Edit . . . . . . . . . . . . . . . . . . . . 29
Ending a Call . . . . . . . . . . . . . . . . . . . .30
Cancelling a Call. . . . . . . . . . . . . . . . . 30
Receiving a Call . . . . . . . . . . . . . . . . . .30
Missed Calls . . . . . . . . . . . . . . . . . . . . 31
Call Diversion . . . . . . . . . . . . . . . . . . . 34
Special Calls . . . . . . . . . . . . . . . . . . . . . 36
Short Data Messages (SDM) . . . . . . . 36
1
English
CONTENTS
Safety . . . . . . . . . . . . . . . . . . . . . . . . . . . . 4
Attaching the Battery . . . . . . . . . . . . . 19
Removing the Battery . . . . . . . . . . . . .19
Attaching the Antenna . . . . . . . . . . . . 20
Removing the Antenna . . . . . . . . . . . . 20
Draining Water from the IP67
GP688R Speaker . . . . . . . . . . . . . . . . . . .21
Radio Operation . . . . . . . . . . . . . . . . . . . 21
Turning The Radio On or Off . . . . . . . 21
Adjusting the Radio’s Volume . . . . . . .21
Radio Registration . . . . . . . . . . . . . . . 22
CONTENTS
Receiving Short Data Messages. . . . .
Storing SDMs . . . . . . . . . . . . . . . . . . .
Interrogating the SDM Calls List . . . . .
Deleting Messages from the
Data Calls List . . . . . . . . . . . . . . . . . . .
Status/Voice Call replies to an SDM . .
Making an SDM Call . . . . . . . . . . . . . .
Status Calls . . . . . . . . . . . . . . . . . . . . .
Making a Status Call . . . . . . . . . . . . .
Receiving a Status Call . . . . . . . . . . .
Emergency Calls . . . . . . . . . . . . . . . . .
Priority Calls . . . . . . . . . . . . . . . . . . . .
Broadcast Calls . . . . . . . . . . . . . . . . . .
DTMF . . . . . . . . . . . . . . . . . . . . . . . . .
English
2
36
36
36
38
38
39
40
40
42
42
43
43
44
PERSONALITY . . . . . . . . . . . . . . . . . . . . 45
MPT . . . . . . . . . . . . . . . . . . . . . . . . . . 45
Talkgroup . . . . . . . . . . . . . . . . . . . . . . 45
Fixed and Dynamic Groups . . . . . . . . 45
Conventional Mode. . . . . . . . . . . . . . . 46
Personality Selection . . . . . . . . . . . . . .47
Call Progress . . . . . . . . . . . . . . . . . . . . . 48
COMPUTER SOFTWARE
COPYRIGHTS
COMPUTER SOFTWARE
COPYRIGHTS
The Motorola products described in this
manual may include copyrighted Motorola
computer programs stored in semiconductor
memories or other media. Laws in the United
States and other countries preserve for
Motorola certain exclusive rights for
copyrighted computer programs, including, but
not limited to, the exclusive right to copy or
reproduce in any form the copyrighted
computer program. Accordingly, any
copyrighted Motorola computer programs
contained in the Motorola products described
in this manual may not be copied, reproduced,
modified, reverse-engineered, or distributed in
any manner without the express written
permission of Motorola.
Furthermore, the purchase of Motorola
products shall not be deemed to grant either
directly or by implication, estoppel, or
otherwise, any license under the copyrights,
patents or patent applications of Motorola,
except for the normal non-exclusive license to
use that arises by operation of law in the sale
of a product.
3
English
SAFETY
PRODUCT SAFETY AND RF
EXPOSURE COMPLIANCE
!
Caution
Before using this product, read
the operating instructions for safe
usage contained in the Product
Safety and RF Exposure booklet
enclosed with your radio.
ATTENTION!
SAFETY
This radio is restricted to occupational use only to
satisfy FCC RF energy exposure requirements.
Before using this product, read the RF energy
awareness information and operating instructions
in the Product Safety and RF Exposure booklet
enclosed with your radio (Motorola Publication part
number 6864117B25) to ensure compliance with
RF energy exposure limits.
English
4
For a list of Motorola-approved antennas,
batteries, and other accessories, visit the following
web site which lists approved accessories:
http://www.motorola.comgovernmentandenterprise
RADIO OVERVIEW
Rotary Knob
On/Off/Volume
Knob
Push to Talk
Button (PTT)
Clear Button
(Side Button 1)
Side Button 2
Top Button
(programmable)
LED Indicator
Microphone
LCD Display
Menu Keys
Keypad
5
English
RADIO OVERVIEW
This user guide covers the operation of the
GP688/GP688R Portable Radio.
RADIO OVERVIEW
OPERATION AND CONTROL FUNCTIONS
Radio Controls
The numbers below refer to the illustrations on
the inside front cover.
1.
Rotary Knob
Used as a multi-function scroll key and as a
channel selector in Conventional mode.
2.
On/Off/Volume Knob
Used to turn the radio on or off, and to adjust
the radio’s volume.
3.
4.
Push to Talk Button (PTT)
Press and hold down this button to talk, release
it to listen.
Clear Button (Side Button 1)
Used to cancel a call, clear down at the end of
a call or Carrier Monitor (Conventional mode).
Personality button, otherwise programmable.
English
6
5.
Side Button 2
Personality button, otherwise programmable.
6.
Top Button (programmable)
Recommended as Emergency button.
7.
LED Indicator
Green: Flashes to indicate NO SERVICE.
Red: On when radio is transmitting.
Red Flashing: When transmitting - battery low.
Red Flashing: When receiving - channel busy
(Conventional Mode).
8.
Microphone
9.
LCD Display (1 Line)
10. Menu Keys
11. Keypad
12. Antenna
13. Accessory Connector
Connects headsets, remote speaker/microphones and other accessories. Replace
attached dust cap when not in use.
Several of your radio buttons can be
programmed (by Customer Programming
Software CPS) to activate the radio features.
Feature
Description
Dedicated Call/
Emergency
To make a call to a pre-determined number. This can
be an emergency number, effectively activating an
Emergency Call.
Personality
Short cut to the personality menu option to select
one of four radio personalities,
(e.g. MPT trunking system or conventional system).
This will normally be Side Button 2.
Missed Calls
Short cut to the Missed Call menu option.
This is a list of calls received and stored by the radio
when you were unable to take the call.
User Absent
To switch the User Absent feature On and Off.
This feature is used to indicate to the caller that you
are away from your radio and unable to take calls.
7
English
RADIO OVERVIEW
The following table shows the features that can
be assigned to the Top button and Side Button 2.
Programmable Buttons
RADIO OVERVIEW
Menu Keys
Exit
Up
Menu/
Select
x
+
c
d
e
f
Left
Down
Right
Menu/Select Key c
Used to enter the Menu Mode. When you are in the
Menu Mode, this key is also used to make menu
selections.
Note: When the radio is in the IDLE STATE,
pressing any of the six menu keys causes
the radio to enter the Menu mode.
Exit Key x
Used to move up to the next higher Menu level.
When the top level menu is selected this key is
used to exit the Menu Mode. Also used to cancel/
end calls.
Up Key +
Used for scrolling when in Menu Mode.
Down Key e
Used for scrolling when in Menu Mode.
Right Key f
Used as More key to provide additional information.
Left Key d
Used as a destructive backspace key when editing.
Refer to the menu navigation chart for menu
selectable features
English
8
Menu Navigation Chart
RADIO OVERVIEW
c
(Refer to Menu Navigation guidelines lower, left-hand corner of this page)
+ e
Status
Missed
Calls
Contact
List
select/
enter ID
select/ ID status
select/
enter ID
Data Calls
User
Absent
select/
enter ID
+ e
Add
Contact
Delete
Contact
Personality
select/
1,2....etc
+ e
search/
edit entry
on/off
Menu Navigation
c to enter Menu Mode.
+ to e to scroll through the list.
c to select Menu item.
+ to e to scroll through sub-list.
x to return to previous menu level.
c to select sub-menu item.
9
English
RADIO OVERVIEW
Keypad Keys
1
4
7
*
2
5
8
0
3
6
9
#
These keys are used when dialling a phone
number, making a radio call or entering
information for programming the radio’s lists.
Each key can generate several different
characters. For example, to enter the character
“C”, press the 2 key three times.
English
10
Pressing # will toggle between the upper
and lower case of the selected character.
If the next character required is on the same
key, press f to move the cursor forward one
character.
If an error is made, press d to delete the
current character and move cursor back one
character.
For full character set, refer to the following
table.
Entering Characters using the Keypad
Ke
y
1
2
3
4
5
6
7
8
9
10
11
12
13
14
15
16
17
0 +
-
0
x
*
/
=
>
<
#
1 .
1
?
¿
!
,
@
-
&
:
“
(
)
‘
%
£
$
2 A
B
C
2
Ä
Å
¥
Á
À
Æ
ß
Ç
Æ
3 D
E
F
3
É
È
Ê
Ê
Ë
4 G
H
I
4
Ì
Í
5 J
K
L
5
³
6 M N
O
6
Ñ
Ñ
Ö
Ò
Ó
7 P
Q
R
S
7
Œ
8 T
U
V
8
Ü
Ù
9 W X
Y
Z
9
Ú
* Space
# Use this key to toggle between UPPER CASE and lower case of the selected character
11
English
RADIO OVERVIEW
Number of Times Key is Pressed
RADIO OVERVIEW
LCD Display and Icons
Displays channel, menu, and radio status
information. The top two screen rows show radio
status indicator symbols, explained in the table
below:
Symbol
A
XPAND™ Indicator
Indicates that your radio has the companding
feature activated.
B
C
Loudspeaker Indicator
Indicates that you have the loudspeaker
active.
H
Scan Indicator
Indicates that you are scanning for a system.
L
Registered Indicator
Indicates that a system has been acquired,
and monitor in conventional mode.
12
Name and Description
M
Signal Quality Indicator
Shows the radio signal quality. Five bars
indicates the best signal.
D
Contact List Edit Indicator
Indicates user is editing the contact list.
K
Data Calls List Indicator
On, indicates a data call in the list
Flashing, indicates new unread calls.
P
Battery Level Indicator
Shows the remaining charge in your battery,
based on how many bars are displayed.
Flashing, indicates flat battery.
Name and Description
Power Level Indicator
“L” lights when your radio is configured to
transmit in Low Power. “H” lights when your
radio is configured to transmit in High Power.
English
Symbol
Missed Calls Indicator
Q
!
On, indicates there are missed calls in the
missed call list.
Flashing, indicates new unread calls.
Timer
Shows the call time.
Audio Signal Tones (Normal)
Tone
Self test
Signal
Tone
Signal
Low pitched tone
Description
Key click
Confidence tone when
any key pressed or
Speech limitation alert.
Fail tone
Hardware error or
Call timed out
(conventional mode).
Description
Power up.
Tone A
Call clear indication.
Tone B
Traffic channel
allocated or PTT/ Mic/
Loudspeaker enabled.
Tone I
Low battery warning.
Tone M1
Talkgroup Confirmation.
Tone C1
System busy.
Tone M2
Talkgroup unavailable.
Tone C2
Unavailable.
Tone N1
Out of range alert.
Tone C3
Called party busy.
Tone C4
Invalid number.
Tone D
Call set up in progress,
wait for further
indications.
Tone F
Transaction
confirmed, called unit
will call back.
Tone G
Look at display for
call set up or
System information.
Tone H
Invalid entry.
Ring
tones
Standard/
English/French/
General
Incoming call, press
PTT, then wait for
further indications.
13
English
RADIO OVERVIEW
High pitched tone
Audio Signal Tones (Alternate)
Tone
Signal
Tone
Self test
Signal
Description
Key click
Confidence tone when
any key pressed or
Speech limitation alert.
Fail tone
Hardware error or
Call timed out
(conventional mode).
Description
Power up.
Tone A
Call clear indication.
Tone B
Traffic channel
allocated or PTT/ Mic/
Loudspeaker enabled.
Tone I
Low battery warning.
Tone M1
Talkgroup Confirmation.
System busy.
Tone M2
Talkgroup unavailable.
Unavailable.
Tone N1
Out of range alert.
Tone C3
Called party busy.
Ring
tones
Tone C4
Invalid number.
Tone D
Call set up in progress,
wait for further
indications.
Tone F
Transaction
confirmed, called unit
will call back.
Tone G
Look at display for
call set up or
System information.
Tone H
Invalid entry.
Tone C1
Tone C2
Standard/
English/French/
General
Incoming call, press
PTT, then wait for
further indications.
14
English
RADIO OVERVIEW
High to Low pitched tones
GETTING STARTED
•
BATTERY INFORMATION
Battery Care and Tips
This product is powered either by a nickel-metalhydride (NiMH), or lithium-ion rechargeable
battery.
•
•
•
•
•
•
•
•
Charge your new battery overnight (14-16 hrs)
before using it to obtain maximum battery
capacity and performance.
Charging in non-Motorola equipment may lead
to battery damage and void the battery warranty.
When charging a battery that is attached to the
radio, turn the radio off to ensure a full charge.
The battery should be at about 25°C (room
temperature) whenever possible. Charging a
cold battery (below 10°C) may result in leakage
of electrolyte and ultimately, in failure of the
battery.
•
15
English
GETTING STARTED
The following battery tips will help you obtain the
highest performance and longest cycle life from
your Motorola rechargeable battery.
Charging a hot battery (above 35°C) results in
reduced discharge capacity, affecting the
performance of the radio. Motorola rapid-rate
battery chargers contain a temperature-sensing
circuit to ensure that the battery is charged
within these temperature limits.
New batteries can be stored up to two years
without significant cycle loss. Store new/unused
batteries in a cool dry area.
Batteries which have been in storage should be
charged overnight.
Do not return fully charged batteries to the
charger for an “extra boost”. This action will
significantly reduce cycle life.
Do not leave your radio and battery in the
charger when not charging. Continuous charging
will shorten battery life. (Do not use your charger
as a radio stand.)
For optimum battery life and operation use only
Motorola brand chargers. They were designed to
operate as an integrated energy system.
Battery chargers will charge only the Motorola
authorized batteries listed below; other batteries
will not charge.
GETTING STARTED
Table 1: IP54 Radio Battery List
Table 2: IP67 Radio Battery List
Part No.
Description
Part No.
Description
JMNN4023_R
Slim Li-Ion, 1000 mAh,
7.5 V Battery (IP54)
PMNN4073_
Li-Ion FM IP67 Standard
Battery
JMNN4024_R
High Capacity Li-Ion,
1320 mAh, 7.5 V Battery
(IP54)
PMNN4074_
Li-Ion Non-FM IP67
Standard Battery
JMNN4025_R
NiMH, 700 mAh, 7.5 V
FM Approved Battery
(IP54)
Do not use IP54 batteries with IP67 radios.
English
16
Note: IP67 water submersible radios MUST be
fitted with Motorola authorized IP67 batteries
to ensure proper functionality.
Battery Label
IP67
Warning:When charging a IP67 battery, make sure
that the IP67 battery (or IP67 battery with
IP67 radio) is not wet prior to placing in
the charger.
GETTING STARTED
Warning:The battery charger is not waterproof. For
your safety and proper operation of the
charger, IP67 radios MUST be dry prior to
placing in the battery charger for charging.
Do NOT operate the charger, when your
hands are wet or while holding a wet IP67
radio. Do NOT touch the battery contacts,
when your hands are wet. Do NOT put the
battery into water, as this may cause the
IP67 metal contacts to corrode.
17
English
Recycling or Disposal of Batteries
Motorola endorses and encourages the recycling
of all re-chargeable batteries. Contact your local
Motorola dealer for further information.
GETTING STARTED
Charging the Battery
If a battery is new, or its charge level is very low,
indicated by battery level indicator showing one
or no segments, you will need to charge the
battery before you can use it in your radio.
Note: Batteries are shipped uncharged from the
factory. New batteries could prematurely
indicate full charge, charge a new battery for
14-16 hrs before initial use.
English
18
Charger LED
Status
Red
Battery is charging
Green
Battery is fully charged
Flashing Red *
Battery is unchargeable
Flashing Yellow
Charger is getting ready to charge
Flashing Green
Battery is 90% charged
*
Battery is damaged. Please contact your dealer.
1.
Place the radio with the battery attached, or the
battery alone, in the charger.
2.
The charger’s LED indicates the charging
progress.
ACCESSORY INFORMATION
Attaching the Battery
Removing the Battery
GETTING STARTED
1.
Fit the extensions at the bottom of the battery
into the slots at the bottom of the radio’s body.
2.
Press the top part of the battery towards the
radio until you hear a click.
1.
Turn off the radio, if it is turned on.
2.
Slide the battery latches, on both sides of the
battery, downwards.
3.
Pull the top part of the battery away from the
radio’s body, and remove the battery.
19
English
GETTING STARTED
Attaching the Antenna
1.
Align the threaded end of the antenna with the
radio’s antenna connector.
2.
Turn the antenna clockwise to fasten it.
English
20
Removing the Antenna
1.
Turn the antenna counterclockwise until you
can remove it.
DRAINING WATER FROM THE IP67 GP688R
SPEAKER
RADIO OPERATION
Turning The Radio On or Off
•
Note: If you accidentally drop your GP688R radio
into water, pick up the radio, and gently tap
the radio (as shown above) to remove the
water from the speaker grille and
microphone port before using it.
Note: Do not submerge your radio for any longer
than 30 minutes and no deeper than 1
metre. If these limits are exceeded then your
radio could be permanently damaged.
•
OFF
To turn the radio on, turn the On/Off//Volume
Control knob clockwise.
To turn the radio off, turn the On/Off//Volume
Control knob counterclockwise until you hear a
click.
Adjusting the Radio’s Volume
•
Turn the On/Off//Volume Control knob to adjust
the volume level.
21
English
GETTING STARTED
ON
Radio Registration
When turned on, the radio enters a self test routine
during which time the display is activated, the self
test tone will sound and the LED will light green.
If the radio fails the self test a continuous low tone
will sound and the display will show a failure
message. e.g.
Synth Lock
GETTING STARTED
until the radio is turned off .
Note: If the radio fails the self test routine, consult
your dealer.
When the self test is complete the radio will display:
Freetext
This display is for the personality last used. To
check the radio personality or select a new
personality refer to PERSONALITY - Personality
Selection.
English
22
After this text has been displayed, the radio will scan
for system access with the LED on the top of the
radio flashing GREEN and the scanning icon H lit.
When a system is acquired, the green LED will go
off, the scanning iconHwill be replaced by the
registered icon L and the display will show:
Idle Freetext
RADIO CALLS
Making a Call
The radio is capable of making a variety of
calls, including calls to individual radios,
groups of radios and calls to private and public
telephone systems.
Before you can make a call the radio must be
in the IDLE STATE, as displayed above, i.e. a
personality has been selected and no call is in
progress.
The radio can make calls by using the Contact
List, Dedicated Calls or Manual Dialling.
Contact List
When the radio is in the IDLE state, the contact
list may be used which allows access to up to
100 preprogrammed numbers accessed via
the menu.
To access the contact list via the menu:
1
c to enter Menu Mode.
2
+ or e until:
Contact List
3
c to select:
Contact List
4
+ or e until:
Alpha Alias
f
f
Number
f
5
Alpha Alias
c or PTT button or # to make call.
You will see:
6
Ring Tone
Calling
After the call is set-up, press PTT button
and talk with your mouth 2.5-5 cm from
microphone. Release PTT to listen.
23
English
RADIO CALLS
Depending on the way your radio is
programmed, the radio will display either the
alpha alias (name) or the number to be dialled.
One of four tones may be tagged to the
preprogrammed numbers, which will sound
when the radio receives a call from that
number.
The contact list can be entered directly by one
click of the rotary knob (1) when the radio is in
the IDLE STATE. Use the rotary knob to scroll
through the list and select the required name
or number as indicated in step 4 below. Make
and end the calls as in steps 5 to 8 below.
7
8
When finished with call.
CLEAR BUTTON
or
x or
*#
Tone A sounds
Call Ended
If a contact list number is selected but no call
request is sent, the display is held until tone H
sounds and then reverts to the IDLE STATE.
When the number is displayed it may be edited
as described in the Keypad Edit section.
To Add an Entry
1
c to enter Menu Mode.
2
+ or e until:
Add Contact
3
c to select:
Add Contact
You will see:
Name?
4
Use the keypad to enter the name (see
pages 8 and 9). A maximum of 14
characters is allowed.
5
c to store the name.
You will see:
RADIO CALLS
Modifying the Contact List
You can modify the Contact List in three ways:
1.
Add an entry
2.
Delete an entry
3. Edit an existing entry
Note: The radio cannot receive any calls while you
are modifying the contact list.
6
Use the keypad to enter the number (see
pages 8 and 9). A maximum of 20 digits
is allowed.
7
c to store the number.
You will see:
8
English
24
Number?
Add Contact
If you make an error, use the d key to
delete the last character/digit and the
f key to create a space.
To Delete an Entry
To Edit an Entry
1
c to enter Menu Mode.
1
c to enter Menu Mode.
2
+ or e until:
Delete Contact
2
+ or e until:
Contact List
3
c to select:
Delete Contact
3
c to select:
Contact List
You will see current
entry e.g.:
4
+ or e until you see the entry you
Alias 1
4
+ or e (or rotary knob) until you see
the entry you want to delete.
You will see e.g.:
5
You will see e.g.:
5
Alias 2
c to select the entry
You will see:
6
want to edit
d for 2 seconds to enter Edit Alias
Mode when display icon D flashes.
You will see
selected entry e.g.:
Alias 3
Delete?
c to delete the selected entry.
Display returns to:
Alias 3
Use the keypad to edit the alias (see
pages 8 and 9) or delete and enter a new
alias.
Use the d key to delete the last
character or the CLEAR key to delete
entire entry.
7
c to store edited/new alias.
Delete Contact
25
English
RADIO CALLS
6
You will see
associated number
e.g :
8
9
To Search for an Entry
01256488116
Use the keypad to edit the number (see
pages 8 and 9) or delete and enter a new
number.
Use the d key to delete the last digit or
the CLEAR key to delete entire entry.
c to store the edited/new entry.
Display returns to:
When in Contact List or Delete Contact menu,
you may search for an alias (name) by
entering
characters from the keypad.
1
2
Enter up to 3
characters from the
keypad e.g.:
c to start search of list:
Display shows
search result e.g.:
Alias 3
3
Pol
Police
* to repeat search using same search
criteria
RADIO CALLS
4
x to cancel search at any time,
or
If search unsuccessful display returns to
contact list menu prior to search.
Note: The search process is not case sensitive.
English
26
User Absent
Display shows:
User Absent can be selected on your radio
when you are unable to take calls. Any calls to
your radio will be put into the Missed Calls list
automatically and the message ‘Will Call Back’
is sent to the caller.
User Absent may be switched on and off
directly by pressing the dedicated User Absent
button (if programmed).
To switch on User Absent via the menu:
Idle Freetext
When you are able to take calls, ensure that
User Absent is switched off by:
1
c to enter Menu Mode.
2
+ or e until:
User Absent
3
c to select:
User Absent
1
c to enter Menu Mode.
4
+ or e until:
Off
2
+ or e until:
User Absent
5
c to select:
Off
3
c to select:
User Absent
6
Followed by:
+ or e until:
On
5
c to select:
On
6
Followed by:
Selected
(held for 10
seconds, then
display returns to
idle)
7
CLEAR button to exit Menu Mode.
7
CLEAR button to exit Menu Mode.
Display shows:
Idle freetext
User Absent may be permanently enabled in
your radio via programming. With this feature
27
English
RADIO CALLS
4
Off
(held for 10
seconds, then
display returns to
idle)
enabled, entry into the user absent mode is
automatic and any calls received when you are
away from your radio will be put into the
Missed Calls list automatically and the
message “Will call back” sent to the caller.
When you return to your radio, check whether
tone G sounds every 10 seconds which
indicates that your radio is in user absent
mode. Press any button to exit user absent
mode and return the radio to the idle state for
normal operation.
Manual Dialling
To make a call from the keypad (12):
1
Enter
2
PTT button or # to make radio call.
RADIO CALLS
Dedicated Calls
Dedicated calls can be made from either a
preprogrammed dedicated call button or using
the speed-dial feature from the keypad.
Press the Dedicated Call button to make a call
to the most commonly used pre- programmed
number. The display will show “Calling”.
To use the speed-dial feature, hold down one
of the keypad keys (0 to 9) for a preset period
to make a call to one of ten (1 of 10)
preprogrammed numbers which are the first
ten entries (1 to 9, 0= 10) in the contact list.
The selected number and then the alias will be
displayed and the conversation can go ahead.
English
28
You will see:
Telephone Number
(PSTN calls always
start with 0)
(PABX calls start
with 6,7 or 8)
or
Radio ID
or
Group ID
Calling
Last Number Redial
Keypad Edit
The last number dialled by the radio is stored
in the memory of the radio.
Partially entered numbers are also stored.
With the radio in the IDLE STATE:
If the radio is displaying a Contact List number,
a Keypad Dialled number, Status number or
Missed Call number, the last digit may be
deleted by:
1
PTT button
2
PTT button or # to make radio call.
You will see:
For Contact List numbers
Number
1
d Once
(to select
number)
1234567
2
d Again
(to delete last
digit)
123456
Calling
The number may also be edited, see Keypad
Edit .
Last number redial does not function when
Talkgroup personality is selected, see
PERSONALITY - Personality Selection.
For all other numbers
3
123456
RADIO CALLS
d Once
(to delete last
digit)
29
English
4
Enter new
numbers
5
PTT button or # to make radio call.
You will see:
12345699
Calling
Note: The edited number is not saved at the end of
the call in the contact list, but is saved in the
last number redial.
30
RADIO CALLS
CLEAR BUTTON
or x or
*#
Cancelling
See "Call Progress - Cancelling a Call".
If you are in doubt about which system you are
operating on, please consult your dealer.
Call Ended
See "Call Progress - Ending a Call".
English
1
There are two types of systems on which the
radio may be used, Off Air Call Set Up (OACSU)
and Full Off Air Call Set Up (FOACSU).
Always end a call by:
CLEAR BUTTON
or x or
*#
Tone A sounds
At any time while setting up a call it may be
cancelled by:
Receiving a Call
Ending a Call
1
Cancelling a Call
Receiving a call on an OACSU system
When the radio is called:
1
Tone D sounds
CallerID
2
Tone B sounds
Call Type
For display Call Type see "Call Progress Receiving"
For display Call Type see " Call Progress Receiving"
Note: The system may have a limited call time,
indicated on the display, and the call may be
terminated automatically if this call time is
exceeded.
e.g.
Display shows:
01:22
Receiving a call on an FOACSU system
When the radio is called:
Missed Calls
Ring tone sounds
2
PTT button or # to accept call.
(Unless in talkgroup personality, when
the radio unmutes automatically for
dynamic and fixed group calls)
3
Tone D sounds
Caller ID
4
Tone B sounds
(when
conversation is
permitted)
Call Type
Caller ID
If a call remains unanswered, the call will be
stored by the radio, provided that missed calls
have been programmed into your radio.
Up to ten calls can be stored. If the same radio
calls more than once the call is only stored
once. When ten calls have been stored by the
radio, the eleventh call received may overwrite
the first.
When a call has been stored by the radio, tone
G will sound every ten seconds, the Missed
Call icon Q will flash and the display will
show:
Missed Calls
31
English
RADIO CALLS
1
With the display showing ‘Missed Calls’ ,
pressing any of the menu buttons provides a
quick access into the Missed Calls List.
The Missed Call List can also be entered
directly by pressing the Missed Call button (if
programmed) when the radio is in the IDLE
STATE or via the menu.
If using the Missed Call button, follow the
procedures from step 4 below.
To view the calls in the list via the menu:
1
c to enter Menu Mode.
2
+ or e until:
Missed Calls
Example:
Display shows
Reception S
where S is a status message associated with
the call
f
Displays message e.g.
On Break
f again
Displays status
number e.g.
Status 04
f again
Display shows
RADIO CALLS
Reception S
3
c to select:
Missed Calls
4
First call in list
Alpha Alias
5
+ or e to scroll
list:
Alpha Alias
Note: In the Missed Calls list some alpha alias/
numbers may contain a suffix S, which
indicates a status message associated with
the call.
English
32
You can call back to any number in the Missed
Call list by:
1
+ or e until:
2
PTT button or # to make the call.
You will see:
3
4
Calling
1
CLEAR button
Display shows:
Delete?
After the call is set-up, press PTT button
and talk with your mouth 2.5-5 cm from
microphone. Release PTT to listen.
2
CLEAR BUTTON
or
3
x to retain missed call in list.
x or
4
*# deletes the currently selected
missed call with no display prompt.
*#
Tone A sounds
Call Ended
Display shows
Idle freetext
c (or *# or CLEAR button)
to delete missed call from the list.
On deletion of the last message in the Missed
Calls list, the radio will exit the menu and return
to the IDLE STATE.
Note: Whilst displaying alias, d will allow
number to be displayed and edited.
33
English
RADIO CALLS
5
Alias
On a successful call set- up, the entry is
automatically deleted from the list together with
an associated voice message.
Unanswered calls may be deleted from the
Missed Call list at any time by pressing:
To exit the Missed Call List:
1
x button
or MISSED CALL button to exit Menu
mode.
Display shows:
Call Diversion
RADIO CALLS
Incoming speech calls or status calls can be
diverted by:
1
*41
From your radio
2
*44
From another radio
When the radio is in the IDLE STATE, call
diversion can be initiated by:
*41*
or
*44*
English
34
*411* To divert
or
speech calls
*441* only
3
*412* To divert status/
or
data calls only
*442*
4
Enter ID of radio to which you are
diverting
5
#
Idle freetext
Note: The calls in the stack are not deleted when
the radio is turned off. It is not possible to
call back status calls.
1
2
To divert all
calls
To complete
call diversion
Examples:
1
*41*234#
Will divert all calls from your radio to the
radio with ID “234”
2 *44*234*
432#
Will redirect all calls from the radio with ID
“234” to the radio with ID“432”
If a call is made to a radio whose calls are
currently being diverted:
1
Tone D sounds
3 To cancel calls redirected to your radio
#45 followed by 1 or 2 if
necessary and
#
Diverting
A call is automatically set up to the radio
which is receiving the diverted calls
To cancel Call Diversion:
1 To cancel call diversion from your radio
#41 followed by 1 or 2 if
necessary and
#
RADIO CALLS
2 To cancel call diversion from another
radio
#44 followed by 1 or 2 if
necessary and
* “ID” (234 in example)#
35
English
SPECIAL CALLS
SPECIAL CALLS
Storing SDMs
Short Data Messages (SDM)
Short data messages may be set up, sent and
received using the radio keypad and controls.
Outgoing data messages from the keypad are
limited to alphanumeric data in any
combination of up to 20 characters (which
include address information and data selection
characters).
Receiving Short Data Messages
On receiving a Short Data Message:
1
Tone G sounds
Data Received
The data message icon K is lit whenever
SDMs are in the data message calls list. Note
that the data message icon flashes when data
messages in the calls list are unread. The icon
is lit permanently when a message is read and
retained in the calls list.
English
36
Incoming SDMs are stored on receipt in the
Short Data Message Calls List. Up to ten
SDMs can be stored by the radio. The data
message icon K is lit whenever SDMs are in
the calls list.
SDMs are not stored when the radio is
switched OFF, except for one SDM only which
can be saved.
Interrogating the SDM Calls List
When an SDM call has been stored by the
radio, the display will show:
Data Received
With the display showing ‘Data Received’ ,
pressing any of the menu buttons provides a
quick access into the Data Calls List.
To view the calls in the list via the menu:
c to enter Menu Mode.
2
+ or e until:
Data Calls
3
c to select:
Data Calls
4
First call in list
1
Read the data message in the Data Calls
List.
2
c
Alpha Alias
You will see:
Save?
or
5
+ or e to
scroll list:
Number
3
c to save selected message.
Alpha Alias
4
x will not save selected message, display
or
will return to Data Calls List.
Number
6
c or f to read
selected message:
7
e.g.
Call 8116
At end of message: f or x to
return to data calls list.
8
x to retain message in list and exit from
When the radio is switched off and on again
the saved SDM will appear in the Data Calls
List.
Note: You must exit the data message calls list
interrogate mode to put the radio in the idle
state in order to make other calls.
data messages
9
x again to exit from Menu Mode
37
English
SPECIAL CALLS
1
To save an SDM to be retained after the radio
is switched off.
SPECIAL CALLS
Deleting Messages from the Data Calls List
1
To delete data messages from the data
calls list or while viewing data messages.
2
CLEAR button
Display shows:
3
Delete?
c (or *# or CLEAR button)
to delete data message from the calls list.
4
x to retain data message in the calls list.
5
*# deletes the currently selected
data message with no display prompt.
6
Radio returns to the data calls list
interrogate mode after each deletion until
the last message is deleted when the
display returns to the idle state and the
data message icon K is extinguished.
English
38
Status/Voice Call replies to an SDM
Where an SDM contains a calling party
number, the radio can respond with a status
message or voice call.
To respond with a status message, from the
data call list interrogate mode or data message
scrolling mode, press the Status button. The
radio will exit the data mode and enter the
dialling state for example:
Display shows:
213S
The status digits can then be specified as in
normal status mode.
To respond with a voice message, use the d
button, to remove the status symbol S and
press the PTT or # button to initiate the call.
Display shows:
213
You can move directly from the Data Calls List
to the Missed Calls List by pressing the Missed
Calls button. Once in the Missed Calls List the
functionality is as detailed in RADIO CALLS Missed Calls.
Making an SDM Call
1.
Via the keypad using a Call modifier
2. Via the Contact List
Note: The maximum data message size is limited
to 20 characters which includes address
information and data selection characters.
Data entered via the call modifier method
may be alphanumeric characters entered
from the keypad.
In the contact list method data may consists
alphanumeric
characters
which
are
preprogrammed into your radio by your
dealer.
1
*2*
Part of modifier
2 Enter message from keypad in
alphanumeric characters (ref pages 8 & 9)
*
Final part of modifier
4 Enter
Called radio address
3
5 Display shows:
*2*Call Bryan
ASAP*NNNNN
+ or e to
scroll message: (where NNNNN is called
radio address.)
6 Press PTT button or # to make a call
to the dialled numbers
Tone D sounds
Display shows:
Sending Data
Number
7 Press CLEAR button or *# at any
time to delete dialled numbers and return
radio to IDLE STATE when tone H sounds
39
English
SPECIAL CALLS
SDM Calls may be initiated in three different
ways:
To initiate a data call via the keypad:
SPECIAL CALLS
To initiate a Data call via the contact list
In this method data may consist of alphanumeric
characters which are preprogrammed into your
radio by your dealer.
Note: The maximum data message size is limited
to 20 characters which includes address
information and data selection characters.
Status Calls
1
c to enter Menu Mode.
2
+ or e until:
Contact List
3
c to select:
Contact List
A status is a code for transmitting prearranged
messages, e.g. status “05” may indicate
“Return to Base”.
4
+ or euntil:
f
f
f
Alpha Alias
Making a Status Call
Number
Ring Tone
Status Calls may be initiated in two different
ways:
Alpha Alias
1.
Via the keypad using a Call modifier,
c or PTT button to make radio call.
2.
Via the Menu
Display shows:
To initiate a status call via the keypad:
5
Sending Data
Alias/Number
6
When finished with call.
7
CLEAR BUTTON
or
x or
*#
Tone A sounds
English
40
Call Ended
1
*0
Part of modifier
2
05
Example of status
digits in range 1-31
3
*
Final part of modifier
4 Enter
Called radio address
7
c or turn rotary
knob to display:
8
+ or e until:
Sending Status
To initiate a status call via the menu:
1
c to enter Menu Mode.
2
+ or e until:
Status
3
c to select:
Status
4
+ or e until:
Status Message e.g.
f
Status Number e.g.
Current entry in
contact list
Alpha Alias
(required name or
number)
PTT button or # to make radio call.
You will see:
Select Contact
*005*NNNNN
Where NNNNN is called radio address.
Make the call by:
1
Display shows for
10 seconds:
9
Alternatively, a
valid number can
be dialled from the
keypad:
e.g.
*004*207
10 c or PTT button or # to make call.
You will see:
On break
Sending Status
Note: The c key only functions when you are
in the contact list menu option.
Status 04
5
c to select:
Status 04
41
English
SPECIAL CALLS
5 Display shows:
6
SPECIAL CALLS
Receiving a Status Call
Your radio receives a Status Call when:
1
Tone G sounds
2
Display alternates
every 2 second
between:
To initiate an emergency call:
Status 04
or
On Break
and
Alias/Number
Where Status message “04” / “On Break” is
example status message. Note that only status
number (04) only will be displayed if
associated message is not programmed into
your radio. Alias/Number is the name or
number of the calling radio.
Emergency Calls
An emergency call allows you the highest form
of priority calling and normally takes
precedence over all other calls.
Your radio can be programmed to give you a
one-button quick access to call a particular
radio or centre (predefined by your dealer) in
emergency situations.
English
42
Conversely you can dial the number, prefixing
it with*9*.
1 Press the Emergency button
or
2 *9* followed by the radio
number and PTT or #.
Tone D will sound
and Display shows:
Emergency
Emergency can be stopped by one of the
following:
1 Switching the radio Off and On again.
2 Pressing the CLEAR button.
3 The emergency time duration is reached.
Note: The emergency time duration is
programmed into your radio by your dealer.
Tone D or Ring tone
will sound and
Display shows:
Emergency
Priority Calls
Broadcast Calls
A broadcast call allows you to make calls to
groups of radios. Note that on a broadcast call
only the calling radio can talk and there is no
indication that any radios in the group have
received the call.
To initiate a broadcast call:
1
A priority call allows you to gain priority over
other users of the system when requesting a
call.
To initiate a priority call:
*11* followed by the
group number and PTT or #.
Tone D will sound
and Display shows
e.g.:
*11*90
1 *8* followed by the number
and PTT or #.
Tone D will sound
and Display shows:
Priority
See " Call Progress - Sending".
43
English
SPECIAL CALLS
Your radio may receive an emergency call
when:
To initiate a DTMF call:
SPECIAL CALLS
DTMF
DTMF means Dual Tone Multi Frequency and
is used when the radio is required to operate in
a radio system with an interface to telephone
systems.
1
Enter Access code
2
Press and hold PTT
An access code, which is system dependent, is
normally needed for DTMF, please contact
your dealer or network manager for further
information.
3
Enter desired number
English
44
PERSONALITY
MPT
This personality permits the radio to operate in
a trunked mode. Incoming and outgoing calls
are set up using a defined set of rules or
protocol between your radio and a controller in
a similar manner to your home telephone. Your
radio ‘registers’ onto an MPT trunked system
as described in GETTING STARTED - Radio
Registration.
Talkgroup is an MPT personality following the
same rules or protocol, but is primarily for
talkgroup calls. In talkgroup personality,
talkgroups are contained in a Talkgroup list,
similar to the Contact list, which is scrolled and
selected using the Rotary Knob (1).
On selection of a talkgroup, you may send and
receive calls as described below.
Fixed and Dynamic Groups
These groups form part of the Talkgroup
Personality, such that when this personality is
selected your talkgroup list shows only these
groups.
A fixed group is a group of users, the address
(number / alias) of which is preprogrammed
into your radio by your dealer.
A dynamic group is a group of users, the
address (number) of which is sent to your radio
‘over air’ at any time via the system controller.
Therefore at any time you may become a
member of a dynamic group, able to receive
calls and (depending on how your radio is
programmed) send calls to that group.
45
English
PERSONALITY
The personalities described below are
programmed into your radio by your dealer and
are accessible either via the personality button
or via the menu.
A radio personality contains data such as
frequencies, display text, alert tones, permitted
calls etc. which determines the mode of
operation of your radio. Your radio may be
programmed with up to 4 different
personalities, selected from MPT, Talkgroup
and Conventional.
Talkgroup
PERSONALITY
Incoming calls to fixed and dynamic group
numbers are detailed in Receiving a Call and
displayed under Call Progress - Receiving.
To make an outgoing call to a selected
talkgroup, press the PTT and speak after the
confidence tone.
Calls are cleared in the normal manner.
If the system is busy an engaged tone will be
heard, release the PTT and wait for the
confidence tone. You may then proceed with
the call by pressing the PTT.
When in Talkgroup personality, you can still
make an individual or status call using the
keypad or entering the Contact List via the
menu as detailed in RADIO CALLS - Contact
List.
Conventional Mode
In the conventional mode your radio operates
as a standard two-way radio.
Select the personality “Conventional” as
described in Personality Selection, the
display shows:
Channel xx
English
46
where xx is the channel number. Use the rotary
knob (1) to display and select the desired
channel.
Prior to transmission always make sure that
the channel is free (red LED not flashing).
Press the PTT (4) to transmit, release to listen.
The red LED lights while the radio transmits
and flashes if the channel is busy.
Some channels may be monitored for activity
by pressing the clear button (3). The L icon
will be displayed until the channel is changed
or the clear button is pressed again.
In the conventional mode, the radio is
equipped with a time out timer. A speech
limitation alert tone will sound a few seconds
before the transmitter in your radio is switched
off. The call timed out tone will sound and
continue until the PTT is released.
To generate DTMF tones, press and hold the
PTT while entering the desired number.
Personality Selection
Personality selection may be entered directly
by pressing the Personality button (5). You
may then scroll using the rotary knob and
select a personality as described in step 7
below, or scroll and select a personality as
described from step 6 below.
To select a personality via the menu:
Ensure radio is in IDLE STATE.
2
c to enter Menu Mode.
3
+ or e until:
Personality
4
c to select:
Personality
5
Display shows
current personality
e.g.:
MPT
6
7
The display will be held for 2 seconds
while your radio retunes to the new
personality.
Your radio will
return
to the idle state:
Freetext
PERSONALITY
1
8
+ or e until
desired personality
e.g.:
Conv Pers
c to select:
Conv Pers
47
English
CALL PROGRESS
When in operation, your radio monitors each
step in setting up a call whether sending or
receiving. These steps are displayed to
provide you with call progress and indicate call
types.
Call Progress - Sending
Tone
D
Display
Comment
Calling
Trying to connect call
Priority
Priority call sent,
modifier *8* used
Unit unavailable
C2
Unavailable
C4
Invalid Number Unit number invalid
C1
System Busy
System busy, try again
D
Alerting
Alerting called unit
C3
Engaged
Called unit is busy
F
Will Call Back User absent, called unit
will call back
CALL PROGRESS
D
Emergency call sent,
modifier *9* used
D
Emergency
D
Sending Status Status call sent,
modifier *0xx* used (xx is
status message number)
G/D Queued
Call queued on system
D
Diverting
Calls to called unit have
been diverted
C2
Unobtainable
Call unobtainable
English
48
C2
Call Failed
Call failed, try again
C2
Timeout
Call request timed out.
Check service is
available
H
Scanning
System access lost, try
again
Call Progress - Receiving
Talkgroup NN
Talkgroup call received
(NN is list number)
A call is being received
on OACSU
B
Dynamic NN
Dynamic group call
received (may be alias or
number - NN)
Ring Caller ID
Tone
A call is being received
on FOACSU. Press PTT
or ‘#’ to accept the call
B
Group NN
Fixed group call received
(may be alias or number NN)
D/
Emergency
Ring
Tone
Emergency call being
received
B
System Wide
Call to all radios in use on
the system
B
Alias/Number
Call from radio in your
fleet
B
Broadcast
broadcast call received,
user reply not permitted
B
Interfleet
Call from radio in another
fleet
G
Status XX
Receiving status
message (xx is status
message number)
B
Telephone
Calls from public
telephone system
B
PABX
Calls from private
telephone system
B
Unknown Party
Call identity unknown to
the system
D
Display
Caller ID
Comment
CALL PROGRESS
B
Tone
49
English
Call Progress - Cancelling a call
Call Progress - Ending a call
Tone
Tone
Display
CALL PROGRESS
D/G Cancelling
English
50
Comment
Call successfully
cancelled by user
A
Display
Call Ended
Comment
Call ended, another call
can now be made
All Rights Reserved.
Motorola Technology Sdn. Bhd. (Company No. 455657-H).
Plot 2, Bayan Lepas Technoplex Industrial Park,
Mukim 12, S.W.D.
11900 Penang, Malaysia.
Printed in Malaysia.
MOTOROLA and the Stylized M Logo are registered in the U.S. Patent and
Trademark Office. All other product or service names are the property of their
respective owners.
© 2007 by Motorola, Inc.
All rights reserved.
6866542D04-P
6866542D04-P
Motorola GP-688
Описание
ф мл ни
дит
нл н з 2 мин ты
Д т в
в
м
з
нии
Характеристики
з в
ии
Д т в
и
гл
л жб
т чн я
дд ж и
л т
вин и
л т з з любым
д бным
б м
тзывы
ции и
ид и
Руководство Motorola ENLN4081 — детальное руководство на русском языке без программного обеспечения для портативных радиостанций GP640, GP680, GP644, GP688.
Основные характеристики
|
Тип |
Руководство пользователя |
|
Артикул производителя |
ENLN4081 |
Устройство:
Motorola GP688R
Размер: 1,02 MB
Добавлено: 2023-06-22 11:36:54
Количество страниц: 56
Печатать инструкцию
Скачать
Как пользоваться?
Наша цель — обеспечить Вам самый быстрый доступ к руководству по эксплуатации устройства Motorola GP688R. Пользуясь просмотром онлайн Вы можете быстро просмотреть содержание и перейти на страницу, на которой найдете решение своей проблемы с Motorola GP688R.
Для Вашего удобства
Если просмотр руководства Motorola GP688R непосредственно на этой странице для Вас неудобен, Вы можете воспользоваться двумя возможными решениями:
- Полноэкранный просмотр -, Чтобы удобно просматривать инструкцию (без скачивания на компьютер) Вы можете использовать режим полноэкранного просмотра. Чтобы запустить просмотр инструкции Motorola GP688R на полном экране, используйте кнопку Полный экран.
- Скачивание на компьютер — Вы можете также скачать инструкцию Motorola GP688R на свой компьютер и сохранить ее в своем архиве. Если ты все же не хотите занимать место на своем устройстве, Вы всегда можете скачать ее из ManualsBase.
Motorola GP688R Руководство по эксплуатации
Печатная версия
Многие предпочитают читать документы не на экране, а в печатной версии. Опция распечатки инструкции также предусмотрена и Вы можете воспользоваться ею нажав на ссылку, находящуюся выше — Печатать инструкцию. Вам не обязательно печатать всю инструкцию Motorola GP688R а только некоторые страницы. Берегите бумагу.
Резюме
Ниже Вы найдете заявки которые находятся на очередных страницах инструкции для Motorola GP688R. Если Вы хотите быстро просмотреть содержимое страниц, которые находятся на очередных страницах инструкции, Вы воспользоваться ими.