Increase more than 700% of Email Subscribers!
Dolor aliquet augue augue sit magnis, magna aenean aenean et! Et tempor, facilisis cursus turpis tempor odio. Diam lorem auctor sit, a a? Lundium placerat mus massa nunc habitasse, arcu, etiam pulvinar.
- Goblinus globalus fantumo tubus dia
- Scelerisque cursus dignissim lopatico
- Montes vutario lacus quis preambul den
- Leftomato denitro oculus softam lorum
- Spiratio dodenus christmas gulleria tix
- Dualo fitemus lacus quis preambul pat
- Montes vutario lacus quis digit turtulis

We hate spam and never share your details.
Посмотреть инструкция для Hidea HDF5 бесплатно. Руководство относится к категории подвесные лодочные моторы, 7 человек(а) дали ему среднюю оценку 8.9. Руководство доступно на следующих языках: английский. У вас есть вопрос о Hidea HDF5 или вам нужна помощь? Задайте свой вопрос здесь
Не можете найти ответ на свой вопрос в руководстве? Вы можете найти ответ на свой вопрос ниже, в разделе часто задаваемых вопросов о Hidea HDF5.
В чем разница между топливом E10 и E5?
Инструкция Hidea HDF5 доступно в русский?
Не нашли свой вопрос? Задайте свой вопрос здесь
Increase more than 700% of Email Subscribers!
Dolor aliquet augue augue sit magnis, magna aenean aenean et! Et tempor, facilisis cursus turpis tempor odio. Diam lorem auctor sit, a a? Lundium placerat mus massa nunc habitasse, arcu, etiam pulvinar.
- Goblinus globalus fantumo tubus dia
- Scelerisque cursus dignissim lopatico
- Montes vutario lacus quis preambul den
- Leftomato denitro oculus softam lorum
- Spiratio dodenus christmas gulleria tix
- Dualo fitemus lacus quis preambul pat
- Montes vutario lacus quis digit turtulis
We hate spam and never share your details.
Посмотреть инструкция для Hidea HDF5 бесплатно. Руководство относится к категории Подвесные лодочные моторы, 5 человек(а) дали ему среднюю оценку 8.9. Руководство доступно на следующих языках: английский. У вас есть вопрос о Hidea HDF5 или вам нужна помощь? Задайте свой вопрос здесь
Не можете найти ответ на свой вопрос в руководстве? Вы можете найти ответ на свой вопрос ниже, в разделе часто задаваемых вопросов о Hidea HDF5.
В чем разница между топливом E10 и E5?
Инструкция Hidea HDF5 доступно в русский?
Не нашли свой вопрос? Задайте свой вопрос здесь

Похожие статьи
Похожие товары
Сайт
- Каталог товаров
- Услуги
- Сервис
- Примеры работ
- Прайс-лист
- Аренда
- База знаний
![]()
Оказываем полный спектр услуг и поддержку в любом вопросе потому что любим своего клиента
Данный сайт носит исключительно информационный характер. Все представленные предложения не являются офертой, определяемой статьей 437 ГК РФ.
Для получения подробной информации свяжитесь с нашим менеджером. Copyright © Прокатись.ру, info@prokatis.ru
Спасибо, Ваш запрос звонка успешно отправлен.
Наш менеджер позвонит Вам в указанное время и ответит на все интересующие вопросы.
Вы в любой момент можете позвонить сами по номеру
8 495 646-88-68
назвать номер запроса (№ )
и задать интересующие вопросы.
ОК
Спасибо, Ваш запрос успешно отправлен.
Наш менеджер позвонит Вам в указанное время и ответит на все интересующие вопросы.
Вы в любой момент можете позвонить сами по номеру
8 495 646-88-68
назвать номер запроса (№ )
и задать интересующие вопросы.
ОК
Выберите подарки
Подарков на сумму
0 p
0 p
Выбрать
Нет аккаунта? Зарегистрируйтесь, это займёт несколько минут.
Регистрация
Нет аккаунта? Регистрация
Уже зарегистрированы? Вход
//
////
Спасибо, Ваш запрос успешно отправлен.
Наш менеджер позвонит Вам и ответит на все интересующие вопросы.
Вы в любой момент можете позвонить сами по номеру
8 495 646-88-68
и задать интересующие вопросы.
ОК
% Акции %
Если у Вас никогда не было лодочного мотора и Вы понятия не имеете (или знаете частично), что с ним делать после покупки, то эта статья и видео будут Вам очень полезны.
Первое, что Вам следует сделать, прежде чем начать полноценно эксплуатировать Ваш мотор, это произвести обкатку.
Помните, что в лодочные моторы Hidea уже залито редукторное масло (в ногу мотора), а моторное масло Вам нужно залить самостоятельно. Смесь топлива должна иметь соотношение 25:1 (топливо:масло).
При 1-ом запуске мотора (мотор уже погружен в воду) он должен поработать не менее 5 минут (чтобы прогреться) на холостом ходу. После прогрева включите передачу вперед и двигайтесь на минимальной скорости.
После 10 минут можно дать больше газу, но не давать свыше 3000 оборотов/мин.
После 1 часа обкатки, не давая оборотам подниматься выше 4000 об./мин., можно давать полный газ, но только 1 минуту и с интервалом 10 минут.
После 2 часов обкатки (не давая оборотам превышать больше 4000 об./мин.) можно давать полный газ только на 2-3 минуты с интервалом в 10 минут.
После 10 часов обкатки можно использовать мотор в нормальном режиме при полностью открытой дроссельной заслонке.
Мотор во время обкатки может сильно греться, поэтому надо давать ему остыть, снимая крышку, а также следить за «контролькой».
Во время обкатки давайте разную нагрузку.
Без гребного винта обкатывать мотор в емкости (бочке или другой подходящей емкости) нельзя, т.к. мотор не получит полной нагрузки, а также останется несгоревшее масло.
В бочке обкатывать 2-х тактные моторы вообще не стоит, т.к. при обкатке масла используется в 2 раза больше, чем при обычной эксплуатации и все это несгоревшее масло поступает в воду вместе с выхлопом.
Последствия: все это несгоревшее масло, плавающее в воде в бочке, затем попадает в систему охлаждения. Эта маслянистая вода пропитает все каналы двигателя. В итоге Ваш двигатель изнутри после 10 часов обкатки будет полностью загрязнен маслянистым налетом.
Более подробную инструкцию по обкатке смотрите на видео выше.
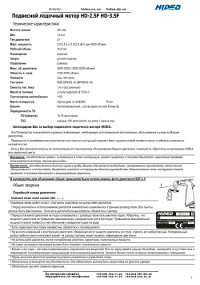
Руководство по эксплуатации и техническому обслуживанию подвесных лодочных моторов Hidea HD-2.5F и HD-3.5F.
- Год издания: —
- Страниц: 10
- Формат: PDF
- Размер: 1,0 Mb

Руководство по эксплуатации и техническому обслуживанию четырехтактного подвесного лодочного мотора Hidea HDF2.5.
- Год издания: —
- Страниц: 22
- Формат: PDF
- Размер: 2,8 Mb

Руководство по эксплуатации и техническому обслуживанию четырехтактных подвесных лодочных моторов Hidea HDF4 и HDF5.
- Год издания: —
- Страниц: 22
- Формат: PDF
- Размер: 3,1 Mb
Руководство по эксплуатации и техническому обслуживанию подвесного лодочного мотора Hidea HD5F.
- Год издания: —
- Страниц: 16
- Формат: PDF
- Размер: 1,9 Mb

Руководство по эксплуатации и техническому обслуживанию двухтактных подвесных лодочных моторов Hidea HD8F/HD9.8F/HD9.9FLT.
- Год издания: —
- Страниц: 19
- Формат: PDF
- Размер: 1,9 Mb

Руководство по эксплуатации и техническому обслуживанию подвесных лодочных моторов Hidea HD9.9F и HD15F.
- Год издания: —
- Страниц: 9
- Формат: DOC
- Размер: 3,2 Mb

Руководство по эксплуатации и техническому обслуживанию четырехтактных подвесных лодочных моторов Hidea HDF9.9H и HDF15H.
- Год издания: —
- Страниц: 22
- Формат: PDF
- Размер: 6,0 Mb
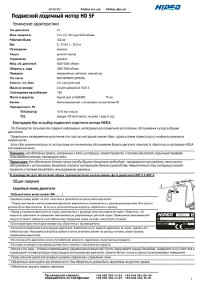
Руководство по эксплуатации и техническому обслуживанию подвесного лодочного мотора Hidea HDF-15.
- Год издания: —
- Страниц: 21
- Формат: PDF
- Размер: 1,0 Mb

Руководство по эксплуатации и техническому обслуживанию двухтактных подвесных лодочных моторов Hidea HD25F и HD30F.
- Год издания: —
- Страниц: 20
- Формат: PDF
- Размер: 3,4 Mb

Руководство по эксплуатации и техническому обслуживанию двухтактного подвесного лодочного мотора Hidea HD40F.
- Год издания: —
- Страниц: 84
- Формат: PDF
- Размер: 3,7 Mb
View a manual of the Hidea HDF5 below. All manuals on ManualsCat.com can be viewed completely free of charge. By using the ‘Select a language’ button, you can choose the language of the manual you want to view.

MANUALSCAT | EN
Question & answers
Have a question about the Hidea HDF5 but cannot find the answer in the user manual? Perhaps the users of ManualsCat.com can help you answer your question. By filling in the form below, your question will appear below the manual of the Hidea HDF5. Please make sure that you describe your difficulty with the Hidea HDF5 as precisely as you can. The more precies your question is, the higher the chances of quickly receiving an answer from another user. You will automatically be sent an e-mail to inform you when someone has reacted to your question.
Ask a question about the Hidea HDF5
Page: 1
29
OPMerking
Leg een handdoek of andere bescherming onder de buitenboordmotor om schade te voorkomen.
ING
• Om te voorkomen dat motorolie vanuit het carter in de cilinder loopt, mag de buitenboordmotor uitsluitend in die
hier afgebeelde posities vervoerd en opgeslagen worden. Wanneer de buitenboordmotor op zijn kant opgeslagen
wordt, moet eerste de motorolie afgetapt worden.
• Laat eerst al het koelwater uit de buitenboordmotor weglopen, voordat deze op zijn kant gelegd wordt,
omdat anders koelwater in de cilinder zou kunnen lopen en daardoor schade veroorzaakt.
• Sla de buitenboordmotor op in een droge, goed geventileerde ruimte, niet in direct zonlicht.
Spoelen in een testtank
leT OP
Start de motor nooit zonder koelwatertoevoer. De waterpomp zal beschadigd raken en motorschade als gevolg van
verhitting kan het gevolg zijn. Voordat de motor gestart wordt moet er zich water in de waterkanalen bevinden.
1. Reinig de buitenkant met schoon zoet water.
2. Sluit de brandstofkraan. Sluit de ventilatieschroef in de tankdop.
3. Verwijder de afdekkap.
4. Plaats de buitenboordmotor in een testtank.
1= Aanbevolen waterniveau
2= Laagste waterniveau
Onderhoud
Place a towel or something similar under the outboard motor to protect it from damage.
Storing outboard motor
When storing your outboard motor for prolonged periods of time (2 months or longer), several
important procedures must be performed to prevent excessive damage.
·To prevent problems which can be caused by oil entering the cylinder from the sump, keep the
outboard motor in the attitude shown when transporting and storing it. If storing or transporting
the outboard motor on its side (not upright), put it on a cushion alter draining the engine oi1.
·Do not place the outboard motor on its side before the cooling water has drained from it
completely, otherwise water may enter the cylinder through the exhaust port and cause engine
trouble.
·Store the outboard motor in a dry, wellventilated place, not in direct sunlight.
Procedure
Flushing in a test tank
Do not run the engine without supplying it with cooling water. Either the engine water pump will
be damaged or the engine will be damaged from overheating. Befor starting the engine, be sure to
supply water to the cooling water passages.
1.Wash the outboard motor body using fresh water.
2. Place the fuel cock in the closed position. Tighten the air vent screw on the fuel tank cap.
3. Remove the engine top cowling and silencer cover.
4. Istall the outboard motor on the test tank.
1.Water surface
2.Lowest water level
Maintenance
27
NOTE:
1
2
w
w
w
.
h
i
d
e
a
—
m
a
r
i
n
e
.
n
l
Page: 2
34
Voordat u de bougie monteert, moet eerst de elektrodeafstand gemeten worden
met behulp van een voelmaat. Stel zo nodig de juiste afstand in.
1. Elektrodeafstand
2. Bougie typeaanduiding (NGK)
Gebruik altijd een nieuwe pakking en reinig het pasvlak van de bougie op de cilinderkop bij de montage van de bougie.
Maak het schroefdraad schoon en monteer met het juiste aanhaalmoment.
OPMerking
Wanneer er geen momentsleutel beschikbaar is bij het monteren van de bougie, geeft de volgende procedure een goede
indicatie van het juiste aanhaalmoment: draai de bougie handvast aan en vervolgens nog een ¼ tot een ½ slag vaster.
Controleer het aanhaalmoment later met een momentsleutel.
Controle brandstofsysteem
WaarsChuWing
Benzine en benzinedampen zijn uiterst brandbaar en explosief. Houd afstand van vonken, sigaretten, open vuur en andere
ontstekingsbronnen.
ING
Lekkende brandstof kan tot brand of een explosie leiden.
• Controleer regelmatig op brandstoflekken.
• Wanneer een lekkage geconstateerd wordt, moet deze door een gekwalificeerde technicus verholpen worden
• Ondeugdelijke reparaties kunnen de buitenboordmotor gevaarlijk in het gebruik maken.
Controleer de brandstofleidingen op lekken, scheuren en werking. Wanneer een defect wordt geconstateerd,
moet dit direct door uw dealer of een gekwalificeerde technicus gerepareerd worden.
Onderhoud
Before fitting the spark plug, measure the electrode gap with a wire thickness gauge; adjust the
gap to specification if necessary.
1. Spark plug gap
2. Spark plug I.D. mark (NGK)
When fitting the plug, always clean the gasket surface and use a new gasket. Wipe off any dirt
from the threads and screw in the spark plug to the correct torque
If a torque-wrench is not available when you are fitting a spark plug, a good estimate of the
cerrect torque is 1/4 to 1/2 a turn past fingertight. Have the spark plug adjusted to the correct
torque as soon as possible with a torque wrench.
Checking fuel system
Gasoline and its vapors are highly flammable and explosive. Keep away from sparks, cigarettes,
flames, or other sources of ignition.
Leaking fuel can result in fire or explosion.
·Check for fuel leakage regularly.
·If any fuel leakage is found, the fuel system must be repaired by a qualified mechanic.
Improper repairs can make the outboard unsafe to operate.
Check the fuel lines for leaks, crack, or maifunction. If a problem is found, our dealer or other
qualified mechanic should repair it immediately.
32
Maintenance
Spark plug torque:
25.0 Nm(18.4 ft-lb) (2.55 kgf-m)
Bougie elektrodeafstand:
0,8-1,0 mm
Aanhaalmoment bougie:
25,0 Nm (1,84 kgm)
Before fitting the spark plug, measure the electrode gap with a wire thickness gauge; adjust the
gap to specification if necessary.
1. Spark plug gap
2. Spark plug I.D. mark (NGK)
When fitting the plug, always clean the gasket surface and use a new gasket. Wipe off any dirt
from the threads and screw in the spark plug to the correct torque
If a torque-wrench is not available when you are fitting a spark plug, a good estimate of the
cerrect torque is 1/4 to 1/2 a turn past fingertight. Have the spark plug adjusted to the correct
torque as soon as possible with a torque wrench.
Checking fuel system
Gasoline and its vapors are highly flammable and explosive. Keep away from sparks, cigarettes,
flames, or other sources of ignition.
Leaking fuel can result in fire or explosion.
·Check for fuel leakage regularly.
·If any fuel leakage is found, the fuel system must be repaired by a qualified mechanic.
Improper repairs can make the outboard unsafe to operate.
Check the fuel lines for leaks, crack, or maifunction. If a problem is found, our dealer or other
qualified mechanic should repair it immediately.
32
Maintenance
Spark plug torque:
25.0 Nm(18.4 ft-lb) (2.55 kgf-m)
w
w
w
.
h
i
d
e
a
—
m
a
r
i
n
e
.
n
l
Page: 3
36
ine is
rd
med
e idle
c.
ge 23.
ould
ng and
acity.
th
sen
ve the
If a torque wrench is not available when you are installing the drain screw, finger tighten th
screw just until the gasket comes into contact with the surface of the drain hole. Then tight
to 1/2 turn more. Tighten the drain screw to the correct torque with a torque wrench as soon
possible.
4. Add the correct amount of oil through the filler hole. Install the filler cap.
1.Oil filler cap
5.Start the engine and watch to make sure the iow oil pressure warning indicator turns off.
sure that there are no oil leaks.
If the low oil pressure warning indicator does not turn off or if there are oil leaks, stop the e
and find the cause. Continued operation with a problem could cause severe engine damage
6. Turn off the engine and wait 3 minutes.Recheck the oil level using the oil filler cap to be
the level falls between the upper and lower marks. Fill with oil if it is below the lower mark
drain to the specified level if it is above the uppermark.
34
Recommended engine oil:
4-stroke outboard motor oil
Engine oil quantity:
0.35L(0.37 US qt) (0.31 lmp.qt)
2
1
OPMerking
Wanneer er geen momentsleutel beschikbaar is bij het monteren van de aftapplug, geeft de volgende procedure een
goede indicatie van het juiste aanhaalmoment: draai de aftapplug handvast aan en vervolgens nog een ¼ tot een ½ slag
vaster. Controleer het aanhaalmoment later met een momentsleutel.
4. Vul de correcte hoeveelheid motorolie bij via de vulopening.
1. Olievuldop
5. Start de buitenboordmotor en controleer of er geen olielekkages zijn.
6. Zet de motor af en wacht 3 minuten. Controleer nogmaals het oliepeil, dat zich tussen het minimum en maximum
peil dient te bevinden. Vul motorolie bij indien nodig, tap motorolie af wanneer het peil boven het maximum
niveau staat.
1. Minimum peil
2. Maximum peil
7. Voer afgewerkte motorolie af als klein chemisch afval conform de geldende voorschriften.
Onderhoud
Aanhaalmoment olie aftapplug
18,0 Nm (1,84 kgm)
Aanbevolen motorolie:
4-takt buitenboordmotor motorolie
Hoeveelheid (zonder oliefilter)
0,5 liter
If a torque wrench is not available when you are installing the drain screw, finger tighten the
screw just until the gasket comes into contact with the surface of the drain hole. Then tighten 1/4
to 1/2 turn more. Tighten the drain screw to the correct torque with a torque wrench as soon as
possible.
4. Add the correct amount of oil through the filler hole. Install the filler cap.
1.Oil filler cap
If the low oil pressure warning indicator does not turn off or if there are oil leaks, stop the engine
and find the cause. Continued operation with a problem could cause severe engine damage.
6. Turn off the engine and wait 3 minutes.Recheck the oil level using the oil filler cap to be sure
the level falls between the upper and lower marks. Fill with oil if it is below the lower mark,or
drain to the specified level if it is above the uppermark.
34
Maintenance
Recommended engine oil:
4-stroke outboard motor oil
Engine oil quantity:
0.35L(0.37 US qt) (0.31 lmp.qt)
w
w
w
.
h
i
d
e
a
—
m
a
r
i
n
e
.
n
l
Page: 4
37
OPMerking
Ververs de motorolie vaker wanneer de buitenboordmotor onder zware omstandigheden gebruikt wordt zoals bij het
slepend vissen (trolling).
ING
U kunt ernstig gewond raken wanneer de buitenboordmotor per ongeluk start en u zich in de nabijheid van de schroef
bevindt.
• Voor de controle, inspectie, montage en demontage van de schroef moet eerst de bougiekap van de bougie
afgenomen worden. Plaats bovendien de schakelhevel in de stand neutraal, zet de hoofdschakelaar op ‘’OFF’’ en
neem de sleutel uit het contactslot, verwijder het veiligheidskoord uit de noodstopschakelaar.
• Gebruik nooit uw hand om de schroef vast of tegen te houden bij het vastzetten of losmaken van de schroefmoer.
Plaats een houten blok tussen de anticavitatieplaat en de schroef om deze te blokkeren.
Onderhoud
7.Dispose of used oil according to local regulations.
·Change the oil more often when operating the engine under adverse conditions such as
extended trolling.
Checking wiring and connectors
·Check that each grounding wire is properly secured.
·Check that each connector is engaged secured.
Exhaust leakage
Start the engine and check that no exhaust leaks from the joints between the exhaust cover,
cylinder head, and body cylinder.
Water leakage
Start the engine and check that no water leaks from the joints between the exhaust cover, cylinder
head, and body cylinder.
Engine oil leakage
Check for oil leaks on the around the engine.
Checking propeller
You could be seriously injured if the engine accidentally starts when you are near the propeller.
·Before inspecting, removing, or installing the propeller, remove the spark plugcaps from the
spark plugs. Also, place the shift control in neutral, turn the main switch to «OFF» (Off) and
remove the key; and remove the lanyard from the engine stop switch.
·Do not use your hand to hold the propeller when loosening or tightening the propeller nut. Put a
wood block between the anti-cavitation plate and the propeller to prevent the propeller from
turning.
35
Maintenance
NOTE:
F5
Tuesday, January 15, 2002 4:11:42 PM
w
w
w
.
h
i
d
e
a
—
m
a
r
i
n
e
.
n
l
Page: 5
38
Onderhoud
Checkpoints
·Check each of the propeller blades for wear, erosion from cavitation or ventilation, or other
damage.
·Check the propeller shaft for damage.
·Check the splines pin for wear or damage.
·Check for fish line tangled around the propeller shaft.
·Check the propeller shaft oil seal for damage.
Removing the propeller
Spline models
1. Straighten the split pin and pull it out using a pair of pliers.
2. Remove the propeller nut and washer.
1.Cotter pin
2.Propeller nut
3.Washer
4.propeller
5.Thrust washer
3. Remove the propeller and thrust holder.
Installing the Propeller
Spline models
·Be sure to install the thrust holder before installing the propeller, otherwise the lower case and
propeller boss could be damaged.
·Be sure to use a new cotter pin and bend the ends over securely. Otherwise the propeller could
come off during operation and be lost.
1. Apply corrosion resistant grease to the propeller shaft.
2. Install the thrust holder, and propeller on the propeller shaft.
3. Install the washer. Tighten the propeller nut until there is no forward-and-backward
movement.
4. Align the propeller nut with the propeller shaft hole. Insert a new cotter pin in the hole and
36
Maintenance
1
2 3 4 5
Controlepunten
• Inspecteer ieder schroefblad op slijtage en erosie door cavitatie en andere schade.
• Controleer de schroefas en spiebanen op schade.
• Controleer de splitpen op schade.
• Controleer of er zich geen vislijnen rond de schroefas bevinden.
• Controleer de afdichting van de schroefas op lekkage.
Schroef verwijderen
Spiebaan uitvoeringen
1. Buig de splitpen recht en trek deze met een tang los.
2. Verwijder de schroefmoer en onderlegring.
1. Splitpen
2. Schroefmoer
3. Onderlegring
4. Schroef
5. Vulstuk
3. Neem de schroef en het vulstuk los van de schroefas.
Montage van de schroef
WaarsChuWing
• Verzeker u er van dat het vulstuk geplaatst is voordat u de schroef monteert, anders kan er schade aan het staartstuk
en het schroefhuis ontstaan.
• Gebruik altijd en nieuwe splitpen en buig de uiteinden om te voorkomen dat de schroef los komt te zitten en verloren
kan gaan.
1. Breng waterbestendig, corrosiewerend vet aan op de schroefas.
2. Plaats eerst het vulstuk en vervolgens de schroef op de schroefas.
3. Plaats de onderlegring. Draai de schroefmoer zodanig vast dat er geen speling voelbaar is wanneer de schroef
op de as heen en weer bewogen wordt.
4. Draai de schroefmoer in lijn met het splitpen gat in de schroefas. Plaats en nieuwe splitpen en buig de uiteinden
daarvan zorgvuldig om.
w
w
w
.
h
i
d
e
a
—
m
a
r
i
n
e
.
n
l
Page: 6
39
Montage van de schroef
OPMerking
Wanneer de schroefmoer na het aandraaien niet in lijn staat met het splitpengat op de schroefas, draai de schroefmoer
dan losser totdat deze in lijn staat.
Staartstukolie verversen
WaarsChuWing
• Verzeker u ervan dat de buitenboordmotor stevig bevestigd is aan de spiegel of motorsteun. Wanneer de motor valt
kan dit ernstig letsel veroorzaken.
• Begeef u nooit onder de buitenboordmotor wanneer deze zich in de gekantelde positie bevindt, ook niet wanneer
het kantelblokkeermechanisme in werking is. Wanneer de motor valt kan dit ernstig letsel veroorzaken.
1. Kantel de buitenboordmotor zodanig dat de aftapplug zich op het laagst mogelijk punt bevindt.
2. Plaats een opvangbak met voldoende capaciteit onder het staartstuk.
3. Draai de olieaftapplug los.
1. Vulplug staartstuk
2. Olieniveau plug
OPMerking
Gebruik altijd nieuwe pakkingringen voor de pluggen.
4. Verwijder de olieniveau plug om alle olie te laten weglopen.
Onderhoud
bend the cotter pin ends.
If the propeller nut does not align with the propeller shaft hole after tightening it, loosen the nut
until it aligns with the hole.
Changing gear oil
·Be sure the outboard motor is securely fastened to the transom or a stable stand. You could be
severely injured if the outboard motor falls on you.
·Never get under the lower unit while it is tilted, even when the tilt support lever or knob is
locked. Severe injury could occur i1′ the outboard motor accidentally tails.
1. Tilt the outboard motor so that the gear oil drain screw is at the lowest point possible.
2. Place a suitable container under the gear case.
3. Remove the gear oil drain screw.
1.Gear oil drain screw
2.Oil level plug
·If a magnetic gear oil drain screw is equipped, remove all metal particles from the screw before
installing it.
·Always use new gaskets. Don not reuse the remove gaskets.
4. Remove the oil level plug to allow the oil to drain completely.
37
Maintenance
NOTE:
NOTE:
w
w
w
.
h
i
d
e
a
—
m
a
r
i
n
e
.
n
l
Page: 7
40
leT OP
Controleer de afgewerkte staartstukolie. Wanneer de olie melkachtig is, betekent dit dat er water bijgekomen is wat tot
schade kan leiden. Ga naar uw dealer om de pakkingen van het straatstuk te laten controleren.
5. Gebruik een flexibele trechter of olievulinstallatie om de staartstukolie in de vulplug te gieten.
ING
Verf de anodes nooit, daardoor verliezen ze hun werking.
Coating van de romp
Een schone romp verbetert de prestaties van de boot. Houd daarom het onderwaterschip zo schoon mogelijk en
verwijder aangroei. Gebruik een anti-fouling coating om aangroei te voorkomen. Gebruik geen anti-fouling die koper of
grafiet bevat, deze coatings versnellen de corrosie van de buitenboordmotor.
Problemen oplossen
Aanbevolen staartstukolie:
Hypoïd SAE 90
Oliehoeveelheid: 100 cc
Inspect the used oil after it has been drained. If the oil is milky, water is getting into the gear case
which can cause gear damage. Consult a yours dealer for repair of the lower unit seals.
5.With the outboard motor in a vertical position, and using a flexible or pressurized filling
device, inject the gear oil into the gear oil drain screw hole.
6. When the oil begins to flow out of the oil level plug hole, insert and tighten the oil level plug.
7. Insert and tighten the gear oil drain screw.
Inspecting and replacing anode(s)
HIDEA outboard motors are protected from corrosion by sacrificial anodes. Inspect the external
anodes periodically. Remove scales from the surfaces of the anodes.
Do not paint anodes, as this would render them ineffective.
Coating the boat bottom
A clean hull improves boat performance. The boat bottom should be kept as clean of marine
growth as possible. If necessary, the boat bottom can be coated with an anti-fouling paint
38
Maintenance
Recommended gear oil:
Hypoid gear oil SAE#90
Gear oil quantity:
3
75.0 cm (2.54 US oz) (2.65 lmp.oz)
w
w
w
.
h
i
d
e
a
—
m
a
r
i
n
e
.
n
l
Page: 8
46
Aanvaringsschade
WaarsChuWing
De buitenboordmotor kan ernstig beschadigd raken door een aanvaring bij het varen of bij het transport van de
buitenboordmotor. Deze beschadigingen kunnen de buitenboordmotor onveilig in het gebruik maken.
Wanneer de buitenboordmotor een object onder water raakt, volg dan de volgende procedure.
1. Zet onmiddellijk de motor af.
2. Controleer alle onderdelen op schade. Controleer ook of de boot beschadigd is.
3. Ongeacht of er schade geconstateerd wordt: vaar direct met lage snelheid naar de dichtstbijzijnde haven.
4. Laat uw dealer de buitenboordmotor controleren voordat u deze weer in gebruik neemt.
Q. Is steering pivot loose or damaged?
A. Tighten or have serviced by our dealer.
Temporary action in emergency
Impact damage
The outboard motor can be seriously damaged by a collision while operating or trailering.
Damage could make the outboard motor unsafe to operate.
If the outboard motor hits an object in the water, follow the procedure below.
1. Stop the engine immediately.
2. Inspect the control system and all components for damage. Also inspect the boat for damage.
3. Whether damage is found or not, return to the nearest harbor slowly and carefully.
4. Have our dealer inspect the outboard motor before operating it again.
43
F2-5
Tuesday, January 15, 2002 3:19:56 PM
Problemen oplossen
w
w
w
.
h
i
d
e
a
—
m
a
r
i
n
e
.
n
l
- Brand:
- Hidea
- Product:
- outboard motors
- Model/name:
- HDF5
- Filetype:
- Available languages:
- Dutch, English
Related products Hidea HDF5
Похожие статьи
Похожие товары
Сайт
- Каталог товаров
- Услуги
- Сервис
- Примеры работ
- Прайс-лист
- Аренда
- База знаний
![]()
Оказываем полный спектр услуг и поддержку в любом вопросе потому что любим своего клиента
Данный сайт носит исключительно информационный характер. Все представленные предложения не являются офертой, определяемой статьей 437 ГК РФ.
Для получения подробной информации свяжитесь с нашим менеджером. Copyright © Прокатись.ру, info@prokatis.ru
Спасибо, Ваш запрос звонка успешно отправлен.
Наш менеджер позвонит Вам в указанное время и ответит на все интересующие вопросы.
Вы в любой момент можете позвонить сами по номеру
8 495 646-88-68
назвать номер запроса (№ )
и задать интересующие вопросы.
ОК
Спасибо, Ваш запрос успешно отправлен.
Наш менеджер позвонит Вам в указанное время и ответит на все интересующие вопросы.
Вы в любой момент можете позвонить сами по номеру
8 495 646-88-68
назвать номер запроса (№ )
и задать интересующие вопросы.
ОК
Выберите подарки
Подарков на сумму
0 p
0 p
Выбрать
Нет аккаунта? Зарегистрируйтесь, это займёт несколько минут.
Регистрация
Нет аккаунта? Регистрация
Уже зарегистрированы? Вход
Спасибо, Ваш запрос успешно отправлен.
Наш менеджер позвонит Вам и ответит на все интересующие вопросы.
Вы в любой момент можете позвонить сами по номеру
8 495 646-88-68
и задать интересующие вопросы.
ОК
% Акции %