-
Contents
-
Table of Contents
-
Bookmarks
Quick Links
Video Intercom Villa Door Station
User Manual
Related Manuals for HIKVISION DS-KIS603-P
Summary of Contents for HIKVISION DS-KIS603-P
-
Page 1
Video Intercom Villa Door Station User Manual… -
Page 2
INTERRUPTION, OR LOSS OF DATA, CORRUPTION OF SYSTEMS, OR LOSS OF DOCUMENTATION, WHETHER BASED ON BREACH OF CONTRACT, TORT (INCLUDING NEGLIGENCE), PRODUCT LIABILITY, OR OTHERWISE, IN CONNECTION WITH THE USE OF THE PRODUCT, EVEN IF HIKVISION HAS BEEN ADVISED OF THE POSSIBILITY OF SUCH DAMAGES OR LOSS. -
Page 3
Video Intercom Villa Door Station User Manual PRODUCTION OF CHEMICAL OR BIOLOGICAL WEAPONS, ANY ACTIVITIES IN THE CONTEXT RELATED TO ANY NUCLEAR EXPLOSIVE OR UNSAFE NUCLEAR FUEL-CYCLE, OR IN SUPPORT OF HUMAN RIGHTS ABUSES. IN THE EVENT OF ANY CONFLICTS BETWEEN THIS MANUAL AND THE APPLICABLE LAW, THE LATER PREVAILS. -
Page 4
Video Intercom Villa Door Station User Manual Symbol Conventions The symbols that may be found in this document are defined as follows. Symbol Description Indicates a hazardous situation which, if not avoided, will or could Danger result in death or serious injury. Indicates a potentially hazardous situation which, if not avoided, Caution could result in equipment damage, data loss, performance… -
Page 5
Video Intercom Villa Door Station User Manual Safety Instruction Warning ● All the electronic operation should be strictly compliance with the electrical safety regulations, fire prevention regulations and other related regulations in your local region. ● Please use the power adapter, which is provided by normal company. The power consumption cannot be less than the required value. -
Page 6
Video Intercom Villa Door Station User Manual by the battery manufacturer. ● Input voltage should meet both the SELV and the Limited Power Source according to 60950-1 standard. ● The power supply must conform to LPS. The recommended adaptor models and manufacturers are shown as below. -
Page 7
Video Intercom Villa Door Station User Manual Regulatory Information FCC Information Please take attention that changes or modification not expressly approved by the party responsible for compliance could void the user’s authority to operate the equipment. FCC compliance: This equipment has been tested and found to comply with the limits for a Class B digital device, pursuant to part 15 of the FCC Rules. -
Page 8
Video Intercom Villa Door Station User Manual designated collection point. For more information see:www.recyclethis.info Industry Canada ICES-003 Compliance This device meets the CAN ICES-3 (B)/NMB-3(B) standards requirements. -
Page 9: Table Of Contents
Video Intercom Villa Door Station User Manual Contents Chapter 1 Appearance …………………… 1 Chapter 2 Terminal and Wiring Description …………….3 2.1 Terminal Description ………………….3 2.2 Wiring Description ……………………. 4 2.2.1 Door Lock Wiring ………………….4 2.2.2 Door Contact Wiring ………………..5 2.2.3 Exit Button Wiring ………………….
-
Page 10
Video Intercom Villa Door Station User Manual 5.5.8 Intercom Settings ………………… 32 5.5.9 Access Control Settings ……………….. 34 Chapter 6 Configuration via Client Software …………….37 6.1 Device Management ………………….37 6.1.1 Add Online Device ………………..37 6.1.2 Add Device by IP Address………………38 6.1.3 Add Device by IP Segment ……………… -
Page 11: Chapter 1 Appearance
Video Intercom Villa Door Station User Manual Chapter 1 Appearance Front Panel and Rear Panel Here takes DS-KV6113-WPE1 for example. Figure 1-1 Front Panel and Rear Panel Table 1-1 Description Description Microphone Camera Indicator Unlock (Green)/ Call (Orange)/ Communicate (White) Button Card Reading Area Loudspeaker…
-
Page 12
Video Intercom Villa Door Station User Manual Description Debugging Port TAMPER Set Screw Bottom Panel Figure 1-2 Bottom Panel Table 1-2 Description Description TF Card Slot (Reserved) Network Interface… -
Page 13: Chapter 2 Terminal And Wiring Description
Video Intercom Villa Door Station User Manual Chapter 2 Terminal and Wiring Description 2.1 Terminal Description Figure 2-1 Terminal Description Note RS-485 terminal is not supported.
-
Page 14: Wiring Description
Video Intercom Villa Door Station User Manual 2.2 Wiring Description 2.2.1 Door Lock Wiring Figure 2-2 Door Lock Wiring Note Terminal NC/COM is set as default for accessing magnetic lock/electric bolt; terminal NO/COM is set as default for accessing electric strike.
-
Page 15: Door Contact Wiring
Video Intercom Villa Door Station User Manual 2.2.2 Door Contact Wiring Figure 2-3 Door Contact Wiring 2.2.3 Exit Button Wiring Figure 2-4 Exit Botton Wiring…
-
Page 16: Alarm Input Device Wiring
Video Intercom Villa Door Station User Manual 2.2.4 Alarm Input Device Wiring Figure 2-5 Alarm Input Device Wiring…
-
Page 17: Chapter 3 Installation
Video Intercom Villa Door Station User Manual Chapter 3 Installation Note ● Make sure the device in the package is in good condition and all the assembly parts are included. ● Make sure your power supply matches your door station. ●…
-
Page 18: Surface Mounting Without Protective Shield
Video Intercom Villa Door Station User Manual 3.2 Surface Mounting without Protective Shield Before You Start ● Tools that you need to prepare for installation: Drill (ø2.846) and gradienter. ● Purchase the protective shield before installation. Steps 1. Stick the mounting template on the wall. Drill screw holes according to the mounting template. Remove the template from the wall.
-
Page 19: Surface Mounting With Protective Shield
Video Intercom Villa Door Station User Manual Figure 3-3 Surface Mounting without Protective Shield 3.3 Surface Mounting with Protective Shield Before You Start ● Tools that you need to prepare for installation: Drill (ø2.846) and gradienter. ● Purchase the protective shield before installation. Steps 1.
-
Page 20
Video Intercom Villa Door Station User Manual Figure 3-4 Mounting Template 2. Align the protective shield with the mounting template. 3. Secure the mounting plate and protective shield on the wall with 4 supplied screws according to the screw holes. 4. -
Page 21
Video Intercom Villa Door Station User Manual Figure 3-5 Flush Mounting with Protective Shield… -
Page 22: Chapter 4 Activation
Video Intercom Villa Door Station User Manual Chapter 4 Activation 4.1 Activate Device via Web You are required to activate the device first by setting a strong password for it before you can use the device. Default parameters of the door station are as follows: ●…
-
Page 23: Edit Network Parameters
Video Intercom Villa Door Station User Manual Note We highly recommend you to create a strong password of your own choosing (using a minimum of 8 characters, including at least three kinds of following categories: upper case letters, lower case letters, numbers, and special characters) in order to increase the security of your product. And we recommend you change your password regularly, especially in the high security system, changing the password monthly or weekly can better protect your product.
-
Page 24: Chapter 5 Remote Configuration Via Web
Video Intercom Villa Door Station User Manual Chapter 5 Remote Configuration via Web 5.1 Live View In the browser address bar, enter the IP address of the device, and press the Enter key to enter the login page. Enter the user name and password and click Login to enter the Live View page. Or you can click Live View to enter the page.
-
Page 25: Number Settings
Video Intercom Villa Door Station User Manual 5.3 Number Settings Link the room No. and SIP numbers. Click Number Settings to enter the page. Click Add, set the Room No. and SIP numbers in the pop-up dialog box. 5.4 Device Management You can manage the linked device on the page.
-
Page 26: System Settings
Video Intercom Villa Door Station User Manual Play Performance Set the live view performance to Shortest Delay, Balanced or Fluent. Auto Start Live View Check Yes to enable the function. Image Format Select the image format for picture capture. Click Save to enable the settings. Record File Parameters Record File Size Select the packed size of the manually recorded and downloaded video files to 256M, 512M or…
-
Page 27
Video Intercom Villa Door Station User Manual ● Enable Manual Time Sync., set the time manually or check the Sync. with computer time. Click Save to enable the settings. Click System Settings → DST to check Enable DST. Set the parameters according to your needs and click Save to enable the settings. -
Page 28: Network Settings
Video Intercom Villa Door Station User Manual Authentication Click Security → Authentication to enter the settings page. On the page, you can select RTSP Authenticationaccording to your actual needs. Click Save to enable the settings. Security Service Click Security → Security Service to enter the settings page. On the page, you can enable SSH according to your actual needs.
-
Page 29
Video Intercom Villa Door Station User Manual device supports IPv4. Steps 1. Click Network → Basic Settings → TCP/IP to enter the settings page. Figure 5-4 TCP/IP Settings 2. Configure the network parameters. – Check DHCP, the device will get the parameters automatically. –… -
Page 30
Video Intercom Villa Door Station User Manual Figure 5-5 Port Settings 2. Set the ports of the device. HTTP Port The default port number is 80, and it can be changed to any port No. which is not occupied. HTTPS Port The default port number is 443, and it can be changed to any port No. -
Page 31
Video Intercom Villa Door Station User Manual SIP Setting Steps 1. Click Network → Basic Settings → SIP to enter the settings page. Figure 5-6 SIP Settings 2. Check Enable VOIP Gateway. 3. Configure the SIP parameters. 4. Click Save to enable the settings. FTP Settings Steps 1. -
Page 32
Video Intercom Villa Door Station User Manual Figure 5-7 FTP Settings 2. Check Enable FTP. 3. Select Server Type. 4. Input the Server IP Address and Port. 5. Configure the FTP Settings, and the user name and password are required for the server login. 6. -
Page 33: Video & Audio Settings
Video Intercom Villa Door Station User Manual Platform Access Platform access provides you an option to manage the devices via platform. Steps 1. Click Network → Advanced Settings → Platform Access to enter the settings page. 2. Check the checkbox of Enable to enable the function. 3.
-
Page 34
Video Intercom Villa Door Station User Manual Figure 5-8 Video Parameters 2. Select the Stream Type. 3. Configure the video parameters. Stream Type Select the stream type to main stream or sub stream. Video Type Select the stream type to video stream, or video & audio composite stream. The audio signal will be recorded only when the Video Type is Video &… -
Page 35
Video Intercom Villa Door Station User Manual Video Encoding The device supports H.264. I Frame Interval Set I Frame Interval from 1 to 400. 4. Click Save to save the settings. Audio Parameters Steps 1. Click Video/Audio → Audio to enter the settings page. Figure 5-9 Audio Settings 2. -
Page 36: Image Settings
Video Intercom Villa Door Station User Manual 5.5.5 Image Settings Display Settings Configure the image adjustment, backlight settings and other parameters in display settings. Steps 1. Click Image → Display Settings to enter the display settings page. Figure 5-10 Display Settings 2.
-
Page 37
Video Intercom Villa Door Station User Manual Figure 5-11 Day/Night Mode Set Day Mode or Night Mode manually.Set the mode as Auto and edit the sensitivity according to your needs.Set the mode as Scheduled-Switch. Set the start time and end time. Note Daytime is from configured start time to configured time. -
Page 38
Video Intercom Villa Door Station User Manual Figure 5-12 Backlight 1) Check the checkbox to enable BLC. 2) Select BLC Area. 6. Click Save to enable the settings. OSD Settings You can customize the camera name, time/date format, display mode, and OSD size displayed on the live view. -
Page 39: Event Settings
Video Intercom Villa Door Station User Manual 5. Select Cropping Resolution. 6. Click Save. 5.5.6 Event Settings Motion Detection Motion detection detects the moving objects in the configured surveillance area, and a series of actions can be taken when the alarm is triggered. Steps 1.
-
Page 40
Video Intercom Villa Door Station User Manual 3. Click Draw Area. Click and drag the mouse on the live video to draw a motion detection area. Click Stop Drawing to finish drawing one area. Click Save to save the settings. Clear Area Click Clear All to clear all of the areas. -
Page 41: Schedule Settings
Video Intercom Villa Door Station User Manual Figure 5-14 Event Linkage 2. Select the Major Type as Device Event or Door Event. 3. Select the type of the Normal Linkage for the event. 4. Click Save to enable the settings. 5.5.7 Schedule Settings You can create call schedule, or else the device will call indoor station all day by default.
-
Page 42: Intercom Settings
Video Intercom Villa Door Station User Manual 2. Click the next row below Enable Indoor Station All Day by Default. 3. Enter Schedule Name. 4. Select Call Type. 5. Set Weekly Schedule. 1) Click Weekly Schedule. 2) Drag mouse to set the schedule according to the actual needs. 3) Optional: Click the copy icon to copy the schedule to other days according to the actual needs.
-
Page 43
Video Intercom Villa Door Station User Manual Figure 5-15 Device ID Settings 2. Select the device type from the drop-down list, and set the corresponding information. 3. Click Save to enable the device number configuration. Note ● For main door station (D series or V series), the serial No. is 0. ●… -
Page 44: Access Control Settings
Video Intercom Villa Door Station User Manual Ring-Back Tone Settings Click Intercom → Ringbacktone Settings to enter the settings page. Click Add to select the ring tone from PC. Note Available Audio Format: WAV、AAC, Size: Less than 600 KB, Sample Rate: 8000Hz, Mono. Press Button to Call Steps 1.
-
Page 45
Video Intercom Villa Door Station User Manual Figure 5-17 Door Parameters 2. Select the door and edit the door name. 3. Set door contact status. 4. Set lock action time. 5. Click Save to enable the settings. Card Security Go to Access Control → Card Security to enter the settings page. Slide to enable card encryption parameters and CPU card reading content. -
Page 46
Video Intercom Villa Door Station User Manual Figure 5-18 Elevator Control 2. Check to enable elevator control function. 3. Select an Elevator No., and select an elevator controller type for the elevator. 4. Set the Negative Floor. 5. Select the Interface Type as RS-485 or Network Interface. And enable the elevator control. –… -
Page 47: Chapter 6 Configuration Via Client Software
Video Intercom Villa Door Station User Manual Chapter 6 Configuration via Client Software 6.1 Device Management Device management includes device activation, adding device, editing device, and deleting device, and so on. After running the iVMS-4200, video intercom devices should be added to the client software for remote configuration and management.
-
Page 48: Add Device By Ip Address
Video Intercom Villa Door Station User Manual Figure 6-1 Add to the Client 6.1.2 Add Device by IP Address Steps 1. Click +Add to pop up the adding devices dialog box. 2. Select IP/Domain as Adding Mode. 3. Enter corresponding information. 4.
-
Page 49: Add Device By Ip Segment
Video Intercom Villa Door Station User Manual 6.1.3 Add Device by IP Segment You can add many devices at once whose IP addresses are among the IP segment. Steps 1. Click +Add to pop up the dialog box. 2. Select IP Segment as Adding Mode. 3.
-
Page 50: Person Management
Video Intercom Villa Door Station User Manual Note ● The lower-level organizations will be deleted as well if you delete an organization. ● Make sure there is no person added under the organization, or the organization cannot be deleted. 6.4 Person Management After adding the organization, you can add person to the organization and manage the added person such as issuing cards in batch, importing and exporting person’s information in batch, etc.
-
Page 51: Modify And Delete Person
Video Intercom Villa Door Station User Manual Click Take Phone Take the person’s photo with the PC camera. Click Remote Take the person’s photo with the collection device. Collection 3. Issue the card for the person. 1) Click Credential → Card. 2) Click + to pop up the Add Card dialog.
-
Page 52: Import And Export Person Information
Video Intercom Villa Door Station User Manual 3. Click OK to save the settings. 6.4.4 Import and Export Person Information The person information can be imported and exported in batch. Steps 1. Exporting Person: You can export the added persons’ information in Excel format to the local 1) After adding the person, you can click Export Person to pop up the following dialog.
-
Page 53: Issue Card In Batch
Video Intercom Villa Door Station User Manual ● The gender of the persons will be Male by default. 6.4.6 Issue Card in Batch You can issue multiple cards for the person with no card issued in batch. Steps 1. Click Batch Issue Cards to enter the dialog page. All the added person with no card issued will display in the Person(s) with No Card Issued list.
-
Page 54: Permission Settings
Video Intercom Villa Door Station User Manual Figure 6-3 Card Settings 3. Select Card Type and Card No. Type. 4. Click OK to save the settings. Result After issuing the card to the person, the person and card information will display in the Person(s) with Card Issued list.
-
Page 55: Video Intercom Settings
Video Intercom Villa Door Station User Manual 4. Click Save. 5. Check the permission and click Apply All to Device. The status of the permission displays as Applied. 6. Optional: Click Applying Status to check the details. Modify/Delete Permissions On the page of the permission settings, click to edit the parameters of the permission.
-
Page 56: Release Notice
Video Intercom Villa Door Station User Manual Note ● One video intercom device can only connect with one client software. ● The maximum ring duration can be set from 15s to 60s via the Remote Configuration of the video intercom device. ●…
-
Page 57
Video Intercom Villa Door Station User Manual Figure 6-4 Search Call Logs 2. Set the search conditions, including call status, device type, start time and end time. Call Status Click ˅ to unfold the drop-down list and select the call status as Dialed, Received or Missed. Or select All to search logs with all statuses. -
Page 58: Upload Armed Information
Video Intercom Villa Door Station User Manual Select Advertising Information, Property Information, Alarm Information or Notice Information as Type according to your needs. Start Time/End Time Click the time icon to specify the start time and end time of a time period to search the logs. Reset the Settings Click Reset to reset all the configured search conditiions.
-
Page 59: Communication Matrix And Device Command
Device Command Scan the following QR code to get the device common serial port commands. Note that the command list contains all commonly used serial ports commands for all Hikvision access control and video intercom devices. Figure A-2 Device Command…
-
Page 60
UD20205B…

Домофоны Hikvision DS-KIS603-P — инструкция пользователя по применению, эксплуатации и установке на русском языке. Мы надеемся, она поможет вам решить возникшие у вас вопросы при эксплуатации техники.
Вы можете скачать инструкцию к Hikvision DS-KIS603-P по ссылке ниже, если не хотите ждать загрузки. Если остались вопросы, задайте их в комментариях после инструкции.
«Загружаем инструкцию», означает, что нужно подождать пока файл загрузится и можно будет его читать онлайн. Некоторые инструкции очень большие и время их появления зависит от вашей скорости интернета.
Полезные видео
Характеристики
Остались вопросы?
Не нашли свой ответ в руководстве или возникли другие проблемы? Задайте свой вопрос в форме ниже с подробным описанием вашей ситуации, чтобы другие люди и специалисты смогли дать на него ответ. Если вы знаете как решить проблему другого человека, пожалуйста, подскажите ему


Часто задаваемые вопросы

Как посмотреть инструкцию к Hikvision DS-KIS603-P?
Необходимо подождать полной загрузки инструкции в сером окне на данной странице или скачать кликнув по специальной кнопке.
Руководство на русском языке?
Все наши руководства представлены на русском языке или схематично, поэтому вы без труда сможете разобраться с вашей моделью
Как можно распечатать инструкцию?
Скачайте ее по специальной кнопке над формой чтения на ваше устройства и отправьте на печать.
Инструкция подходит для комплекта DS-KIS603-P так и для вызывной панели DS-KV6113-WPE1 и экрана DS-KH6320-WTE1
Подключаем все оборудование к 12 вольт и к локальной сети. Подробно видео подключения, можно посмотреть ниже.
Для обнаружения устройств скачиваем SADP tool.
Обновление вызывной панели происходит через браузер, интересует пункт:
Настройки — Система — Обслуживание — Обновление и обслуживание
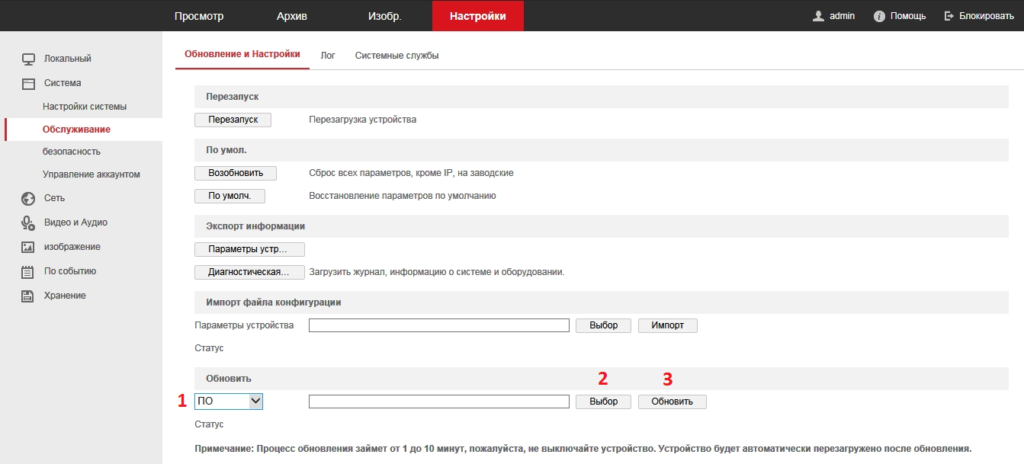
Обновление монитора делается только через программу iVMS-4200 так же скачиваем русификатор . Скачиваем, находим нашу панель, авторизируемся и закидываем прошивку по аналогии с вызывной панелью.
Скачать прошивку монитора DS-KH6320-WTE1 версия от 19.04.23 г.
Видео Hikvision ds-kis603p обзор настройка подключение замка

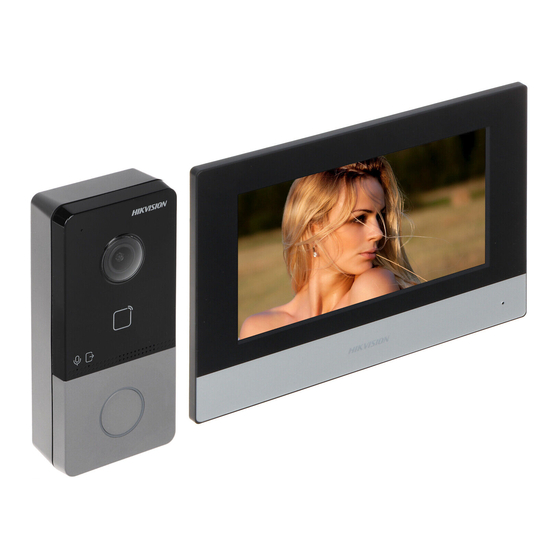
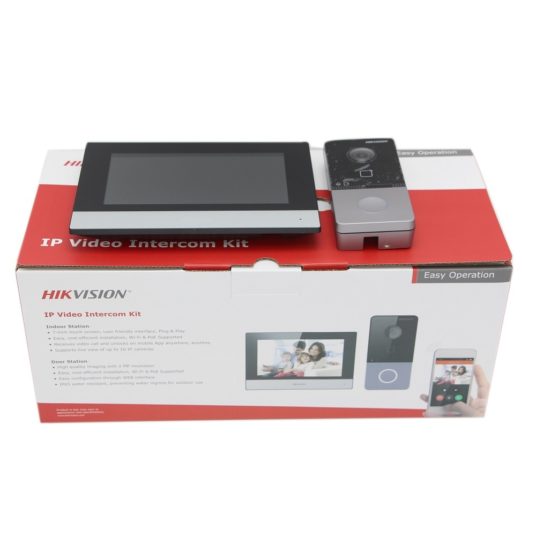
Комплект IP видеодомофона Hikvision DS-KIS603-P
Наличие и цена — по запросу
Запрос цены
Цена актуальна только для товаров, которые есть в наличии
Цена действительна только для интернет-магазина и может отличаться от цен в розничных магазинах

Постоянные скидки

Проверенные бренды

Гарантийный сервис

Оперативная доставка
- Описание
- Отзывы
- Задать вопрос
-
Наличие
Задать вопрос
Вы можете задать любой интересующий вас вопрос по товару или работе магазина.
Наши квалифицированные специалисты обязательно вам помогут.
Задать вопрос
Услуги

При установке домофона наши специалисты оценивают все особенности объекта, количество пользователей, поставленные задачи и любые индивидуальные пожелания заказчиков. Мы отлично разбираемся в современном оборудовании и поможем найти оптимальные решения даже в самых сложных и нестандартных ситуациях.


Будьте всегда в курсе!
Узнавайте о скидках и акциях первым
Обзор комплекта WI-FI видеодомофона Hikvision DS-KIS603-P
Состав комплекта:
Видеомонитор WI-FI Hikvision DS-KH6320-WTE1
Вызывная панель IP Hikvision DS-KV6113-WPE1
Основная фишка WI-FI домофона, это прием вызова и управление электрозамком с Вашего смартфона, планшета, компьютера, или сразу с нескольких устройств одновременно.
Прием и управление вызовами осуществляется через мобильное приложение Hik-connect для всех мобильных платформ.
хх
На корпусе монитора имеется слот карты памяти Micro SD, для хранения изображений вызова, также можно сохранять фотографии посетителя в режиме онлайн.
Основные способы подключения:
Монитор и панель поддерживают питание от блока 12 Вольт, а также могут быть запитаны при помощи poe коммутатора.
На вызывной панели имеются контакты реле управления электрозамком, а также встроенный считыватель бесконтактных брелоков Mifare.
Видеомонитор имеет встроенный Wi-fi модуль для подключения к роутеру.
Т.е для обеспечения связи необходимо подключить монитор к Вашей wi-fi сети и далее соединить вызывную панель с монитором стандартным кабелем Ethernet и коннектором RJ-45.