-
Драйверы
8
-
Инструкции по эксплуатации
59
Языки:

HP Ink Tank 310 инструкция по эксплуатации
(102 страницы)
- Языки:Русский
-
Тип:
PDF -
Размер:
1.97 MB
Просмотр

HP Ink Tank 310 инструкция по эксплуатации
(102 страницы)
- Языки:Русский
-
Тип:
PDF -
Размер:
1.77 MB
Просмотр

HP Ink Tank 310 инструкция по эксплуатации
(98 страниц)
- Языки:Английский
-
Тип:
PDF -
Размер:
1.7 MB
Просмотр

HP Ink Tank 310 инструкция по эксплуатации
(12 страниц)
- Языки:Английский
-
Тип:
PDF -
Размер:
1.6 MB
Просмотр

HP Ink Tank 310 инструкция по эксплуатации
(98 страниц)
- Языки:Английский
-
Тип:
PDF -
Размер:
1.67 MB
Просмотр

HP Ink Tank 310 инструкция по эксплуатации
(17 страниц)
- Языки:Английский
-
Тип:
PDF -
Размер:
1.58 MB
Просмотр

HP Ink Tank 310 инструкция по эксплуатации
(100 страниц)
- Языки:Словенский
-
Тип:
PDF -
Размер:
1.91 MB
Просмотр

HP Ink Tank 310 инструкция по эксплуатации
(99 страниц)
- Языки:Корейский
-
Тип:
PDF -
Размер:
2.21 MB
Просмотр

HP Ink Tank 310 инструкция по эксплуатации
(105 страниц)
- Языки:Украинский
-
Тип:
PDF -
Размер:
2.05 MB
Просмотр

HP Ink Tank 310 инструкция по эксплуатации
(103 страницы)
- Языки:Венгерский
-
Тип:
PDF -
Размер:
1.92 MB
Просмотр

HP Ink Tank 310 инструкция по эксплуатации
(100 страниц)
- Языки:Португальский
-
Тип:
PDF -
Размер:
1.91 MB
Просмотр

HP Ink Tank 310 инструкция по эксплуатации
(104 страницы)
- Языки:Болгарский
-
Тип:
PDF -
Размер:
2.06 MB
Просмотр

HP Ink Tank 310 инструкция по эксплуатации
(100 страниц)
- Языки:Эстонский
-
Тип:
PDF -
Размер:
1.9 MB
Просмотр

HP Ink Tank 310 инструкция по эксплуатации
(99 страниц)
- Языки:Хорватский
-
Тип:
PDF -
Размер:
1.94 MB
Просмотр

HP Ink Tank 310 инструкция по эксплуатации
(102 страницы)
- Языки:Латышский
-
Тип:
PDF -
Размер:
1.92 MB
Просмотр

HP Ink Tank 310 инструкция по эксплуатации
(103 страницы)
- Языки:Румынский
-
Тип:
PDF -
Размер:
2.07 MB
Просмотр

HP Ink Tank 310 инструкция по эксплуатации
(95 страниц)
- Языки:Иврит
-
Тип:
PDF -
Размер:
2.29 MB
Просмотр

HP Ink Tank 310 инструкция по эксплуатации
(16 страниц)
- Языки:Китайский
-
Тип:
PDF -
Размер:
2.37 MB
Просмотр

HP Ink Tank 310 инструкция по эксплуатации
(103 страницы)
- Языки:Литовский
-
Тип:
PDF -
Размер:
1.93 MB
Просмотр

HP Ink Tank 310 инструкция по эксплуатации
(100 страниц)
- Языки:Датский
-
Тип:
PDF -
Размер:
1.91 MB
Просмотр

HP Ink Tank 310 инструкция по эксплуатации
(101 страница)
- Языки:Нидерландский
-
Тип:
PDF -
Размер:
1.9 MB
Просмотр

HP Ink Tank 310 инструкция по эксплуатации
(96 страниц)
- Языки:Китайский
-
Тип:
PDF -
Размер:
2.06 MB
Просмотр

HP Ink Tank 310 инструкция по эксплуатации
(102 страницы)
- Языки:Индонезийский
-
Тип:
PDF -
Размер:
1.9 MB
Просмотр

HP Ink Tank 310 инструкция по эксплуатации
(101 страница)
- Языки:Тайский
-
Тип:
PDF -
Размер:
2.29 MB
Просмотр

HP Ink Tank 310 инструкция по эксплуатации
(100 страниц)
- Языки:Шведский
-
Тип:
PDF -
Размер:
1.9 MB
Просмотр

HP Ink Tank 310 инструкция по эксплуатации
(99 страниц)
- Языки:Турецкий
-
Тип:
PDF -
Размер:
2 MB
Просмотр

HP Ink Tank 310 инструкция по эксплуатации
(99 страниц)
- Языки:Чешский
-
Тип:
PDF -
Размер:
1.91 MB
Просмотр

HP Ink Tank 310 инструкция по эксплуатации
(102 страницы)
- Языки:Польский
-
Тип:
PDF -
Размер:
1.91 MB
Просмотр

HP Ink Tank 310 инструкция по эксплуатации
(103 страницы)
- Языки:Французский
-
Тип:
PDF -
Размер:
1.93 MB
Просмотр

HP Ink Tank 310 инструкция по эксплуатации
(98 страниц)
- Языки:Арабский
-
Тип:
PDF -
Размер:
2.27 MB
Просмотр

HP Ink Tank 310 инструкция по эксплуатации
(102 страницы)
- Языки:Испанский
-
Тип:
PDF -
Размер:
1.91 MB
Просмотр

HP Ink Tank 310 инструкция по эксплуатации
(101 страница)
- Языки:Финский
-
Тип:
PDF -
Размер:
1.89 MB
Просмотр

HP Ink Tank 310 инструкция по эксплуатации
(106 страниц)
- Языки:Греческий
-
Тип:
PDF -
Размер:
2.04 MB
Просмотр

HP Ink Tank 310 инструкция по эксплуатации
(100 страниц)
- Языки:Словенский
-
Тип:
PDF -
Размер:
1.69 MB
Просмотр

HP Ink Tank 310 инструкция по эксплуатации
(99 страниц)
- Языки:Турецкий
-
Тип:
PDF -
Размер:
1.74 MB
Просмотр

HP Ink Tank 310 инструкция по эксплуатации
(60 страниц)
- Языки:Сербский
-
Тип:
PDF -
Размер:
5.36 MB
Просмотр

HP Ink Tank 310 инструкция по эксплуатации
(100 страниц)
- Языки:Эстонский
-
Тип:
PDF -
Размер:
1.68 MB
Просмотр

HP Ink Tank 310 инструкция по эксплуатации
(106 страниц)
- Языки:Греческий
-
Тип:
PDF -
Размер:
1.79 MB
Просмотр

HP Ink Tank 310 инструкция по эксплуатации
(101 страница)
- Языки:Тайский
-
Тип:
PDF -
Размер:
2.03 MB
Просмотр

HP Ink Tank 310 инструкция по эксплуатации
(24 страницы)
- Языки:Китайский
-
Тип:
PDF -
Размер:
2.38 MB
Просмотр

HP Ink Tank 310 инструкция по эксплуатации
(96 страниц)
- Языки:Китайский
-
Тип:
PDF -
Размер:
1.88 MB
Просмотр

HP Ink Tank 310 инструкция по эксплуатации
(102 страницы)
- Языки:Индонезийский
-
Тип:
PDF -
Размер:
1.68 MB
Просмотр

HP Ink Tank 310 инструкция по эксплуатации
(100 страниц)
- Языки:Португальский
-
Тип:
PDF -
Размер:
1.69 MB
Просмотр

HP Ink Tank 310 инструкция по эксплуатации
(98 страниц)
- Языки:Арабский
-
Тип:
PDF -
Размер:
2.23 MB
Просмотр

HP Ink Tank 310 инструкция по эксплуатации
(102 страницы)
- Языки:Латышский
-
Тип:
PDF -
Размер:
1.69 MB
Просмотр

HP Ink Tank 310 инструкция по эксплуатации
(99 страниц)
- Языки:Шведский
-
Тип:
PDF -
Размер:
1.68 MB
Просмотр

HP Ink Tank 310 инструкция по эксплуатации
(104 страницы)
- Языки:Французский
-
Тип:
PDF -
Размер:
1.7 MB
Просмотр

HP Ink Tank 310 инструкция по эксплуатации
(103 страницы)
- Языки:Румынский
-
Тип:
PDF -
Размер:
1.81 MB
Просмотр

HP Ink Tank 310 инструкция по эксплуатации
(102 страницы)
- Языки:Венгерский
-
Тип:
PDF -
Размер:
1.7 MB
Просмотр

HP Ink Tank 310 инструкция по эксплуатации
(105 страниц)
- Языки:Болгарский
-
Тип:
PDF -
Размер:
1.82 MB
Просмотр

HP Ink Tank 310 инструкция по эксплуатации
(100 страниц)
- Языки:Чешский
-
Тип:
PDF -
Размер:
1.69 MB
Просмотр

HP Ink Tank 310 инструкция по эксплуатации
(105 страниц)
- Языки:Украинский
-
Тип:
PDF -
Размер:
1.82 MB
Просмотр

HP Ink Tank 310 инструкция по эксплуатации
(95 страниц)
- Языки:Иврит
-
Тип:
PDF -
Размер:
2.06 MB
Просмотр

HP Ink Tank 310 инструкция по эксплуатации
(101 страница)
- Языки:Нидерландский
-
Тип:
PDF -
Размер:
1.68 MB
Просмотр

HP Ink Tank 310 инструкция по эксплуатации
(99 страниц)
- Языки:Датский
-
Тип:
PDF -
Размер:
1.68 MB
Просмотр

HP Ink Tank 310 инструкция по эксплуатации
(100 страниц)
- Языки:Финский
-
Тип:
PDF -
Размер:
1.68 MB
Просмотр

HP Ink Tank 310 инструкция по эксплуатации
(103 страницы)
- Языки:Литовский
-
Тип:
PDF -
Размер:
1.7 MB
Просмотр

HP Ink Tank 310 инструкция по эксплуатации
(100 страниц)
- Языки:Хорватский
-
Тип:
PDF -
Размер:
1.68 MB
Просмотр

HP Ink Tank 310 инструкция по эксплуатации
(99 страниц)
- Языки:Корейский
-
Тип:
PDF -
Размер:
2.05 MB
Просмотр
На NoDevice можно скачать инструкцию по эксплуатации для HP Ink Tank 310. Руководство пользователя необходимо для ознакомления с правилами установки и эксплуатации HP Ink Tank 310. Инструкции по использованию помогут правильно настроить HP Ink Tank 310, исправить ошибки и выявить неполадки.
![]()
HP Ink Tank 310 series

Table of contents
|
1 HP Ink Tank 310 series Help ……………………………………………………………………………………………………………. |
1 |
|
2 Get started …………………………………………………………………………………………………………………………………. |
2 |
|
Printer parts ……………………………………………………………………………………………………………………………………….. |
3 |
|
Get to know the ink tank system …………………………………………………………………………………………………………… |
5 |
|
Control panel features …………………………………………………………………………………………………………………………. |
6 |
|
Control panel lights and display icons status …………………………………………………………………………………………. |
8 |
|
Load media ………………………………………………………………………………………………………………………………………. |
13 |
|
Load an original on the scanner glass ………………………………………………………………………………………………….. |
17 |
|
Paper basics ……………………………………………………………………………………………………………………………………… |
18 |
|
Open the HP printer software (Windows) ……………………………………………………………………………………………… |
20 |
|
Sleep mode ………………………………………………………………………………………………………………………………………. |
21 |
|
Quiet Mode ……………………………………………………………………………………………………………………………………….. |
22 |
|
utoff …………………………………………………………………………………………………………………………………………… |
23 |
|
3 Print ……………………………………………………………………………………………………………………………………….. |
24 |
|
Print from your computer …………………………………………………………………………………………………………………… |
25 |
|
Tips for print success …………………………………………………………………………………………………………………………. |
30 |
|
4 Copy and scan ……………………………………………………………………………………………………………………………. |
33 |
|
Copy documents ……………………………………………………………………………………………………………………………….. |
34 |
|
Scan using the HP printer software ……………………………………………………………………………………………………… |
35 |
|
Tips for copy and scan success ……………………………………………………………………………………………………………. |
38 |
|
5 Manage ink and printhead ……………………………………………………………………………………………………………. |
39 |
|
Ink levels ………………………………………………………………………………………………………………………………………….. |
40 |
|
Refill ink tanks ………………………………………………………………………………………………………………………………….. |
41 |
|
Order ink supplies ……………………………………………………………………………………………………………………………… |
44 |
|
Print with black ink only …………………………………………………………………………………………………………………….. |
45 |
|
Tips for working with ink and printhead ………………………………………………………………………………………………. |
46 |
|
Move printer ……………………………………………………………………………………………………………………………………… |
47 |
|
6 Connect your printer …………………………………………………………………………………………………………………… |
48 |
|
Connect your printer to your computer with a USB cable (non-network connection) ………………………………… |
49 |
|
7 Solve a problem …………………………………………………………………………………………………………………………. |
50 |
|
Jams and paper-feed issues ……………………………………………………………………………………………………………….. |
51 |
|
Printhead issues ……………………………………………………………………………………………………………………………….. |
58 |
|
Printing issues ………………………………………………………………………………………………………………………………….. |
64 |
|
Copy issues ………………………………………………………………………………………………………………………………………. |
73 |
|
Scan issues ……………………………………………………………………………………………………………………………………….. |
74 |
|
Printer hardware issues ……………………………………………………………………………………………………………………… |
75 |
|
Control panel error codes …………………………………………………………………………………………………………………… |
76 |
|
HP support ……………………………………………………………………………………………………………………………………….. |
77 |
|
Appendix A Technical information ……………………………………………………………………………………………………. |
79 |
|
HP Company notices ………………………………………………………………………………………………………………………….. |
80 |
|
Specifications ……………………………………………………………………………………………………………………………………. |
81 |
|
Regulatory notices …………………………………………………………………………………………………………………………….. |
83 |
|
Environmental product stewardship program ………………………………………………………………………………………. |
87 |
|
Index …………………………………………………………………………………………………………………………………………. |
94 |

1HP Ink Tank 310 series Help
Learn how to use your printer.
●Get started on page 2
●Print on page 24
●Copy and scan on page 33
●Manage ink and printhead on page 39
●Connect your printer on page 48
●Solve a problem on page 50
●Technical information on page 79

2Get started
●Printer parts
●Get to know the ink tank system
●Control panel features
●Control panel lights and display icons status
●Load media
●Load an original on the scanner glass
●Paper basics
●Open the HP printer software (Windows)
●Sleep mode
●Quiet Mode
●utoff
|
2 Chapter 2 Get started |
ENWW |

Printer parts
|
1 |
Paper-width guide |
|
2 |
Input tray |
|
3 |
Input tray shield |
|
4 |
Scanner lid |
|
5 |
Scanner glass |
|
6 |
Output tray extender (also referred to as the tray extender) |
|
7 |
Output tray |
|
8 |
Front door |
|
9 |
Ink tank |
|
10 |
Ink tank caps |
|
11 |
Ink tank lid |
|
12 |
Control panel |
|
13 |
Printhead access door |
|
14 |
Printheads |
|
15 |
Printhead latch |

|
16 |
Power connection |
|
17 |
USB port |
|
4 Chapter 2 Get started |
ENWW |
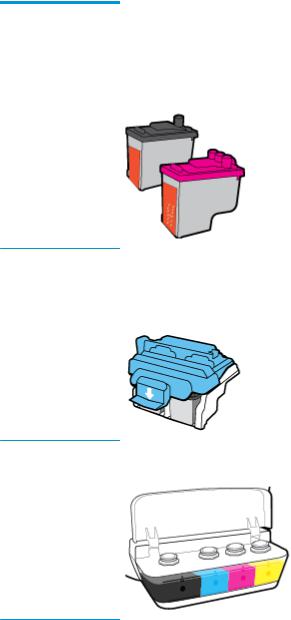
Get to know the ink tank system
|
Term |
efin t on |
|
Printheads |
The printheads are the components in the print mechanism that apply ink to the paper. There are two |
|
printheads: a black ink printhead and a tri-color ink printhead. |
|
|
CAUTION: After the printheads are installed and primed with ink, do not open the printhead latch unless |
|
|
you are installing new printheads or moving the printer outside your home or office. |
|
Printhead latch |
The printhead latch on the carriage secures the printheads in the carriage. Make sure the printhead latch is |
|
properly closed to avoid problems such as carriage jams. |
|
|
CAUTION: After the printheads are installed and primed with ink, do not open the printhead latch unless |
|
|
you are installing new printheads or moving the printer outside your home or office. |
|
Ink tanks |
Ink tanks are external ink reservoirs located at the right side of the printer. There are four ink tanks. Each |
|
ink tank corresponds to an individual color: black, cyan, magenta, and yellow. |
|
Ink tank caps |
Ink tank caps are rubber plugs that seal each ink tank. |
|
Priming |
Priming is the process of filling the ink supply tubes that run between the ink tanks and the printheads. |
|
This process occurs when you install new printheads and start the priming process from the control panel. |
|
|
For more information about priming, see Printhead priming and alignment icons on page 9. |
|
|
Alignment |
Alignment is a process of aligning the printheads to improve print quality. For more information about |
|
alignment, see Printhead priming and alignment icons on page 9. |
|
|
ENWW |
Get to know the ink tank system 5 |
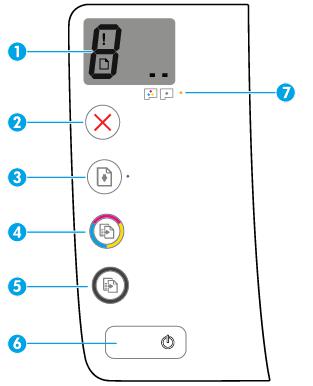
Control panel features
Overview of buttons and lights
|
Feature |
Description |
|
1 |
Control Panel Display : Indicates number of copies, printhead priming status, media errors, and printhead |
|
problems. |
|
|
2 |
Cancel button: Stops the current operation. |
|
3 |
Resume button: Resumes a job after a disruption (for example, after loading paper or clearing a paper jam). |
|
Resume light: Indicates the printer is in a warning or error state. |
|
|
4 |
Color Copy button: Starts a color copy job. To increase the number of color copies, press the button |
|
multiple times. Copying will start two seconds after the last button press. |
|
|
NOTE: You can generate a print quality diagnostics report by pressing and holding the Color Copy button |
|
|
for three seconds. |
|
|
5 |
Black Copy button: Starts a black-and-white copy job. To increase the number of black-and-white copies, |
|
press the button multiple times. Copying will start two seconds after the last button press. |
|
|
6 |
Power button: Turns the printer on or off. |
|
7 |
Printhead Alert light: Indicates printhead problems. |
|
6 Chapter 2 Get started |
ENWW |
![]()
Control panel display icons
|
Icon |
Description |
|
Number of copies icon: Shows the number of copies when you are copying documents, changes to the |
|
|
letter P when the printer needs priming, and alternates between the letter E and a number when the |
|
|
printer is in an error state. |
Error icon: Indicates an error.
Paper Error icon: Indicates a paper-related error.
Printhead icons: The left printhead icon ashing shows an error related to the tri-color printhead, and the right icon ashing shows an error related to the black printhead.
|
ENWW |
Control panel features 7 |

Control panel lights and display icons status
●Power button light
●Printhead icons and Printhead Alert light
●Printhead priming and alignment icons
●Error icon, Paper Error icon, and Resume light
●Number of copies icon
●Ink system maintenance icon
Power button light
|
Status |
Description |
|
|
On |
The printer is on. |
|
|
ff |
The printer is powered off. |
|
|
Dimmed |
Indicates the printer is in Sleep mode. The printer automatically enters Sleep mode after 5 minutes |
|
|
of inactivity. After 2 hours of inactivity, the printer automatically turns off if not connected to a |
||
|
computer. |
||
|
Blinking |
The printer is processing a job. To cancel the job, press the Cancel button ( |
). |
|
Fast blinking |
If the printhead access door is open, close it. If the printhead access door is closed and the light is |
|
|
blinking fast, the printer is in an error state that you can resolve by following the on-screen |
||
|
messages from the computer. If you do not see any on-screen messages, try printing a document to |
||
|
generate an on-screen message. |
||
Printhead icons and Printhead Alert light
●The Error icon, one of the Printhead icons, and the Printhead Alert light are blinking.
|
8 Chapter 2 Get started |
ENWW |

One of the following might have occurred.
—The corresponding printhead is missing.
—The corresponding printhead is installed incorrectly.
—The corresponding printhead still has orange plastic tape or the plug on it.
—If one of the printheads is missing, insert the corresponding printhead.
—If both printheads are installed in the printer, remove the corresponding printhead, make sure there is no plug or plastic tape on it, and then reinsert the printhead securely.
CAUTION: These instructions are only applicable when you install printheads during initial printer setup. If printheads have been primed with ink, do not open the printhead latch unless installing new printheads or moving the printer outside your home or office.
For more information, see Fix printhead problems on page 58.
●The Error icon, both Printhead icons, and the Printhead Alert light are blinking.
One of the following might have occurred.
—Both printheads are missing.
—Both printheads are installed incorrectly.
—Both printheads still have orange plastic tapes or plugs on them.
—Both printheads are incompatible or damaged.
—If there are no printheads installed in the printer, install the printheads.
—If both printheads are installed in the printer, remove the printheads, make sure there is no plug or plastic tape on them, and then reinsert the printheads securely.
CAUTION: These instructions are only applicable when you install printheads during initial printer setup. If printheads have been primed with ink, do not open the printhead latch unless installing new printheads or moving the printer outside your home or office.
—Make sure that you are using the correct HP printheads for your printer.
—If the error persists, contact HP Support for help.
Printhead priming and alignment icons
Printheads ready for priming
●The Number of copies icon changes to a blinking P during initial printer setup. At the same time all other icons on the control panel display are turned off.
|
ENWW |
Control panel lights and display icons status |
9 |

During initial setup, the printer detects that the new printheads are installed and the ink system is ready for priming.
Make sure all ink tanks are filled above the minimum line, and the printhead latch is closed firmly. Press and hold the
Resume button ( ) for three seconds to start ink priming.
NOTE: Priming will occur in the background and will not block printing, copying, or scanning.
Alignment status icon
●The Number of copies icon becomes a blinking A.
|
Cause |
Solution |
||
|
The alignment page is printing and waiting to scan. |
Place the alignment page print side down on the scanner |
||
|
glass, and then press the Color Copy button ( |
) on the |
||
|
control panel to align. |
|||
|
NOTE: When scan starts, blinking «A» changes to solid «A». |
|||
|
Alignment is complete after the scan. |
|||
|
— |
If alignment event occurs as part of the priming process |
||
|
during initial printer setup, the solid «A» changes to «0» |
|||
|
once alignment is complete. |
|||
|
— |
If alignment event occurs after initial printer setup, the |
||
|
control panel display returns to normal state once |
|||
|
alignment is complete. |
|||
Priming in progress
●Printhead priming is in progress.
Printhead priming is in progress.
Priming can take place in the background when the printer is idle. Priming is complete when the display shows «0».
When priming is in progress, you can still print, scan, or copy.
Error icon, Paper Error icon, and Resume light
The Error icon, the Paper Error icon, and the Resume light are blinking.
|
10 Chapter 2 Get started |
ENWW |

|
Cause |
Solution |
|
|
The printer receives a printing job, and detects that there is no |
Load paper, and then press the Resume button ( |
) to continue |
paper in the input tray.
printing.
For information about how to load paper, see Load media on page 13.
Number of copies icon
●The Number of copies icon is alternating between the letter E and the number 3. At the same time, the Resume light is blinking, and the Power button light is on.
The carriage inside the printer has stalled.
Open the printhead access door, make sure the printhead latch is properly closed and the print carriage is not obstructed. Move the carriage to the right, close the printhead access door,
and then press the Resume button ( ) to continue printing.
See Jams and paper-feed issues on page 51 for more information.
CAUTION: Do not open the printhead latch unless you are installing new printheads or moving the printer outside your home or office.
●The Number of copies icon is alternating between the letter E and the number 4. At the same time, the Error icon, the Paper Error icon, and the Resume light are blinking.
Cause
There is a paper jam.
Solution
Clear the jam, and then press the Resume button ( ) to continue printing.
For more information, see Jams and paper-feed issues on page 51.
●The Number of copies icon is alternating between the letter E and the number 5. At the same time, all lights on the control panel are blinking.
|
ENWW |
Control panel lights and display icons status 11 |

The scanner is not working.
Turn off and turn on the printer.
If the problem persists, contact HP. The printer still prints even if the scanner is not working.
●The Number of copies icon is alternating between the letter E and the number 6.
The printer is in an error state.
Reset the printer.
1.Turn off the printer.
2.Unplug the power cord.
3.Wait a minute, and then plug the power cord back in.
4.Turn on the printer.
If the problem persists, contact HP.
Ink system maintenance icon
The Number of copies icon is alternating between the letter E and the number 9.
The printer detects that ink system maintenance is required.
Open the printhead access door completely, and then close it immediately. This process helps remove ink buildup and maintains the best print quality throughout the life of the printer.
CAUTION: Do not open the printhead latch during this process unless you are installing new printheads or moving the printer outside your home or office.
|
12 Chapter 2 Get started |
ENWW |

Load media
Select a paper size to continue.
To load full-size paper
1.Raise the input tray.
2.Slide the paper-width guide to the left.
3.Insert a stack of paper into the input tray with the short edge down and the print side up, and slide the stack of paper down until it stops.

4.Slide the paper-width guide to the right until it stops at the edge of the paper.
5.Pull out the output tray and the tray extender.
To load small-size paper
1.Raise the input tray.
2.Slide the paper-width guide to the left.
|
14 Chapter 2 Get started |
ENWW |

3.Insert a stack of small-size paper (like photo paper) into the far-right side of the input tray with the short edge down and the print side up, and slide the stack of paper down until it stops.
4.Slide the paper-width guide to the right until it stops at the edge of the paper.
5.Pull out the output tray and the tray extender.
To load envelopes
1.Raise the input tray.

2.Slide the paper-width guide to the left.
3.Insert one or more envelopes into the far-right side of the input tray and slide the stack of envelopes down until it stops.
The side to be printed on should face up. For envelope with ap on the long edge, insert the envelope vertically with the ap on the left side and facing down. For envelope with the ap on the short edge, insert the envelope vertically with the ap on the top and facing down.
4.Slide the paper-width guide to the right against the stack of envelopes until it stops.
5.Pull out the output tray and the tray extender.
|
16 Chapter 2 Get started |
ENWW |
![]()
Load an original on the scanner glass
To load an original on the scanner glass
1.Lift the scanner lid.
2.Load the original print-side down on the right corner of the scanner glass.
3.Close the scanner lid.
|
ENWW |
Load an original on the scanner glass 17 |

Paper basics
The printer is designed to work well with most types of office paper. It is best to test a variety of print paper types before buying large quantities. Use HP paper for optimum print quality. Visit the HP website at www.hp.com for more information about HP paper.
HP recommends plain papers with the ColorLok logo for printing everyday documents. All papers with the ColorLok logo are independently tested to meet high standards of reliability and print quality, and produce documents with crisp, vivid color, bolder blacks, and that dry faster than ordinary plain papers. Look for papers with the ColorLok logo in a variety of weights and sizes from major paper manufacturers.
This section contains the following topics:
●Recommended papers for printing
●Order HP paper supplies
Recommended papers for printing
If you want the best print quality, HP recommends using HP papers that are specifically designed for the type of project you are printing.
Depending on your country/region, some of these papers might not be available.
Photo printing
●HP Premium Plus Photo Paper
HP Premium Plus Photo Paper is HP’s highest-quality photo paper for your best photos. With HP Premium Plus Photo Paper, you can print beautiful photos that are instant-dry so you can share them right off the printer. It is available in several sizes, including A4, 8.5 x 11 inches, 4 x 6 inches (10 x 15 cm), 5 x 7 inches (13 x 18 cm), and in two finishes — glossy or soft gloss (semi-gloss). Ideal for framing, displaying, or gifting your best photos and special photo projects. HP Premium Plus Photo Paper delivers exceptional results with professional quality and durability.
●HP Advanced Photo Paper
This glossy photo paper features an instant-dry finish for easy handling without smudging. It resists water, smears, fingerprints, and humidity. Your prints have a look and feel comparable to a storeprocessed photo. It is available in several sizes, including A4, 8.5 x 11 inches, 10 x 15 cm (4 x 6 inches), 13 x 18 cm (5 x 7 inches). It is acid-free for longer lasting documents.
●HP Everyday Photo Paper
Print colorful, everyday snapshots at a low cost, using paper designed for casual photo printing. This affordable photo paper dries quickly for easy handling. Get sharp, crisp images when you use this paper with any inkjet printer. It is available in glossy finish in several sizes, including A4, 8.5 x 11 inches, 5 x 7 inches, and 4 x 6 inches (10 x 15 cm). It is acid-free for longer lasting documents.
●HP Photo Value Packs
HP Photo Value Packs conveniently package original HP ink cartridges and HP Advanced Photo Paper to save you time and take the guesswork out of printing affordable, lab-quality photos with your HP
|
18 Chapter 2 Get started |
ENWW |
printer. Original HP inks and HP Advanced Photo Paper have been designed to work together so your photos are long lasting and vivid, print after print. Great for printing out an entire vacation’s worth of photos or multiple prints to share.
Business documents
●HP Premium Presentation Paper 120g Matte or HP Professional Paper 120 Matt
This paper is a heavy two-sided matte paper perfect for presentation, proposals, reports, and newsletters. It is heavyweight for an impressive look and feel.
●HP Brochure Paper 180g Glossy or HP Professional Paper 180 Glossy
These papers are glossy-coated on both sides for two-sided use. They are the perfect choice for nearphotographic reproductions and business graphics for report covers, special presentations, brochures, mailers, and calendars.
●HP Brochure Paper 180g Matte or HP Professional Paper 180 Matte
These papers are matte-coated on both sides for two-sided use. They are the perfect choice for nearphotographic reproductions and business graphics for report covers, special presentations, brochures, mailers, and calendars.
Everyday printing
All the papers listed for everyday printing feature ColorLok Technology for less smearing, bolder blacks, and vivid colors.
●HP Bright White Inkjet Paper
HP Bright White Inkjet Paper delivers high-contrast colors and sharp text. It is opaque enough for twosided color usage with no show-through, which makes it ideal for newsletters, reports, and yers.
●HP Printing Paper
HP Printing Paper is a high-quality multifunction paper. It produces documents that look and feel more substantial than documents printed on standard multipurpose or copy paper. It is acid-free for longer lasting documents.
|
● |
HP |
ff ce Paper |
|
HP |
ffice Paper is a high-quality multifunction paper. It is suitable for copies, drafts, memos, and other |
|
|
everyday documents. It is acid-free for longer lasting documents. |
||
|
● |
HP |
ff ce Recycled Paper |
|
HP |
ffice Recycled Paper is a high-quality multifunction paper made with 30% recycled fiber. |
Order HP paper supplies
The printer is designed to work well with most types of office paper. Use HP paper for optimum print quality.
To order HP papers and other supplies, go to www.hp.com . At this time, some portions of the HP website are available in English only.
HP recommends plain papers with the ColorLok logo for printing and copying of everyday documents. All papers with the ColorLok logo are independently tested to meet high standards of reliability and print quality, and produce documents with crisp, vivid color, bolder blacks and shorter dry-time than ordinary plain papers. Look for papers with the ColorLok logo in a variety of weights and sizes from major paper manufacturers.

Open the HP printer software (Windows)
After installing the HP printer software, double-click the printer icon on the desktop or do one of the following to open the printer software:
●Windows 10: From the computer desktop, click Start, select HP from the app list, and then select the icon with the printer name.
●Windows 8.1: Click the down arrow in lower left corner of the Start screen, and then select the printer name.
●Windows 8: Right-click an empty area on the Start screen, click All Apps on the app bar, and then select the printer name.
●Windows 7, Windows Vista, and Windows XP: From the computer desktop, click Start, select All Programs, click HP, click the folder for the printer, and then select the icon with the printer name.
 NOTE:
NOTE:
●If you have not installed the HP printer software, enter 123.hp.com in a web browser on your computer to download and install the HP printer software.
●You can also use the HP printer software CD, or download the HP printer software at www.support.hp.com.
|
20 Chapter 2 Get started |
ENWW |
Sleep mode
●Power usage is reduced while in Sleep mode.
●After initial setup of printer, the printer will enter Sleep mode after 5 minutes of inactivity.
●The Power button light is dimmed and the printer control panel display is off in Sleep mode.
●Pressing any button on the control panel, or sending a print or scan job can wake up the printer from sleep mode.

Quiet Mode
Quiet Mode slows down printing to reduce overall noise without affecting print quality. Quiet Mode only works for printing with Normal print quality on plain paper. To reduce printing noise, turn on Quiet Mode. To print at normal speed, turn Quiet Mode off. Quiet Mode is off by default.
 NOTE: In Quiet Mode, if you print on plain paper with the Draft or Best print quality, or if you print photos or envelopes, the printer works in the same way as when Quiet Mode is off.
To turn Quiet Mode on or off from the printer software (Windows)
1.Open the HP printer software. For more information, see Open the HP printer software (Windows) on page 20.
2.Click the Quiet Mode tab.
3. Click On or ff.
4.Click Save Setting.
To turn Quiet Mode on or off from the printer software (OS X and macOS)
1.Open HP Utility.
 NOTE: HP Utility is located in the HP folder in the Applications folder.
2.Select the printer.
3.Click Quiet Mode .
4. Select On or ff .
5.Click Apply Now.
|
22 Chapter 2 Get started |
ENWW |
uto ff
This feature turns the printer off after 2 hours of inactivity to help reduce energy use. uto ff turns the printer off completely, so you must use the Power button to turn the printer back on. If your printer supports this energy saving feature, utoff is automatically enabled or disabled depending on printer capabilities and connection options. Even when utoff is disabled, the printer enters Sleep mode after 5 minutes of inactivity to help reduce energy use.
|
● |
uto- |
ff is enabled when the printer is turned on, if the printer does not have network or fax capability, |
|
or is not using these capabilities. |
||
|
● |
uto- |
ff is disabled when a printer’s wireless or Wi-Fi Direct capability is turned on or when a printer |
|
with fax, USB, or Ethernet network capability establishes a fax, USB, or Ethernet network connection. |

3Print
●Print from your computer
●Tips for print success

Print from your computer
●Print documents
●Print photos
●Print envelopes
●Print using the maximum dpi
Print documents
Before printing documents, make sure you have paper loaded in the input tray and the output tray is open. For more information about loading paper, see Load media on page 13.
To print a document (Windows)
1.From your software, select Print.
2.Make sure your printer is selected.
3.Click the button that opens the Properties dialog box.
Depending on your software application, this button might be called Properties, Options, Printer Setup,
Printer Properties, Printer, or Preferences.
4.Select the appropriate options on the Printing Shortcuts or Printing Shortcut tab. To change other print settings, click the other tabs.
For more printing tips, see Printer settings tips on page 31.
 NOTE: If you change the paper size, be sure to load the correct paper in the input tray and set the paper size on the printer control panel.
5.Click OK to close the Properties dialog box.
6.Click Print or OK to begin printing.
To print documents (OS X and macOS)
1.From the File menu in your software, choose Print.
2.Make sure your printer is selected.
3.Set the print options.
If you do not see options on the Print dialog, click Show Details.
● Choose the appropriate paper size in the Paper Size pop-up menu.
 NOTE: If you change the paper size, ensure that you have loaded the correct paper.
●Select the orientation.
●Enter the scaling percentage.
4.Click Print.
|
ENWW |
Print from your computer 25 |

To print on both sides of the page (Windows)
1.From your software, select Print.
2.Make sure your printer is selected.
3.Click the button that opens the Properties dialog box.
Depending on your software application, this button might be called Properties, Options, Printer Setup,
Printer Properties, Printer, or Preferences.
4.On the Printing Shortcuts or Printing Shortcut tab, select the Two-sided (Duplex) Printing shortcut, and then select an option from the Print On Both Sides Manually drop-down list.
To change other print settings, click the other tabs.
For more printing tips, see Printer settings tips on page 31.
 NOTE: If you change the paper size, be sure to load the correct paper in the input tray and set the paper size on the printer control panel.
5.Click OK to close the Properties dialog box.
6.Click Print or OK to begin printing.
To print on both sides of the page (OS X and macOS)
1.From the File menu in your software, choose Print.
2.In the Print dialog, choose Paper Handling from the pop-up menu and set Page Order to Normal.
3.Set Pages to Print to Odd Only.
4.Click Print.
5.After all of the odd numbered pages have printed, remove the document from the output tray.
6.Reload the document so that the end that came out of the printer is now going into the printer and the blank side of the document is facing toward the front of the printer.
7.In the Print dialog, return to the Paper Handling pop-up menu and set the page order to Normal and the pages to print to Even Only.
8.Click Print.
Print photos
Before printing photos, make sure you have photo paper loaded in the input tray and the output tray is open. For more information about loading paper, see Load media on page 13.
To print a photo on photo paper (Windows)
1.From your software, select Print.
2.Make sure your printer is selected.
3.Click the button that opens the Properties dialog box.
Depending on your software application, this button might be called Properties, Options, Printer Setup,
Printer Properties, Printer, or Preferences.
 Loading…
3.0
Rated 3 out of 5
3 out of 5 stars (based on 1 review)
Your overall rating
HP INK TANK 310 (01) PDF MANUAL
Click here to download HP INK TANK 310 (01) PDF MANUAL
HP INK TANK 310 (01) PDF MANUAL
FREE ENGLISH PDF
OPERATING INSTRUCTIONS
USER GUIDE – USER MANUAL
OWNER GUIDE – OWNER MANUAL
REFERENCE GUIDE – REFERENCE MANUAL
INSTRUCTION GUIDE – INSTRUCTION MANUAL
Your overall rating
HP INK TANK 310 (01) PDF MANUAL
HP INK TANK 310 (01) PDF MANUAL
Leave a comment, question, review or page error below. Account not required.
This site uses Akismet to reduce spam. Learn how your comment data is processed.
Содержание
- Подключение принтеров от HP к компьютеру или ноутбуку
- Шаг 1: Распаковка и подсоединение кабелей
- Шаг 2: Инсталляция драйверов
- Шаг 3: Настройка устройства для сетевой работы
- Шаг 4: Настройка принтера
- Начало работы
- Как подключить принтер к ноутбуку
- Подключение принтера к ноутбуку через usb
- Как подключить принтер к ноутбуку без установочного диска
- Как подключить ноутбук к принтеру через Wi-Fi
- Как подключить старый принтер к ноутбуку
- Заключение
- Настройка принтера HP (USB-кабель)
- Настройка подключения принтера по USB (Windows)
- Настройка подключения принтера по USB (Mac)
- Настройка подключения принтера по USB (Chromebook)
- Альтернативные варианты подключения по USB
- Настройка подключения принтера по USB с использованием встроенного драйвера (Windows)
- Настройка подключения принтера по USB с использованием встроенного драйвера (Mac)
- Драйвер для HP Ink Tank 310
- Установка драйвера в Windows 10
- Как подключить принтер к компьютеру в Windows 10
- Подготовка принтера к работе
- Как подключить принтер к компьютеру через USB-кабель
- Добавление и настройка принтера в Windows 10
- Как подключить принтер к компьютеру по сети
- Как открыть общий доступ к принтеру
- Обнаружение сетевого принтера
Подключение принтеров от HP к компьютеру или ноутбуку

Шаг 1: Распаковка и подсоединение кабелей
Первоочередная задача — распаковать принтер, выбрать для него подходящее расположение, подключить кабели. Если с проводом питания обычно не возникает никаких проблем, поскольку он стандартный, то вот обеспечение соединения между печатающим оборудованием и компьютером у неопытных пользователей вызывает трудности. Для этого нужен кабель, который тоже есть в комплекте.
Одна его сторона имеет необычный разъем USB типа B, представление которого вы видите на следующем изображении. Эту сторону нужно вставить в порт, расположенный на самом принтере. Обычно он находится сзади или сбоку в виде углубления, поэтому придется осмотреть внешние части устройства, чтобы отыскать его.

Далее в ход идет вторая сторона провода со стандартным разъемом USB. Его вставьте в любой соответствующий порт на ноутбуке, а после включения принтера нажатием на кнопку в операционной системе должно появиться уведомление об обнаружении нового устройства.

Обратим внимание, что при использовании персональных компьютеров предпочтение следует отдать порту USB, который находится на материнской плате, то есть расположенному сзади корпуса. Если вы подключите принтер к передней панели, в большинстве случаев не возникнет никаких проблем, но иногда подача сигнала не обеспечивается, что связано с недостачей электроэнергии, поступающей к такому разъему.

Шаг 2: Инсталляция драйверов
Сейчас у многих пользователей на компьютере или ноутбуке установлена Windows 10, а в этой версии операционной системы хорошо работает функция автоматического поиска драйверов, которая начинается сразу же после подключения принтера или другого оборудования. Этот процесс сопровождается появлением соответствующих уведомлений, в том числе и того, которое всплывет после успешной настройки устройства. Если же девайс был обнаружен и его название нормально определяется, но при этом к работе он не готов, возможно, проблема заключается в установленном ограничении на скачивание программного обеспечения через лимитные подключения, что необходимо отключить следующим образом:


Не всегда скачивание драйверов начинается сразу же после активации параметра скачивания через лимитные подключения. Чаще всего для этого придется либо переподключить принтер, желательно выбрав другой разъем USB, либо отправить компьютер на перезагрузку и дождаться, скачивания ПО при старте следующего сеанса.
Если же принтер вовсе не обнаруживается операционной системой, соответственно, загрузка драйверов тоже не происходит, понадобится использовать альтернативные варианты скачивания программного обеспечения. Это может быть официальный сайт или стороннее приложение, о чем читайте в универсальной инструкции далее или же найдите статью, посвященную конкретной модели принтера от HP, через поиск на нашем сайте.
Шаг 3: Настройка устройства для сетевой работы
Когда планируется использовать несколько ПК или ноутбуков для того, чтобы печатать на принтере HP, лучше всего сразу настроить его общий доступ и разрешить печать в пределах локальной сети. Для этого предлагаем воспользоваться отдельным руководством на нашем сайте, перейдя по следующей ссылке.

Помимо настройки общего доступа на других компьютерах нужно организовать сетевое подключение. Для этого должна быть настроенной локальная сеть, а само устройство — уже находиться в ней. Остальные действия не требуют затрат по времени и выполняются крайне просто. Ознакомьтесь с ними в другой нашей статье.
Шаг 4: Настройка принтера
Не всегда принтер сразу же готов для печати, особенно, когда речь идет о нестандартных форматах бумаги или самой выпускаемой продукции. Тогда надо обратиться к настройкам принтера в операционной системе или задействовать для этого приложение от разработчиков. На нашем сайте есть полное руководство, посвященное данной теме, в котором вы найдете ответы на все интересующие вопросы.
Начало работы
После выполнения всех операций по подключению и настройке оборудования можно сразу же переходить к взаимодействию с ним. При этом пользователям стоит учитывать, что печать определенных форматов документов осуществляется по-разному, а также есть другие нюансы, о которых нужно знать.
У нас также есть вспомогательные руководства, посвященные обслуживанию устройства, чем тоже рано или поздно понадобится заняться. Подберите подходящую для себя тему и прочтите ее, чтобы знать больше о предстоящей задаче.
Если во время взаимодействия с печатающим оборудованием возникли ошибки, их нужно решить, подобрав соответствующий метод. О доступных способах исправления частых проблем с печатью читайте далее.
Помимо этой статьи, на сайте еще 12354 инструкций.
Добавьте сайт Lumpics.ru в закладки (CTRL+D) и мы точно еще пригодимся вам.
Отблагодарите автора, поделитесь статьей в социальных сетях.
Источник
Как подключить принтер к ноутбуку
Подключение принтера к ноутбуку не потребует от вас каких-либо специальных навыков или сложных настроек. Начать подключение любого устройства следует с его включения в сеть.
Подключение принтера к ноутбуку через usb
Как подключить принтер к ноутбуку без установочного диска
Даже если у вас отсутствует установочный диск с драйверами, не переживайте — можно обойтись и без него. Производители большинства современных моделей принтеров позаботились о том, чтобы любой пользователь мог установить драйверы, скачав их с официального сайта разработчика. Можно ли подключить принтер к ноутбуку без драйверов? Безусловно, нет. Так или иначе вам придется искать драйвер. А для этого нужно знать модель вашего принтера, название которой обычно имеется на фронтальной части корпуса устройства.
Просто вбиваем в поиск «драйвер …. (модель вашего устройства)», а затем переходим на сайт производителя программного обеспечения для скачивания по ссылке.
На сайте указываем операционную систему и загружаем драйвер на свой ноутбук.
Установка драйверов с использованием скачанного файла ничем не отличается от установки с диска. Точно так же следуем инструкциям на экране, а затем добавляем наш принтер в устройства по умолчанию.
Как подключить ноутбук к принтеру через Wi-Fi
Сегодня все больше устройств благодаря технологии Wi-Fi не нуждаются в кабельном подключении. Это и не удивительно. В век прогрессивных технологий мы постепенно снимаем с себя оковы путающихся проводов, и принтеры не стали исключением.
Конечно же, для того чтобы подключить принтер по Wi-Fi, он должен поддерживать эту технологию. Об этом вам подскажет соответствующий значок на фронтальной части корпуса гаджета.
Также для полного беспроводного подключения вам потребуется Wi-Fi роутер с функцией WPS. Если же на роутере нет такой кнопки, то принтер придется установить в непосредственной близости к Wi-Fi роутеру и подключить его с помощью кабеля Ethernet.
Для начала подключения нажмите и удерживайте кнопку Wi-Fi на принтере, пока она не начнет мигать. Затем нажмите и удерживайте кнопку WPS на корпусе роутера и дождитесь, пока устройство подключится к сети Wi-Fi.
Примечание. На некоторых моделях необходимо, кроме кнопки включения Wi-Fi, последовательно нажимать несколько кнопок, расположенных на корпусе принтера. Последовательность кнопок для вашего устройства вы можете узнать на сайте производителя конкретной модели принтера. Для этого введите в поиске «Инструкция подключения …. (модель вашего принтера)» и перейдите на сайт, чтобы узнать комбинацию для вашего устройства.
После этого переустановите драйвер принтера и укажите при установке беспроводной способ подключения.
Как подключить старый принтер к ноутбуку
Многие обладатели старых принтеров или МФУ сталкиваются с проблемами подключения к ноутбуку и не знают, как присоединить старый принтер к ноутбуку. Дело в том, что многие производители постепенно перестают поддерживать старые устройства, и драйвер для своего устройства вы, скорее всего, не найдете на сайте производителя.
Но выход есть. Можно попробовать установить ближайший по наименованию к вашему устройству подходящий драйвер. Например, если вы не нашли на сайте драйвер для принтера Xerox Phaser 3121, можно скачать имеющийся драйвер для Xerox Phaser 3117 и установить его на свой компьютер. Затем необходимо будет произвести некоторые настройки.
После установки драйвера перейдите в «Устройства и принтеры» и выберите пункт «Добавление принтера», а затем пункт «Необходимый принтер отсутствует в списке».
Затем в появившемся окне выберете пункт «Добавить локальный или сетевой принтер с параметрами, заданными вручную» и далее «USB001 Порт виртуального принтера для USB».
Затем нажмите на кнопку «Установить с диска» и укажите компьютеру путь до файла с расширением *.inf, который лежит в папке с вашим установленным драйвером.
По завершении этих действий мастер установки предложит вам напечатать пробную страницу. Если печать прошла успешно, значит, драйвер установлен, и можно использовать наше устройство для работы. Жмем «Готово» и приступаем к печати.
Заключение
Подводя итоги, хотим напомнить, что подключение принтера — процесс, который требует от пользователя внимания. Если подключение не ладится, возможно, вы сами что-то упустили. При кабельном подключении в первую очередь проверьте, чтобы используемый порт USB в ноутбуке был исправен. А перед тем, как подключить принтер к ноутбуку, также не забудьте удостовериться в его надежном подключении в корпусе устройства. Все это является одними из частых причин, по которым ноутбук просто не сможет распознать ваш печатающий гаджет.
При использовании сети Wi-Fi удостоверьтесь, чтобы устройство находилось в зоне действия роутера. Используйте драйверы, скачанные только с официальных страниц производителей. Надеемся, что установка не отнимет у вас много времени, а ваши устройства принесут вам только положительные эмоции от использования!
Источник
Настройка принтера HP (USB-кабель)
Настройте ваш принтер для подключения по USB на компьютере Windows, Mac или Chromebook.
Настройка подключения принтера по USB (Windows)
Загрузите приложение HP Smart, затем выполните инструкции, чтобы настроить подключение по USB в Windows.
Если вы уже подключили принтер по кабелю USB к вашему компьютеру, отсоедините его, затем удалите принтер с компьютера.
Убедитесь, что на компьютере доступен свободный порт USB. Не подключайте принтер к концентратору USB или док-станции, так как он может не получать достаточно электроэнергии для надлежащей работы.
Откройте HP Smart – Microsoft Store и установите приложение HP Smart.
Настройка подключения принтера по USB (Mac)
Загрузите приложение HP Smart, затем выполните инструкции, чтобы настроить подключение по USB в macOS.
Если вы уже подключили принтер по кабелю USB к вашему компьютеру, отсоедините его, затем удалите принтер с компьютера.
Убедитесь, что на компьютере доступен свободный порт USB. Не подключайте принтер к концентратору USB или док-станции, так как он может не получать достаточно электроэнергии для надлежащей работы.
Откройте HP Smart – Mac App Store и установите приложение HP Smart.
Настройка подключения принтера по USB (Chromebook)
Подсоедините кабель USB, затем настройте подключение по USB в Chrome OS.
Подсоедините USB-кабель принтера к компьютеру.
Альтернативные варианты подключения по USB
Настройте подключение к принтеру по USB с помощью другого метода.
Настройка подключения принтера по USB с использованием встроенного драйвера (Windows)
При подключении кабеля USB от принтера Windows автоматически устанавливает и добавляет принтер, обеспечивая базовые функции печати.
Убедитесь, что непосредственно на компьютере есть свободный порт USB. При использовании концентратора USB или док-станции принтер может не получать достаточно электроэнергии для надлежащей работы.
Подсоедините USB-кабель принтера к компьютеру.
Если отображается сообщение «Найдено новое оборудование», следуйте запросам на экране для установке драйвера, затем отправьте задание печати, чтобы проверить подключение.
Если подключение принтера или задание печати завершается со сбоем, выполните следующие действия.
Если ваш принтер не указан в списке, перейдите к выполнению следующих действий.
Отсоедините, затем снова подсоедините кабель USB, чтобы завершить настройку принтера.
Настройка подключения принтера по USB с использованием встроенного драйвера (Mac)
При подключении кабеля USB от принтера macOS автоматически устанавливает и добавляет принтер, обеспечивая базовые функции печати.
Убедитесь, что непосредственно на компьютере есть свободный порт USB. При использовании концентратора USB или док-станции принтер может не получать достаточно электроэнергии для надлежащей работы.
Если ваш принтер отображается в списке, выберите его и щелкните значок минус для удаления принтера.
Подсоедините USB-кабель принтера к компьютеру.
По запросу на загрузку нового программного обеспечения следуйте инструкциям по его установке.
Убедитесь, что принтер указан в списке Принтеры.
Если принтер присутствует в списке, установка завершена.
Если ваш принтер не указан в списке, перейдите к выполнению следующих действий.
Источник
Драйвер для HP Ink Tank 310

Windows 7/8/8.1/10 — полный пакет драйверов (рекомендуем)
Установка драйвера в Windows 10
Установка драйвера для принтера HP Ink Tank 310 необходима, чтобы согласовать работу устройства с операционной системой. Без программного обеспечения невозможно начать выводить/печатать информацию с компьютера. Разработчиками предусмотрен менеджер установки, который заметно облегчает процесс. Поэтому справиться с этой задачей сможет даже пользователь-новичок.
Для начала переходим по ссылке и скачиваем файл с программой. Затем переходим в меню браузера и запускаем его из папки «Загрузки». Сразу же появится окно помощника, где следует выбрать кнопку «Продолжить».

На экране появится информация о дальнейших действиях помощника. По желанию изучаем документ, расположенный по ссылке о сборе данных. Нажимаем «Далее».

В новом окне рекомендуется ознакомиться с лицензионным соглашением, другими дополнительными сведениями. Здесь ставим галочку «Я согласен(а)…» и переходим «Далее».

Выполняем все действия, рекомендованные менеджером, по подключению принтера к компьютеру с помощью кабеля USB. Если устройство будет использоваться позже, ставим галочку «Продолжить установку…».

Программное обеспечение установлено. Нажимаем «Готово».

На рабочем столе находим иконку принтера и двойным щелчком запускаем меню.
Источник
Как подключить принтер к компьютеру в Windows 10
Подключить принтер к компьютеру/ноутбуку можно двумя способами:
Локально — устройство соединяется с компьютером через USB-кабель.
По сети — задействуется встроенная сетевая карта (LAN/Wi-Fi), либо предоставляется общий доступ к принтеру, который подключен к другому компьютеру.
При выборе любого из способов подключения, понадобятся драйвера. Несмотря на то, что Windows 10 может установить свои (стандартные) драйвера, необходимо использовать те, которые разработаны производителем, что позволит задействовать возможности принтера на 100%. Установить драйвера можно с диска из комплекта поставки или скачать с официального сайта производителя.
Подготовка принтера к работе
Прежде чем использовать принтер, его необходимо распаковать и подготовить к работе. Обязательно изучите инструкцию!
Как правило, подготовка устройства к работе сводится:

Принтер подключается к ПК при помощи кабеля USB A-B. A — плоский разъём. B — квадратный разъём.
Как подключить принтер к компьютеру через USB-кабель
Чтобы подключить принтер к компьютеру, выполните следующие шаги:
Добавление и настройка принтера в Windows 10
Вызовите меню «Пуск» и перейдите в «Параметры Windows 10» затем выберите пункт «Устройства».

В новом окне, слева, воспользуйтесь опцией «Принтеры и сканеры», после чего, в правой части окна, выберите пункт «Добавить принтер или сканер». Дождитесь, пока Windows 10 обнаружит принтер.


Если процедура прошла успешно, в списке ниже, отобразится ваш принтер. При клике по его названию, появятся кнопки действий, которые можно совершить с устройством. Вам будут доступны, следующие опции: очередь печати, управление принтером, удаление устройства.

По окончании процесса установки, необходимо проверить принтер. Для этого кликните по кнопке «Управление» и, в новом окне, запустите «Печать пробной страницы».


В данном разделе, доступны и другие полезные опции: настройки печати, свойства принтера и устранения неполадок.
Как подключить принтер к компьютеру по сети
Если в локальной сети есть компьютер, к которому подключен принтер, то вполне реально настроить печать документов с любого ПК данной сети. Для этого необходимо открыть доступ к принтеру на компьютере, к которому он подключен.
Для использования локального принтера в качестве сетевого, достаточно:
Как открыть общий доступ к принтеру
На компьютере, к которому подключен принтер, необходимо пройти по цепочке: «Пуск» — «Параметры Windows» — «Устройства» — «Принтеры и сканеры». В списке устройств, выбрать нужный принтер и кликнуть «Управление», затем, выбрать «Свойства принтера» и перейти на вкладку «Доступ».

Во вкладке «Доступ», нужно отметить «Общий доступ к данному принтеру» и «Прорисовка заданий печати на клиентских компьютерах (рекомендуется)». Не забудьте указать «Имя ресурса», которое будет доступно в качестве названия принтера в сети.
Обнаружение сетевого принтера
На других компьютерах локальной сети, необходимо также пройти по цепочке: «Пуск» — «Параметры Windows» — «Устройства» — «Принтеры и сканеры» — «Добавить принтер или сканер». После обнаружения сетевого принтера, назначьте его в качестве устройства по умолчанию.

Если поиск не дал результатов, выберите «Необходимый принтер отсутствует в списке», переключитесь на «Выбрать общий принтер по имени» и укажите полный сетевой путь к нему «\имя компьютераимя сетевого принтера», нажмите «Далее». Распечатайте пробную страницу.


Более подробный процесс настройки сетевого принтера описан здесь.
Источник
Ink Tank 116


HP Ink Tank 118,
8 pages
Ink Tank 116

HP Ink Tank 118 Setup Poster,
8 pages
SP400

HP sp400 User’s Manual,
17 pages
2533t
HP 2533t White Paper,
3 pages
NB50000c
HP NB50000c Reference Guide,
3 pages
Switch Q6766-90801
HP Switch Q6766-90801 User’s Manual,
16 pages
CP6015
HP CP6015 User’s Manual,
1 pages
E3000
HP E3000 User’s Manual,
5 pages
Photosmart 1200 Photo Scanner
HP Photosmart 1200 Photo Scanner User’s Guide,
48 pages
S1931A


HP S1931a Setup Poster,
2 pages
CM1312
HP CM1312 User’s Manual,
13 pages
DL380
HP DL380 User’s Manual,
16 pages
C5
HP C5 Setup Poster,
2 pages
M175nw
HP M175nw Reference Guide,
236 pages
1220 Fax series
HP 1220 Fax series Setup Poster,
2 pages
S2331
HP S2331 Setup Poster,
1 pages
3PAR
HP 3PAR User’s Manual,
24 pages
DL380
HP DL380 Getting Started Guide,
1 pages
CDW-G767755
HP CDW-G767755 User’s Manual,
2 pages
1200C
HP 1200C User’s Manual,
7 pages