Предложите, как улучшить StudyLib
(Для жалоб на нарушения авторских прав, используйте
другую форму
)
Ваш е-мэйл
Заполните, если хотите получить ответ
Оцените наш проект
1
2
3
4
5
Eco-Logic
4-& 6-Station Indoor Controller
Owners Manual and Programming Instructions
Weather Sensor
Installation Instructions
Remove lower access cover. Place a screw into the wall and hang the controller from the
keyhole on the back. Secure the controller using one or more screws below the terminal
strip. One wire from each solenoid should be connected to the C terminal (common wire).
The other wire from each solenoid to its respective number on the terminal strip. Connect
the transformer wires to the 24 VAC terminal strip. Attach the two sensor wires (if needed)
to the SEN terminals. Connect a 9-volt alkaline battery (not included) to the battery wire
clip. Plug the transformer into a nearby power outlet.
Main Display
Current Time/Day – Set current day and time.
Start Times – Set 1 to 4 start times for each program.
Run Times – Set each valve station run time from 1 min. to 4 hrs.
Water Days – Select specific days to water, odd/even days, or a selected number
of days between waterings (interval).
Seasonal Adjustment – Make run time changes according to the seasons without
reprogramming the controller.
System Off – Stops all automatic watering.
Program Designator – identifies program in use (A or B).
Flashing Sprinkler – indicates that watering is occurring.
Umbrella – indicates rain sensor is suspending irrigation.
Crossed Umbrella – Indicates rain sensor has been manually bypassed.
– identifies month when programming current date.
– identifies day when programming current date.
Manual Single Station – indicates the one time watering of a single valve station.
1
Manual All Station – indicates the one time watering of all valve stations or selected
stations.
System Off
Seasonal
Adjustment
A
B
Water Days
Control Buttons
Button – increases displayed item.
Button – decreases the displayed item.
Button – advances to the next item.
Button – advances to the previous item.
Button – Select program A or B for different watering requirements.
Mode Button – Advanced through programming functions.
Programming the Controller
An irrigation program consists of three parameters:
1) A program start time, 2) watering duration for each station and 3) days to water. A
program will run all stations assigned to it in sequential order. Programs are independent
and stations can be assigned to both programs.
Setting the Current Date and Time
1. Press the
Mode button until the arrow is pointing at the Current Time/Day
position.
2. The year will be flashing. Use the
button to proceed to setting the month.
3. The month will be flashing and the
buttons to change the month. Press the
4. The day will be flashing and the
tons to change the day. Press the
5. The time will be displayed. Use the
24 hour. Press the
button to set the hour.
MasterValve
%
AM
PM
24
RST
SEN
C
MV
1
2
3
4
5
6
24VAC
9 VOLT
ALKALINE
BATTERY
24VAC
Current
Time/Day
%
AM
PM
Start Times
24
1
Run Times
or
buttons to change the year. Press the
icon will be displayed. Use the
button to proceed to setting the day.
icon will be displayed. Use the
button to proceed to setting the time.
and
buttons to select AM, PM, or
6. Hours will be flashing. Use the
the
button to move to minutes.
7. Use the
and
have now been set.
Valve 4
Setting the Program Start Time(s)
Valve 3
NOTE: One start time will activate all stations sequentially in that program. This
eliminates the need to enter each station’s start time. Multiple start times in a
Valve 2
program can be used for separate morning, afternoon, or evening watering cycles.
Valve 1
1. Press the
2. Program A will be displayed. (If Program B is desired, press the
3. Use the
or
4. Press the
button to add an additional start time, or
program.
Eliminating a Program Start Time
With the arrow pointing at the Start Times position, press the
you reach 12:00 AM. Push the
Setting Station Run Times
1. Press the
2. Use the
button to select a program (A or B).
3. Press the
or
Press the
button to advance to the next station.
Setting Days to Water
1. Press the
2. Use the
button to select the desired program.
3. Arrows point at the specific days of the week in which watering is to occur. Press
the
button to activate that day or the
Selecting Odd or Even Days to Water
This feature is uses numbered days of the month for watering instead of specific days
of the week (Odd days 1st, 3rd, 5th, etc.; Even days 2nd, 4th, 6th, etc.).
1. When in the Water Days mode, press the
either ODD or EVEN on the display.
2. Press the
button to select, or the
to water.
Selecting Interval Watering
You can select interval watering from 1 to 31 days.
1. When in the Water Days mode, press the
Press the
button and the interval watering icon
a 1 will be flashing.
2. Press the
or
(1 to 31 days). This is called the interval.
The controller will water the selected program at the next start time and will then
water at the interval programmed.
Seasonal Adjustment
Seasonal Adjustment is used to make global run time changes without re-program-
ming the entire controller.
1. Press the
2. Press the
or
from 10% to 150%.
NOTE: The controller should always be initially programmed in
the 100% position.
System Off
To turn your controller off, press the
the System Off
watering will be shut off. All active programs will be discontinued and watering
stopped. To return the controller to normal automatic operation, simply press the
Mode button once. The current time and day will be displayed.
Programmable Off
This feature will stop all programmed waterings for a designated period of time from
1 to 7 days. After the programmed off period, the controller will automatically resume
or
programmed watering.
1. Press the
or
but-
function.
2. Wait 2 seconds until OFF is displayed.
3. Press the
button to set the number of days off (up to 7 days).
and
buttons to change the hour shown. Press
buttons to change the minutes shown. The date, day and time
Mode button until the arrow is pointing at Start Times
buttons to change the start time.
button once to reach the OFF position.
Mode button until the arrow is pointing at Run Times
buttons to change the station run time from 1 minute to 4 hours.
Mode button until the arrow is pointing at Water Days
button to cancel watering for that day.
button until the cursor is above
button to cancel either ODD or EVEN days
button until the cursor is over INT.
button to select the number of days between watering days
Mode button until the arrow is pointing at Seasonal Adjustment
buttons to adjust the percentage of the seasonal adjustment
Mode button until the arrow is pointing at
. Wait 2 seconds and the display will read OFF. Valves currently
Mode button until the arrow is positioned next to the System Off
.
button).
button for the next
or
buttons until
.
.
will be displayed and
.
Приобретая систему автополива в нашем магазине, вам, конечно же, не обойтись без инструкции Hunter. Руководство по эксплуатации и программированию пультов управления есть в каждом комплекте оборудования, которое имеется в нашем каталоге. Однако мы решили разместить инструкции Hunter к товарам и на сайте, чтобы любой посетитель или потенциальный клиент имел представление о различных конструкциях автоматического полива.
Зачем нужна инструкция к системе автополива Hunter
Если вы хотите самостоятельно произвести перенастройку оборудования, изменить программу работы контролера или загрузить настройки заново, вам придут на помощь оригинальные инструкции Hunter на русском языке.
Руководства по эксплуатации включают детальные описания процессов замены, первичной установки оборудования, и подключения контролера. Благодаря этому настройка работы системы пройдет легко. Кроме того, вы получите информацию о специальных функциях каждой конструкции.
Сделать распечатку или скачать инструкции к системе автополива Hunter на различные модификации контролера можно также при их утере или при срочной необходимости.
 |
Инструкция по эксплуатации и настройки пультов управления серии Hunter ЕС | Скачать в формате PDF |
 |
Инструкция по эксплуатации и настройки пультов управления серии Hunter X-Core | Скачать в формате PDF |
 |
Инструкция по эксплуатации и настройки пультов управления серии Hunter Pro C | Скачать в формате PDF |
 |
Инструкция по эксплуатации и настройки пультов управления серии Hunter ICC | Скачать в формате PDF |
 |
Инструкция по эксплуатации и настройки пультов управления серии Hunter SVC | Скачать в формате PDF |
 |
Инструкция по эксплуатации и настройки пультов управления серии Hunter NODE | Скачать в формате PDF |
Таймер автоматического полива Hunter Eco Logic идеально подходит для установки на небольшие приусадебные участки и управления автополивом.
Инструкция по настройке
Посмотрите видео инструкцию, как настраивать конторллер
Почему таймер ECO LOGIC подойдет именно вам
Невысокая цена, высокий функционал автоматического таймера для полива, легкая программируемость, широкий выбор настроек. Все это вы получаете приобретая пульт ECO LOGIC.
Пульт управления превосходно работает в паре с насосом Espa Tecnopres 25 4m.
Фирма Hunter специально разработала данный вид пультов, чтобы владельцы любых участков, даже с небольшим бюджетом, могли установить себе систему автоматического полива.
Как происходит настройка
Всего 1 раз вы настраиваете систему и целый год наслаждаетесь результатами ее работы.
За все это отвечает компьютер, безошибочно точно распределяющий расход воды в системе орошения.
Hunter — фирма из США, давно зарекомендовавшая себя на рынке поливочного оборудования.
Существует альтернативный автоматический контроллер полива RZX-4i от Rain Bird
Гарантия
Гарантия на все устройства и механизмы составляет 2 года с момента установки.
Таймеры Eco Logic расчитаны на 4 или 6 зон. Устанавливать пульт нужно в помещении.
Как экономить свое время и силы
Если вам требуется внешний контроллер, обратитесь к пульту управления X-Core
Установите систему автополива на своем участке и дайте растениям возможность расти без вашего участия — экономьте 100% своего времени затрачиваемого на орошение.
Звоните сейчас или оставьте заявку на сайте. Наш менеджер ответит на все ваши вопросы и даст подробную консультацию.
Получите бесплатно расчет стоимости системы автоматического полива сейчас.
Главная
» Новости
» Пошаговая инструкция по настройке контроллера Hunter. УСТАНОВКА КОНТРОЛЛЕРА HC
18.01.2022 в 17:09
Содержание
- Пошаговая инструкция по настройке контроллера Hunter. УСТАНОВКА КОНТРОЛЛЕРА HC
- ТОЧКИ ВВОДА ПРОВОДОВ
- УСТАНОВКА КОНТРОЛЛЕРА
- Hunter Eco Logic настройка. How do I program my Hunter Eco Logic controller?
- Programming the Controller
- Setting the Current Date and Time
- Setting the Program Start Time(s)
- Setting Station Run Times
- Setting Days to Water
- Selecting Odd or Even Days to Water
- Selecting Interval Watering
- Seasonal Adjustment
- System Off
Пошаговая инструкция по настройке контроллера Hunter. УСТАНОВКА КОНТРОЛЛЕРА HC
HC
Контроллер HC предназначен только для установки и использования в помещении. В выбранном месте должен иметься доступ к беспроводной сети Wi-Fi. Покрытие Wi-Fi можно легко проверить с помощью смартфона или самого контроллера HC (сила сигнала отображается при выборе беспроводной сети).
Примечание. Контроллер HC – это модель для внутренней установки. Контроллер не является водо- и погодоустойчивым, и должен устанавливаться в помещении или в защищенном месте.
Примечание. Не подключайте трансформатор к сети до тех пор, пока контроллер не будет установлен, а вся проводка – подключена.
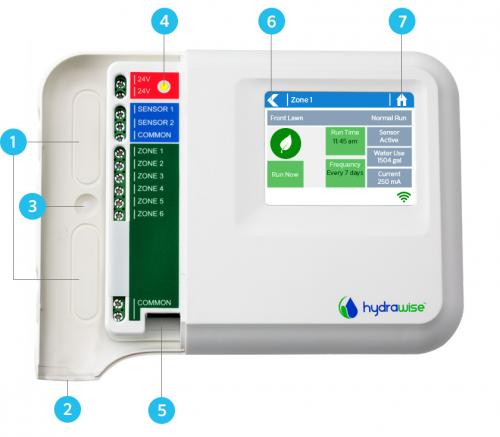
ТОЧКИ ВВОДА ПРОВОДОВ
Контроллер предусматривает два варианта ввода проводов – через заднюю панель корпуса или через изоляционную трубу в нижней части
ВВОД ЧЕРЕЗ ЗАДНЮЮ ПАНЕЛЬ КОНТРОЛЛЕРА
Используя острый нож, удалите два намеченных выреза на задней панели контроллера, как показано на иллюстрации .
ВВОД ЧЕРЕЗ ИЗОЛЯЦИОННУЮ ТРУБУ ¾»
Используя острый нож, отрежьте трубку на контроллере по полукруглой линии, как показано на иллюстрации. Отрежьте по такой же линии синюю крышку для проводки.
УСТАНОВКА КОНТРОЛЛЕРА
- Используя сверло диаметром 3/16 дюйма, просверлите отверстие глубиной 25 мм.
- Вставьте пластмассовый анкер заподлицо с поверхностью стены.
- Закрутите 1-дюймовый винт в анкер таким образом, чтобы головка винта выступала примерно на 4 мм.
- Заведите корпус контроллера на головку винта.
- Отметьте вторую точку установки (см. на иллюстрации), снимите контроллер, просверлите отверстие, вставьте анкер, заведите корпус контроллера на головку первого винта и закрутите второй винт.
Hunter Eco Logic настройка. How do I program my Hunter Eco Logic controller?
Eco Logic
Programming the Controller
An irrigation program consists of three parameters:
1) A program start time.
2) Watering duration for each station.
3) Days to water.
A program will run all stations assigned to it in sequential order. Programs are independent and stations can be assigned to both programs.
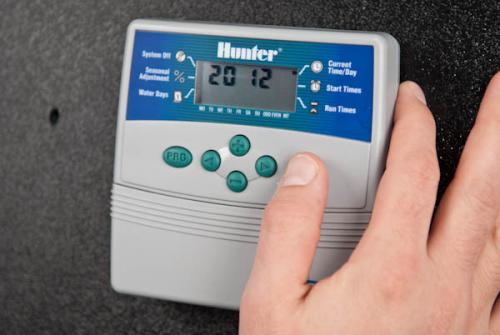
Setting the Current Date and Time1. Press the Mode button until the arrow is pointing at the Current Time/Day position. 2. The year will be flashing. Use theorbuttons to change the year. Press thebutton to proceed to setting the month. 3. The month will be flashing and the icon will be displayed. Use theorbuttons to change the month. Press thebutton to proceed to setting the day. 4. The day will be flashing and the icon will be displayed. Use theorbuttons to change the day. Press thebutton to proceed to setting the time. 5. The time will be displayed. Use theandbuttons to select AM, PM, or 24 hour. Press thebutton to set the hour. 6. Hours will be flashing. Use theandbuttons to change the hour shown. Press thebutton to move to minutes. 7. Use theandbuttons to change the minutes shown. The date, day and time have now been set. |
|
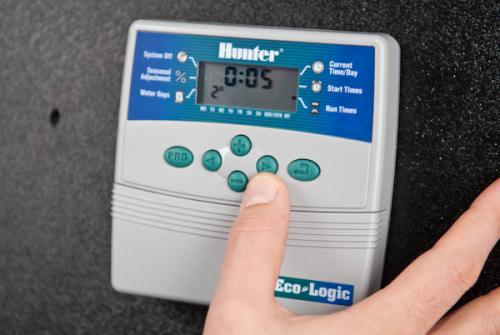
Setting the Program Start Time(s)1. Press theMode button until the arrow is pointing at Start Times. Eliminating a Start Time: With the arrow pointing at the Start Times position, press theorbuttons until you reach 12:00am. Push thebutton once to reach the OFF position. |
 |
Setting Station Run Times1. Press theMode button until the arrow is pointing at Run Times. |
 |
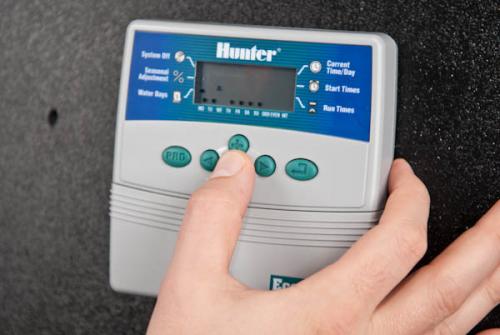
Setting Days to Water1. Press theMode button until the arrow is pointing at Water Days . Selecting Odd or Even Days to WaterThis feature uses numbered days of the month for watering instead of specific days of the week (Odd days 1st, 3rd, 5th, etc.; Even days 2nd, 4th, 6th, etc.). Selecting Interval WateringYou can select interval watering from 1 to 31 days. 1. When in the Water Days mode, press thebutton until the cursor is over INT. Press thebutton and the interval watering iconwill be displayed and a 1 will be flashing. The controller will water the selected program at the next start time and will then water at the interval programmed. |
 |
Seasonal AdjustmentSeasonal Adjustment is used to make global run time changes without re-programming the entire controller. 1. Press theMode button until the arrow is pointing at Seasonal Adjustment. Note: The controller should always be intially programmed in the 100% position. |
 |
System OffTo turn your controller off, press theMode button until the arrow is pointing at |
 |