Hunter NODE-100 Manual

NODE FEATURES
- Simple push-button programming
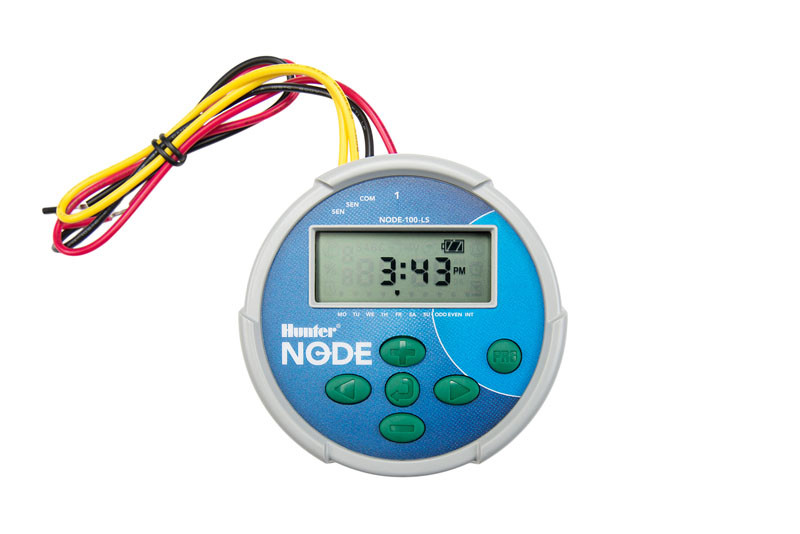
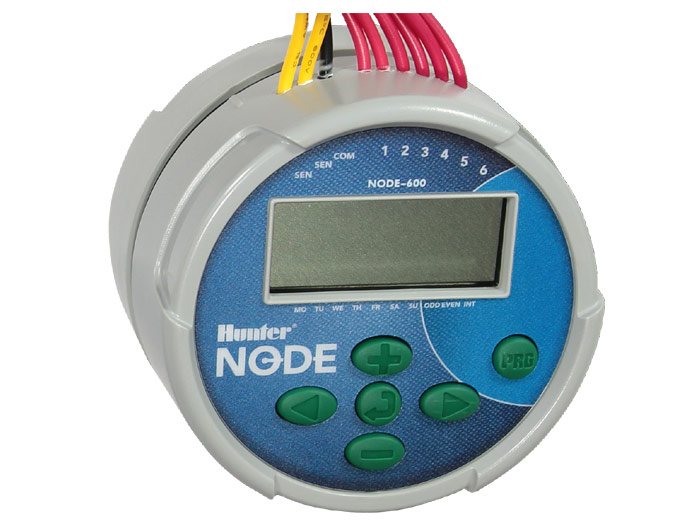
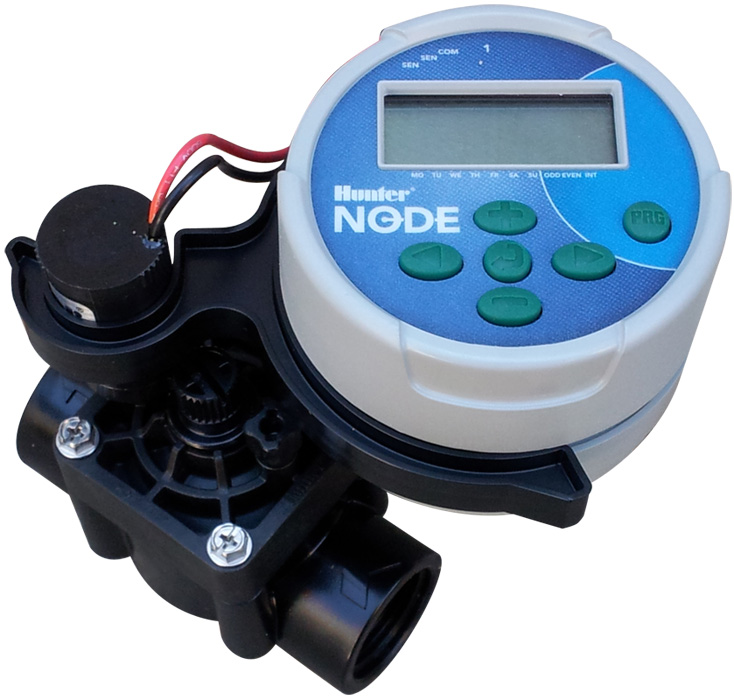
- Single-station model (NODE-100) with DC latching solenoid. Single-, two-, four-, or six-station models are also available (solenoids not included).
- Large Liquid Crystal Display (LCD) with easy-to-understand icons
- Operates using at least one standard nine-volt alkaline battery (use two for extended battery life)
- Three programs (A, B, or C) with up to four start times each
- Run times from one minute to six hours
- Manual watering capabilities
- Battery-life indicator
- Wired rain sensor compatible
- Non-volatile memory retains all program information
- Seasonal Adjustment from 10–150%
- Easy Retrieve™ memory allows saving/retrieval of preferred program data
- Manual bypass of rain sensor
- Total Run Time Calculator shows total program irrigation time per program
NODE COMPONENTS
This section provides an overview of some of the components of the NODE. Each item will be discussed in further detail later. However, this section can be helpful in getting acquainted with the different options available.

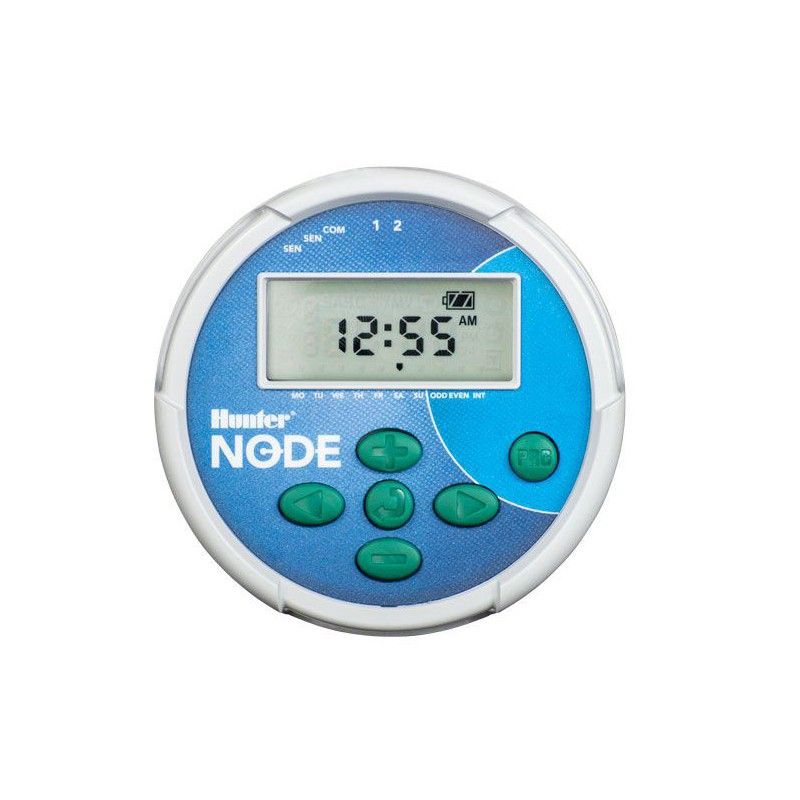
Control Buttons
 Button – Increases the selected flashing display
 Button – Decreases the selected flashing display
- Button – Selects programming function
 Button – Advances the selected flashing display back to the next item
- Button – Navigates the selected flashing display back to the previous item
 Button – Selects the program (A, B, or C)
LCD Display
- Main Display – Indicates all program information
- Station Number – Indicates the station number being programmed
- Start Time Number – Indicates the start timer number being programmed
- Program – Indicates the program (A, B, or C)
 Current Time/Day – Indicates when current day/time is being set
 Start Times – Indicates when start times are being set
 Run Times – Indicates when Run Times are being set. Allows user to set run times from one minute to six hours.
- Watering Days – Allows the user to select individual days to water or a selected number of days between watering (interval)
- % Seasonal Adjustment – Allows the seasonal adjustment to be programmed form 10–150% (default value is 100%)
- System Off – Indicates that watering is suspended
- Manual On/Off – Indicates when manual watering is programmed. Allows the user to activate the station manually.
- MV – Indicates that station one is set to master valve operation (only available on two-, four-, or six-station models)
- Battery Status – Indicates remaining battery life
- Umbrella – Indicates the rain sensor is suspending irrigation
 Crossed Umbrella – Indicates the rain sensor has been manually bypassed
CONNECTING THE BATTERY/BATTERIES
The NODE uses one or two standard nine-volt batteries (not included) to operate the valves and program the controller. The controller can operate using either a single nine-volt battery or using two nine-volt batteries. Under normal conditions, the expected life is one year for a single battery and two years when using two nine-volt batteries.
NOTE: The NODE has non-volatile memory. This allows the battery to be removed without losing program information.

To Install the Battery/Batteries
- Unscrew the rear body of the NODE body to gain access to the battery compartment.
- Insert the battery/batteries into the battery tray and connect to the controller using the battery connector.
- Make sure that no water is inside the battery compartment.
- Screw the NODE rear body back onto the front half.
NOTE: Verify that the seal marker on the rear half of the NODE lines up with the front half, ensuring that a proper seal is created.

ATTACHING SOLENOIDS
The NODE-100 is provided with a solenoid attached to the controller. The NODE-100-LS does not include a solenoid. The NODE-200, NODE-400, and NODE-600 multi-station controllers will operate up to two, four, or six solenoids, respectively. Hunter DC-latching solenoids (P/N 458200) can easily be installed on all Hunter plastic valves.
NOTE: Use DC latching solenoids operating between 9-11 VDC. 24 VAC solenoids will not operate with the NODE.

To Wire DC Solenoids to the NODE
- Attach the black leads from each solenoid to the single common wire (black lead) coming from the NODE. Secure all wire connections with waterproof connectors.
- Attach one red wire from each solenoid to the corresponding station wire (red lead) from the NODE. The station numbers are identified on the face of the NODE. Secure all wire connections with waterproof connectors.
NOTE: The maximum wire distance between the solenoid and NODE is 100′ (30 m) using 18 AWG (1 mm) minimum wire size.
MOUNTING THE NODE
The NODE can easily be mounted on any Hunter plastic valve. A specially designed valve mounting clip makes installation a snap. A protective rubber cover is provided to prevent dirt from accumulating on the face of the NODE.
To Mount the NODE to a Valve
- Screw the Hunter DC latching solenoid (P/N 458200) into the valve bonnet.
- Set the small open end of the NODE holder on top of the solenoid.
- Set the NODE controller into the large open end of the NODE holder.

CONNECTING A WEATHER SENSOR
A Hunter Mini-Clik® or Wired Rain-Clik® rain sensor can be connected to the NODE. The purpose of this sensor is to stop watering when weather conditions dictate.
NOTE: When the Wired Rain Sensor is interrupting the watering, the display will show the System Off icon
 , «OFF» and
  on the display.
- Cut the yellow wire loop attached to the NODE at approximately the middle of the loop.
- Remove approximately ½» (13 mm) of insulation from each wire. Attach one yellow wire to each of the wires of the weather sensor. You can mount the rain sensor up to 100 ft (30 m) from the NODE controller (18 AWG/1 mm minimum wire size).
- Secure wire connections with waterproof connectors.

IDLE MODE
Normally, the NODE display shows the time and day, day of the week, MV (if master valve option is activated), and the battery-life indicator. After a short period of inactivity, the display will shut off to retain battery power. Pressing any button will bring the NODE into idle mode.

RUN MODE
When the controller is operating a program, the items shown on the display will include the station number, program letter, remaining run time, and the blinking Rotor icon.

PROGRAMMING
The NODE uses standard Hunter controller programming with three programs (A, B, or C) and four start times per program. On standard Hunter controllers a dial is used to scroll between the programming functions. However, on the NODE the ![]() button is used to quickly and easily create the irrigation program. When programming, the flashing portion of the display can be changed by pressing the
button is used to quickly and easily create the irrigation program. When programming, the flashing portion of the display can be changed by pressing the  or
or  buttons. To change something that is not flashing, press the
  or
or  buttons until the desired item is flashing.

Setting the Date and Time
- Push the
 button until the
  icon is displayed.
 - All four digits will be displayed representing the year. Use the or buttons to change the year. Press the
 button to proceed to setting the month.
 - All four digits will be displayed with the two digits on the left representing the month flashing. Use the or buttons to change the month. Press the button to proceed to setting the day.
- Only the two digits on the right side will be displayed and flashing, representing the day. Press the or buttons to change the day. Press the button to proceed with changing the hour. Press the button to proceed to setting the time.
- The AM/PM/24-hour time setting is shown flashing. Press the or button to change the time setting to AM, PM, or 24-hour time. Press the button to proceed to setting the hour.
- All four numbers are shown with the two numbers on the left flashing, representing the hour. Use the or buttons to change the hour. Press the button to proceed to setting the minutes.
- All four numbers are shown with the two numbers on the right flashing, representing the minutes. Use the or buttons to change the minutes. Pressing the button will advance to the year setting at Step 2.
- Press the button to proceed to the next programming function or allow controller to return to idle mode.
 icon is displayed.
 Setting Watering Start Times
- Press the button until the icon is displayed.
- The start time will be displayed flashing, along with the program letter (A, B, or C) and the start time number (1, 2, 3, or 4) in the upper left of the display. Up to 4 different start times can be set for each program.
- Use the or buttons to change the start time for the program that is displayed. Each press of the button will change the start time in one-minute increments.
- Press the button to add an additional start time to the program displayed. The start time number is shown in the upper left corner of the display.
- Press the button to add start times to a different program.
- Press the button to proceed to the next programming function or allow controller to return to idle mode.
 icon is displayed.
 button to add start times to a different program.
NOTE: After programming the run time for the last station press the
![]() button to display the total run time for the program.
button to display the total run time for the program.
Setting the Run Times
- Press the button until the
 icon is displayed.
 - The run time will be displayed flashing. Also shown is the program letter (A, B, or C) and the active station number on the lower left side of the display. Press the or buttons to change the station run time from one minute to six hours.
- Press the button to advance to the next station.
- Press the button to add a run time to another program.
- Press the button to proceed to the next programming function or allow controller to return to idle mode.

Setting Watering Days
- Press the button until the icon is displayed.
- The program letter (A, B, or C) will be displayed.
- Arrows point at the specific days of the week on which watering will occur. Press the or buttons to scroll though the days.
- Press the button to activate that day for the program displayed, or the button to cancel watering for that day. The arrow will show on the watering days for the active program.
- Press the button to set days to water for a different program, if desired.
- Press the button to proceed to the next programming function or allow controller to return to idle mode.
 icon is displayed.
Selecting Odd/Even Days to Water
This feature uses numbered days of the month for watering instead of specific days of the week.
- Press the button until the icon is displayed.
- Press the button until the cursor is above either ODD or EVEN on the display.
- Press the button to select, or the button to cancel either ODD or EVEN days to water.
- Once ODD or EVEN mode is activated, it will be the only cursor shown on the display.

Selecting Interval Days to Water
- Press the button until the
 icon is displayed.
 - Press the button until the cursor is above INT on the display.
- Press the button and a 1 will be flashing, indicating the number of days between watering.
- Press the or buttons to select the number of days between watering days (1 to 31).

Setting the Seasonal Adjustment
- Press the button until the
 is displayed.
 - Press the or button to increase or decrease the seasonal adjustment value from the default 100% (down to a minimum of 10% or a maximum of 150%).
- The value programmed for seasonal adjustment will be applied to all irrigation programs and will immediately be reflected in the run times displayed. For example, if 20-minute run times are programmed and then the seasonal adjustment is changed from 100% to 50%, the run times displayed will be 10 minutes.

Turning the System Off
To turn your controller off, press the ![]() button until the
button until the ![]() icon and OFF is displayed on screen. To return the controller to auto programming mode, press the
icon and OFF is displayed on screen. To return the controller to auto programming mode, press the ![]() button. The controller will immediately return to auto programming mode and will display the time and battery-life indicator.
button. The controller will immediately return to auto programming mode and will display the time and battery-life indicator.

Manual Watering
Manual Watering allows the user to test each station or a program for a specified run time. The weather sensor condition (if used) will be disregarded in this mode.
- Make sure the controller is in idle mode. Press and hold the button until the icon is displayed.
- The station number will be displayed in the lower left side of the display along with the run time.
- Use the and buttons to select the desired station and the and buttons to set the manual watering time for the station shown.
- To manually activate a program, press the button. The program letter (A, B, or C) will show on the screen. If a different program is needed, press the button until the desired program is displayed.
- To stop the Manual Watering cycle, press the button until the time is reduced to zero.
- Press the button to proceed to the next programming function or allow controller to return to idle mode.
 icon is displayed.
NOTE:
Sensor Operation
The NODE is compatible with Hunter Clik-type rain sensors, including Mini-Clik®, Freeze-Clik, and Wired Rain-Click®, as well as many other interrupt-type devices/sensors that do not require power. Simply connect the sensor to the NODE controller by cutting the yellow wire loop and connecting to the sensor wires.
NOTE: NODE is not compatible with Hunter Wireless Rain-Clik® or other weather devices that require 24 VAC power.
When the sensor is activated, it will suspend irrigation and the  icon will show on the display.

ADVANCED PROGRAMMING FEATURES
All advanced programming functions are initiated from the idle mode, which shows the time, day of the week, and battery-life indicator on the display. If something is flashing on the display then the controller is in one of the programming modes. After a short period of inactivity the controller will return to idle mode.
Sensor Bypass
- From the idle mode, press and hold the button until the icon is displayed.
- The display will show the umbrella icon flashing and ON.
- Press the button to bypass the sensor. The display will show and OFF to indicate the weather sensor is bypassed. The icon will show on the display during normal operation, indicating the controller is in bypass mode.
- To reactivate the weather sensor, press and hold the button until the icon is displayed. Press the button to return to normal sensor mode.

 and OFF to indicate the weather sensor is bypassed. The
Easy Retrieve Memory
This function allows the user to save a preferred program to permanent memory in the controller, which can be restored at any time. This is a great way to override changes made, and revert back to the original programming schedule.
To save a program:
- Make sure that the controller is programmed with the preferred programming schedule.
- From idle mode, press and hold the and button for five seconds to save the current program.
- The screen will show three dashed lines moving from left to right to indicate the current program is being saved to permanent memory. The display will flash DONE when the process is complete.

To retrieve a saved program:
- From idle mode, press and hold the and button for five seconds.
- The screen will show three dashed lines moving from right to left to indicate the preferred program is being retrieved from memory.
The controller now has the preferred program as the current program. The display will flash DONE when the process is complete.
NOTE: Be careful when using Easy Retrieve memory. Saving program data to memory using Easy Retrieve will take the current program information and override whatever is saved in permanent memory. When saving program data, make sure that the current program data is what you want saved.
Setting Master Valve Operation (NODE-200, NODE-400, & NODE-600 Only)
The multi-station NODE models (NODE-200, NODE-400, and NODE-600) can be programmed with the use of a normally closed master valve. When programming with the master valve you will be assigning Station 1 as the master valve, effectively losing the use of Station 1 for activation of an irrigation station.
- From the idle mode, press the button until the icon is displayed.
- Program A will be displayed along with the active station number on the lower left. Make sure the active station showing is «1.» The run time will be shown.
- Press the button once and the MV icon will display on the screen and the time will disappear. Station 1 is now acting as the master valve and will not be available in other programming screens.
- When the master valve is activated, it will apply to all programs and the MV icon will stay displayed on the screen at all times.
 icon is displayed.
  Step 1")
 Step 2")
Programmable Off (Up to 99 Days)
This feature permits the user to stop all programmed watering for the designated period from 1-99 days. At the end of the programmable off period, the controller will resume normal operation.
- From idle mode, press the button until the icon is displayed. Wait two seconds until OFF is shown on the display. The controller is now in System Off mode.
- Press the button and a blinking «1» will be displayed, indicating the number of days the controller will stay off. Program the off days as desired, up to 99 days maximum.
- The display will show the number of days remaining in the OFF period.
- To interrupt the OFF period, press the button to return to the idle mode screen, showing the time of day and day of the week.
BATTERY-LIFE INDICATOR
The remaining battery life can be estimated from the battery-life indicator shown on the display. The NODE can operate using either a single nine-volt battery or using two nine-volt batteries. Using two nine-volt batteries will yield approximately twice the battery life of a single nine-volt battery. The battery-life indicator chart below shows an estimate on the remaining battery life.
 Full: 100–60% remaining battery life
 Med: 60–25% remaining battery life
 Low: 25–0% remaining battery life
 Replace battery immediately!
RESETTING CONTROLLER
Resetting the controller will erase the current program data and restart the controller. A reset does not, however, delete a program saved to permanent memory using the Easy Retrieve memory feature to save a preferred program.
- From idle mode, press and hold the , , and keys.
- After two seconds the screen will go blank. Continue to hold the , , and keys.
- 12:00 will flash on the display. Release the keys.
- The controller may show a countdown from 10 to 1 on the display, and then 12:00 am will be shown flashing when the reset is complete. The controller can now be reprogrammed.
TROUBLESHOOTING GUIDE
| Problem | Causes | Solutions |
There is no display |
Display is off. Battery is dead. | Press any button for one second. Replace the battery. |
Display indicates watering but none is occurring |
No water pressure. Faulty solenoid. Incompatible solenoid. | Turn on main system supply. Replace solenoid. Must use Hunter DC latching solenoid (P/N 458200) or other compatible DC latching solenoid. |
Automatic irrigation does not start at start time |
Controller in System Off mode. AM/PM/time of day not set correctly. AM/PM/start time not set correctly. | Verify that controller is programmed for automatic watering. Correct AM/PM/time of day. Correct AM/PM/start time. |
Rain sensor does not suspend watering |
Rain sensor defective or miswired. | Verify proper operation of the rain sensor and wire connections. |
Controller waters more than one time |
The program has more than one start time assigned to it. Each program has up to four start times. | Eliminate program start times as needed. |
SPECIFICATIONS
Dimensions: 3 ½»(89 mm) diameter, 2 ½»(64 mm) high
Sensor inputs: One
Power source: One nine-volt alkaline battery (use two for extended battery life). Activates DC latching solenoids operating 9-11VDC (Hunter PN 458200).
Operating temperature: 0ºF to 140ºF (-17ºC to 60ºC)
Approvals:
IP68
CE
FCC
C-Tick
Hunter Industries Incorporated
1940 Diamond Street • San Marcos, California 92078, USA
www.hunterindustries.com/global

© 2018 Hunter Industries Incorporated
Videos
NODE: Programming Video
NODE: Turn on stations manually video
Documents / Resources
References
International | Hunter Industries
Download manual
Here you can download full pdf version of manual, it may contain additional safety instructions, warranty information, FCC rules, etc.
Download Hunter NODE-100 Manual
Главная » охотник » Руководство пользователя контроллера Hunter NODE с батарейным питанием
Руководство пользователя контроллера Hunter NODE с батарейным питанием
Похожие сообщения
-
 Button – Increases the selected flashing display
 - Button – Decreases the selected flashing display
- Button – Selects programming function
- Button – Advances the selected flashing display back to the next item
- Button – Navigates the selected flashing display back to the previous item
- Button – Selects the program (A, B, or C)
- Main Display – Indicates all program information
- Station Number – Indicates the station number being programmed
- Start Time Number – Indicates the start timer number being programmed
- Program – Indicates the program (A, B, or C)
- Current Time/Day – Indicates when current day/time is being set
- Start Times – Indicates when start times are being set
- Run Times – Indicates when Run Times are being set. Allows user to set run times from one minute to six hours.
- Watering Days – Allows the user to select individual days to water or a selected number of days between watering (interval)
- % Seasonal Adjustment – Allows the seasonal adjustment to be programmed form 10–150% (default value is 100%)
- System Off – Indicates that watering is suspended
- Manual On/Off – Indicates when manual watering is programmed. Allows the user to activate the station manually.
- MV – Indicates that station one is set to master valve operation (only available on two-, four-, or six-station models)
- Battery Status – Indicates remaining battery life
- Umbrella – Indicates the rain sensor is suspending irrigation
- Crossed Umbrella – Indicates the rain sensor has been manually bypassed
- Unscrew the rear body of the NODE body to gain access to the battery compartment.
- Insert the battery/batteries into the battery tray and connect to the controller using the battery connector.
- Make sure that no water is inside the battery compartment.
- Screw the NODE rear body back onto the front half.
- Attach the black leads from each solenoid to the single common wire (black lead) coming from the NODE. Secure all wire connections with waterproof connectors.
- Attach one red wire from each solenoid to the corresponding station wire (red lead) from the NODE. The station numbers are identified on the face of the NODE. Secure all wire connections with waterproof connectors.
- Screw the Hunter DC latching solenoid (P/N 458200) into the valve bonnet.
- Set the small open end of the NODE holder on top of the solenoid.
- Set the NODE controller into the large open end of the NODE holder.
- Cut the yellow wire loop attached to the NODE at approximately the middle of the loop.
- Remove approximately ½» (13 mm) of insulation from each wire. Attach one yellow wire to each of the wires of the weather sensor. You can mount the rain sensor up to 100 ft (30 m) from the NODE controller (18 AWG/1 mm minimum wire size).
- Secure wire connections with waterproof connectors.
- Push the button until the icon is displayed.
- All four digits will be displayed representing the year. Use the or buttons to change the year. Press the button to proceed to setting the month.
- All four digits will be displayed with the two digits on the left representing the month flashing. Use the or buttons to change the month. Press the button to proceed to setting the day.
- Only the two digits on the right side will be displayed and flashing, representing the day. Press the or buttons to change the day. Press the button to proceed with changing the hour. Press the button to proceed to setting the time.
- The AM/PM/24-hour time setting is shown flashing. Press the or button to change the time setting to AM, PM, or 24-hour time. Press the button to proceed to setting the hour.
- All four numbers are shown with the two numbers on the left flashing, representing the hour. Use the or buttons to change the hour. Press the button to proceed to setting the minutes.
- All four numbers are shown with the two numbers on the right flashing, representing the minutes. Use the or buttons to change the minutes. Pressing the button will advance to the year setting at Step 2.
- Press the button to proceed to the next programming function or allow controller to return to idle mode.
- Press the button until the icon is displayed.
- The start time will be displayed flashing, along with the program letter (A, B, or C) and the start time number (1, 2, 3, or 4) in the upper left of the display. Up to 4 different start times can be set for each program.
- Use the or buttons to change the start time for the program that is displayed. Each press of the button will change the start time in one-minute increments.
- Press the button to add an additional start time to the program displayed. The start time number is shown in the upper left corner of the display.
- Press the button to add start times to a different program.
- Press the button to proceed to the next programming function or allow controller to return to idle mode.
- Press the button until the icon is displayed.
- The run time will be displayed flashing. Also shown is the program letter (A, B, or C) and the active station number on the lower left side of the display. Press the or buttons to change the station run time from one minute to six hours.
- Press the button to advance to the next station.
- Press the button to add a run time to another program.
- Press the button to proceed to the next programming function or allow controller to return to idle mode.
- Press the button until the icon is displayed.
- The program letter (A, B, or C) will be displayed.
- Arrows point at the specific days of the week on which watering will occur. Press the or buttons to scroll though the days.
- Press the button to activate that day for the program displayed, or the button to cancel watering for that day. The arrow will show on the watering days for the active program.
- Press the button to set days to water for a different program, if desired.
- Press the button to proceed to the next programming function or allow controller to return to idle mode.
- Press the button until the icon is displayed.
- Press the button until the cursor is above either ODD or EVEN on the display.
- Press the button to select, or the button to cancel either ODD or EVEN days to water.
- Once ODD or EVEN mode is activated, it will be the only cursor shown on the display.
- Press the button until the icon is displayed.
- Press the button until the cursor is above INT on the display.
- Press the button and a 1 will be flashing, indicating the number of days between watering.
- Press the or buttons to select the number of days between watering days (1 to 31).
- Press the button until the is displayed.
- Press the or button to increase or decrease the seasonal adjustment value from the default 100% (down to a minimum of 10% or a maximum of 150%).
- The value programmed for seasonal adjustment will be applied to all irrigation programs and will immediately be reflected in the run times displayed. For example, if 20-minute run times are programmed and then the seasonal adjustment is changed from 100% to 50%, the run times displayed will be 10 minutes.
- Make sure the controller is in idle mode. Press and hold the button until the icon is displayed.
- The station number will be displayed in the lower left side of the display along with the run time.
- Use the and buttons to select the desired station and the and buttons to set the manual watering time for the station shown.
- To manually activate a program, press the button. The program letter (A, B, or C) will show on the screen. If a different program is needed, press the button until the desired program is displayed.
- To stop the Manual Watering cycle, press the button until the time is reduced to zero.
- Press the button to proceed to the next programming function or allow controller to return to idle mode.
- From the idle mode, press and hold the button until the icon is displayed.
- The display will show the umbrella icon flashing and ON.
- Press the button to bypass the sensor. The display will show and OFF to indicate the weather sensor is bypassed. The icon will show on the display during normal operation, indicating the controller is in bypass mode.
- To reactivate the weather sensor, press and hold the button until the icon is displayed. Press the button to return to normal sensor mode.
- Make sure that the controller is programmed with the preferred programming schedule.
- From idle mode, press and hold the and button for five seconds to save the current program.
- The screen will show three dashed lines moving from left to right to indicate the current program is being saved to permanent memory. The display will flash DONE when the process is complete.
- From idle mode, press and hold the and button for five seconds.
- The screen will show three dashed lines moving from right to left to indicate the preferred program is being retrieved from memory.
- From the idle mode, press the button until the icon is displayed.
- Program A will be displayed along with the active station number on the lower left. Make sure the active station showing is «1.» The run time will be shown.
- Press the button once and the MV icon will display on the screen and the time will disappear. Station 1 is now acting as the master valve and will not be available in other programming screens.
- When the master valve is activated, it will apply to all programs and the MV icon will stay displayed on the screen at all times.
- From idle mode, press the button until the icon is displayed. Wait two seconds until OFF is shown on the display. The controller is now in System Off mode.
- Press the button and a blinking «1» will be displayed, indicating the number of days the controller will stay off. Program the off days as desired, up to 99 days maximum.
- The display will show the number of days remaining in the OFF period.
- To interrupt the OFF period, press the button to return to the idle mode screen, showing the time of day and day of the week.
- From idle mode, press and hold the , , and keys.
- After two seconds the screen will go blank. Continue to hold the , , and keys.
- 12:00 will flash on the display. Release the keys.
- The controller may show a countdown from 10 to 1 on the display, and then 12:00 am will be shown flashing when the reset is complete. The controller can now be reprogrammed.
International | Hunter Industries
 Button – Increases the selected flashing display
LCD Display
CONNECTING THE BATTERY/BATTERIES
The NODE uses one or two standard nine-volt batteries (not included) to operate the valves and program the controller. The controller can operate using either a single nine-volt battery or using two nine-volt batteries. Under normal conditions, the expected life is one year for a single battery and two years when using two nine-volt batteries.
NOTE: The NODE has non-volatile memory. This allows the battery to be removed without losing program information.
To Install the Battery/Batteries
NOTE: Verify that the seal marker on the rear half of the NODE lines up with the front half, ensuring that a proper seal is created.
ATTACHING SOLENOIDS
The NODE-100 is provided with a solenoid attached to the controller. The NODE-100-LS does not include a solenoid. The NODE-200, NODE-400, and NODE-600 multi-station controllers will operate up to two, four, or six solenoids, respectively. Hunter DC-latching solenoids (P/N 458200) can easily be installed on all Hunter plastic valves.
NOTE: Use DC latching solenoids operating between 9-11 VDC. 24 VAC solenoids will not operate with the NODE.
To Wire DC Solenoids to the NODE
NOTE: The maximum wire distance between the solenoid and NODE is 100′ (30 m) using 18 AWG (1 mm) minimum wire size.
MOUNTING THE NODE
The NODE can easily be mounted on any Hunter plastic valve. A specially designed valve mounting clip makes installation a snap. A protective rubber cover is provided to prevent dirt from accumulating on the face of the NODE.
To Mount the NODE to a Valve
CONNECTING A WEATHER SENSOR
A Hunter Mini-Clik® or Wired Rain-Clik® rain sensor can be connected to the NODE. The purpose of this sensor is to stop watering when weather conditions dictate.
NOTE: When the Wired Rain Sensor is interrupting the watering, the display will show the System Off icon
, «OFF» and on the display.
IDLE MODE
Normally, the NODE display shows the time and day, day of the week, MV (if master valve option is activated), and the battery-life indicator. After a short period of inactivity, the display will shut off to retain battery power. Pressing any button will bring the NODE into idle mode.
RUN MODE
When the controller is operating a program, the items shown on the display will include the station number, program letter, remaining run time, and the blinking Rotor icon.
PROGRAMMING
The NODE uses standard Hunter controller programming with three programs (A, B, or C) and four start times per program. On standard Hunter controllers a dial is used to scroll between the programming functions. However, on the NODE the ![]() button is used to quickly and easily create the irrigation program. When programming, the flashing portion of the display can be changed by pressing the or buttons. To change something that is not flashing, press the or buttons until the desired item is flashing.
button is used to quickly and easily create the irrigation program. When programming, the flashing portion of the display can be changed by pressing the or buttons. To change something that is not flashing, press the or buttons until the desired item is flashing.
Setting the Date and Time
Setting Watering Start Times
NOTE: After programming the run time for the last station press the
![]() button to display the total run time for the program.
button to display the total run time for the program.
Setting the Run Times
Setting Watering Days
Selecting Odd/Even Days to Water
This feature uses numbered days of the month for watering instead of specific days of the week.
Selecting Interval Days to Water
Setting the Seasonal Adjustment
Turning the System Off
To turn your controller off, press the ![]() button until the
button until the ![]() icon and OFF is displayed on screen. To return the controller to auto programming mode, press the
icon and OFF is displayed on screen. To return the controller to auto programming mode, press the ![]() button. The controller will immediately return to auto programming mode and will display the time and battery-life indicator.
button. The controller will immediately return to auto programming mode and will display the time and battery-life indicator.
Manual Watering
Manual Watering allows the user to test each station or a program for a specified run time. The weather sensor condition (if used) will be disregarded in this mode.
NOTE:
Sensor Operation
The NODE is compatible with Hunter Clik-type rain sensors, including Mini-Clik®, Freeze-Clik, and Wired Rain-Click®, as well as many other interrupt-type devices/sensors that do not require power. Simply connect the sensor to the NODE controller by cutting the yellow wire loop and connecting to the sensor wires.
NOTE: NODE is not compatible with Hunter Wireless Rain-Clik® or other weather devices that require 24 VAC power.
When the sensor is activated, it will suspend irrigation and the icon will show on the display.
ADVANCED PROGRAMMING FEATURES
All advanced programming functions are initiated from the idle mode, which shows the time, day of the week, and battery-life indicator on the display. If something is flashing on the display then the controller is in one of the programming modes. After a short period of inactivity the controller will return to idle mode.
Sensor Bypass
Easy Retrieve Memory
This function allows the user to save a preferred program to permanent memory in the controller, which can be restored at any time. This is a great way to override changes made, and revert back to the original programming schedule.
To save a program:
To retrieve a saved program:
The controller now has the preferred program as the current program. The display will flash DONE when the process is complete.
NOTE: Be careful when using Easy Retrieve memory. Saving program data to memory using Easy Retrieve will take the current program information and override whatever is saved in permanent memory. When saving program data, make sure that the current program data is what you want saved.
Setting Master Valve Operation (NODE-200, NODE-400, & NODE-600 Only)
The multi-station NODE models (NODE-200, NODE-400, and NODE-600) can be programmed with the use of a normally closed master valve. When programming with the master valve you will be assigning Station 1 as the master valve, effectively losing the use of Station 1 for activation of an irrigation station.
Programmable Off (Up to 99 Days)
This feature permits the user to stop all programmed watering for the designated period from 1-99 days. At the end of the programmable off period, the controller will resume normal operation.
BATTERY-LIFE INDICATOR
The remaining battery life can be estimated from the battery-life indicator shown on the display. The NODE can operate using either a single nine-volt battery or using two nine-volt batteries. Using two nine-volt batteries will yield approximately twice the battery life of a single nine-volt battery. The battery-life indicator chart below shows an estimate on the remaining battery life.
Full: 100–60% remaining battery life Med: 60–25% remaining battery life Low: 25–0% remaining battery life Replace battery immediately!
RESETTING CONTROLLER
Resetting the controller will erase the current program data and restart the controller. A reset does not, however, delete a program saved to permanent memory using the Easy Retrieve memory feature to save a preferred program.
TROUBLESHOOTING GUIDE
| Problem | Causes | Solutions |
There is no display |
Display is off. Battery is dead. | Press any button for one second. Replace the battery. |
Display indicates watering but none is occurring |
No water pressure. Faulty solenoid. Incompatible solenoid. | Turn on main system supply. Replace solenoid. Must use Hunter DC latching solenoid (P/N 458200) or other compatible DC latching solenoid. |
Automatic irrigation does not start at start time |
Controller in System Off mode. AM/PM/time of day not set correctly. AM/PM/start time not set correctly. | Verify that controller is programmed for automatic watering. Correct AM/PM/time of day. Correct AM/PM/start time. |
Rain sensor does not suspend watering |
Rain sensor defective or miswired. | Verify proper operation of the rain sensor and wire connections. |
Controller waters more than one time |
The program has more than one start time assigned to it. Each program has up to four start times. | Eliminate program start times as needed. |
SPECIFICATIONS
Dimensions: 3 ½»(89 mm) diameter, 2 ½»(64 mm) high
Sensor inputs: One
Power source: One nine-volt alkaline battery (use two for extended battery life). Activates DC latching solenoids operating 9-11VDC (Hunter PN 458200).
Operating temperature: 0ºF to 140ºF (-17ºC to 60ºC)
Approvals:
IP68
CE
FCC
C-Tick
Hunter Industries Incorporated
1940 Diamond Street • San Marcos, California 92078, USA
www.hunterindustries.com/global
© 2018 Hunter Industries Incorporated
Videos
NODE: Programming Video
NODE: Turn on stations manually video
Documents / Resources
References
Download manual
Here you can download full pdf version of manual, it may contain additional safety instructions, warranty information, FCC rules, etc.
Download Hunter NODE-100 Manual
Главная » охотник » Руководство пользователя контроллера Hunter NODE с батарейным питанием
Руководство пользователя контроллера Hunter NODE с батарейным питанием
Похожие сообщения


Контроллер Hunter NODE100, 1 зона, наружный | GreenYard
Каталог
- Ландшафтный полив
- Статические дождеватели и принадлежности к ним
- Статические дождеватели
- Комплектующие для спринклеров
- Сопла и форсунки
- Контроллеры и датчики погоды
- Контроллеры
- Датчики погоды
- Модули расширения
- Дополнительное оборудование
- Эл. магн. клапаны и принадлежности к ним
- Электромагнитные клапаны
- Комплектующие для эл. магн. клапанов
- Электрика
- Роторные дождеватели и принадлежности к ним
- Роторные дождеватели
- Комплектующие для роторов
- Короба пластиковые
- Водорозетки
- Фильтры
- Капельный полив
- Капельная трубка
-
Слепая трубка
- Фитинги капельной трубки
- Регуляторы давления
- Насосное оборудование
- Автоматика насосов
- Насосы поверхностные
- Фитинги
- Подключение дождевателей
- Седелки
- Компрессионные
Артикул: NODE-100
Наличие на складе
Контроллер для системы автоматического полива Hunter NODE100
- Количество зон: 1
- Тип корпуса: фиксированный, для установки вне помещения (с питанием от батареи)
- Материал корпуса: пластмассовый
Контроллер NODE, имея широкие возможности в настройках и работающий на батареях, чрезвычайно прост в использовании. Он зарекомендовал себя, как прочный, качественный и высоконадёжный программатор, способный управлять поливом небольших частных приусадебных участков с имеющимися затруднениями в подключении к электросети. Компактный пульт управления NODE имеет возможность бесперебойно работать от солнечной батареи Solar Panel Kit (SPXCH). Это инновационное изобретение американских производителей Хантер является экологической альтернативой любым источникам питания. Управление данным контроллером очень простое. В помощь пользователю предусмотрено резервное копирование в памяти расписания и предыдущих настроек пульта управления, возможность отключения каких-либо зон полива при получении особых сигналов с датчиков погоды. Можно произвести быструю настройку времени полива при помощи процентной шкалы, подключить датчики погоды, с которыми контроллер NODE Хантер полностью совместим. Пульт Node легко и быстро подключается к соленоиду электромагнитного клапана без болтов, отверток и дополнительных проводов.
Линейка контроллеров NODE
 |
 |
 |
 |
 |
| NODE-100 | NODE-200 | NODE-400 | NODE600 | NODE-100-VALVE-B |
| Количество зон: 1 Тип: наружный Источник питания: батарея 9 В или солнечная панель |
Количество зон: 2 Тип: наружный Источник питания: батарея 9 В или солнечная панель |
Количество зон: 4 Тип: наружный Источник питания: батарея 9 В или солнечная панель |
Количество зон: 6 Тип: наружный Источник питания: батарея 9 В или солнечная панель |
Количество зон: 1 Тип: наружный Источник питания: батарея 9 В или солнечная панель |
ТЕХНИЧЕСКИЕ ХАРАКТЕРИСТИКИ
• Количество станций: 1, 2, 4, 6
• Количество независимых программ: 3
• Макс. продолжительность полива станции: 6 часов
• Работает с одной или двумя батареями 9 В
• Совместимость с погодными датчиками
• Программируемый режим отключения
• Память «Easy Retrieve» для резервного копирования
• Ручной запуск с переходом от станции к станции
• Поправка на сезонные колебания (общая): 50%–100%
• Длина провода соленоида – до 30 м (сечение 1 мм²)
• Легкий в настройке жидкокристаллический экран
• Водонепроницаемый корпус (глубина до 3,7м, защита IP68)
• Защитное резиновое покрытие
• Гарантийный срок: 2 года
ЭЛЕКТРИЧЕСКИЕ ХАРАКТЕРИСТИКИ
►Работает только с фиксирующими соленоидами пост. тока 9-11В
►Эксплуатационная температура: от -18º C до 60º C
►Источник питания: батарея 9 В или солнечная панель
►Разъемы датчиков: 1
Характеристики NODE
Закажите бесплатную консультацию специалиста по телефону прямо сейчас!
НашиКонтакты
![]()
-
Главная
-
Каталог
- Назад
- Каталог
-
Автополив
- Назад
- Автополив
-
Спринклеры (дождеватели)
- Назад
- Спринклеры (дождеватели)
-
Веерные спринклеры
-
Роторные спринклеры
-
Готовые комплекты дождевателей с соплами
-
Дождеватели
-
Форсунки и сопла для полива
- Назад
- Форсунки и сопла для полива
-
Насадки MP Rotator
-
Сопла для полива
-
Узлы подключения дождевателей
- Назад
- Узлы подключения дождевателей
-
Соединения дождевателей
-
Седелки
-
Клапаны электромагнитные
-
Контроллеры для полива
- Назад
- Контроллеры для полива
-
Контроллеры проводные
-
Модули расширения для контролеров
-
Таймеры для полива
-
Датчики полива
-
Электро товары и кабель для полива
-
Капельный полив и микроорошение
- Назад
- Капельный полив и микроорошение
-
Шланги и трубки для капельного полива
-
Фитинги капельного полива
-
Капельницы и микроспрей форсунки
-
Комплекты капельного полива
-
Регуляторы давления для капельного полива
-
Микроредукторы давления и фильтра с регулятором давления
-
Короба, водяные розетки и гидранты
- Назад
- Короба, водяные розетки и гидранты
-
Короба
-
Гидранты и водяные розетки
-
Краны и фильтры
- Назад
- Краны и фильтры
-
Краны для полива
-
Фильтры для полива
-
Редукторы давления
-
Насосы
- Назад
- Насосы
-
Насосы колодезные
-
Насосы циркуляционные
-
Насосные станции
-
Насосы скважинные
-
Насосы для полива ESPA и UNIPUMP
-
Погружные насосы
-
Автоматика для насосов
-
Прочее для насосов
-
Пластиковые емкости
- Назад
- Пластиковые емкости
-
Емкости цилиндрические
-
Емкости прямоугольные
-
Емкости горизонтальные
-
Емкости подземные
-
Комплектующие для емкостей
-
Еврокубы
-
Баки для душа
-
Кессоны и колодцы
-
Септики ТЕРМИТ
-
Трубы и фитинги ПНД
- Назад
- Трубы и фитинги ПНД
-
Трубы ПНД
-
Компрессионные фитинги
- Назад
- Компрессионные фитинги
-
Тройники ПНД
-
Заглушки ПНД
-
Отводы и углы ПНД
-
Муфты ПНД
-
Резьбовые фитинги Irritec
- Назад
- Резьбовые фитинги Irritec
-
Заглушки пластиковые
-
Футорки пластиковые
-
Тройники и отводы пластиковые
-
Ниппеля пластиковые
-
Муфты резьбовые пластиковые
-
Фитинги ПНД пайка
-
Услуги
- Назад
- Услуги
-
Сад газон
-
Обслуживание полив
-
Доставка
-
Ремонт системы полива
-
Проектирование системы полива
-
Автополив своими руками
-
Установка системы полива
-
Шеф монтаж автополива
-
Электро товары
- Назад
- Электро товары
-
Кабель и провод
-
Автоматические выключатели
-
Электрощиты и боксы
-
Розетки и выключатели
-
Светильники
-
Сантехника
- Назад
- Сантехника
-
Смесители на кухню и ванну
-
Водонагреватели
-
Товары интернет-магазинов
- Назад
- Товары интернет-магазинов
-
https://citisfera.ru/
-
Прочее
- Назад
- Прочее
-
Благоустройство участка
-
Ёмкости до 300 литров
-
Плитка тротуарная
-
Декоративные штукатурки
- Назад
- Декоративные штукатурки
-
Жидкие обои
-
Поверхностное водоотведение
-
Садовая мебель
-
Заборы ограждения
-
Прочее асортимент
-
Акции
-
Услуги
-
Блог
-
Компания
- Назад
- Компания
-
Доставка и оплата
-
Возврат и гарантия
-
Производители
-
Лицензии и сертификаты
- Назад
- Лицензии и сертификаты
-
Доставка и оплата
-
Возврат и гарантия
-
Производители
-
Лицензии и сертификаты
- Назад
- Лицензии и сертификаты
-
Доставка и оплата
-
Возврат и гарантия
-
Производители
-
Лицензии и сертификаты
-
Оптовые продажи
-
Контакты
-
Политика конфиденциальности
-
Оптовые продажи
-
Контакты
-
Политика конфиденциальности
-
Оптовые продажи
-
Контакты
-
Политика конфиденциальности
-
Контакты
-
Тольятти
- Назад
- Города
- Самара
- Тольятти
- Димитровград
- Екатеринбург
- Казань
- Москва
- Саратов
- Уфа
- Санкт-Петербург
- Волгоград
- Нижний Новгород
- Воронеж
- Ульяновск
- Оренбург
-
Личный кабинет
-
Корзина0 -
Отложенные0
-
Сравнение товаров0
-
8 800 302-98-79
Контактная информация
г.Самара, ул.Олимпийская 73
г.Тольятти, с.Подстепки, ул.Фермерская 4
г.Москва, ул.Ижорская 15, строение 2
Артикул:
NODE-100-Valve-B

Надежный и удобный в настройке
23 251 руб.
20 950 руб./шт.
—9.9%
Экономия 2 301 руб.

Бесплатный проект системы полива
Подробнее
Бесплатное проектирование при заказе оборудования у нас. План-схема вашего участка, техническая документация для установки своими руками, техподдержка и консультирование – бесплатно.

Гарантия и только оригинальный товар
Подробнее
Гарантия от производителя и от нашей компании на разные категории товаров. Все условия уточняйте у менеджера.

До 186 дней на обмен или возврат
Подробнее
Возврат или обмен невостребованного оборудования (без потери стоимости). Срок действия от 30 до 186 дней (в зависимости от сезонности). Условие: приобретенный товар не был в употреблении и сохранил товарный внешний вид.

Бесплатная доставка по России
Подробнее
Транспортные компании Деловые линии, ПЭК, СДЭК, ЭНЕРГИЯ, КИТ, DPD, boxberi.
-
Описание
-
Наличие
-
Отзывы
-
Задать вопрос
-
Характеристики
Наличие
Склад Тольятти
тел: 8-800-302-98-79
 В наличии
Склад Самара
тел: 8-800-302-98-79
В наличии, 2 шт.
Склад Москва
тел: 8-800-302-98-79
В наличии
Склад Казань
тел: 8-800-302-98-79
В наличии
Задать вопрос
Вы можете задать любой интересующий вас вопрос по товару или работе магазина.
Наши квалифицированные специалисты обязательно вам помогут.
Характеристики
|
? Электропитание Источник питания (вольт) |
9 вольт |
|
Количество зон полива |
1 линия |
|
Тип контроллера |
Автономный |
|
БРЕНД |
HUNTER |
|
Установка |
Комнатная, Улица |
|
Страна-производитель |
Китай |
Видео
Услуги
Задать вопрос
Беспроводной пульт управления клапаном. Является одним из наиболее популярных в мире пультов управления, работающих от батареи. Если Вы работаете в изолированном месте, или если там нет электроэнергии для обычного пульта управления — этот пульт — решение такой проблемы. Пульт управления представляет собой экономичный прибор, работающий на постоянном токе от одной 9-вольтовой батареи. Он компактен, прост в эксплуатации и может обслуживать до четырех зон. Обладает высокой надежностью и прочностью.
ХАРАКТЕРИСТИКИ: NODE-100
— в комплекте с контроллером, постовляется соленоид 9V
— подключение одна зона
— 3 независимые программы
— 4 старта полива на программу
— макс. продолжительность полива станции: 6 часов
— ручной запуск одним нажатием с переходом от станции к станции
— операции с управляющим клапаном (в наличии модели с 2, 4 и 6 станциями)
— длина провода соленоида – до 30 м (используйте провод с сечением 1 мм2 )
— источник питания: батарея 9 В или солнечная панель