-
Contents
-
Table of Contents
-
Troubleshooting
-
Bookmarks
Quick Links
WAND MODULE FOR
X2
CONTROLLERS
™
QUICK START GUIDE
hydrawise.com
hunterindustries.com
Related Manuals for Hunter Hydrawise WAND
Summary of Contents for Hunter Hydrawise WAND
-
Page 1
WAND MODULE FOR CONTROLLERS ™ QUICK START GUIDE hydrawise.com hunterindustries.com… -
Page 2
Obstructions such as interior walls SCAN and landscaping can block the signal. for help Need help? Run the Wi-Fi Wizard App. https:/ /hunter.help/wandhelp support@hydrawise.com Step 1: Check the Wi-Fi signal https:/ /hunter.info/wifiwizardiOS Use your smartphone to check the signal strength for the desired Wi-Fi connection at the controller location. -
Page 3
Informationen zu Ihrem Produkt? instalación, programación y más. Hier finden Sie Tipps zur Installation, ¿Necesita ayuda? Programmieranweisungen und weiteres. https://hunter.help/wandhelp Für Hilfe scannen? Paso 1: Compruebe la señal de Wi-Fi https://hunter.help/wandhelp Use su teléfono móvil para comprobar Schritt 1: WLAN-Signal überprüfen la fuerza de la señal Wi-Fi deseada en la… -
Page 4
Scannez le code QR pour obtenir de l’aide : Scansionare il codice QR per assistenza: https://hunter.help/wandhelp https://hunter.help/wandhelp Étape 1 : Vérification du signal Wi-Fi Passaggio 1: controllare il segnale Wi-Fi À l’aide de votre smartphone, vérifiez Utilizzare lo smartphone per verificare l’intensité… -
Page 5
Kontrol ünitesi controladores e muito mais. programlama, kurulum ve daha fazlası hakkında ipuçları edinin. Procurar ajuda? https://hunter.help/wandhelp Yardım için taransın mı? https://hunter.help/wandhelp Etapa 1: verifique o sinal do Wi-Fi 1. Adım: Wi-Fi Sinyalini kontrol edin Use o seu smartphone para verificar a intensidade do sinal da conexão Wi-Fi… -
Page 6
Product Installation Step 2: Installing the WAND Module 1. Remove the Wi-Fi cover from the 2. Insert the WAND Module. X2 Controller. When installed, the WAND Module All programming is now managed via disables the X2 Controller’s dial and button cloud-based Hydrawise Software from a functions, the existing schedule, and smartphone, tablet, or desktop browser. -
Page 7
Product Installation Installation des Produkts Las operaciones manuales como Encendido/Apagado de Estación y Probar Schritt 2: WAND-Modul installieren Todas las Estaciones se pueden activar 1. Nehmen Sie die WLAN-Abdeckung vom desde el programador. X2-Steuergerät ab. 2. Inserte el módulo WAND. Nach der Installation deaktiviert Toda la programación se maneja a través das WAND-Modul die Schalter- und del software Hydrawise basado en la nube… -
Page 8
Product Installation Installazione del prodotto Seções, podem ainda ser ativadas no controlador. Passaggio 2: installare il modulo WAND 2. Insira o módulo WAND. 1. Rimuovere il coperchio del Wi-Fi dal programmatore X2. Toda a programação será então gerenciada pelo software Hydrawise na nuvem Quando viene installato, WAND disabilita por meio de um smartphone, tablet ou le funzioni del selettore e dei pulsanti del… -
Page 9
Product Overview Step 3: Navigating WAND with X2 Leave the WAND Module installed with the dial in the RUN position during setup to Locate the following: remain connected to Hydrawise Software. A. Wi-Fi status LED If the WAND Module is removed, the controller will revert to the programs B. -
Page 10
Product Overview Hydrawise-Software bestehen bleibt. Wenn Hydrawise. Si se quita el WAND, el das WAND-Modul entfernt wird, wird das programador volverá a los programas y a la Steuergerät auf die über den Drehschalter configuración introducidos mediante el dial und die Tasten konfigurierten Programme y los botones. -
Page 11
Product Overview Pour vérifier que le programmateur Per garantire che il programmatore X2 X2 fonctionne avec Hydrawise, le funzioni con Hydrawise, è necessario sélecteur doit être en position Run. Le che il selettore si trovi nella posizione programmateur ne fonctionnera pas à Acceso. -
Page 12
Product Overview Ürüne Genel Bakış 3. Adım: X2 ile WAND’da gezinme Aşağıdakileri bulun: A. Wi-Fi durumu LED ışığı B. Wi-Fi kurulum düğmesi C. WAND seri numarası Seri numarası, WAND için Hydrawise yönetimini etkinleştirmek amacıyla kullanılır. Kontrol ünitesini Hydrawise hesabınıza eklerken çevrimiçi kurulum işlemi sırasında seri numarasını… -
Page 13
Hydrawise app or website screen. 4. Continue following all steps to add your X2 Controller to your Hydrawise account https:/ /hunter.info/hydrawiseiOS and connect to Wi-Fi. Existing Hydrawise account user: 1. Sign in to your Hydrawise app or account. -
Page 14
Google Play™ Store Ihr X2-Steuergerät zu Ihrem Hydrawise- herunter oder melden Sie sich Konto hinzuzufügen und eine WLAN- auf hydrawise.com an. Verbindung herzustellen. https://hunter.info/hydrawiseiOS Configuración de Hydrawise https://hunter.info/hydrawiseAndroid Paso 4: Acceda al software Schritt 5: Steuergerät hinzufügen Hydrawise Für neue Hydrawise-Konto-Nutzer: Descargue la aplicación… -
Page 15
Hydrawise à partir de l’App 4. Suivez toutes les étapes pour ajouter Store d’Apple ou de la ® votre programmateur X2 à votre compte boutique Google Play™, Hydrawise et vous connecter au Wi-Fi. ou connectez-vous sur hydrawise.com. https://hunter.info/hydrawiseiOS https://hunter.info/hydrawiseAndroid hunterindustries.com… -
Page 16
® Google Play™ Store, oppure il programmatore X2 all’account accedere a hydrawise.com. Hydrawise e connettersi al Wi-Fi. Configuração do Hydrawise https://hunter.info/hydrawiseiOS Etapa 4: acesse o software https://hunter.info/hydrawiseAndroid Hydrawise Passaggio 5: aggiungere il programmatore Baixe o aplicativo Hydrawise Nuovo account Hydrawise:… -
Page 17
App Store veya Google ® Play™ Store’dan indirin veya 3. Kontrol Ünitelerim listesinin altındaki + hydrawise.com adresinde simgesine tıklayın. oturum açın. 4. X2 kontrol ünitenizi Hydrawise https://hunter.info/hydrawiseiOS hesabınıza eklemek ve Wi-Fi’ye https://hunter.info/hydrawiseAndroid bağlanmak için tüm adımları izlemeye devam edin. hunterindustries.com… -
Page 18
“UPd8b” will appear on the controller upgrading to for help the latest Hydrawise firmware. 3. UPd8C — When online, the WAND LED will stay green and “UPd8C” will https:/ /hunter.help/wifispecs appear on the controller upgrading to the latest Wi-Fi firmware. hydrawise.com… -
Page 19
Product Reset Zurücksetzen des Produkts Es wurde ein falsches WLAN-Passwort eingegeben oder das WLAN-Netzwerk ist nicht Zurücksetzen des WAND-Moduls auf die mehr verfügbar. Werkseinstellungen LED-Leuchte blinkt: 1. Halten Sie die Taste WAND 5 Sekunden lang gedrückt. Auf der LCD-Anzeige des 2-faches Blinken: WAND befindet sich im Steuergeräts erscheint daraufhin „Fdr‘… -
Page 20
Product Reset Reinicio del producto LED de color parpadeante: Reinicio a los valores de fábrica de WAND 2 parpadeos, el WAND está en modo «SAP» (Wi-Fi Direct). 1. Mantenga presionado el botón WAND durante 5 segundos. En la pantalla 3 parpadeos, el WAND está en modo «Pbc» LCD del programador aparecerá… -
Page 21
Product Reset Réinitialisation du produit Couleur des LED clignotantes : Réinitialisation d’usine du module WAND 2 clignotements : le module WAND est en mode « SAP » (direct Wi-Fi). 1. Maintenez le bouton du module enfoncé pendant 5 secondes. Vous verrez alors 3 clignotements : le module WAND est en apparaître « Fdr »… -
Page 22
Product Reset Reset del prodotto LED colorato lampeggiante: Ripristino alle impostazioni di fabbrica Il LED lampeggia 2 volte: WAND è in di WAND modalità “SAP” (Wi-Fi Direct). 1. Tenere premuto il pulsante WAND per 5 Il LED lampeggia 3 volte: WAND è in secondi. -
Page 23
Product Reset Redefinição de produto Cor do LED piscando: Restauração do WAND para o padrão de Com duas piscadas, o WAND está no modo fábrica “SAP” (Wi-Fi Direct). 1. Aperte e segure o botão do WAND por 5 Com três piscadas, o WAND está no modo segundos. -
Page 24
Product Reset Ürün Sıfırlama Yanıp sönen LED Rengi: WAND’ı Fabrika Ayarlarına Sıfırla 2 yanıp sönme, WAND «SAP» (Wi-Fi Direk) modunda. 1. WAND düğmesini 5 saniye boyunca basılı tutun. Kontrol ünitesinin LCD ekranında “Fdr” 3 yanıp sönme, WAND, «Pbc» yönlendirici- (fabrika ayarlarına sıfırla) yazısı görünecektir. router destekli (WPS düğmesi) modda. -
Page 25
Changes or modifications not expressly installed and used in accordance with the approved by Hunter Industries could void instructions, may cause harmful interference the user’s authority to operate this device. to radio communications. However, there… -
Page 26
Innovation, Science and Economic Certificate of Conformity to Development Canada (ISED) Compliance European Directives Notice Hunter Industries declares that the irrigation This device contains licence-exempt controller complies with the standards of the transmitter(s)/receiver(s) that comply European Directives of “electromagnetic with Innovation, Science and Economic compatibility”… -
Page 27
Notes The Bluetooth® word mark and logos are registered trademarks owned by Bluetooth SIG Inc. and any use of such marks by Hunter Industries is under license. hunterindustries.com… -
Page 28
Hunter family of customers for years to come. Gregory R. Hunter, CEO of Hunter Industries Gene Smith, President, Landscape Irrigation and Outdoor Lighting HUNTER INDUSTRIES | Built on Innovation®…
- Manuals
- Brands
- Hunter Manuals
- Wireless Router
- WAND
- Quick start manual
-
Contents
-
Table of Contents
-
Troubleshooting
-
Bookmarks
Quick Links
WAND Quick Start Guide
hunterindustries.com
Related Manuals for Hunter WAND
Summary of Contents for Hunter WAND
-
Page 1
WAND Quick Start Guide hunterindustries.com… -
Page 2
TABLE OF CONTENTS English (EN) Español (ES) Français (FR) Italiano (IT) Português (PT) Deutsch (DE) Türkçe (TR) -
Page 3: Installing The Wi-Fi Module
In this case, move the controller or router to improve the signal. INSTALLING THE WI-FI MODULE 1. Insert the WAND module into the right-side accessory port of the X2™ controller. When installed, WAND disables the X2 controller’s dial and button functions as well as the…
-
Page 4
3. Wi-Fi status LED WI-FI SETUP Once installed, a solid amber ● LED will appear on the module near the right of the dial positions and a flashing icon will appear on the controller LCD. WAND is now ready for Wi-Fi setup. -
Page 5
Choose one of three methods to connect to Hydrawise: 1. Bluetooth setup (recommended) ® 2. Wi-Fi direct setup 3. WPS setup Download the Hydrawise App from the Apple ® Store or Google Play™ Store. hunter.direct/HydrawiseiOS hunter.direct/HydrawiseAndroid… -
Page 6: Bluetooth Setup
The word “DONE” and a solid icon will appear on the controller LCD. 6. Continue following the instructions on the app programming screen. NOTE: Pairing will stop after 2 minutes if no action is taken. Press the WAND button once to restart Bluetooth setup.
-
Page 7
Setup Wizard, and select your X2 model. Continue following the instructions on the app programming screen. NOTE: Pairing will stop after 2 minutes if no action is taken. Press the WAND button twice to restart Wi-Fi direct setup. -
Page 8: Wps Setup
4. Open the Hydrawise smartphone app, navigate to Setup Wizard, select your X2 model. Continue following the instructions on the app programming screen. NOTE: Pairing will stop after 2 minutes if no action is taken. Press the WAND button three times to restart WPS setup.
-
Page 9: Factory Reset
3. Release the button when the solid amber ● LED appears. The word “DONE” will appear on the controller LCD. 4. Return to the setup process to reconnect WAND to Wi-Fi. TROUBLESHOOTING Display • The display shows “FAIL” and a solid red ●…
-
Page 10
® by Hunter Industries is under license. Apple and the Apple logo are trademarks of Apple Inc., registered in the U.S. and other countries. App Store is a service mark of Apple Inc. Google, the Google logo, Android, and Google Play are trademarks of Google LLC. -
Page 11
X2™. Cuando está instalado, el WAND deshabilita las funciones de dial y de botón del programador X2, así como el programa y los ajustes actuales. Toda la programación se maneja a través del software Hydrawise™ basado en la nube desde un navegador de teléfono inteligente o… -
Page 12
Una vez instalado, un LED de color ámbar sólido ● aparecerá en el módulo a la derecha de las posiciones del dial, y un ícono parpadeante aparecerá en la pantalla LCD del programador. El WAND ahora está listo para la configuración Wi-Fi. -
Page 13
Elija uno de los tres métodos para conectarse a Hydrawise: 1. Configuración por Bluetooth (recomendada) ® 2. Configuración directa por Wi-Fi 3. Configuración por WPS Descargue la aplicación Hydrawise de la App Store de Apple o de la Google Play™ Store. ® hunter.direct/HydrawiseiOS hunter.direct/HydrawiseAndroid… -
Page 14
LCD del programador. 6. Continúe siguiendo las instrucciones en la pantalla de programación de la aplicación. NOTA: El emparejamiento se detendrá después de dos minutos si no realiza ninguna acción. Presione el botón WAND una vez para reiniciar la configuración por Bluetooth. -
Page 15
CONFIGURACIÓN DIRECTA POR WI-FI 1. Habilite la función Wi-Fi en su teléfono inteligente. 2. Presione el botón WAND dos veces: • La LED ámbar sólida ● en el módulo parpadeará dos veces por segundo. 3. Inicie un navegador web ya sea en su teléfono inteligente, tablet o ordenador: •… -
Page 16
NOTA: El emparejamiento se detendrá después de dos minutos si no realiza ninguna acción. Presione el botón WAND dos veces para reiniciar la configuración directa por Wi-Fi. CONFIGURACIÓN POR WPS 1. Presione el botón WAND tres veces: • La LED ámbar sólida ●… -
Page 17: Restablecimiento De Fábrica
• La pantalla muestra “FAIL” y una LED roja sólida ● Posible causa • El WAND no se conectó a la red Wi-Fi. Posibles soluciones • Colóquese dentro del rango de la señal del router. • Verifique que el nombre de la red (SSID) y la contraseña sean los correctos.
-
Page 18
® de tales marcas por Hunter Industries se hace bajo licencia. Apple y el logotipo de Apple son marcas comerciales de Apple Inc., registradas en EE. UU. y en otros países. App Store es una marca comercial de Apple Inc. Google, el logotipo de Google, Android y Google Play son marcas comerciales de Google LLC. -
Page 19
Si l’intensité est trop faible, la connexion ne s’établira pas. Dans ce cas, déplacez le programmateur ou le routeur pour améliorer le signal. INSTALLER LE MODULE WI-FI 1. Insérez le module WAND dans le port accessoire droit du programmateur X2™. Une fois le WAND installé, il désactive les fonctions du sélecteur et des boutons du… -
Page 20
Manuel. Repositionnez le sélecteur sur Marche. Les fonctionnalités masquées du programmateur sont toujours disponibles. NAVIGUER DANS LE MODULE SERIAL NO. ➌ 5555-5555 ➊ ➋ 1. Bouton de paramétrage Wi-Fi 2. Numéro de série du WAND 3. Diode d’état Wi-Fi… -
Page 21
● apparaît sur le module, à droite des options du sélecteur, tandis qu’une icône clignotante apparaît sur l’écran LCD du programmateur. Le WAND est maintenant prêt pour le paramétrage Wi-Fi. REMARQUE : laissez le module installé pendant le paramétrage pour rester connecté au logiciel Hydrawise. Si le module est retiré, le programmateur retournera au mode de… -
Page 22
PARAMÉTRAGE BLUETOOTH 1. Activez le paramétrage Bluetooth sur votre smartphone. 2. Connectez votre smartphone au réseau voulu. 3. Appuyez une fois sur le bouton WAND : • La diode brillant en orange continu ● module clignote une fois par seconde. ●… -
Page 23
PARAMÉTRAGE DIRECT WI-FI 1. Activez le paramétrage Wi-Fi sur votre smartphone. 2. Appuyez deux fois sur le bouton WAND : • La diode brillant en orange continu ● du module clignote deux fois par seconde. 3. Ouvrez un navigateur Internet sur votre smartphone, tablette ou ordinateur :… -
Page 24
REMARQUE : l’appairage s’arrêtera au bout de 2 minutes si aucune action n’est entreprise. Appuyez deux fois sur le bouton WAND pour redémarrer le paramétrage direct Wi-Fi. PARAMÉTRAGE WPS 1. Appuyez trois fois sur le bouton WAND : • La diode brillant en orange continu ●… -
Page 25: Réinitialisation D’usine
• L’écran affiche «ÉCHEC» et la diode brille en rouge continu ● Cause possible • Le WAND n’a pas réussi à se connecter au réseau Wi-Fi. Solutions possibles • Mettez-vous à portée du signal du routeur. • Vérifiez sir le nom du réseau (SSID) et le mot de passe sont corrects.
-
Page 26
® marques par Hunter Industries est effectuée sous licence. Apple et le logo Apple sont des marques de commerce d’Apple Inc, déposées aux États-Unis et dans d’autres pays. App Store est une marque de service d’Apple Inc. Google, le logo Google, Android et Google Play sont des marques de commerce de Google LLC. -
Page 27
Se la potenza è troppo bassa, la connessione non funzionerà. In questo caso, spostare il programmatore o il router per migliorare la potenza del segnale. INSTALLAZIONE DEL MODULO WI-FI 1. Inserire il modulo WAND nella porta accessoria sul lato destro del programmatore X2™. Quando viene installato, WAND disabilita le funzioni del selettore e dei pulsanti del programmatore X2, nonché… -
Page 28
è in posizione OFF o Manuale. Riportare il selettore in posizione RUN. Le funzioni nascoste del programmatore restano comunque disponibili. ESPLORANDO IL MODULO SERIAL NO. ➌ 5555-5555 ➊ ➋ 1. Pulsante di configurazione Wi-Fi 2. Numero di serie WAND 3. LED di stato Wi-Fi… -
Page 29
LCD del programmatore. Il modulo WAND è ora pronto per la configurazione della rete Wi-Fi. NOTA: lasciare il modulo installato durante la configurazione per rimanere connessi al software Hydrawise. -
Page 30
“FINE” e un’icona fissa. 6. Continuare a seguire le istruzioni nella schermata di programmazione dell’app. NOTA: l’abbinamento si interromperà dopo 2 minuti se non si esegue alcuna azione. Premere il pulsante WAND una sola volta per riavviare la configurazione Bluetooth. -
Page 31
Configurazione guidata e scegliere il proprio modello di X2.Continuare a seguire le istruzioni nella schermata di programmazione dell’app. NOTA: l’abbinamento si interromperà dopo 2 minuti se non si esegue alcuna azione. Premere il pulsante WAND due volte per riavviare la configurazione Wi-Fi Direct. -
Page 32: Configurazione Wps
Configurazione guidata e scegliere il modello di X2.Continuare a seguire le istruzioni nella schermata di programmazione dell’app. NOTA: l’abbinamento si interromperà dopo 2 minuti se non si esegue alcuna azione. Premere il pulsante WAND tre volte per riavviare la configurazione WPS.
-
Page 33: Impostazioni Di Fabbrica
● di color rosso fisso. Causa possibile • La connessione tra WAND e la rete Wi-Fi non è riuscita. Soluzioni possibili • Restate nella zona di segnale del router. • Verificare che il nome di rete (SSID) e la password siano corretti.
-
Page 34
® da parte di Hunter Industries è concesso in licenza. Apple e il logo di Apple sono marchi di Apple Inc, registrati negli Stati Uniti e in altri paesi. App Store è un marchio di servizio di Apple Inc. Google, il logo di Google, Android e Google Play sono marchi di Google LLC. -
Page 35
INSTALAÇÃO DO MÓDULO WI-FI 1. Insira o módulo WAND na porta de acessórios do lado direito do controlador X2™. Quando instalado, o WAND desativa as funções do seletor e dos botões do controlador X2,… -
Page 36
NAVEGAÇÃO NO MÓDULO SERIAL NO. ➌ 5555-5555 ➊ ➋ 1. Botão de configuração do Wi-Fi 2. Número de série do WAND 3. LED de status do Wi-Fi… -
Page 37
● acenderá no módulo à direita das posições do seletor, e um ícone ficará piscando na tela do controlador. Isso indica que o WAND está pronto para a configuração do Wi-Fi. NOTA: deixe o módulo instalado durante a configuração para permanecer conectado ao software Hydrawise. -
Page 38
6. Continue seguindo as instruções na tela de programação do app. NOTA: o pareamento será interrompido depois de 2 minutos se nenhuma ação for realizada. Pressione o botão do WAND uma vez para reiniciar a configuração por Bluetooth. -
Page 39
CONFIGURAÇÃO DIRETA POR WI-FI 1. Ative o Wi-Fi no seu smartphone. 2. Pressione o botão do WAND duas vezes: • O LED amarelo ● no módulo piscará duas vezes por segundo. 3. Abra um navegador de Internet no seu smartphone, tablet ou computador: •… -
Page 40
NOTA: o pareamento será interrompido depois de 2 minutos se nenhuma ação for realizada. Pressione o botão do WAND duas vezes para reiniciar a configuração direta por Wi-Fi. CONFIGURAÇÃO POR WPS 1. Pressione o botão do WAND três vezes: • O LED amarelo ●… -
Page 41: Solução De Problemas
• O visor mostra «FALHA» e um LED vermelho fixo ● Possível causa • O WAND não conseguiu se conectar à rede Wi-Fi. Soluções possíveis • Fique ao alcance do sinal do roteador. • Verifique se o nome da rede (SSID) e a senha estão corretos.
-
Page 42
® de tais marcas por parte da Hunter Industries é feito sob licença. Apple e o logotipo da Apple são marcas comerciais da Apple Inc., registradas nos EUA e em outros países. App Store é uma marca de serviço da Apple Inc. Google, o logotipo do Google, Android e Google Play são marcas comerciais da Google Inc. -
Page 43
1. Setzen Sie das WAND-Modul in den rechten Zubehöranschluss des X2™ Steuergeräts ein. Nach der Installation deaktiviert das WAND die Schalter- und Tastenfunktionen am X2 sowie den programmierten Beregnungsplan und die Einstellungen.Die gesamte Programmierung verläuft anschließend über die Hydrawise™ cloudbasierende Software per Smartphone oder Desktop-Browser. -
Page 44
Drehschalter in der Position AUS oder „Manuell“ steht. Stellen Sie den Drehschalter zurück auf BETRIEB. Verborgene Steuergerätfunktionen sind weiterhin verfügbar. NAVIGATION DES MODULS SERIAL NO. ➌ 5555-5555 ➊ ➋ 1. Wi-Fi-Setup Taste 2. WAND Seriennummer 3. Wi-Fi-Status LED… -
Page 45
LED an dem Modul rechts neben dem Drehschalter auf und ein blinkendes Symbol erscheint auf dem LCD-Display des Steuergeräts. WAND ist jetzt bereit für das Wi-Fi-Setup. HINWEIS: Lassen Sie das Modul während des Setups installiert, damit die Verbindung zur Hydrawise Software bestehen bleibt. -
Page 46
BLUETOOTH-SETUP 1. Aktivieren Sie Bluetooth auf Ihrem Smartphone. 2. Verbinden Sie Ihr Smartphone mit dem gewünschten Netzwerk. 3. Drücken Sie die Taste WAND einmal: • Die gelbe ● LED auf dem Modul blinkt einmal pro Sekunde auf. ● • Auf dem LCD-Display des Steuergeräts wird ein vierstelliger Code mit einem Bluetooth-Symbol angezeigt. -
Page 47
HINWEIS: Wenn keine Aktion ausgeführt wird, wird die Kopplung nach 2 Minuten beendet. Drücken Sie die Taste WAND einmal, um das Bluetooth-Setup erneut zu starten. WI-FI DIREKT-SETUP 1. Aktivieren Sie Wi-Fi auf Ihrem Smartphone. 2. Drücken Sie die Taste WAND zweimal: •… -
Page 48
Bildschirm zur App-Programmierung. HINWEIS: Wenn keine Aktion ausgeführt wird, wird die Kopplung nach 2 Minuten beendet. Drücken Sie die Taste WAND zweimal, um das Wi-Fi Direkt-Setup erneut zu starten. WPS-SETUP 1. Drücken Sie die Taste WAND dreimal: • Die gelbe ●… -
Page 49: Auf Werkseinstellungen Zurücksetzen
2. Die Modul-LED erlischt. 3. Lassen Sie die Taste los, wenn die gelbe ● LED erscheint. Das Wort FERTIG wird auf dem LCD-Display des Steuergeräts angezeigt. 4. Gehen Sie zurück zum Setup, um WAND erneut mit dem Wi-Fi zu verbinden.
-
Page 50: Fehlerbehebung
Display • Auf dem Bildschirm wird FEHLER angezeigt und eine rote ● LED leuchtet. Mögliche Ursache • WAND konnte sich nicht mit dem Wi-Fi-Netzwerk verbinden. Mögliche Lösungen • Stellen Sie sicher, dass Sie sich in der Reichweite des Routersignals befinden.
-
Page 51
Marken von Bluetooth SIG, Inc. und jede Nutzung dieser ® Marken von Hunter Industries Corporation steht unter Lizenz. Apple und das Apple-Logo sind Marken von Apple Inc. App Store ist eine Dienstleistungsmarke von Apple Inc. und in den USA und anderen Ländern eingetragen. Google, das Google- Logo und Google Play sind Marken von Google LLC. -
Page 52
Güç çok düşükse bağlantı çalışmaz. Bu durumda sinyali iyileştirmek için kontrol ünitesini veya yönlendiriciyi hareket ettirin. WI-FI MODÜLÜNÜ TAKMA 1. WAND modülünü X2™ kontrol ünitesinin sağ tarafındaki donanım girişine takın. WAND modülü takıldığında, X2 kontrol ünitesinin kadran ve düğme işlevlerinin yanı sıra mevcut planlama ve ayarları… -
Page 53
● LED ışığı görünür ve kontrol ünitesinin LCD ekranında yanıp sönen bir simge belirir. WAND artık Wi-Fi kurulumuna hazırdır. NOT: Hydrawise yazılımına bağlı kalmak için kurulum sırasında modülü takılı halde bırakın. Modül çıkarılırsa kontrol ünitesi kadran tabanlı programlamaya geri döner. -
Page 54
BLUETOOTH KURULUMU 1. Akıllı telefonunuzda Bluetooth ayarını etkinleştirin. 2. Akıllı telefonunuzu istediğiniz ağa bağlayın. 3. WAND düğmesine bir kez basın: • Modül üzerindeki kehribar renkli sabit ● LED ışığı saniyede bir kez yanıp söner. ● • Kontrol ünitesinin LCD ekranında Bluetooth simgesi ile 4 haneli bir kod görünür. -
Page 55
6. Uygulama programlama ekranındaki talimatları izlemeye devam edin. NOT: İşlem yapılmazsa eşleme 2 dakika sonra durur. Bluetooth kurulumunu yeniden başlatmak için WAND düğmesine bir kez basın. DOĞRUDAN WI-FI KURULUMU 1. Akıllı telefonunuzda Wi-Fi ayarını etkinleştirin. 2. WAND düğmesine iki kez basın: •… -
Page 56
5. Akıllı telefonunuzda Hydrawise Uygulamasını açın, Kurulum Sihirbazına gidin ve X2 modelinizi seçin. Uygulama programlama ekranındaki talimatları izlemeye devam edin. NOT: İşlem yapılmazsa eşleme 2 dakika sonra durur. Wi-Fi kurulumunu yeniden başlatmak için WAND düğmesine iki kez basın. -
Page 57
ünitesinin LCD ekranında “DONE” (Bitti) yazısı ve sabit bir simge görünür. 4. Hydrawise akıllı telefon uygulamasını açın, Kurulum Sihirbazına gidin ve X2 modelinizi seçin.Uygulama programlama ekranındaki talimatları izlemeye devam edin. NOT: İşlem yapılmazsa eşleme 2 dakika sonra durur. WPS kurulumunu yeniden başlatmak için WAND düğmesine üç kez basın. -
Page 58: Sorun Giderme
FABRIKA AYARLARINA SIFIRLA 1. WAND düğmesini 5 saniye boyunca basılı tutun. 2. Modül LED ışığı kapanacaktır. 3. Kehribar rengi sabit ● LED ışığı göründüğünde düğmeyi serbest bırakın. Kontrol ünitesinin LCD ekranında “DONE” (Bitti) yazısı görünür. 4. WAND’i Wi-Fi’a yeniden bağlamak için kurulum sürecine dönün.
-
Page 59
Apple ve Apple logosu Apple Inc.’a ait ABD ve diğer ülkelerde kayıtlı ticari markalardır. App Store, Apple Inc.’ın hizmet markasıdır. Google, Google logosu, Android ve Google Play, Google LLC’nin ticari markalarıdır. © 2019 Hunter Industries Inc. Hunter, Hunter logosu ve diğer tüm ticari markalar ABD ve diğer ülkelerde Hunter Industries’e aittir. -
Page 60
Find more helpful information about your product, including installation tips, controller programming, and more. hunter.direct/wandhelp 1-800-733-2823 HUNTER INDUSTRIES INCORPORATED | Built on Innovation® 1940 Diamond Street, San Marcos, California, 92078 USA hunterindustries.com RC-103-QG-WAND MULTI 10/19…
Check Wi-Fi Signal
Use your smartphone to check the signal strength for the desired router connection at the controller location. If the strength is too low, the connection will not work. In this case, move the controller or router to improve the signal. Obstructions such as interior walls and landscaping can block the signal.
Check if the Wi-Fi network is 2.4 GHz by calling your Internet Service Provider (ISP). 5 GHz Wi-Fi networks are not compatible with WAND.
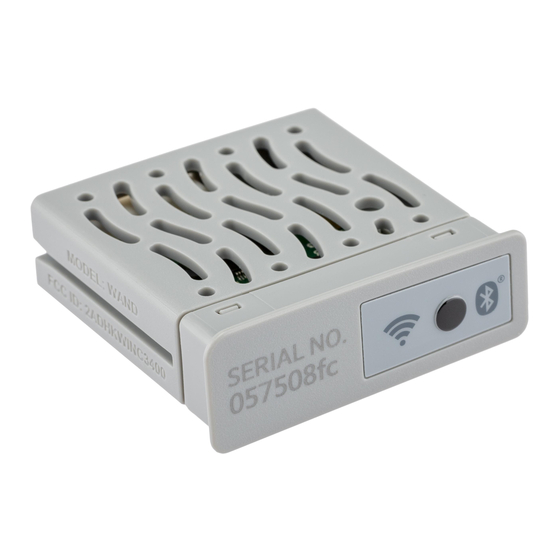
Navigating the Module
- Wi-Fi setup button
- WAND serial number
- Wi-Fi status LED

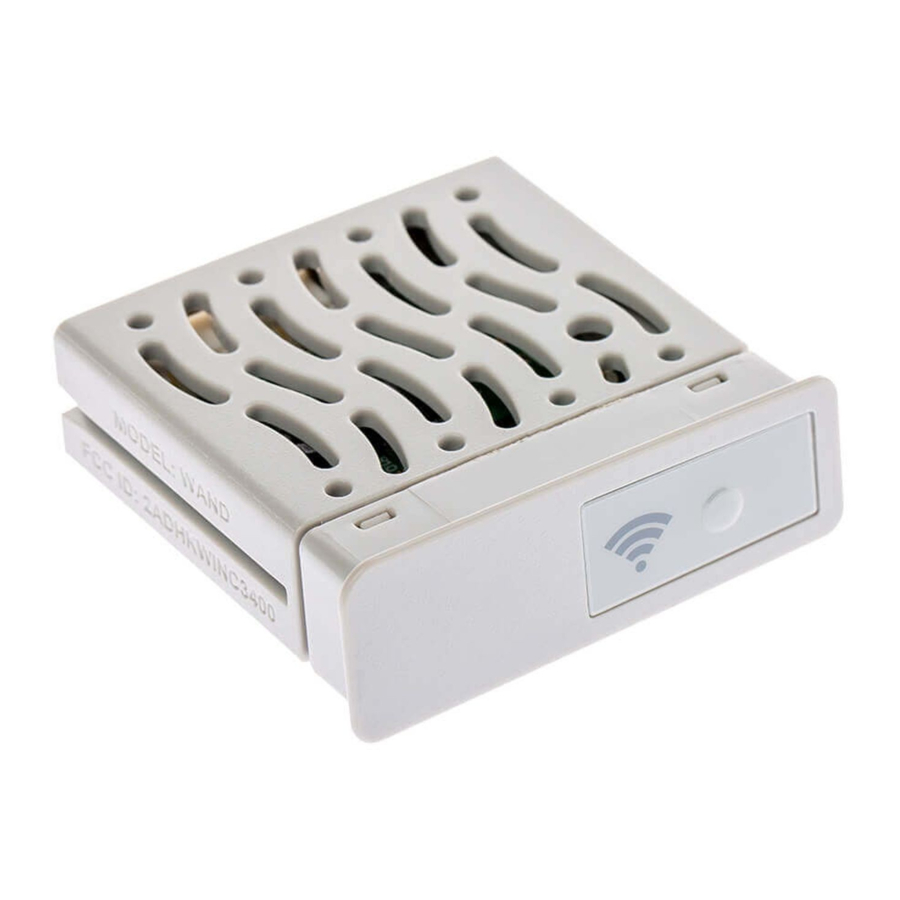
Installing the WAND Module
- Remove the COVER insert by pulling outward.
- Insert the WAND module into the right-side open port of the X2™ controller.
- Once installed, a solid amber Sorry, your browser does not support inline SVG. LED will appear on the module near the right of the dial positions and a flashing icon will appear on the controller LCD. The WAND is now ready for Wi-Fi setup.
IMPORTANT:
- All programming is now managed via Hydrawise cloud-based software from a smartphone, tablet, or desktop browser.
- WAND disables the controller’s dial and button functions, the existing schedule, and settings.
- Manual operation functions such as Start/Stop Station and Test All Stations can still be activated from the controller.
Table of Contents for Hunter WAND:
-
DE 46 BLUETOOTH-SETUP 1. Aktivieren Sie Bluetooth auf Ihrem Smartphone. 2. Verbinden Sie Ihr Smartphone mit dem gewünschten Netzwerk. 3. Drücken Sie die Taste WAND einmal: • Die gelbe ● LED auf dem Modul blinkt einmal pro Sekunde auf. • Auf dem LCD-Display des Steuergeräts wird ein vierstelliger Code mit einem Bluetooth-Symbol angezeigt. 4. Önen Sie die Hydrawise App auf Ihrem Smartphone, navigieren Sie zum Setup-Assistent
-
FR 26 hunter.direct/wandhelp 1-800-733-2823 Découvrez d’autres informations utiles sur votre produit, notamment des conseils pour l’installation, la conguration du programmateur, etc. La marque et les logos Bluetooth ® sont des marques déposées détenues par Bluetooth SIG Inc., et toute utilisation de ces marques par Hunter Industries est eectuée sous licence. Apple et le logo Apple sont des marques de commerce d’Ap
-
IT 34 hunter.direct/wandhelp 1-800-733-2823 Trovate informazioni utili sul prodotto, inclusi suggerimenti di installazione, programmazione del programmatore e altro ancora. Il termine e i logotipi Bluetooth ® sono marchi registrati di proprietà di Bluetooth SIG Inc. e qualsiasi utilizzo di tali marchi da parte di Hunter Industries è concesso in licenza. Apple e il logo di Apple sono marchi di Apple Inc, registrati negli Stati Uniti e in altri paesi. App Store è un marchio di servizio di Apple Inc. Google, il logo di Google, Android e Google Play sono
-
TR 54 Hydrawise’a bağlanmak için üç yöntemden birini seçin: 1. Bluetooth ® kurulumu (önerilir) 2. Wi-Fi doğrudan kurulumu 3. WPS kurulumu Hydrawise Uygulamasını Apple ® App Store veya Google Play™ Store’dan indirebilirsiniz. hunter.direct/HydrawiseiOS hunter.direct/HydrawiseAndroid BLUETOOTH KURULUMU 1. Akıllı telefonunuzda Bluetooth ayarını etkinleştirin. 2. Akıllı telefonunuzu istediğiniz ağa bağlayın. 3. WAND düğmesine bir kez basın: • Modül üzerindeki kehribar renkli sabit ● LED ışığı saniyede bir kez yan�
-
IT 28 NOTA: il programmatore non funziona con Hydrawise quando il selettore è in posizione OFF o Manuale. Riportare il selettore in posizione RUN. Le funzioni nascoste del programmatore restano comunque disponibili. ESPLORANDO IL MODULO SERIAL NO. 5555-5555 ➊ ➋ ➌ 1. Pulsante di congurazione Wi-Fi 2. Numero di serie WAND 3. LED di stato Wi-Fi
-
PT 35 1-800-733-2823 SINAL WI-FI Use seu smartphone para vericar a intensidade do sinal do roteador desejado no local do controlador. Se o sinal estiver muito fraco, a conexão não irá funcionar.Nesse caso, mude o controlador ou o roteador de lugar para melhorar o sinal. INSTALAÇÃO DO MÓDULO WI-FI 1. Insira o módulo WAND na porta de acessórios do lado direito do controlador X2™. Quando instalado, o WAND desativa as funções do seletor e dos botões do controlador X2, bem como a programação e as congurações existent
-
PT 41 RESTAURAÇÃO DE FÁBRICA 1. Segure o botão do WAND por 5 segundos. 2. O LED do módulo se apagará. 3. Solte o botão quando o LED amarelo xo ● acender. A palavra «PRONTO» aparecerá na tela do controlador. 4. Retorne ao processo de conguração para reconectar o WAND ao Wi-Fi. SOLUÇÃO DE PROBLEMAS Mostrador • O visor mostra «FALHA» e um LED vermelho xo ● . Possível causa • O WAND
-
DE 47 HINWEIS: Wenn keine Aktion ausgeführt wird, wird die Kopplung nach 2 Minuten beendet. Drücken Sie die Taste WAND einmal, um das Bluetooth-Setup erneut zu starten. WI-FI DIREKT-SETUP 1. Aktivieren Sie Wi-Fi auf Ihrem Smartphone. 2. Drücken Sie die Taste WAND zweimal: • Die gelbe ● LED auf dem Modul blinkt zweimal pro Sekunde auf. 3. Önen Sie auf Ihrem Smartphone, Tablet oder Computer einen Webbrowser: • Geben Sie hydrawise.com/x2 in die Suchleiste ein. •
-
8 EN WPS SETUP 1. Press the WAND button three times: • The solid amber ● LED on the module will blink three times per second. 2. Press the WPS button on your Wi-Fi router. 3. Once connected, the module LED will turn solid green ●. The word “DONE” and a solid icon will appear on the controller LCD. 4. Open the Hydrawise smartphone app, navigate to Setup Wizard, select your X2 model. Continue following the instructions on the app programming screen. NOTE: Pairing will stop aer 2 minutes if no action
-
4 EN NAVIGATING THE MODULE SERIAL NO. 5555-5555 ➊ ➋ ➌ 1. Wi-Fi setup button 2. WAND serial number 3. Wi-Fi status LED WI-FI SETUP Once installed, a solid amber ● LED will appear on the module near the right of the dial positions and a ashing icon will appear on the controller LCD. WAND is now ready for Wi-Fi setup.
Questions, Opinions and Exploitation Impressions:
You can ask a question, express your opinion or share our experience of Hunter WAND device using right now.
Specifications:1935/1935238-wand.pdf file (04 Dec 2022) |
Accompanying Data:
Hunter WAND Wireless Router PDF Quick Start Manual (Updated: Sunday 4th of December 2022 05:22:45 AM)
Rating: 4.1 (rated by 16 users)
Compatible devices: DN-7019, A2C-WIFI, VERIZON Jetpack ZT610TM, AR625W, LaserJet Pro M1212nf — Multifunction Printer, W300D, 940CD-01, FR114W — ProSafe 802.11b Wireless-Ready Firewall Router.
Recommended Documentation:
Text Version of Quick Start Manual
(Ocr-Read Summary of Contents of some pages of the Hunter WAND Document (Main Content), UPD: 04 December 2022)
-
50, Hunter WAND DE 50 FEHLERBEHEBUNG Display • Auf dem Bildschirm wird FEHLER angezeigt und eine rote ● LED leuchtet. Mögliche Ursache • WAND konnte sich nicht mit dem Wi-Fi-Netzwerk verbinden. Mögliche Lösungen • Stellen Sie sicher, dass Sie sich in der Reichweite des Routersignals benden. • Überprüfen …
-
34, IT 34 hunter.direct/wandhelp 1-800-733-2823 Trovate informazioni utili sul prodotto, inclusi suggerimenti di installazione, programmazione del programmatore e altro ancora. Il termine e i logotipi Bluetooth ® sono marchi registrati di proprietà di Bluetooth SIG Inc. e qualsiasi utilizzo di tali marchi da p…
-
41, PT 41 RESTAURAÇÃO DE FÁBRICA 1. Segure o botão do WAND por 5 segundos. 2. O LED do módulo se apagará. 3. Solte o botão quando o LED amarelo xo ● acender. A palavra «PRONTO» aparecerá na tela do controlador. 4. Retorne ao processo de conguração para reconectar o WAND ao …
-
25, Hunter WAND FR 25 RÉINITIALISATION D’USINE 1. Maintenez enfoncé le bouton WAND pendant 5 secondes. 2. La diode du module s’éteint. 3. Relâchez le bouton quand la diode brillant en orange continu ● apparaît. Le mot «TERMINÉ» apparaît sur l’écran LCD du programmateur. 4. Retournez au …
-
48, DE 48 5. Önen Sie die Hydrawise App auf Ihrem Smartphone, navigieren Sie zum Setup-Assistenten und wählen Sie Ihr X2-Modell aus.Befolgen Sie weiter die Anweisungen auf dem Bildschirm zur App-Programmierung. HINWEIS: Wenn keine Aktion ausgeführt wird, wird die Kopplung nach 2 Minuten beendet. D…
-
47, DE 47 HINWEIS: Wenn keine Aktion ausgeführt wird, wird die Kopplung nach 2 Minuten beendet. Drücken Sie die Taste WAND einmal, um das Bluetooth-Setup erneut zu starten. WI-FI DIREKT-SETUP 1. Aktivieren Sie Wi-Fi auf Ihrem Smartphone. 2. Drücken Sie die Taste WAND zweimal: • Die gelbe ● LED auf dem Modul …
-
18, ES 18 hunter.direct/wandhelp 1-800-733-2823 Obtenga más información sobre su producto, incluyendo consejos de instalación y programación, y mucho más. La marca nominativa y logotipos de Bluetooth ® son marcas registradas propiedad de Bluetooth SIG Inc., y cualquier uso de tales marcas por…
-
Hunter WAND User Manual
-
Hunter WAND User Guide
-
Hunter WAND PDF Manual
-
Hunter WAND Owner’s Manuals
Recommended: 00271-06000, A-807, LC-90


-
Kenwood FFINELINE RFU-6100
RFU-6100Kenwood FFineline™ Quick SStart GGuideIf you have any questions about your new system, please contact our Customer Service Department at(800) KENWOOD or visit our web site at www.kenwoodusa.comCopyright ©2004 Kenwood USA Corporation. All rights reserved. …
FFINELINE RFU-6100 1
-
NETGEAR WNR2000
24/7TECHNICAL SUPPORT*1-888-NETGEAR (638-4327)Email: [email protected], high-speed Internet connection •Simpleandsecurewaytoshareyourhigh-speedInternetconnection•WorkswitholderWireless-GdevicesandnewWireless-Ndevices•Push‘N’Connects …
WNR2000 2
-
Linksys WRV200
Model No.Quick InstallationModel No.Wireless1A Before you begin, make sure that you have the setup infor-mation for your specific type of Internet connection. The installation technician from your ISP should have left this information with you after installing your broadband connection. If not, you can call …
WRV200 2
-
Tenda 3G622R+
BRIEF INTRODUCTION PRODUCT FEATURESWireless3G3G622R 3G Wireless-N Router with USB2.0 interface and built-in 4-Port Wi-Fi 300Mbps Router is designed for people who want to share the 3G Internet connection with multi computers or devices with Wi-Fi function. To plug your 3G USB modem into the USB2.0 interface …
3G622R+ 2
Additional Information:
Operating Impressions, Questions and Answers: