
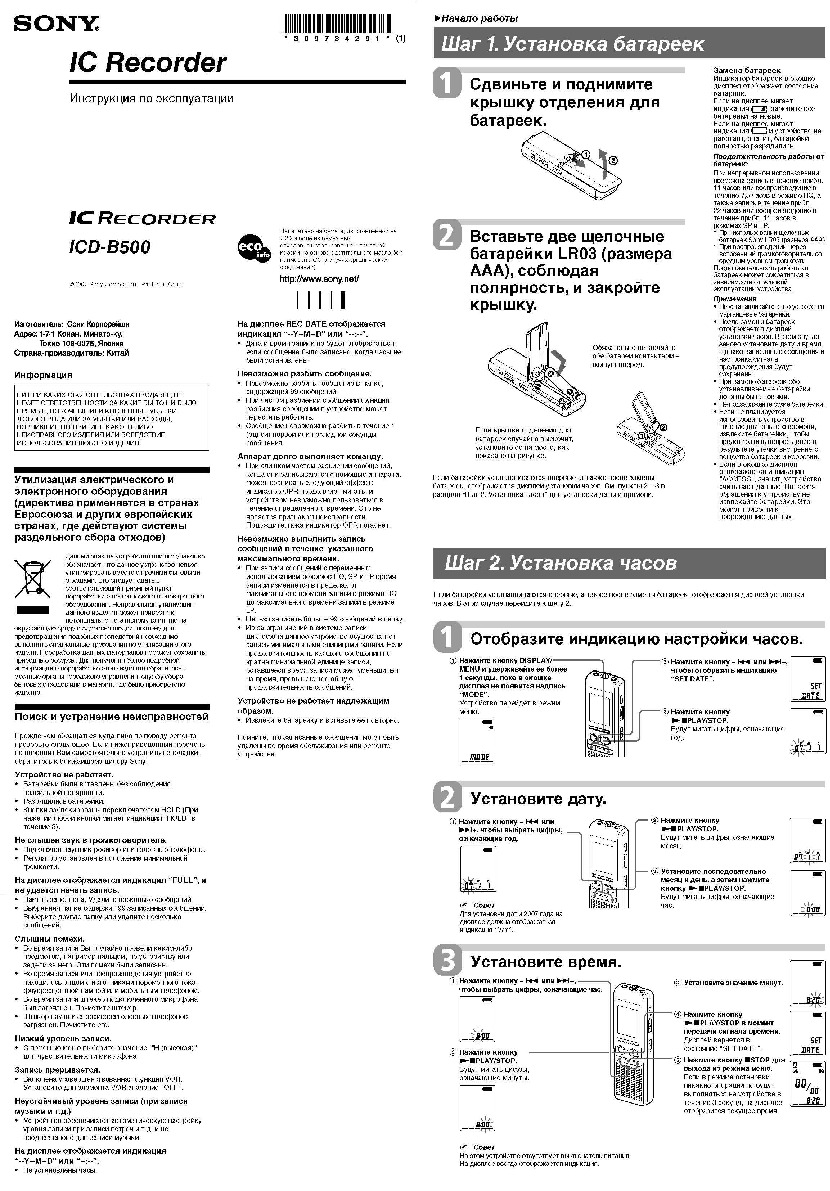
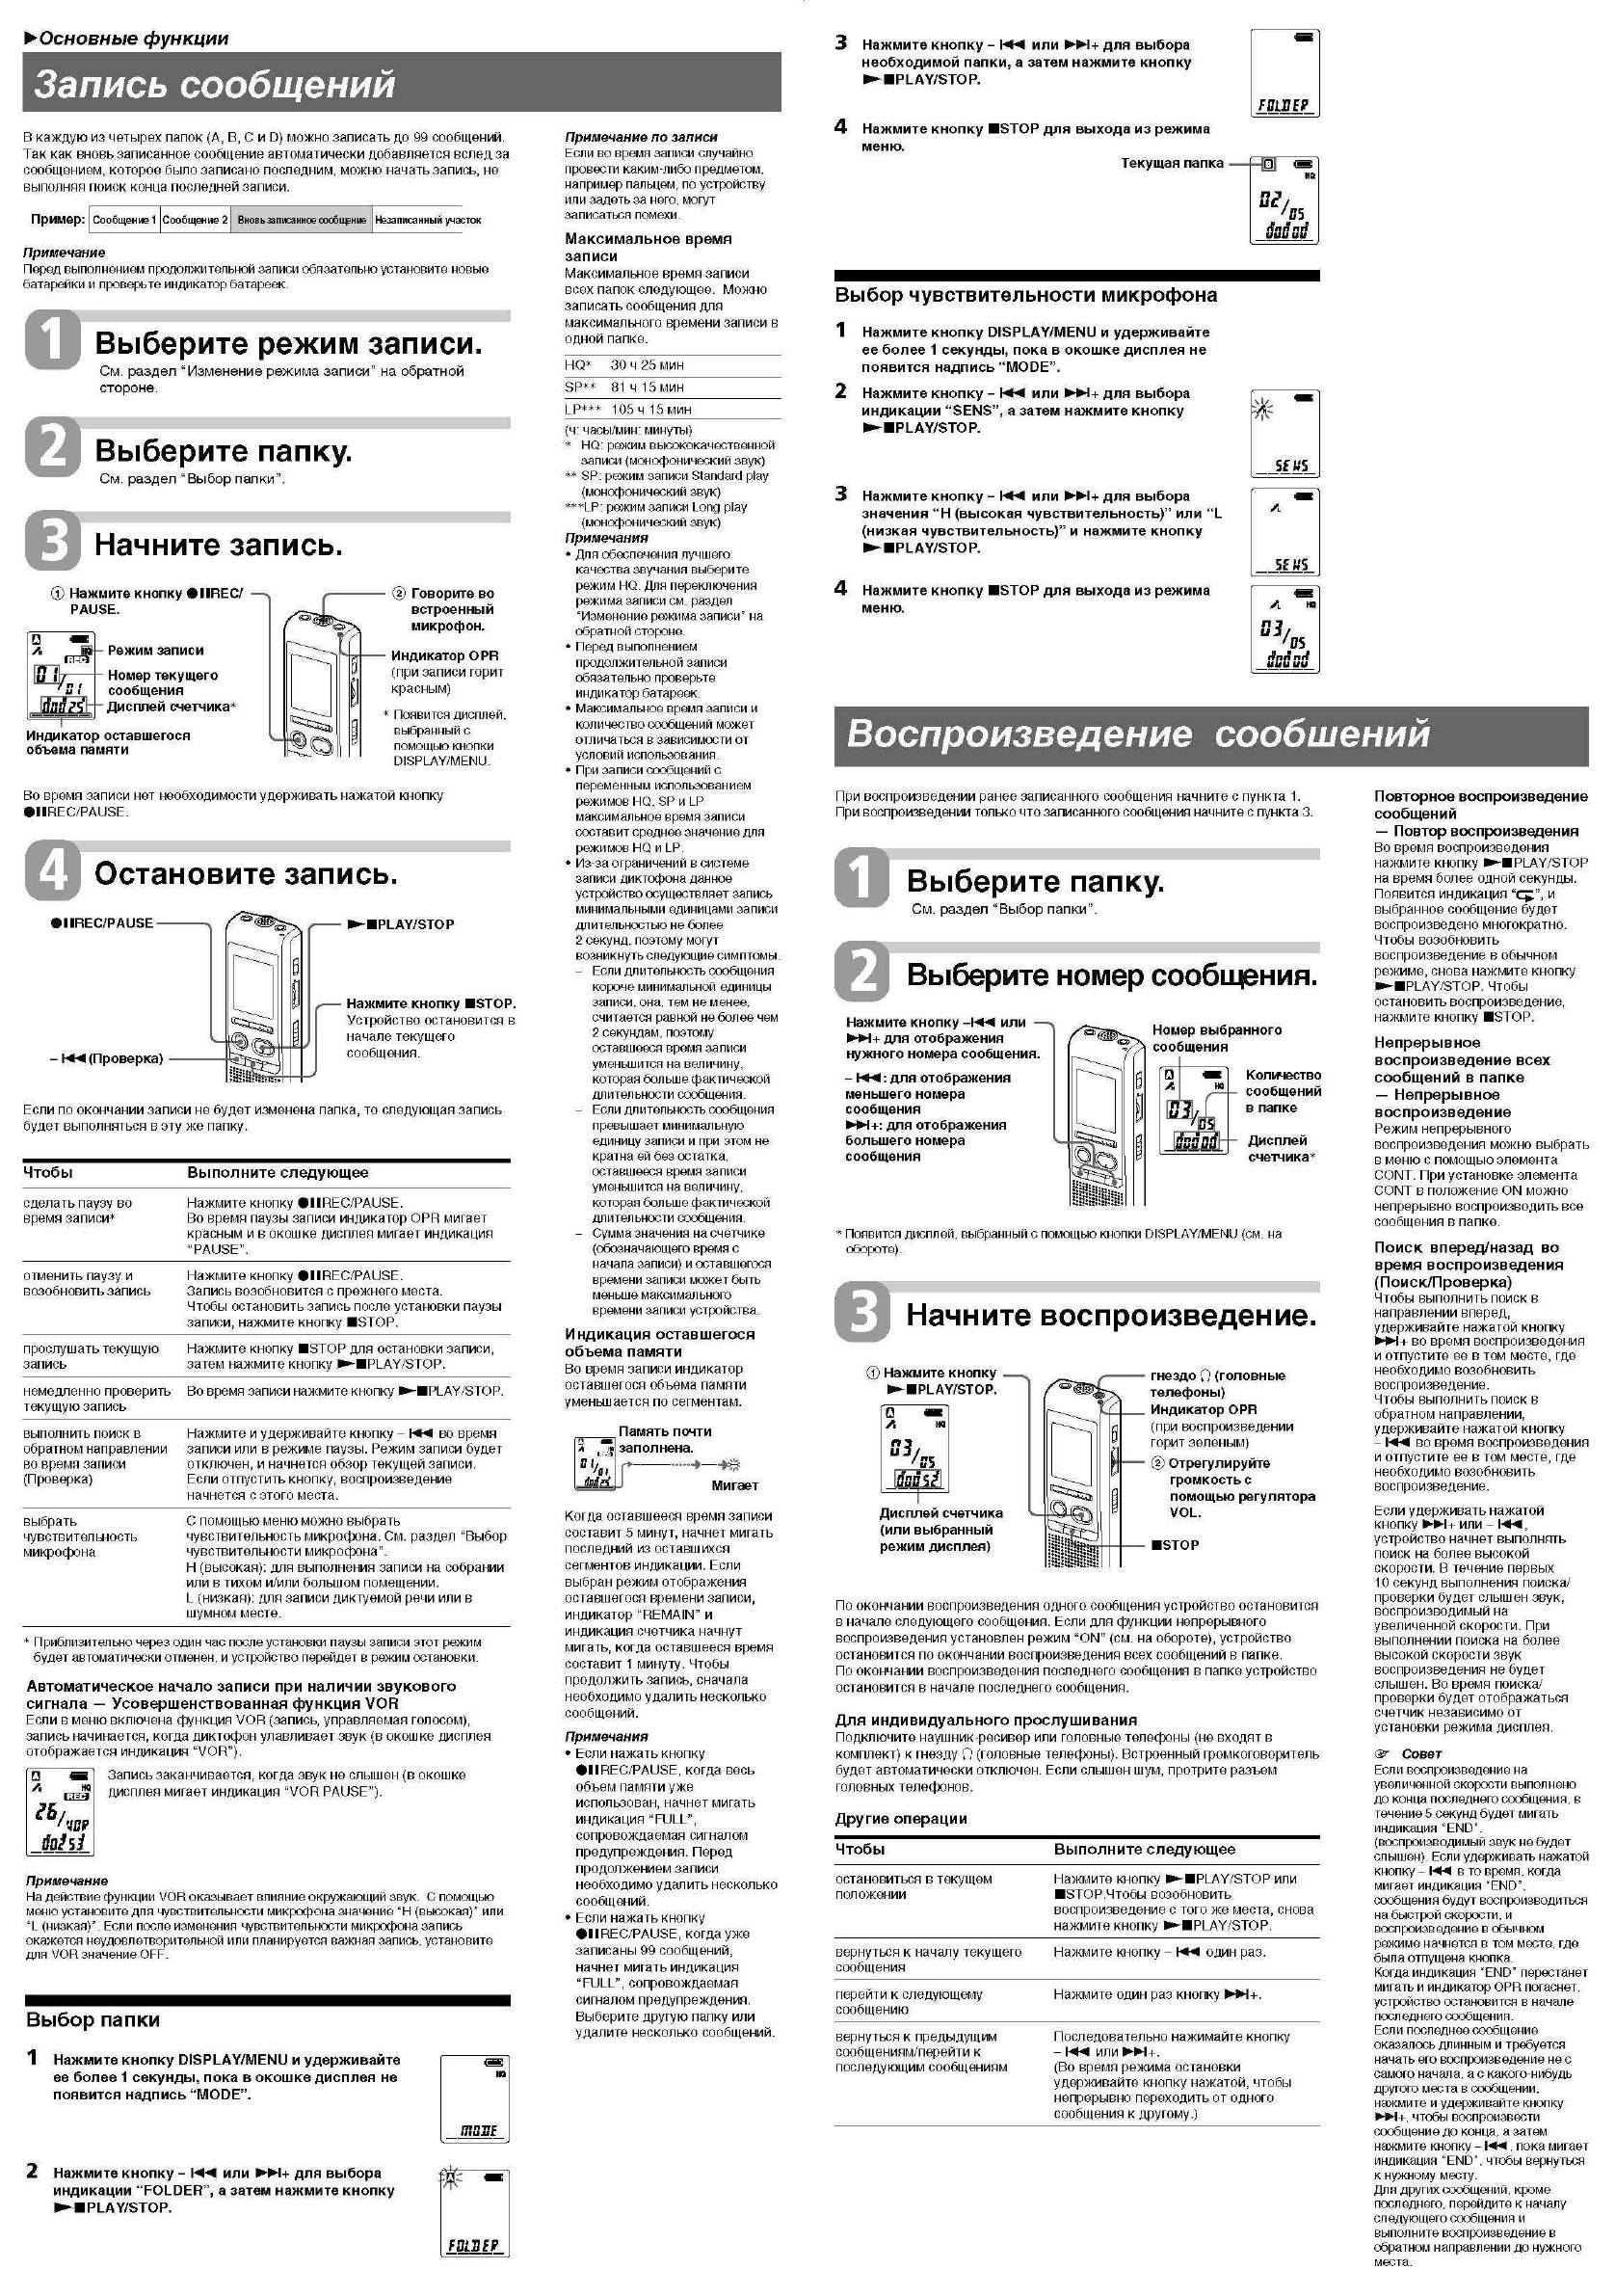
Р-Начало работы
3 0 9 7 3 4 2 9 1 * 0 )
IC Recorder
Шаг 1. Установка батареек
Инструкция по эксплуатации
1C R
gcordgr
¡CD-B500
©2007 Sony Corporation Printed in China
Изготовитель: Сони Корпорейшн
Адрес: 1-7-1 Конан, Минато-ку,
Токио 108-0075, Япония
Страна-производитель; Китай
Информация
ни ПРИ КАКИХ ОБСТОЯТЕЛЬСТВАХ ПРОДАВЕЦ НЕ
НЕСЕТ ОТВЕТСТВЕННОСТИ ЗА КАКИЕ БЫ ТО НИ БЫЛО
ПРЯМЫЕ, ПОБОЧНЫЕ ИЛИ КОСВЕННЫЕ УБЫТКИ
ЛЮБОГО РОДА ИЛИ ЗА УБЫТКИ ИЛИ РАСХОДЫ,
ВОЗНИКШИЕ ПО ПРИЧИНЕ КАКОГО-ЛИБО
НЕИСПРАВНОГО ИЗДЕЛИЯ ИЛИ ВСЛЕДСТВИЕ
ИСПОЛЬЗОВАНИЯ ЛЮБОГО ИЗДЕЛИЯ.
Утилизация электрического и
электронного оборудования
(директива применяется в странах
Евросоюза и других европейских
странах, где действуют системы
раздельного сбора отходов)
Данный знак на устройстве или его упаковке
обозначает, что данное устройство нельзя
утилизировать вместе с прочими бытовыми
отходами. Его следует сдать в
соответствующий приемный пункт
переработки электрического и электронного
оборудования. Неправильная утилизация
данного изделия может привести к
потенциально негативному влиянию на
окружающую среду и здоровье людей, поэтому для
предотвращения подобных последствий необходимо
выполнять специальные требования по утилизации этого
изделя. Переработка данных материалов поможет сохранить
природные ресурсы. Для получения более подробной
информации о переработке этого изделия обратитесь в
местные органы городского управления, службу сбора
бытовых отходов или в магазин, где было приобретено
изделие.
Поиск и устранение неисправностей
Прежде чем обращаться куда-либо по поводу ремонта,
проверьте следующее. Если нижеприведенный перечень
не позволит Вам самостоятельно устранить неполадки,
обратитесь к ближайшему дилеру Sony.
Устройство не работает.
♦ Батарейки были вставлены без соблюдения
правильной полярности.
♦ Разрядились батарейки.
♦ Кнопки заблокированы переключателем HOLD (При
нажатии любой кнопки мигает индикация “HOLD” в
течение 3).
Не слышен звук в громкоговорителе.
♦ Подключен наушник-ресивер или головные телефоны.
♦ Регулятор установлен в положение минимальной
громкости.
На дисплее отображается индикация “FULL”, и
не удается начать запись.
♦ Память заполнена. Удалите несколько сообщений.
♦ Выбранная папка содержит 99 записанных сообщений.
Выберите другую папку или удалите несколько
сообщений.
Слышны помехи.
♦ Во время записи Вы случайно провели каким-либо
предметом, например пальцем, по устройству или
задели за него. Эти помехи были записаны.
♦ Во время записи или воспроизведения устройство
находилось рядом с источниками переменного тока,
флуоресцентной лампой или мобильным телефоном.
♦ Во время записи штекер подключенного микрофона
был загрязнен. Почистите штекер.
♦ Штекер наушника-ресивера/головных телефонов
загрязнен. Почистите его.
Низкий уровень записи.
♦ С помощью меню выберите значение “Н (высокая)”
для чувствительности микрофона.
Запись прерывается.
♦ Включена усовершенствованная функция VOR.
Установите для элемента VOR значение “OFF”.
Неустойчивый уровень записи (при записи
музыки и
Т.Д.)
♦ Устройство обеспечивает автоматическую настройку
уровня записи при записи встреч и т.д. и не
предназначено для записи музыки.
На дисплее отображается индикация
или
♦ Не установлены часы.
О
Сдвиньте и поднимите
крышку отделения для
батареек.
ЩЁф
Напечатано на бумаге, изготовленной на
70% и боле из бумажных
отходов, с использованием печатной
краски на основе растительного масла без
примесей ЛОС (летучих органических
соединений),
http://www.sony. net/
I
На дисплее REC DATE отображается
индикация “-Y-M-D” или
♦ Дата и время записи не будет отображаться,
если сообщение было записано, когда часы не
были установлены.
Невозможно разбить сообщение.
♦ Невозможно разбить сообщение в папке,
содержащей 99 сообщений.
♦ При частом разбиении сообщений функция
разбиения сообщений в устройстве может
перестать работать.
♦ Сообщение невозможно разбить в течение 1
(одной) первой или последней секунды
сообщения.
Аппарат долго выполняет команду.
♦ При слишком частом разбиении сообщений,
когда они записываются с помощью аппарата,
может возникать следующий эффект:
индикатор OPR продолжает мигать, и
устройством невозможно пользоваться в
течение определенного времени. Это не
является признаком неисправности.
Подождите, пока индикатор OPR погаснет.
Невозможно выполнить запись
сообщений в течение указанного
максимального времени.
♦ При записи сообщений с переменным
использованием режимов HQ, SP и LP время
записи изменяется в пределах от
максимального времени записи в режиме HQ
до максимального времени записи в режиме
LP.
♦ Нельзя записать больше 99 сообщений в папку.
♦ Из-за ограничений в системе записи
диктофона данное устройство осуществляет
запись минимальными единицами записи. Если
продолжительность каждого сообщения не
кратна минимальной единице записи,
оставшееся время записи может уменьшиться
на время, превышающее общую
продолжительность сообщений.
Устройство не работает надлежащим
образом.
♦ Извлеките батарейку и вставьте ее повторно.
Помните, что записанные сообщения могут быть
удалены во время обслуживания или ремонта
устройства.
О
Вставьте две щелочные
батарейки LR03 (размера
ААА), соблюдая
полярность, и закройте
крышку.
Обязательно вставляйте
обе батареи контактами —
(минус) вперед.
Если крышка отделения для
батареек случайно выскочит,
установите ее на место, как
показано на рисунке.
Если батарейки устанавливаются впервые, а также после замены
батареек, отображается дисплей установки часов. См. пункты 2 — 3 в
разделе “Шаг 2. Установка часов” для установки даты и времени.
Замена батареек
Индикатор батареек в окошке
дисплея отображает состояние
батареек.
Если на дисплее мигает
индикация CZ3> замените все
батарейки на новые.
Если на дисплее мигает
индикация си и устройство не
работает, значит, батарейки
полностью разрядились.
Продолжительность работы от
батареек*
При непрерывном использовании
возможна запись в течение прибл.
11 часов или воспроизведение в
течение 7,5 часов в режиме HQ, а
также запись в течение прибл.
22 часов или воспроизведение в
течение прибл. 11 часов в
режимах SP и LP.
♦ При использовании щелочных
батареек Sony LR03 (размера ААА)
♦ При воспроизведении через
встроенный громкоговоритель со
средним уровнем громкости
Продолжительность работы от
батареек может сократиться в
зависимости от условий
эксплуатации устройства.
Примечания
♦ Не устанавливайте в это устройство
марганцевые батарейки.
♦ После замены батареек
отображается дисплей
установки часов. В этом случае
заново установите дату и время.
Однако записанные сообщения и
настройка сигнала
предупреждения будут
сохранены.
♦ При замене батареек обе
устанавливаемые батарейки
должны быть новыми.
♦ Не псязаряжайте сухие батарейки.
♦ Если не планируется
использовать устройство в
течение длительного времени,
извлеките батарейки, чтобы
предотвратить повреждение в
результате утечки внутреннего
вещества батареек и коррозии.
♦ Если в окошке дисплея
отображается индикация
“ACCESS”, значит, устройство
считывает данные. Во время
обращения к устройству не
извлекайте батарейки. Это
может привести к
повреждению данных.
Шаг 2. Установка часов
Если батарейки устанавливаются впервые, а также после замены батареек, отображается дисплей установки
часов. В этом случае перейдите к шагу 2.
О
Отобразите индикацию настройки часов.
ф Нажмите кнопку DISPLAY/-
MENU и удерживайте ее более
1 секунды, пока в окошке
дисплея не появится надпись
“MODE”.
Устройство перейдет в режим
меню.
Нажмите кнопку — НМ! или WH+,
чтобы отобразить индикацию
“SET DATE”.
@ Нажмите кнопку
►■PLAY/STOP.
Будут мигать цифры, означающие
год.
О
Установите дату.
® Нажмите кнопку
►■PLAY/STOP.
Будут мигать цифры, означающие
месяц.
месяц и день, а затем нажмите
кнопку ►’■РЕАУ/ЗТОР.
Будут мигать цифры, означающие
час.
дисплее должна отображаться
индикация “07Y”.
0
Установите время.
@ Установите значение минут.
¿¿ik
® Нажмите кнопку
►-■PLAY/STOP в момент
передачи сигнала времени.
Дисплей вернется в
состояние “SET DATE”.
(D
Нажмите кнопку BSTOP для
выхода из режима меню.
Если в режиме остановки
никакие операции не будут
выполняться на устройстве в
течение 3 секунд, на дисплее
отобразится текущее время.
Sir
ШТЕ
Q
УЬ
пп
ии/
DÜ
8-го
Совет
На этом устройстве отсутствует выключатель питания.
На дисплее всегда отображается индикация.
IC Recorder
Operating Instructions
Owner’s Record
The model number is located at the rear and the serial number is located inside the battery
compartment. Record the serial number in the space provided below. Refer to these numbers
whenever you call upon your Sony dealer regarding this product.
Model No. ICD-B500 Serial No. _____________________________________
ICD-B500
recycled paper using VOC
(Volatile Organic Compound)-
free vegetable oil based ink.
2007 Sony Corporation
Printed in China
Information
Troubleshooting
IN NO EVENT SHALL SELLER BE LIABLE FOR ANY DIRECT,
INCIDENTAL OR CONSEQUENTIAL DAMAGES OF ANY
Before taking the unit for repair, check the following
NATURE, OR LOSSES OR EXPENSES RESULTING FROM ANY
sections. Should any problem persist after you have
DEFECTIVE PRODUCT OR THE USE OF ANY PRODUCT.
made these checks, consult your nearest Sony dealer.
The unit does not operate.
For the customers in the U.S.A.
• The batteries have been inserted with incorrect
polarity.
The following FCC statement applies only to the version of this
• The batteries are weak.
model manufactured for sale in the USA. Other versions may
• The buttons are locked with the HOLD switch. (If
not comply with FCC technical regulations.
you press any button, «HOLD» will flash for 3
seconds.)
INFORMATION
This equipment has been tested and found to comply with the
No sound comes from the speaker.
limits for a Class B digital device, pursuant to Part 15 of the
• The ear receiver or headphones are plugged in.
FCC Rules. These limits are designed to provide reasonable
• The volume is turned down completely.
protection against harmful interference in a residential
«FULL» is displayed and you cannot start
installation. This equipment generates, uses, and can radiate
recording.
radio frequency energy and, if not installed and used in
accordance with the instructions, may cause harmful
• The memory is full. Erase some of the messages.
interference to radio communications.
• 99 messages have been recorded in the selected
However, there is no guarantee that interference will not occur
folder. Select another folder or erase some of the
in a particular installation. If this equipment does cause
messages.
harmful interference to radio or television reception, which can
Noise is heard.
be determined by turning the equipment off and on, the user is
• An object, such as your finger, etc., accidentally
encouraged to try to correct the interference by one or more of
rubbed or scratched the unit during recording so
the following measures:
that noise was recorded.
– Reorient or relocate the receiving antenna.
• The unit was placed near an AC power source, a
– Increase the separation between the equipment and
fluorescent lamp or a mobile phone during
receiver.
recording or playback.
– Connect the equipment into an outlet on a circuit different
• Plug of the connected microphone was dirty when
from that to which the receiver is connected.
recording. Clean the plug.
– Consult the dealer or an experienced radio/TV technician
• Ear receiver/headphones plug is dirty. Clean the
for help.
plug.
You are cautioned that any changes or modifications not
Recording level is low.
expressly approved in this manual could void your authority
• Set the microphone sensitivity to «H (high)» using
to operate this equipment.
the menu.
This device complies with Part 15 of the FCC Rules. Operation
Recording is interrupted.
is subject to the following two conditions: (1) This device may
• The advanced VOR function is activated. Set VOR
not cause harmful interference, and (2) this device must accept
to «OFF».
any interference received, including interference that may
cause undesired operation.
Recording level is unstable (when recording
music, etc.).
• This unit is designed to automatically adjust the
If you have any questions about this product, you may call:
recording level when recording meetings, etc., and
Sony Customer Information Services Center 1-800-222-7669 or
is not suitable for music recording.
http://www.sony.com/
«—Y—M—D» or «—:—» is displayed.
• You have not set the clock.
«—Y—M—D» or «—:—» is displayed on the REC
DATE display.
Disposal of Old Electrical &
• The date and time of recording will not be
Electronic Equipment (Applicable in
displayed if you recorded the message when the
clock was not set.
the European Union and other
You cannot divide a message.
European countries with separate
• You cannot divide a message in a folder which has
collection systems)
99 messages.
• If you divide messages frequently, the unit may
become unable to divide a message.
This symbol on the product or on its packaging
• You cannot divide a message in the first or the last
indicates that this product shall not be treated
1 second of a message.
as household waste. Instead it shall be handed
over to the applicable collection point for the
It takes longer for the unit to start
recycling of electrical and electronic equipment.
operation.
By ensuring this product is disposed of
• If you divide messages too frequently while the
correctly, you will help prevent potential
unit is recording them, the following phenomenon
negative consequences for the environment and
may occur: The OPR indicator keeps flashing, and
human health, which could otherwise be caused by
you cannot operate the unit for a certain period.
inappropriate waste handling of this product. The recycling of
This is not a malfunction. Wait until the OPR
materials will help to conserve natural resources. For more
indicator goes off.
detailed information about recycling of this product, please
contact your local Civic Office, your household waste disposal
You cannot record messages up to the
service or the shop where you purchased the product.
maximum recording time.
• If you record messages in a mixture of HQ, SP and
LP modes, the recordable time varies from the
maximum HQ mode recording time to the
maximum LP mode recording time.
• No more recording can be made when 99 messages
each have been recorded in a folder.
• Due to the limitation of the IC recording system,
this unit records in the minimum recording unit. If
the length of each message cannot be divided by
the minimum recording unit, the remaining
recording time may decrease by more than the
total length of the messages.
The unit does not operate correctly.
• Take out the batteries and insert them again.
Please note that recorded messages may be erased
during service or repair work.
BGetting started
Step 1: Installing the Batteries
1
Slide and lift the battery
compartment lid.
2
Insert two LR03 (size AAA)
alkaline batteries with
Printed on 70% or more
correct polarity, and close the
lid.
Make sure to insert both
of the batteries from
their – ends.
If the battery compartment lid is
accidentally detached, attach it as
illustrated.
Clock setting display appears when you insert batteries for the first time, or
when you replace the batteries with new ones. Please refer to Steps 2 to 3 in
«Step 2: Setting the Clock» to set the date and time.
Step 2: Setting the Clock
Clock setting display appears when you insert batteries for the first time, or when you replace the batteries with new ones. In
this case, proceed from step 2.
1
Display the clock setting display.
1 Press DISPLAY/MENU for more
2 Press – . or >+ to display
than 1 second until «MODE»
appears in the display window.
The unit enters the menu mode.
3 Press NxPLAY/STOP.
2
Set the date.
2 Press NxPLAY/STOP.
The month digits will flash.
1 Press – . or >+ to select
the digits of the year.
3 Set the month and day in sequence,
then press NxPLAY/STOP.
The hour digits will flash.
Tip
To set the date to Year 2005, display
«05Y».
3
Set the time.
1 Press – . or >+ to select
3 Set the minute.
the digits of the hour.
4 Press NxPLAY/STOP at the time
2 Press NxPLAY/STOP.
5 Press xSTOP to exit from the
The minute digits will flash.
Tip
This unit does not have a power on/off switch. The display is shown at all times.
BBasic Operations
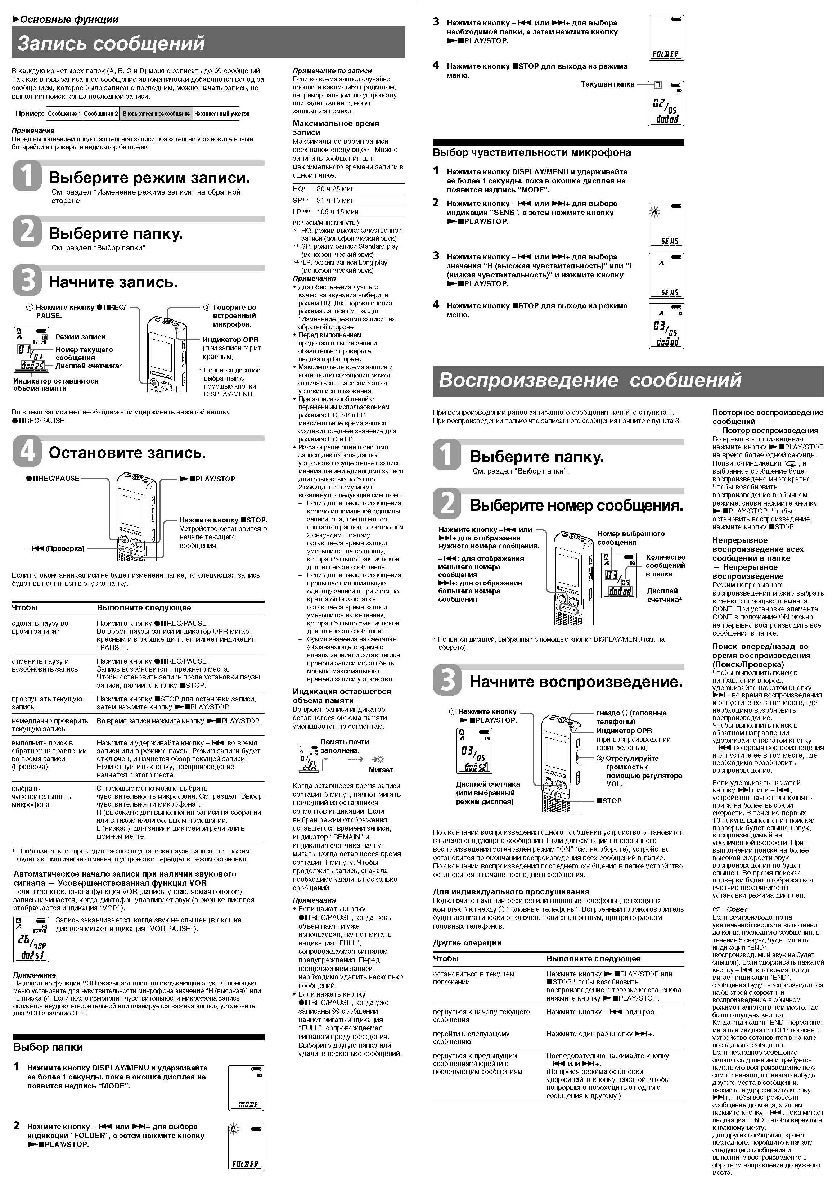
Recording Messages
Replacing the batteries
You can record up to 99 messages in each of the four folders (A, B, C, and D).
The battery indicator in the display
Since a newly recorded message is automatically added behind the last recorded
window shows the battery
message, you can start recording quickly without searching for the end of the
condition.
last recording.
When
flashes, replace the
batteries with new ones.
e.g.
Message 1
Message 2 Newly recorded message
When
flashes, the batteries are
Note
exhausted and the unit will stop
Before making a long recording, be sure to insert new batteries and check the battery
operation.
indicator.
Battery life*
1
With continuous use, approx. 11 hours
Select the recording mode.
recording/7.5 hours playback in the
HQ mode, and approx. 22 hours
recording/11 hours playback in the SP
See «Changing the Recording Mode» on the reverse side.
and LP modes is possible.
* Using Sony alkaline batteries LR03
2
(size AAA)
Select the folder.
* When playing back through the
internal speaker with the medium
See «Selecting the Folder».
volume level
The battery life may shorten
depending on the operation of the
3
unit.
Start recording.
Notes
• Do not use manganese batteries for
this unit.
1 Press zXREC/PAUSE.
• When you replace the batteries with
new ones, the clock setting display
appears. In this case, set the date
Recording mode
and time again. The recorded
Current message
messages and alarm setting,
number
however, will remain.
• When replacing the batteries, be
Counter display*
sure to replace both batteries with
new ones.
Remaining memory
• Do not charge dry batteries.
indicator
• When you are not going to use the
unit for a long time, remove the
batteries to prevent damage from
battery leakage and corrosion.
You do not need to keep pressing zXREC/PAUSE while recording.
• The unit is accessing data while
«ACCESS» appears in the display
window. While accessing, do not
4
remove the batteries. Doing so may
Stop recording.
damage the data.
zXREC/PAUSE
– .(Review)
If you do not change the folder after you stop recording, the next time you
«SET DATE».
record you will record in the same folder.
To
Do this
pause recording*
Press zXREC/PAUSE.
During recording pause, the OPR indicator flashes in
The year digits will flash.
red and «PAUSE» flashes in the display window.
release pause and
Press zXREC/PAUSE.
resume recording
Recording resumes from that point.
(To stop recording after pausing recording, press
xSTOP.)
listen to the current
Press xSTOP to stop recording, then press
recording
NxPLAY/STOP.
review the current
Press NxPLAY/STOP during recording.
recording instantly
search backward during
Hold down – . during recording or recording
recording (Review)
pause. Recording mode will be released, and
reviewing of the current recording starts. If you
release the button, playback starts from that point.
select the microphone
You can select the microphone sensitivity using the
sensitivity
menu. See «Selecting the Microphone Sensitivity».
H (high): To record at meeting or in a quiet and/or
spacious place.
L (low): To record for dictation or in a noisy place.
* About one hour after you pause recording, recording pause is automatically released
and the unit goes into the stop mode.
Selecting the Folder
1
Press DISPLAY/MENU for more than 1 second until
«MODE» appears in the display window.
2
Press – . or >+ to select «FOLDER» and press
NxPLAY/STOP.
signal.
The display will return to «SET
DATE».
3
Press – . or >+ to select the folder you want
and press NxPLAY/STOP.
menu mode.
If the unit is left unused for more
than 3 seconds in the stop mode, the
display will show the current time.
4
Press xSTOP to exit the menu mode.
Selecting the Microphone Sensitivity
1
Press DISPLAY/MENU for more than 1 second until
«MODE» appears in the display window.
2
Note on recording
Press – . or >+ to select «SENS» and press
Noise may be recorded if an object,
NxPLAY/STOP.
such as your finger, etc., accidentally
rubs or scratches the unit during
recording.
Blank space
Maximum recording time
3
Press – . or >+ to select «H (high sensitivity)»
The maximum recording time of all
or «L (low sensitivity)» and press NxPLAY/STOP.
the folders is as follows. You can
record messages for the maximum
recording time in a single folder.
HQ*
30 h. 25 min.
4
Press xSTOP to exit the menu mode.
SP**
81 h. 15 min.
LP***
150 h. 15 min.
(h.: hours/min.: minutes)
* HQ: High quality recording mode
(monaural sound)
** SP: Standard play recording mode
(monaural sound)
Playing Back Messages
***LP: Long play recording mode
(monaural sound)
Notes
• To record in better sound quality,
select the HQ mode. For switching
When playing back a previously recorded message, start from Step 1.
the recording mode, see «Changing
When playing back a message you have just finished recording, start from Step 3.
the Recording Mode» on the reverse
side.
2 Speak to the
• Before making a long recording, be
1
built-in
sure to check the battery indicator.
Select the folder.
microphone.
• The maximum recording time and
the number of messages you can
OPR indicator
make vary depending on the
See «Selecting the Folder».
(lights in red during
conditions of use.
recording.)
• When you record messages in the
mixture of HQ, SP and LP mode, the
2
* The display selected
Select the message number.
maximum recording time will be
with the DISPLAY/
between those for the HQ and LP
MENU button
modes.
appears.
• Due to the limitation of the IC
recording system, this unit records
Press – . or >+ to
in the minimum recording unit of
display the desired
approx. 2 seconds at most, therefore
message number.
the following symptoms may occur:
– .: for smaller
– When a message is shorter than
the minimum recording unit, it is
message number
still counted as approx. 2 seconds
>+: for larger
at most so the remaining
message number
recording time will decrease by
more than the actual length of the
message.
NxPLAY/STOP
– When the message is longer than
the minimum recording unit, the
remaining recording time will
* The display selected with the DISPLAY/MENU button appears (see the reverse side).
decrease by more than the actual
length of the message if it cannot
Press xSTOP.
be divided by the minimum
3
The unit stops at the
recording unit without a
Start playback.
beginning of the current
remainder.
recording.
– The sum of the number on the
counter (elapsed recording time)
and the remaining recording time
1 Press NxPLAY/STOP.
may be less than the unit’s
maximum recording time.
Remaining memory
indication
During recording, the remaining
memory indicator decreases one by
Counter display (or the
one.
selected display mode)
The memory is
nearly full.
Flashing
When the remaining time of
recording reaches 5 minutes, the
last one of the indication flashes.
After playing back one message, the unit stops at the beginning of the next
If the remaining recording time
message. When the continuous play function is set to «ON» (see the reverse
display mode is selected,
side), the unit stops after playing all messages in a folder.
«REMAIN» and the counter display
When the last message on a folder has been played back, the unit stops at the
flash when the remaining time
beginning of the last message.
reaches 1 minute.
To continue recording, first erase
For private listening
some of the messages.
Connect an ear receiver or headphones (not supplied) to the i (headphone) jack.
The built-in speaker will be automatically disconnected. If noise is heard, wipe
Notes
the headphones plug.
• If you press zXREC/PAUSE when
the memory is full, «FULL» will flash
Other operations
with an alarm sound. Erase some of
the messages before you start
To
recording again.
stop at the current position
• If you press zXREC/PAUSE after
you have recorded 99 messages,
«FULL» will flash with an alarm
sound. Select another folder or erase
go back to the beginning
some of the messages.
of the current message
skip to the next message
Starting recording
automatically in response
go back to previous
to the sound — Advanced
messages/skip to succeeding
messages
VOR function
When VOR (voice operated
recording) is set to ON in the menu,
recording starts when the recorder
detects sound. («VOR» is displayed
in the display window.)
Recording stops when no sound is
heard. («VOR PAUSE» flashes in
the display window.)
Note
Current folder
VOR function is affected by the sound
around you. Set the microphone
sensitivity to «H (high)» or «L (low)»
using the menu. If recording is not
satisfactory after you have changed
the microphone sensitivity, or for
important recording, set VOR to OFF.
Playing back a message
repeatedly
— Repeat Play
During playback, press
NxPLAY/STOP for more than
one second.
«
» will be displayed and the
selected message will be played
back repeatedly.
To resume normal playback, press
NxPLAY/STOP again. To stop
playback, press xSTOP.
Playing back all messages
in a folder continuously
— Continuous Play
Selected message number
You can select the continuous play
mode with the CONT in the menu.
Number of
When you set CONT to ON, you
messages in
can play back all messages in a
a folder
folder continuously.
Counter
Searching forward/
display*
backward during playback
(Cue/Review)
To search forward, keep >+
pressed during playback and
release the button at the point you
wish to resume playback.
To search backward, keep – .
pressed during playback and
release the button at the point you
wish to resume playback.
If you keep >+ or – .pressed,
i (headphone) jack
the unit starts to search at higher
speed.
For the first 10 seconds of cue/
OPR indicator
review, fast playback sound can be
(lights in green during
heard. When searching at a higher
playback.)
speed, playback sound will not be
2 Adjust the volume
heard.
with the VOL control.
During cue/review, the counter
will be displayed, regardless of the
display mode setting.
xSTOP
1
Tip
When fast playback is done to the end
of the last message, «END» flashes for
5 seconds. (You cannot hear the
playback sound.) If you keep – .
pressed while «END» is flashing, the
messages are played back rapidly, and
normal playback will start at the point
you release the button.
When «END» stops flashing and the
OPR indicator goes off, the unit will
stop at the beginning of the last
message.
If the last message is long and you
wish to start playback at a later part of
the message, keep >+ pressed to
play back the message to the end and
then press – . while «END» is
flashing to go back to the desired
point.
Do this
(For messages other than the last one,
Press NxPLAY/STOP or xSTOP.
go to the beginning of the next
To resume playback from that point,
message and play backward to the
press NxPLAY/STOP again.
desired point.)
Press – . once.
Press >+ once.
Press – . or >+ repeatedly.
(During stop mode, keep the button
pressed to skip the messages
continuously.)
Перед Вами Руководство пользователя диктофона Sony ICD-B500. Вы можете ознакомиться и скачать данное руководство по эксплуатации бесплатно.
Инструкция по применению на русском языке, предложенная производителем, позволяет
правильно использовать Вашу бытовую технику и электронику.
-
 1
1
-
2
-
3
-
4
-
5
-
6
-
7
-
8


Главная >
Диктофоны >
Sony >
ICD-B500
Поделиться
Раздел: Мобильные, портативные устройства и аксессуары
Тип: Диктофон
Характеристики, спецификации
Ширина:
53 мм
Высота:
153 мм
Гарантия:
1 год
Страна:
КНР
Текстовый дисплей:
Да
Разъем для наушников 3.5 мм:
1 шт
Встроенная память (ROM):
256 МБ
Активизация голосом:
Да
Счетчик:
электронный
Встроенный микрофон:
1
Звук:
моно
Продолжительность записи:
до 150 часов
Габаритные размеры (В*Ш*Г):
153*53*26 мм
Цвет:
серебр./черный
Базовый цвет:
серебристый/серый
Формат:
цифровой
Инструкция к Диктофону Sony ICD-B500
Аннотации для Диктофона Sony ICD-B500 в формате PDF
Топ 10 инструкций
100.00
Gefest 6100-03
99.98
Alcatel 9008D A3 XL 16Gb White Blue
99.85
Gefest 6100-04 0001
99.85
Alcatel Pixi 4
99.75
Casio EX-H20G Silver
99.72
Tp-Link TL-WA5210G
99.72
Gefest 3102
99.67
Casio CTK-4000
99.64
Gefest 6100-02
99.63
Casio EX-Z1050 Silver
К рейтингу инструкций и мануалов →
Другие инструкции

Hotpoint-Ariston RST 7029 S

Vitek VT-3623

Sony ICD-B300
Sony ICD-B5
Sony ICD-B600
Sony ICD-B7
When playing back a previously recorded message, start from Step 1.
When playing back a message you have just finished recording, start from Step 3.
1
Select the folder.
See “Selecting the Folder”.
2
Select the message number.
* The display selected with the DISPLAY/MENU button appears (see the reverse side).
3
Start playback.
After playing back one message, the unit stops at the beginning of the next
message. When the continuous play function is set to “ON” (see the reverse
side), the unit stops after playing all messages in a folder.
When the last message on a folder has been played back, the unit stops at the
beginning of the last message.
For private listening
Connect an ear receiver or headphones (not supplied) to the i (headphone) jack.
The built-in speaker will be automatically disconnected. If noise is heard, wipe
the headphones plug.
Other operations
To
Do this
stop at the current position
Press NxPLAY/STOP or xSTOP.
To resume playback from that point,
press NxPLAY/STOP again.
go back to the beginning
Press – . once.
of the current message
skip to the next message
Press >+ once.
go back to previous
Press – . or >+ repeatedly.
messages/skip to succeeding
(During stop mode, keep the button
messages
pressed to skip the messages
continuously.)
1
Slide and lift the battery
compartment lid.
2
Insert two LR03 (size AAA)
alkaline batteries with
correct polarity, and close the
lid.
Clock setting display appears when you insert batteries for the first time, or
when you replace the batteries with new ones. Please refer to Steps 2 to 3 in
“Step 2: Setting the Clock” to set the date and time.
IC Recorder
Operating Instructions
2007 Sony Corporation Printed in China
ICD-B500
Owner’s Record
The model number is located at the rear and the serial number is located inside the battery
compartment. Record the serial number in the space provided below. Refer to these numbers
whenever you call upon your Sony dealer regarding this product.
Model No. ICD-B500
Serial No. _____________________________________
Step 1: Installing the Batteries
Replacing the batteries
The battery indicator in the display
window shows the battery
condition.
When
flashes, replace the
batteries with new ones.
When
flashes, the batteries are
exhausted and the unit will stop
operation.
Battery life*
With continuous use, approx. 11 hours
recording/7.5 hours playback in the
HQ mode, and approx. 22 hours
recording/11 hours playback in the SP
and LP modes is possible.
* Using Sony alkaline batteries LR03
(size AAA)
* When playing back through the
internal speaker with the medium
volume level
The battery life may shorten
depending on the operation of the
unit.
Notes
• Do not use manganese batteries for
this unit.
• When you replace the batteries with
new ones, the clock setting display
appears. In this case, set the date
and time again. The recorded
messages and alarm setting,
however, will remain.
• When replacing the batteries, be
sure to replace both batteries with
new ones.
• Do not charge dry batteries.
• When you are not going to use the
unit for a long time, remove the
batteries to prevent damage from
battery leakage and corrosion.
• The unit is accessing data while
“ACCESS“ appears in the display
window. While accessing, do not
remove the batteries. Doing so may
damage the data.
Clock setting display appears when you insert batteries for the first time, or when you replace the batteries with new ones. In
this case, proceed from step 2.
1
Display the clock setting display.
2
Set the date.
3
Set the time.
Tip
This unit does not have a power on/off switch. The display is shown at all times.
2
Press NxPLAY/STOP.
The month digits will flash.
3
Set the month and day in sequence,
then press NxPLAY/STOP.
The hour digits will flash.
2
Press – . or >+ to display
“SET DATE”.
3
Press NxPLAY/STOP.
The year digits will flash.
Tip
To set the date to Year 2005, display
“05Y”.
Step 2: Setting the Clock
Recording Messages
You can record up to 99 messages in each of the four folders (A, B, C, and D).
Since a newly recorded message is automatically added behind the last recorded
message, you can start recording quickly without searching for the end of the
last recording.
e.g.
Message 1
Message 2 Newly recorded message
Blank space
Note
Before making a long recording, be sure to insert new batteries and check the battery
indicator.
1
Select the recording mode.
See “Changing the Recording Mode” on the reverse side.
2
Select the folder.
See “Selecting the Folder”.
3
Start recording.
You do not need to keep pressing zXREC/PAUSE while recording.
4
Stop recording.
If you do not change the folder after you stop recording, the next time you
record you will record in the same folder.
To
Do this
pause recording*
Press zXREC/PAUSE.
During recording pause, the OPR indicator flashes in
red and “PAUSE” flashes in the display window.
release pause and
Press zXREC/PAUSE.
resume recording
Recording resumes from that point.
(To stop recording after pausing recording, press
x
STOP.)
listen to the current
Press xSTOP to stop recording, then press
recording
Nx
PLAY/STOP.
review the current
Press NxPLAY/STOP during recording.
recording instantly
search backward during
Hold down – . during recording or recording
recording (Review)
pause. Recording mode will be released, and
reviewing of the current recording starts. If you
release the button, playback starts from that point.
select the microphone
You can select the microphone sensitivity using the
sensitivity
menu. See “Selecting the Microphone Sensitivity”.
H (high): To record at meeting or in a quiet and/or
spacious place.
L (low): To record for dictation or in a noisy place.
* About one hour after you pause recording, recording pause is automatically released
and the unit goes into the stop mode.
Selecting the Folder
1
Press DISPLAY/MENU for more than 1 second until
“MODE” appears in the display window.
2
Press – . or >+ to select “FOLDER” and press
Nx
PLAY/STOP.
3
Press – . or >+ to select the folder you want
and press NxPLAY/STOP.
4
Press xSTOP to exit the menu mode.
Current folder
B
Basic Operations
Information
IN NO EVENT SHALL SELLER BE LIABLE FOR ANY DIRECT,
INCIDENTAL OR CONSEQUENTIAL DAMAGES OF ANY
NATURE, OR LOSSES OR EXPENSES RESULTING FROM ANY
DEFECTIVE PRODUCT OR THE USE OF ANY PRODUCT.
For the customers in the U.S.A.
The following FCC statement applies only to the version of this
model manufactured for sale in the USA. Other versions may
not comply with FCC technical regulations.
INFORMATION
This equipment has been tested and found to comply with the
limits for a Class B digital device, pursuant to Part 15 of the
FCC Rules. These limits are designed to provide reasonable
protection against harmful interference in a residential
installation. This equipment generates, uses, and can radiate
radio frequency energy and, if not installed and used in
accordance with the instructions, may cause harmful
interference to radio communications.
However, there is no guarantee that interference will not occur
in a particular installation. If this equipment does cause
harmful interference to radio or television reception, which can
be determined by turning the equipment off and on, the user is
encouraged to try to correct the interference by one or more of
the following measures:
– Reorient or relocate the receiving antenna.
– Increase the separation between the equipment and
receiver.
– Connect the equipment into an outlet on a circuit different
from that to which the receiver is connected.
– Consult the dealer or an experienced radio/TV technician
for help.
You are cautioned that any changes or modifications not
expressly approved in this manual could void your authority
to operate this equipment.
This device complies with Part 15 of the FCC Rules. Operation
is subject to the following two conditions: (1) This device may
not cause harmful interference, and (2) this device must accept
any interference received, including interference that may
cause undesired operation.
If you have any questions about this product, you may call:
Sony Customer Information Services Center 1-800-222-7669 or
http://www.sony.com/
Disposal of Old Electrical &
Electronic Equipment (Applicable in
the European Union and other
European countries with separate
collection systems)
This symbol on the product or on its packaging
indicates that this product shall not be treated
as household waste. Instead it shall be handed
over to the applicable collection point for the
recycling of electrical and electronic equipment.
By ensuring this product is disposed of
correctly, you will help prevent potential
negative consequences for the environment and
human health, which could otherwise be caused by
inappropriate waste handling of this product. The recycling of
materials will help to conserve natural resources. For more
detailed information about recycling of this product, please
contact your local Civic Office, your household waste disposal
service or the shop where you purchased the product.
Note on recording
Noise may be recorded if an object,
such as your finger, etc., accidentally
rubs or scratches the unit during
recording.
Maximum recording time
The maximum recording time of all
the folders is as follows. You can
record messages for the maximum
recording time in a single folder.
HQ*
30 h. 25 min.
SP**
81 h. 15 min.
LP***
150 h. 15 min.
(h.: hours/min.: minutes)
* HQ: High quality recording mode
(monaural sound)
** SP: Standard play recording mode
(monaural sound)
***LP: Long play recording mode
(monaural sound)
Notes
• To record in better sound quality,
select the HQ mode. For switching
the recording mode, see “Changing
the Recording Mode” on the reverse
side.
• Before making a long recording, be
sure to check the battery indicator.
• The maximum recording time and
the number of messages you can
make vary depending on the
conditions of use.
• When you record messages in the
mixture of HQ, SP and LP mode, the
maximum recording time will be
between those for the HQ and LP
modes.
• Due to the limitation of the IC
recording system, this unit records
in the minimum recording unit of
approx. 2 seconds at most, therefore
the following symptoms may occur:
– When a message is shorter than
the minimum recording unit, it is
still counted as approx. 2 seconds
at most so the remaining
recording time will decrease by
more than the actual length of the
message.
– When the message is longer than
the minimum recording unit, the
remaining recording time will
decrease by more than the actual
length of the message if it cannot
be divided by the minimum
recording unit without a
remainder.
– The sum of the number on the
counter (elapsed recording time)
and the remaining recording time
may be less than the unit’s
maximum recording time.
Remaining memory
indication
During recording, the remaining
memory indicator decreases one by
one.
The memory is
nearly full.
Flashing
When the remaining time of
recording reaches 5 minutes, the
last one of the indication flashes.
If the remaining recording time
display mode is selected,
“REMAIN” and the counter display
flash when the remaining time
reaches 1 minute.
To continue recording, first erase
some of the messages.
Notes
• If you press zXREC/PAUSE when
the memory is full, “FULL” will flash
with an alarm sound. Erase some of
the messages before you start
recording again.
• If you press zXREC/PAUSE after
you have recorded 99 messages,
“FULL” will flash with an alarm
sound. Select another folder or erase
some of the messages.
Starting recording
automatically in response
to the sound — Advanced
VOR function
When VOR (voice operated
recording) is set to ON in the menu,
recording starts when the recorder
detects sound. (“VOR” is displayed
in the display window.)
Recording stops when no sound is
heard. (“VOR PAUSE” flashes in
the display window.)
Note
VOR function is affected by the sound
around you. Set the microphone
sensitivity to “H (high)” or “L (low)”
using the menu. If recording is not
satisfactory after you have changed
the microphone sensitivity, or for
important recording, set VOR to OFF.
Playing Back Messages
B
Getting started
Troubleshooting
Before taking the unit for repair, check the following
sections. Should any problem persist after you have
made these checks, consult your nearest Sony dealer.
The unit does not operate.
• The batteries have been inserted with incorrect
polarity.
• The batteries are weak.
• The buttons are locked with the HOLD switch. (If
you press any button, “HOLD” will flash for 3
seconds.)
No sound comes from the speaker.
• The ear receiver or headphones are plugged in.
• The volume is turned down completely.
“FULL” is displayed and you cannot start
recording.
• The memory is full. Erase some of the messages.
• 99 messages have been recorded in the selected
folder. Select another folder or erase some of the
messages.
Noise is heard.
• An object, such as your finger, etc., accidentally
rubbed or scratched the unit during recording so
that noise was recorded.
• The unit was placed near an AC power source, a
fluorescent lamp or a mobile phone during
recording or playback.
• Plug of the connected microphone was dirty when
recording. Clean the plug.
• Ear receiver/headphones plug is dirty. Clean the
plug.
Recording level is low.
• Set the microphone sensitivity to “H (high)” using
the menu.
Recording is interrupted.
• The advanced VOR function is activated. Set VOR
to “OFF”.
Recording level is unstable (when recording
music, etc.).
• This unit is designed to automatically adjust the
recording level when recording meetings, etc., and
is not suitable for music recording.
“—Y—M—D” or “—:—” is displayed.
• You have not set the clock.
“—Y—M—D” or “—:—” is displayed on the REC
DATE display.
• The date and time of recording will not be
displayed if you recorded the message when the
clock was not set.
You cannot divide a message.
• You cannot divide a message in a folder which has
99 messages.
• If you divide messages frequently, the unit may
become unable to divide a message.
• You cannot divide a message in the first or the last
1 second of a message.
It takes longer for the unit to start
operation.
• If you divide messages too frequently while the
unit is recording them, the following phenomenon
may occur: The OPR indicator keeps flashing, and
you cannot operate the unit for a certain period.
This is not a malfunction. Wait until the OPR
indicator goes off.
You cannot record messages up to the
maximum recording time.
• If you record messages in a mixture of HQ, SP and
LP modes, the recordable time varies from the
maximum HQ mode recording time to the
maximum LP mode recording time.
• No more recording can be made when 99 messages
each have been recorded in a folder.
• Due to the limitation of the IC recording system,
this unit records in the minimum recording unit. If
the length of each message cannot be divided by
the minimum recording unit, the remaining
recording time may decrease by more than the
total length of the messages.
The unit does not operate correctly.
• Take out the batteries and insert them again.
Please note that recorded messages may be erased
during service or repair work.
Playing back a message
repeatedly
— Repeat Play
During playback, press
Nx
PLAY/STOP for more than
one second.
“
“ will be displayed and the
selected message will be played
back repeatedly.
To resume normal playback, press
Nx
PLAY/STOP again. To stop
playback, press xSTOP.
Playing back all messages
in a folder continuously
— Continuous Play
You can select the continuous play
mode with the CONT in the menu.
When you set CONT to ON, you
can play back all messages in a
folder continuously.
Searching forward/
backward during playback
(Cue/Review)
To search forward, keep >+
pressed during playback and
release the button at the point you
wish to resume playback.
To search backward, keep – .
pressed during playback and
release the button at the point you
wish to resume playback.
If you keep >+ or – .pressed,
the unit starts to search at higher
speed.
For the first 10 seconds of cue/
review, fast playback sound can be
heard. When searching at a higher
speed, playback sound will not be
heard.
During cue/review, the counter
will be displayed, regardless of the
display mode setting.
1 Tip
When fast playback is done to the end
of the last message, “END” flashes for
5 seconds. (You cannot hear the
playback sound.) If you keep – .
pressed while “END” is flashing, the
messages are played back rapidly, and
normal playback will start at the point
you release the button.
When “END” stops flashing and the
OPR indicator goes off, the unit will
stop at the beginning of the last
message.
If the last message is long and you
wish to start playback at a later part of
the message, keep >+ pressed to
play back the message to the end and
then press – . while “END” is
flashing to go back to the desired
point.
(For messages other than the last one,
go to the beginning of the next
message and play backward to the
desired point.)
1
Press – . or >+ to select
the digits of the year.
Make sure to insert both
of the batteries from
their – ends.
Printed on 70% or more
recycled paper using VOC
(Volatile Organic Compound)-
free vegetable oil based ink.
1
Press DISPLAY/MENU for more
than 1 second until “MODE”
appears in the display window.
The unit enters the menu mode.
Selecting the Microphone Sensitivity
1
Press DISPLAY/MENU for more than 1 second until
“MODE” appears in the display window.
2
Press – . or >+ to select “SENS” and press
Nx
PLAY/STOP.
3
Press – . or >+ to select “H (high sensitivity)”
or “L (low sensitivity)” and press NxPLAY/STOP.
4
Press xSTOP to exit the menu mode.
If the battery compartment lid is
accidentally detached, attach it as
illustrated.
Press – . or >+ to
display the desired
message number.
>
+: for larger
message number
– .: for smaller
message number
Counter
display*
Selected message number
Number of
messages in
a folder
2
Adjust the volume
with the VOL control.
i
(headphone) jack
1
Press NxPLAY/STOP.
Counter display (or the
selected display mode)
x
STOP
OPR indicator
(lights in green during
playback.)
1
Press zXREC/PAUSE.
* The display selected
with the DISPLAY/
MENU button
appears.
Current message
number
Counter display*
2
Speak to the
built-in
microphone.
OPR indicator
(lights in red during
recording.)
Remaining memory
indicator
Recording mode
Press xSTOP.
The unit stops at the
beginning of the current
recording.
Nx
PLAY/STOP
– .(Review)
zX
REC/PAUSE
3
Set the minute.
4
Press NxPLAY/STOP at the time
signal.
The display will return to “SET
DATE”.
5
Press xSTOP to exit from the
menu mode.
If the unit is left unused for more
than 3 seconds in the stop mode, the
display will show the current time.
1
Press – . or >+ to select
the digits of the hour.
2
Press NxPLAY/STOP.
The minute digits will flash.