Содержание
- Установка раздвижных межкомнатных дверей
- Система раздвижных дверей
- Рельсовый механизм
- Рельсовые сдвижные двери
- Варианты использования раздвижных систем
- Тонкости технологических этапов установки
- Раздвижные межкомнатные двери-купе
Установка раздвижных межкомнатных дверей
В наше время каждый хочет иметь жилье, которое отличается комфортом, удобством и уютом. Именно с такими факторами связано желание заменить привычные распашные двери на раздвижные. Многие при этом считают, что этот процесс довольно сложный и без специалистов никак не обойтись. На самом деле, сложностей особых нет и раздвижные двери без особых усилий можно установить своими руками. Проблемы могут заключаться лишь в том, что качественный механизм стоит недешево. Достоинство таких дверей в том, что они не отбирают полезное жилое пространство, по сравнению с классическими распашными дверьми.
По сравнению с достоинствами, имеются и некоторые недостатки. Например, такие двери не отличаются хорошими звукоизоляционными характеристиками, так как полотно просто закрывает видимый проем. Если эти характеристики некритичные, то можно начинать процесс выбора дверей, их покупки, а затем и установки.
Система раздвижных дверей

На сегодняшний день известно о двух механизмах реализации функции раздвижных дверей: о подвесном и о рельсовом. Каждый механизм имеет, как свои достоинства, так и недостатки.
Рельсовый механизм
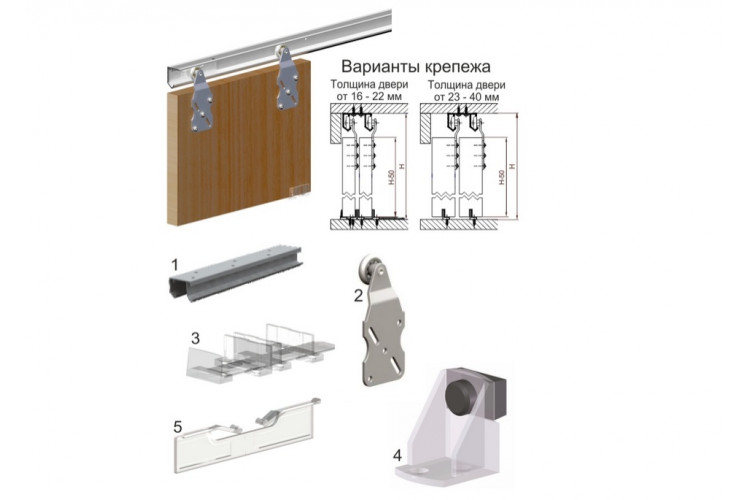
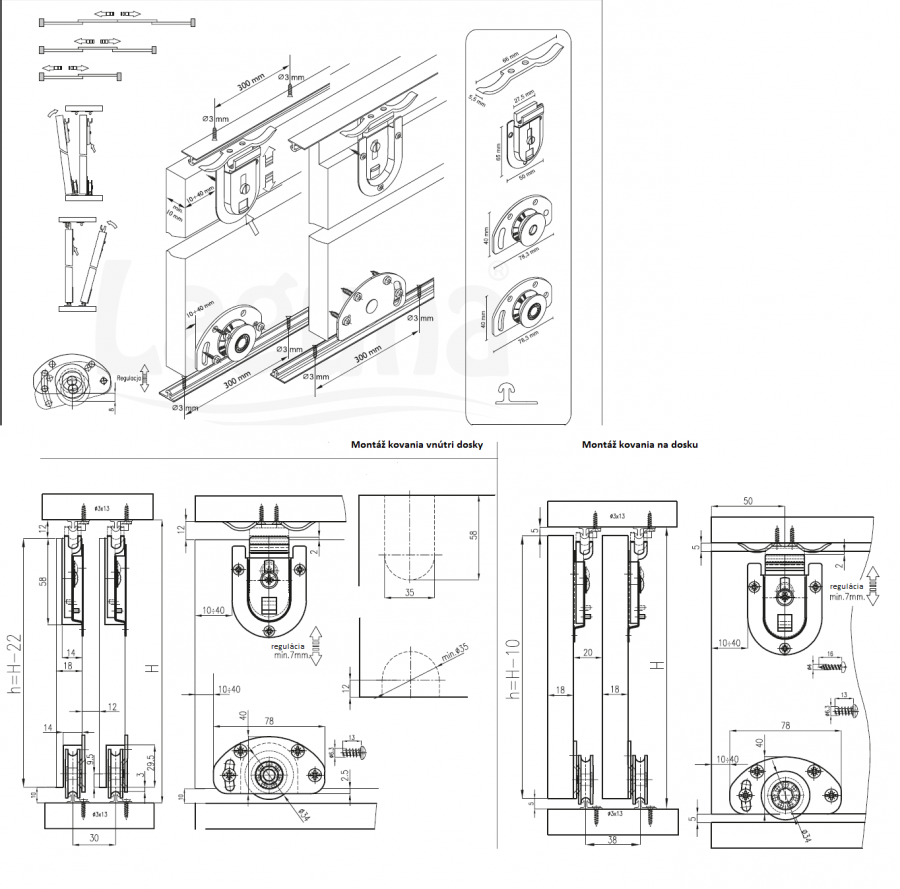
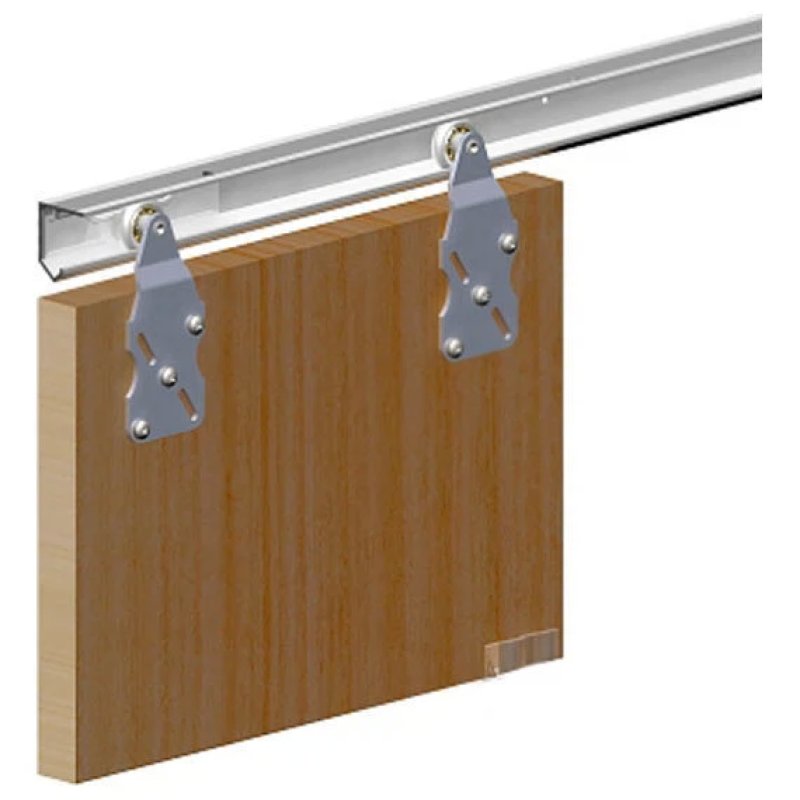
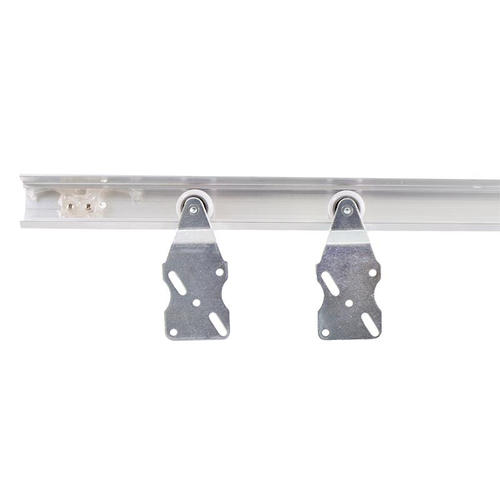
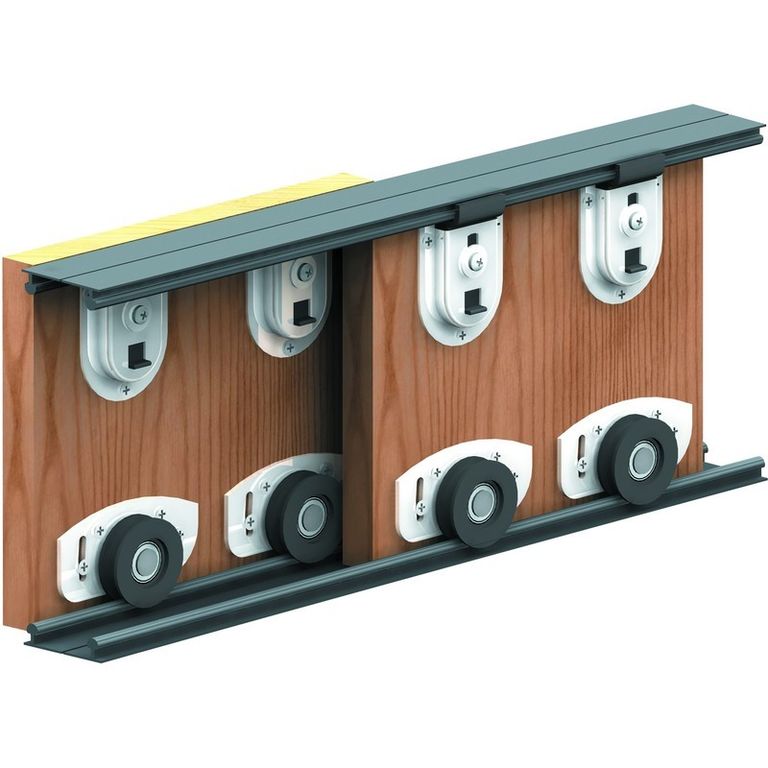
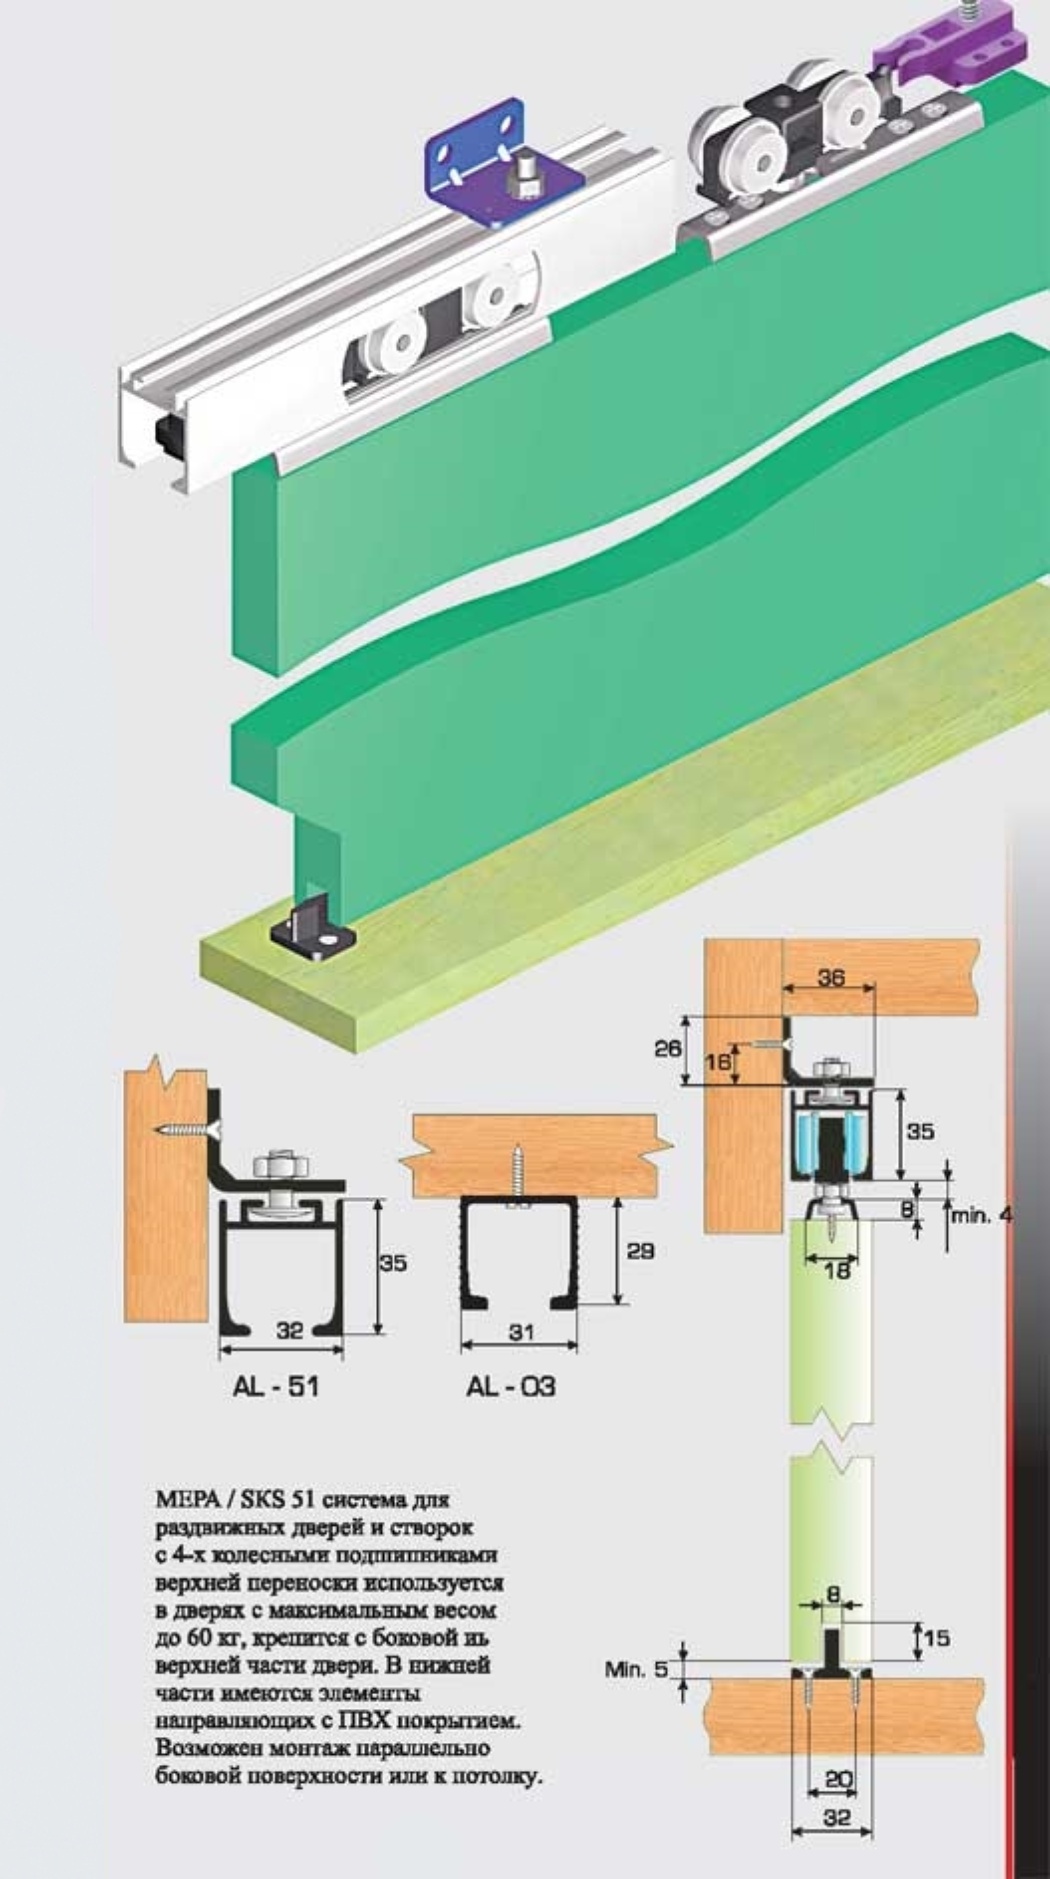
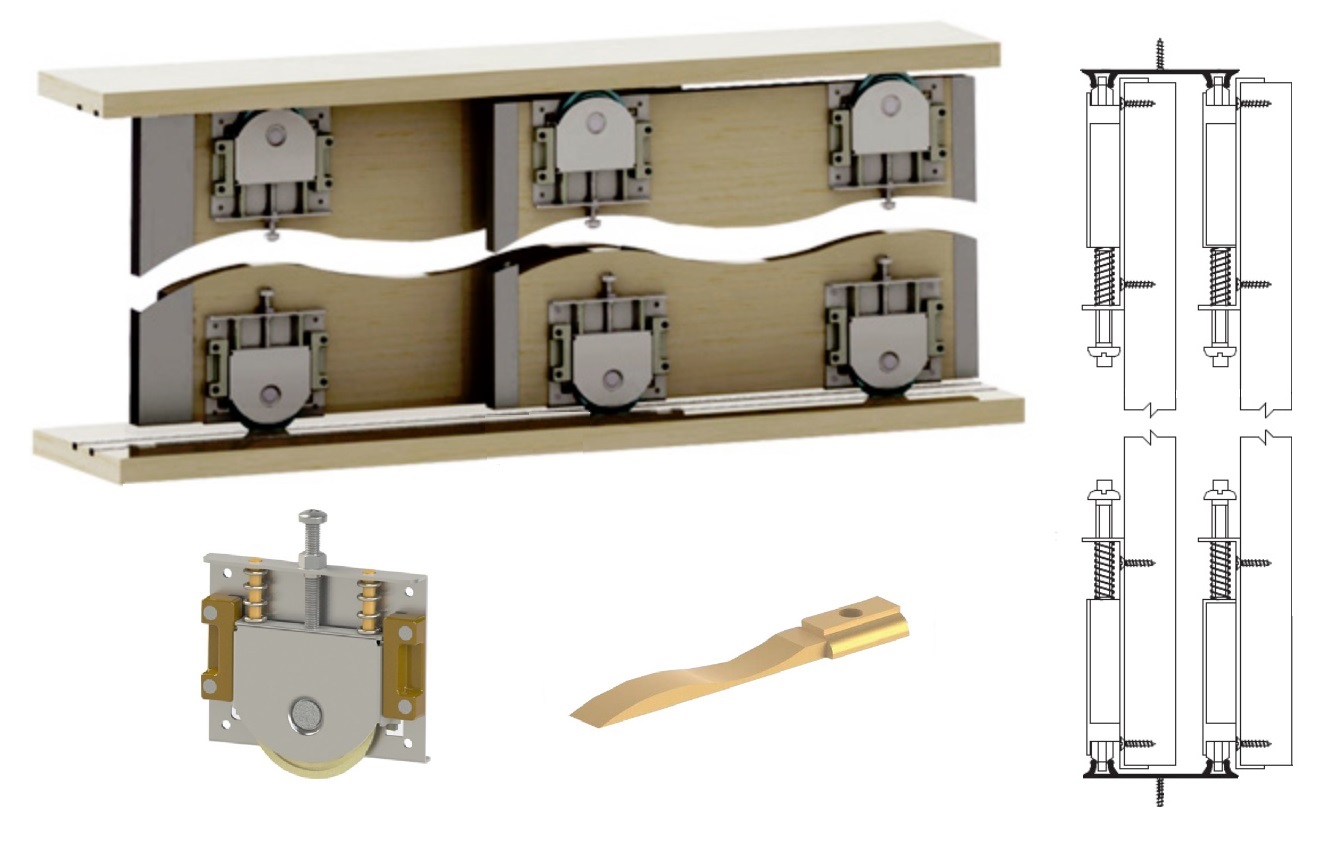
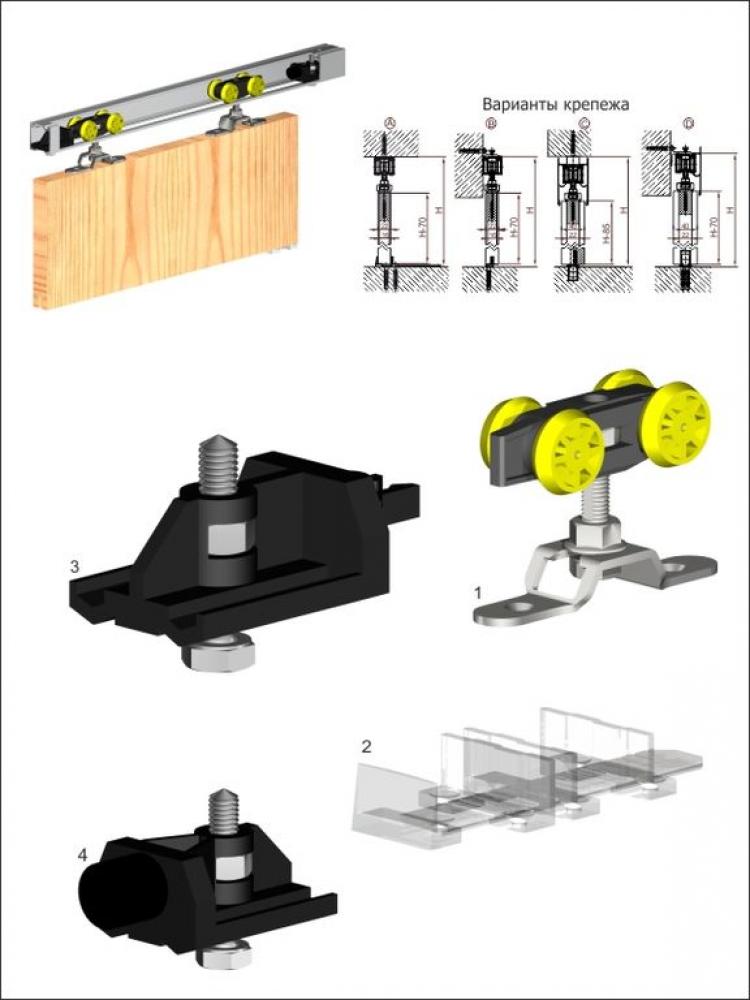
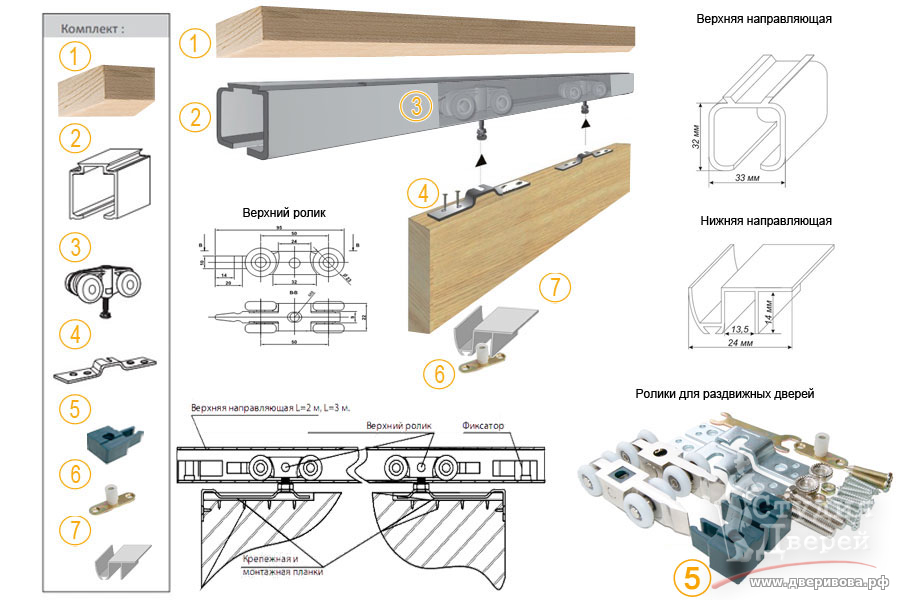
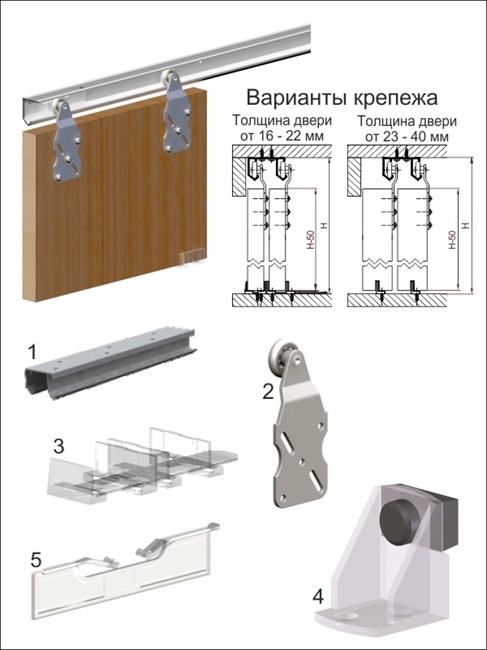
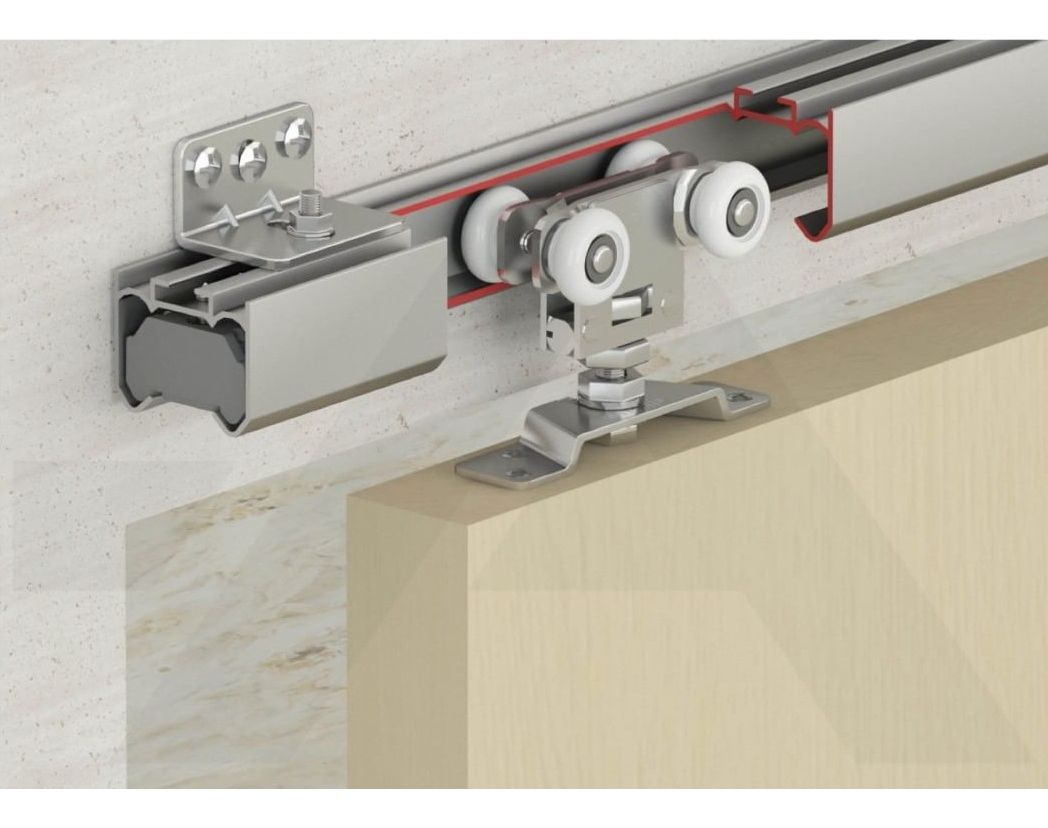
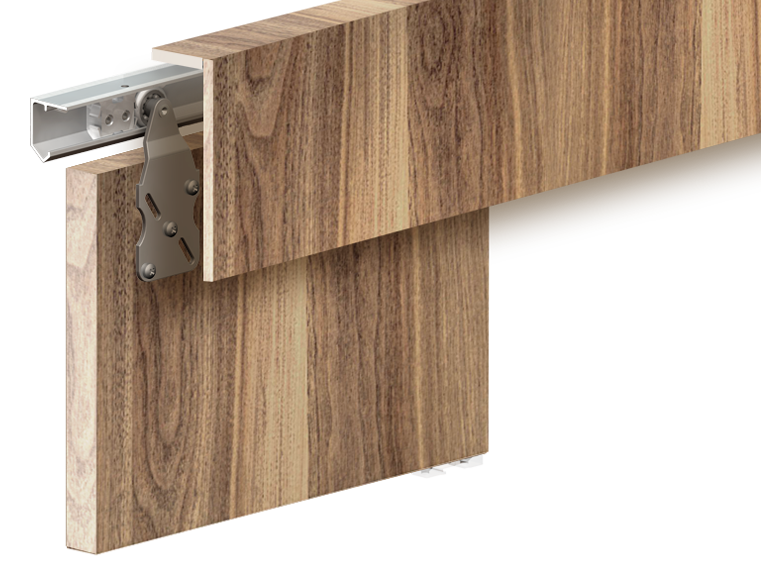
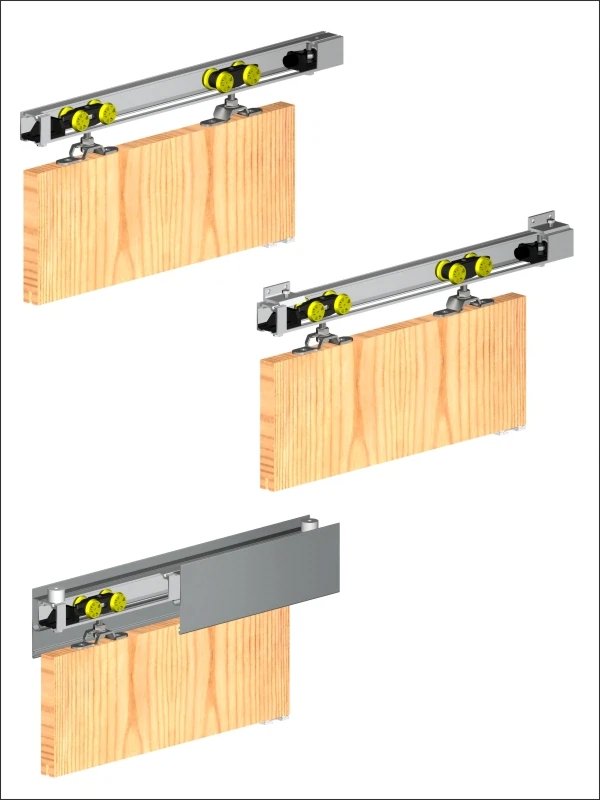
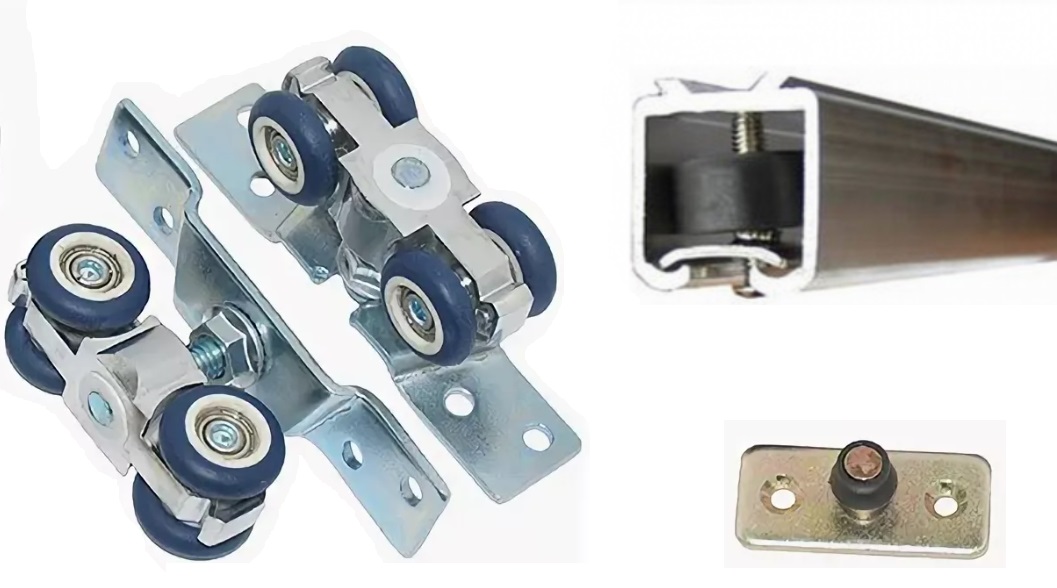
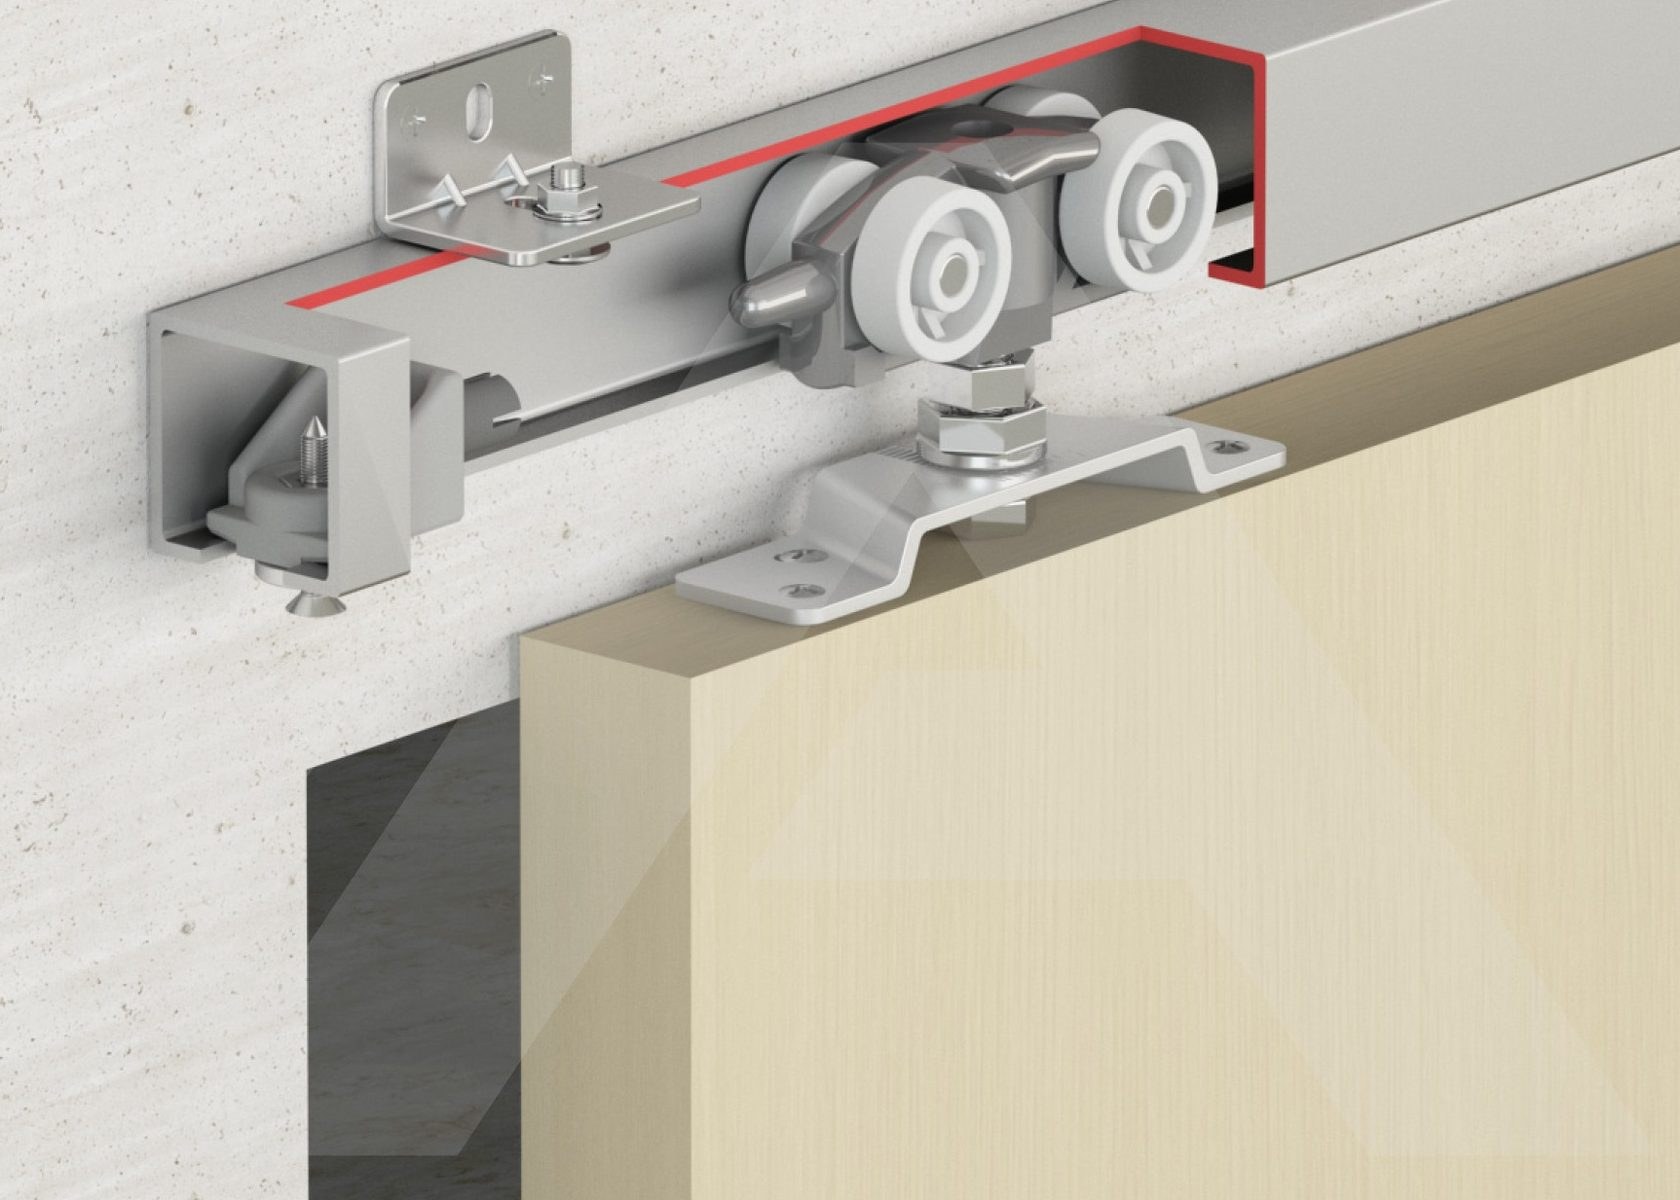
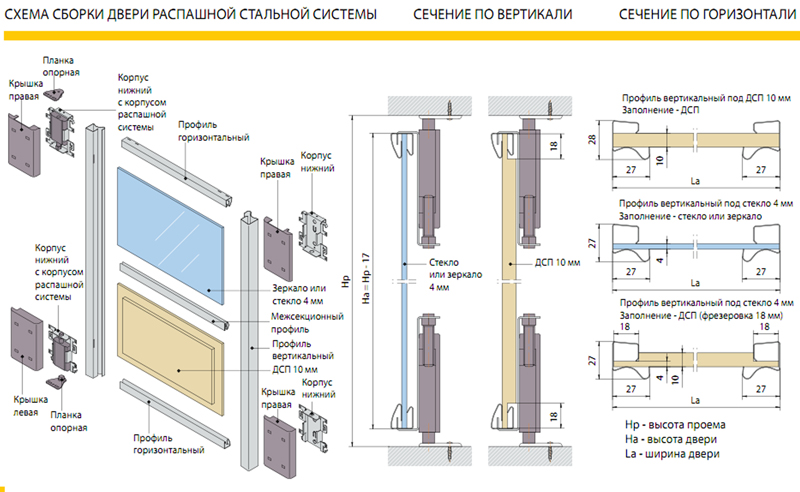
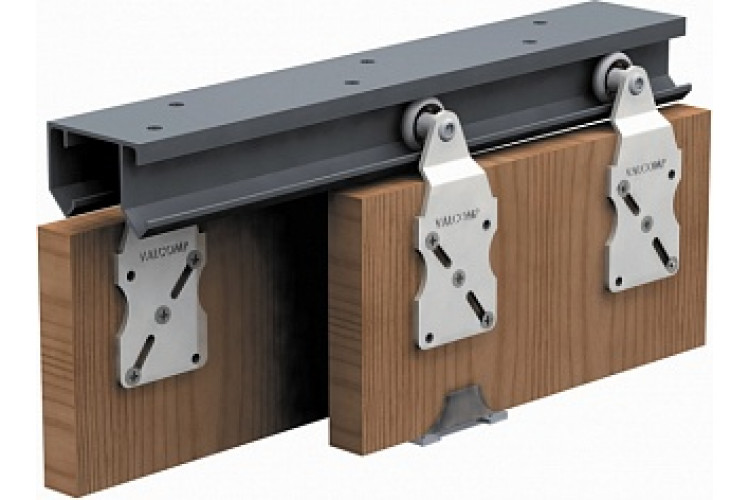
В качестве подвижного механизма используется несущая балка, к которой крепится направляющее устройство в виде буквы «П». Устанавливается этот элемент ребрами вверх, что дает возможность свободно перемещаться в ней роликам, на которых крепится дверное полотно. Другими словами, это подвесная дверь, скользящая по направляющей.
Принципиальное устройство раздвижных межкомнатных дверей на верхней рельсе
Установка таких дверей не предусматривает монтажа каких-либо напольных элементов, поэтому пол остается ровным, нетронутым. Справа и слева монтируются нижние ролики, которые попадают в пазы, размещенные в нижней части дверного полотна. Это необходимо для того, чтобы фиксировать полотно в вертикальной плоскости. Считается, что монтаж такой системы не отличается сложностью и доступен для каждого, кто пожелает ее установить у себя дома.
Монтаж включает в себя несколько этапов:
- Процесс крепления верхней рельсы.
- Крепление роликов к верхнему торцу полотна.
- Установка полотна с роликами в направляющую рельсу.
- Монтаж верхнего стопорного механизма.
- Закрепление нижнего направляющего ролика.
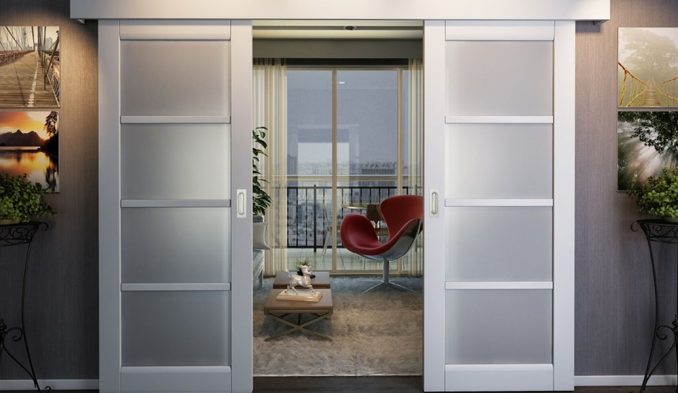
Одностворчатые межкомнатные сдвижные двери
Как видно из этапов, ничего сложного, нужно лишь иметь желание и инструмент, а также не помешает помощник. Подобная система практически не задерживает никаких шумов, но зато закрывается проход.
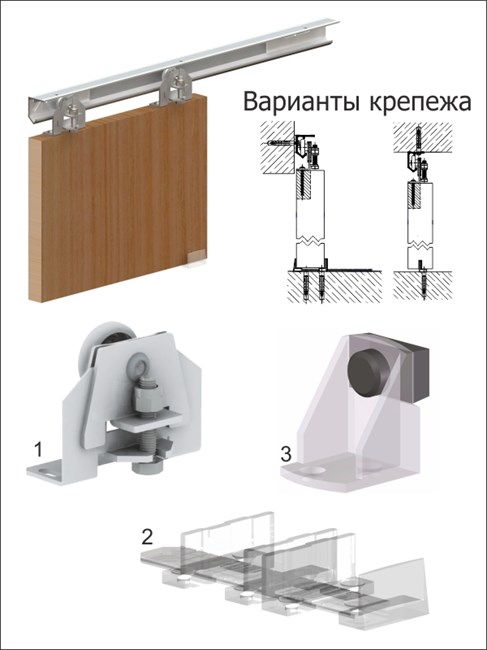
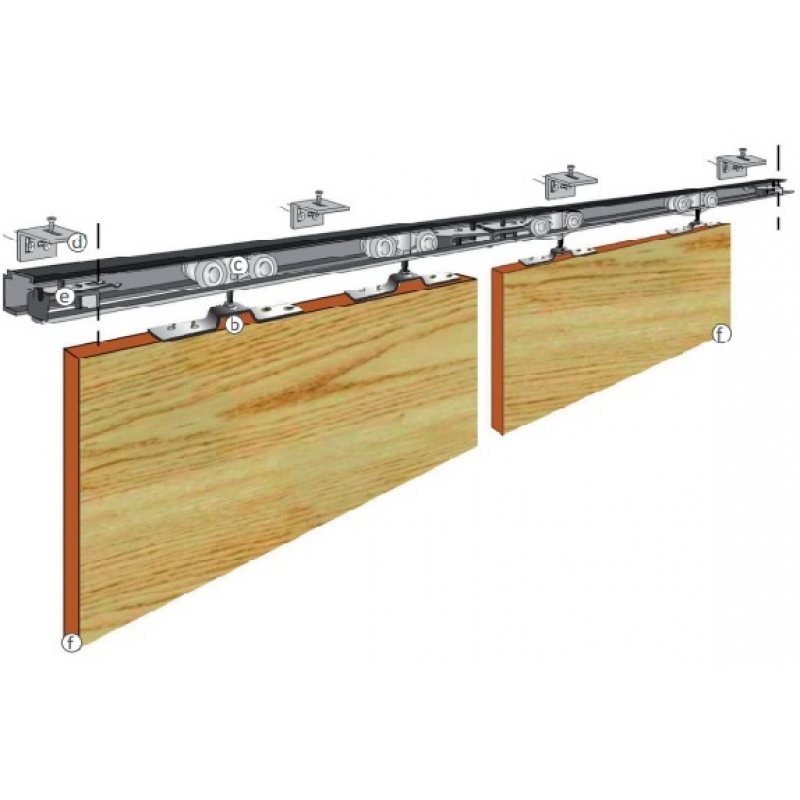
Рельсовые сдвижные двери
Такие двери характеризуются наличием верхней и нижней направляющей рельсы. Вверху и внизу также монтируются ролики. Такая конструкция механизма отличается повышенной устойчивостью, поскольку она не может отклоняться в вертикальной плоскости.
Рельсовые раздвижные двери
Наличие направляющей рельсы в полу – это негативный момент, влияющий на процесс уборки, да и не только, поскольку она мешает свободному проходу. Наилучший вариант – это установить такие двери в каком-либо шкафу или в гардеробной. Поскольку эта система более устойчивая, то наличие детей не может привести к различным травмам, так как дети многие элементы интерьера пробуют на прочность.
Варианты использования раздвижных систем
Раздвижные системы, независимо от конструкционных особенностей, допустимо использовать в качестве:
- Дверей-купе, достаточно на стене закрепить направляющие, по которым двигается дверное полотно.
Двери-купе. Направляющая монтируется на стене над верным проемом
Кассетных дверей, когда в стене делается специальная ниша, в которую прячется дверное полотно при открывании.
Кассетная раздвижная межкомнатная дверь: полотно прячется в стенную нишу
Каскадных дверей, которые могут состоять из одной неподвижной двери и нескольких подвижных, которые при открывании прячутся за неподвижной частью.
Каскадные сдвижные двери: одна створка тянет другую
Двери-купе относятся к самому простому варианту решения проблемы занятости жилого пространства. Такие двери легко монтируются самостоятельно. Очень важно, чтобы подготовительные работы были качественными: стенка должна быть ровной по вертикали, а также надежной, способной выдержать дополнительную нагрузку. О недостатках уже говорилось, поэтому такая система мало подходит для установки, например, во взрослую спальню. Достоинство кассетных дверей в том, что в открытом состоянии они никому не мешают, да и ничему, поскольку находятся в нише. К тому же, такие двери имеют лучшие характеристики по звукоизоляции, так как имеется возможность по периметру наклеить уплотнитель. Недостатки, хотя и неочевидные, но существуют: во-первых, такие двери можно установить лишь на стадии ремонта, а во-вторых, они также отбирают полезное пространство, поскольку приходится монтировать фальшстену. Хотя, как было сказано выше, это не каждый может понять, так как недостатки являются скрытыми.
Каскадные двери отличаются сложностью установки из-за наличия нескольких направляющих элементов и полотен. Их монтаж требует точного расчета, поэтому такая система дорого обойдется, да и самому ее установить, без опыта, не представляется возможным. Как правило, подобные двери устанавливаются в элитных жилых помещениях, когда вопросы экономии средств уходят на второй план.
Тонкости технологических этапов установки
Несмотря на наличие некоторых нюансов, связанных с технологией установки раздвижных дверей, вполне реально обойтись без мастеров, хотя времени на их установку уйдет больше. Главное – это придерживаться рекомендаций, изложенных в этой статье.
Раздвижные межкомнатные двери-купе
Несмотря на отличие некоторых систем, технологические этапы установки ничем не отличаются, как и требования к подготовительным процессам, которые должны обеспечить:
- Идеально ровные размеры дверного проема, чтобы не устанавливать слишком большое дверное полотно.
- Соответствующую несущую способность дверного проема, а также стен.
- Отделку дверного проема, с оклейкой обоев или монтажом декоративных панелей.
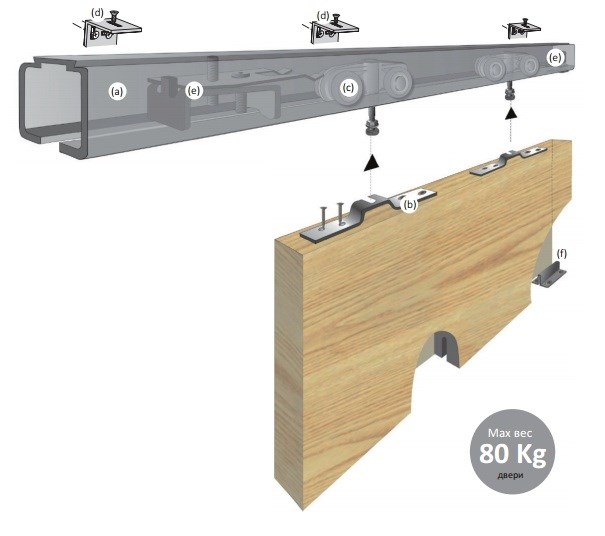
После проведения всех подготовительных работ, можно приступать к процессу установки дверной системы. В первую очередь можно закрепить ролики, воспользовавшись некоторыми рекомендациями производителей раздвижных систем. Некоторые производители рекомендуют сделать небольшое отступление от края дверного полотна, а некоторые рекомендуют осуществлять крепление, не отступая от края. Именно о такой системе крепления пойдет речь дальше. Поэтому профиль, на который устанавливаются ролики, крепятся сразу же, не отступая от краев дверного полотна.
Разметка места установки роликов
На этом этапе очень важно все отцентрировать, а также позаботиться о том, чтобы расстояния были одинаковыми. С помощью карандаша или маркера делаются отметки, после чего в этих точках сверлятся отверстия. При этом, нужно позаботиться о том, чтобы диаметры отверстий были на 1 мм меньше толщины шурупов или саморезов.
Закрепление роликовых колодок
После сверления отверстий профильные пластины устанавливаются на свои места и закрепляются с помощью крепежных винтов, длина которых может составлять 70 мм, а то и больше: чем длиннее крепежные шурупы, тем надежнее. На этапе сверления необходимо позаботиться также о том, чтобы отверстия были просверлены ровно, без перекосов.
Установка роликов
После этого можно приступить к установке самих роликов, для этого в профиль вставляются специальные пластины, к которым прикручиваются ролики, закрепленные на штыре с резьбой.
На штыри накручиваются роликовые платформы
Желательно, чтобы на этом этапе были установлены ручки, а также замки особой конструкции. Если все эти элементы входили в комплект раздвижной системы, то вполне возможно, что на месте этих элементов имеются все углубления и просверлены все отверстия. Как правило, это приходится делать самостоятельно, тем более, если полотно покупалось отдельно. Чтобы самому врезать замок, придется запастись терпением, карандашом и острым инструментом.
Установка ручки
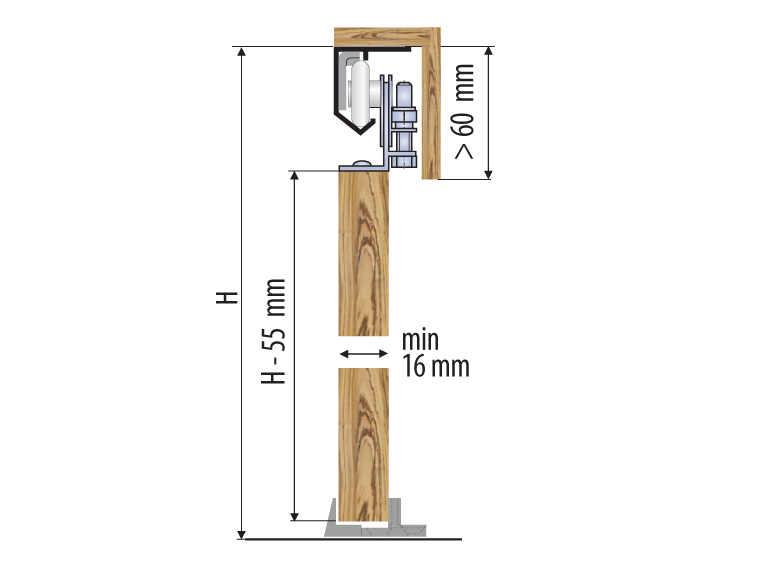
После того, как дверное полотно подготовлено, следует приступать к монтажу направляющей системы. Самое главное на этом этапе – это закрепить ее на требуемой высоте. Если на полотне уже установлены ролики, то задача существенно упрощается.
Зачастую направляющая рельса крепится к деревянному брусу такой же длины, сечением 5х7 см. Размеры направляющего профиля вычисляются из условия двух размеров ширины дверного полотна, с добавлением по краям по 5 см. Такого же размера берется и деревянный брус.
Отмеряем длину несущей и монтажного бруска
Чтобы закрепить направляющую на деревянном брусе, его укладывают на пол, после чего выставляется направляющая. Крепеж осуществляется саморезами, длиной не меньше 70 мм. Количество точек крепления должно быть не меньше 3-х – по краям и по середине: чем чаще, тем лучше и надежнее, но в разумных пределах. Здесь многое зависит от того, какой вес имеет дверное полотно. Естественно, что чем оно легче, тем лучше для всей системы.
Крепление направляющей к брусу
После этого можно осуществлять замеры, чтобы определить, на какой высоте следует закрепить брус с направляющим профилем. Перед креплением в горизонтальной плоскости бруса сверлится 4 отверстия.
Направляющая с брусом «накатываются» на ролики на двери
Брус следует закрепить так, чтобы между полом и полотном оставался зазор не меньше 10 мм, тем более, если предполагается наличие напольного покрытия. Если предполагается укладка ламината, линолеума или других покрытий, то их толщину обязательно нужно учитывать.
Примеряем к дверному проему
При установке такое полотно может отклоняться в вертикальной плоскости, что существенно усложняет монтаж всей системы. Чтобы этого не случилось, полотно следует зафиксировать с помощью деревянного клинышка, причем клиньев должно быть два, возле каждого ролика.
Расклиниваем полотно
Чтобы отметить места крепления, брус прикладывается к стене, причем строго горизонтально, что контролируется с помощью строительного уровня. Места креплений также отмечаются с помощью карандаша или саморезов, которые вставляются в отверстия, после чего по ним стучат молотком. В результате, на стене остаются отметки, где сверлятся отверстия для крепежных элементов. Наилучший вариант крепления – это анкерные болты, а еще лучше – осуществить крепление с помощью сквозных болтов, что наиболее надежно.
Если прочность стены позволяет, то систему допустимо закрепить с помощью дюбелей. Как правило, это практикуется в том случае, если стена бетонная (в панельных домах).
В случае, если стена кирпичная, лучше просверлить сквозные отверстия и закрепить систему на болты, установив с внутренней стороны стены шайбы большого диаметра.
Закрепляем раздвижные двери на стене
В комплекте системы должны быть стопорные элементы, которые крепятся после того, как будет установлено дверное полотно. Перед тем, как их закрепить, необходимо проконтролировать, чтобы двери полностью закрывали дверной проем, а при открывании откатывались на приемлемое расстояние.
Установка стопоров на сдвижных дверях
После этого приступают к креплению флажковых роликов на полу. Он должен заходить в паз, выпиленный в нижней части дверного полотна. Он необходим для того, чтобы двери не смогли отклоняться в вертикальной плоскости.
Установка флажкового ролика
В первую очередь ролик необходимо вставить в паз при закрытой двери, после чего, с помощью карандаша делаются отметки под крепежные элементы.
Так выглядит установленный флажковый ролик при открытых дверях
После установки направляющего ролика можно смело говорить о том, что раздвижные двери установлены. Остается только проверить их на работоспособность, а затем окультурить. Для этого используется декоративная накладка, с помощью которой закрывается деревянный брус. Эту накладку можно просто прибить гвоздями или закрепить с помощью шурупов, что более функционально. Если вдруг придется снимать эту накладку, то не придется изловчаться, чтобы ее не сломать. Монтируя накладку, следует проконтролировать, что взору человека были недоступны все элементы системы, иначе красивого интерьера не получится.
Декоративную накладку можно прибить прямо к брусу
Видео: наглядная демонстрация монтажа раздвижных дверей такой системы.
Источник
-
Contents
-
Table of Contents
-
Bookmarks
Quick Links
Related Manuals for Sigma TANDEM VECTOR
Summary of Contents for Sigma TANDEM VECTOR
-
Page 2
SIGMA TANDEM SYSTEM OWNER’S MANUAL TANDEM VECTOR OWNER’S MANUAL WARNING Sport parachuting is a hazardous activity that can Experts estimate that hundreds of people are also result in injury or death. injured. Some of these deaths and injuries are the Parachutes sometimes malfunction, even when they result of equipment malfunctions. -
Page 3
Section 6 — Appendix Sigma Tandem “Pin Check” ………………….X Replacing the Drogue Ripcord System ………………. X Installing a New Sigma Drogue Kill Line ………………X Tandem Water Landing Procedures ………………..X Tandem Fatality Reports ………………….X Test for Sigma Endorsement …………………. X Line Trim Charts …………………… -
Page 5
SECTION 1: THE SIGMA TANDEM SYSTEM SECTION 1: THE SIGMA TANDEM SYSTEM CHAPTER 1 — NEW FEATURES CHAPTER 1 — NEW FEATURES CHAPTER 2 — APPLICANT INFORMATION CHAPTER 2 — APPLICANT INFORMATION… -
Page 6
CHAPTER 1 CHAPTER 1 THE SIGMA THE SIGMA TANDEM SYSTEM TANDEM SYSTEM… -
Page 7
This makes the Sigma Tandem System a more realistic training aid for future skydivers. -
Page 8
A NEW MAIN DEPLOYMENT BAG The Sigma Tandem main deployment bag has also been redesigned, eliminating the grommet at the top of the bag, and replacing it with a continuous loop of tubular nylon. This prevents canopy damage caused by trapping canopy fabric between the bag’s grommet and the canopy attachment point. -
Page 9
A NEW STUDENT HARNESS The New Sigma student harness is designed to be far more comfortable, while at the same time offering more control on exit, and forcing the student’s legs forward and upward under canopy. This means fewer students will get sick or pass out under canopy. -
Page 10
It has tuck-tab main, reserve, and riser covers. Clear plastic windows make reserve pin checks and Cypres operation easier. It has “Wonderfoam” padding throughout. 11301 — 00.00.0000 Section 1: The Sigma Tandem System • Chapter 1 — New Features Page 5:172… -
Page 12
CHAPTER 2 CHAPTER 2 APPLICANT APPLICANT & COURSE & COURSE INFORMATION INFORMATION… -
Page 13
The course fee does not include the candidates personal jumps or the cost of the experienced student who rides with the candidate during certification. Page 2:X Section 1: The Sigma Tandem Systm • Chapter 2 — Applicant Information 11301 — 00.00.0000… -
Page 14
The logbook, when complete, must be verified by a Tandem examiner or a Tandem rig owner. If the applicant is a Tandem Vector owner, then he must submit to the Relative Workshop a video tape of at least 3 of the final 10 probationary jumps along with the training logbook. -
Page 15
12 months, at least three of which have been made within the preceding 90 days. If you have fulfilled the above requirement, you need only: 1) Have a Tandem Instructor Recertification form verified and signed by either a Relative Workshop Tandem Vector owner or Relative Workshop Tandem Examiner, and 2) Send the endorsed form and the license fee to the Relative Workshop. -
Page 16
USA must possess the original Relative workshop tandem rating. USPA also offers tandem ratings in conjunction with tandem manufacturers. 11301 — 00.00.0000 Section 1: The Sigma Tandem Systm • Chapter 2 — Applicant Information Page 5:X… -
Page 18
SECTION 2: EQUIPMENT SECTION 2: EQUIPMENT CHAPTER 1 — DESCRIPTION CHAPTER 1 — DESCRIPTION CHAPTER 2 — OPERATION CHAPTER 2 — OPERATION CHAPTER 3 — RESERVE PACKING CHAPTER 3 — RESERVE PACKING CHAPTER 4 — MAIN PACKING CHAPTER 4 — MAIN PACKING… -
Page 19
CHAPTER 1 CHAPTER 1 DESCRIPTION DESCRIPTION… -
Page 20
SIGMA TANDEM SYSTEM OWNER’S MANUAL CONTAINER Cypres Inspection Window Turn Cypres on or off through clear window. Cypres condition Reserve Pin can be checked at a glance. Inspection Window Lexan window allows pin check at a glance, without opening reserve pin cover flap. -
Page 21
SIGMA TANDEM SYSTEM OWNER’S MANUAL HARNESS Auxiliary Reserve Ripcord/Integrated Lanyard (Dual Purpose) A. Auxiliary Reserve Ripcord: Right hand pull. Ball handle on reserve static line next to 3-Ring on right hand side of rig. To be used if left hand is incapacitated in any way, and unable to pull reserve ripcord. -
Page 22
THE STUDENT HARNESS The Sigma / Vector Student Harness is quite a departure from previous tandem student harnesses. It was designed, with the help of a cardiologist, to safely contain the human body without cutting off normal blood flow. Disrupted blood flow is why almost all students on older student harnesses were uncomfortable, and why some got sick or even passed out. -
Page 23
SIGMA TANDEM SYSTEM OWNER’S MANUAL THE STUDENT HARNESS Diagonal Back Strap Horizontal Back Strap Chest Strap Top Attachment Points (Snap Hooks) Side Attachment Points (Quick Ejectors) Adjustable Leg Straps Belly Strap 11301 — 00.00.0000 Section 2: Equipment • Chapter 1 — Description… -
Page 24
SIGMA TANDEM SYSTEM OWNER’S MANUAL THE MAIN CANOPY Canopy Nose A-Line B-Line C-Line Canopy Tail D-Line Standard Control Lines Long Gold Toggles Short Black Tandem Instructor Toggle Toggles Student Toggle Diagram shows loaded ribs only Page 6:X Section 2: Equipment • Chapter 1 — Description… -
Page 25
13. It has tuck-tab main, reserve, and riser covers. 14. Clear plastic windows make reserve pin checks and Cypres operation easier. 15. It has “Wonderfoam” padding throughout. THE SIGMA IS MADE TO THE HIGHEST QUALITY STANDARDS IN THE INDUSTRY BY THE RELATIVE WORKSHOP. 11301 — 00.00.0000 Section 2: Equipment •… -
Page 26
SIGMA TANDEM SYSTEM OWNER’S MANUAL DROGUE DEFINITIONS Exterior – Top Down 1 . Handle – The 1-5/8in ball, connected to the apex of the drogue envelope, used to deploy the drogue. 2 . Envelope – The fabric and mesh portion of the drogue. Its top is called the apex, its bottom the base. -
Page 27
SIGMA TANDEM SYSTEM OWNER’S MANUAL THE DROGUE 11301 — 00.00.0000 Section 2: Equipment • Chapter 1 — Description Page 9:X… -
Page 28
THE SIGMA DROGUE COLLAPSE SEQUENCE The collapse sequence on the Sigma drogue is the same as on previous Vector drogues. The drogue partially collapses, at a controlled rate during bag lift-off, yielding just the right amount of force for an orderly deployment. However, the method of collapse is slightly different. -
Page 29
SIGMA TANDEM SYSTEM OWNER’S MANUAL UNDERSTANDING THE MAIN RECOIL RIPCORD SYSTEM The Recoil Ripcord System for the Tandem Sigma drogue consists of: 1 . A single length of 1,000 lb. Spectra line with finger locked loops at each end, and near the center. -
Page 30
(RSL side) main riser breaks or prematurely releases by itself, for any reason. On the Sigma, it is integrated into the RSL with no external lanyard. This is accomplished by threading the left riser 3-ring release cable through a loop in the reserve static line (RSL). -
Page 32
CHAPTER 2 CHAPTER 2 OPERATION OPERATION… -
Page 33
Canopy brakes and steering system The Tandem Sigma is a very different system from any sport skydiving system. There are more handles on the Tandem Sigma, and they are all in different places. In particular, the reserve and cutaway handles are mounted outboard (otherwise they’d be blocked by the student). -
Page 34
2) With the hand in the same position, take a firm grip on the handle or drogue canopy just below the handle. Note: Not an issue with Sigma Drogues. 3) The force required to extract the drogue can be substantial, especially when the pouch is new, so grip and pull firmly. -
Page 35
(EZ425, 384 & Sigma 370, 395, 340 models) on each side of the canopy. Unlike most canopies, the lines are a ttached at the full cell junctions, rather than at the half cell point. When so much of the canopy tail is pulled down for landing, it makes for an exceptional flare, and therefore, a softer landing. -
Page 36
STUDENT HARNESS ADJUSTMENT GUIDE The Sigma / Vector Student Harness is quite a departure from previous tandem student harnesses. It was designed, with the help of a cardiologist, to safely contain the human body without cutting off normal blood flow. -
Page 37
SIGMA TANDEM SYSTEM OWNER’S MANUAL Please use the following guide to keep your students safe and comfortable. HARNESS ADJUSTMENT Loosen the harness before donning. Rotate the harness on the student’s shoulders so the Top Attachment Snaps will be easy to hook Adjust the chest strap loosely. -
Page 39
CHAPTER 3 CHAPTER 3 RESERVE RESERVE CONTAINER CONTAINER… -
Page 40
SIGMA TANDEM SYSTEM OWNER’S MANUAL Once the canopy has been correctly attached to the risers and while it is still laid on its side, begin to attach the reserve steering toggles using the following steps: Pass steering line through grommet from back side. -
Page 41
SIGMA TANDEM SYSTEM OWNER’S MANUAL End of steering line is passed through the grommet and looped over the toggle tip. Pull steering line break setting through the guide ring. Pass the brake setting loop through the steering line cats eye and insert the toggle tip. -
Page 42
SIGMA TANDEM SYSTEM OWNER’S MANUAL Route two turns of seal thread around top, middle part of L-Bar, and all steering lines in preparation for safety tie. Repeat for opposite side, and secure with riggers knot. Page 4:X Section 2: Equipment • Chapter 3 — Packing the Reserve w/ Skyhook… -
Page 43
SIGMA TANDEM SYSTEM OWNER’S MANUAL Perform a thorough inspection of all components of the reserve parachute system. Reserve Pilot Chute, Reserve Bridle, Freebag, Safety Stow, Reserve Canopy, lines, slider, and links. Follow the canopy manufacturer’s reserve packing instructions. Pick up the front, rear and steering line groups in the left and right groups respectively. -
Page 44
SIGMA TANDEM SYSTEM OWNER’S MANUAL Flaking the Canopy: With the lines passing over the shoulder start with the end cell nearest your legs, begin flaking the nose of the canopy. Pull each cell completely out, and keep it in your hand. -
Page 45
SIGMA TANDEM SYSTEM OWNER’S MANUAL Hold the lines in one hand and use your free arm to support the canopy fabric, while gently placing the canopy on the packing surface. Place a packing weight at the base of the canopy to maintain line tension use your hand to keep lines centered while you are flaking the canopy. -
Page 46
SIGMA TANDEM SYSTEM OWNER’S MANUAL Flake the material between the A and B lines away from the line channel in the center of the pack job. Be sure that all of the T-seams to the outside of the center cell are neatly flaked. Find the bottom seams to the outside of the center cell and flake them out toward the stabilizer. -
Page 47
SIGMA TANDEM SYSTEM OWNER’S MANUAL Flake the material between the upper control lines toward the outside of the pack job, leaving the control lines stacked neatly on the top of the A, B, C, and D lines. Repeat the above steps for the other side as performed previously. -
Page 48
SIGMA TANDEM SYSTEM OWNER’S MANUAL Fold the Flaked tail section of the canopy under to achieve the same width as the rest of the canopy. Use the center cell material to cocoon around the tail section. The Flaked tail section folds and center cell material are folded around the B to D material and tucked in behind the A to B material. -
Page 49
SIGMA TANDEM SYSTEM OWNER’S MANUAL Once nose is neatly flaked on it’s side, count off top four cells, rolls these till equal to fold line, and place into center cell, then do same for bottom four cells. Then fold the nose under with the fold line established at the edge of the cocooned canopy. -
Page 50
SIGMA TANDEM SYSTEM OWNER’S MANUAL Prepare the reserve bag to receive the canopy. Insert the locking pull-up cord, to maintain a “loop channel” as the canopy is placed into the bag. Page 12:X Section 2: Equipment • Chapter 3 — Packing the Reserve w/ Skyhook… -
Page 51
SIGMA TANDEM SYSTEM OWNER’S MANUAL The dressed width of the canopy should be 1 to 2 inches wider than the width of the reserve pack tray. The use of packing paddles to make S-folds will help maintain line tension and precise fold lines as seen in the next photo. -
Page 52
SIGMA TANDEM SYSTEM OWNER’S MANUAL Press down and hold tension on lines over 1st S-fold. Reach under top of cocooned canopy to bring on next S-fold Fold cocooned canopy over 1st S-fold. Dress center cell to the width of the pack job. -
Page 53
SIGMA TANDEM SYSTEM OWNER’S MANUAL Place the reserve bag in position above the canopy. Use a packing paddle to establish the fold line for the remaining half of the S-fold. Both S-folds should be even at the bottom. 11301 — 00.00.0000 Section 2: Equipment •… -
Page 54
SIGMA TANDEM SYSTEM OWNER’S MANUAL Make sure 2nd and top S-fold lines up even with 1st/bottom S-fold, and remove long bars. Split the remaining part of the canopy into 2 ears. Be careful not to roll fabric in front of the leading edge. -
Page 55
SIGMA TANDEM SYSTEM OWNER’S MANUAL Insert into the reserve bag. Repeat the previous two steps for the other side of the canopy. Use a needle fold of bridle material to secure one end of the safety stow to allow you make the first locking stow. -
Page 56
SIGMA TANDEM SYSTEM OWNER’S MANUAL Dress the pack job to the finished shape desired. 2″ to 3″ of canopy material protruding from the mouth of the bag will help fill the reserve container corners. Do not rely on the container to shape the pack… -
Page 57
SIGMA TANDEM SYSTEM OWNER’S MANUAL If the container is equipped with a Cypres, create an indentation in the center of the pack job to accommodate the unit. Place the risers to the sides of the reserve tray with the ends fanned to reduce bulk. Insert a pull-up cord in the reserve closing loop. -
Page 58
SIGMA TANDEM SYSTEM OWNER’S MANUAL Pull the reserve closing loop through the reserve bag and secure with a temp pin. Ensure that no canopy material has pulled through the grommet. Place cypress into indentation previously made, and place the lower corners of the reserve pack job into the reserve container. -
Page 59
SIGMA TANDEM SYSTEM OWNER’S MANUAL Thread the pull-up cord through the bottom kicker flap (flap #1). If equipped with a Cypres be sure to pass through the cutter before passing through flap #1. You may evaluate the length of your closing… -
Page 60
SIGMA TANDEM SYSTEM OWNER’S MANUAL SKYHOOK PACKING INSTRUCTIONS A standard RSL does one thing. It pulls the reserve ripcord pin automatically after a breakaway. The Skyhook RSL does this, and then goes two steps further. A. It automatically releases the Left (non-RSL) riser, if the right (RSL) riser releases prematurely for any reason (Collins’… -
Page 61
SIGMA TANDEM SYSTEM OWNER’S MANUAL SKYHOOK II ADDENDUM Y o u r r i g i s e q u i p p e d w i t h t h e n e w S k y h o o k I I . -
Page 62
SIGMA TANDEM SYSTEM OWNER’S MANUAL WARNING Before Packing: There is no RSL guide Ring on flap #6 on Skyhook equipped rigs. Make sure the RSL guide ring has been removed on converted rigs. It was never really necessary, and someone might pass the Skyhook lanyard through it some day, causing a reserve total. -
Page 63
SIGMA TANDEM SYSTEM OWNER’S MANUAL NOTE: IT IS VERY IMPORTANT THAT THE PIN IS INSERTED IN TO THE POCKET. Close RSL pocket by mating velcro on container. Make sure the left hand (exposed) yellow breakaway cable passes through the Collins’… -
Page 64
SIGMA TANDEM SYSTEM OWNER’S MANUAL Make sure that the Skyhook is sewn to the reserve freebag bridle correctly, with the pointed end of the hook facing toward the bag. If the Skyhook were sewn on the bridle facing the wrong way, a reserve pilot chute in tow would result if the reserve were pulled in response to a main total. -
Page 65
SIGMA TANDEM SYSTEM OWNER’S MANUAL Fold the bridle over the edge of flap #2, and insert the GREEN flex-tab on the freebag bridle into the GREEN pocket on the #2 flap. Lay the bridle over flap #2 with the Skyhook facing up. -
Page 66
SIGMA TANDEM SYSTEM OWNER’S MANUAL Close the Skyhook cover flap (2A) over the Skyhook assemblage, pass the reserve closing loop through its grommet, and secure with the temporary pin. Pass the pull-up cord through the base of the reserve pilot chute and out the grommet in the center of the pilot chute cap. -
Page 67
SIGMA TANDEM SYSTEM OWNER’S MANUAL Apply tension to the pull-up cord and hold the base of the reserve pilot chute centered over the closing loop. Compress the reserve pilot chute… 11301 — 00.00.0000 Section 2: Equipment • Chapter 3 — Packing the Reserve w/ Skyhook… -
Page 68
SIGMA TANDEM SYSTEM OWNER’S MANUAL …and secure with the temp pin. Pull all of the reserve pilot chute material out of the spring coils and ensure that the pilot chute base is centered under the cap. S-fold the pilot chute material to within 1″ of the edge of the pilot chute cap. -
Page 69
SIGMA TANDEM SYSTEM OWNER’S MANUAL Repeat the S-fold for the rest of the pilot chute. Close the reserve side flap (flap #4) and secure with the temp pin. Close the reserve side flap (flap #5) and secure with the temp pin. -
Page 70
SIGMA TANDEM SYSTEM OWNER’S MANUAL Close reserve flap #6 and secure with reserve pin. Carefully remove the pull-up cord. Inspect the closing loop to ensure that no damage has occurred during packing. Dress the container. Install the Rigger seal if applicable. -
Page 72
CHAPTER 4 CHAPTER 4 MAIN CONTAINER MAIN CONTAINER… -
Page 73
The stow bands used on the Tandem Sigma are very important. Even more so than sport rigs, as the Tandem main bag is lifted out of the container at a more rapid rate. -
Page 74
SIGMA TANDEM SYSTEM OWNER’S MANUAL INSPECT MAIN CLOSING LOOP The main container-closing loop is also constructed of 1,000 lb. Spectra line, and finished to a set length. Spectra is used because of its low surface friction. Any other line (other than Teflon, which is too weak) would cause a hard or impossible pull in this application. -
Page 75
SIGMA TANDEM SYSTEM OWNER’S MANUAL 4) steering lines, brake lock loops and toggle attachment While inspecting the steering lines watch for damage especially at the brake lock loops, the toggle attachment points and at the attachment points at the canopy. -
Page 76
SIGMA TANDEM SYSTEM OWNER’S MANUAL INSPECT THE DROGUE Check the envelope for tears and snags. Tiny holes can be ignored for a few jumps, but medium to large size tears must be repaired before the next jump. Check the outer Kevlar bridle for signs of wear or broken stitches. -
Page 77
SIGMA TANDEM SYSTEM OWNER’S MANUAL TOGGLE ATTACHMENT Pass steering line through grommet from bottom side. Thread toggle tip through loop at end of steering line. Pull steering line tight to secure Larks Head connection. Page 6:X Section 2: Equipment • Chapter 4 — Packing & Closing the Main… -
Page 78
SIGMA TANDEM SYSTEM OWNER’S MANUAL Stowing main dual brakes; position and stow the secondary toggles. Feed the stow loop through the cats-eye on primary brake line. Feed stow loop through cats eye on secondary brake line. NOTE: Do not pull secondary brake line through guide ring. -
Page 79
SIGMA TANDEM SYSTEM OWNER’S MANUAL Pass stow loop through primary guide ring as shown. Pull head of primary toggle through the stow loop; stowing brakes. Mate the snap and appropriate Velcro. Neatly S-fold remainder of lines next to primary toggle. -
Page 80
SIGMA TANDEM SYSTEM OWNER’S MANUAL Secure S-Folded lines with Velcro cotton wrap. Ensure the Velcro is fully mated to reduce Velcro damage to the suspension lines. Divide the line set between fingers as shown. Walk your fingers up the lines to the slider making sure there are no twists, flip throughs, etc. -
Page 81
SIGMA TANDEM SYSTEM OWNER’S MANUAL Count the nose making sure you have all cells in your hand. After shaking the canopy once, or twice secure the nose between your legs. Page 10:X Section 2: Equipment • Chapter 4 — Packing & Closing the Main… -
Page 82
SIGMA TANDEM SYSTEM OWNER’S MANUAL Flake canopy in an accordian fashion from nose to tail making sure the line groups run down the middle of the canopy, and the canopy fabric is pushed to the outside and quarter slider. Making sure the D-lines are taught, find center of tail and bring it over the slider. -
Page 83
SIGMA TANDEM SYSTEM OWNER’S MANUAL Leaving the nose exposed will cause the canopy to open quicker, maybe harder. Folding/tucking the nose in will cause the canopy to snivel longer. You may choose the method that works best for your particular canopy. -
Page 84
SIGMA TANDEM SYSTEM OWNER’S MANUAL Roll tail around nose 3-5 times. Neatly set canopy on floor. Carefull not to drop canopy on floor. 11301 — 00.00.0000 Section 2: Equipment • Chapter 4 — Packing & Closing the Main Page 13:X… -
Page 85
SIGMA TANDEM SYSTEM OWNER’S MANUAL Purge or squeeze all air out of the canopy. Up fold canopy bringing lines back to center. Page 14:X Section 2: Equipment • Chapter 4 — Packing & Closing the Main 11301 — 00.00.0000… -
Page 86
SIGMA TANDEM SYSTEM OWNER’S MANUAL Repeat for opposite side. Extract center cell. Bring center cell out and around canopy. 11301 — 00.00.0000 Section 2: Equipment • Chapter 4 — Packing & Closing the Main Page 15:X… -
Page 87
SIGMA TANDEM SYSTEM OWNER’S MANUAL Cocoon the canopy. Page 16:X Section 2: Equipment • Chapter 4 — Packing & Closing the Main 11301 — 00.00.0000… -
Page 88
SIGMA TANDEM SYSTEM OWNER’S MANUAL Once cocooned purge out the rest of the air. Prepare bag to accept canopy. Make first S-fold according to depth of bag. 11301 — 00.00.0000 Section 2: Equipment • Chapter 4 — Packing & Closing the Main… -
Page 89
SIGMA TANDEM SYSTEM OWNER’S MANUAL This fold will lock the slider in place, so be sure slider grommets are all the way up to the slider stops. Hold down first S-old with knee. Page 18:X Section 2: Equipment • Chapter 4 — Packing & Closing the Main… -
Page 90
SIGMA TANDEM SYSTEM OWNER’S MANUAL Reach underneath canopy in preparation for second S-fold. Making second S-fold. 11301 — 00.00.0000 Section 2: Equipment • Chapter 4 — Packing & Closing the Main Page 19:X… -
Page 91
SIGMA TANDEM SYSTEM OWNER’S MANUAL After 2nd S-fold tuck ears underneath and above 1st S-fold to depth of bag. Secure S-fold with D-bag. Insert that half of the canopy into the D-bag Repeat previous 2 steps for other side. Page 20:X Section 2: Equipment •… -
Page 92
SIGMA TANDEM SYSTEM OWNER’S MANUAL Bring bag around S-folded canopy. Secure D-bag with first 2 stows. Use tandem Tude stowes here to reduce the chance of line dump. 11301 — 00.00.0000 Section 2: Equipment • Chapter 4 — Packing & Closing the Main… -
Page 93
SIGMA TANDEM SYSTEM OWNER’S MANUAL Stow the remainder of lines. Leave about 2 feet between the last stow and the risers. Stow your main risers along side of the reserve container. Make sure the risers are not underneath tuck tab flap over shoulder. -
Page 94
SIGMA TANDEM SYSTEM OWNER’S MANUAL Neatly S-fold remainder of lines in the main pack tray, and not over top main flap #2. Place D-bag in container with line stows to bottom of container. 11301 — 00.00.0000 Section 2: Equipment • Chapter 4 — Packing & Closing the Main… -
Page 95
SIGMA TANDEM SYSTEM OWNER’S MANUAL Arrow on disk should be pointing up towards reserve container. Thread main closing loop through chimney of disk, and secure with main pin, as shown in picture. Doing so will allow you to immobilize the disc for cocking. -
Page 96
SIGMA TANDEM SYSTEM OWNER’S MANUAL Cock the drogue in the normal fashion. Notice that the Kevlar bridle on the left side of the container is scrunched up after you cock your drogue. 11301 — 00.00.0000 Section 2: Equipment • Chapter 4 — Packing & Closing the Main… -
Page 97
SIGMA TANDEM SYSTEM OWNER’S MANUAL Position and keep the scrunched Kevlar bridle on the left side and on top between the D-bag and reserve container. Using a length of 725lb or 1000lb spectra pull- up cord. Thread through D-rings and around the disk to close container. -
Page 98
SIGMA TANDEM SYSTEM OWNER’S MANUAL Pass pull-up cord through grommet on bottom flap. As the four (4) flaps are drawn together, keep the disk centered with arrow pointing to the reserve container. Secure with pin. be sure the flap D-Ring and closing loop are below the flange. -
Page 99
SIGMA TANDEM SYSTEM OWNER’S MANUAL Once secure, remove the pull-up cord. Insert safety pin (attached to drogue bridle) into main pin eyelet and ensure that it enters the grommet. Page 28:X Section 2: Equipment • Chapter 4 — Packing & Closing the Main… -
Page 100
SIGMA TANDEM SYSTEM OWNER’S MANUAL Secure drogue bridle underneath right main side flap. Secure the 2 small tuck tabs on pin flap underneath main plate flap. Close main pin cover flap into center flap. 11301 — 00.00.0000 Section 2: Equipment • Chapter 4 — Packing & Closing the Main… -
Page 101
SIGMA TANDEM SYSTEM OWNER’S MANUAL Layout drogue in a nice flat, circular fashion. Fold drogue in half down towards the bridle. Fold drogue and bridle up towards ball. Page 30:X Section 2: Equipment • Chapter 4 — Packing & Closing the Main… -
Page 102
SIGMA TANDEM SYSTEM OWNER’S MANUAL S-fold remainder of bridle on top of each other leaving approximately 15″ of loose bridle. Fold canopy over/across bridle in 3 ’s. Fold across once more making the folded drogue approximately 15″ x 6″. 11301 — 00.00.0000 Section 2: Equipment •… -
Page 103
SIGMA TANDEM SYSTEM OWNER’S MANUAL Insert drogue in its pouch and tuck bridle away so it is not visible. Page 32:X Section 2: Equipment • Chapter 4 — Packing & Closing the Main 11301 — 00.00.0000… -
Page 105
SECTION 3: INSTRUCTOR TECHNIQUES SECTION 3: INSTRUCTOR TECHNIQUES CHAPTER 1 — PREPARATION CHAPTER 1 — PREPARATION CHAPTER 2 — IN-AIRCRAFT & EXITS CHAPTER 2 — IN-AIRCRAFT & EXITS CHAPTER 3 — FREEFALL/DROGUE-FALL CHAPTER 3 — FREEFALL/DROGUE-FALL CHAPTER 4 — CANOPY CONTROL CHAPTER 4 — CANOPY CONTROL… -
Page 106
CHAPTER 1 CHAPTER 1 PREPARATION PREPARATION… -
Page 107
SIGMA TANDEM SYSTEM OWNER’S MANUAL CRITERIA FOR JUMPING The following is the minimum criteria to be followed and will be discussed under the headings of: A. Personal B. Geographical A. Personal requirements: Physical condition Weight Size Before any Tandem jump, it is important to determine that the student meets a few basic criteria. There are very few restrictions on who may jump, but the few guidelines put forth here must be followed carefully in order to protect yourself, the student, and the entire Tandem program. -
Page 108
SIGMA TANDEM SYSTEM OWNER’S MANUAL 1) Weather assessment: a) Wind speeds: For Tandem jumping, the optimum range for winds is 5 — 20 mph. All jumpers should realize that very high winds are unsafe to jump in. In the case of Tandem jumping, we need to realize that it may be equally unwise to jump in extremely low winds. -
Page 109
STUDENT HARNESS ADJUSTMENT GUIDE The Sigma / Vector Student Harness is quite a departure from previous tandem student harnesses. It was designed, with the help of a cardiologist, to safely contain the human body without cutting off normal blood flow. Disrupted blood flow is why almost all students on older student harnesses were uncomfortable, and why many got sick or even passed out. -
Page 110
SIGMA TANDEM SYSTEM OWNER’S MANUAL Tip: It’s recommended to hook up and pre-hang your student so the harness conforms to the student’s body. Release the student and check all adjustment points. You may find it necessary to tighten the harness a bit more. -
Page 111
SIGMA TANDEM SYSTEM OWNER’S MANUAL BRIEFING THE STUDENT (for the first Tandem jump) One great advantage of Tandem first jumps is that the student does not need to know nearly as much as when making their first solo jump. The student can therefore relax and enjoy the jump rather than worry about forgetting the hundreds of facts necessary to make a jump on their own. -
Page 112
SIGMA TANDEM SYSTEM OWNER’S MANUAL 2) Exit practice and hookup procedures: Perform drill at the aircraft or aircraft mock-up. Practice the proper hand and foot placement and set up for the exit launch. Have student practice solo as well as hooked up for realism. -
Page 113
SIGMA TANDEM SYSTEM OWNER’S MANUAL Before putting on the Tandem Vector, perform a thorough and systematic gear check. Always start your gear check at the same point and systematically move from item to item until completed. An example of this would be: start at the drogue pouch working up the back of the rig then down the front. -
Page 115
CHAPTER 2 IN-AIRCRAFT & EXITS… -
Page 116
SIGMA TANDEM SYSTEM OWNER’S MANUAL IN-AIRCRAFT GEAR CHECK This section is split into areas of safety checks: A. Pre-exit preparation B. Pre-exit gear check C. Drogue handle check A. Pre-exit preparation: While in the aircraft (before jump altitude is reached), verbally acknowledge the hookup of each top snap as it is clicked into place. -
Page 117
SIGMA TANDEM SYSTEM OWNER’S MANUAL The second procedure is a diving type exit. This requires the student to change body position immediately upon exit. If the student cooperates, then the Tandem Instructor’s job is much easier. If the student gets into a less-than-ideal body position, then the Tandem Instructor will have to work harder to maintain stability. -
Page 119
CHAPTER 3 CHAPTER 3 FREEFALL & FREEFALL & DROGUE-FALL DROGUE-FALL… -
Page 120
SIGMA TANDEM SYSTEM OWNER’S MANUAL ALTITUDE AND TIME RECOMMENDATIONS When performing tandem jumps the following altitude recommendations apply: A. Exit above 7,500 AGL. B. Deploy drogue within 5 seconds after exit. C. Minimum exit altitude is 4,500 AGL (not applicable during training or probationary jumps). -
Page 121
SIGMA TANDEM SYSTEM OWNER’S MANUAL E. Reserve initiation altitude is 2,500 AGL For all the reasons mentioned above, do not delay the execution of reserve procedures. If the situation calls for it, make a decision and carry it out. The following chart (Fig. 1) shows the difference between freefall and drogue fall. -
Page 122
SIGMA TANDEM SYSTEM OWNER’S MANUAL B. Anticipation: The key to keeping control is being able to recognize a potential problem prior to it becoming a real problem. Students sometimes do crazy things during the first few seconds after exit. Usually, after the initial shock of freefall their eyes will reopen and they will attain their body position assisting stability. -
Page 123
SIGMA TANDEM SYSTEM OWNER’S MANUAL NOTE: It is very important to retain stability throughout the exit sequence of every Tandem jump. In the past few years of the Tandem program, disturbing stories have come forth of Tandem Instructors having difficulty making stable exits or of keeping drogue fall smooth. -
Page 124
SIGMA TANDEM SYSTEM OWNER’S MANUAL ARM EXTENSION (OPTIONAL) Once the drogue is deployed, tap the student’s head or shoulder to indicate it is time for him to put his arms out in normal freefall position. DO NOT reach around and pull the students arms into position, as this would give the student a chance to grab your arms. -
Page 126
CHAPTER 4 CHAPTER 4 CANOPY CANOPY CONTROL CONTROL… -
Page 127
SIGMA TANDEM SYSTEM OWNER’S MANUAL Tandem canopy openings are generally quite comfortable and smooth. The opening sequence usually begins as a slight streamer with the slider high. The fall rate of the Tandem pair decreases steadily for several seconds in this configuration. -
Page 128
SIGMA TANDEM SYSTEM OWNER’S MANUAL Demonstrate forward flight with hands all the way up (this can be a difficult position for the student). As you set up for final approach explain what you are doing with reference to the target. If you plan to have the student flare for landing then have the student perform 3-5 practice flares while at altitude with feedback of their technique and overall performance. -
Page 129
SIGMA TANDEM SYSTEM OWNER’S MANUAL B. Landings: There are three kinds of Tandem landings: 1. Stand Up 2. Running 3. Sliding 1. Stand up When the wind is over 10 mph, a proper flare should yield a no forward speed stand up landing. All a student has to do is keep enough leg tension to support his or her own weight. -
Page 131
SECTION 4: MALFUNCTIONS & SECTION 4: MALFUNCTIONS & EMERGENCIES EMERGENCIES CHAPTER 1 — RESERVE PROCEDURES CHAPTER 1 — RESERVE PROCEDURES CHAPTER 2 — IN-AIRCRAFT CHAPTER 2 — IN-AIRCRAFT CHAPTER 3 — FREEFALL CHAPTER 3 — FREEFALL CHAPTER 4 — CANOPY CONTROL CHAPTER 4 — CANOPY CONTROL… -
Page 132
CHAPTER 1 CHAPTER 1 RESERVE RESERVE PROCEDURES PROCEDURES… -
Page 133
SIGMA TANDEM SYSTEM OWNER’S MANUAL EMERGENCY RESPONSE SEQUENCE It is very important to take the time to think out and rehearse how you would respond to different situations before you are ever faced with them. Always read the Tandem accident and incident reports to learn from the mistakes of others. -
Page 134
SIGMA TANDEM SYSTEM OWNER’S MANUAL 4) Canopy transfers: A canopy transfer, where the reserve is deployed without first jettisoning the main, is not recommended with a ram- air reserve under normal circumstances, nor is it recommended with Tandem. The reserve pilot chute may not have enough drag to extract the reserve freebag from its container. -
Page 136
CHAPTER 2 CHAPTER 2 AIRCRAFT AIRCRAFT EMERGENCIES & EMERGENCIES & STUDENT STUDENT REFUSAL REFUSAL… -
Page 137
Exit the aircraft, deploy the drogue, pull drogue release handle at appropriate altitude. It is important to note here that not all Tandem systems work the same way. On the Tandem Vector, the drogue will not fully inflate if the release handle is pulled first. -
Page 138
SIGMA TANDEM SYSTEM OWNER’S MANUAL 11301 — 00.00.0000 Section 4: Malfunctions & Emergencies • Chapter 2 — Emergencies & Refusal Page 3:X… -
Page 140
CHAPTER 3 CHAPTER 3 FREEFALL FREEFALL… -
Page 141
SIGMA TANDEM SYSTEM OWNER’S MANUAL ACCIDENTAL DEPLOYMENTS Rapid drogue throw: It is not necessary to deploy the drogue immediately upon exit. As a matter of fact, throwing the drogue too soon after exit can be dangerous. There have been cases of Tandem Instructors throwing the drogue directly into the tail of the aircraft. -
Page 142
SIGMA TANDEM SYSTEM OWNER’S MANUAL PROBLEM: Left arm is held. REACTION: If he has your left arm, hit him on the side of his head as hard as you can; he’ll probably let go. If you cannot free your left arm, throw the drogue and release it at the proper altitude. -
Page 143
SIGMA TANDEM SYSTEM OWNER’S MANUAL ANALYSIS: It is not necessary to pull either the drogue release handle or the breakaway handle first. In this situation, the reserve ripcord should be pulled promptly, before your velocity builds up. The longer you wait, the greater the reserve opening shock. -
Page 144
SIGMA TANDEM SYSTEM OWNER’S MANUAL G. Drogue in tow: PROBLEM: Drogue release handle is pulled, but the main does not deploy, even after a few extra seconds (the time it would take for an uninflated drogue to deploy the main). -
Page 146
CHAPTER 4 CHAPTER 4 CANOPY CANOPY CONTROL CONTROL… -
Page 147
SIGMA TANDEM SYSTEM OWNER’S MANUAL MALFUNCTIONS A. Drogue entanglement with main B. Drogue detaches from main C. Horseshoe malfunction, drogue cannot be pulled D. Horseshoe malfunction, drogue can be pulled A. Drogue entanglement with the main: PROBLEM: The drogue becomes entangled with the inflated main canopy. This may or may not create a problem. -
Page 148
Refer to the section on student harness adjustment. A properly adjusted Sigma stuent harness will help eliminate most blood flow issues. 11301 — 00.00.0000 Section 4: Malfunctions &… -
Page 150
SECTION 5: STUDENT TECHNIQUES SECTION 5: STUDENT TECHNIQUES CHAPTER 1 — STUDENT SKILLS CHAPTER 1 — STUDENT SKILLS CHAPTER 2 — OTHER ACTIVITIES CHAPTER 2 — OTHER ACTIVITIES… -
Page 151
CHAPTER 1 CHAPTER 1 STUDENT SKILLS STUDENT SKILLS FOR FIRST JUMP FOR FIRST JUMP… -
Page 152
SIGMA TANDEM SYSTEM OWNER’S MANUAL The following briefing points will be presented in logical order as they would happen on a jump. The briefing points listed here are the minimum points to be briefed. You may chose to include a few extra points from the progression list to fulfill your targeted learning objectives for freefall transition. -
Page 153
SIGMA TANDEM SYSTEM OWNER’S MANUAL Elbows back: head back, torso arched, feet together, and hands holding onto the same side of harness, elbows back. This last position is recommended but remember to emphasize the importance of keeping the arms IN on exit to reduce the likelihood of door contact. -
Page 154
SIGMA TANDEM SYSTEM OWNER’S MANUAL C. Flaring the canopy: Practice performed at 4000′ — 1500′. Have the student practice flaring the canopy upon your command. The student should follow these steps in flaring; — Have both arm raised all the way up in the full flight position. -
Page 156
CHAPTER 2 CHAPTER 2 OTHER OTHER ACTIVITIES ACTIVITIES… -
Page 157
SIGMA TANDEM SYSTEM OWNER’S MANUAL These guidelines are not optional. They must be followed, or the Tandem Instructor and Tandem rig owner will be in violation of the User Agreement under which Tandem jumping is operated and will consequently no longer be allowed to legally perform Tandem Jumps. -
Page 158
SIGMA TANDEM SYSTEM OWNER’S MANUAL REMEMBER: If you delay drogue deployment, you eat up altitude at a much faster rate than when the drogue is deployed. See Tandem freefall chart on page 72. Relative work with Tandem increases the possibility of accident and injury. However, it can be done if approached with care. -
Page 160
APPENDIX… -
Page 161
SIGMA TANDEM SYSTEM OWNER’S MANUAL SIGMA TANDEM “PIN CHECK” Back of Rig — Top Down 1. Look through window in the yoke and check the Cypres. 2. Open reserve pin cover, check that the yellow breakaway cable is threaded through the Collin’s Lanyard loop inside the yoke. -
Page 162
INSTALLING A NEW SIGMA DROGUE KILL LINE The Sigma drogue kill line is little more than a length of line with a finger locked loop at each end. But because each new drogue envelope and bridle may vary slightly, and each can stretch a bit after use, we cannot supply a finished replacement kill line that is the right length for all used drogues. -
Page 163
SIGMA TANDEM SYSTEM OWNER’S MANUAL TANDEM WATER LANDING PROCEDURES A water landing is not a likely scenario for a Tandem jump, but it is a possibility. Below is a list of procedures to follow for a Tandem water landing. Since it is best to be prepared for every eventuality, practice the sequence on the ground a few times to get familiar with the order of events. -
Page 164
. t n . n i e l l . t c TI = Tandem Instructor NC = Not currently rated fir Sigma used NR= Not rated for Tandem jumping TE = Tandem Examiner 11301 — 00.00.0000 Section 6 — Appendix… -
Page 165
3. What differences in emergency procedures are there between the Vector II and Sigma tandem rigs? 4. Why must the main closing loop (and ripcord) on a Sigma tandem system be constructed of Spectra (microline)? 5. What is the only correct length for that closing loop? 6. -
Page 166
SIGMA TANDEM SYSTEM OWNER’S MANUAL 21. What problem does a kill line that is too long cause? LINE TRIM CHARTS All line trim charts are reproduced with permission from Performance Designs, Inc. It is advisable to check directly with Performance Designs for any updates or changes to the information contained within the charts. -
Page 167
SIGMA TANDEM SYSTEM OWNER’S MANUAL Page 8:X Section 6- Appendix 11301 — 00.00.0000… -
Page 168
SIGMA TANDEM SYSTEM OWNER’S MANUAL 11301 — 00.00.0000 Section 6 — Appendix Page 9:X… -
Page 169
SIGMA TANDEM SYSTEM OWNER’S MANUAL Page 10:X Section 6- Appendix 11301 — 00.00.0000… -
Page 170
SIGMA TANDEM SYSTEM OWNER’S MANUAL 11301 — 00.00.0000 Section 6 — Appendix Page 11:X… -
Page 171
SIGMA TANDEM SYSTEM OWNER’S MANUAL Page 12:X Section 6- Appendix 11301 — 00.00.0000… -
Page 172
SIGMA TANDEM SYSTEM OWNER’S MANUAL 11301 — 00.00.0000 Section 6 — Appendix Page 13:X… -
Page 173
SIGMA TANDEM SYSTEM OWNER’S MANUAL Page 14:X Section 6- Appendix 11301 — 00.00.0000… -
Page 174
SIGMA TANDEM SYSTEM OWNER’S MANUAL 11301 — 00.00.0000 Section 6 — Appendix Page 15:X…
Строительные технологии
МЕНЮ
Обновлено: 11.07.2023


Читайте также:
- почему бетонный пол сыреет
- строительный пылесос с розеткой для подключения инструмента
- стабилизатор напряжения подключение к ардуино

* Basis ANSI Nema FL1
≤ 50h
SAFE
IPX4
≤ 165m
*
USB-C
FAST CHARGING
EN
SIGMA—ELEKTRO GmbH hereby declares that the BUSTER 1100 comply with the
fundamental requirements and other relevant regulations of Directive 2014/30/EU
and RoHS Directive 2011/65/EU. You can fi nd the CE declaration at:
ce.sigmasport.com/buster1100
DE
Hiermit erklärt SIGMA—ELEKTRO GmbH, dass sich die BUSTER 1100
in Übereinstimmung mit den grundlegenden Anforderungen und den anderen
relevanten Vorschriften der Richtlinie 2014/30/EU und RoHS Directive 2011/65/EU
befi nden. Sie fi nden die Konformitäts-Erklärung unter folgendem Link:
ce.sigmasport.com/buster1100
CZ
ES prohlášení najdete na adrese: ce.sigmasport.com/buster1100
PL
Deklaracja CE znajduje się na stronie: ce.sigmasport.com/buster1100
RU
Декларацию о соответствии нормам ЕС Вы можете найти по адресу:
ce.sigmasport.com/buster1100
DK
Du kan fi nde EF—overensstemmelseserklæringen på: ce.sigmasport.com/buster1100
This device complies with Part 15 of the FCC Rules.
Operation is subject to the following two conditions:
(1) This device may not cause harmful interference, and (2) This device must accept any inter-
ference received, including interference that may cause undesired operation. The grantee is not
responsible for any changes or modifi cations not expressly approved by the party responsible
for compliance. Such modifi cations could void the user’s authority to operate the equipment.
This equipment should be installed and operated with a minimum distance of
5 millimeters between the radiator and your body.
NOTE:
This equipment has been tested and found to comply with the limits for a Class B digital
device, pursuant to part 15 of the FCC Rules. These limits are designed to provide reasonable
protection against harmful interference in a residential installation. This equipment generates,
uses and can radiate radio frequency energy and, if not installed and used in accordance with
the instructions, may cause harmful interference to radio communications. However, there is
no guarantee that interference will not occur in a particular installation. If this equipment does
cause harmful interference to radio or television reception, which can be determined by turning
the equipment off and on, the user is encouraged to try to correct the interference by one or
more of the following measures:
− Reorient or relocate the receiving antenna.
− Increase the separation between the equipment and receiver.
− Connect the equipment into an outlet on a circuit different from that to which the receiver
is connected.
− Consult the dealer or an experienced radio/TV technician for help.
FCC Caution:
Any changes or modifi cations not expressly approved by the party responsible for compliance
could void the user’s authority to operate this equipment.
Radiation Exposure Statement:
The product comply with the FCC portable RF exposure limit set forth for an uncontrolled
environment and are safe for intended operation as described in this manual. The further RF
exposure reduction can be achieved if the product can be kept as far as possible from the user
body or set the device to lower output power if such function is available.
CE INFORMATION
FCC DECLARATION OF CONFORMITY
189862/5
We, SIGMA-ELEKTRO GmbH, declare that the equipment above has been tested in our facility
and found compliance with the requirement limits of applicable standards, in accordance with
the Electromagnetic Compatibility Regulations 2016 and the Restriction of the Use of Certain
Hazardous Substances in Electrical and Electronic Equipment Regulations 2012. The test
record, data evaluation and Equipment Under Test (EUT) confi gurations represented herein
are true and accurate under the standards herein specifi ed.
UKCA STATEMENT
Designed in Germany
Manufactured in China
DOPLŇKY / AKCESORIA /КОМПЛЕКТУЮЩИЕ / TILBEHØRRef. No. 00153DOPLŇKY / AKCESORIA /КОМПЛЕКТУЮЩИЕ / TILBEHØRRef. No. 18462DOPLŇKY / AKCESORIA /КОМПЛЕКТУЮЩИЕ / TILBEHØRRef. No. 00154DOPLŇKY / AKCESORIA /КОМПЛЕКТУЮЩИЕ / TILBEHØRRef. No. 00151DOPLŇKY / AKCESORIA /КОМПЛЕКТУЮЩИЕ / TILBEHØRRef. No. 00150
SP2
SIGMA-ELEKTRO GmbHDr.-Julius-Leber-Straße 1567433 Neustadt / WeinstraßeGermanyTel. +49 6321-9120-118 kundenservice@sigmasport.com
BUSTER
1100
LUMENS
HEADLIGHT
MONTÁŽ / MONTAŻ / МОНТАЖ / MONTERING
3 mm
BUSTER 1100BUSTER 1100BUSTER 1100
VÝSTRAŽNÉ UPOZORNĚNÍ / OSTRZEŻENIE / ПРЕДУПРЕЖДЕНИЕ / ADVARSEL!MONTÁŽNÍ VARIANTY
/
OPCJE MONTAŻU / ВАРИАНТ УСТАНОВКИ ИЗДЕЛИЯ
/
MONTERINGSMULIGHEDCZ Zvolenou polohu světla lze uzamknout
dotažením šroubu.
PL Wybrane położenie lampki można
zablokować, dokręcając śrubę.
RU Отрегулировать положение фонаря
можно посредством затяжки винта.
DK Den ønskede position for lygten kan låses
ved fastspænding af skruen.
Šroub dotahujte pouze tak, abyste polohu světla mohli
během jízdy upravovat bez použití nářadí.
PL PORADA OD FIRMY SIGMA:
Śrubę dokręć na tyle, aby jej regulacja bez użycia narzędzi
była możliwa również podczas jazdy.
RU РЕКОМЕНДАЦИЯ ОТ SIGMA:
Усилие затяжки винта должно быть таким, чтобы во
время движения вы и без ключа смогли
отрегулировать положение фонаря.
DK SIGMA TIP:
Spænd kun skruen så lygten kan justeres under kørslen
også uden værktøj.
CZ Páskem na suchý zip
Optimální varianta montáže na helmu s paralelně
uspořádanými větracími otvory.
PL Za pomocą jednej taśmy „rzep”
Optymalna opcja montażu wprzypadku kasków
zrównolegle rozmieszczonymi otworami
wentylacyjnymi.
RU С помощью ленты-липучки
Оптимальная возможность установки на
шлемы с расположенными параллельно
отверстиями для вентиляции.
DK Med velcrobånd
Optimal monteringsmulighed for hjelm med
parallelle ventilationsåbninger.
CZ Dvěma pásky na suchý zip
Alternativní varianta montáže na helmu s větracími otvory
zobrazenými vpravo.
PL Za pomocą dwóch taśm „rzep”
Alternatywna opcja montażu wprzypadku kasków zrozmieszczeniem
otworów wentylacyjnych zilustrowanym po prawej.
RU Две ленты-липучки
Дополнительная возможность крепления на шлемы с показанными
справа вентиляционными отверстиями.
DK Med to velcrobånd
Alternativ monteringsmulighed for hjelm med ventilationsåbninger
i højre side.
1 1
3
1
2
3
2
4
3
2
Silikonový držák
Uchwyt silikonowy
Силиконовый кронштейн
Silikoneholder
Adaptér pro držák akční kamery
Adapter do uchwytu kamery sportowej
Адаптер для экшн-камеры
Adapter for action kamera holder
Šroubovací držák
Uchwyt skręcany
Кронштейн Screw-Bracket
Skruebeslagsholder
Sada držáků na helmu
Zestaw — uchwyt na kask
Комплект крепления на шлем
Hjelmholdersæt
Nabíjecí kabel USB-C
Kabel do ładowania USB-C
Зарядный кабель USB-C
USB-C ladekabel
CZ
Potenciálně nebezpečné optické záření! Nikdy se nedívejte za
provozu do světla ani ho nesměrujte do očí jiných osob.
PL
Potencjalnie niebezpieczne promieniowanie optyczne! Podczas pracy
lampki nigdy nie wolno patrzeć bezpośrednio do jej wnętrza ani
kierować strumienia światła wstronę oczu innych osób.
RU
Не исключается появление опасного для человека оптического
излучения! Во время эксплуатации исключите прямой
визуальный контакт с источником излучения, также
запрещается направлять источник излучения на органы
зрения других людей.
DK
Mulig fare ved optisk stråling! Se aldrig direkte ind i lampen under
brugen og ret den aldrig mod øjnene på andre personer.
~4 cm
DOPLŇKY / AKCESORIA /КОМПЛЕКТУЮЩИЕ / TILBEHØRRef. No. 18461
Nabíječka + kabel USB-C
Ładowarka + kabel USB-C
Зарядное устройство с разъемом + Зарядный кабель USB-C
Lader + kabel USB-C
189862-5_BUSTER-1100-HL_Manual_90x55-SP2.indd 1189862-5_BUSTER-1100-HL_Manual_90x55-SP2.indd 1 19.07.2022 08:21:0619.07.2022 08:21:06