инструкцияHikvision IDS-TCM203-A

User Manual of Network Traffic Camera
0
Network Traffic Camera
User Manual
Посмотреть инструкция для Hikvision IDS-TCM203-A бесплатно. Руководство относится к категории камеры видеонаблюдения, 3 человек(а) дали ему среднюю оценку 7.8. Руководство доступно на следующих языках: английский. У вас есть вопрос о Hikvision IDS-TCM203-A или вам нужна помощь? Задайте свой вопрос здесь
- Chapter 1 System Requirement
- Chapter 2 Network Connection
- Chapter 3 Login
- Chapter 4 Live View
- Chapter 5 Picture Search
- Chapter 6 Log Search
- Chapter 7 Local Configuration
- Chapter 8 System Configuration
- Chapter 9 Encoding and Storage Configuration
- Chapter 10 Text Overlay Configuration
- Chapter 11 Capture Parameters Configuration
- Chapter 12 Image Parameters Configuration
- Chapter 13 Application Mode Configuration
- Chapter 14 Exception
- Chapter 15 Maintenance
- Appendix
Главная
Дизайн
| Формат | Пуля |
| Защитные возможности | Влагостойкость |
| International Protection (IP) код | IP66 |
| Цвет товара | Серый |
| Тип крепления | Потолок/стена |
Производительность
| Максимальное рабочее расстояние | 50 m |
| Сертификация | CE, FCC |
| Технология подключения | Проводная |
| Поддерживаемое размещение | Вне помещения |
| Тип | IP камера видеонаблюдения |
Объектив
| Количество линз | 1 |
| Фокусное расстояние | 8 — 32 mm |
| Максимальное число установки диафрагмы | 1.4 |
Видео
| Всего мегапикселей | 2 MP |
| Максимальное разрешение | 1920 x 1080 пикселей |
| Частота смены кадров | 60 fps |
| Форматы сжатия видео | H.264, H.265, M-JPEG |
| Видео поток | Да |
Содержимое упаковки
Характеристики управления
| Управление через веб-интерфейс | Да |
Сеть
| Поддерживаемые сетевые протоколы | TCP/IP, HTTP, HTTPS, FTP, DNS, DDNS, RTP, RTSP, RTCP, NTP, UPnP, IPv6, UDP |
| Подключение Ethernet | Да |
| Wi-Fi | Нет |
| Bluetooth | Нет |
| Тип Ethernet интерфейса | Гигабитный Ethernet |
Устройства хранения данных
| Встроенный жесткий диск | Нет |
| Совместимые карты памяти | MicroSD (TransFlash) |
| Встроенный кардридер | Да |
| Максимальный объем флеш-карты | 128 GB |
Порты и интерфейсы
| Количество портов Ethernet LAN ( RJ-45) | 1 |
| RS-485 порты | 2 |
| RS-232 порты | 1 |
Датчик изображения
| Количество датчиков | 1 |
| Размер оптического сенсора | 1/1.8 « |
| Тип сенсора | CMOS |
Ночное видение
| Количество светительных светодиодов | 3 |
| Ночное видение | Да |
| Инфракрасные волны | 850 nm |
| Тип светодиода | Инфракрасный |
Камера
| Угол обзора | 42.5 ° |
| Управление поворотом камеры | Нет |
| Управление наклоном камеры | Нет |
| Минимальное освещение | — lx |
Системные требования
| Поддерживаемые операционные системы Linux | Да |
Аудио
| Входные аудио каналы | 2 |
| Выходные звуковые каналы | 2 канала |
Технические характеристики
| Сертификаты устойчивого развития | RoHS |
Условия эксплуатации
| Диапазон температур при эксплуатации | -30 — 70 °C |
| Диапазон относительной влажности при эксплуатации | 5 — 95 % |
Энергопитание
| Тип источника питания | Постоянный ток |
| Выходное напряжение постоянного тока | 24 |
| Максимальное потребление энергии | 15 W |
Вес и размеры
| Ширина | 120 mm |
| Глубина | 428.5 mm |
| Высота | 132.8 mm |
| Вес | 3120 g |
показать больше
Не можете найти ответ на свой вопрос в руководстве? Вы можете найти ответ на свой вопрос ниже, в разделе часто задаваемых вопросов о Hikvision IDS-TCM203-A.
Какой вес Hikvision IDS-TCM203-A?
Что означает аббревиатура MП?
Какие сертификаты Hikvision IDS-TCM203-A имеет?
Какая высота Hikvision IDS-TCM203-A?
Какая ширина Hikvision IDS-TCM203-A?
Какая толщина Hikvision IDS-TCM203-A?
Инструкция Hikvision IDS-TCM203-A доступно в русский?
Не нашли свой вопрос? Задайте свой вопрос здесь
Specifications:912/912625-idstcm203a.pdf file (01 Feb 2023) |
Accompanying Data:
HIKVISION iDS-TCM203-A Security Camera PDF Operation & User’s Manual (Updated: Wednesday 1st of February 2023 09:15:32 PM)
Rating: 4.7 (rated by 29 users)
Compatible devices: DS-2AF1-513, DS-MH2211/32G, DS-2DF6223-CX, DS-2XC6685G0, DS-2AE5232T-A, 26 series, TURBO HD DS-2CE5AD0T-VPIT3F, DS-2CD series.
Recommended Documentation:
Text Version of Operation & User’s Manual
(Ocr-Read Summary of Contents of some pages of the HIKVISION iDS-TCM203-A Document (Main Content), UPD: 01 February 2023)
-
65, 64 Figure 15-4 Modify Admin Figure 15-5 Modify Operator/User 3. Click OK to save the settings. 15.2.3 Deleting a User Steps: 1. Select the user you want to delete and click Delete. 2. Click OK on the pop-up message box to delete the user. 15.3 Rebooting the Camera Steps: 1. Go to Conf…
-
50, HIKVISION iDS-TCM203-A User Manual of Network Traffic Camera revise 49 Chapter 11 Capture Parameters Configuration Purpose: You can configure license plate, flash light, traffic light synchronization, image composition, cabinet, and vehicle feature on this page. 11.1 Configuring License Plate Parameters This series of…
-
35, User Manual of Network Traffic Camera revise 34 Chapter 9 Encoding and Storage Configuration Purpose: You can configure the encoding and storage related parameters from this page, including video encoding, image encoding, ROI, record schedule, redundant storage, and FTP. 9.1 Configuri…
-
49, User Manual of Network Traffic Camera revise 48 Figure 10-7 OSD on Video 2. Select the OSD Properties. 3. Select the OSD Font Size. 4. Configure the parameters below according to your needs. Check Camera Name and edit the name in the text field. Configure date. 1) Check Disp…
-
41, HIKVISION iDS-TCM203-A User Manual of Network Traffic Camera revise 40 Redundant Storage. Figure 9-6 Redundant Storage Configuration 2. View the HDD information such as Capacity, Free Space, Status, etc. 3. (Optional) Check the HDD and click Format to format it. 4. (Optional) Check Auto-Initialize Redundant Storage. Then the TF…
-
26, HIKVISION iDS-TCM203-A User Manual of Network Traffic Camera revise 25 for speed detection. Steps: 1. Go to Configuration > Device Configuration > System Configuration > Installation Parameters. Figure 8-2 Installation Parameters 2. Set the installation parameters according to the actual condit…
-
68, 67 2. Click Browse to select the local upgrade file. 3. Click Upgrade to start remote upgrade. Figure 15-11 Remote Upgrade Note: The upgrading process will take 1 to 10 minutes. Do not disconnect power of the camera during the process, and the camera reboots automatically after upgrade.
…
-
HIKVISION iDS-TCM203-A User Manual
-
HIKVISION iDS-TCM203-A User Guide
-
HIKVISION iDS-TCM203-A PDF Manual
-
HIKVISION iDS-TCM203-A Owner’s Manuals
Recommended: KMS-750MLH, 53 SC, INOblender 10026


-
EtroVISION N58 Series
N58 Series Quick Installation Guide www.etrovision.com +886-2-2655-1518 Technical Support: [email protected] Sales Contact: [email protected] Install EtroScan on a Windows PC EtroScan™ is a utility is used to configure network settings for cameras & …
N58 Series 2
-
VideoComm Technologies ZX-580SR120
Day-Night Camera Series Manual Rev.D 2013 1 It’s About Real Time Day-Night All Weather Camera Series ZX-580SR120 | ZX-580SR200 | ZX-580SR205 | ZX-580SR210 CX-580SR120 | CX-580SR200 | CX-580SR205 | CX-580SR210 OWNER’S MANUAL (888) 379-2666 US Toll Free (905) 336-9665 Phone (905) 336-966 …
ZX-580SR120 12
-
Cisco 7030E
© 2014 Cisco and/or its affiliates. All rights reserved. This document is Cisco Public Information. Page 1 of 7 Data Sheet Cisco Video Surveillance 7030E IP Camera The Cisco® Video Surveillance 7030E IP Camera is an outdoor, high-definition, full-functioned video endpoint with industry-leading ima …
7030E 7
-
SECO-LARM Dome Color Camera EV-2605-NKEQ
Tel: 1-800-662-0800 (Domestic U.S. & Canada) Email: [email protected] Website: www.seco-larm.com 16842 Millikan Avenue, Irvine CA 92606 Tel: 1-949-261-2999 (California and International) Fax: 1-949-261-7326 Pi-ev-26XX-NXEQ (4-pg).docx Day Night Day Ni …
Dome Color Camera EV-2605-NKEQ 4
Popular Right Now:
Operating Impressions, Questions and Answers:
View a manual of the Hikvision IDS-TCM203-A below. All manuals on ManualsCat.com can be viewed completely free of charge. By using the ‘Select a language’ button, you can choose the language of the manual you want to view.
Page: 1
User Manual of Network Traffic Camera
0
Network Traffic Camera
User Manual
Page: 2
User Manual of Network Traffic Camera revise
1
User Manual
COPYRIGHT ©2018 Hangzhou Hikvision Digital Technology Co., Ltd.
ALL RIGHTS RESERVED.
Any and all information, including, among others, wordings, pictures, graphs are the
properties of Hangzhou Hikvision Digital Technology Co., Ltd. or its subsidiaries
(hereinafter referred to be “Hikvision”). This user manual (hereinafter referred to be
“the Manual”) cannot be reproduced, changed, translated, or distributed, partially or
wholly, by any means, without the prior written permission of Hikvision. Unless
otherwise stipulated, Hikvision does not make any warranties, guarantees or
representations, express or implied, regarding to the Manual.
About this Manual
This Manual is applicable to Network Traffic Camera (hereinafter referred to as
“camera”).
The Manual includes instructions for using and managing the product. Pictures, charts,
images and all other information hereinafter are for description and explanation only.
The information contained in the Manual is subject to change, without notice, due to
firmware updates or other reasons. Please find the latest version in the company
website (http://overseas.hikvision.com/en/).
Please use this user manual under the guidance of professionals.
Trademarks Acknowledgement
and other Hikvision’s trademarks and logos are the properties of Hikvision
in various jurisdictions. Other trademarks and logos mentioned below are the
properties of their respective owners.
Legal Disclaimer
TO THE MAXIMUM EXTENT PERMITTED BY APPLICABLE LAW, THE
PRODUCT DESCRIBED, WITH ITS HARDWARE, SOFTWARE AND
FIRMWARE, IS PROVIDED “AS IS”, WITH ALL FAULTS AND ERRORS, AND
HIKVISION MAKES NO WARRANTIES, EXPRESS OR IMPLIED, INCLUDING
WITHOUT LIMITATION, MERCHANTABILITY, SATISFACTORY QUALITY,
FITNESS FOR A PARTICULAR PURPOSE, AND NON-INFRINGEMENT OF
THIRD PARTY. IN NO EVENT WILL HIKVISION, ITS DIRECTORS, OFFICERS,
EMPLOYEES, OR AGENTS BE LIABLE TO YOU FOR ANY SPECIAL,
CONSEQUENTIAL, INCIDENTAL, OR INDIRECT DAMAGES, INCLUDING,
AMONG OTHERS, DAMAGES FOR LOSS OF BUSINESS PROFITS, BUSINESS
INTERRUPTION, OR LOSS OF DATA OR DOCUMENTATION, IN
CONNECTION WITH THE USE OF THIS PRODUCT, EVEN IF HIKVISION HAS
BEEN ADVISED OF THE POSSIBILITY OF SUCH DAMAGES.
REGARDING TO THE PRODUCT WITH INTERNET ACCESS, THE USE OF
PRODUCT SHALL BE WHOLLY AT YOUR OWN RISKS. HIKVISION SHALL
NOT TAKE ANY RESPONSIBILITES FOR ABNORMAL OPERATION,
PRIVACY LEAKAGE OR OTHER DAMAGES RESULTING FROM CYBER
ATTACK, HACKER ATTACK, VIRUS INSPECTION, OR OTHER INTERNET
SECURITY RISKS; HOWEVER, HIKVISION WILL PROVIDE TIMELY
TECHNICAL SUPPORT IF REQUIRED.
SURVEILLANCE LAWS VARY BY JURISDICTION. PLEASE CHECK ALL
RELEVANT LAWS IN YOUR JURISDICTION BEFORE USING THIS PRODUCT
IN ORDER TO ENSURE THAT YOUR USE CONFORMS THE APPLICABLE
LAW. HIKVISION SHALL NOT BE LIABLE IN THE EVENT THAT THIS
PRODUCT IS USED WITH ILLEGITIMATE PURPOSES.
IN THE EVENT OF ANY CONFLICTS BETWEEN THIS MANUAL AND THE
APPLICABLE LAW, THE LATER PREVAILS.
Page: 3
User Manual of Network Traffic Camera revise
2
Regulatory Information
FCC Information
Please take attention that changes or modification not expressly approved by the party
responsible for compliance could void the user’s authority to operate the equipment.
FCC compliance: This equipment has been tested and found to comply with the
limits for a digital device, pursuant to part 15 of the FCC Rules. These limits are
designed to provide reasonable protection against harmful interference when the
equipment is operated in a commercial environment. This equipment generates, uses,
and can radiate radio frequency energy and, if not installed and used in accordance
with the instruction manual, may cause harmful interference to radio communications.
Operation of this equipment in a residential area is likely to cause harmful
interference in which case the user will be required to correct the interference at his
own expense.
FCC Conditions
This device complies with part 15 of the FCC Rules. Operation is subject to the
following two conditions:
1. This device may not cause harmful interference.
2. This device must accept any interference received, including interference that may
cause undesired operation.
EU Conformity Statement
This product and — if applicable — the supplied accessories too are
marked with «CE» and comply therefore with the applicable
harmonized European standards listed under the EMC Directive
2014/30/EU, the LVD Directive 2014/35/EU, the RoHS Directive
2011/65/EU.
2012/19/EU (WEEE directive): Products marked with this symbol
cannot be disposed of as unsorted municipal waste in the European
Union. For proper recycling, return this product to your local
supplier upon the purchase of equivalent new equipment, or dispose
of it at designated collection points. For more information see:
www.recyclethis.info.
2006/66/EC (battery directive): This product contains a battery that
cannot be disposed of as unsorted municipal waste in the European
Union. See the product documentation for specific battery
information. The battery is marked with this symbol, which may
include lettering to indicate cadmium (Cd), lead (Pb), or mercury
(Hg). For proper recycling, return the battery to your supplier or to
a designated collection point. For more information see:
www.recyclethis.info
Industry Canada ICES-003 Compliance
This device meets the CAN ICES-3 (A)/NMB-3(A) standards requirements.
Page: 4
User Manual of Network Traffic Camera revise
3
Symbol Conventions
The symbols that may be found in this document are defined as follows.
Symbol Description
Note
Provides additional information to emphasize or
supplement important points of the main text.
Indicates a potentially hazardous situation, which
if not avoided, could result in equipment damage,
data loss, performance degradation, or
unexpected results.
Indicates a hazard with a high level of risk, which
if not avoided, will result in death or serious
injury.
Safety Instructions
Please adopt the power adapter which can meet the safety extra low voltage
(SELV) standard. And source with 12 VDC according to the IEC60950-1 and
Limited Power Source standard.
To reduce the risk of fire or electrical shock, do not expose this product to rain or
moisture.
This installation should be made by a qualified service person and should conform
to all the local codes.
Please install blackouts equipment into the power supply circuit for convenient
supply interruption.
Please make sure that the ceiling can support more than 50(N) Newton gravities if
the camera is fixed to the ceiling.
If the product does not work properly, please contact your dealer or the nearest
service center. Never attempt to disassemble the camera yourself. (We shall not
assume any responsibility for problems caused by unauthorized repair or
maintenance.)
Preventive and Cautionary Tips
Make sure the power supply voltage is correct before using the camera.
Do not drop the camera or subject it to physical shock.
Do not touch sensor modules with fingers. If cleaning is necessary, use a clean
cloth with a bit of ethanol and wipe it gently. If the camera will not be used for an
extended period of time, put on the lens cap to protect the sensor from dirt.
Do not aim the camera lens at the strong light such as sun or incandescent lamp.
The strong light can cause fatal damage to the camera.
The sensor may be burned out by a laser beam, so when any laser equipment is
being used, make sure that the surface of the sensor not be exposed to the laser
Page: 5
User Manual of Network Traffic Camera revise
4
beam.
Do not place the camera in extremely hot, cold temperatures (the operating
temperature should be between -30°
C ~ 70°
C), dusty or damp environment, and
do not expose it to high electromagnetic radiation.
To avoid heat accumulation, good ventilation is required for a proper operating
environment.
Keep the camera away from water and any liquid.
While shipping, the camera should be packed in its original packing.
Improper use or replacement of the battery may result in hazard of explosion.
Please use the manufacturer recommended battery type.
0402021080620
Page: 6
User Manual of Network Traffic Camera revise
5
Table of Contents
Chapter 1 System Requirement………………………………………………………………… 7
Chapter 2 Network Connection………………………………………………………………… 8
2.1 Wiring over the LAN……………………………………………………………………………..8
2.2 Activating the Camera…………………………………………………………………………..9
2.2.1 Activation via Web Browser………………………………………………………………………………….9
2.2.2 Activation via SADP Software………………………………………………………………………………10
Chapter 3 Login ……………………………………………………………………………………12
Chapter 4 Live View ………………………………………………………………………………14
4.1 Live View Page………………………………………………………………………………….. 14
4.2 Starting Live View……………………………………………………………………………… 16
4.3 Recording and Capturing Pictures Manually……………………………………………. 16
4.4 Checking Live Status and Traffic Statistics……………………………………………….. 16
Chapter 5 Picture Search………………………………………………………………………..20
Chapter 6 Log Search…………………………………………………………………………….21
Chapter 7 Local Configuration………………………………………………………………..22
Chapter 8 System Configuration………………………………………………………………24
8.1 Viewing Device Information ………………………………………………………………… 24
8.2 Configuring Installation Parameters………………………………………………………. 24
8.3 Configuring Serial Ports………………………………………………………………………. 25
8.4 Configuring TCP/IP Settings …………………………………………………………………. 26
8.5 Configuring Port………………………………………………………………………………… 28
8.6 Configuring HTTPS …………………………………………………………………………….. 29
8.7 Configuring Time ………………………………………………………………………………. 31
8.8 Enabling User Lock …………………………………………………………………………….. 33
Chapter 9 Encoding and Storage Configuration …………………………………………34
9.1 Configuring Video Encoding ………………………………………………………………… 34
9.2 Configuring Image Encoding ………………………………………………………………… 36
9.3 Configuring ROI…………………………………………………………………………………. 36
9.4 Configuring Record Schedule……………………………………………………………….. 38
9.5 Configuring Redundant Storage ……………………………………………………………. 39
9.6 Configuring FTP…………………………………………………………………………………. 40
Page: 7
User Manual of Network Traffic Camera revise
6
Chapter 10 Text Overlay Configuration …………………………………………………..44
10.1 Configuring Single Picture Overlay ………………………………………………………… 44
10.2 Configuring Text Overlay on Video………………………………………………………… 47
Chapter 11 Capture Parameters Configuration …………………………………………49
11.1 Configuring License Plate Parameters ……………………………………………………. 49
11.2 Configuring Flash Light Parameters……………………………………………………….. 50
11.3 Configuring Cabinet Parameters …………………………………………………………… 51
Chapter 12 Image Parameters Configuration……………………………………………52
12.1 Configuring General Parameters …………………………………………………………… 52
12.2 Configuring Video Image…………………………………………………………………….. 54
12.3 Configuring Picture ……………………………………………………………………………. 55
12.4 Configuring ICR …………………………………………………………………………………. 56
Chapter 13 Application Mode Configuration ……………………………………………58
13.1 Smart Mode……………………………………………………………………………………… 58
Chapter 14 Exception …………………………………………………………………………..60
Chapter 15 Maintenance ………………………………………………………………………61
15.1 Checking Device Status……………………………………………………………………….. 61
15.2 Managing Users ………………………………………………………………………………… 61
15.2.1 Adding a User……………………………………………………………………………………………………62
15.2.2 Modifying a User……………………………………………………………………………………………….63
15.2.3 Deleting a User………………………………………………………………………………………………….64
15.3 Rebooting the Camera………………………………………………………………………… 64
15.4 Restoring Default Settings …………………………………………………………………… 65
15.5 Exporting Debug File………………………………………………………………………….. 65
15.6 Exporting Configuration File………………………………………………………………… 65
15.7 Importing the Configuration File…………………………………………………………… 66
15.8 Upgrading the System ………………………………………………………………………… 66
Appendix ……………………………………………………………………………………………….68
SADP Software Introduction…………………………………………………………………………… 68
Page: 8
User Manual of Network Traffic Camera revise
7
Chapter 1 System Requirement
Operating System: Microsoft Windows XP SP1 and above version/Vista/Win 7/Win
10/Server 2003/Server 2008 32bits
CPU: 1.0 GHz or higher
RAM: 1G or higher
Display: 1024×
768 resolution or higher
Web Browser: Internet Explorer 8.0 and above version, and Google Chrome 36.
Page: 9
User Manual of Network Traffic Camera
8
Chapter 2 Network Connection
Note:
You shall acknowledge that the use of the product with Internet access might be
under network security risks. For avoidance of any network attacks and
information leakage, please strengthen your own protection. If the product does
not work properly, please contact with your dealer or the nearest service center.
To ensure the network security of the camera, we recommend you to have the
camera assessed and maintained termly. You can contact us if you need such
service.
Purpose:
To view and configure the camera via a LAN, you need to connect the camera in the
same subnet with your computer, and install the SADP to search and change the IP
address of the camera.
Note: For the detailed introduction of SADP, please refer to Appendix.
2.1 Wiring over the LAN
The following figures show the two ways of cable connection of a camera and a
computer:
Purpose:
To test the camera, you can directly connect the camera to the computer with a
network cable as shown in Figure 2-1.
Refer to the Figure 2-2 to set camera over the LAN via a switch or a router.
Network Cable
Computer
Traffic Camera
Figure 2-1 Connecting Directly
Page: 10
User Manual of Network Traffic Camera revise
9
Switch
Computer
Traffic Camera
Figure 2-2 Connecting via a Switch or a Router
2.2 Activating the Camera
You are required to activate the camera first by setting a strong password for it before
you can use the camera.
Activation via Web Browser and Activation via SADP Software are supported.
2.2.1 Activation via Web Browser
Steps:
1. Power on the camera, and connect the camera to the network.
2. Input the IP address into the address bar of the web browser, and press Enter to
enter the activation interface.
Figure 2-3 Activation Interface (Web)
3. Create a password and input the password into the password field.
Page: 11
User Manual of Network Traffic Camera revise
10
STRONG PASSWORD RECOMMENDED– We highly recommend you create a
strong password of your own choosing (using a minimum of 8 characters, including
upper case letters, lower case letters, numbers, and special characters) in order to
increase the security of your product. And we recommend you reset your password
regularly, especially in the high security system, resetting the password monthly or
weekly can better protect your product.
4. Confirm the password.
5. Click OK to save the password and enter the live view interface.
2.2.2 Activation via SADP Software
SADP software is used for detecting the online device, activating the camera, and
resetting the password.
Get the SADP software from the official website
(http://www.hikvision.com/cn/download_more_393.html) and install the SADP
according to the prompts.
Steps:
1. Run the SADP software to search the online devices.
2. Check the device status from the device list, and select the inactive device.
Figure 2-4 SADP Interface
3. Create a password and input the password in the password field, and confirm it.
Page: 12
User Manual of Network Traffic Camera revise
11
4. Click Activate to activate the device.
STRONG PASSWORD RECOMMENDED– We highly recommend you create a
strong password of your own choosing (using a minimum of 8 characters, including
upper case letters, lower case letters, numbers, and special characters) in order to
increase the security of your product. And we recommend you reset your password
regularly, especially in the high security system, resetting the password monthly or
weekly can better protect your product.
5. Change the device IP address to the same subnet with your computer by either
modifying the IP address manually or checking Enable DHCP.
Note:
DHCP (Dynamic Host Configuration Protocol) is a LAN network protocol using
UDP to work.
Figure 2-5 Create Password
6. Input the password and click Modify to activate your IP address modification.
Page: 13
User Manual of Network Traffic Camera
12
Chapter 3 Login
Steps:
1. Open the web browser.
2. In the browser address bar, input the IP address of the camera, and press the Enter
key to enter the login interface.
3. Input User Name and Password.
4. Click Login.
The admin user should configure the device accounts and user/operator permissions
properly. Delete the unnecessary accounts and user/operator permissions.
Figure 3-1 Login Interface
5. Install the plug-in before viewing the live video and operating the camera. Please
follow the installation prompts to install the plug-in.
Page: 14
User Manual of Network Traffic Camera revise
13
Figure 3-2 Download and Install Plug-in
Note: You may have to close the web browser to install the plug-in. Please reopen
the web browser and log in again after installing the plug-in.
Page: 15
User Manual of Network Traffic Camera
14
Chapter 4 Live View
4.1 Live View Page
Purpose:
The live view page allows you to view the real-time video and capture images.
Log in to the camera to enter the live view page, or you can click Live View on the
menu bar of the main page to enter the live view page.
Descriptions of the live view page:
Menu Bar
Display Control
Live Traffic
Statistics and
PTZ Panel
Live view
Window
Toolbar
Figure 4-1 Live View Page
Menu Bar:
Click each tab to enter Live View, Picture, Log, and Configuration page
respectively. Click Logout to log out of the system. Click to view the license.
Display Control:
Click the icons to adjust the layout and the stream type of the live view.
Live View Window:
Display the live video.
Toolbar:
Operations on the live view page, e.g., start/stop live view, enable/disable audio,
Page: 16
User Manual of Network Traffic Camera revise
15
adjust the volume, enable/disable two-way audio, capture, record, enable/disable
digital zoom, etc.
Refer to the following table for the description of the icons on the live view page.
Table 4-1 Descriptions of Live View Icons
Icon Description
/ Start/Stop live view.
The window size is 4:3.
The window size is 16:9.
The original widow size.
Self-adaptive window size.
Live view with the main stream.
Live view with the sub stream.
Start/Stop audio and adjust the volume.
/ Enable/Disable regional focus.
/ Enable/Disable two-way audio.
Manually capture the picture.
/ Manually start/stop recording.
/ Turn on/off digital zoom function.
Enter the live status and traffic statistics page.
/ To show/hide PTZ panel.
Zoom +/zoom —
Focus +/focus —
Iris +/iris —
One-touch focus
Lens initialization: set the lens to initial settings
PTZ speed: adjust speed of zoom, focus, and iris
change. Higher value means faster speed.
Click to start wiper. Only applicable to camera that
has a wiper.
Regional focus: Click on the tool bar to enter the regional focus operation mode.
Drag the mouse to draw a rectangle on the image as the desired focus region. Click
to exit the regional focus operation mode.
Page: 17
User Manual of Network Traffic Camera revise
16
Digital zoom: Click to enable digital zoom function and the icon turns into .
Then drag the mouse towards low right direction to draw a rectangle on the image as
the desired zoom. After viewing it you can click any place of the picture to get back to
normal picture.
4.2 Starting Live View
On the live view page, click on the toolbar to start the live view of the camera.
4.3 Recording and Capturing Pictures Manually
On the live view page, click on the toolbar to capture the live pictures or click
to start record. The saving paths of the captured pictures and recorded videos can
be set on the Configuration > Local Configuration page.
Note: The captured image will be saved as JPEG file in your computer.
4.4 Checking Live Status and Traffic Statistics
Click Live Traffic Statistics on the upper right of the live view window to enter the
live status and traffic statistics configuration page.
Page: 18
User Manual of Network Traffic Camera revise
17
Figure 4-2 Live Status and Traffic Statistics
As displayed on the figure above, the picture area can be divided into three parts:
scene shot area, digital zoom area, license plate area.
Arm the camera: Level 1 Arming, Level 2 Arming, and Disarming are
selectable.
Level 1 Arming: The camera is allowed to connect to only one data storage
device for image and information uploading. It is recommended when you
develop products, that is, if you use SDK, level 1 arming is the only option.
Level 2 Arming: The camera is allowed to connect to three data storage
devices for image and information uploading.
Note: Level 2 Arming is recommended for debugging. Because when the
device is running, Level 1 Arming cannot be activated.
Measure Plate: Measure the pixel of the captured license plate. You can click
Page: 19
User Manual of Network Traffic Camera revise
18
Disable to disable the function.
Ruler On: Enable ruler to measure the length of the captured license plate. You
can click Ruler Off to disable the function.
Open Folder: Open the folder that saves the captured pictures.
Capture: Click Capture to capture the picture, and the captured pictures will be
listed in the Picture List.
Figure 4-3 Picture List
Table 4-2 Description of Picture List Parameters
Item Description
No. Picture No.
Capture Time
The time of capturing the picture with millisecond
precision. For example, 20171011143350933 means
the picture is captured at 14:33:50:933, on October
11th
, in 2017.
Lane No. The lane where the vehicle is captured.
Plate Color
The color of the captured license plate.
Note: This function is not valid for this camera model.
License Plate No. The license plate number of the vehicle.
Speed The speed of the captured vehicle.
Illegal Type
The captured type, normal, wrong-way driving are
selectable.
Note: Detection of plate color, speed and illegal
behavior is not supported for this camera model.
Vehicle No.
The vechile counting No. ranging from 1 to 65535. It
will overwrite if it reachs the max. value.
Directory The file path of the saved picture.
Continuous Capture: Click Continuous Capture to set the parameters
including Lane No., Waiting Time, Capture Times, and Continuous Capture
Interval.
Page: 20
User Manual of Network Traffic Camera revise
19
Figure 4-4 Set Continuous Capture Parameters
Page: 21
User Manual of Network Traffic Camera
20
Chapter 5 Picture Search
Purpose:
The captured picture of all types, including normal, overspeed, wrong-way driving,
etc., can be searched from this page. You can also export the pictures to the PC local
directory.
Before you start:
Please insert a memory card in the camera for picture storage.
Steps:
1. Click Picture on the menu bar to enter picture searching page.
Figure 5-1 Picture Searching
2. Set the picture search conditions to specify the search, including Lane No.,
Vehicle Type, Illegal Type, Start Time, and End Time.
3. Click Search to search pictures. The matched pictures will be displayed in
Picture List.
4. Click Export Picture to export the pictures to your PC.
Page: 22
User Manual of Network Traffic Camera
21
Chapter 6 Log Search
Purpose:
The operation, alarm, exception and information of the camera can be stored in log
files. You can also export the log files on your demand.
Before you start:
Please configure network storage for the camera or insert a memory card in the
camera.
Steps:
1. Click Log on the menu bar to enter log searching page.
Figure 6-1 Log Searching
2. Set the log search conditions to specify the search, including Major Type, Minor
Type, Start Time, and End Time.
3. Click Search to search log files. The matched log files will be displayed in the
list.
4. To export the log files, click Save to save the log files in your PC.
Page: 23
User Manual of Network Traffic Camera
22
Chapter 7 Local Configuration
Purpose:
You can configure the live view parameters, recording files settings, and picture
settings from this page.
Note:
The record files and captured pictures are the ones you record and captured using the
web browser and thus the saving paths of them are on the PC running the browser.
Enter the local configuration page: Configuration > Local Configuration.
Figure 7-1 Local Configuration
Steps:
1. Configure the following settings:
Live View Parameters: Set the protocol type, live view performance, and rules.
Protocol Type: TCP and UDP are selectable.
TCP: Ensures complete delivery of streaming data and better video quality,
yet the real-time transmission will be affected.
UDP: Provides real-time audio and video streams.
Page: 24
User Manual of Network Traffic Camera revise
23
Live View Performance: Set the live view performance to Real-time, Balanced
or Fluent.
Rules: Enable or disable rules. If you enable rules, when there is vehicle passing,
a tracking frame will appear in the live view.
Pos Info: Enable the function, feature information of the detected target is
dynamically displayed near the target in the live image.
Record File Settings: Set the manual recorded video parameters.
Record File Size: Select the packed size of the manually recorded and
downloaded video files to 256M, 512M or 1G. After the selection, the maximum
record file size is the value you selected.
Save record files to: Set the saving path for the manually recorded video files in
the live view page.
Picture Settings: Set the saving path of pictures under the different conditions.
Save snapshots in live view to: Set the saving path of the manually captured
pictures in live view.
Save downloaded pictures to: Set the saving path of the captured pictures in
picture search interface.
Save captured pictures to: Set the saving path of the captured pictures in the
live status and traffic statistic interface.
Note: You can click Browse to change the directory for saving the videos and
pictures.
2. Click Save to save the settings.
Page: 25
User Manual of Network Traffic Camera
24
Chapter 8 System Configuration
Purpose:
You can configure the parameters on this page, including device information, serial
ports, network parameters, time configuration, service, etc.
8.1 Viewing Device Information
Go to the device information page to check the device information: Configuration >
Device Configuration > System Configuration > Device Information.
Device Name and Device No. can be changed as desired.
Other information of the camera, such as Model, Serial No., Firmware Version,
Encoding Version, Hardware Version, Number of Channels, Number of Trigger Input,
and Number of Trigger Output are displayed for your reference. And the information
cannot be edited in this menu.
Figure 8-1 Device Information
8.2 Configuring Installation Parameters
You can set the installation parameters of the camera. These parameters are designed
Page: 26
User Manual of Network Traffic Camera revise
25
for speed detection.
Steps:
1. Go to Configuration > Device Configuration > System Configuration >
Installation Parameters.
Figure 8-2 Installation Parameters
2. Set the installation parameters according to the actual conditions.
Installation height and horizontal distance can be set according to the actual
installation height.
Horizontal field angel and vertical field angel refer to the installation angel of the
camera. You can set the degrees manually according to the actual installation
angel.
3. Click Save to save the settings.
8.3 Configuring Serial Ports
Purpose:
Configure the RS-485 parameters and RS-232 parameters in this page.
The RS-485 ports are used to input signals related to traffic control. The number
of available RS-485 ports can be different according to different camera models.
The RS-232 port can be used in two ways:
• Parameters Configuration: Connect a computer to the camera through the
Page: 27
User Manual of Network Traffic Camera revise
26
serial port. Device parameters can be configured by using software such as
HyperTerminal. The serial port parameters must be the same as the serial port
parameters of the camera.
• Transparent Channel: Connect a serial device directly to the camera. The
serial device will be controlled remotely by the computer through the
network.
Steps:
1. Go to Configuration > Device Configuration > System Configuration > Serial
Ports.
Figure 8-3 Serial Ports Settings
2. Configure the RS-485 and RS-232 parameters.
3. Click Save to save the settings.
8.4 Configuring TCP/IP Settings
Purpose:
TCP/IP settings must be properly configured before you operate the camera over
network.
Page: 28
User Manual of Network Traffic Camera revise
27
Steps:
1. Go to Configuration > Device Configuration > System Configuration >
TCP/IP.
Figure 8-4 Network Parameters
2. Configure the following parameters.
NIC Settings
Configure the NIC parameters, including the NIC Type, IPv4 Address, IPv4
Subnet Mask, IPv4 Default Gateway, IPv6 Mode, IPv6 Address, IPv6 Subnet
Mask, IPv6 Default Gateway, MAC Address (read-only), MTU settings
(read-only), Multicast Address, Alarm Management Host Address/Port, ANPR IP
address, ANPR port, Alarm Host Address, and Alarm Host Port.
Notes:
Page: 29
User Manual of Network Traffic Camera revise
28
● The Multicast sends a stream to the multicast group address and allows
multiple clients to acquire the stream at the same time by requesting a copy
from the multicast group address. Before utilizing this function, you have to
enable the Multicast function of your router.
● Number plate data can be transmitted through ANPR protocol. Before using
this function, you have to configure ANPR IP address and ANPR port to
connect the host.
DNS Server Configuration
DNS (Domain Name System) is a network system used to translate names into IP
address.
3. Click Save to save the settings.
8.5 Configuring Port
Purpose:
Configure the HTTP port, RTSP port, SDK port information on this page.
Steps:
1. Go to Configuration > Device Configuration > System Configuration > Port.
Figure 8-5 Port Configuration
2. Configure the following parameters.
HTTP Port: The default port number is 80, and it can be changed to any port No.
ranges from 1 to 65536 which is not occupied, except 21 (FTP port) and 23
(Telnet port).
RTSP Port: The default port number is 554 and it can be changed to any port No.
ranges from 1 to 65536 which is not occupied, except 21 (FTP port) and 23
(Telnet port).
SDK Port: The default server port number is 8000, and it can be changed to any
Page: 30
User Manual of Network Traffic Camera revise
29
port No. ranges from 2000 to 65535 which is not occupied.
3. Click Save to save the settings.
8.6 Configuring HTTPS
Purpose:
HTTPS provides authentication of the web site and associated web server that one is
communicating with, which protects against Man-in-the-middle attacks. Perform the
following steps to set the port number of https.
Example
If you set the port number as 443 and the IP address is 192.168.1.64, you may access
the device by inputting https://192.168.1.64:443 via the web browser.
Note:
The HTTPS port can be only configured through the web browser.
1. Go to Configuration > Device Configuration > System Configuration >
HTTPS.
Figure 8-6 HTTPS Configuration
2. Create and install the certificate.
OPTION 1: Create private certificate.
1) Click Create private certificate.
2) Click Create and the following message box pops up as below.
Page: 31
User Manual of Network Traffic Camera revise
30
Figure 8-7 Create Private Certificate
3) Enter the parameters.
4) Click OK to save the settings.
OPTION 2: Signed certificate is available. Start the installation directly.
1) Click Signed certificate is available. Start the installation directly.
2) Click View to find the saving path of the certificate.
3) Click Install to install the certificate.
OPTION 3: Create the certificate request first and continue the installation.
1) Click Create the certificate request first and continue the installation.
2) Click Create to create the certificate request.
3) Click Download to download the certificate request and submit it to the
trusted certificate authority for signature.
4) After receiving the signed valid certificate, click View to find the saving path
of the certificate and click Install to install it.
5) (Optional) Click Delete to delete the certificate.
There will be the certificate information after you successfully create and install
the certificate.
Page: 32
User Manual of Network Traffic Camera revise
31
8.7 Configuring Time
You can follow the instructions in this section to configure the time synchronization
and DST settings.
Time Settings
Steps:
1. Go to Configuration > Device Configuration > System Configuration> Time.
2. Select the time zone of your region.
3. You can adjust time manually. Or you can enable NTP (National Time Protocol)
to synchronize time of your camera to the configured NTP server.
● Manual Synchronization
Steps:
1) Select Synchronization Mode as Manual Synchronization.
2) Check Device Time. The grayed out device time shows the current camera
time.
3) Click to set the system time from the pop-up calendar.
Figure 8-8 Manual Synchronization
4) (Optional) you can also check Synchronize with PC. The camera time is
synchronized with the time of your computer.
5) Click Save to save the settings.
● NTP Synchronization
Page: 33
User Manual of Network Traffic Camera revise
32
Steps:
1. Select Synchronization Mode as NTP Synchronization.
Figure 8-9 NTP Synchronization
2. Configure the following settings:
Server Address: IP address of NTP server.
NTP Port: Port of NTP server.
Interval: The time interval between the two synchronizing actions with NTP
server.
Note: If the camera is connected to a public network, you should use a NTP
server that has a time synchronization function, such as the server at the National
Time Center (IP Address: 210.72.145.44). If the camera is set in a customized
network, NTP software can be used to establish a NTP server for time
synchronization.
4. Click Save to save the settings.
Configuring DST (Daylight Saving Time)
Steps:
1. Go to Configuration > Device Configuration > System Configuration > DST.
2. Check Enable DST.
3. Set Start Time, End Time, and DST Bias.
4. Click Save to save the settings.
Page: 34
User Manual of Network Traffic Camera revise
33
Figure 8-10 DST Settings
8.8 Enabling User Lock
Steps:
1. Go to Configuration > Device Configuration > System Configuration>
Service.
Figure 8-11 Service Configuration
2. Check Enable User Lock to enable the function.
3. Click Save to save the settings.
Page: 35
User Manual of Network Traffic Camera revise
34
Chapter 9Encoding and Storage
Configuration
Purpose:
You can configure the encoding and storage related parameters from this page,
including video encoding, image encoding, ROI, record schedule, redundant storage,
and FTP.
9.1 Configuring Video Encoding
Steps:
1. Go to Configuration >Device Configuration > Encoding and Storage > Video
Encoding.
Figure 9-1 Video Encoding
2. Configure the Main Stream Parameters:
The main stream is usually used for recording and live view with good bandwidth.
Stream Type: Video and Video & Audio are selectable.
Page: 36
User Manual of Network Traffic Camera revise
35
Max. Bitrate: Set the max. bitrate to 32 to 16384 Kbps, or custom. The higher
value corresponds to the higher video quality, and the higher bandwidth is
required.
Note: The maximum limit of the max. bitrate value varies according to different
cameras. For some certain cameras, the maximum limit is 8192 Kbps or 12288
Kbps.
Frame Rate: The range of frame rate varies according to different video standard.
Under NTSC standard, the max. rate can be set to 60 fps. Under PAL standard, the
max. rate can be set to 50 fps. The frame rate is to describe the frequency at which
the video stream is updated and it is measured by frames per second (fps). A
higher frame rate is advantageous when there is movement in the video stream, as
it maintains image quality throughout.
Resolution: Select the resolution of the video output.
SVC: Scalable Video Coding is an extension of the H.264/AVC standard. Select
on/off to enable/disable the SVC function.
3. Configure the sub-stream parameters. Sub-stream can be used for live view when
the bandwidth is limited.
4. (Optional) Click Advanced Settings to expand the menu and configure the
following parameters.
Bitrate Type: Select the bitrate type to Constant or Variable.
Video Quality: When bitrate type is selected as Variable, 6 levels of video quality
are selectable.
Encoding Complexity: Select the encoding complexity. The higher the complexity
is, the better the image quality is.
I Frame Interval: Set the I-Frame interval to 1 to 400.
Video Encoding: Select the encoding mode to H.264, MJPEG, or H.265.
5. Click Save to save the settings.
Page: 37
User Manual of Network Traffic Camera revise
36
9.2 Configuring Image Encoding
Steps:
1. Go to Configuration >Device Configuration > Encoding and Storage > Image
Encoding.
Figure 9-2 Image Encoding
2. Select Capture Resolution.
3. Enter JPEG Picture Size. The captured pictures are saved as JPEG files, and you
can define the picture size by manually entering the value.
4. Click Save to save the settings.
9.3 Configuring ROI
Purpose:
ROI (Region of Interest) encoding helps to discriminate the ROI and background
information in video compression, which means, the technology assigns more
encoding resource to the region of interest, thus to increase the quality of the ROI
whereas the background information is less focused.
Note: ROI function varies according to different camera models.
Steps:
1. Go to Configuration> Device Configuration> Encoding and Storage > ROI.
Page: 38
User Manual of Network Traffic Camera revise
37
Figure 9-3 ROI Settings
2. Select Stream Type for ROI encoding.
This camera model supports main stream and sub stream.
3. Check Enable under Fixed Area item.
4. Select Area Code from the drop-down list for ROI settings. There are four fixed
areas selectable.
5. Click Draw Area, and then drag the mouse to draw the region of interest on the
live video.
6. Select ROI Level to set the image quality enhancing level. The larger the value is,
the better the image quality is.
7. Enter Area Name for ROI as desired.
8. Click Save to save the settings.
Page: 39
User Manual of Network Traffic Camera revise
38
9.4 Configuring Record Schedule
Purpose:
You can follow the instructions to configure the scheduled recording. By default, the
record files of scheduled recording are stored in the microSD card. The max. storage
space is 128 G.
Steps:
1. Go to Configuration > Device Configuration > Encoding and Storage >
Record Schedule.
Figure 9-4 Record Schedule Configuration
2. Select Record Stream.
3. (Optional) Check Enable Recording Overwriting.
If you enable the function, when the storage space is full, the former record files
will be overwritten.
If you disable the function, when the storage space is full, the notice that the space
is full will be reminded.
4. Check Enable Record Schedule.
5. Click Edit to edit the record schedule.
Page: 40
User Manual of Network Traffic Camera revise
39
Figure 9-5 Edit Record Schedule
1) Select the day to set the record schedule.
2) Set all-day record or segment record.
If you want to configure the all-day recording, check the All Day checkbox.
If you want to record in different time sections, check the Customize
checkbox. Set the Start Time and End Time.
Notes:
The time of each segment cannot be overlapped. Up to 4 segments can
be configured.
The default record type is Normal and you cannot edit it.
3) Check Select All and click Copy to copy settings of this day to the whole
week. You can also check any of the checkboxes before the date and click
Copy.
4) Click OK to save the settings and exit from the interface.
6. Click Save to save the settings.
9.5 Configuring Redundant Storage
Purpose:
You can manage the storage, view the HDD information, format the HDD, etc.
Steps:
1. Go to Configuration > Device Configuration > Encoding and Storage >
Page: 41
User Manual of Network Traffic Camera revise
40
Redundant Storage.
Figure 9-6 Redundant Storage Configuration
2. View the HDD information such as Capacity, Free Space, Status, etc.
3. (Optional) Check the HDD and click Format to format it.
4. (Optional) Check Auto-Initialize Redundant Storage. Then the TF card in the
redundant storage can be formatted automatically. The storage is used for store
captured pictures, traffic violation video, and log.
5. (Optional) Check Auto-Upload Data in Redundant Storage.
6. Configure the HDD Quota.
1) Enter the Capture Quota Ratio.
2) Enter the Video Quota Ratio.
Notes:
The Capture Quota Ratio ranges from 0 to 100%.
The sum of Capture Quota Ratio and Video Quota Ratio should be 100%.
9.6 Configuring FTP
Purpose:
You can configure the FTP server related information to enable the uploading of the
captured pictures to the FTP server.
Note:
Page: 42
User Manual of Network Traffic Camera revise
41
We have three ways to storage data (priority ranking from prior to less prior): FTP,
SDK arming and local memory card storage. If FTP is enabled, the SDK arming and
local memory card storage are invalid. If SDK arming is enabled, memory card
storage is invalid.
Steps:
1. Go to Configuration > Device Configuration > Encoding and Storage > FTP.
Figure 9-7 FTP Configurations
2. Check Upload Additional Information to FTP to enable the uploading function.
3. Select the FTP uploading mode.
Disable: No data will be uploaded to FTP.
Enable One: Data can be uploaded to one FTP server.
1) Select Enable One.
Figure 9-8 Upload to One FTP Server
2) Configure the FTP server parameters, including Server Address, Port,
User Name, and Password.
3) Select the Directory Structure to save the files. Save in Root Directory,
Save in Parent Directory, and Save in Level 2/3/4 Directory are
Page: 43
User Manual of Network Traffic Camera revise
42
selectable.
4) Select the content in different directories. For the Parent Directory, you
can select Device Name, Device No., and Device IP Address. For the
Level 2/3/4 Directory, you can select Camera Name, Camera No.,
Device IPAddress, etc.
5) (Optional) Check Upload Plate Close-up to upload the close-up of the
license plate to the FTP server.
Enable Two: Data can be uploaded to two FTP servers.
1) Select Enable Two.
Figure 9-9 Upload to Two FTP Servers
2) Select the data type for uploading to FTP 1.
3) Select the data type for uploading to FTP 2.
For the data type, Chekpoint Data and Violation Data are selectable. If
you select Chekpoint Data for FTP 1, FTP 2 will receive the Violation
Data by default.
4) Configure the FTP server parameters, including Server Address, Port,
User Name, and Password.
5) Select the Directory Structure to save the files. Save in Root Directory,
Save in Parent Directory, and Save in Level 2/3/4 Directory are
Page: 44
User Manual of Network Traffic Camera revise
43
selectable.
6) Select the content in different directories. For the Parent Directory, you
can select Device Name, Device No., and Device IP Address. For the
Level 2/3/4 Directory, you can select Camera Name, Camera No.,
Device IPAddress, etc.
7) (Optional) Check Upload Plate Close-up to upload the close-up of the
license plate to the FTP server.
4. Configure the Name Rule.
1) Select the Separator.
2) Select the Elements of each name.
Figure 9-10 Name Rule Configuration
5. Configure the OSD Information.
Figure 9-11 OSD Information
6. Click Save to save the settings.
Page: 45
User Manual of Network Traffic Camera revise
44
Chapter 10Text Overlay
Configuration
Purpose:
Configure the OSD on the captured pictures and videos.
10.1 Configuring Single Picture Overlay
Purpose:
You can configure the overlay information of the captured single picture.
Steps:
1. Go to Configuration > Device Configuration > Text Overlay > Single Picture
Overlay.
Figure 10-1 Single Picture Overlay
2. Check Capture Picture Overlay.
3. Configure the parameters below.
Percentage: the percentage of the information overlaid on the picture.
Font Size: the font size of the overlay information.
Foreground Color: the foreground color of the overlay information.
Background Color: the background color of the overlay information.
Page: 46
User Manual of Network Traffic Camera revise
45
4. Set the overlay text position.
Overlay on Picture: Display the information on the picture.
Figure 10-2 Overlay on Picture
Overlay Above the Picture: Display the information on the top.
Figure 10-3 Overlay Above the Picture
Overlay Below the Picture: Display the information on the bottom.
Page: 47
User Manual of Network Traffic Camera revise
46
Figure 10-4 Overlay Below the Picture
5. (Optional) Check Overlay Number Zeroizing.
6. (Optional) Check Overlay Plate Close-up on the captured picture.
7. Configure the overlay information.
Figure 10-5 Configure Display Information
1) Check the overlay information or check Select All to display all the overlay
information.
2) Configure the overlay information.
Overlay Information: You can edit the details of the overlay information
type.
Overlay Position: For some information you want to display separately,
check the checkbox of the desired items. For the other items, they will be
displayed together.
Page: 48
User Manual of Network Traffic Camera revise
47
Space: It stands for the length of blank space between the last character of
the first item and the first character of the next item.
Line Break Characters: When you add Line Break Characters to an item,
the item is displayed as a new paragraph, and the number stands for the scale
of space above the paragraph.
/ : Click to move the overlay position up. Click to move the
overlay position down.
E.g., the following picture displays the overlay information.
Figure 10-6 OSD Display
10.2 Configuring Text Overlay on Video
Purpose:
You can customize the video OSD on the screen.
Steps:
1. Go to Configuration > Device Configuration > Text Overlay > Video.
Page: 49
User Manual of Network Traffic Camera revise
48
Figure 10-7 OSD on Video
2. Select the OSD Properties.
3. Select the OSD Font Size.
4. Configure the parameters below according to your needs.
Check Camera Name and edit the name in the text field.
Configure date.
1) Check Display Date.
2) Select the Time Format.
3) Select the Date Format.
4) Check Display Week.
5) Check Display Millisecond.
Check Display Item and edit the custom content in the corresponding text
fields.
5. Click Save to save the settings.
Page: 50
User Manual of Network Traffic Camera revise
49
Chapter 11 Capture Parameters
Configuration
Purpose:
You can configure license plate, flash light, traffic light synchronization, image
composition, cabinet, and vehicle feature on this page.
11.1 Configuring License Plate Parameters
This series of camera supports license plate recognition.
Steps:
1. Go to Configuration > Device Configuration > Capture Parameters > License
Parameters.
Figure 11-1 License Parameters Configuration
2. Enter the country code in Country text field.
Country/region code:
Country/Region Code Country/Region Code
Europe-General 0 France 77
Aland (Finland) 17 Poland 180
Ukraine 230 Greece 91
Switzerland 45 Hungary 102
Spain 70 Macedonia 145
Ireland 104 Bulgaria 24
United Kingdom 79 Czech Republic 58
Netherlands 167 Slovakia 203
Italy 112 Croatia 100
Germany 59 Austria 14
3. Select License Plate Type. Small-Size Plate Recognition and Large-Size Plate

ANPR IP—камера для транспорта
Краткое руководство пользователя

ANPR IP—камера для транспорта · Краткое руководство
Краткое руководство пользователя
©2018 Hangzhou Hikvision Digital Technology Co., Ltd.
Данное руководство применимо для ANPR IP—камера для
транспорта, серия 91xx. Руководство содержит инструкции для
использования и управления продуктом. Программное
обеспечение, используемое в продукте, регулируется
лицензионным соглашением пользователя, охватывающим этот
продукт.
О руководстве
Настоящее Руководство защищено авторским правом в
соответствии с внутренними и международными соглашениями.
Все права на данное Руководство принадлежат компании
Hangzhou Hikvision Digital Technology Co., Ltd. («Hikvision«). Данное
руководство пользователя не подлежит воспроизведению,
изменению, переводу или распространению, частично или
целиком, без предварительного разрешения Hikvision.
Торговые марки
и другие торговые марки Hikvision и логотипы
являются интеллектуальной собственностью Hikvision и/или ее
аффилированных лиц в различных юрисдикциях. Другие торговые
марки и логотипы, содержащиеся в руководстве, являются
собственностью их владельцев. Право на получение лицензии по
использованию таких торговых марок предоставляется только по
специальному разрешению.
Правовая информация
ДО МАКСИМАЛЬНО ДОПУСТИМОЙ СТЕПЕНИ, РАЗРЕШЕННОЙ
ДЕЙСТВУЮЩИМ ЗАКОНОДАТЕЛЬСТВОМ, ПРОДУКТ, АППАРАТУРА,

ANPR IP—камера для транспорта · Краткое руководство
ПРОГРАММНОЕ И АППАРАТНОЕ ОБЕСПЕЧЕНИЕ ПРЕДОСТАВЛЯЕТСЯ
«КАК ЕСТЬ», СО ВСЕМИ ОШИБКАМИ И НЕТОЧНОСТЯМИ, HIKVISION
НЕ ДАЕТ НИКАКИХ ГАРАНТИЙ, ЯВНЫХ ИЛИ ПОДРАЗУМЕВАЕМЫХ,
КАСАТЕЛЬНО УДОВЛЕТВОРИТЕЛЬНОСТИ КАЧЕСТВА,
СООТВЕТСТВИЯ УКАЗАННЫМ ЦЕЛЯМ И ОТСУТСТВИЯ НАРУШЕНИЙ
СО СТОРОНЫ ТРЕТЬИХ ЛИЦ. КОМПАНИЯ HIKVISION НЕ
ГАРАНТИРУЕТ И НЕ ПРЕДОСТАВЛЯЕТ ЗАВЕРЕНИЙ В ОТНОШЕНИИ
ИСПОЛЬЗОВАНИЯ ДАННОГО РУКОВОДСТВА, А ТАКЖЕ В
ОТНОШЕНИИ ВЕРНОСТИ, ТОЧНОСТИ ИЛИ АКТУАЛЬНОСТИ
ИНФОРМАЦИИ, СОДЕРЖАЩЕЙСЯ В НЕМ. ОТВЕТСТВЕННОСТЬ ЗА
ИСПОЛЬЗОВАНИЕ ДАННОГО РУКОВОДСТВА И ЕГО СОДЕРЖИМОГО
НЕСЕТ ПОЛЬЗОВАТЕЛЬ.
ДО МАКСИМАЛЬНО ДОПУСТИМОЙ СТЕПЕНИ, РАЗРЕШЕННОЙ
ДЕЙСТВУЮЩИМ ЗАКОНОДАТЕЛЬСТВОМ, НИ HIKVISION, НИ ЕГО
ДИРЕКТОРА, НИ СОТРУДНИКИ ИЛИ ПРЕДСТАВИТЕЛИ НЕ НЕСУТ
ОТВЕТСТВЕННОСТИ ПЕРЕД ПОТРЕБИТЕЛЕМ ЗА КАКОЙ—ЛИБО
СЛУЧАЙНЫЙ ИЛИ КОСВЕННЫЙ УЩЕРБ, ВКЛЮЧАЯ УБЫТКИ ИЗ—ЗА
ПОТЕРИ ПРИБЫЛИ, ПЕРЕРЫВА В ДЕЯТЕЛЬНОСТИ, НАРУШЕНИЯ
БЕЗОПАСНОСТИ ИЛИ ПОТЕРИ ДАННЫХ ИЛИ ДОКУМЕНТАЦИИ, В
СВЯЗИ С ИСПОЛЬЗОВАНИЕМ ДАННОГО РУКОВОДСТВА ИЛИ ЕГО
СОДЕРЖИМОГО, ДАЖЕ ЕСЛИ HIKVISION БЫЛО ИЗВЕСТНО О
ВОЗМОЖНОСТИ ТАКОГО УЩЕРБА.
НЕКОТОРЫЕ ЮРИСДИКЦИИ НЕ ДОПУСКАЮТ ИСКЛЮЧЕНИЙ ИЛИ
ОГРАНИЧЕНИЙ ОТВЕТСТВЕННОСТИ ЗА НАНЕСЕНИЕ
ОПРЕДЕЛЕННОГО УЩЕРБА, ПОЭТОМУ НЕКОТОРЫЕ ЛИБО ВСЕ
ИСКЛЮЧЕНИЯ ИЛИ ОГРАНИЧЕНИЯ МОГУТ НЕ ДЕЙСТВОВАТЬ В
КОНКРЕТНОМ РЕГИОНЕ.

ANPR IP—камера для транспорта · Краткое руководство
Уведомление о конфиденциальности
Законы, регулирующие видеонаблюдение, варьируются в
зависимости от страны. Пожалуйста, проверьте все
соответствующие законы вашей страны перед использованием
оборудования.
Обслуживание
При возникновении каких—либо вопросов следует обращаться к
местному поставщику.
Регулирующая информация
Информация о FCC
Соответствие FCC: Это оборудование было проверено и найдено
соответствующим регламенту для цифрового устройства Класса B,
применительно к части 15 Правил FCC. Данный регламент
разработан для того, чтобы обеспечить достаточную защиту от
вредных эффектов, возникающих при использовании
оборудования в коммерческой среде. Это оборудование
генерирует, использует, и может излучать радиоволны на разных
частотах и, если установлено и используется не в соответствии с
инструкцией, может создавать помехи для радиосвязи. Тем не
менее, нет никакой гарантии, что помехи не возникнут в каких—
либо конкретных случаях установки. Если оборудование создает
вредные помехи для приема радио— или телевизионных сигналов,
что может быть определено путем включения и выключения
оборудования, пользователю рекомендуется попытаться
устранить помехи одним или несколькими способами, а именно:
Изменить ориентацию или местоположение приемной антенны.
Увеличить расстояние между оборудованием и приемником.

ANPR IP—камера для транспорта · Краткое руководство
Подключить оборудование к розетке в цепи, отличной от той, к
которой подключен приемник.
Обратитесь к поставщику или опытному радио/телемастеру.
Условия FCC
Это устройство соответствует регламенту для цифрового
устройства применительно к части 15 Правил FCC. Эксплуатация
допускается при соблюдении следующих двух условий:
1. Данное устройство не должно создавать вредных помех.
2. Устройство должно выдерживать возможные помехи, включая
и те, которые могут привести к выполнению нежелательных
операций.
Соответствие стандартам ЕС
Данный продукт и — если применимо – также и
поставляемые принадлежности отмечены знаком
«CE» и, следовательно, согласованны с
европейскими стандартами, перечисленными под директивой
2014/30/EC ЕМС, директивой 2011/65/EC RoHS.
2012/19/EС (директива WEEE): Продукты,
отмеченные данным знаком, запрещено
выбрасывать в коллекторы несортированного
мусора в Европейском союзе. Для надлежащей
утилизации верните продукт поставщику при покупке
эквивалентного нового оборудования, либо избавьтесь от него в
специально предназначенных точках сбора. За дополнительной
информацией обратитесь по адресу: www.recyclethis.info
.

ANPR IP—камера для транспорта · Краткое руководство
2006/66/EC (директива о батареях): Данный
продукт содержит батарею, которую запрещено
выбрасывать в коллекторы несортированного
мусора в Европейском союзе. Подробная
информация о батарее изложена в документации
продукта. Батарея отмечена значком, который может включать
наименования, обозначающие содержание кадмия (Cd), свинца
(Pb) или ртути (Hg). Для надлежащей утилизации возвратите
батарею своему поставщику либо избавьтесь от нее в специально
предназначенных точках сбора. За дополнительной информацией
обращайтесь по адресу: www.recyclethis.info
.

ANPR IP—камера для транспорта · Краткое руководство
Инструкции по технике по безопасности
Эта инструкция предназначена для того, чтобы пользователь мог
использовать продукт правильно и избежать опасности или
причинения вреда имуществу.
Меры предосторожности разделены на «Предупреждения» и
«Предостережения«.
Предупреждения: игнорирование предупреждения может
привести к тяжелым травмам или смерти.
Предостережения: игнорирование предостережения может
привести к травмам или порче оборудования.
Предупреждения
● Использование продукта должно соответствовать нормам
электробезопасности страны и региона. Пожалуйста,
Предупреждения:
следуйте данным
правилам для
предотвращения
серьезных травм и
смертельных случаев.
Предостережения:
следуйте мерам
предосторожности, чтобы
предотвратить возможные
повреждения или
материальный ущерб.

ANPR IP—камера для транспорта · Краткое руководство
обратитесь к техническим спецификациям для получения
подробной информации.
● Пожалуйста, используйте источник питания DC 24 В, который
соответствует стандарту безопасного сверхнизкого
напряжения (SELV) и IEC60950—1 стандарту. Пожалуйста,
обратитесь к техническим спецификациям для получения
подробной информации.
● Не подключайте несколько устройств к одному блоку питания,
перегрузка адаптера может привести к перегреву или
возгоранию.
● Убедитесь, что штепсель плотно соединен с разъемом
питания. Устройство, установленное на стене или потолке,
должно быть надежно закреплено.
● Если из устройства идет дым или доносится шум – отключите
питание, извлеките кабель и свяжитесь с сервисным центром.
Предостережения
● Перед началом использования камеры убедитесь, что
напряжение питания соответствует требованиям камеры.
● Не бросайте камеру и не подвергайте ее ударам.
● Не дотрагивайтесь до матрицы пальцами. Если очистка
необходима, используйте чистую ткань с небольшим
количеством этанола и аккуратно протрите ее. Если камера не
будет использоваться в течение длительного периода

ANPR IP—камера для транспорта · Краткое руководство
времени, установите крышку объектива для защиты сенсора
от пыли.
● Не направляйте объектив камеры на яркий свет, такой как
солнце или лампы накаливания. Яркий свет может вызвать
расплывание или потерю четкости изображения (что не
является признаком неисправности), а также повлиять на
долговечность матрицы.
● Матрица может быть сожжена лазерным лучом, поэтому,
когда используется любое лазерное оборудование, убедитесь,
что поверхность матрицы не подвергается воздействию
лазерного луча.
● Не размещайте камеру в местах чрезвычайно низкой или
высокой температуры (рабочая температура окружающей
среды должна быть в пределах от минус 30 °C до плюс 70 °C),
пыльных или влажных помещениях. Не подвергайте камеру
воздействию сильных электромагнитных помех.
● Для того, чтобы избежать накопления тепла, необходима
хорошая вентиляция рабочей среды.
● Не помещайте камеру в воду и любую другую жидкость.
● Во время транспортировки, камера должна быть упакована в
оригинальную упаковку.
● Регулярная замена частей: некоторые части (например,
электролитический конденсатор) оборудования должны
регулярно заменяться в соответствии с их средним сроком
службы. Средний срок службы зависит от рабочей среды и
частоты использования, поэтому рекомендуется регулярно
проверять работоспособность. Для получения более

ANPR IP—камера для транспорта · Краткое руководство
подробной информации, пожалуйста, свяжитесь с вашим
поставщиком.
● Неправильное использование или замена батареи может
привести к опасности взрыва. Проводите замену на такие же
батареи или аналогичные. Утилизируйте использованные
батареи в соответствии с инструкциями, предоставленными
производителем батарей.
● Если продукт не работает должным образом, обратитесь к
поставщику или в ближайший сервисный центр. Не пытайтесь
самостоятельно разобрать камеру. (Мы не несем
ответственность за проблемы, вызванные
несанкционированным ремонтом или техническим
обслуживанием.)

ANPR IP—камера для транспорта · Краткое руководство
Содержание
1 Описание внешнего вида ………………………………………………… 11
1.1 Тип I …………………………………………………………………… 11
1.1.1 Боковая панель …………………………………………. 11
1.1.2 Задняя панель …………………………………………… 14
1.2 Тип II ………………………………………………………………….. 18
2 Установка ………………………………………………………………………. 20
2.1 Установка камеры I типа ……………………………………… 20
2.2 Установка камеры II типа …………………………………….. 25
2.2.1 Установка карты памяти …………………………….. 25
2.2.2 Установка на стену/потолок ……………………….. 27
2.2.3 Установка на перекладину …………………………. 31
3 Подключение сетевой камеры через LAN …………………………. 36
3.1 Активация камеры ………………………………………………. 36
Активация через веб—браузер …………………….. 36
Активация через SADP ……………………………….. 38
Изменение IP—адреса ………………………………………….. 39
4 Доступ через веб—браузер ……………………………………………….. 42
ANPR IP—камера для транспорта · Краткое руководство
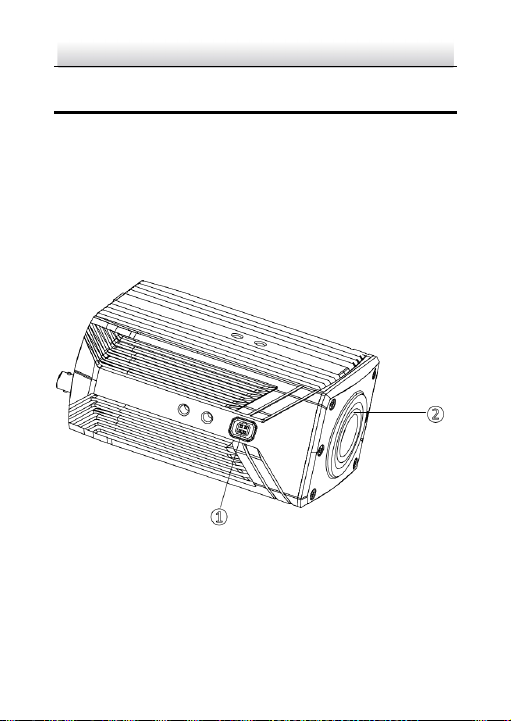
1 Описание внешнего вида
В данной серии камер представлены два типа устройств:
1.1 Тип I
1.1.1 Боковая панель
Внешний вид боковой панели камеры в стандартном корпусе
представлен на рисунке ниже:
Рисунок 1—1 Боковая панель
ANPR IP—камера для транспорта · Краткое руководство
Таблица 1—1 Описание компонентов
№ Описание № Описание
1 Интерфейс
автоматической
диафрагмы
2 Интерфейс объектива
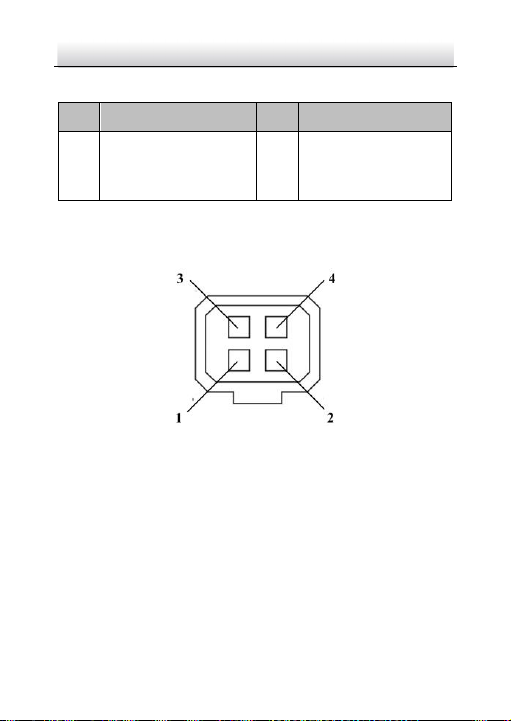
Внешний интерфейса автоматической диафрагмы представлен на
рисунке ниже:
Рисунок 1—2 Интерфейс автоматической диафрагмы

ANPR IP—камера для транспорта · Краткое руководство
Таблица 1—2 Пины
№ DC
1 Damp-
2 Damp+
3 Drive+
4 Drive—
Пины Damp +, Damp—, Drive + и Drive— используются, когда
автоматическая диафрагма управляется DC.
 Loading…
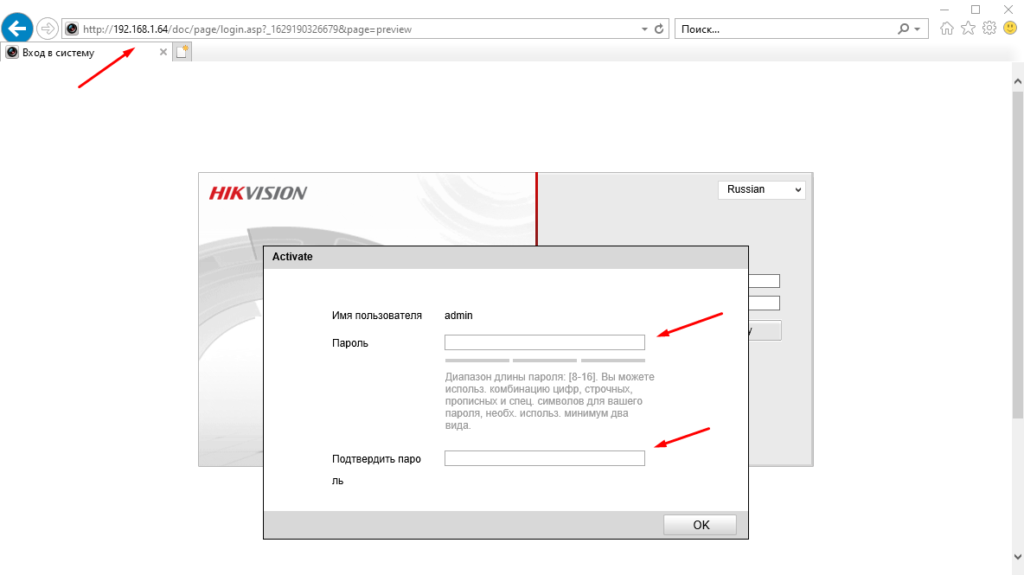
IP камеры Hikvision IDS-TCM203-A использую только опытные специалисты, которые без особого труда все настроят и подключат. Но подобного рода задачи (по настройке и подключению) могут выполнять и обычные пользователи у которых вообще нет опыта работы с подобным оборудованием. Данная статья предназначена специально для них. Сегодня я хочу рассказать о первоначальной настройки данной камеры. А именно активации и создании учетной записи пользователя.
Как произвести первоначальную настройку
У всех устройств фирмы Hikvision по умолчанию уже прописан IP адрес по которому можно подключиться к данной камере и выполнить её настройку.
У Hikvision IDS-TCM203-A это — 192.168.1.64
После распаковки установки и подключению камеры к сети нужно открыть браузер IE и в адресной строке ввести его. Если вы подключили камеру правильно вы должны увидеть страницу с активацией. Первое что нужно сделать это задать пароль.
Если при вводе IP адреса камеры страница с активацией не открывается читаем вот эту статью.
 Loading…
IP камеры Hikvision IDS-TCM203-A использую только опытные специалисты, которые без особого труда все настроят и подключат. Но подобного рода задачи (по настройке и подключению) могут выполнять и обычные пользователи у которых вообще нет опыта работы с подобным оборудованием. Данная статья предназначена специально для них. Сегодня я хочу рассказать о первоначальной настройки данной камеры. А именно активации и создании учетной записи пользователя.
Как произвести первоначальную настройку
У всех устройств фирмы Hikvision по умолчанию уже прописан IP адрес по которому можно подключиться к данной камере и выполнить её настройку.
У Hikvision IDS-TCM203-A это — 192.168.1.64
После распаковки установки и подключению камеры к сети нужно открыть браузер IE и в адресной строке ввести его. Если вы подключили камеру правильно вы должны увидеть страницу с активацией. Первое что нужно сделать это задать пароль.
Если при вводе IP адреса камеры страница с активацией не открывается читаем вот эту статью.
После чего уже можно подключиться к веб интерфейсу камеры.
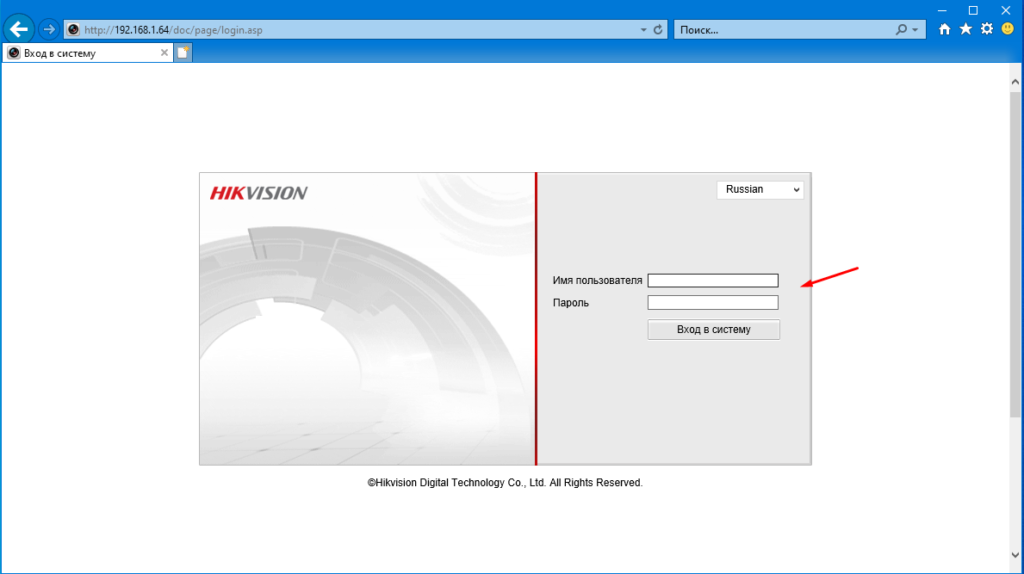
Очень часто после ввода имени пользователя и пароля можно увидеть следующие сообщение.
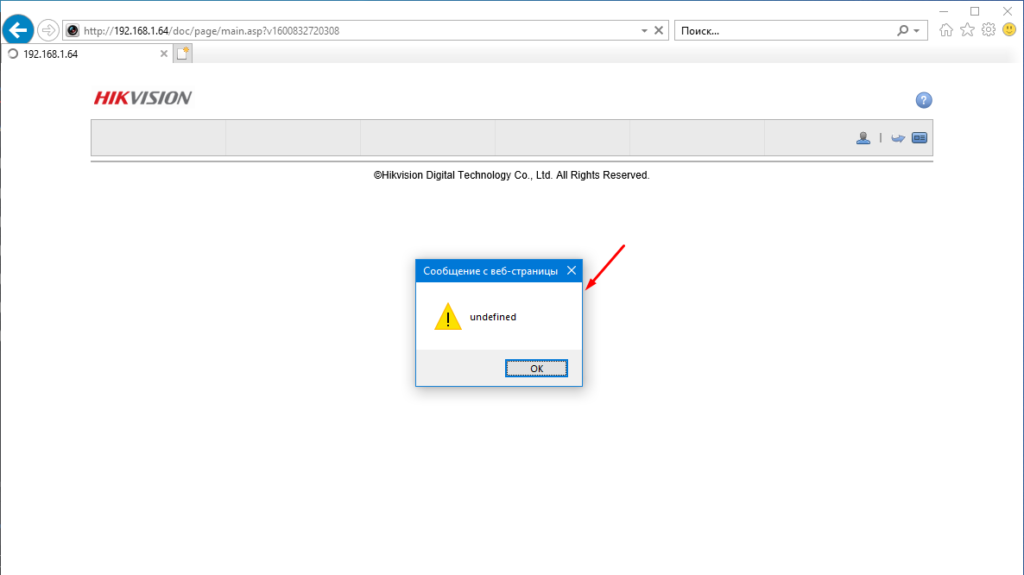
Это говорит о том что по каким то причинам надстройка которую нужно установить для работы с камерой либо не скачалась либо не установилась. Решение достаточно простое открываем другой браузер, например, Хром, заходим в веб интерфейс и скачиваем плагин.
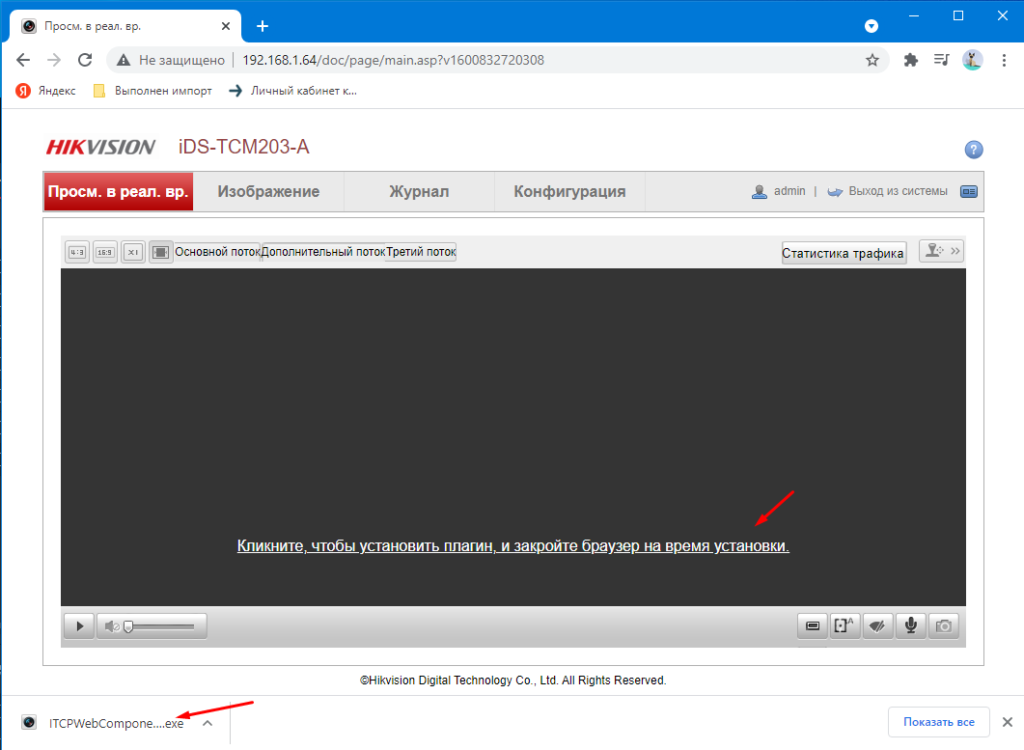
Устанавливаем его на компьютер перезапускам браузер.
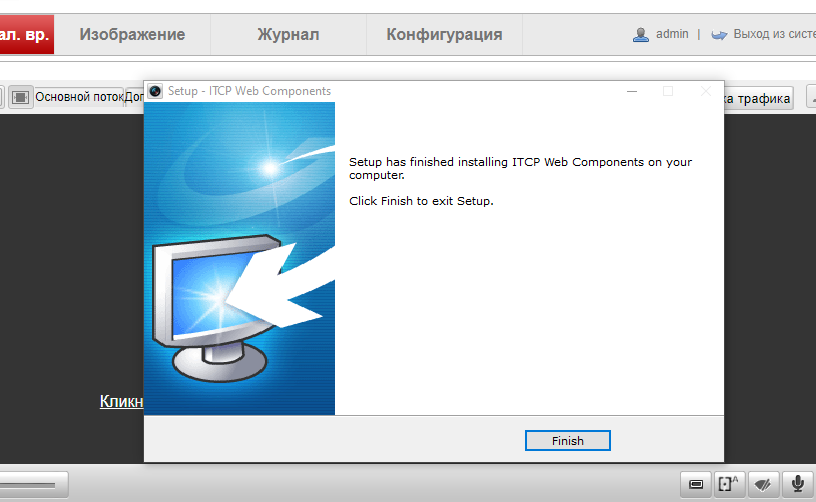
И пробуем подключиться уже через IE.
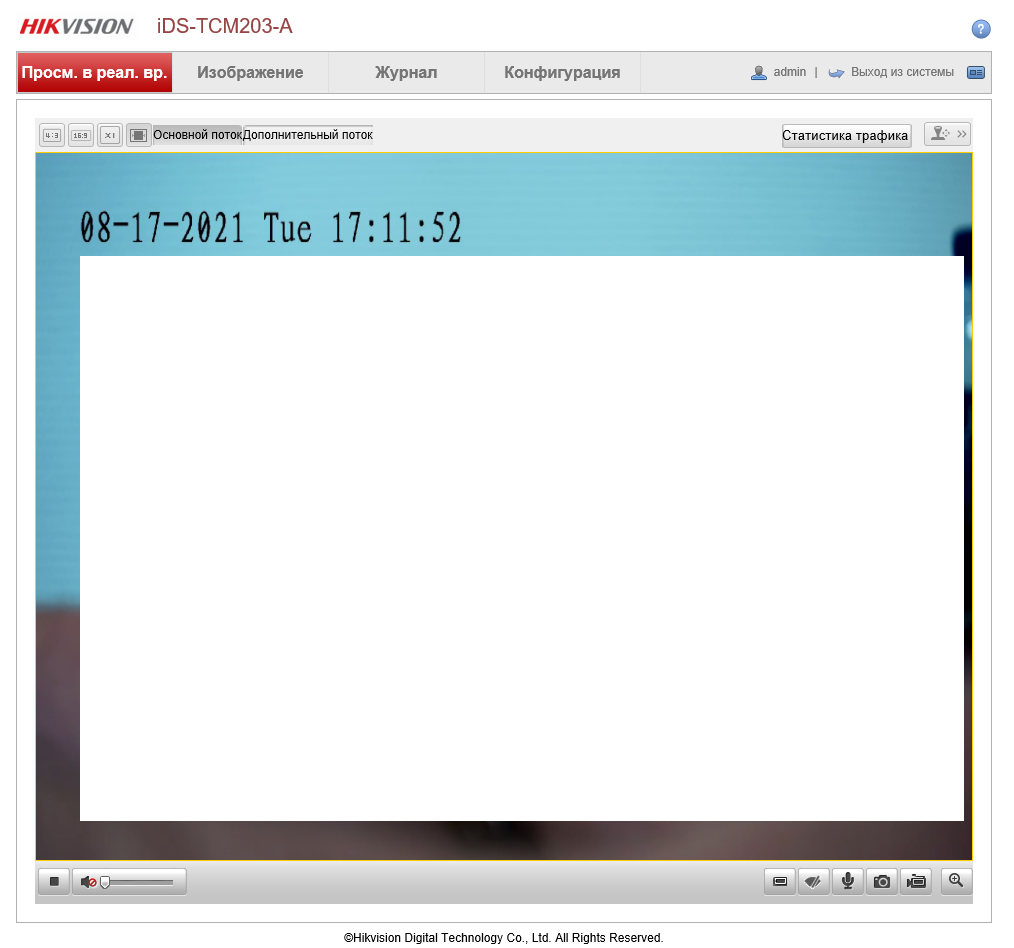
Данные надстройки работают корректно только в Internet Explorer. В любом другом браузере изображение с камеры будет не доступно.