Посмотреть инструкция для Huskystar 215 бесплатно. Руководство относится к категории швейные машины, 6 человек(а) дали ему среднюю оценку 7.2. Руководство доступно на следующих языках: английский. У вас есть вопрос о Huskystar 215 или вам нужна помощь? Задайте свой вопрос здесь
Не можете найти ответ на свой вопрос в руководстве? Вы можете найти ответ на свой вопрос ниже, в разделе часто задаваемых вопросов о Huskystar 215.
Какой размер иглы лучше всего использовать?
Какой срок службы у швейной иглы?
Что может повредить иглу при шитье?
Инструкция Huskystar 215 доступно в русский?
Не нашли свой вопрос? Задайте свой вопрос здесь
- Инструкции и руководства
- Бренды
- Viking
- Huskystar 215
- Справочник Пользователя
207/215
User’s Guide
Type B
Смотреть руководство для Huskystar 215 ниже. Все руководства на ManualsCat.com могут просматриваться абсолютно бесплатно. Нажав кнопку «Выбор языка» вы можете изменить язык руководства, которое хотите просмотреть.
MANUALSCAT | RU
Вопросы и ответы
У вас есть вопрос о Huskystar 215, но вы не можете найти ответ в пользовательском руководстве? Возможно, пользователи ManualsCat.com смогут помочь вам и ответят на ваш вопрос. Заполните форму ниже — и ваш вопрос будет отображаться под руководством для Huskystar 215. Пожалуйста, убедитесь, что вы опишите свои трудности с Huskystar 215 как можно более детально. Чем более детальным является ваш вопрос, тем более высоки шансы, что другой пользователь быстро ответит на него. Вам будет автоматически отправлено электронное письмо, чтобы проинформировать вас, когда кто-то из пользователей ответит на ваш вопрос.
инструкция к швейной машинке huskystar 55 series
Виктор2023-03-13
Задать вопрос о Huskystar 215
- Бренд:
- Huskystar
- Продукт:
- швейные машины
- Модель/название:
- 215
- Тип файла:
- Доступные языки:
- английский
Сопутствующие товары Huskystar 215
Specifications:196/196551-huskystar_215.pdf file (27 Jun 2023) |
Accompanying Data:
Viking Huskystar 215 Sewing Machine PDF Operation & User’s Manual (Updated: Tuesday 27th of June 2023 10:48:25 PM)
Rating: 4.3 (rated by 92 users)
Compatible devices: Emerald 122, Quilt Designer II, Sapphire 870 QUILT, Scandinavia 200, Huskystar C10, Emerald 203, 2780, Huskylock S15.
Recommended Documentation:
Text Version of Operation & User’s Manual
(Ocr-Read Summary of Contents of some pages of the Viking Huskystar 215 Document (Main Content), UPD: 27 June 2023)
-
31, Viking Huskystar 215 29 Stitch selector: 1 — 8 Stitch length: Stitch width: 5 Presser foot: Zigzag foot Thread ten sion: 2 — 6 Stitch selector: 6 («7» for Model 207) Stitch length: 2 Stitch width: 5 (for Model 215) Presser foot: Zigzag foot Thread tension: 4 — …
-
15, 13 Balancing Needle Thread Tension The needle thread and the bobbin thread should interlock in the center of two layers of fabric in straight stitch seams. 1 Match the desired thread tension number with the setting mark. Setting mark 2 Loosen the needle thread tension by moving the dial to a lo…
-
29, Viking Huskystar 215 27 Pin or baste zipper tape to the fabric and place it under the foot. With thread tails toward the back, lower the foot. To sew the left side of the zipper, guide the edge of the zipper foot along the zipper teeth, stitching through the garment and zipper tape. Turn the fabric and sew the other side of the zi…
-
34, 32 Dismantling and Assembling the Hook Assembly Turn off the power switch or unplug the machine. To dismantle the hook assembly: Raise the needle to its highest position and open the hook cover. Open the hinged latch of the bobbin case and take it out of the machine. Open the hook assembly ring holders…
-
39, Viking Huskystar 215 We reserve the right to change the machine equipment and the ass ort ment of accessories without prior notice, or make modifi cations to the performance or design. Such modifi cations, however, will always be to the benefi t of the user and the product. Please note that on disposal, this product mus…
-
5, 3 Extension Table The extension table provides added sewing surface and can be easily removed for free arm sewing. Detaching the table: Pull the table away from the machine, as illustrated. Attaching the table: Push the extension table until it snaps into the machine. Advantages and uses of free a…
-
13, 11 2 4 Threading the Machine Switch off the main switch. Raise the take-up lever to its highest position by turning the handwheel toward you. Raise the presser foot. Place the spool on the spool pin as shown, with the thread coming from the back of the spool. 1 Draw the thread into the thread guid…
-
Viking Huskystar 215 User Manual
-
Viking Huskystar 215 User Guide
-
Viking Huskystar 215 PDF Manual
-
Viking Huskystar 215 Owner’s Manuals
Recommended: KK-C37, 619, Phase Linear BT1613
-
SunStar SPS/B-2516 Series
EElleeccttrroonniiccaallllyy CCoonnttrroolllleeddPPaatttteerrnn SSeewwiinngg MMaacchhiinnee((MMeecchhaanniiccaall PPaarrtt))USER’’SMANUALSPS/B-2516 SERIESSPS/A-2516 SERIESSSUUNNSSTTAARR MMAACCHHIINNEERRYY CCOO..,, LLTTDD..1) FOR AT MOST USE WITH EASINESS, PLEASE CERTAINLY READ THIS MANUALBEFORE …
SPS/B-2516 Series 50
-
Kenmore 385.15212
SEWING MACHINEOwner’s Manual (Operating fundamentals)MAQUlNA DE COSERManual de InstruccionesMACHINE .g,COUDRE (Principes fundamentaux)Manuel d’instructionsModel, Modelo, Modele 385.15212, 15616, 15718304-800-180 Sears, Roebuck and Co., Hoffman Estates, IL 60179 U.S.A. w_w.sears.com …
385.15212 70
-
Bernina 330
1Dear Bernina Customer,Congratulations!You’ve decided on BERNINA, a reliable choice that will delight you for years to come. For over 100 years, our family has placed the highest value on satisfied customers. For myself, it is a matter of personal pride to offer you Swiss precision at the height of perfecti …
330 50
-
JUKI MO-2000QVP
MO-2000QVP2-Needle, 2/3/4-Thread Overlock Sewing MachineIMPORTANT:Read all safety regulations carefully and understand them before using your sewing machine.Retain this instruction manual for future reference.INSTRUCTION MANUAL …
MO-2000QVP 40
Additional Information:
Popular Right Now:
Operating Impressions, Questions and Answers:
This houshold sewing machine is designed to comply with IEC/EN 60335-2-28 and UL1594
IMPORTANT SAFETY INSTRUCTIONS
When using an electrical appliance, basic safety precautions should always be followed, including the following:
Read all instructions before using this household sewing machine.
DANGER — To reduce the risk of electric shock:
•A sewing machine should never be left unattended when plugged in. Always unplug this sewing machine from the electric outlet immediately after using and before cleaning.
•Always unplug before relamping. Replace bulb with same type rated 15 Watt.
WARNING — To reduce the risk of burns, fire, electric shock, or injury to persons:
•This sewing machine is not intended for use by persons (including children) with reduced physical, sensory or mental capabilities, or lack of experience and
knowledge, unless they have been given supervision or instruction concerning use of the sewing machine by a person responsible for their safety.
•Children should be supervised to ensure that they do not play with the sewing machine.
•Use this sewing machine only for its intended use as described in this manual. Use only attachments recommended by the manufacturer as contained in this manual.
•Never operate this sewing machine if it has a damaged cord or plug, if it is not working properly, if it has been dropped or damaged, or dropped into water. Return the sewing machine to the nearest authorized dealer or service center for examination, repair, electrical or mechanical adjustment.
•Never operate the sewing machine with any air openings blocked. Keep ventilation openings of the sewing machine and foot controller free from the accumulation of lint, dust, and loose cloth.
•Keep fingers away from all moving parts. Special care is required around the sewing machine needle.
•Always use the proper needle plate. The wrong plate can cause the needle to break.
•Do not use bent needles.
•Do not pull or push fabric while stitching. It may deflect the needle causing it to break.
•Switch the sewing machine off (“0”) when making any adjustment in the needle area, such as threading needle, changing needle, threading bobbin, or changing presser foot, etc.
•Always unplug sewing machine from the electrical outlet when removing covers, lubricating, or when making any other user servicing adjustments mentioned in the instruction manual.
•Never drop or insert any object into any opening.
•Do not use outdoors.
•Do not operate where aerosol (spray) products are being used or where oxygen is being administrated.
•To disconnect, turn all controls to the off (“0”) position, then remove plug from outlet.
•Do not unplug by pulling on cord. To unplug, grasp the plug, not the cord.
SAVE THESE INSTRUCTIONS
For the USA and Canada
This sewing machine has a polarized plug (one blade wider than the other). To reduce the risk of electric shock, this plug is intended to fit in a polarized outlet only one way. If the plug does not fit fully in the outlet, reverse the plug. If it still does not fit, contact a qualified electrician to install the proper outlet. Do not modify the plug in any way.
10
11
12
13
14
15
16
10
11
12
13
14
15
16
19
20
21
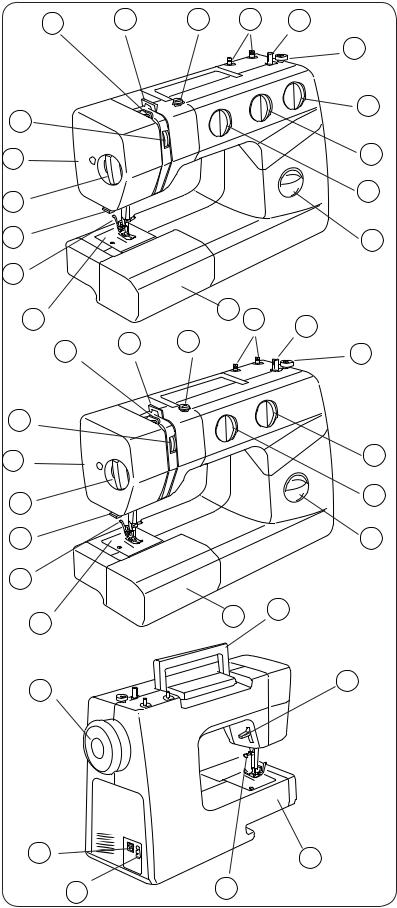
SECTION 1 ESSENTIAL PARTS
5
4
3
2
1
|
(Model 215) |
|||
|
17 |
7 |
6 |
|
|
9 |
8 |
||
|
5 |
|||
3
2
1
(Model 207)
17 18
24
23
22
2
Name of Parts
1 Reverse stitch button
2 Pattern selector dial
3 Stitch length dial
4 Stitch width dial (for Model 215)
5 Bobbin winder stopper
6 Bobbin winder spindle
7 Spool pins
8 Bobbin winder thread guide
9 Thread guide
10Thread take-up lever
11Thread tension dial
12Face plate
13Presser Foot Pressure dial
14Thread cutter
15Presser foot holder
16Needle plate
17Extension table
18Carrying handle
19Handwheel
20Power switch
21Machine socket
22Needle clamp screw
23Free arm
24Presser foot lifter
SECTION 2 GETTING READY TO SEW
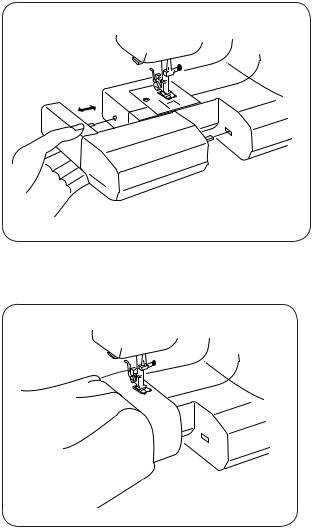
Extension Table
The extension table provides added sewing surface and can be easily removed for free arm sewing.
Detaching the table:
Pull the table away from the machine, as illustrated.
Attaching the table:
Push the extension table until it snaps into the machine.
Advantages and
uses of free arm sewing:
-To avoid fabric bunching around the needle when bartacking to reinforce pockets, plackets and waistbands.
-For stitching sleeves, waistbands, pant legs or any circular garment.
-For darning socks or mending knees, elbows or areas of wear in children’s clothes.
Note: Some fabrics have a lot of excess dye which can cause discoloration on other fabric but also on your
sewing machine. This discoloring may be very difÀcult or impossible to remove.
Fleece and denim fabric in especially red and blue often contain a lot of excess dye.
If you suspect that your fabric/ready-to-wear garment contains a lot of excess dye, always pre-wash it before sewing/embroidering to avoid the discoloring.
3
|
1 |
2 |
3 |
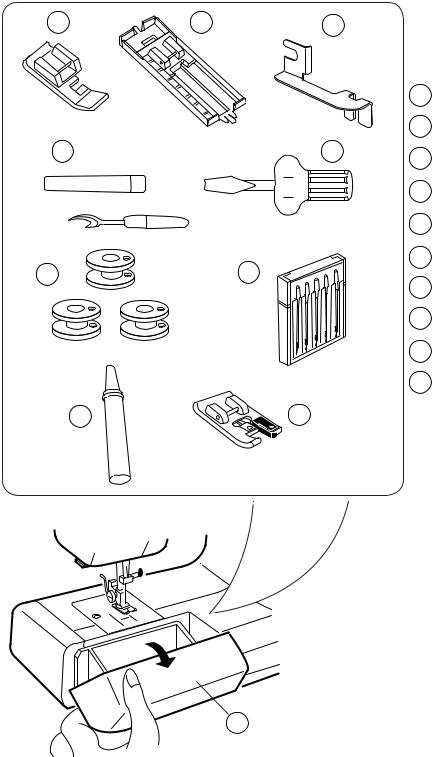
Standard Accessories |
||
|
and Storage Place |
|||||
|
1 |
Zipper foot |
||||
|
2 |
Sliding buttonhole foot |
||||
|
4 |
5 |
3 |
Hem guide |
||
|
4 |
Seam ripper |
||||
|
5 |
Large screwdriver |
||||
|
6 |
7 |
6 |
Bobbins |
||
|
7 |
Set of needles |
||||
|
8 |
Oil |
||||
|
9 |
Overcast foot (for Model 215) |
||||
|
10 |
Extension table |
||||
|
8 |
9 |
10
4
|
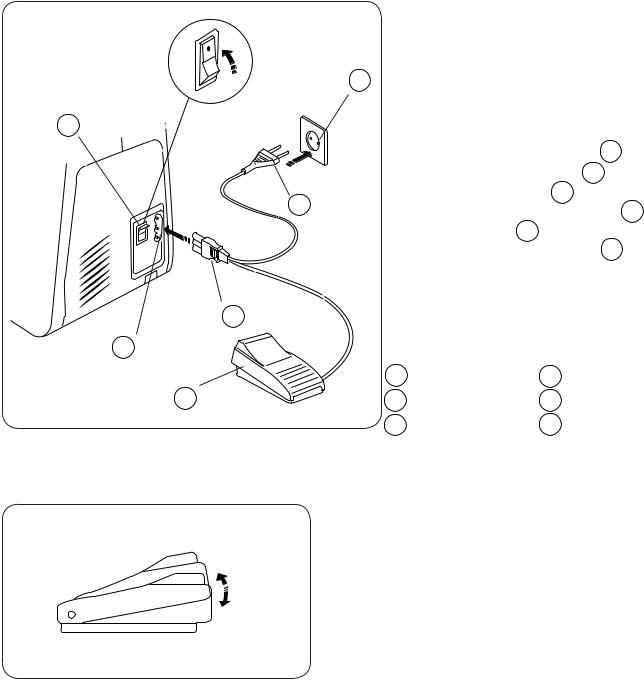
Connecting the Machine |
|||||||
|
to the Power Supply |
|||||||
|
3 |
Before connecting the power cord, |
||||||
|
make sure the voltage and fre- |
|||||||
|
2 |
quency shown on the machine |
||||||
|
conform to your electrical power. |
|||||||
|
1. Turn off the power switch |
2 . |
||||||
|
2. |
Insert the machine plug 5 |
into |
|||||
|
1 |
the machine socket |
4 . |
|||||
|
3. Insert the power supply plug 1 |
|||||||
|
into the outlet 3 . |
2 |
||||||
|
4. Turn on the power switch |
|||||||
|
to turn on the power and sewing |
|||||||
|
light. |
|||||||
|
5 |
|||||||
|
4 |
|||||||
|
1 |
Power supply plug |
2 |
Power switch |
||||
|
6 |
3 |
Outlet |
4 |
Machine socket |
|||
|
5 |
Machine plug |
6 |
Foot control |
Foot Control
Sewing speed can be varied by the foot control.
The harder you press on the control, the faster the machine runs.
Foot controller type YC-482J or TJC-150 for use with sewing machine Model 207 and 215 (for USA/Canada only).
5
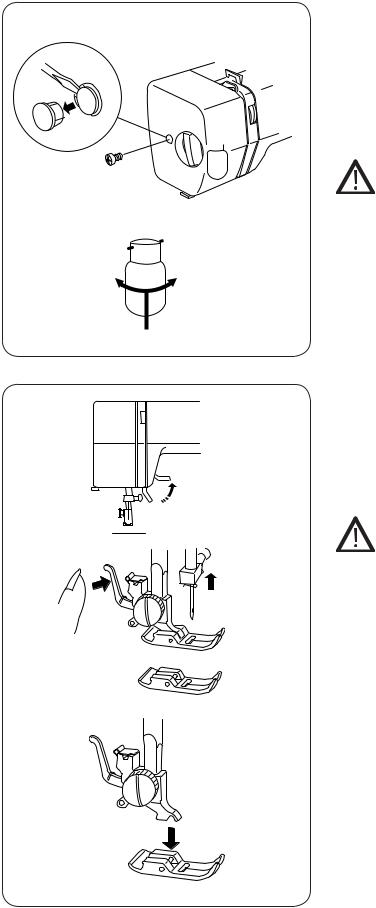
Sewing Light
The sewing light is located behind the face plate.
To change the bulb, take the face plate off the sewing machine by removing the set screw.
Unplug the power supply before changing the bulb.
To remove the bulb:
— Push and twist to the left.
To replace the bulb:
— Push and twist to the right.
The maximum power of the light bulb
is 15W.
To Attach and
Remove the Presser Foot
Unplug the power supply before changing the presser foot.
To remove:
Turn the handwheel toward you to raise the needle to its highest position.
Raise the presser foot.
Press the lever on the back of the ankle. The presser foot will drop off.
To attach:
Place the presser foot so the pin on the foot lies just under the groove of the ankle. Lower the ankle to lock the foot in place.
6

|
Changing Needles |
|||||||||||||||||||||||||||
|
Switch off the main switch. |
|||||||||||||||||||||||||||
|
Raise the needle by turning the handwheel |
|||||||||||||||||||||||||||
|
toward you and lower the presser foot. |
|||||||||||||||||||||||||||
|
Loosen the needle clamp screw by |
|||||||||||||||||||||||||||
|
turning it counterclockwise. |
|||||||||||||||||||||||||||
|
Remove the needle from the clamp. |
|||||||||||||||||||||||||||
|
Insert the new needle into the clamp with |
|||||||||||||||||||||||||||
|
the flat side away from you. |
|||||||||||||||||||||||||||
|
When inserting the needle into the clamp, |
|||||||||||||||||||||||||||
|
push it up as far as it will go and tighten the |
|||||||||||||||||||||||||||
|
clamp screw firmly with the screwdriver. |
|||||||||||||||||||||||||||
|
NOTE: |
Check your needles frequently for barbed or |
||||||||||||||||||||||||||
|
blunted points. Snags and runs in knits, Àne |
|||||||||||||||||||||||||||
|
silks and silk-like fabrics are permanent and |
|||||||||||||||||||||||||||
|
are almost always caused by a damaged needle. |
|||||||||||||||||||||||||||
|
Thread and Needle Chart |
|||||||||||||||||||||||||||
|
Fabric |
Cotton |
Silk |
|||||||||||||||||||||||||
|
Needle Size |
Thread Size |
Thread Size |
|||||||||||||||||||||||||
|
No. 60 (#7) |
Fine Silk |
||||||||||||||||||||||||||
|
No. 70 (#10) |
Crepe de chine |
70 — 80 |
100 — 140 |
||||||||||||||||||||||||
|
No. 80 (#12) |
Poplin |
50 — 60 |
80 — 100 |
||||||||||||||||||||||||
|
Pure Silk |
|||||||||||||||||||||||||||
|
No. 80-90 (#12-14) |
Broadcloth |
40 — 50 |
60 — 70 |
||||||||||||||||||||||||
|
Cotton |
|||||||||||||||||||||||||||
|
No. 90-100 (#14-16) |
Wool |
30 — 40 |
50 — 60 |
||||||||||||||||||||||||
|
No. 90-110 (#14-18) |
Denim |
30 |
45 — 50 |
||||||||||||||||||||||||
|
Stretch Needle |
Tricot |
70 — 80 |
100 — 140 |
||||||||||||||||||||||||
|
No. 70 (#10) |
|||||||||||||||||||||||||||
|
7 |
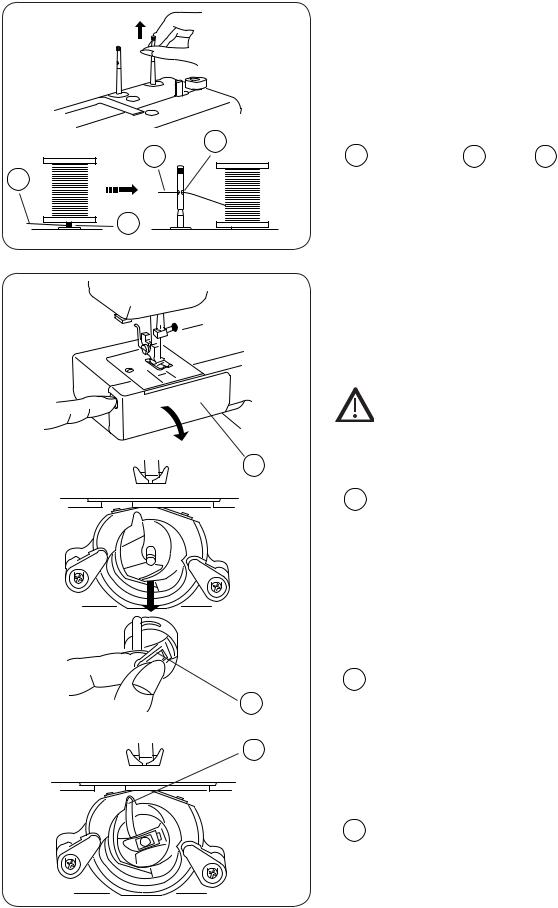
|
Setting Spool Pins |
|
|
The spool pins are used for holding the |
|
|
spool of thread to feed thread to the |
|
|
machine. To use, pull up the spool pin. |
|
|
Push down for storage. |
|
|
2 |
1 Upper thread 2 H o l e 3 Tangle |
|
1 |
|
|
1 |
|
|
3 |
NOTE: When using thread which has a tendency to |
|
tangle around the spool pin,thread through the |
|
|
hole of spool pin as shown.The hole should face |
|
|
the thread spool. |
|
|
Removing or |
|
|
Inserting the Bobbin Case |
|
|
Switch off the main switch. |
|
|
Open the hook cover. |
|
|
1 |
Hook cover |
|
1 |
|
|
Raise the needle by turning the handwheel |
|
|
toward you. |
|
|
Take out the bobbin case by holding the |
|
|
latch. |
|
|
Latch |
|
|
2 |
|
|
2 |
|
|
3 |
When inserting the bobbin case, place the |
|
finger into the recess of the hook race area. |
|
|
Finger |
|
|
3 |
8
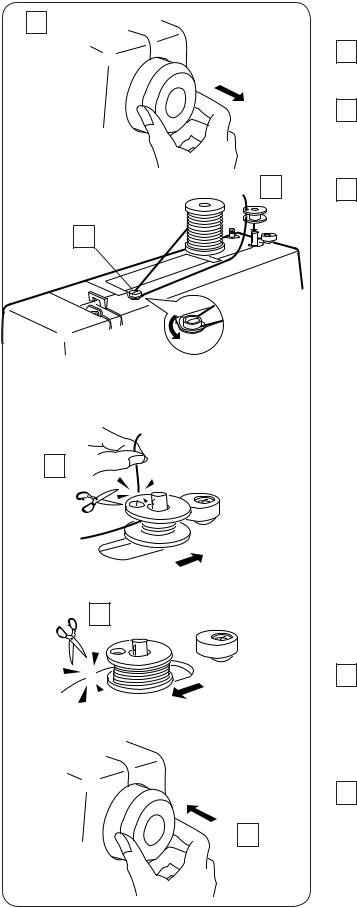
Winding the Bobbin
1
1 Pull the handwheel out to disengage.
2 Draw the thread from the spool. Guide the thread around the bobbin winder thread guide.
|
3 |
3 Insert the thread through the hole in the |
|
|
bobbin from the inside to the outside. |
||
|
2 |
Put the bobbin on the bobbin winder |
|
|
spindle. |
||
5
|
4 |
Push it to the right. |
||||
|
4 |
|||||
|
5 |
With the free end of the thread held in |
||||
|
your hand, depress the foot control. Stop |
|||||
|
6 |
the machine when it has made a few |
||||
|
turns, and cut the thread close to the |
hole in the bobbin.
6 Depress the foot control again. When the bobbin is fully wound, stop the machine. Return the bobbin winder spindle to its original position by moving the spindle to the left, and cut the thread.
7 Push the handwheel to the left to re-en- gage. (original position).
7
NOTE: Return the bobbin winder spindle to the left when the machine stops.
9
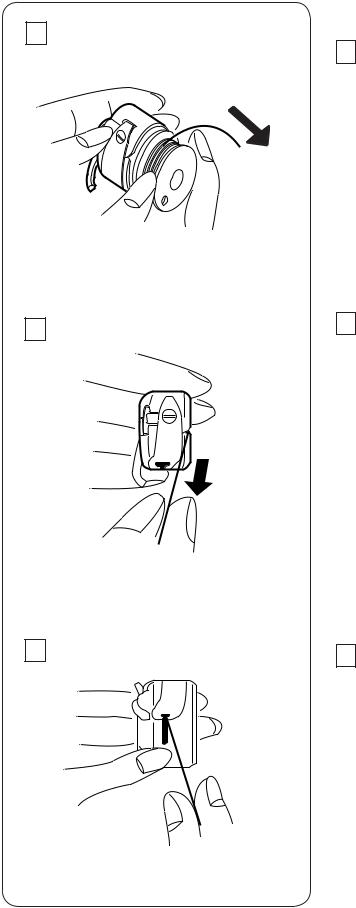
Threading Bobbin Case
1Place the bobbin into the bobbin case. Make sure the thread unwinds in the direction of arrow (clockwise).
2 Pull the thread into the bobbin case slot.
3Draw the thread under the tension spring and into the delivery eye.
NOTE: Leave about 10 cm (4″) of free thread.
10


