(скачивание инструкции бесплатно)
Формат файла: PDF
Доступность: Бесплатно как и все руководства на сайте. Без регистрации и SMS.
Дополнительно: Чтение инструкции онлайн
Страница:
(1 из 45)
навигация

1

2
3

4

5

6

7

8
9

10

11
12

13

14
15

16
17
18

19

20
21
22

23

24

25

26

27
28

29

30

31
32

33
34

35
36
37

38

39

40

41

42

43

44

45
Оглавление инструкции
- Страница 1 из 46
- Страница 2 из 46
- Страница 3 из 46
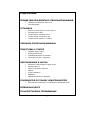
СОДЕРЖАНИЕ ПРЕЖДЕ ЧЕМ ПОЛЬЗОВАТЬСЯ СТИРАЛЬНОЙ МАШИНОЙ • • Правила техники безопасности Рекомендации УСТАНОВКА • • • • • Снятие транспортировочных винтов Регулировка ножек Подключение к электросети Подключение к водопроводу Подключение сливного шланга ОПИСАНИЕ СТИРАЛЬНОЙ МАШИНЫ ПОДГОТОВКА К СТИРКЕ • - Страница 4 из 46
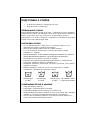
ПРЕЖДЕ ЧЕМ ПОЛЬЗОВАТЬСЯ СТИРАЛЬНОЙ МАШИНОЙ ПРАВИЛА ТЕХНИКИ БЕЗОПАСНОСТИ • • • • • • • • • • • • • • • • • Не пользуйтесь удлинителями или многогнездовыми розетками. Не вставляйте вилку в розетку, если на сетевом шнуре имеются повреждения. В случае повреждения сетевого шнура во избежание риска он - Страница 5 из 46
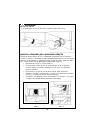
• После операций по контролю качества машины в ней может оставаться некоторое количество воды. Это не представляет вреда для машины. УСТАНОВКА Перед тем, как приступать к эксплуатации машины, Вам следует уделить внимание следующим вопросам. СНЯТИЕ ТРАНСПОРТИРОВОЧНЫХ ВИНТОВ • • • • • • • • - Страница 6 из 46
РЕГУЛИРОВКА НОЖЕК • • • • • • • Не устанавливайте Вашу машину на коврах или подобных покрытиях. Для того, чтобы Ваша машина работала бесшумно и без вибраций, она должна быть установлена на плоской, нескользкой и твердой поверхности. Вы можете выровнять машину, отрегулировав положение ее ножек. - Страница 7 из 46
• • • • При давлении в идущей из/под крана воды 1/10 бар Ваша машина будет работать более эффективно (давление 1 бар означает подачу более, чем 8 литров за минуту при полностью открытом кране). После завершения выполнения всех соединений проверьте их герметичность, полностью открыв кран подачи - Страница 8 из 46
ОПИСАНИЕ СТИРАЛЬНОЙ МАШИНЫ 1 2 3 4 5 6 / / / / / / Рабочий стол Панель управления Дозатор моющих средств Дверца Цоколь, закрывающий доступ к насосу Регулируемые ножки 6 - Страница 9 из 46
ПОДГОТОВКА К СТИРКЕ • • Подключите машину к электрической сети. Откройте кран подачи воды. ПЕРВЫЙ ЦИКЛ СТИРКИ Внутри Вашей машины может быть вода, оставшаяся после проведения заводских испытаний. Рекомендуется выполнить первый цикл стирки без белья, чтобы слить эту воду; высыпьте половину мерки - Страница 10 из 46
ЗАГРУЗКА МОЮЩЕГО СРЕДСТВА Количество моющего средства, которое Вам следует загружать в машину, зависит от следующих критериев: • Расход моющего средства будет варьироваться в соответствии со степенью загрязнения Вашего белья. Для стирки слабозагрязненного белья не используйте предварительную стирку - Страница 11 из 46
ОБСЛУЖИВАНИЕ И ЧИСТКА • • Отсоедините машину от сети электропитания. Закройте кран подачи воды. ФИЛЬТРЫ МАГИСТРАЛИ ПОДАЧИ ВОДЫ Со стороны крана в наливном шланге и по краям входных клапанов расположены фильтры, которые служат для того, чтобы предотвратить попадание в машину с водой грязи и - Страница 12 из 46
ВНИМАНИЕ! Опасность ожога! Т.к. вода внутри насоса может быть горячей, дайте ей остыть. ДОЗАТОР (ЯЩИЧЕК) ДЛЯ МОЮЩИХ СРЕДСТВ Остатки моющих средств могут со временем скапливаться в дозаторе и в отсеке, в который он вставляется. Периодически вынимайте дозатор моющих средств, чтобы удалять скопившиеся - Страница 13 из 46
СИФОН Вытяните дозатора моющих средств. Выньте сифон и тщательно удалите все остатки умягчителя. Установите сифон на свое место. Убедитесь, что он хорошо встал на место. Сифон КОРПУС МАШИНЫ Для чистки машины снаружи используйте нейтральное моющее средство и влажную тряпку. Будьте осторожны и не - Страница 14 из 46
РУКОВОДСТВО ПО ПОИСКУ НЕИСПРАВНОСТЕЙ Все ремонтные работы, которые следует выполнять на машине, должны производиться специалистами авторизованного сервисного центра. Если Вашей машине требуется ремонт или если Вы не смогли устранить неисправность с помощью нижеприведенных указаний: • Отсоедините - Страница 15 из 46
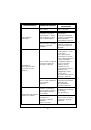
НЕИСПРАВНОСТЬ Ваша машина вибрирует. Чрезмерное пенообразование в дозаторе моющих средств. Неудовлетворительные результаты стирки. ВЕРОЯТНАЯ ПРИЧИНА СПОСОБЫ УСТРАНЕНИЯ В машину загружено мало белья. Это не препятствует работе машины. В машину загружено слишком много белья или же белье уложено очень - Страница 16 из 46
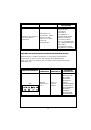
НЕИСПРАВНОСТЬ ВЕРОЯТНАЯ ПРИЧИНА СПОСОБЫ УСТРАНЕНИЯ Загрузка машины превышает максимально допустимую. Загрузите столько белья, чтобы загрузка машины не превышала максимально допустимую. Вода слишком жесткая. Отрегулируйте количество используемого моющего средства в соответствии с указаниями его - Страница 17 из 46
НЕИСПРАВНОСТЬ Отжим не выполняется или начинается с задержкой. СПОСОБЫ УСТРАНЕНИЯ ВЕРОЯТНАЯ ПРИЧИНА Неисправность отсутствует. Таким образом может работать система контроля балансировки. Система контроля балансировки попытается равномерно распределить в машине Ваше белье. Отжим начинается после - Страница 18 из 46
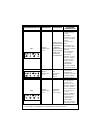
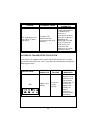
КОД НЕИСПРАВНОСТИ E02 ИНДИКАТОР НЕИСПРАВНОСТИ МЕРЫ ПО УСТРАНЕНИЮ НЕИСПРАВНОСТИ Мигают индикаторы 1 и 3. Уровень воды в машине ниже нагревательног о элемента. Давление воды в водопроводе может быть низким или нестабильным. Выкрутите кран подачи воды до отказа. Возможно, прервана подача воды, - Страница 19 из 46
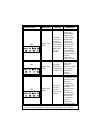
КОД НЕИСПРАВНОСТИ ИНДИКАТОР НЕИСПРАВНОСТИ E05 Мигают индикаторы 2 и 4. ВЕРОЯТНАЯ НЕИСПРАВНОСТЬ Отказ нагреватель ного элемента или датчика. Выключите машину и отключите ее от сети электропитания. Закройте кран подачи воды и обратитесь в ближайший авторизованный сервисный центр. Отказ двигателя. - Страница 20 из 46
КОД НЕИСПРАВНОСТИ E09 ИНДИКАТОР НЕИСПРАВНОСТИ Мигают индикаторы 1, 2 и 4. ВЕРОЯТНАЯ НЕИСПРАВНОСТЬ Слишком высокое или слишком низкое напряжение сети. Если напряжение сети ниже 150 В или выше 260 В, Ваша машина автоматически остановится. Когда напряжение вернется в норму, машина возобновит работу. - Страница 21 из 46
СЕРВИСНЫЙ ЦЕНТР Прежде чем обращаться в сервисный центр: 1. Попробуйте устранить неисправность самостоятельно (см. раздел «Поиск неисправностей»). 2. Запустите программу еще раз, чтобы проверить, не устранилась ли неисправность автоматически. 3. Если неисправность не исчезла, обратитесь в сервисный - Страница 22 из 46
CONTENTS BEFORE USING THE WASHING MACHINE • • Safety warning Recommendations INSTALLATION • • • • • Removal of transportation screws Adjustment of feet Electrical connection Water supply connection Water drain connection DESCRIPTION OF THE WASHING MACHINE WASH PREPARATION • • • • First wash cycle - Страница 23 из 46
BEFORE USING THE WASHING MACHINE SAFETY WARNINGS • • • • • • • • • • • • • • • • • Do not use a multiple socket or extension cord. Do not insert a plug with a damaged or broken cord into the socket. If the cord is damaged, it should be replaced by the manufacturer or appointed service agent in - Страница 24 из 46
• As a result of quality control procedures, a certain amount of water may remain in your machine. This is not harmful for your machine. INSTALLATION You must pay close attention to the following issues before using your washing machine. REMOVAL OF TRANSPORTATION SCREWS • • • • • • • • - Страница 25 из 46
ADJUSTMENT OF FEET • • • • • • • Do not install your machine on rugs or similar surfaces. For your machine to work silently and without vibrations, it should be settled on a flat, non-slippery and tough surface. You can adjust the balance of your machine from its feet. First, loosen the plastic - Страница 26 из 46
• • • • Water pressure of 1-10 bars from your tap will enable your machine to work more efficiently (1 bar pressure means water flow of more than 8 litres per minute from a fully opened tap). After connections are secure, check for non-leakage of the connection joints by turning on your tap fully. - Страница 27 из 46
DESCRIPTION OF THE WASHING MACHINE 1 — Worktop 2 — Control panel 3 — Detergent dispenser 4 — Door 5 — Plinth covering pump access 6 — Adjustable feet 25 - Страница 28 из 46
PREPARATION OF THE WASHING • • Plug in the machine. Open the water tap. FIRST WASH CYCLE There may be water left inside your machine after factory tests and trials. It is recommended that the first wash cycle should be made without any laundry to drain this water; pour half a measuring cup of - Страница 29 из 46
FILLING DETERGENT IN THE MACHINE The quantity of the detergent that you will fill in your machine depends on the following criteria: • Your detergent consumption will change according to the level of dirtiness of your clothes. For your slightly dirty clothes, do not prewash and put a small amount - Страница 30 из 46
MAINTENANCE AND CLEANING • • Unplug your machine. Close the water tap. WATER INLET FILTERS On the tap part of your machine’s water inlet hose and at the extremities of the water inlet valves, there are filters to prevent entrance of dirt and foreign bodies into the water to the machine. If the - Страница 31 из 46
WARNING! Danger of scalding! Since the water inside the pump maybe hot, wait for it to cool. DETERGENT DRAWER Detergents may cause residue build-up in the detergent drawer and its slot over time. Take out the detergent drawer periodically to clean away the accumulated residue. To remove the drawer, - Страница 32 из 46
SIPHON PLUG Pull out the detergent drawer. Remove the siphon plug and thoroughly clean any softener residue. Refit the cleaned siphon plug back in its place. Check that it is fitted properly. Siphon plug THE CABINET To clean the outside of the appliance, use a neutral detergent and a damp cloth. - Страница 33 из 46
TROUBLESHOOTING GUIDE All repairing which must be done on the machine should be performed by authorized service personnel. When your machine requires repairs or you are unable to eliminate the failure with the help of the information given below: • Unplug the machine. • Close the water tap. • - Страница 34 из 46
FAILURE PROBABLE CAUSE There is a small amount of clothes in the device. Your machine is vibrating. Excessive amount of clothes are filled in the machine or the clothes are not placed in a well-balanced manner. Your machine touches a ripid object. Too much detergent has been used. Excessive foam in - Страница 35 из 46
FAILURE PROBABLE CAUSE Machine load exceeds maximum capacity. Washing quality is poor. The water is drained from the machine as soon as it is filled. No water is seen in the drum during washing. Your water may be hard. Distribution of the clothes in your machine is not evenlybalanced. The end of - Страница 36 из 46
FAILURE The spinning process is not done or starts with delay. PROBABLE CAUSE No failure. The unbalanced load control may operate in that way. METHODS OF ELIMINATION The unbalanced load control system will try to distribute your clothes in a homogenous manner. After your clothes are distributed, - Страница 37 из 46
FAILURE CODE E02 FAILURE INDICATOR Lights 1 and 3 blink. The water level in your machine is below heater. The pressure of your water supply may be low or unstable. Lights 1 and 4 blink. The pump has failed or the pump filter is obstructed. Lights 2 and 3 blink. There is an excessive amount of water - Страница 38 из 46
FAILURE CODE FAILURE INDICATOR PROBABLE FAILURE Lights 2 and 4 blink. The heater of your machine or the heat sensor has failed. Lights 3 and 4 blink. The motor has failed. Lights 1, 2 and 3 blink. Electronic card has failed. Lights 2, 3 and 4 blink. The motor has failed. E05 E06 E07 E08 36 - Страница 39 из 46
FAILURE CODE E09 FAILURE INDICATOR PROBABLE FAILURE Lights 1, 2 and 4 blink. The network voltage is too high or too low. Lights 1, 3 and 4 blink. Communication error. E10 37 CORRECTIVE MEASURES If the network voltage is lower than 150V or higher than 260V, your machine will automatically stop. When - Страница 40 из 46
AFTER-SALES SERVICE Before contacting After-Sales Service: 1. Try to remedy the problem yourself (see “Troubleshooting Guide”). 2. Restart the programme to check whether the problem has solved itself. 3. If the washing machine continues to function incorrectly, call the AfterSales Service. Specify: - Страница 41 из 46
NOTES ______________________________________________________________ ______________________________________________________________ _____________________________________________________________ ______________________________________________________________ - Страница 42 из 46
NOTES ______________________________________________________________ ______________________________________________________________ _____________________________________________________________ ______________________________________________________________ - Страница 43 из 46
- Страница 44 из 46
- Страница 45 из 46
Инструкция загружена с сайта http://mcgrp.ru большой выбор руководств и инструкций в формате pdf, doc, exe и с возможностью онлайн просмотра. - Страница 46 из 46
Инструкции и руководства похожие на WHIRLPOOL AWG 247
Другие инструкции и руководства из категории Стиральная машина
© 2023 manuals-help.ru, Все права защищены
-
Инструкции по эксплуатации
1

Whirlpool AWG 247 инструкция по эксплуатации
(45 страниц)
- Языки:Русский
-
Тип:
PDF -
Размер:
2.1 MB -
Описание:
Стиральная машина
Просмотр
На NoDevice можно скачать инструкцию по эксплуатации для Whirlpool AWG 247. Руководство пользователя необходимо для ознакомления с правилами установки и эксплуатации Whirlpool AWG 247. Инструкции по использованию помогут правильно настроить Whirlpool AWG 247, исправить ошибки и выявить неполадки.
При использовании стиральной машины придерживайтесь указаний, приведенных в инструкции по эксплуатации стиральной машины Whirlpool AWG 247 и в Таблице программ.

Описание инструкции Whirlpool AWG 247:
Тип устройства: Стиральные машины;
Фирма производитель: Whirlpool;
Модель: Whirlpool AWG 247;
Язык инструкции: русский;
Формат файла: pdf;
Количество страниц: 45;
Размер файла: 2 Мб.
Инструкция для Whirlpool AWG 247:
В руководстве Whirlpool AWG 247 содержатся следующие важные сведения: меры предосторожности и общие рекомендации, описание стиральной машины, перед первой стиркой, моющие средства и добавки, чистка и уход, руководство по поиску неисправностей, установка.
Инструкции для похожих моделей, которые помогают нашим пользователям:
-
Page 1: Whirlpool AWG 247
193 INSTRUCTIONS FOR USE BEFORE USING THE APPLIANCE ………………….. ……….. PAGE 194 SAFEGUARDING THE ENVIRONMENT ………………….. PAGE 194 PRECAUTIONS AND GENERAL RECOMMENDATIONS ……………………………………….. …….. PAGE 195 CONTROL PANEL DESCRIPTION ………………….. ……….. PAGE 196 USE OF ICE MAK[…]
-
Page 2: Whirlpool AWG 247
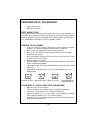
194 BEFORE USING THE APPLIANCE SAFEGUARDING THE ENVIRONMENT • Your new appliance is de signed exclusively for domestic use To get the most out of your new appliance, read the user handb ook thoroughly. The handbook contains a description of the appliance and useful tips for storing food. Keep this handbook fo r future consultation. 1. After unpac[…]
-
Page 3: Whirlpool AWG 247
195 PRECAUTIONS AND GENERAL RECOMMENDATIONS • Use the refrigerator compartment only for storing fresh food and beverages and use the freezer compartment only for storing frozen food, freezing fresh food and making ice cubes. • After installation, make sure that the appliance is not standing on the power supply cable. • Do not store glass cont[…]
-
Page 4: Whirlpool AWG 247
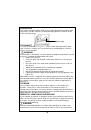
196 CONTROL PANEL DESCRIPTION The control Panel is located at the top front of the refrigerator compartment. T emperature Controls For your convenience, your temperature controls are preset at the factory. Wh en you first install your refrigerator, make sure the controls are stil l set to the recommended set points as shown. Recommended Settings IM[…]
-
Page 5: Whirlpool AWG 247
197 Fast Cooling & Fast Freezing The Fast Cooling & Fast Freezing feature as sists with periods of high refrigerator use, full grocery loads, or tem porarily warm room temperatures. • Press the Fast Cooling & Fast Freezin g touch pad to set the freezer and refrigerator to the lowest temperature settings. Pres s the Fast Cooling & […]
-
Page 6: Whirlpool AWG 247
198 Wa t e r D i s p e n s e r (select models) If you did not flush the water system when the refrigerator was first installed, dispense water into a co ntainer until you draw and discard 2 to 3 L (8 to 12 gal.) or for approx imately 6 to 7 minutes after the water begins dispensing. The water you dr aw and discard rinses the pipes. Allow several ho[…]
-
Page 7: Whirlpool AWG 247
199 USE OF ICE MAKER AND WATER DISPENSER Automatic Ice Maker Connect the ice maker to the water supply as instructed. Proper water flow and a level refrigerat or are essential for optimal ice maker performance. Ice Maker Operation • To turn ice maker On push ar m down from locked position. • Lift arm up and lock into posi tion to turn ice maker[…]
-
Page 8: Whirlpool AWG 247
200 WATER FILTER (SELECT MODELS) W ater Filter Removal and Installation If your appliance must be connec ted to the mains water supply to operate the water dispenser and/or ice maker, it must be a water supply which delivers potable water only. Ice makers not connected to a mains water supply must be filled with potable water only. Initial Installa[…]
-
Page 9: Whirlpool AWG 247
201 GUIDE TO INTERNAL COMPONENTS Shelves • Never attempt to adjust a shel f that is loaded with food (except in the case of the lift shelf). • Confirm shelf is secure befo re placing items on shelf. Your refrigerator has either spill guard glass shelf or non- sealed Shelves . The spill guard glass shelf shelves have a spill retainer edge which […]
-
Page 10: Whirlpool AWG 247
202 To Install: • Reverse the removal p rocedure. Be sure the shelf is in a level position. • When the sliding shelf is pushed to the rear , it will reposition the rear latches to their correct operating position. The Crisper Top serves as the lowe r fresh food shelf. To Remove the Crisper Top: • Remove crisper drawers as indicated on page 11[…]
-
Page 11: Whirlpool AWG 247
203 P arty chiller (select models) The party chiller keeps beverages and other items cooler than the rest of the fr esh food section. A cold air inlet allows air from the freezer section to pass into the beverage chiller. The party chiller control is located on the left wall of the fresh food compartment. The control ad justs the amount of cold air[…]
-
Page 12: Whirlpool AWG 247
204 Notes • Cold air directed to the draw er can decrease refrigerator temperature. Refrigerator contro l may need to be adjusted. • Do not place leafy veg etables in the drawer. Colder temperatures could damage leafy produce. To Remove Drawer: • Lift lid. Pull drawer out to fu ll extension. Tilt up front of drawer and pull straight out. To I[…]
-
Page 13: Whirlpool AWG 247
205 Wire Basket (select models) To Remove: • Pull basket out to full extension. Tilt up front of basket and pull straight out. To Install: • Insert basket into freezer liner rails and push back into place. Freezer Door Shelf (select models) The Freezer Door Shelf provides convenient storage for frozen food items in freezer door. To Remove: • […]
-
Page 14: Whirlpool AWG 247
206 GUIDE TO STORAGE AND THAWING OF FOOD The freezer compartment, marked with the symbol , is used for storing fr ozen food and freezing fresh or cooked food. The maximum quantity of food which can be frozen in a 24 hour period, at an ambient temperature of 25°C, is stated on the ra ting plate, inside the refrigerator compartment. For more efficie[…]
-
Page 15: Whirlpool AWG 247
207 FOOD STORAGE CHART Storage time will vary according to the quality of the food, th e type of packaging or wrap used (moisture and vapour proof), and the storage tempe rature (which should be -18°C). FOODSTUFF AND STORAGE TIME DAIR Y PRODUCTS PA S T R Y A N D B R E A D Fruit Concentrated fruit juice 12 months Fruit (in general) 8 to 12 months C[…]
-
Page 16: Whirlpool AWG 247
208 MAINTENANCE AND CLEANING Before any cleaning or maintenance operation, unplug the appliance from the mains or disconnect the electrical power supply. Periodically clean the refrigerator and freezer compartmen ts with a cloth and a solution of lukewarm water and neutral detergent specific ally for refrigerator interiors. Never use detergents or […]
-
Page 17: Whirlpool AWG 247
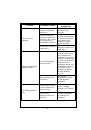
209 TROUBLESHOOTING GUIDE/AFTER-SALES SERVICE When you hear these noises Before contacting After-sales Service…. Performance problems often result fr om simple things you can find a n d solve yourself without tools of any kind. The appliance is not working • Is the power plug plugged into a li ve socket with the proper voltage? • Have you che[…]
-
Page 18: Whirlpool AWG 247
210 AFTER-SALES SERVICE Before contacting After-Sales Service: 1. See if you can solve the problem yourself with the help of the “TROUBLESHOOTING GUIDE/ AFTER-SALES SERVICE”). 2. Switch the appliance on again to see if the problem has been solved. If it has not, disconnect the appliance from the power supply and wait for about an hour before sw[…]
-
Page 19: Whirlpool AWG 247
211 INSTALLATION Your new appliance is a FULL NO FROST model exclusively for domestic use, i.e. both refrigerator and freezer compartments are provided with an auto matic defrosting function. This manual contains indication s and warnings for correct and safe installation of th e appliance — read it ca refully before starting installation operation[…]
-
Page 20: Whirlpool AWG 247
212 DOOR AND DRAWER REMOVAL Some installations require door/d rawer removal to transport the refrigerator to its final location. Disconnect power to refrigerat or before removing doors or drawer. Connect power only after replacing doors or drawer. Door remov al To Remove: 1. Unplug power cord from power source. 2. Remove toe grille and bottom hinge[…]
-
Page 21: Whirlpool AWG 247
213 Drawer Removal To avoid possible injury, product, or property damage, you will need two people to perform the following instructions. To Remove: 1. Pull drawer open to full extension. 2. Pull upper basket ou t to full ex tension and lift out to remove. 3. Lift lower basket straight up and out to remove. 4. On each side rail is a basket cr adle […]
-
Page 22: Whirlpool AWG 247
214 Leveling • Do not use power tools when pe rforming leveling procedure. • To enhance the appearance an d maintain performance, the refrigerator should be level. (side to side) Note Complete any required door revers al, panel installation and/or a water supply connection, before leveling. Materials Needed • 3/8” hex head driver • Carpen[…]
-
Page 23: Whirlpool AWG 247
215 Handles If not installed, the handle is lo cated in the interior of the fresh food section or attached to th e back of your refrigerator. Remove and discard handle packagin g and tape. Handle design varies from re frigerator to refrigerator. Please reference the appropria te instructions for your model below. Fresh Food Handles Front Mount Hand[…]
-
Page 24: Whirlpool AWG 247
216 Freezer Handles Partial-Width Handle Materials Needed • Phillips screwdriver To Install: 1. Install handle by fasten ing with screws removed from edge of door. • If reversing freezer door, remove door plugs from top edge of door and insert in to screw holes. To Remove: Remove handle screws with Ph illips screwdriver and retain screws for la[…]
-
Page 25: Whirlpool AWG 247
217 Front Mount F reezer Handle Materials Needed • Gloves to protect hands. • Phillips screwdriver. • Plastic handle removal card (o r 0.1 cm thick plastic card). Retain the card. Notes • There is a slight curve to th is style of freezer handle. For proper installation, be sure handle is oriented as shown. To Install: 1. Align door handle c[…]
-
Page 26: Whirlpool AWG 247
218 WATER CONNECTION Opening and Closing Y o ur Fresh Food Doors (select models) Your new refrigerator is uniquely designed with two fresh food doors. Either door can be open ed or closed independently of one another. There is a vertically-hinged section on the left fresh food door. When the left door is closed, the hinged section automatically for[…]
-
Page 27: Whirlpool AWG 247
219 ELECTRICAL CONNECTION Regulations requir e that the appliance is earthed. The manufacturer declines all liability for injury to persons or animals and for damage to property result ing from failure to observe the prescriptions. Make sure that the inst allation and the electrical connection are carried out by a qualifi ed technician according to[…]

193
INSTRUCTIONS FOR USE
BEFORE USING THE APPLIANCE
…………………..………..PAGE 194
SAFEGUARDING THE ENVIRONMENT
…………………..PAGE 194
PRECAUTIONS AND GENERAL
RECOMMENDATIONS
………………………………………..……..PAGE 195
CONTROL PANEL DESCRIPTION
…………………..………..PAGE 196
USE OF ICE MAKER AND WATER DISPENSER
………PAGE 199
WATER FILTER (SELECT MODELS)
…………………..……..PAGE 200
GUIDE TO INTERNAL COMPONENTS
……………………PAGE 201
GUIDE TO STORAGE AND THAWING OF
FOOD
…………………….…………………………………………….………..PAGE 206
MAINTENANCE AND CLEANING
………………….………..PAGE 208
TROUBLESHOOTING GUIDE/AFTER-SALES
SERVICE
………………………………………………………………………..PAGE 209
AFTER-SALES SERVICE
………………….…………………………..PAGE 210
INSTALLATION
……………………………………………….…………..PAGE 211
WATER CONNECTION
………………….…………………………..PAGE 218
ELECTRICAL CONNECTION
……………….…………………….PAGE 219
31102000GB.fm Page 193 Friday, August 12, 2005 2:33 PM