
ViaVentode Luxe
Инструкция по использованию
Пожалуйста, перед пользованием кофевмашины внимательно прочитайте инструкцию
по эксплуатации и указания по соблюдению техники безопасности.
ДЛЯ ИСПОЛЬЗОВАНИЯ только в ДОМАШНЕМ ХОЗЯЙСТВЕ
а
Производитель оставляет за собой право вносить изменения в конструкцию без предварительного оповещения.
инструкцияPhilips Saeco Via Veneto de Luxe RI9345

ISTRUZIONI PER L’USO
OPERATING INSTRUCTIONS
MODE D’EMPLOI
BEDIENUNGSANLEITUNG
INSTRUCCIONES DE USO
INSTRUÇÕES PARA USO
GEBRUIKSAANWIJZING
LEGGERE ATTENTAMENTE QUESTE ISTRUZIONI D’USO PRIMA DI UTILIZZARE LA MACCHINA
READ THESE OPERATING INSTRUCTIONS CAREFULLY BEFORE USING THE MACHINE
LIRE ATTENTIVEMENT CE MODE D’EMPLOI AVANT D’UTILISER LA MACHINE
DIESE BEDIENUNGSANLEITUNG IST VOR DEM ERSTEN GEBRAUCH DER
MASCHINE AUFMERKSAM ZU LESEN
LEER ATENTAMENTE ESTAS INSTRUCCIONES DE USO ANTES DE UTILIZAR LA MÁQUINA
LER ATENTAMENTE ESTAS INSTRUÇÕES DE USO ANTES DE UTILIZAR A MÁQUINA
LEES DEZE GEBRUIKSAANWIJZINGEN AANDACHTIG DOOR, ALVORENS HET APPARAAT TE GEBRUIKEN
FOR HOUSEHOLD USE ONLY
type sin013c
Посмотреть инструкция для Philips Saeco Via Veneto de Luxe RI9345 бесплатно. Руководство относится к категории кофеварки, 13 человек(а) дали ему среднюю оценку 8.7. Руководство доступно на следующих языках: английский. У вас есть вопрос о Philips Saeco Via Veneto de Luxe RI9345 или вам нужна помощь? Задайте свой вопрос здесь
Главная
| Philips | |
| Saeco Via Veneto de Luxe RI9345 | RI9345/11 | |
| кофеварка | |
| 8015925100935, 8015925101475, 8015925101567, 18015925100932, 68015925100937 | |
| английский | |
| Руководство пользователя (PDF) |
Прочие свойства
Производительность
| Вместимость в чашках | — чашек |
| Емкость водного резервуара | 1.5 L |
| Максимальное рабочее давление | 15 бар |
| Тип продукта | Машина для эспрессо |
Эргономика
| Съемный резервуар для воды | Да |
| Материал корпуса | Aluminium, Plastic |
| Цвет товара | Черный |
| Длина шнура | 1.2 m |
Вес и размеры
| Ширина | 245 mm |
| Глубина | 240 mm |
| Высота | 300 mm |
| Вес | 4100 g |
Энергопитание
| Мощность | 1050 W |
| Частота входящего переменного тока | 50 Hz |
| Входящее напряжение сети | 230 V |
Программы и функции приготовления пищи
показать больше
Не можете найти ответ на свой вопрос в руководстве? Вы можете найти ответ на свой вопрос ниже, в разделе часто задаваемых вопросов о Philips Saeco Via Veneto de Luxe RI9345.
Какой вес Philips Saeco Via Veneto de Luxe RI9345?
Как часто следует очищать кофеварку от накипи?
Какой лучший способ очистки кофеварки от накипи?
Как долго можно хранить кофе в зернах?
Как лучше всего хранить кофе?
Как помол сказывается на вкусе кофе?
Какая высота Philips Saeco Via Veneto de Luxe RI9345?
Какая ширина Philips Saeco Via Veneto de Luxe RI9345?
Какая толщина Philips Saeco Via Veneto de Luxe RI9345?
Инструкция Philips Saeco Via Veneto de Luxe RI9345 доступно в русский?
Не нашли свой вопрос? Задайте свой вопрос здесь
Перед Вами Инструкция кофеварки Saeco Via Vento de Luxe. Вы можете ознакомиться и скачать данное руководство по эксплуатации бесплатно.
Инструкция по применению на русском языке, предложенная производителем, позволяет
правильно использовать Вашу бытовую технику и электронику.
-
 1
1
-
2
-
3
-
4
-
5
-
6
-
7
-
8
-
9
-
10
-
11
-
Repair manuals
1

Saeco Via Veneto service manual
(4 pages)
-
Type:
PDF -
Size:
721.73 KB
Preview
Saeco Via Veneto (Kitchen Appliances) service manuals in PDF format will help to find failures and errors and repair Saeco Via Veneto and restore the device’s functionality.
![]()
TYPE COM 004 C
ISTRUZIONI PER L’USO
OPERATING INSTRUCTIONS
MODE D’EMPLOI
BEDIENUNGSANLEITUNG
INSTRUCCIONES DE USO
INSTRUÇÕES PARA USO
GEBRUIKSAANWIJZING
PER LA VOSTRA SICUREZZA LEGGERE ATTENTAMENTE LE ISTRUZIONI PER L’USO.
FOR YOUR SAFETY CAREFULLY READ THE OPERATING INSTRUCTIONS.
POUR VOTRE SÉCURITÉ, LISEZ ATTENTIVEMENT LE MODE D’EMPLOI.
FÜR IHRE SICHERHEIT LESEN SIE BITTE SORGFÄLTIG DIE BEDIENUNGSANLEITUNG, BEVOR SIE DAS GERÄT IN BETRIEB SETZEN.
PARA SU SEGURIDAD LEA ATENTAMENTE LAS INSTRUCCIONES DE USO.
PARA A SUA SEGURANÇA DEVE LER ATENTAMENTE ESTAS INSTRUÇÕES.
LEES DEZE GEBRUIKSAANWIJZING ZORGVULDIG VOORDAT U DE MACHINE GEBRUIKT.
FOR HOUSEHOLD USE ONLY
USAGE DOMESTIQUE SEULEMENT

2
Congratulazioni,
Ci congratuliamo con voi per l’acquisto di questa macchina per caffè espresso, di qualità superiore, e vi ringraziamo per la fi ducia accordataci. Prima di mettere in funzione la macchina, vi consigliamo di leggere attentamente le istruzioni per l’uso che vi spiegano come utilizzarla, pulirla e mantenerla in perfetta efficienza. Se avete altre domande, rivolgetevi al rivenditore o direttamente alla nostra casa. Saremo lieti di darVi tutti i chiarimenti desiderati.
Thank you for purchasing this highest quality espresso coffee machine and for your confi dence in our company. Before operating the machine, we recommend carefully reading the operating instructions that explain how to use, clean and maintain it in perfect working order. For any questions please refer to your dealer or directly to this company.We will be happy to provide any clarifi cations you should require.
Compliments,
Nous vous félicitons pour l’achat de cette machine à café expresso de qualité supérieure et vous remercions de votre confi ance. Avant de mettre la machine en marche, nous vous recommandons de lire attentivement ce mode d’emploi qui vous explique comment utiliser, nettoyer et conserver la machine en parfait état de fonctionnement. Si vous avez des questions à poser, nous vous prions de contacter le revendeur ou directement notre maison. Nous vous donnerons avec plaisir toutes les informations nécessaires.
Wir gratulieren Ihnen zum Kauf dieser Espresso-Maschine von höchster Qualität und wir danken Ihnen für das Vertrauen, das Sie uns entgegenbringen. Bevor Sie die Maschine in Betrieb nehmen, empfehlen wir Ihnen, die Gebrauchsanweisung aufmerksam zu lesen, in der der Gebrauch, die Reinigung und die Pfl ege beschrieben werden. Sollten Sie darüber hinaus weitere Fragen haben, so wenden Sie sich bitte an den Händler oder direkt an uns. Wir liefern Ihnen gerne alle gewünschten Informationen.
Enhorabuena por haber comprado esta máquina de café exprés de alta calidad y gracias por la confi anza depositada en nosotros. Antes de poner en funcionamiento la máquina se aconseja leer atentamente las instrucciones de uso que explican cómo utilizarla, limpiarla y mantenerla en perfectas condiciones. En caso de dudas, dirigirse a un revendedor o directamente al fabricante. Será un placer responderle.
Parabéns,
Está de parabéns pela aquisição desta máquina de café expresso, de qualidade superior e agradecemos a confi ança demonstrada. Antes de utilizar a máquina é aconselhável ler atentamente o manual de instruções no qual lhe explicamos como utilizá-la, limpá-la e mantê-la em perfeitas condições de efi ciência. Para outros esclarecimentos, dirija-se ao revendedor ou directamente ao fabricante. Teremos todo o prazer em esclarecer quaisquer outras dúvidas.
Gefeliciteerd! Wij feliciteren u met het feit dat u dit espresso-apparaat van topkwaliteit gekocht heeft en wij danken u voor het in ons gestelde vertrouwen. Voordat u het apparaat in gebruik neemt adviseren wij u deze gebruiksaanwijzing aandachtig te lezen. In deze gebruiksaanwijzing wordt namelijk uitgelegd hoe u het apparaat het beste kunt gebruiken, schoonmaken en onderhouden zodat het apparaat lang meegaat. Als u nog vragen heeft kunt u zich wenden tot de verkoper of rechtstreeks met ons contact opnemen. Wij zullen u met plezier de gewenste informatie verschaffen.


4


|
6 |
GENERALITÁ |
|||||
|
1 GENERALITÁ |
2 DATI TECNICI |
La macchina per caffè è indicata per la preparazione di 1 o 2 tazze di caffè espresso ed è dotata di un tubo orientabile per l’erogazione del vapore e dell’acqua calda.
I comandi sulla parte frontale dell’apparecchio sono contrassegnati con i simboli di facile interpretazione.
Il corpo della macchina dall’elegante design è stato progettato per uso domestico e non è indicato per un funzionamento continuo di tipo professionale.
Attenzione. Non si assumono responsabilità per eventuali danni in caso di:
•Impiego errato e non conforme agli scopi previsti;
•Riparazioni non eseguite presso centri d’assistenza autorizzati;
•Manomissione del cavo d’alimentazione;
•Manomissione di qualsiasi componente della macchina;
•Impiego di pezzi di ricambio e accessori non originali;
•Mancata decalcificazione e stoccaggio in locali al di
sotto di 0°C.
In questi casi viene a decadere la garanzia.
1.1 Per facilitare la lettura
Il triangolo d’avvertimento indica tutte le istruzioni importanti per la sicurezza dell’utente. Attenersi scrupolosamente a tali indicazioni per evitare ferimenti gravi!
 Questo simbolo evidenzia le informazioni da te-
  nere in maggiore considerazione, per un miglio-
re utilizzo della macchina.
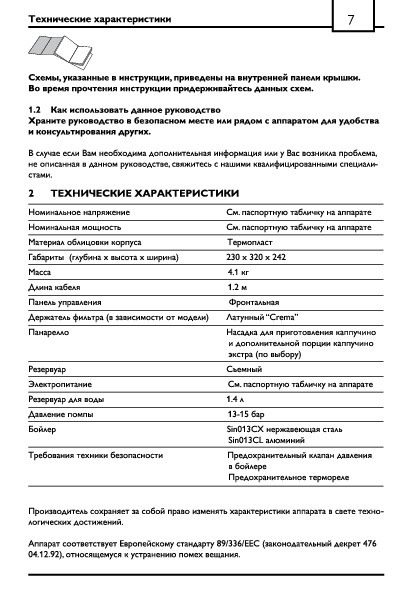
Tensione nominale — Potenza nominale — Alimentazione Vedi targhetta posta sull’apparecchio
Materiale corpo
Termoplastico
Dimensioni (l x a x p)
350 x 335 x 242
Peso
4,1 kg
Lunghezza cavo
1,2 m
Pannello di comando
Frontale
Portafi ltro (variabili in funzione dei modelli) Crema od Ottone
Pannarello
Speciale per cappuccini (opzionale)
Cappuccinatore (opzionale)
Serbatoio acqua
1,4 litri — Estraibile
Pressione pompa
13-15 bar
Caldaia
Com004CX — Inox
Com004CL — Alluminio
Dispositivi di sicurezza
Valvola di sicurezza pressione caldaia Termostato di sicurezza
(Fig.2) — Il riferimento ad illustrazioni, parti dell’apparecchio o elementi di comando, ecc. è indicato da numeri o lettere; in questo caso si rimanda all’illustrazione.
Con riserva di modifi che di costruzione ed esecuzione dovute al progresso tecnologico.
1.2 Impiego di queste istruzioni per l’uso
Conservare queste istruzioni per l’uso in un luogo sicuro e allegarle alla macchina per caffè qualora un’altra persona dovesse utilizzarla.
Per ulteriori informazioni o nel caso di problemi, non trattati del tutto o soltanto insufficientemente nelle presenti istruzioni, rivolgetevi agli specialisti competenti.

|
NORME DI SICUREZZA |
7 |
||
|
Pericolo d’ustioni |
|||
|
3 NORME DI SICUREZZA |
Mai mettere a contatto dell’acqua le parti sotto corrente: pericolo di cortocircuito! Il vapore surriscaldato e l’acqua calda possono provocare scottature! Mai dirigere il getto di vapore o dell’acqua calda verso parti del corpo, toccare con precauzione il beccuccio vapore / acqua calda: pericolo di scottature!
Destinazione d’uso
La macchina per caffè è prevista esclusivamente per l’impiego domestico. È vietato apportare modifi che tecniche e ogni impiego illecito, a causa dei rischi che essi comportano! L’apparecchio non è destinato ad essere utilizzato da persone (compresi i bambini) con ridotte capacità fi siche, mentali o sensoriali o con esperienza e/o competenze insufficienti, a meno che non siano sotto la supervisione di una persona responsabile della loro sicurezza o non vengano da essa istruite sull’uso dell’apparecchio.
Alimentazione di corrente
Allacciare la macchina per caffè soltanto ad una presa di corrente adeguata.
La tensione deve corrispondere a quella indicata sulla targhetta dell’apparecchio.
Cavo d’alimentazione
Mai usare la macchina per caffè se il cavo d’alimentazione è difettoso. Se il cavo d’alimentazione è danneggiato, deve essere cambiato dal produttore o dal suo servizio assistenza clienti. Non far passare il cavo d’alimentazione per angoli e su spigoli vivi, sopra oggetti molto caldi e proteggerlo dall’olio.
Non portare o tirare la macchina per caffè tenendola per il cavo. Non estrarre la spina tirandola per il cavo oppure toccarla con le mani bagnate.
Evitare che il cavo d’alimentazione cada liberamente da tavoli o scaffali.
Protezione d’altre persone
Assicurarsi che nessun bambino abbia la possibilità di giocare con la macchina per caffè.
I bambini non si rendono conto del pericolo connesso agli elettrodomestici.
Non lasciare alla portata dei bambini i materiali utilizzati per imballare la macchina.
Evitare di dirigere contro se stessi e/o altri il getto di vapore surriscaldato e/o d’acqua calda.
Usare sempre le apposite maniglie o manopole.
Non disinserire (togliere) mai il portafi ltro durante l’erogazione del caffè. Durante la fase di riscaldamento dal gruppo erogazione caffè possono uscire gocce d’acqua calda.
Non erogare caffè quando è premuto l’interruttore (5) perchè è attiva la funzione vapore e la caldaia ha una temperatura troppo elevata.
Ubicazione
Sistemare la macchina per caffè in un posto sicuro, dove nessuno può rovesciarla o venirne ferito.
Acqua calda o vapore surriscaldato potrebbero fuoriuscire: pericolo di scottature!
Non tenere la macchina a temperatura inferiore a 0°C; c’è il pericolo che il gelo possa danneggiare la macchina.
Non usare la macchina per caffè all’aperto.
Non posare la macchina su superfi ci molto calde e nelle vicinanze di fi amme libere per evitare che la carcassa fonda o comunque si danneggi.
Pulizia
Prima di pulire la macchina, è indispensabile disinserire tutti i tasti e poi staccare la spina dalla presa di corrente.
Inoltre, aspettare che la macchina si raffreddi. Mai immergere la macchina nell’acqua!
È severamente vietato cercare d’intervenire all’interno della macchina.
Non utilizzare, per scopi alimentari, l’acqua rimasta nel serbatoio per alcuni giorni, lavare il serbatoio e riempirlo con acqua fresca potabile.
Spazio per l’uso e la manutenzione
Per il corretto e buon funzionamento della macchina per caffè si consiglia quanto segue:
•Scegliere un piano d’appoggio ben livellato;
•Scegliere un ambiente sufficientemente illuminato, igienico e con presa di corrente facilmente accessibile;
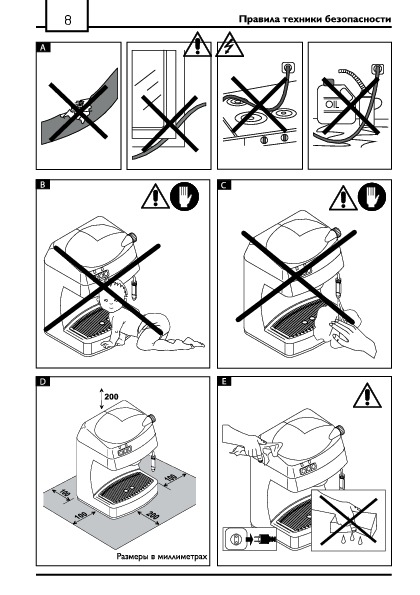
•Prevedere una distanza minima dalle pareti della macchina come indicato in fi gura (Fig.A).
Custodia della macchina
Quando la macchina rimane inutilizzata per un periodo prolungato, disinserire la macchina e staccare la spina dalla presa. Custodirla in luogo asciutto e non accessibile ai bambini. Proteggerla dalla polvere e dallo sporco.

|
8 |
NORME DI SICUREZZA — INSTALLAZIONE |
|
Riparazioni / Manutenzione
Nel caso di guasti, difetti o sospetto di difetto dopo una caduta, staccare subito la spina dalla presa.
Mai mettere in funzione una macchina difettosa.
Soltanto gli specialisti competenti possono effettuare interventi e riparazioni.
Le riparazioni vanno eseguite unicamente da un centro di assistenza autorizzato.
Nel caso di interventi non eseguiti a regola d’arte, si declina ogni responsabilità per eventuali danni.
4 INSTALLAZIONE
Per la propria sicurezza e quella di terzi attenersi scrupolosamente alle “Norme di sicurezza” riportate nel cap. 3.
4.1 Imballaggio
L’imballaggio originale è stato progettato e realizzato per proteggere la macchina durante la spedizione.
Si consiglia di conservarlo per un eventuale trasporto futuro.
Antincendio
In caso di incendio utilizzare estintori ad anidride carbonica (CO2). Non utilizzare acqua o estintori a polvere.
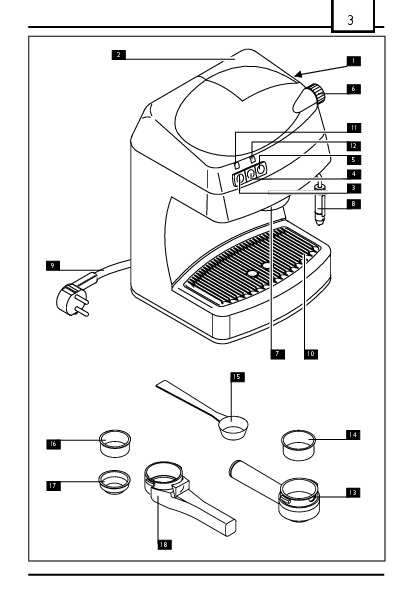
Legenda componenti macchina
1Serbatoio acqua
2 Coperchio serbatoio acqua
3 Interruttore generale
4 Interruttore caffè
5Interruttore vapore
6 Pomello rubinetto acqua calda/vapore
7 Gruppo erogatore caffè
8Tubo vapore
9Cavo alimentazione
10Vasca recupero acqua + griglia
11Coperchio contenitore caffè
12Contenitore caffè in grani
13Manopola regolazione macinatura
14Convogliatore uscita caffè
15Pulsante azionamento macinacaffè
16Spia macchina accesa
17Spia pronto macchina
Accessori (variabili in funzione del modello)
18Portafi ltro“Crema”
19Filtro per portafi ltro“Crema” (Unico per l’erogazione di 1o 2 caffè)
20Misurino
21Filtro 2 caffè per portafiltro in ottone
22Filtro 1 caffè per portafiltro in ottone
23Portafiltro in ottone
4.2 Avvertenze di Installazione
Prima di installare la macchina, attenersi alle seguenti prescrizioni di sicurezza:
•sistemare la macchina in un luogo sicuro;
•accertarsi che i bambini non abbiano la possibilità di giocare con la macchina;
•evitare che la macchina venga collocata su superfi ci molto calde o vicino a fi amme aperte.
La macchina per caffè è ora pronta per essere collegata alla rete elettrica.
 Nota: si consiglia di lavare i componenti prima
  del loro primo utilizzo e/o dopo un periodo d’i-
nutilizzo.
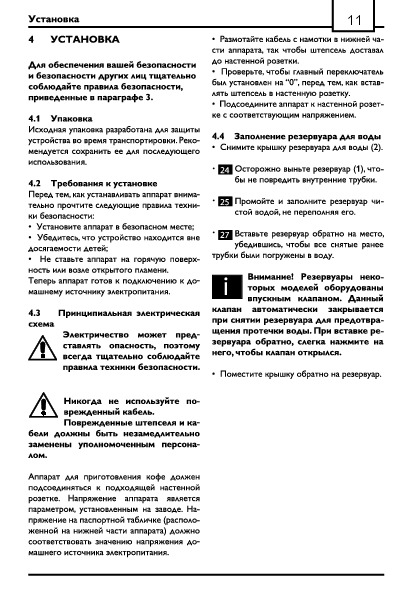
4.3Riempimento del serbatoio acqua
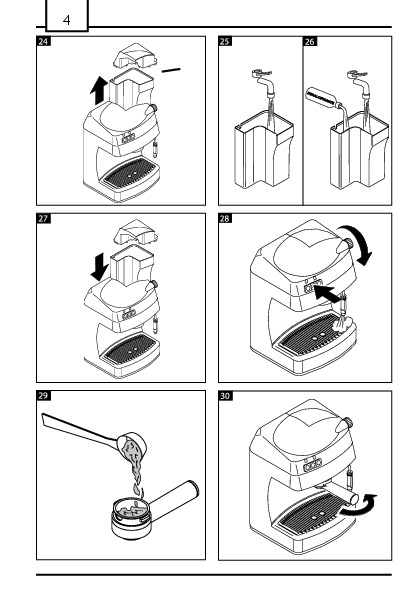
•(Fig.24) — Togliere il coperchio del serbatoio (2)
•Estrarre il serbatoio dell’acqua (1) sollevandolo, facendo attenzione a non danneggiare i tubi che si trovano inseriti nel serbatoio.
•(Fig.25) — Sciacquarlo e riempirlo con acqua fresca, evitando di immetterne una quantità eccessiva.
•(Fig.27) — Reinserire il serbatoio nella sua sede e reinserire i tubi sfi lati in precedenza.
 Nota bene! Alcuni modelli sono provvisti di ser-
  batoio con valvola di aspirazione acqua. Questa valvola si chiude automaticamente quando il serbatoio viene estratto per impedire la fuoriuscita dell’acqua. Una volta inserito il serbatoio effettuare una leggera
pressione.
•Rimettere il coperchio sul serbatoio.
Immettere nel serbatoio sempre e soltanto acqua fresca non gassata. Acqua calda nonché altri

liquidi possono danneggiare il serbatoio. Non mettere in funzione la macchina senza acqua: accertarsi che ve ne sia a sufficienza all’interno del serbatoio.
4.4 Collegamento alla rete elettrica
La corrente elettrica può essere pericolosa! Di  conseguenza, attenersi sempre scrupolosamente alle norme di sicurezza. Non usare mai cavi difettosi! I cavi e le spine difettosi devono essere sostituiti imme-
diatamente da specialisti autorizzati.
La tensione dell’apparecchio è stata impostata in fabbrica. Verifi care che la tensione della rete corrisponda alle indicazioni riportate sulla targhetta d’identifi cazione posta sul fondo dell’apparecchio.
•Srotolare dal fondo dell’apparecchio la quantità di cavo necessario per il collegamento alla rete elettrica.
•Verifi care che l’interruttore generale sia posto su “0” prima di collegare la macchina alla rete elettrica.
•Inserire la spina in una presa di corrente di tensione adeguata.
4.5 Caricamento del circuito
Al primo utilizzo, dopo aver erogato vapore o dopo aver terminato l’acqua nel serbatoio, il circuito della macchina deve essere sempre ricaricato.
•Premere l’interruttore generale (3), la spia (16) si accende.
•Dirigere il tubo vapore (pannarello) sopra la vasca raccogligocce.
•(Fig.28) — Aprire il pomello (6) “acqua calda/vapore” ruotandolo in senso antiorario e premere l’interruttore caffè (4).
•Attendere che dal tubo vapore (pannarello) fuoriesca un getto regolare di acqua.
•Premere di nuovo l’interruttore caffè (4) e chiudere il pomello (6)“acqua calda/vapore”ruotandolo in senso orario.
La macchina ora è pronta per l’erogazione del caffè e del vapore; si rimanda ai capitoli relativi per i dettagli di funzionamento.
4.6 Primo utilizzo o dopo un periodo di inutilizzo
Questa semplice operazione vi assicura un’erogazione ottimale e deve essere eseguita:
—al primo avvio;
—quando la macchina rimane inutilizzata per lungo tempo (per più di 2 settimane).
 L’acqua erogata deve essere vuotata in un ap-
  posito scarico e non può essere utilizzata per l’alimentazione. Se il contenitore si riempe, durante il ciclo, fermare l’erogazione e vuotarlo prima di riprende-
re l’operazione.
•(Fig.25) — Risciacquare il serbatoio e riempirlo con acqua fresca potabile.
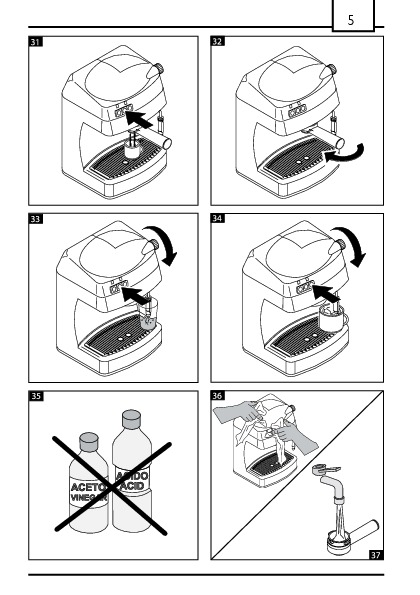
•(Fig.33) — Sistemare un contenitore sotto al tubo vapore (pannarello). Aprire il rubinetto (6) ruotandolo in senso antiorario e premere l’interruttore caffè (4).
•Erogare tutto il contenuto del serbatoio dell’acqua dal tubo vapore/acqua calda; per terminare l’erogazione premere nuovamente l’interruttore erogazione caffè (4) e chiudere il rubinetto (6) ruotandolo in senso orario.
•(Fig.25) — Riempire il serbatoio con acqua fresca potabile.
•(Fig.30) — Inserire dal basso il portafi ltro nel gruppo erogazione (7) e ruotarlo da sinistra verso destra fi no al suo bloccaggio.
•(Fig.31) — Inserire un contenitore adeguato sotto al portafi l- tro.
•Premere il tasto caffè (4) ed erogare tutta l’acqua presente nel serbatoio. Terminata l’acqua, fermare l’erogazione premendo nuovamente il tasto caffè (4).
Al termine svuotare il contenitore.
•(Fig.32) — Rimuovere il portafi ltro dal gruppo ruotandolo da destra verso sinistra e sciacquarlo con acqua fresca portabile.
•Riempire nuovamente il serbatoio ed attendere che la spia (17)“pronto macchina”si accenda.
•Dopo la macchina è pronta per l’utilizzo.

|
10 |
MACINACAFFÈ — EROGAZIONE DEL CAFFÈ |
|
5 MACINACAFFÈ
Attenzione! La manopola di regolazione della  macinatura deve essere ruotata solo quando il macinacaffè è in funzione. Non inserire caffè macinato
nel contenitore caffè in grani.
Vietato introdurre qualsiasi materiale che non  sia caffè in grani. Il macinacaffè contiene organi in movimento che possono essere pericolosi; vietato introdurre le dita e/o altri oggetti. Prima di intervenire, per qualsiasi motivo, all’interno del contenitore caffè disinserire l’interruttore generale e staccare la spina dalla presa di corrente. Non immettere caffè in grani nel con-
tenitore caffè quando la macina è in funzione.
•Togliere il coperchio (11) del contenitore caffè in grani (12).
•Verifi care che il contenitore sia pulito, versare il caffè fresco in grani e richiudere il contenitore con il coperchio (11).
La qualità ed il gusto del caffè dipendono, oltre che dalla miscela utilizzata, anche dal grado di macinatura.
La macchina è dotata di una manopola (13) per la regolazione del grado di macinatura.
Per variare il grado di macinatura ruotare la manopola graduata quando la macina è in funzione (le cifre ne indicano il grado); ogni apparecchio è regolato in fabbrica su un grado di macinatura medio.
Ruotando la manopola verso numeri più bassi si aumenta il grado di macinatura; verso numeri più alti si diminuisce il grado di macinatura.
 É sconsigliato miscelare caffè con diversi gradi di
  macinatura.
5.1Azionamento macinacaffè / dosatura
•Accendere la macchina, se questa non è attiva, premendo l’interruttore generale (3).
•(Fig.29) — Per azionare il macinacaffè avvicinare il portafi ltro verso il convogliatore uscita caffè (14) inserendolo nell’apposita forcella. Premere con il portafi ltro fi no ad azionare l’interruttore macinatura caffè (15).
•Il macinacaffè entra in funzione dosando caffè macinato all’interno del portafi ltro.
•Interrompere la macinatura del caffè in polvere quando si è raggiunta la quantità desiderata estraendo il portafi ltro dalla forcella.
 Nota. La dosatura avviene all’istante ed è affidata alla sensibilità dell’utilizzatore, evitare una dosatura eccessiva o scarsa; la quantità di caffè in polvere per ogni tazzina di caffè dovrebbe variare da 5 a 7 gr.
Attenzione! è vietato azionare il macinacaffè con altri dispositivi e/o strumenti diversi dal portafil-
tro.
6 EROGAZIONE DEL CAFFÈ
Attenzione! Durante l’erogazione del caffè è vietato disinserire il portafiltro ruotandolo manual-
mente in senso orario. Pericolo di ustioni!
•Durante questa operazione la spia di pronto macchina (17) può accendersi e spegnersi; tale funzionamento deve essere considerato normale e non un’anomalia.
•Assicurarsi, prima dell’uso, che il pomello (6) acqua calda/ vapore sia chiuso e che il serbatoio acqua della macchina contenga una quantità di acqua sufficiente.
•Accendere la macchina, se questa non è attiva, con l’interruttore generale (3), la spia (16) si accende.
•Attendere che la spia di pronto macchina (17) si accenda, ora la macchina è pronta per l’erogazione del caffè.
6.1 Con portafiltro Crema
• Inserire il fi ltro (19) nel portafi ltro“Crema”(18).
•(Fig.30) — Inserire dal basso il portafi ltro “Crema” nel gruppo erogazione (7), ruotandolo da sinistra verso destra fi no al suo bloccaggio.
•Lasciare la presa dal manico del portafi ltro.
Un sistema automatico riporta ora leggermente il manico verso sinistra. Questo movimento garantisce il perfetto funzionamento del portafi ltro.
•(Fig.31) — Posizionare una tazza sotto al portafi ltro. Preriscaldare il portafi ltro e la tazza premendo l’interruttore caffè (4); l’acqua comincerà ad uscire dal portafi ltro (questa operazione si rende necessaria solo per il primo caffè).
•Quando la tazza sarà sufficientemente piena premere nuovamente l’interruttore caffè (4).
•(Fig.32) — Togliere il portafi ltro dalla macchina ruotandolo da destra verso sinistra e vuotare l’acqua residua.
•Con lo speciale portafi ltro Crema (18) di cui è dotata la mac-
![]()
|
EROGAZIONE DEL CAFFÈ — TIPO DI CAFFÈ — CONSIGLI |
11 |
|
china, non occorre cambiare fi ltro per ottenere uno o due caffè.
•(Fig.29) — Prelevare, con il portafi ltro, una quantità di caffè macinato adeguata (par. 5.1) per ottenere uno o due caffè.
•Pulire il bordo del portafi ltro da eventuali residui di caffè.
•(Fig.30) — Inserire dal basso il portafi ltro “Crema” (18) nel gruppo erogazione (7), ruotandolo da sinistra verso destra, fi no al suo bloccaggio completo come visto in precedenza.
•(Fig.31) — Prelevare 1 o 2 tazzine preriscaldate e posizionarle sotto al portafi ltro; verifi care che siano correttamente sistemate sotto ai fori di uscita caffè.
•Premere il tasto caffè. Attendere che le tazzine siano sufficientemente piene.
•Premere nuovamente il tasto caffè per fermare l’erogazione del caffè.
•(Fig.32) — Al termine dell’erogazione attendere qualche secondo, estrarre il portafi ltro e vuotarlo dai fondi residui.
•(Fig.30) — Inserire dal basso il portafi ltro in ottone (23) nel gruppo erogatore (7), ruotandolo da sinistra verso destra, fi no al suo bloccaggio completo.
•(Fig.31) — Prelevare 1 o 2 tazzine preriscaldate e posizionarle sotto al portafi ltro; verifi care che siano correttamente sistemate sotto ai fori di uscita caffè.
•Premere il tasto caffè. Attendere che le tazzine siano sufficientemente piene.
•Premere nuovamente il tasto caffè per fermare l’erogazione del caffè.
•(Fig.32) — Al termine dell’erogazione estrarre il portafi ltro e vuotarlo dai fondi residui.
 Nota di pulizia: mantenere pulito il filtro del
  portafiltro estraendolo dalla propria sede e la-
vandolo con acqua.
 Nota di pulizia: mantenere pulito il filtro del por-
  tafiltro “Crema” estraendolo dalla propria sede e
lavandolo con acqua potabile.
6.2Con portafiltro in ottone
•Inserire il fi ltro (22 o 21, da 1 o 2 tazze secondo il numero di caffè da realizzare) nel portafi ltro in ottone (23).
•(Fig.30) — Inserire dal basso il portafi ltro in ottone nel gruppo erogazione (7), ruotandolo da sinistra verso destra fi no al suo bloccaggio.
•(Fig.31) — Posizionare una tazza sotto al portafi ltro.
•Preriscaldare il portafi ltro e la tazza premendo l’interruttore caffè (4); l’acqua comincerà ad uscire dal portafi ltro (questa operazione si rende necessaria solo per il primo caffè).
•Quando la tazza sarà sufficientemente piena premere nuovamente l’interruttore caffè (4).
•(Fig.32) — Togliere il portafi ltro dalla macchina ruotandolo da destra verso sinistra.
•(Fig.29) — Prelevare, con il portafi ltro, una o due dosi di caffè macinato (pa.5.1), in funzione del fi ltro montato in precedenza.
•Premere il caffè utilizzando la parte inferiore del misurino (20) e pulire il bordo del portafiltro da eventuali residui di caffè.
7 TIPO DI CAFFÈ CONSIGLI
In linea di massima si possono utilizzare tutti i tipi di caffè esistenti in commercio.
Tuttavia, il caffè è un prodotto naturale ed il suo gusto cambia in funzione dell’origine e della miscela; è preferibile quindi provarne vari tipi, al fi ne di trovare quello che meglio si addice ai gusti personali.
Per migliori risultati si consiglia comunque di utilizzare miscele espressamente preparate per macchine espresso.
Il caffè dovrebbe sempre fuoriuscire regolarmente dal portafi l- tro senza gocciolare.
La velocità di fuoriuscita del caffè può essere modifi cata cambiando leggermente la dose, il grado di macinatura e/o di pressatura del caffè nel fi ltro.
PRIMA DI ESEGUIRE QUALSIASI OPERAZIONE RELA-  TIVA ALL’EROGAZIONE DEL VAPORE O DELL’ACQUA CALDA VERIFICARE CHE IL TUBO VAPORE (PANNARELLO)
SIA ORIENTATO SOPRA LA VASCA RECUPERO ACQUA.

|
12 |
EROGAZIONE DELL’ACQUA CALDA — EROGAZIONE DEL VAPORE — PULIZIA |
|
8 EROGAZIONE DELL’ACQUA CALDA
Pericolo di scottature! All’inizio dell’erogazione  possono verificarsi brevi spruzzi di acqua calda. Il tubo di erogazione può raggiungere temperature eleva-
te: evitare di toccarlo direttamente con le mani.
•Accendere la macchina, se questa non è attiva, con l’interruttore generale (3), la spia (16) si accende.
•Attendere che la spia (17) si accenda.
•(Fig.33) — Sistemare una tazza o un bicchiere da tè sotto al tubo vapore (pannarello).
•Aprire il pomello (6) “Acqua calda/vapore” ruotandolo in senso antiorario e premere l’interruttore caffè (4) per la fuoriuscita dell’acqua fi no alla quantità desiderata.
•Premere nuovamente l’interruttore caffè (4) e chiudere il pomello (6) ruotandolo in senso orario per interrompere l’erogazione di acqua calda.
•Dopo aver utilizzato il vapore per il tempo desiderato chiudere il pomello (6) e riportare in posizione iniziale l’interruttore (5)“Vapore”.
 Utilizzando questo sistema con il latte si procede
  alla preparazione del cappuccino. Per garantire
un miglior risultato utilizzare latte freddo.
•Procedere con il caricamento del circuito descritto nel par. 4.5 per rendere operativa la macchina.
•Pulire, dopo questa operazione il tubo vapore (pannarello) con un panno umido.
 Nota bene: se non si riesce ad erogare un cappuc-
  cino come descritto, si deve ricaricare il circuito come descritto nel par. 4.5 e successivamente ripetere le
operazioni.
9 VAPORE/ CAPPUCCINO
Pericolo di scottature! All’inizio dell’erogazione  possono verificarsi brevi spruzzi di acqua calda. Il tubo d’erogazione può raggiungere temperature eleva-
te: evitare di toccarlo direttamente con le mani.
Attenzione! Non erogare caffè quando è selezionata la funzione vapore perchè la temperatura è
troppo alta e c’è il rischio di ustioni.
•Accendere la macchina, se questa non è attiva, con l’interruttore generale (3), la spia (16) si accende.
•Premere l’interruttore (5) vapore; si spegne la spia (17).
•Attendere che la spia di pronto macchina (17) si riaccenda, a questo punto la macchina è pronta per l’erogazione del vapore.
•(Fig.28) — Dirigere il tubo vapore (pannarello) sopra la vasca raccogligocce, aprire il pomello (6)“Acqua calda/vapore” per qualche istante, in modo da far uscire l’acqua residua dal tubo vapore (pannarello); in breve tempo comincerà ad uscire solo vapore.
•Chiudere il pomello (6).
•(Fig.34) — Immergere il tubo vapore (pannarello) nel liquido da riscaldare e aprire il pomello (6); far ruotare il recipiente con lenti movimenti dal basso verso l’alto per rendere uniforme il riscaldamento.
10 PULIZIA
La manutenzione e la pulizia possono essere effettuate soltanto quando la macchina è fredda e scollegata dalla rete elettrica.
•Non immergere la macchina nell’acqua e non inserire i componenti nella lavastoviglie.
•Non utilizzare oggetti acuminati o prodotti chimici aggressivi (solventi) per la pulizia.
•(Fig.25) — Si consiglia di pulire quotidianamente il serbatoio dell’acqua e di riempirlo con acqua fresca.
•Dopo aver riscaldato il latte, prelevare una piccola quantità di acqua calda per la pulizia del tubo e pulirlo esternamente con un panno umido.
•(Fig.36) — Per la pulizia dell’apparecchio utilizzare un panno morbido inumidito di acqua.
•(Fig.37) — Per la pulizia del portafi ltro procedere come segue:
•Estrarre il fi ltro, immergerlo in acqua calda e lavarlo con cura.
•Lavare l’interno del portafi ltro.
•Non asciugare la macchina e/o i suoi componenti utilizzando un forno a microonde e/o un forno convenzionale.
•Pulire, quando è presente, il pannarello situato sopra il tubo vapore.
Per fare questo occorre svitare la ghiera ed estrarre il pannarello dal tubo vapore, smontare il corpo esterno del pannarello.

Lavare con acqua corrente e rimontare il pannarello.
 Si consiglia di serrare la ghiera in modo adegua-
  to; il pannarello potrebbe sfilarsi durante il suo
utilizzo.
(Fig.33) — Prelevare (come descritto nel capitolo 8 del manuale), dal tubo vapore/acqua calda, 2 tazze (circa 150 ml. ciascuna) di acqua; dopodichè spegnere la macchina tramite l’interruttore ON/OFF (3).
6Lasciare agire il decalcifi cante circa 15-20 minuti con la macchina spenta.
11 DECALCIFICAZIONE
La formazione di calcare è una conseguenza naturale dell’uso dell’apparecchio. La decalcifi cazione è necessaria ogni 1-2 mesi di utilizzo della macchina e/o quando si osserva una riduzione di portata dell’acqua. Usare esclusivamente il prodotto decalcifi cante Saeco.
 Quanto indicato nel manuale di uso e manutenzione ha priorità rispetto alle indicazioni riportate su accessori e/o materiali d’uso venduti separata-
mente, laddove sussista un conflitto.
Usare solamente il prodot-  to decalcificante Saeco. E’ stato formulato specificatamente per mantenere al meglio la performance e la funzionalità della macchina per tutta la sua vita, nonchè per evitare, se correttamente usato, ogni alterazione del prodotto erogato. La soluzione decalcificante deve essere smaltita
secondo quanto previsto dal costruttore e/o dalle norme vigenti nel Paese d’utilizzo.
Non bere la soluzione decalcificante e i prodotti erogati fino al completamento del ciclo. Non uti-
lizzare in nessun caso l’aceto come decalcificante..
1(Fig.30) — Inserire dal basso il portafi ltro nel gruppo erogazione (7) e ruotarlo da sinistra verso destra fi no al suo bloccaggio.
2 (Fig.24) — Rimuovere e svuotare il serbatoio dell’acqua.
3(Fig.26) — Versare METÀ del contenuto della bottiglia di decalcifi cante concentrato Saeco nel serbatoio dell’acqua dell’apparecchio e riempire con acqua fresca potabile fi no al livello MAX.
4Rimuovere il pannarello (o cappuccinatore) eventualmente installato sul tubo vapore.
7Accendere la macchina premendo l’interruttore ON/OFF (3). (Fig.33) — Prelevare (come descritto nel capitolo 8 del manuale) dal tubo vapore/acqua calda 2 tazze (circa 150 ml ciascuna) di acqua. Successivamente spegnere la macchina tramite l’interruttore ON/OFF (3) e lasciarla spenta per 3 minuti.
8Ripetere le operazioni descritte al punto 7 fi no al completo svuotamento del serbatoio dell’acqua.
9(Fig.25) — Risciacquare il serbatoio con acqua fresca potabile e riempirlo completamente.
10Inserire un contenitore sotto al portafi ltro.
11(Fig.31) — Accendere la macchina premendo l’interruttore ON/OFF (3); premere l’interruttore caffè (4) e tramite il portafi ltro, prelevare l’intero contenuto del serbatoio.
12(Fig.25) — Riempire nuovamente il serbatoio con acqua fresca. (Fig.33) — Posizionare un contenitore capiente sotto al tubo vapore. Aprire il rubinetto di erogazione dell’acqua (6) ruotandolo in senso anti orario. Azionare il tasto (4) e prelevare l’intero contenuto del serbatoio tramite il tubo vapore/acqua calda.
13Dopo aver fi nito il prelievo di acqua, fermare l’erogazione premendo nuovamente il tasto (4); chiudere il rubinetto erogazione acqua (6) ruotando in senso orario.
14Ripetere un’altra volta le operazioni dal punto (9) per un totale di 4 serbatoi.
15(Fig.32) — Rimuovere il portafi ltro dal gruppo ruotandolo da destra verso sinistra e sciacquarlo con acqua fresca portabile.
Il ciclo di decalcifi cazione è cosi concluso.
(Fig.25) — Riempire nuovamente il serbatoio con acqua fresca. Se necessario effettuare il caricamento del circuito come descritto nel par. 4.5 del manuale.
Al termine, rimontare sul tubo vapore il pannarello (o cappuccinatore) che vi era installato precedentemente.
5 Accendere la macchina premendo l’interruttore ON/OFF (3).

14
12 SMALTIMENTO
INFORMAZIONE AGLI UTENTI: ai sensi dell’art. 13 del Decreto Legislativo 25 luglio 2005, n. 151”Attuazione delle Direttive 2002/95/CE, 2002/96/CE e 2003/108/CE, relative alla riduzione dell’uso di sostanze pericolose nelle apparecchiature elettriche ed elettroniche, nonché allo smaltimento dei rifi uti”
Il simbolo del cassonetto barrato riportato sull’apparecchiatura o sulla sua confezione indica che il prodotto alla fi ne della propria vita utile deve essere raccolto separatamente dagli altri rifi uti.
L’utente dovrà, pertanto, conferire l’apparecchiatura giunta a fi ne vita agli idonei centri di raccolta differenziata dei rifi uti
elettronici ed elettrotecnici, oppure riconsegnarla al rivenditore al momento dell’acquisto di una nuova apparecchiatura di tipo equivalente, in ragione di uno a uno.
L’adeguata raccolta differenziata per l’avvio successivo dell’apparecchiatura dismessa al riciclaggio, al trattamento e allo smaltimento ambientalmente compatibile contribuisce ad evitare possibili effetti negativi sull’ambiente e sulla salute e favorisce il reimpiego e/o riciclo dei materiali di cui è composta l’apparecchiatura.
Lo smaltimento abusivo del prodotto da parte dell’utente comporta l’applicazione delle sanzioni amministrative previste dalla normativa vigente.
SMALTIMENTO

|
INCONVENIENTI, CAUSE E RIMEDI |
15 |
||||||
|
13 INCONVENIENTI, CAUSE E RIMEDI |
|||||||
|
Guasto |
Cause possibili |
Rimedio |
|||||
|
La macchina non si accende. |
Macchina non collegata alla rete elet- |
Collegare la macchina alla rete elettrica. |
|||||
|
trica. |
|||||||
|
La pompa è molto rumorosa. |
Manca acqua nel serbatoio (par.4.3). |
Rabboccare con acqua. |
|||||
|
La spia (17) era spenta quando è stato |
Attendere che la spia si illumini. |
||||||
|
premuto l’interruttore (4). |
|||||||
|
Il caffè é troppo freddo. |
|||||||
|
Portafi ltro non inserito per il preriscal- |
Preriscaldare il portafi ltro. |
||||||
|
damento (par. 6.1-6.2) |
|||||||
|
Non si forma la schiuma del latte. |
Latte non adatto. |
Controllare il tenore del grasso. |
|||||
|
Il caffè sgorga troppo velocemente, |
Troppo poco caffè nel portafi ltro. |
Aggiungere il caffè (par. 6.1 — 6.2). |
|||||
|
Macinatura troppo grossa. |
Modifi care il grado di macinatura. (cap.5). |
||||||
|
non si forma la crema. |
|||||||
|
Caffè vecchio o non adatto. |
Usare una miscela diversa (cap.7). |
||||||
|
Mancanza di acqua. |
Rabboccare con acqua (par.4.3) |
||||||
|
Macinatura troppo fi ne. |
Modifi care il grado di macinatura. (cap.5). |
||||||
|
Caffè premuto nel portafi ltro. |
Smuovere il caffè macinato. |
||||||
|
Troppo caffè nel portafi ltro. |
Ridurre la quantità di caffè utilizzando il misu- |
||||||
|
Il caffè non sgorga o sgorga solo a |
rino. |
||||||
|
gocce. |
Pomello |
(6) “Acqua calda/vapore” |
Chiudere il pomello. |
||||
|
aperto. |
|||||||
|
Macchina calcifi cata. |
Decalcifi care la macchina (cap.11). |
||||||
|
Doccia otturata. |
Pulire l’elemento fi ltrante. |
||||||
|
Filtro nel portafi ltro otturato. |
Pulire il fi ltro (cap.10). |
||||||
|
Portafi ltro |
inserito male nel gruppo |
Inserire correttamente il portafi ltro (par.6.1-6.2). |
|||||
|
erogazione caffè. |
|||||||
|
Bordo superiore del portafi ltro sporco. |
Pulire il bordo del portafi ltro. |
||||||
|
Il caffè sgorga dai bordi. |
|||||||
|
Guarnizione della caldaia sporca o |
Pulire o sostituire la guarnizione. |
||||||
|
usurata. |
|||||||
Troppo caffè nel portafi ltro.
Ridurre la quantità di caffè utilizzando il misurino.
Per i guasti non contemplati dalla suddetta tabella o in caso che i rimedi suggeriti non li risolvano, rivolgersi ad un centro assistenza.

IMPORTANT SAFEGUARDS
When using electrical appliances, basic safety precautions should always be followed, including the following:
1.Read all instructions.
2.Do not touch hot surfaces. Use handles or knobs.
3.To protect against fire, electric shock and injury to persons do not immerse cord, plugs, or appliance in water or other liquid.
4.Close supervision is necessary when the appliance is used by or near children.
5.Unplug from outlet when not in use and before cleaning. Allow to cool before putting on or taking off parts, and before cleaning the appliance.
6.Do not operate any appliance with a damaged cord or plug or after the appliance malfunctions, or has been damaged in any manner. Return appliance to the nearest authorized service facility for examination, repair or adjustment.
7.The use of accessory attachments not recommended by the appliance manufacturer may result in fire, electric shock or injury to persons.
8.Do not use outdoors.
9.Do not let cord hang over edge of table or counter, or touch hot surfaces.
10.Do not place on or near a hot gas or electric burner, or in a heated oven.
11.Always attach plug to appliance first, then plug cord into wall outlet. To disconnect, turn any control to “off”, then remove plug from wall outlet.
12.Do not use appliance for other than intended use.
13.Save these instructions.
SAVE THESE INSTRUCTIONS

CAUTION
This appliance is for household use only. Any servicing, other than cleaning and user maintenance, should be performed by an authorized service center. Do not immerse machine in water. To reduce the risk of fire or electric shock, do not disassemble the machine. There are no parts inside the machine serviceable by the user. Repair should be done by authorized service personnel only.
1.Check voltage to be sure that the voltage indicated on the nameplate corresponds with your voltage.
2.Never use warm or hot water to fill the water tank. Use cold water only.
3.Keep your hands and the cord away from hot parts of the appliance during operation.
4.Never clean with scrubbing powders or harsh cleaners. Simply use a soft cloth dampened with water.
5.For optimal taste of your coffee, use purified or bottled water. Periodic descaling is still recommended every 2-3 months.
6.Do not use caramelized or flavored coffee beans.
INSTRUCTIONS FOR THE POWER
SUPPLY CORD
A.A short power-supply cord (or detachable power-supply cord) is to be provided to reduce risks resulting from becoming entangled in or tripping over a longer cord.
B.Longer detachable power-supply cords or extension cords are available and may used if care is exercised in their use.
C.If a long detachable power-supply cord or extension cord is used,
1.The marked electrical rating of the detachable power-supply cord or extension cord should be at least as great as the electrical rating of the appliance
2.If the appliance is of the grounded type, the extension cord should be a grounding-type 3-wire cord, and
3.The longer cord should be arranged so that it will not drape over the counter top or table top where it can be pulled on by children or tripped over.

|
18 |
GENERAL INFORMATION |
|||||
|
1 GENERAL INFORMATION |
2 TECHNICAL SPECIFICATIONS |
The coffee machine is suitable for preparing 1 or 2 cups of espresso coffee and is provided with a swivel steam and hot water wand.
The controls on the front side of the appliance are labelled with easy-to-read symbols.
The structure of the machine with its elegant housing has been designed for domestic use only and is not suitable for continuous professional-type operation.
Warning. No liability is held for damage caused by:
•Incorrect use not in accordance with the intended purposes.
•Repairs not carried out in authorised service centres.
•Tampering with the power cord.
•Tampering with any part of the machine.
•Use of non-original spare parts and accessories.
•Failure to descale the machine and storage at tem-
peratures below 0°C.
In these cases, the warranty is not valid.
Nominal Voltage — Power Rating — Power Supply
See label on the appliance
Housing Material
Thermoplastic material
Size (w x h x d)
350 x 335 x 242
Weight
4.1 kg
Power Cord Length
1.2 m
Control Panel
On the front
Filter Holder (possible variations according to the different models)
Crema or Brass
Pannarello
Special for cappuccinos (optional)
Cappuccinatore (optional)
1.1 To Simplify Manual Reading
The warning triangle indicates the instructions that are important for user’s safety.
Please carefully follow these instructions to avoid serious injury!
 This symbol is used to highlight information that
  is particularly important to ensure optimal use
of the machine.
(Fig.2) — References to illustrations, parts of the appliance or controls, etc. are indicated by numbers or letters. Whenever possible, refer to the illustration.
1.2 How to Use these Operating Instructions
Keep these operating instructions in a safe place and make them available to anyone who may use the coffee machine. For further information or if you experience problems not completely or sufficiently covered in these instructions, please contact an authorised specialist.
Water Tank
1.4 litres – Removable
Pump Pressure
13-15 bar
Boiler
Com004CX — Stainless steel type Com004CL — Aluminium type
Safety Devices
Boiler pressure safety valve
Safety thermostat
Subject to engineering and manufacturing changes due to technological improvements.

|
SAFETY REGULATIONS |
19 |
||
|
Danger of Burns |
|||
|
3 SAFETY REGULATIONS |
Never allow water to come into contact with any of the electrical parts of the machine: Danger of short circuit! Overheated steam and hot water may cause scalding! Never direct the steam or hot water jet towards body parts. Handle the steam/hot water spout with care: Danger of scalding!
Intended Use
The coffee machine is intended for domestic use only. Do not make any technical changes or use the machine for unauthorised purposes since this would create serious hazards! The appliance is not to be used by persons (including children) with reduced physical, mental or sensory abilities or with limited experience and/or expertise, unless they are supervised by a person responsible for their safety, or they are instructed by this person on how to properly use the machine.
Power Supply
Only connect the coffee machine to a suitable socket.
The voltage must correspond to that indicated on the appliance’s label.
Power Cord
Never use the coffee machine if the power cord is defective or damaged. If damaged, the power cord must be replaced by the manufacturer or an authorised service centre. Do not pass the power cord around corners, over sharp edges or over hot objects and keep it away from oil.
Do not use the power cord to carry or pull the coffee machine. Do not pull out the plug by the power cord or touch it with wet hands.
Do not let the power cord hang freely from tables or shelves.
For the Safety of Others
Make sure that the coffee machine is out of children’s reach. Children are not aware of the risks related to electrical household appliances.
Do not leave the machine packaging materials within the reach of children.
Never direct jets of overheated steam and/or hot water towards yourself or others.
Always use the handles or knobs provided.
Do not disconnect (remove) the fi lter holder during coffee brewing. Hot water drips may spill out of the brew unit during the warming phase.
Never brew coffee when the button (5) is pressed because the steam function is on and the temperature of the boiler is too high.
Machine Location
Place the coffee machine in a safe place, where there will be no danger of overturning or injury.
Hot water or overheated steam may spill out of the machine:
Danger of scalding!
Do not keep the machine at temperatures below 0°C. Frost may damage the machine.
Do not use the coffee machine outdoors.
In order to prevent its housing from melting or being damaged, do not place the machine on very hot surfaces and close to open fl ames.
Cleaning
Before cleaning the machine it is necessary to turn off all buttons and remove the plug from the socket.
Wait for the machine to cool down. Never immerse the machine in water!
It is strictly forbidden to tamper with the internal parts of the machine.
Water left in the tank for several days should not be consumed. Wash the tank and fi ll it with fresh drinking water.
Suitable Location for Operation and Maintenance
To ensure a correct and efficient performance of the coffee machine, we recommend following the instructions below:
•Choose a level surface.
•Choose a location that is sufficiently well-lit, clean and near an easily reachable socket.
•Provide for a minimum distance from the sides of the machine as shown in the fi gure (Fig. A).
Storing the Machine
If the machine is to remain inactive for a long time, turn it off and unplug it.
Store it in a dry place, out of the reach of children. Keep it protected from dust and dirt.

|
20 |
SAFETY REGULATIONS — INSTALLATION |
|
Repairs / Maintenance
In case of failure, problems or a suspected fault resulting from the falling of the machine, immediately remove the plug from the socket.
Never attempt to operate a faulty machine.
Servicing and repairs may only be carried out by authorised specialists.
Repairs must be carried out only by an authorised service centre. All liability for damages resulting from work not carried out by professionals is declined.
Fire Safety Precautions
In case of fi re, use carbon dioxide (CO2) extinguishers. Do not use water or dry powder extinguishers.
Key to Machine Components
1Water tank
2 Water tank lid
3 Power button
4 Brew button
5Steam button
6 Hot water / steam knob
7 Brew unit
8 Steam wand
9Power cord
10Water recovery tray + grill
11Coffee bean hopper cover
12Coffee bean hopper
13Grinder adjustment knob
14Coffee brewing conveyor
15Coffee grinder operation button
16“Machine on”light
17“Machine ready”light
Accessories (possible variations according to the different models)
18«Crema» fi lter holder
19«Crema» fi lter for fi lter holder (single piece for 1 or 2 coffees)
20Measuring scoop
212-coffee fi lter for brass fi lter holder
221-coffee fi lter for brass fi lter holder
23Brass fi lter holder
4 INSTALLATION
For your own and other people safety, carefully follow the «Safety Regulations» indicated in section 3.
4.1 Packaging
The original packaging has been designed and manufactured to protect the machine during transport.
We recommend keeping the packaging material for possible future transport.
4.2 Installation Instructions
Before installing the machine, read the following safety instructions carefully:
•Place the machine in a safe place.
•Make sure children cannot play with the machine.
•Do not place the machine on hot surfaces or near open fl ames.
The coffee machine is now ready to be connected to the electric network.
 Note: We recommend washing the components
  before using them for the first time and/or after
they have not been used for a certain period of time.
4.3Filling the Water Tank
•(Fig.24) — Remove the cover from the water tank (2).
•Remove the water tank (1) by pulling it up. Pay attention not to damage the pipes inserted in the tank.
•(Fig.25) — Rinse and fi ll it with fresh water taking care not to overfi ll.
•(Fig.27) — Reinsert the tank into its seat and reposition the pipes previously removed.
 Important Note: On some models the tank is
  equipped with water intake valve. When the tank is removed, this valve automatically closes to pre-
vent water from spilling out. Once inserting the tank, press gently.
•Replace the tank cover.
![]()
Fill the tank only with fresh, non-sparkling wa-  ter. Hot water or any other liquid may damage the tank. Do not switch on the machine without water.
Make sure there is enough water in the tank.
4.4 Power Supply Connection
Electric power may be very dangerous! It is  therefore necessary to strictly follow the safety regulations. Do not use faulty power cords! Faulty cords and plugs must be replaced immediately by
authorised specialists.
The voltage of the appliance has been pre-set by the manufacturer.
Check that the voltage matches the indication on the data plate at the bottom of the appliance.
•Unroll the necessary cord length from the bottom of the appliance to connect it to the power network.
•Check that the power button is set on «0» before connecting the machine to the electric network.
•Connect the plug to a socket with suitable voltage.
4.5 Circuit Priming
Upon fi rst use, after dispensing steam or when the water tank is empty, the machine’s water circuit must always be primed.
•Press the power button (3), the light (16) will turn on.
•Direct the steam wand (Pannarello) over the drip tray.
•(Fig.28) — Open the «hot water/steam» knob (6) by turning it counter-clockwise and press the brew button (4).
•Wait until a steady jet of water fl ows out of the steam wand (Pannarello).
•Press the brew button (4) again and close the «hot water/ steam» knob (6) by turning it clockwise.
The machine is now ready to brew coffee and dispense steam. Please see related sections for operating details.
4.6 Using the Machine for the First Time or after a Period of Inactivity
This simple operation ensures an optimum brewing and must be performed:
—At fi rst start-up;
—When the machine remains inactive for a long time (more than 2 weeks).
 Dispensed water must be emptied into an ad-
  equate drain. It is not suitable for food use. If the container fills up during the cycle, stop dispensing
water and empty the container before resuming the operation.
•(Fig.25) — Rinse the tank and fi ll it with fresh drinking water.
•(Fig.33) — Place a container under the steam wand (Pannarello). Open the knob (6) by turning it counter-clockwise and press the brew button (4).
•Dispense all the water tank content through the steam/hot water wand.To end the operation, press the brew button (4) again and close the knob (6) by turning it clockwise.
•(Fig.25) — Fill the water tank with fresh drinking water.
•(Fig.30) — Insert the fi lter holder into the brew unit from the bottom (7) and turn it from left to right until it locks into place.
•(Fig.31) — Place a suitable container under the fi lter holder.
•Press the brew button (4) and dispense all the water in the tank. Once the water tank is empty, stop dispensing by pressing the brew button again (4).
At the end, empty the container.
•(Fig.32) — Remove the fi lter holder from the unit by turning it from right to left and rinse it with fresh drinking water.
•Fill the tank again and wait until the “machine ready” light (17) comes on.
•The machine is now ready to be used.

|
22 |
COFFEE GRINDER — COFFEE BREWING |
|
5 COFFEE GRINDER
Warning! The grind adjustment knob must only be turned when the coffee grinder is working. Do
not pour ground coffee into the coffee bean hopper.
Do not insert any material other than coffee  beans. The grinder contains moving parts that may be dangerous. Therefore, do not insert fingers and/ or other objects. Turn off the power button and unplug the machine from the socket before carrying out any type of operation inside the coffee bean hopper. Do not pour coffee beans into the bean hopper when the coffee
grinder is working.
Remove the cover (11) from the coffee bean hopper (12).
•Make sure the hopper is clean and pour in the fresh coffee beans. Then close the hopper with its cover (11).
The quality and fl avour of coffee depend on the degree of grind, as well as on the blend used.
The machine is equipped with a knob (13) to adjust the degree of grind.
To vary the degree of grind turn the graduated knob when the coffee grinder is working (the digits indicate the degree). Each appliance is pre-set on a medium grind degree.
Turning the knob to lower digits increases the grind degree, turning the knob to higher digits decreases the grind degree.
 It is not recommended to mix coffee from differ-
  ent degrees of grind.
5.1Coffee Grinder / Dosing Operation
•If the machine is off, switch it on by means of the power button (3).
•(Fig.29) — To operate the coffee grinder, approach the fi lter holder to the coffee brewing conveyor (14) and insert it into the appropriate fork. Press the fi lter holder until the coffee grind button (15) is activated.
•The coffee grinder starts working and doses ground coffee in the fi lter holder.
•Once the desired quantity is reached, stop grinding ground coffee by removing the fi lter holder from the fork.
 Note: Dosing is an instant operation at the user’s care. Excessive or insufficient dosing should be avoided. The quantity of ground coffee for each cup
should range from 5 to 7 g.
Warning! It is forbidden to operate the coffee grinder with any devices and/or tools other than
the filter holder.
6 COFFEE BREWING
Warning! During coffee brewing, do not remove the filter holder by manually turning it clock-
wise. Danger of burns!
•During this operation the “machine ready” light (17) may turn on and off. This should be considered a standard operation, not a fault.
•Before using the machine, make sure that the hot water/ steam knob (6) is closed and that there is enough water in the machine tank.
•If the machine is off, switch it on by means of the power button (3). The light (16) will turn on.
•Wait until the“machine ready”light (17) comes on. The machine is now ready to brew coffee.
6.1Using the Crema Filter Holder
•Insert the fi lter (19) into the «Crema» fi lter holder (18).
•(Fig.30) — Insert the «Crema» fi lter holder into the brew unit from the bottom (7) and turn it from left to right until it locks into place.
•Release the grip from the fi lter holder handle.
The handle is automatically slightly turned leftwards. This movement guarantees proper fi lter holder performance.
•(Fig.31) — Place a cup under the fi lter holder.
Preheat the fi lter holder and the cup by pressing the coffee button (4). Water will fl ow out of the fi lter holder (this operation is only necessary for the first coffee).
•When the cup is adequately fi lled, press the brew button (4) again.
•(Fig.32) — Remove the fi lter holder from the machine by turning it from right to left and pour out any water left.

•As the machine is fi tted with the special «Crema» fi lter holder (18), there is no need to change the fi lter when making one or two coffees.
•(Fig.29) — By means of the fi lter holder, obtain an adequate quantity of ground coffee (section 5.1) to prepare one or two coffees.
•Clean the fi lter holder rim from any coffee residues.
•(Fig.30) — Insert the «Crema» fi lter holder (18) into the brew unit (7) from the bottom and turn it from left to right until it perfectly locks into place, as previously described.
•(Fig.31) — Take 1 or 2 preheated cups and place them under the fi lter holder. Make sure that they are correctly placed under the coffee brewing nozzles.
•Press the brew button. Wait until the cups are adequately fi lled.
•Press the brew button again to stop coffee brewing.
•(Fig.32) — Wait a few seconds after brewing, then remove the fi lter holder and empty the remaining coffee grounds out.
 Cleaning note: Keep the filter of the «Crema» fil-
  ter holder clean by removing it from its seat and
washing it with drinking water.
6.2Using the Brass Filter Holder
•Insert the fi lter (22 or 21, for 1 or 2 cups according to the number of coffees you wish to prepare) into the brass fi lter holder (23).
•(Fig.30) — Insert the brass fi lter holder into the brew unit (7) from the bottom and turn it from left to right until it locks into place.
•(Fig.31) — Place a cup under the fi lter holder.
•Preheat the fi lter holder and the cup by pressing the coffee button (4). Water will fl ow out of the fi lter holder (this operation is only necessary for the first coffee).
•When the cup is adequately fi lled, press the brew button (4) again.
•(Fig.32) — Remove the fi lter holder from the machine by turning it from right to left.
•(Fig.29) — By means of the fi lter holder, obtain one or two doses of ground coffee (section 5.1) according to the previously mounted fi lter.
•Tamp the coffee using the lower part of the measuring scoop (20) and clean the fi lter holder rim from any coffee residues.
•(Fig.30) — Insert the brass fi lter holder (23) into the brew unit (7) from the bottom and turn it from left to right until it perfectly locks into place.
•(Fig.31) — Take 1 or 2 preheated cups and place them under the fi lter holder. Make sure that they are correctly placed under the coffee brewing nozzles.
•Press the brew button. Wait until the cups are adequately fi lled.
•Press the brew button again to stop coffee brewing.
•(Fig.32) — At the end of the operation remove the fi lter holder and empty the remaining coffee grounds out.
 Cleaning note: Keep the filter of the filter holder
  clean by removing it from its seat and washing it
with drinking water.
7 TIPS FOR CHOOSING COFFEE
As a general rule, any type of coffee available on the market can be used.
However, coffee is a natural product and its fl avour changes according to its origin and blend; it is therefore a good idea to try different types of coffee in order to fi nd the most suited to your personal taste.
For optimal results, we recommend using espresso machine blends.
As a rule, coffee should always come out of the fi lter holder regularly and without dripping.
The speed of coffee brewing can be modifi ed by slightly changing the amount of coffee in the fi lter, the degree of grind and/ or how the coffee is tamped in the fi lter.
BEFORE PERFORMING ANY OPERATIONS RELATED  TO HOT WATER/STEAM DISPENSING, MAKE SURE THAT THE STEAM WAND (PANNARELLO) IS DIRECTED OVER
THE WATER RECOVERY TRAY.

|
24 |
DISPENSING HOT WATER — DISPENSING STEAM — CLEANING |
|
8 DISPENSING HOT WATER
Danger of scalding! Dispensing may be preceded  by small jets of hot water. The steam wand may reach high temperatures: Never touch it with bare
hands.
•If the machine is off, switch it on by means of the power button (3). The light (16) will turn on.
•Wait until the light (17) comes on.
•(Fig.33) — Place a cup or a tea glass under the steam wand (Pannarello).
•Open the «hot water/steam» knob (6) by turning it counterclockwise and press the brew button (4) to let the desired quantity of water fl ow out.
•Press the brew button (4) again and close the knob (6) by turning it clockwise in order to stop hot water dispensing.
9 STEAM / CAPPUCCINO
Danger of scalding! Dispensing may be preceded  by small jets of hot water. The steam wand may reach high temperatures: Never touch it with bare
hands.
Warning! Never brew coffee when the steam function is on, as the temperature is too high and
there is a risk of burns.
•If the machine is off, switch it on by means of the power button (3). The light (16) will turn on
•Press the steam button (5), the light (17) will go off.
•Wait until the “machine ready” light (17) comes on again. The machine is now ready to dispense steam.
•(Fig.28) — Direct the steam wand (Pannarello) over the drip tray, open the“hot water/steam”knob (6) for a few seconds so as to let the remaining water come out of the steam wand (Pannarello). In a short time, only steam will come out of the spout.
•Close the knob (6).
•(Fig.34) — Immerse the steam wand (Pannarello) into the liquid to be heated and open the knob (6). Turn the container with slow upward movements to allow even heating.
•After dispensing steam for the desired time, close the knob
(6) and set the «steam» button (5) back to its initial position.
 Using this system with milk enables preparing
  cappuccino. Use cold milk to get a better result.
•Prime the circuit as described in section 4.5 to make the machine ready for use.
•After this operation, clean the steam wand (Pannarello) with a dampened cloth.
 Important note: If it is not possible to brew
  cappuccino as described, prime the circuit as ex-
plained in section 4.5 and then repeat the steps.
10 CLEANING
Maintenance and cleaning can only be carried out when the machine is cold and disconnected from the electric network.
•Do not immerse the machine in water or place any of its parts in a dishwasher.
•Do not use sharp objects or harsh chemical products (solvents) for cleaning.
•(Fig.25) — We recommend cleaning the water tank and refi lling it with fresh water daily.
•After heating milk, dispense a small quantity of hot water to clean the wand. Use a dampened cloth to clean the outside of the wand.
•(Fig.36) — Use a soft, dampened cloth to clean the appliance.
•(Fig.37) — Perform the following operations to clean the fi lter holder:
•Remove the fi lter, immerse it in hot water and wash it thoroughly.
•Clean the inside of the fi lter holder.
•Do not dry the machine and/or its components using a microwave and/or standard oven.
•Clean the Pannarello placed over the steam wand (if any). To do this, unscrew the ring nut, remove the Pannarello from the steam wand and disassemble the outer body of the Pannarello.
Wash under running water and reassemble the Pannarello.
 We recommend tightening the ring nut properly
  because the Pannarello could slip off during op-
eration.

11 DESCALING
Limescale normally builds up with the use of the appliance. The machine needs descaling every 1-2 months (if used) and/ or whenever a reduction in water fl ow is noticed. Use the Saeco descaling solution only.
 In case of conflict, priority must be given to what is indicated in the operation and maintenance manual over the instructions provided on separately
sold accessories and materials.
Use the Saeco descaling  solution only. Its formula has been designed to ensure better machine performance and operation for its whole operating life. If correctly used, it also avoids alterations in the brewed product. The descaling solution must be disposed of according to the manufacturer’s instructions and/
or regulations in force in the country of use.
Never drink the descaling solution or any prod-  ucts dispensed until the cycle has been carried out to the end. Never use vinegar as a descaling solution.
1(Fig.30) — Insert the fi lter holder into the brew unit (7) from the bottom and turn it from left to right until it locks into place.
2 (Fig.24) — Remove and empty the water tank.
3(Fig.26) — Pour HALF the content of the Saeco concentrated descaling solution into the water tank, then fi ll the tank with fresh drinking water up to the MAX level.
4Remove the Pannarello (or Cappuccinatore) installed on the steam wand, if any.
5 Switch on the machine by pressing the ON/OFF button (3). (Fig.33) — Fill up (as described in section 8 of the manual) 2 cups of water (about 150 ml each) from the steam / hot water wand and turn off the machine by means of the ON/ OFF button (3).
6Let the descaling solution take effect for approx.15-20 minutes with the machine turned off.
7Switch on the machine by pressing the ON/OFF button (3). (Fig.33) — Fill up (as described in section 8 of the manual) 2 cups of water (about 150 ml each) from the steam / hot water wand. Then turn the machine off by means of the ON/ OFF button (3) and leave it off for 3 minutes.
8Repeat the operations described in step 7 until the water tank is completely empty.
9(Fig.25) — Rinse the water tank with fresh drinking water and fi ll it completely.
10Place a container under the fi lter holder.
11(Fig.31) — Switch on the machine by pressing the ON/OFF button (3); press the brew button (4) and, using the fi lter holder, dispense the whole content of the tank.
12(Fig.25) — Fill the tank again with fresh water.
(Fig.33) — Place a large enough container under the steam wand. Open the water dispensing knob (6) by turning it counter-clockwise. Press the button (4) and dispense the whole content of the tank by means of the steam / hot water wand.
13After water dispensing is complete, press the button (4) again to end the operation; close the water dispensing knob
(6) by turning it clockwise.
14Repeat the operations from step (9) once again for a total of 4 tanks.
15(Fig.32) — Remove the fi lter holder from the unit by turning it from right to left and rinse it with fresh drinking water.
The descaling cycle is now complete.
(Fig.25) — Fill the tank again with fresh water. If necessary, prime the circuit as described in section 4.5 of the manual.
Once fi nished, reposition the previously installed Pannarello (or Cappuccinatore) on the steam wand.

12DISPOSAL
—The packing materials can be recycled.
—Appliance: Unplug the appliance and cut the power cord.
—Deliver the appliance and power cord to a service center or public waste disposal facility.
This product complies with eu directive 2002/96/EC.
The  on the product or on its packaging indicates that this product may not be treated as household waste. Instead it shall be handed over to the applicable collection point for the recycling of electrical and electronic equipment. By ensuring this product is disposed of correctly, you will help prevent potential negative consequences for the environment and human health, which could otherwise be caused by inappropriate waste handling of this product. For more detailed information about recycling of this product, please contact your local city office, your household waste disposal service or the shop where you purchased the product.
 Loading…