Printed in Spain
3-298-243-61(1)
For useful information about Sony products
Для получения полезной информации о продукции Сони
© 2008 Sony Corporation 3-298-243-61(1)
GB
RU
LCD Digital Colour TV
Operating Instructions
Инструкция по эксплуатации
KDL-52W40xx
KDL-52W42xx
KDL-46W40xx
KDL-46W42xx
KDL-40W40xx
KDL-40W42xx
KDL-32W40xx
KDL-32W42xx
KDL-40E40xx
KDL-32E40xx
KDL-26E40xx
KDL-37V45xx
KDL-37V47xx
KDL-32V45xx
KDL-32V47xx
KDL-26V45xx
KDL-26V47xx
000COV_0mm(611)m.indd 1000COV_0mm(611)m.indd 1 18/03/2008 16:59:4518/03/2008 16:59:45
2
GB
Thank you for choosing this Sony product.
Before operating the TV, please read this manual
thoroughly and retain it for future reference.
Disposal of Old Electrical &
Electronic Equipment (Applicable in
the European Union and other
European countries with separate
collection systems)
This symbol on the product or on its
packaging indicates that this product
shall not be treated as household waste.
Instead it shall be handed over to the applicable collection
point for the recycling of electrical and electronic
equipment. By ensuring this product is disposed of
correctly, you will help prevent potential negative
consequences for the environment and human health,
which could otherwise be caused by inappropriate waste
handling of this product. The recycling of materials will
help to conserve natural resources. For more detailed
information about recycling of this product, please contact
your local Civic Office, your household waste disposal
service or the shop where you purchased the product.
Disposal of waste batteries
(applicable in the European Union
and other European countries with
separate collection systems)
This symbol on the battery or on the
packaging indicates that the battery
provided with this product shall not be
treated as household waste. By ensuring
these batteries are disposed of correctly,
you will help prevent potentially negative consequences
for the environment and human health which could
otherwise be caused by inappropriate waste handling of the
battery. The recycling of the materials will help to conserve
natural resources. In case of products that for safety,
performance or data integrity reasons require a permanent
connection with an incorporated battery, this battery should
be replaced by qualified service staff only. To ensure that
the battery will be treated properly, hand over the product
at end-of-life to the applicable collection point for the
recycling of electrical and electronic equipment. For all
other batteries, please view the section on how to remove
the battery from the product safely. Hand the battery over
to the applicable collection point for the recycling of waste
batteries. For more detailed information about recycling of
this product or battery, please contact your local Civic
Office, your household waste disposal service or the shop
where you purchased the product.
The manufacturer of this product is Sony
Corporation, 1-7-1 Konan Minato-ku Tokyo, 108-
0075 Japan. The Authorized Representative for EMC
and product safety is Sony Deutschland GmbH,
Hedelfinger Strasse 61, 70327 Stuttgart, Germany.
For any service or guarantee matters please refer to
the addresses given in separate service or guarantee
documents.
• Any functions related to Digital TV ( ) will only
work in countries or areas where DVB-T (MPEG2 and
MPEG4 AVC) digital terrestrial signals are broadcast or
where you have access to a compatible DVB-C (MPEG2
and MPEG4 AVC) cable service. Please confirm with
your local dealer if you can receive a DVB-T signal
where you live or ask your cable provider if their DVB-
C cable service is suitable for integrated operation with
this TV.
• The cable provider may charge an additional fee for such
a service and you may be required to agree to their terms
and conditions of business.
• Although this TV set follows DVB-T and DVB-C
specifications, compatibility with future DVB-T digital
terrestrial and DVB-C digital cable broadcasts cannot be
guaranteed.
• Some Digital TV functions may not be available in some
countries/regions and DVB-C cable may not operate
correctly with all providers.
• For more information about DVB-C functionality please
see our cable support site:
http://support.sony-europe.com/TV/DVBC
/
• is a registered trademark of the DVB Project
• Manufactured under license from BBE Sound, Inc.
Licensed by BBE Sound, Inc. under one or more of the
following US patents: 5510752, 5736897. BBE and
BBE symbol are registered trademarks of BBE Sound,
Inc.
• Manufactured under license from Dolby Laboratories.
“Dolby” and the double-D symbol are trademarks
of Dolby Laboratories.
• HDMI, the HDMI logo and High-Definition Multimedia
Interface are trademarks or registered trademarks of
HDMI Licensing LLC.
~
• The illustrations used in this manual are of the
KDL-40W4000 unless otherwise state.
• The «x» that appear on the model name, correspond to
numeric digits related to colour variation.
Introduction
Disposal of the TV set
Notice for Digital TV function
Trademark information
HD3D Sound
ViV
A
010COV.book Page 2 Wednesday, March 26, 2008 2:49 PM
3
GB
Table of Contents
Start-up Guide 4
Checking the accessories………………………………………………………………………………………. 4
Safety information……………………………………………………………………………………………….… 9
Precautions……………………………………………………………………………………………………..…. 10
Overview of the remote ……………………………………………………………………………………… 11
Overview of the TV buttons and indicators…………………………………………………………. 12
Watching TV……………………………………………………………………………………………………..… 13
Checking the Guide …………………………………………………………………………………….. 15
Using the Digital Favourite list ………………………………………………………………………. 16
Connecting optional equipment……………………………………………………………………………… 17
Viewing pictures from connected equipment …………………………………………………………… 18
Using BRAVIA Sync (Control for HDMI) …………………………………………………………………. 19
Overview of the TV Home Menu (XMB™)………………………………………………………………. 21
Settings………………………………………………………………………………………………………..……. 22
Picture ………………………………………………………………………………………………………..… 22
Sound …………………………………………………………………………………………………………… 23
Features ………………………………………………………………………………………………………..24
Set-up ……………….………………………………………………………………………………………….. 25
Analogue Set-up ..………………………………………………………………………………………….. 28
Digital Set-up ……………………………………………………………………………………….. 29
Photo ………………………………………………………………………………………………………………… 32
Picture Frame ………………………………………………………………………………………………… 32
USB Photo Viewer …………………………………………………………………………………………. 32
Specifications…………………………………………………………………………………………………..…. 33
Troubleshooting …………………………………………………………………………………………………..35
Start-up Guide 4
Watching TV
Using Optional Equipment
Using MENU Functions
Additional Information
: for digital channels only
GB
Before operating the TV, please read the “Safety information” section of this manual.
Retain this manual for future reference.
010COV.book Page 3 Wednesday, March 26, 2008 2:49 PM
4
GB
Start-up Guide
1: Checking the
accessories
Mains lead (1) (only for KDL-52W4xxx, KDL-
46W4xxx, KDL-40W4xxx, KDL-40E4xxx)
Remote RM-ED011 (1)
Remote RM-ED011 W (1) (only for KDL-
40E4xxx, KDL-32E4xxx, KDL-26E4xxx)
Size AA batteries (R6 type) (2)
Stand (1) (except for KDL-52W4xxx,
KDL-26E4xxx)
Screws for stand (4) (only for KDL-
46W4xxx, KDL-40W4xxx, KDL-40E4xxx,
KDL-37V4xxx)
Screws for stand (3) (only for KDL-
32W4xxx, KDL-32E4xxx, KDL-32V4xxx,
KDL-26V4xxx)
To insert batteries into the remote
~
• Observe the correct polarity when inserting batteries.
• Do not use different types of batteries together or mix
old and new batteries.
• Dispose of batteries in an environmentally friendly way.
Certain regions may regulate disposal of batteries.
Please consult your local authority.
• Handle the remote with care. Do not drop or step on it,
or spill liquid of any kind onto it.
• Do not place the remote in a location near a heat source,
a place subject to direct sunlight, or a damp room.
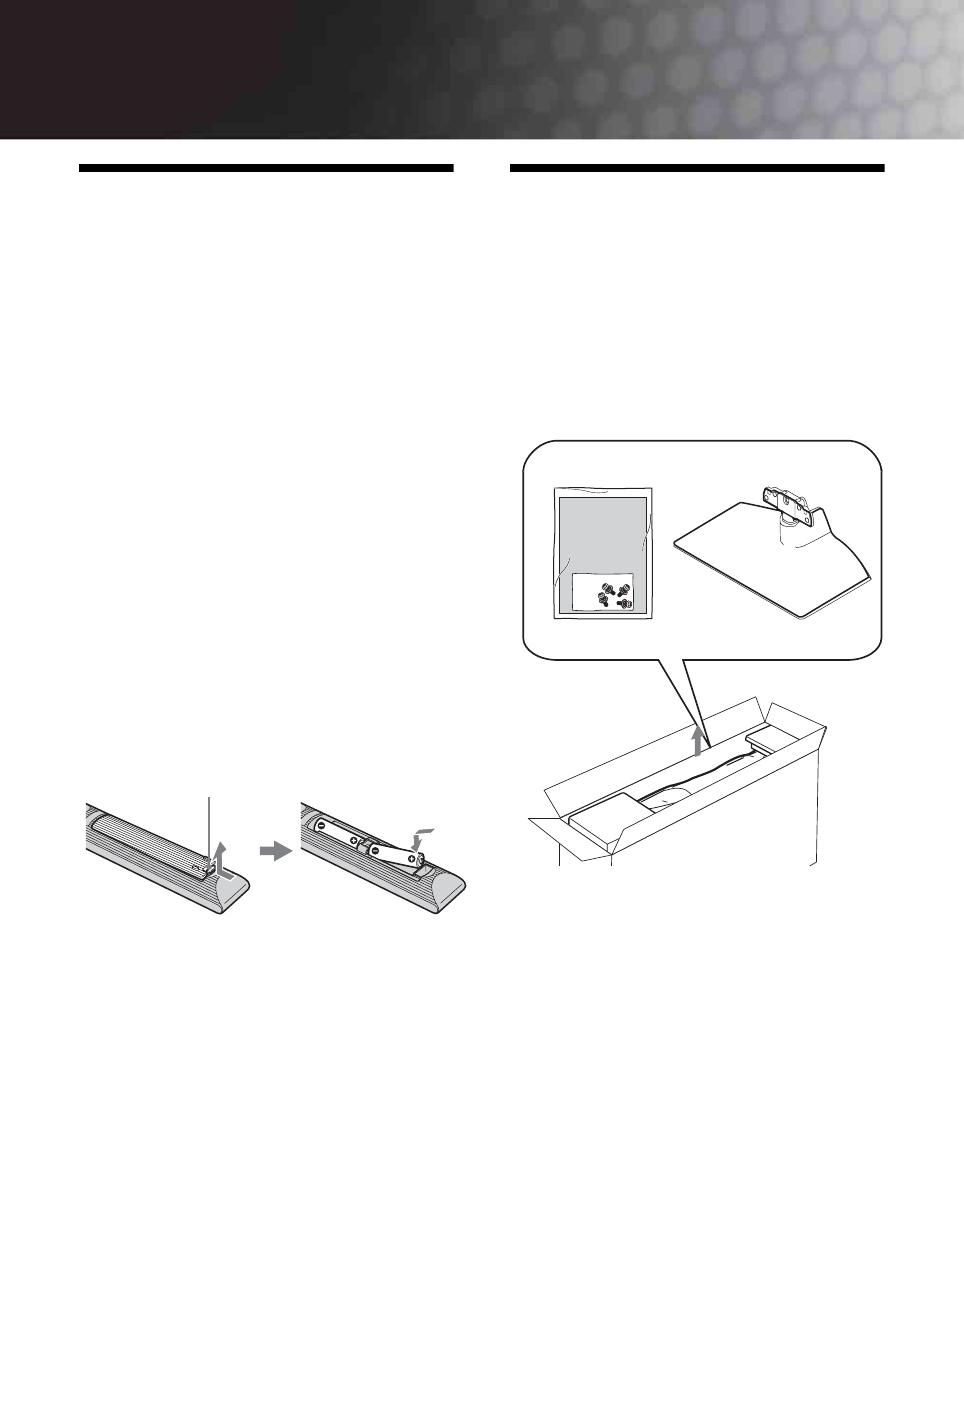
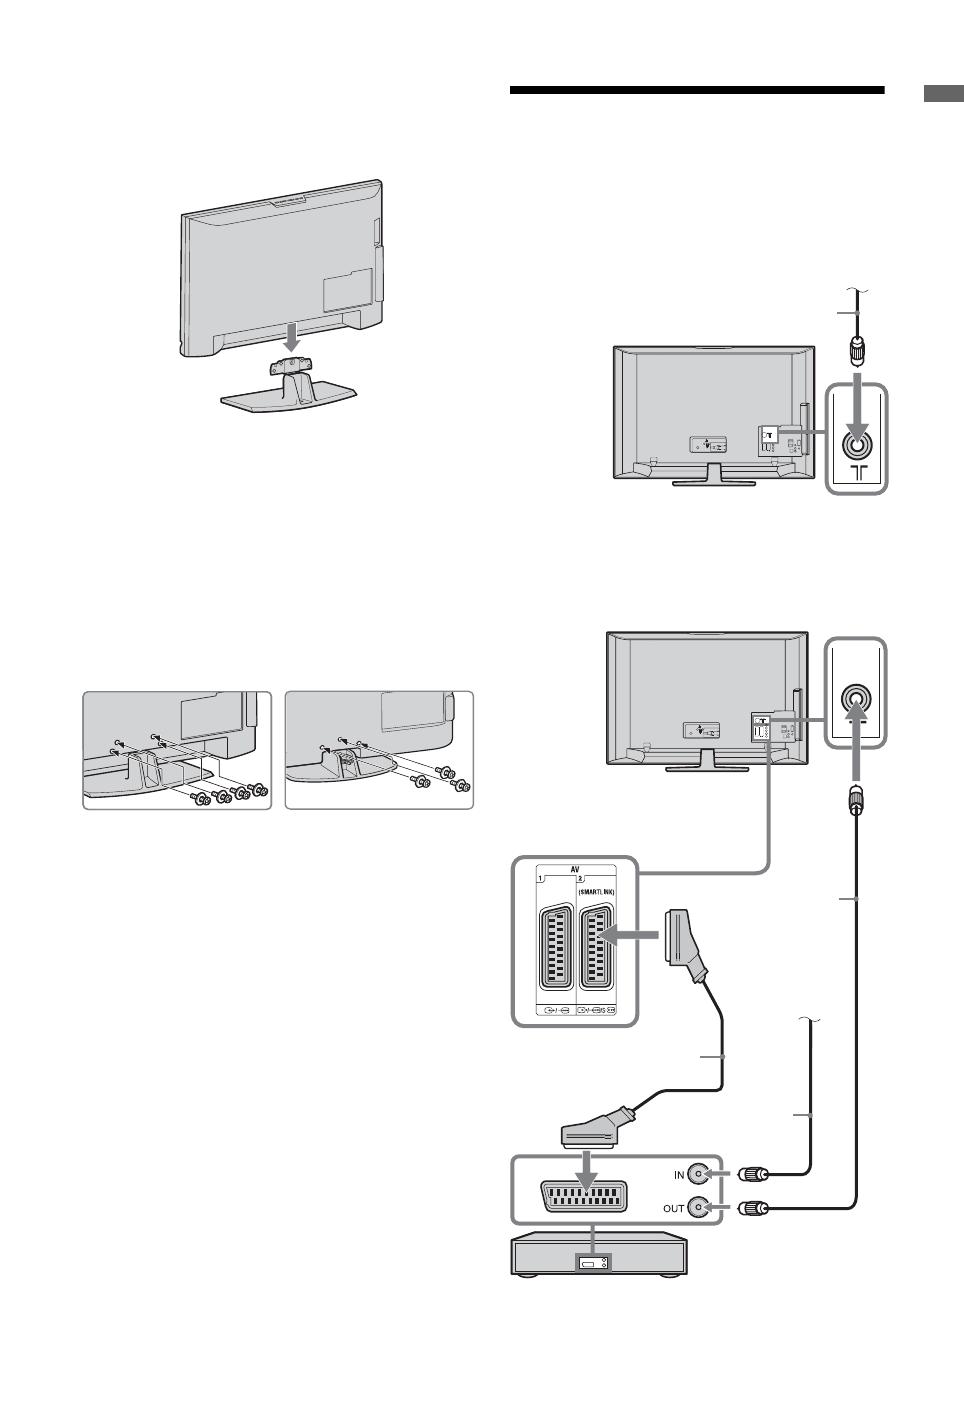
2: Attaching the stand
(except for KDL-52W4xxx,
KDL-26E4xxx)
1 Open the carton box and take out the stand
and the screws.
Push and lift the cover to open.
010COV.book Page 4 Wednesday, March 26, 2008 2:49 PM
5
GB
Start-up Guide
2 Place the TV set on the stand. Take care not to
interfere with cables.
3 Fix the stand to the TV using the supplied
screws.
~
If using an electric screwdriver, set the tightening torque at
approximately 1.5 N·m (15 kgf·cm)
3: Connecting an
aerial/VCR/ DVD
recorder
KDL-46W4xxx
KDL-40W4xxx
KDL-40E4xxx
KDL-37V4xxx
KDL-32W4xxx
KDL-32E4xxx
KDL-32V4xxx
KDL-26V4xxx
onnecting an aerial/cable
Connecting an aerial/ cable/ VCR/ DVD recorder
Coaxial cable
Scart lead
VCR/ DVD recorder
Coaxial cable
Coaxial cable
Terrestrial signal
or cable
Terrestrial signal
or cable
010COV.book Page 5 Wednesday, March 26, 2008 2:49 PM
6
GB
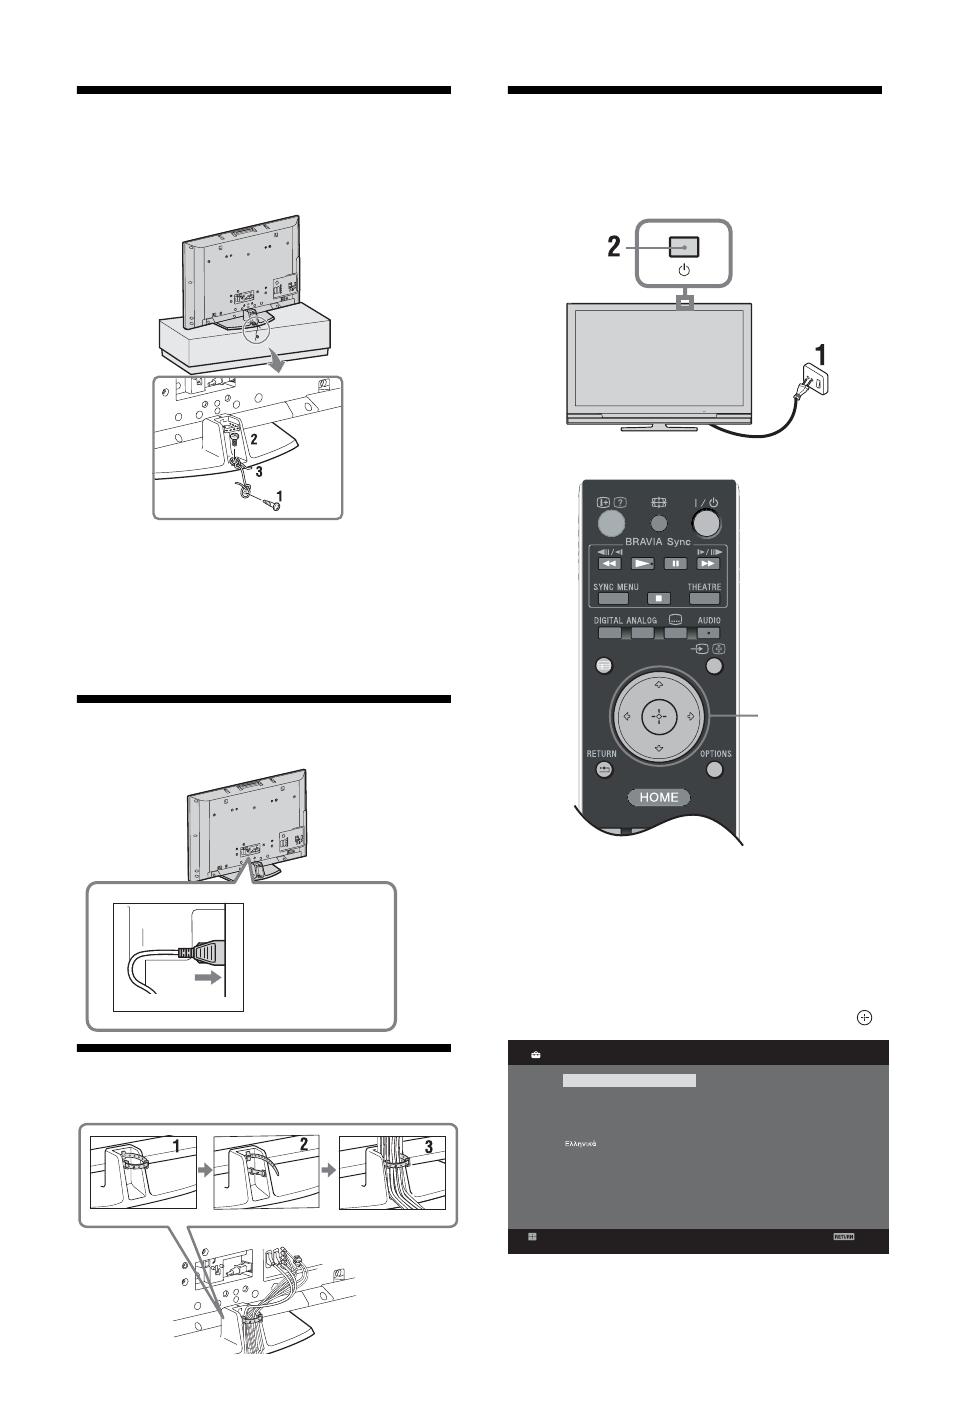
4: Preventing the TV
from toppling over
1 Install a wood screw (4 mm in diameter, not
supplied) in the TV stand.
2 Install a machine screw (M5 x 12, not
supplied) into the screw hole of the TV.
3 Tie the wood screw and the machine screw
with a strong cord.
5: Connecting the cables
6: Bundling the cables
7:
Performing the initial
set-up
1 Connect the TV to your mains socket
(220-240V AC, 50Hz).
2 Press 1 on the TV.
When you switch on the TV for the first time, the
Language menu appears on the screen.
3 Press F/f/G/g to select the language
displayed on the menu screens, then press .
KDL-52W4xxx
KDL-46W4xxx
KDL-40W4xxx
KDL-40E4xxx
3,4,5
GUIDE
Česky
Magyar
Русский
ББ
лгар
ски
Suomi
Dansk
Svenska
Norsk
Slovenčina
Română
English
Nederlands
Français
Italiano
Deutsch
Türkçe
Español
Català
Português
Polski
Language
Back
Set
Analogue
010COV.book Page 6 Wednesday, March 26, 2008 2:49 PM
7
GB
Start-up Guide
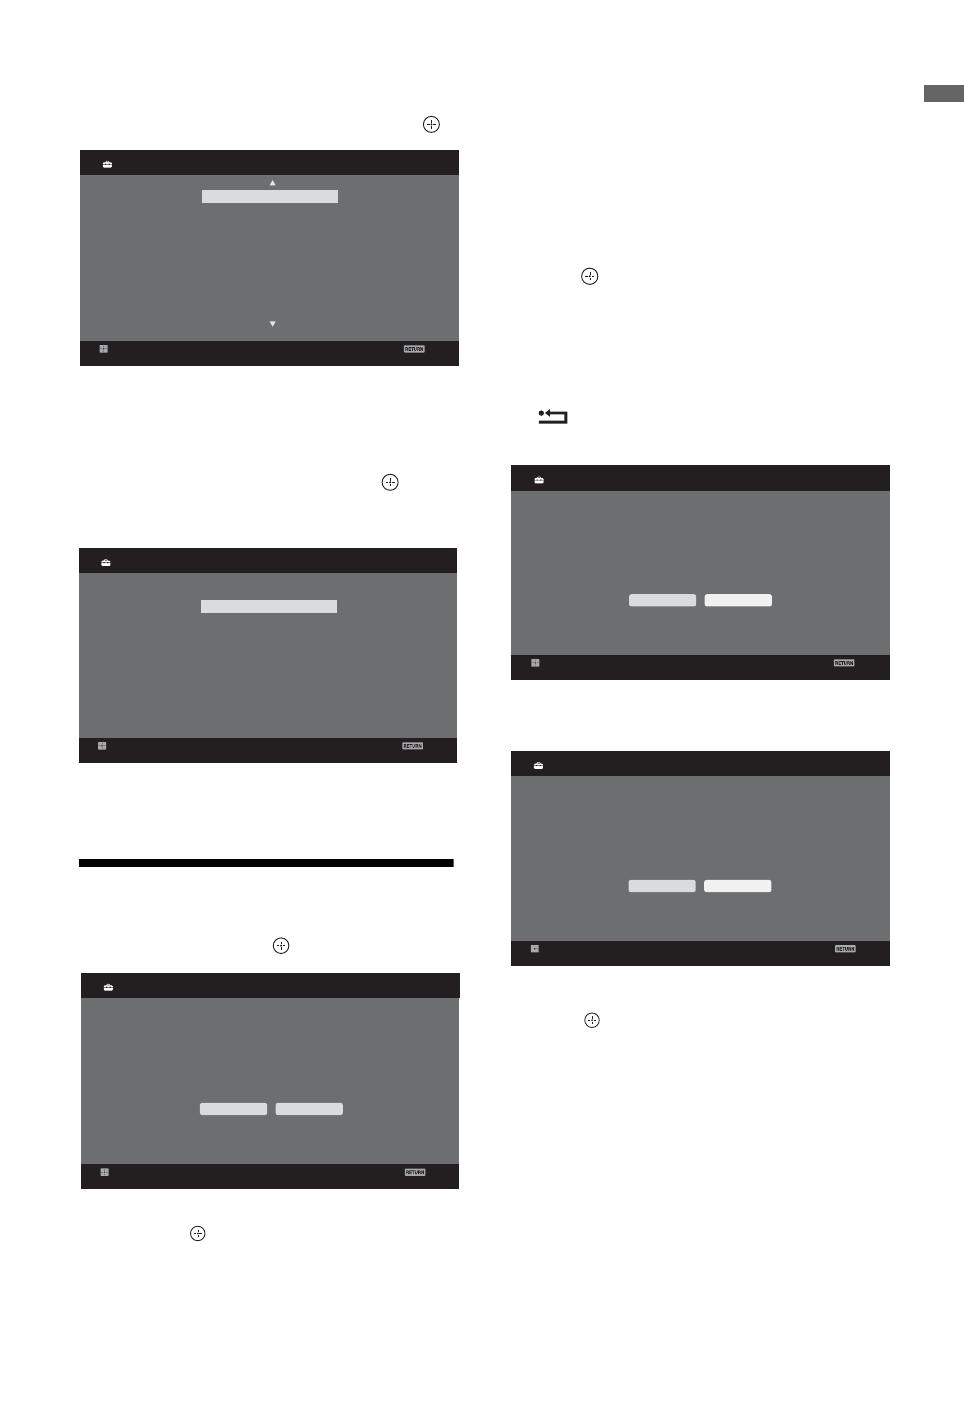
4
Press
F
/
f
to select the country/region in
which you will operate the TV, then press .
If the country/region in which you want to use
the TV does not appear in the list, select “-”
instead of a country/region.
5 Press F/f to select the location type in which
you will operate the TV, then press .
~
Sony recommends you to select “Home” for power saving.
This option selects the initial picture mode
appropriate for the typical lighting condition in
these enviroments.
8: Auto-tuning the TV
1 Select OK then press .
2 Press F/f to select “Antenna” or “Cable”,
then press .
If you select “Cable”, the screen for selecting the
scan type appears. See “To tune the TV for
Cable connection” (page 8).
The TV starts searching for all available digital
channels, followed by all available analogue
channels. This may take some time, so do not
press any buttons on the TV or remote while
proceeding.
If a message appears for you to confirm the
aerial connection
No digital or analogue channels were found.
Check all the aerial/cable connection and then
press to start auto-tuning again.
3 When the Programme Sorting menu appears
on the screen, follow the steps of
“Programme Sorting”(page 28).
If you do not change the order in which the
analogue channels are stored on the TV, press
RETURN to go to step 4.
4
For details, see page 24.
5
For details, see page 19.
6 Press .
The TV has now tuned in all the available
channels.
~
When a digital broadcast channel cannot be received, or
when selecting a region in which there are no digital
broadcasts in step 3 (page 7), the time must be set after
performing step 3.
Back
Set
Analogue
United Kingdom
Ireland
Nederland
België/Belgique
Luxembourg
France
Italia
Schweiz/Suisse/Svizzera
Deutschland
—
Country
Back
Set
Analogue
Location
Home
Shop
Back
Set
Analogue
Auto Tuning
OK Cancel
Do you want to start Auto Tuning?
Back
Set
Analogue
Quick Start
Yes No
Do you want to enable Quick Start?
TV turns on more quickly but standby power
consumption is increased.
Back
Set
Analogue
Control for HDMI
Yes No
Do you want to enable control for compatible
HDMI devices?
010COV.book Page 7 Wednesday, March 26, 2008 2:49 PM
8
GB
To tune the TV for Cable connection
1 Press .
2 Press F/f to select “Quick Scan” or “Full
Scan”, then press .
«Quick Scan» : channels are tuned according to
the cable operator information within the
broadcast signal.
Recommended setting for «Frequency»,
«Network ID» and «Symbol Rate» is «Auto».
This option is recommended for fast tuning
when supported by your cable operator.
If the «Quick Scan» does not tune, please use the
«Full Scan» method below.
«Full Scan» : All available channels are tuned
and stored. This procedure may take some time.
This option is recommended when «Quick Scan»
is not supported by your cable provider.
For further information about supported cable
providers, refer to support web site:
http://support.sony-europe.com/TV/DVBC/
3 Press f to select “Start”, then press .
The TV starts searching for channels. Do not
press any buttons on the TV or remote.
~
Some cable providers do not support “Quick Scan”. If no
channels are detected using “Quick Scan”, perform “Full
Scan”.
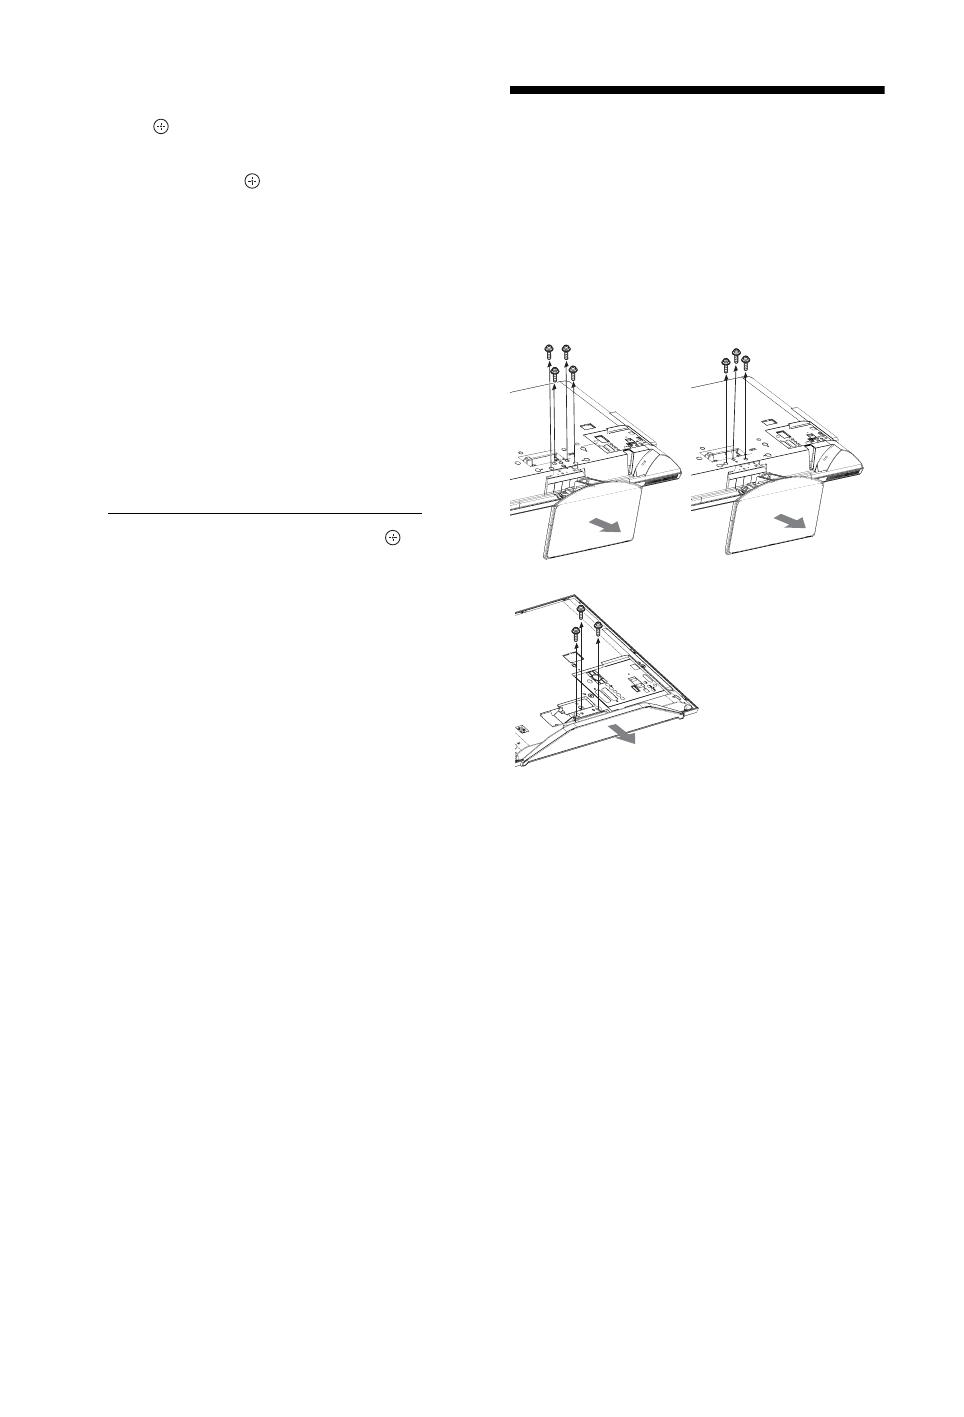
Detaching the Table-
Top Stand from the TV
~
Do not remove the Table-Top Stand for any reason other
than to wall-mount the TV.
KDL-32W4xxx
KDL-32E4xxx
KDL-32V4xxx
KDL-26V4xxx
KDL-52W4xxx
KDL-46W4xxx
KDL-40W4xxx
KDL-40E4xxx
KDL-37V4xxx
KDL-26E4xxx
010COV.book Page 8 Wednesday, March 26, 2008 2:49 PM
9
GB
Safety information
Installation/Set-up
Install and use the TV set in accordance with the
instructions below in order to avoid any risk of fire,
electrical shock or damage and/or injuries.
Installation
• The TV set should be installed near an easily accessible
mains socket.
• Place the TV set on a stable, level surface.
• Only qualified service personnel should carry out wall
installations.
• For safety reasons, it is strongly recommended that you
use Sony accessories, including:
— KDL-52W40xx/ KDL-52W42xx/ KDL-46W40xx/
KDL-46W42xx/ KDL-40W40xx/ KDL-40W42xx/
KDL-32W40xx/ KDL-32W42xx/ KDL-40E40xx/
KDL-32E40xx/ KDL-37V45xx/ KDL-37V47xx/
KDL-32V45xx/ KDL-32V47xx:
Wall-Mount Bracket SU-WL500.
— KDL-26V45xx/ KDL-26V47xx / KDL-26E40xx:
Wall-mount Bracket SU-WL100.
— KDL-46W40xx/ KDL-46W42xx/ KDL-40W40xx/
KDL-40W42xx/KDL-32W40xx/ KDL-32W42xx/
KDL-40E40xx/ KDL-32E40xx/ KDL-37V45xx/
KDL-37V47xx/ KDL-32V45xx/ KDL-32V47xx:
TV stand SU-FL300M.
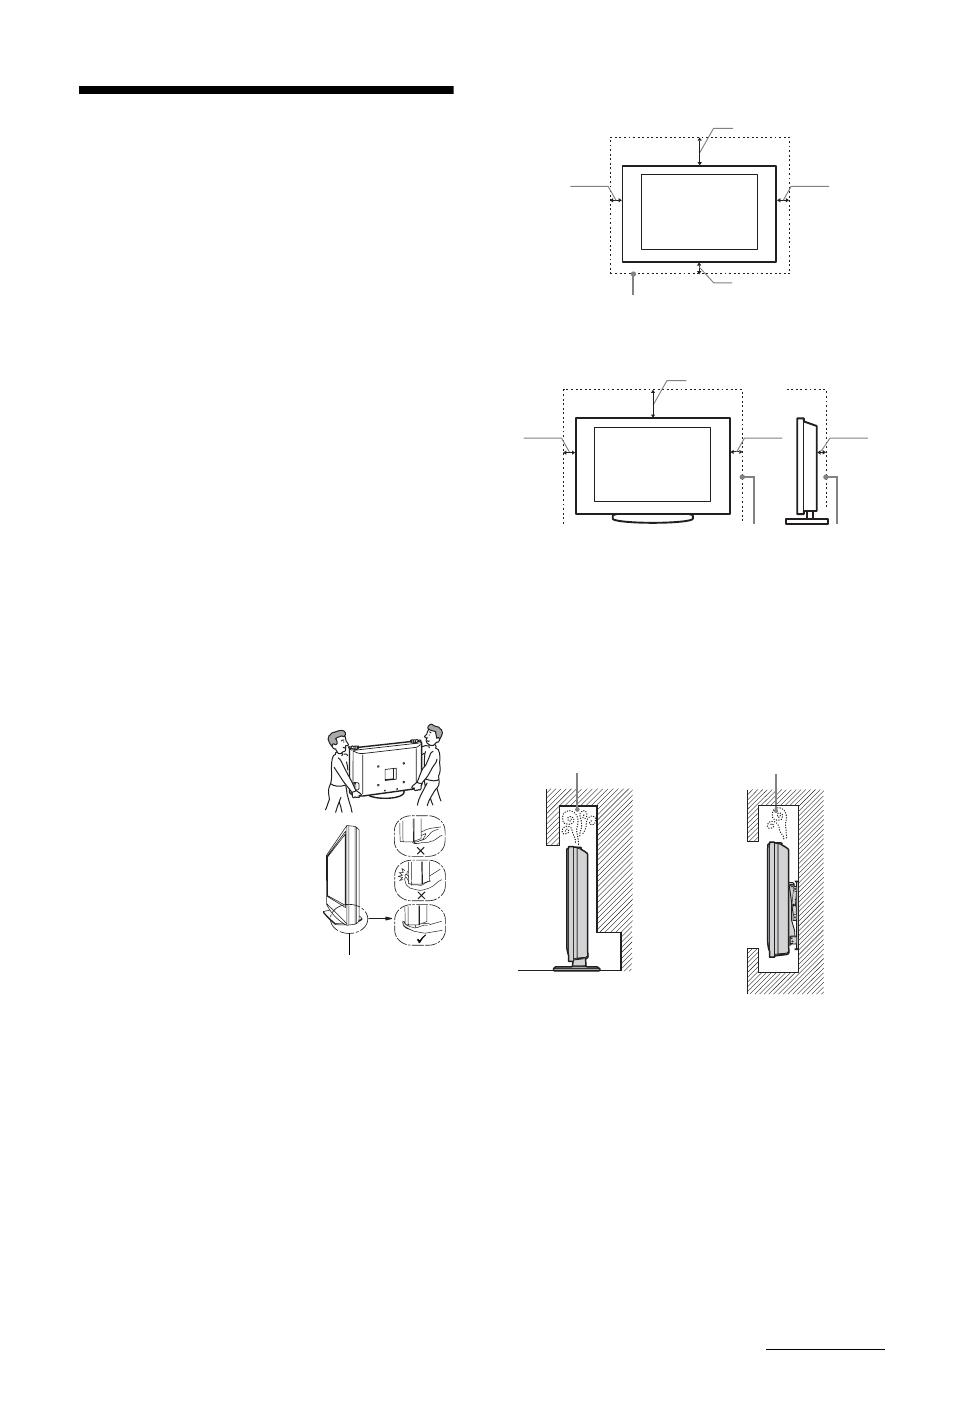
Transporting
• Before transporting the TV set,
disconnect all cables.
• Two or three people are needed
to transport a large TV set.
• When transporting the TV set by
hand, hold it as shown on the
right. Do not put stress on the
LCD panel and the frame around
the screen.
• When lifting or moving the TV
set, hold it firmly from the
bottom.
• When transporting the TV set, do
not subject it to jolts or excessive
vibration.
• When transporting the TV set for
repairs or when moving, pack it
using the original carton and packing material.
Ventilation
• Never cover the ventilation holes or insert anything in
the cabinet.
• Leave space around the TV set as shown below.
• It is strongly recommended that you use a Sony wall-
mount bracket in order to provide adequate air-
circulation.
Installed on the wall
Installed with stand
• To ensure proper ventilation and prevent the collection
of dirt or dust:
– Do not lay the TV set flat, install upside down,
backwards, or sideways.
– Do not place the TV set on a shelf, rug, bed or in a
closet.
– Do not cover the TV set with a cloth, such as curtains,
or items such as newspapers, etc.
– Do not install the TV set as shown below.
Mains lead
Handle the mains lead and socket as follows in order
to avoid any risk of fire, electrical shock or damage
and/or injuries:
– Use only Sony mains leads, not those of other brands.
– Insert the plug fully into the mains socket.
– Operate the TV set on a 220-240 V AC supply only.
– When wiring cables, be sure to unplug the mains lead
for your safety and take care not to catch your feet on
the cables.
– Disconnect the mains lead from the mains socket
before working on or moving the TV set.
– Keep the mains lead away from heat sources.
– Unplug the mains plug and clean it regularly. If the
plug is covered with dust and it picks up moisture, its
insulation may deteriorate, which could result in a
fire.
Be sure to hold the
bottom of the panel,
not the front part.
30 cm
10 cm
10 cm
10 cm
Leave at least this space around the set.
30 cm
10 cm10 cm
6 cm
Leave at least this space around the set.
Air circulation
is blocked.
Air circulation
is blocked.
Wall
Wall
Continued
010COV.book Page 9 Wednesday, March 26, 2008 2:49 PM

10
GB
Notes
• Do not use the supplied mains lead on any other
equipment.
• Do not pinch, bend, or twist the mains lead excessively.
The core conductors may be exposed or broken.
• Do not modify the mains lead.
• Do not put anything heavy on the mains lead.
• Do not pull on the mains lead itself when disconnecting
the mains lead.
• Do not connect too many appliances to the same mains
socket.
• Do not use a poor fitting mains socket.
Prohibited Usage
Do not install/use the TV set in locations,
environments or situations such as those listed
below, or the TV set may malfunction and cause a
fire, electrical shock, damage and/or injuries.
Location:
Outdoors (in direct sunlight), at the seashore, on a ship or
other vessel, inside a vehicle, in medical institutions,
unstable locations, near water, rain, moisture or smoke.
Environment:
Places that are hot, humid, or excessively dusty; where
insects may enter; where it might be exposed to mechanical
vibration, near flammable objects (candles, etc).
The TV set shall not be exposed to dripping or splashing
and no objects filled with liquids, such as vases, shall be
placed on the TV.
Situation:
Do not use when your hands are wet, with the cabinet
removed, or with attachments not recommended by the
manufacturer. Disconnect the TV set from mains socket
and aerial during lightning storms.
Broken pieces:
• Do not throw anything at the TV set. The screen glass
may break by the impact and cause serious injury.
• If the surface of the TV set cracks, do not touch it until
you have unplugged the mains lead. Otherwise electric
shock may result.
When not in use
• If you will not be using the TV set for several days, the
TV set should be disconnected from the mains for
environmental and safety reasons.
• As the TV set is not disconnected from the mains when
the TV set is just turned off, pull the plug from the mains
to disconnect the TV set completely.
• However, some TV sets may have features that require
the TV set to be left in standby to work correctly.
For children
• Do not allow children to climb on the TV set.
• Keep small accessories out of the reach of children, so
that they are not mistakenly swallowed.
If the following problems occur…
Turn off the TV set and unplug the mains lead
immediately if any of the following problems occur.
Ask your dealer or Sony service centre to have it
checked by qualified service personnel.
When:
– Mains lead is damaged.
– Poor fitting of mains socket.
– TV set is damaged by being dropped, hit or having
something thrown at it.
– Any liquid or solid object falls through openings in
the cabinet.
Precautions
Viewing the TV
• View the TV in moderate light, as viewing the TV in
poor light or during long period of time, strains your
eyes.
• When using headphones, adjust the volume so as to
avoid excessive levels, as hearing damage may result.
LCD Screen
• Although the LCD screen is made with high-precision
technology and 99.99% or more of the pixels are
effective, black dots may appear or bright points of light
(red, blue, or green) may appear constantly on the LCD
screen. This is a structural property of the LCD screen
and is not a malfunction.
• Do not push or scratch the front filter, or place objects on
top of this TV set. The image may be uneven or the LCD
screen may be damaged.
• If this TV set is used in a cold place, a smear may occur
in the picture or the picture may become dark. This does
not indicate a failure. These phenomena disappear as the
temperature rises.
• Ghosting may occur when still pictures are displayed
continuously. It may disappear after a few moments.
• The screen and cabinet get warm when this TV set is in
use. This is not a malfunction.
• The LCD screen contains a small amount of liquid
crystal. Some fluorescent tubes used in this TV set also
contain mercury. Follow your local ordinances and
regulations for disposal.
Handling and cleaning the screen surface/cabinet
of the TV set
Be sure to unplug the mains lead connected to the TV set
from mains socket before cleaning.
To avoid material degradation or screen coating
degradation, observe the following precautions.
• To remove dust from the screen surface/cabinet, wipe
gently with a soft cloth. If dust is persistent, wipe with a
soft cloth slightly moistened with a diluted mild
detergent solution.
• Never use any type of abrasive pad, alkaline/acid
cleaner, scouring powder, or volatile solvent, such as
alcohol, benzene, thinner or insecticide. Using such
materials or maintaining prolonged contact with rubber
or vinyl materials may result in damage to the screen
surface and cabinet material.
• When adjusting the angle of the TV set, move it slowly
so as to prevent the TV set from moving or slipping off
from its table stand
Optional Equipment
Keep optional components or any equipment emitting
electromagnetic radiation away from the TV set. Otherwise
picture distortion and/or noisy sound may occur.
010COV.book Page 10 Wednesday, March 26, 2008 2:49 PM
11
GB
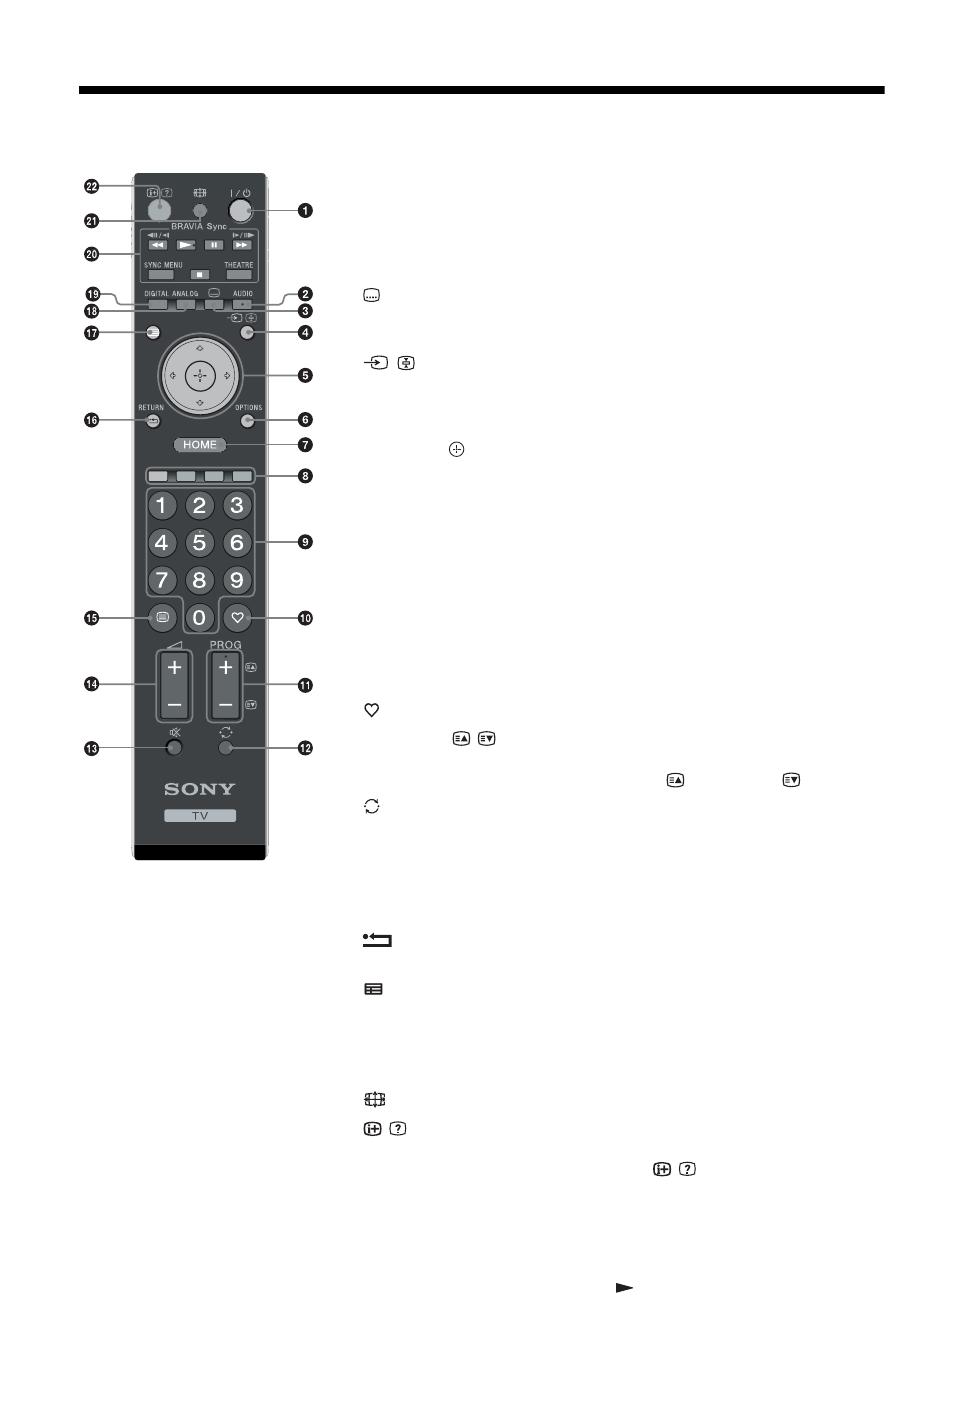
Overview of the remote
1 «/1 – TV standby
Turns the TV on and off from standby mode.
2 AUDIO
In analogue mode: Press to change the dual sound mode (page 24).
In digital mode: Press to select the audio language (page 30).
3 – Subtitles
Press to display the subtitles on current program if TV channels broadcast
such information (in digital mode only) (page 30).
4 / – Input select / Text hold
• In TV mode: Selects the input source from equipment connected to the TV
sockets (page 18).
• In Text mode (page 14): Holds the current page.
5 F/f/G/g/
6 OPTIONS (page 14, 19)
Enables you to access various viewing options and change/make adjustments
according to the source and screen format.
7 HOME (page 21)
Displays the TV Home menu.
8 Coloured buttons (page 14, 15, 16)
9 Number buttons
• In TV mode: Selects channels. For channel numbers 10 and above, enter the
second and third digit quickly.
• In Text mode: Enters the three digit page number to select the page.
0 – Favourite (page 16)
qa PROG +/–//
• In TV mode: Selects the next (+) or previous (-) channel.
• In Text mode (page 14): Selects the next ( ) or previous ( ) page.
qs – Previous channel
Returns to the previous channel watched (for more than five seconds).
qd % – Mute the sound
qf 2 +/– – Volume
qg / – Text (page 14)
qh – RETURN
Returns to the previous screen of any displayed menu.
qj – GUIDE (page 15)
qk ANALOG – Analogue mode (page 13)
ql DIGITAL – Digital mode (page 13)
w; BRAVIA Sync (page 19)
wa – Screen mode (page 14)
ws / – Info / Text reveal
• In digital mode: Displays details of the programme currently being watched.
• In analogue mode: Each time you press
/ , the information on the
screen changes as follows: Displays information such as current channel
number and screen format
t Time is displayed t Information is hidden.
• In Text mode (page 14): Reveals hidden information (e.g. answers to a
quiz).
z
The number 5, PROG +, AUDIO and buttons have tactile dots. Use the
tactile dots as references when operating the TV.
GUIDE
010COV.book Page 11 Wednesday, March 26, 2008 2:49 PM
12
GB
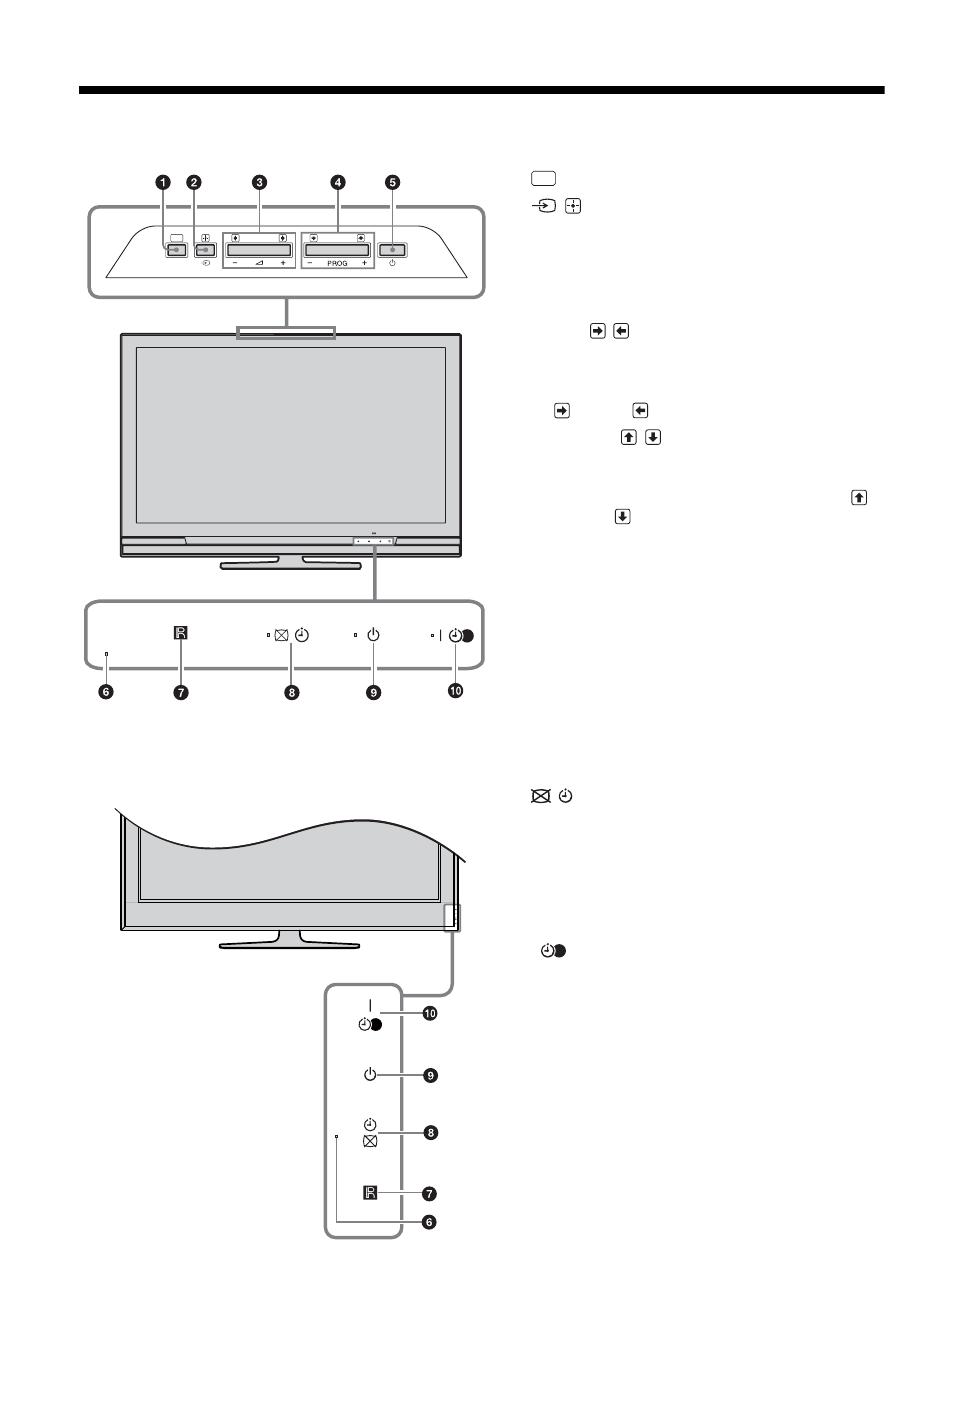
Overview of the TV buttons and indicators
1 (page 21)
2 / – Input select / OK
• In TV mode: Selects the input source from
equipment connected to the TV sockets
(page 18).
• In TV menu: Selects the menu or option, and
confirms the setting.
3 2 +/–//
• In TV mode: Increases (+) or decreases (-) the
volume.
• In TV menu: Moves through the options right
( ) or left ( ).
4 PROG +/–//
• In TV mode: Selects the next (+) or previous (-)
channel.
• In TV menu: Moves through the options up ( )
or down ( ).
5 1 – Power
Turns the TV on or off.
~
To disconnect the TV completely, pull the plug
from the mains.
6 Light Sensor
Do not put anything over the sensor, as its function
may be affected.
7 Remote control sensor
• Receives IR signals from the remote.
• Do not put anything over the sensor, as its
function may be affected.
8 – Picture Off / Timer indicator
• Lights up in green when the picture is switched
off (page 24).
• Lights up in orange when the timer is set
(page 25).
9 1 – Standby indicator
Lights up in red when the TV is in standby mode.
0 « – Power / Timer REC programme indicator
• Lights up in green when the TV is turned on.
• Lights up in orange when the timer recording is
set (page 15).
• Lights up in red during the timer recording.
~
• Make sure that the TV is completely turned off
before unplugging the mains lead. Unplugging the
mains lead while the TV is turned on may cause the
indicator to remain lit or may cause the TV to
malfunction.
• Do not put anything over the indicators as their
functions may be affected.
HOME
(only for KDL-40E4xxx, KDL-32E4xxx,
KDL-26E4xxx)
HOME
010COV.book Page 12 Wednesday, March 26, 2008 2:49 PM
13
GB
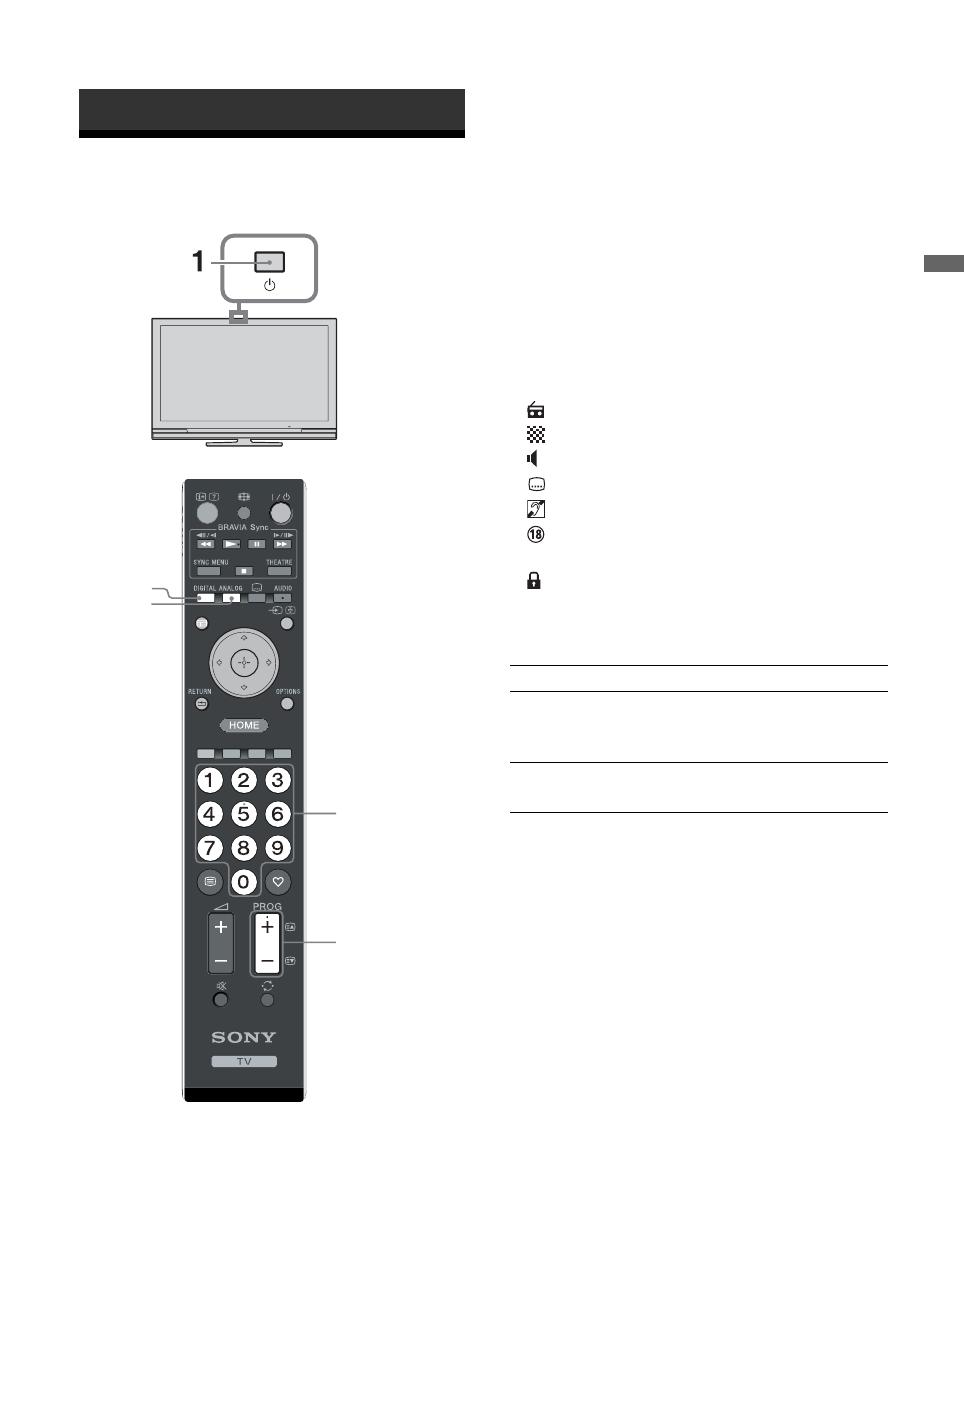
Watching TV
Watching TV
1 Press 1 on the TV to switch on the TV.
When the TV is in standby mode (the 1
(standby) indicator on the TV (front) is red),
press «/1 on the remote to switch on the TV.
2 Press DIGITAL to switch to digital mode or
ANALOG to switch to analogue mode.
The channels available vary depending on the
mode.
3 Press the number buttons or PROG +/- to
select a TV channel.
To select channel numbers 10 and above using
the number buttons, enter the second and third
digits within two seconds.
To select a digital channel using the Guide, see
page 15.
In digital mode
An information banner appears briefly. The
following icons may be indicated on the banner.
Additional operations
Watching TV
3
2
3
GUIDE
: Radio service
: Scrambled/Subscription service
: Multiple audio languages available
: Subtitles available
: Subtitles available for the hearing impaired
: Recommended minimum age for current
programme (from 4 to 18 years)
: Parental Lock
c: Current programme is being recorded
To Do this
Turn on the TV
from Standby mode
without sound
Press %. Press 2 +/- to set the
volume level.
Adjust the volume Press 2 + (increase)/
— (decrease).
010COV.book Page 13 Wednesday, March 26, 2008 2:49 PM
14
GB
To access Text
Press /. Each time you press /, the display
changes cyclically as follows:
Text t Text over the TV picture (mix mode) t No
Text (exit the Text service)
To select a page, press the number buttons or
PROG +/-.
To hold a page, press / .
To reveal hidden information, press / .
z
When four coloured items appear at the bottom of the Text
page, Fastext is available. Fastext allows you to access
pages quickly and easily. Press the corresponding coloured
button to access the page.
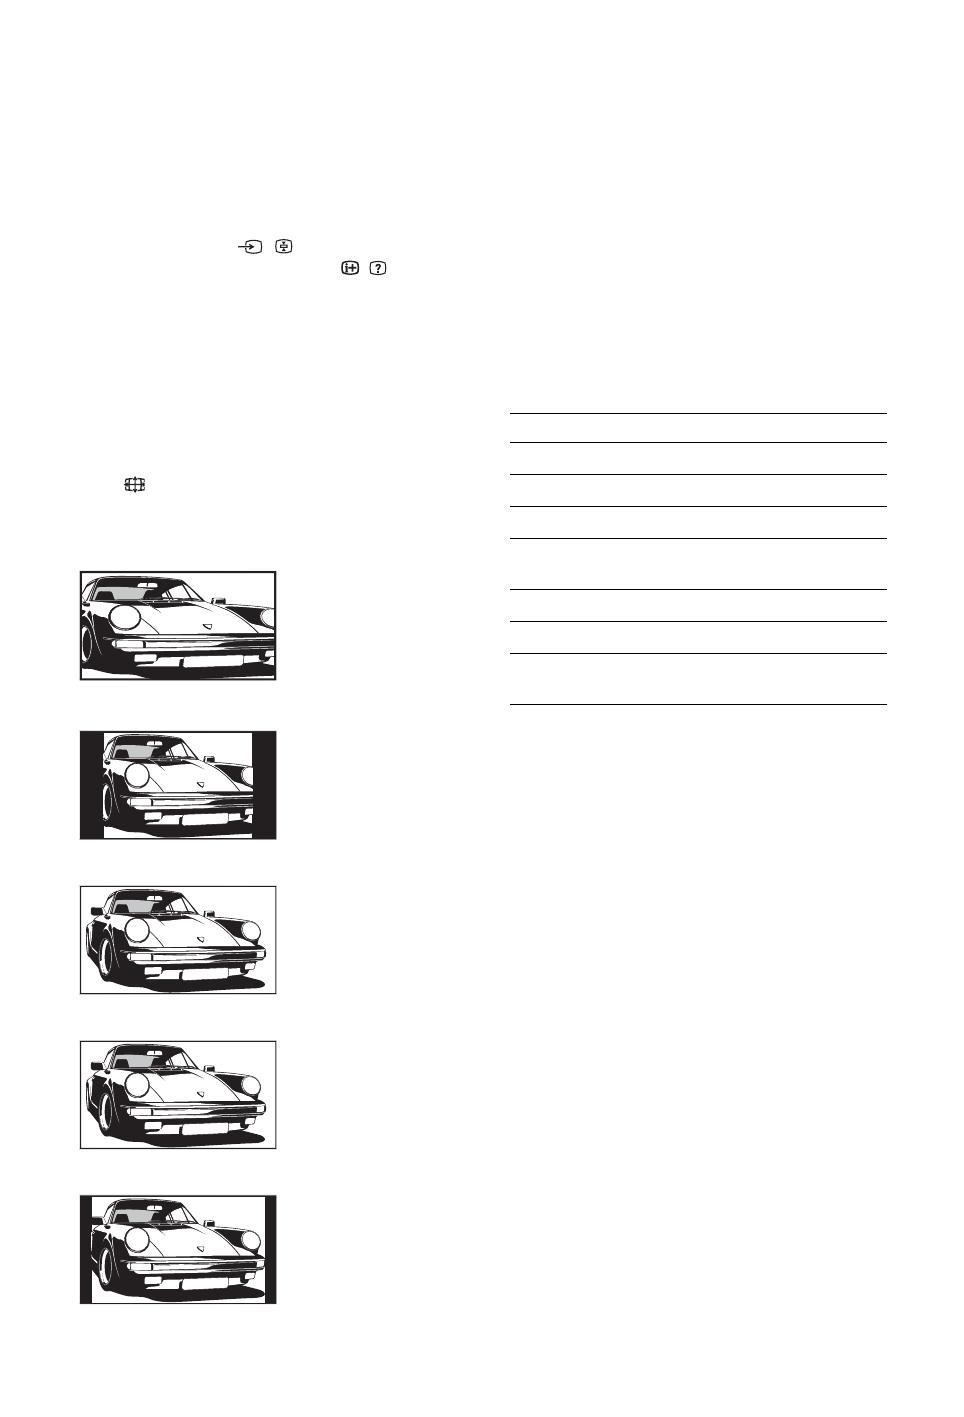
To change the screen format manually to
suit the broadcast
Press repeatedly to select the desired screen
format.
* Parts of the top and bottom of the picture may be cut off.
~
Some characters and/or letters at the top and the bottom of
the picture may not be visible in Smart mode. In such a
case, you can select “Vertical Size” using the “Screen
Settings” (page 26) menu and adjust vertical size to make
it visible.
z
• When “Auto Format” is set to “On”, the TV will
automatically select the best mode to suit the broadcast
(page 26).
• You can adjust the position of the picture when selecting
“Smart”, “14:9” or “Zoom”. Press
F/f to move up or
down (e.g. to read subtitles).
Using the Options menu
Press OPTIONS to display the following options
when viewing a TV programme.
Smart*
Displays conventional
4:3 broadcasts with an
imitation wide screen
effect. The 4:3 picture
is stretched to fill the
screen.
4:3
Displays conventional
4:3 broadcasts (e.g.
non-wide screen TV) in
the correct proportions.
Wide
Displays wide screen
(16:9) broadcasts in the
correct proportions.
Zoom*
Displays cinemascopic
(letter box format)
broadcasts in the
correct proportions.
14:9*
Displays 14:9
broadcasts in the
correct proportions. As
a result, black border
areas are visible on the
screen.
Options Description
Picture Mode See page 22.
Sound Effect See page 23.
Speaker See page 27.
Subtitle Setting (in
digital mode only)
See page 30.
Sleep Timer See page 25.
Power Saving See page 24.
System Information (in
digital mode only)
See page 31.
010COV.book Page 14 Wednesday, March 26, 2008 2:49 PM
15
GB
Watching TV
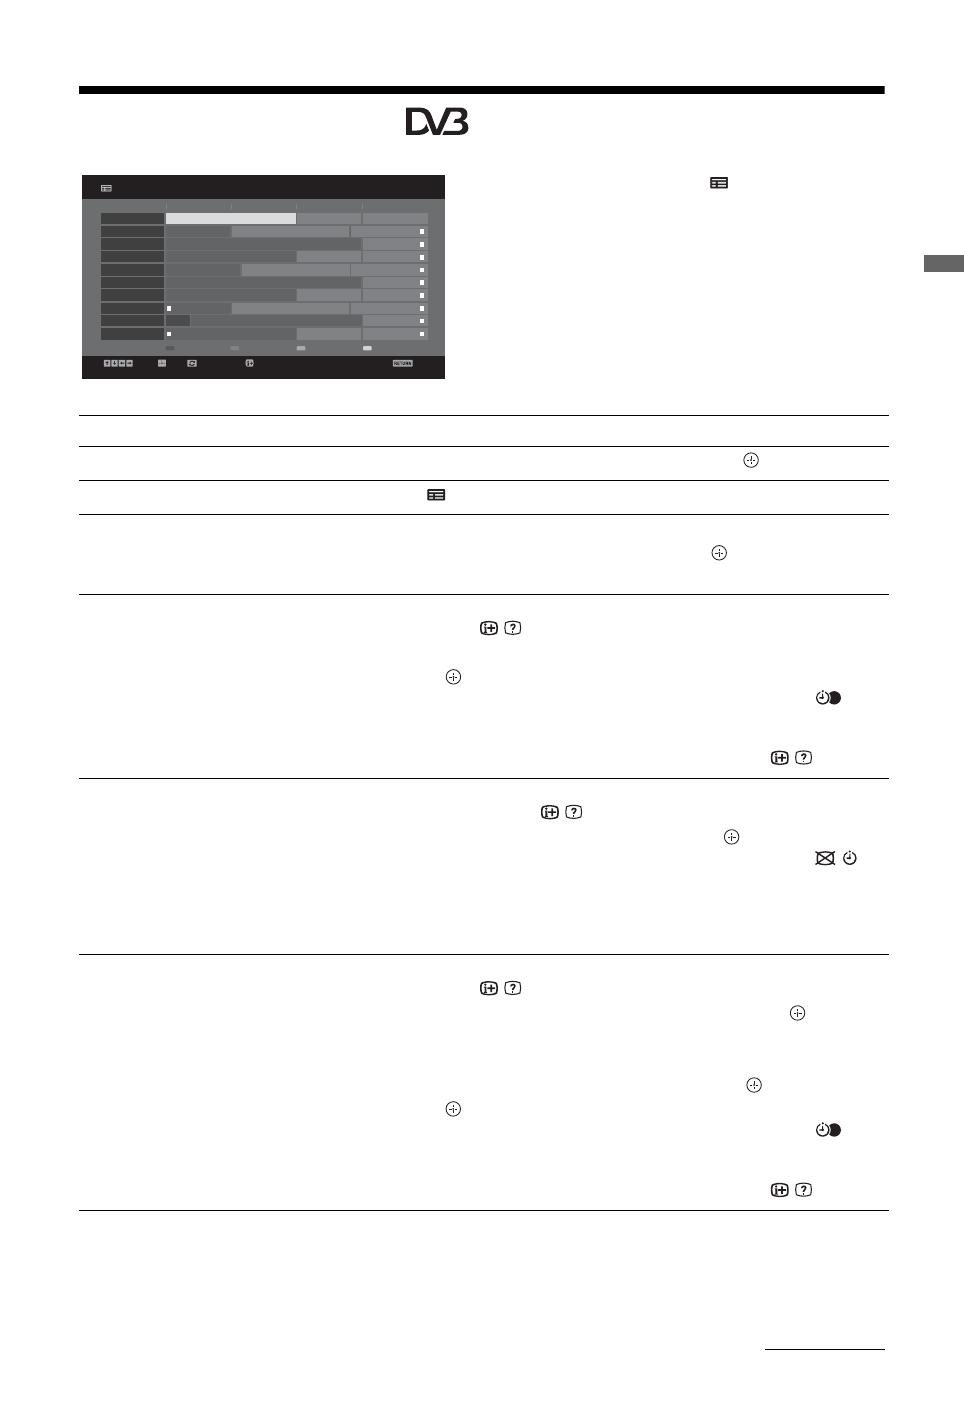
Checking the Guide *
1 In digital mode, press GUIDE.
2 Perform the desired operation as shown in the
following table or displayed on the screen.
* This function may not be available in some countries/regions.
Back
001 BBC ONE
002 BBC TWO
003 ITV1
004 Channel 4
005 Five
006 ITV2
007 BBC THREE
008 BBC FOUR
009 ITV3
010 SKY THREE
Category30 min ViewNextPrevious
Homes Under the Hammer Neighbours Afterlife
Ready Steady Cook Extraordinary People: Britains Iden… CSI: Crime Scene Inv…
Dancing On Ice Exclusive Cracker
Sign Zone: Ancient Rome: The Rise a… The Jeremy Kyle… Homes Under th…
House Law and Order: Special Victims U… PartyPoker.com Worl…
Crime Hour: Midsomer Murders Vodafone TBA: L…
BBC Learning Zone: Schools: World P… A Picture of Brit… Eastenders
ER Real Crime: The Truth About the… This is BBC FOUR
Past Everybody Loves Raymond The Sharon Osb…
Racing from Chepstow and Ascot Baseball Wedne… Trans World Sport
Select +/- 1 day on/off Event InformationTun e
To day
13: 0012: 3012: 0011: 30
All Categories
Fri 16 Mar 11:35
To Do this
Watch a programme Press F/f/G/g to select the programme, then press .
Turn off the Guide Press
GUIDE.
Sort the programme information by
category
– Category list
1 Press the blue button.
2 Press
F/f to select a category, then press .
Set a programme to be recorded
– Timer REC
1 Press F/f/G/g to select the future programme you want to record,
then press
/ .
2 Press
F/f to select “Timer REC”.
3 Press to set the TV and your VCR/DVD recorder timers.
A c symbol appears by that programme’s information. The
indicator on the TV front panel lights up in orange.
z
To record the programme you are currently watching, press / .
Set a programme to be displayed
automatically on the screen when it
starts
– Reminder
1 Press F/f/G/g to select the future programme you want to
display, then press
/ .
2 Press
F/f to select “Reminder”, then press .
A c symbol appears by that programme’s information. The
indicator on the TV front panel lights up in orange.
~
If you switch the TV to standby mode, it will automatically turn itself on
when the programme is about to start.
Set the time and date of a programme
you want to record
– Manual timer REC
1 Press F/f/G/g to select the future programme you want to record,
then press
/ .
2 Press
F/f to select “Manual timer REC”, then press .
3 Press
F/f to select the date, then press g.
4 Set the start and stop time in the same way as in step 3.
5 Press
F/f to select the programme, then press .
6 Press to set the TV and your VCR/ DVD recorder timers.
A c symbol appears by that programme’s information. The
indicator on the TV front panel lights up in orange.
z
To record the programme you are currently watching, press / .
Continued
010COV.book Page 15 Wednesday, March 26, 2008 2:49 PM
16
GB
~
• You can set VCR/ DVD recorder timer recording on the TV only for SmartLink compatible VCR/ DVD recorder. If your
VCR/ DVD recorder is not SmartLink compatible, a message will be displayed to remind you to set your VCR/ DVD
recorder timer.
• Once a recording has begun, you can switch the TV to standby mode, but do not turn off the TV completely or the recording
may be cancelled.
• If an age restriction for programmes has been selected, a message asking for a PIN Code will appear on the screen. For
details, see “Parental Lock” (page 30).
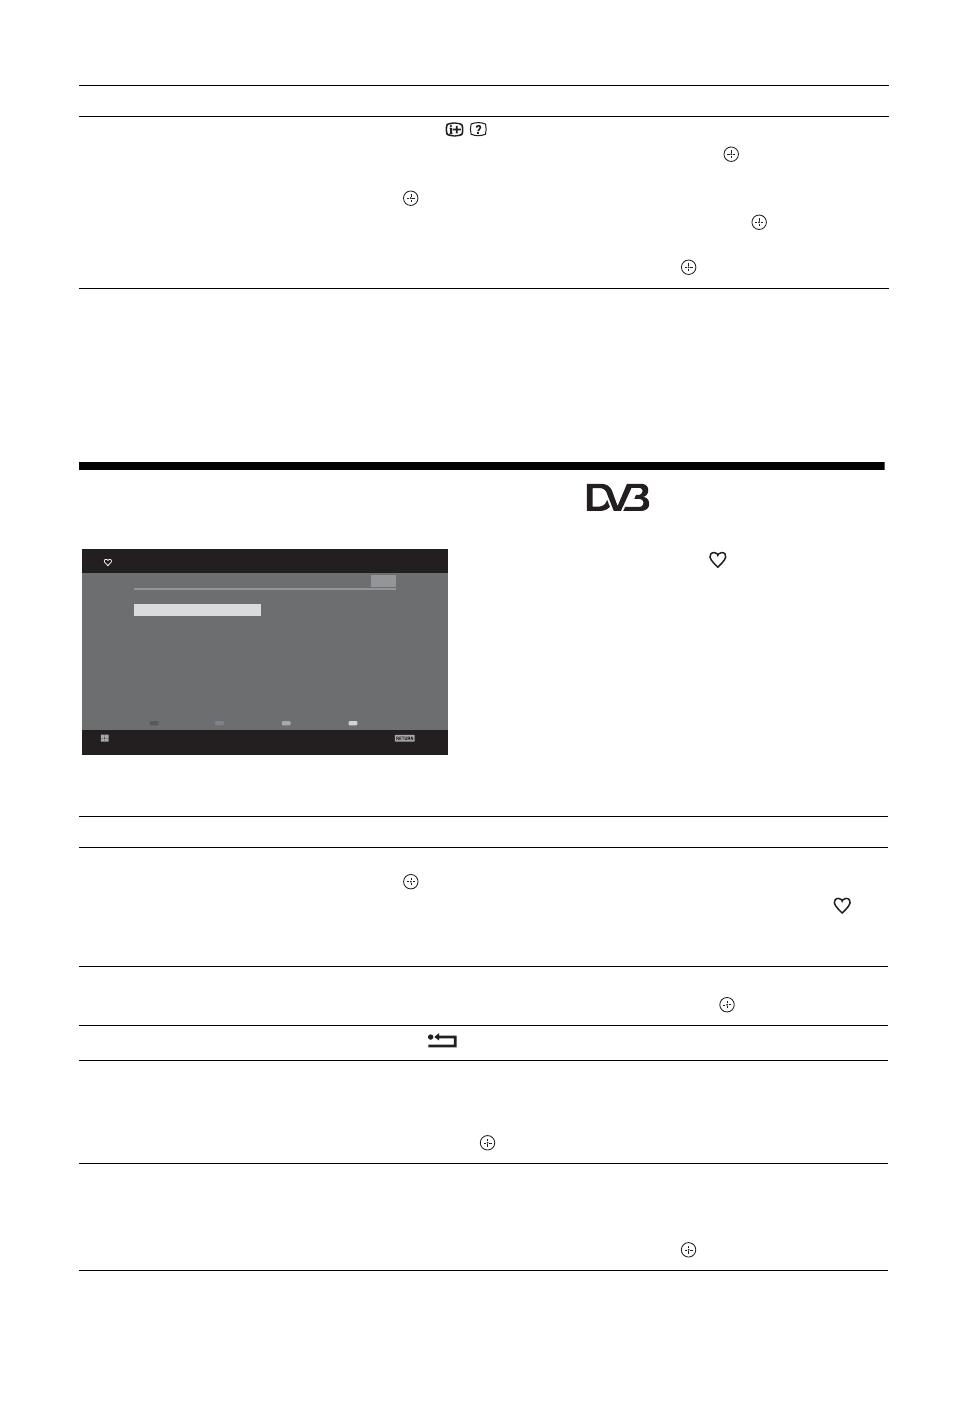
Using the Digital Favourite list *
1 In digital mode, press .
2 Perform the desired operation as shown in the
following table or displayed on the screen.
* This function may not be available in some countries/regions.
Cancel a recording/reminder
– Timer list
1 Press / .
2 Press
F/f to select “Timer list”, then press .
3 Press
F/f to select the programme you want to cancel, then press
.
4 Press
F/f to select “Cancel Timer”, then press .
A display appears to confirm that you want to cancel the programme.
5 Press G/g to select “Yes”, then press to confirm.
To Do this
Digital Favourite list
Back
Store Favourite
Digital
Favourite Set-up
Favourites 1
001 BBC ONE
002 BBC TWO
003 ITV1
004 Channel 4
005 Five
006 BBC Three
007 ITV2
008 Sky Sports
009 UKTV History
010 Channel 4+1
011 More 4
012 abc1
013 QVC
014 UKTV Gold
015 The HITS
016 UKTV Bright Ideas
017 ftn
018 TMF
019 E4
020 E4+1
Favourites 2NextPrevious
Enter Programme Number: — — —
To Do this
Create your Favourite list for the first
time
1 Press F/f/G/g to select the channel you want to add, then press
.
Channels that are stored in the Favourite list are indicated by a
symbol.
2 Press yellow key to select “Favourites 2” or “Favourites 3”.
Watch a channel
1 Press yellow key to navigate through favourite lists.
2 Press
F/f to select the channel, then press .
Turn off the Favourite list
Press RETURN.
Add or remove channels in the currently
edited Favourite list
1 Press the blue button.
2 Press the yellow button to choose the list you want to edit.
3 Press
F/f/G/g to select the channel you want to add or remove,
then press .
Remove all channels from the current
Favourite list
1 Press the blue button.
2 Press the yellow button to select the favourite list you want to edit.
3 Press the blue button.
4 Press
G/g to select “Yes”, then press to confirm.
010COV.book Page 16 Wednesday, March 26, 2008 2:49 PM
17
GB
Using Optional Equipment
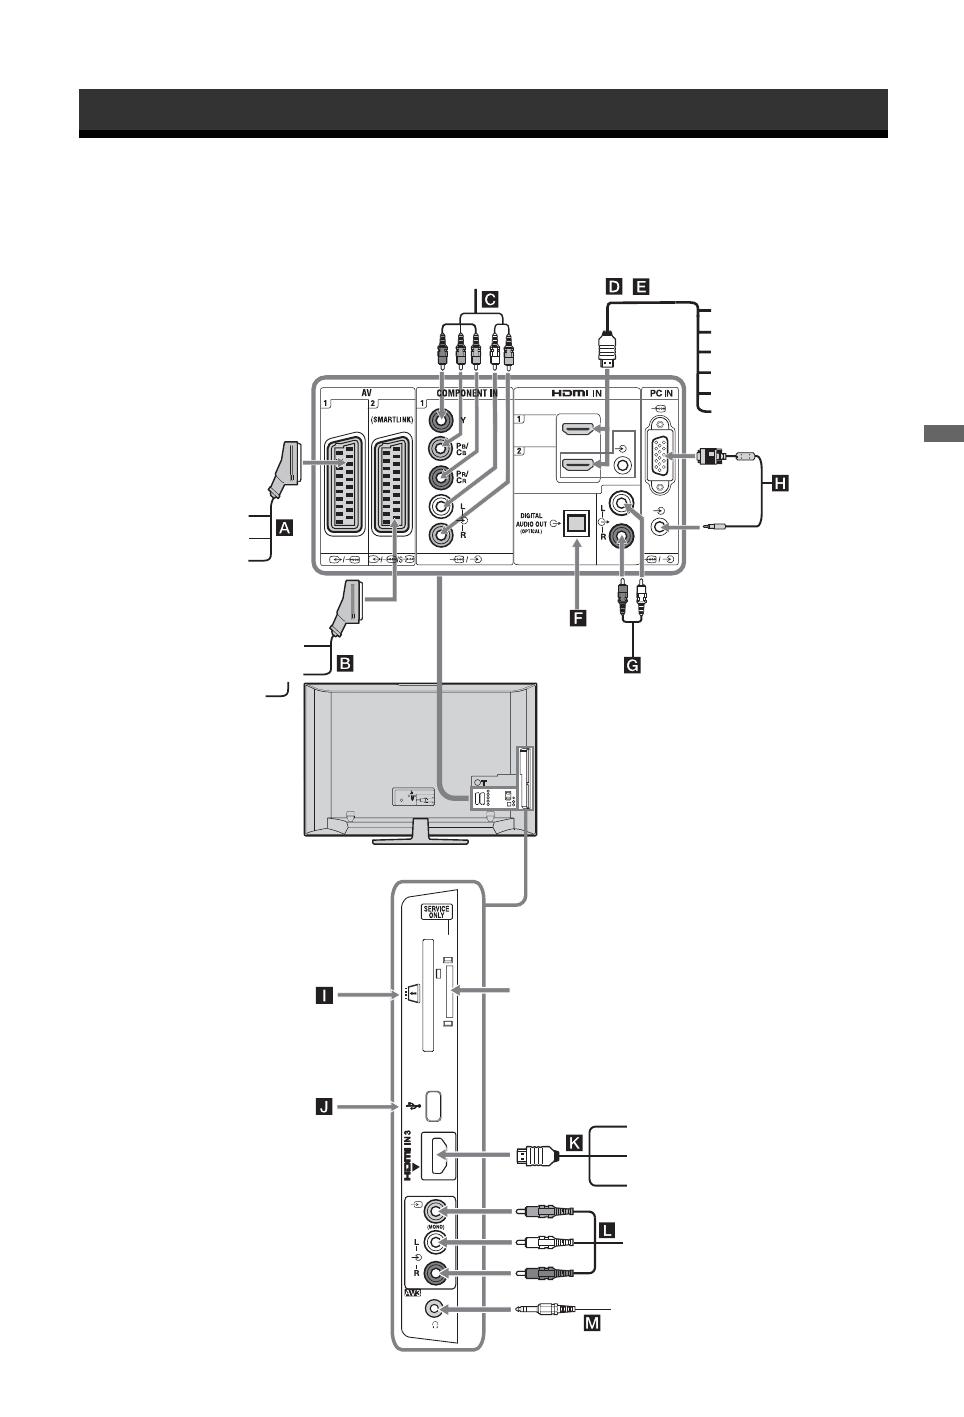
Connecting optional equipment
You can connect a wide range of optional equipment to your TV. Connecting cables are not supplied.
Using Optional Equipment
,
For service
use only
DVC camcorder
Headphones
DVD recorder
Decoder
VCR
Video game
equipment
DVD player
Decoder
PC
PC (HDMI output)
Blu-ray disc player
Digital video camera
Audio system
PC (HDMI output)
Blu-ray disc player
Digital video camera
DVD player
CAM card
USB
Hi-Fi audio
equipment
Digital decoder
DVD player with
component output
Hi-Fi audio
equipment
with optical
audio input
010COV.book Page 17 Wednesday, March 26, 2008 2:49 PM
18
GB
Viewing pictures from
connected equipment
Switch on the connected equipment, then
perform one of the following operation.
For equipment connected to the scart sockets using
a fully-wired 21-pin scart lead
Start playback on the connected equipment.
The picture from the connected equipment appears
on the screen.
For an auto-tuned VCR/ DVD recorder
In analogue mode, press PROG +/-, or the number
buttons, to select the video channel.
For other connected equipment
Press / to display a list of connected
equipment. Press
F/f to select the desired input
source, then press .
The highlighted item is automatically selected if you
do not perform any operation for two seconds after
pressing
.
If you have set an input source to «Skip» in the «AV
Preset» menu (page 26), that input source does not
appear in the list.
z
To return to normal TV mode, press DIGITAL or
ANALOG.
Additional operations
Symbol on the
screen
Description
AV1
To see the equipment connected to
A.
AV2
To see the equipment connected to
B.
~
SmartLink is a direct link between
the TV and a VCR/DVD recorder.
AV3 To see the equipment connected to
L.
HDMI 1 HDMI IN 1*.
To see the equipment connected to
D.
HDMI 2 HDMI IN 2*.
To see the equipment connected to
E.
If the equipment has a DVI socket,
connect the DVI socket to the
HDMI IN socket through a DVI-
HDMI adaptor interface (not
supplied), and connect the
equipment’s audio out socket to the
audio in HDMI IN socket.
HDMI 3 HDMI IN 3*.
To see the equipment connected to
K.
* ~
• Be sure to use only an HDMI cable that bears the HDMI
logo.
• When “Control for HDMI” compatible equipment is
connected, communication with the connected
equipment is supported. Refer to page 19 to set up this
communication.
• When connecting an audio system with HDMI socket,
be sure to also connect to the HiFi socket.
Component To see the equipment connected to
C.
PC To see the equipment connected to
H.
z
It is recommended to use a PC
cable with ferrites, such as the
«Connector, D-sub 15» (ref. 1-
793-504-11, available in Sony
Service Centre) or equivalent.
To connect Do this
Headphones M Connect to the i socket to listen to
sound from the TV on headphones.
Conditional
Access Module
(CAM) I
To use Pay Per View services.
For details, refer to the instruction
manual supplied with your CAM. To
use the CAM, remove the rubber
cover from the CAM slot. Switch off
the TV when inserting your CAM
into the CAM slot. When you do not
use the CAM, we recommend that
you replace the cover on the CAM
slot.
~
CAM is not supported in all countries.
Please check with your authorized
dealer.
Hi-Fi audio
equipment G
Connect to the audio output sockets
to listen to the sound from the
TV on Hi-Fi audio equipment.
DIGITAL
AUDIO OUT
(OPTICAL) F
Use an optical audio cable.
USB J Use USB memory to display photos.
To Do this
Return to normal TV
mode
Press DIGITAL or ANALOG.
Symbol on the
screen
Description
010COV.book Page 18 Wednesday, March 26, 2008 2:49 PM
19
GB
Using Optional Equipment
Using the Options menu
Press OPTIONS to display the following options
when viewing pictures from connected equipment.
To view two pictures simultaneously
– PAP (Picture and Picture)
You can view two pictures (external input and
TV programme) on the screen simultaneously.
Connect an optional equipment (page 17), and
make sure that images from the equipment
appear on the screen (page 18)
~
• This function is not available for a PC input
source.
• You cannot change the size of the pictures.
• You cannot display analogue TV video in the TV
programme picture while displaying AV1, AV2 or
AV3 video in the external inputs picture.
1 Press OPTIONS.
2 Press F/f to select “PAP”, then press .
The picture from the connected equipment
is displayed on the left, and the TV
programme is displayed on the right.
3 Press the number buttons or PROG +/- to
select the TV channel.
To return to single picture mode
Press or RETURN.
z
The picture framed in green is audible. You can
switch the audible picture by pressing G/g.
To view two pictures simultaneously
– PIP (Picture in Picture)
You can view two pictures (PC input and TV
programme) on the screen simultaneously.
Connect a PC (page 17), and make sure that images
from a PC appear on the screen.
1 Press OPTIONS to display the Options
menu.
2 Press F/f to select “PIP”, then press .
The picture from the connected PC is displayed
with full size and the TV programme is displayed
on the right corner.
You can use
F/f/G/g to move the TV programme
screen position.
3 Press number buttons or PROG +/- to select
the TV channel.
To return to single picture mode
Press RETURN.
z
You can switch the audible picture by selecting “PC
Sound/TV Sound” from the Options menu.
Using BRAVIA Sync
(Control for HDMI)
The control for HDMI function enables the TV
to communicate with the connected equipment
that is compatible with the function, using
HDMI CEC (Consumer Electronics Control).
For example, by connecting Sony equipment
that is compatible with control for HDMI
(with HDMI cables), you can control them
together.
Be sure to connect the equipment correctly,
and make the necessary settings.
Control for HDMI
• Automatically turns the connected
equipment off when you turn the TV off.
• Automatically turns the TV on and
switches the input to the connected
equipment when the equipment starts to
play.
• If you turn on a connected audio system
while the TV is on, the sound output
switches from the TV speaker to the audio
system.
• Adjusts the volume (2 +/-) and mutes the
sound (%) of a connected audio system.
• You can operate the connected Sony
equipment that has the BRAVIA Sync logo
by the TV remote by pressing:
– N/x/X/m/M to operate the connected
equipment directly.
Options Description
Picture Mode (except
PC input mode)
See page 22.
Display Mode (in PC
input mode only)
See page 22.
Sound Effect See page 23.
Speaker See page 27.
PIP (in PC input
mode only)
See page 19.
PAP (except PC input
mode)
See page 19.
Auto Adjustment (in
PC input mode only)
See page 26.
Horizontal Shift (in
PC input mode only)
See page 26.
Sleep Timer (except
PC input mode)
See page 25.
Power Saving See page 24.
Continued
010COV.book Page 19 Wednesday, March 26, 2008 2:49 PM
20
GB
– SYNC MENU to display the menu of the connected
HDMI equipment on the screen.
After displaying the menu, you can operate the
menu screen by using F/f/G/g and .
– OPTIONS to display “Device Control”, then select
options from “Menu”, “Options”, and “Content
List” to operate the equipment.
– Refer to the instruction manual of the equipment for
available control.
To connect the equipment that is
compatible with control for HDMI
Connect the compatible equipment and the TV
with a HDMI cable. When connecting an
audio system, be sure to also connect the
DIGITAL AUDIO OUT (OPTICAL) socket
of the TV and the audio system using an
optical audio cable. For details, see page 18.
To make the control for HDMI settings
The control for HDMI settings must be set on
both the TV side and connected equipment
side. See HDMI Set-up on page 27 for the TV
side settings. For settings on the connected
equipment, refer to the operating instructions
for that equipment.
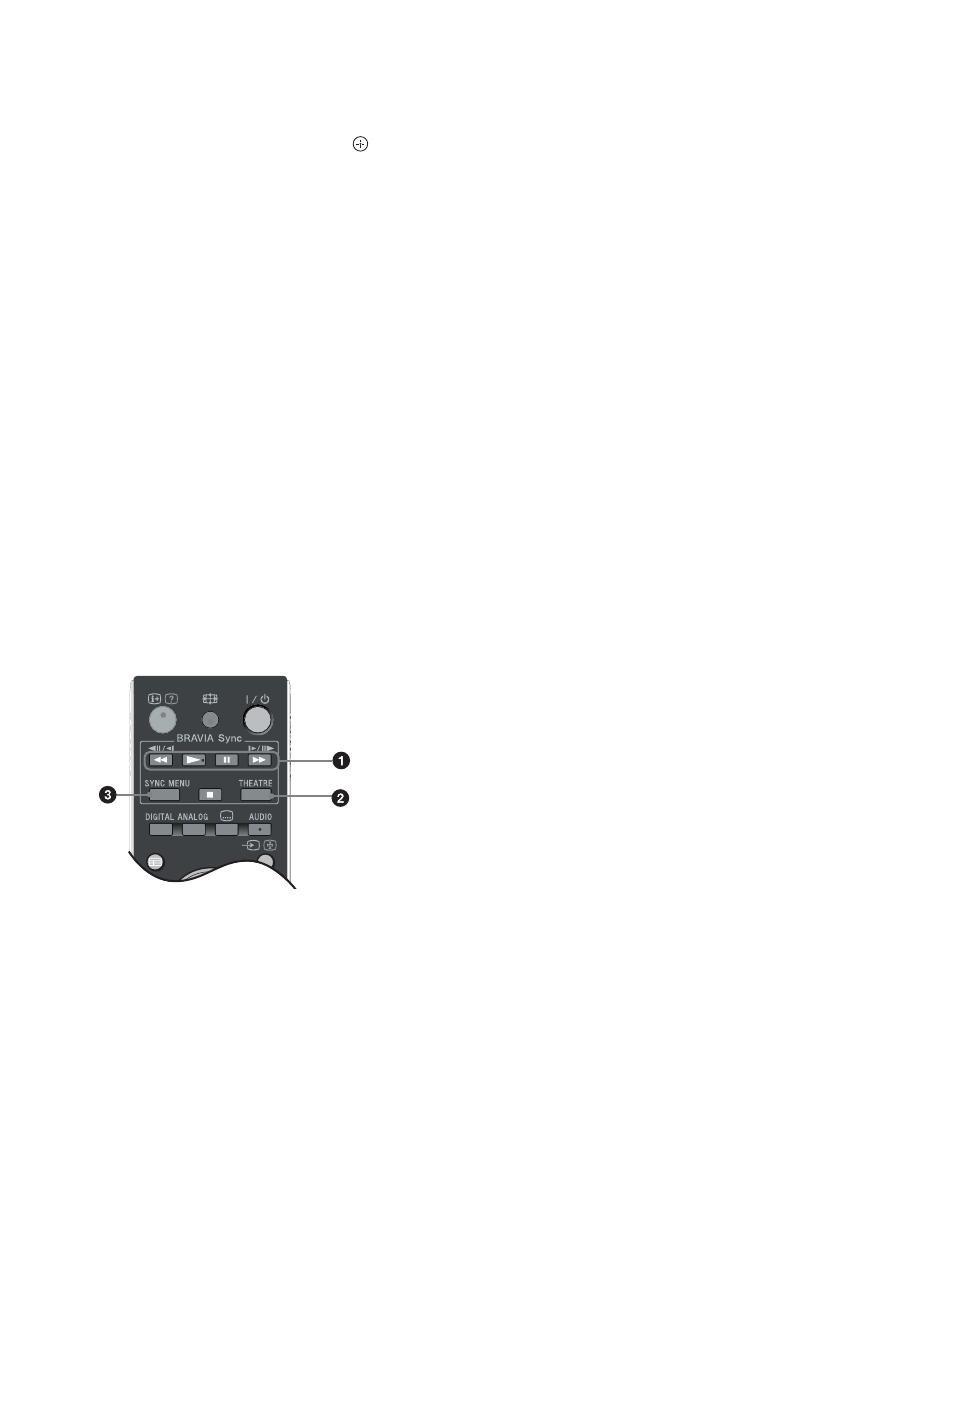
Buttons for using optional equipment
1 m/N/X/M/x: You can operate the
BRAVIA Sync-compatible equipment that is
connected to the TV.
2 THEATRE
You can set Theatre Mode on or off. When
Theatre Mode is set to on, the optimum audio
output (if the TV is connected with an audio
system using an HDMI cable) and picture
quality for film-based contents are
automatically set.
z
If you turn the TV off, Theatre Mode is also
turned off.
3 SYNC MENU: Displays the menu of connected
HDMI equipment. While viewing other input
screens or TV programmes, “HDMI Device
Selection” is displayed when the button is
pressed.
~
Control for HDMI (BRAVIA Sync) is only
available with the connected Sony equipment that
has the BRAVIA Sync logo or is compatible with
control for HDMI.
GUIDE
010COV.book Page 20 Wednesday, March 26, 2008 2:49 PM
инструкцияSony KDL-52W4000

LCD Digital Colour TV
Printed in Spain
3-298-243-43(1)
K
For useful information about Sony products
Для получения полезной информации о продукции Сони
Szczegółowe informacje o produktach Sony
Užitečné informace o výrobcích Sony
Pre viac informácií o produktoch Sony
Sony termékekről hasznos információkat találhat az alábbi
weboldalon
© 2008 Sony Corporation 3-298-243-43(1)
GB
RU
K
PL
CZ
SK
HU
KDL-52W40xx
KDL-52W42xx
KDL-46W40xx
KDL-46W42xx
KDL-40W40xx
KDL-40W42xx
KDL-32W40xx
KDL-32W42xx
KDL-40E40xx
KDL-32E40xx
KDL-26E40xx
KDL-37V45xx
KDL-37V47xx
KDL-32V45xx
KDL-32V47xx
KDL-26V45xx
KDL-26V47xx
LCD Digital Colour TV
Operating Instructions
Инструкция по эксплуатации
Instrukcja obsługi
Návod k použití
Návod na obsluhu
Kezelési utasítás
000COV_10,4mm(431).indd 1000COV_10,4mm(431).indd 1 07/08/2008 18:43:1507/08/2008 18:43:15
Посмотреть инструкция для Sony KDL-52W4000 бесплатно. Руководство относится к категории телевизоры, 3 человек(а) дали ему среднюю оценку 5.4. Руководство доступно на следующих языках: русский, английский. У вас есть вопрос о Sony KDL-52W4000 или вам нужна помощь? Задайте свой вопрос здесь
Главная
| Sony | |
| KDL-52W4000 | KDL-52W4000 | |
| телевизор | |
| русский, английский | |
| Руководство пользователя (PDF) |
Аудио
| Аудиосистема | Dolby Digital Plus |
| Номинальная RMS-мощность | 20 W |
| Количество колонок | 2 |
Производительность
| Телетекст | 1000 страниц |
| Режим игры | Да |
| Замок от детей | Да |
| Функция телетекста | Да |
Экран
| Видимая область экрана по диагонали | 1320 mm |
| Прогрессивная развертка | Да |
| Поддерживаемые разрешения | 1920 x 1080 (HD 1080) |
| Поддерживаемые видеоформаты | 1080i, 1080p, 480p, 576i, 576p, 720p |
| Технолигия дисплея | ЖК |
| Диагональ экрана | 52 « |
| Угол обзора по горизонтали | 178 ° |
| Угол обзора по вертикали | 178 ° |
| Разрешение экрана | 1920 x 1080 пикселей |
| Контрастность (динамическая) | 33000:1 |
| Тип HD | Full HD |
| Собственное форматное соотношение | 16:9 |
Характеристики управления
| Экранное меню (OSD) | Да |
| Таймер засыпания | Да |
| Картинка-в-картинке | Да |
| Электронный телегид (EPG) | Да |
| Таймер включения/выключения | Да |
Вес и размеры
| Вес (со стойкой) | 38000 g |
| Глубина с подставкой | 347 mm |
| Высота с подставкой | 871 mm |
| Ширина с подставкой | 1262 mm |
| Вес (без подставки) | 32000 g |
| Ширина (без подставки) | 1262 mm |
| Глубина (без подставки) | 119 mm |
| Высота (без подставки) | 829 mm |
Порты и интерфейсы
| Количество SCART портов | 2 |
| RS-232 порты | 0 |
| Общий интерфейс (CI) | Да |
| Количество слотов CardBus PCMCIA | 1 |
| Линейные выходы наушников | 1 |
| Композитный видео выход | 0 |
| Композитный видео вход | 1 |
| Вход для ПК (D-Sub) | Да |
| Аудиовход для ПК | Да |
| Компонентный видео вход (YPbPr/YCbCr) | 1 |
| Количество портов USB 2.0 | 1 |
| Количество HDMI портов | 3 |
| HDCP | Да |
Прочие свойства
| LED индикатор питания | Да |
| Встроенные колонки | Да |
| Порт подключения наушников | 3,5 мм |
| Подсветка | Да |
| Тип подсветки | CCFL |
| 3D | Нет |
Дизайн
| Крепление VESA | 300 x 300 mm |
| Цвет товара | Черный |
| крепление VESA | Да |
Данные об упаковке
| Глубина упаковки | 426 mm |
| Высота упаковки | 998 mm |
| Ширина упаковки | 1380 mm |
| Пульт дистанционного управления | Да |
Энергопитание
| Потребляемая мощность (в обычном режиме) | 223 W |
| Потребляемая мощность (в режим ожидания) | 0.19 W |
Сеть
| Wi-Fi | Нет |
| Подключение Ethernet | Нет |
показать больше
Не можете найти ответ на свой вопрос в руководстве? Вы можете найти ответ на свой вопрос ниже, в разделе часто задаваемых вопросов о Sony KDL-52W4000.
Не нашли свой вопрос? Задайте свой вопрос здесь

Printed in Spain
3-298-243-61(1)
For useful information about Sony products
Для получения полезной информации о продукции Сони
© 2008 Sony Corporation
3-298-243-61(1)
GB
RU
LCD Digital Colour TV
Operating Instructions
Инструкция по эксплуатации
KDL-52W40xx
KDL-52W42xx
KDL-46W40xx
KDL-46W42xx
KDL-40W40xx
KDL-40W42xx
KDL-32W40xx
KDL-32W42xx
KDL-40E40xx
KDL-32E40xx
KDL-26E40xx
KDL-37V45xx
KDL-37V47xx
KDL-32V45xx
KDL-32V47xx
KDL-26V45xx
KDL-26V47xx
000COV_0mm(611)m.indd 1
000COV_0mm(611)m.indd 1
18/03/2008 16:59:45
18/03/2008 16:59:45
Printed in Spain
3-298-243-61(1)
For useful information about Sony products
Для получения полезной информации о продукции Сони
© 2008 Sony Corporation 3-298-243-61(1)
GB
RU
LCD Digital Colour TV
Operating Instructions
Инструкция по эксплуатации
KDL-52W40xx
KDL-52W42xx
KDL-46W40xx
KDL-46W42xx
KDL-40W40xx
KDL-40W42xx
KDL-32W40xx
KDL-32W42xx
KDL-40E40xx
KDL-32E40xx
KDL-26E40xx
KDL-37V45xx
KDL-37V47xx
KDL-32V45xx
KDL-32V47xx
KDL-26V45xx
KDL-26V47xx
000COV_0mm(611)m.indd 1000COV_0mm(611)m.indd 1 18/03/2008 16:59:4518/03/2008 16:59:45
2
GB
Thank you for choosing this Sony product.
Before operating the TV, please read this manual
thoroughly and retain it for future reference.
Disposal of Old Electrical &
Electronic Equipment (Applicable in
the European Union and other
European countries with separate
collection systems)
This symbol on the product or on its
packaging indicates that this product
shall not be treated as household waste.
Instead it shall be handed over to the applicable collection
point for the recycling of electrical and electronic
equipment. By ensuring this product is disposed of
correctly, you will help prevent potential negative
consequences for the environment and human health,
which could otherwise be caused by inappropriate waste
handling of this product. The recycling of materials will
help to conserve natural resources. For more detailed
information about recycling of this product, please contact
your local Civic Office, your household waste disposal
service or the shop where you purchased the product.
Disposal of waste batteries
(applicable in the European Union
and other European countries with
separate collection systems)
This symbol on the battery or on the
packaging indicates that the battery
provided with this product shall not be
treated as household waste. By ensuring
these batteries are disposed of correctly,
you will help prevent potentially negative consequences
for the environment and human health which could
otherwise be caused by inappropriate waste handling of the
battery. The recycling of the materials will help to conserve
natural resources. In case of products that for safety,
performance or data integrity reasons require a permanent
connection with an incorporated battery, this battery should
be replaced by qualified service staff only. To ensure that
the battery will be treated properly, hand over the product
at end-of-life to the applicable collection point for the
recycling of electrical and electronic equipment. For all
other batteries, please view the section on how to remove
the battery from the product safely. Hand the battery over
to the applicable collection point for the recycling of waste
batteries. For more detailed information about recycling of
this product or battery, please contact your local Civic
Office, your household waste disposal service or the shop
where you purchased the product.
The manufacturer of this product is Sony
Corporation, 1-7-1 Konan Minato-ku Tokyo, 108-
0075 Japan. The Authorized Representative for EMC
and product safety is Sony Deutschland GmbH,
Hedelfinger Strasse 61, 70327 Stuttgart, Germany.
For any service or guarantee matters please refer to
the addresses given in separate service or guarantee
documents.
• Any functions related to Digital TV ( ) will only
work in countries or areas where DVB-T (MPEG2 and
MPEG4 AVC) digital terrestrial signals are broadcast or
where you have access to a compatible DVB-C (MPEG2
and MPEG4 AVC) cable service. Please confirm with
your local dealer if you can receive a DVB-T signal
where you live or ask your cable provider if their DVB-
C cable service is suitable for integrated operation with
this TV.
• The cable provider may charge an additional fee for such
a service and you may be required to agree to their terms
and conditions of business.
• Although this TV set follows DVB-T and DVB-C
specifications, compatibility with future DVB-T digital
terrestrial and DVB-C digital cable broadcasts cannot be
guaranteed.
• Some Digital TV functions may not be available in some
countries/regions and DVB-C cable may not operate
correctly with all providers.
• For more information about DVB-C functionality please
see our cable support site:
http://support.sony-europe.com/TV/DVBC
/
• is a registered trademark of the DVB Project
• Manufactured under license from BBE Sound, Inc.
Licensed by BBE Sound, Inc. under one or more of the
following US patents: 5510752, 5736897. BBE and
BBE symbol are registered trademarks of BBE Sound,
Inc.
• Manufactured under license from Dolby Laboratories.
“Dolby” and the double-D symbol are trademarks
of Dolby Laboratories.
• HDMI, the HDMI logo and High-Definition Multimedia
Interface are trademarks or registered trademarks of
HDMI Licensing LLC.
~
• The illustrations used in this manual are of the
KDL-40W4000 unless otherwise state.
• The «x» that appear on the model name, correspond to
numeric digits related to colour variation.
Introduction
Disposal of the TV set
Notice for Digital TV function
Trademark information
HD3D Sound
ViV
A
010COV.book Page 2 Wednesday, March 26, 2008 2:49 PM
3
GB
Table of Contents
Start-up Guide 4
Checking the accessories………………………………………………………………………………………. 4
Safety information……………………………………………………………………………………………….… 9
Precautions……………………………………………………………………………………………………..…. 10
Overview of the remote ……………………………………………………………………………………… 11
Overview of the TV buttons and indicators…………………………………………………………. 12
Watching TV……………………………………………………………………………………………………..… 13
Checking the Guide …………………………………………………………………………………….. 15
Using the Digital Favourite list ………………………………………………………………………. 16
Connecting optional equipment……………………………………………………………………………… 17
Viewing pictures from connected equipment …………………………………………………………… 18
Using BRAVIA Sync (Control for HDMI) …………………………………………………………………. 19
Overview of the TV Home Menu (XMB™)………………………………………………………………. 21
Settings………………………………………………………………………………………………………..……. 22
Picture ………………………………………………………………………………………………………..… 22
Sound …………………………………………………………………………………………………………… 23
Features ………………………………………………………………………………………………………..24
Set-up ……………….………………………………………………………………………………………….. 25
Analogue Set-up ..………………………………………………………………………………………….. 28
Digital Set-up ……………………………………………………………………………………….. 29
Photo ………………………………………………………………………………………………………………… 32
Picture Frame ………………………………………………………………………………………………… 32
USB Photo Viewer …………………………………………………………………………………………. 32
Specifications…………………………………………………………………………………………………..…. 33
Troubleshooting …………………………………………………………………………………………………..35
Start-up Guide 4
Watching TV
Using Optional Equipment
Using MENU Functions
Additional Information
: for digital channels only
GB
Before operating the TV, please read the “Safety information” section of this manual.
Retain this manual for future reference.
010COV.book Page 3 Wednesday, March 26, 2008 2:49 PM
4
GB
Start-up Guide
1: Checking the
accessories
Mains lead (1) (only for KDL-52W4xxx, KDL-
46W4xxx, KDL-40W4xxx, KDL-40E4xxx)
Remote RM-ED011 (1)
Remote RM-ED011 W (1) (only for KDL-
40E4xxx, KDL-32E4xxx, KDL-26E4xxx)
Size AA batteries (R6 type) (2)
Stand (1) (except for KDL-52W4xxx,
KDL-26E4xxx)
Screws for stand (4) (only for KDL-
46W4xxx, KDL-40W4xxx, KDL-40E4xxx,
KDL-37V4xxx)
Screws for stand (3) (only for KDL-
32W4xxx, KDL-32E4xxx, KDL-32V4xxx,
KDL-26V4xxx)
To insert batteries into the remote
~
• Observe the correct polarity when inserting batteries.
• Do not use different types of batteries together or mix
old and new batteries.
• Dispose of batteries in an environmentally friendly way.
Certain regions may regulate disposal of batteries.
Please consult your local authority.
• Handle the remote with care. Do not drop or step on it,
or spill liquid of any kind onto it.
• Do not place the remote in a location near a heat source,
a place subject to direct sunlight, or a damp room.
2: Attaching the stand
(except for KDL-52W4xxx,
KDL-26E4xxx)
1 Open the carton box and take out the stand
and the screws.
Push and lift the cover to open.
010COV.book Page 4 Wednesday, March 26, 2008 2:49 PM
5
GB
Start-up Guide
2 Place the TV set on the stand. Take care not to
interfere with cables.
3 Fix the stand to the TV using the supplied
screws.
~
If using an electric screwdriver, set the tightening torque at
approximately 1.5 N·m (15 kgf·cm)
3: Connecting an
aerial/VCR/ DVD
recorder
KDL-46W4xxx
KDL-40W4xxx
KDL-40E4xxx
KDL-37V4xxx
KDL-32W4xxx
KDL-32E4xxx
KDL-32V4xxx
KDL-26V4xxx
onnecting an aerial/cable
Connecting an aerial/ cable/ VCR/ DVD recorder
Coaxial cable
Scart lead
VCR/ DVD recorder
Coaxial cable
Coaxial cable
Terrestrial signal
or cable
Terrestrial signal
or cable
010COV.book Page 5 Wednesday, March 26, 2008 2:49 PM
6
GB
4: Preventing the TV
from toppling over
1 Install a wood screw (4 mm in diameter, not
supplied) in the TV stand.
2 Install a machine screw (M5 x 12, not
supplied) into the screw hole of the TV.
3 Tie the wood screw and the machine screw
with a strong cord.
5: Connecting the cables
6: Bundling the cables
7:
Performing the initial
set-up
1 Connect the TV to your mains socket
(220-240V AC, 50Hz).
2 Press 1 on the TV.
When you switch on the TV for the first time, the
Language menu appears on the screen.
3 Press F/f/G/g to select the language
displayed on the menu screens, then press .
KDL-52W4xxx
KDL-46W4xxx
KDL-40W4xxx
KDL-40E4xxx
3,4,5
GUIDE
Česky
Magyar
Русский
ББ
лгар
ски
Suomi
Dansk
Svenska
Norsk
Slovenčina
Română
English
Nederlands
Français
Italiano
Deutsch
Türkçe
Español
Català
Português
Polski
Language
Back
Set
Analogue
010COV.book Page 6 Wednesday, March 26, 2008 2:49 PM
7
GB
Start-up Guide
4
Press
F
/
f
to select the country/region in
which you will operate the TV, then press .
If the country/region in which you want to use
the TV does not appear in the list, select “-”
instead of a country/region.
5 Press F/f to select the location type in which
you will operate the TV, then press .
~
Sony recommends you to select “Home” for power saving.
This option selects the initial picture mode
appropriate for the typical lighting condition in
these enviroments.
8: Auto-tuning the TV
1 Select OK then press .
2 Press F/f to select “Antenna” or “Cable”,
then press .
If you select “Cable”, the screen for selecting the
scan type appears. See “To tune the TV for
Cable connection” (page 8).
The TV starts searching for all available digital
channels, followed by all available analogue
channels. This may take some time, so do not
press any buttons on the TV or remote while
proceeding.
If a message appears for you to confirm the
aerial connection
No digital or analogue channels were found.
Check all the aerial/cable connection and then
press to start auto-tuning again.
3 When the Programme Sorting menu appears
on the screen, follow the steps of
“Programme Sorting”(page 28).
If you do not change the order in which the
analogue channels are stored on the TV, press
RETURN to go to step 4.
4
For details, see page 24.
5
For details, see page 19.
6 Press .
The TV has now tuned in all the available
channels.
~
When a digital broadcast channel cannot be received, or
when selecting a region in which there are no digital
broadcasts in step 3 (page 7), the time must be set after
performing step 3.
Back
Set
Analogue
United Kingdom
Ireland
Nederland
België/Belgique
Luxembourg
France
Italia
Schweiz/Suisse/Svizzera
Deutschland
—
Country
Back
Set
Analogue
Location
Home
Shop
Back
Set
Analogue
Auto Tuning
OK Cancel
Do you want to start Auto Tuning?
Back
Set
Analogue
Quick Start
Yes No
Do you want to enable Quick Start?
TV turns on more quickly but standby power
consumption is increased.
Back
Set
Analogue
Control for HDMI
Yes No
Do you want to enable control for compatible
HDMI devices?
010COV.book Page 7 Wednesday, March 26, 2008 2:49 PM
8
GB
To tune the TV for Cable connection
1 Press .
2 Press F/f to select “Quick Scan” or “Full
Scan”, then press .
«Quick Scan» : channels are tuned according to
the cable operator information within the
broadcast signal.
Recommended setting for «Frequency»,
«Network ID» and «Symbol Rate» is «Auto».
This option is recommended for fast tuning
when supported by your cable operator.
If the «Quick Scan» does not tune, please use the
«Full Scan» method below.
«Full Scan» : All available channels are tuned
and stored. This procedure may take some time.
This option is recommended when «Quick Scan»
is not supported by your cable provider.
For further information about supported cable
providers, refer to support web site:
http://support.sony-europe.com/TV/DVBC/
3 Press f to select “Start”, then press .
The TV starts searching for channels. Do not
press any buttons on the TV or remote.
~
Some cable providers do not support “Quick Scan”. If no
channels are detected using “Quick Scan”, perform “Full
Scan”.
Detaching the Table-
Top Stand from the TV
~
Do not remove the Table-Top Stand for any reason other
than to wall-mount the TV.
KDL-32W4xxx
KDL-32E4xxx
KDL-32V4xxx
KDL-26V4xxx
KDL-52W4xxx
KDL-46W4xxx
KDL-40W4xxx
KDL-40E4xxx
KDL-37V4xxx
KDL-26E4xxx
010COV.book Page 8 Wednesday, March 26, 2008 2:49 PM
9
GB
Safety information
Installation/Set-up
Install and use the TV set in accordance with the
instructions below in order to avoid any risk of fire,
electrical shock or damage and/or injuries.
Installation
• The TV set should be installed near an easily accessible
mains socket.
• Place the TV set on a stable, level surface.
• Only qualified service personnel should carry out wall
installations.
• For safety reasons, it is strongly recommended that you
use Sony accessories, including:
— KDL-52W40xx/ KDL-52W42xx/ KDL-46W40xx/
KDL-46W42xx/ KDL-40W40xx/ KDL-40W42xx/
KDL-32W40xx/ KDL-32W42xx/ KDL-40E40xx/
KDL-32E40xx/ KDL-37V45xx/ KDL-37V47xx/
KDL-32V45xx/ KDL-32V47xx:
Wall-Mount Bracket SU-WL500.
— KDL-26V45xx/ KDL-26V47xx / KDL-26E40xx:
Wall-mount Bracket SU-WL100.
— KDL-46W40xx/ KDL-46W42xx/ KDL-40W40xx/
KDL-40W42xx/KDL-32W40xx/ KDL-32W42xx/
KDL-40E40xx/ KDL-32E40xx/ KDL-37V45xx/
KDL-37V47xx/ KDL-32V45xx/ KDL-32V47xx:
TV stand SU-FL300M.
Transporting
• Before transporting the TV set,
disconnect all cables.
• Two or three people are needed
to transport a large TV set.
• When transporting the TV set by
hand, hold it as shown on the
right. Do not put stress on the
LCD panel and the frame around
the screen.
• When lifting or moving the TV
set, hold it firmly from the
bottom.
• When transporting the TV set, do
not subject it to jolts or excessive
vibration.
• When transporting the TV set for
repairs or when moving, pack it
using the original carton and packing material.
Ventilation
• Never cover the ventilation holes or insert anything in
the cabinet.
• Leave space around the TV set as shown below.
• It is strongly recommended that you use a Sony wall-
mount bracket in order to provide adequate air-
circulation.
Installed on the wall
Installed with stand
• To ensure proper ventilation and prevent the collection
of dirt or dust:
– Do not lay the TV set flat, install upside down,
backwards, or sideways.
– Do not place the TV set on a shelf, rug, bed or in a
closet.
– Do not cover the TV set with a cloth, such as curtains,
or items such as newspapers, etc.
– Do not install the TV set as shown below.
Mains lead
Handle the mains lead and socket as follows in order
to avoid any risk of fire, electrical shock or damage
and/or injuries:
– Use only Sony mains leads, not those of other brands.
– Insert the plug fully into the mains socket.
– Operate the TV set on a 220-240 V AC supply only.
– When wiring cables, be sure to unplug the mains lead
for your safety and take care not to catch your feet on
the cables.
– Disconnect the mains lead from the mains socket
before working on or moving the TV set.
– Keep the mains lead away from heat sources.
– Unplug the mains plug and clean it regularly. If the
plug is covered with dust and it picks up moisture, its
insulation may deteriorate, which could result in a
fire.
Be sure to hold the
bottom of the panel,
not the front part.
30 cm
10 cm
10 cm
10 cm
Leave at least this space around the set.
30 cm
10 cm10 cm
6 cm
Leave at least this space around the set.
Air circulation
is blocked.
Air circulation
is blocked.
Wall
Wall
Continued
010COV.book Page 9 Wednesday, March 26, 2008 2:49 PM
10
GB
Notes
• Do not use the supplied mains lead on any other
equipment.
• Do not pinch, bend, or twist the mains lead excessively.
The core conductors may be exposed or broken.
• Do not modify the mains lead.
• Do not put anything heavy on the mains lead.
• Do not pull on the mains lead itself when disconnecting
the mains lead.
• Do not connect too many appliances to the same mains
socket.
• Do not use a poor fitting mains socket.
Prohibited Usage
Do not install/use the TV set in locations,
environments or situations such as those listed
below, or the TV set may malfunction and cause a
fire, electrical shock, damage and/or injuries.
Location:
Outdoors (in direct sunlight), at the seashore, on a ship or
other vessel, inside a vehicle, in medical institutions,
unstable locations, near water, rain, moisture or smoke.
Environment:
Places that are hot, humid, or excessively dusty; where
insects may enter; where it might be exposed to mechanical
vibration, near flammable objects (candles, etc).
The TV set shall not be exposed to dripping or splashing
and no objects filled with liquids, such as vases, shall be
placed on the TV.
Situation:
Do not use when your hands are wet, with the cabinet
removed, or with attachments not recommended by the
manufacturer. Disconnect the TV set from mains socket
and aerial during lightning storms.
Broken pieces:
• Do not throw anything at the TV set. The screen glass
may break by the impact and cause serious injury.
• If the surface of the TV set cracks, do not touch it until
you have unplugged the mains lead. Otherwise electric
shock may result.
When not in use
• If you will not be using the TV set for several days, the
TV set should be disconnected from the mains for
environmental and safety reasons.
• As the TV set is not disconnected from the mains when
the TV set is just turned off, pull the plug from the mains
to disconnect the TV set completely.
• However, some TV sets may have features that require
the TV set to be left in standby to work correctly.
For children
• Do not allow children to climb on the TV set.
• Keep small accessories out of the reach of children, so
that they are not mistakenly swallowed.
If the following problems occur…
Turn off the TV set and unplug the mains lead
immediately if any of the following problems occur.
Ask your dealer or Sony service centre to have it
checked by qualified service personnel.
When:
– Mains lead is damaged.
– Poor fitting of mains socket.
– TV set is damaged by being dropped, hit or having
something thrown at it.
– Any liquid or solid object falls through openings in
the cabinet.
Precautions
Viewing the TV
• View the TV in moderate light, as viewing the TV in
poor light or during long period of time, strains your
eyes.
• When using headphones, adjust the volume so as to
avoid excessive levels, as hearing damage may result.
LCD Screen
• Although the LCD screen is made with high-precision
technology and 99.99% or more of the pixels are
effective, black dots may appear or bright points of light
(red, blue, or green) may appear constantly on the LCD
screen. This is a structural property of the LCD screen
and is not a malfunction.
• Do not push or scratch the front filter, or place objects on
top of this TV set. The image may be uneven or the LCD
screen may be damaged.
• If this TV set is used in a cold place, a smear may occur
in the picture or the picture may become dark. This does
not indicate a failure. These phenomena disappear as the
temperature rises.
• Ghosting may occur when still pictures are displayed
continuously. It may disappear after a few moments.
• The screen and cabinet get warm when this TV set is in
use. This is not a malfunction.
• The LCD screen contains a small amount of liquid
crystal. Some fluorescent tubes used in this TV set also
contain mercury. Follow your local ordinances and
regulations for disposal.
Handling and cleaning the screen surface/cabinet
of the TV set
Be sure to unplug the mains lead connected to the TV set
from mains socket before cleaning.
To avoid material degradation or screen coating
degradation, observe the following precautions.
• To remove dust from the screen surface/cabinet, wipe
gently with a soft cloth. If dust is persistent, wipe with a
soft cloth slightly moistened with a diluted mild
detergent solution.
• Never use any type of abrasive pad, alkaline/acid
cleaner, scouring powder, or volatile solvent, such as
alcohol, benzene, thinner or insecticide. Using such
materials or maintaining prolonged contact with rubber
or vinyl materials may result in damage to the screen
surface and cabinet material.
• When adjusting the angle of the TV set, move it slowly
so as to prevent the TV set from moving or slipping off
from its table stand
Optional Equipment
Keep optional components or any equipment emitting
electromagnetic radiation away from the TV set. Otherwise
picture distortion and/or noisy sound may occur.
010COV.book Page 10 Wednesday, March 26, 2008 2:49 PM
11
GB
Overview of the remote
1 «/1 – TV standby
Turns the TV on and off from standby mode.
2 AUDIO
In analogue mode: Press to change the dual sound mode (page 24).
In digital mode: Press to select the audio language (page 30).
3 – Subtitles
Press to display the subtitles on current program if TV channels broadcast
such information (in digital mode only) (page 30).
4 / – Input select / Text hold
• In TV mode: Selects the input source from equipment connected to the TV
sockets (page 18).
• In Text mode (page 14): Holds the current page.
5 F/f/G/g/
6 OPTIONS (page 14, 19)
Enables you to access various viewing options and change/make adjustments
according to the source and screen format.
7 HOME (page 21)
Displays the TV Home menu.
8 Coloured buttons (page 14, 15, 16)
9 Number buttons
• In TV mode: Selects channels. For channel numbers 10 and above, enter the
second and third digit quickly.
• In Text mode: Enters the three digit page number to select the page.
0 – Favourite (page 16)
qa PROG +/–//
• In TV mode: Selects the next (+) or previous (-) channel.
• In Text mode (page 14): Selects the next ( ) or previous ( ) page.
qs – Previous channel
Returns to the previous channel watched (for more than five seconds).
qd % – Mute the sound
qf 2 +/– – Volume
qg / – Text (page 14)
qh – RETURN
Returns to the previous screen of any displayed menu.
qj – GUIDE (page 15)
qk ANALOG – Analogue mode (page 13)
ql DIGITAL – Digital mode (page 13)
w; BRAVIA Sync (page 19)
wa – Screen mode (page 14)
ws / – Info / Text reveal
• In digital mode: Displays details of the programme currently being watched.
• In analogue mode: Each time you press
/ , the information on the
screen changes as follows: Displays information such as current channel
number and screen format
t Time is displayed t Information is hidden.
• In Text mode (page 14): Reveals hidden information (e.g. answers to a
quiz).
z
The number 5, PROG +, AUDIO and buttons have tactile dots. Use the
tactile dots as references when operating the TV.
GUIDE
010COV.book Page 11 Wednesday, March 26, 2008 2:49 PM
12
GB
Overview of the TV buttons and indicators
1 (page 21)
2 / – Input select / OK
• In TV mode: Selects the input source from
equipment connected to the TV sockets
(page 18).
• In TV menu: Selects the menu or option, and
confirms the setting.
3 2 +/–//
• In TV mode: Increases (+) or decreases (-) the
volume.
• In TV menu: Moves through the options right
( ) or left ( ).
4 PROG +/–//
• In TV mode: Selects the next (+) or previous (-)
channel.
• In TV menu: Moves through the options up ( )
or down ( ).
5 1 – Power
Turns the TV on or off.
~
To disconnect the TV completely, pull the plug
from the mains.
6 Light Sensor
Do not put anything over the sensor, as its function
may be affected.
7 Remote control sensor
• Receives IR signals from the remote.
• Do not put anything over the sensor, as its
function may be affected.
8 – Picture Off / Timer indicator
• Lights up in green when the picture is switched
off (page 24).
• Lights up in orange when the timer is set
(page 25).
9 1 – Standby indicator
Lights up in red when the TV is in standby mode.
0 « – Power / Timer REC programme indicator
• Lights up in green when the TV is turned on.
• Lights up in orange when the timer recording is
set (page 15).
• Lights up in red during the timer recording.
~
• Make sure that the TV is completely turned off
before unplugging the mains lead. Unplugging the
mains lead while the TV is turned on may cause the
indicator to remain lit or may cause the TV to
malfunction.
• Do not put anything over the indicators as their
functions may be affected.
HOME
(only for KDL-40E4xxx, KDL-32E4xxx,
KDL-26E4xxx)
HOME
010COV.book Page 12 Wednesday, March 26, 2008 2:49 PM
13
GB
Watching TV
Watching TV
1 Press 1 on the TV to switch on the TV.
When the TV is in standby mode (the 1
(standby) indicator on the TV (front) is red),
press «/1 on the remote to switch on the TV.
2 Press DIGITAL to switch to digital mode or
ANALOG to switch to analogue mode.
The channels available vary depending on the
mode.
3 Press the number buttons or PROG +/- to
select a TV channel.
To select channel numbers 10 and above using
the number buttons, enter the second and third
digits within two seconds.
To select a digital channel using the Guide, see
page 15.
In digital mode
An information banner appears briefly. The
following icons may be indicated on the banner.
Additional operations
Watching TV
3
2
3
GUIDE
: Radio service
: Scrambled/Subscription service
: Multiple audio languages available
: Subtitles available
: Subtitles available for the hearing impaired
: Recommended minimum age for current
programme (from 4 to 18 years)
: Parental Lock
c: Current programme is being recorded
To Do this
Turn on the TV
from Standby mode
without sound
Press %. Press 2 +/- to set the
volume level.
Adjust the volume Press 2 + (increase)/
— (decrease).
010COV.book Page 13 Wednesday, March 26, 2008 2:49 PM
14
GB
To access Text
Press /. Each time you press /, the display
changes cyclically as follows:
Text t Text over the TV picture (mix mode) t No
Text (exit the Text service)
To select a page, press the number buttons or
PROG +/-.
To hold a page, press / .
To reveal hidden information, press / .
z
When four coloured items appear at the bottom of the Text
page, Fastext is available. Fastext allows you to access
pages quickly and easily. Press the corresponding coloured
button to access the page.
To change the screen format manually to
suit the broadcast
Press repeatedly to select the desired screen
format.
* Parts of the top and bottom of the picture may be cut off.
~
Some characters and/or letters at the top and the bottom of
the picture may not be visible in Smart mode. In such a
case, you can select “Vertical Size” using the “Screen
Settings” (page 26) menu and adjust vertical size to make
it visible.
z
• When “Auto Format” is set to “On”, the TV will
automatically select the best mode to suit the broadcast
(page 26).
• You can adjust the position of the picture when selecting
“Smart”, “14:9” or “Zoom”. Press
F/f to move up or
down (e.g. to read subtitles).
Using the Options menu
Press OPTIONS to display the following options
when viewing a TV programme.
Smart*
Displays conventional
4:3 broadcasts with an
imitation wide screen
effect. The 4:3 picture
is stretched to fill the
screen.
4:3
Displays conventional
4:3 broadcasts (e.g.
non-wide screen TV) in
the correct proportions.
Wide
Displays wide screen
(16:9) broadcasts in the
correct proportions.
Zoom*
Displays cinemascopic
(letter box format)
broadcasts in the
correct proportions.
14:9*
Displays 14:9
broadcasts in the
correct proportions. As
a result, black border
areas are visible on the
screen.
Options Description
Picture Mode See page 22.
Sound Effect See page 23.
Speaker See page 27.
Subtitle Setting (in
digital mode only)
See page 30.
Sleep Timer See page 25.
Power Saving See page 24.
System Information (in
digital mode only)
See page 31.
010COV.book Page 14 Wednesday, March 26, 2008 2:49 PM
15
GB
Watching TV
Checking the Guide *
1 In digital mode, press GUIDE.
2 Perform the desired operation as shown in the
following table or displayed on the screen.
* This function may not be available in some countries/regions.
Back
001 BBC ONE
002 BBC TWO
003 ITV1
004 Channel 4
005 Five
006 ITV2
007 BBC THREE
008 BBC FOUR
009 ITV3
010 SKY THREE
Category30 min ViewNextPrevious
Homes Under the Hammer Neighbours Afterlife
Ready Steady Cook Extraordinary People: Britains Iden… CSI: Crime Scene Inv…
Dancing On Ice Exclusive Cracker
Sign Zone: Ancient Rome: The Rise a… The Jeremy Kyle… Homes Under th…
House Law and Order: Special Victims U… PartyPoker.com Worl…
Crime Hour: Midsomer Murders Vodafone TBA: L…
BBC Learning Zone: Schools: World P… A Picture of Brit… Eastenders
ER Real Crime: The Truth About the… This is BBC FOUR
Past Everybody Loves Raymond The Sharon Osb…
Racing from Chepstow and Ascot Baseball Wedne… Trans World Sport
Select +/- 1 day on/off Event InformationTun e
To day
13: 0012: 3012: 0011: 30
All Categories
Fri 16 Mar 11:35
To Do this
Watch a programme Press F/f/G/g to select the programme, then press .
Turn off the Guide Press
GUIDE.
Sort the programme information by
category
– Category list
1 Press the blue button.
2 Press
F/f to select a category, then press .
Set a programme to be recorded
– Timer REC
1 Press F/f/G/g to select the future programme you want to record,
then press
/ .
2 Press
F/f to select “Timer REC”.
3 Press to set the TV and your VCR/DVD recorder timers.
A c symbol appears by that programme’s information. The
indicator on the TV front panel lights up in orange.
z
To record the programme you are currently watching, press / .
Set a programme to be displayed
automatically on the screen when it
starts
– Reminder
1 Press F/f/G/g to select the future programme you want to
display, then press
/ .
2 Press
F/f to select “Reminder”, then press .
A c symbol appears by that programme’s information. The
indicator on the TV front panel lights up in orange.
~
If you switch the TV to standby mode, it will automatically turn itself on
when the programme is about to start.
Set the time and date of a programme
you want to record
– Manual timer REC
1 Press F/f/G/g to select the future programme you want to record,
then press
/ .
2 Press
F/f to select “Manual timer REC”, then press .
3 Press
F/f to select the date, then press g.
4 Set the start and stop time in the same way as in step 3.
5 Press
F/f to select the programme, then press .
6 Press to set the TV and your VCR/ DVD recorder timers.
A c symbol appears by that programme’s information. The
indicator on the TV front panel lights up in orange.
z
To record the programme you are currently watching, press / .
Continued
010COV.book Page 15 Wednesday, March 26, 2008 2:49 PM
16
GB
~
• You can set VCR/ DVD recorder timer recording on the TV only for SmartLink compatible VCR/ DVD recorder. If your
VCR/ DVD recorder is not SmartLink compatible, a message will be displayed to remind you to set your VCR/ DVD
recorder timer.
• Once a recording has begun, you can switch the TV to standby mode, but do not turn off the TV completely or the recording
may be cancelled.
• If an age restriction for programmes has been selected, a message asking for a PIN Code will appear on the screen. For
details, see “Parental Lock” (page 30).
Using the Digital Favourite list *
1 In digital mode, press .
2 Perform the desired operation as shown in the
following table or displayed on the screen.
* This function may not be available in some countries/regions.
Cancel a recording/reminder
– Timer list
1 Press / .
2 Press
F/f to select “Timer list”, then press .
3 Press
F/f to select the programme you want to cancel, then press
.
4 Press
F/f to select “Cancel Timer”, then press .
A display appears to confirm that you want to cancel the programme.
5 Press G/g to select “Yes”, then press to confirm.
To Do this
Digital Favourite list
Back
Store Favourite
Digital
Favourite Set-up
Favourites 1
001 BBC ONE
002 BBC TWO
003 ITV1
004 Channel 4
005 Five
006 BBC Three
007 ITV2
008 Sky Sports
009 UKTV History
010 Channel 4+1
011 More 4
012 abc1
013 QVC
014 UKTV Gold
015 The HITS
016 UKTV Bright Ideas
017 ftn
018 TMF
019 E4
020 E4+1
Favourites 2NextPrevious
Enter Programme Number: — — —
To Do this
Create your Favourite list for the first
time
1 Press F/f/G/g to select the channel you want to add, then press
.
Channels that are stored in the Favourite list are indicated by a
symbol.
2 Press yellow key to select “Favourites 2” or “Favourites 3”.
Watch a channel
1 Press yellow key to navigate through favourite lists.
2 Press
F/f to select the channel, then press .
Turn off the Favourite list
Press RETURN.
Add or remove channels in the currently
edited Favourite list
1 Press the blue button.
2 Press the yellow button to choose the list you want to edit.
3 Press
F/f/G/g to select the channel you want to add or remove,
then press .
Remove all channels from the current
Favourite list
1 Press the blue button.
2 Press the yellow button to select the favourite list you want to edit.
3 Press the blue button.
4 Press
G/g to select “Yes”, then press to confirm.
010COV.book Page 16 Wednesday, March 26, 2008 2:49 PM
17
GB
Using Optional Equipment
Connecting optional equipment
You can connect a wide range of optional equipment to your TV. Connecting cables are not supplied.
Using Optional Equipment
,
For service
use only
DVC camcorder
Headphones
DVD recorder
Decoder
VCR
Video game
equipment
DVD player
Decoder
PC
PC (HDMI output)
Blu-ray disc player
Digital video camera
Audio system
PC (HDMI output)
Blu-ray disc player
Digital video camera
DVD player
CAM card
USB
Hi-Fi audio
equipment
Digital decoder
DVD player with
component output
Hi-Fi audio
equipment
with optical
audio input
010COV.book Page 17 Wednesday, March 26, 2008 2:49 PM
18
GB
Viewing pictures from
connected equipment
Switch on the connected equipment, then
perform one of the following operation.
For equipment connected to the scart sockets using
a fully-wired 21-pin scart lead
Start playback on the connected equipment.
The picture from the connected equipment appears
on the screen.
For an auto-tuned VCR/ DVD recorder
In analogue mode, press PROG +/-, or the number
buttons, to select the video channel.
For other connected equipment
Press / to display a list of connected
equipment. Press
F/f to select the desired input
source, then press .
The highlighted item is automatically selected if you
do not perform any operation for two seconds after
pressing
.
If you have set an input source to «Skip» in the «AV
Preset» menu (page 26), that input source does not
appear in the list.
z
To return to normal TV mode, press DIGITAL or
ANALOG.
Additional operations
Symbol on the
screen
Description
AV1
To see the equipment connected to
A.
AV2
To see the equipment connected to
B.
~
SmartLink is a direct link between
the TV and a VCR/DVD recorder.
AV3 To see the equipment connected to
L.
HDMI 1 HDMI IN 1*.
To see the equipment connected to
D.
HDMI 2 HDMI IN 2*.
To see the equipment connected to
E.
If the equipment has a DVI socket,
connect the DVI socket to the
HDMI IN socket through a DVI-
HDMI adaptor interface (not
supplied), and connect the
equipment’s audio out socket to the
audio in HDMI IN socket.
HDMI 3 HDMI IN 3*.
To see the equipment connected to
K.
* ~
• Be sure to use only an HDMI cable that bears the HDMI
logo.
• When “Control for HDMI” compatible equipment is
connected, communication with the connected
equipment is supported. Refer to page 19 to set up this
communication.
• When connecting an audio system with HDMI socket,
be sure to also connect to the HiFi socket.
Component To see the equipment connected to
C.
PC To see the equipment connected to
H.
z
It is recommended to use a PC
cable with ferrites, such as the
«Connector, D-sub 15» (ref. 1-
793-504-11, available in Sony
Service Centre) or equivalent.
To connect Do this
Headphones M Connect to the i socket to listen to
sound from the TV on headphones.
Conditional
Access Module
(CAM) I
To use Pay Per View services.
For details, refer to the instruction
manual supplied with your CAM. To
use the CAM, remove the rubber
cover from the CAM slot. Switch off
the TV when inserting your CAM
into the CAM slot. When you do not
use the CAM, we recommend that
you replace the cover on the CAM
slot.
~
CAM is not supported in all countries.
Please check with your authorized
dealer.
Hi-Fi audio
equipment G
Connect to the audio output sockets
to listen to the sound from the
TV on Hi-Fi audio equipment.
DIGITAL
AUDIO OUT
(OPTICAL) F
Use an optical audio cable.
USB J Use USB memory to display photos.
To Do this
Return to normal TV
mode
Press DIGITAL or ANALOG.
Symbol on the
screen
Description
010COV.book Page 18 Wednesday, March 26, 2008 2:49 PM
19
GB
Using Optional Equipment
Using the Options menu
Press OPTIONS to display the following options
when viewing pictures from connected equipment.
To view two pictures simultaneously
– PAP (Picture and Picture)
You can view two pictures (external input and
TV programme) on the screen simultaneously.
Connect an optional equipment (page 17), and
make sure that images from the equipment
appear on the screen (page 18)
~
• This function is not available for a PC input
source.
• You cannot change the size of the pictures.
• You cannot display analogue TV video in the TV
programme picture while displaying AV1, AV2 or
AV3 video in the external inputs picture.
1 Press OPTIONS.
2 Press F/f to select “PAP”, then press .
The picture from the connected equipment
is displayed on the left, and the TV
programme is displayed on the right.
3 Press the number buttons or PROG +/- to
select the TV channel.
To return to single picture mode
Press or RETURN.
z
The picture framed in green is audible. You can
switch the audible picture by pressing G/g.
To view two pictures simultaneously
– PIP (Picture in Picture)
You can view two pictures (PC input and TV
programme) on the screen simultaneously.
Connect a PC (page 17), and make sure that images
from a PC appear on the screen.
1 Press OPTIONS to display the Options
menu.
2 Press F/f to select “PIP”, then press .
The picture from the connected PC is displayed
with full size and the TV programme is displayed
on the right corner.
You can use
F/f/G/g to move the TV programme
screen position.
3 Press number buttons or PROG +/- to select
the TV channel.
To return to single picture mode
Press RETURN.
z
You can switch the audible picture by selecting “PC
Sound/TV Sound” from the Options menu.
Using BRAVIA Sync
(Control for HDMI)
The control for HDMI function enables the TV
to communicate with the connected equipment
that is compatible with the function, using
HDMI CEC (Consumer Electronics Control).
For example, by connecting Sony equipment
that is compatible with control for HDMI
(with HDMI cables), you can control them
together.
Be sure to connect the equipment correctly,
and make the necessary settings.
Control for HDMI
• Automatically turns the connected
equipment off when you turn the TV off.
• Automatically turns the TV on and
switches the input to the connected
equipment when the equipment starts to
play.
• If you turn on a connected audio system
while the TV is on, the sound output
switches from the TV speaker to the audio
system.
• Adjusts the volume (2 +/-) and mutes the
sound (%) of a connected audio system.
• You can operate the connected Sony
equipment that has the BRAVIA Sync logo
by the TV remote by pressing:
– N/x/X/m/M to operate the connected
equipment directly.
Options Description
Picture Mode (except
PC input mode)
See page 22.
Display Mode (in PC
input mode only)
See page 22.
Sound Effect See page 23.
Speaker See page 27.
PIP (in PC input
mode only)
See page 19.
PAP (except PC input
mode)
See page 19.
Auto Adjustment (in
PC input mode only)
See page 26.
Horizontal Shift (in
PC input mode only)
See page 26.
Sleep Timer (except
PC input mode)
See page 25.
Power Saving See page 24.
Continued
010COV.book Page 19 Wednesday, March 26, 2008 2:49 PM
20
GB
– SYNC MENU to display the menu of the connected
HDMI equipment on the screen.
After displaying the menu, you can operate the
menu screen by using F/f/G/g and .
– OPTIONS to display “Device Control”, then select
options from “Menu”, “Options”, and “Content
List” to operate the equipment.
– Refer to the instruction manual of the equipment for
available control.
To connect the equipment that is
compatible with control for HDMI
Connect the compatible equipment and the TV
with a HDMI cable. When connecting an
audio system, be sure to also connect the
DIGITAL AUDIO OUT (OPTICAL) socket
of the TV and the audio system using an
optical audio cable. For details, see page 18.
To make the control for HDMI settings
The control for HDMI settings must be set on
both the TV side and connected equipment
side. See HDMI Set-up on page 27 for the TV
side settings. For settings on the connected
equipment, refer to the operating instructions
for that equipment.
Buttons for using optional equipment
1 m/N/X/M/x: You can operate the
BRAVIA Sync-compatible equipment that is
connected to the TV.
2 THEATRE
You can set Theatre Mode on or off. When
Theatre Mode is set to on, the optimum audio
output (if the TV is connected with an audio
system using an HDMI cable) and picture
quality for film-based contents are
automatically set.
z
If you turn the TV off, Theatre Mode is also
turned off.
3 SYNC MENU: Displays the menu of connected
HDMI equipment. While viewing other input
screens or TV programmes, “HDMI Device
Selection” is displayed when the button is
pressed.
~
Control for HDMI (BRAVIA Sync) is only
available with the connected Sony equipment that
has the BRAVIA Sync logo or is compatible with
control for HDMI.
GUIDE
010COV.book Page 20 Wednesday, March 26, 2008 2:49 PM
/
на других языках
Похожие инструкции
Содержание
- Магнитола sony 52wx4 инструкция
- Составляющие для подключения
- Коннекторы
- Провода
- Способы подключения
- Обычная кнопка
- Аварийка
- Через соленоид
- Монтаж автомагнитолы и как ее снять
- Настройка и эксплуатация
- Как настроить время
- Как настроить радио
- Как разблокировать магнитолу
- Особенности
- Виды и модели
- Фотогалерея «Модели Sony»
- Инструкция по применению
- Основные аспекты подключения и настройки
- Возможные неисправности и способы их устранения
- Плюсы и минусы девайса
- Цена вопроса
- Видео «Подробный обзор магнитолы DSX-A55BTE от пользователя»
- Рекомендуем к прочтению
- Комментарии и отзывы
- Подключение
- Настройка
- Настройки аудио
- Функциональные настройки
- Sony Xplod CDX-GT650UI
- Sony Xplod CDX-GT450u
- Sony Xplod CDX-GT47UE
Магнитола sony 52wx4 инструкция
Распиновка магнитолы Сони подразумевает правильную установку, подключение и настройку автомобильного аудио устройства. При выполнении подобных работ нужно соблюдать некоторые правила, в противном случае, магнитофон будет функционировать некорректно.
Составляющие для подключения
Для подключения автомагнитолы используется несколько видов деталей.
Коннекторы
Важной частью схемы подключения аудио устройства являются разъемы. Существуют следующие типы коннекторов:
- Индивидуальные. Применение таких разъемов требует использования переходника ISO или обрезки провода. Соединять кабели подобным способом нежелательно. Это может приводить к перебоям в работе магнитолы или выходу аппаратуры из строя. Специалисты рекомендуют применять термоусадочные кембрики и другие средства безопасности.
- Стандартные. Разъемы ISO удобны в использовании. Если аудио устройство Сони оснащено стандартными коннекторами, подключение не занимает много времени.
Провода
Важную роль в установке автомагнитолы играет правильное подсоединение плюсового кабеля. При соединении устройства с аккумуляторной батареей используется предохранитель. При выборе деталей нужно учитывать диаметр проводов, который должен соответствовать размеру разъема головного блока. Для повышения эффективности работы АКБ подключение осуществляют с учетом следующих нюансов:
- черный кабель, идущий от батареи, является массой;
- желтый провод считается плюсовым;
- красный кабель отвечает за передачу сигнала головному устройству при повороте ключа в замке зажигания;
- синий провод подводится к антенне или дополнительным устройствам.
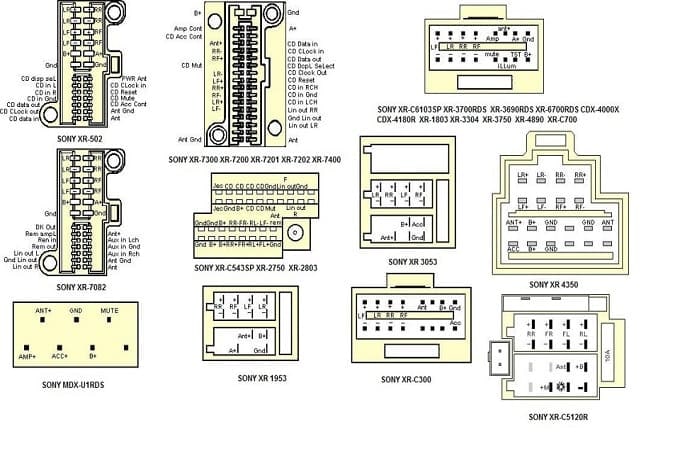
Ты водитель автомобиля?! Тогда ты сможешь пройти этот простейший тест и узнать . Перейти к тесту »
Согласно руководству пользователя, распиновка для автомагнитолы Sony осуществляется следующим образом:
- Желтый силовой кабель используется в качества плюса. Эта часть системы отвечает за питание блока управления.
- Красный провод подключается через замок зажигания. Этот кабель отвечает за отключение головного устройства при прекращении работы двигателя.
Некоторые автовладельцы скручивают плюсовые провода и подключают их к бортовой сети. Делать так нельзя. Магнитола в таком случае работает независимо от состояния двигателя, что приводит к быстрому разряду аккумулятора. Если аппаратуру подключают к отечественным автомобилям, красный провод можно подсоединять к 5 контакту колодки БСК. При выборе этой схемы аудио устройство будет работать только при включенном двигателе.
Способы подключения
Существует 3 метода установки магнитолы, каждый из которых считается правильным.
Обычная кнопка
Подключение осуществляется через кнопку, к которой подводится красный кабель головного устройства. Она имеет двухфазный тип. При использовании такой схемы подключения магнитолы Sony блок управления работает постоянно. При необходимости выключения звуковой аппаратуры питание прекращают нажатием кнопки.
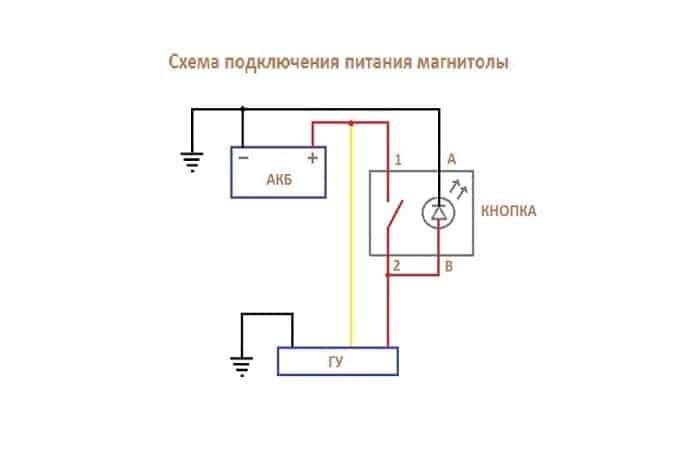
Аварийка
В этом случае применяется не простая кнопка, а автомобильная аварийка. Работает система следующим образом:
- при использовании аварийки питание на головной блок подается через постоянный плюсовой кабель;
- если кнопка не нажата, магнитола подпитывается от замка зажигания.
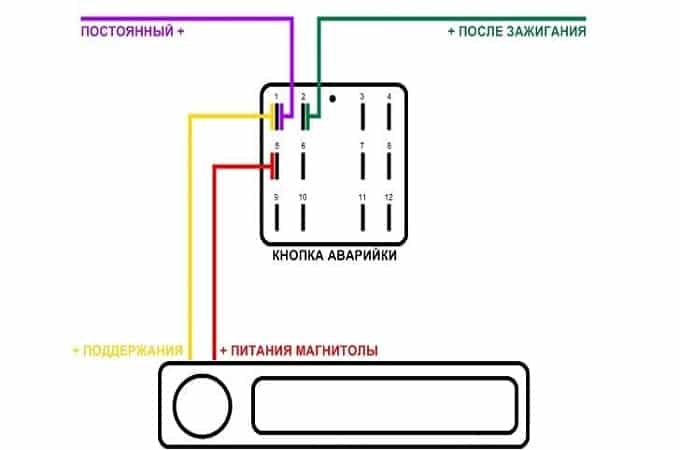
Схема подключения автомагнитолы Сони выглядит следующим образом:
- провод подсветки аудио устройства подсоединяют к подсветке прикуривателя;
- питание после поворота ключа подается с колодки часов;
- электрический ток поступает с аккумулятора или прикуривателя;
- черный провод отводится от прикуривателя.
Через соленоид
Если автомобиль снабжен двухпроводным соленоидом, срабатывающим при закрытии и открытии дверей, схема подключения автомагнитолы Sony выглядит так:
- при открытии двери машины сигнал попадает в реле Р1, последнее срабатывает и начинает подавать питание к головному устройству;
- при закрытии двери срабатывает реле Р2, питание прекращается, аудио устройство отключается.

Схема имеет большое количество недостатков, главным среди которых является высокое потребление энергии за счет ввода лишнего реле.
Монтаж автомагнитолы и как ее снять
После подключения автомагнитолы к бортовой сети одним из вышеуказанных способов выполняются следующие работы:
- Подключение динамиков. Для этого используют многожильный акустический провод с сечением 2-4 мм. Динамики снабжены 2 клеммами различных размеров. Широкая шпилька подсоединяется к плюсу, узкая — к минусу. Длина проводов должна быть минимальной, в противном случае качество звука будет ухудшаться. Рекомендуется подключать 4 динамика — 2 задних и 2 боковых.
- Подключение антенны. Эта часть системы дает возможность прослушивания радио. Если штатная антенная отсутствует, рекомендуется купить активную. Установить ее несложно. Антенну приклеивают к лобовому стеклу автомобиля. После этого ее нужно подключить к проводу белого цвета, помеченному маркировкой REM или AMP.
Снять автомагнитолу можно следующим образом:
- с аккумуляторной батареи скидывают массу, что помогает предотвратить возникновение короткого замыкания;
- наружную панель снимают, отдергивая фиксаторы и подтягивая вверх;
- вывинчивают шурупы, расположенные над консолью системы климат-контроля;
- убирают пепельницу (после этого нужно снять винты, удерживающие головной блок магнитолы).
После выполнения указанных работ аудио устройство можно вытащить.
Настройка и эксплуатация
Согласно инструкции по эксплуатации автомагнитолы Sony, при первом включении необходимо настроить все необходимые параметры.
Как настроить время
Часы аудио устройства марки Сони имеют 24-часовой формат индикации. Настраивать их можно следующим образом:
- нажимают и удерживают кнопку выбора (на экран выводится меню настройки);
- после появления надписи CLOCK-ADJ нажимают кнопку SEEK;
- когда начинает мигать индикация часа, поворотом регулятора громкости выбирают нужное значение;
- индикатор перемещают нажатием кнопки SEEK, после чего устанавливают требуемый параметр;
- нажатием кнопки выбора настройка времени завершается.
Как настроить радио
Настроить радиостанции на магнитоле Сони можно следующими способами:
- Автоматическое сохранение. После нажатия кнопки SOURSE дожидаются появления индикатора TUNER. Для изменения диапазона используют клавишу MODE. После выбора нужной радиостанции нажимают кнопку SEEK. Настройки сохраняются в памяти устройства. Радиостанции располагаются в порядке повышения частот.
- Ручное сохранение. Во время приема радиостанции нажимают и удерживают номерную кнопку. Появление индикации MEMORY свидетельствует о сохранении параметров.
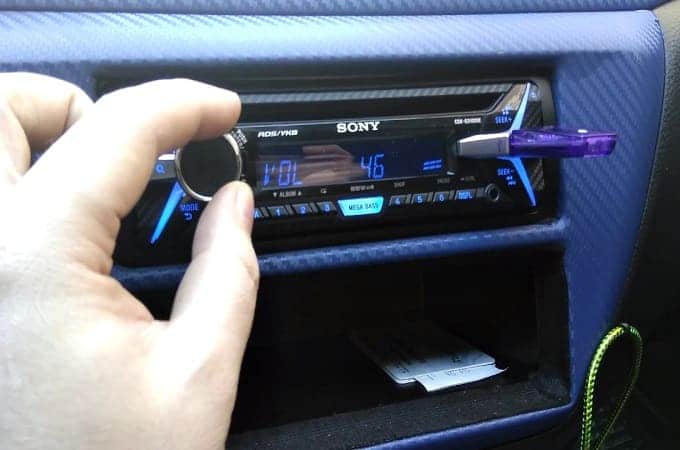
Как разблокировать магнитолу
Согласно инструкции по применению автомагнитолы, разблокирование производится следующим образом:
- Устройство демонтируют. Расположенный на верхней крышке код записывают или запоминают.
- После появления индикации CODE вводят требуемые цифры. Делается это путем нажатия на кнопки предварительной настройки радиостанций. Для подтверждения нажимают *. Если код введен некорректно, можно повторить ввод. Количество потраченных попыток отражается на экране.
Автолюбитель, знающий, как настроить магнитолу Сони в машине, может без труда проводить ремонтные работы.

Наверное, каждый человек хоть раз в жизни слышал о компании Sony. Этот бренд на протяжении многих лет занимается выпуском техники и электроники, линейка производства также включает в себя и автомобильные аудиосистемы. Какими особенностями обладает магнитола Sony, какие недостатки для нее характерны и что нужно знать об установке такой системы — ответы на эти вопросы ищите ниже.
Фотогалерея «Модели Sony»
Инструкция по применению
Основные аспекты подключения и настройки
Возможные неисправности и способы их устранения
Плюсы и минусы девайса
Видео «Подробный обзор магнитолы DSX-A55BTE от пользователя»
Комментарии и Отзывы
Особенности
Особенности автомагнитол Sony могут отличаться в зависимости от модели головного устройства.
Предлагаем ознакомиться с основными особенностями аудиосистем на примере модели gt660ue, эта магнитола считается одной из самых востребованных среди покупателей:
- Эта модель оснащается USB-разъемом. Магнитолы с флешкой позволяют считывать данные с накопителей.
- На передней панели этой модели расположен AUX-выход. С его помощью водитель может прослушивать музыку, подключив к автомагнитоле мобильный гаджет либо МП3-плеер.
- В соответствии с данными, указанными в инструкции по эксплуатации, данная модель оборудуется достаточно мощным звуковым процессором. Следует отметить, что эта особенность также характерна для многих других моделей, в частности, xplod, g3100ue, a30, a35ue и т.д.
- Практически все модели магнитол этого бренда характеризуются огромным функционалом, который включает в себя множество настроек для низких частот и эквалайзера.
- Конкретно эта модель — gt660ue — характеризуется динамической тонкомпенсацией.
- При необходимости потребитель может настроить временные задержки звука.
- Устройство работает с русскоязычными тегами.
- У пользователя есть большой выбор вариантом для подсветки клавиш управления и дисплея аудиосистемы. В частности, в данной модели есть 20 стандартных цветов, но если возникнет необходимость, то пользователь может добавить около 36 тысяч новых цветов.
- Головное устройство включает в комплектацию также пульт ДУ.
- В комплекте к аудиосистеме также идет подробная схема для подключения и настройки аудиосистемы, в ней указана подробная распиновка.
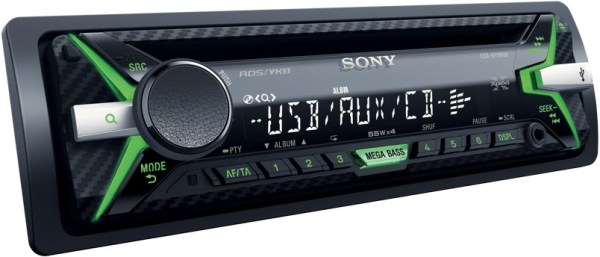
Виды и модели
На сегодняшний день рынок автомобильной электроники включает в себя множество различных моделей, предлагаем ознакомиться с наиболее популярными:
- DSX-A40UI;
- DSX-A400BT;
- DSX-A30E;
- DSX-S100;
- DSX-A202UI;
- DSXA102Y;
- CDX-GT660UE;
- CDX-GT470UE;
- CDX-GT47UE;
- CDX-G1003ER;
- CDX-GT267ME;
- CDX-G1100U;
- CDX-GT250MP;
- MEX-BT2707E;
- MEX-N5150BT;
- MEX-GS610BE;
- RSX GS9;
- XAV-AX100;
- XAV E722;
- XAV 64BT;
- XAV 612BT;
- XAV 601BT;
- XAV 65 и т.д.
Фотогалерея «Модели Sony»
Инструкция по применению
Вкратце о том, как осуществляется установка автомобильной аудиосистемы Sony своими руками:
- Сначала производится монтаж автомобильных колонок для авто. Они устанавливаются в передние, а также в задние двери либо в полку.
- Когда динамики будут установлены, нужно уложить провода к центральной консоли, где будет установлена сама аудиосистема. Провода от динамиков нужно прокладывать под пластиковой облицовкой салона, непосредственно под порогами. Чтобы не допустить проблем в будущем, уложите проводку так, чтобы на нее не воздействовали движущие части кузова.
- После этого аудиосистема монтируется в торпеду — на центральной консоли имеется соответствующий разъем. Прежде чем установить магнитолу в него, сначала нужно вмонтировать шахту — железную рамку, она включается в комплектацию. После установки шахты нужно выгнуть так называемые лепестки, они расположены на торцевых частях, а также сверху и снизу, для этого используется отвертка.
- Когда эти действия будут выполнены, осуществляется подключение всех разъемов и проводов, об этом мы расскажем ниже. Для подключения используйте инструкцию по эксплуатацию, идущую в комплекте.
- Далее, нужно протестировать работу магнитолы. Если система работает нормально, то автомагнитолы устанавливается в шахту до щелчка, который будет свидетельствовать о ее успешной установке (автор видео — Stanislav Tarasov).
Основные аспекты подключения и настройки
Один из самых важных моментов касательно подключения — это подсоединение плюсового кабеля. Если вы решите подключить аудиосистему Sony к автомобильному аккумулятору, то данную цепь нужно будет защитить при помощи предохранительного элемента. В данном случае важен также диаметр кабеля — он должен быть не менее штекера установленной аудиосистемы. Если диаметр не соответствует, то магнитолу можно подключить к прикуривателю.
Чтобы снизить возможную утечку напряжения от аккумуляторной батареи, подключение осуществляется следующим образом:
- черный провод, который идет от аккумулятора — это заземление;
- желтый провод, который также идет от аккумулятора — это положительный контакт, 12-вольтное питание;
- красный провод обеспечивает активацию автомобильной магнитолы при включении замка зажигания;
- провод синего цвета (или сине-белого) необходим для подключения антенного адаптера либо прочих устройств.
В вопросе подключения динамиков нет ничего сложного. В комплекте к любой аудиосистеме идет подробная инструкция касательно подключения колонок — воспользуйтесь ею при установке. Что касается настройки, то она также осуществляется в соответствии с инструкцией.

Возможные неисправности и способы их устранения
С какими неисправностями может столкнуться автовладелец:
- Магнитола не реагирует на пульт управления. Вероятнее всего, причина проблемы заключается в севшей батарейке, значительно реже выходит из строя сам ПДУ. Решить проблему можно путем замены аккумулятора или ремонтом пульта.
- Устройство самопроизвольно отключается. Проблема может заключаться в питании. Нужно проверить силовой кабель, прозвонить электроцепь подключения. Если провод будет ненадежно зафиксирован в разъеме магнитолы, то система может отключаться, когда автомобиль едет по кочкам или попадает в ямы.
- Не регулируется звук, для его увеличения или уменьшения водителю приходится дольше крутить колесико. На практике в некоторых моделях регулятор звука — это слабое место системы. При интенсивной эксплуатации он может выйти из строя и перестать работать. В таком случае нужно разбирать аудиосистему и менять сам регулятор.
- Не читаются данный с CD-диска или USB-накопителя. Такая проблема может быть программной, в данном случае потребуется детальная диагностика устройства и его ремонт. Но может быть такое, что диск не воспроизводится по причине его повреждения или записи треков на носитель в несоответствующем формате. К примеру, магнитола читает только WAV, а вы записали треки в формате MP3.
Также причина может заключаться в поврежденном диске. Что касается флешек, то некоторые устройства не воспроизводят данные, записанные на накопитель, работающий в формате NTFS или FAT32. Нужно попытаться отформатировать карту памяти в другой формат (автор видео — Александр Хайруллин).
Плюсы и минусы девайса
В заключение предлагаем ознакомиться с основными достоинствами и недостатками аудиосистем Sony.
Сначала рассмотрим плюсы:
- Основное преимущество — это название бренда. Как сказано выше, Sony — это всемирно известная компания, которую знает практически каждый. Известность бренда попросту обязывает компанию выпускать только качественную продукцию.
- Производитель предлагает потребителям большой выбор моделей, так что практически каждый потребитель сможет выбрать тот вариант, который подойдет ему больше всего. Также следует отметить, что покупателям предлагаются разные системы в соответствии с функционалом, а также стоимостью. При ограниченных финансовых возможностях можно сделать выбор в соответствии с имеющимся бюджетом.
- Все современные автомагнитолы оборудуются широким функционалом, который позволяет повысить комфорт. Например, девайс может быть оснащен GPS-навигатором либо ТВ-тюнером. Нужно отметить, что такие опции более характерны для дорогих устройств.
- Практически каждая система имеет большой функционал, позволяющий подстроить автомагнитолу под свои потребности.
- Как утверждают отзывы потребителей, магнитолы Sony обладают довольно простой и удобной платформой для управления и использования. Если есть необходимость, большинство моделей позволяют синхронизировать магнитолу с мобильным девайсом (автор видео — Саня Белоус).
Теперь вкратце о минусах:
- В соответствии с основными неисправностями, одним из недостатков является низкокачественный пульт. На практике это устройство ломается часто.
- Если подключение и настройка аудиосистемы будет неправильно, качество выдаваемого звучания будет достаточно низким.
- Огромное количество подделок Sony на рынке. Есть вероятность, что покупая магнитолу, вы купите подделку, которая не сможет похвастаться преимуществами, описанными выше. Рекомендуем покупать магнитолы у проверенных продавцов.
Цена вопроса
Что касается стоимости, то самые дешевые модели Sony на сегодняшний день стоят около 3 тысяч рублей. Аудиосистемы средней ценовой категории обойдутся покупателю примерно в 5-10 тысяч рублей.
Видео «Подробный обзор магнитолы DSX-A55BTE от пользователя»
В ролике ниже представлен подробный обзор автомобильной магнитолы DSX-A55BTE от потребителя с обозначением основных недостатков аудиосистемы (автор видео — Sergei Gusev).

Рекомендуем к прочтению


Комментарии и отзывы
Добрый день!
не могу включить магнитолу сони драйв s старого образца, без юсб, время есть а дальше ничего не происходит
Подскажите модель магнитолы изображённой в фотогалерее ниже
Здравствуйте у меня возникла проблема с авто магнитолой телевизор перестала работать флейта и меню не показывает и горит синим экран
Здравствуйте!
Каким образом подключить сабвуфер напрямую к магнитола Sony g3100 use?
CDX-G1100U нужна фишка к этой магнитоле !
Здравствуйте. Проблема такая на 2bin сони 6515. Сильно большая громкость на минимальной громкости.
На дисплее выходят буквы АТТ и сразу звук становится тише
Компания Sony более полувека выпускает бытовую технику и электронику. Вся техника, выпускаемая компанией, отличается высоким качеством и надежностью, не стали исключением и автомагнитолы, выпускаемые под брендом Sony.
У каждой модели есть свои особенности, преимущества и недостатки, и порой какая-нибудь мелочь может сыграть роль при выборе устройства той или иной модели.
 Бренд Sony
Подключение
Подключение магнитолы Sony Xplod может производиться нескольким способами, все зависит от наличия необходимых разъемов. Наиболее простой и быстрый способ – это подключение при помощи стандартного разъема ISO, достаточно подсоединить магнитолу согласно инструкции. Инструкция для магнитолы Sony Xplod идет в комплекте с устройством, правда, не факт, что она будет на русском. Как подключить устройство посредством стандартного разъема, показано на фото.
При отсутствии такого типа подключения приходится подключать устройство согласно схеме.
При подключении следует помнить: плохой контакт в местах соединения или неправильное подключение проводов может привести к выходу из строя отдельных элементов акустической системы и даже самого головного устройства. При соединении проводов необходимо использовать термоусадочные кембрики, это более надежно, нежели использование простой изоленты.
Настройка
Настройка устройства довольно простая, и можно легко ее выполнить, если следовать инструкции, но ввиду отсутствия русского языка это может стать проблемой.
 Схема опдключения магнитолы
Настройки аудио
Переход в меню настроек аудио происходит нажатием на центр регулятора громкости. В этом меню можно настроить эквалайзер, балансы левый-правый и передний-задний, усиление НЧ, уровень сабвуфера, а также позволяет переключиться между предустановленными настройками эквалайзера.
Функциональные настройки
Чтобы перейти в меню функциональных настроек, необходимо нажать и удерживать регулятор громкости по центру. Это меню позволяет настроить часы, включить/выключить звук нажатия клавиш, настроить параметры автоматического выключения устройства, настраивать диммер, включать или выключать динамический эквалайзер на дисплее, настраивать параметры приема и воспроизведения радиостанций, настраивать параметры работы сабвуфера, а также задавать параметры работы обычных динамиков.
 Настройка магнитолы
Как можно заметить, настройки устройства имеют широкие возможности и позволяют настроить звук именно под свой вкус.
Sony Xplod CDX-GT650UI
Типоразмер автомагнитолы Sony Xplod CDX-GT650UI соответствует стандартам 1 DIN. В комплекте с устройством идут: инструкция, кабель питания со стандартным разъемом ISO, ключ для снятия устройства и шурупы для его крепления.

Функциональность:
- воспроизводит популярные музыкальные форматы, есть CD-привод,
- тюнер работает в FM- и AM-диапазонах, есть возможность внести в память устройства до 30 радиостанций,
- USB-порт для подключения съемных носителей.
Максимальная выходная мощность, которую выдает магнитола Sony Xplod – 52W4. Отзывы покупателей касательно этой модели в основном положительные: модель по функциональности и качеству полностью оправдывает свою цену. Из отрицательных отзывов про Sony Xplod: невысокий функционал, но это полностью оправдано доступной ценой.
Sony Xplod CDX-GT450u
Размеры автомагнитолы 1 дин, что позволяет устанавливать устройство в штатные места без проблем. В комплекте с устройством идут: инструкция, ПДУ и все необходимое для установки и подключения.
Функциональность CDX-GT450u:
- семиполосный эквалайзер,
- читает CD-R/RW диски,
- есть FM/AM тюнер,
- USB-порт на передней панели.
Выходная мощность устройства – 52WX4. Пользователи положительно отзываются про Sony Xplod CDX-GT450u. Больше всего покупатели оценили качество звучания, большое количество настроек, хороший дизайн и невысокую стоимость.
Sony Xplod CDX-GT47UE
Устанавливается CDX-GT47UE в слоты стандарта 1 дин.
В комплекте с устройством идут:
- инструкция,
- ключ для снятия магнитолы,
- шурупы для крепления и разъемы ISO для подключения устройства.

Головное устройство воспроизводит популярные форматы музыки, читает CD-диски, есть возможность подключения съемных носителей через USB-порт на передней панели.
Пиковая выходная мощность – 45WX4, имеется возможность ручной настройки звука и предустановленных настроек эквалайзера. Пользователи по достоинству оценили качественный звук при доступной цене. Из недостатков – отсутствие ПДУ в комплекте.
Источник