ИП Центрекс
Краткое руководство
ИСПОЛЬЗУЙТЕ ДОСТУП К МОЕЙ УЧЕТНОЙ ЗАПИСИ, ЧТОБЫ УВЕЛИЧИТЬ СВОИ ТЕЛЕФОННЫЕ ВОЗМОЖНОСТИ Зайдите на myaccount.coxbusiness.com и введите свое имя пользователя и пароль. Ваше имя пользователя находится в вашем адресе электронной почты, и ваш пароль был предоставлен вам Cox Business по электронной почте. Если вы забыли свой пароль, введите свой адрес электронной почты и нажмите «Забыли пароль?» чтобы получить временный пароль.
Часто используемые функции и функции
ОТПРАВИТЬ ЗВОНОК НА ГОЛОСОВУЮ ПОЧТУ // Нажмите программную клавишу xfer (Перевод) и наберите * 55 плюс добавочный номер; затем нажмите набор ИЛИ вы можете нажать программную клавишу XferVM и добавочный номер.
ПЕРЕДАТЬ ЗВОНОК // Во время активного вызова нажмите программную клавишу xfer. Наберите номер, объявите о звонке и снова нажмите программную кнопку xfer, чтобы завершить перевод.
СЛУЧАЙНЫЙ ПЕРЕНОС // Ответьте на вызов, нажмите программную кнопку xfer, наберите номер принимающей стороны и снова нажмите программную кнопку xfer, чтобы завершить перевод.
ПЕРЕАДРЕСАЦИЯ ЗВОНКОВ // Нажмите программную кнопку cfwd (переадресация вызова) и введите номер, на который следует переадресовывать вызовы. Если вы переадресовываете вызовы на внешний номер, используйте код доступа и код города по мере необходимости. Нажмите «Набор». На ЖК-дисплее отобразятся переадресации вызовов. Чтобы отменить переадресацию вызовов, нажмите программную клавишу cfwd (Переадресация).
ПЕРЕАДРЕСАЦИЯ ЗВОНКОВ НЕ ДОСТУПНА // В меню «Голосовые инструменты» в MyAccount щелкните Входящие вызовы. Выберите ссылку «Переадресация вызовов недоступна». Введите номер телефона для переадресации звонков и нажмите OK.
ИНТЕРКОМ (НАЖАТЬ ДЛЯ РАЗГОВОРА) * // Нажмите * 50 на клавиатуре, чтобы активировать функцию Push to Talk, наберите добавочный номер и нажмите диск. Для пейджинга всех добавочных номеров используйте Push to Talk в сочетании с функцией мгновенного группового вызова, которую может настроить телефонный администратор вашей компании.
БЫСТРЫЙ НАБОР* // Если вы запрограммировали ускоренный набор 8 в MyAccount, снимите трубку и введите однозначный код номера, по которому хотите позвонить, а затем нажмите #. Если вы запрограммировали быстрый набор 100 в MyAccount, снимите трубку, наберите двузначный код номера, по которому хотите позвонить, а затем нажмите #.
ПРИЕМ ЗВОНКА // Создайте группу перехвата вызовов в MyAccount. Как только это будет сделано, наберите * 98 #, чтобы ответить на внутренний номер вашей группы перехвата.
НЕ БЕСПОКОЙТЕ // Нажмите функциональную клавишу dnd (DND). ЖК-экран показывает, что на телефоне активирован режим «Не беспокоить», а вызовы перенаправляются на голосовую почту. Для деактивации снова нажмите функциональную клавишу dnd (DND).
УСТАНОВИТЬ КОНФЕРЕНЦ-ЗВОНОК // Наберите первого абонента, с которым хотите провести конференцию. Когда абонент ответит, нажмите программную клавишу конф., Чтобы перевести его в режим ожидания. Наберите следующий номер, который хотите включить в звонок, и снова нажмите конф. Повторите эти шаги, чтобы добавить к вызову до 15 участников.
ПАРК / ПОЛУЧИТЬ ЗВОНОК // Во время активного вызова нажмите кнопку удержания, получите второй гудок и нажмите * 68 плюс добавочный номер и #. Чтобы получить запаркованный вызов с этого добавочного номера, наберите * 88 # плюс добавочный номер и затем нажмите #.
ГОЛОСОВЫЙ ПОРТАЛ * // Review Руководство пользователя VoiceManager для активации функций и установки пароля перед использованием Voice Portal. Чтобы изменить параметры персонального диспетчера состояния переадресации вызовов, наберите номер доступа к голосовому порталу для вашего региона ___________ и введите свой 10-значный номер телефона и код доступа голосового портала.
ЕДИНОЕ СООБЩЕНИЕ * // В меню «Инструменты голосовой почты / портала» в MyAccount выберите параметр «Управление сообщениями». Щелкните ссылку «Настройки переадресации голосовой почты и уведомлений». Введите адрес электронной почты, на который вы хотите отправлять сообщения голосовой почты. Установите флажок Прикрепить голосовое сообщение. Установите переключатель слева от предпочтительного варианта размещения голосовых сообщений. Щелкните ссылку Сохранить.
* Для использования этой функции может потребоваться конфигурирование.
Дисплей телефона
Модель Cisco SPA504G имеет четыре клавиши линий, телефон SPA508G — восемь клавиш линий, а SPA525G2 — пять клавиш линий.
Описание функций
- ТРУБКА // Поднимите трубку, чтобы ответить или позвонить.
- ОРАТОР // Динамик для телефона.
- ИНДИКАТОР ОЖИДАНИЯ СООБЩЕНИЯ // Когда индикатор:
• Красный: у вас есть новая голосовая почта.
• Мигающий красный: входящий вызов. - ЖК-ЭКРАН // Ваш телефон может отличаться, но обычно отображает:
• Дата и время
• Название телефонной станции
• Продление линии
• Параметры программных клавиш - КЛЮЧИ ЛИНИИ // Показывает состояние телефонной линии:
• Зеленый: линия свободна и готова к использованию.
• Красный (постоянный): линия активна или используется.
• Красный (непрерывно мигает): линия на удержании.
• Красный (мигает дважды, затем нет цвета и цикл повторяется): линия SCA используется.
• Оранжевый (постоянный): линия не зарегистрирована (не может использоваться).
• Оранжевый (мигает): линия настроена неправильно.
• Выкл .: клавиша линии не настроена. - ПРОГРАММНЫЕ КНОПКИ // Расположен под ЖК-экраном. Выполняет функции, указанные на вкладках, отображаемых на ЖК-экране.
- КНОПКА НАВИГАЦИИ С ПРОКРУТКОЙ // Нажмите в любом направлении для прокрутки параметров на ЖК-экране.
- ВЫБОР ЦЕНТРА // Нажмите, чтобы выбрать выделенный параметр.
- КНОПКА СООБЩЕНИЙ // Нажмите, чтобы получить доступ к голосовой почте.
- КНОПКА УДЕРЖИВАТЬ // Нажмите, чтобы удержать вызов.
- КНОПКА НАСТРОЙКИ // Нажмите, чтобы получить доступ к меню для настройки функций и предпочтений для этого телефона, доступа к истории звонков и информации о состоянии телефона.
- КНОПКА ВЫКЛЮЧЕНИЯ ЗВУКА // Нажмите, чтобы выключить и включить звук на телефоне. Мигающий красный означает отсутствие сетевого подключения.
- КНОПКА ГРОМКОСТИ // Используйте для регулировки громкости звонка, когда трубка снята, громкости трубки, когда трубка снята, громкости гарнитуры, когда гарнитура активна, и громкости громкой связи, когда она активна.
- КНОПКА ДИНАМИКА // Нажмите, чтобы включить громкую связь.
- КНОПКА ГАРНИТУРЫ // Нажмите, чтобы активировать гарнитуру.
- КЛАВИАТУРА // Нажмите для набора номера.
Core Calling Actions
Размещение и ответ на звонок
- Поднимите трубку.
- Нажмите кнопку динамика или гарнитуры.
- Нажмите кнопку линии и наберите номер с клавиатуры.
- Если вызов поступает на вашу основную линию, снимите трубку, нажмите кнопку динамика или гарнитуры.
- Если вызов поступает на кнопку другой линии, нажмите эту кнопку.
Изменение тона звонка
- Нажмите кнопку меню.
- Прокрутите и выберите Пользовательские настройки.
- Прокрутите и выберите Настройки звука.
- Прокрутите до добавочного номера (клавиша линии), который нужно изменить.
- Нажмите стрелку вправо.
- Прокрутите мелодии звонка. Нажмите Play, чтобы услышать.
- Нажмите Выбрать на выбранной мелодии звонка.
Завершение звонка
- Положите трубку или нажмите программную клавишу endCall. (Примечание: если вы используете громкую связь, нажмите кнопку динамика.)
Регулировка громкости
- Поднимите трубку или нажмите кнопку динамика.
- Нажмите + или — на кнопке громкости, чтобы увеличить или уменьшить громкость.
- Нажмите Сохранить, чтобы сохранить новый уровень.
Отключение звука телефона
- Нажмите кнопку отключения звука на телефоне, чтобы отключить и включить громкую связь или трубку.
Свободный телефон
повторный набор // Звонит по последнему набранному номеру.
директор // Открывает предварительно настроенную адресную книгу.
cfwd // Перенаправляет входящие звонки на другой телефонный номер.
не знаю // Не беспокойте. Запрещает входящим вызовам звонить на ваш телефон. Автоматическая переадресация вызовов на голосовую почту, если у этого номера есть почтовый ящик.
ПРОКРУТКА> lcr // Последний звонок. Повторный набор последнего входящего вызова.
РТТ // Нажми чтобы говорить. Включает функцию внутренней связи.
Phone Softkey Descriptions
Во время разговора
конец вызова // Завершает звонок.
конф // Связывает два или более вызовов. Для конференц-связи:
- Наберите первого абонента.
- Нажмите программную кнопку conf.
- Слушайте гудок.
- Наберите второго абонента.
- Снова нажмите программную кнопку conf. (Если вы положите трубку, конференц-связь прервется.)
bxfer // Переводит звонок без представления звонящего.
xfer // Устанавливает вызов на удержание, пока вы набираете номер, на который хотите отправить вызов.
- Во время активного вызова нажмите программную кнопку xfer и наберите телефонный номер получателя.
- Когда трубка ответит на звонок, представьте звонок.
- Нажмите кнопку xfer и положите трубку.
ПРОКРУТКА> XferVM // Переводит звонок на голосовую почту.
держать // Удерживает вызов.
Пока на удержании
резюме // Перезапускает удерживаемый вызов.
конец вызова // Завершает звонок.
новый звонок // Делает новый звонок.
повторный набор // Звонит по последнему набранному номеру.
ПРОКРУТКА> XferVM // Переводит звонок на голосовую почту.
директор // Открывает предварительно настроенную адресную книгу.
cfwd // Перенаправляет входящие звонки на другой телефонный номер.
не знаю // Не беспокойте. Запрещает входящим вызовам звонить на ваш телефон. Автоматическая переадресация вызовов на голосовую почту, если у этого номера есть почтовый ящик. Перенаправляет входящие звонки на другой телефонный номер.
Администратор телефона может ограничить некоторые функции.
Быстрый набор номера при использовании кодов доступа к функциям: нажмите символ #, чтобы завершить любую строку набора для более быстрого соединения.
Для получения дополнительной информации об IP Centrex перейдите на myaccount.coxbusiness.com и щелкните ссылку «Узнать больше».
Услуги доступны не во всех областях. Могут применяться другие ограничения. Для получения технической поддержки наберите 1.866.272.5777.
 Коды доступа к часто используемым функциям
Всегда переадресация звонков — Активировать — * 72
Постоянная переадресация вызовов — Деактивировать — * 73
Переадресация при отсутствии ответа — Активировать — * 92
Переадресация вызовов при отсутствии ответа — Деактивировать — * 93
Парковка вызова — нажмите и удерживайте> * 68> добавочный номер
Восстановление парковки вызова — поднимите трубку или нажмите кнопку громкой связи> * 88 #> введите добавочный номер, на котором запаркован вызов> #
Перехват вызова — нажмите * 98, чтобы принять вызов добавочного номера. Нажмите * 97> Добавочный номер> #, чтобы ответить на конкретный добавочный номер.
Обратный звонок — * 69
Ожидание вызова — Активировать — * 43
Ожидание вызова — Деактивировать — # 43
Прямая передача голосовой почты — нажмите перевод (xfer), затем * 55> добавочный номер> #
Интерком (Нажми и говори) — * 50> Внутренний номер> #
Удаленный доступ с переадресацией вызовов — наберите свой локальный номер удаленного доступа к голосовому порталу> введите 10-значный номер станции IP Centrex и пароль
Руководство пользователя IP-телефона IP Centrex Cisco SPA504G — Оптимизированный PDF
Руководство пользователя IP-телефона IP Centrex Cisco SPA504G — Исходный PDF
-
Contents
-
Table of Contents
-
Bookmarks
Quick Links
USER GUIDE
Cisco Small Business Pro
SPA 504G IP Phone
for 8×8 Virtual Office
Related Manuals for Cisco SPA 504G
Summary of Contents for Cisco SPA 504G
-
Page 1
USER GUIDE Cisco Small Business Pro SPA 504G IP Phone for 8×8 Virtual Office… -
Page 2
Cisco and the Cisco Logo are trademarks of Cisco Systems, Inc. and/or its affiliates in the U.S. and other countries. A listing of Cisco’s trademarks can be found at www.cisco.com/ go/trademarks. Third party trademarks mentioned are the property of their respective owners. The use of the word partner does not imply a partnership relationship between Cisco and any other company. -
Page 3: Table Of Contents
Connecting Wired and Wireless Headsets (Optional) Verifying Phone Startup Upgrading Your Phone’s Firmware Determining Your Current Firmware Version Download the Firmware Get Your Phone’s IP Address Install the Firmware Cisco Small Business Pro IP Phone SPA 504G User Guide (SIP)
-
Page 4
Forwarding Calls — Phone-based Setup Forwarding All Calls Forwarding Calls When Your Phone is Busy Forwarding Calls When You Don’t Answer the Phone Delaying Call Forwarding When You Don’t Answer the Phone Cisco Small Business Pro IP Phone SPA 504G User Guide (SIP) -
Page 5
Creating Speed Dials Creating Speed Dials on Unused Line Buttons Creating Numerical Speed Dials Using Speed Dials Customizing Your LCD Screen Changing the LCD Screen Contrast Changing the Screen Backlight Settings Cisco Small Business Pro IP Phone SPA 504G User Guide (SIP) -
Page 6
Viewing Call History Lists Creating Speed Dials Adjusting Audio Volume Changing the LCD Contrast Configuring the Phone Screen Saver Appendix A: Where to Go From Here Product Resources 61 Cisco Small Business Pro IP Phone SPA 504G User Guide (SIP) -
Page 7: Chapter 1: Getting Started
Understanding Your Phone’s Lines and Buttons, page 4 About This Document This guide describes the concepts and tasks necessary to use and configure your Cisco Small Business Pro IP Phone. Cisco Small Business Pro IP Phone SPA 504G User Guide (SIP)
-
Page 8
Getting Started About This Document Organization This document describes using the Cisco SPA 504G with the 8×8 Virtual Office. This table describes the contents of each chapter in this document. Title Description Chapter 1 Getting Started A description of this book and an overview of the Cisco Small Business Pro IP Phones. -
Page 9: Overview Of The Cisco Spa 504G
Overview of the Cisco SPA 504G Overview of the Cisco SPA 504G The Cisco SPA504G is a full-featured VoIP (Voice over Internet Protocol) phone that provides voice communication over an IP network. The phone provide traditional features, such as call forwarding, redialing, speed dialing, transferring calls, conference calling and accessing voice mail.
-
Page 10: Understanding Your Phone’s Lines And Buttons
Displays solid red when you have a new voice mail message. Indicator Flashes red during an incoming call. LCD Screen Displays date and time, phone station name, line extensions, and softkey options. Cisco Small Business Pro IP Phone SPA 504G User Guide (SIP)
-
Page 11
Push to turn the speaker on or off. When the speaker is on, the button glows green. Keypad Use to dial phone numbers, enter letters, and choose menu items. Cisco Small Business Pro IP Phone SPA 504G User Guide (SIP) -
Page 12: Softkey Buttons
The softkey buttons on your phone display may vary depending on your phone model and the phone system setup. (Softkey buttons are not available on the Cisco SPA 501G.) Press the Right Arrow or Left Arrow keys on the navigation button to view additional softkey buttons.
-
Page 13
Performs a call transfer. xfer2vm Transfers an active call to voice mail. Enters a submenu and when pressed, toggles between Yes or No to enable or disable an option. Cisco Small Business Pro IP Phone SPA 504G User Guide (SIP) -
Page 14: Using Keypad Shortcuts
When using the phone menus, you can use the keypad to enter the number shown next to the menu or sub-menu item on the LCD screen. For example, to obtain your IP address on the Cisco SPA 504G, press the Setup button and dial The IP address is displayed on the Network screen.
-
Page 15: Chapter 2: Installing Your Phone
Installing Your Phone This chapter describes how to install your Cisco Small Business Pro IP Phone and connect it to your network. It contains the following sections: • Before You Begin, page 10 • Phone Connections, page 10 • Connecting the Handset, page 11 •…
-
Page 16: Before You Begin
The RJ-11 port marked “AUX” is reserved for connection with the Cisco SPA 500S Attendant NOTE Console that works with the IP phones.
-
Page 17: Connecting The Handset
Do not attach the desk stand if you want to mount the phone to the wall. If you are attaching a NOTE Cisco SPA 500S attendant console, attach the console before attaching the desk stand. Connect the phone stand by lining up the tabs on the stand with the slots on the phone body.
-
Page 18: Mounting The Phone To The Wall (Optional)
Mounting the Phone to the Wall (Optional) To mount the phone to the wall, you must purchase the MB100 wall mount bracket kit. Figure 2 MB100 Wall Mount Kit Cisco Small Business Pro IP Phone SPA 504G User Guide (SIP)
-
Page 19
Orient the MB such that the phone’s Ethernet and handset ports are accessible after STEP 2 installation. Push the MB onto the phone’s base. Slide the MB upwards to lock it in place. STEP 3 Cisco Small Business Pro IP Phone SPA 504G User Guide (SIP) -
Page 20
Installing Your Phone Mounting the Phone to the Wall (Optional) (Optional) If a Wi-Fi or PoE dongle is installed, place in the tray. STEP 4 Cisco Small Business Pro IP Phone SPA 504G User Guide (SIP) -
Page 21
Installing Your Phone Mounting the Phone to the Wall (Optional) Plug in the Ethernet and power cables. Cisco Small Business Pro IP Phone SPA 504G User Guide (SIP) -
Page 22: Reversing The Handset Retention Tab
Push the latch in. STEP 1 Slide the retention tab up until it detaches from the phone. STEP 2 Cisco Small Business Pro IP Phone SPA 504G User Guide (SIP)
-
Page 23: Connecting The Power
If you are using an external power source, insert one end of the power cord into an outlet and insert the other end of the power cord into the power port on the phone body. Cisco Small Business Pro IP Phone SPA 504G User Guide (SIP)
-
Page 24: Connecting Your Phone To The Network
Connecting the Phone to the Wireless Network You can use the Cisco WBP54G Wireless-G Bridge for Phone Adapters to connect the IP phone to a Wireless-G network instead of the wired local network. This procedure requires the optional Cisco SPA 9000 Voice System IP Phone PA100 power NOTE adapter to provide power to the WBP54G.
-
Page 25: Connecting A Pc To Your Phone (Optional)
IP Phone. • Wired headsets—Connect the 2.5mm connector from the headset into the headset port on the right side of the IP phone as shown in the following graphic: Cisco Small Business Pro IP Phone SPA 504G User Guide (SIP)
-
Page 26: Verifying Phone Startup
Verifying Phone Startup After receiving power and network connectivity, the phone executes a boot-up sequence. During this sequence, phones with screens display the Cisco logo and then “Initializing Network”. All of the lights on the phone will flash. After your phone is successfully connected to the network and receives a basic configuration, your phone line keys should glow green.
-
Page 27: Upgrading Your Phone’s Firmware
To upgrade your phone’s firmware, do one of the following: • Download the firmware from the Cisco website and install it from your PC. See the following section for instructions. •…
-
Page 28: Get Your Phone’s Ip Address
Do not disconnect your phone’s power until the upgrade is complete (the lights on your phone NOTE are no longer blinking). Click OK to dismiss the status message of the upgrade. STEP 7 Cisco Small Business Pro IP Phone SPA 504G User Guide (SIP)
-
Page 29: Chapter 3: Using Basic Phone Functions
• Placing a Three-Way Conference Call, page 38 • Using Conference Bridges, page 39 • Using the Phone Directories, page 41 • Using the Call History Lists, page 42 Cisco Small Business Pro IP Phone SPA 504G User Guide (SIP)
-
Page 30: Using Phone Hardware And Accessories
(If you are switching from the handset to a wireless headset, however, do not replace the handset or you will disconnect the call.) Cisco Small Business Pro IP Phone SPA 504G User Guide (SIP)
-
Page 31: Sending Audio To The Phone Speaker
Choose Preferred Audio Device and press edit. STEP 3 Press option to view your choices. When the option you want is displayed, press ok. STEP 4 Press save. STEP 5 Cisco Small Business Pro IP Phone SPA 504G User Guide (SIP)
-
Page 32: Adjusting Call Volume And Muting
You may have to dial a number or numbers to reach an outside line. Ask your phone NOTE administrator. To place or answer a call, do one of these: • Pick up the receiver. • Press the Speaker button. Cisco Small Business Pro IP Phone SPA 504G User Guide (SIP)
-
Page 33: Using Dial Assistance
Hold button places the active call on hold. Resuming a Call To resume the call, press the flashing red line button for the call or press the resume soft key. Cisco Small Business Pro IP Phone SPA 504G User Guide (SIP)
-
Page 34: Ending A Call
Blind Transfer—You transfer the call without speaking to the other party to which you are transferring the call. • Voicemail—You transfer the call to another’s voicemail so that the caller can leave a recorded message. Cisco Small Business Pro IP Phone SPA 504G User Guide (SIP)
-
Page 35: Performing An Attended Transfer
STEP 1 During an active call, press xfer2vm. STEP 2 Enter the number to which you want to transfer the call and press Dial. The call is transferred with no further action required on your part. Cisco Small Business Pro IP Phone SPA 504G User Guide (SIP)
-
Page 36: Transferring A Held Call To An Active Call
(Optional) Press edit to select a number and modify it (for example, to add an area code). STEP 2 When you’re done, press ok. Lift the handset or press dial to automatically dial the selected number. STEP 3 Cisco Small Business Pro IP Phone SPA 504G User Guide (SIP)
-
Page 37: Viewing And Returning Missed Calls
If the LCD screen shows a missed call, press the miss softkey to view a list of missed calls. • If the LCD screen does not show a missed call: a. Press the Setup button. b. Select Call History. c. Select Missed Calls. Cisco Small Business Pro IP Phone SPA 504G User Guide (SIP)
-
Page 38: Turning The Missed Calls Shortcut On And Off
STEP 2 Dial the number you wish to intercom to and then press Dial. If you are receiving an intercom call, the phone rings, then automatically connects to your speakerphone. Cisco Small Business Pro IP Phone SPA 504G User Guide (SIP)
-
Page 39: Forwarding Calls — Online Setup
If forwarding calls to an outside line, be sure to use any access and area codes required. Press dial. The LCD screen displays Calls Forwarded. STEP 3 Cisco Small Business Pro IP Phone SPA 504G User Guide (SIP)
-
Page 40: Forwarding Calls When Your Phone Is Busy
Right navigation button, press the alpha softkey, and enter letters using the keypad. Press the Left navigation button. Press ok. STEP 4 Press save. STEP 5 Cisco Small Business Pro IP Phone SPA 504G User Guide (SIP)
-
Page 41: Forwarding Calls When You Don’t Answer The Phone
In the Call Forward Screen, make sure CFWD No Ans Delay is highlighted and press the edit STEP 1 softkey. Enter the number of seconds to delay forwarding calls, if there is no answer at your phone. STEP 2 Cisco Small Business Pro IP Phone SPA 504G User Guide (SIP)
-
Page 42: Stopping Call Forwarding
Press the Setup button and select Preferences > Do Not Disturb. STEP 1 Press the edit softkey. STEP 2 Press y/n to choose y, then press ok. STEP 3 Press save. STEP 4 Cisco Small Business Pro IP Phone SPA 504G User Guide (SIP)
-
Page 43: Deactivating Do Not Disturb
Choose Call Waiting and press edit. STEP 3 Press the y/n softkey to turn call waiting on or off. STEP 4 Press ok. STEP 5 Press save. STEP 6 Cisco Small Business Pro IP Phone SPA 504G User Guide (SIP)
-
Page 44: Parking A Call
Press the conf softkey during an active call. The first call is placed on hold, a second line is STEP 1 opened, and you hear a dial tone. Dial the second person’s telephone number. STEP 2 Cisco Small Business Pro IP Phone SPA 504G User Guide (SIP)
-
Page 45: Conferencing A Held Call With An Active Call
STEP 2 Follow the Conference Bridge voice prompts. Conference Menu Options Enter a Conference — (Option 1): STEP 1 Enter your extension then press #. STEP 2 Enter conference ID then press #. Cisco Small Business Pro IP Phone SPA 504G User Guide (SIP)
-
Page 46
STEP 1 Enter your extension then press #. STEP 2 Enter your password then press #. (Voicemail Password) STEP 3 Enter the conference ID you want to delete then press #. Cisco Small Business Pro IP Phone SPA 504G User Guide (SIP) -
Page 47: Using The Phone Directories
Press the play softkey to play the selected ring tone or the select softkey to assign that ringtone to the person whose number you are adding to the directory. Cisco Small Business Pro IP Phone SPA 504G User Guide (SIP)
-
Page 48: Using The Corporate Directory
Select the Call History list you want to view. Available Call History lists are: STEP 3 • Redial List—Shows the last 60 numbers dialed from your phone. • Answered Calls—Shows the caller ID of the last 60 answered calls. Cisco Small Business Pro IP Phone SPA 504G User Guide (SIP)
-
Page 49: Calling From The Call History Lists
Use the navigation button to scroll to the right to access more softkey button options, and press STEP 2 save. Edit the information (if desired) and press save again. The entry is added to your directory. STEP 3 Cisco Small Business Pro IP Phone SPA 504G User Guide (SIP)
-
Page 50: Setting Or Changing A Phone Password
STEP 2 Press the record soft key. You will see a «Recording is ON» confirmation message on the phone screen. To turn Call Recording off: STEP 1 Press the exit soft key. Cisco Small Business Pro IP Phone SPA 504G User Guide (SIP)
-
Page 51: Chapter 4: Using Advanced Phone Features
STEP 1 Select Preferences. STEP 2 Choose Dial Preferences and press edit. STEP 3 Press y/n to choose yes. STEP 4 Press ok. STEP 5 Press save. STEP 6 Cisco Small Business Pro IP Phone SPA 504G User Guide (SIP)
-
Page 52: Creating Speed Dials
STEP 2 For a new speed dial, scroll to select an unused speed dial (marked with Not Assigned). To edit STEP 3 a previously existing speed dial, select it. Cisco Small Business Pro IP Phone SPA 504G User Guide (SIP)
-
Page 53: Using Speed Dials
Use the navigation button to adjust the screen contrast. Pressing the Left navigation button STEP 2 decreases the contrast. Pressing the Right navigation button increases the contrast. Press save. STEP 3 Cisco Small Business Pro IP Phone SPA 504G User Guide (SIP)
-
Page 54: Changing The Screen Backlight Settings
PC using the IP Phone Web Interface. See “Configuring the Phone Screen Saver,” on page To configure your screen saver: Press the Setup button. STEP 1 Select Screen Saver Mode. STEP 2 Cisco Small Business Pro IP Phone SPA 504G User Guide (SIP)
-
Page 55
Lock—Overlays a lock graphic onto the picture. • Phone—Overlays a phone graphic onto the picture. • Date/Time—Overlays the date and time onto the picture. Press ok. STEP 3 Press save. STEP 4 Cisco Small Business Pro IP Phone SPA 504G User Guide (SIP) -
Page 56: Turning On The Screen Saver
Choose the extension for which to choose a ring tone and press change. STEP 3 Scroll through the ring tones and press play to play the highlighted ring tone. Press select to STEP 4 choose the highlighted ringtone for that extension. Cisco Small Business Pro IP Phone SPA 504G User Guide (SIP)
-
Page 57: Configuring Date And Time Parameters On Your Phone
8×8 Support Team. Errors can interrupt your service. To access advanced menus, follow the procedures below. Press the Setup button. STEP 1 Cisco Small Business Pro IP Phone SPA 504G User Guide (SIP)
-
Page 58
8×8 Support team. Your phone will no longer be connected to 8×8 service if it is reset it to the Cisco factory default. Cisco Small Business Pro IP Phone SPA 504G User Guide (SIP) -
Page 59: Rebooting Your Phone
To reboot your phone: Press the Setup button. STEP 1 Scroll to Reboot and press select. STEP 2 Press ok. STEP 3 Cisco Small Business Pro IP Phone SPA 504G User Guide (SIP)
-
Page 60: Chapter 5: Using The Web Interface
Using the Web Interface Your Cisco IP Phone provides a web interface to the phone that allows you to configure some features of your phone using a web browser. This chapter contains the following sections: • Logging in to the Web Interface, page 54 •…
-
Page 61
Call History—Displays calls received and made from your phone. • Personal Directory—Contains your personal address book. • Attendant Console Status—Provides information about Cisco SPA 500S attendant consoles, if installed. Cisco Small Business Pro IP Phone SPA 504G User Guide (SIP) -
Page 62: Setting Do Not Disturb
If you set your call forwarding rules on your phone, they will not be in effect if your phone is disconnected from an Internet connection. Log in to the web interface. STEP 1 In the Voice tab, click the User tab. STEP 2 Cisco Small Business Pro IP Phone SPA 504G User Guide (SIP)
-
Page 63: Configuring Call Waiting
Under Supplementary Services, locate the CW Setting field. STEP 3 Choose yes or no to enable or disable. STEP 4 At the bottom of the page, click Submit All Changes. STEP 5 Cisco Small Business Pro IP Phone SPA 504G User Guide (SIP)
-
Page 64: Using Your Personal Directory
Placed—Shows the last 60 numbers dialed from your phone. • Answered—Shows the caller ID of the last 60 answered calls. • Missed—Shows the last 60 missed calls. Click the tab for each list to view it. Cisco Small Business Pro IP Phone SPA 504G User Guide (SIP)
-
Page 65: Creating Speed Dials
Ringer Volume • Speaker Volume • Handset Volume • Headset Volume Enter a volume between 1 and 10, with 1 being the lowest. Click Submit All Changes. STEP 3 Cisco Small Business Pro IP Phone SPA 504G User Guide (SIP)
-
Page 66: Changing The Lcd Contrast
“Press any key to unlock your phone.” A moving phone icon. The station date and time in the middle of the screen. Click Submit All Changes. STEP 3 Cisco Small Business Pro IP Phone SPA 504G User Guide (SIP)
-
Page 67: Appendix A: Where To Go From Here
Where to Go From Here Cisco provides a wide range of resources to help you obtain the full benefits of the Cisco SPA 504G. Product Resources Support Cisco Small Business Support www.cisco.com/go/smallbizsupport Community Online Technical Support and www.cisco.com/support Documentation (Login Required) Phone Support Contacts www.cisco.com/en/US/support/tsd_cisco_small_…
-
Page 68
Cisco WBP54G Wireless-G Bridge for Phone Adapters User Guide—Installation and use of the WBP54G wireless bridge with your Cisco IP phone. Other Cisco-provided documentation may be useful as a reference, but it often refers to features NOTE that are supported only on specific plans of specific providers or PBXs. It also may exclude some cloud-provided services for your business that are provided by 8×8, Inc.
-
Подключите IP-телефон к локальной сети и запишите IP-адрес, полученный устройством.
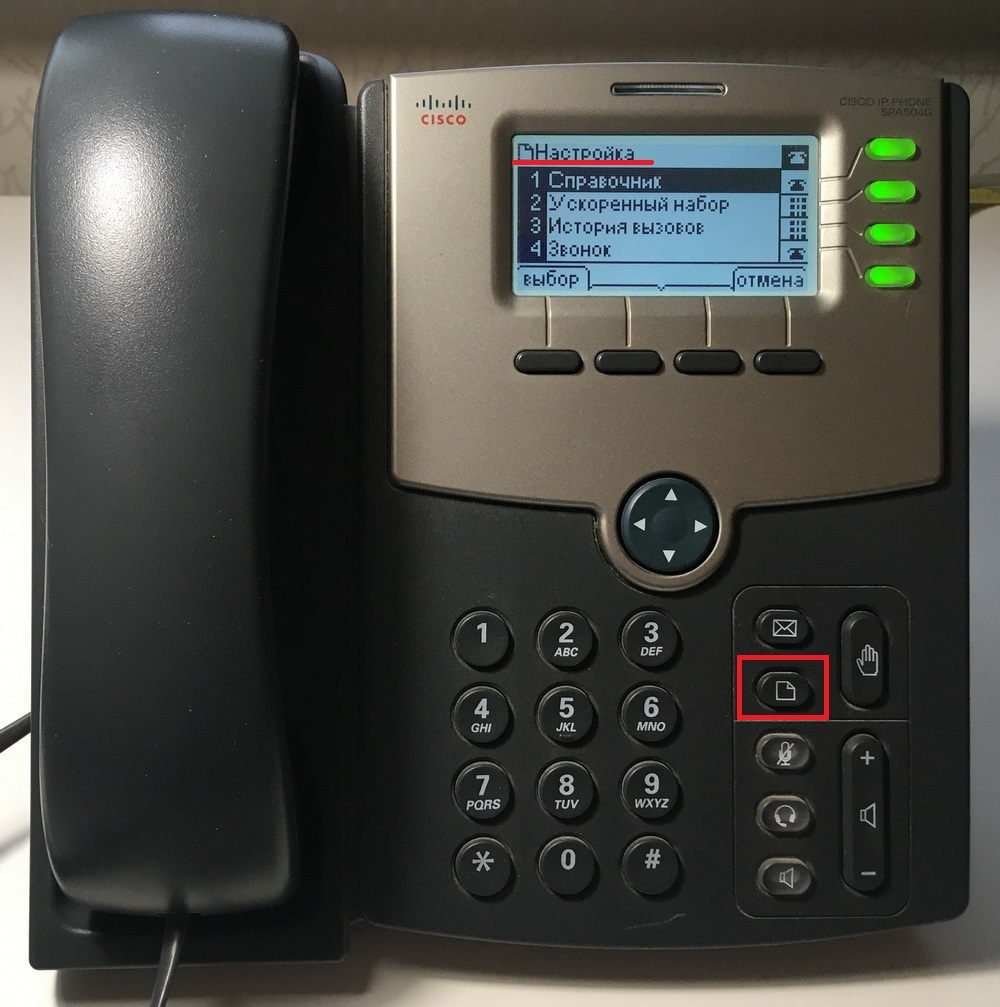
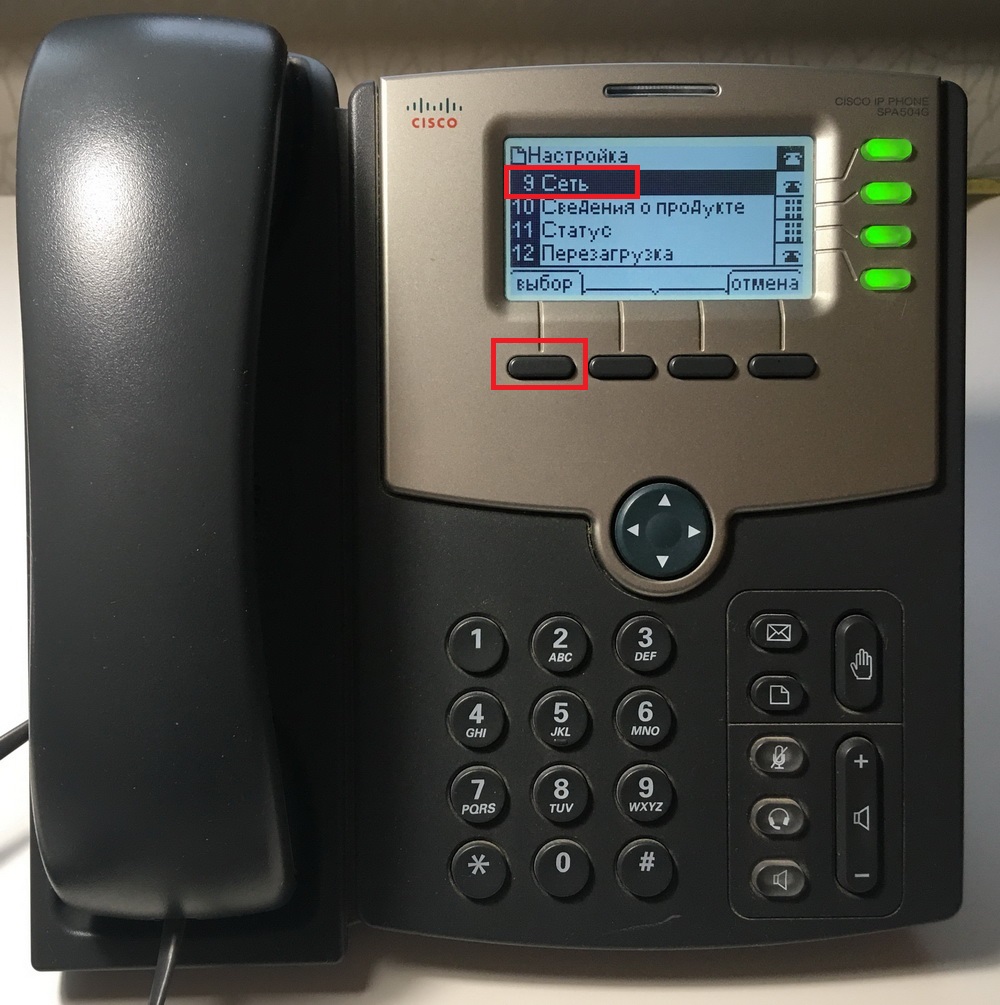
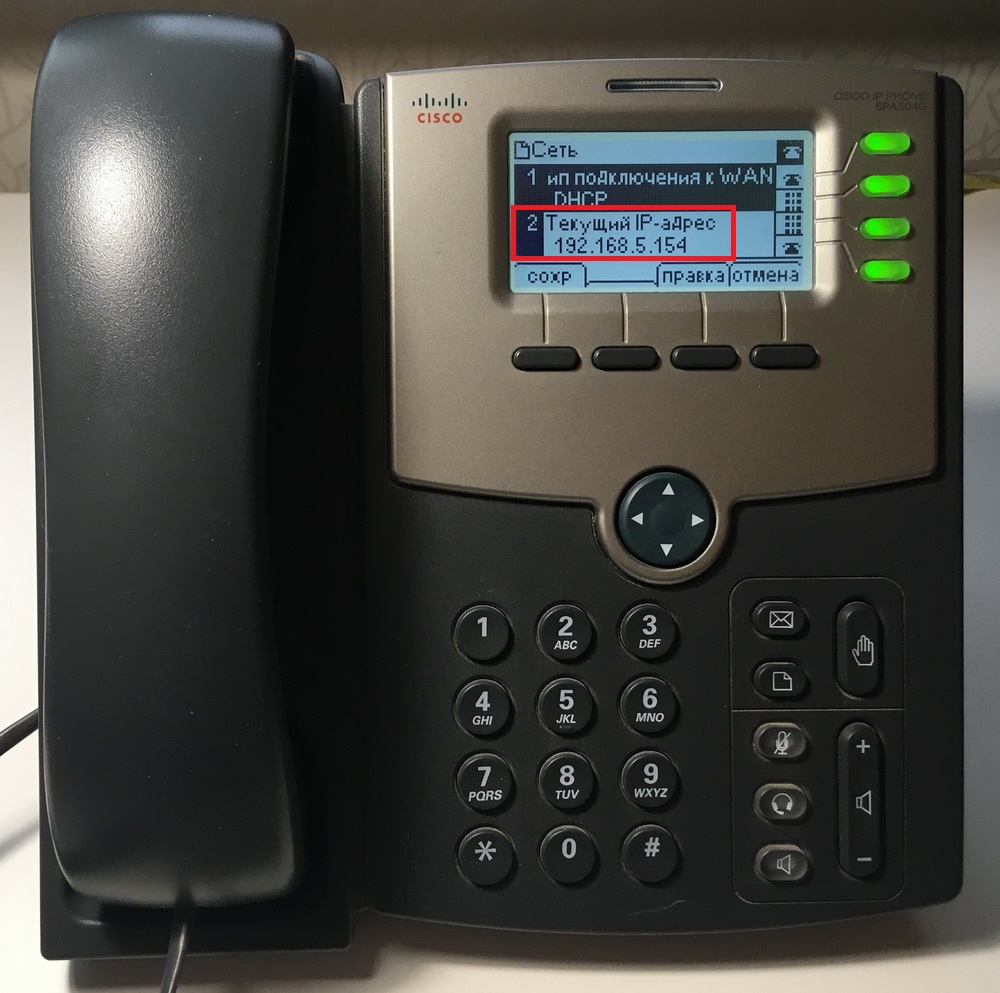
Для выяснения IP-адреса, который назначен IP-телефону после включения и загрузки, необходимо выполнить следующие действия:
Нажмите на телефоне кнопку с символом для входа в меню настроек.
Выберите пункт Сеть или нажмите на кнопку с цифрой 9.
Текущий IP-адрес будет отображен на экране.
-
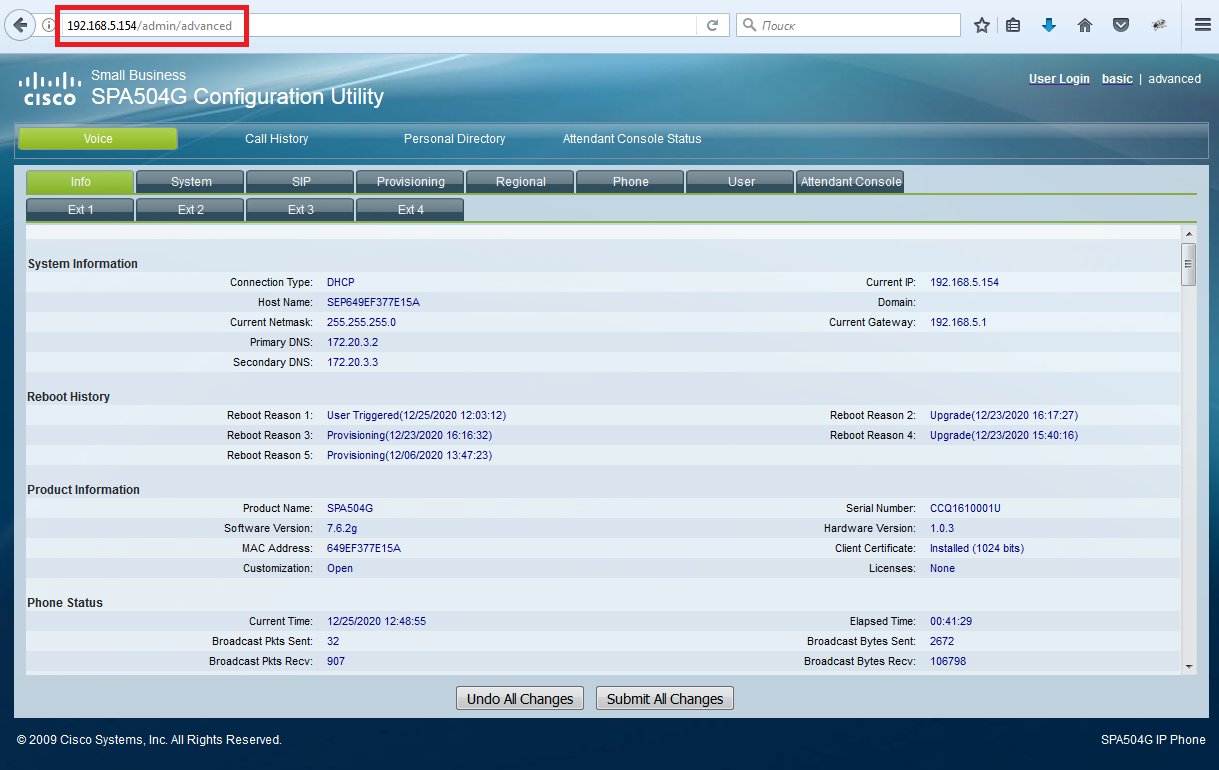
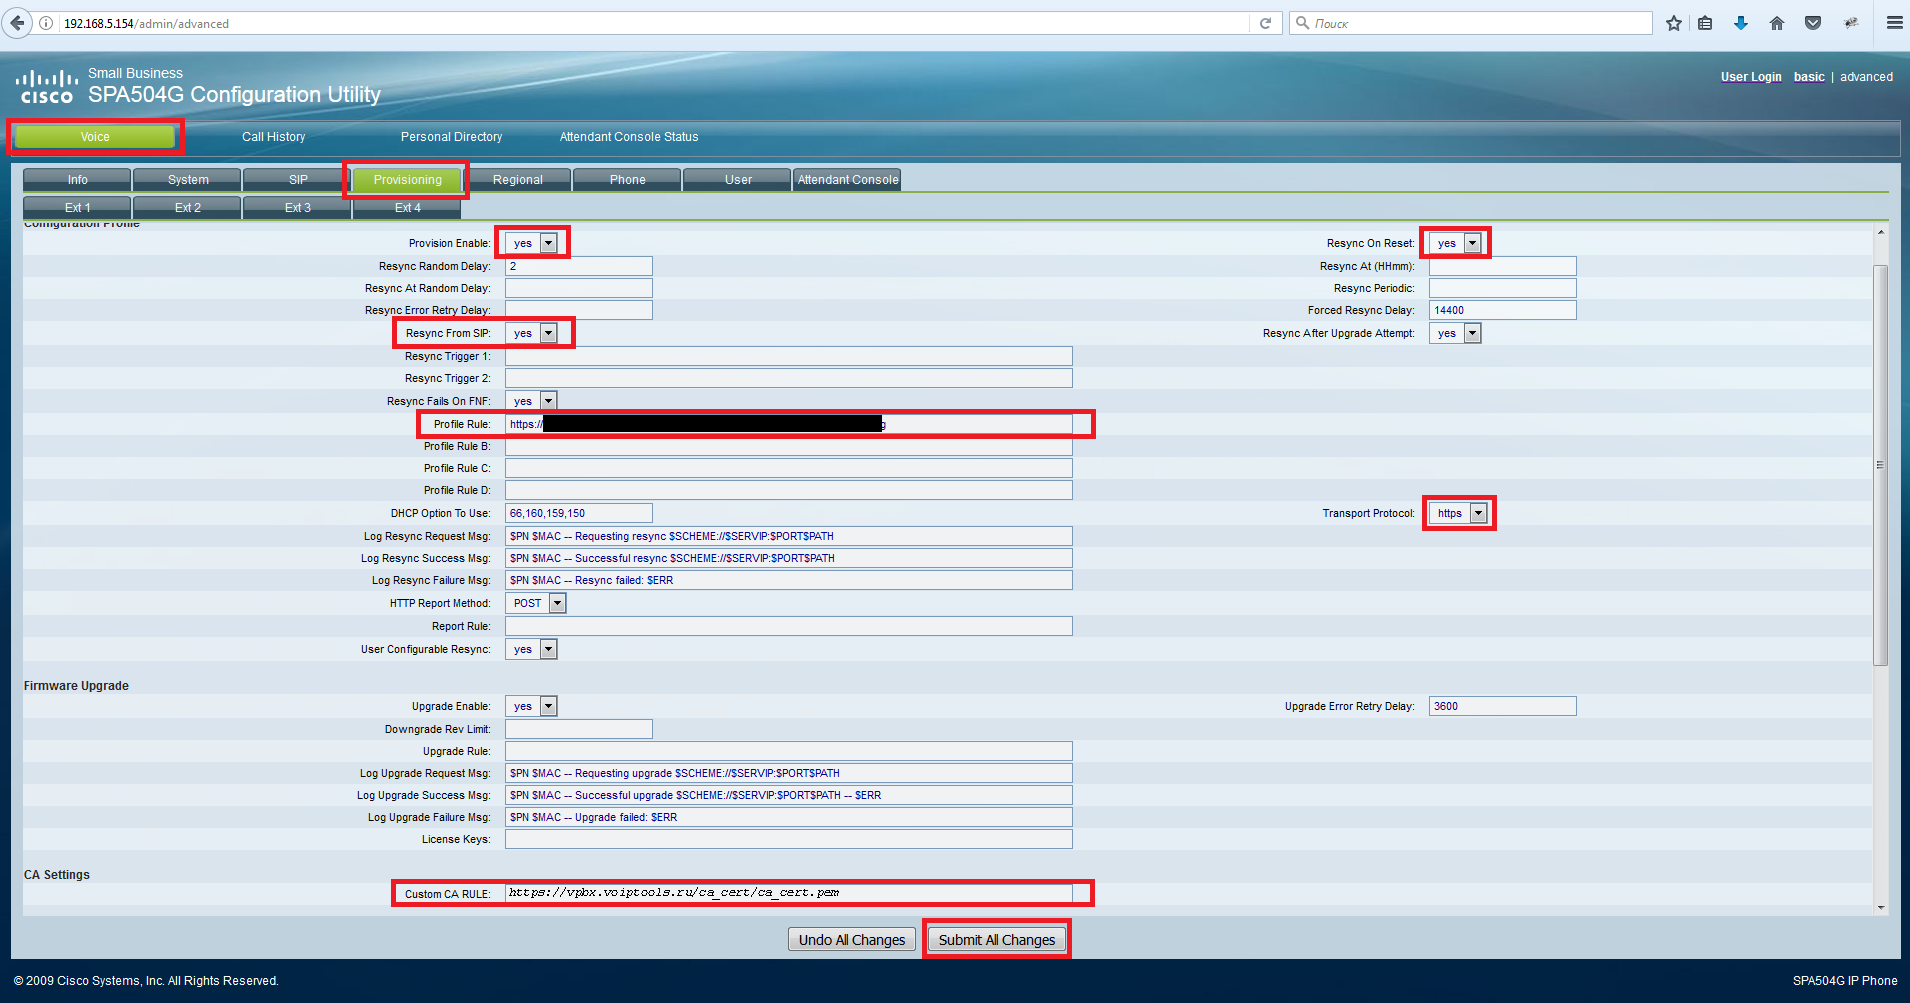
Откройте WEB-браузер (Firefox, Chrome, Yandex) и в адресной строке наберите http://[IP-адрес телефона с предыдущего шага]/admin/advanced для подключения к интерфейсу управления Cisco SPA504G.
-
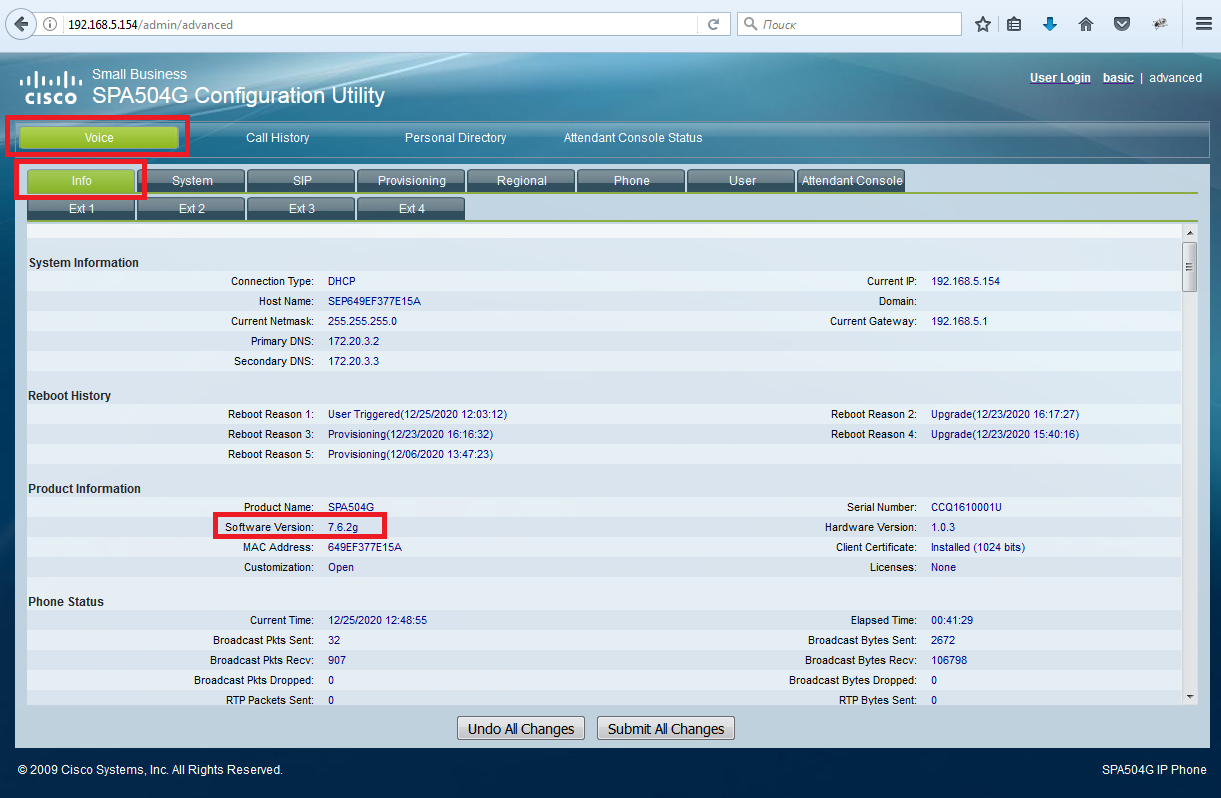
Проверьте версию прошивки Cisco SPA504G. Раздел Voice, вкладка Info, параметр Software Version. Если версия младше 7.5.7, обновите прошивку, следуя инструкции.
-
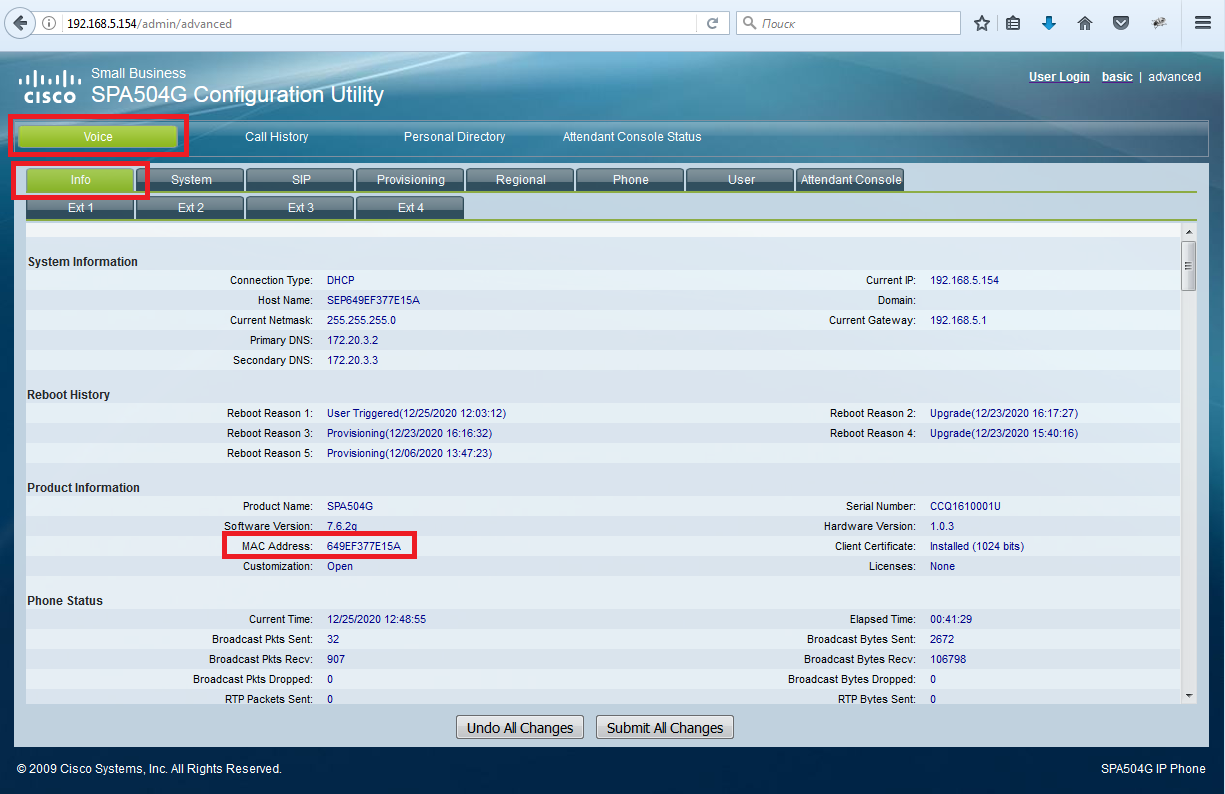
Получение MAC-адреса IP-телефона.
В интерфейсе управления Cisco SPA504G откройте раздел Voice и выберите вкладку Info.
В открывшемся окне параметр MAC Address содержит необходимые сведения. -
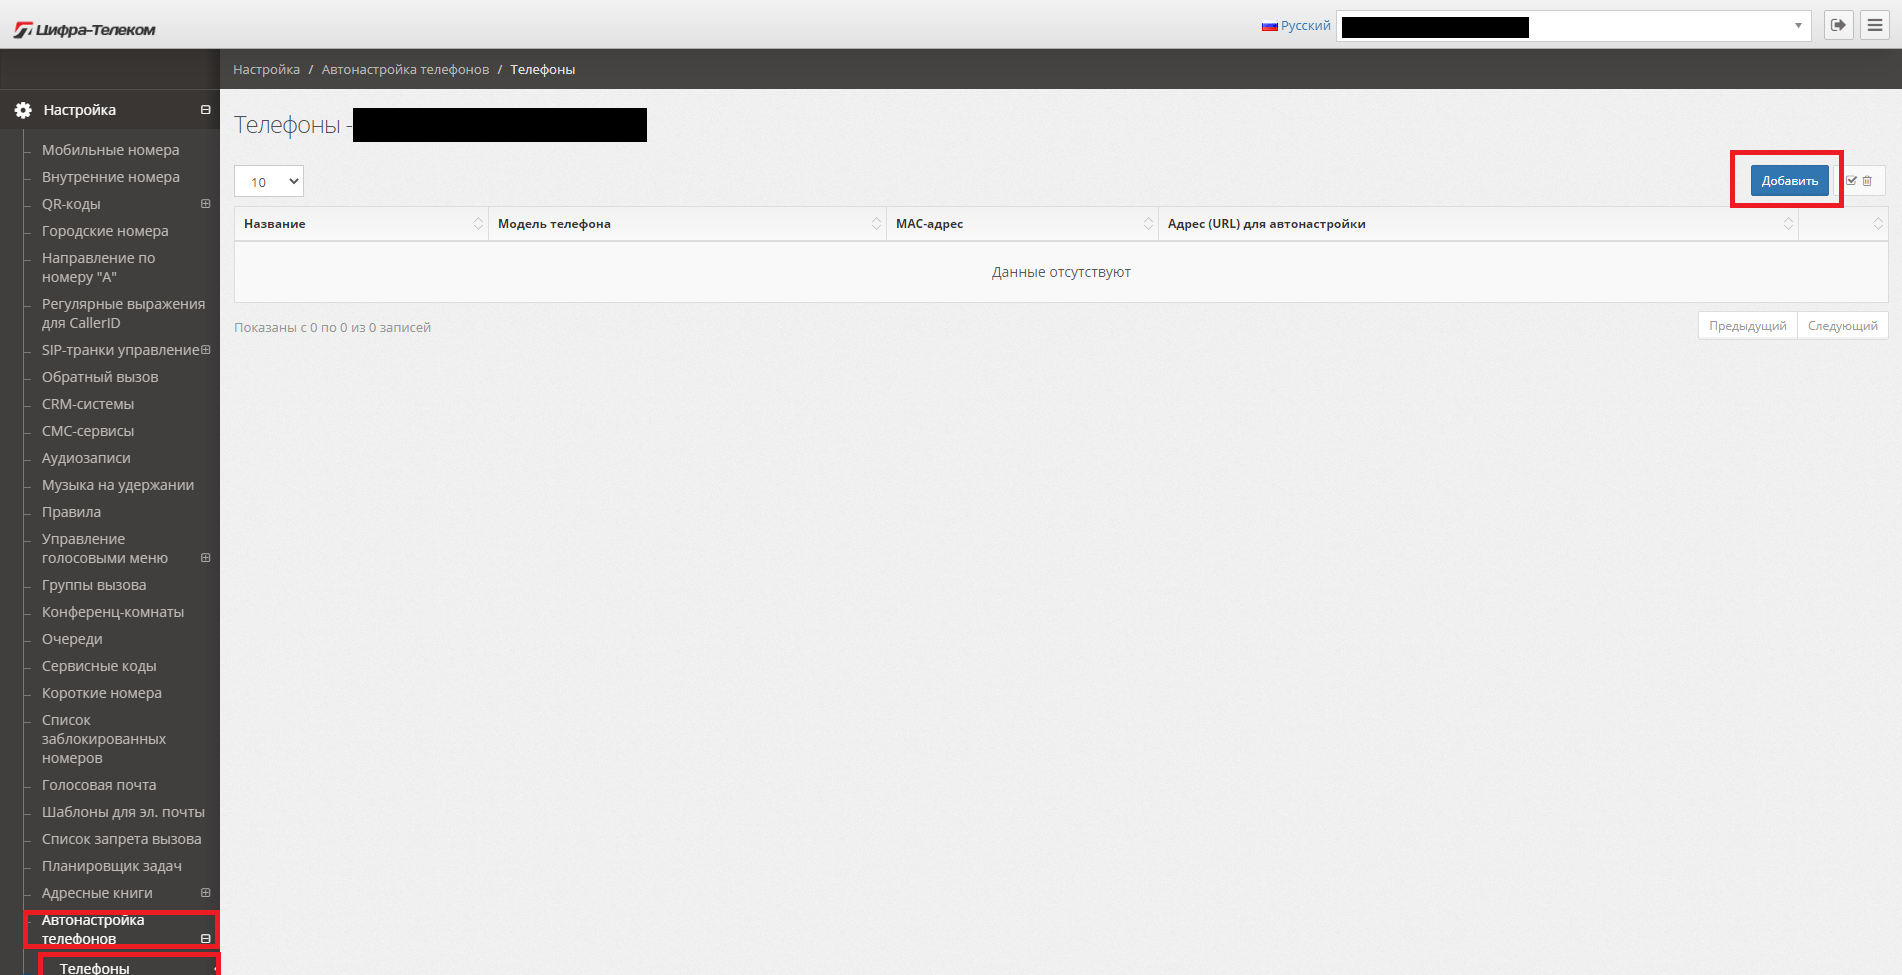
В системе управления вАТС в разделе «Автонастройка телефонов» / «Телефоны» нажмите на кнопку «Добавить»для создания конфигурации IP-телефона.
-
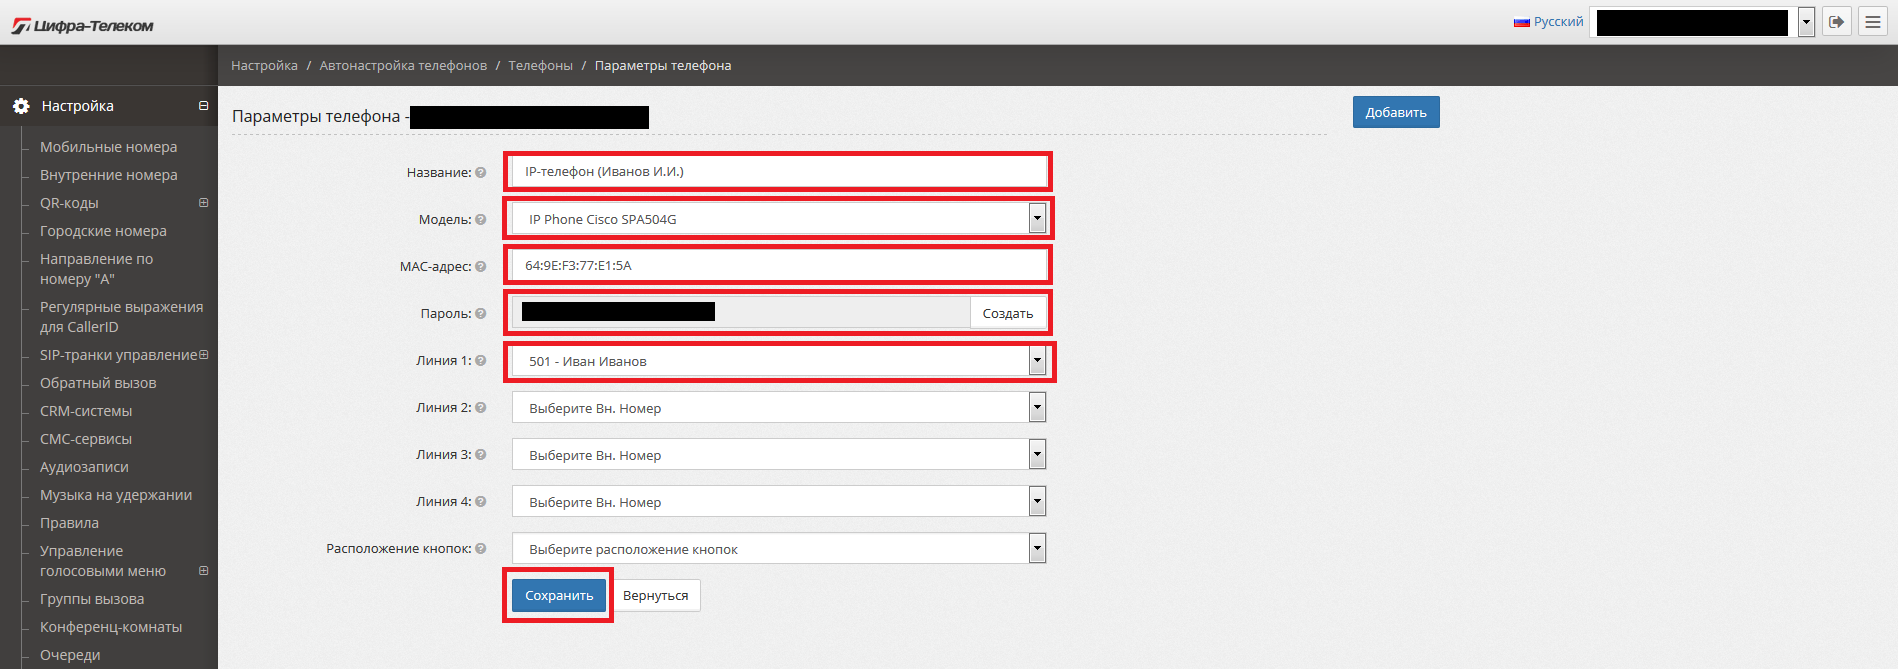
В открывшемся окне укажите параметры для настройки IP-телефона и нажмите кнопку «Сохранить».
Название: название конфигурации, по которому можно идентифицировать устройство.
Модель: выберите модель оборудования. В данном случае — Cisco SPA504G.
MAC-адрес: MAC-адрес устройства. См. шаг 4.
Пароль: формируется нажатием на кнопку «Создать».
Линии: выберите внутренние номера пользователей, которые будут использоваться при подключении IP-телефона к вАТС.
Расположение кнопок: не обязательно. Используется для настройки кнопок телефона в режиме BLF (отслеживание состояний линии других пользователей). -
В разделе «Автонастройка телефонов» / «Телефоны» скопируйте ссылку «Адрес (URL) для автонастройки» и вставьте её в интерфейс управления IP-телефоном в раздел «Voice», вкладка «Provisioning», параметр «Profile Rule»и нажмите на кнопку «Submit All Changes».
Ссылка конфигурации для Cisco SPA504G в системе управления вАТС.
Параметры Cisco SPA504G для автонастройки.
-
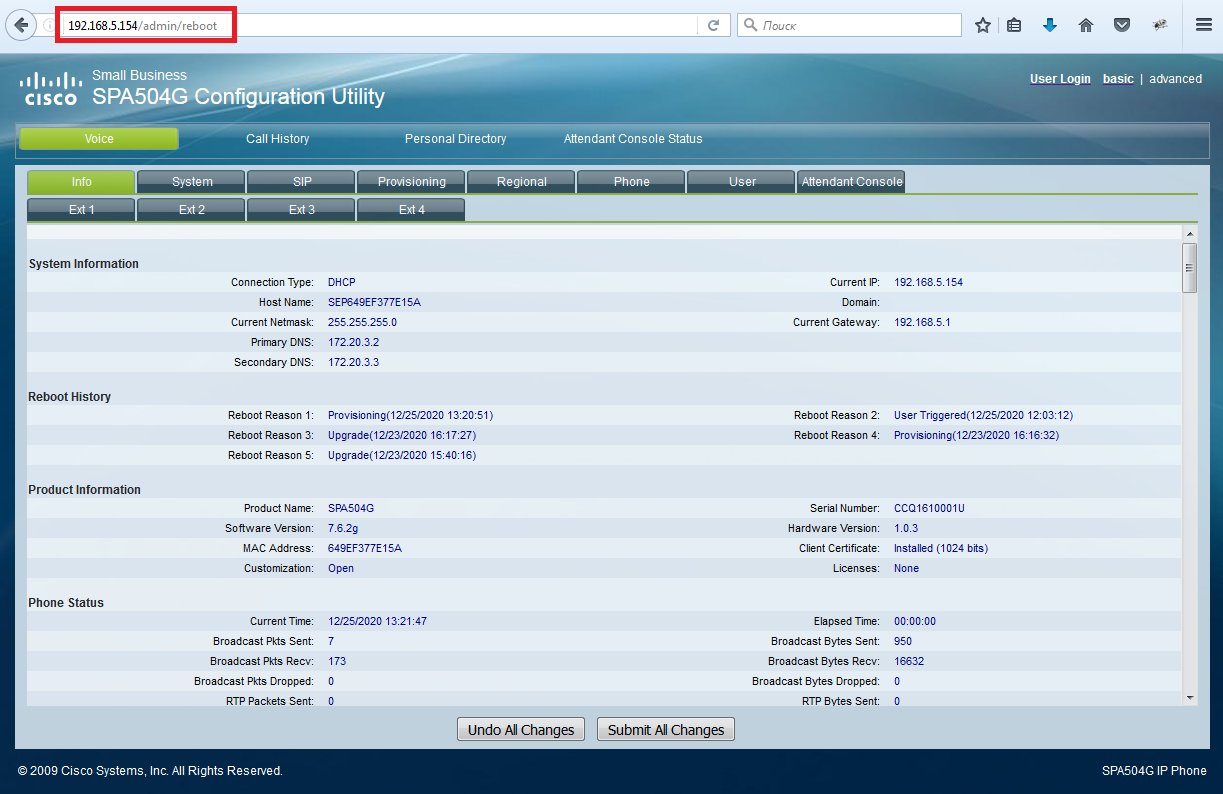
Перезагрузите IP-телефон для того, чтобы он принял конфигурацию, и им можно было управлять из вАТС. Для перезагрузки в адресной строке WEB-браузера (Firefox, Chrome, Yandex) наберите http://[IP-адрес телефона]/admin/reboot
1
Краткое руководство пользователя IP-телефона Cisco Small Business серии SPA500
78-100622-01
Краткое руководство
пользователя IP-телефона Cisco
Small Business серии SPA500
Дата выпуска: 15 января 2015 г.
Описание продукта
IP-телефоны Cisco Small Business серии SPA500 на базе SIP, которые входят
в серию Cisco Small Business Pro, были проверены на полную совместимость
с оборудованием VoIP ведущих поставщиков. IP-телефоны Cisco серии
SPA500 отвечают традиционным требованиям корпоративных заказчиков,
предлагая все преимущества IP-телефонии. IP-телефоны Cisco серии SPA500
предоставляют широкий набор функций и возможностей, включая
голосовую связь HD, телефонные приложения и удобное пользовательское
меню. Cisco SPA525G2 поддерживает дополнительные варианты
подключения через Bluetooth, Power over Ethernet (PoE) (802.3af) или
еспроводной клиент 802.11g.
-
Инструкции по эксплуатации
1
Cisco SPA504G инструкция по эксплуатации
(14 страниц)
- Языки:Русский
-
Тип:
PDF -
Размер:
368.42 KB
Просмотр
На NoDevice можно скачать инструкцию по эксплуатации для Cisco SPA504G. Руководство пользователя необходимо для ознакомления с правилами установки и эксплуатации Cisco SPA504G. Инструкции по использованию помогут правильно настроить Cisco SPA504G, исправить ошибки и выявить неполадки.


