Руководство по установке корпоративного IP-телефона Fanvil X1S
Список упаковки
IP-телефон
Телефонная трубка
Шнур телефонной трубки
стенд
Шнур Ethernet
Адаптер питания (X1SP не является обязательным)
Руководство по быстрой установке
Настенная подставка (приобретается отдельно)
Значок экрана
![]() В режиме громкой связи
В режиме громкой связи![]() В режиме гарнитуры
В режиме гарнитуры![]() В режиме трубки
В режиме трубки![]() Без звука активирован
Без звука активирован![]() Звонок выключен
Звонок выключен![]() Вызов на удержании
Вызов на удержании![]() Автоответчик активирован
Автоответчик активирован![]() Переадресация вызова активирована
Переадресация вызова активирована![]() Не беспокоить активирован
Не беспокоить активирован![]() SIP-точка доступа активирована
SIP-точка доступа активирована![]() VLAN активирован
VLAN активирован![]() VPN активирован
VPN активирован![]() Новое СМС
Новое СМС![]() Новые сообщения ВМ
Новые сообщения ВМ![]() Уровень качества голоса при вызове
Уровень качества голоса при вызове![]()
![]() Сетевой шторм
Сетевой шторм![]() Клавиатура заблокирована
Клавиатура заблокирована![]() Переадресация вызовов
Переадресация вызовов![]() Пропущенные звонки)
Пропущенные звонки)![]() Входящие звонки)
Входящие звонки)![]() Набранный (-ые) вызов (-а)
Набранный (-ые) вызов (-а)![]() подключенного к сети Интернет
подключенного к сети Интернет![]() Интернет отключен
Интернет отключен![]() Нет IP-адреса
Нет IP-адреса
Ключевые особенности
![]() Программные клавиши
Программные клавиши![]() Индикатор ожидающего сообщения
Индикатор ожидающего сообщения Левая и правая клавиши навигации
Клавиша навигации вверх, ярлык для журнала вызовов
Клавиша навигации вниз, ярлык для статуса
Клавиша OK, ярлык для меню![]() Клавиша удержания, удержание / возобновление вызова
Клавиша удержания, удержание / возобновление вызова![]() Клавиша перевода вызова
Клавиша перевода вызова![]() Клавиша конференции
Клавиша конференции![]() Клавиша телефонной книги
Клавиша телефонной книги![]() Клавиша голосовых сообщений
Клавиша голосовых сообщений![]() Клавиши линии
Клавиши линии![]() Клавиша гарнитуры, активировать/деактивировать гарнитуру
Клавиша гарнитуры, активировать/деактивировать гарнитуру![]() Клавиша повторного набора, доступ к повторному набору последней записи
Клавиша повторного набора, доступ к повторному набору последней записи![]() В режиме ожидания: звонок выключен
В режиме ожидания: звонок выключен
В режиме связи: выключить / включить звонок![]() В режиме ожидания или во время звонка: увеличить или уменьшить громкость звонка
В режиме ожидания или во время звонка: увеличить или уменьшить громкость звонка
При общении: увеличьте или уменьшите громкость динамика, гарнитуры или громкой связи![]() Клавиша громкой связи, активация / деактивация громкой связи
Клавиша громкой связи, активация / деактивация громкой связи![]() Нажмите и удерживайте, чтобы заблокировать клавиатуру.
Нажмите и удерживайте, чтобы заблокировать клавиатуру.
Введите PIN-код, чтобы разблокировать клавиатуру
Установка устройства
Пожалуйста, следуйте инструкциям на картинке ниже, чтобы установить устройство.
Подключение к устройству
Подключите адаптер питания, сеть, ПК, телефонную трубку и гарнитуру к соответствующим портам, как показано на рисунке ниже.
- Порт питания: подключите адаптер питания.
- Сетевой порт: подключение к локальной сети или Интернету.
- Порт ПК: сетевой порт для подключения к компьютеру.
- Порт для гарнитуры: подключение гарнитуры.
- Порт трубки: подключите трубку IP-телефона.


Конфигурация
Конфигурация по телефону
- Нажмите Меню > Система (пароль по умолчанию 123).
- Выберите сеть: чтобы настроить параметры сети (IPv4/IPv6/IPv4 и IPv6, DHCP/статический/PPPoE)
- Выберите учетные записи: для настройки включите учетную запись, введите адрес SIP-сервера, порт, имя пользователя, пароль и т. д.
Конфигурация через Web
- Получить IP-адрес с телефона: Нажмите
 или Меню > Статус > IPv4/IPv6.
 - Вход: введите IP-адрес в web браузер. ПК и телефон должны находиться в одном сегменте IP-адресов (имя пользователя и пароль по умолчанию — «admin»).
- Настройка: выберите сеть/учетную запись и т. д. и заполните соответствующий контент.
- Сохраните конфигурацию.
Настройка языка
- Нажмите клавишу меню > Настройки > Основные настройки > Язык.
- Выберите нужный язык и нажмите программную клавишу OK.
Посылка вызова
- Предварительный набор: введите номер телефона и снимите трубку.
- Прямой набор: поднимите трубку и введите номер телефона.
- Громкая связь: введите номер телефона и нажмите
 или наоборот.
 - Гарнитура: введите номер телефона и нажмите
 или наоборот.
 - Назначенная линия: нажмите клавишу линии, введите номер телефона и нажмите клавишу набора номера.
Прием звонка
- С трубкой: снимите трубку.
- С гарнитурой: нажмите .
- С громкой связью: нажмите .
Перевод вызова на удержание
- Нажмите
 клавишу или программную клавишу Удержание, вызывающий абонент будет поставлен на удержание.
 - Для возврата к звонку нажмите или программную клавишу Возобновить.
Примечание: с более чем одним активным вызовом, выберите нужный вызов с помощью ![]() навигационных клавиш и используйте соответствующую функциональную клавишу для удержания или возобновления.
навигационных клавиш и используйте соответствующую функциональную клавишу для удержания или возобновления.
3-сторонняя конференция
- Оказавшись в очереди к 1-му абоненту, нажмите
 клавишу или программную клавишу Конф., 1-й абонент ставится на удержание.
 - Затем позвоните по 2-му номеру.
- После установления 2-го звонка нажмите клавишу или программную клавишу Conf, чтобы
настроить конференцию.
Переадресация
Посещенный трансфер:
- Нажмите
 клавишу или программную клавишу Xfer во время активного разговора вызов будет поставлен на удержание.
 - Наберите второй телефонный номер.
- Когда на вызов ответят, нажмите клавишу или программную клавишу Xfer для завершения операции.
Слепой перевод:
- Нажмите клавишу или программную клавишу Xfer во время активного разговора, вызов будет удерживаться.
- Затем введите 2-й телефонный номер и нажмите клавишу или программную клавишу Xfer.
Переадресация звонка
- Нажмите Меню > Функции > Переадресация вызова.
- Выберите линию, тип переадресации, введите номер и статус получателя и ОК.
Вызов без звука
- Нажмите
 Отключить микрофон во время разговора.
 - Нажмите еще раз, чтобы включить звук в разговоре.
Список звонков
- Нажмите
 или Меню > Журнал вызовов > Локальные журналы вызовов
 - Прокрутите список с помощью
 .
. - Чтобы набрать запись, нажмите программную клавишу Набор, поднимите трубку или нажмите
 or
or  .
.
Телефонная книга
Телефонная книга доступа:
- Нажмите
 или программную клавишу Каталог или Меню > Каталог > Локальные контакты.
 - Выберите Контакты или Группы.
- Чтобы набрать номер, нажмите программную клавишу Набор или поднимите трубку или
нажмите or .
Добавить новую запись:
- Нажмите программную клавишу Dir > Локальные контакты > Все контакты или группы > Нажмите Добавить
- Введите имя и номер и нажмите программную клавишу OK.
Программируемые клавиши
- Вы также можете настроить ярлыки для навигационных клавиш, которые будут доступны в режиме ожидания.
- Нажмите «Меню» > «Основные» > «Клавиатура», выберите среди настраиваемых элементов и выберите нужный тип и значение, нажмите клавишу «ОК».
Повторный набор
- Нажмите
 клавишу, повторно набрать номер вызова.
Не беспокоить
- Нажмите программную клавишу «Не беспокоить» и включите режим «Не беспокоить».
- Или нажмите Меню > Функции > Не беспокоить, выберите Режим и Тип и нажмите программную клавишу OK.
Голосовая почта
- Чтобы получить доступ к голосовой почте, нажмите
 или Меню > Сообщение > Голосовое сообщение, количество сообщений будет указано, если оно предоставлено вашим сервером или АТС.
 - Выберите линию и нажмите Play, чтобы позвонить.
Фэнвил Технолоджи Ко., Лтд.
Веб-сайт: www.fanvil.com
Email: sales@fanvil.com support@fanvil.com
Tel: +86-755-2640-2199 Fax: +86-755-2640-2618
Добавить: 10/F Блок A, Глобальный научный инновационный центр Dualshine,
Honglang North 2nd Road, район Баоань, Шэньчжэнь, Китай
Фэнвил Технолоджи Ко., Лтд.
www.fanvil.com

Документы / Ресурсы
Рекомендации

Фэнвил Технолоджи Ко., Лтд.

- Manuals
- Brands
- Fanvil Manuals
- Telephone
- X1S
- User manual
-
Contents
-
Table of Contents
-
Troubleshooting
-
Bookmarks
Quick Links
Related Manuals for Fanvil X1S
Summary of Contents for Fanvil X1S
-
Page 1
User Manual X1S/X1SP… -
Page 2
Revision History Document VER Firmware VER Explanation Time V1.0 1.1.20 Initial issue 20190703… -
Page 3: Table Of Contents
Directory Directory………………………………3 1 Picture………………………………8 2 Table………………………………12 3 Safety Instruction…………………………..13 4 Overview…………………………….14 4.1 Overview…………………………..14 4.2 Packing Contents………………………….15 5 Desktop Installation…………………………16 5.1 PoE And the use of external power adapters………………..16 5.2 Desktop and wall mounted method……………………17 6 Appendix Table…………………………..19 6.1 Appendix I — Icon…………………………19 6.2 Appendix II — Keyboard character query table………………..20 6.3 Appendix III — LED Definition………………………
-
Page 4
8.8.2 Ringing Mute……………………….. 35 8.9 Call Hold/Resume…………………………36 8.10 DND…………………………….. 36 8.11 Call Forward…………………………37 8.12 Call Transfer…………………………39 8.12.1 Blind transfer……………………….39 8.12.2 Semi-Attended transfer……………………. 39 8.12.3 Attended transfer……………………….39 8.13 Call Waiting…………………………39 8.14 Conference…………………………. 41 8.14.1 Local Conference……………………… 41 8.14.2 Network Conference……………………..42 8.15 Call Park…………………………..42 8.16 Pick Up………………………….. -
Page 5
10.1.2 Time & Date……………………….61 10.1.3 Screen…………………………63 10.1.3.1 Brightness and backlight………………….63 10.1.3.2 Screen Saver……………………..63 10.1.4 Ring…………………………..64 10.1.5 Voice Volume……………………….64 10.1.6 Greeting Words……………………….64 10.1.7 Reboot…………………………64 10.2 Phone Book…………………………65 10.2.1 Local Contact……………………….65 10.2.1.1 Add / Edit / Delete Contact………………….. 65 10.2.1.2 Add / Edit / Delete Group…………………. -
Page 6
11.5 System >> Upgrade……………………….81 11.6 System >> Auto Provision……………………..81 11.7 System >> Tools…………………………81 11.8 System >> Reboot Phone……………………..81 12 Network >> Basic………………………….. 82 12.1 Network >> Service Port……………………..82 12.2 Network >> VPN…………………………82 12.3 Network >> Advanced………………………. 83 12.4 Line >>… -
Page 7
13.4 Screenshot…………………………107 13.5 Network Packets Capture……………………..108 13.6 Get Log Information……………………….109 13.7 Common Trouble Cases……………………..109… -
Page 8: Picture
1 Picture Picture 1 — Device installation……………………17 Picture 2 — Desktop to wall-mounted………………….17 Picture 3 — Connecting to the Device………………….18 Picture 4 — Instruction of Keypad……………………23 Picture 5 — Screen layout/default home screen………………25 Picture 6 — Scroll icon……………………….25 Picture 7 — The Phone status…………………….
-
Page 9
Picture 37 — Set call forward………………………38 Picture 38 — Transfer interface……………………39 Picture 39 — Semi-Attended transfer………………….39 Picture 40 — Attended transfer……………………39 Picture 41 — Call waiting setting……………………40 Picture 42 — Web call waiting setting………………….40 Picture 43 — Web call waiting tone setting………………..40 Picture 44 — Local conference setting………………….41 Picture 45 — Local conference (1)……………………41 Picture 46 — Local conference (2)……………………41… -
Page 10
Picture 75 — Set Private Hold Function Key………………..55 Picture 76 — SMS icon……………………….56 Picture 77 — New Voice Message Notification…………………57 Picture 78 — Voice message interface………………….57 Picture 79 — Configure voicemail number………………..58 Picture 80 — Register SIP account…………………….58 Picture 81 — SIP hotspot server configuration………………… 59 Picture 82 — SIP hotspot client configuration………………..59 Picture 83 — Phone language setting…………………. -
Page 11
Picture 113 — IPv6 Static IP network mode………………..72 Picture 114 — The phone configures the web server type…………….. 74 Picture 115 — Keypad lock password………………….74 Picture 116 — Set keyboard lock password ………………..74 Picture 117 — Phone keypad lock password input interface…………..74 Picture 118 — Web keyboard lock password Settings……………. -
Page 12: Table
2 Table Table 1 — Hardware Interface Description………………..18 Table 2 — Keypad Icons……………………… 19 Table 3 — Status Prompt and Notification Icons………………19 Table 4 — Look-up Table of Characters………………….20 Table 5 — DSS KEY LED State……………………22 Table 6 — Instruction of Keypad……………………23 Table 7 — Talking mode……………………….
-
Page 13: Safety Instruction
3 Safety Instruction Please read the following safety notices before installing or using this unit. They are crucial for the safe and reliable operation of the device. Please use the external power supply that is included in the package. Other power supply may cause …
-
Page 14: Overview
X1S/X1SP.This document may not be applicable to the latest version of the software. If you have any questions, you can use the help prompt interface of the X1S/X1SP phone, or download and update your user manual from the office website.
-
Page 15: Packing Contents
4.2 Packing Contents Phone Handset Receiver cable Stand Network cable Power adapter (Optional) Hanging parts (need an additional wall hanging parts)
-
Page 16: Desktop Installation
PoE switch and power adapter at the same time, the power adapter will be used in priority and will switch to PoE power supply once it fails. Please use the power adapter supplied by Fanvil and the PoE switch met the specifications to ensure the device work properly.
-
Page 17: Desktop And Wall Mounted Method
5.2 Desktop and wall mounted method The device supports two installation modes, desktop and wall mounted.If the phone is on the desktop, please follow the instructions in the picture below to install the phone. Picture 1 — Device installation if the phone is mounted on the wall, please follow the instructions below to install it. Note: wall hanging bracket needs to be purchased separately Picture 2 — Desktop to wall-mounted…
-
Page 18
Connect the power adapter, network, PC, phone and earphone to the appropriate port as shown in the picture below. Picture 3 — Connecting to the Device Table 1 — Hardware Interface Description Index Interface Description Power Interface Connecting Power Adapter ①… -
Page 19: Appendix Table
6 Appendix Table 6.1 Appendix I — Icon Table 2 — Keypad Icons Redial PhoneBook Hands-free (HF) speaker Mute Microphone (During Call) Volume down Volume up Hold Headset Conference Transfer Table 3 — Status Prompt and Notification Icons Call out Call in Call Hold Network Disconnected…
-
Page 20: Appendix Ii — Keyboard Character Query Table
Handset (HS) Mode Mute Microphone The Voice quality of calling The Voice encryption of calling HD Voice Voice recording Open SIP Hotline 6.2 Appendix II — Keyboard character query table Table 4 — Look-up Table of Characters Mode Icon Text Mode Key Button Characters Of Each Press Numeric…
-
Page 21
@:;()<> A B C D E F G H I J K L M N O Upper Case P Q R S Alphabets T U V WZYX (space) .,*/+-:_= * # ^!&$% 2 a b c A B C 3 d e f D E F 4 g h I G H I 5 j k l J K L 6 m n o M N O… -
Page 22: Appendix Iii — Led Definition
6.3 Appendix III — LED Definition Table 5 — DSS KEY LED State Type LED Light State Line inactive Green On Line ready (Registered) Green Blinking Ringing Line Key Red Blinking Line is trying to register Red Blinking Line error (Registration failure) Red On Dialing/Line in use (Talking) Yellow Blinking…
-
Page 23: Introduction To The User
7 Introduction to the User 7.1 Instruction of Keypad Picture 4 — Instruction of Keypad The picture above shows the keypad layout of the phone.Each button provides its own specific function.Users can refer to the instructions for the keys in the illustration in this section to operate the phone. Table 6 — Instruction of Keypad The keypad Number…
-
Page 24: Using Handset / Hands-Free Speaker / Headphone
Press the «Transfer» button, the user can transfer the current call to other ○ Transfer Key numbers. Press the «Conference» button, the user can initiate a three-party ○ Conference conference. The user can press the up/down navigation key to change the line or move the cursor in the screen list.On some Settings and text editing Navigate/OK pages, the user can press the left/right navigation key to change options…
-
Page 25: Idle Screen
Using Hands-free Speaker To talk over hands-free speaker, user should press the hands-free button then dial the number, or dial the number first then press the hands-free button. User can switch audio channel to the speaker from handset by pressing the hands-free button when audio channel is opened in handset.
-
Page 26
VLAN ID IPv4 or IPv6 status IP Address Network Mode The Phone Device Information: Mac Address Phone Mode Hardware Version number Software Version number Phone Storage (RAM and ROM) System Running Time SIP Account Information: SIP Account SIP Account Status ( register / uncommitted / trying / time out) TR069 Connect Status (Displays only in the phone interface state) … -
Page 27: Web Management
7.5 Web Management Phone can be configured and managed on the web page of the phone. The user first needs to enter the IP address of the phone in the browser and open the web page of the phone. The user can check the IP address of the phone by pressing [Menu] >>…
-
Page 28: Sip Configurations
provider. The device is default configured in DHCP mode. There are three common IP configuration modes about IPv6 DHCP — This is the automatic configuration mode by getting network configurations from a DHCP server. Users need not to configure any parameters manually. All configuration parameters will be getting from DHCP server and applied to the device.
-
Page 29
Picture 11 — Web SIP registration… -
Page 30: Basic Function
8 Basic Function 8.1 Making Phone Calls Default Line The device provides twenty line services. If both lines are configured, user can make or receive phone calls on either line. If default line is configured by user, there will be a default line to be used for making outgoing call which is indicated on the top left corner.
-
Page 31: Answering Calls
Cancel Call While calling the number, user can press end the audio channel by putting back the handset or pressing the hands-free button to drop the call. Picture 15 — Call number 8.2 Answering Calls When there is an incoming call while the device is idle, user will see the following incoming call alerting screen.
-
Page 32: End Of The Call
User will see the call message in the middle of current screen. The device will not be ringing but playing call waiting tone in the audio channel of the current call and the LED will be flashing in green. User can accept or reject the call as same as normal incoming call.
-
Page 33: Dial-Up Query
Log in the phone page, enter [Phone Settings] >> [Features] >> [Redial Settings], check redial to enter the call record, press the redial button when standby to enter the call record page, and press again to call out the currently located number. Picture 20 — Redial set 8.5 Dial-up Query Phone default to open the dial-up inquiry function, dial-out, enter two or more Numbers, dial the interface will…
-
Page 34: Callback
Picture 22 — The line has enabled auto-answering WEB interface: Log in the phone page, enter [Line] >> [SIP], select [SIP] >> [Basic settings], start auto-answering, and click apply after setting the automatic answering time. Picture 23 — Web page to start auto-answering 8.7 Callback The user can dial back the number of the last call.
-
Page 35: Mute
page, select the function Key, set the type as the function Key, and set the subtype as the callback, as shown in the figure: Picture 25 — Set the callback key on the web page 8.8 Mute You can turn on mute mode during a call and turn off the microphone so that the local voice is not heard. Normally, mute mode is automatically turned off at the end of a call.
-
Page 36: Call Hold/Resume
Cancel ring tone mute: On the standby or incoming call screen, press the mute button again volume up cancel ring tone mute, no longer shows mute icon in upper right corner after cancel .The phone mute icon is off 8.9 Call Hold/Resume The user can press the [Hold] button to maintain the current call, and this button will become the [ Resume ] button, and the user can press the «resume»…
-
Page 37: Call Forward
line), and DND timing function. Picture 32 — DND Settings The user turns on the DND for a specific route on the web page:Enter [Line] >> [SIP], select a [Line] >> [Basic settings], and enable DND. Picture 33 — Line DND 8.11 Call Forward Call forward is also known as ‘Call Divert’…
-
Page 38
number. Call Forward on No Answer – When user does not answer the incoming call after the configured delay time, the incoming call will be forwarded to the configured number. Phone interface: Default standby mode 1) Press [Menu] >> [Features] >> [Call Forward] button, select the line by up/down navigation key, press [OK] button to set call forward. -
Page 39: Call Transfer
8.12 Call Transfer When the user is talking with a remote party and wish to transfer the call to another remote party, there are three way to transfer the call, blind transfer, attended transfer and Semi-Attended transfer. Blind transfer: Do not need to negotiate with the other side, directly transfer the call to the other side. …
-
Page 40
Enable call waiting tone: when you receive a new call on the line, the tone will beep. The user can enable/disable the call waiting function in the phone interface and the web interface. Phone interface: Press [Menu] >> [Features] >> [Call waiting], the navigation key left/right button to … -
Page 41: Conference
8.14 Conference Local Conference 8.14.1 To conduct local conference, the user needs to log in the webpage and enter [Line] >> [SIP] >> [Basic settings]. The meeting mode is set as local (the default is local mode), as shown in the figure: Picture 44 — Local conference setting Two ways to create a local conference: 1)…
-
Page 42: Network Conference
Network Conference 8.14.2 Users need server support for network conference. Log in the web page, enter [Line] >> [SIP] >> [Basic settings], set the conference mode as server mode (default is local mode), set the server conference room number (please consult your system administrator), as shown in the figure: Picture 47 — Network conference Method to join a network conference:…
-
Page 43: Pick Up
park number, set up corresponding SIP lines. WEB interface: log in the phone page, enter the [Function Key] >> [Function Key] page, select a DSSkey, set the function key type as memory key, the subtype as call park, and the value as the call park number of the server, and set the corresponding SIP line.
-
Page 44: Anonymous Call
Picture 51 — WEB pick up setting 8.17 Anonymous Call Anonymous Call 8.17.1 The phone can set up anonymous calls to hide the calling number and the calling name. You can see anonymity in the context of [Menu] >> [Advanced Settings] >> [Accounts] >> …
-
Page 45: Ban Anonymous Call
Picture 54 — Anonymous call log Ban Anonymous Call 8.17.2 The device can be set to prohibit anonymous calls, that is anonymous calls to the number will be directly rejected. In the phone [Menu] >> [Features] >> [Ban anonymous call], click to enter and all SIP lines will be …
-
Page 46: Emergency Call
Picture 58 — Hotline set up on webpage 8.19 Emergency Call The emergency call function is used to enable the keypad lock. Users can set the corresponding emergency call number on the phone. You can also call emergency services when your phone is locked. 1) Configure the emergency call number: log in the phone page, enter the [Phone Settings] >>…
-
Page 47: Advance Function
9 Advance Function 9.1 BLF (Busy Lamp Field) Configure the BLF Functionality 9.1.1 Page interface: log in the phone page, enter the [Function key] >> [Function key] page, select a DSS key, set the function key type as memory key, choose subtype among BLF/NEW CALL, BLF/BXFER, BLF/AXFER, BLF/CONF, set BLF/DTMF value as the number to be subscribed, set the corresponding SIP line.
-
Page 48: Use The Blf Function
When you press this BLF key while talking to Pressing the BLF key while standby BLF/BXFER another user, you blind transfer the call to the to dial the subscriber number. subscribed number. When you press this BLF key while talking to Pressing the BLF key while standby BLF/AXFER another user, you attendance transfer the call to…
-
Page 49: Blf List
9.2 BLF List BLF List Key is to put the number to be subscribed into a group on the server side, and the phone uses the URL of this group to make unified subscription. The specific information, number, name and status of each number can be resolved based on notify sent from the server.
-
Page 50: Record
[Application] >> [Manage recording]. The type is selected as network, and the address and port of the recording server are filled in and the voice coding is selected. The web is as follows: Picture 65 — Web server recording Note: to be used with Fanvil recording software. SIP INFO Record 9.3.2 The phone is registered with a server that supports SIP INFO recording.
-
Page 51: Agent
9.4 Agent Agent (Agent function) of the phone can be realized: when multiple people use a device for Agent services at different times, he or she can quickly register his or her SIP account on the same server. The Agent functions of the phone can be divided into Normal and Hotel Guest.
-
Page 52: Intercom
3) Click Unregister and the phone retain the user name and password, and logs out of the SIP account. Picture 69 — Agent logon page 9.5 Intercom When the Intercom is enabled, it can automatically receive calls from the intercom. Picture 70 — Web Intercom configure Table 10 — Intercom configure Parameter…
-
Page 53: Sca (Shared Call Appearance)
9.7 SCA (Shared Call Appearance) Users need the support of server end to use SCA function. You can refer to http://www.fanvil.com/Uploads/Temp/download/20180920/5ba38181e4e4b.pdf 1) Configure on Phone When registering with the BroadSoft server, a Fanvil Phone can register the account created previously …
-
Page 54
Specific Server Type to BroadSoft, as shown in the following figure. Picture 73 — Set BroadSoft server If a Fanvil phone set needs to use the SCA function, enable it for the phone set. Specifically, log in to the webpage of the phone set, choose [Line] >> [SIP] >> [Advanced Settings], and select Enable… -
Page 55
Picture 74 — Enable SCA After an account is configured and successfully registered, you can configure lines whose DSS Key is Shared Call Appearance on the Function Key page to facilitate viewing the call status of the group. Each line key represents a call appearance. -
Page 56: Message
Table 12 — LED Status of SCA State&Direction Local Remote Idle Seized Steady green Steady red Progressing (outgoing call) Steady green Steady red Alerting (incoming call) Fast blinking green Fast blinking green Active Steady green Steady red Public Held (hold) Slow blinking green Slow blinking red Held-private (private hold)
-
Page 57: Mwi (Message Waiting Indicator)
Press the [Edit] button to edit the voice message number. When finished, press the [OK] button to save the configuration. In the following picture, “17” in front of Fanvil line brackets represents unread voice messages, and “17” represents the total number of voice messages.
-
Page 58: Sip Hotspot
Picture 79 — Configure voicemail number 9.9 SIP Hotspot SIP hotspot is a simple but practical function. With simple configurations, the SIP hotspot function can implement group ringing. SIP accounts can be expanded. Phone set functions as a SIP hotspot and other phone sets (B and C) function as SIP hotspot clients. When somebody calls phone set A, phone sets A, B, and C all ring.
-
Page 59
you’d better use broadcast. But, if client choose broadcast, the SIP hotspot phone must be broadcast. Monitor Address The address of broadcast, hotspot server and hotspot client must be same. Remote Port Type the Remote port number. Configure SIP hotspot server: Picture 81 — SIP hotspot server configuration Configure SIP hotspot client: To set as a SIP hotspot client, no SIP account needs to be set. -
Page 60
Call extension number: The hotspot server and the client can dial each other through the extension number. For example, extension 1 dials extension 0. … -
Page 61: Phone Settings
10 Phone Settings 10.1 Basic Settings Language 10.1.1 The user can set the phone language through the phone interface and web interface. Phone end: After resetting the factory settings, the user needs to set the language; when setting the language during standby, go to [Menu] >>…
-
Page 62
Picture 86 — Set time & date on webpage Table 14 — Time Settings Parameters Parameters Description Mode Auto/Manual Auto: Enable network time synchronization via SNTP protocol, default enabled. Manual: User can modify data manually. SNTP Server SNTP server address Time zone Select the time zone Time format… -
Page 63: Screen
YY-MM-DD YYYY-MM-DD Separator Choose the separator between year and moth and day 12-Hour Clock Display the clock in 12-hour format Daylight Saving Time Enable or Disable the Daylight Saving Time Screen 10.1.3 The user can set the phone screen parameters through both of the phone interface and web interface. Phone: When the phone is in the default standby state, go to [Menu] >>…
-
Page 64: Ring
Picture 89 — Phone screen saver Ring 10.1.4 When the device is in the default standby mode, Press soft-button [Menu] till you find the [Basic] item. Enter [Basic] item till you find [Ring] item. Enter [Ring] item and you will find [Headset] or [Handsfree] item, press left / right navigator keys to …
-
Page 65: Phone Book
10.2 Phone Book Local Contact 10.2.1 User can save contacts’ information in the phone book and dial the contact’s phone number(s) from the phone book. To open the phone book, user can press soft-menu button [Contact] in the default standby screen or keypad.
-
Page 66: Add / Edit / Delete Group
[Option] >> [Delete] button and confirm with [OK]. 10.2.1.2 Add / Edit / Delete Group By default, the group list is blank. User can create his/her own groups, edit the group name, add or remove contacts in the group, and delete a group. To add a group, press [Add Group] button.
-
Page 67: Cloud Phone Book
It is also a useful tool to synchronize his/her phonebook from a personal mobile phone to the device with Fanvil Cloud Phonebook Service and App which is to be provided publicly soon.
-
Page 68: Call Log
Picture 99 — Downloading Cloud Phone book Picture 100 — Browsing Contacts in Cloud Phone book 10.3 Call Log The device can store up to 1000 call log records and user can open the call logs to check all incoming, outgoing, and missed call records by pressing soft-menu button [CallLog] .
-
Page 69: Headset
Picture 103 — DSS LCD key Page Configuration Screen The DSS Key could be configured as followings, Memory Key Speed Dial/Intercom/BLF/Presence/Call Park/Call Forward (to someone) Line Key Event MWI/DND/Hold/Transfer/Phonebook/Redial/Pickup/Call Forward (to specified line)/Headset/ SMS/Release DTMF …
-
Page 70: Ehs Headset
On the webpage [Phone settings] >> [Features], you can set the headset answering function, and the ring tone for headset. Picture 105 — Headset function settings EHS Headset 10.5.2 Phone into [Menu] >> [Function] >> [Advanced], Select [EHS Headset] , can open EHS Headset (default closed EHS Headset).
-
Page 71: Network Settings
Network Settings 10.6.2 10.6.2.1 Network Settings IP Mode There are 3 network protocol mode options, IPv4, IPv6 and IPv4 & IPv6. User could select available mode via “<” or “>”. The selected IP mode will be activated after pressing [OK] button.
-
Page 72: Qos & Vlan
VLAN ID to the phone configuration QoS Mode configure SIP DSCP and audio DSCP VLAN VLAN WAN port VLAN configuration VLAN VLAN LAN port VLAN configuration CDP enable/disable ,CDP interval time Note : QoS & VLAN details refer to http://www.fanvil.com/Uploads/Temp/download/20180920/5ba383b56c3ef.pdf…
-
Page 73: Vpn
Same as L2TP connection, the connection will be established every time when system rebooted until user disable it manually. http://www.fanvil.com/Uploads/Temp/download/20180920/5ba38303bfcf0.pdf 10.6.2.4 Web Server Type Configure the Web Server mode to be HTTP or HTTPS and will be activated after the reboot. Then user could…
-
Page 74: Set The Secret Key
Picture 114 — The phone configures the web server type Set The Secret Key 10.6.3 When the device is in the default standby mode, Select [Menu] >> [Advanced setting], and enter it via [Confirm] or [OK] button. As default, the Advance setting password is 123. …
-
Page 75: Maintenance
LCD: [Menu] >> [Advanced setting] >> [Maintenance] >> [Auto Provision]. Picture 120 — Phone auto provision settings Fanvil devices support SIP PnP, DHCP options, Static provision, TR069. If all of the 4 methods are enabled, the priority from high to low as below: PNP>DHCP>TR069>…
-
Page 76
Table 16 — Auto Provision Parameters Description Basic settings CPE Serial Number Display the device SN Authentication Name The user name of provision server Authentication Password The password of provision server Configuration File If the device configuration file is encrypted , user should add the Encryption Key encryption key here General Configuration… -
Page 77: Firmware Upgrade
Provisioning server address. Support both IP address and domain Server Address address. The configuration file name. If it is empty, phone will request the common file and device file which is named as its MAC address. Configuration File Name The file name could be a common name, $mac.cfg, $input.cfg. The file format supports CFG/TXT/XML.
-
Page 78
LCD interface: go to [Menu] >> [Advanced setting] >> [Firmware Upgrade] . Picture 122 — Firmware upgrade information display Table 17 — Firmware upgrade Parameter Description Upgrade server Enable automatic upgrade, If there is a new version txt and new Enable Auto Upgrade software firmware on the server, phone will show a prompt upgrade message after Update Interval. -
Page 79: Factory Reset
TXT file format must be UTF-8 vendor_model_hw10.TXT The file format is as follows: Version=1.6.3 #Firmware Firmware=xxx/xxx.z #URL,Relative paths are supported and absolute paths are possible, distinguished by the presence of protocol headers. BuildTime=2018.09.11 20:00 Info=TXT|XML Xxxxx Xxxxx Xxxxx Xxxxx After the interval of update cycle arrives, if the server has available files and versions, the phone will …
-
Page 80: Web Configurations
11 Web Configurations 11.1 Web Page Authentication The user can log into the web page of the phone to manage the user’s phone information and operate the phone. Users must provide the correct user name and password to log in. 11.2 System >>…
-
Page 81: System >> Upgrade
11.6 System >> Auto Provision The Auto Provision settings help IT manager or service provider to easily deploy and manage the devices in mass volume. For the detail of Auto Provision, please refer to this link Auto Provision Description。 http://www.fanvil.com/Uploads/Temp/download/20180920/5ba3816f8d5f0.pdf 11.7 System >> Tools Tools provided in this page help users to identify issues at trouble shooting.
-
Page 82: Network >> Basic
12 Network >> Basic This page allows users to configure network connection types and parameters. 12.1 Network >> Service Port This page provides settings for Web page login protocol, protocol port settings and RTP port. Picture 124 — Service Port Settings Table 18 — Service port Parameters Description…
-
Page 83: Network >> Advanced
12.3 Network >> Advanced Advanced network Settings are typically configured by the IT administrator to improve the quality of the phone service. For configuration, query the 10.6 advanced Settings. 12.4 Line >> SIP Configure the Line service configuration on this page. Table 19 — Line configuration on the web page Parameters Description…
-
Page 84
Enable auto-answering, the incoming calls will be answered automatically Enable Auto Answering after the delay time Set the delay for incoming call before the system automatically answered Auto Answering Delay Enable unconditional call forward, all incoming calls will be forwarded to Call Forward Unconditional the number specified in the next field Call Forward Number for… -
Page 85
DTMF Type Set the DTMF type to be used for the line DTMF SIP INFO Mode Set the SIP INFO mode to send ‘*’ and ‘#’ or ‘10’ and ‘11’ Enable Do-not-disturb, any incoming call to this line will be rejected Enable DND automatically Enable the device to subscribe a voice message waiting notification, if… -
Page 86
Enable Blocking Set the feature code to dial to the server Anonymous Call Disable Blocking Set the feature code to dial to the server Anonymous Call Call Waiting On Code Set the feature code to dial to the server Call Waiting Off Code Set the feature code to dial to the server Send Anonymous On Set the feature code to dial to the server… -
Page 87
IP address, not the address in via field. Convert URI Convert not digit and alphabet characters to %hh hex code Use Quote in Display Whether to add quote in display name, i.e. “Fanvil” vs Fanvil Name Enable GRUU Support Globally Routable User-Agent URI (GRUU) -
Page 88: Line >> Sip Hotspot
PTime(ms) Set whether to bring ptime field, default no. SIP Global Settings Strict Branch Set up to strictly match the Branch field. Enable Group Set open group. Enable RFC4475 Set to enable RFC4475. Enable Strict UA Match Enable strict UA matching. Registration Failure Retry Set the registration failure retry time.
-
Page 89
Hang up the handle or press the hands-free button to realize the Attended Transfer on Onhook function of transfer, which can transfer the current call to a third party. Attended Transfer on During a three-way call, hang up the handle and the remaining two Conference Onhook parties remain on the call. -
Page 90: Line >> Basic Settings
del –The characters will be deleted from the phone number. rep: xxx – xxx will be substituted for the specified characters. Suffix Characters to be added at the end of the phone number. It is an optional item. Set the number of characters to be deleted.
-
Page 91: Phone Settings >> Features
Set the STUN binding period which can be used to keep the NAT pinhole Binding Period opened. SIP Waiting Time Set the timeout of STUN binding before sending SIP messages The TLS authentication Upload or delete the TLS certification file used for encrypted SIP TLS Certification File transmission.
-
Page 92
Set the device to accept Active URI command from specific IP address. Restrict Active URI Source More details please refer to this link http://www.fanvil.com/Uploads/Temp/download/20180920/5ba3641fe81a5. pdf. Configure the Push XML Server, when phone receives request, it will Push XML Server determine whether to display corresponding content on the phone which sent by the specified server or not. -
Page 93
relevant notify content. Tone Settings Enable Holding Tone When turned on, a tone plays when the call is held Enable Call Waiting Tone When turned on, a tone plays when call waiting Play DTMF tone on the device when user pressed a phone digits at dialing, Play Dialing DTMF Tone default enabled. -
Page 94: Phone Settings >> Media Settings
default. The status of power lamp when there is unread short message/voice SMS/MWI message, including off/on/slow flash/quick flash, default slow flash. The state of the power lamp when there is a missed call, including Missed off/on/slow flash/quick flash, the default slow flash. In the talk/dial state, the power lamp state, off is off, on is always red bright, Talk/Dial the default is off.
-
Page 95: Phone Settings >> Mcast
Configure default ringtones. If no special ringtone is set for the phone Default Ring Type number, the default ringtone will be used. Speakerphone Volume Set the hands-free volume to 1-9. Headset Ring Volume Set the volume of the earphone ringtone to 1~9. Headset Volume Set the volume of the headset to 1~9.
-
Page 96: Phone Settings >> Action
Listened multicast server’s multicast IP address and port. 12.11 Phone settings >> Action Action URL Note! Action urls are used for IPPBX systems to submit phone events. Please refer to Fanvil Action URL for details. http://www.fanvil.com/Uploads/Temp/download/20180920/5ba3641fe81a5.pdf 12.12 Phone settings >> Time/Date The user can configure the time Settings of the phone on this page.
-
Page 97: Phone Settings >> Tone
Offset The offset minutes when DST started Month Start The DST start month Week Start The DST start week Weekday Start The DST start weekday Hour Start The DST start hour Minute Start The DST start minute Month End The DST end month Week End The DST end week Weekday End…
-
Page 98: Phonebook >> Contact
Enable Energy Saving Backlight Time LCD Menu Password Settings. The password is 123 by default. Keyboard Lock Settings. Configure Greeting Words The greeting message will display on the top left corner of the LCD when the device is idle, which is limited to 16 characters.
-
Page 99: Phonebook >> Call List
Access password (optional) Note! Refer to the LDAP technical documentation before creating the LDAP phonebook and phonebook server. http://www.fanvil.com/Uploads/Temp/download/20180920/5ba382eb399eb.pdf Web page preview Phone page supports preview of Internet phone directory and contacts After setting up the XML Voip directory or LDAP, …
-
Page 100: Phonebook >> Web Dial
12.18 Phonebook >> Web Dial Use web pages for call, reply, and hang up operations. 12.19 Phonebook >> Advanced Users can export the local phone book in XML, CSV, and VCF format and save it on the local computer. Users can also import contacts into the phone book in XML, CSV, and VCF formats. Attention! If the user imports the same phone book repeatedly, the same contact will be ignored.
-
Page 101: Function Key >> Softkey
Intercom: This feature allows the operator or the secretary to connect the phone quickly; it is widely used in office environments. Line It can be configured as a Line Key. User is able to make a call by pressing Line Key. User can select a key event as a shortcut to trigger.
-
Page 102: Function Key >> Advanced
/Prev line Ringing Answer/Forward/Reject/Mute/Release/Headset/Video/Audio/DSS key Hold/Transfer/Conference/End/Mute/Release/New Call/ Talking Local Contacts/Listen/CallLog/Next call/Prev call/ Private/Headset/Video/Audio/DSS Key Transfer Alerting End/Transfer/Headset/Release/DSS Key Redial/Delete/Exit/2aB/Dial/Local Contacts/Transfer/ Transfer Dialer CallLog/Clear/Missed/Dialed/Pause/Headset/Video/Audio/Remote XML/DSS Trying End/Release/Headset/DSS Key Hold/Transfer/Conference/End/Answer/Forward/Mute/Next call/New call/Prev Waiting call/Reject/Release/Headset/Listen/ Video/Audio/DSS Key 12.23 Function Key >> Advanced One key transfer: for example, set the memory key 4370. Press the memory key when talking with 4374 to decide whether to call 4370 or transfer 4374 to 4370.
-
Page 103: Security >> Trust Certificates
Picture 132 — Web Filter settings Picture 133 — Web Filter Table Add and remove IP segments that are accessible; Configure the starting IP address within the start IP, end the IP address within the end IP, and click [Add] to submit to take effect. A large network segment can be set, or it can be divided into several network segments to add.
-
Page 104: Security >> Device Certificates
Picture 134 — Certificate of settings 12.27 Security >> Device Certificates Select the device certificate as the default and custom certificate. You can upload and delete uploaded certificates. Picture 135 — Device certificate setting…
-
Page 105: Security >> Firewall
12.28 Security >> Firewall Picture 136 — Network firewall Settings Through this page can set whether to enable the input, output firewall, at the same time can set the firewall input and output rules, using these Settings can prevent some malicious network access, or restrict internal users access to some resources of the external network, improve security.
-
Page 106: Device Log >> Device Log
Is the source address mask. When configured as 255.255.255.255, it Src Mask means that the host is specific. When set as 255.255.255.0, it means that a network segment is filtered. Is the destination address mask. When configured as 255.255.255.255, it Dst Mask means the specific host.
-
Page 107: Trouble Shooting
When the phone is not in normal use, the user can try the following methods to restore normal operation of the phone or collect relevant information and send a problem report to Fanvil technical support mailbox. 13.1 Get Device System Information Users can get information by pressing the [Menu] >>…
-
Page 108: Network Packets Capture
Picture 139 — Screenshot 13.5 Network Packets Capture Sometimes it is helpful to dump the network packets of the device for issue identification. To get the packets dump of the device, user needs to log in the device web portal, open page [System] >> [Tools] and click [Start] in “Network Packets Capture”…
-
Page 109: Get Log Information
User may examine the packets with a packet analyzer or send it to Fanvil support mailbox. 13.6 Get Log Information Log information is helpful when encountering an exception problem. In order to get the log information of the phone, the user can log in the phone web page, open the page [Device log], click the [Start] button, follow the steps of the problem until the problem appears, and then click the [End] button, [Save] to local analysis or send the log to the technician to locate the problem.
-
Page 110
Headphone the Headphone provided by Fanvil, or consult Fanvil the wire sequence if you wish to use a third-party headphone. 2. The network bandwidth and delay may be not suitable for audio call at the moment. This is usually due to loud volume feedback from speaker to microphone.
This manual is also suitable for:
X1sp
Характеристики
-
Свойства IP-телефонов
-
100 Мбит/с, Fast Ethernet
-
2 порта Ethernet, Без PoE, Блок питания в комплекте, Крепление на стену
-
Программируемые BLF клавиши
-
Участников конференц-вызова
(чел.)
Описание
Данная модель относится к категории VoIP-устройств начального уровня. Этот стационарный телефон обладает необходимым набором функций для организации качественной голосовой связи между офисными сотрудниками.
Корпус, выполненный в классическом дизайне, имеет возможность настенного крепления. В базовой комплектации предусмотрена удобная настольная подставка с двумя углами наклона (50 и 45 градусов). IP-телефон поддерживает до 2 SIP-аккаунтов, передает аудио в HD-качестве. Есть возможность подключения EHS-гарнитур и созыва аудоконференций с числом участников до 3. Все рабочие параметры отображаются на информативном дисплее с дополнительной подсветкой.
X1S от Fanvil имеет функцию сохранения телефонных номеров. Записная книжка может содержать данные до 1 тыс. абонентов. Кроме этого, предусмотрена опция черного и белого списков. IP-телефон поддерживает функцию автоответа и удержания вызововов, оснащен возможностью caler ID. Для удобства использования X1S-IP обладает 2 программируемыми DSS-клавишами. В конструкции предусмотрено 2 сетевых порта на 100 Мбит, что обеспечивает широкие возможности развертывания в сети. Данное устройство поддерживает все популярные SIP-платформы: 3CX, Asterisk, Avaya, Broadsoft, Metaswitch, Elastix и прочие.
Технические характеристики Fanvil X1S
Основные функции:
- 2 SIP линии
- HD звук
- 128×48 матричный дисплей
- Трубка / Громкая связь / Гарнитура
- Настольная подставка / Настенная подставка (необходимы дополнительные детали для настенного крепления)
- Блок питания
Функции телефона:
- Телефонная книга (1000 записей)
- Удаленная телефонная книга (XML/LDAP, 1000 записей)
- Логи звонков (Принятые/Набранные/Пропущенные, 600 записей)
- Черный/Белый список
- Индикация ожидающего голосового сообщения (VMWI)
- Программируемые DSS/Софт клавиши
- Синхронизация времени по сети
- Поддержка Plantronics беспроводных гарнитур (через Plantronics APD-80 EHS переходник)
- Поддержка Jabra беспроводных гарнитур (через Fanvil EHS20 EHS переходник)
- Поддержка записи разговоров (через сервер)
- Action URL / Active URI
- uaCSTA
Функции звонка
- Вызов / Ответ / Повторный вызов
- Микрофон: Вкл/Откл
- Удержание / Возобновление
- Ожидание
- Интерком
- Caller ID
- Быстрый набор
- Анонимный звонок (скрывает Caller ID)
- Переадресация (Всегда/Занят/Не овечает)
- Перевод звонка (Сопровождаемые/Слепой)
- Парковка вызова/Pick-up (при поддержке сервером)
- Повторный набор
- Режим Не беспокоить
- Автоответ
- Голосовые сообщения (с сервером)
- 3-сторонняя конференция
- Горячая линия
- Hot desking
Функции
- 2 SIP линии, 3-сторонняя конференция, SIP hotspot
- 1000 контактов, caller ID, удержание, перевод звонка
- 128×48 матричный дисплей
- HD аудио как через спикерфон, так и через трубку
- Поддержка EHS беспроводных гарнитур
- Двойные сетевые порты 10/100Mб/c
- Подставка с 2-мя регулируемыми углами 45 и 50 градусов
- Поддержка основных SIP платформ: Asterisk, Broadsoft, 3CX, Metaswitch, Elastix, Avaya и т.д.
Аудио
- HD микрофон/спикерфон (Трубка/Гарнитура, 0 ~ 7KHz частотный отклик)
- HAC трубка
- Широкополосная ADC/DAC 16KHz дискретизация
- Узкополосные кодеки: G.711a/u, G.726-32K, G.729A, iLBC
- Широкополосные кодеки: G.722, Opus
- Полнодуплексное акустическое эхоподавление (AEC)
- Обнаружение голосовой активности (VAD) / Генерация комфортного шума (CNG) Оценка фонового шума (BNE) / Подавление шума (NR)
- Сокрытие потерь пакетов (PLC)
- Динамически адаптивный Jitter Buffer
- DTMF: In-band, Out-of-Band — DTMF-Relay (RFC2833) / SIP INFO
Сеть
- Физические порты: 10/100 Мб/с Ethernet, двойные сетевые порты с функцией маршрутизатора
- Режимы IP: IPv4/IPv6/IPv4&IPv6
- Конфигурации IP: Static IP / DHCP / PPPoE
- Контроль доступа к сети: 802.1x
- VPN: L2TP / OpenVPN
- VLAN
- LLDP
- QoS
- RTCP-XR (RFC3611), VQ-RTCPXR (RFC6035)
Протоколы
- SIP2.0 over UDP/TCP/TLS
- RTP/RTCP/SRTP
- STUN
- DHCP
- LLDP
- PPPoE
- 802.1x
- L2TP
- OpenVPN
- SNTP
- FTP/TFTP
- HTTP/HTTPS
- TR-069
Настройка и управление
- Автонастройка (автопровижинг) через FTP/TFTP/HTTP/HTTPS/DHCP OPT66/SIP PNP/TR-069
- Веб интерфейс
- Сетевой дамп пакетов
- Конфигурация Экспорт / Импорт
- Телефонная книга Экспорт / Импорт
- Обновление прошивки
- Syslog
Физические характеристики
- Основной LCD дисплей: 128×48 матричный черно-белый с подсветкой
- Клавиатура: 34 клавиши, включающие:
- 4 софт клавиши
- 9 функциональных клавиш (Удержание/Перевод/Конференция/Телефонная книга/MWI/Гарнитура/Повторный набор)
- 2 клавиши линии (со световым LED индикатором)
- 4 навигационных клавиши
- 1 клавиша «OK»
- 12 стандартных телефонных клавиш
- 3 клавиши регулировки громкости (Громче/Выше/Без звука (микрофон))
- 1 громкая связь
- HD телефонная трубка (RJ9) x1
- Стандартный RJ9 для гарнитуры x1
- 1.5M CAT5 сетевой кабель x1
- Back Rack x1
- Индикатор состояния LED x1 (красный)
- RJ9 порты x2: Трубка x1, Гарнитура x1
- RJ45 порты x2: сеть x1, PC x1 (Bridged to Network)
- Safety Keyhole x1
- Блок питания: 5V/0.6A
- Потребляемая мощность: не активный 0.9~1.65W, пиковая 1.8~2.95W
- Рабочая температура: 0~45°C
- Влажность: 10~95%
- Установка:
- Настольная
- Настенная (нужны дополнительные настенные детали)
- Цвет: черный
Наша компания с ноября 2020-го года начала поставки IP-телефонов Fanvil в Казахстан.
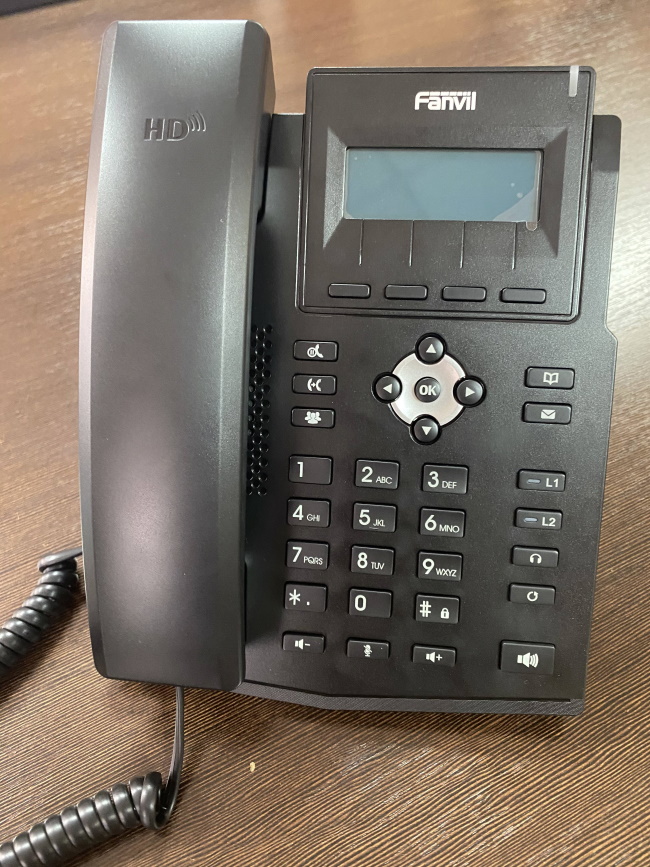
Сегодня на обзоре IP-телефон начального уровня Fanvil X1S.
Это обновлённая модель устаревшего телефонного аппарата Fanvil X1. В новой моделе: новый дизайн внешнего вида, добавлены функции HD-звука, а также обновлён процессор, что позволило увеличить производительность аппарата.
Краткий обзор Fanvil X1S
Итак, Fanvil X1S является самым доступным на сегодняшний день IP-телефоном в Казахстане. При этом, по функциональности и производительности данная модель конкурирует с большинством представленных на рынке моделей начального уровня.
Основные характеристики Fanvil X1S
- Монохромный дисплей с разрешением 128*48 и подсветкой;
- HD-аудио с G.722 и Opus, предотвращает фоновые шумы от внешней среды и обеспечивает идеальное HD-звучание;
- Поддержка 2-х учетных записей SIP;
- Подключение гарнитуры по RJ9;
- RJ45 Ethernet порт х2 (Bridged to Network)
Одним из преимуществ данной модели является наличие подсветки экрана, а также функции HD-звука (данные функции присутствуют не на всех телефонах начального уровня).
Модель Fanvil X1SP (с индеком P) поддерживает питание по PoE.
Внешний вид Fanvil X1S

Как собрать и подключить Fanvil X1S
Как и любой другой IP-телефон, Fanvil X1S собирается и подключается из коробки достаточно просто.
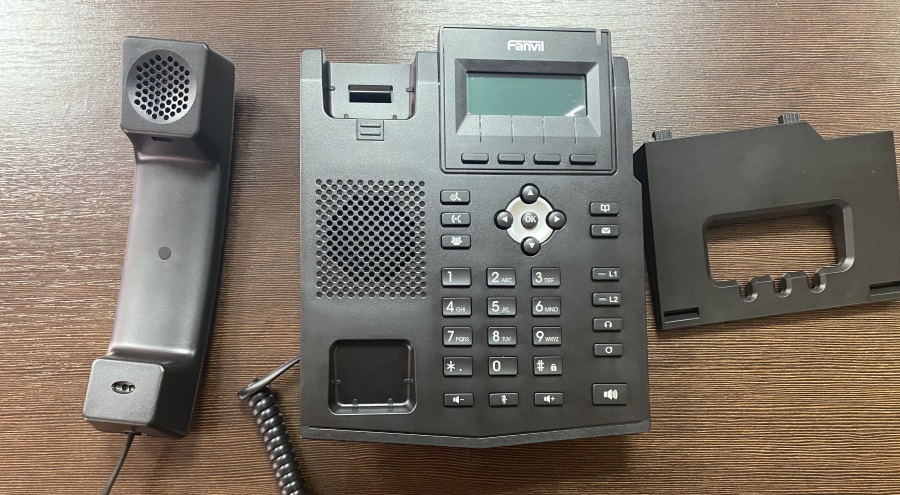
Телефон поставляется в следующем комплекте:
- Телефонный аппарат;
- Трубка;
- Витой шнур;
- Подставка для телефона;
- Блок питания 5V/0.6A;
- Патчкор RJ45 с литыми коннекторами.
В первую очередь необходимо подключить витой шнур к трубке с одной стороны, с другой стороны шнур нужно подключать к телефону в соответствующий разъём (как на фото ниже):
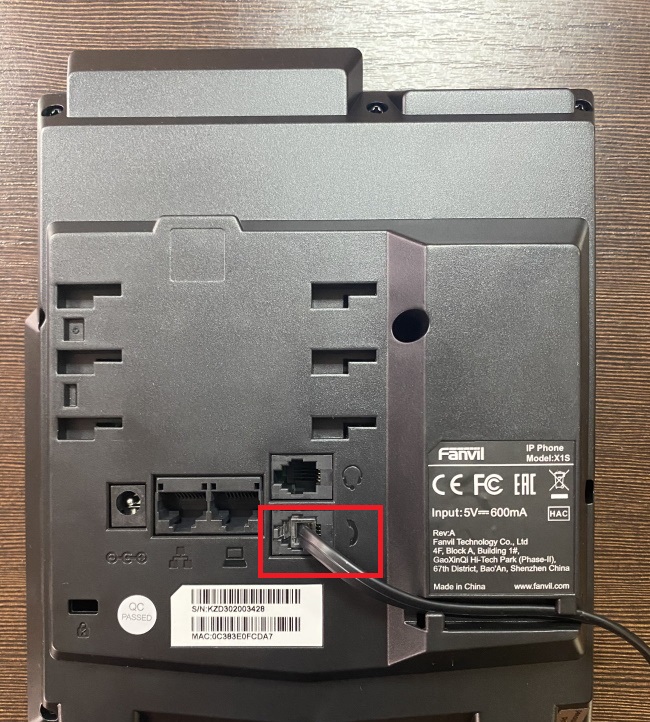
Далее потребуется подсоединить IP-телефон к локальной сети и, если на рабочем месте присутствует персональный компьютер с проводным подключением, подключить его к телефону в соответствующий разъём (можно увидеть пиктограмму).
После этого вставляется в пазы подставка для телефона и аппарат подключается к электричеству.
Базовые настройки Fanvil X1S
Как и любой другой IP-телефон, Fanvil X1S удобнее настраивать посредством WEB-интерфейса. Для это вам необходимо узнать IP-адрес телефона, который был выдан устройству после подключения к локальной сети и его загрузке.
Для этого на панели клавиш вам необходимо нажать кнопку «вниз», после чего на экране появится IP-адрес:
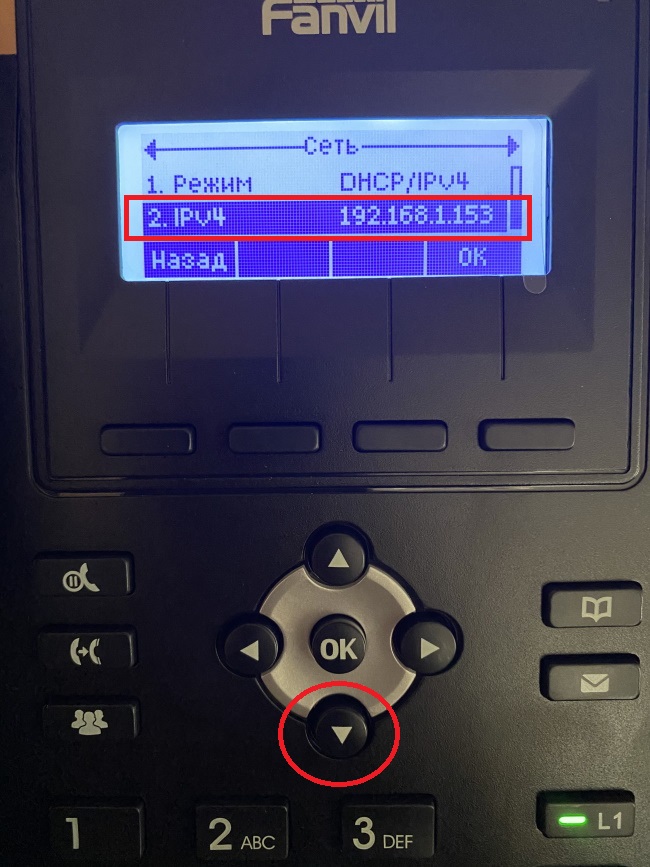
Для входа в веб-интерфейс телефона вам следует запустить любой web-браузер и в командной строке вписать IP-адрес (в нашем случае 192.168.1.153), после чего загрузится стартовая страница интерфейса, где следует ввести login-password
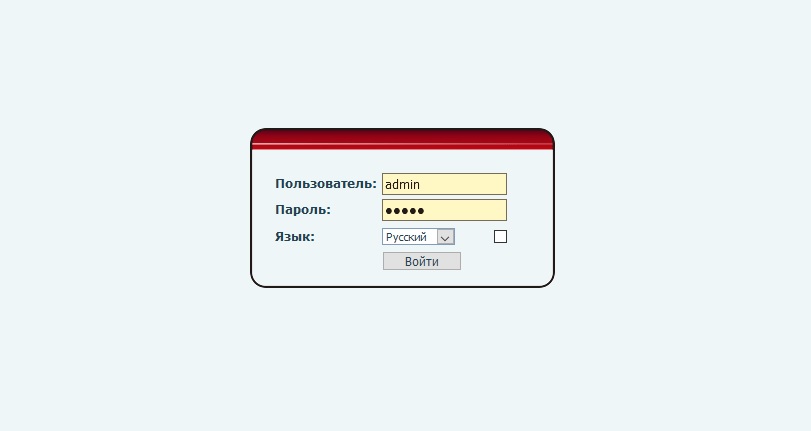
Стандартные login/password для Fanvil X1S
Login — admin
Password — admin
После ввода данных загрузится страница с настройками:
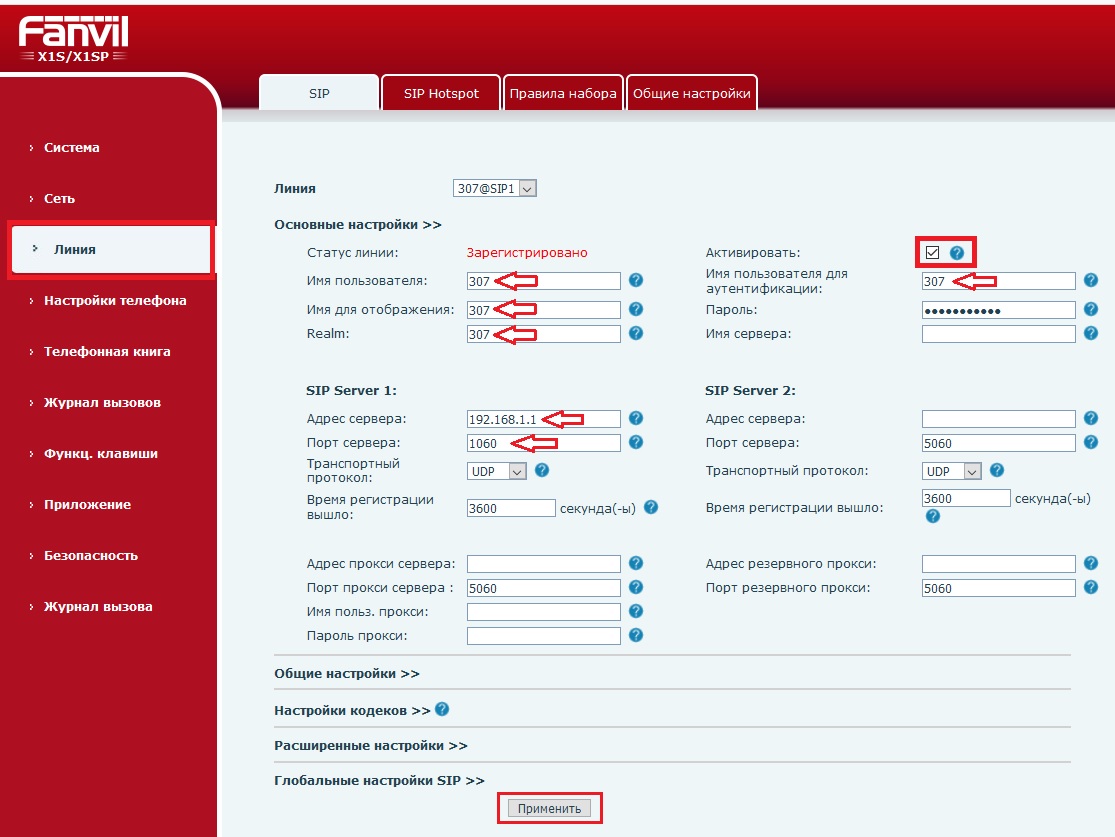
На странице необходимо выбрать поле «Линия» и перейти к настройке SIP-аккаунта. В соответствующие поля вам необходимо ввести учётные данные вашей учётной записи. После чего обязательно поставить «галочку» в поле «Активировать» и потом применить настройки, нажав на клавишу внизу страницы.
Если все данные были введены правильно, то «Статус линии» будет показывать надпись «Зарегистрировано«.
8.8.2 Ringing Mute…………………………………………………………………………………………………………………………… 35
8.9 Call Hold/Resume…………………………………………………………………………………………………………………………….36
8.10 DND………………………………………………………………………………………………………………………………………………. 36
8.11 Call Forward………………………………………………………………………………………………………………………………….. 37
8.12 Call Transfer…………………………………………………………………………………………………………………………………..39
8.12.1 Blind transfer…………………………………………………………………………………………………………………………. 39
8.12.2 Semi-Attended transfer…………………………………………………………………………………………………………. 39
8.12.3 Attended transfer……………………………………………………………………………………………………………………39
8.13 Call Waiting…………………………………………………………………………………………………………………………………… 39
8.14 Conference……………………………………………………………………………………………………………………………………. 41
8.14.1 Local Conference………………………………………………………………………………………………………………….. 41
8.14.2 Network Conference………………………………………………………………………………………………………………42
8.15 Call Park…………………………………………………………………………………………………………………………………………42
8.16 Pick Up………………………………………………………………………………………………………………………………………….. 43
8.17 Anonymous Call……………………………………………………………………………………………………………………………..44
8.17.1 Anonymous Call……………………………………………………………………………………………………………………. 44
8.17.2 Ban Anonymous Call……………………………………………………………………………………………………………..45
8.18 Hotline…………………………………………………………………………………………………………………………………………….45
8.19 Emergency Call…………………………………………………………………………………………………………………………….. 46
9 Advance Function……………………………………………………………………………………………………………………………………… 47
9.1 BLF (Busy Lamp Field)…………………………………………………………………………………………………………………….47
9.1.2 Use the BLF Function………………………………………………………………………………………………………………48
9.2 BLF List…………………………………………………………………………………………………………………………………………….49
9.3 Record…………………………………………………………………………………………………………………………………………….. 50
9.3.1 Server Record…………………………………………………………………………………………………………………………. 50
9.3.2 SIP INFO Record……………………………………………………………………………………………………………………..50
9.4 Agent………………………………………………………………………………………………………………………………………………..51
9.5 Intercom……………………………………………………………………………………………………………………………………………52
9.6 MCAST……………………………………………………………………………………………………………………………………………. 52
9.7 SCA (Shared Call Appearance)……………………………………………………………………………………………………….53
9.8 Message………………………………………………………………………………………………………………………………………….. 56
9.8.1 SMS………………………………………………………………………………………………………………………………………… 56
9.9 SIP Hotspot………………………………………………………………………………………………………………………………………58
10 Phone Settings………………………………………………………………………………………………………………………………………… 61
10.1 Basic Settings……………………………………………………………………………………………………………………………….. 61
10.1.1 Language……………………………………………………………………………………………………………………………….61
4