iVMS 4200 client от Hikvision это клиентское ПО которое предоставляет пользователю множество функций которые необходимы для систем безопасности. Как правило, при первом использовании, данная программа может показаться сложной к восприятию и возможно непонятной. Именно для того чтобы начинающему пользователю было проще разобраться с интерфейсом и функционалом мы разработали данную инструкцию.
Ниже вы можете скачать инструкцию для iVMS 4200 на русском и английском языке. Но стоит отметить что это руководство пользователя с большим количеством материала, который скорее всего не потребуется пользователю.
| Инструкция | Скачать |
|---|---|
| Инструкция iVMS 4200 v2.5.1 на русском языке | |
| Инструкция iVMS 4200 v3.5.0 на английском языке |
Ниже мы постарались собрать наиболее частные вопросы которые интересуют начинающего пользователя клиентского ПО iVMS 4200.
- Как установить iVMS 4200 на компьютер;
- Инструкция по добавлению камеры в iVMS;
- Как просматривать камеру через интернет;
- Как просматривать и скачать записи с камеры Hikvision;
- Как использовать аккаунт Hik-connect со смартфона в iVMS4200;
- Инструкция по удаленной настройке камер Hikvision через iVMS 4200;
- Инструкция по изменению кода подтверждения (verification code);
Как установить iVMS 4200 client на компьютер с ОС Windows
У нас на сайте есть информационные статьи в которых описываются пошаговые действия которые нужно произвести для достижения нужного результата. На тему как установить iVMS 4200 на компьютер есть полноценная статья-инструкция. В которой тщательно расписан каждый шаг, а также созданы красочные иллюстрации для более удобного восприятия.
Как подключить камеру Hikvision к iVMS 4200
Данный вопрос волнует начинающих пользователей как одиночных камер, так и целых систем с многоканальными видео регистраторами. Такая процедура подключения довольно проста, но для некоторых может показаться непривычным и сложным.

На тему добавления камеры у нас есть полноценная поясняющая статья-инструкция, в которой расписаны все пошаговые действия — добавление камеры к iVMS 4200
Для тех же кто хочет получить краткий курс по добавлению оборудования Hikvision в клиентское ПО продолжайте чтение этой статьи.
Если у Вас уже настроено отображение камер через приложение Hik-connect, то наиболее целесообразным будет использовать его и на ПК. Для того чтобы войти в аккаунт нужно нажать на кнопку «Вход» в правом верхнем углу приложения.

Откроется новое окно для ввода имени пользователя и пароля от аккаунта Hik-connect (либо Ezviz).

Также в данном меню можно произвести регистрацию в сервисе Hik-connect и после этого осуществить вход.
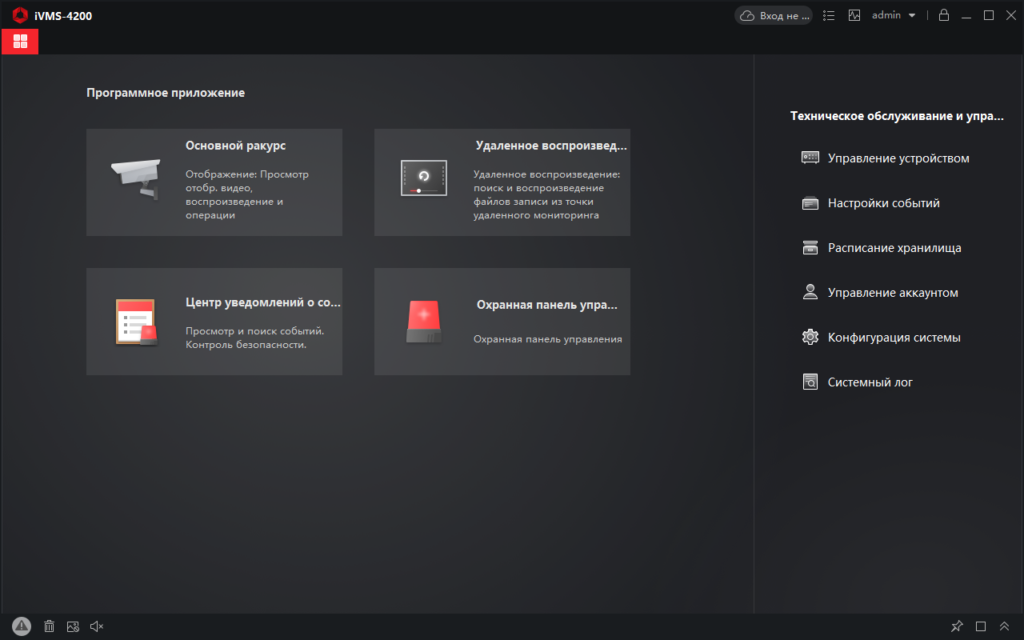
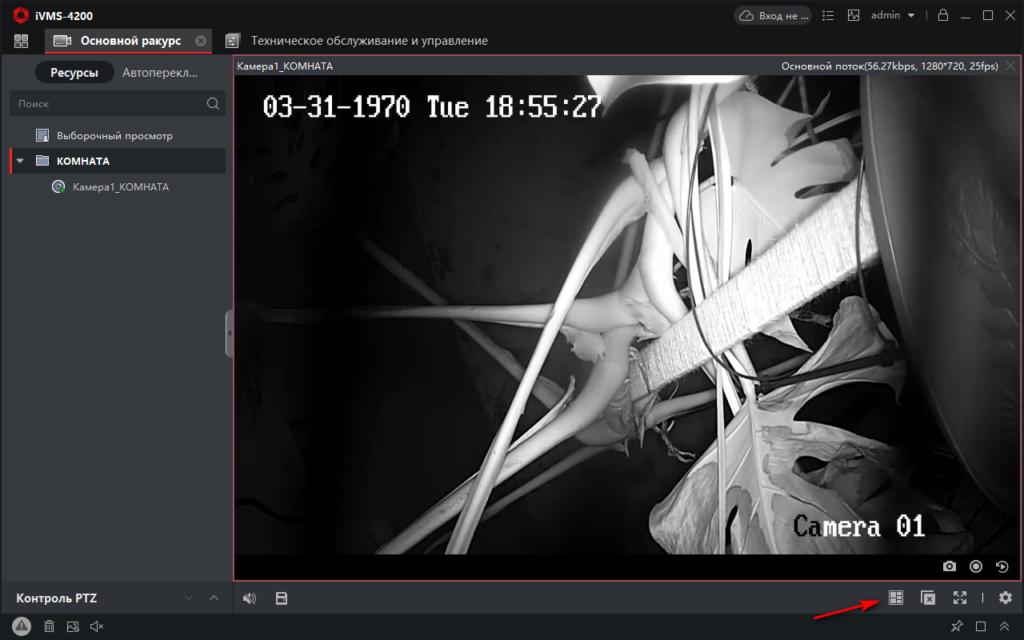
После того как данные введены, можно перейти к просмотру подключенного к аккаунту оборудования, к примеру камер видеонаблюдения. Для этого нужно выбрать в основном меню пункт «Основной ракурс»

На следующем шаге потребуется ввести код подтверждения (verification code) который устанавливался при первоначальной настройке камеры. Если Вы забыли код подтверждения, то рекомендуем прочесть статью про код подтверждения Hik-connect.

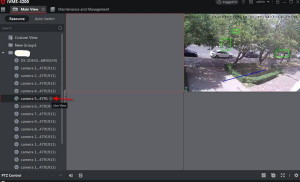
Пункт «Основной ракурс» предназначен для того чтобы пользователь мог видеть изображение с камер в реальном времени. Для того чтобы начать просмотр, нужно выбрать нужную камеру или видеорегистратор в левой колонке двойным кликом мыши. После этого потребуется ввести код подтверждения и просмотр будет активирован.

В режиме просмотра доступны некоторые полезные функции:
- Двойным кликом по любому из маленьких изображений можно открыть полноэкранный просмотр;
- В полноэкранном режиме доступна функция масштабирования, т.е. цифрового увеличения. Для того чтобы ей воспользоваться нужно кликнуть правой клавишей мыши по изображению и выбрать «Открыть цифровой зум». После чего, используя скролл (колесико) мыши, можно приблизить или уменьшить нужную область. Либо можно выделить прямоугольник на изображении и эта зона будет увеличена.
- Еще одна функция которая может пригодиться многим пользователям это изменение потока. По умолчанию iVMS 4200 автоматически настраивает режим отображения, т.е. подбирает картинку соответствующую скорости интернета и производительности компьютера. Открыв меню поток «поток» пользователь может вручную изменить тип потока. К примеру максимальное качество это «Основной поток», в нем качество видео с камеры будет наилучшим.
- Можно сделать мгновенный снимок того что происходит сейчас на дисплее использую пункт «Сохранение». Программа iVMS 4200 при нажатии на эту кнопку сохранит снимок в библиотеке файлов на компьютере.
- Если камера оснащена встроенным микрофоном, или к ней подключен внешний, то данное контекстное меню позволит включить воспроизведение. Сделать это можно используя пункт «Аудио включено».
- Если есть необходимость, то можно начать запись с камеры видеонаблюдения прямо во время просмотра онлайн. Для этого нужно воспользоваться пунктом меню «Начать запись». Данная запись будет сохранена на компьютер в папке для записей.

При установке системы видеонаблюдения большинство современных пользователей хотят иметь возможность просматривать их удаленно, т.е. используя сеть интернет. Для того чтобы настроить эту функцию в iVMS 4200 существует несколько способов.
- Использовать облачный сервис Hik-connect, о его использовании написано выше;
- Доступ к оборудованию через статический IP адрес (более сложный вариант, обычно с ним работают опытные пользователи);
- Воспользоваться сторонним сервисом DDNS, с которым можно получить доступ к системе по доменному имени;
Наиболее популярным и простым в использовании это получать доступ и управление через аккаунт Hik-connect (либо Ezviz). Это связано с тем что нет необходимости производить настройки сети, заказывать дополнительные услуги и вносить изменения в параметры маршрутизатора. Проще говоря это наиболее удобный способ настройки удаленного доступа.
Недостатком данного способа можно назвать ограничение количества настроек, которые можно производить, находясь удаленно от системы.
Доступ с использованием статического IP адреса провайдера также довольно популярен, но им обычно пользуются системные инженеры и администраторы. Нужен он для полного контроля за системой из любого уголка мира. Доступ по статическому IP позволяет получить полный доступ к тонкой настройке системы видеонабллюдения.
Недостатком метода является сложность настройки и необходимость заказа дополнительных услуг от провайдера интернета.
Как просматривать и скачать записи через iVMS 4200
Возникают ситуации когда нужно просмотреть записи с камер и зачастую не просто просмотреть, но и скачать их для предоставления в соответствующие органы. Можно конечно воспользоваться мобильным приложением Hik-connect и там сохранить запись на телефон, а после скопировать на флешку, но это не всегда удобно. К примеру если промежуток записи большой, то на телефоне придется его весь просмотреть и сохранить.
Удобнее всего воспользоваться для скачивания записей программой iVMS 4200, которая предназначена для подобных целей.
В данной инструкции рассмотрим как можно сохранить нужный фрагмент архива записей на ПК, с последующим копированием на накопитель.
Для того чтобы начать просмотр записей нужно открыть пункт в главном меню «Удаленное воспроизведение».

Откроется меню по просмотру архива.
- Здесь нужно найти в левой колонке камеру с которой необходима запись. Кликом мыши выбираем её.
- Далее в той же левой колонке, вверху, открываем календарь, в котором выбираем начальную и конечную дату, по которой нужно увидеть запись.
- В том же календаре вводим начальное и конечное время, в промежутке которого есть нужное видео.

Стоит отметить что выбирать промежуток записи за промежуток больший чем 24 часа не стоит, т.к. просмотреть столь большой временной отрезок сложно физически. Также такой отрезок будет очень большим для загрузки и даже с высокой скоростью интернета, его придется долго скачивать.
После того как временные промежутки установлены, можно начать воспроизведение. Для этого нужно навести мышью на выбранную камеру, возле нее появится значёк воспроизведения. Нужно нажать на него и внизу экрана отобразится временная шкала которая была выбрана в календаре.

Для того чтобы перемещаться между фрагментами записи можно использовать временную шкалу. Если Ваша система настроена на запись по детектору движения, то шкала будет выглядеть отрывками, если запись постоянная, то блок будет цельным.
Временная шкала позволяет масштабировать себя, более удобного выбора точного времени. Для масштабирования нужно навести мышь на временную шкалу и прокрутить скролл (колёсико мыши) вперед. После этого, путем перетаскивания отрывков шкалы, вдоль красного, центрального маркера, отображение записей будет тоже перемещаться.

Как скачать записи через iVMS 4200
Многие интересуются как можно скачать видео с камеры Hikvision. Для этого существует несколько способов:
- Использовать программу iVMS 4200
- Скачивание через мобильное приложение Hik-connect, либо Ezviz
- Локальная загрузка архива через видеорегистратор. Способ не подходит для владельцев одиночных камер.
В принципе любой из способов работоспособен, но степень удобства работы с архивом может отличаться. К примеру если Вам нужно скачать архив с камеры за последние 12 часов, то сделать это с телефона будет не удобно. Доступ же к видеорегистратору не всегда возможен.
Наиболее удобным будет использование iVMS 4200. Программа позволит с удобством предварительно просмотреть отрывки за нужное время и потом скачать его.
По информации выше Вы сможете просмотреть записи, теперь давайте рассмотрим как скачать фрагмент записи.
Для этого во время воспроизведения нужно нажать на значёк «ножниц» в левом нижнем углу.

После нажатия на «ножницы» отобразится окно в котором будут показаны временные промежутки за которые нужно скачать запись. Если есть необходимость изменить время, то это можно сделать прямо в этом всплывающем окне.
После того как Вы убедились что все данные соответствуют необходимым, можно нажать кнопку «Да».

Теперь осталось только дождаться когда запись скачается. Прогресс загрузки отображается в правом верхнем углу возле кнопки «Вход».
Инструкция по удаленной настройке камер Hikvision через iVMS 4200
Иметь доступ к системе видеонаблюдения, на данный момент, вполне понятная и реализуемая задача. Настроить удаленный доступ может практически любой, более менее разбирающийся в ПК человек. Но есть такая задача как управление системой наблюдения, и вот тут зачастую возникают сложности.
Компания Hikvision реализовала свои системы таким образом что для получения полного доступа нужно довольно глубоко вникнуть в тонкие настройки программы iVMS 4200.
Для чего может понадобиться удаленная настройка видеонаблюдения
- У Вас есть несколько объектов, расположенных в разных населенных пунктах и при очередном просмотре Вы обнаруживаете что одна из камер загружается медленно;
- Есть необходимость производить контроль объема накопителя находясь удаленно;
- Нужно поменять параметры отображения информации на камере, к примеру водяного знака, либо изменить системное время;
- Изменение параметров изображения на камере, таких как яркость, контрастность.
- Управление ночным видением. Расписание переключения, настройки чувствительности и прочее;
- Создание и редактирование учетных записей пользователей;
- Изменение параметров локальной сети каждой отдельной камеры, или системы в целом;
Это лишь краткий перечень возможностей которые предоставит iVMS 4200 тем пользователям которые хотят производить удаленную настройку.
Для того чтобы начать удаленное управление нужно иметь установленную программу iVMS 4200 и добавленное в нее оборудование. Под оборудованием имеется ввиду минимум одна камера Hikvision, или система видеонаблюдения.
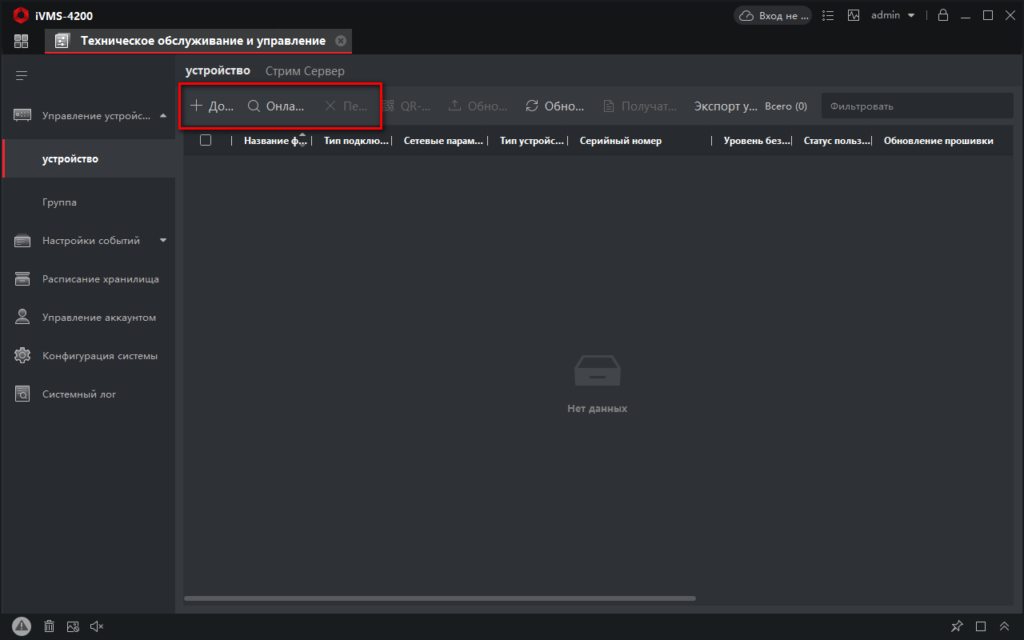
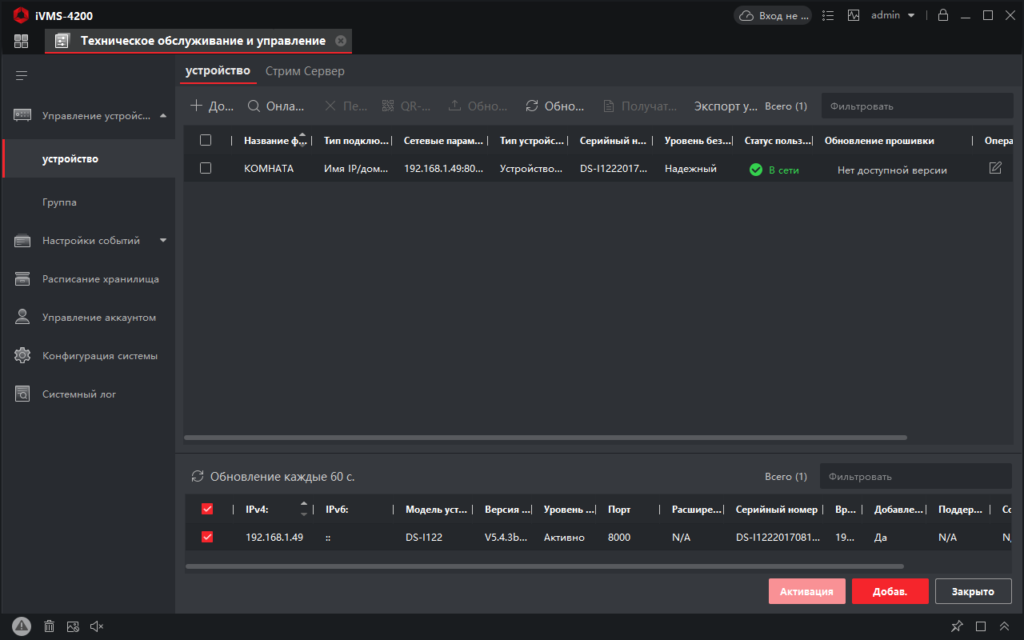
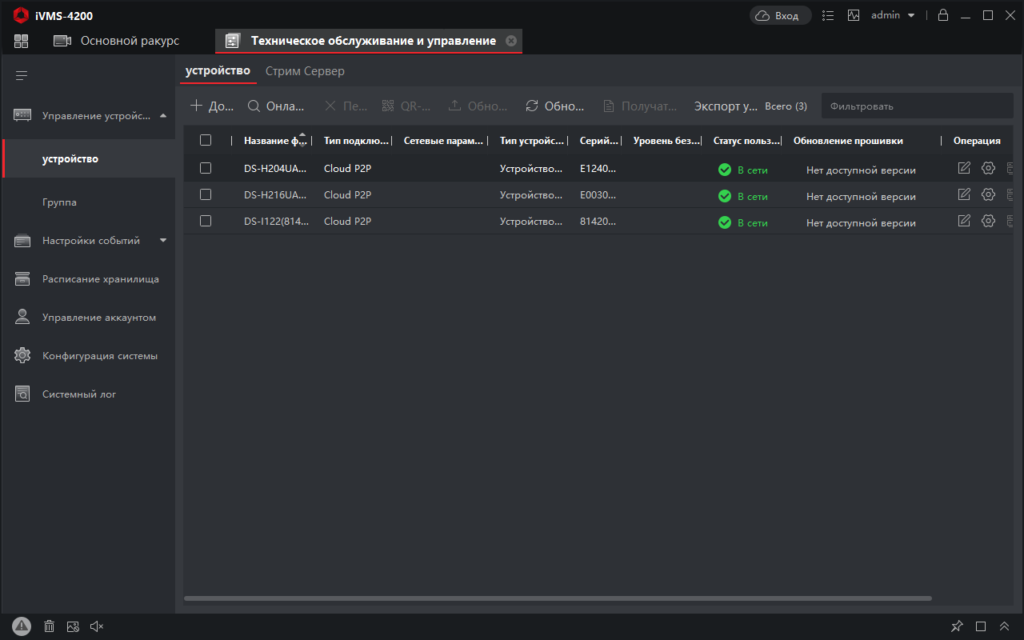
В первую очередь с главного экрана программы нужно открыть раздел меню «Управление устройством».

В открывшемся окне нужно выбрать объект, при условии что их несколько и нажать на значок шестеренки, который нужен для «Удаленной настройки».

Здесь отобразится общая информация об устройстве к которому Вы подключились, такая как серийный номер, название модели и прочее.

Далее пройдемся по самым часто используемым пунктам меню.
Время
В разделе время можно управлять настройками отображения времени, а также настроить автоматическую настройку через интернет. Также доступен к выбору часовой пояс который необходим для данного объекта.
Еще один важный пункт это настройка DST. В ней можно задать когда нужно переводить часы. К примеру в Украине перевод времени производится два раза в год:
- Март — последнее воскресенье — 00:00 часов
- Октябрь — последнее воскресенье — 00:00 часов
Параметр для автоматического перевода — 60 минут.
В указанные месяцы будет осуществляться автоматический перевод времени на 1 час. Если в Вашей стране не переводятся часы, то данную настройку нужно выключить

Обслуживание системы
Полезный пункт когда есть необходимость произвести следующие действия:
- Перезагрузить всю систему или камеру
- Сделать сброс настроек до заводских установок
- Загрузить конфигурацию системы. К примеру ранее сохраненные настройки.
- Скачать файл конфигурации с текущими настройками. Нужно для того чтобы можно было в несколько кликов восстановить все настройки.
- Обновление программного обеспечения, прошивки.

Управление хранилищем
Накопитель установленный в камеру, или в регистратор иногда может потребовать обслуживания, либо попросту наблюдения за объемом. Для того чтобы просмотреть текущий объем хранилища нужно перейти в раздел «Хранилище». В нем будет виден объем установленного жесткого диска, либо карты памяти в системе.
Здесь можно произвести форматирование накопителя. Можно установить резервный жесткий диск и производить на него резервное копирование с основного HDD.

Настройка событий и детектора движения Hikvision
Довольно обширный раздел, в котором можно произвести множество нужных настроек. Самые распространенные из них:
- Включение детектора движения, настройка чувствительности и установка зон обнаружения;
- Детекция подделки видео, или закрытие объектива;
- Потеря видео и оповещение об этом владельца, либо оператора;
- Тревога — настройка тревожных выходов, при наличии таковых на камере;
- Электронная почта — настройка отправки оповещений на email. Здесь настраиваются параметры для отправки сообщений о тревоге и движении. Для настройки нужно уточнить данные у провайдера электронной почты;
- Ошибка — настройка предупреждений об ошибках которые могут возникнуть при эксплуатации оборудования;
- Настройка расписания записи — важный пункт, в котором устанавливаются параметры записи, а также предзапись и пост-запись;
- Детектор пересечения линии — одна из разновидностей смарт-функций в камерах Hikvision. Позволяет установить виртуальную линию на изображении, при пересечении которой происходит запись, или оповещение владельца;
- Обнаружение вторжения — настройка приватных масок и обнаружения несанкционированного доступа;

Изображение — настройка
Настройка параметров изображения это один из наиболее важных пунктов при монтаже системы видеонаблюдения. Здесь производится настройка кодеков сжатия и разрешения камер. Также можно включить или отключить запись аудио.

Сеть — настройка и изменение параметров локальной сети
Сетевая настройка системы наблюдения через iVMS 4200 позволяет установить автоматическое получение IP адреса, либо установка статического IP адреса. Также возможно изменить порты по которым в дальнейшем будет производится доступ и управление регистратором или камерами.

Hik-connect — включение и настройка кода подтверждения
Hik-connect это облачный сервис от компании Hikvision который позволяет получить доступ к камерам без использования дополнительных услуг провайдера интернета.
Под доп. услугами имеется ввиду подключение внешнего статического IP (белого) адреса, активация и проброс портов.
Для того чтобы доступ через Hik-connect заработал необходимо указать код подтверждения (code verification).

Также здесь можно изменить или посмотреть код подтверждения, если Вы его забыли. Для этого нужно нажать на чекбокс в строке «Код верификации».
Блог
Назад к статьям
Настройка программы iVMS-4200 для удаленного просмотра камер Hikvision
02.08.2020
Для работы с камерами, регистраторами, системами домофонии и СКУД компания Hikvision предлагает клиентское программное обеспечение iVMS-4200. С помощью данной программы можно полноценно управлять всеми устройствами Hikvision — производить конфигурацию, просматривать видео, управлять системой СКУД и домофонией и многое другое. Одна из возможностей iVMS-4200 — это удаленный доступ к устройствам Hikvision, подключенным по технологии p2p. В этой статье мы расскажем, как очень легко настроить удаленный просмотр камер Hikvision на ноутбуке или компьютере.
Как установить iVMS-4200. Руководство пользователя.
Hikvision предлагает свой облачный сервис p2p, который доступен через приложения Hik-connect и HiLook. Если вы подключили свои устройства Hikvision через одно из перечисленных приложений, то вы сможете с помощью программы iVMS-4200 получить удаленный доступ к подключенным устройствам на компьютере или ноутбуке. Итак, как это сделать? Для установки воспользуемся инструкцией на русском языке для программы iVMS-420.
Давайте выполним следующие шаги последовательно:
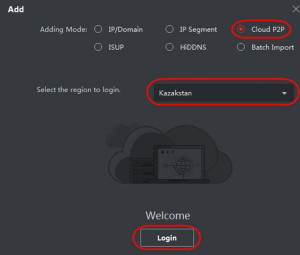
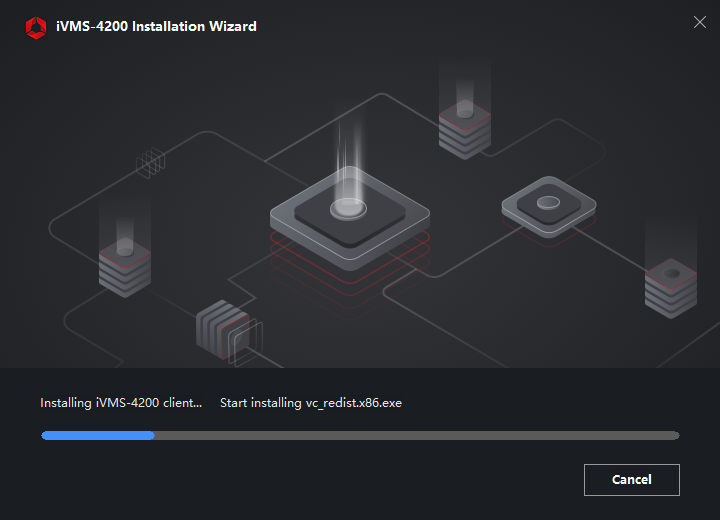
1. Установка программы iVMS-4200 (здесь и далее мы работаем с версией программы 3.3.0.7), которую вы можете скачать с официального сайта Hikvision в разделе “Поддержка”. Во время установки можно использовать параметры по умолчанию, но в качестве региона — “Cloud P2P Region” нужно указать вашу страну, в нашем случае Казахстан.
Во время установки программа попросит указать пароль пользователя admin — придумайте пароль, запомните или запишите.
Также далее последуют проверочные вопросы для восстановления пароля, которые также следует заполнить соответствующими ответами;
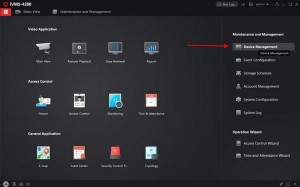
2. После установки софта и первого запуска перейдите в раздел “Device Management”, как показано на рисунке:
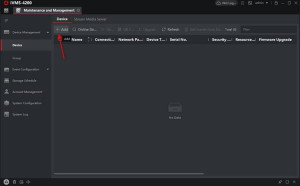
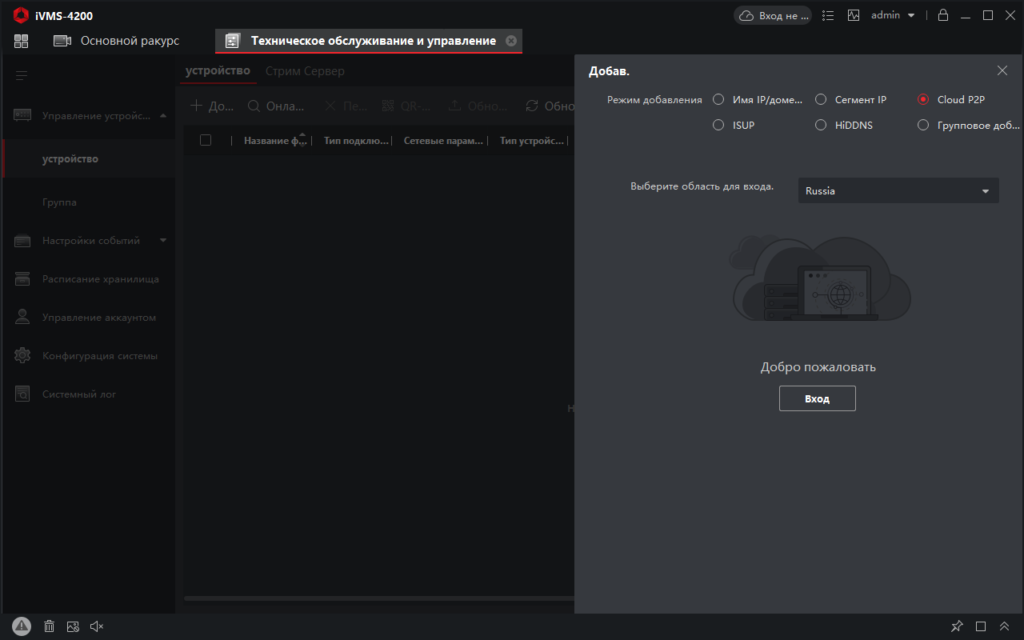
3. В следующем окне нужно добавить устройство нажав на кнопку “Add”:
4. В появившемся окне нужно выбрать Cloud P2P и выбрать регион — в нашем случае Казахстан, далее нажать на кнопку “Login”:
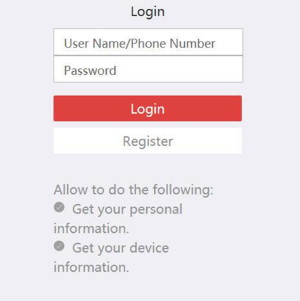
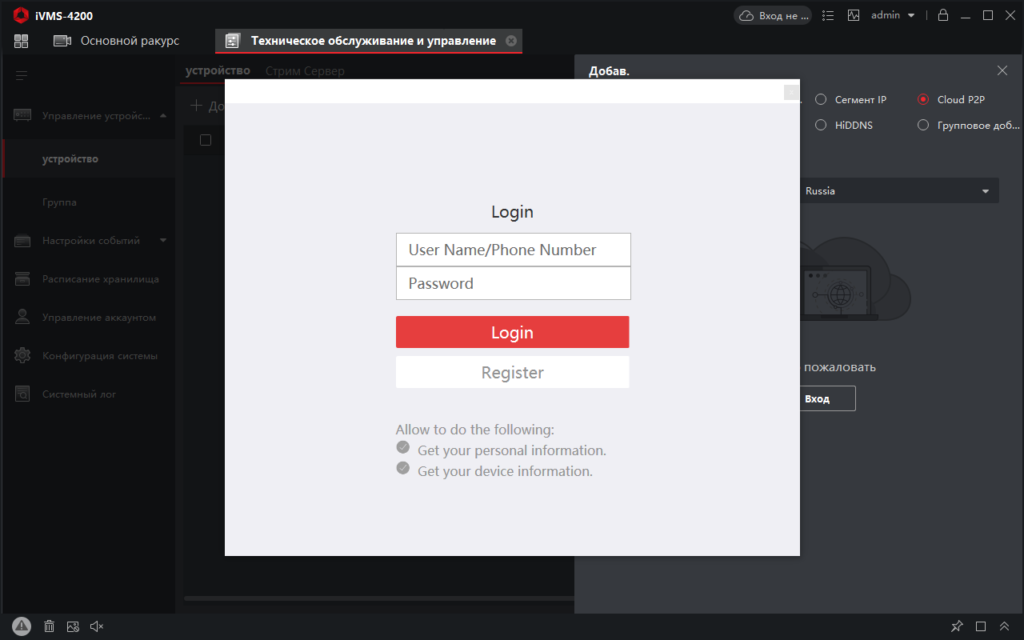
5. В следующем окне необходимо указать данные учетной записи Cloud P2P — это почта или номер телефона, которые вы указывали при регистрации в приложениях Hik-connect/HiLook:
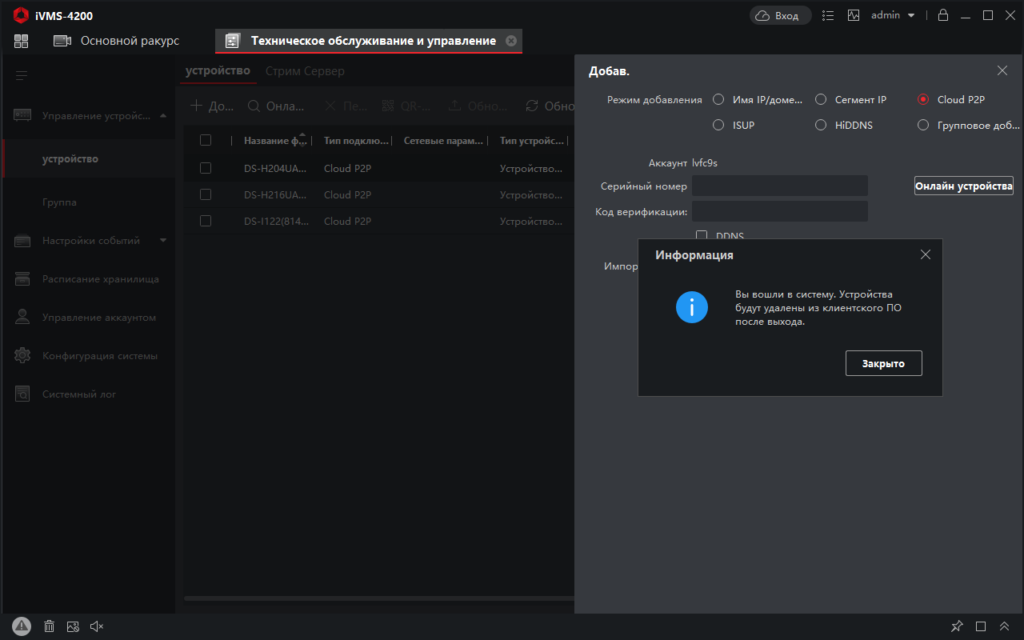
После успешной регистрации вы увидите сообщение:
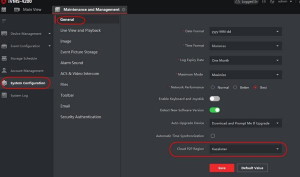
На этом шаге может возникнуть ошибка “user name does not exist”. В этом случае необходимо проверить регион вашей учетной записи, правильно ли вы указали его на шаге 4. Также нужно проверить регион в основных настройках “System Configuration”:
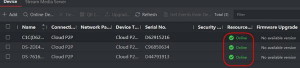
В результате успешного добавления в списке устройств появятся ваши камеры или регистраторы, привязанные к учетной записи Hik-connect/HiLook:
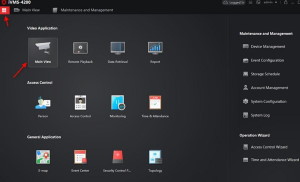
6. Чтобы сделать удаленный просмотр с камеры нужно перейти на начальный экран и выбрать функцию “Main view”:
7. В разделе “Main View” выбрать подключенное устройство нажать на кнопку Live и через некоторое время онлайн видео с удаленной камеры начнет отображаться в программе:
На этом все. Программа установлена и настроена. Вы можете осуществлять удаленное управление всеми устройствами Hikvision.
На сегодняшний день все IP камеры Hikvision, HiLook, HiWatch, Ezviz, а также HD-TVI видеорегистраторы поддерживают облачный сервис Hikvision и их можно удаленно просматривать не только через мобильные приложения Hik-Connect/HiLook, но и через настольное клиентское приложение iVMS-4200.
В интернет-магазине Manggis вы можете приобрести камеры видеонаблюдения с удаленным просмотром по доступной цене. Мы предлагаем покупателям большой выбор камер, качественное обслуживание и быструю доставку товара в Алматы и другие города Казахстана.
Посмотрите ассортимент наших товаров в интернет-магазине
У Вас появились вопросы?
Оставьте заявку на звонок нашего консультанта


Получите доступ к своим камерам с любой точки мира через интернет!
Просмотров 99.5к. Опубликовано 09.01.2021
Обновлено 29.12.2022
Работа с сайтом личного кабинета и приложением для мобильных ОС рассмотрена в статье Как настроить Hik-Connect?. Тем не менее часто этого недостаточно, потому что требуется смотреть картинки на компьютере с Windows. Облако EZVIZ позволяет это делать прямо в личном кабинете через браузер, а вот Hik-Connect – нет. Но выход есть – приложение iVMS-4200.
Скачать нужно два инсталлятора. Первый устанавливает само приложение с англоязычным интерфейсом, второй – другие языки интерфейса. При установке, имеет смысл выбрать только свой – остальные ставить ни к чему.
Содержание
- Установка iVMS-4200 E
- Установка языков интерфейса
- Первый запуск iVMS-4200
- Поключение устройств
- Подключение по адресу
- Подключение через облако
- Отображение
Установка iVMS-4200 E
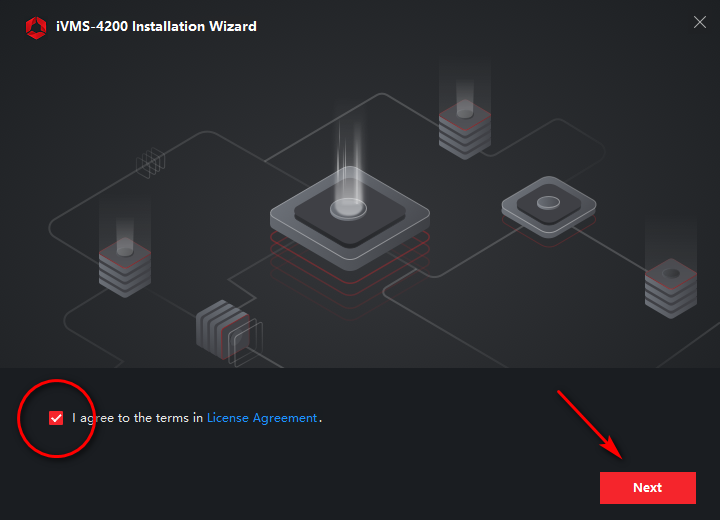
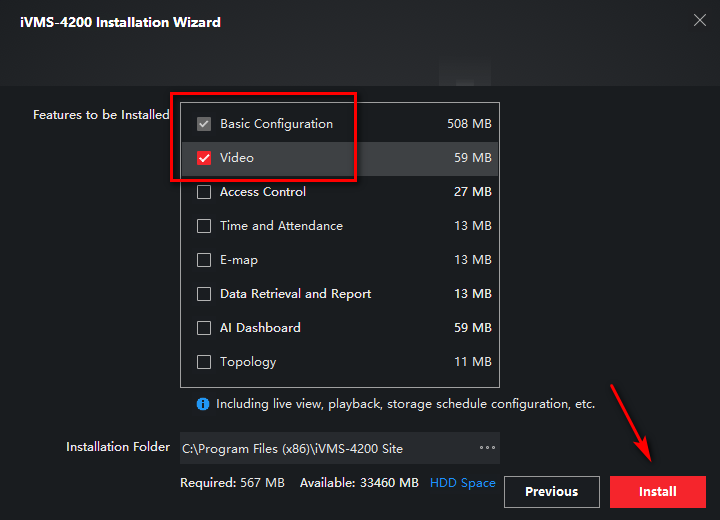
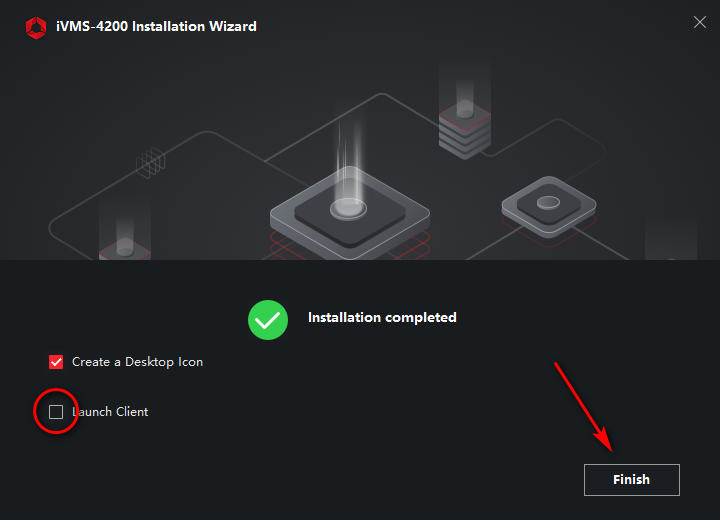
В первом окне инсталлятора ставим галку, подтверждая, что согласны с лицензионным соглашением. В следующем окне оставляем только две верхние галки, чтобы не устанавливать ненужные компоненты приложения. В последнем окне убираем галку запуска приложения, т.к. перед запуском, его нужно ещё русифицировать и жмём Finish.
Установка языков интерфейса
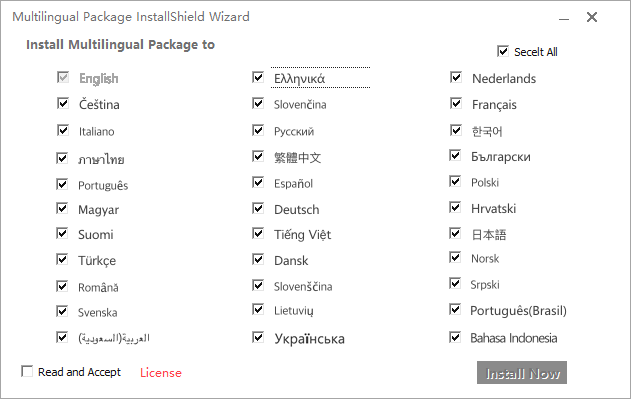
Запускаем инсталлятор языков интерфейса. В первом окне видим много-много языков и много-много галочек. Ставим галку Read and Accept License, снимаем галку Select All и ставим галку Русский. Жмём Install Now. В последнем окне жмём Start Now, но можно не ждать – ничего не стартует.

Первый запуск iVMS-4200
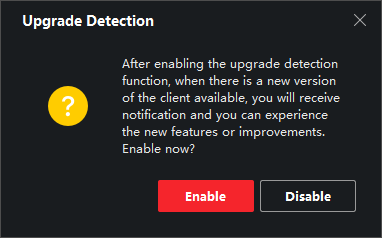
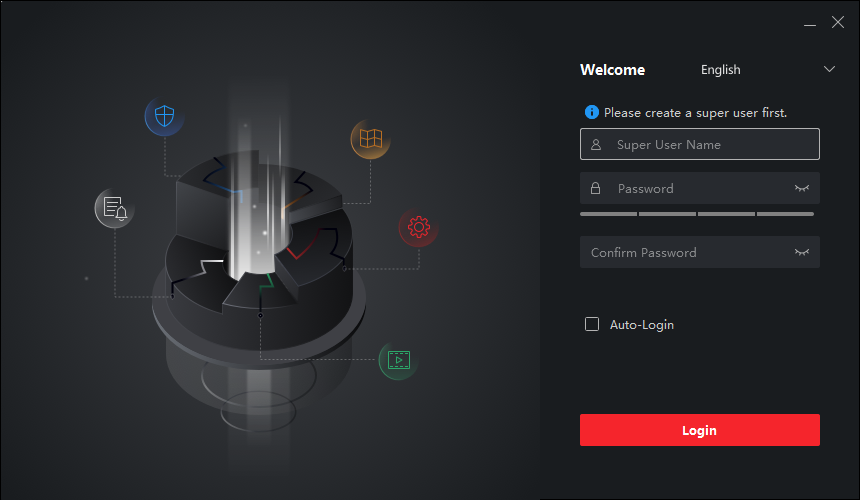
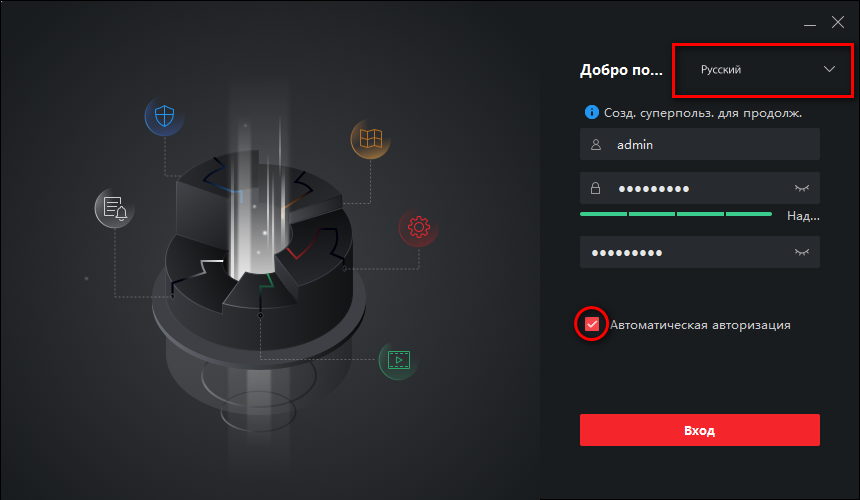
Находим на рабочем столе ярлык приложения iVMS-4200 и запускаем. Сначала выскочит окошечко с предложением настроить функцию Upgrade Detection, чтобы софтинка мониторила появление новых версий и уведомляла о выходе оных. Далее откроется окно с предложением выбрать язык интерфейса и создать суперпользователя. Язык выбираем, понятно, русский, а пользователя назовём просто и эффектно – admin. Придумываем ему сложный пароль не менее 8-ми символов из цифр и латинских букв разного регистра и вводим его дважды в соответствующие поля. Ставим галку Автоматическая авторизация, чтобы не вводить пароль при каждом входе в программу. Хотя тут возможны варианты – галку можно не ставить, а потом создать пользователя с ограниченными правами и сделать автовход уже ему, а не админу.
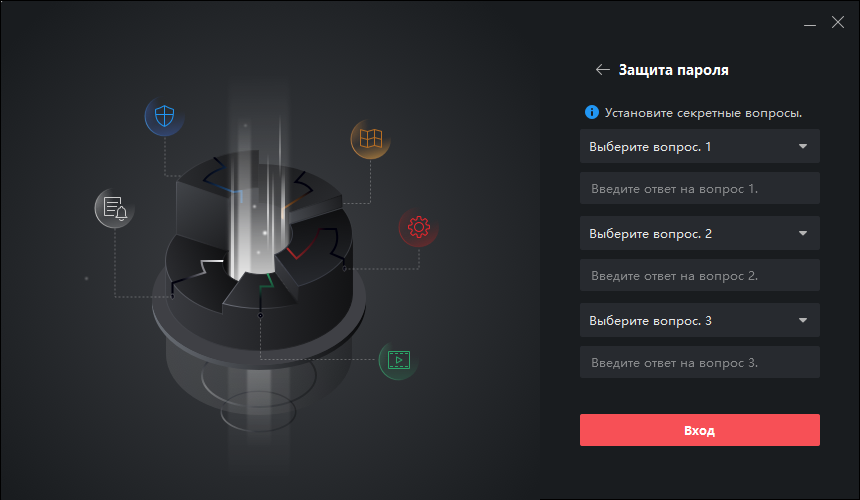
В следующем окне видим предложение выбрать секретные вопросы и вписать, в соответствующие поля, ответы на них. Это нужно для восстановления пароля в случае его утраты. Выбираем, вписываем ответы и наконец-то видим основное окно программы iVMS-4200!
Сразу оговорюсь, что при работе с китайским ПО вообще и с iVMS-4200, в частности, нужно учитывать, что локализация интерфейса производится китайцами, не очень хорошо знающими русский язык. Судя по всему, с английским у них лучше, поэтому, если что-то непонятно, то лучше переключить язык интерфейса на английский и посмотреть, как это выглядит на нём.
Поключение устройств
ПО установлено. Теперь нужно подключить к нему устройства, чтобы работать с ними – смотреть трансляцию, воспроизводить запись и производить удалённую настройку. Для этого на правой панели нажимаем на ссылку (кнопку?) Управление устройством. Существует два варианта – устройство расположено внутри локальной сети или снаружи. Второй вариант, в свою очередь, делится ещё на два – подключение через реальный IP-адрес или через облако. Локальное подключение и подключение через реальный IP-адрес ничем не отличаются, кроме того, что во втором случае, должны быть сделаны определённые настройки на роутере удалённой сети, а именно переадресация портов. Можно объединить эти два способа одним названием – Подключение по адресу.
Существует три кнопки для манипуляции устройствами: Добав., Онлайн устройства и Переместить. Необходимо пояснить:
- Добав. – это, понятно, Добавить. Используется для добавления устройств в самом общем случае.
- Онлайн устройства – открывает в нижней части окна программы список совместимых устройств, которые находит в локальной сети.
- Переместить – вот тут интересно. На самом деле, эта кнопка должна называться Удалить. Используется, соответственно, для удаления устройств.
Подключение по адресу
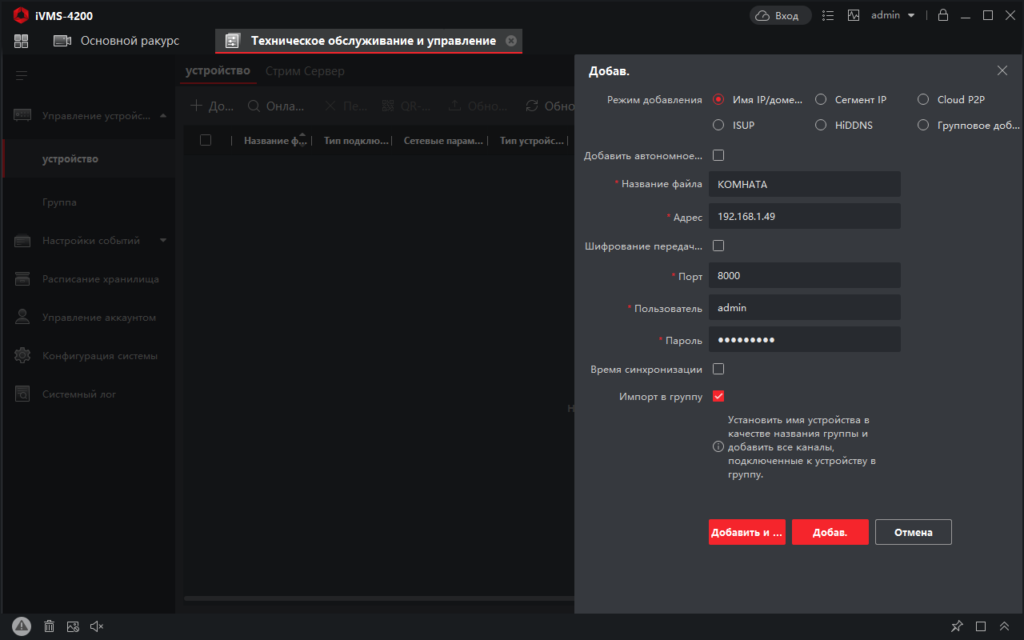
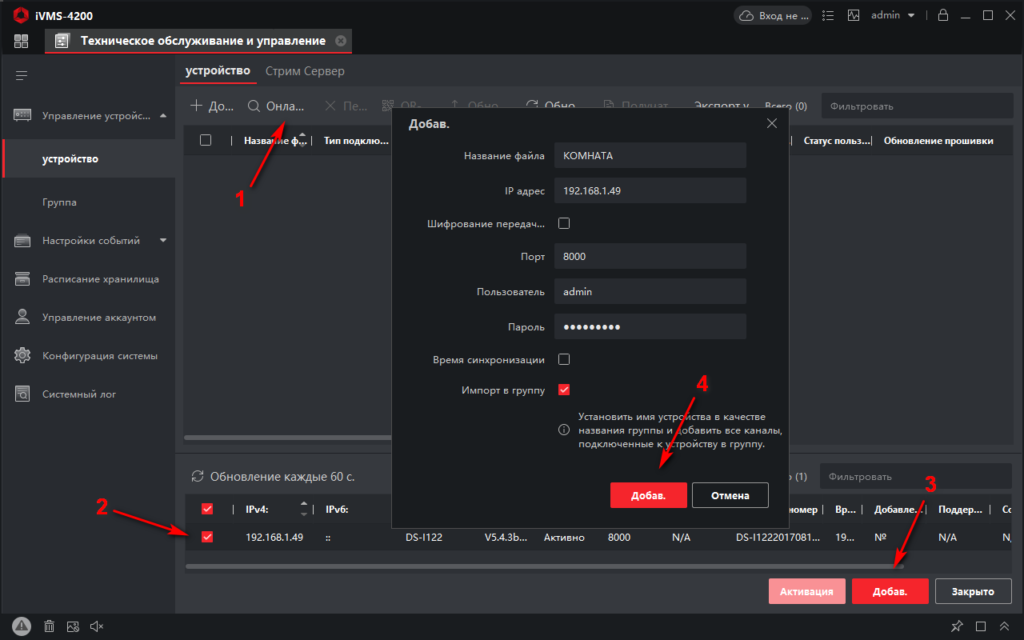
Нужно нажать Добавить, выбрать первый вариант Имя IP/Домена и заполнить все поля. При локальном подключении, для упрощения процесса, можно воспользоваться кнопкой Онлайн устройства и, в открывшемся снизу списке, выбрать нужное устройство. В этом способе два очевидных плюса: есть понимание, что устройство в сети и не придётся вводить IP-адрес.
Первое поле Название файла – это, опять же, название никакого не файла, а добавляемого устройства, под которым оно будет прописано в системе. Выбирается по своему вкусу. Шифрование советую не включать. Добавить в группу нужно, т.к. с устройствами не занесёнными в группу работать не получится. Группу можно создать и позже, вручную и добавить в неё устройства или удалить. Особенно это актуально для видеорегистраторов – каналы, к которым не подключены камеры надо удалять, чтобы не болтались зря и не смущали пользователей.
Если адрес, логин и пароль прописаны верно, то на следующем шаге, в верхней области окна увидим добавленное устройство и его статус будет В сети.
Подключение через облако
Нужно нажать кнопку Добавить и выбрать вариант Cloud P2P. Вместо нескольких полей ввода останется только один выпадающий список, из которого нужно выбрать свой регион и нажать кнопку Вход. Откроется окно ввода параметров авторизации в облаке. Если всё введено верно, то будет выведено сообщение и в списке устройств появятся все устройства, зарегистрированные в облачном аккаунте.
Отображение
Теперь можем вывести изображение на экран. Для этого возвращаемся на главный экран, нажав четыре квадратика в левом верхнем углу окна и выбираем там Основной ракурс – тоже такой себе термин. Откроется окно наблюдения – слева панель, справа видеоокна. На панели будет созданная группа и устройства в ней. Для простоты, можно просто дважды щёлкнуть на названии группы и система автоматически выберет подходящий режим экрана и расставит камеры по окнам. Если так не нравится, то справа снизу щёлкаем по кнопке Разделение окон и выбираем подходящий режим экрана. Кстати, можно и свой нарисовать. Далее, драг-н-дропом перетаскиваем камеры с панели в нужное окно, либо второй вариант – щелчок на окне, двойной щелчок на камере и так для каждой камеры/канала, если их несколько.
продолжение следует…
…будет как воспроизводить видео, делать клипы и некоторые системные настройки…
- Manuals
- Brands
- HIKVISION Manuals
- Security Camera
- iVMS-4200
- User manual
-
Contents
-
Table of Contents
-
Bookmarks
Quick Links
User Manual of Network Camera
Network Camera
User Manual
1
Related Manuals for HIKVISION iVMS-4200
Summary of Contents for HIKVISION iVMS-4200
-
Page 1: Network Camera
User Manual of Network Camera Network Camera User Manual…
-
Page 2: About This Manual
Network Camera User Manual User Manual About this Manual This Manual is applicable to Network Camera. The Manual includes instructions for using and managing the product. Pictures, charts, images and all other information hereinafter are for description and explanation only. The information contained in the Manual is subject to change, without notice, due to firmware updates or other reasons.
-
Page 3: Regulatory Information
Network Camera User Manual SECURITY RISKS; HOWEVER, OUR COMPANY WILL PROVIDE TIMELY TECHNICAL SUPPORT IF REQUIRED. SURVEILLANCE LAWS VARY BY JURISDICTION. PLEASE CHECK ALL RELEVANT LAWS IN YOUR JURISDICTION BEFORE USING THIS PRODUCT IN ORDER TO ENSURE THAT YOUR USE CONFORMS THE APPLICABLE LAW.
-
Page 4: Safety Instruction
Network Camera User Manual harmonized European standards listed under the EMC Directive 2004/108/EC, the RoHS Directive 2011/65/EU. 2012/19/EU (WEEE directive): Products marked with this symbol cannot be disposed of as unsorted municipal waste in the European Union. For proper recycling, return this product to your local supplier upon the purchase of equivalent new equipment, or dispose of it at designated collection points.
-
Page 5
Network Camera User Manual prevent serious injury or death. prevent potential injury or material damage. Warnings: Please adopt the power adapter which can meet the safety extra low voltage (SELV) standard. And source with 12 VDC or 24 VAC (depending on models) according to the IEC60950-1 and Limited Power Source standard. -
Page 6
Network Camera User Manual being used, make sure that the surface of the sensor not be exposed to the laser beam. Do not place the camera in extremely hot, cold temperatures (the operating temperature should be between -30°C to +60°C, or -40°C to +60°C if the camera model has an “H”… -
Page 7: Table Of Contents
Network Camera User Manual Table of Contents Table of Contents……………………. 7 Chapter 1 System Requirement………………9 Chapter 2 Network Connection………………10 2.1 Setting the Network Camera over the LAN…………10 2.1.1 Wiring over the LAN…………….10 2.1.2 Activating the Camera…………….11 2.2 Setting the Network Camera over the WAN………….16 2.2.1 Static IP Connection…………….
-
Page 8
Network Camera User Manual 7.10 Configuring Platform Access Settings…………60 7.11 Configuring HTTPS Settings…………….61 Chapter 8 Video/Audio Settings………………64 8.1 Configuring Video Settings…………….64 8.2 Configuring Audio Settings…………….66 8.3 Configuring ROI Encoding…………….67 8.4 Display Info. on Stream………………69 Chapter 9 Image Settings………………..69 9.1 Configuring Display Settings…………….69 9.1.1 Day/Night Auto-Switch…………….70 9.1.2 Day/Night Scheduled-Switch………….. -
Page 9: Chapter 1 System Requirement
Network Camera User Manual Chapter 1 System Requirement Operating System: Microsoft Windows XP SP1 and above version CPU: 2.0 GHz or higher RAM: 1G or higher Display: 1024×768 resolution or higher Web Browser: Internet Explorer 8.0 and above version, Apple Safari 5.0.2 and above version, Mozilla Firefox 5.0 and above version and Google Chrome 18 and above version.
-
Page 10: Chapter 2 Network Connection
To view and configure the camera via a LAN, you need to connect the network camera in the same subnet with your computer, and install the SADP or iVMS-4200 software to search and change the IP of the network camera.
-
Page 11: Activating The Camera
Network Camera User Manual Refer to the Figure 2-2 to set network camera over the LAN via a switch or a router. Figure 2-1 connecting Directly Figure 2-2 Connecting via a Switch or a Router 2.1.2 Activating the Camera You are required to activate the camera first by setting a strong password for it before you can use the camera.
-
Page 12
Network Camera User Manual Figure 2-3 SADP Interface 3. Create a password and input the password in the password field, and confirm the password. STRONG PASSWORD RECOMMENDED– We highly recommend you create a strong password of your own choosing (using a minimum of 8 characters, including at least three of the following categories: upper case letters, lower case letters, numbers, and special characters) in order to increase the security of your product. -
Page 13
Network Camera User Manual Figure 2-4 Modify the IP Address 6. Input the password and click the Save button to activate your IP address modification. Activation via Client Software The client software is versatile video management software for multiple kinds of devices. -
Page 14
Network Camera User Manual Figure 2-5 Control Panel 2. Click the Device Management icon to enter the Device Management interface, as shown in the figure below. Figure 2-6 Device Management Interface 3. Check the device status from the device list, and select an inactive device. -
Page 15
Network Camera User Manual 4. Click the Activate button to pop up the Activation interface. 5. Create a password and input the password in the password field, and confirm the password. STRONG PASSWORD RECOMMENDED–We highly recommend you create a strong password of your own choosing (using a minimum of 8 characters, including at least three of the following categories: upper case letters, lower case letters, numbers, and special characters) in order to increase the security of your product. -
Page 16: Setting The Network Camera Over The Wan
Network Camera User Manual Figure 2-8 Modifying the Network Parameters 8. Change the device IP address to the same subnet with your computer by either modifying the IP address manually or checking the checkbox of Enable DHCP. 9. Input the password to activate your IP address modification. 2.2 Setting the Network Camera over the WAN Purpose: This section explains how to connect the network camera to the WAN with a static IP…
-
Page 17: Dynamic Ip Connection
Network Camera User Manual 1. Connect the network camera to the router. 2. Assign a LAN IP address, the subnet mask and the gateway. 3. Save the static IP in the router. 4. Set port mapping, e.g., 80, 8000, and 554 ports. The steps for port mapping vary according to the different routers.
-
Page 18
Network Camera User Manual 2. In the camera, assign a LAN IP address, the subnet mask and the gateway. Refer to Section 2.1.2 for detailed IP address configuration of the network camera. 3. In the router, set the PPPoE user name, password and confirm the password. 4. -
Page 19
Network Camera User Manual Figure 2-12 Normal Domain Name Resolution Steps: 1. Apply a domain name from a domain name provider. 2. Configure the DDNS settings in the DDNS Settings interface of the network camera. 3. Visit the camera via the applied domain name. … -
Page 20: Chapter 3 Access To The Network Camera
User Manual of Network Camera Chapter 3 Access to the Network Camera 3.1 Accessing by Web Browsers Steps: 1. Run the SADP software to search the online devices. 2. Double click IPv4 Address to open the browser. Figure 3-1 SADP Interface 3.
-
Page 21: Accessing By Client Software
3.2 Accessing by Client Software The product CD contains the iVMS-4200 client software. You can view the live video and manage the camera with the software. Follow the installation prompts to install the software. The control panel and live view…
-
Page 22
Network Camera User Manual Figure 3-4 iVMS-4200 Control Panel Figure 3-5 iVMS-4200 Main View… -
Page 23: Chapter 4 Wi-Fi Settings
Network Camera User Manual Chapter 4 Wi-Fi Settings Purpose: By connecting to the wireless network, you don’t need to use cable of any kind for network connection, which is very convenient for the actual surveillance application. Note: This chapter is only applicable for the cameras with the built-in Wi-Fi module. 4.1 Configuring Wi-Fi Connection in Manage and Ad-hoc Modes Purpose:…
-
Page 24: Wireless Connection In Ad-Hoc Mode
Network Camera User Manual Figure 4-2 Wi-Fi Setting 4. Check the radio button to select the Network mode as Manage, and the Security mode of the network is automatically shown when you select the wireless network, please don’t change it manually. Note: These parameters are exactly identical with those of the router.
-
Page 25
Network Camera User Manual 3. Choose the Security Mode of the wireless connection. 4. Enable the wireless connection function for your PC. 5. On the PC side, search the network and you can see the SSID of the camera listed. Figure 4-4 Ad-hoc Connection Point 6. -
Page 26
Network Camera User Manual Authentication — Select Open or Shared Key System Authentication, depending on the method used by your access point. Not all access points have this option, in which case they probably use Open System, which is sometimes known as SSID Authentication. -
Page 27
Network Camera User Manual Figure 4-8 EAP-TLS Identity — Enter the user ID to present to the network. Private key password – Enter the password for your user ID. EAPOL version — Select the version used (1 or 2) in your access point. … -
Page 28: Easy Wi-Fi Connection With Wps Function
Network Camera User Manual increase the security of your product. Proper configuration of all passwords and other security settings is the responsibility of the installer and/or end-user. 4.2 Easy Wi-Fi Connection with WPS function Purpose: The setting of the wireless network connection is never easy. To avoid the complex setting of the wireless connection you can enable the WPS function.
-
Page 29
Network Camera User Manual 1. Check the checkbox of to enable WPS. 2. Choose the connection mode as PBC. Note: Support of this mode is mandatory for both the Access Points and the connecting devices. 3. Check on the Wi-Fi router to see if there is a WPS button. If yes push the button and you can see the indicator near the button start flashing, which means the WPS function of the router is enabled. -
Page 30: Ip Property Settings For Wireless Network Connection
Network Camera User Manual If the PIN code is generated from the router side, you should enter the PIN code you get from the router side in the Router PIN code field. 3. Click Connect. You can generate the PIN code on the camera side. And the expired time for the PIN code is 120 seconds.
-
Page 31
Network Camera User Manual Figure 4-11 Setting WLAN Parameters 3. Customize the IPv4 address, the IPv4 Subnet Mask and the Default Gateway. The setting procedure is the same with that of LAN. If you want to be assigned the IP address you can check the checkbox to enable the DHCP. -
Page 32: Chapter 5 Live View
User Manual of Network Camera Chapter 5 Live View 5.1 Live View Page Purpose: The live view page allows you to view the real-time video, capture images, realize PTZ control, set/call presets and configure video parameters. Log in the network camera to enter the live view page, or you can click Live View on the menu bar of the main page to enter the live view page.
-
Page 33: Starting Live View
Network Camera User Manual Toolbar allows you to adjust the live view window size, the stream type, and the plug-ins. It also allows you to process the operations on the live view page, e.g., start/stop live view, capture, record, audio on/off, two-way audio, start/stop digital zoom, etc.
-
Page 34: Recording And Capturing Pictures Manually
Network Camera User Manual Icon Description Manually start/stop recording. Audio on and adjust volume /Mute. Turn on/off microphone. Start/stop digital zoom function. Start/Stop 3D Zoom Note: The icons vary according to the different camera models. 5.3 Recording and Capturing Pictures Manually In the live view interface, click on the toolbar to capture the live pictures or click to record the live view.
-
Page 35
Network Camera User Manual Figure 5-3 PTZ Control Panel Click the zoom/focus/iris buttons to realize lens control. Notes: There are eight direction arrows ( , ) in the control panel. Click the arrows to realize adjustment in the relative positions. … -
Page 36
Network Camera User Manual Figure 5-4 Setting a Preset 2. Use the PTZ control buttons to move the lens to the desired position. • Pan the camera to the right or left. • Tilt the camera up or down. • Zoom in or out. •… -
Page 37: Chapter 6 Network Camera Configuration
User Manual of Network Camera Chapter 6 Network Camera Configuration 6.1 Configuring Local Parameters Purpose: The local configuration refers to the parameters of the live view, record files and captured pictures. The record files and captured pictures are the ones you record and capture using the web browser and thus the saving paths of them are on the PC running the browser.
-
Page 38
Network Camera User Manual Protocol Type: TCP, UDP, MULTICAST and HTTP are selectable. TCP: Ensures complete delivery of streaming data and better video quality, yet the real-time transmission will be affected. UDP: Provides real-time audio and video streams. HTTP: Allows the same quality as of TCP without setting specific ports for streaming under some network environments. -
Page 39: Configure System Settings
Network Camera User Manual Save clips to: Set the saving path of the clipped video files in playback mode. Note: You can click Browse to change the directory for saving the clips and pictures, and click Open to open the set folder of clips and picture saving. 3.
-
Page 40: Configuring Time Settings
Network Camera User Manual 6.2.2 Configuring Time Settings Purpose: You can follow the instructions in this section to configure the time synchronization and DST settings. Steps: Enter the Time Settings interface,Configuration > Advanced Configuration> System > Time Settings. Figure 6-3 Time Settings 1.
-
Page 41: Configuring Maintenance
Network Camera User Manual Figure 6-4 Time Sync by NTP Server Note: If the camera is connected to a public network, you should use a NTP server that has a time synchronization function, such as the server at the National Time Center (IP Address: 210.72.145.44).
-
Page 42
Network Camera User Manual The maintenance interface allows you to process the operations, including reboot, default, export/import the configuration files, and remote upgrade the device. Enter the Maintenance interface: Configuration > Advanced Configuration> System > Maintenance Figure 6-6 Maintenance Reboot: Restart the device. … -
Page 43: Configuring Rs232 Settings
Network Camera User Manual to certain place. 2. Click Browse to select the saved configuration file and then click Import to start importing configuration file. Note: You need to reboot the camera after importing configuration file. Remote Upgrade: Upgrade the device to a certain version. Steps: 1.
-
Page 44: Configuring Dst Settings
Network Camera User Manual 2. Configure the Baud Rate, Data Bit, Stop Bit, Parity, Flow Control, and Usage. Figure 6-7 RS232 Settings Note: If you want to connect the camera by the RS232 port, the parameters of the RS232 should be exactly the same with the parameters you configured here. 3.
-
Page 45: Configuring Service
Network Camera User Manual Figure 6-8 DST Settings 2. Select the start time and the end time. 3. Select the DST Bias. 4. Click Save to activate the settings. 6.2.6 Configuring Service Purpose: For the device Service, including the IR light and status LED, you can control them via the Web browser.
-
Page 46: Chapter 7Network Settings
User Manual of Network Camera Chapter 7Network Settings Purpose: You can configure the parameters, including TCP/IP, Port,DDNS, PPPoE, SNMP,QoS,FTP,Wi-Fi,Email,NAT,Platform Access,HTPPS etc., by following the instructions in this section. 7.1 Configuring TCP/IP Settings Purpose: TCP/IP settings must be properly configured before you operate the camera over network.
-
Page 47: Configuring Port Settings
Network Camera User Manual 2. Configure the basic network settings, including the NIC Type, IPv4 or IPv6 Address, IPv4 or IPv6 Subnet Mask, IPv4 or IPv6 Default Gateway, MTU settings and Multicast Address. 3. (Optional) Check the checkbox of Enable Multicast Discovery, and then the online network camera can be automatically detected by client software via private multicast protocol in the LAN.
-
Page 48: Configuring Ddns Settings
Network Camera User Manual Figure 7-2 Port Settings 2. Set the HTTP port, RTSP port, HTTPS port and server port of the camera. HTTP Port: The default port number is 80, and it can be changed to any port No. which is not occupied.
-
Page 49
Network Camera User Manual 1. Enter the DDNS Settings interface: Configuration > Advance Configuration > Network > DDNS. 2. Check the Enable DDNS checkbox to enable this feature. 3. Select DDNS Type. Four DDNS types are selectable: HiDDNS, IPServer , DynDNS and NO-IP. -
Page 50
Network Camera User Manual Figure 7-4 IP Server Settings Note: For the IP Server, you have to apply a static IP, subnet mask, and gateway • and preferred DNS from the ISP. The Server Address should be entered with the static IP address of the computer that runs the IP Server software. For the US and Canada area, you can enter 173.200.91.74 as the server •… -
Page 51: Configuring Pppoe Settings
Network Camera User Manual (3)Enter the Domain name you registered. (4)Enter the User Name and Password. (5)Click Save and then you can view the camera with the domain name. HiDDNS Steps: (1) Choose the DDNS Type as HiDDNS. Figure 7-6 HiDDNS Settings (1)Enter the Server Address www.hiddns.com.
-
Page 52: Configuring Snmp Settings
Network Camera User Manual Figure 7-7 PPPoE Settings 2. Check the Enable PPPoE checkbox to enable this feature. 3. Enter User Name, Password, and Confirm password for PPPoE access. Note: The User Name and Password should be assigned by your ISP. For your privacy and to better protect your system against security risks, we …
-
Page 53
Network Camera User Manual Before setting the SNMP, please download the SNMP software and manage to receive the camera information via SNMP port. By setting the Trap Address, the camera can send the alarm event and exception messages to the surveillance center. Note: The SNMP version you select should be the same as that of the SNMP software. -
Page 54
Network Camera User Manual Figure 7-8 SNMP Settings 2. Check the checkbox of Enable SNMPv1, Enable SNMP v2c, Enable SNMPv3 to enable the feature correspondingly. 3. Configure the SNMP settings. Note: The settings of the SNMP software should be the same as the settings you configure here. -
Page 55: Configuring Qos Settings
Network Camera User Manual A reboot is required for the settings to take effect. • To lower the risk of information leakage, you are suggested to enable SNMP v3 • instead of SNMP v1 or v2. 7.6 Configuring QoS Settings Purpose: QoS (Quality of Service) can help solve the network delay and network congestion by configuring the priority of data sending.
-
Page 56
Network Camera User Manual You can configure the FTP server related information to enable the uploading of the captured pictures to the FTP server. The captured pictures can be triggered by events or a timing snapshot task. Steps: 1. Enter the FTP Settings interface: Configuration > Advance Configuration > Network >… -
Page 57: Configuring Email Settings
Network Camera User Manual 4. Set the directory structure and picture filing interval. Directory: In the Directory Structure field, you can select the root directory, parent directory and child directory. When the parent directory is selected, you have the option to use the Device Name, Device Number or Device IP for the name of the directory;…
-
Page 58
Network Camera User Manual Please configure the DNS Server settings under Configuration > Advance Configuration > Network > TCP/IP before using the Email function. Steps: 1. Enter the TCP/IP Settings (Configuration > Advance Configuration > Network > TCP/IP) to set the IPv4 Address, IPv4 Subnet Mask, IPv4 Default Gateway and the Preferred DNS Server. -
Page 59
Network Camera User Manual For your privacy and to better protect your system against security risks, we strongly recommend the use of strong passwords for all functions and network devices. The password should be something of your own choosing (using a minimum of 8 characters, including at least three of the following categories: upper case letters, lower case letters, numbers and special characters) in order to increase the security of your product. -
Page 60: Configuring Nat Settings
Network Camera User Manual 7.9 Configuring NAT Settings Purpose: NAT interface allows you to configure the UPnP™ parameters. Universal Plug and Play (UPnP™) is a networking architecture that provides compatibility among networking equipment, software and other hardware devices. The UPnP protocol allows devices to connect seamlessly and to simplify the implementation of networks in the home and corporate environments.
-
Page 61: Configuring Https Settings
Network Camera User Manual Platform access provides you an option to manage the devices via platform. Steps: 1. Enter the Platform Access settings interface: Configuration > Advance Configuration > Network >Platform Access Figure 7-13 Platform Access 2. Check the checkbox of Enable to enable the platform access function of the device.
-
Page 62
Network Camera User Manual Figure 7-14 HTTPS Configuration Interface 3. Create the authorized certificate. Create the authorized certificate (1) Select Create the certificate request first and continue the installation as the Installation Method. (2) Click Create button to create the certificate request. Fill in the required information in the popup window. -
Page 63
Network Camera User Manual (3) Download the certificate request and submit it to the trusted certificate authority for signature. (4) After receiving the signed valid certificate, import the certificate to the device. 4. There will be the certificate information after your successfully creating and installing the certificate. -
Page 64: Chapter 8 Video/Audio Settings
User Manual of Network Camera Chapter 8 Video/Audio Settings Purpose: Follow the instructions below to configure the video setting, audio settings, ROI, and Display info. on Stream. 8.1 Configuring Video Settings Steps: 1. Enter the Video Settings interface, Configuration > Advance Configuration > Video/Audio >…
-
Page 65
Network Camera User Manual Select the stream type to video stream, or video & audio composite stream. The audio signal will be recorded only when the Video Type is Video & Audio. Resolution: Select the resolution of the video output. Bitrate Type: Select the bitrate type to constant or variable. -
Page 66: Configuring Audio Settings
Network Camera User Manual bitrate. Profile: Basic profile, Main Profile, and High Profile for coding are selectable. I Frame Interval: Set I Frame Interval from 1 to 400. SVC: Scalable Video Coding is an extension of the H.264/AVC standard. Select OFF/ON to disable/enable the SVC function.
-
Page 67: Configuring Roi Encoding
Network Camera User Manual Figure 8-2 Audio Settings 2. Configure the following settings. Note: Audio settings vary according to different camera models. Audio Encoding:G.711 ulaw, G.711alaw, G.726, MP2L2 and PCM are selectable. For MP2L2, the Sampling Rate and Audio Stream Bitrate are configurable. For PCM, the Sampling Rate can be set.
-
Page 68
Network Camera User Manual Figure 8-3 Region of Interest Settings Steps: 1. Enter the ROI settings interface: Configuration > Advance Configuration > Video/Audio > ROI. 2. Select the Stream Type for ROI encoding. 3. Check the checkbox of Enable under Fixed Region item. 4. -
Page 69: Display Info. On Stream
Network Camera User Manual (6) Click Save the save the settings of ROI settings for chosen fixed region. (7) Repeat steps (1) to (6) to setup other fixed regions. 5. Click Save to save the settings. Note: ROI level means the image quality enhancing level. The larger the value is, the better the image quality would be.
-
Page 70: Day/Night Auto-Switch
Network Camera User Manual Note: The display parameters vary according to the different camera models. Please refer to the actual interface for details. 9.1.1 Day/Night Auto-Switch Steps: 1. Enter the Display Settings interface, Configuration > Advance Configuration > Image > Display Settings. Figure 9-1 Display Settings of Day/Night Auto-Switch 2.
-
Page 71: Exposure Settings
Network Camera User Manual Sharpness describes the edge contrast of the image, which ranges from 1 to 100. Exposure Settings If the camera is equipped with the fixed lens, only Manual is selectable, and the iris mode is not configurable. If Auto is selected, you can set the auto iris level from 0 to 100.
-
Page 72
Network Camera User Manual the value is, the easier the mode switches. The filtering time refers to the interval time between the day/night switch. You can set it from 5s to 120s. Scheduled-Switch: Set the start time and the end time to define the duration for day/night mode. -
Page 73
Network Camera User Manual Figure 9-5 White Balance Image Enhancement Digital Noise Reduction: DNR reduces the noise in the video stream. OFF, Normal and Expert are selectable. Set the DNR level from 0 to 100 in Normal Mode. Set the DNR level from both space DNR level [0-100] and time DNR level [0-100] in Expert Mode. -
Page 74: Day/Night Scheduled-Switch
Network Camera User Manual Figure 9-7 Video Adjustment 9.1.2 Day/Night Scheduled-Switch Day/Night scheduled-switch configuration interface enables you to set the camera parameters for day and night separately, guaranteeing the image quality in different illumination. Figure 9-8 Day/Night Scheduled-Switch Configuration Interface Steps: 1.
-
Page 75: Configuring Osd Settings
Network Camera User Manual 10 o’clock in the morning and stopped at 1 o’clock early in the next morning. 2. Click Common tab to configure the common parameters applicable to the day mode and night mode. Note: For the detailed information of each parameter, please refer to Section 9.1.1 Day/Night Auto-Switch.
-
Page 76: Configuring Text Overlay
Network Camera User Manual week if required. 3. Edit the camera name in the text field of Camera Name. 4. Select from the drop-down list to set the time format and date format. 5. Select from the drop-down list to set the time format, date format, display mode, OSD size and OSD color.
-
Page 77: Configuring Privacy Mask
Network Camera User Manual Figure 9-10 Text Overlay 2. Check Enable text Overlay checkbox 1 to enable the function. 3. Input a text you want. 4. Click Save to save settings. Note: There are 4 text that you can input ,and the text can move if you want. 9.4 Configuring Privacy Mask Purpose: Privacy mask enables you to cover certain areas on the live video to prevent certain…
-
Page 78: Chapter 10 Security Settings
Network Camera User Manual Figure 9-11 Privacy Mask Settings 4. Click and drag the mouse in the live video window to draw the mask area. Note: You are allowed to draw up to 4 areas on the same image. 5. Click Stop Drawing to finish drawing or click Clear All to clear all of the areas you set without saving them.
-
Page 79
Network Camera User Manual Steps: Configuration > Advance Enter User Management interface: Configuration > Security > User Figure 10-1 User Management Interface Adding a User The admin user has all permissions by default and can create/modify/delete other accounts. The admin user cannot be deleted and you can only change the admin password. Steps: 1. -
Page 80
Network Camera User Manual Figure 10-2 Add a User Modifying a User Steps: 1. Left-click to select the user from the list and click Modify. 2. Modify the User Name, Level and Password. 3. STRONG PASSWORD RECOMMENDED–We highly recommend you create a strong password of your own choosing (using a minimum of 8 characters, including at least three of the following categories: upper case letters, lower case letters, numbers, and special characters) in order to… -
Page 81: Authentication
Network Camera User Manual Figure 10-3 Modify a User Deleting a User Steps: 1. Click to select the user you want to delete and click Delete. 2. Click OK on the pop-up dialogue box to confirm the deletion. 10.2 Authentication Purpose: You can specifically secure the stream data of live view.
-
Page 82: Ip Address Filter
Network Camera User Manual 2. Select the RTSP Authentication type basic or disable in the drop-down list to enable or disable the RTSP authentication. Note: If you disable the RTSP authentication, anyone can access the video stream by the RTSP protocol via the IP address. 3.
-
Page 83: Security Service
Network Camera User Manual Add an IP Address Steps: (1) Click the Add to add an IP. (2) Input the IP Adreess. Figure 10-6 Add an IP (3) Click the OK to finish adding. Modify an IP Address Steps: (1) Left-click an IP address from filter list and click Modify.
-
Page 84
Network Camera User Manual 1. Enter the security service configuration interface: Configuration > Advance Configuration > Security >Security Service. Figure 10-8 Security Service 2. Check the checkbox of Enable SSH to enable the data communication security, and uncheck the checkbox to disable the SSH. 3. -
Page 85: Chapter 11 Basic Event Settings
User Manual of Network Camera Chapter 11 Basic Event Settings You can configure the basic events by following the instructions in this section, including motion detection, video tampering, alarm input, alarm output, and exception, etc. These events can trigger the linkage methods, such as Notify Surveillance Center, Send Email, Trigger Alarm Output, etc.
-
Page 86
Network Camera User Manual Figure 11-1 Enable Motion Detection 4. Click Draw Area. Click and drag the mouse on the live video to draw a motion detection area. Click Stop Drawing to finish drawing one area. 5. (Optional) Click Clear All to clear all of the areas. 6. -
Page 87
Network Camera User Manual 1. (Optional) Click Delete to delete the current arming schedule, or click Save to save the settings. 2. Move the mouse to the end of each day, a copy dialogue box pops up, and you can copy the current settings to other days. 3. -
Page 88
Network Camera User Manual Note: To send the Email when an event occurs, please refer to Section 7.2.3 to complete Email setup in advance. Upload to FTP/Memory Card/NAS Capture the image when an alarm is triggered and upload the picture to a FTP server. -
Page 89
Network Camera User Manual Figure 11-4 Expert Mode of Motion Detection Day/Night Switch OFF Steps: 1. Draw the detection area as in the normal configuration mode. Up to 8 areas are supported. 2. Select OFF for Switch Day and Night Settings. 3. -
Page 90: Configuring Video Tampering Alarm
Network Camera User Manual the selected area at night. 6. Set the arming schedule and linkage method as in the normal configuration mode. 7. Click Save to save the settings. Day/Night Scheduled-Switch Steps: 1. Draw the detection area as in the normal configuration mode. Up to 8 areas are supported.
-
Page 91: Configuring Alarm Input
Network Camera User Manual Figure 11-6 Video Tampering Alarm 2. Check Enable Video Tampering checkbox to enable the video tampering detection. 3. Set the video tampering area. 4. The default arming schedule for video tampering is 7*24 hours. 5. Check the checkbox to select the linkage method taken for the video tampering. Audible warning, notify surveillance center, send email and trigger alarm output are selectable.
-
Page 92
Network Camera User Manual 2. Choose the alarm input No. and the Alarm Type. The alarm type can be NO (Normally Open) and NC (Normally Closed). Edit the name to set a name for the alarm input (optional). Figure 11-8 Alarm Input Settings 3. -
Page 93: Configuring Alarm Output
Network Camera User Manual 11.4 Configuring Alarm Output Figure 11-10 Alarm Output Settings Steps: 1. Enter the Alarm Output Settings interface: Configuration > Advance Configuration >Basic Event > Alarm Output. 2. Select one alarm output channel in the Alarm Output drop-down list. You can also set a name for the alarm output (optional).
-
Page 94: Exception
Network Camera User Manual 11.5 Exception The exception type can be HDD full, HDD error, network disconnected, IP address conflicted and illegal login to the cameras. Steps: Configuration > Advance 1. Enter Exception Settings interface: Configuration >Basic Event >Exception. 2. Check the checkbox to set the actions taken for the Exception alarm. Figure 11-11 Exception Settings 3.
-
Page 95: Chapter 12 Smart Event
Network Camera User Manual Figure 11-12 Setting PIR Alarm 2. Check the checkbox of Enable to activate the PIR alarm function. 3. Input the alarm name in the text field as desired. 4. Check the checkbox to select the linkage methods taken for the PIR alarm. 5.
-
Page 96: Configuring Line Crossing Detection
Network Camera User Manual Output, etc. 12.1 Configuring Line Crossing Detection Purpose: Line crossing detection function detects people, vehicle or other objects which cross a pre-defined virtual line, and some certain actions can be taken when the alarm is triggered. Note: Line crossing detection function varies according to different camera models.
-
Page 97: Configuring Intrusion Detection
Network Camera User Manual 5. Click-and-drag the line, and you can locate it on the live video as desired. Click on the line, two red squares are displayed on each end, and you can click-and-drag one of the red squares to define the shape and length of the line. 6.
-
Page 98
Network Camera User Manual 1. Enter the Intrusion Detection settings interface, Configuration > Advance Configuration >Smart Event>Intrusion Detection. Figure 12-2 Intrusion Detection 2. Check the checkbox of Enable Intrusion Detection to enable the function. 3. Select the region from the drop-down list for detection settings. 4. -
Page 99
Network Camera User Manual object can trigger the alarm. Percentage: Range [1-100]. Percentage defines the ratio of the in-region part of the object which can trigger the alarm. For example, if the percentage is set as 50%, when the object enters the region and occupies half of the whole region, the alarm is triggered. -
Page 100: Chapter 13 Storage Settings
User Manual of Network Camera Chapter 13 Storage Settings Before you start: To configure record settings, please make sure that you have the network storage device or local storage device configured. 13.1 Configuring Record Schedule Purpose: There are two kinds of recording for the cameras: manual recording and scheduled recording.
-
Page 101
Network Camera User Manual 2. Set the camera record parameters. Figure 13-2 Record Parameters Pre-record: The time you set to start recording before the scheduled time or the event. For example, if an alarm triggers recording at 10:00, and the pre-record time is set as 5 seconds, the camera starts to record at 9:59:55. -
Page 102
Network Camera User Manual detection area and check the checkbox of Trigger Channel in the Linkage Method of Motion Detection Settings interface. For detailed information, please refer to the Task 1: Set the Motion Detection Area in the Section 10.1.1. … -
Page 103: Configuring Storage Management
Network Camera User Manual 13.2 Configuring Storage Management Purpose: With memory card input, you can view the memory card status. Steps: 1. Enter storage management configuration interface: Configuration > Advance Configuration >Storage >Storage Management Figure 13-3 Storage Management 2. View the memory card status on HDD Device List. 3.
-
Page 104
Network Camera User Manual (1) Enter the NAS settings interface, Configuration > Advance Configuration >Storage > NAS Figure 13-4 Add Network Disk (2) Enter the IP address of the network disk, and enter the file path. (3) Select the mounting type. NFS and SMB/CIFS are selectable. And you can set the user name and password to guarantee the security if SMB/CIFS is selected. -
Page 105
Network Camera User Manual (1) Enter the HDD Settings interface, Configuration > Storage > Storage Management > HDD Management, in which you can view the capacity, free space, status, type and property of the disk. Figure 13-5 Storage Management Interface (2) If the status of the disk is Uninitialized, check the corresponding checkbox to select the disk and click Format to start initializing the disk. -
Page 106: Configuring Snapshot
Network Camera User Manual Figure 13-7 Quota Settings Note: Up to 8 NAS disks can be connected to the camera. 13.4 Configuring Snapshot Purpose: You can configure the scheduled snapshot and event-triggered snapshot. The captured picture can be stored in the local storage or network storage. Steps: Configuration >…
-
Page 107
Network Camera User Manual Figure 13-8 Set Capture Parameters 4. Set the time interval between two snapshots. 5. Click Save to save the settings. -
Page 108: Chapter 14 Playback
User Manual of Network Camera Chapter 14 Playback Purpose: This section explains how to view the remotely recorded video files stored in the network disks or memory cards. Steps: 1. Click Playback on the menu bar to enter playback interface. Figure 14-1 Playback Interface 2.
-
Page 109
Network Camera User Manual 3. Click to play the video files found on this date. The toolbar on the bottom of Playback interface can be used to control playing process. Figure 14-3 Playback Toolbar Table 14-1 Description of the buttons Button Operation Button… -
Page 110: Appendix
User Manual of Network Camera Appendix Appendix 1 SADP Software Introduction Description of SADP SADP (Search Active Devices Protocol) is a kind of user-friendly and installation-free online device search tool. It searches the active online devices within your subnet and displays the information of the devices.
-
Page 111
Network Camera User Manual Note: Device can be searched and displayed in the list in 15 seconds after it went online; it will be removed from the list in 45 seconds after it went offline. Search online devices manually You can also click to refresh the online device list manually. -
Page 112
Network Camera User Manual Figure A.1.2 Modify Network Parameters… -
Page 113: Appendix 2 Port Mapping
Network Camera User Manual Appendix 2 Port Mapping The following settings are for TP-LINK router (TL-WR641G). The settings vary depending on different models of routers. Steps: 1. Select the WAN Connection Type, as shown below: Figure A.2.1 Select the WAN Connection Type 2.
-
Page 114
Network Camera User Manual another camera as 81, 8001, 555, 8201 with IP 192.168.1.24. Refer to the steps as below: Steps: 1. As the settings mentioned above, map the port 80, 8000, 554 and 8200 for the network camera at 192.168.1.23 2.